

Page 1
GSM cell
Instruction
Easiphone MM461
phone
manual
Page 2

2
Page 3

3 3
If you need technical assistance, call the following hotline
(+48) 32 325 07 00 or serwis@maxcom.pl
Our website:
http://www.maxcom.pl/
Set content:
GSM cell phone
Charger
Battery 600mAh
Instruction manual
Warranty card
Desktop charger
Keep the package, it may be useful in
the case of possible transport.
Keep the receipt, it is inseparable part
of warranty.
Note – The phone operates in GSM 900/1800 network. Before
switching the phone on insert the SIM card correctly.
Page 4

4 4
Large highlighted keys
SOS button (Emits an alarm and automatically calls and
sends SMS to a previously specified number)
ICE button (Press and hold „2 ICE” button to display the
contacts you may call in the case of an accident as well as
the information about the user)
Large type, simple Menu
Hands-free function
Phonebook -300 entries
Receiving and sending SMS
Quick dialing of 7 numbers
Displaying the time of a call
Loud ringtone (10 melodies)
Torch
Calculator
Alarm clock
Bluetooth
Micro SD card slot
Standby time: to 120 hours*.
Talking time: to 3 hours*
Weight:91g
Dimensions: 106 X 53 X 15mm
*depending on conditions and GSM network signal
Page 5

5 5
Table of contents
1 Buttons localisation......................................................... 9
2 Rules of safe use.......Błąd! Nie zdefiniowano zakładki.
2.1 GSM network ............................................................. 14
3 Installation .................................................................... 14
3.1 SIM card installation .................................................. 15
3.1 Micro SD card installation .......................................... 16
3.2 Battery installation ..Błąd! Nie zdefiniowano zakładki.
3.3 Battery charging .....Błąd! Nie zdefiniowano zakładki.
3.3.1 Desktop charger (option) ........................................ 19
3.4 Low battery alarm ...Błąd! Nie zdefiniowano zakładki.
3.5 Switching on the phoneBłąd! Nie zdefiniowano zakładki.
3.6 Switching off the phoneBłąd! Nie zdefiniowano zakładki.
3.7 Keylock ................... Błąd! Nie zdefiniowano zakładki.
3.8 Standby mode ........Błąd! Nie zdefiniowano zakładki.
3.9 Icons on the display ................................................... 23
3.10 Basic functions of the buttons .Błąd! Nie zdefiniowano
zakładki.
4 Using MENU................................................................. 25
5 Torch ......................... Błąd! Nie zdefiniowano zakładki.
6 ICE button. ................................................................... 26
7 Emergency calls ........Błąd! Nie zdefiniowano zakładki.
7.1 SOS button ................................................................ 27
7.1.1 Emergency procedureBłąd! Nie zdefiniowano zakładki.
7.1.2 Emergency contactsBłąd! Nie zdefiniowano zakładki.
7.1.3 Emergency text ....Błąd! Nie zdefiniowano zakładki.
Page 6

6 6
7.1.4 SOS information/Information about the owner ........ 29
7.1.5 Deactivation of SOS alarm...................................... 30
8 Calls .......................... Błąd! Nie zdefiniowano zakładki.
8.1 Making a call...........Błąd! Nie zdefiniowano zakładki.
8.1.1 Quick dialing ........Błąd! Nie zdefiniowano zakładki.
8.2 Hands free mode ....Błąd! Nie zdefiniowano zakładki.
8.1 Volume regulation...Błąd! Nie zdefiniowano zakładki.
8.2 Conference .............Błąd! Nie zdefiniowano zakładki.
9 SMS............................................................................. 33
9.1 Writing SMS............................................................... 33
9.2 Changing the method of entering the text .................. 34
9.3 Sending messages .Błąd! Nie zdefiniowano zakładki.
9.4 Saving messages ...Błąd! Nie zdefiniowano zakładki.
9.5 Reading SMS ............................................................ 36
9.6 SMS boxes ................................................................ 37
9.6.1 Inbox .................... Błąd! Nie zdefiniowano zakładki.
9.6.2 Sent messages ....Błąd! Nie zdefiniowano zakładki.
9.6.3 Drafts ................... Błąd! Nie zdefiniowano zakładki.
9.7 SMS templates .......................................................... 38
9.8 Voice mail ...............Błąd! Nie zdefiniowano zakładki.
9.9 SMS settings ............................................................ 39
9.9.1 Number of message center..................................... 39
9.9.2 Message validity ..Błąd! Nie zdefiniowano zakładki.
9.9.3 Report of delivery.................................................... 40
9.9.4 Saving sent messages............................................ 40
9.9.5 Memory settings ..Błąd! Nie zdefiniowano zakładki.
Page 7

7 7
9.10 Deleting all messagesBłąd! Nie zdefiniowano zakładki.
9.11 Memory state ..........Błąd! Nie zdefiniowano zakładki.
10 Phonebook ................ Błąd! Nie zdefiniowano zakładki.
10.1 Scrolling contacts ...................................................... 41
10.2 Creating a new contactBłąd! Nie zdefiniowano zakładki.
10.3 Deleting contacts ....Błąd! Nie zdefiniowano zakładki.
10.4 Copying contacts ....Błąd! Nie zdefiniowano zakładki.
10.5 Transferring contactsBłąd! Nie zdefiniowano zakładki.
10.6 Programming quick dialing ........................................ 44
10.7 Adding a contact to the black list ............................... 45
10.8 Other settigs of the phonebook.................................. 45
10.8.1 My number .............................................................. 45
10.8.2 Numbers of services ............................................... 46
10.8.3 Memory status .....Błąd! Nie zdefiniowano zakładki.
11 Call list....................... Błąd! Nie zdefiniowano zakładki.
11.1 Deleting entries.......Błąd! Nie zdefiniowano zakładki.
11.2 Call time.................. Błąd! Nie zdefiniowano zakładki.
12 Multimedia .................................................................... 47
12.1 Picture browser.......................................................... 48
12.2 Music player ...........Błąd! Nie zdefiniowano zakładki.
12.3 Dictaphone ................................................................ 49
13 FM radio ....................................................................... 49
14 Alarm clock (alarm)....................................................... 49
14.1 Alarm clock settings Błąd! Nie zdefiniowano zakładki.
14.2 Deleting the alarm clockBłąd! Nie zdefiniowano zakładki.
15 Applications .................................................................. 50
Page 8

8 8
15.1 SIM services .............................................................. 51
15.1 Scrolling files ..........Błąd! Nie zdefiniowano zakładki.
15.2 Torch ...................... Błąd! Nie zdefiniowano zakładki.
15.3 Calendar ................. Błąd! Nie zdefiniowano zakładki.
15.4 Calculator ...............Błąd! Nie zdefiniowano zakładki.
15.5 Bluetooth ................................................................... 53
16 Settings ..................... Błąd! Nie zdefiniowano zakładki.
16.1 Call settings ............Błąd! Nie zdefiniowano zakładki.
16.1.1 Call transfer .........Błąd! Nie zdefiniowano zakładki.
16.1.2 Waiting call ..........Błąd! Nie zdefiniowano zakładki.
16.1.3 Call barring ..........Błąd! Nie zdefiniowano zakładki.
16.1.4 Hiding the numberBłąd! Nie zdefiniowano zakładki.
16.1.5 Additional call settingsBłąd! Nie zdefiniowano zakładki.
16.2 Phone settings ........Błąd! Nie zdefiniowano zakładki.
16.2.1 Time and date ......Błąd! Nie zdefiniowano zakładki.
16.2.2 Phone language...Błąd! Nie zdefiniowano zakładki.
16.2.3 Automatic switching on/off the phone .................... 58
16.2.4 Factory settings ...Błąd! Nie zdefiniowano zakładki.
16.3 Display settings ......Błąd! Nie zdefiniowano zakładki.
16.3.1 Wallpaper.............Błąd! Nie zdefiniowano zakładki.
16.3.2 Display contrast ...Błąd! Nie zdefiniowano zakładki.
16.3.3 Display highlightingBłąd! Nie zdefiniowano zakładki.
16.3.4 Automatic keylock ................................................... 60
16.3.5 Highlighting ..........Błąd! Nie zdefiniowano zakładki.
16.3.6 Signalling events..Błąd! Nie zdefiniowano zakładki.
16.4 Security settings .....Błąd! Nie zdefiniowano zakładki.
Page 9

9 9
16.4.1 PIN.......................................................................... 61
16.4.2 PIN 2....................................................................... 61
16.4.3 Phone lock ...........Błąd! Nie zdefiniowano zakładki.
16.4.4 Privacy protection Błąd! Nie zdefiniowano zakładki.
16.4.5 Locking the key with red receiver button ..... Błąd! Nie
zdefiniowano zakładki.
16.4.6 Set numbers ........Błąd! Nie zdefiniowano zakładki.
16.4.7 Black list...............Błąd! Nie zdefiniowano zakładki.
16.5 Profile settings ........Błąd! Nie zdefiniowano zakładki.
16.5.1 Ringtone settings .Błąd! Nie zdefiniowano zakładki.
16.5.2 Volume settings ...Błąd! Nie zdefiniowano zakładki.
16.5.3 Vibration settings .Błąd! Nie zdefiniowano zakładki.
16.5.4 Keys and warnings tones ........................................ 65
16.6 Network selection ...Błąd! Nie zdefiniowano zakładki.
17 Connecting to the computer ......Błąd! Nie zdefiniowano
zakładki.
18 FAQ (Solving problems) ............................................... 67
19 Use and safety term ..Błąd! Nie zdefiniowano zakładki.
20 Warranty conditions...................................................... 72
21 Information concerning the battery ............................... 73
22 Information about SAR ................................................ 74
23 Information concerning environment protection............ 76
24 Declaration of conformity .............................................. 78
Page 10
10 10
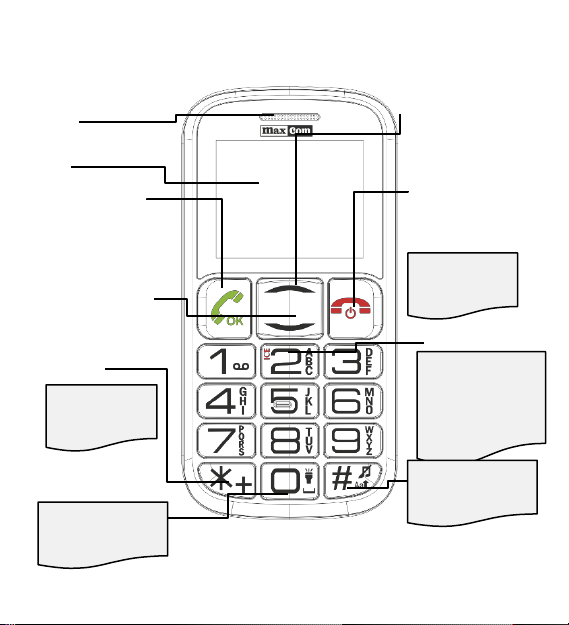
1 Buttons localisation
Speaker
Display
Call button/
Confirming the
function
Entering the
phonebook/ “Down”
navigation key
Type change
MENU
Press and hold
to change the
type size
Torch button
Press and hold to
switch on/off the
torch
Entering
MENU/”Up
navigation
key
Call end button/
Cancelling the
function
Press and hold
to switch on/off
the phone
ICE button
Press and hold to
display important
contacts and
information about
the user
Silent mode
Press and hold to
switch on/off the
ringtone
Page 11
11 11
e
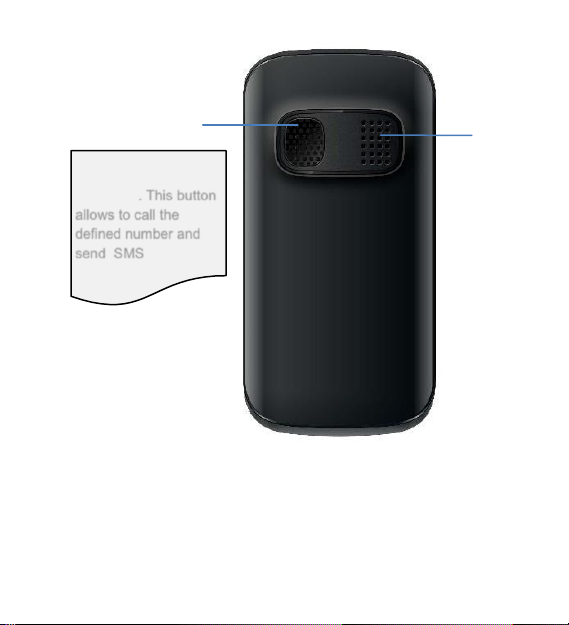
SOS button
Press and hold to
activate the emergency
procedur . This button
allows to call the
defined number and
send SMS
Speaker
Page 12
12 12
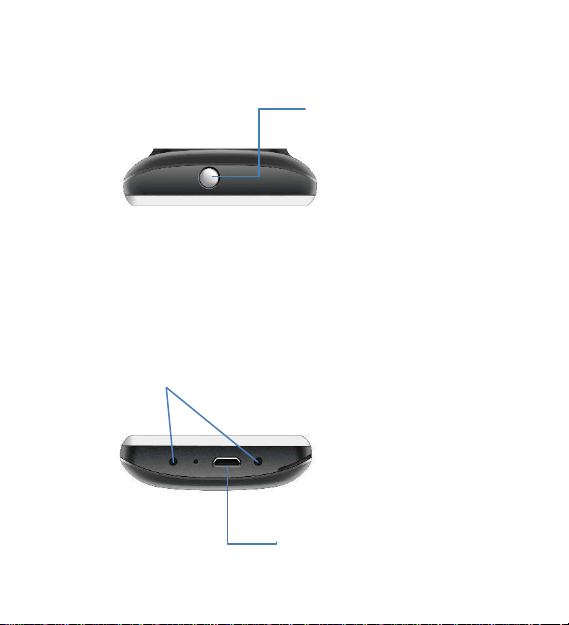
Top view
Torch
Bottom view
Charging contacts
Charging jack
Page 13

13 13
2 Rules of safe use
Reading the following rules will minimize the risk of
improper use of the phone. The rules are described in
details in further part of the instruction manual.
USE – do not use the phone in the places where it is
forbidden for example in petrol stations or hospitals. Using
the phone in such places may be dangerous for other
people.
TORCH– do not look directly on the light beam.
HEARING AID– If the user has got a hearing aid, set the
phone volume carefully and properly set the sensitivity of
the hearing aid.
WATERTIGHTNESS – the phone is not watertight. Keep it
in dry place.
HANDS-FREE SET –the phone may be used in hands
free mode using Bluetooth wireless technology. The
hands-free set may be purchased separately in shops with
GSM accessories.
Page 14

14 14
2.1 GSM network
The phone is set to operate in GSM 900/1800 network.
Before using the phone functions ask the GSM operator
whether the functions are available.
Note: No all operators make it possible to send polish
characters in text messages. Consult your operator.
3 Installation
Before switching on the phone install SIM card and the
battery. Pay attention not to damage the card while
inserting it.
Keep SIM cards away from children.
Page 15
15 15
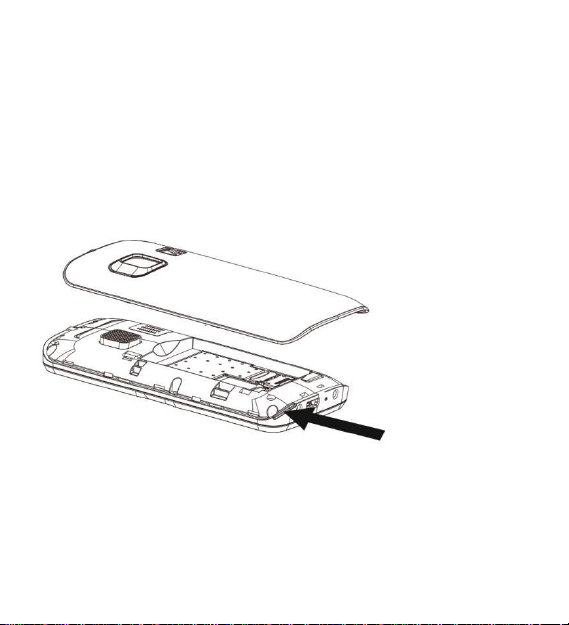
3.1 SIM card installation
Before inserting SIM card make sure that the phone is
switched off. The charger should be disconnected.
1. Lever the battery cover with your nail in the notch,
located at the bottom of the phone (as shown in the
figure)
Notch
Page 16
16 16
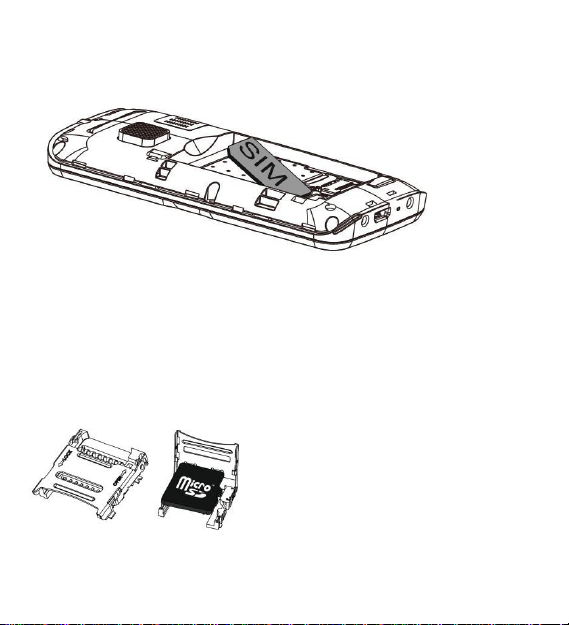
2. Insert the SI M card to „SIM slot” as shown in the
figure.
3.1 Micro SD card installation
On the right, next to the SIM card slot there is a slot for
MicroSD card. Move the cotter pin to OPEN side and then
lift it up. Insert the microSD card so that the contacts touch
the phone contacts, close the cotter pin moving it to LOCK.
Page 17

17 17
Exercise caution while using the memory card, particularly
when inserting and removing it. Some memory cards must
be first formatted with the use of a computer.
Regularly prepare backups of the information saved on
cards used in other devices, if you use card of SD type!
Incorrect use or other factors may cause the damage or
the loss of cards content. The set does not include the
micro SD card. Micro SD card increases the phone
memory, which may be used for saving multimedia files.
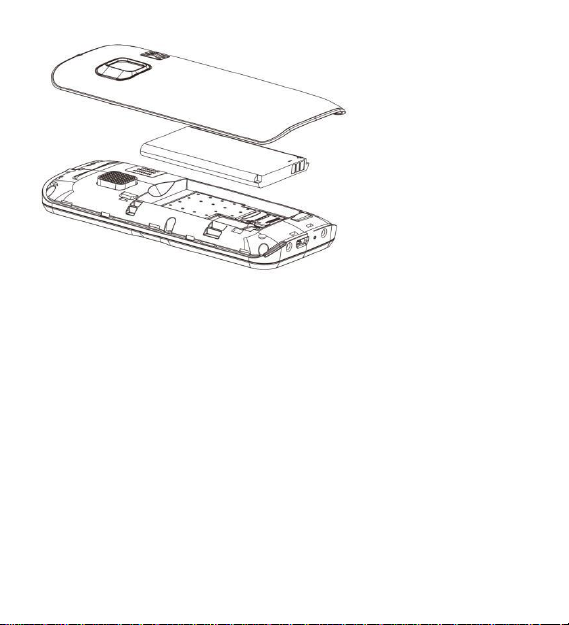
3.2 Battery installation
1. Insert the battery so that +/- contacts were directed
downwards.
2. After inserting the battery place the battery cover on
the phone and press the edges gently.
Page 18
18 18
3.3 Battery charging
Note! Use the battery included in the set. Using other
battery may cause the damage of the phone and the loss
of warranty. Do not connect the charger when the battery
cover is removed.
To charge the phone:
1. Connect the charger to the jack located at the
bottom of the phone.
Page 19

19 19
2. Connect the plug to the wall socket. In the right
upper corner information about battery charging will
appear. The battery symbol shows the battery
charging state.
3. Whe n the battery is fully charged
dis
connect the
charger from the wall socket and then the cable
from the phone.
3.3.1 Desktop charger (option)
In the case of using the desktop charger, first connect the
small plug of the charger to the desktop charger and then
connect the adapter to the wall socket. To charge the
battery insert the phone to the desktop charger with the
contacts directed downwards.
3.4 Low battery alarm
The phone will generate a sound signal (if warning sounds
are activated in profiles) together with the message on the
display when the battery level will be too low. The display
will show the red symbol of empty battery. Charge the
battery when this message will appear.
Page 20
20 20
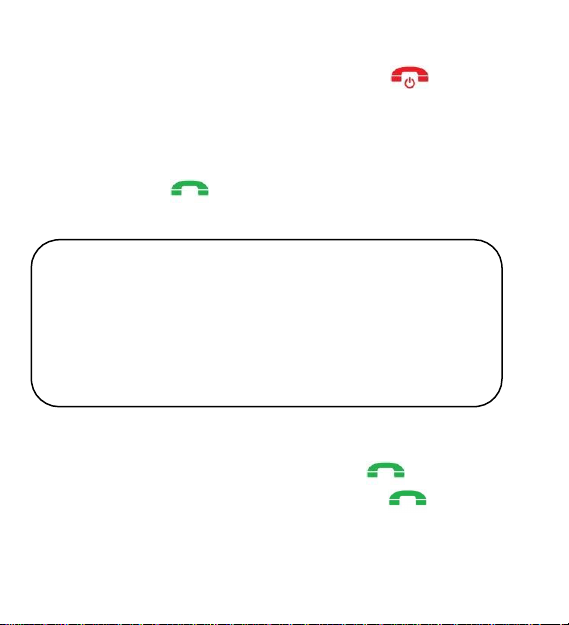
3.5 Switching on the phone
Press and hold the red call end button , to switch on
the phone.
If you are asked for PIN code you need to enter it. You will
find it in the SIM card starter set.
After entering the code confirm it pressing the green
receiver button .
Warning: Entering incorrect PIN code three
times in a raw will cause that the SIM card will
be locked. It can be unlocked with the use of
PUK code. Entering incorrect PUK code 10
times will cause that the card will be locked
permanently.
After first switching on the phone you will be asked to enter
the cur rent date and time. Enter appropriate digits of the
date and time and then confirm with . Then in similar
way enter current time and confirm with .
Page 21
21 21
You may use UP/DOWN keys to switch
between the digits.
3.6 Switching off the phone
To switch off the phone press and hold the call end key
.
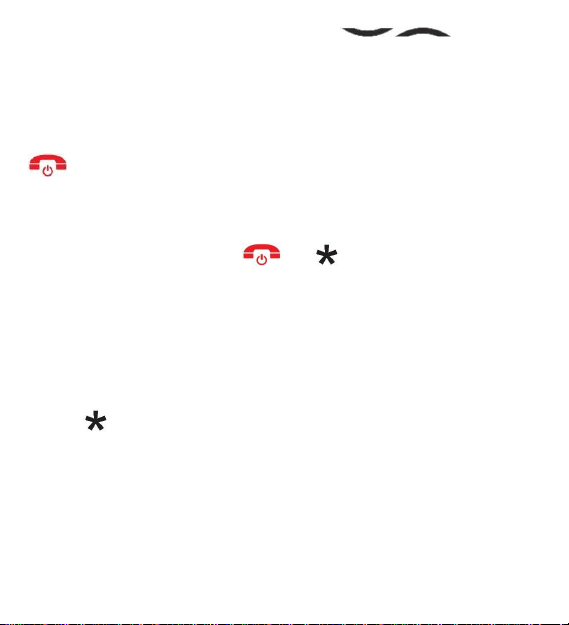
3.7 Keylock
To lock the keys press : and .
The keys will be locked automatically after specified period
of time of idle operation. This period of time may be
changed or deactivated by entering: MENU > Settings >
Display > Automatic keylock.
You may also set the function of locking the keys only by
pressing the red receiver button (it will not be necessary to
press key)
MENU > Settings > Security > Red receiver button lock
To unlock the keys press:
Page 22
22 22
and .
It is not necessary to unlock the keys to answer the call.
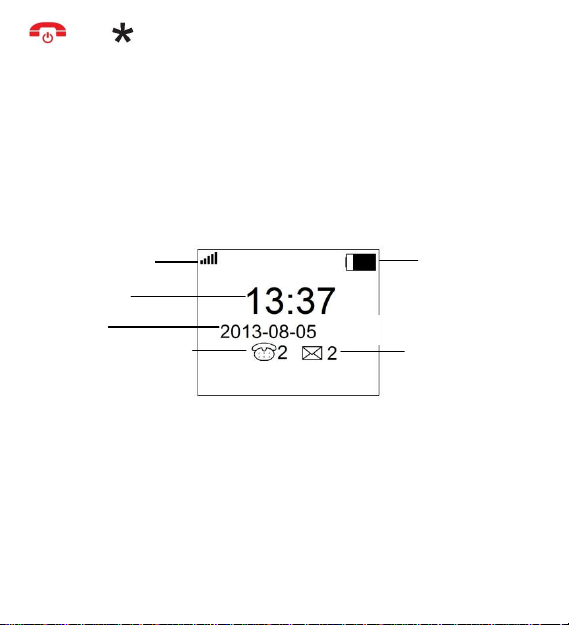
3.8 Standby mode
When the phone is switched on but no actions are taken
then it is in the standby mode.
Range of the
network
Time
Date
Missed calls
Display
description:
(Mon)
Battery level
Unread
messages
Flashing display indicates the new message or a missed
call. The display flashes for about 1 hour. This function
may be deactivated in:
MENU > Settings > Display > Events signalling
Page 23
23 23
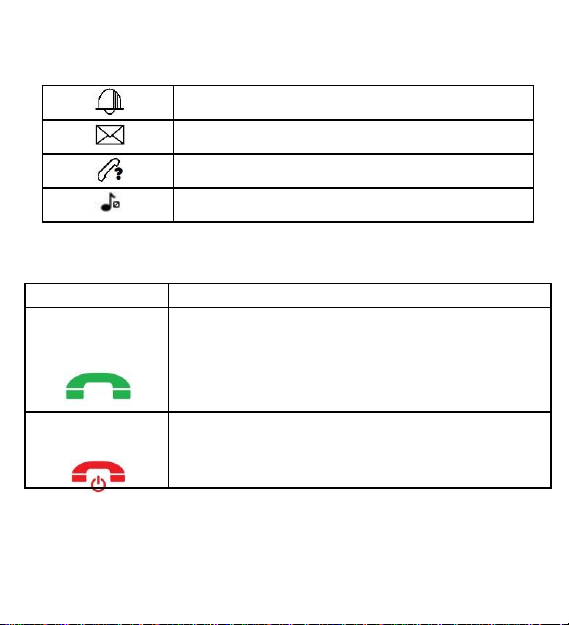
3.9 Icons on the display
Alarm clock
New message
Missed calls
Silent mode
Button
Functions
Call button
(green
receiver)
Making and answering calls. Standby mode:
press to enter the call history.
Navigation in MENU: ”Confirm” Press to
confirm the function you have chosen.
Call end button
(red receiver)
Switching on/off the phone.
Navigation in MENU: ”Back” Press to return
to the previous MENU
3.10 Basic functions of buttons
Page 24

„UP” navigation
key
Standby mode: Press to enter the main
MENU
Navigation in MENU: Press to move the
cursor up
„DOWN”
navigation key
Standby mode: Press to enter the
phonebook.
Navigation in MENU: Press to move the
cursor down
1 key
Press: digit 1
Press and hold: voice mail
2 key
Press: digit 2
Press and hold: Displaying MENU ICE „In
emergency”
3-9 keys
Press: digits 3 to 9
Press and hold: dials the programmed
quick dialing number
Button
Standby mode: Press and hold to change
the mode into silent or normal
Writing SMS: Press to change the mode of
entering
Button
Writing SMS: Press to use symbols
Torch button
Standby mode: Press and hold to switch
on/off the torch.
24
Page 25

25 25
Emergency
button (SOS )
If the emergency calls are activated press
and hold to start SOS procedure
4 Using MENU
To enter MENU in standby mode press UP .
To move in MENU use UP and DOWN .
To confirm the selected function press the call button .
To return to the previous MENU (return), press .
Page 26

26 26
5 Torch
To switch on/off the torch press and hold ZERO key .
or enter:
MENU > Applications>Torch
6 ICE button.
ICE (In Case of Emergency) – the abbreviation informing
the rescuemen to whom they should call in the case of
emergency. Pressing and holding 2 ICE button results in
displaying the contacts and information about the user.
ICE abbreviation is known by the rescuremen all around
the world and allows to obtain important information about
the injured person, that is why it is recommended to enter
emergency contacts, page Błąd! Nie zdefiniowano
zakładki. and information about the user, page 29.
7 Emergency calls
When the phone is switched on you may always in the
case of emergency enter 112 and dial the number using
green receiver button .
Page 27

27 27
Most of – but not all – networks accept emergency
numbers(112, 999 etc.) without active or inserted SIM
card.
Page 28

28 28
Contact your operator to get more information.
112 number is the European Emergency Number.
7.1 SOS button
Enter:
MENU > Settings > SOS Menu > Status and
select Activate or Deactivate.
If the function is activated the phone will make the
emergency calls automatically after pressing and holding
SOS button. If the function is deactivated, after pressing
SOS button you will see the message that the function is
deactivated. To cancel press .
7.1.1 Emergency procedure
1. When the function of emergency calls is
activated: press and hold SOS button in the back of the
phone. The phone will start the alarm, it will sent the
messages to previously set emergency contacts and it will
automatically call them one by one. There will be three
attempts of calling to each set number.
Page 29

29 29
The phone will call the next number, if it will not call the
previous one.
2. The phone will activate the sound alarm while sending
the messages and while calling.
3. If no contact will answer the emergency call the phone
will enter the emergency mode for one hour. It
means that the phone will automatically answer every
incoming call and it will automatically activate the
hands-free mode. If while calling the emergency calls
one call will be answered the phone will automatically
return to the normal state after the end of a call.
To stop the emergency procedure press and hold SOS
button, pressing will only cause the interruption of
dialing the current number.
7.1.2 Emergency contacts
To set the SOS number enter the main MENU pressing
Up button . Then select:
Page 30

30 30
Settings > SOS Menu > ICE contacts
Press . You may set not more than five emergency
numbers entering them manually or selecting them from
the phonebook.
To delete a given contact select Edit, and then using red
receiver button delete the number and press OK.
7.1.3 Emergency text
You may change the text of SMS, which is sent during the
emergency call. Enter MENU > Settings> SOS Menu >
emergency SMS
The following text is entered by default: „Emergency SMS !
Call me!” You may activate or deactivate the function of
sending SOS messages in emergency mode. In order to
do this select MENU > Settings > SOS Menu >
Emergency SMS >Status> Deactivate/Activate
7.1.4 SOS information /Information about the owner
Settings > SOS Menu > Information about the user
Page 31

31 31
It is recommended to enter the information about the
person, which may be useful in the case of emergency
such as surname, illnesses, allergies and the blood group.
Page 32

2. Press
to call the selected number
30 30
This information will be shown on the screen, in the case
of emergency mode (when no one will answer the
emergency call) and also after pressing „2”( ICE)
7.1.5 Deactivation of SOS alarm
You may activate/deactivate the emergency signal while
making the SOS call. In order to do this select MENU >
Settings > SOS Menu > SOS alarm >
Deactivate/Activate
8 Calls
8.1 Making a call
1. Enter the number you want to call
For international calls it is required to enter „00”
or „+” before the number. In order to enter „+”
press „*” twice
Page 33

2. Press
to call the selected number
31 31
3. To end a call press red receiver .
8.1.1 Quick dialing
If you have previously assigned the contacts to 3-9 keys,
in standby mode press and hold appropriate key to make a
call, see page 44
8.2 Hands free mode
During a call press twice to switch on the speaker.
If
you
want to switch off the speaker press twice again.
8.1 Volume regulation
You may press UP/DOWN to increase and
decrease the volume during a call.
Page 34

32 32
8.2
Conference
The conference is an operator’s service making it possible
to conduct trilateral conversation. The service must be
available at the operator’s. There are two methods of
creating the conference:
Method 1
One person calls your phone and you call the other
one.
1. Answer the first call
2. Press green receiver and select Add new call
3. Call the number of the third caller. You may do this
only by entering its phone number and pressing green
receiver. When you select new number the first call
will be stopped. To create the conference press green
receiver and select Conference.
Method 2
Two incoming calls.
1. Answer the first call
Page 35

33 33
2. Answer the second call: when the second incoming
call will appear the display will show the relevant
information. Answer this call pressing green receiver
Page 36

34 34
button. To create the conference press the green
receiver button again and select Conference.
9 SMS
The phone makes it possible to send and receive SMS.
When icon is displayed on the screen it means that
there is at least one unread message.
To enter SMS MENU in standby mode press UP ,
and then green receiver .
* The phone has got a memory for 100 SMS. The
massages may be saved on SIM card (the memory
depends on the SIM card)
9.1 Writing SMS
1. In SMS MENU select Write a message to open the
message editor.
2. Write your message. To enter the digit press and hold
appropriate key.
Page 37

35 35
3. Press if you want to enter the template, contact
from the phonebook, add the emoticon or save the
message in drafts.
In right upper corner there is an information about the
method of entering the text and the number of
available characters.
9.2 Changing the method of entering the text
To change the method of entering the text (digits, capital
or small letters) press „#” key”.
Pl, PL,pl- alphabet with Polish characters
ABC, Abc, abc – basic alphabet
To select other method of entering select MENU >
Settings >Phone settings>Language>Text
language
If you want to enter the symbol press . Using
UP/DOWN keys select symbol and confirm with .
Page 38

36 36
Note:
Accented letters, symbols and letters characteristic for
Polish language (ą,ć,ę,ł,ń,ó,ś,ź,ż) need more place, at the
same time they restrict the number of characters which
may be used in a single SMS.
SMS may be sent even when the acceptable number of
characters in a single message will be exceeded ( max
160 characters). Longer message will be sent in the form
of two messages. For each message the service provider
may calculate the charge according to the rates of a given
operator.
9.3 Sending messages
Press to enter options and select Send:
- enter the number of the recipient and then press Options
and Send.
or
- press Options>Contacts. Select relevant
contact/contacts and select
Options>Mark>Ok>Options>Ok. Press Options>Send.
Page 39

37 37
9.4 Saving messages
To save already written message press , and then
select Save as a Draft
9.5 Reading SMS
1. When a message about new SMS will be displayed on
the screen, you may press , to read the message
or , in order not to read the massage and return to
the standby mode. The icon of unread message will be
shown on the display.
2. To view the received messages in SMS MENU enter
the inbox selecting Inbox. To read the message, press
, while reading the message you may use
additional options pressing .
3. icon next to the message means that the message
is unread.
Page 40

38 38
9.6 SMS
boxes
9.6.1 Inbox
Shows the received messages, sorted in terms of date of
receiving.
To move in the inbox use UP/DOWN keys
and to view a given message.
During reading the message press to select one of
the following options:
Delete, Answer, Delete, Call (to call a given number),
Lock (to secure the SMS against deleting ), Mark, Sort,
Add the sender to (to add the person to the list of
contacts), Delete the same number (to delete all
messages from this sender), Add to the black list (to lock
a given sender).
9.6.2 Sent messages
Saved sent messages are in Sent folder if the function of
saving is activated in settings:
Page 41

39 39
MENU> Messages > Settings> Save sent messages.
9.6.3 Drafts
You may save unsent messages in „Drafts” folder. In order
to do this write your message and after pressing the call
button select Save as a draft
9.7 SMS templates
The phone has got 5 templates. You may delete, edit,
send and create new messages from them. During editing
the messages press call button to enter options and select
Enter template.
9.8 Voice mail
The voice mail is the operator’s service making it possible
to leave voice messages when someone could not make
a call with you. To get more information, contact your
operator. If you want to change the number of your voice
mail box select MENU > Messages > Voice mail and
press
Page 42

40 40
The number of the voice mail may be obtained from the
service provider.
To call the voice mail in the standby mode press and hold
1 key.
9.9 SMS settings
MENU> Messages > Settings
9.9.1 Number of message center
It intermediates between users while sending SMS. To
send SMS from the cell phone you need to have proper
number of SMS center.
You will obtain the number from the service provider.
9.9.2 Validity of the message
It is possible to set the time of message validity.
Before SMS will reach the recipient, it is transferred to
SMS center. The period of validity – is the time when the
network attempts to deliver the SMS from SMS center to
the recipient.
Page 43

41 41
9.9.3 Report of delivery
You may set to receive the return SMS that your SMS
was delivered to the recipient (network service)
9.9.4 Save sent messages
Allows to activate/deactivate the function of saving sent
messages
9.9.5 Memory settings
Allows to select whether the messages are going to be
saved in the phone or on SIM card
9.10 Deleting all messages
You may delete all messages by entering: MENU>
Messages > Delete all, and then select, which box you
want to clear.
9.11 Memory
MENU> Messages > Memory state.
state
Page 44

42 42
With this function you may check the status of the memory
on SIM card and in the phone.
10 Phonebook
You may save names and numbers of contacts in the
phone and SIM card memory. The contact with icon is
saved in phone memory while the contact with icon is
saved on SIM card.
To enter the phonebook in standby mode press DOWN
.
To enter the option of Phonebook enter MENU, pressing
key , then using key select Contacts, press
, with DOWN key select a given contact and
confirm with call button .
Page 45

43 43
10.1 Scrolling
contacts
Method 1
1. Select MENU > Contacts
2. Enter the first letter of the name you are looking for
3. The phone will go to the names beginning with this
letter. You may scroll the list with navigation keys
.
Method 2
1. In standby mode press key.
2. Enter the first letter of the name you are looking
for
3. The phone will go to the names beginning with this
letter. You may scroll the list with navigation keys
.
10.2 Creating new contacts
1. Select MENU > Contacts > Options > Add, to add
new contact.
2. Select the type of memory (SIM/Phone)
3. Select Name and enter the name you want to use for a
given number. Press Ok.
4. Select Phone and enter the phone number you want to
save and press Ok.
Page 46

44 44
5. You may also assign a unique ringtone to the contact
6. Press save.
10.3 Deleting contacts
If you want to delete the contact from the phone or SIM
card perform the following actions:
1. Select: MENU > Contacts > Options > Delete.
Confirm with .
2. If you want to delete several contacts select: MENU >
Contact > Options > Delete > Delete many, and then
mark contacts which are going to be deleted. Press
Option>Ok and select OK.
3. If you want to delete all contacts from the phone
memory, select: MENU > Contacts > Options>
Delete > Delete from the phone > Ok
10.4 Copying contacts
To copy contacts from SIM card to the phone or from the
phone to SIM card:
1. Select: MENU > Contacts > Options > Copy
Page 47

45 45
2. Then select the source (Copy from) and the place
where the contact is going to be copied (Copy to).
Page 48

46 46
3. Press Option>Copy. Select appropriate contact and
press Options>Mark. You may mark several contacts.
Then select Options>Ok.
10.5 Transferring contacts
To transfer the contacts from SIM card to the phone or
from the phone to the SIM card, select MENU > Contacts
> Options > Transfer. Then perform actions the same as
while copying contacts.
10.6 Programming quick dialing
You may program 7 numeric keys (3-9) of quick dialing.
After pressing and holding relevant key a call will be made
with the saved number.
1 key is reserved for the voice mail.
Programming keys
To programme quick dialing numbers select:
MENU > Contacts > Options > Simple dialing>OK
Page 49

47 47
Select the key where you want to save the number, enter it
manually or enter the contact saved in the phonebook.
10.7 Adding contact to the black list
If you add the contact to the black list the person calling
from this number will always hear the busy signal. You
may add the number to the black list from the phonebook.
MENU > Contacts > Options >Add to the black list
You may delete the contacts from the black list in:
MENU > Settings> Security > Black list
10.8 Other settings of the
phonebook
10.8.1 My number
Some SIM cards make it possible to check your own
number. You may also edit it or enter your number
manually, select:
MENU > Contacts > Options > Other>My number
Page 50

48 48
10.8.2 Numbers of services
To check the numbers of services saved on SIM card
select
MENU > Contacts > Options > Other>Numbers of
services
10.8.3 Memory status
This option makes it possible to check the state of card
and phone memory. Select:
MENU > Contacts > Options> Other > Memory state
11 Call list
To enter the call list enter the main MENU> Call list, and
then select:
Missed calls
Dialed numbers
Answered calls
Rejected calls
Page 51

49 49
You may enter the list of last calls by pressing in
standby mode.
Page 52

50 50
11.1 Deleting entries
To delete all entries from the call list select:
MENU > Call list > Delete all
11.2 Call time
You may view the time of last call and the time of all calls,
answered and made calls, by selecting the following
option:
MENU > Call list > Call time. To delete all Times select
Reset.
12 Multimedia
The phone may use pictures and sounds. Entering the
following path we may scroll the existing graphics and
sounds saved in the phone on the memory card
MENU > Multimedia.
Page 53

51 51
12.1 Picture browser
The picture browser allows to view the pictures saved on
memory card.
12.2 Music player
The player plays the sound files saved in the phone or on
the memory card.
The functions of keys during playing the sound files:
- #: increasing volume
- *: decreasing volume
- UP: play previous song
- DOWN: play next song
To start playing, press Options>Play. To stop the song,
select Options>Pause.
To leave the player select Options>4 Exit, then press red
receiver button. Otherwise the music will be played in the
background all the time.
Page 54

52 52
12.3
Dictaphone
To activate the dictaphone: MENU > Multimedia >
Dictaphone > Options > Start.
In options you may change the place for saving data, the
file format and play the recordings.
13 FM radio
The phone may be used as a FM radio. To switch on the
radio enter: MENU > Radio FM. To enter the radio
settings select: MENU > FM Radio > Options.
To stop or start the radio select Options > Pause/Play.
To change the volume press or keys.
Searching for channels: Options > Searching channels.
To save the station in the memory select : Options >
Save.
To manually enter the frequency select: Options >
Manual searching.
To minimize the radio and perform other actions in the
phone while the radio is playing select: Options > Music
background.
14 Alarm clock (alarm)
Page 55

53 53
The phone is equipped with Alarm clock function. You may
set the time and ringtone of the alarm clock.
To enter the alarm clock settings select:
MENU > Alarm.
14.1 Alarm clock settings
Select: MENU > Alarm
Select one of three areas for saving the alarm confirm it
with call button. Select Options > Edit. Then select the
alarm content, the time, ringtone and select whether the
alarm is going to be repeated every day or on working
days. After setting confirm with .
14.2 Canceling the alarm
clock
To cancel the programmed alarms select:
MENU > Alarm > Options > Deactivate
In the same way you may activate the previously set
alarm.
15 Applications
Page 56

54 54
15.1 SIM services
SIM services are additional services which are offered by
SIM card (usually payable). Because of the limited
functionality of the phone some services cannot be
activated when using MM461 phone.
15.1 Scrolling files
The user may scroll the files saved in the phone or on the
card. Select:
MENU > Application > My files
15.2 Torch
Select Menu>Application>Torch and then switch on or off
to switch on/off the torch.
15.3 Calendar
The phone is equipped with the calendar available under
MENU > Application > Calendar. Apart from viewing the
Page 57

55 55
calendar you may add your own entries setting specified
time, date, the function of repeating and the sound signal.
Page 58

56 56
To plan the task find the da y using keys and
press , the following options will appear:
- New task
- View tasks
- All tasks
- Today task clearing
- Clear all
- Go to the date
To move between the months use * and # keys.
15.4 Calculator
The phone is equipped with a simple calculator. You may
use it for adding, subtracting, multiplying and dividing.
Select: MENU > Applications > Calculator
1. Enter the first digit when on the display there is only 0
2. Select the symbol of operation you want to perform
using keys and press green receiver
button.
Page 59

57 57
3. Enter the second digit and press .
Bluetooth state
Activate or deactivate Bluetooth
Visibility
Activate so that others could find
your phone
My devices
Devices which you have been
previously connected
My name
Select the name for your device
4. To delete the recently entered digit or symbol of
arithmetic operation press .
5. To leave the calculator press a few times.
15.5 Bluetooth
Thanks to Bluetooth connection you may send and receive
files. You may also connect other devices for example
wireless hands free set.
Select in MENU: Applications> Bluetooth
In Bluetooth Menu you may select one of the following
Bluetooth options:
Page 60

58 58
Memory
16 Settings
Select where the received files are
going to be saved
To enter the settings open the main MENU pressing UP
key , and then select Settings
16.1 Call
settings
16.1.1 Transferring a call
It is the network service. If the operator offers this service
you need to perform relevant configuration. The user may
set transfer ring the incoming calls directly to the voice mail
or to other selected number.
1. To set the service „Transferring calls” enter: MENU >
Settings > Call settings > Transferring calls
2. Then select when you want to transfer the calls from
available list: 1 Unconditionally (Transferring all
incoming calls to a selected number), 2 When busy
Page 61

59 59
(Transferring incoming calls when you are currently
Page 62

60 60
making a call) 3 When there is no answer (Transferring
incoming calls when you do not answer the phone), 4
When unavailable (Transferring calls, when your phone
is switched off or when you are out of range).
3. Press Activate and enter the number to which you
want to transfer the calls to activate the service or
Cancel all transfers to deactivate the transfer.
16.1.2 Waiting call
It is the network service. If the operator offers this service
you need to perform relevant configuration.
After entering MENU > Settings > Call settings >
Waiting call you may check the state of availability and
select whether you want to activate this function.
If the function of waiting call is activated , and the user is
just making a call, every next incoming call will be
signaled by the signal of the second call (every 5
seconds), the number of the calling person will also be
displayed. It is possible to answer the second call and
suspend the first one.
Page 63

61 61
16.1.3 Call barring
It is the network service. If the operator offers this service
you need to perform relevant configuration. This function
makes it possible to lock different types of calls.
1. Enter:
2. MENU > Settings > Call settings > Call barring.
Select the type of calls you want to lock from the list. You
may lock all outcoming calls, all international outcoming
calls, international calls (except for the calls from the
country), all incoming calls and calls incoming while
roaming is activated.
16.1.4 Hiding the number
It is the network service. If the operator offers this service
you need to perform relevant configuration. This function
makes it possible to hide your own number during a call.
Select :
MENU > Settings > Call settings >Hide the number
Page 64

62 62
16.1.5 Additional call settings
You may set additional preferences concerning the calls
such as:
Signallig the call time,
Automatic numer dialing
Vibration after making a call
After rejecting a call send SMS
Record the call automatically
Select
MENU > Settings > Call settings > Other.
and then mark relevant option with
16.2 Phone
settings
To enter the phone settings enter : MENU >Settings>
Phone settings
16.2.1 Time and date
To change the current time enter: MENU > Settings >
Phone settings> Time and date. Apart from time and
date you may set the format of displayed time and date.
Page 65

63 63
16.2.2 Phone language
To change the language enter: MENU > Settings >
Phone settings > Language. Here you may set
separately menu language and writing language.
If you set the foreign language accidently, change the
language for relevant by pressing:
2x Up
1x OK
2x Down
1x OK
1x Down
2x OK
16.2.3 Automatic switching on/off the phone
Enter: MENU > Settings> Phone settings > Automatic
switching on/off
You may set the time and days of the week when the
phone is going to automatically switch on/off.
16.2.4 Factory settings
To restore the factory settings select : MENU > Settings >
Phone settings > Restore factory settings.
Page 66

64 64
To perform this operation you must know the password.
The default password is 1234
16.3 Display
settings
16.3.1 Wallpaper
MENU > Settings > Display > Wallpaper
You may select one of system wallpapers or any of
memory cards.
16.3.2 Display contrast
MENU > Settings > Display > Contrast.
Adjust the display contrast using keys.
16.3.3 Display highlighting
MENU > Settings > Display > Keys highlighting
Select the time of keys highlighting or deactivate it
completely.
Page 67

65 65
16.3.4 Automatic keylock
Keys are locked automatically after specified period of time
of idle operation. The automatic keylock may be
deactivated or you may change its time by entering:
MENU > Settings > Display > Automatic keylock
16.3.5 Highlighting
Select MENU > Settings > Display > Highlighting to set the
time of display highlighting or set the display so that it is
always highlighted.
16.3.6 Signaling events
Signaling events (flashing display) informs about receiving
new message or about missed call. The display flashes for
about 1 hour.
This option may be activated or deactivated by entering
MENU > Settings > Display > Signaling events
16.4 Security settings
To change the security settings select: MENU > Settings
> Security
Page 68

66 66
16.4.1 PIN
You may activate or deactivate the demand for PIN code
and change it in:
MENU > Settings > Security > PIN
16.4.2 PIN 2
PIN 2 is a code securing the access to advanced functions
of the cell phone assigned to a given SIM card. It is
required first of all while resetting the counter of call costs
or activating the fixed dialing number (FDN) mode. In order
to obtain PIN2 contact your operator.
You may change PIN 2 in:
MENU > Settings > Security > Change PIN2
16.4.3 Phone lock
You may activate the phone lock. When switching on the
phone you will need to enter the lock code. The default
code is 1234
To activate the password of the phone lock mark the
option:
MENU > Settings > Security > Phone lock,
Page 69

67 67
To change the password of phone lock select: MENU >
Settings > Security > Change the phone password
16.4.4 Privacy protection
With the use of a code you may lock the access to: call list,
messages, contacts, files, calendar, Udisk and audio
player. Select MENU > Settings > Security > Privacy
protection. Enter the ph one code, mark the elements
which you want to lock the access to and press Return.
16.4.5 Locking the keys with red receiver button
Enter the following path to activate the keylock with one
button: MENU > Settings > Security > Locking with red
receiver button
The keys will be locked after pressing the red receiver
button in standby mode.
16.4.6 Fixed numbers
It is the network service. If the operator offers this service
perform relevant configuration. This function makes it
possible to lock different types of calls.
Page 70

68 68
Enter:
MENU > Settings > Security > Fixed number.
For this service PIN 2 is required ( available at the
operator’s).
Select from the list the type of calls you want to lock or
add the number do the list of fixed dialing.
16.4.7 Black list
Select MENU > Settings > Security > Blacklist> Black
list settings, to activate or deactivate the function of
rejecting calls, lock or unlock the function of displaying
SMS from the number placed on the list. If the black list is
activated, the calls incoming from the numbers placed on
the black list will not be realized, the person calling from
this number will always hear the busy signal.
16.5 Profile settings
In profile settings you may change the ringtones and
volume in the phone. Select : MENU > Settings >
Profiles, and then select the required profile.
Page 71

69 69
You may activate or change it. To change the profile enter
MENU > Settings > Profiles > Settings
16.5.1 Ringtone settings
Here you may change the ringtone of incoming call or
message.
MENU > Settings > Profiles > Settings > Ringtones.
You may set one of phone ringtones or other from the
external memory.
16.5.2 Volume settings
MENU > Settings > Profiles > Settings > Volume
In this submenu you may change the ringtone volume,
message signal volume, volume during the conversation,
the volume of starting animation. You may regulate it with
the use of keys.
After making the adjustments press to save.
16.5.3 Vibration settings
MENU > Settings > Profiles > Settings > Ringtone type
Page 72

70 70
In this submenu you may change the type of incoming call,
SMS and alarm ringtone. The following options are
available:
Only ringtone
Only vibration
Without sound
Vibration and then the ringtone
Ringtone and vibration
Select appropriate type, confirm with OK key .
After adjusting the settings press to save.
16.5.4 Keys and warnings sounds
MENU > Settings > Profiles > Settings > Other sounds
By entering the above path you may set the keys sound,
the sound of the low battery warning, the sound of
switching on/off as well as voice prompts when pressing
keys.
Page 73

71 71
16.6 Network
selection
You may change the mode of selecting the network
between manual and automatic mode. Select:
MENU > Settings > Network selection
After selecting the manual mode all available networks will
be displayed.
17 Connecting to the computer
You may connect the phone to the computer with the use
of USB cable, thanks to which you may copy and transfer
the files between the phone and the computer
Connecting:
- insert USB cable to the phone
- connect the other end of the cable to the port in the
computer
- the screen of the phone will show the following message:
„Charging” and „Udisk”. Select Udisk
Page 74

72 72
18 FAQ (Solving problems)
„It is not
possible to
make a call”
Check whether the dialed number is correct.
While dialing the number of other country always
add a relevant prefix (for example Germany
0049 or+49)
If the user have a prepaid type card (supplying
with a card), it is necessary to check if the
resources are available on the account, to make
a call)
„SIM card is
inserted, only
emergency
calls possible
(112)”
Check whether the SIM card is installed correctly.
The phone
does not
operate, after
connecting the
It is possible that the phone is switched off,
switch on the phone pressing and holding the
relevant button (red receiver button) for about 3
seconds.
The phone may be repaired only by authorized service. It
is forbidden to repair or modify the phone by yourself
otherwise the warranty may be lost!
Page 75

charger it is not
charged
After longer period when the phone was not used
the battery may be in the state of so called” deep
discharge”, in order to restore the correct
operation of the phone connect the charger,
although there is nothing shown on the display.
„Is it possible to
make calls
being abroad?”
If the user is abroad, the phone automatically
logs into the foreign network, if ROAMING is
activated. Ask the operator for more information.
„Is it possible to
make
emergency
calls in the
place where the
phone is out of
range or when
there are no
resources on
the account?”
It is not possible to make any call, if the phone is
out of range.
If the user do not have any resources on the
account it is possible to make emergency calls to
112.
„How may I
increase the
range?”
Places such as buildings restrict the range,
approach the window or go beyond the area
where there are many buildings.
The keys do not
operate.
Keylock is activated. Unlock the keys.
68
Page 76

„What is SMS
center ?”
Number of operator’s center, where text
messages are stored. The number is saved on
SIM card, but in phone menu you may change it
or enter other number.
„When the
charge for a call
is calculated ?”
The charge is calculated just after establishing
the call. Ask the operator for the calculation
mode. For international calls fee may be charged
with a certain delay.
How to check
whether SMS
was delivered
to the recipient?
Activate the option of Delivery report. After the
SMS is delivered you will get SMS with the
information that the message was delivered
(network service)
69
Page 77

70 70
19 Use and safety
terms
Do not switch on the phone if it may cause the
interference into the operation of other devices!
• Do not use the phone without relevant hands-free set
while driving a car. This model is adjusted to using
wireless Bluetooth set.
• The phone emits electromagnetic filed, which may
negatively influence other electronic devices including,
for example, medical equipment.
Do not use the phone in hospitals, planes, near petrol
stations and near inflammable materials.
Do not repair or modify the phone by yourself. All
defects should be removed by qualified service.
The phone is not watertigh t, it should not be exposed
to water and other liquids.
The device and its accessories may consist of small
parts. The phone and its parts should be protected
against children.
Page 78

71 71
The phone cannot be cleaned with chemical
substances, or caustic substances.
Do not use the phone near payment and credit cards –
it may cause the loss of data.
Because of safety reasons do not talk by the phone
when the charger is connected.
Do not expose the device to low and high
temperatures and direct influence of sunlight. Do not
place the device near heating installation, for example
radiator, heater, oven, central heating furnace, bonfire,
barbecue etc.
Page 79

72 72
20 Warranty terms
The phone has a warranty, which inseparable element is
the proof of purchase. If the phone is damaged because of
improper use, electrostatic discharge or lighting stroke, the
user will have to pay for the repair. If the user attempts to
repair or modify the phone by themselves it causes the
loss of warranty! The abovementioned information are
presented for informative purposes.
Page 80

73 73
21 Information concerning the battery
There is a battery in the phone, which may be charged
again with the use of the charger included in the set.
The period of phone’s operation depends on different
conditions of operation. The distance from the relay station
and the length and the number of calls significantly
influence the shorter operation of the phone. While moving
the phone continuously switches between the relay
stations, which also considerably influences the period of
phone’s operation.
The battery which was charged and discharged several
hundred times naturally loses its properties. If the user
observes significant loss of efficiency, it is necessary to
buy a new battery.
Use only the batteries recommended by the producer.
Do not store the phone in places where the temperature is
too high. It may negatively influence the battery and the
phone itself. Never use the battery with visible damage. It
may lead to the short circuit and the damage of the ph one.
Page 81

74 74
The battery must be inserted in compliance with the
polarization.
Page 82

75 75
Leaving the battery, where the temperature is too high or
too low, will make its life shorter. The battery must be
stored in the temperature from 15°C to 25°C. If you insert
cold battery to the phone, it may not operate correctly and
there is a risk of damage.
The set includes li-ion battery. Used
batteries are harmful for the environment.
They should be disposed in relevant point,
in appropriate container, in compliance with
relevant regulations. Batteries cannot be
disposed to the household waste, they should be left in the
place of collection.
DO NOT THROW THE BATTERIES TO THE FIRE!
22 Information about SAR
This model fulfils the international guidelines in the scope
of radio waves impact. It is designed so that not to exceed
the limits of radio waves impact, recommended by
international guidelines. These guidelines have been
Page 83

76 76
prepared by independent scientific organization called
ICNIRP taking into account the safety margin in order to
Page 84

77 77
guarantee the protection for all the people regardless of
age and state of health. These guidelines use the unit of
measure called Specific Absorption Rate (SAR) – specific
absorption coefficient. The limit value of SAR specified by
ICNIRP for portable devices is 2,0 W/kg but it is the value
averaged for 10 grams of tissue. The SAR value is
measured in standard conditions of device operation, with
the highest transmitting power and in entire range of
analyzed frequencies. The real SAR of value may be
considerably lower than the maximum one, because the
device is designed so that to use only the minimum
transmitting power required to providing the connection
with the network.
In the case of this model the highest measured SAR value
is 0,529 -10g(W/Kg).
SAR values may also differ depending on domestic
requirements of reporting and testing and on the frequency
band in a given network.
Page 85

78 78
23 Information concerning the environment
protection
Note: This device is marked in compliance with European
Directive 2002/96/WE and Polish Act concerning
used electric and electronic equipment with
crossed out container.
This mark informs that this equipment, after the
period of its use cannot be placed in household
waste.
Note: This equipment cannot be thrown away together
with household waste!!! This product should be utilized by
separated collection in specially prepared places.
Correct treatment of used electric and electronic
equipment allows to avoid the consequences harmful for
people’s health and natural environment, resulting from the
presence of dangerous compounds and improper storage
and treatment of such kind of equipment.
Page 86

79 79
Some information included in the instruction manual may
differ from the information displayed by the phone, it
depends on the installed software and service provider.
The producer is not responsible for the consequences
resulting from the inproper use, abuse or not observing the
instructions.
If you need some technical assistance, we recommend to
contact the technical department under the number:
32 325 07 00 or email serwis@maxcom.pl
Our website:
http://www.maxcom.pl
Page 87

24 Declaration of conformity
78
Page 88

79
Page 89

MM461 V1/-09-2014
MAXCOM
43-100
ul Towarowa
POLAND
tel. 32 327 70
fax 32 327 78 60
www.maxcom.pl
office@maxcom.pl
S.A.
Tychy,
23a
89
80
0700
 Loading...