

Maxcom MM460 User Manual
Dear Customer!
Congratulations on your purchase of this Maxcom mobile
telephone! You have made the right decision.
Included in-box: Mobile telephone, desktop charger,
traveler charger, battery, instructions
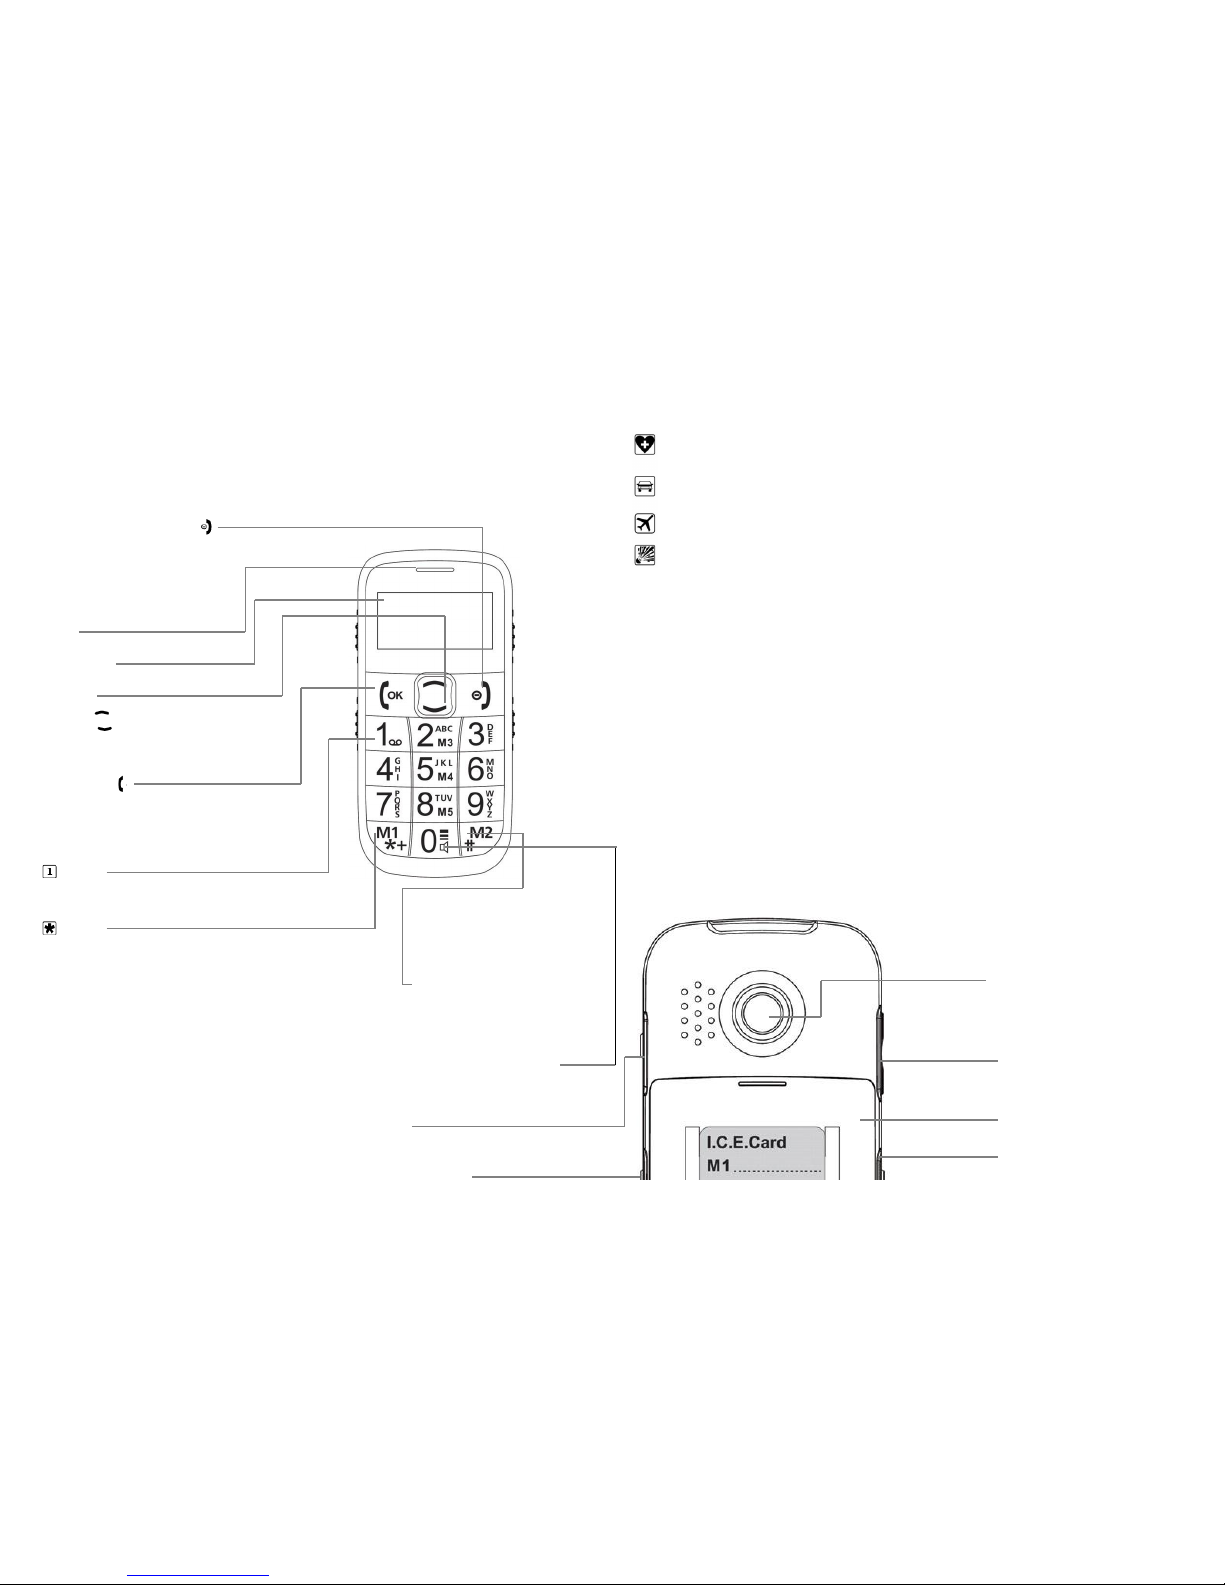
1 CONTROLS
Terminate/Back/Delete/On/Off-Key
- Terminate a call
- In menu: one step back
- Delete entry
- On/Off: press for 2 seconds
Receiver
Display (Screen)
Arrow Keys
- On standby: Enter the menu
- On standby: Enter the phone book
- Scroll in menu and phone book
Pick-up/OK-Key
- Make call or take call
- In menu: Confirm selection
- On standby: Enter dialed numbers
- Key
Press and hold to connect with voice mail
- Key
- On standby:
● Press and hold for quick dial key M1 (see Chapter 7)
● For SMS: Special characters
( , . ? ; : ! “ ’ @ _ ~ & + - ( ) < > { } [ ] % = / \ # * $ § ...)
- Radio: Scan (filter) sender
16 SAFETY INSTRUCTIONS
Switch off mobile telephone in hospitals or near medical
devices. There should be a minimal distance between
pacemakers and switched-on telephones.
Do not operate a vehicle while holding a mobile phone in
your hand. Follow the laws and traffic rules of the country
you are in.
The mobile phone is to be switched off while you are in an
airplane.
The telephone is to be switched off near petrol stations or
other areas with explosive materials.
Never shine LED- flashlight into the eyes of humans or animals!
(Protection class 3)
SAR-value: The maximum weight determined by the EU is 2.0 W/kg.
This model has a maximum of 0,557W/kg.
17 INTENDED USE
This mobile telephone is robust and intended for mobile use. It is
to be protected from moisture (rain, bathroom...) and impacts. Do
not expose to prolonged direct sunlight.
Other use as described above leads to damage of product and
furthermore is associated with hazards such as electrical shock,
fire and so on. The entire product may not be altered nor rebuilt
nor can the housing be opened.
The power adapter is designed for use in household wall outlets
to public electricity grids with 230 volts / 50 Hz (10/16A) voltage.
18 TECHNICAL DATA
Dual band GSM 900/1800MHz Battery: Li-Ion 3.7V / 1000mAh
Dimensions: 107x52x15mm Standby-Time: 210h
Weight: 101g Talk time: 170min
# - Key
- On standby:
Press and hold for quick dial key M2
- For SMS: Switch between capital,
small letters & numerals
0 - Key
- For SMS: Space
- Press and hold for inserting: +
(country prefix, e.g. “+39” for ITALY)
Flashlight
- Switch up: Flashlight on
- Switch down: Flashlight off
Key lock
- Switch up: Key lock off
- Switch down: Key lock on
Emergency call button
Volume Control + & -
Change the handset volume or the
radio volume
Radio
- Switch up: Radio on
- Switch down: Radio off
Battery door
5 THE FIRST STEPS
When you first use your Sim card, the phone will ask you to
fulfill the Emergency info as indications (See chapter8.)
Pressing the - key for at least 2 seconds switches the
telephone on.
To switch off, also press for 2 seconds.
When using a new SMS card, the 4 digit PIN Code (Personal
Identification Number) must be entered and confirmed with.
PIN-Code: The PIN-Code is a 4-digit number combination
which should prevent others from switching on your mobile
phone.
● Switch off PIN-Code: In menu: Settings PIN
request
Off
Entering Menu: Press - key
● Scroll through menu points: with and
● Confirm: with
Incoming Call:
● Pick up: Press - key - Reject: Press - key
To end call: Press - key
To Dial: Enter the telephone number over the keypad
(including area code with 0) - begin call with .
Repeat Dial: By pressing the - key, you reach the Dialed
numbers. Select a number with and and
begin the call with .
Storing phone book entries (Name & Number):
Enter menu with
continue to Phone book: ,
continue to Add contact: ,
choose the memory
on SIM card or on phone:
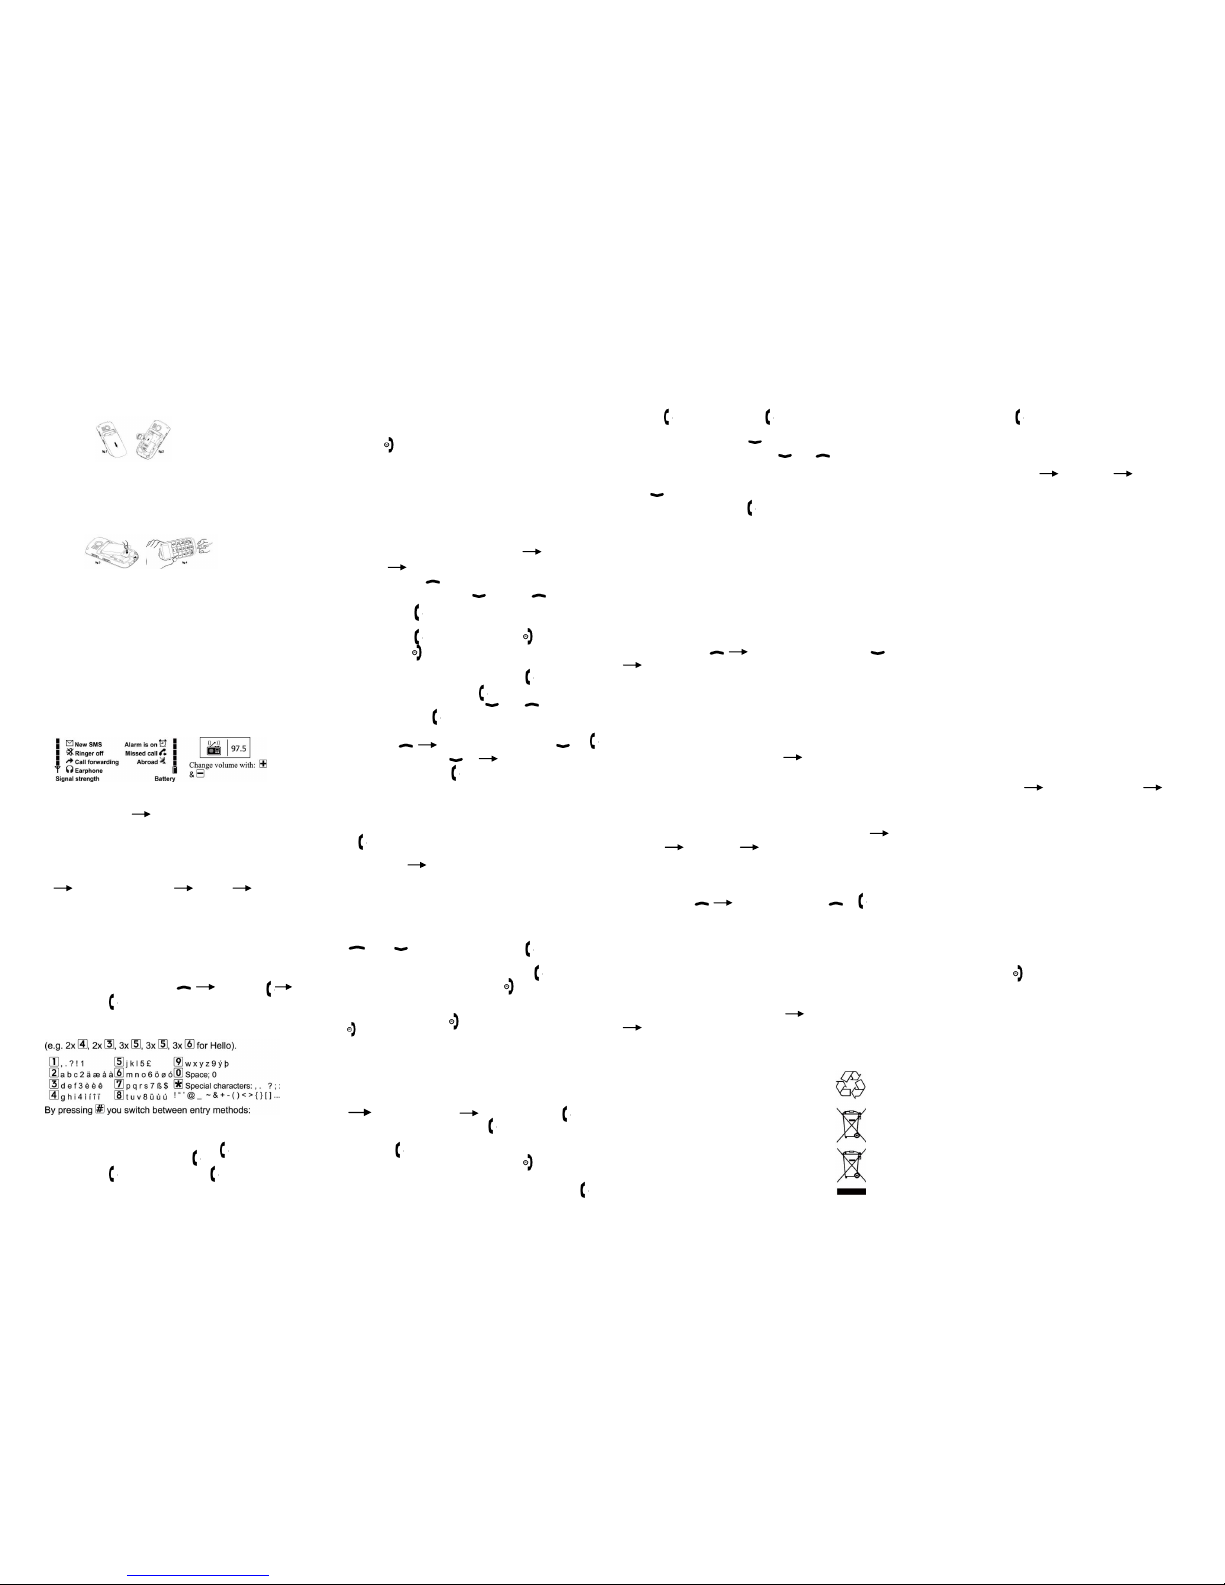
2 INSERTING SIM CARD
Fig. 1: Remove battery cover (as shown).
Fig. 2: Slide SIM card in with the gold contact facing
down.
3 INSERTING AND LOADING BATTERY
Fig. 3: Insert battery
Slide cover to closed position with a ‘click’.
Fig. 4: Insert the charger cable in the socket on the
underside of the handset.
During charging: Bars moving on display.
Full battery: Bars are solid.
Charge battery for at least 4 hours before
making/receiving first call!
4 DISPLAY SYMBOLS (SCREEN)
Standby: Radio:
Enter name over keypad (See chapter 9, Write SMS for text
entry), , enter number,
Searching phone book entries:
Open the phone book with:
● Scroll through the entries with and . Or:
● Use the Name Search: Enter the initial letter of the
searched entry on the keypad (if necessary scroll through
with ).
When it is displayed, press to make a call.
Dialing with Quick Dial Keys:
Using * , # and keys 2 to 9 you can call a predefined
and often called contact by the press of one button (press and
hold for 2 seconds). See Chapter 7.
Hands free Speaking:
The Hands free option can be switch on or off by pressing
KEY 0 during an active call.
6 PHONE BOOK
Saving names and numbers (start with international prefix,
e.g. +39 for Italy).
Go into menu with
continue to Phone book:
, Menu-Points: Search name, Add contact, Delete,
Copy all Emergency numbers (save, edit, delete, status
on/off), Quick dial keys, Phone book Settings (Save entry on
SIM Card/Phone, Memory status).
7 QUICK DIAL KEYS
Dial a saved number with ‘one press’ of a key. Press and
hold the * or # key or any key 2 to 9 .
To set, enter the menu, Phone book
Quick dial keys,
select the quick key to allocate. In the point Edit, select the
contact and save with .
Note: The name must already be saved in the phone book.
Saving a new entry directly to quick dial keys is not possible.
Key 1 is reserved for the voicemail number. You can change
this in the menu Messages
Mailbox
Mailbox
number.
8 EMERGENCY FUNCTION
You can save a total of 5 emergency numbers (family,
neighbors, friends, emergency services). These preselected
numbers will be sent SMS & then dialed automatically in a
stored sequence in an emergency, if the emergency button on
the back of the phone is pressed and held, A continual
warning signal sounds during the emergency so that you and
the person called will know that this is an emergency! At the
same time, the Prestored emergency contacts will receive the
SMS like „Emergency Call, pls call me” in sequence.
Emergency calls will be made after the SMS sending
finishes. If the first number is not reached, the second
number will be called automatically. If the second number is
not
reached, the third will be called again and so on (max. 3
rotations of the 5 numbers).
Note: This telephone does not recognize whether a person
or machine has picked up the call and assumes that the call
has been successful!
If no emergency number is saved or if your calling card
has expired or you have no access to a foreign network
(e.g. roaming not permitted), 112 can be dialed.
● Saving emergency numbers:
Emergency numbers
Add contact
b.When you first use your SIM card, you are asked to
input the Local SOS number Owner info Emergency
Number(you can input the number or choose from your
prestored phonebook)
● Switch emergency function On / Off: In menu Phone
book
Emergency numbers
Status
On / Off
Note: If you want to save emergency numbers like emergency
services, police, fire department, etc., you must clarify this
with each institution. No liability will be assumed for
possible costs incurred if you dial accidentally.
9 SMS MESSAGES
SMS (Short Message Service) are written messages with
a maximum of 160 characters.
●Write SMS: Enter menu with
Messages:
Write new SMS: . The text entry takes place over the
keypad each key is supplied with several characters
which appear with multiple presses.
By pressing KEY # you switch between entry methods:
● Send SMS: Select Send with 2x and enter
number or dial from phone book ( , scroll to names
and select with ). Then press to send
● Receive SMS: A short signal and a registration on the
display inform you about a new, incoming SMS message.
With you can read the message immediately or see a
list of messages which have already been received in the
menu Messages
Received SMS.
10 RADIO
● Switch on: Slider on the left side upwards.
● Switch off: Slider on the left side downwards.
● Station enter/search:
- If the desired station is known, enter frequency over the
numeric keypad or scroll through the frequency values with
and , then confirm with , same for
decimal place.
- Open automatic station search with *, with continue
to next station and confirm station with .
● When you switch your radio off and on again, you are on
the last heard station again.
● To mute radio: Press - to activate again: press
again.
● Change volume (does not function in automatic. search):
with + & - on the left side of the telephone.
● Headphone:
You can use the radio with and without headphone
11 TOOLS & CALCULATOR
● Alarm clock: Choose an alarm from the list in Settings
Alarm clock
Set Alarm: 2 x ,
select Once or Every day: , enter hours and
minutes as two digits. Select the alarm melody and after
pressing again the alarm clock is set.
If the alarm clock goes off, end with . (Note: If
the alarm clock is switched on in the menu, it will ring
the next day again!!) or activate mute function with
and the clock will ring again after 5 minutes.
To change alarm clock melody in Setting
Settings
Ring tone
Alarm melody.
● Memo: Save memos with reminder functionality.
● Calculator: Execute basic arithmetical operations.
12 OTHER FUNCTIONS IN SETTINGS
Into menu with
continue to Settings: ,
● Silent mode: The mobile telephone does not make any
sound for incoming calls and does not sound for incoming.
● Vibrating alert: Enable or disable the vibration for
incoming calls.
● Settings: You can change the Ring tones here (for
incoming calls, SMS, birthday reminder), the Volume
(call, ringing, key tones), language, Time and Date.
● Network selection: Settings
Network settings
Network selection: Automatic or manual.
● PIN request: On/Off or Change.
● Master reset: Reset the mobile phone to factory settings.
13 DISPOSAL
Disposal of packaging: Packaging and
packaging aids are recyclable and should
be entered into the recycling process.
Battery disposal: Batteries do not belong
in the household trash! As a consumer,
you are obligated to return used batteries.
These can be handed into local collection
areas or to specialty shops.
Device Disposal: When this product is eventually taken out
of service, please do not throw it into the household trash.
Take care of the environment by bringing it to a collection
area where old devices are accepted and brought into an
environmentally friendly disposal/recycling procedure.
14 FREQUENTLY ASKED QUESTIONS
● Screen shows “No SIM card!“: Check the direction of
the SIM card (Gold contact facing downwards)
● A call failed: Check the selected telephone number and
area code again for accuracy (area code entered?)
● The mobile telephone display is blank/black:
Telephone is in energy saving mode: press any key. Or it is
switched off (Hold key for 2 seconds long to switch
on)
● The mobile phone does not react: Remove battery,
Re-insert and switch device on. If there is still no reaction,
refer to the service centre.
● The charging procedure does not begin: This can take
several minutes. If there is no reaction after 10 minutes, refer
to service centre.
 Loading...