

Maxcom MM431 BB User Manual
1
Maxcom MM431 BB

2

3
If you need technical assistance, please contact the hotline
on
(+48) 32 325 07 00 or serwis@maxcom.pl
Our website:
http://www.maxcom.pl/
The content of the set
GSM Phone
Charger
Rechargeable 800mAh
User manual
Warranty Card
Do not lose the package,it can be
useful for eventual transport.
Please keep the receipt, it is an
integral part of the warranty.

4
Note - The phone operates in GSM 900/1800. Before
turning to properly insert the SIM card.

5
Mobile phone GSM 900/1800
Large backlit keys
128x64 pixel display resolution
SOS button (emits an alarm and automatically calls and
sends SMS to a predefined number)
Large font, easy to Menu
Hands-free
Phone book entries -200
The function of sending and receiving SMS
Speed dial 10 numbers
Displaying call duration
Loud ringer (10 melody)
torch
calculator
alarm
Lock Switch
Standby time: Up to 200 h. *.
Talk time Up to 3 hours. *
Weight: 80g
Dimensions: 110x47.6x15.7mm

6
Table of Contents
1 Location of the buttons 7
2 Principles of safe use 9
2.1 GSM network 9
3 Installing the elements 10
3.1 Installing the SIM card and battery 10
3.2 Charging the Battery 13
3.3 Low Battery Alarm 15
4 Using your phone 15
4.1 Turning on the phone 15
4.2 Turning off 17
4.3 Standby Mode 17
4.4 The icons on the display 18
4.5 Basic functions of the buttons 20
4.6 Key Lock 24
4.7 Torch 24
5. Operation MENU 24
6. Connections 25
6.1 Making a call 25
6.2 The emergency call 25
6.2.1 Number 25 SOS
6.2.2 Information about the owner of 26

7
6.2.3 Entering and modifying the alarm contacts 26
6.2.4 The text of the alarm 27
6.2.5 Emergency 27
6.2.6 The SIM card is inserted 28
6.2.7 The SIM card is not inserted 29
6.3 Answering a call 29
6.4 Key hands-free 29
6.5 Conference 30
6.5.1 Method 1 30
6.5.2 Method 2 31
6.6 Adjusting the volume 31
7. SMS 31
7.1 Writing and sending SMS 32
7.2 Read and reply to SMS messages 34
7.3 SMS Box 35
7.3.1 Inbox 35
7.4 Sent items 35
7.5 Drafts 36
7.6 SMS Templates 36
7.7 Deleting messages 37
7.8 Voice Mail 37
7.9 SMS Center Number 37
7.10 Report service 38
7.11 Memory Status 38

8
8 Phone Book 38
8.1 Overview of contacts 39
8.2 Creating a new contact 40
8.3 Deleting contacts 40
8.4 Copying contacts 41
8.5 Setting the phone book 41
8.5.1 Memory 41
8.5.2 Memory status 41
8.6 Emergency calls 42
8.7 Speed dialing 42
8.7.1 Programming the keys 42
8.7.2 Implementation of high-speed 43
9 Call Log 43
9.1 Delete all entries 44
9.2 Call time 44
10 Extras 45
10.1 SIM services 45
10.2 Alarm 45
10.2.1 Setting the clock 45
10.2.2 Clearing the alarm 46
10.3 Notes 47
10.3.1 Saving a memo 47
10.3.2 Deleting a note 47
10.4 Birthday Reminders 48

9
10.4.1 Saving the birth of 48
10.4.2 Deleting, editing notes, 48
11 Calculator 49
12 Settings 50
12.1 Quiet Mode 50
12.2 Setting up the phone 50
12.2.1 Sound 50
12.2.2 Alarm clock 50
12.2.3 Voice prompts dialed number 51
12.2.4 Change in Volume 51
12.2.5 Changing the display 52
12.2.6 Language 52
12.2.7 Setting the time and date 53
12.3 Network Settings 53
12.3.1 Call Waiting 54
12.3.2 Transferring a call 54
12.3.3 Call barring 55
12.3.4 Selection of Network 56
12.3.5 Hiding own number 56
12.4 PIN 57
12.5 The factory settings 57
13. FAQ (Troubleshooting) 58
14 Terms of Use and safety of 61

10
15 Disclaimer 62
16 Battery information 62
17 Information on SAR 64
18 Environmental Information 66
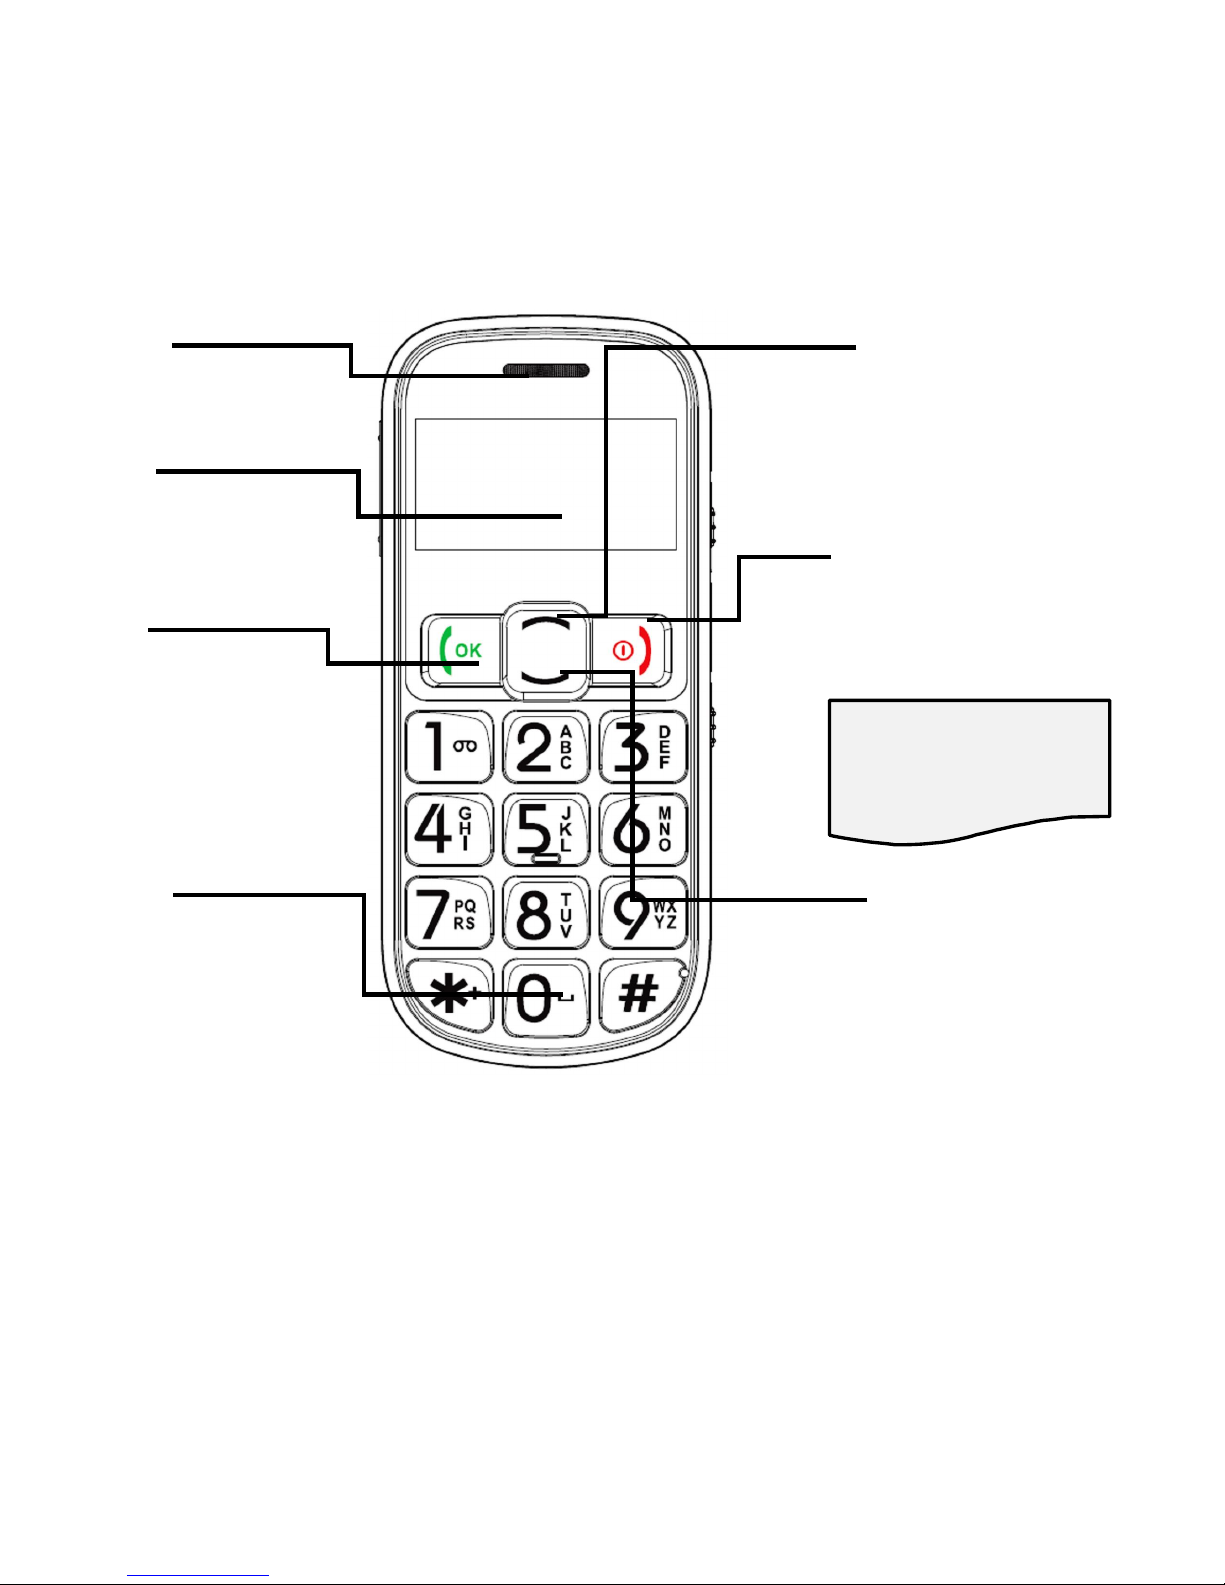
1. Location of keys
Speake
on/off phone
Screen
The entrance
to the menu
navigation
button "Up"
The connection
/
confirmation
Handsfree Button
Disconnect button /
cancel the function
Press and hold
button to turn
The entrance
to the Books
Tel.
Navigation
button
11

12
Left side
Right side
Alarm clock button
Holding the panel
will include a
SSOOSS bbuuttttoon
2.
n
Volume control
buton +/-
procedure
Call the defined
number and send
SMS
Torch button
Lock keyboard
button

Important safety measures
Read the following rules will minimize the
risk of improper use of the phone. In the
following rules are discussed in detail.
USE - Do not use the phone to an area where
it is prohibited such as gas stations or
hospitals. Using the phone in such places may
put others at risk.
TORCH - Do not look directly into the beam
of light
Hearing Aid-If you have a hearing aid, you
must carefully choose the volume of the
phone and set the sensitivity of the hearing
aid.
WATER - the phone is not waterproof. Keep
it dry.
GSM network
The phone is designed to operate on the GSM 900/1800.
13

14
Before using the instructions available on the phone
features, you should check with your GSM operator
whether features are available.
Note: Not all operators allow you to send Polish characters
in text messages. Check with your operator.
1 Installing the components
Before turning on the phone, you should install a SIM card.
Pay attention not to damage the card when inserted.
SIM cards out of reach of children.
3. Installing the elements
Installing the SIM card and battery
Before inserting the SIM card, make sure the phone is
turned off. Charger should be disconnected. To insert the
SIM card you must first remove the battery in accordance
with the drawings and description:
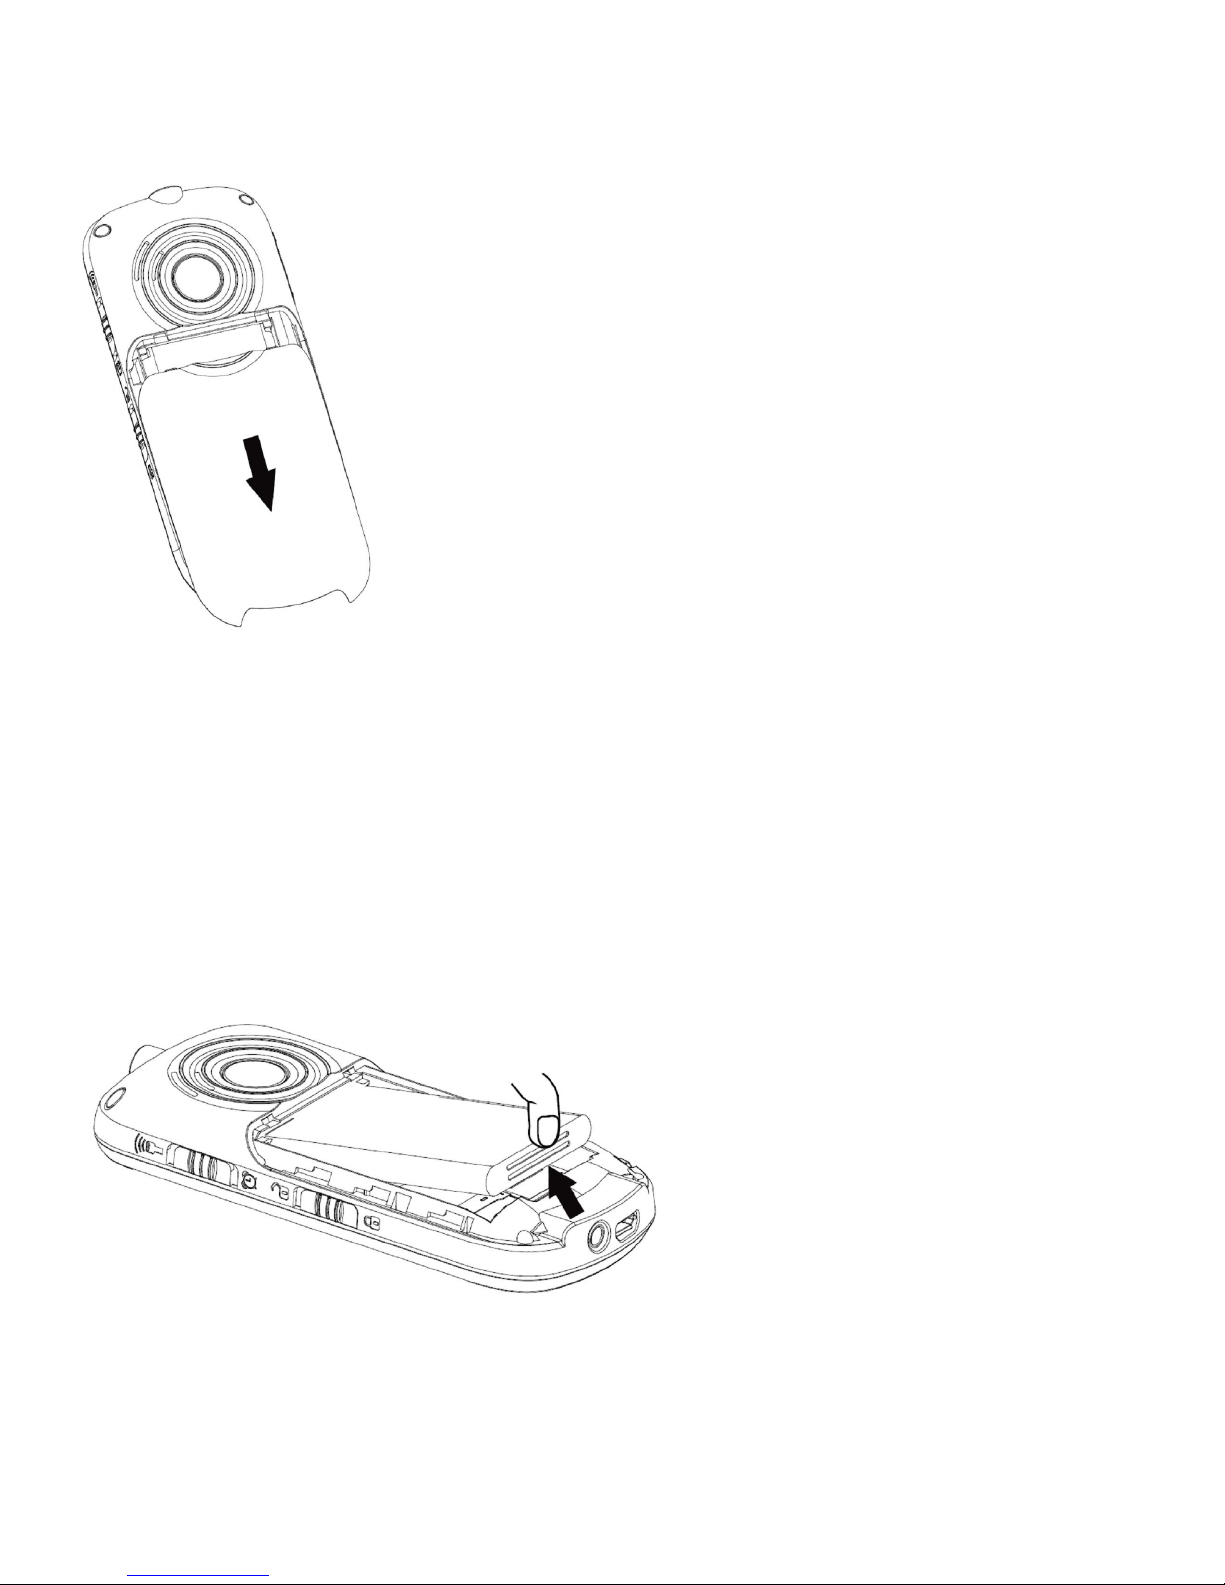
Slide
down
1. First When the phone is off, press the top cover
and slide it in the direction shown in Figure
Second Remove the battery as shown.
15
16
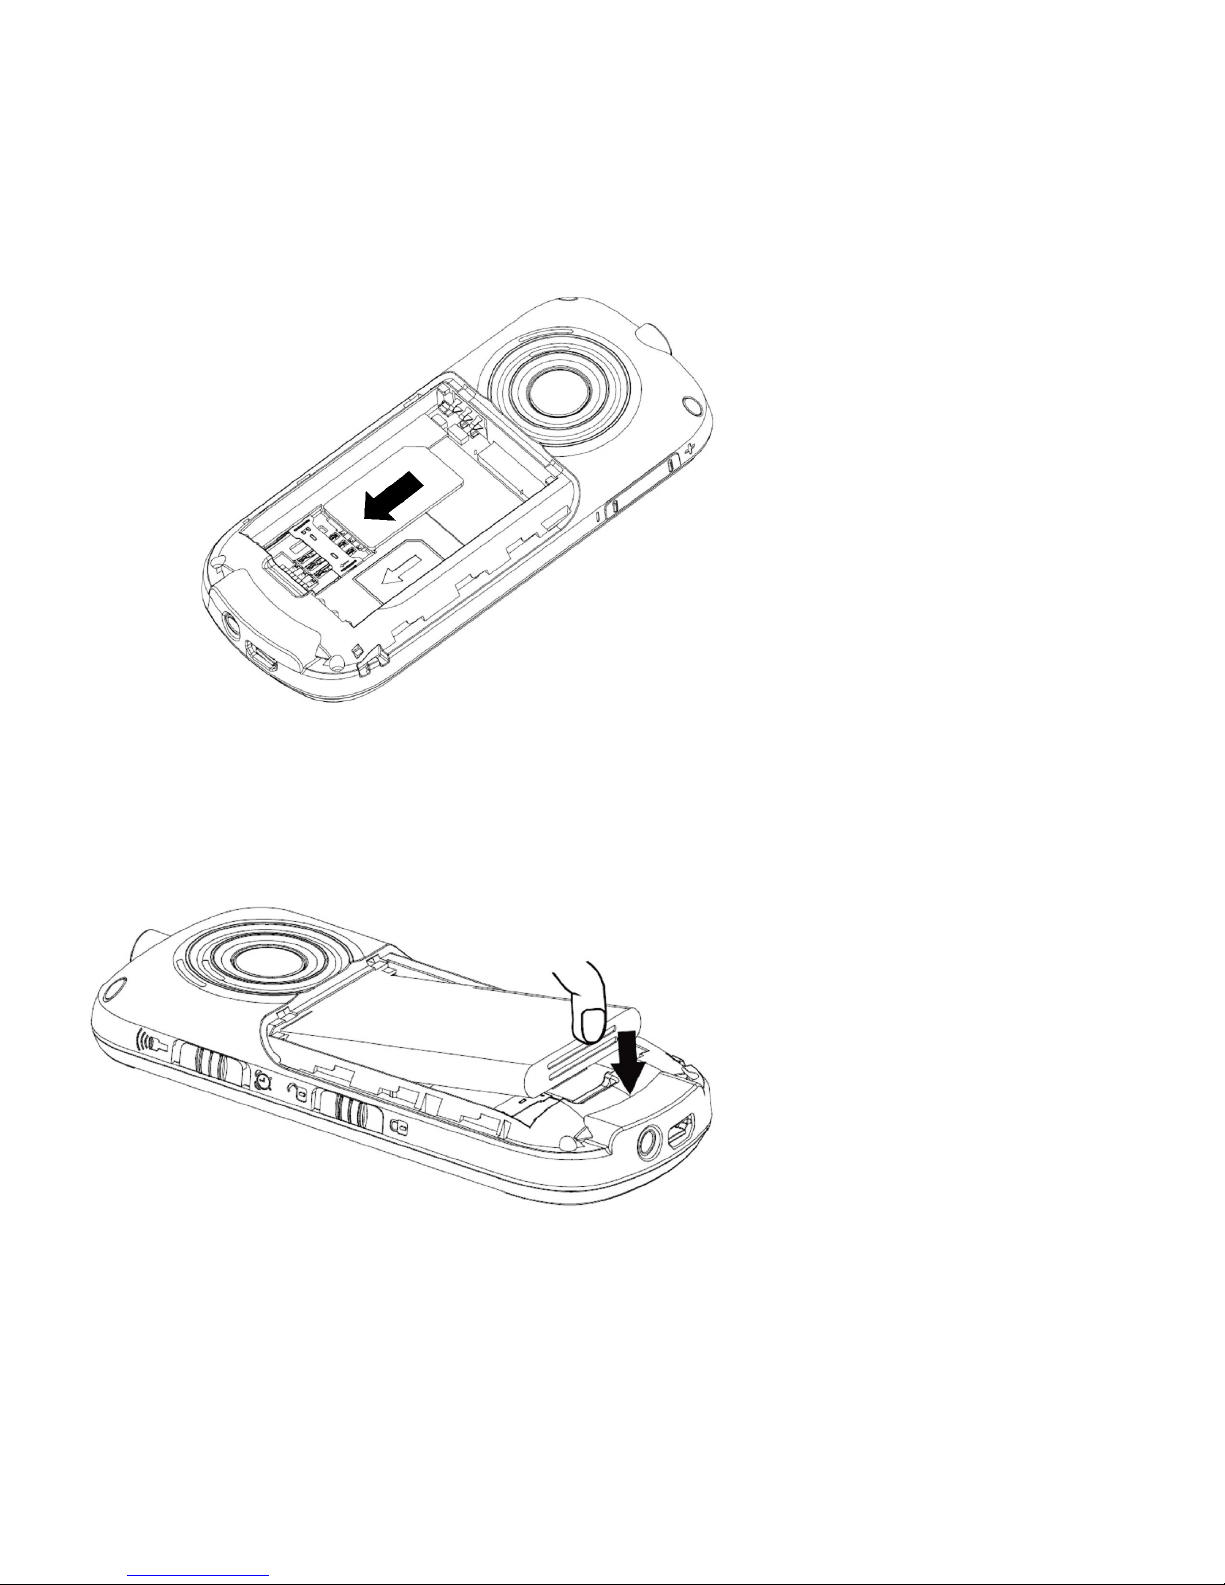
2. Insert the SIM card into the "SIM" as shown.
3. Insert the battery so that terminals + /-were
directed to the top of the phone.

4. First After inserting the battery, slip cover. After the
correct assumption is characteristic audible snap.
3.2 Charging the battery
Note! Replace the battery contained in the set. Use of
another battery may damage the phone and will void the
warranty.
Do not connect the charger when the rear cover is
removed.
To charge the phone:
1.First Connect the charger to the socket at the bottom of
the phone.
17
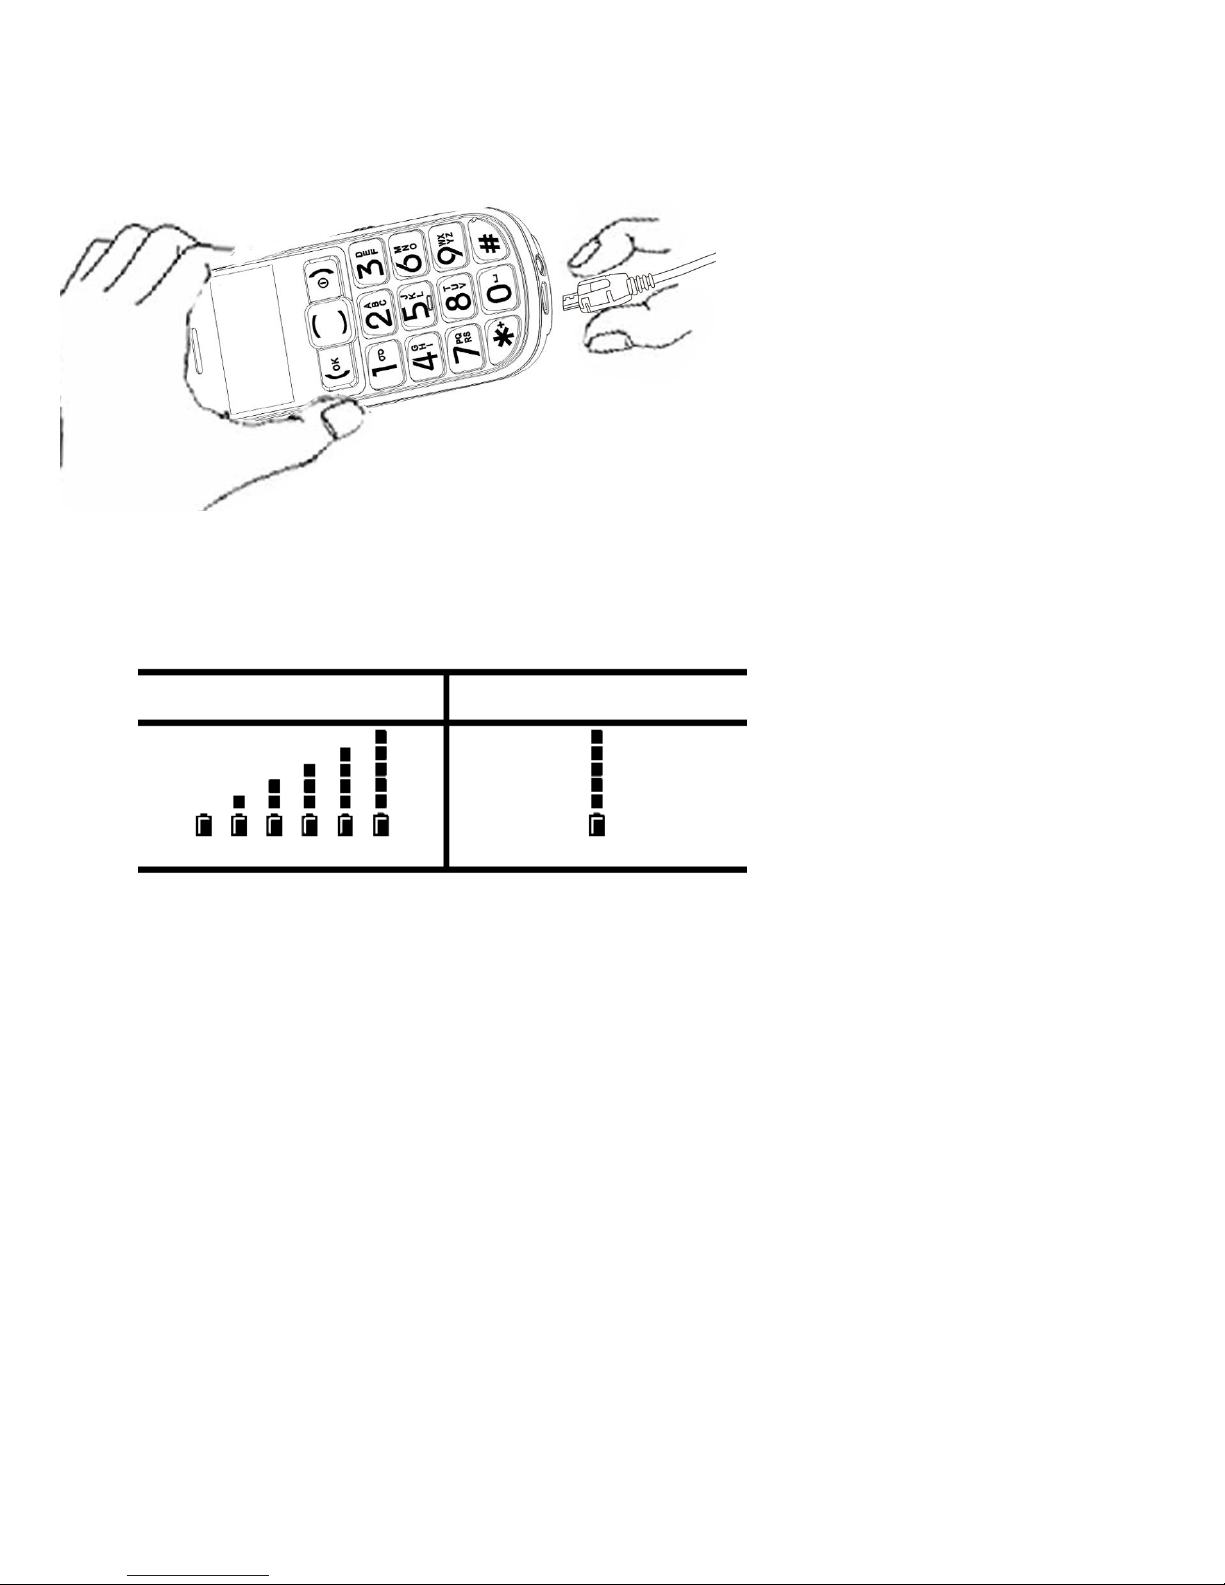
18
Charged
Charging
2. First Insert the plug into the socket. The display shows
information about the charge.
3. First When the battery is fully charged, unplug the
charger from the electrical outlet and cable from the
phone.
3.3 Low Battery Alarm
Your phone will alert you when the battery is too low. Also
displays a message on the screen. Recharge your
batteries when you see this message. If the message
appears during a call, also connect the phone to power not
to lose the connection.
4. Using your phone
4.1. Turning on the phone
Press and hold the red button on disconnect , to
activate the phone.
If the phone requests a PIN code you must enter it. You'll
find it in the startup kit card.
After entering the code to confirm it by pressing the green
handset .
4.2. Turning off
Warning: When you enter an incorrect PIN code
three times in a row, the SIM card is blocked
You can unlock it with the PUK code. 10 times
wrong PUK code to enter the SIM lock permanently
19

20
To turn the phone off, press and hold the disconnect .
When you first start you see the "Set Phone", select
edit , to set SOS number, time, date and information
about the owner. Choose cancel to start using the
phone and make these settings later through the MENU
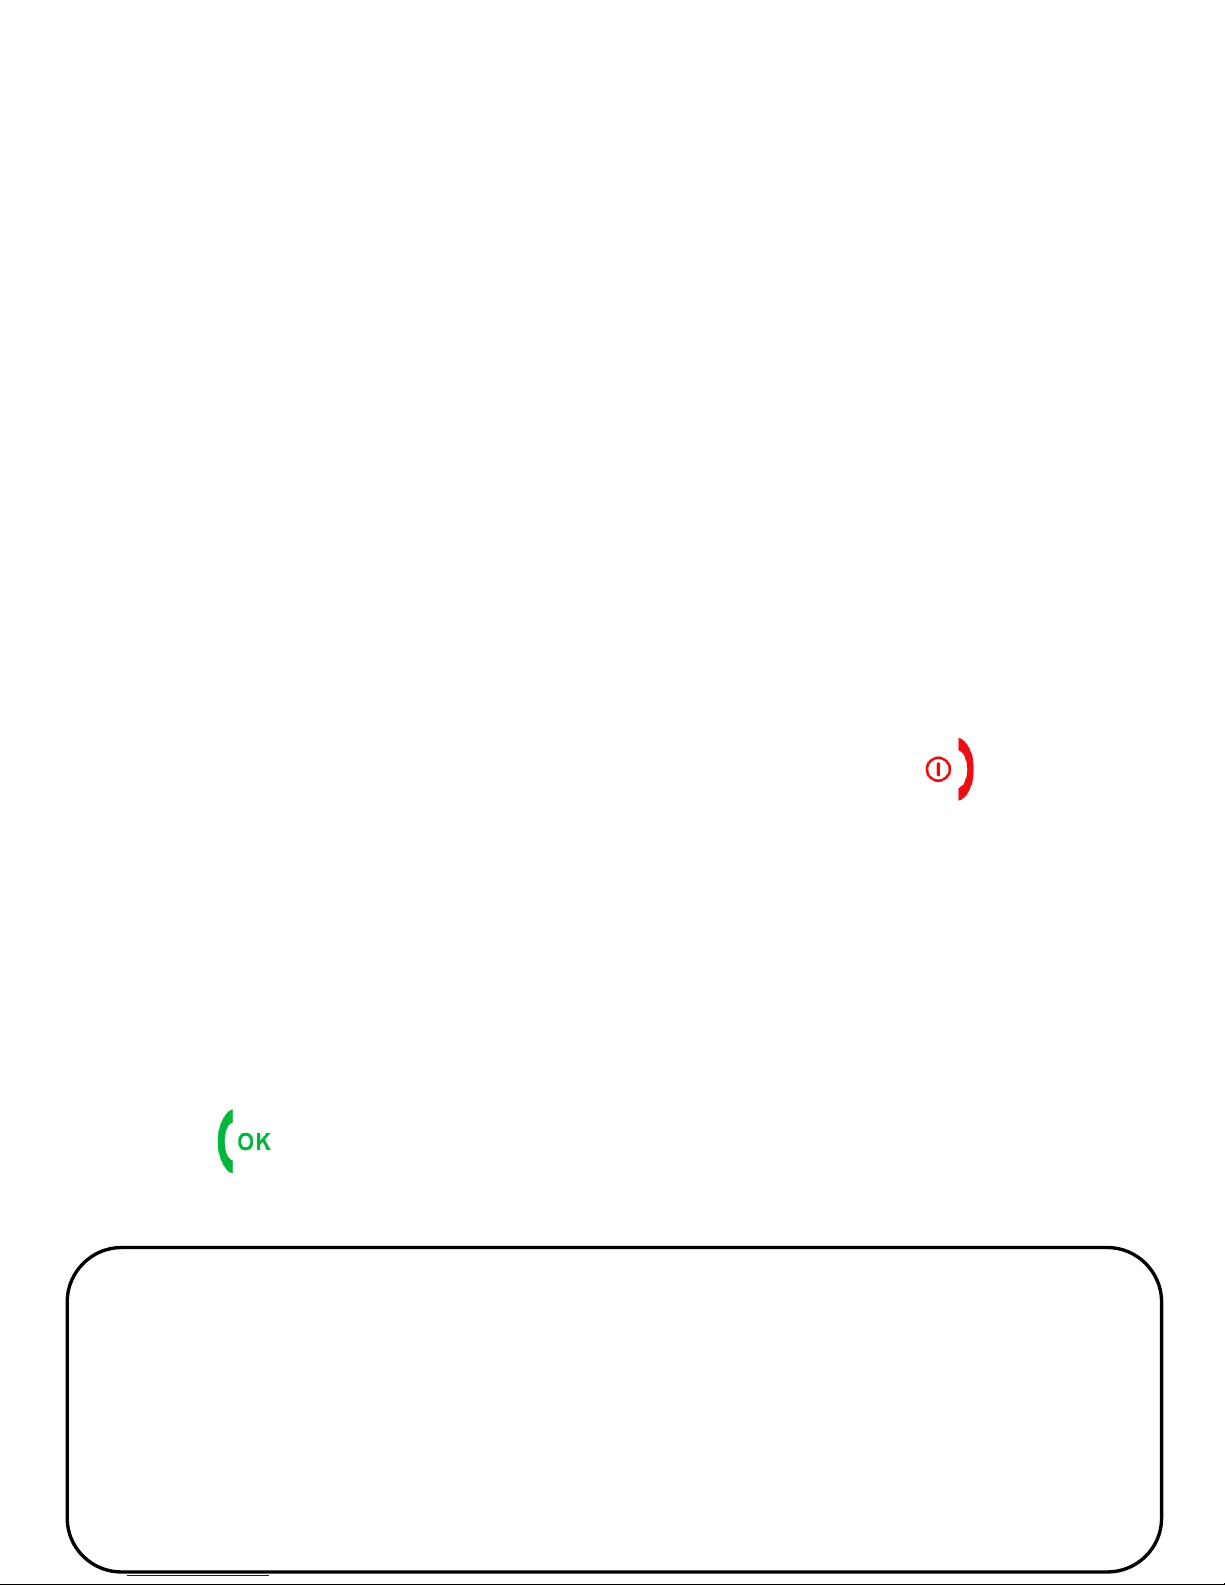
4.3. Standby
When the phone is turned on, but take no actions that it is
in standby mode.
Description of display:
3 5 4 2
7
1
6
1.First network signal
2.Second battery Level
3.Third Icons showing different features
4. Icons showing different features
5. Name of operator
6. Time
7. Date
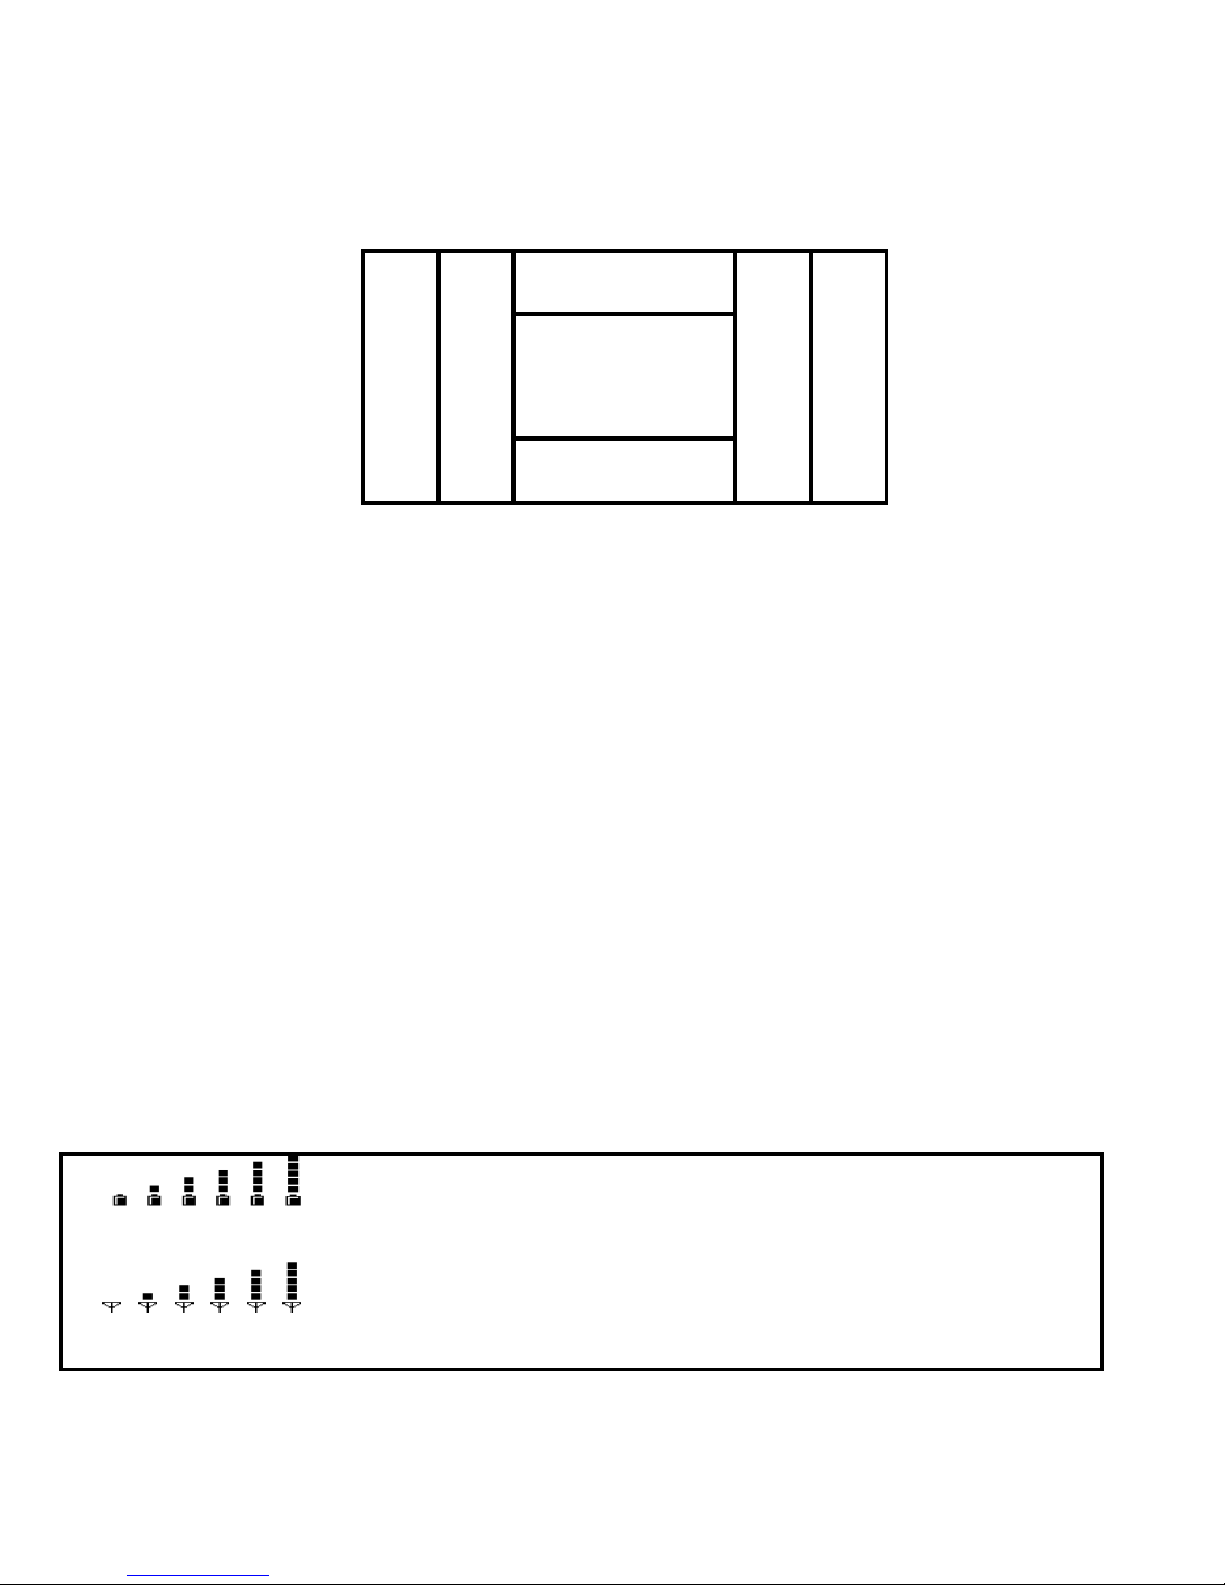
4.4 The icons on the display
Batery level
Network signal strength
21
 Loading...