

Page 1

1
Maxcom MM28D HS
USER MANUAL
Page 2

2
SA FETY INSTRUCTION
To use the phone properly, please read this user manual carefully and pay attention on the
following precaution before use:
Please charge the spare battery for at least 16 hours before the first use.
Not to use the phone when driving.
Move the antenna to indoor area when the lightning storm is coming. Do not use the phone
when thundering.
Turn off the phone when close to dangerous substances like as fuel, chemical material, or
close to gas station, or on the plane and at hospital.
Turn off the phone in the forbidden places. The fixed wireless phone may disturb the heart
pacemaker, hearing aids and other medical equipments.
The capability of the phone may be disturbed when used near to the TV, radiogram and PC
or other machine equipments.
Turn off the phone to clear it. Using the cloth with a little humidity or defending the static and
please do not use the lotion or other chemical products to clean it.
This product can produce magnetic field, so do not place it next to the magnetism storage
equipment like the PC’s magnetic disk and so on.
Do not place it under sunlight to avoid being heated.
Not to let any liquid get into the phone to avoid any damages.
Pay attention on the law system of local fixed wireless phone before sending or answering
the calls.
Use the authorized power adapter and spare battery or it may cause danger using other
power supply equipments.
This product adapts the encrypt SIM card, so do not move the card to other phone or insert
other SIM card into this phone, both of which may cause the SIM card-locked or damaged.
As the software of the phone is continuing upgrading, please make sure you understand the
operation when there is any discrepancy found on the user manual.
Page 3

3
Support SIM card read and write
Fixed antenna, External antenna (optional) compatible
LCD displays the number in two rows available
Call log for 50 groups of received calls, dialed calls and missed calls
15 levels of LCD contrast for selection
Interface language: Polish / Croatian / English/ Spanish/ French for selection
LCD backlight function
Call waiting and call transfer
16 kinds of incoming ringing/alarm tone for selection
6 kinds of power on/off tone for selection
2 kinds keypad tone for selection
7 kinds of message tone for selection
7 levels of ringing/key tone volume for adjustment
3 groups of alarm clock
300 memories of phonebook
SMS functions with 200 memories of incoming and outgoing messages
Calculator and unit converter function
BMI index
Handsfree dialing and Speed dialing function
Pre-dial and redial function
In use and power LED indicator
FEATURES
Page 4
4
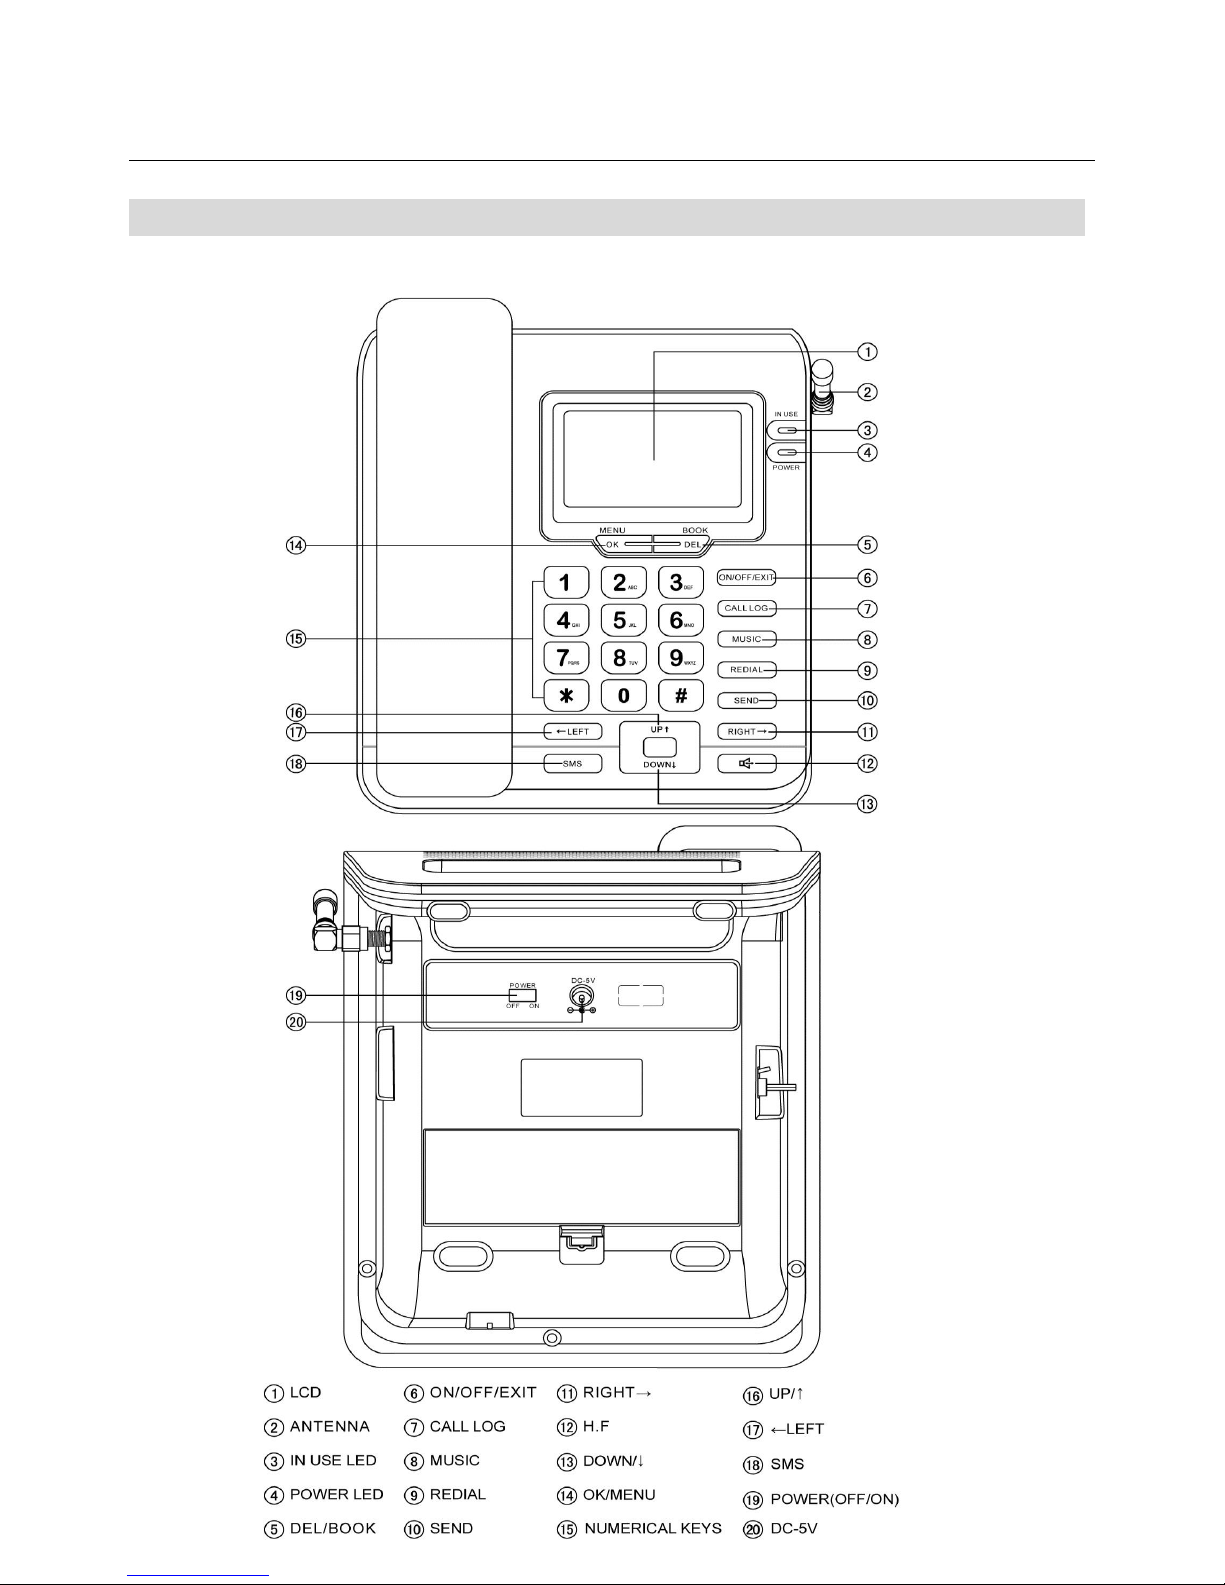
LOCATION DISCRIPTION
Page 5
5
TECHNOLOGY PARAMETER
Environment Temperature: -10℃~+45℃
Relative Humidity: 10%~95%
Atmospheric Pressure: 86~106Kpa
Working Frequency: E-GSM 900/1800 or 850/1900 (option)
Working Power: AC220V, 50Hz, DC 5V 1000mA
Backup Battery: Rechargeable battery Ni-MH AAA 3.6V600mAh
Standby Time: around 5 days
Talk Time: About 2 hrs
NOTE:
The standby time and talk time are also depending on the local network and the battery use.
INSTALLATION AND CONNECTION
Battery installation
The unit requires rechargeable battery. Open the battery compartment cover and insert the
batteries in the right polarity, then close the cover. Also you can connect to the DC adaptor to
supply power.
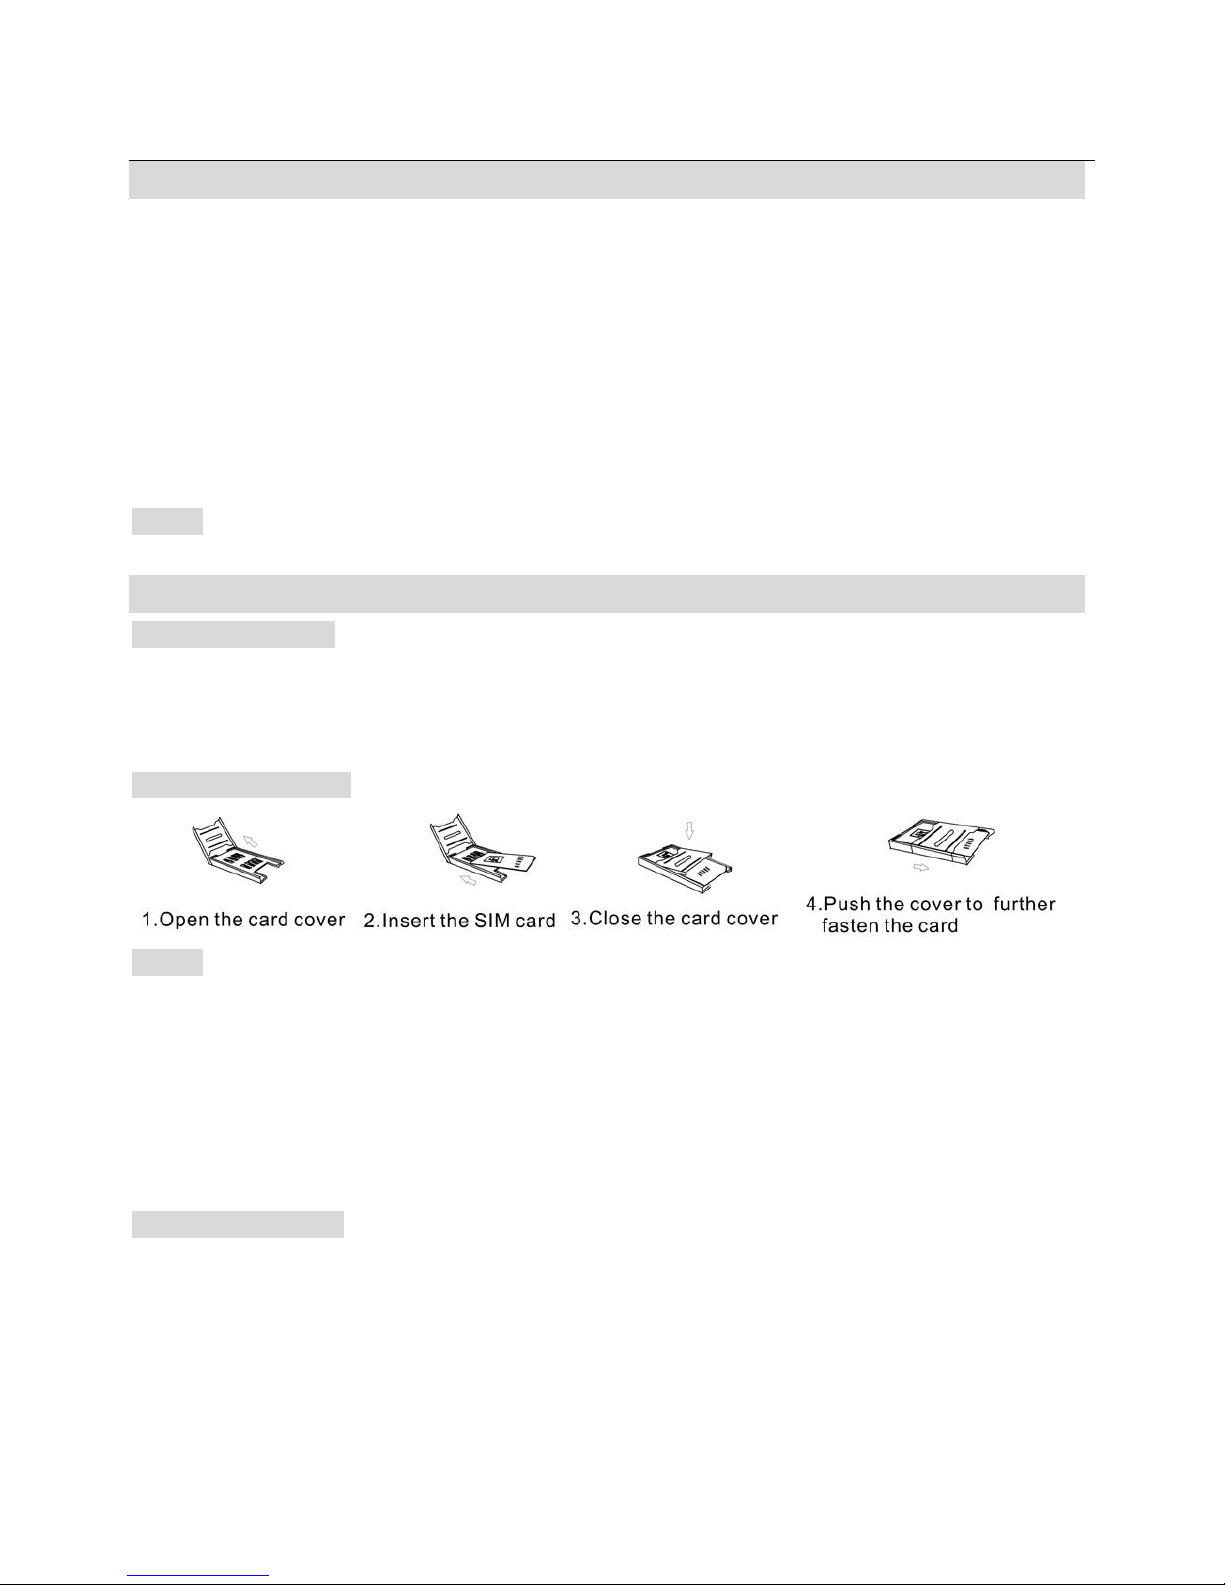
SIM card Installation
NOTE:
Make sure to turn off the phone before inserting or taking out the SIM card. Completely
forbid to insert or take out SIM card when the phone is connected to the external power
supply or the SIM card may be damaged.
Do not touch the metal plate area of the SIM card in order to avoid losing or damaging the
messages in the card and put the card far away from the electromagnetism. If the card is
damaged, the phone can not enter into the GSM network.
Adapter connection
Page 6

6
Handset Connection
Connect the handset and the base of the phone with a coil cord.
Turn on or Turn off the Phone
Turn On: Move the power switch to the “ON” place and the screen will be light. The phone
begins to search the network and it can provide the services after getting into idle state.
Turn off: Move the power switch to the “OFF” place and the light of the LCD will go out which
indicates the phone is turned off.
You also can turn off the telephone by long pressing ON/OFF/EXIT key then long press it to turn
the phone on.
KEY-PRESS INTRODUCTION
Power light indicator : When the phone is connected to the external power adapter, the
power light indicator will be always bright.
MENU/OK key : In the idle state, press this key to enter menu ; In the menu operation state,
press this key to confirm.
BOOK/DEL key : In the idle state, press this key to get into the phone book directly; In the
editing state, press this key to delete one character in front of the cursor; press this key to
return to the superior menu.
ON/OFFEXIT key : Press and hold this key to turn on/off the telephone ; Press this key to
exit and return to the idle state directly
CALL LOG key : In the idle state, press this key to get into the call records menu directly.
MUSIC key : In the idle state, press this key to get into incoming ringing tones setting
interface.
REDIAL key : In the idle state, press this key to dial the last dialed phone number.
SEND key : Press this key to send the number at once after inputting the number; In the idle
state, press this key to get into dialed calls interface.
RIGHT→ key : During editing the number or name , press this key to move the cursor to
Page 7

7
right; In the calculator state, it represents÷. When adjusting the volume, press this key can
increase the volume. It also can be used for LCD contrast adjustment.
←LEFT key : During editing the number or name , press this key to move the cursor to left;
in the calculator state, it represents ×. When adjusting the volume, press this key can
decrease the volume. It also can be used for LCD contrast adjustment.
SMS key : In the idle state, press this key to get into message menu directly.
UP↑key : Press this key to select the submenu and move the cursor upward; in the
calculator state, it represents +. When adjusting the volume, press this key can increase the
volume. It also can be used for LCD contrast adjustment.
DOWN↓key : Press this key to select the submenu and move the cursor downward; in the
calculator state, it represents -. When adjusting the volume, press this key can decrease the
volume. It also can be used for LCD contrast adjustment.
key : Enter or exit the handsfree mode.
BASIC OPERATION
RECEIVING A CALL
When a call comes, the telephone rings, and LCD displays the incoming number
From handset
1. Pick up the handset and talk to the other party.
2. When finished, return the handset to the base.
Switching to speakerphone
1. When using the handset, press key and return the handset to the base.
2. When finished, press key again.
From speakerphone
1. When the telephone rings, press key and talk to the caller. For the other party to hear
your voice clearly, speak into the speaker from a distance of 32cm or less.
2. When finished, press key again.
NOTE:
Generally telecom transmits the incoming message between the first ring and the second ring.
So please answer the phone after the second ring.
MAKING A CALL
From handset
1. Pick up the handset.
2. When you hear the dial tone, dial the desired number , it will be sent out automatically after 5
Page 8

8
seconds or press SEND key ,the number will be dialed out immediately
3. When finished, return the handset to the base.
From Speakerphone
1. Press key
2. When you hear the dial tone, dial the desired number , it will be sent out automatically after
5 seconds or press SEND key ,the number will be dialed out immediately
3. When finished, press key again.
Pre-dial
1. When the handset is on the base, dial the desired number.
2. If there are mistakes, use the BOOK/DEL key to edit.
3. Press key or SEND key or pick up the handset , the number will be dialed out
immediately
Redial
1. Pick up the handset or press key,
2. Press REDIAL key, the last dialed number will be dialed again
MENU OPERATION
PHONEBOOK
QUICK SEARCH
1. In on-hook state, press MENU/OK key + 1 key to enter the Phonebook interface and the
cursor stops at Quick search.
2. Press MENU/OK key to confirm and Input the first letter of name which you want to find,
LCD will display the first suitable phone record.
3. Press MENU/OK key to confirm and enter the submenu of View, Edit, Delete, Copy, Move,
Send Message, then you can press UP↑ or DOWN↓ key to select and do operations to
the following:
1) View: View the entry.
2) Edit: Edit the current entry.
3) Delete: Delete the current entry
4) Copy: Copy this entry from SIM card (or phone) to phone (or SIM card).
5) Move: Move this entry from SIM card (or phone) to phone (or SIM card).
6) Send Message: Send messages to the current phone number.
NOTE:
Page 9

9
In idle mode, you also can press BOOK key to enter the Contact list interface directly, the
operation method refers to “QUICK SEARCH” item.
SEARCH ENTRY
1. In on-hook state, press MENU/OK key + 1 key to enter the Phonebook interface, the
cursor stops at Quick search.
2. Press UP↑ or DOWN↓ key to move the cursor to Search entry, press MENU/OK key to
confirm
3. Input the name you want to search using digit key.
4. Press MENU/OK key, LCD will display one of the entries you want to search
5. Press UP↑ or DOWN↓ key to view other entries that accordant with the name you have
input
When your desired entry displayed on LCD , press MENU/OK key to enter the submenu
of View, Edit,Delete, Copy, Move, Send Message and then you can do the following
operations the same with quick search.
ADD NEW CONTACT
1. In on-hook state, press MENU/OK key + 1 key to enter the Phonebook interface, the
cursor stops at Quick search.
2. Press UP↑ or DOWN↓ key to move the cursor to Add new contact,
3. Press MENU/OK key to confirm and enter the submenu with To SIM, To phone
4. Press UP↑ or DOWN↓ key to select save the desired entry to SIM card or to phone
5. Press MENU/OK key and then input the name and number using digit key.
If want to add new contact, you also can enter the submenu with To SIM, To phone by the
following way :
1. In on-hook state, dial the desired number directly
2. Press MENU/OK key
DELETE ALL NUMBERS IN THE PHONEBOOK
1. In on-hook state, press MENU/OK key + 1 key to enter the Phonebook interface, the
cursor stops at Quick search.
2. Press UP↑ or DOWN↓ key to move the cursor to Delete all
3. Press MENU/OK key to confirm and enter the submenu with From SIM, From phone
4. Press UP↑ or DOWN↓ key to select move all phone numbers from SIM card or from the
phone.
5. Press MENU/OK key to confirm
COPY ALL
Page 10

10
1. In on-hook state, press MENU/OK key + 1 key to enter the Phonebook interface, the
cursor stops at Quick search.
2. Press UP↑ or DOWN↓ key to move the cursor to Copy all
3. Press MENU/OK key to confirm and enter the submenu of From SIM, From phone
4. Press UP↑ or DOWN↓ key to select copy all phone numbers from SIM card or from the
phone
5. Press MENU/OK key to confirm
MEMORY STATUS
1. In on-hook state, press MENU/OK key + 1 key to enter the Phonebook interface, the
cursor stops at Quick search.
2. Press UP↑ or DOWN↓ key to move the cursor to Memory status
3. Press MENU/OK key, LCD displays the memory status of the SIM and the Phone
MESSAGES
Write message
1. In on-hook state, press MENU/OK key + 2 key to enter the Messages interface, the cursor
stops at Write message
2. Press MENU/OK key to confirm and edit the message using numerical key
3. Press MENU/OK key to enter to Options and select Done by press MENU/OK key again
4. Enter to the submenu of Send only, Save and Send, Save, Send to many, then you can
press UP↑or DOWN↓ key to select and do operations to the following:
1) Send only : just send the current message .
2) Save and Send : save and send the current message
3) Save: save the message and do not send it at once
4) Send to many: send the message to many people simultaneously.
REVIEW MESSAGE FROM INBOX
1. In on-hook state, press MENU/OK key + 2 key to enter the Messages interface, the cursor
stops at Write message
2. Press UP↑ or DOWN↓ key to move the cursor to Inbox, press MENU/OK key to confirm
and enter the submenu with a list of messages saved in the inbox
3. Press UP↑ or DOWN↓ key to select the message that you want to check the content
4. Press MENU/OK key to confirm and the content of the message is displayed on LCD.
5. After finished reading the message content, press MENU/OK key to confirm and enter the
submenu of Forward , Reply , Delete, Edit , Copy to phone ,Move to phone, Delete all ,
Page 11

11
Copy all ,Move all , Use number
6. Press UP↑ or DOWN↓ key to select and do operations to the following:
1) Forward: send this message to others.
2) Reply: reply the message to the sender and LCD will show editing window after pressing
MENU/OK key , Press MENU/OK key to send the message after editing.
3) Delete: delete this message.
4) Edit: edit the content of this message and press MENU/OK key to get into sending options.
5) Copy to phone (SIM card): copy this message to phone or SIM card.
6) Move to phone (SIM card): move this message to phone or SIM card.
7) Delete all: delete all of messages in inbox.
8) Copy all: copy all of messages in phone (SIM card) to SIM card (phone).
9) Move all: move all of messages in phone (SIM card) to SIM card (phone).
10) Use Number: see the phone number of sender and press MENU/OK key to choose “Dial” or
“Save” to SIM card or phone.
REVIEW MESSAGE FROM OUTBOX
1. In on-hook state, press MENU/OK key + 2 key to enter the Messages interface, the cursor
stops at Write message
2. Press UP↑or DOWN↓ key to move the cursor to Outbox , press MENU/OK key to confirm
and enter the submenu with a list of messages saved in the outbox
3. Press UP↑or DOWN↓ key to select the message that you want to check the content
4. Press MENU/OK key to confirm and the content of the message is displayed on LCD.
5. After finished reading the message content ,press MENU/OK key to confirm and enter the
submenu of Send ,Edit, Delete, Copy to phone ,Move to phone, Delete all , Copy
all ,Move all , Use number
6. Press UP↑ or DOWN↓ key to select and do operations to the following:
1) Send: send this message to others.
2) Edit: edit the content of this message and press MENU/OK key to get into sending options.
3) Delete: delete this message.
4) Copy to phone (SIM card): copy this message to phone or SIM card.
5) Move to phone (SIM card): move this message to phone or SIM card.
6) Delete all: delete all of these messages.
7) Copy all: copy all of messages in phone (SIM card) to SIM card (phone).
8) Move all: move all of messages in phone (SIM card) to SIM card (phone).
9) Use Number: pick up the phone number of this message and press MENU/OK key to
Page 12

12
choose “Dial” or “Save” to SIM card or phone.
DRAFTS
1. In on-hook state, press MENU/OK key + 2 key to enter the Messages interface, the cursor
stops at Write message
2. Press UP↑ or DOWN↓ key to move the cursor to Drafts, press MENU/OK key to confirm
and enter the submenu with a list of messages failed sent but saved in the draft
3. Press UP↑ or DOWN↓ key to select the message you want to check the content
4. Press MENU/OK key to confirm and the content of the message is displayed on LCD.
5. After finished reading the message content, press MENU/OK key to confirm and then you
can do the rest operations the same with outbox.
USE TEMPLATES
1. In on-hook state, press MENU/OK key + 2 key to enter the Messages interface, the cursor
stops at Write message
2. Press UP↑ or DOWN↓ key to move the cursor to Use templates, press MENU/OK key to
confirm and enter the submenu with a list of template message
3. Press UP↑ or DOWN↓ key to select your desired template
4. Press MENU/OK key to confirm and enter the submenu of Edit, Erase, Write message
5. Press UP↑ or DOWN↓ key to select and do relevant operations to the following:
1) Edit: do some change to message content on the template such as adding some contents
2) Erase: delete the original message content on the template
3) Write message: it is similar with Edit.
MESSAGE SETTINGS
1. In on-hook state, press MENU/OK key + 2 key to enter the Messages interface, the cursor
stops at Write message
2. Press UP↑ or DOWN↓ key to move the cursor to Message settings
3. Press MENU/OK key to confirm and enter the submenu of Profile settings, Common
settings, Memory status
4. Press UP↑ or DOWN↓ key to select your desired one and do relevant operations to the
following:
1) Profile settings : It includes the MSC no(it means the message center number, you can
erase the number using BOOK/DEL key and input a new number using digit key ), Validity(it
means the period of validity, you can press UP↑ or DOWN↓ key to select 1 hour,12
hours,1day,1 week or maximum), Type(it means the mode the message will be sent in,
totally Email ,Page ,Text, Fax for selection)
Page 13

13
2) Common settings: It includes the Delivery report and Reply path, you can press UP↑ or
DOWN↓ key to select one of them and then press MENU/OK key to set it On or Off, press
BOOK/DEL key to select Done, when LCD displays Save?, press MENU/OK key(or
BOOK/DEL key) to select save it(or not save it).
3) Memory status : It includes the space occupancy of messages stores in the SIM and
Phone
NOTE:
You also can press SMS key to enter the Messages interface directly.
CALL HISTORY
MISSED CALLS
1. In on-hook state, press MENU/OK key + 3 key to enter the Call history interface, the
cursor stops at Missed calls
2. Press MENU/OK key to confirm and enter the submenu with a list of the missed calls
3. Press UP↑ or DOWN↓ key to select one of the missed calls and then press MENU/OK
key to check the details of the call
4. Press MENU/OK key to enter the submenu of Delete, Save, Dial, Edit
5. Press UP↑ or DOWN↓ key to select and do some operations to the following:
1) Delete: delete the missed call that you have chosen.
2) Save: save the phone number of this missed call to SIM card or to phone.
3) Dial: dial back this missed call.
4) Edit: you can edit the phone number of the missed calls and save it to SIM card or to phone.
5) Send message: you can edit a message and send it to the people who make the missed
call.
DIALLED CALLS
1. In on-hook state, press MENU/OK key + 3 key to enter the Call history interface, the
cursor stops at Missed calls
2. Press UP↑ or DOWN↓ key to move the cursor to Dialled calls,
3. Press MENU/OK key to confirm and enter the submenu with a list of the dialed calls
4. Press UP↑ or DOWN↓ key to select one of the dialed calls and then press MENU/OK key
to check the details of the call
5. Press MENU/OK key to enter the submenu of Delete, Save, Dial, Edit
and do the rest operations the same with Missed calls
RECEIVED CALLS
Page 14

14
1. In on-hook state, press MENU/OK key + 3 key to enter the Call history interface, the
cursor stops at Missed calls
2. Press UP↑ or DOWN↓ key to move the cursor to Received calls,
3. Press MENU/OK key to confirm and enter the submenu with a list of the received calls
4. Press UP↑ or DOWN↓ key to select one of the received calls and then press MENU/OK
key to check the details of the call
5. Press MENU/OK key to enter the submenu of Delete, Save, Dial, Edit
and do the rest operations same with Missed calls
DELETE CALL LOGS
If you erase the call by this way, the number is not be deleted one by one but kind by kind. For
example, if you select Missed calls, all the number belong to missed calls will be deleted.
1. In on-hook state, press MENU/OK key + 3 key to enter the Call history interface, the
cursor stops at Missed calls
2. Press UP↑ or DOWN↓ key to move the cursor to Delete call logs
3. Press MENU/OK key to confirm and enter the submenu of Missed calls, Dialed calls,
Received calls, Delete all
4. Press UP↑ or DOWN↓ key to select the kind of calls you want to delete and press
MENU/OK key to confirm
NOTE:
You also can press CALL LOG key to enter the Call history interface directly in idle mode.
Settings
PHONE SETUP
Setting date & time
1. In on-hook state, press MENU/OK key + 4 key to enter the Settings interface, the cursor
stops at Phone setup
2. Press MENU/OK key to confirm and enter the submenu of Time and date, Language,
Input method, Contrast, Greeting text, LCD backlight
3. Press UP↑ or DOWN↓ key to select Time and date, press MENU/OK key to enter the
submenu with Set time/date, Set format
4. Press UP↑ or DOWN↓ key to select Set time and date, press MENU/OK key to confirm
and enter the submenu with time, date
5. Press UP↑ or DOWN↓ key to select one of them, then press MENU/OK key and edit it
using digit key
Page 15

15
6. Press MENU/OK key to confirm and repeat the above steps for rest option items setting.
Setting language
1. In on-hook state, press MENU/OK key + 4 key to enter the Settings interface, the cursor
stops at Phone setup
2. Press MENU/OK key to confirm and enter the submenu of Time and date, Language,
Input method, Contrast, Greeting text, LCD backlight
3. Press UP↑ or DOWN↓ key to select Language, press MENU/OK key to enter the
submenu of Polish / Croatian / French/ English/ Spanish.
4. Press UP↑ or DOWN↓ key to select your desired language
5. Press MENU/OK key to confirm
Setting the input method
1. In on-hook state, press MENU/OK key + 4 key to enter the Settings interface, the cursor
stops at Phone setup
2. Press MENU/OK key to confirm and enter the submenu of Time and Date, Language,
Input method, Contrast, Greeting text, LCD backlight
3. Press UP↑ or DOWN↓ key to select Input method , press MENU/OK key to enter the
submenu with Multitap ABC, Multitap abc, Numeric, Multitap ES, Multitap es, Multitap
PO, Multitap po, Multitap CR, Multitap cr, Multitap FR, Multitap fr, Smart ABC, Smart
abc.
4. Press UP↑ or DOWN↓ key to select your desired input method
5. Press MENU/OK key to confirm
NOTE:
During inputting, you also can change the input method by pressing # key directly
Setting LCD contrast
1. In on-hook state, press MENU/OK key + 4 key to enter the Settings interface, the cursor
stops at Phone setup
2. Press MENU/OK key to confirm and enter the submenu of Time and date, Language,
Input method, Contrast, Greeting text, LCD backlight
3. Press UP↑ or DOWN↓ key to select Contrast, press MENU/OK key to confirm and LCD
displays the current LCD contrast level
4. Press UP↑ or DOWN↓ (or ←LEFT or RIGHT→) key to select a comfortable LCD contrast,
total 15 levels for selection
5. Press MENU/OK key to confirm
Setting Greeting text
Page 16

16
1. In on-hook state, press MENU/OK key + 4 key to enter the Settings interface, the cursor
stops at Phone setup
2. Press MENU/OK key to confirm and enter the submenu of Time and date, Language,
Input method, Contrast, Greeting text, LCD backlight
3. Press UP or DOWN key to select Greeting text, press MENU/OK key to enter the submenu
with On (or Off) and Welcome
4. Use UP↑ or DOWN↓ key to select the status to On (or Off) and edit the greeting text by
pressing digit key
5. Press MENU/OK key to confirm
Setting duration of LCD backlight
1. In on-hook state, press MENU/OK key + 4 key to enter the Settings interface, the cursor
stops at Phone setup
2. Press MENU/OK key to confirm and enter the submenu of Time and date, Language,
Input method, Contrast, Greeting text, LCD backlight
3. Press UP↑ or DOWN↓ key to select LCD backlight, press MENU/OK key to enter the
submenu with 5 sec, 15 sec, 30 sec, 45 sec
4. Press UP↑ or DOWN↓ key to select your desired duration of LCD backlight
5. Press MENU/OK key to confirm
After the LCD backlight duration has been set , the backlight will turn off after being
turned on (by pressing any key or picking up the handset )up to the setting duration.
CALL SETUP
Call waiting
1. In on-hook state, press MENU/OK key + 4 key to enter the Settings interface, the cursor
stops at Phone setup
2. Press UP↑ or DOWN↓ key to move the cursor to Call setup, press MENU/OK key to
confirm and enter the submenu of Call waiting, Call divert, Speed dial, Auto call
3. Press UP↑ or DOWN↓ key to select Call waiting , press MENU/OK key to confirm and
enter the submenu with Activate, Deactivate or Query status
4. Press UP↑ or DOWN↓ key select activate or deactivate the call waiting function.
5. Press MENU/OK key to confirm
If you select Activate and the unit prompt success in call waiting activated, when you are
talking with someone and there comes another call, the net will tell the caller: please wait.
When the conversation is ended, it will get through the waiting call.
NOTE:
Page 17

17
This function should be supported by net operator
Call transfer
1. In on-hook state, press MENU/OK key + 4 key to enter the Settings interface, the cursor
stops at Phone setup
2. Press UP↑ or DOWN↓ key to move the cursor to Call setup, press MENU/OK key to
confirm and enter the submenu of Call waiting ,Call divert, Speed dial, Auto call
3. Press UP↑ or DOWN↓ key to select Call divert
4. Press MENU/OK key to confirm and enter the submenu of All voice calls, If unreachable ,
If no answer, If busy, All data calls, Cancel all diverts, press UP or DOWN key to select
and do operations to the following :
1) All Voice Calls: All incoming calls will be diverted to another appointed phone. Press
MENU/OK key to get into it and continue to select it Activate or Deactivate( Do not divert
the calls) or Query status, if select Activate, use the digit keys to set the number you want
to divert to.
2) If unreachable: When there is no network or this phone is power off, all incoming calls will
be diverted to another appointed phone .The operations are the same as “All Voice Calls”.
3) If No Answer: When there is no answer, the incoming calls will be diverted to another
appointed phone. The operations are the same as “All Voice Calls”.
4) If busy: If this phone is on busy line, the incoming calls will be diverted to another
appointed phone. The operations are the same as “All Voice Calls”.
After activate this function, you can divert the incoming calls to another appointed phone
when you can not receive or do not want to receive them
Note: This function should be supported by net operator and not supported by some SIM card.
Speed dial
1. In on-hook state, press MENU/OK key + 4 key to enter the Settings interface, the cursor
stops at Phone setup
2. Press UP↑ or DOWN↓ key to move the cursor to Call setup, press MENU/OK key to
confirm and enter the submenu of Call waiting ,Call divert, Speed dial, Auto call
3. Press UP↑ or DOWN↓ key to select Speed dial
4. Press MENU/OK key to confirm and enter the submenu with Enable speed dial, Set
number, press UP↑ or DOWN↓ key to select and do operations to the following:
1) Enable speed dial : select it to set the speed dial function to On or Off
2) Set number : Set the speed dialed number(Input the name and number using digit keys)on
location 2-9 . 8 groups of speed dialed number can be set in all.
Page 18

18
Note: the first digit of the number must be set from 2 to 9
After set the speed dial function to ON, in off-hook state, press and hold one of the digit
keys(2-9), the number set in it will be dialed out directly.
Auto call
1. In on-hook state, press MENU/OK key + 4 key to enter the Settings interface, the cursor
stops at Phone setup
2. Press UP↑ or DOWN↓ key to move the cursor to Call setup, press MENU/OK key to
confirm and enter the submenu of Call waiting ,Call divert, Speed dial, Auto call
3. Press UP↑ or DOWN↓ key to select Auto call
4. press MENU/OK key to confirm and enter the submenu of 3 Sec, 4 Sec, 5 Sec, Off
5. Press UP↑ or DOWN↓ key to select your desired delay time or Off
6. Press MENU/OK key to confirm
After finishing this setting, the pre-dialed number will be dialed out with delay up to the selected
delay time
SECURITY SETUP
1. In on-hook state, press MENU/OK key + 4 key to enter the Settings interface, the cursor
stops at Phone setup
2. Press UP↑ or DOWN↓ key to move the cursor to Security setup, press MENU/OK key to
confirm and enter the submenu with SIM lock, Change password
3. Press UP↑ or DOWN↓ key to select SIM lock and then select it On or Off
4. Press UP↑or DOWN↓ key to select Change password, press MENU/OK key to enter,
and choose PIN or PIN2, press MENU/OK key to enter, then input the old security
password using digit key
5. Press MENU/OK key to confirm, input the new security password using digit key, then press
MENU/OK key to confirm.
RESTORE FACTORY SETTING
1. In on-hook state, press MENU/OK key + 4 key to enter the Settings interface, the cursor
stops at Phone setup
2. Press UP↑or DOWN↓ key to move the cursor to Restore factory setting, press
MENU/OK key to confirm and Input the correct password“1122”using digit key
3. Press MENU/OK key to confirm
After the password has been correctly input, all the setting will restore to the original
factory setting.
RINGING TONE SETTING
Page 19

19
SELECT THE RINGING
1. In on-hook state, press MENU/OK key + 5 key to enter the User profiles interface, the
cursor stops at Tone setup
2. Press MENU/OK key to confirm and enter the submenu of Incoming call, Alarm, Power
on( boot-strap), Power off, Message tone ,Keypad tone
3. Press UP↑ or DOWN↓ key to select one of the above options
4. Press MENU/OK key to confirm and enter the submenu with a list of tones such as MIDI 1
5. Press UP↑ or DOWN↓ key to select your desired tone and press MENU/OK key to
confirm
ADJUST THE RINGING VOLUME
1. In on-hook state, press MENU/OK key + 5 key to enter the User profiles interface, the
cursor stops at Tone setup
2. Press UP↑ or DOWN↓ key to move the cursor to Volume
3. Press MENU/OK key to confirm and enter the submenu of Ring tone, key tone
4. Press UP↑ or DOWN↓ key to select your one of them, press MENU/OK key to confirm
and LCD displays the relevant volume level
5. Press UP↑ or DOWN↓ (or ←LEFT or RIGHT→) key to adjust the volume (totally 7 levels
for selection)
6. Press MENU/OK key to confirm
Alert type
1. In on-hook state, press MENU/OK key + 5 key to enter the User profiles interface, the
cursor stops at Tone setup
2. Press UP↑ or DOWN↓ key to move the cursor to Alert type
3. Press MENU/OK key to confirm and enter the submenu of Ring, Light only
4. Press UP↑ or DOWN↓ key to select and press MENU/OK key to confirm.
Ring type
1. In on-hook state, press MENU/OK key + 5 key to enter the User profiles interface, the
cursor stops at Tone setup
2. Press UP↑ or DOWN↓ key to move the cursor to Ring type
3. Press MENU/OK key to confirm and enter the submenu of Single, Repeat and Ascending
4. Press UP↑ or DOWN↓ key to select and press MENU/OK key to confirm.
Extra tone
1. In on-hook state, press MENU/OK key + 5 key to enter the User profiles interface, the
cursor stops at Tone setup
Page 20

20
2. Press UP↑ or DOWN↓ key to move the cursor to Extra tone
3. Press MENU/OK key to confirm and enter the submenu of Warning, Error, Campon and
connect.
4. Press UP↑ or DOWN↓ key to select and press MENU/OK key to confirm.
Organizer
TO DO LIST ADDING (The list of things to do)
1. In on-hook state, press MENU/OK key + 6 key to enter the Organizer interface, the cursor
stops at To do list
2. Press MENU/OK key to confirm and enter the submenu with time of task list
3. Press UP↑ or DOWN↓ key to select one
4. Press MENU/OK key to confirm and enter the submenu of Add, Edit, Delete, Delete all
5. Press UP↑ or DOWN↓ key to select and do some operations to the following:
1) Add: use numerical keys to edit the year, month, date, time, content of task and its stay
duration and press MENU/OK key to save it.
2) Edit: it is similar with Add
3) Delete: select one record in the to do list and then delete it
4) Delete all: delete all the records in the To do list.
ALARM CLOCK SETTING
1. In on-hook state, press MENU/OK key + 6 key to enter the Organizer interface, the cursor
stops at To do list
2. Press UP↑ or DOWN↓ key to move the cursor to Alarm
3. Press MENU/OK key to confirm and LCD displays 3 groups of alarm time
4. Press UP↑ or DOWN↓ key to select one group, press MENU/OK key to enter the
submenu with alarm status (default as Off) and the alarm time
5. Press SET key to enter the submenu operation, use UP↑ or DOWN↓ key to select the
alarm status from Off, Once, Everyday and use digit keys to edit the alarm time.
6. Press MENU/OK key to save.
7. Repeat the above steps for the additional alarm clock setting.
CALCULATOR FUNCTION
In on-hook state, press MENU/OK key + 6 key to enter the Organizer interface and then press
UP↑ or DOWN↓ key to select Calculator and then press MENU/OK key to enter the
calculator mode ,the unit is available for operation of “+.-.×.÷”. In the calculator state, MENU/OK
key is used as “=” and the * key is used as “.”, ←LEFT and RIGHT→ key are used as × and ÷
respectively. UP↑ or DOWN↓ key is used as sign of positive/negative.
Page 21

21
Eg. (10+26) ÷2
1. In on-hook state, press MENU/OK key + 6 key to enter the Organizer interface
2. Press UP↑ or DOWN↓ key to select Calculator
3. Press MENU/OK key to enter the calculator mode and LCD displays 0
4. Press (1, 0, UP↑, 2, 6), RIGHT→, 2, MENU/OK keys
5. After calculated, press BOOK/DEL key to start directly the next calculator, or press
ON/OFF/EXIT key to return to the standby state directly.
Eg. 1.5× 0.6-1
1. In on-hook state, press MENU/OK key + 6 key to enter the Organizer interface
2. Press UP↑ or DOWN↓ key to select Calculator
3. Press MENU/OK key to enter the calculator mode and LCD displays 0
4. Press1, *, 5, ←LEFT, 0, *, 6, DOWN↓, 1, MENU/OK keys
5. After calculated, press BOOK/DEL key to start the next calculator, or press ON/OFF/EXIT
key to return to the standby state directly.
UNIT CONVERTER
In on-hook state, press MENU/OK key + 6 key to enter the Organizer interface and then press
DOWN↓ key to select Unit converter, press MENU/OK key to confirm and then press
DOWN↓ key to select Weight (including the converter Kg→Pound, Kg→Ounce, Pound→Kg,
Ounce→Kg ) or Length (including the converter Km→Mile , Mile→Km , M→Yard, Yard→M,
M→Foot, Foot→M, Cm→Inch, Inch→Cm) .Press MENU/OK key to confirm and then you can
start to do the unit converter
Eg. 3.2 kg → ?Ounce
1. In on-hook state, press MENU/OK key + 6 key to enter the Organizer interface
2. Press UP↑ or DOWN↓ key to select Unit converter
3. Press MENU/OK key to confirm
4. Press UP↑ or DOWN↓ key to select Weight
5. Press MENU/OK key and press UP↑ or DOWN↓key to select Kg↔Pound
6. Press MENU/OK key to enter, use UP↑ or DOWN↓ key to select Kg↔Ounce
7. Press MENU/OK key to confirm, press UP↑ or DOWN↓ key to select <Kg>
8. Press MENU/OK key to confirm
9. Press 3, #, 2 and then press MENU/OK key ,LCD will displays 112.8768 on the location of
Ounce (It indicates 3.2Kg = 112.8768 Ounce)
10. Press BOOK/DEL key to return to the superior menu, or press ON/OFF/EXIT key to return
to the standby state directly.
Page 22

22
Eg. 12.6 Mile → ? Km
1. In on-hook state, press MENU/OK key + 6 key to enter the Organizer interface
2. Press UP↑ or DOWN↓ key to select Unit converter
3. Press MENU/OK key to confirm
4. Press UP↑ or DOWN↓ key to select Length
5. Press MENU/OK key and press UP↑ or DOWN↓ key to select <Mile>
6. Press MENU/OK key to confirm
7. Press 1, 2, #, 6 and then press MENU/OK key ,LCD will displays 20.277772 on the
location of Km(It indicates 12.6 Mile → 20.277772 Km)
8. Press BOOK/DEL key to return to the superior menu, or press ON/OFF/EXIT key to return
to the standby state directly.
BMI INDEX
1. In on-hook state, press MENU/OK key + 6 key to enter the Organizer interface
2. Press UP↑ or DOWN↓ key to move the cursor to BMI
3. Press MENU/OK key to confirm and LCD displays Male, Female
4. Press UP↑ or DOWN↓ key to select the gender Male or Female
5. Press MENU/OK key to confirm and LCD displays Height (the unit is Cm)
6. Press MENU/OK key and then Input the height using digit key
7. Press MENU/OK key to confirm and then press UP↑ or DOWN↓ key to select Weight (the
unit is Kg)
8. Press MENU/OK key and then Input the weight using digit key
9. Press MENU/OK key to confirm and then press UP↑ or DOWN↓ key to select Compute
10. Press MENU/OK key and the healthy index will displayed on LCD
11. Press BOOK/DEL key to return to the superior menu or press ON/OFF/EXIT key to return
to the standby state directly.
ADVANCED FUNCTION
1. During two-way conversation, there are hold mode, mute mode DTMF function can be select.
2. You can have messaging, call history and phonebook operation during conversation.
3. Press MENU key to enter submenu and select which you want. The detail of the operation as
follow:
Volume
During conversation, if you use the handset press ←LEFT and RIGHT→ to adjust the handset
volume. If you use the hands-free press ←LEFT and RIGHT→ to adjust the hands-free volume,
there are 7 levels totally.
Page 23

23
Enter hold mode
During conversation, press MENU key, LCD display Hold, Press MENU key, LCD display H on
the LCD, the phone enter hold mode, the another part just can receive busy tone, and you can
not receive any tone.
Exit hold mode
During conversation, press MENU key, LCD display Retrieve, press MENU key to confirm, LCD
display Retrieved, the phone enter normal state.
End
During conversation, press MENU key, LCD display Hold, press DOWN↓ key once to move the
cursor to End, press MENU key to confirm and end this call.
New call
It is able to make another call, during conversation.
Press MENU or OK key, LCD display Hold, press DOWN↓ key to move the cursor to New call,
Press MENU key to enter, then you can dial another call, when the second call enter
conversation state, press MENU key to enter submenus:
Swap
Press MENU or OK key, LCD display Swap, press MENU or OK key to swap between two calls,
then another caller will enter hold mode and can receive busy tone only, and you can talk with
one line only. The current conversation number will be display on the LCD, another caller
number will be hided and there is H on the LCD.
Conference
Press MENU key, LCD display Swap, press UP↑ or DOWN↓ to select Conference, press
MENU or OK key to enter three-way talk mode.
(Note: This function needs network service support.)
Transfer
Press MENU key, LCD display Swap, press DOWN↓ key until to move the cursor to Transfer,
press MENU key to transfer current call function, but this function should be apply for your local
telecom company.
End single call
Press MENU or OK key, LCD display Hold, press DOWN↓ key until to move the cursor to End
single call, press MENU key to end current conversation, another line still in the hold mode,
then press MENU or OK key, LCD display Retrieve single call, press MENU key to confirm,
LCD display Retrieved, the phone enter normal conversation state.
End all
Press MENU or OK key, LCD display Swap, press DOWN↓ key until to move the cursor to End
all, press MENU key to end two calls together.
Page 24

24
Phonebook
Press MENU or OK key, LCD display Swap, press DOWN↓ key until to move the cursor to
Phonebook, press MENU key to enter phonebook menu operation.
Messages
Press MENU or OK key, LCD display Swap, press DOWN↓ key until to move the cursor to
Messages, press MENU or OK key to enter messaging menu operation.
Mute
When making a phone call, if you need a temporal talk with someone else and you don’t want the
phone receiver hear your sound, and you want hear receive caller speaking, you can enter mute
mode.
Press MENU or OK key, LCD display Swap, press DOWN↓ key until to move the cursor to
Mute.
Press MENU or OK key to enter with submenu On or Off, press ↑ or ↓ to select, press MENU or
OK key to confirm. Select On to enter mute mode during conversation. Select Off to exit mute
mode during conversation.
DTMF
During conversation, press MENU key, LCD display Hold, press DOWN↓ key to move the
cursor to DTMF, press MENU key to enter with submenu On or Off, press UP↑ or DOWN↓ to
select, press MENU key to confirm. Select On, the other part can hear your dial number tone
during conversation. Select Off, the other part can not hear your dial number tone during
conversation.
Phonebook
During conversation, press MENU key, LCD display Hold, press DOWN↓ key to move the
cursor to Phonebook, press MENU key to enter phonebook menu options.
Messages
During conversation, press MENU key, LCD display Hold, press DOWN↓ key to move the
cursor to Messages, press MENU key to enter Messages menu options.
Mute
During conversation, press MENU key, LCD display Hold, press DOWN↓ key to move the
cursor to Mute, press MENU key to enter with submenu On or Off, press UP↑ or DOWN↓ to
select, press MENU key to confirm. Select On to enter mute mode, you can get the other part
voice, but he or she can not get your voice, select Off to return to normal conversation status.
DTMF
During conversation, press MENU key, LCD display Hold, press DOWN↓ key to move the
cursor to DTMF, press MENU key to enter with submenu On or Off, press UP↑ or DOWN↓ to
select, press MENU key to confirm. Select On, the other part can hear your dial number tone
Page 25

25
during conversation. Select Off, the other part can not hear your dial number tone during
conversation.
NOTE: Due to continuous product development, all features and specifications are subject to
change without prior notice.
EN
EU Declaration of Conformity 23/2017/RED
Name and address of the manufacturer:
Maxcom S.A., ul. Towarowa23a, 43-100 Tychy, Poland
This declaration of conformity is issued under the sole responsibility of the manufacturer.
Object of the declaration:
GSM Fixed Wireless Telephone
Model Name: MM28 D HS
The object of the declaration described above is in conformity with the relevant Union harmonisation
legislation:
Directive 2014/53/UE
Directive 2011/65/UE (RoHS)
References to the relevant harmonised standards used or references to the other technical
specifications in relation to which conformity is declared.
EN 301 511 V12.1.1 (2015-06)
EN 301 908-1 V11.1.1 (2016-07),
EN 301 908-2 V11.1.1
(
2016-07)
Test Report RSZ170919003-11A1, 2017-09-26
Test Report RSZ170919003-22A1, 2017-09-26
EN 301 489-1 V2.2.0 (2017-03),
EN 301 489-52 V1.1.0
(
2016-11)
Test Report RSZ170919003-02A1, 2017-09-26,
EN 60950-1: 2006 + A11: 2009 + A1: 2010 +
A
12: 2011 + A2: 2013
Test Report RSZ170919003-03A1, 2017-09-22
EN 62311: 2008
Test Report RSZ170919003A1, 2017-09-26
The notified body
Bay Area Compliance Laboratories Corp. (BAC), number: 1313
performed intervention in accordance with Annex III (Module B) Directive 2014/53/EU and issued the
EU-type examination certificate:
Certificate No.
B1709271
Signed for and on behalf of:
Maxcom S.A.
place and date of issue: name, function:
Tychy, 28-09-2017 Adam Grzyś, Development Director
Page 26

MAXCOM S.A.
43-100 Tychy,
ul Towarowa 23a
POLAND
tel. +48 32 327 70 89
fax 48 32 327 78 60
www.maxcom.pl
office@maxcom.pl
Complains or device defects can be reported via website:
http://www.comtek.co.uk/maxcom-rma-service/
Mobile service address:
Comtek Network Systems
Unit 108, Tenth Avenue (Zone 3)
Deeside Industrial Estate
Deeside, Flintshire CH5 2UA
 Loading...