

Page 1
Short User Manual
GSM Mobile Telephone
Note: The telephone works in the GSM 850/900/1800/1900MHz network.
Prior to switching on the phone, a SIM Card should be properly installed.
1 INTRODUCTION
This Manual has been published by the Manufacturer. The Manufacturer
reserves the right to make any updates and modifications arisi ng from
errors and inaccuracies in current information or from any upgrades in the
telephone and software without prior notification; such updates, however,
will be reflected in newer versions of the Manual. For more information or
for any form of assistance go to the website at www.maxcom.pl. The entire
content of this Manual is copyright by the Manufacturer.
The full copy of the User Manual is available online at
http://www.maxcom.pl/
Copyright and trademarks as mentioned in this Manual remain the
property of their owner. Reproduction, transmission, storing, or
dissemination of any material, in whole or in part, covered by copyright,
without prior written consent, are strictly prohibited.
2 TECHNICAL SPECIFICATIONS
Color LCD: 1,77" 176 x 220 pix
Camera 0,08 Mpix
Two SIM Cards
Contacts: up to 300 entries
Text Message Memory: up to 100 messages
Loud ringtone
Bluetooth
Torch
Radio FM
Audio & video file player
MicroSD cards up to 16 GB
Battery: 600 mAh
Idle time up to 100 hrs.*
Conversation time up to 4,5 hrs.*
Weight: 60 g
Dimensions: 111 × 47 × 15 mm
*depending on conditions and the GSM signal strength
3 WHAT THE SET INCLUDES
The Set includes:
Telephone GSM
Charger
Battery
Short User Manual
Headset
Note: Keeping the package is highly recommended as it might be used for
transport.
Keep the receipt as it is necessary for warranty.
4 ACCESSORIES
Use only batteries, chargers, and accessories recommended by the
phone’s Manufacturer. Check with your seller what accessories are
available in your area.
5 IMPORTANT SAFETY PRECAUTIONS
Note: Reading these guidelines presented below will minimize the risk of
misusing the phone.
USING: T he telephone emits electromagnetic field that might
negatively interfere with other electronic devices including medical
equipment.
Never use the phone in any area where the use of mobile phones is
prohibited such as hospitals, airplanes, refueling points or in proximity
to flammable materials. Using mobile phones in such places might
expose others to danger.
Never use the phone without hands-free accessories while driving.
The device and its accessories might contain small parts. Keep the
phone and all parts out of reach of children.
SERVICING - Never repair or modify the phone by your own. Only
qualified service is authorized to repair the phone.
CLEANING – Never use any chemicals or corrosives to clean the
phone.
TORCH – Never look directly into the stream of light.
HEARING DEVICE – If the user has a hearing dev ice, phone volume
and hearing aid sensitivity should be carefully adjusted.
ELECTRONIC MEDICAL DEVICES – the phone is a radio transmitter
that might interfere with electronic medical devices or implants such as
hearing aid, heart pacemakers or insulin pumps, etc. A minimum
distance of 15 cm is recommended to be kept between a telephone
and an implanted medical device. For more information, consult your
physician or manufacturers of such medical devices.
ELECTRONIC EQUIPMENT – To minimize the risk of degaussing,
never let electrical devices stay close to the phone for longer time.
WATERPROOF – The phone is not waterproof. Keep it dry at all times.
DUSTPROOF – The phone is not dustproof, never use the phone i n
areas with high concentration of dust.
LCD DISPLAY: Never press the LCD display too hard and do not use
sharp tools as it might damage the phone.
Never press battery contacts with metal objects as it may explode.
Never expose the phone to low or hi gh temperatures, direct sunlight or
high humidity. Never place the phone next to heating devices such as
radiators, heaters, ovens, furnaces, camp fires, barbeque, etc.
Protect your hearing!
Prolonged exposure to loud sounds might damage
your hearing. Listen to music at a moderate level, and
do not hold the phone too close to an ear while using
a speakerphone. Set t he volume to a safe level prior
to connecting a headset.
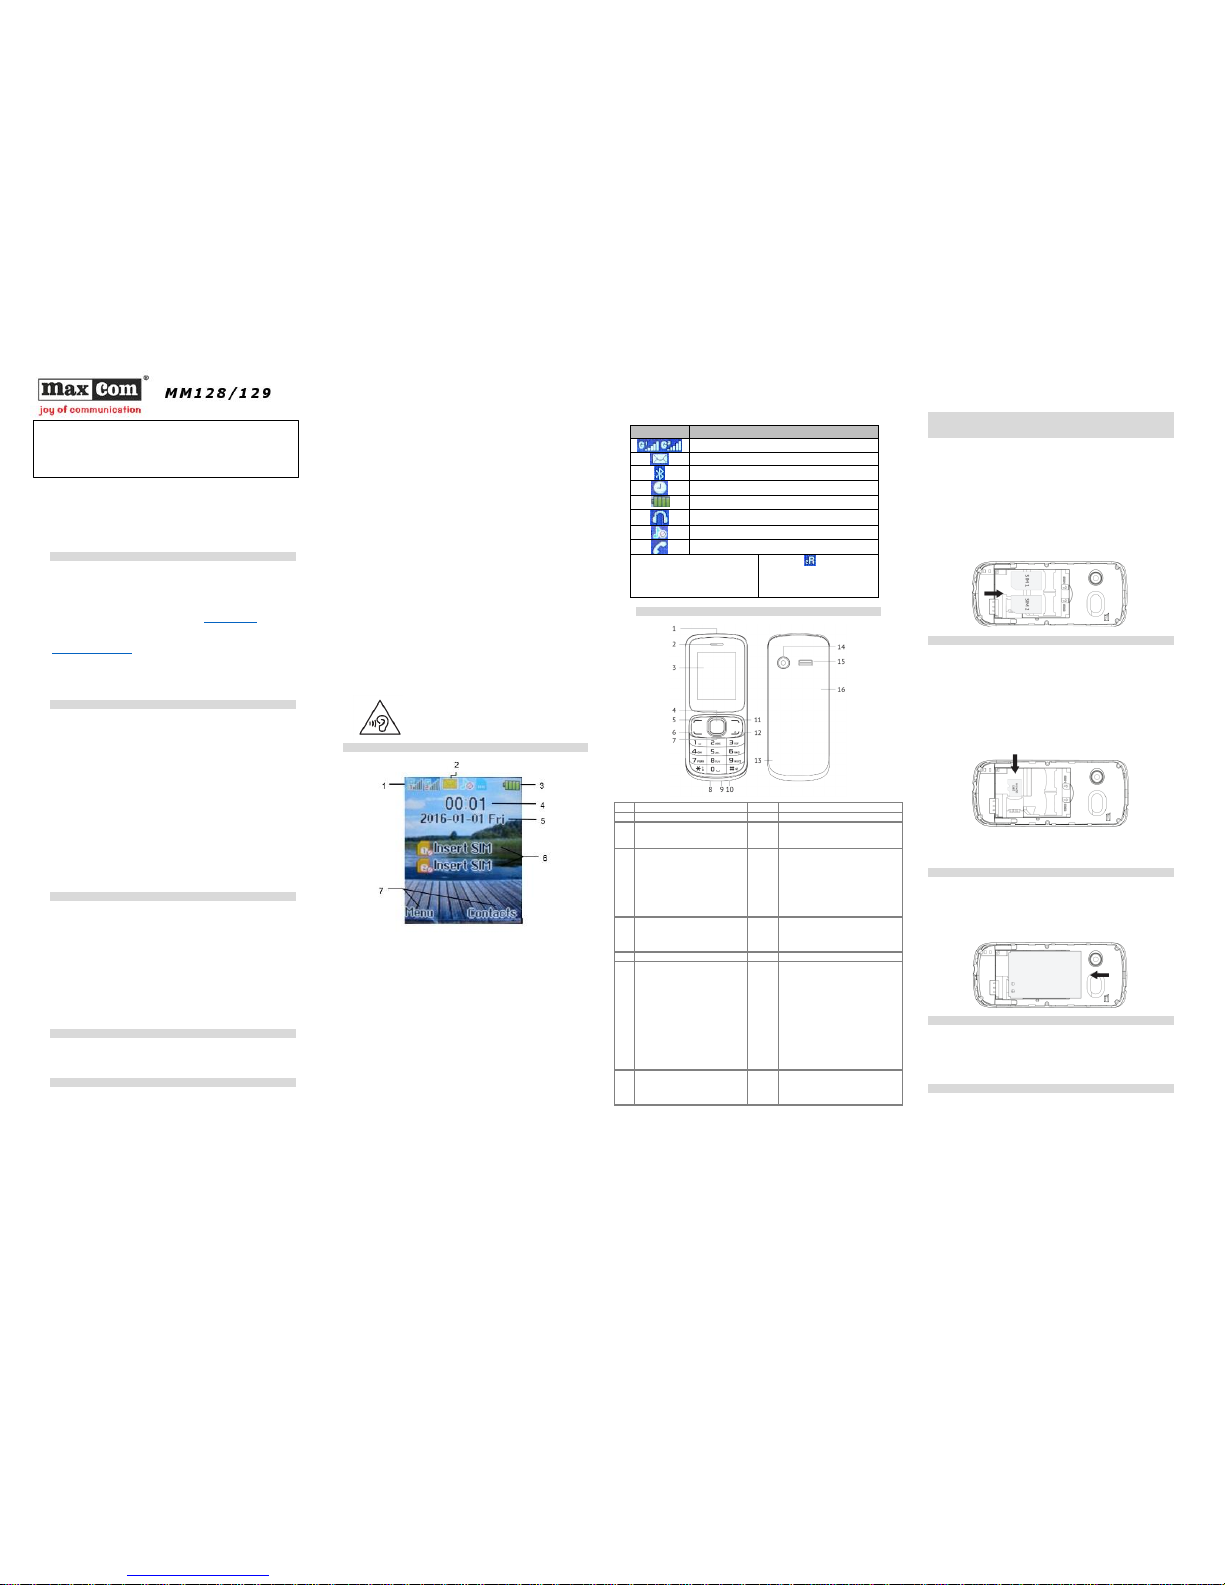
6 LCD DESCRIPTION
1. Signal strength for SIM1 & SIM2 Cards
2. Icons showing functions (please see the chart below)
3. Battery level
4. Time
5. Date
6. Service provider’s name
7. Description of function keys.
Icon
Meaning
Signal strength for SIM1 & SIM2
New/Unread Text Message
Bluetooth Enabled
Alarm Clock On
Battery Level
Headset On
Profile Currently Used
Missed Phone Call
Icons might vary depending on the
version of software.
* The icon also appears in
case of domestic roaming when
the subscriber uses the other
service provider’s network
7 PHONE DESCRIPTION
1
Torch 9 Headset slot
2
Speaker
10
Microphone
3
LCD Display.
11
Right Function Key (RFK) lets
you use functions as displayed at
the bottom right corner
4
OK Key (middle function key):
in Idle mode, press this key to
directly enter the main Menu.
Functions of this key and of
the Left Function Key are
almost identical.
12
End Call Key. It serves to switch
on/off the phone, End
Call/Ignore, it lets you end phone
call or reject an incoming phone
call. It switches the phone ON or
OFF the phone. The key restores
Idle mode when the phone is in
other options.
5
Left Function Key (LFK) – lets
you use the function
displayed at the bottom left
corner of the LCD
13
An opening to help you to
remove the back cover
6
Make Call/Answer Call key.
14
Camera Lens
7
Navigation key lets you move
the cursor left, right, up and
down or navigate in menu. In
Idle mode, press Up/Down,
Left/Right to directly display a
certain menu (depending on
definition [Settings >Phone
Settings >Shortcut Settings]).
15
Ringtone Volume
8
USB port lets you charge the
phone and connect the phone
to a computer in order to
transfer data
16
Back Cover
Note: In order to save energy, after certain time, the LCD automatically
goes to sleep mode. Press any key to enable the LCD backlight. If the
LCD backlight turns off while the keypad is l ocked, press the Left Function
Key, and then „*” to unlock.
8 GETTING STARTED
8.1 SIM CARD INSTALLATION
The telephone can hold two SIM cards. Insert at least one SIM Card into
the phone prior to using it. You will receive the SIM Card from your service
provider. Keep the SIM Card away from children.
Any scratching or bending might easily damage a SIM Card. Therefore,
pay close attention not to damage the SIM Card while inserting, removing,
and storing it.
Note: Never insert or remove SIM Cards while the phone is connected to
the charger. Prior to removing the battery, make sure the phone is
switched off.
Enter the SIM Card into the SIM card slot so that its gold contacts will face
down into the phone as shown in the illustration below.
8.2 MEMORY CARD INSTALLATION
A Micro SD memory card with 16GB might be installed in the phone.
Never bend or scratch the memory card, do not expose the card to static
electricity, do not immerse the card into water.
1. First, switch off the phone and remove the battery.
2. Insert the memory card so that gold contacts will face down, see the
illustration below.
While using the memory card, be very careful specially while inserting and
removing the card. Some memory cards require to be formatted on the
computer prior to using it for the first time.
Note: If you use SD cards, on the regular basis make backup copies of
any data stored on cards in other devices. Misuse of the card or other
factors might cause damage or loss of entire data stored on the card.
8.3 BATTERY INSTALLATION
1. Place your fingernail in the little opening on the side of the phone, and
open the back cover.
2. Insert the battery so that its metal contacts will face down into t he
phone, see the illustration below.
3. Place the battery cover in position (back of the phone).
8.4 REMOVING BATTERY
Switch off the phone, lever up the back cover from the lower end, and then
lift the back cover and remove the battery.
Removing the battery might cause l oss of any settings and data saved on
the card and in the phone. Remove the battery only when the phone is
switched off. Otherwise, some problems might occur.
8.5 CHARGING THE BATTERY
1. Plug the charger into a power outlet.
2. Plug the charger cable into a slot at the bottom of the phone. A battery
icon will start blinking on the LCD after the charger is properly connected.
After charging is completed, and the battery icon stops blinking, plug the
charger out.
If there are any problems with the phone, contact the Maxcom
technical assistance, or return the item to the seller.
For assistance, please call the hotline:
+ 49 32 325 07 00
Page 2
When the battery is almost discharged, there will be a message „Lo w
Battery” on the LCD, and the phone will emit a warning beep (if the feature
is enabled: Menu ->Settings ->Profiles ->Options ->Settings ->Other
Sound Alerts ->Low Battery); as soon as the battery is fully discharged, the
phone will automatically switch off. Do not leave the battery discharged for
a long time, otherwise it might negatively impact the battery quality and the
battery life. To ensure the phone works properly, use only the charger
recommended by its Manufacturer. While charging, keep the back cover in
place. While charging, the phone should be placed in a well ventilated spot
with air temperature between 0°C ~ 45°C. I f the battery is totally
discharged, it might take several minutes for the battery icon to appear on
the LCD and the phone to be ready to work again. If the phone has not
been used for a long time, the battery mi ght be “deeply-discharged”; to
recover a deeply-discharged battery, leave the charger plugged i n,
although there will be no image on the LCD. It might take up to an hour.
8.6 SECURITY CODES
8.6.1 PIN CODE
PIN Code is the SIM Card Personal Identification Number and it is
provided by the service provider.
PIN2 code is provided by the service provider along with SIM cards. Some
SIM cards do not have such a code.
If you enter incorrect PIN three times in a row, the SIM Card will be
blocked. The card mi ght be unblocked by using Personal Unblocking Key
[PUK]. Entering incorrect PUK ten times in a row will permanently block
the SIM card.
To learn more, contact your service provider.
8.6.2 PHONE SECURITY CODE
Phone Security Code does not allow other people to use your phone
without authorization (default code is 0000).
To protect your personal data, the default phone security code should be
changed.
8.6.3 PROTECTING YOUR PRIVACY
Using the phone security code, you might block selected settings in your
phone so that other people will not use these settings.
9 USING THE PHONE
9.1 SWITCHING ON/OFF THE PHONE
Press and hold the End Call key to switch on & off the phone.
1. If there is a single SIM Card in the phone, an input text window will be
displayed on the LCD for you to enter the phone security code and PIN (if
security features are enabled). After the PIN and the phone security code
are entered, the phone will go to Idle mode for a current SIM Card.
2. If there are two SIM cards in the phone (depending on security settings)
an input text window might be displayed for you to enter the PIN SIM1 and
the PIN SIM2. You will be prompted to enter one PIN after the other.
If you make a mistake while entering the PIN and the phone security code,
you might clear your input by pressing the RFK (right function key).
After the phone i s powered on, available network(s) is/are automatically
searched for.
As soon as an authorized network is detected, the network name and
signal strength are displayed on the LCD. If there is no network available,
only emergency phone calls and phone’s non-calling features are allowed.
9.2 MAKING PHONE CALLS
In Idle mode, enter the phone number you wish to dial.
Press the RFK [Delete] to delete any mistakes.
After the number is correctl y entered, press the Make Call key, and use
keys Up/Down to select which SIM Card you want to use to make a phone
call, and press the Make Call key again.
1. Dialing extension numbers
Some numbers cannot be dialed directly, a call center number or a
telephone exchange must be dial ed first before extension number is
dialed.
2. Making international phone calls.
To make an international phone call, dialing „00” or „+” is required before
dialing the actual number. To enter „+” press the key [*]
3.Dialing a number from Contacts.
Press Menu to enter Contacts, use navigation keys Up/Down to find a
Contact, or type the Contact name’s first letter to access the list of
Contacts with names starting with this letter, and select Contact you are
looking for. Press the Make Call key, select t he SIM Card you want to use
for making this phone call, and press the Make Call key again.
4. Dialing a number from Call Log.
Enter Call Log (press the Make Call key in Idle m ode or press Menu to
enter), and use navigation keys Up/Down t o select a Contact you are
looking for. Press Right/Left to scroll down/up between answered, rejected
and missed phone calls.
9.3 ANSWERING PHONE CALLS
If there is an incoming phone call, the phone will notify you by a sound
alert; if your network accepts the Caller ID of the person who is calling you,
her/his name and number will be displayed on the LCD (if there is any
information about this Caller in Contacts).
1. Press the Make Call key or press the LFK twice to answer a n incoming
phone call.
2. If in [Settings->Call Settings->Other->Auto Call Recorder] the recording
feature is enabled, the incoming phone call will be recorded.
3. If you do not wish to answer an incoming phone call, press the End Call
key. To silence an incoming phone call, press the middle function key.
4. While talking, select Menu to adjust volume, go to
Contacts/Messages/Call Log, to suspend phone call, silence phone call,
add new phone call or start recording. Press the middle function key to
enable/disable speakerphone mode. Use navigation keys Up/Down to
adjust volume.
9.4 KEYPAD LOCK
To lock the keypad, press the Left Function Key and then press . If auto
keypad lock i s enabled, after el apsed time the keypad gets automatically
locked. To unlock the keypad, press the LFK and then .
9.5 EMERGENCY NUMBER
You might directly dial the emergency number 112 with no SIM card. The
European Emergency Number is 112.
10 TEXT MESSAGES
The phone lets you send and receive text messages. If the icon
appears on the LCD, it means you have at least one unread message.
To enter Message MENU press LFK in Idle mode, and then select
Messages ->Inbox.
10.1 INBOX
If you receive a text (SMS) message, you will be notified by a sound alert;
and a message icon will be displayed on the LCD. Receiv ed text
messages might be stored either in the phone or on the SIM Card.
Press the LFK „Read” to open the message. Press the RFK „I gnore” to
read the message later.
If memory i s full, the message “Memory Full” will appear on the LCD. To
be able to receive new messages, old messages must be deleted from the
inbox. If a new message is bigger than space l eft in the inbox, the
message might get lost and it will be incomplete.
Enter Menu ->Messages -> Inbox -> OK (middle function key) to read a
selected message. Press the LFK „Option”, to display the following menu:
Reply: you can reply to text messages
Delete: the message will be deleted
Call: call the message sender
Block/unblock: blocked messages can’t be deleted
Transfer: a message might transfer either to the phone or SIM Card
Copy: you can copy a message to the phone or SIM card
Select: select some messages to transfer, copy, block or reply to them
by sending a text message
Sort: sort messages by time, Contacts, description or type
Add sender to: you can add the sender to a new or existing Contact
Delete repeated numbers: this option lets you delete any messages
received from the same number.
Add to blacklist: any messages com ing from this number will not be
received.
10.2 CREATE & SEND TEXT MESSAGES
1. Go to Menu ->Messages ->Create Message, to access the message
editor. Enter the recipient’s number or press the middle function key t o
select t he number from Contacts. Select t he recipient(s) f rom Contacts,
and press Options -> OK. Use the Down key to enter the input text
window, and type your message. Changing the text input mode: to
change text input mode (digits, upper & lower case letters) press the key
„#” and use Up/Down to select what you want.
Note: A text message might be up to 160 characters. If Polish diacritics
are used, the message might be limited to 60 characters. Information on
how many characters and how many messages might be sent is displayed
at the top right corner. Press the key [#] to change text language and input
mode.
2. Sending Text Messages – press the Left Function Key „Opti ons”, to
select the following options while editing the message:
Send: text message will be sent
Insert template: select template you wish to insert
Insert Contact: select Contact you wish to insert
Add emoticon: select an emoticon you wish to add
Save as draft: select to save the message in the Drafts folder
Ignore: leave the message without saving.
10.3 DRAFTS
Unsent messages might be saved in „Drafts” folder. In order to do so, type
your message, and after pressing the LFK select “Save in Drafts”.
Go to Drafts to send, delete or edit saved messages.
10.4 VOICEMAIL
Voicemail is a network service to allow callers to leave a v oice message
when you cannot answer the phone call. To learn m ore, contact your
service provider. You can get a voicemail number from the service
provider. The number should be entered: Menu->Messages->Voicemail.
Then, select the card you wish to enter the voicemail number on.
In standby mode, press and hold the key 1 to get to the voicemail.
10.5 TEXT MESSAGE SETTINGS
In Menu ->Messages press Options ->Settings to change parameters of
text message service for SIM1/SIM2 cards.
You can select the Message Service Center Number, prioritize messages,
enable/disable delivery reports, select to save sent messages and select
the location for messages to be saved.
11 BATTERY INFORMATION
There is a battery in the phone. The battery can be recharged using a
charger that is included in the set.
The battery life depends on conditions in which the phone is used. Your
distance from a relay transmitter, number and the length of phone calls
significantly reduce the battery life. While moving, the phone switches
between relay transmitters and such switching also significantly affects the
battery life.
After multiple charges and discharges, it is natural for the battery to
eventually lose its ability to hold a charge. Get a new battery if you notice a
significant drop in the battery’s performance.
Use only batteries recommended by the Manufacturer. Never leave the
charger on longer than 2-3 days.
Note: Never keep the phone in excessively hot places. High temperatures
might negatively impact both the battery and the phone.
Never use a battery that is clearly damaged. Doing so might cause a short
circuit, and might damage the phone. Make sure to install the battery in
accordance with polarization.
Leaving the battery in excessively hot or cold places will reduce the battery
life. The recommended storage temperature range is between 15°C and
25°C. Installing a cold battery into the phone might cause the phone to
malfunction and might damage the phone.
12 PROTECT YOUR ENVIRONMENT
Note: The phone follows the European Waste Electrical and Electronic
Equipment Directive 2002/96/EC (WEEE) and the Polish Act on Waste
Electrical and Electronic Equipment.
Such a logo tells us that the equipment, after use, must
not be disposed of in the normal waste stream.
Note: Never throw a phone to municipal solid waste!!!
The product should be utilized in authorized places only.
As the product contains hazardous components, improper
storage and use of such equipment might lead to serious
consequences harmf ul f or both people and natural
environment. To avoid such consequences, proper handling of waste
electrical and electronic equipment is essential!
To f acilitate recycling of materials used to produce t he phone package,
follow the waste sorting rules in your area.
A Li-ion battery is included in the package. Old batteries pose
environmental risks. They should be disposed
of at a special place in a special container in
compliance with current regulations. Never
throw old batteries or chargers to municipal
solid waste, they should be collected for disposal.
NEVER PUT BATTERIES AND CHARGERS INTO FIRE!
This Manual is for information purposes onl y. Some features and options
might vary depending on software and your geographical location.
If any technical assistance is required, contact the technical department at
+48 32 325 07 00 or via email at serwis@maxcom.pl
Our website:
http://www.maxcom.pl/
Note: Battery performance is influenced by local network conditions, SIM
Card and the way the phone is used.
The Manufacturer shall not be l iable for any problems/consequences
arising from misuse, abuse or incompliance with this Manual.
Note: The Manufacturer reserves the right to change or update current
information, without a previous notice. All trademarks mentioned or used in
this Manual are the Manufacturer’s property.
13 DECLARATION OF CONFORMITY
http://www.maxcom.pl/maxcom-classic-mm129
MM128/129 Ver 1.0_05/2016
 Loading...