

Page 1

MaxCom MC6950
Page 2
F
G
H
K L
J I
Page 3
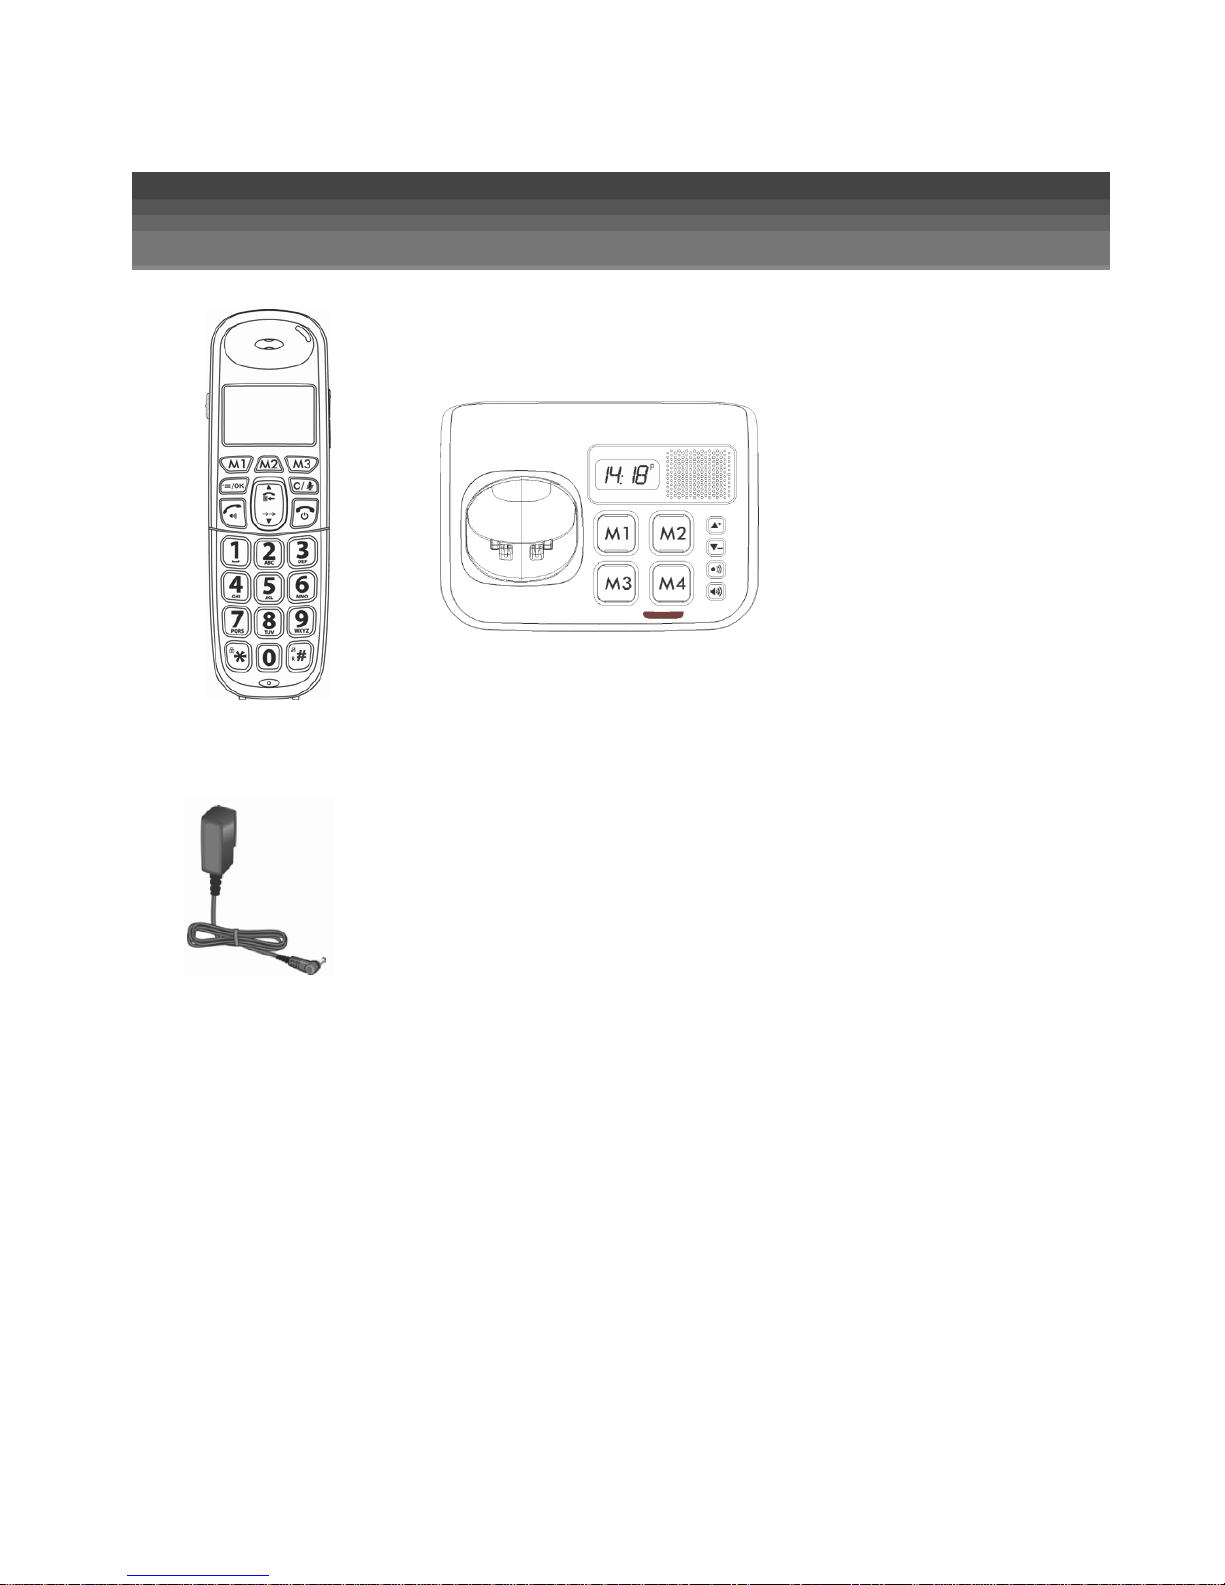
Unpacking
Page 4

Contents
Quick Start Guide 4
Install your phone 4
Setting your handset 5
Use your phone 6
Discover your new phone 7
Presentation 7
Keypad description (Handset) 8
Keypad description (Base) 9
LCD description 10
Numeric Keypad description 11
Key Features 11
Photo Installation Method 12
Menu List 13
Setting the handset 14
Setting the base unit 21
Directory 25
Intercom 28
Redial List 30
Call log 32
Other functions 35
Safety warnings and precautions 37
Troubleshooting 39
Disclaimer, Trademark and Recycling 40
Page 5
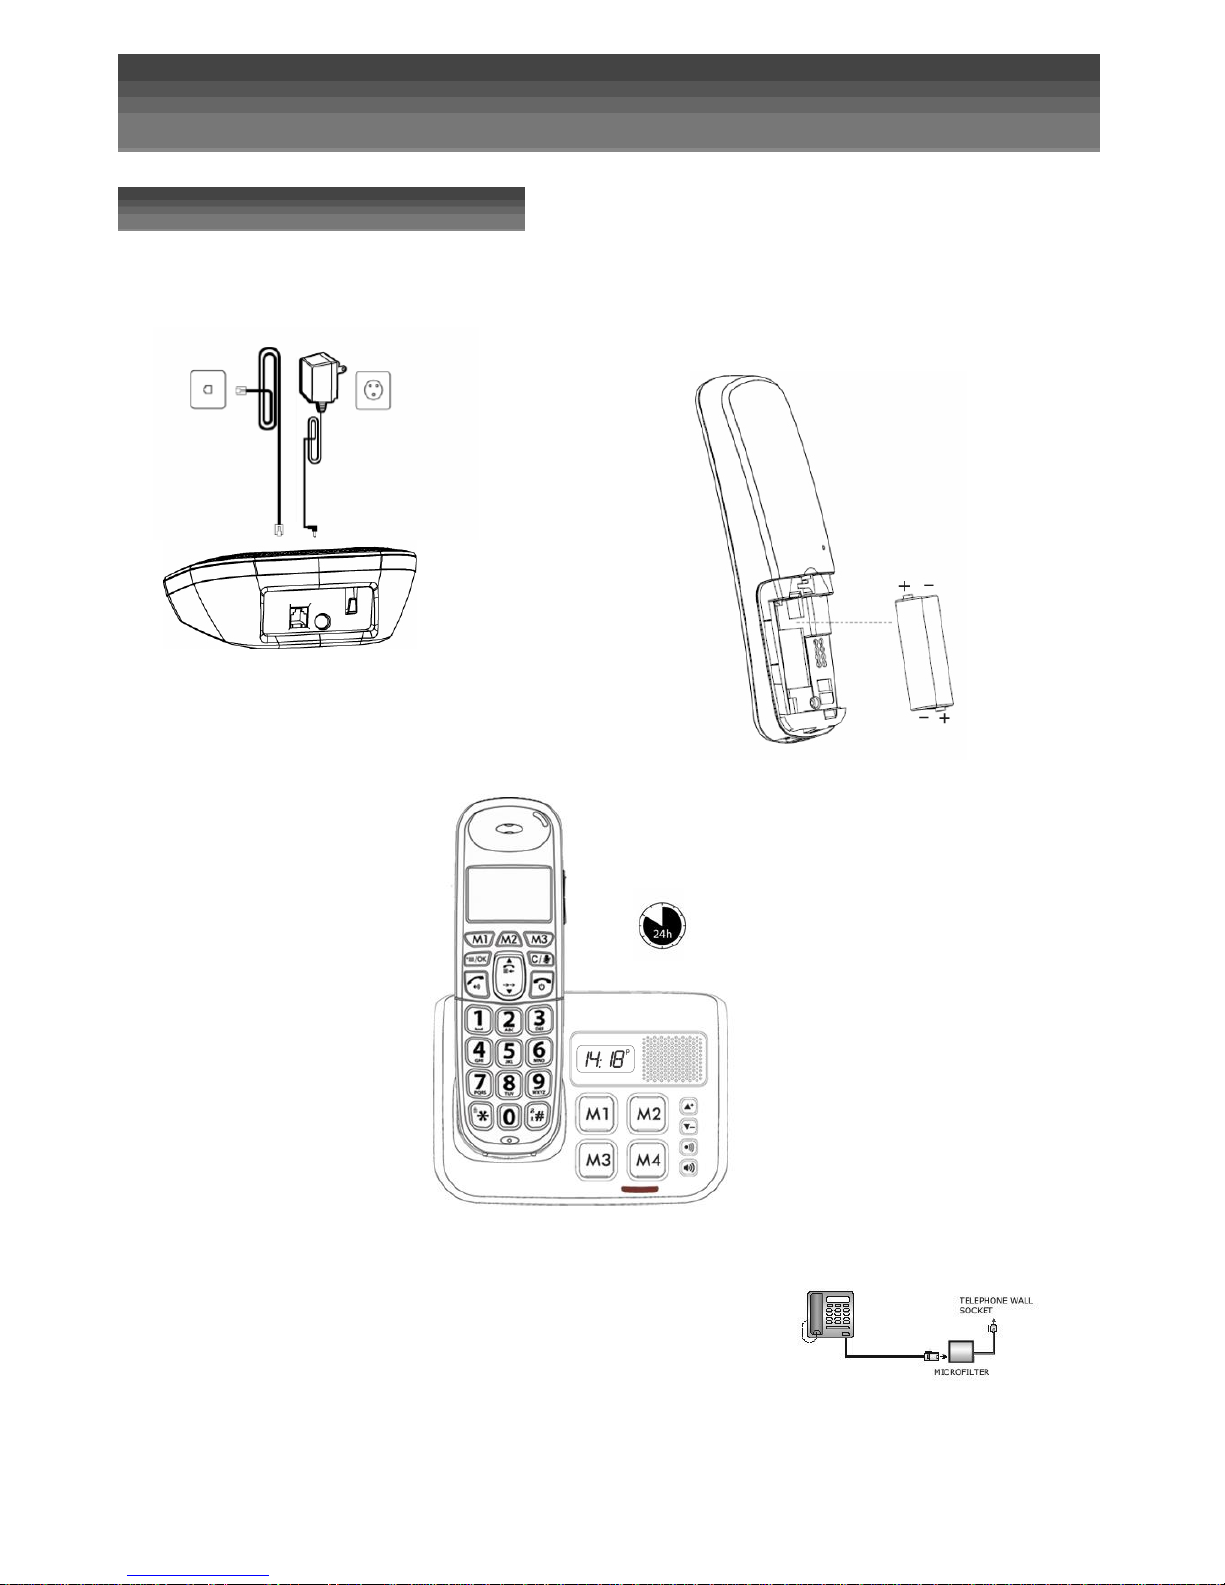
Quick start guide
Install your phone
1
2
3
If you have a Broadband line
If you connect your telephone to a line with a broadband connection, you will need to insert a micro-filter between
the telephone and the telephone line, otherwise you may get interference between the
telephone and the broadband, which could cause problems. In a home with broadband, every telephone
must have a micro-filter connected, not just the one at the telephone point that your modem is connected to. If
you need more broadband micro-filters, contact your broadband supplier.
Page 6
Press on handset :
or
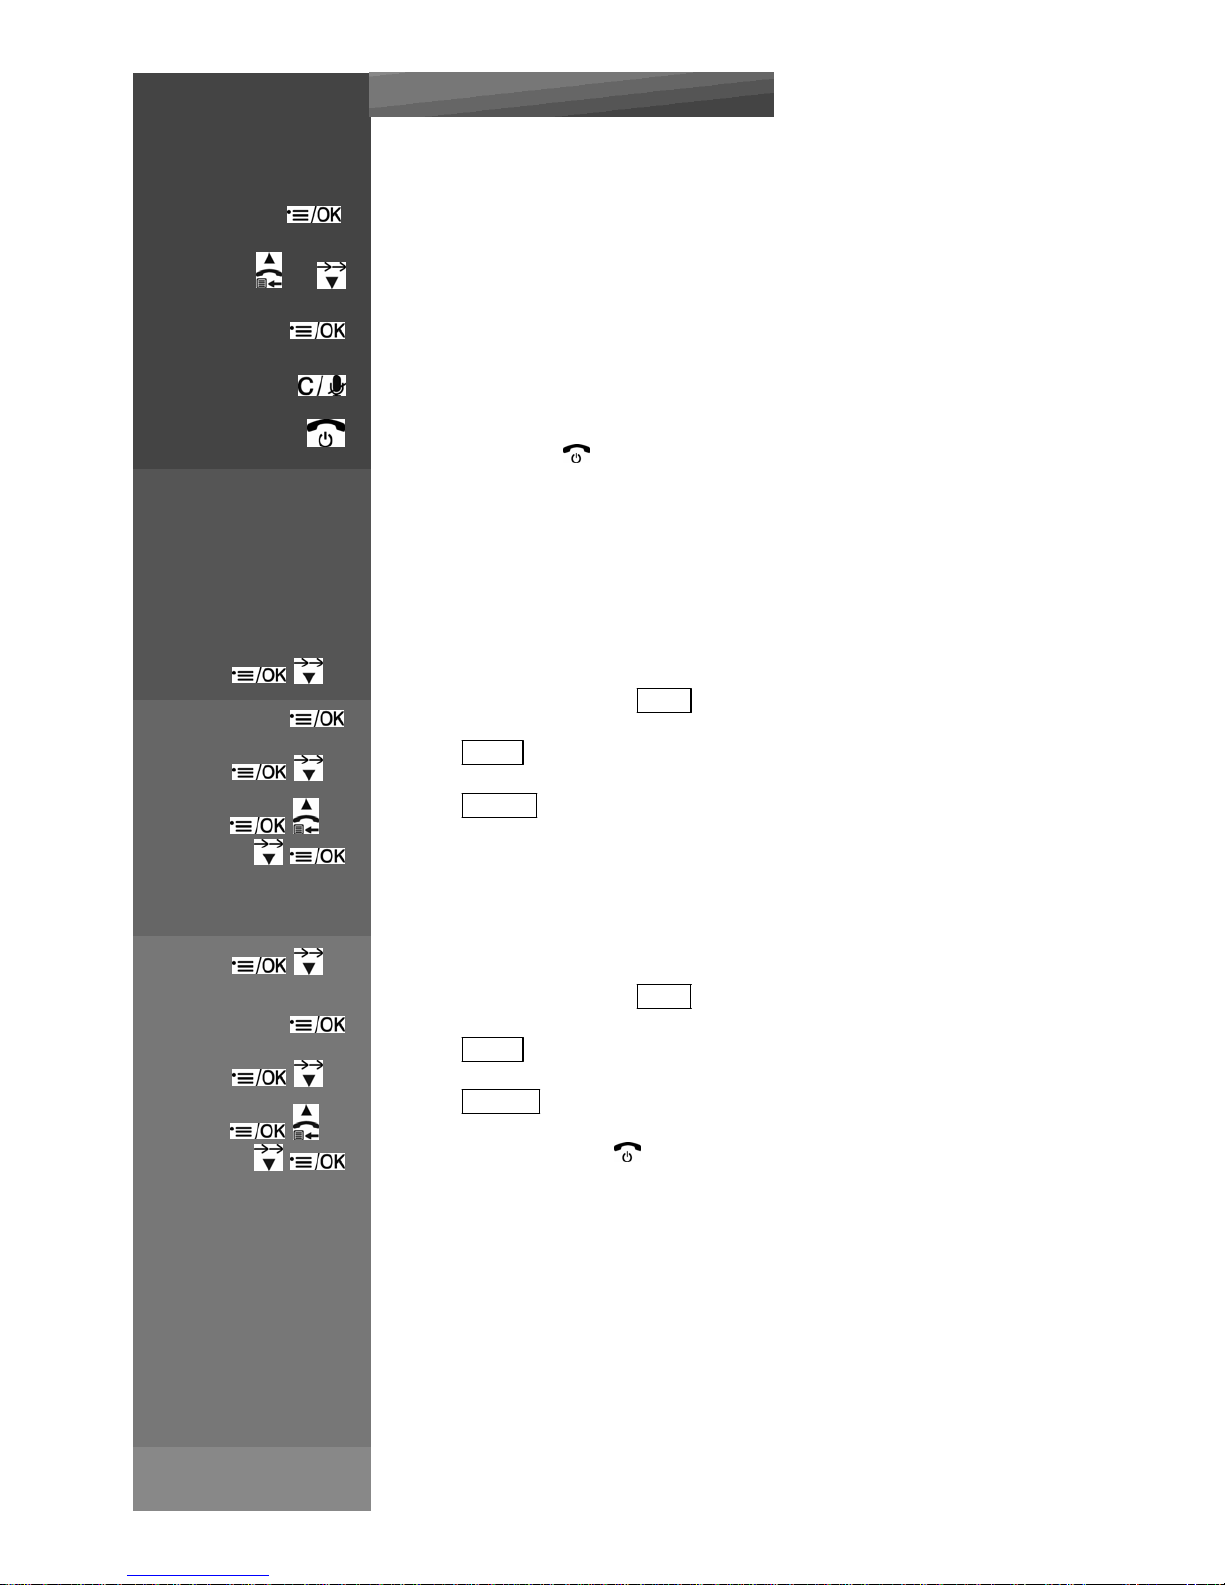
Setting your handset
1
Navigate in the Menu List
To setup and personalize your phone, enter in the menu by pressing MENU / OK
To navigate in the list press the UP and DOWN keys
To confirm a choice or enter a sub menu, press MENU / OK
To return to the previous menu press CLEAR
To quit the list press
To have a complete view of the Menu list please go to chapter “MENU LIST”
2
Change the ring tone
You can select between 10 different ring tones for external calls
x 3
Enter in the menu and Select HS SET
Select RINGER
x 1
Select EXT RING
or
Select your new melody
3
Set the Ringer Volume
x 3
Enter in the menu and Select HS SET
Select RINGER
x 2
Select RING VOL
or
Select the volume (1 to 5) or
Page 7

Press on handset :
4
Change the language
x 3 Enter in the menu and Select HS SET
x 4 Select LANGUAGE
or
Choose your language
5
Record a contact in the phonebook
Enter in the menu and Select CONTACTS
x 2
Select ADD (See chapter “DIRECTORY” for other directory function)
Enter the name of your contact using keypad and press MENU / OK
Enter the phone number and press MENU / OK
Select the melody dedicated to this contact
or
Press MENU / OK to store the phonebook entry
Use
your phone
1
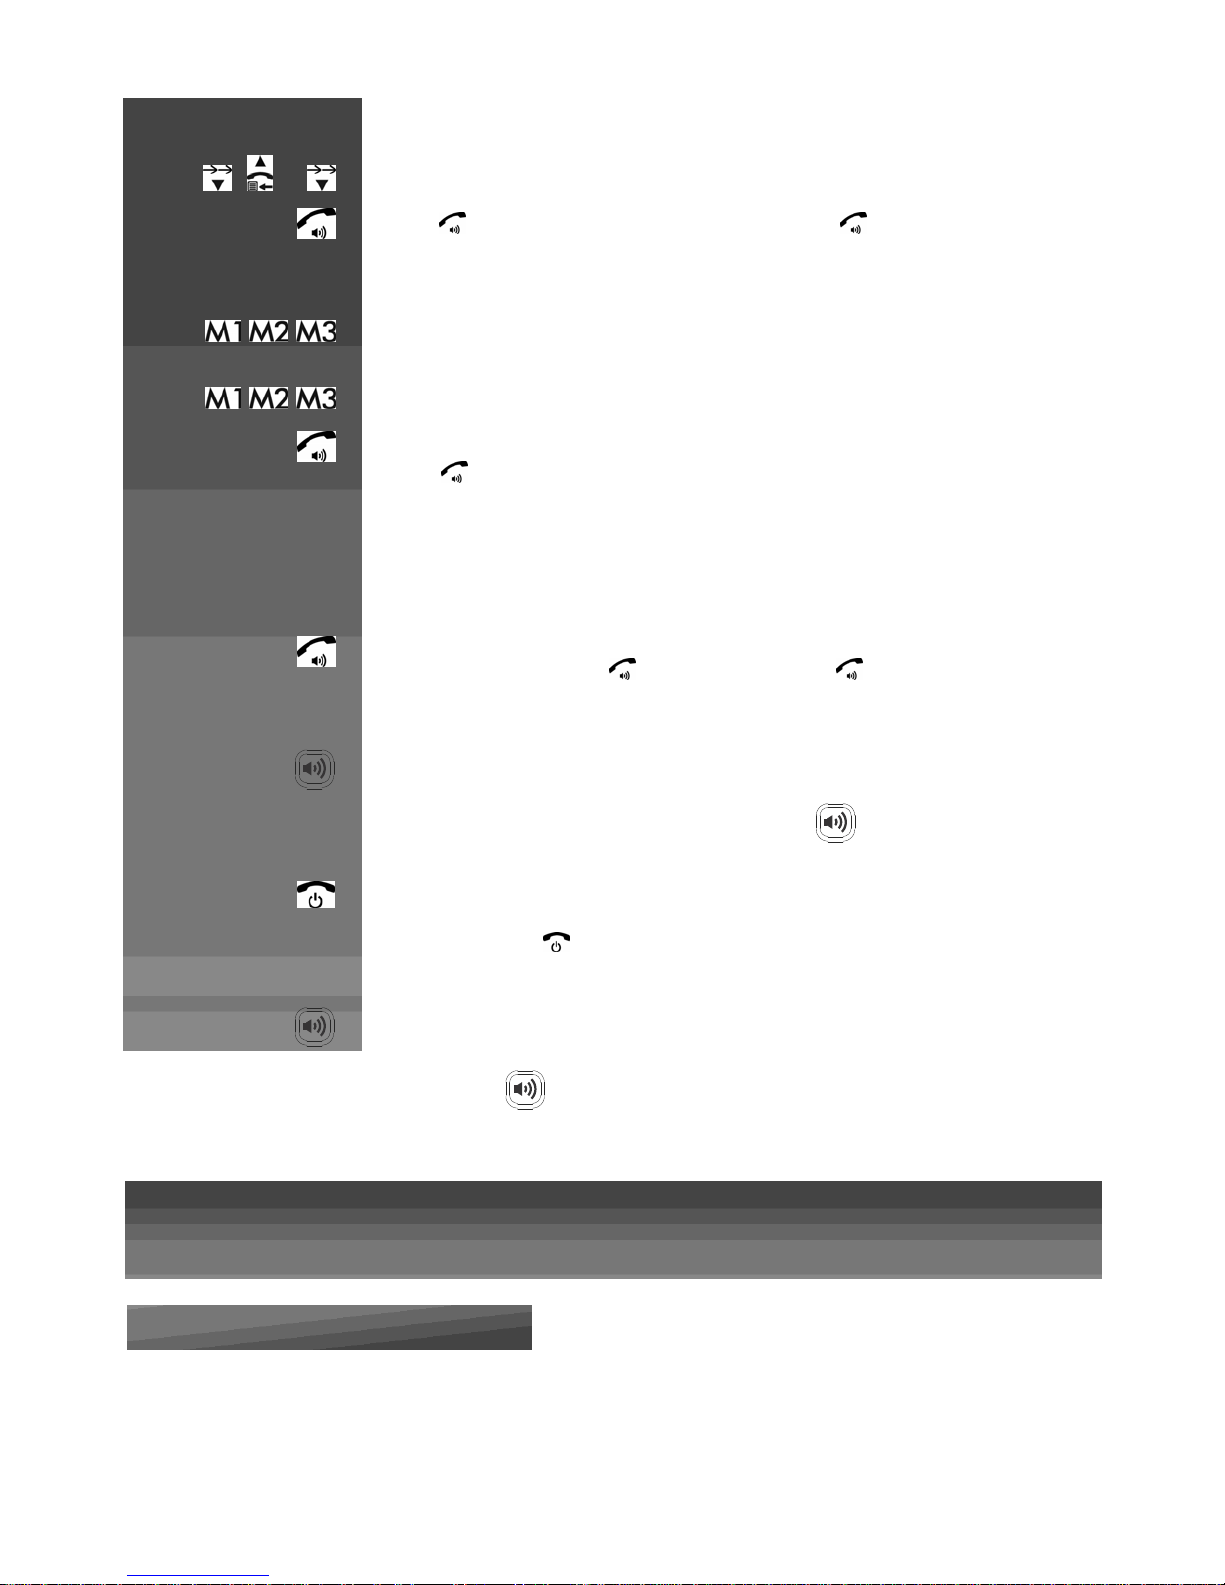
Making a Call
Normal dialling method:
Press to connect to the line and then
enter the phone number. Press again to turn
on
the speakerphone.
Note: If you enter a wrong digit you cannot correct it with the CLEAR key.
Pre‐ dialling method:
Enter the phone number and press to connect to the line and dial the number. Press
again to turn on the speakerphone.
When entering the number, if you
make a mistake, press CLEAR
to delete digits.
Using phonebook contact
Enter in the menu and Select CONTACTS
or
Press UP / DOWN to select the desired phonebook entry.
Press to dial out the selected phonebook entry. Press again to turn on the
speakerphone.
Note: The alphanumeric keys provide a short‐cut to find entries beginning with the
Page 8

corresponding letters.
Page 9
Press on handset :
or
Call from redial list
Press DOWN / REDIAL to access the redial list and press UP / DOWN to select the desired redial
number.
Press to dial out the selected redial number. Press again to turn on the
speakerphone.
Make a call from direct memory keys (M1‐M3)
A direct memory key, M1, M2, or M3 must be programmed with a number before it can be used.
(See section “Set the direct memory keys” for details.)
In idle, press and hold <M1>/<M2>/<M3> to dial the number pre‐stored into the respective key.
Press if you wish to turn on the speakerphone.
Note: If no number is stored, you will hear a double beeps tone.
2
Answer a call
If the handset is not on the charging cradle:
When the phone rings, press to answer a call. Press again to turn on the
speakerphone.
Note: If AUTO ANS is set to ON, then lifting the handset off the base or charger will
answer the call automatically, and no buttons need to be pressed.
OR
Use base to answer a call, Press base answer call button to answer a Call.
3
End a call
During a call, press to end the
call. OR
Put the hand
set
on the base
station
or charger to end the call
OR
Use base, Press to end the call.
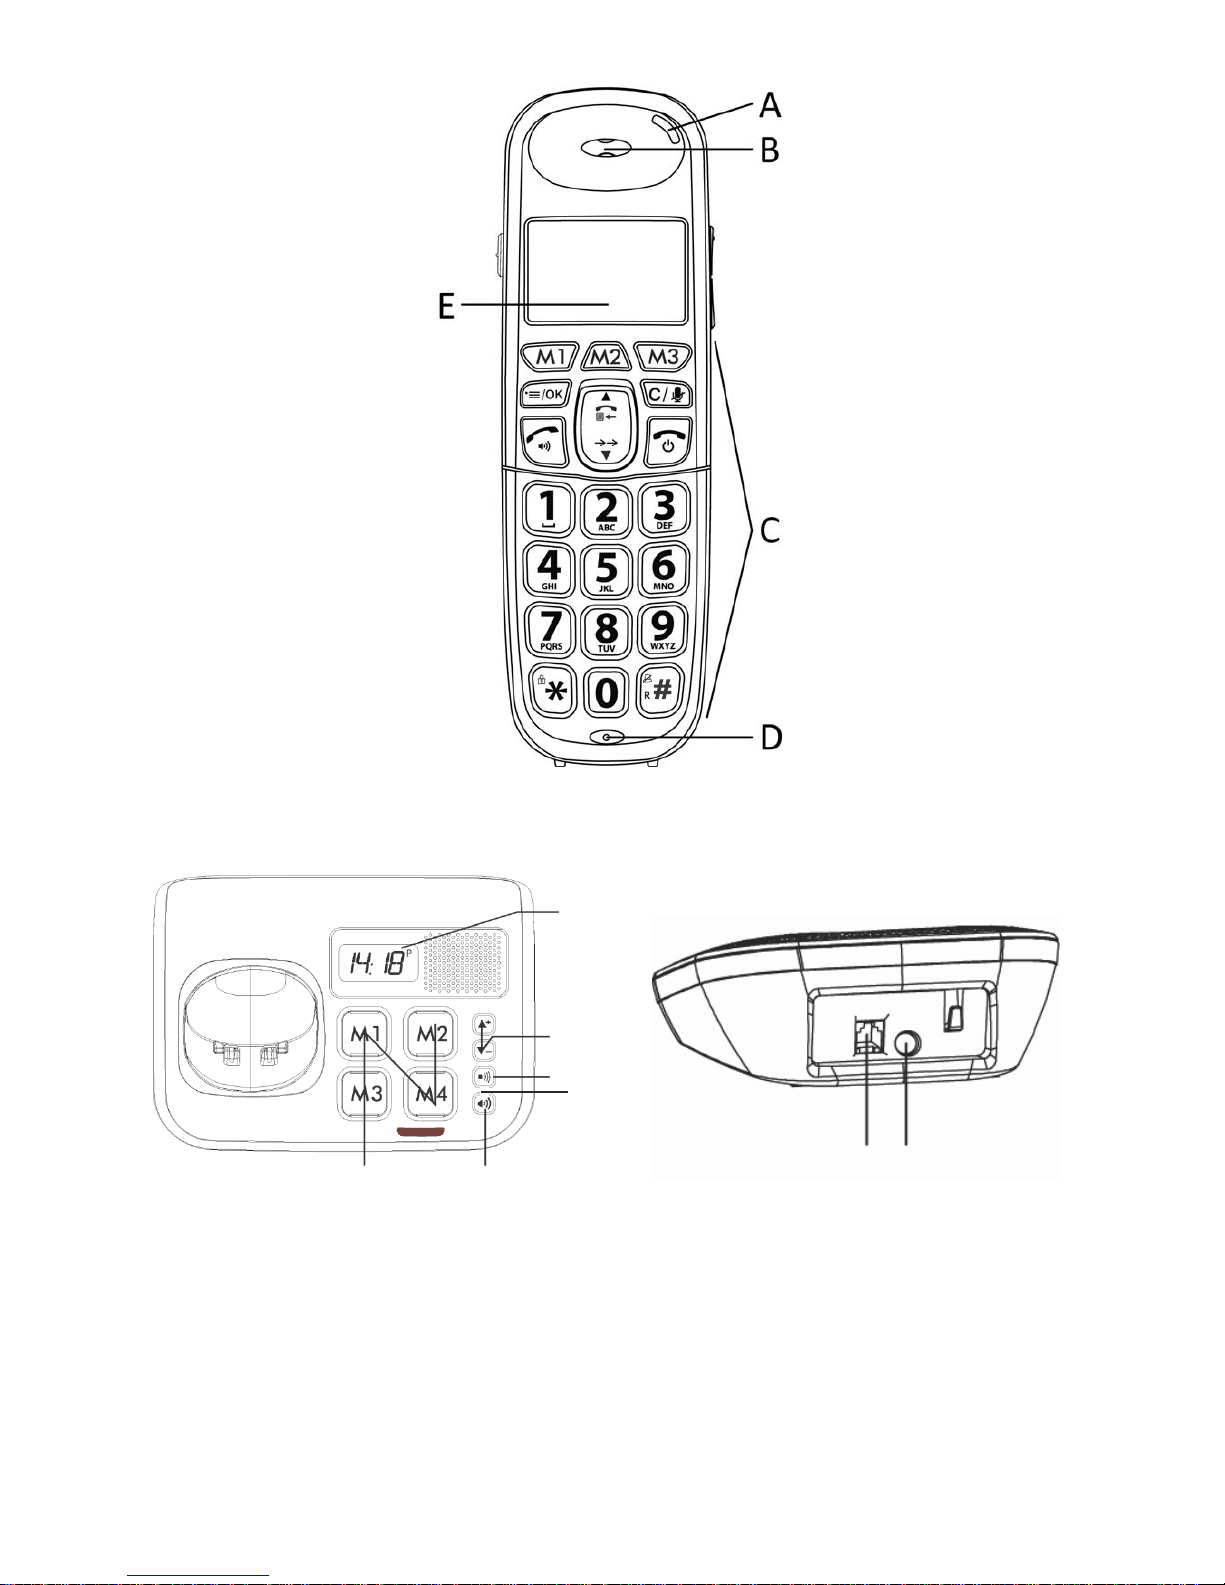
Discover your new phone
Presentation
A LED
B Earpiece
C Keypad
D Microphone
E LCD screen
F Clock
G Volume up/Down
H Page
button
Page 10

I
Speakerphon
e
J Memory key
K Phone plug
L DC plug
Page 11
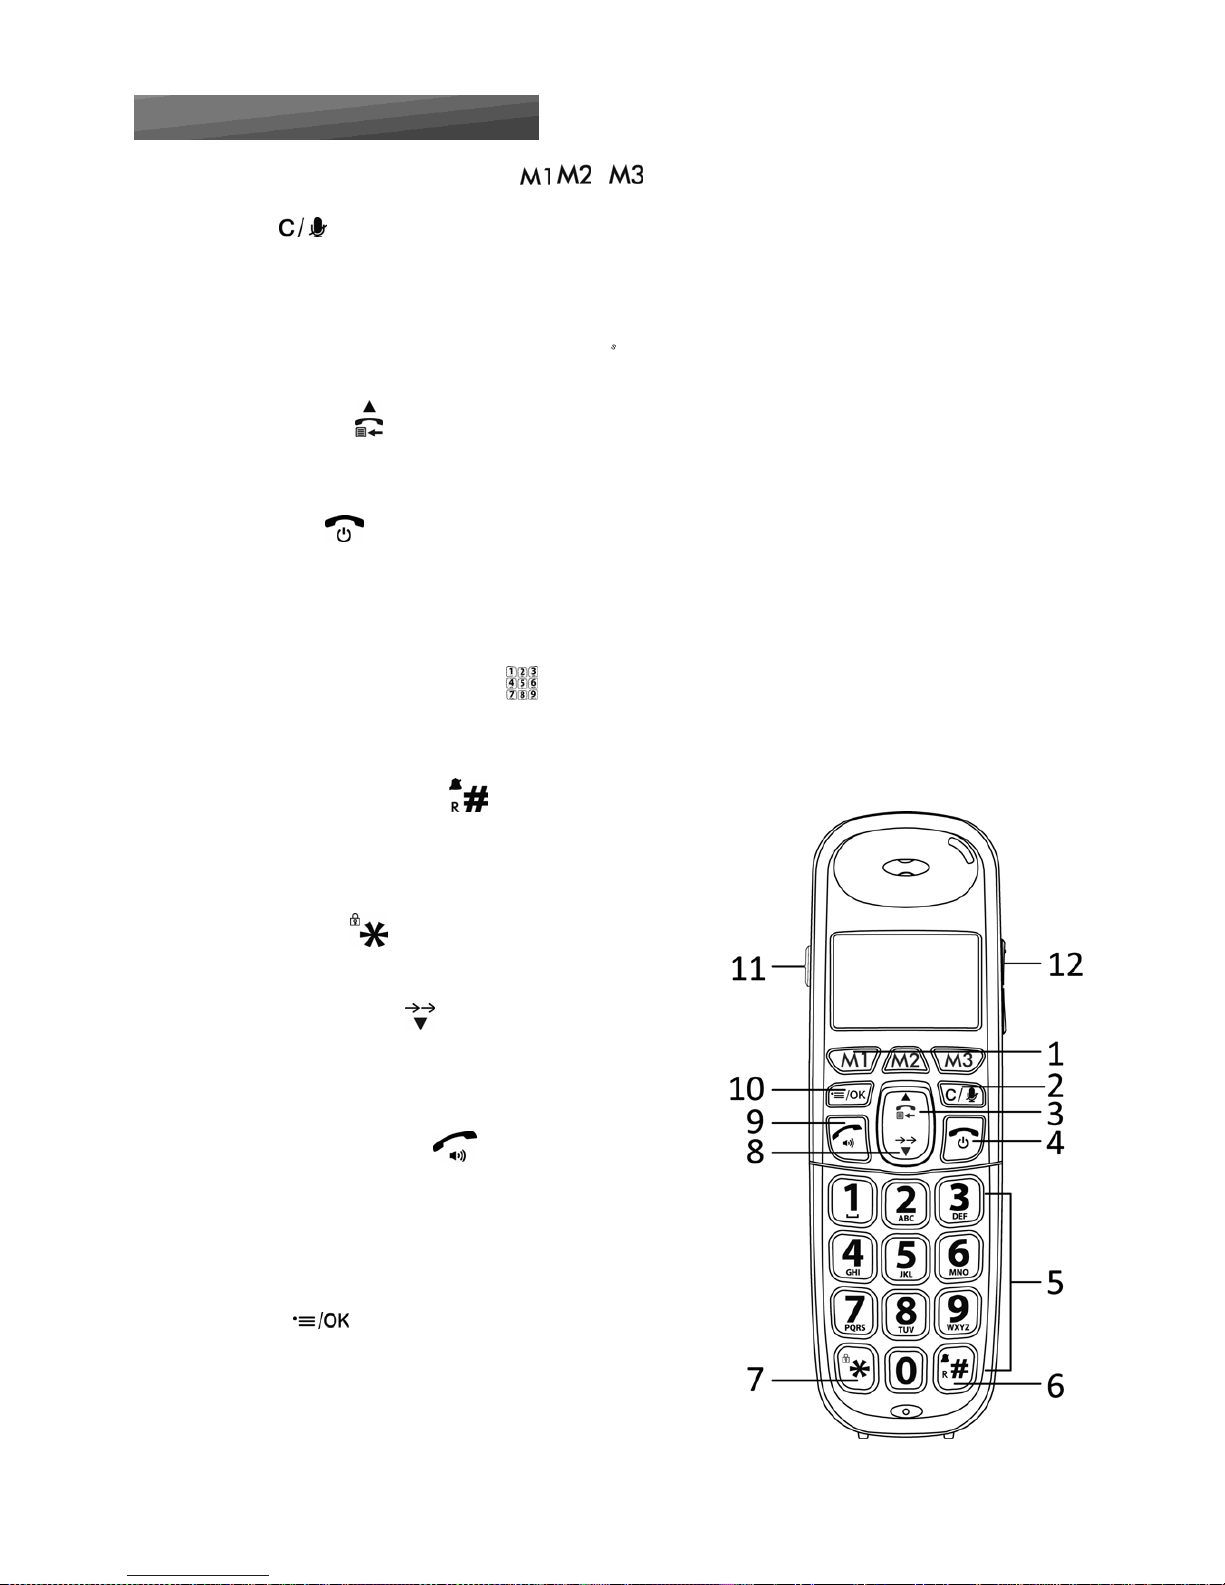
Keypad description (Handset)
1. M1/M2/M3 – DIRECT MEMORY KEYS
In idle mode: Press and hold to dial stored number.
2. CLEAR
In main menu mode: Press to go back to idle screen
In sub‐menu mode: Press to go back to previous level
In sub‐menu mode: Press and hold to go back to idle screen
In editing / predialling mode: Press to clear a character / digit
In editing / predialling mode: Press and hold to delete all the characters / digits
During a call: Press to mute/unmute the microphone
In idle mode: Press to intercom another handset
3. UP/CALL LIST
In idle mode: Press to access the call list
In menu mode: Press to scroll up the menu items
In Phonebook list / Redial list / Call List: Press to scroll up the list
4. TALK OFF
During a call: Press to end a call and go back to idle screen
In menu / editing mode: Press to go back to previous menu
In idle mode: Press and hold to power off the handset
In idle mode (when the handset is powered off):
Press and hold to power on the handset.
5. ALPHANUMERIC KEYPAD (1‐9, 0)
Press to insert a digit / character / * / #
In idle mode (Keys 1‐9): Press and hold to dial out pre‐stored fast key memories.
In idle / predialling / number editing mode (Key 0): Press and hold to insert a pause.
6. HASH / SILENCE / RECALL
In idle mode: Press and hold to activate/deactivate the ring
During a call: Press and hold to insert a recall (R) signal
(also called flash)
In Call List: Press to review caller’s number (if applicable)
7. STAR / LOCK
In idle mode: Press and hold to lock/unlock the keypad
During a call: Press to switch between Pulse and Tone mode
8. DOWN/REDIAL LIST
In idle mode: Press to access the redial list
In menu mode: Press to scroll down the menu items
In Phonebook list / Redial list / Call List:
Press to scroll down the list
9. TALK ON/SPEAKERPHONE
In idle / predialling mode: Press to make a call.
Press again to turn on the speakerphone.
In Redial list / Call List / Phonebook list: Press to make a call
to the displayed entry. Press again to turn on the speakerphone.
During ringing: Press to answer a call. Press again to answer
with speakerphone.
10. MENU
In idle mode: Press to access the main menu
In sub‐menu mode: Press to confirm the selection
During a call: Press to access Intercom/Phonebook/
Redial List/ Call List
Page 12
11. Amplification
During a call, press to turn on or off the audio boost. (only in handset earpiece mode)
12. UP / DOWN
During a call, press to increase or decrease the earpiece volume.
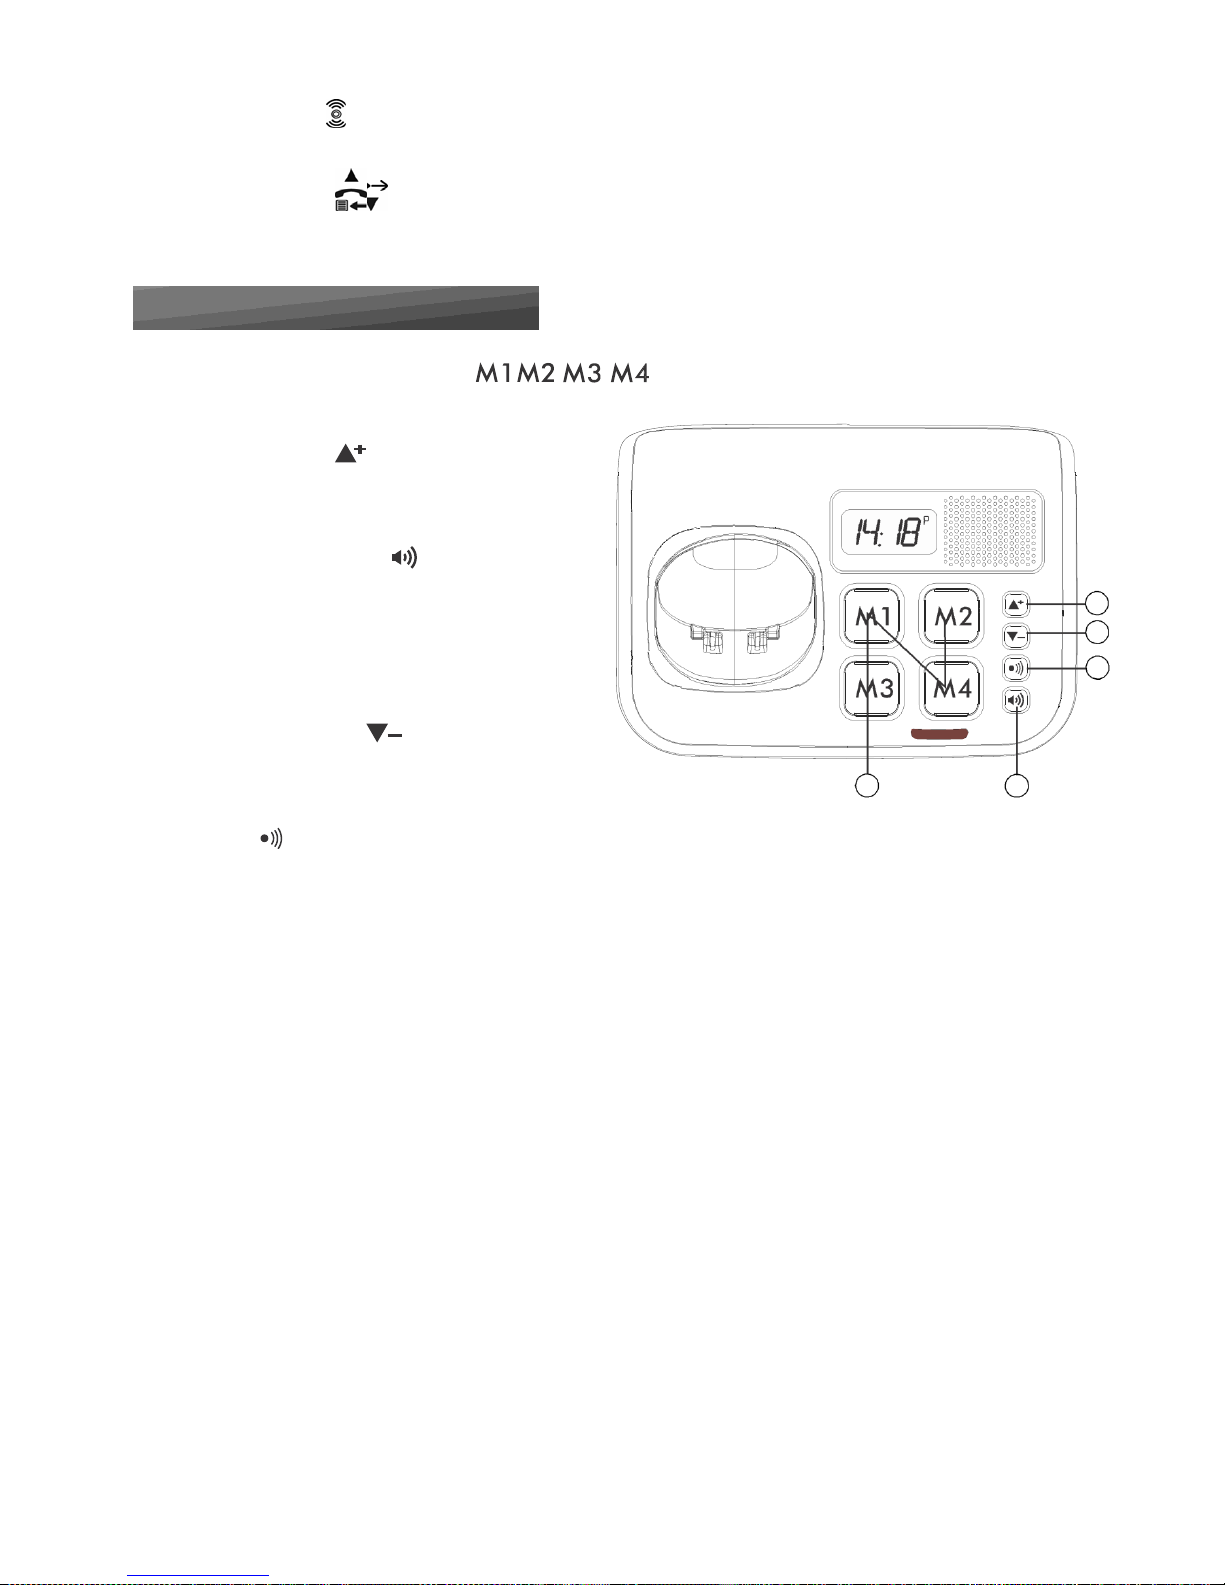
Keypad description (Base)
1. M1-M4 - DIRECT MEMORY KEYS
Press to call the number stored in the memory key.
2. VOLUME UP (+)
In base speaker mode: Press to increase
the speaker volume.
3. SPEAKER (Illuminated)
In idle: Press to turn on/off the speaker phone.
2
During ring: Backlight LED will flash,
press to answer the incoming call.
4
During a call: Backlight LED will light on if
5
speaker is activated. Press to hang off the call.
4. VOLUME DOWN ( -)
In base speaker mode: press to decrease the
1 3
speaker volume.
5. PAGE
Press the Page on the base station to page your registered handset(s).
Press and hold for more than 5s to enter registration mode.
Page 13
13
14
16
18
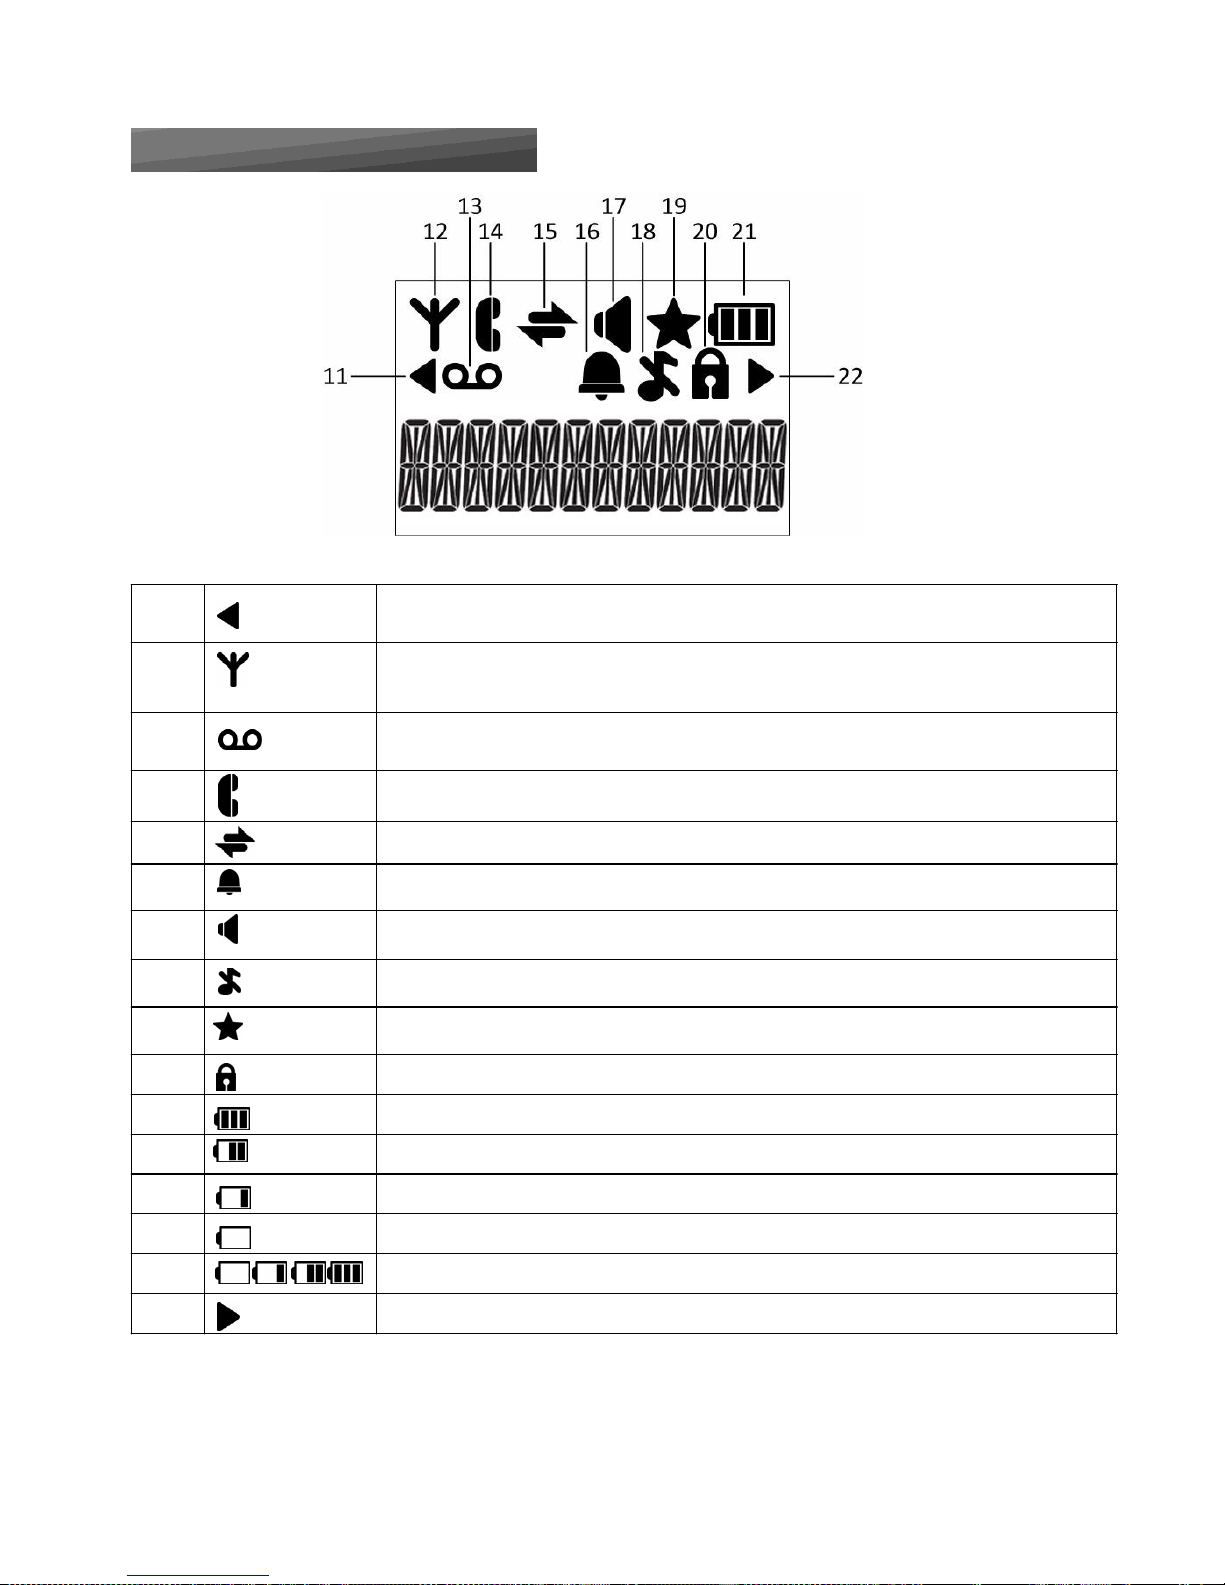
LCD
display description
11
Indicates when there are more characters or numbers in front of those being displayed.
Steady on when the handset is within range of the base.
12
Flashes when the handset is in marginal range of the base.
Off when out of range or cannot communicate with the base.
On when you have a new Voice Mail message. (This is a caller display service and is not
usually available from UK network providers.)
Steady on when a call is in progress.
Flashes during an intercom ringing.
15
Steady on when an intercom call is in progress. Flashes during intercom ringing.
Flashes when the alarm time has been reached.
On when the keypad is locked.
17
On when the speakerphone is turned on.
On when the handset ringer is switched off.
Steady on when an alarm is set.
19
On when a new call is viewed in the Call Log.
20
On when the keypad is locked.
21a
Full battery power level.
21b
2/3 battery power level.
21c
1/3 battery power level.
21d
Flashes when low battery power level is detected, needs charging.
21e
Cycle when battery is charging.
22
Indicates when there are more characters or numbers after those being displayed.
Page 14
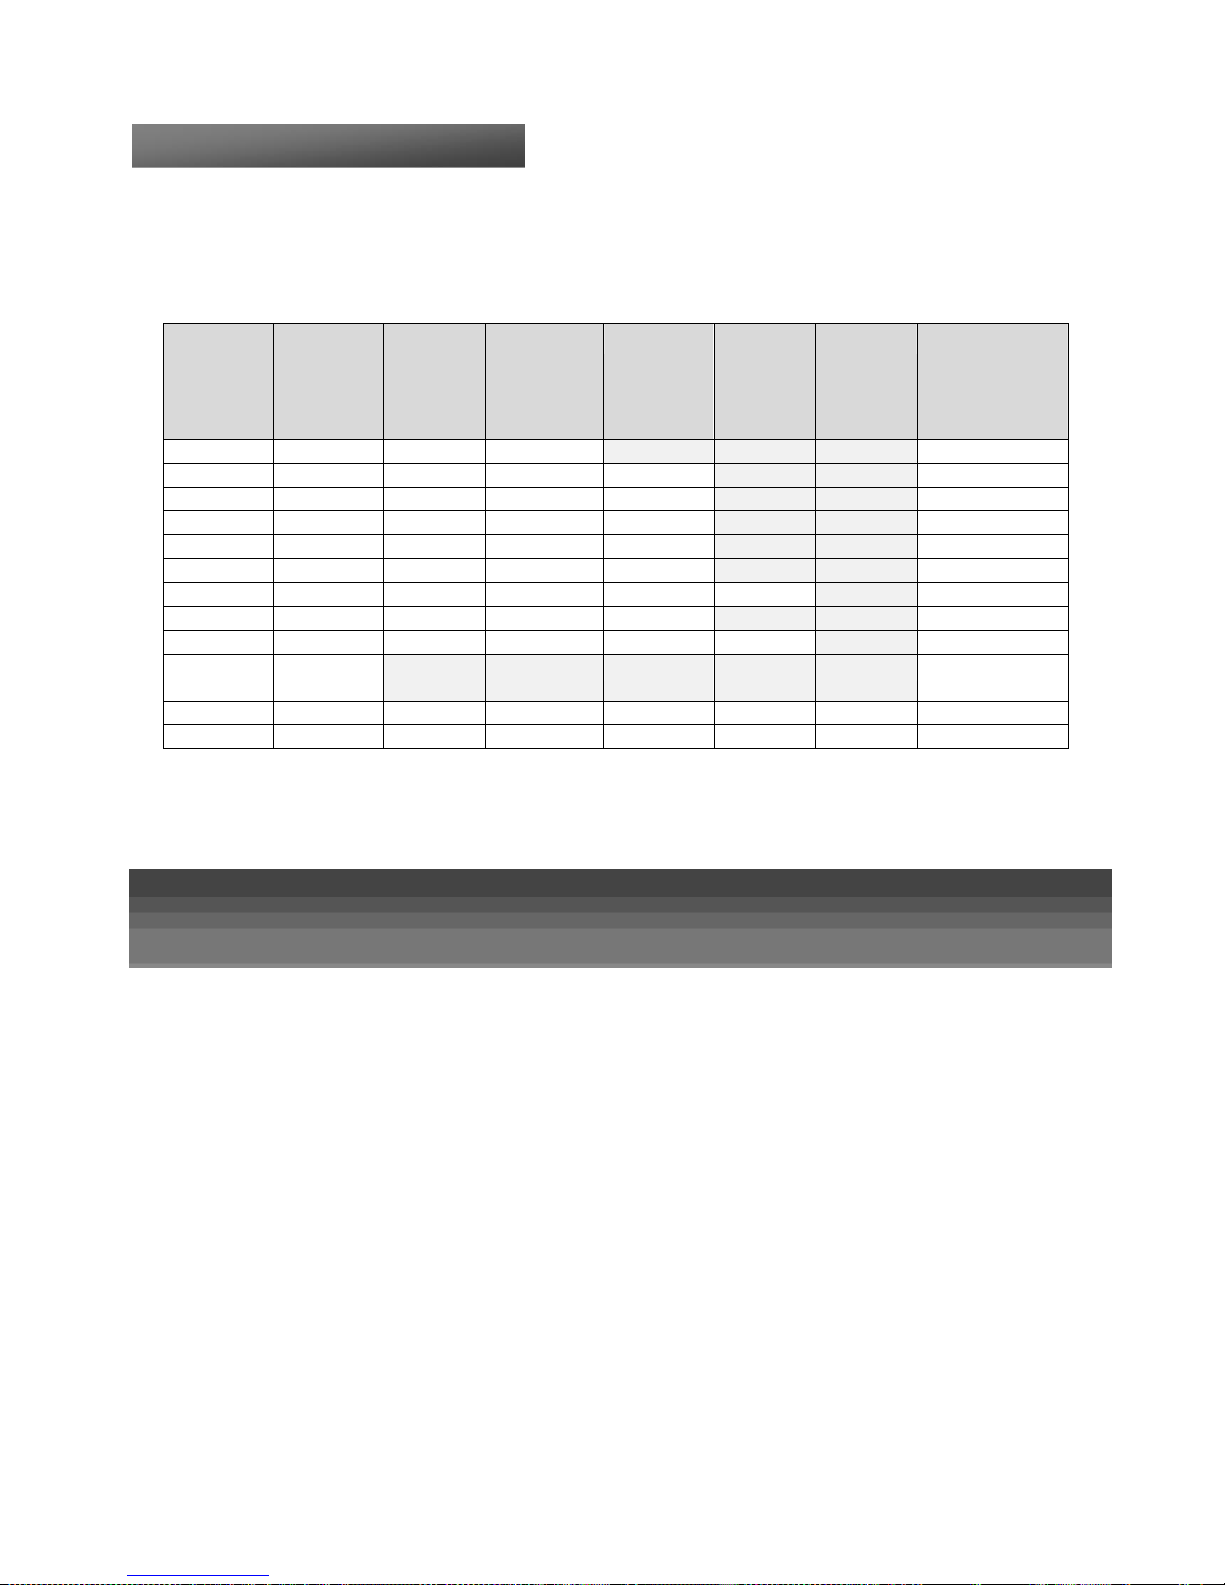
Numeric
Keypad description
Some of the functions, such as the directory, require the use of the alphanumeric keypad. The keypad will automatically
switch to the alphanumeric mode when you enter one of these functions. To enter a letter/number, press the corresponding
touch key on the keypad as many times as necessary following the below table
Key Press
1
st
2
nd
3
rd
4
th
5
th
6
th
Number Editing
(For phone
number editing,
date/time
editing)
1
SPACE ‐ 1
1
2 A B C 2
2 3 D E F
3
3
4 G H I 4
4 5 J K L
5
5 6 M N O
6
6
7 P Q R S
7 7
8 T U V 8
8 9 W X Y Z 9 9
0
0
0, or P (Pause) if
press and hold
* * ? / \ ( ) * #
#
,
,
‐
,
&
#
Page 15
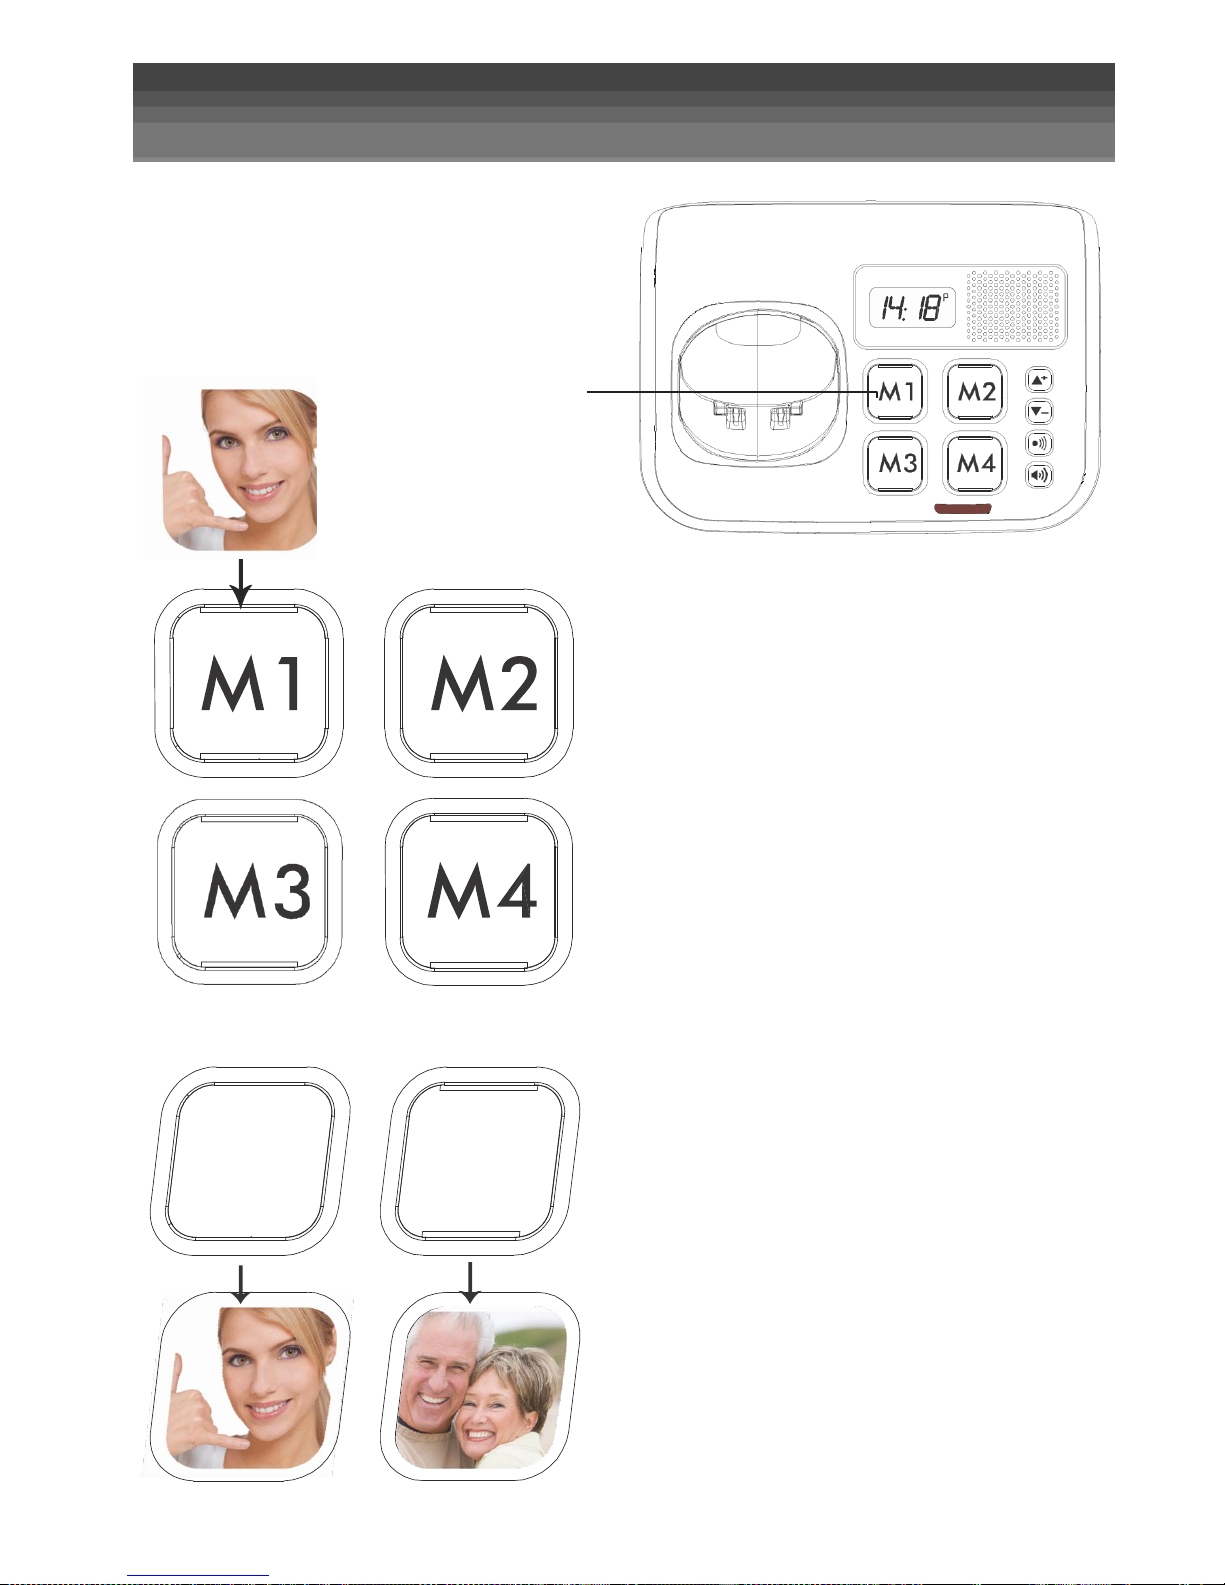
Photo Installation Method
Photo Installation Method:
1. Remove the transparent cover
2. Place the picture (or contact name) in position
3. Replace the transparent cover
Cut and insert your
contact ph otos h ere
Example
Page 16
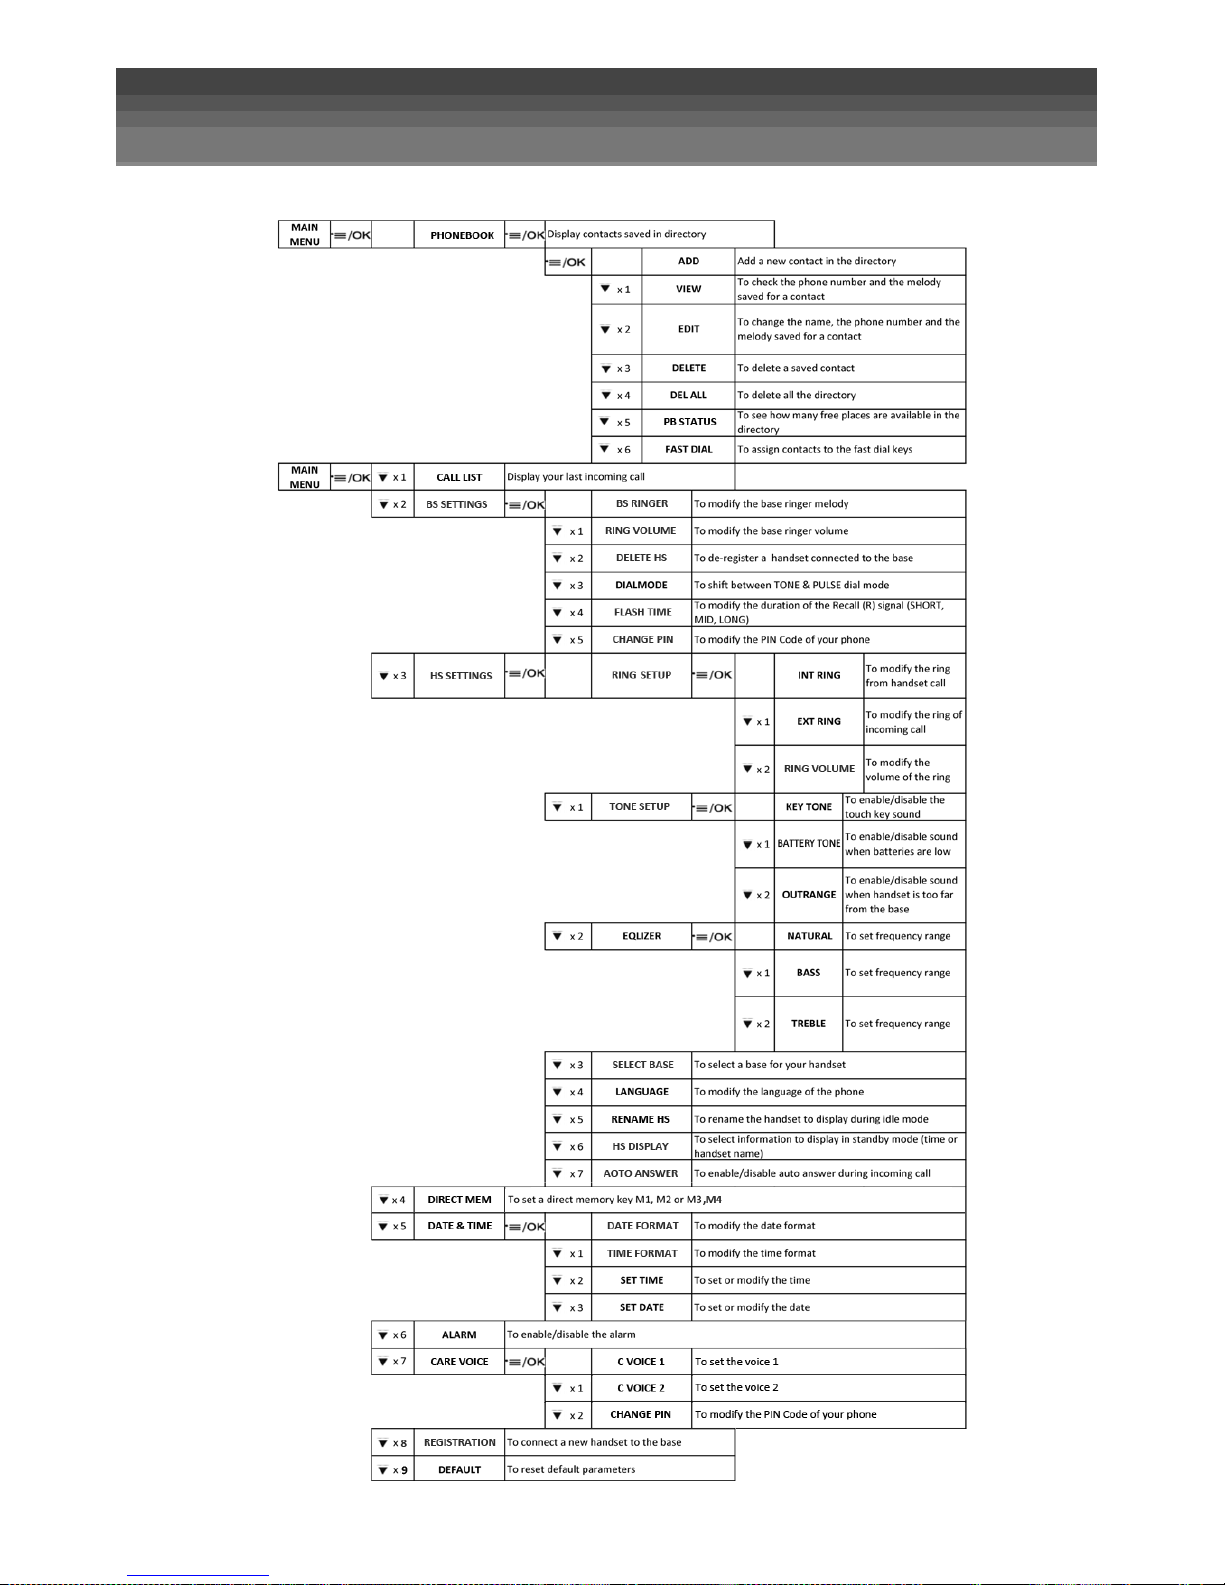
Menu List
Follow the menu list to configure your phone and use your phone
Page 17

Setting the handset
Press on handset :
Time
and
Date
1
Date
Select date format
You can choose to display the time in the format month/day/year (MMDDYY) or in the format
day/month/year (DDMMYY).
x 4 Enter in the menu and Select CLOCK
or
Select DATE FMT
or
Select the format. Press MENU / OK to confirm.
Setting the date
or
To modify the date, follow the above step and select SET DATE instead of DATE FMT
Enter the date in the format you have set above. Press MENU / OK to confirm.
Note: If date
has
been
set
before, the
curre
nt time
will
display,
othe
rwise,
“DDMMYY”
will
display.
2
Time
Select time format
You may choose to display the time in the 24Hr (HH:MM) or in the 12Hr format (the time will be
displayed with HH:MM P (pm) or HH:MM A (am)).
x 4
Enter in the menu and Select CLOCK
or
Select TIME FMT
or
Select the format. Press MENU / OK to confirm.
Page 18

Press on handset :
or
Setting the time
To modify the date, follow the above step and select SET TIME instead of TIME FMT
Enter the time in 24 hour format. Press MENU / OK to confirm.
Note: If time
has
been
set
before, the
curre
nt time
will
display,
othe
rwise,
“HH:MM”
will
display.
Sounds and
Tones
1
Touch key beep tones
x 3
Enter in the menu and Select HS SET
x 1
Select TONE
Select KEY TONE
or
Press
MENU / OK
and
UP / DOWN to turn on or off
these
tones.
Press MENU / OK to confirm.
2
Low battery alert
You can activate or deactivate the beep tone informing you about the battery power low level.
x 3
Enter in the menu and Select HS SET
x 1
Select TONE
x 1
Select LOW BATT
or
Press
MENU / OK
and
UP / DOWN to turn on or off
these
tones.
Press MENU / OK to confirm.
3
Out of range beep tones
x 3
Enter in the menu and Select HS SET
x 1
Select
TONE
x 2
Select
OUTRANGE
or
Press
MENU / OK
and
UP / DOWN to turn on or off
these
tones.
Press MENU / OK to confirm.
Page 19

Press on handset :
x 3
Ring tone
1
Ring tone for external call
Enter in the menu and Select HS SET
Select RINGER
x 1
Select EXT RING
or
Press
MENU / OK
and
UP / DOWN to select the melody you want to hear for external calls.
Note: The
respective melody will be played while browsing
the ring tone list.
Press MENU / OK to confirm.
2
Ring tone for internal call
x 3 Enter in the menu and Select HS SET
Select RINGER
Select INT RING
or
Press
MENU / OK
and
UP / DOWN to select the melody you want to hear for internal calls.
Note: The
respective melody will be played while browsing
the ring tone list.
Press MENU / OK to confirm.
Handset
volume
1
Change the volume of the ring tone
x 3
Enter in the menu and Select HS SET
Select RINGER
x 2
Select RING VOL
or
Press
UP / DOWN to select the desired ringer volume. (a total of 6
ringer volume levels including
OFF).
Note: The
respective ringer volume will be played during your selection.
Page 20

Press on handset :
or
2
Change the handset volume level
There are 5 levels (VOLUME 1 to VOLUME 5) to choose from for each of
the earpiece and speaker volumes.
During a call, press
UP / DOWN to
select volume 1‐5. The current setting is shown.
When you end the call, the
setting
will remain at the
last sel
ected level.
3
Audio Boost Feature
The audio boost feature allows you to amplify the handset earpiece volume to compensate for
the ear’s limited sensitivity.
To turn on the audio boost feature:
During a call, press AMPLIFY at any time. The handset top indicator LED turns on.
When the audio boost feature is activated, press UP / DOWN to increase or decrease the
or
earpiece volume within the specific frequency range set in Equalizer. (See section “Equalizer”
for more details.)
To turn off the audio boost feature:
Press AMPLIFY again and the handset top indicator LED turns off.
Note: The audio boost feature will be turned off automatically when the call is ended.
Set the Equaliz
er
The phone has three different frequency range filters (NATURAL, BASS, TREBLE) that you can
set, to adjust the sound in the earpiece to suit your preference.
x 3
Enter in the menu and Select HS SET
x 2
Select EQLIZER
or
Select NATURAL or BASS or TREBLE
Press MENU / OK to confirm.
Page 21

Press on handset :
Select
Base
If you registered the handset to more than one base, you can select any one of them to use
with your handset. You can only use the handset with one base at any one time.
x 3
Enter in the menu and Select HS SET
x 3 Select SEL BASE
Press MENU / OK and UP / DOWN to select the desired base. The currently selected base is
or
indicated by a *.
Press MENU / OK to confirm.
Note: The handset may take a short while to search for the new base.
Alarm
setting
You can set an alarm on this phone. When an alarm is set, the alarm icon < > is shown on the
handset display. When the alarm time is
reache
d, the
alarm icon
< >
and ALARM ON flash on
the
handset display, and the
alarm
tone
rings
for 45 secon
ds.
You
can press
any key
to
disable
the
alarm.
If the
snooze
function is activated, the
alarm will sound
again
at the
end
of the snooze period o
f
s
even minutes. You
can also press
and hold
while
the
alarm is sounding, to
stop
the
alarm and
turn off the
snooze
function.
Note:
a. A
key press will still disable
the
alarm even
if the
handset
keypad is locked when
the
alarm rings.
b. The
alarm
volume
level
is the
same as the
settings of the
hand
set
ringer
volume. If the
handset ringer is se
t to OFF, the
alarm still sounds at VOLUME 1
level
.
c.
During
an ext
ernal
call
or internal call, if an
alarm
is
set
and
when
the
alarm
time
is
reache
d, the < >
and
AL
ARM
ON
will
still
flash.
An
alarm
tone
will
be emitted from the
earpiece
to alert the
user
the
alarm
time is
reached. Once the
user presses any key or presses
and holds
to
disable
the alarm, the
display will
revert to the
call
duration.
d.
During
paging
or ringing, the
alarm
will
not
sound
when
the
alarm
time is
re
ached. However, if the
snooze
function is
enabled
and
there is no
paging
or
ringing, the
alarm
will
sound again
at the
end
of the
snooze
period.
1
Turn on/off the alarm
x 5
Enter in the menu and Select ALARM
or
Press
MENU / OK
and
UP / DOWN to turn on or off
the alarm
.
Press MENU / OK to confirm.
Page 22

Note: If ON is selected, you will be asked to set the alarm time. See the next section.
Page 23

Press on handset :
or
2
Set the alarm time (if alarm time is set to be ON)
Follow the steps in the section above to turn on the alarm.
Enter the alarm time in 24 hour format.
Press MENU / OK to display SNOOZE.
Press
MENU / OK
and
UP / DOWN to turn on or off
the snooze function
.
Press MENU / OK to confirm.
Screen
display setting
x 3
Enter in the menu and Select HS SET
x 6
Select DISPLAY
or
Select HANDSET NAME or TIME
Press MENU / OK to confirm.
Rename
the handset
x 3
Enter in the menu and Select HS SET
x 5
Select HS NAME
Press MENU / OK and change the name of your handset, using CLEAR to delete the letters and
alphanumeric keys to enter up to 6 letters for the name.
Press MENU / OK to confirm.
Auto Talk setting
x 3
Enter in the menu and Select HS SET
x 7
Select AUTO ANS
Press
MENU / OK
and
UP / DOWN to turn on or off
the auto answer feature.
or
Press MENU / OK to confirm.
Page 24

Press on handset :
Set the
Direct Memory ke
ys
There are three direct memory keys M1, M2, M3 and M4. You can store a number of
up to 20 digits into each of these keys and dial them directly from idle mode.
In handset, by pressing and holding the M1, M2 or M3 key
for more than 2 seconds.
OR
In base, by pressing the M1, M2, M3 or M4 key, and press key to dial out.
x 3
Enter in the menu and Select HS SET .
x 8 Select MEM KEY
or
Press MENU / OK and UP / DOWN to select the desired memory key from M1, M2 and M3, M4.
Press MENU / OK to enter a new number or edit the number stored already.
Press MENU / OK to confirm.
Page 25

Setting the base unit
Press on handset :
PIN code
setting
A 4‐digit
system PIN
code is used
for
changing
the system se
ttings
of the
base station.
It is
used
to
pr
otect
your phone against unauthorized use.
The default
system
PIN
code is 0000.
x 2
Enter in the menu and Select BS SET
x 5
Select CHG PIN
Press
MENU / OK to disp
lay
OLD PIN?
Enter the old system PIN.
Press
MENU / OK to disp
lay
NEW PIN?,
and
enter
your new
4‐digit system PIN.
Press
MENU / OK to dis
play CONFIRM?, and enter your new 4‐digit system
PIN
again
.
Press MENU / OK to confirm.
Registering
a handset to the base unit
IMPORTANT: When
you purchase your CDP401 phone system, all handsets are already regist
ered
to
your base, so
you do not need to register t
hem. Handset registrat
ion is
only necessary when
you buy extra handsets or
if a
handset has become
faulty.
You
can register
additional
handsets
to
have up
to five
handsets per base
unit, with
each
handset's number (1
to 5)
shown on its display.
Each handset can be registered to up to 4 bases, but can only operate with one base at a time.
(See chapter “Select Base”, for how to change between bases.)
To
register
a new
handset
to your
base:
Press and hold
PAGE on the
base st
ation for
more
than five
seconds to put the
base station
into
regi
stra
tion mode. It
will stay in registration mode
for about 1 minute, so the
following
handset sequence must
be completed within
this
time.
x 6
Enter in the menu and Select REGISTER
Press
MENU / OK to
display
BASE 1.
Press UP / DOWN to select which base number you want to use. (Note: a * will be shown next
or
to any base numbers the handset is already registered with, and if selected the new registration
will overwrite it.)
Page 26

Press
MENU / OK to
display
PIN?‐‐‐‐‐.
Page 27

Press on handset :
Enter the 4‐digit
system
PIN (default 0000).
Press
MENU / OK to confirm,
and
the
display will show
SEARCH’G.
If the
handset regist
ration is su
cce
ssful, you will hear a c
onfirmation tone
and the
< >
will stop
flashi
ng.
The
handset will
automati
cally be allocated
the next
available handset
number.
This
handset number is shown in
the
hand
set d
isplay in sta
ndby
mode. If the
handset
registra
tion is
unsucce
ssful,
the < >
will still flash.
Dereg
istering a handset to the base unit
This
operation
should
only
be
necessary
if
one
of
your
handsets
becomes
faulty
or
lost
and
needs
to be replaced.
You
will need
to enter the 4‐digit
System
PIN (Default PIN is
0000) in order
to
de‐register a
handset
from the
base station. A de‐registered handset will have
the < >
flashing
and
"‐‐UNREG‐‐" on the
display.
Note: You cannot
de‐re
gister the
handse
t that
you are curren
tly
usin
g.
x 2
Enter in the menu and Select BS SET
x 2
Select DEL HS
Press
MENU / OK to
display
PIN?‐‐‐.
Enter the 4‐digit
system
PIN (default 0000).
Press
MENU / OK
and
the
first handset number is displayed.
Press
UP / DOWN to
scroll
through the
list
of
registered handsets and select
the number of the
or
handset
you want to de‐re
giste
r.
Press
MENU / OK
to confirm,
and
the
chosen handset will be de‐registered.
Set the base
ringer melody
x 2
Enter in the menu and Select BS SET
Select RINGER
Press MENU / OK and UP / DOWN to select the desired ringer melody. (a total of 5 melodies for
or
your selection)
Note: The
respective melody will be played while browsing
the melody list.
Page 28

Press MENU / OK to confirm.
Page 29

Press on handset :
Set the
ringer volume
x 2
Enter in the menu and Select BS SET
x 1
Select RING VOL
Press MENU / OK and UP / DOWN to select the desired ringer volume. (a
total of 6 ringer
or
volume levels including OFF)
Note: The
respective ringer volume will be played during your selection.
Press MENU / OK to confirm.
Dialling
mode
setting
You
should
normally leave the dialling mode at
its
default
setting
of TONE
(also
called DTMF)
unless
the phone is connected to an old exchange that only
recognises
PULSE dialling.
Note: If PULSE dialling is
set,
you can
press
the * key to
switch
to TONE dialling for the
rest
of
that call.
x 2
Enter in the menu and Select BS SET
x 3
Select DIALMODE
or
Select TONE or PULSE
(The current setting is indicated by an asterisk to the right)
Press MENU / OK to confirm.
Touc
h R setting
You may need to change the recall
(flash)
time if your phone is connected to a PBX. The recall
time
options
are SHORT (
100ms), MEDIUM (30
0ms)
or LONG
(600ms).
x 2
Enter in the menu and Select BS SET
x 4
Select FLASH
Select SHORT or MID or LONG
or
(The current setting is indicated by an asterisk to the right)
Press MENU / OK to confirm.
Page 30

Press on handset :
Reinitialization of the
def
ault setting
You
can reset
your phone to
the default
settings
. After a
reset, all
your
personal se
ttings, call list
entries, and redial list entries will be
deleted but
your phonebook remains
unchanged
.
x 7
Enter in the menu and Select DEFAULT
Press
MENU / OK to
display
PIN?‐‐‐.
Enter the 4‐digit
system
PIN (default 0000).
Press
MENU / OK to dis
play CONFIRM?
Press MENU / OK to confirm and the phone will be reset to its default settings.
Page 31

Directory
Press on handset :
Record
a contact
Enter in the menu and Select CONTACTS
x 2
Select ADD
Enter the name of your contact using keypad and press MENU / OK
Enter the phone number and press MENU / OK
or
Select the melody dedicated to this contact
Press MENU / OK to store the phonebook entry
Search
through the
direct
ory
The alphanumeric keys provide a short‐cut to find entries beginning with the
corresponding letters.
x 2
Enter in the menu and Select CONTACTS
Enter the
first
letter of the name
using
the alphanumeric
keys (e.g.
if it begins with C, press the 2
key three times),
Press UP / DOWN to select the desired phonebook entry.
or
View
a contact
Enter in the menu and Select CONTACTS
or
Press UP / DOWN to select the desired phonebook entry.
x 1
Select VIEW
or
Press MENU / OK and UP / DOWN to review the name, number and ring tone of the selected entry.
Note: If the number is more than 8
digits, press
STAR <*> or HASH <
#> KEY to view the
remaining
digits.
Page 32

Press on handset :
Edit a contact
Enter in the menu and Select CONTACTS
or
Press UP / DOWN to select the desired phonebook entry.
x 2
Select EDIT
Press MENU / OK to display the current name.
Edit the name of your contact using keypad and press MENU / OK
Edit the phone number and press MENU / OK
or
Select the melody dedicated to this contact
Press MENU / OK to confirm.
Delete
a contact
Enter in the menu and Select CONTACTS
or
Press UP / DOWN to select the desired phonebook entry.
x 3
Select DELETE
Press MENU / OK to confirm.
Delete
all contacts
x 2 x 4
Enter in the menu and Select CONTACTS
Select DEL ALL
Press
MENU / OK to dis
play CONFIRM?
Press MENU / OK to confirm. All
entries
will be deleted and the
display
will
show
EMPTY.
Chec
k phonebook
usage
You can check how many phonebook e
ntries
are s
tored
in your
handset
and how many
phonebook entries are available for you to
store
in the phonebook.
Enter in the menu and Select CONTACTS
x 2 x 5
Select CAPACITY
Press
MENU / OK to dis
play how much of the phonebook is being used, for example 14/20
means 14 entries are stored out of the total 20 available spaces.
Page 33

Press on handset :
Set the Fast Dial
Number
s
Up to 8 of your phonebook entries can be allocated to a fast dial key (from 2 to 9), where you
can dial the number from idle mode by simply pressing and holding the appropriate digit key for
more than 2 seconds. If no fast dial number is stored, you will hear a double‐beep tone when
the key is held down.
1
Add the Fast Dial Number
Enter in the menu and Select CONTACTS
x 2 x
6
or
Select FASTDIAL
Press MENU / OK and UP / DOWN to show the digit key from 2 to 9 that you want to set.
Press MENU / OK to select. If there is no number stored in the selected
key, <EMPTY> is
displayed.
or
Press UP / DOWN to select an entry from the contacts list.
Press MENU / OK to save the new number in the selected Fast Dial key.
2
Edit the Fast Dial Number
Enter in the menu and Select CONTACTS
x 2 x
6
or
Select FASTDIAL
Press MENU / OK and UP / DOWN to show the digit key from 2 to 9 that you want to set.
Press MENU / OK to display the current name.
x 2
Press MENU / OK to select EDIT.
or
Press MENU / OK and UP / DOWN to select an entry from the contacts list.
Press MENU / OK to save the new number in the selected Fast Dial key.
3
Delete a Fast Dial Number
Enter in the menu and Select CONTACTS
x 2 x
6
or
Select FASTDIAL
Press MENU / OK and UP / DOWN to show the digit key from 2 to 9 that you want to set.
Press MENU / OK to display the current name.
Press MENU / OK and UP / DOWN to select DELETE.
x 3
Page 34

Press MENU / OK to confirm.
or
Press MENU / OK to save the new number in the selected Fast Dial key.
Page 35

Intercom
Press on handset :
Call another handset
This
feature is only applicable when there are at least two regi
ste
red hand
sets. It
allows
you to
make internal calls, transfe
r external calls from one
handset to another ha
ndset
and make
conference calls. If the called hand
set is
not
answered
within 60
seconds,
the called hand
set
will
stop
ringing and the calling
handset
will return to
sta
ndby mode.
Note: If only one hand
set is
regi
ste
red to the
base st
ation, when INT is
pressed,
it will
disp
lay FAILED.
In idle mode, press
CLEAR and all the other
registered handset
numbers
will
display, along with a "9".
Enter the number of the
handset
that you want to call.
Note: If only two hand
sets
are
registe
red to the base
stati
on,
pressing
INT will call the other
handset
immediately.
Note: If there is an external call while you are on an intercom call, you'll hear
warning
beeps,
and you have to end the intercom call, before you can
answer
the external call.
Call all
other
handsets
In idle mode, press
CLEAR and all the other
registered handset
numbers
will
display, along with a "9".
Enter "9" to call all registered
handsets.
Receiving
an internal call
When the handset rings, press to establish the intercom call.
Receiving
an
external
call during an internal call
If there is an external call while you are on an intercom call, you’ll hear warning beeps. You have
to end the intercom call, before you can answer the external call.
Page 36

Press on handset :
or
Transferring
an
externa
l call to another handset
During an external call:
Press
MENU / OK and UP / DOWN to
select
INTERC.OM
Press
MENU / OK to
show
all the other
registered handset numbers, plus
"9".
Enter the number for the
handset
you want to
transfer
the call to.
The external call is put on hold automatically and the called hand
set rings. Press
on the
called hand
set
to
establish
an internal call.
Press
on the calling hand
set
or put the calling han
dse
t on the charging cradle to
end the current call with the external party. The external call is tran
sfe
rred to the
called han
dset.
Note: If the other
handset
has
not
answered
the intercom call, you can
stop
the intercom and return to the external call by
pressing
.
Transfer
an
externa
l call
from
base to handset
During an external call on base:
Grab off the handset from base cradle, the external call on base will be transferred to handset
automatically, and base will go to idle.
Note: Before lifting up the handset, please ensure the handset is in line use status (shows
the <TALK ON> icon). If you lift up the handset before it showing the <TALK ON> icon, call
transfer will be failed, you need to put back the handset on cradle and try again.
3 people
conference
call
The conference call feature
allows
one external call to be shared with two hand
sets
(in
intercom). The three parties can
share
the conv
ersation
and no additional network
subscri
ption is required.
During an external call:
or
Press
MENU / OK and UP / DOWN to
select
INTERC.OM
Press
MENU / OK to
show
all the other
registered handset numbers, plus
"9".
Enter the number for the
handset
you want to
transfer
the call to.
The external call is put on hold automatically and the called hand
set rings. Press
on the
called hand
set
to
establish
an internal call.
Press and hold the star key <*> on the calling handset to establish the conference call.
Either
handset
can exit the conference by
pressing
, leaving the other
handset
Page 37

still
connected to the external call.
Page 38

Redial list
Press on handset :
Search
a
number
You can redial any of the 5
last
numb
ers
called. If you have
stored
a name in phonebook to go
with the number, the name will be
displ
ayed
inst
ead.
The
most
recent last number will di
splay
at the top of the redial
list.
In
idle mode, press DOWN / REDIAL to access the redial li
st.
Note: If the redial
list
entry
shows
a name,
press HASH <#>
to view the number of
this entry.
or
Press
UP / DOWN to browse the redial
list.
Press
to dial to the
sele
cted redial number.
Note: If there are no numb
ers
in the redial
list,
the
display shows
EMPTY
.
Record
a
number
In idle mode, press DOWN / REDIAL to access the redial li
st.
or
Press
UP / DOWN to browse the redial
list.
or
Press
MENU / OK and UP / DOWN to
select
STORE.
Press
MENU / OK
and then enter the name you want to use in the
phonebook.
Press
MENU / OK and then modify the number, if
necessary.
Press
MENU / OK to
show
RING 1.
Press
UP / DOWN to br
owse
the ringtone
list.
The re
spective
ringtone will be played when
browsing the ringtone
list.
(Note: the
selected
melody will only be played when you receive a
or
call if you
subscribe
to Caller
Display
and the incoming number
matches
the
stored
number.)
Press
MENU / OK to confirm, and the entry will be
stored.
Delete
a
number
In idle mode, press DOWN / REDIAL to access the redial li
st.
or
Press
UP / DOWN to browse the redial
list.
or
Press
MENU / OK and UP / DOWN to
select
DELETE.
Press MENU / OK to confirm.
Page 39

Press on handset :
Delete
all
numbers
In idle mode, press DOWN / REDIAL to access the redial li
st.
or
Press
UP / DOWN to browse the redial
list.
or
Press
MENU / OK and UP / DOWN to
select
DEL ALL.
Press
MENU / OK to dis
play CONFIRM?
Press MENU / OK to confirm. All
entries
will be deleted and the
display
will
show
EMPTY.
Page 40

Call log
Press on handset :
Caller ID
This
feature is available if you have
subscribed
to the Calling Line Identification
service
with your network
serv
ice provider. Your phone can
store
up to 10 received
calls
with
date/time information in the Call
List.
The number will be
shown
on the
handset
display
when the phone is ringing. If the number matches with one of the
entries
in
your Private Phonebook, the caller’s name
stored
in the private phonebook will be
displayed
alternately with the number, and the hand
set
will ring with the ring tone
associated
with that phonebook entry.
If the call is from someone who withheld their number, e.g. by dialling 141,
WITHHELD will display.
If the call is from
someone whose
number is unavailable, e.g. an international call or
from a private exchange, OUT AREA will di
splay.
If you've got new Caller
Display records,
the
handset
will
display
"X NEW CALLS" in st
andby
mode.
The New
Calls
indication will remain until all the new call
records
have been viewed on that
handset.
Searching
through the call log
All received
calls
are
save
d in the Call List with the
latest
call at the top of the
list.
When
the call list is full, the oldest call will be replaced by a new call. Any
unanswered calls
which
have not been viewed are marked with a <*> icon at the centre of the bottom line of the
display.
Pr
ess
UP / CALLS to access the call
list
, or
x 1
Enter in the menu and Select CALL LOG
or
Press
UP / DOWN to
sel
ect the de
sire
d entry.
Press
<#> to view the caller’s number if applicable.
or
Press
MENU / OK and UP / DOWN
to
show
DETAILS, and then MENU / OK
to
display
the date of
the call.
Press <#> to see the time of the call, and press MENU / OK to return to the name or number.
Press
MENU / OK to go back to the
previous screen.
Page 41

Press on handset :
Calling through the call log
Pr
ess
UP / CALLS to access the call
list
, or
x 1
Enter in the menu and Select CALL LOG
or
Press
UP / DOWN to
sel
ect the de
sire
d entry.
Press
to dial to the
sele
cted call list number.
Saving a
number
through the call log
Pr
ess
UP / CALLS to access the call
list
, or
x 1
Enter in the menu and Select CALL LOG
or
Press
UP / DOWN to
sel
ect the de
sire
d entry.
or
Press
MENU / OK and UP / DOWN to
show
STORE.
Press
MENU / OK and then enter the name.
Press
MENU / OK and the
selecte
d call list number is
displ
ayed. Edit the number if necessary.
or
Press
MENU / OK and UP / DOWN to
select
the ringtone.
Press
MENU / OK to
store
the phonebook entry and return to the
calls list.
Delete
a call
Pr
ess
UP / CALLS to access the call
list
, or
x 1
Enter in the menu and Select CALL LOG
or
Press
UP / DOWN to
sel
ect the de
sire
d entry.
or
Press
MENU / OK and UP / DOWN to
select
DELETE.
Press MENU / OK to confirm.
Delete
all calls
Pr
ess
UP / CALLS to access the call
list
, or
x 1
Enter in the menu and Select CALL LOG
or
Press
UP / DOWN to
sel
ect the de
sire
d entry.
or
Press
MENU / OK and UP / DOWN to
select
DEL ALL.
Press
MENU / OK to dis
play CONFIRM?
Press MENU / OK to confirm. All
entries
will be deleted and the
display
will
show
EMPTY.
Page 42

Press on handset :
Call log
category
You can set the handset to record all received calls or only missed calls in the call log.
Pr
ess
UP / CALLS to access the call
list
, or
x 1
Enter in the menu and Select CALL LOG
or
Enter in the menu and Select CATEGORY
or
Press MENU / OK and UP / DOWN to show ALL or MISSED.
Press MENU / OK to confirm.
Page 43

Other functions
Press on handset :
Locking the keypad
In idle, press and hold STAR <*> to turn on the keypad lock.
< > is displayed on the LCD.
Note: You can
still answer
a call when the
handset is
locked.
Unlocking the keypad
To turn the keypad lock off, press and hold STAR <*> again.
Secrecy Mode
You can talk to
some
one nearby without letting the caller hear you during a call.
During a call:
Press
CLEAR to mute the microphone and MUTED will
displ
ay on the LCD. Your caller
cannot hear you.
Press
CLEAR again to unmute the microphone.
Hands
‐free Mode
During a call:
P
ress
to alternate between
hands‐free speakerphone
and normal
handset use.
De
activate/activate the
ringer
tone of the handset
In idle,
press
and hold HASH <#> to turn off the
handset
ringer.
< > icon is
displayed
on the LCD.
Note: The
display
will
still flash
the < > icon and
show
CALL or the Caller
Display
number,
when there is an incoming call, even if the ringer is turned off.
To turn the ringer back on,
press
and hold HASH <#> again.
Find the handset
Press PAGE key on the base station. All the handsets registered to the base will produce the
paging tone.
or
Press / / CLEAR on any handset or PAGE key on the base again.
Note: If there is an incoming call during paging, the phone will ring with
Page 44

the incoming call instead of paging.
Page 45

Press on handset :
Care Voice
You can record voice messages. The voice message will be played automatically
through the base speaker when the time reaches.
Play the
Care Voice Message
x7
Enter MENU to select CARE VOICE.
or
Press MENU/OK and UP/DOWN to select C VOICE 1 or C VOICE 2.
or
Press MENU/OK and UP/DOWN to select PLAYBACK.
Press MENU/OK to play the desired voice message.
Note: If no message recorded before, display will show "EMPTY".
Record
a
Care Voice Message
x7
Enter MENU to select CARE VOICE.
or
Press MENU/OK and UP/DOWN to select C VOICE 1 or C VOICE 2.
or
Press MENU/OK and UP/DOWN to select RECORD.
Press MENU/OK and speak to the phone after a beep to record the message.
Note: If there is already a message recorded before, display will show "REPLACE".
Press MENU/OK to record the new message.
Press MENU/OK to save, and the recorded message will be played automatically.
OR
Press BACK/CLEAR to cancel, then the current message will not be recorded and the
previous message will be removed as well.
Turn
the
Care Voice Message ON
/
OFF
x7
Enter MENU to select CARE VOICE.
or
Press MENU/OK and UP/DOWN to select C VOICE 1 or C VOICE 2.
or
Press MENU/OK and UP/DOWN to select ON/OFF.
Press MENU/OK and UP/DOWN to select DAILY, ONCE or OFF.
Press MENU/OK to confirm.
If you selected DAILY or ONCE, enter the time in 24 HR format to set the alert time.
Note: If you selected OFF, and if there is a message preset by user, the date/ time setting
will be removed, but the recorded message will be kept. You can turn it on for next use.
Press MENU/OK to confirm.
Note: You can also activate the Care Voice even if you have not recorded any message for
it before. In this case, base will play the heading music without voice announcement when
the set time arrives.
Page 46

Change
the
Care Voice PIN
When you access the Care Voice line remote mode, you will need to enter the
Care Voice PIN. You can change the PIN by menu.
x7
Enter MENU to select CARE VOICE.
or
Press MENU/OK and UP/DOWN to select CHG PIN.
Press MENU/OK and display will show "OLD PIN?".
Press MENU/OK to enter the old PIN (default is 0000).
Note: If the PIN entered is incorrect or invalid, display will return to the previous menu.
Press MENU/OK and display will show "NEW PIN?".
Press MENU/OK to enter the new PIN.
Press MENU/OK and display will show "CONFIRM?".
Press MENU/OK to repeat the new PIN.
Note: If the new PIN re-entered is not matched with the new PIN, display will
return to step 5.
Press MENU/OK to confirm.
Care Voice
line
remote
If you are away from your home, you can use another telephone to call and access the
Care Voice line remote mode, to set or listen to your messages remotely
Call the number and system will answer the call after 10 rings to allow user enter
Care Voice line remote mode.
Enter the Care Voice PIN code.
Press the voice message number (e.g.1) you would like to access.
Press the following keys to carry out your desired function.
Key
Function
1 Play the selected Care Voice message.
2 Record a Care Voice message.
3 Activate the Care Voice message.
4 Deactivate the Care Voice message.
Note:
1). If you press <2>, start recording the message after a beep, and then press <2> to
save. If there is already a Care Voice message recorded before, it will be replaced.
2). If you press <3>, enter the time in 24 hour format (HH:MM), and then press <3> to
confirm. The time will be played, and then you can press <3> to reconfirm or
press <*> to cancel. If the Care Voice message is saved in this case, it will announce
once only at the set time.
Page 47

Safety warnings and precautions
• Only use the mains adapter provided.
• The device should not be placed in a dusty environment or where it may be subject to vibrations or shocks.
• Do not place the device in the vicinity of a magnetic source (television, speakers etc) as it may cause interference.
• Do not spill liquids on the device as it may cause a short circuit.
• Do not place the base unit in a humid environment.
• Never disassemble the device.
• Unplug the phone connection before unplugging the power outlet.
• Immediately unplug the device from the power outlets if it is faulty and have it repaired at one of the authorised
aftersales service departments.
• When moving the device, start by plugging it into the power outlet.
• Do not place heavy objects on the power cord and ensure that it is placed in a location where no one will step on it.
• Do not overload power outlets.
• Never install the device during an electrical storm.
• Never touch uninsulated telephone wires unless the telephone line has been disconnected.
• Unplug the device from power outlets before cleaning. Do not use liquid or aerosol cleaners, use a soft, moist cloth.
• Do not place the device on an unstable surface as serious damage will be ensue should the device fall.
• The device will not be able to dial or receive calls if there is a power failure or if it is unplugged. You will not be able to call
or receive calls during that time. That is why we strongly recommend that you use a traditional telephone to complement
this device.
• Please save these instructions for future reference.
• This equipment is not designed for making emergency telephone calls when the power fails. Alternative arrangements
should be made for access to dial emergency services.
IMPORTANT
• Batteries must be inserted taking care to match the polarities shown. Make sure that the (+) and (‐) terminals are placed in the
correct direction.
• Do not mix old and new batteries or batteries of different types: alkaline, standard (carbon‐zinc) or rechargeable
(nickel‐cadmium).
• Never use batteries that show signs of electrolyte leaks or cracking.
• Never dispose of used batteries in an open fire, risk of explosion.
• Keep batteries out of reach of children.
• Never short circuit battery terminals.
• Always remove used batteries from the appliance case.
Page 48

• Remove batteries from the appliance before disposing of it at the end of its service life, or during long periods of non‐use.
Page 49

• Do not try to open the batteries.
• Batteries (battery pack or batteries installed) shall not be exposed to excessive heat such as sunshine, fire or the like.
• Do not charge non‐rechargeable batteries.
• Ensure the battery compartment panel is secure.
• When replacing used batteries, please comply with applicable regulation relating to their disposal. Please return them to a
suitable collection facility for environmentally friendly disposal.
CAUTIONS
‐ Danger of explosion if battery is replaced by an incorrect type.
‐ Replace only with the same or equivalent type.
USER INSTRUCTIONS
• The AC adaptor is used as the main disconnect device. Ensure that the AC outlet is installed near the product and is easily
accessible.
• The product should not be used when temperature exceeds 35° C.
• Warning: If you do not allow your handset to charge for at least 24 hours prior to its first use, it will not function to its full
capacity.
• The warrantee does not cover malfunction problems caused by the improper charging of handset prior to its first use.
POWER SUPPLY INFORMATION
• Power supply : 230 V ~50 Hz
• Power consumption 0.1W in standby mode
ADDITIONAL INFORMATION
• This product uses audio frequency bands that are standardised throughout the European community.
• The marking of the certified terminal equipment is found under the base unit.
• The SAR test is not required for products whose power is lower than or equal to 20 mW. This product has an average
power level which falling below this level and therefore is not subject to the test.
• This product is compatible only with the internet set up box which are compliant with the PSTN (public switches telephone
network)
• The device must be connected to a power outlet with an AC/DC mains adapter, in compliance with the EN 60950
• The device cannot be connected to an IT power scheme.
• The telephone line jack is in compliance with the security norm TRT‐3.
• The power outlet is in compliance with the security norm TBTS.
• The electrical security corresponds to the EN 60950 specifications.
Page 50

Troubleshooting
PROBLEMS
VERIFICATION
SOLUTIONS
Nothing displayed on screen
Batteries are wrong inserted
Respect the polarity of the batteries
indicated on the handset batteries
compartment
Batteries are empty
Put the handset on the base
Batteries are correctly inserted and not
empty
Remove the batteries and reinserted
them once again
Batteries are not charged
Batteries are wrong inserted
Respect the polarity of the batteries
indicated on the handset batteries
compartment
Batteries are empty
Clean the charge contact points of the
handset and on base unit.
Batteries are correctly inserted and not
empty
Remove the batteries and reinserted
them once again
The handset cannot find the
base unit
You are too far from the base unit
Move the handset close to the base
unit
Base unit is not connected
Connect the base unit following quick
start guide description
Verify the batteries
Remove the batteries and reinserted
them once again
Reset the base unit
Remove and plug the adapter of the
base unit
A tone alert is emitting during
or out of communication
Battery are empty
Recharge the batteries
You are too far from the base unit
Move the handset close to the base
unit
No dialling tone
Check the telephone plug
Remove and plug the telephone plug
to the base unit and the telephone
outlet
Page 51

Recycling
This product bears the selective sorting symbol for waste electrical and electronic equipment (WEEE).
This means that this product must be handled pursuant to European Directive 2002/96/EC in order to
be
recycled or dismantled to minimize its impact on the environment.
For further information, please contact your local or regional authorities.
Electronic products not included in the selective sorting process are potentially dangerous for the environment
and human heath due to the presence of hazardous substances.
Net weight: XXg
This equipment is in compliance with the essential requirements of Directive 1999/5/EC. For further information about the
conformity of this equipment, please write to the following address:
Page 52

Page 53

 Loading...