

Page 1
Portable Fridge/
Freezer
OPERATING INSTRUCTIONS
Section 5
CARE AND MAINTENANCE
If storing for a long period of time, leave the lid slightly open to prevent mildew and odor build-up.
Defrosting:
Humidity can form frost and ice in the interior of the unit. This reduces the cooling capacity
and needs to be removed.
1. Transfer contents of the unit to another cooler or freezer.
2. Turn off by pressing and holding the power button. Disconnect the power cord from the
power source.
3. Open the DRAIN PLUG so the water can drain out as the frost/ice melts. Leave the lid
open for better air circulation. Wipe any water remaining inside until dry. Replace plug
before using again.
4. Never use sharp objects to remove ice or loosen food that might have frozen in place.
Cleaning:
• Unplug before cleaning. Use a mild liquid detergent with a moist cloth to wipe off dirt and
spills. Let dry. Do not clean with metal souring pads, abrasives, or solvents.
• Do not immerse cord or unit in water or other liquids
• Allow unit to defrost before storing
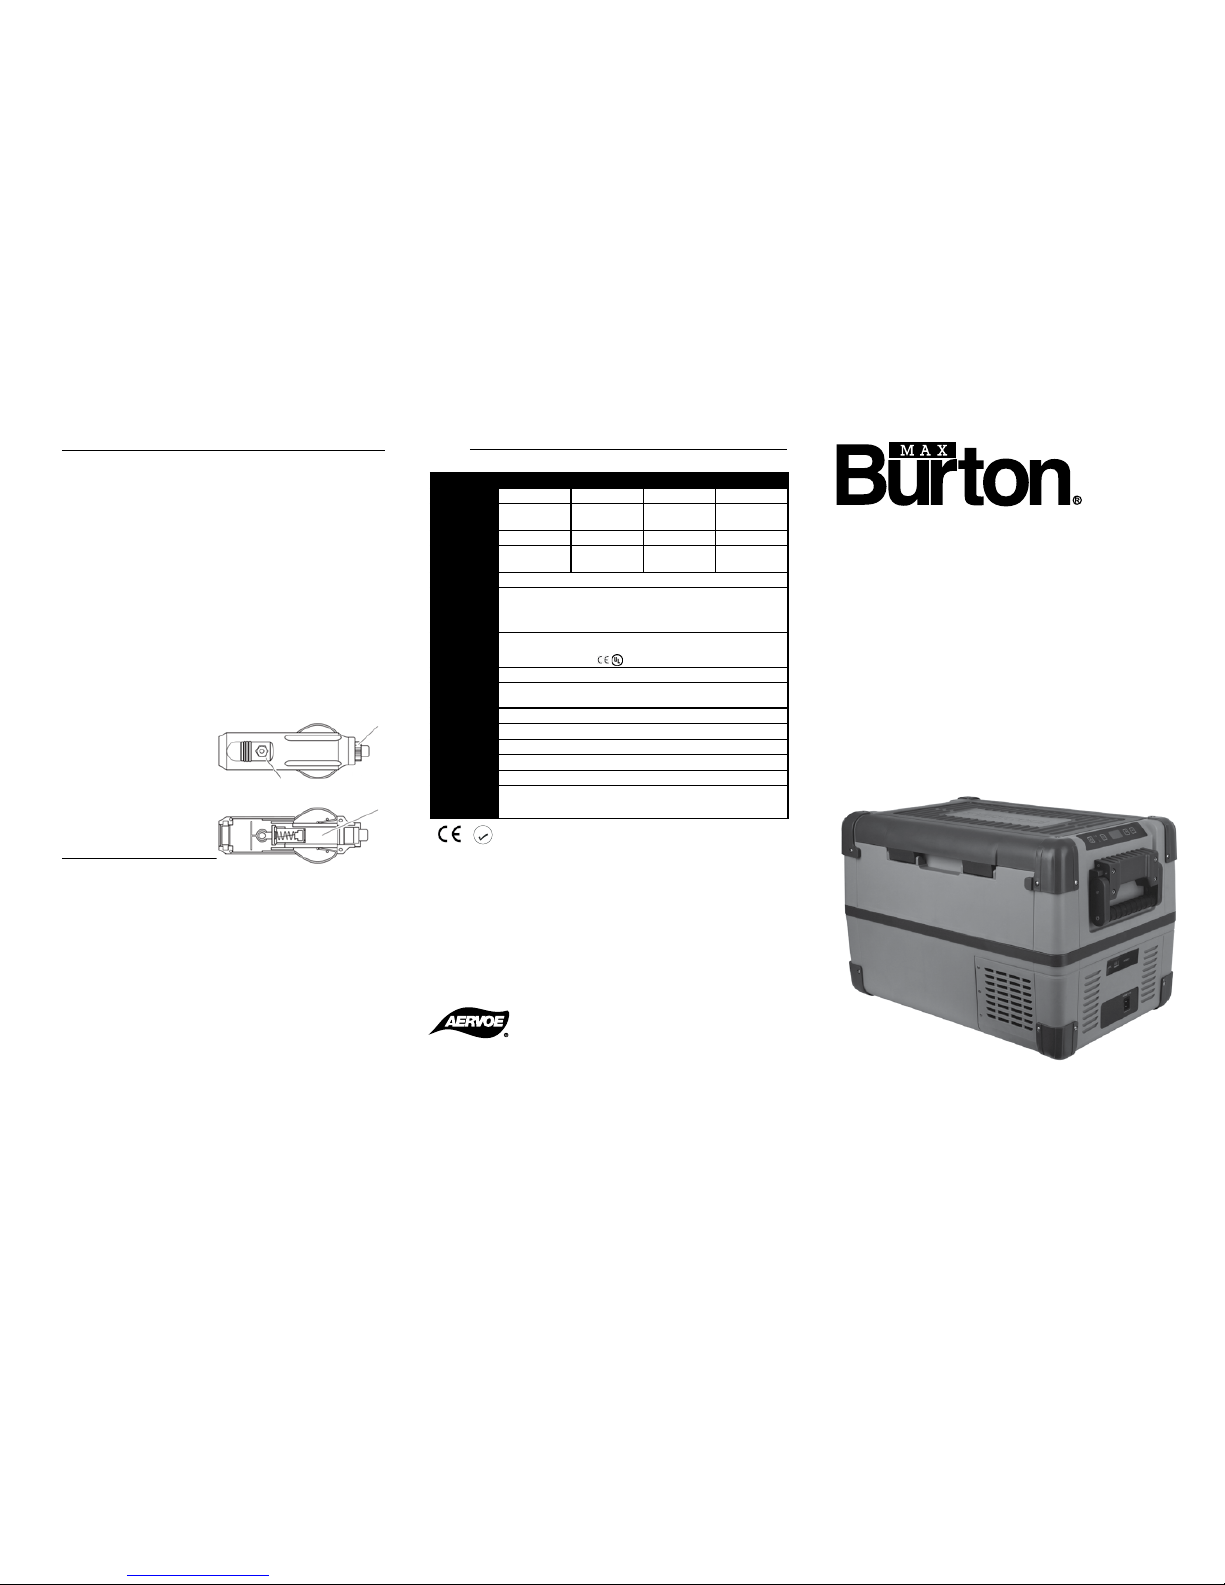
Replacing the 12/24V DC Plug Fuse:
1. Disconnect the power cord from the power source.
2. Turn the red cap on the plug counter clockwise to remove it. Remove the middle
assembly screw.
3. Replace the defective fuse with one with the same rating (see the specifications section).
4. Reassemble in the reverse order.
Inner Compartment Light Replacement:
Contact Aervoe Industries, Inc.
Section 6
TROUBLESHOOTING GUIDE & CUSTOMER SERVICE
If after reviewing the troubleshooting guide the problem is not resolved, do not attempt to repair yourself.
Contact your dealer or call our Customer Service Department at 1-800-227-0196 for additional information.
1. LED indicator light is not lit and the Control Panel is not working
• Make sure the power cords are securely connected.
• Check the battery voltage of the power supply you are using. If it is low, recharge to
the proper level and try again.
• Check the 12V/24V Power Cord fuse. Replace as instructed above if needed.
• If the above actions do not correct the problem, select the EMERGENCY position on
the OPERATION SWITCH.
2. Unit will not cool or freeze
• Ensure all power connections are secure as described above
• Check the temperature set points. Reset if needed.
• Make sure the vents are not blocked or damaged
• If the ambient temperature is above 90ºF cooling will be affected. Make sure the cooler
is out of direct sunlight.
• Frost will affect cooling. If it has built-up, defrost as described above.
• If the above actions do not correct the problem, select the EMERGENCY position on the
OPERATION SWITCH. If that doesn’t fix the problem, contact Aervoe Industries, Inc.
3. Error Codes
• If an error code appears in the CONTROL PANEL, unplug the unit from the power
source and reconnect.
• If the above actions do not correct the problem, select the EMERGENCY position on the
OPERATION SWITCH. If that doesn’t fix the problem, contact Aervoe Industries, Inc.
Section 7
SPECIFICATIONS
Aervoe Industries, Inc.
Gardnerville, NV 89410 • (800) 227-0196
www.aervoe.com • mailbox@aervoe.com
CS:1/16
Max Burton is a registered trademark of Aervoe Industries, Inc.
Models available:
• #6984 30 qt.
• #6987 37 qt.
• #6988 42 qt.
• #6989 53 qt.
#6984 #6987 #6988 #6989
Capacity 30 qt./28L 37 qt./35L 42 qt./40L 53 qt./50L
Dimension 21.9” x 14.7” x 14.5”
(557 x 374 x 367 mm)
21.9” x 14.7” x 16”
(557 x 374 x 407 mm)
28” x 17.7” x 16.7”
(714 x 449 x 426 mm)
28” x 17.7” x 18.5”
(714 x 449 x 469 mm)
Weight 28.5 lbs. (13 kg) 31 lbs. (14 kg) 44.5 lbs. (20.2 kg) 47.5 lbs. (21.5 kg)
Max. Power (est) 12V DC, 3.2A, 38.4W
24V DC, 1.6A, 38.4W
12V DC, 3.8A, 45.6W
24V DC, 1.9A, 45.6W
12V DC, 4.2A, 50.4W
24V DC, 2.2A, 52.8W
12V DC, 4.2A, 50.4W
24V DC, 2.2A, 52.8W
DC Input 12/24V DC
Input: 12/24V DC 6A
Output: 12/24V DC 6A
Cord length: 6 ft.
Protection fuse: 250V DC 5A, 5 x 20 mm glass fuse
DC to AC Converter Input: 100-240V AC
Output: 12V/5A
LED Display Displays the temperature: -7ºF to 53ºF (-22ºC to 10ºC)
Optimum Ambient
Temperature
60ºF - 109ºF (16ºC to 43ºC)
If the ambient temperature is above 90ºF (32ºC) the minimum temperature might not be attained.
LED Indicator Green = compressor is on. Orange = compressor is off. Flashing Red = low voltage. Red = error.
Cooling Unit Low wattage, high efficiency DC compressor. R134A refrigerant.
Insulation CFC-free PU foam, 45mm average thickness
Lid Can be opened from either direction or removed completely.
Handles Spring-loaded rubber wrapped steel handles.
Battery Monitor 1). Switches off when vehicle battery becomes too low. 2). Switches off automatically if plugged
into a 12V DC vehicle battery and the battery level becomes too low when the engine is turned
off. 3). Auto power shut-off when battery voltage falls below a preset level.
Warranty
1-year warranty to the original registered owner on all products from date of purchase. User
returns, exchanges and defective refunds must be made with the original place of purchase,
for the first 30 days after purchase in accordance with the distributor/retailer’s return policy.
After 30 days of purchase and with a Warranty Registration card on file, the buyer can make a
product warranty claim directly with Aervoe Industries, Inc. There is no warranty for buyer’s
remorse. Because Aervoe cannot control Buyer’s handling or use of product, Aervoe makes no
warranty expressed or implied when not used or stored in accordance with directions. Aervoe
shall not be liable for cost of labor, incidental or consequential damages, and this warranty is
limited to replacement or repair of product or credit of purchase.
RoHS
COMPLIANT
Red
Cap
Assembly
Screw
Fuse
Page 2
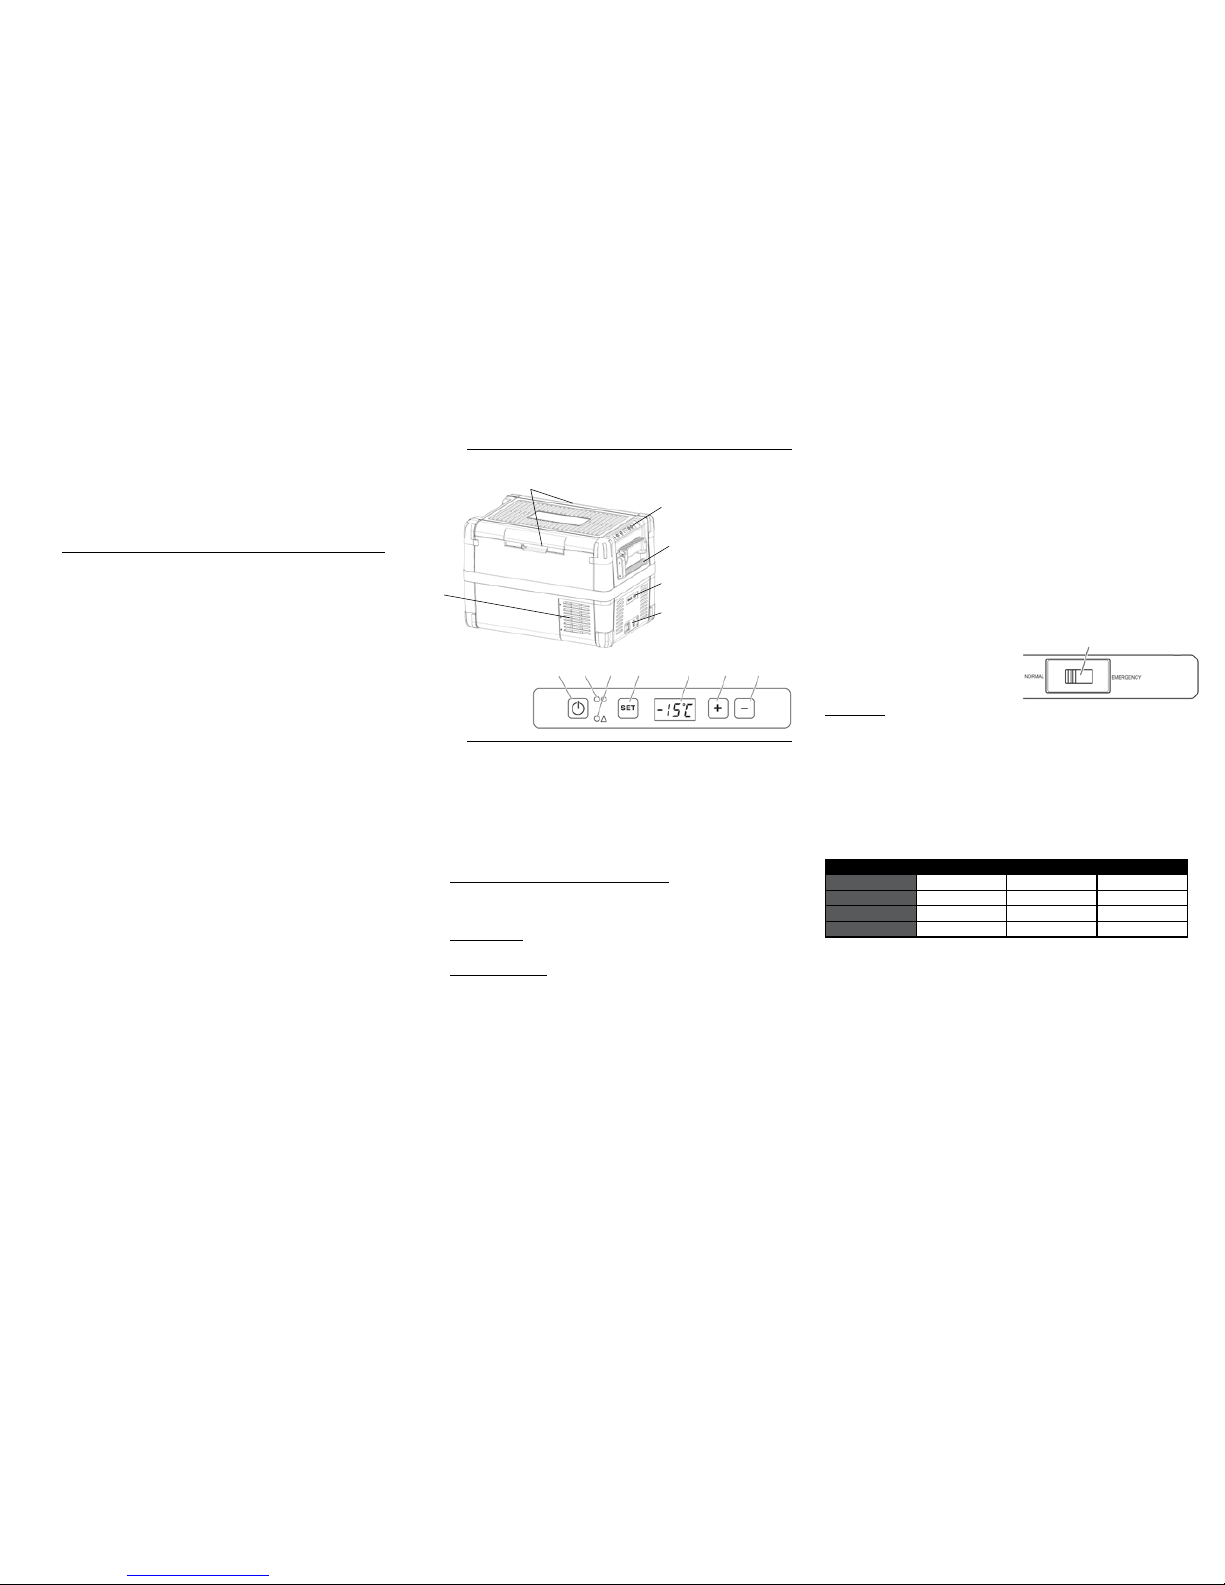
Section 2
PARTS IDENTIFICATION
Section 3
OPERATING INSTRUCTIONS
Before first use, clean the inside with a damp cloth.
Set Up:
1. Make sure all packing materials have been removed.
2. The lid can be hinged from either direction or removed completely. Squeeze and lift up on
either or both latches to open. To close push firmly to ensure the latch seals completely.
Connecting To A Power Supply (12V/24V DC or 120V AC):
• Connect the rubber DC plug on the DC POWER CORD into the DC INPUT of the unit.
• 12V/24V DC Operation (vehicle or portable power center): Before plugging the other end
into a vehicle’s power receptacle, start the engine. If the vehicle battery becomes too low
it will automatically shut down to protect the battery. Plug the DC plug with the red tip
into the DC output of a portable power center or vehicle power receptacle.
• 120V AC Operation: Plug the DC plug with the red tip into the female socket of the DC to
AC converter. Plug the converter into any 120V AC electrical outlet.
• Solar Collector Operation: Because this unit contains a low-wattage compressor,
the Sierra Wave 80-Watt or 120-Watt Solar Collector can be used to power it. If your
model is the #6988 (42-qt.) or #6989 (53-qt.) unit, use the 120-Watt Collector. Read all
instructions provided with the solar collector. The solar charge controller provided with
the Sierra Wave Collector must be used to prevent damage to the cooler or collector.
Plug the DC plug with the red tip into the female socket of the barrel power adapter
provided with the solar collector. Plug that adapter into the LOAD port of the solar charge
controller.
Energy Saving Tips:
• Choose a well ventilated location out of direct sunlight
• Allow warm food to cool before placing inside
• Do not open more than necessary and for longer than needed
• Defrost if a layer of ice forms
• Avoid unnecessary low temperatures
Max Burton® Portable Fridge/Freezer
#6984-30 qt., #6987-37 qt., #6988-42 qt., #6989-53 qt.
This unit provides efficient refrigeration and freezing in a well designed, rugged cooler. It will
operate from any 12V/24V DC power supply, such as a vehicle 12V power receptacle, Sierra
Wave® portable power center, or Sierra Wave® 80-Watt or 120-Watt Solar Collector. It may also
be used with a 120V AC electrical outlet when paired with the included DC to AC converter. The
temperature can be adjusted from -7ºF to 53ºF by using the control panel.
Section 1
Important Warnings & Safeguards
Read all instructions thoroughly before operating this unit to avoid injury to self or property
and avoid damage to the unit. Keep instructions handy for reference during use.
ENERGIZED EQUIPMENT - ELECTRICAL SHOCK HAZARD
• WARNING: NO USER SERVICEABLE PARTS. Never dismantle the unit or adapters to
inspect or repair. Contact Aervoe Industries, Inc. for service information.
• CAUTION: Contains non-flammable refrigerant gas R134A under pressure. Stop use
immediately if you notice a leak or damage. Move the unit outdoors to prevent contact
with gas. Contact Aervoe Industries, Inc. for service information.
• For proper ventilation do not block the air inlet or exhaust fan. Allow at least 12” of space
between the unit and walls or other objects.
• Disconnect from the power adapter when not in use
• Administer close supervision when operating around children or people with disabilities
• Do not operate if cord is frayed and wires are exposed
• Use only in a dry environment. Do not submerge in liquid or use in a wet outdoor
environment.
• Do not use or store near open flame or sources of heat
• Do not use in flammable or explosive environments. Never store aerosol containers or
other flammables inside.
• Do not clean with corrosive chemicals. Follow the cleaning instructions provided.
• Cooling performance can be affected when ambient temperatures are below 32ºF or
above 90ºF. Place out of direct sunlight to prevent overheating.
• Defrosting may be required. See instructions provided.
• Do not dispose of the unit in a landfill as it contains refrigerant gas. Contact your local
waste management authority for proper disposal instructions.
FOODS, LIQUIDS, AND MEDICINE
• For safety, keep foods in closed containers
• To prevent spoilage, remove contents prior to storage. Routinely clean the inside of the
unit according to the care and maintenance instructions provided.
• If used to refrigerate medication, it is the sole responsibility of the user to ensure
proper temperature is maintained. Aervoe Industries, Inc. assumes no responsibility for
improperly refrigerated medications.
Using the Fridge/Freezer:
1. Place the OPERATION SWITCH in the NORMAL position.
2. Press and hold the POWER BUTTON for 1-2 seconds. The LED POWER INDICATOR LIGHT
will illuminate (see color information in the Specifications section). Press and hold again to
turn off.
3. The CONTROL PANEL will show the current temperature of the large interior compartment.
The temperature of the small compartment will be higher than the large compartment and is
suitable for refrigerated foods.
4. Temperature can be displayed in either Fahrenheit or Celsius. Press the SET BUTTON 2
times and use the (+) or (-) button to select either Fahrenheit or Celsius as your preferred
display. The display will flash several times and return to the current temperature.
5. To set the temperature between -7ºF and 53ºF (-22ºC and 10ºC), press the SET BUTTON
once and use the (+) or (-) buttons to increase or decrease the temperature. The requested
temperature will flash several times and return to the current temperature.
NOTE: EMERGENCY SWITCH. If a failure occurs, slide the OPERATION SWITCH to the
EMERGENCY position. The unit will operate in full cooling mode to preserve foods until the failure
is resolved. Contact Aervoe Industries, Inc. for service.
Battery Monitor:
Protects your vehicle battery against excessive discharge. If the unit is operated when the vehicle
engine is off, it will automatically switch off and the red LED WARNING INDICATOR will flash
when the battery voltage falls below a set level. The unit will switch back on once the vehicle
battery has been recharged to a safe voltage. If the warning LED fails to stop flashing after the
battery voltage has returned to a normal level, unplug the unit from the power supply to reset.
The Meter may be set for Low, Medium and High sensitivity. When High is selected the battery
monitor will react at a higher voltage tolerance. High is recommended when operating from a
vehicle battery. Low is recommended if operating from a 12V/24V power supply or solar collector.
1. Press the SET BUTTON 3 times.
2. Use the (+) or (-) buttons to select the Battery Monitor Mode. The display will flash several
times and return to the current temperature.
Battery Monitor Mode Lo Md Hi
12V Off Voltage 10.1V 11.4V 11.8V
12V Restart Voltage 11.4V 12.2V 12.6V
24V Off Voltage 21.5V 24.1V 24.6V
24V Restart Voltage 23.0V 25.3V 26.2V
EXAMPLES OF OPERATING TIMES USING SIERRA WAVE POWER CENTERS AND BASED ON
THE COMPRESSOR IN CONTINUOUS OPERATION DURING THE COOLING CYCLE. LONGER
TIMES ARE OBTAINED AFTER SET TEMPERATURE IS ACHIEVED AND THE COMPRESSOR ISN’T
RUNNING. Run times are indefinite when continuous power is supplied with a solar collector,
12V/24V DC, and 120V AC power. Times listed are approximate and based on a fully charged
power center with a preset temperature of 10F and ambient temperature of 70F.
#9695 PowerPro 200 6+ hours
#9675 1000W Energy Center 30+ hours
#9690 1500W Center (500W capacity) 15+ hours
#9690 + #9691 Battery (1000W capacity) 30+ hours
#9690 + 2 #9691 Batteries (1500W capacity) 45+ hours
Latches
Handle
Control Panel
Operation Switch
DC Input
Vent
Power
Button
Decrease
Button
Increase
Button
Control Panel
Display
Set
Button
LED
Warning
Indicator
LED
Power
Indicator
Operation Switch
 Loading...