

Page 1
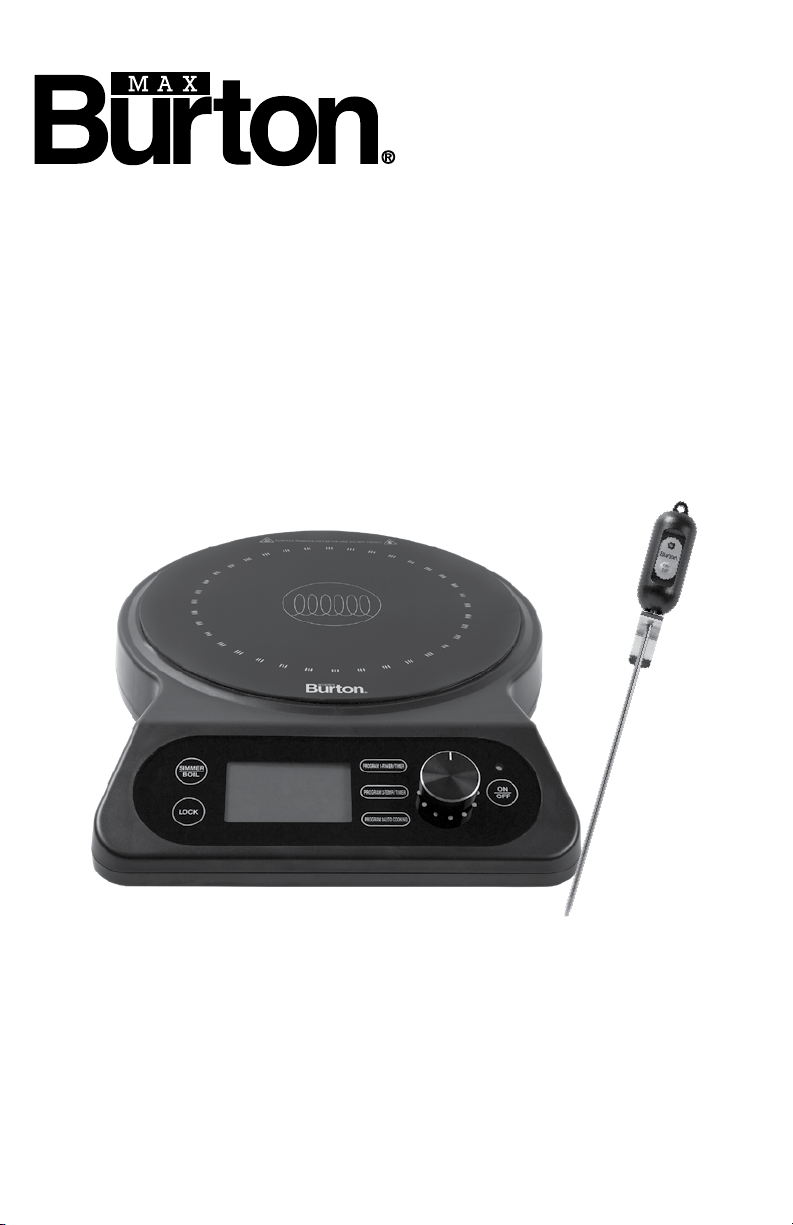
Digital Induction
Cooktop 18XL
OPERATING INSTRUCTIONS
Featuring the latest in induction cooking technology.
• Precise temperature control using the included wireless
Temperature Probe - ideal for sous vide, maintaining oil
temperature, beer brewing and much more.
• Extra large 9” induction system accomadates larger cookware.
• Bright LCD display, touchpad and push-to set control knob.
Page 2

IMPORTANT WARNINGS & SAFEGUARDS
Read all instructions thoroughly before operating this unit to avoid injury to self or property and avoid
damage to the unit. Keep instructions handy for reference during use.
Caution: This unit emits an electromagnetic field. Persons with cardiac implanted pacemakers or
other implantable heart devices should consult with their physician before using.
W A R N I N G
RISK OF FIRE OR ELECTRICAL SHOCK
DO NOT OPEN
Electrical Hazards
• Do Not disassemble. There are no user serviceable parts. Contact Aervoe Industries, Inc. at 800227-0196 for assistance.
• Do Not submerge unit or electrical cord in liquid, touch with wet hands, or use in a wet
environment
• Do Not use if cooktop is cracked
• Do Not operate if the cord has frayed and wires are exposed
• Do Not let cord hang over the edge of a table or counter
• Never move the unit by pulling on the power cord
Personal Safety
• Do Not touch the hot cooktop surface or cookware. It may remain hot for several minutes after use.
• Do Not move the unit during cooking or with hot cookware on top
• Do Not place metal objects on the cooktop other than metal cookware or our Max Burton
Induction Interface Disk.
• Do Not heat unopened cans of food. The container could explode.
• Do Not use in or around flammable or explosive environments
• Administer close supervision when operating around children
• Electric shock hazard. Only a qualified expert may perform repair and maintenance work on this
unit. Never attempt to repair yourself.
Product & Property Damage
• Do Not place cookware with contents heavier than 60 pounds on the glass plate
• Do Not block the air inlet or exhaust fan. Keep the rear and sides of the unit at least 4” from walls
for proper ventilation
• Do Not clean in a dishwasher
• Do Not use the unit for other than its intended use
• Do Not place objects with a magnetic strip near the unit while in operation
• Use a dedicated 120V, 15A electrical outlet that is not shared with other appliances to avoid
overheating or shutdown
FCC REQUIREMENTS
NOTE: This equipment has been tested and found to comply with the limits for a Class B digital device,
pursuant to Part 15 of the FCC Rules. These limits are designed to provide reasonable protection
against harmful interference in a residential installation.
Operation is subject to the following two conditions:
1. This device may not cause harmful interference
2. This device must accept any interference received, including interference that may cause
undesired operation.
This equipment generates uses and can radiate radio frequency energy and, if not installed and used in
accordance with the instructions, may cause harmful interference to radio communications. However,
there is no guarantee that interference will not occur in a particular installation. If this equipment does
2
Page 3
cause harmful interference to radio or television reception, which can be determined by turning the
equipment off and on, the user is encouraged to try to correct the interference by one or more of the
following measures:
• Reorient or relocate the receiving antenna
• Increase the separation between the equipment and receiver
• Connect the equipment into an outlet on a circuit different from that to which the receiver is
connected
• Consult the dealer or an experienced radio/TV technician for help.
FCC ID#
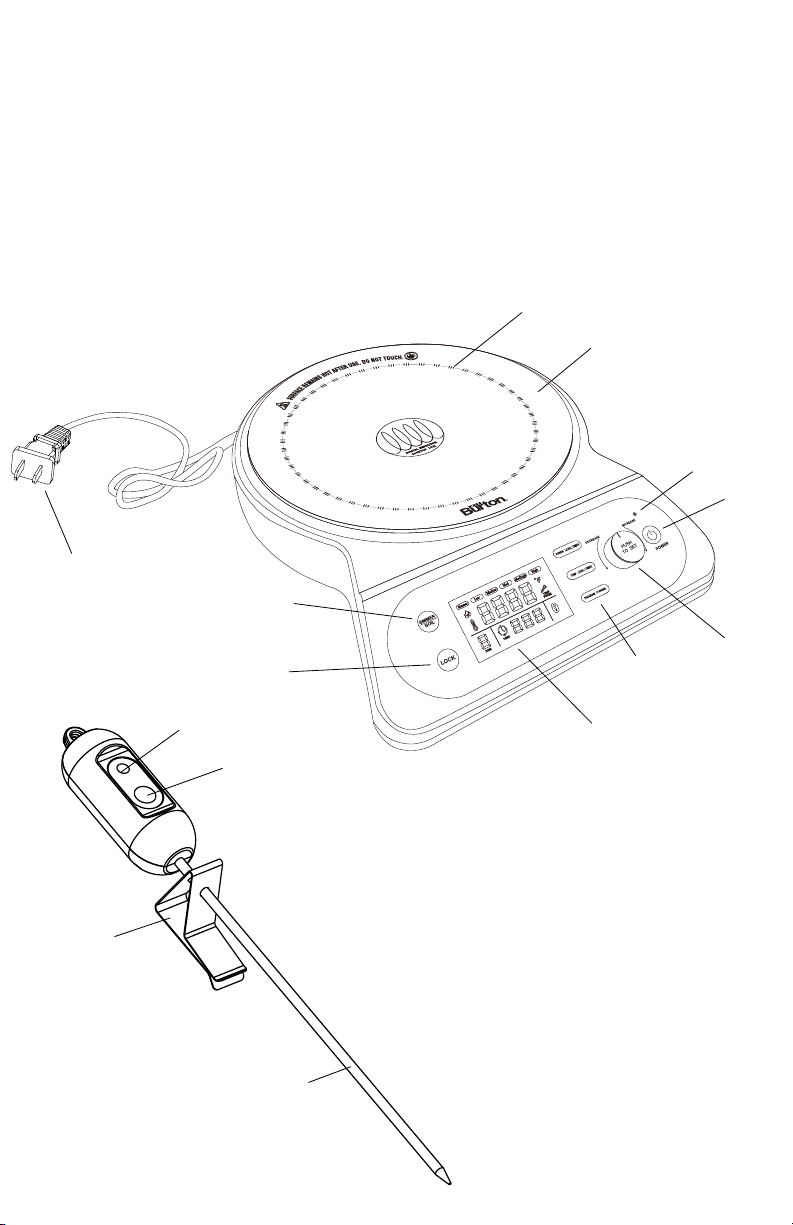
PARTS IDENTIFICATION
Power Cord
Power LED
One Touch
Simmer & Boil
Function Lock
ON/OFF Button
WIRELESS TEMPERATURE PROBE
Cookware Placement Guides
Glass Cooktop
Function Buttons
LCD Display
Power Indicator LED
ON/OFF Button
Push To Set
Control Knob
Cookware
Clip
Temperature Probe
3
Page 4
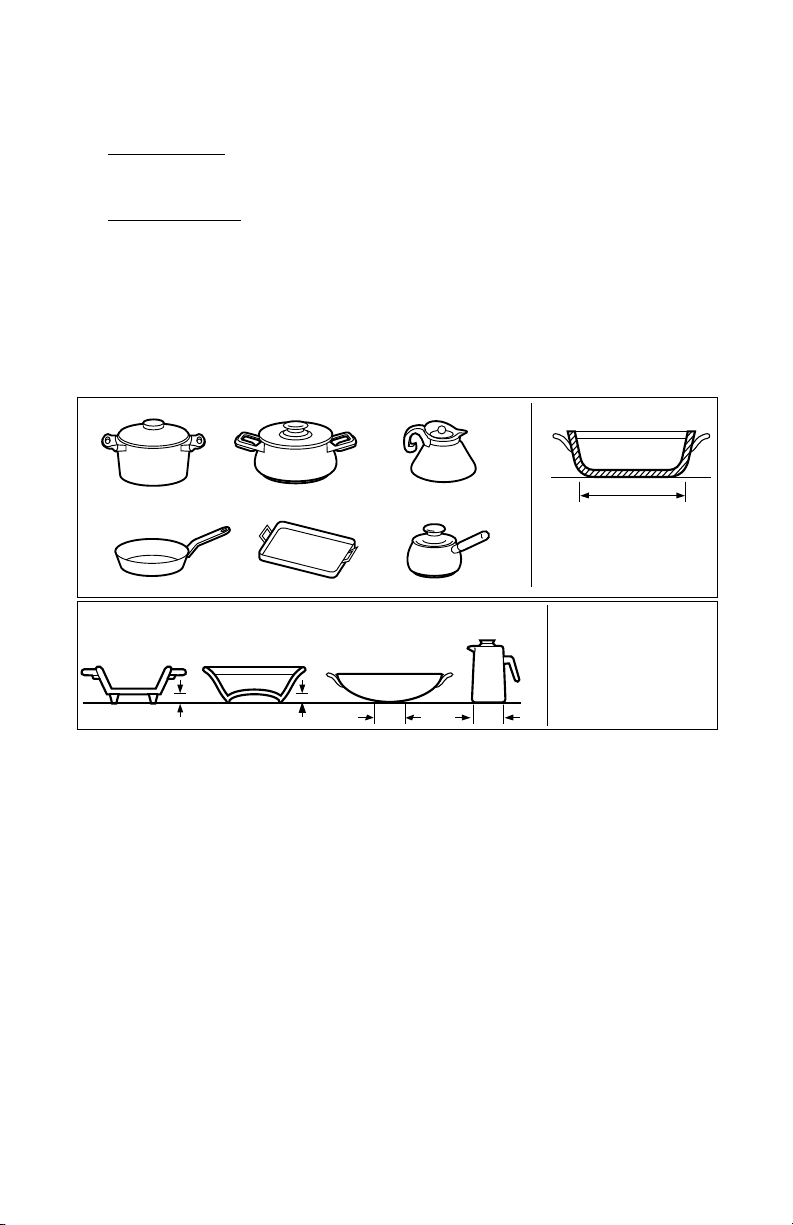
SELECTING THE PROPER COOKWARE
Your induction cooktop will not operate without the proper cookware. Size, shape, and construction
are all factors for suitable cookware.
1. Suitable Cookware: the base of the cookware must be made of ferrous magnetic materials
including cast iron, carbon steel, magnetic stainless steel or cast aluminum with an induction
rated base.
2. Unsuitable Cookware: will cause an E0 error and the cooktop will not operate.
3. In general, if a magnet will stick to the bottom of the cookware, it will work on your induction
cooktop. A magnet is included for you to use to test your cookware.
4. If proper cookware is not available we offer an Induction Interface Disk (#6010) that will provide
the necessary connectivity between the induction cooktop and your non-suitable cookware. It is
normal for reduced efficiency when using the Interface Disk.
NOTE: Different types of cookware and sizes will result in varying wattage/heat efficiency. For maximum
efficiency, do not use cookware with a base larger than 14” or a combined weight over 60 lbs.
SUITABLE COOKWARE
Cast Iron Pot Magnetic Magnetic
Stainless Steel Pot Stainless Steel/Enamel
Iron/Steel Frying Pan Iron Tray/Grille Iron Enamelware
UNSUITABLE COOKWARE
Material: Glass, Ceramic, Copper, Aluminum, Non Magnetic Stainless Steel
1.5”
4.5”1.5” 4.5”
Size and Form
Diameter 4.5” minimum
Cookware should have
a flat surface.
Unsuitable Size and Form
Cookware of which the
height from induction
plate is over 1.5” and
the bottom diameter is
less than 4.5”.
OPERATING INSTRUCTIONS
If the unit doesn’t operate as intended, please see the Troubleshooting Guide.
Start-Up
1. Select cookware according to the instructions above.
2. Place the unit on a dry, level surface at least 4 inches away from other objects to allow proper
ventilation.
3. Plug the power cord into a dedicated 120V/15A electrical socket. For optimum performance,
use only one appliance per outlet. A red LED above ON/OFF will appear indicating the cooktop is
ready to use.
4. Before turning the unit on, make sure the ingredients are in the cookware and place it on the
glass plate centered over the COOKWARE PLACEMENT GUIDES.
5. Touch the ON/OFF symbol to turn the unit on. The LCD DISPLAY will illuminate and the default
PL1 will show in the window. The cooling fan will turn on.
NOTE: It is normal for the cooling fan to operate for up to 2 minutes after the unit has powered off.
4
Page 5
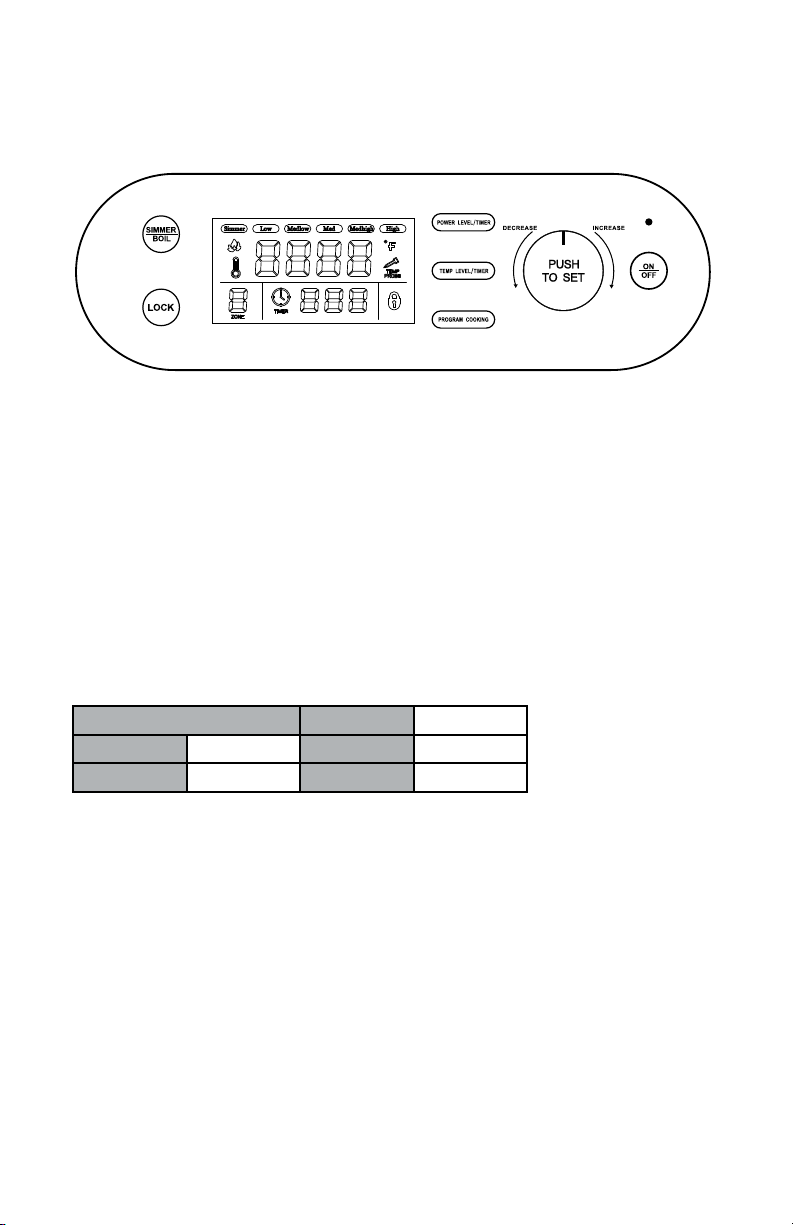
Controls
All operations are easily controlled using the touchpad and PUSH TO SET CONTROL KNOB. The
control knob will increase or decrease your selection by turning the knob. Once a desired setting is
reached, push the knob to select it.
POWER LEVEL/TIMER MODE (10-watt settings)
This is the default mode. Use this mode for quick heat-up and where close temperature control is not
a requirement. The higher the Power Level, the more wattage applied to the cookware and increased
heating rate. Cookware will respond differently depending on type and size.
1. Touch the POWER LEVEL/TIMER symbol to select this mode. The default PL-1 will flash in the
LCD window. Use the CONTROL KNOB to increase (clockwise) or decrease (counter-clockwise)
the power as needed. Push the KNOB to lock in the setting.
2. Next the TIMER symbol will flash in the LCD window. You will then be able to set the timer from
1-180 minutes. For safety only 180-minutes is available. If 0 is selected or nothing is selected
within a few seconds, the timer function will not be used.
3. Your cooktop will follow the power level and time settings you selected and turn off when
finished. You can change the settings at any time by pressing the CONTROL KNOB and repeat
these steps.
POWER LEVEL SETTINGS MEDIUM
LOW
MED/LOW
ONE-TOUCH & LOCK FUNCTIONS
1. One-touch BOIL function will instantly select the PL-10 setting.
2. One-Touch SIMMER function will instantly select 100°F.
3. Touch the LOCK symbol at any time to lock in your desired setting. To unlock, touch and hold the
LOCK symbol for 2 seconds or power the unit off and restart.
TEMP LEVEL/TIMER MODE (21 settings)
This mode is best when more accurate cooking temperature control is needed. It is important to
realize that the following settings measure the temperature of the base of your cookware and not the
temperature of the food you are cooking.
NOTE: For more precise temperature control, go to the TEMPERATURE PROBE section below.
1. Touch the TEMP LEVEL/TIMER symbol to select this mode. The default 100° temperature will
flash in the LCD window. Use the CONTROL KNOB to increase (clockwise) or decrease (counterclockwise) the temperature as needed. Push the KNOB to lock in the setting.
Temperature settings will increase by 10° from 100° to 200°F and by 25° from 225° to 450°F.
PL1, PL2, PL3
PL4, PL5
MED/HIGH
HIGH
PL6, PL7
PL8, PL9
PL10
5
Page 6

2. Next the TIMER symbol will flash in the LCD window. You will then be able to set the timer from
0-180 minutes. For safety only 180-minutes is available. If 0 is selected or nothing is selected
within a few a few seconds, the timer function will not be used.
3. Your cooktop will follow the temperature level and time settings you selected and turn off when
finished. You can change the settings at any time by pressing the CONTROL KNOB and repeat
these steps.
SIMMER
LOW
MED/LOW
100º - 120º
130º-160º
170º-200º
MEDIUM
MED/HIGH
HIGH
225º-275º
300º-375º
400º-450º
TEMPERATURE PROBE MODE FOR PRECISE TEMPERATURE CONTROL
When precise temperature control is needed, use the wireless TEMPERATURE PROBE. This feature
may be used with the TEMP LEVEL or PROGRAM COOKING modes only. Selected temperature will be
closely maintained.
1. Clip the PROBE to the inside of the pan so that it is submerged in the pan contents or insert it
into the meat you are cooking. It should not touch the bottom of the pan.
2. Press the ON/OFF button on the PROBE. A red LED on the probe will light up periodically to show
it is active and a temperature probe icon will show in the LCD display during operation.
3. The current temperature of the food you are cooking (shown on the right side of LCD display)
and the temperature you set it to reach (shown on the left side of LCD display) will alternately
flash in the LCD display.
4. Clean the probe after use and store.
5. If the red LED does not come on when the probe is turned on, replace the battery with a standard
A23/12V alkaline battery. The probe will automatically shut down if the induction is turned off or
no change in temperature is detected after 30 minutes. Reset power as noted above.
6. Time can be set from 1-360 minutes below 200ºF and from 1-180 minutes above 225ºF.
PROGRAM COOKING MODE
This mode allows you to program up to 3 cooking time and temperature zones to create different
stages of cooking. You can program all 3 zones or just one. It may be used in slow cooking, sous vide,
beer brewing and much more; and can be used with or without the temperature probe.
Example: Zone #1 set at 300°F for 60 minutes; Zone #2 set at 225°F for 75 minutes; Zone #3 set at
100°F for 60 minutes.
1. Touch the PROGRAMMABLE COOKING symbol once to program Zone 1.
2. Zone 1 Temperature Setting:
• 100ºF will flash in the display
• Set your desired temperature by turning the CONTROL KNOB
• Push the KNOB to lock in the temperature. It will then advance to the timer setting.
3. Zone 1 Timer Setting:
• The timer icon will flash in the display
• Set your desired time by turning the CONTROL KNOB
• Push the KNOB to lock in the time and advance to Zone #2
Note: Time can be set from 1-360 minutes below 200ºF and from 1-180 minutes above 225ºF.
4. Zone 2 and Zone 3 Settings:
• Repeat the above instructions for Zone 2 and Zone 3
• Each zone must be programed quickly, or the previous setting will be locked in
• If either Zone 2 or Zone 3 are not needed, simply set the temperature and time the same
as Zone 1.
6
Page 7

FRANÇAIS
5. After all 3 programs have been set, the LCD display will cycle through all of the settings and lock
in.
6. If changes are needed after they are set, touch and hold the LOCK icon for 2 seconds and restart
from the beginning.
CARE AND MAINTENANCE
• Do Not clean with metal scouring pads, abrasives, or solvents
• Do Not immerse cord or unit in water or other liquids
• Unplug when not in use and before cleaning
• Allow unit to cool before storing
• Do Not use if glass cooktop or power cord is damaged
• Keep away from other sources of heat
• Unplug and let cool before cleaning. Use a mild liquid detergent with a moist cloth to wipe off
grease and stains. Let dry. Cover the unit to protect it from dust when being stored.
• Clean the TEMPERATURE PROBE after use.
TROUBLESHOOTING GUIDE & CUSTOMER SERVICE
If after reviewing the troubleshooting guide the problem is not resolved, do not attempt to repair.
Contact your dealer or call our Customer Service Department at 1-800-227-0196 for additional
information.
1. The Power Indicator light does not illuminate and/or the exhaust fan is not running.
• The power plug may be loose in the electrical outlet or there might be a 120V power
supply fault. Reset the circuit breaker and retry.
• E3 error code means the 120V input power supply is receiving voltage that is too high or
too low and shuts down after one minute. Unplug from the power receptacle and use a
voltage sensor to verify that the voltage is at least 110V AC and not more than 120V AC. If
not, switch electrical outlets or correct before operating the unit.
• The fuse or circuit breaker has malfunctioned or the unit is unplugged.
2. The fan is not running and the cookware is not heating up. E0 or E2 error code may be displayed.
• The cookware may be unsuitable and it is preventing operation (see Selecting the Proper
Cookware). If no cookware is present an E0 code will show.
• The cookware needs to be centered on the glass plate
• The glass plate may be cracked
3. The induction cooktop suddenly stops heating during operation and shuts down. E1 or E2 error
code may be displayed.
• The overheating sensor detected an excessive high glass top temperature and caused it to
automatically shut down. Heating empty cookware may cause this. Remove cookware and
let everything cool down and retry.
• The air inlet or exhaust fan is blocked or failed and caused it to overheat. Make sure the
unit is at least 4” from walls and other objects and all vents are clear.
4. The TEMPERATURE PROBE is not accurately keeping to the set temperature.
• Verify the Temperature Mode is selected.
• Follow the instructions in the Temperature Probe Section above to turn it back on.
7
Page 8

SPECIFICATIONS
INDUCTION TYPE Household rated
POWER SOURCE 120V/15A, 60Hz
WATTAGE RANGE 500 - 1800 watts (PL1-PL10)
TEMPERATURE RANGE 100ºF - 450ºF (21 settings)
WEIGHT 8 lbs. (3.6 kg)
DIMENSIONS 16.25” x 13.25” x 3.5” (41.28 x 33.65 x 8.9 cm)
CORD LENGTH 5 ft. (1.52m)
GLASS COOKTOP DIMENSIONS 11.5” round (29.2 cm)
MAXIMUM WEIGHT LOAD 60 lbs. (cookware & contents)
TEMPERATURE PROBE 10” Stainless steel probe
Replaceable A23 12-volt alkaline battery
SAFETY FEATURES Non-suitable cookware detection
Overheat protection
Improper voltage supply detection
APPROVALS ETL US (conforms to UL 1026 household rated)
FCC ID# YT9-6600P
PRODUCT WARRANTY (see warranty card included)
Aervoe Industries, Inc. warrants that this product shall be free from all defects in material and
workmanship for 1 year from date of purchase. All merchandise must be returned to the original place
of purchase to be processed according to the retailer return policy. A warranty card must be on file
with Aervoe Industries, Inc. within 30-days of purchase and proof of purchase is required to obtain
warranty performance.
8
Page 9

FRANÇAIS
PRÉCAUTIONS ET AVERTISSEMENTS IMPORTANTS
Lire toutes les instructions complètement avant de mettre l’appareil en marche afin d’éviter tout
dommage pour les personnes et les biens ainsi qu’éviter tout dommage à l’appareil. Conserver les
instructions pour références ultérieures.
Attention : Cet appareil émet un champ électromagnétique. Les personnes avec les stimulateurs
cardiaques ou autres dispositifs cardiaques implantés devraient consulter un médecin avant d’utiliser.
AVERTISSEMENT
RISQUE D'INCENDIE OU DE CHOC ÉLECTRIQUE
NE PAS OUVRIR
Danger Électrique
• Ne pas démontez. Il n’y a aucune pièce utile d’utilisateur à l’intérieur. Communiquer Aervoe
Industries, Inc. au 800-227-0196 pour assistance.
• Ne pas plonger l’appareil ou cordon électrique dans un liquide, toucher avec les mains mouillé,
ou bien utiliser dans un environnent humide
• Ne pas utiliser si la surface de cuisson est fendue
• Ne pas utiliser si le cordon est endommagé et les câbles sont exposés
• Ne pas laisser le cordon pendre par dessus le bord de table ou comptoir
• Ne jamais essayer de déplacer l’appareil en tirant sur le cordon électrique
Sécurité Personnelle
• Ne pas toucher la surface de cuisson chaude ou articles de cuisson. Il pourrait rester chaud
pendant plusieurs minutes après l’utilisation.
• Ne pas déplacer l’appareil pendant la cuisson ou avec des articles de cuissons sur le dessus.
• Ne pas placer des objets de métal autre que des articles de cuissons de métal ou bien notre Max
Burton Induction Interface Disk sur la surface de cuisson
• Ne pas chauffer de contenants fermés, la pression pourrait s’accumuler et causer une explosion.
• Ne pas utiliser dans ou autour d’environnent explosifs ou inflammable
• La surveillance proche est exigée quand l’appareil est utilisé dans le voisinage d’enfants
• Danger d’électrocution. Les travaux d’entretien et réparation doivent être confiée à des personnes compétentes. N’essayez jamais de réparer l’appareil.
Blessures ou Dommage d’Équipement
• Ne pas placer les appareils de cuissons avec contenus pesant plus de 60 livres sur la plaque de
verre
• Ne pas boucher les entrées ou les sorties d’air. Maintenir l’arrière et les côtés de l’appareil à 4”
des murs afin d’assurer une bonne ventilation
• Ne pas passer au lave vaisselle
• N’utilisez jamais l’appareil à des fins autres que celles pour lesquelles elle a été conçue
• Ne pas placer les objets avec bande magnétique prés de l’appareil pendant le fonctionnement
• Utiliser une prise murale dédiée de 120V, 15A qui n’est pas partagé avec d’autres électroménagers afin d’éviter qu’il surchauffe ou l’arrêt
EXIGENCES DU FCC
Remarque : Cet équipement a été testé et il a été établi qu’il respecte les limitations d’un appareil
numérique de classe B, conformément à l’article 15 des règlementations de la FCC (Commission
fédérale des communications) Ces restrictions visent à garantir une protection suffisante contre les
interférences nuisibles dans le cadre d’une installation à domicile.
Son fonctionnement est soumis aux deux conditions suivantes:
1. Cet appareil ne doit pas causer d’interférences nuisibles,
2. Cet appareil doit accepter toute interférence reçue, y compris les interférences pouvant entraîner
un fonctionnement non désiré.
Cet équipement génère, utilise et peut émettre une énergie par radiofréquence et, s’il n’est pas installé
et employé conformément aux instructions, il peut provoquer des interférences nuisibles aux commu-
9
Page 10

Power LED
nications radio. Il n’existe toutefois aucune garantie que de telles interférences ne se produiront pas
dans une installation particulière. Si ce matériel provoque des interférences nuisibles aux réceptions
radio ou télévisuelle (ce qui peut être vérifié en éteignant puis en rallumant l’équipement), il est conseillé à l’utilisateur de chercher à corriger le problème par l’un des moyens suivants:
• Réorienter ou déplacer l’antenne réceptrice.
• Augmenter l’espacement entre l’équipement et le récepteur.
• Brancher l’appareil sur un circuit différent de celui du récepteur.
• Contacter le revendeur ou un technicien qualifié.
FCC ID#
IDENTIFICATION DES PIECES
Cookware Placement Guides
Glass Cooktop
Power Indicator LED
Power Cord
One Touch
Simmer & Boil
Function Lock
Function Buttons
ON/OFF Button
Push To Set
Control Knob
LCD Display
ON/OFF Button
SONDE DE TEMPÉRATURE SANS FIL
Cookware
Clip
Temperature Probe
10
Page 11

CHOISIR LES RECIPIENTS APPROPRIE
Votre surface de cuisson à induction ne fonctionnera pas sans les articles de cuissons appropriés.
La taille, forme et construction sont tous des facteurs propices à la sélection d’articles de cuissons
convenable.
1. Articles De cuissons Approprié : la base des articles doit être fait de matériel ferromagnétique, tel
en fonte, acier au carbone, aciers inoxydables magnétiques ou bien l’aluminium coulé avec une
base à induction.
2. Articles De cuissons Inadapté : causera l’erreur E0 et la surface de cuisson ne fonctionnera pas.
3. En général, si un aimant s’attache à la base d’un article de cuisson approprié, ce dernier fonctionnera sur votre surface de cuisson à induction.
4. Si les articles de cuissons appropriés ne sont pas disponibles, nous offrons un Induction
Interface Disk (#6010) qui fourni la connectivité nécessaire entre la surface d’induction et vos
articles de cuissons inadapté. Il est normal de connaître une réduction d’efficacité en utilisant le
Interface Disk.
NOTE : Différents type et tailles d’articles de cuissons résulteront en efficacité de puissance/calorifique
variées. Pour une plus grande efficacité, ne pas utiliser des articles de cuissons avec une base plus
large que 13” ou d’un poids de plus de 60 lb.
Batterie de cuisine appropriée
Casserole en fonte Casserole en acier Acier inoxydable
inoxydable magnétique magnétique/émail
Poêle à frire Plateau/plaque à Fer émaillé
en fer/acier frire en fer
Batterie de cuisine inappropriée
Matériaux : Verre, céramique, cuivre, aluminium, acier inoxydable non magnétique
1.5” 1.5” 4.5” 4.5”
Taille et forme
4.5 po (11.4 cm) de
diamètre minimum
Les ustensiles doivent avoir
une surface plane.
Taille et forme
inappropriée
Une batterie de cuisine dont la
hauteur à partir de la plaque à
induction est supérieure à 1.5
po (3.8 cm) et le diamètre du
fond est inférieur`
à 4.5 po (11.4
cm).
11
Page 12

MODE D’EMPLOI
Si l’appareil ne fonctionne pas comme prévu, veuillez consulter le guide de dépannage.
Commencez
1. Sélectionnez la batterie de cuisine en suivant les instructions ci-dessus.
2. Placez l’appareil sur une surface sèche et plane à au moins 4 pouces des autres objets pour
permettre une ventilation adéquate.
3. Branchez le câble d’alimentation sur une prise électrique de 120V/15A. Pour des performances
optimales, utilisez un seul appareil par prise. Un voyant rouge au-dessus de ON/OFF s’allume
pour indiquer que la table de cuisson est prête à être utilisée.
4. Avant d’allumer l’appareil, assurez-vous que les ingrédients sont bien dans la batterie de cuisine
et placez-le sur la plaque de verre centrée sur les GUIDES DE POSITIONNEMENT DE LA TABLE
DE CUISSON.
5. Touchez le symbole ON/OFF pour allumer l’appareil. L’ÉCRAN LCD s’allumera et le PL1 par défaut
apparaîtra dans la fenêtre. Le ventilateur de refroidissement se met en marche.
REMARQUE : Il est normal que le ventilateur de refroidissement fonctionne pendant une durée de 2
minutes au maximum après la mise hors tension de l’appareil.
Commandes
Toutes les opérations sont facilement contrôlées à l’aide du pavé tactile et du bouton de commande
PUSH TO SET. Le bouton de commande augmentera ou diminuera votre sélection en le tournant. Une
fois le réglage souhaité a été obtenu, appuyez sur le bouton pour le sélectionner.
NIVEAU DE PUISSANCE/MODE MINUTERIE (paramètres de 10 watts)
C’est le mode par défaut. Utilisez ce mode pour un chauffage rapide et lorsque le contrôle de la
température n’est pas une exigence. Plus le niveau de puissance est élevé, plus la puissance de cuisson appliquée à la batterie de cuisine est élevée et plus le taux de chauffage est élevé. La batterie de
cuisson répond différemment selon le modèle et la taille.
1. Touchez le symbole POWER LEVEL/TIMER pour sélectionner ce mode. Le PL-1 par défaut
clignotera dans la fenêtre LCD. Utilisez le BOUTON DE COMMANDE pour augmenter (dans le
sens des aiguilles d’une montre) ou diminuer (dans le sens inverse des aiguilles d’une montre) la
puissance nécessaire. Appuyez sur le BOUTON pour verrouiller le réglage.
2. Ensuite, le symbole TIMER clignotera dans la fenêtre LCD. Vous pourrez alors régler le minuteur
de 1 à 180 minutes. Pour des raisons de sécurité, vous ne disposez que de 180 minutes. Si 0 est
sélectionné ou rien n’est sélectionné au bout de quelques secondes, la fonction de minuterie ne
sera pas utilisée.
3. Votre table de cuisson suivra les paramètres de niveau de puissance et de l’heure sélectionnés
et s’éteindra une fois l’opération terminée. Vous pouvez modifier les réglages à tout moment en
appuyant sur le bouton de commande puis en répétant ces étapes.
12
Page 13

FONCTIONS À UNE TOUCHE ET VERROUILLAGE
1. La fonction BOIL à une touche sélectionnera instantanément le réglage PL-10.
2. La fonction SIMMER à une touche sélectionnera instantanément 100°F.
3. Appuyez sur le symbole LOCK à tout moment pour verrouiller le réglage souhaité. Pour déverrouiller, touchez et maintenez le symbole LOCK pendant 2 secondes ou mettez l’appareil hors
tension, puis redémarrez.
MODE TEMP LEVEL/TIMER (21 réglages)
Ce mode est préférable lorsqu’un contrôle plus précis de la température de cuisson est nécessaire. Il
est important de noter que les réglages suivants mesurent la température de la base de votre batterie
de cuisine et non la température de la nourriture que vous cuisinez.
REMARQUE : Pour un contrôle plus précis de la température, reportez-vous à la section SONDE DE
TEMPÉRATURE ci-dessous.
1. Touchez le symbole TEMP LEVEL/TIMER pour sélectionner ce mode. La température par défaut
de 100° clignote dans la fenêtre LCD. Utilisez le BOUTON DE COMMANDE pour augmenter (dans
le sens des aiguilles d’une montre) ou diminuer (dans le sens inverse des aiguilles d’une montre)
la température, si nécessaire. Appuyez sur le BOUTON pour verrouiller le réglage.
2. Les réglages de température augmenteront de 10° de 100° à 200°F et de 25° de 225° à 450°F.
3. Ensuite, le symbole TIMER clignotera au niveau de la fenêtre LCD. Vous pourrez alors régler le
minuteur de 0 à 180 minutes. Pour des raisons de sécurité, vous ne disposez que de 180 minutes. Si 0 est sélectionné ou rien n’est sélectionné au bout des secondes qui suivent, la fonction
de minuterie ne sera pas utilisée.
4. Votre table de cuisson suivra les réglages de température et de durée sélectionnés et s’éteindra
une fois l’opération terminée. Vous pouvez modifier les réglages à tout moment en appuyant sur
le bouton de commande et en répétant ces étapes.
MIJOTER
DOUX
MOYEN-DOUX
100º
125º-150º
175º-250º
MOYEN
MOYEN-ÉLEVÉ
ÉLEVÉ
275º-325º
350º-400º
425º-450º
MODE SONDE DE TEMPÉRATURE POUR UN CONTRÔLE PRÉCIS DE LA TEMPÉRATURE
Lorsqu’un contrôle de température précis est nécessaire, utilisez la SONDE DE TEMPÉRATURE sans
fil. Cette fonction peut être utilisée avec les modes TEMP LEVEL ou PROGRAM COOKING uniquement.
La température sélectionnée sera étroitement maintenue.
1. Attachez la SONDE à l’intérieur de la casserole de manière à la plonger dans le contenu de la
casserole ou insérez-la dans la viande que vous cuisinez. Elle ne doit pas toucher le fond de la
casserole.
2. Appuyez sur le bouton ON/OFF de la SONDE. Une LED rouge sur la sonde s’allumera périodiquement pour indiquer qu’elle est active et une icône de sonde de température s’affichera sur l’écran
LCD pendant le fonctionnement.
3. La température actuelle des aliments que vous cuisinez (indiquée à droite de l’écran LCD) et
la température que vous souhaitez atteindre (indiquée à gauche de l’écran LCD) clignoteront
alternativement sur l’écran LCD.
4. Nettoyez la sonde après utilisation et rangez-la.
5. Si le voyant rouge ne s’allume pas lorsque la sonde est allumée, remplacez la pile par une pile
alcaline A23/12V standard. La sonde s’éteindra automatiquement si l’induction est désactivée ou
si aucun changement de température n’est détecté après 30 minutes. Réinitialisez l’alimentation
comme indiqué ci-dessus.
6. La durée peut être réglée de 1 à 180 minutes à plus de 225ºF.
13
Page 14

MODE DE PROGRAMME DE CUISSON
Ce mode vous permet de programmer jusqu’à 3 durées de cuisson et zones de température pour créer
différentes étapes de cuisson. Vous pouvez programmer les 3 zones ou une seule. Ce mode peut être
utilisé dans la cuisson lente, sous vide, dans la fabrication de la bière et bien plus encore; et peut être
utilisé avec ou sans la sonde de température.
Exemple : La zone n°1 est réglée à 300°F pendant 60 minutes; La zone n°2 est réglée à 225°F pendant
75 minutes; La zone n°3 est réglée à 100°F pendant 60 minutes.
1. Appuyez une fois sur le symbole PROGRAMMABLE COOKING pour programmer la zone 1.
2. Réglage de la température de la zone 1 :
• 100ºF clignotera à l’écran
• Réglez la température souhaitée en tournant le BOUTON DE COMMANDE.
• Appuyez sur le BOUTON pour verrouiller la température. Il passera ensuite au réglage de
la minuterie.
3. Réglage de la minuterie de la zone 1 :
• L’icône de la minuterie clignotera à l’écran
• Réglez la durée souhaitée en tournant le BOUTON DE COMMANDE.
• Appuyez sur le BOUTON pour verrouiller la durée et passer à la zone 2.
Remarque : la durée peut être réglée de 1 à 180 minutes à plus de 225ºF.
4. Paramètres de la zone 2 et de la zone 3 :
• Répétez les instructions ci-dessus pour les zones 2 et 3.
• Chaque zone doit être programmée rapidement, sinon le réglage précédent sera verrouillé.
• Si la zone 2 ou la zone 3 ne sont pas nécessaires, il suffit de régler la température et
l’heure de la même manière que la zone 1.
5. Une fois que les 3 programmes ont été définis, l’écran LCD passera en revue tous les paramètres
et se verrouillera.
6. Si des modifications sont nécessaires après leur paramétrage, touchez et maintenez l’icône LOCK
pendant 2 secondes et recommencez depuis le début.
ENTRETIENT ET MAINTIEN
• Ne pas nettoyer avec tampon à récurer en métal, les abrasifs ou les solvants
• Ne pas immerger le câble ou l’appareil dans l’eau ou d’autres liquides
• Débrancher lorsqu’il n’est pas utilisé et avant de nettoyer
• Permettre à l’appareil de refroidir avant de ranger
• Ne pas utiliser si la surface de cuisson de verre ou le cordon sont endommagés
• Tenir loin de toutes sources de chaleur
• Débrancher et permettre de refroidir avant de nettoyer. Utiliser un détergent doux avec une
lingette humide afin de retirer tout type de graisse, huile ou saleté. Laisser sécher. Couvrir
l’appareil afin de le protéger de poussière.
• Nettoyer la SONDE de TEMPÉRATURE après l’utilisation et placer dans l’endroit de STORAGE
dédié.
GUIDE DE DEPANNAGE & SERVICE A LA CLIENTELE
Si après avoir consulter le guide de dépannage votre problème n’est pas régler, ne pas tentez aucune
réparation. Communiquer avec votre détaillant ou avec notre Service à la Clientèle 1-800-227-0196
pour obtenir plus de détails.
1. L’indicateur de puissance ne s’allume pas et/ou le ventilateur de sortie ne fonctionne pas.
• La prise électrique pourrait avoir une mauvaise connexion avec la prise électrique ou bien il
pourrait avoir un défaut de puissance de 120V. Remettre l’électricité et réessayer.
14
Page 15

• Un code d’erreur E3 veut dire que l’alimentation en électricité d’entrée 120V est trop élevée
ou trop base et s’éteint après une minute. Débrancher de l’alimentation et utiliser un capteur de tension afin de vérifier que la tension est au moins à 110V AC et pas plus que 120V
AC. Si non, changer de prise électrique ou bien corriger avant d’utiliser l’appareil.
• Le fusible ou le disjoncteur est défectueux, ou bien l’appareil n’est pas branché.
2. Le ventilateur ne fonctionne pas et l’article de cuisson ne se chauffe pas. Code d’erreur E0 ou E2
pourrait être affiché.
• L’article de cuisson pourrait être inadapté et empêche le bon fonctionnement (Voir Choisir
les Récipients Appropriés). S’il n’y a pas d’article de cuisson présent, E0 sera affiché.
• L’article de cuisson doit être centré sur la plaque de verre
• La plaque de verre pourrait être fendu
3. La surface de cuisson à induction arrête de chauffer pendant sont utilisation et s’’éteint. Les
codes erreurs E1 ou E2 peuvent être affiché.
• Les capteurs de surchauffe ont détecté une température excessive sur la plaque de verre et
s’arrête automatiquement. Ceci pourrait être provoqué par chauffer les articles de cuisson.
Enlever les articles de cuisson, laisser le tous refroidir et réessayer.
• L’entrée d’air ou le ventilateur est bloqué ou à failli et provoqué qu’il surchauffe. Assurer
vous que l’appareil est à au moins 4” des murs et d’autres objets et que tous les fentes
sont libre.
4. La SONDE DE TEMPÉRATURE ne tient pas compte de la température avec précision.
• Vérifier que la fonction Température est sélectionnée (Vois Section Sonde de Température).
• Refixer la sonde afin qu’elle soit bien connecté.
15
Page 16

SPECIFICATIONS
TYPE D ‘INDUCTION Domestique
SOURCE D’ALIMENTATION 120V/15A, 60Hz
GAMME DE PUISSANCE 500 - 1800 watts (PL1-PL10)
PLAGE DE TEMPÉRATURE 100ºF - 450ºF (21 paramètres)
POIDS 8 lbs. (3.6 kg)
DIMENSIONS 16.25” x 13.25” x 3.5” (41.28 x 33.65 x 8.9 cm)
LONGUEUR DE CORDON 5 pi. (1.52 m)
DIMENSIONS DE SURFACES DE
CUISSON DE VERRE
CHARGE MAXIMALE 60 lbs. (article de cuisson et contenu)
SONDE DE TEMPÉRATURE 10” Sonde. Acier inoxydable.
ÉLÉMENTS DE SÉCURITÉ Détection d’article de cuisson non-convenable
AUTORISATIONS ETL US (conforme à UL STD 1026 domestique)
11.5 Rond(29.2 cm)
A23 Replaceable pile alcaline de 12 volts.
Sécurité de surchauffe
Détection de mauvaise tension d’alimentation
FCC ID# YT9-6600P
GARANTIE PRODUIT (voir la carte de garantie)
Aervoe Industries, Inc. garantie que se produit sera exempt de défauts de matière et de fabrication à
partir de la date de la vente pendant 1 ans. Toutes marchandises doivent être retournées à l’endroit où
ils ont été achetés selon la politique de retour du détaillant. Une carte de garantie doit figurer dans les
dossiers de Aervoe Industries, Inc. dans les 30 jours suivant l’achat et une preuve d’achat valide est
requise pour des réparations sous garantie.
AERVOE INDUSTRIES, INC.
Gardnerville, NV 89410 • 1-800-227-0196
6600inst; cs4/19
16
www.aervoe.com • mailbox@aervoe.com
 Loading...