

A I R C O N D I T I O N I N G
R22
D5
MANUALE UTENTE - INSTALLATORE
INSTALLATION AND OPERATION MANUAL
Serie /Series /Serie/Sé rie
Emissi one/Ed ition /Au-
sgabeIs sue
HHW 07÷32
01.06
Catalo go/Cat alogue /Kat alog/ Brochur e
Sostit uisce /Supers eedes
Ersetz t/Rem place
MUI0111250100
08.05
M U R A L E I D R O N I C O
H Y D R O N I C H I G H W A L L

AIR CONDITIONING
HHW 07÷32

AIR CONDITIONING
HHW 07÷32
1. Informazioni Importanti sulla sicurezza
Important Safety Information 3
2. Posizionamento dell’unità
Location for Fan Coil Unit 4
3. Installazione della dima
Mounting Plate Installation 4
4. Tubazioni e scarico condensa
Piping and Drainage of Fan Coil Units 6
5. Collegamenti idraulici
Field Piping Connections 7
6. Come rimuovere ed installare la griglia frontale
How to Remove the Frame Grille 7
7. Controllo del drenaggio
Checking the Drainage 9
8. Collegamenti elettrici
Wiring Connections 9
9. Spurgo dell’Aria
Air Purging 10
10. Schemi elettrici
Wiring Diagrams 11
11. LED di stato dell’unità
LED mode indicators for water fan coil 13
12. Guida del telecomando
Remote Control Operation Guide 13
13. Avvisi per l’utente
User Notices 16
14. Note supplementari sul funzionamento
Additional Notes on Operation 17
15. Cura e manutenzione
Care and Maintenance 18
INDICE / CONTENTS
AVVERTIMENTO: Le parti in movimento e la corrente possono causare infortuni e morte. Isolare e togliere l’alimentazione alla macchina prima dell'assistenza.
ATTENZIONE: I bordi e le superfici taglienti della macchina possono provocare delle ferite; evitare di entrare in
contatto con esse.
WARNING: Moving machinery and electrical power hazards may cause several injury or death disconnect and lock
off the power before servicing equipment.
CAUTION: Sharp edges and coil surfaces are potential injury hazard avoid contact with them.
2
AIR CONDITIONING
HHW 07÷32
1. IMPORTANT SAFETY INFORMATION
READ ALL SAFETY INFORMATION BEFORE USE:
This air conditioner must be properly installed in accordance with the installation instruction before it is used.
Disconnect and lock-off all power from air conditioner
before making any repairs.
NOTE: Strongly recommed that any servicing be performed by a qualifìed techinician.
Warning :
THIS PRODUCT MUST BE PROPERLY GROUNDED.
For personal safety, this product must be properly
grounded.
Check all local codes and ordinances that could affect
installation of this air conditioner system.
Refer to rating plate on each unit for the correct volttage,
frequency and amperes.
Be sure power supply available corresponds to that specified on the unit rating namesplate.
Check electrical service provided by utility for the site to
be sure the electrical service capacity can handle the
load imposed by this unit.
Refer to dimensional drawings for location of pipings,
condensate drain, and electrical connections before set-
ting in place.
Do not use this product with water temperature higher
than 60°C.
1. INFORMAZIONI IMPORTANTI SULLASICUREZZA
LEGGERE TUTTE LE INFORMAZIONI DI SICUREZZA
PRIMA DI UTILIZZARE:
Questo condizionatore deve essere installato correttamente in conformità con le seguenti istruzioni prima di
essere usato.
Staccare l’alimentazione prima di qualsiasi riparazione.
NOTA: Si raccomanda che l’assistenza sia fatta da un
tecnico qualificato .
Avvertimento:
QUESTO PRODOTTO DEVE ESSERE COLLEGATO
CORRETT AMENTE AMASSA.
Per sicurezza personale, questo prodotto deve essere
collegato a massa.
Controllare tutte le norme e le ordinanze locali che
potrebbero interessare l'installazione di questo sistema
di climatizzazione.
Riferirsi all’etichetta presente su ogni unità per il voltaggio, la frequenza e gli ampère corretti.
Assicurarsi che l’alimentazione disponibile corrisponda a
quella specificata sull’etichetta delle caratteristiche dell'unità.
Assicurarsi della sufficente potenza elettrica disponibile
per gestire il carico imposto da questa unità.
Riferirsi ai disegni dimensionali per la posizione delle
tubazioni, dello scolo di condensa e dei connettori elettrici prima del posizionamento sul posto.
Non usare qesto prodotto con acqua a temperatura
superiore ai 60°C
3
AIR CONDITIONING
HHW 07÷32
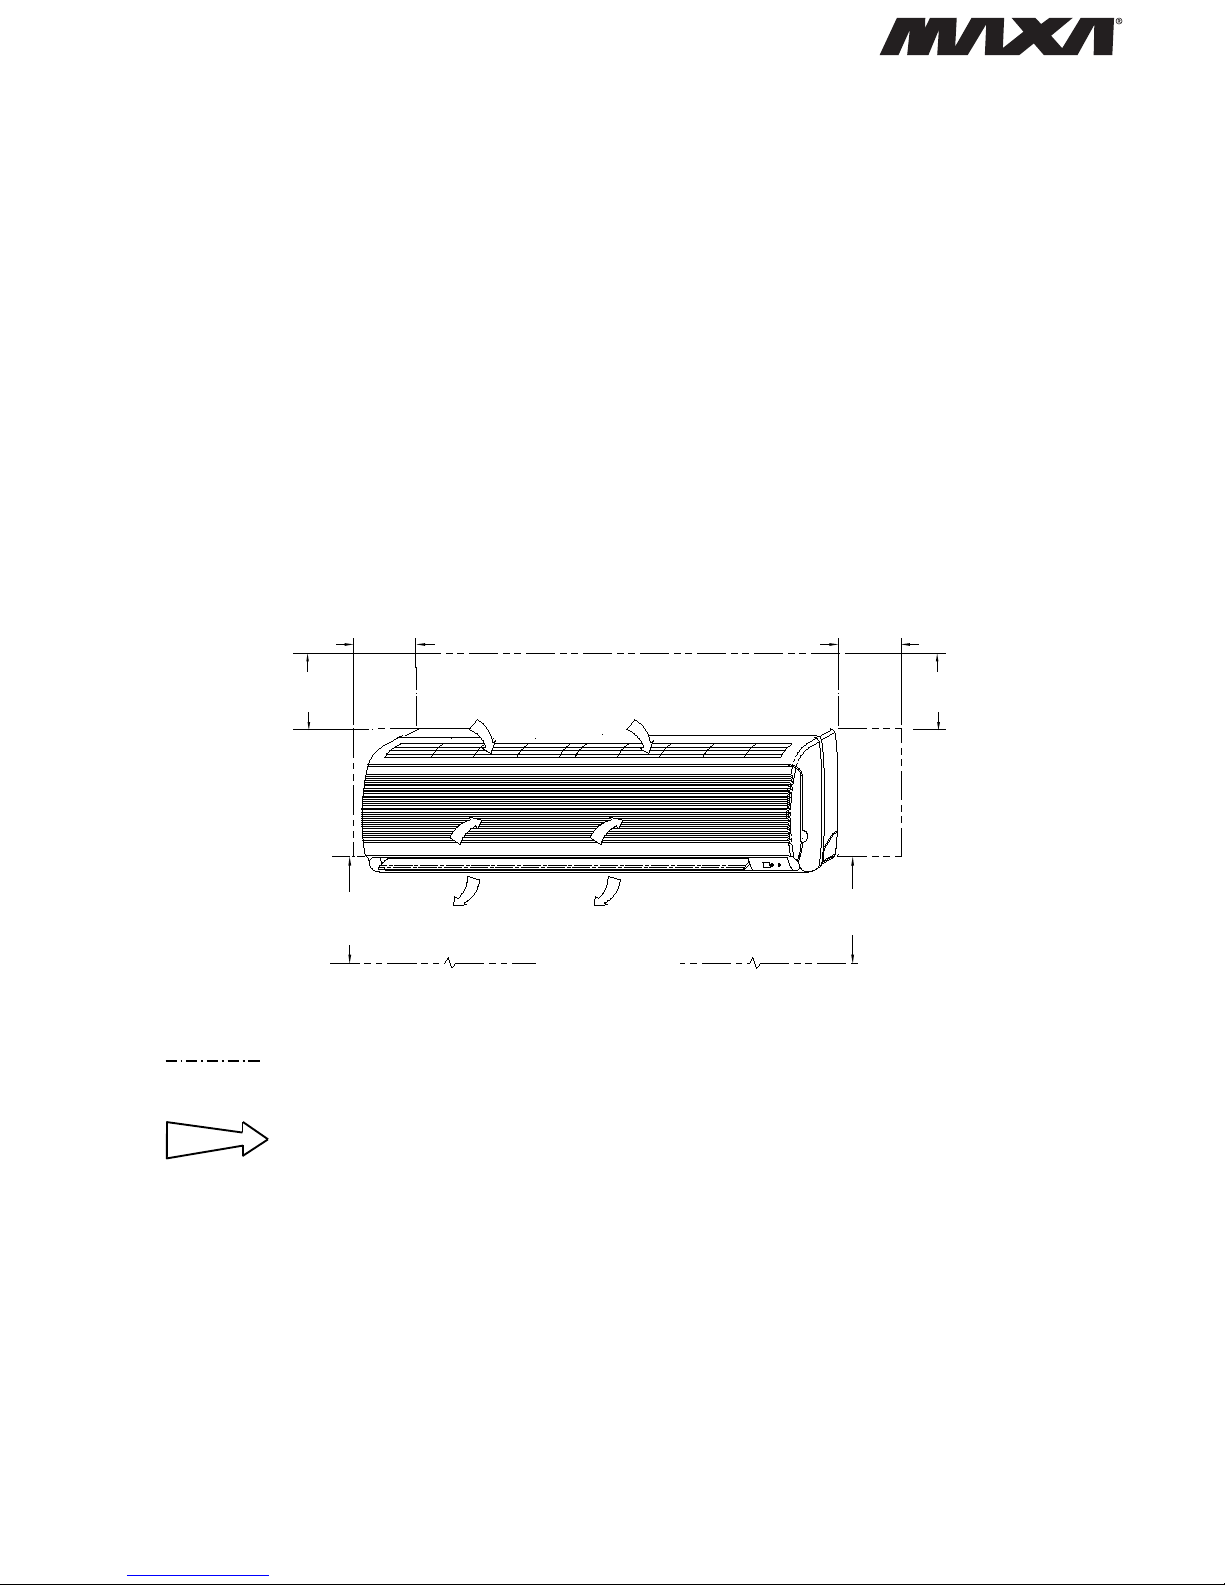
2. LOCATION FOR FAN COIL UNIT
Select the location of the fan coil unit with following consideration:
1. The front of the air inlet and outlet shall be free from
any obstruction. The outlet air should flow out freely.
2. The wall where the unit is to be mounted should be
stiff enough not to resonate and produce noise.
3. Ensure the clearance on every side of the fan coil unit
to conform to figure 1.
4. From floor, the height should be more than eye level.
CAUTION: Avoid installing the unit from direct sunlight.
3. MOUNTING PLATE INSTALLATION
1. After a suitable place for installation has been selected, place the mounting plate horizontally on the wall.
Make sure the alignment is horizontal. Use a plumb
line, if available.
2. Refering to the figure on page 5, mark the location for
the wall plugs and the hole for the pipings.
2. POSIZIONAMENTO DELL’UNITÀ
Selezionare la posizione dell'unità con le seguenti considerazioni:
1. Le prese d’aria anteriori e posteriori non devono
essere ostruite. Dalla presa l’aria dovrebbe uscire
liberamente.
2. Il muro dove l'unità dovrebbe essere montata deve
essere rigido per non essere messo in vibrazione e
quindi produrre rumore.
3. Accertarsi che lo spazio da ogni lato dell'unità sia
conforme a figura 1.
4. Dal pavimento, l'altezza dovrebbe essere superiore
all’altezza d’uomo.
ATTENZIONE: Evitare di installare l'unità esposta alla
luce solare diretta.
3. INSTALLAZIONE DELLA DIMA DI SUPPORTO
1. Dopo aver selezionato un posto adatto per installazione della macchina, disporre la dima di montaggio
orizzontalmente sulla parete. Assicurisi che l'allineamento sia orizzontale. Usare una bolla se disponibile.
2. Riferirsi alla figura qui sotto, contrassegnare la posizione per i tasselli ed il foro per le condutture.
50.00
80.00
Superiore altezza occhio
Higher than eye level
Superiore altezza occhio
Higher than eye level
50.00
80.00
Livello pavimento
Floor level
Spazio di servizio & di manutenzione
Maintenance & service space
Direzione dell’aria
Air flow direction
NOTA: Le dimensioni sono in millimetri
NOTE: Dimension are in millimeter
4
Figure 1
AIR CONDITIONING
HHW 07÷32
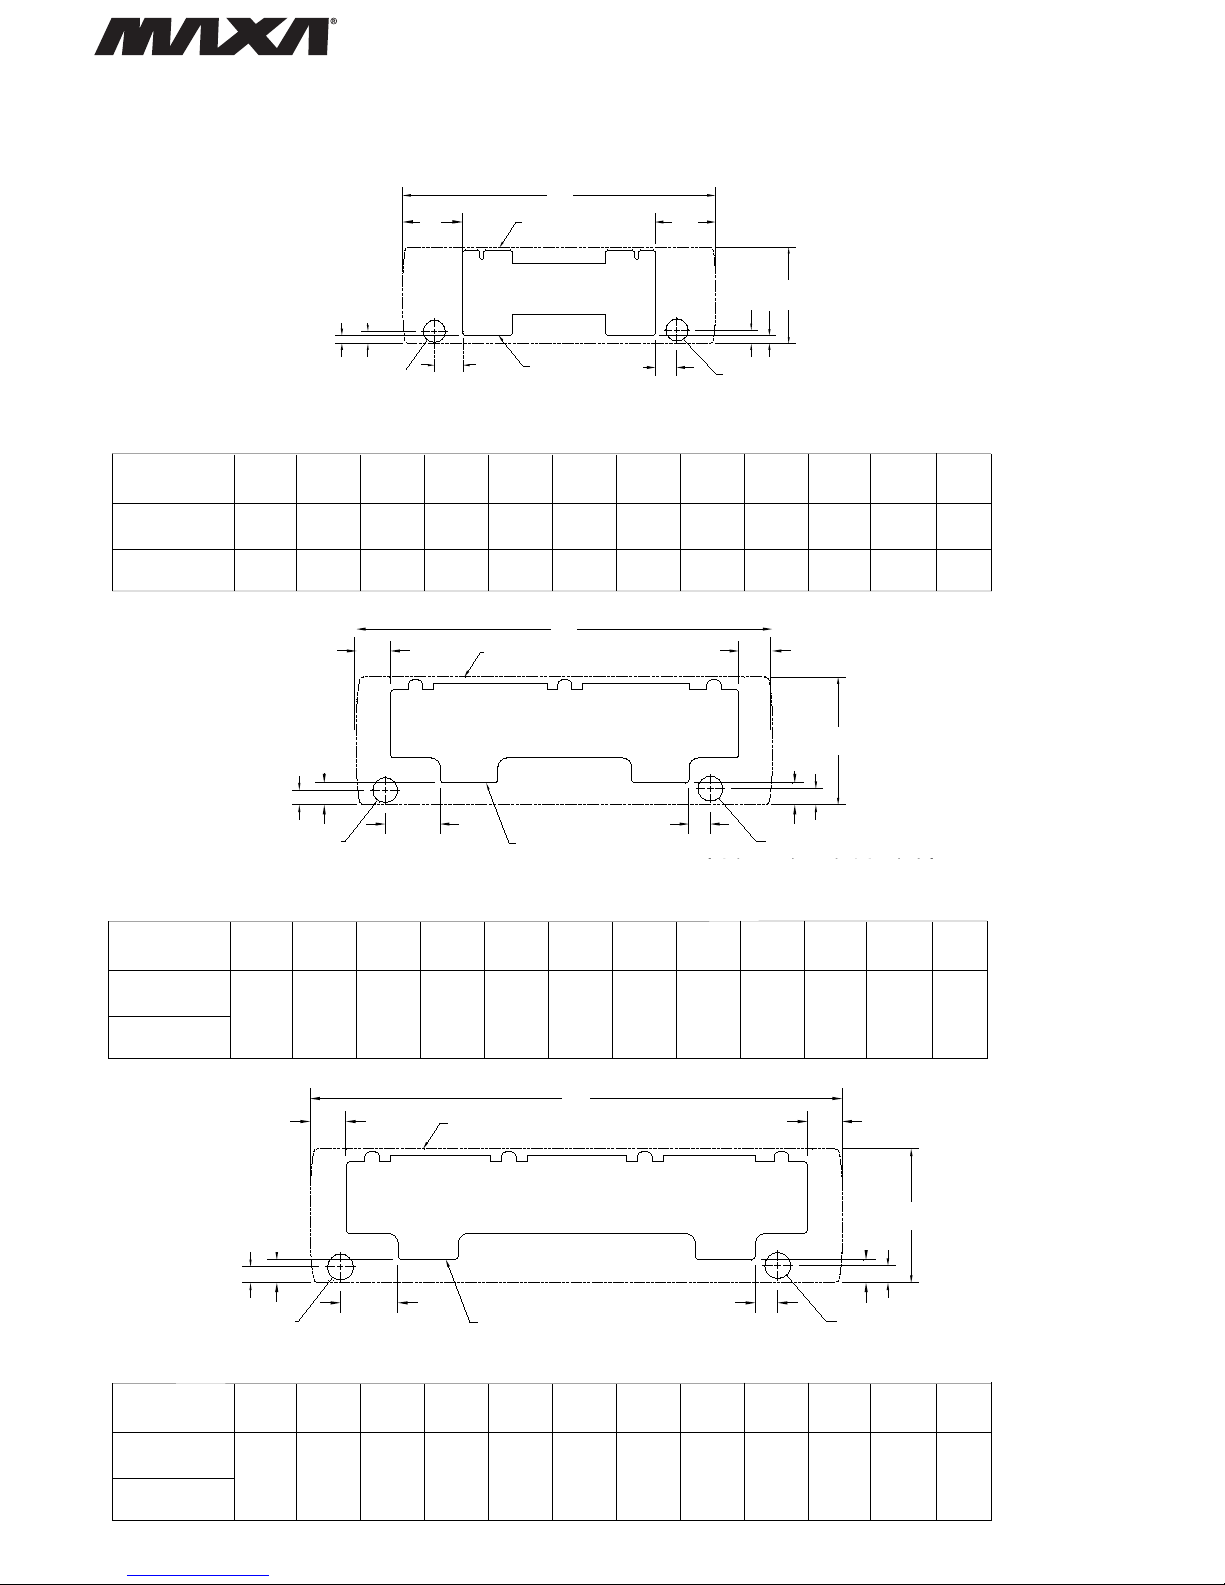
PLAN DIMENSIONS FOR MOUNTING PLATE INSTALLATION
SEQUENZA DI OPERAZIONI PER L'INSTALLAZIONE
DELLA DIMA DI MONTAGGIO
K
E
C
F
D
Bordo fan coil
Outline of fan coil unit
Piastra di montaggio
Mouting plate
L
I J
B
H G
Foro parte sinistra
Left backward piping hole
Foro parte destra
Right backward piping hole
A
K
E
C
F
A
Bordo fan coil
Outline of fan coil unit
L
I J
B
H G
Foro parte sinistra
Left backward piping hole
Foro parte destra
Right backward piping hole
D
Piastra di montaggio
Mouting plate
MODELLO
ABCDEFGHI JKL
MODEL
07 880 298 190 190 90 68 42 20 26 20 Ø70 Ø70
10 990 305 191 191 91 69 39 27 43 27 Ø70 Ø70
MODELLO
ABCDEFGHI JKL
MODEL
16
1170 360 96 96 155 60 62 42 6262 46 Ø70 Ø70
21
MODELLO
ABCDEFGHI JKL
MODEL
26
1451 365 100 100 155 70 38 42 38 46 Ø70 Ø70
32
5
K
E
C
F
A
Bordo fan coil
Outline of fan coil unit
Piastra di montaggio
Mouting plate
L
I J
B
H G
Foro parte sinistra
Left backward piping hole
Foro parte destra
Right backward piping hole
D
Dim. in millimetri
Dim. are in millimeter
Dim. in millimetri
Dim. are in millimeter
Dim. in millimetri
Dim. are in millimeter

AIR CONDITIONING
HHW 07÷32
3. Drill 6.4 mm diameter, 32.0 mm depth on the wall.
4. Insert the wall plugs.
5. Secure the mounting plate and check for stiffness.
6. Drill a piping hole 70.0 mm diameter hole either from
the right or to the left indoor side and make sure that
the hole is slightly slant downward.
7. If the wall is hollow please provide a sleeve for tube
assembly to prevent dangers cause by mice biting the
connecting cables.
4. PIPING AND DRAINAGE OF FAN COIL
UNIT
1. Route the fan coil tubing with drain hose to the hole.
There are three possible tubing routes. For the route
1 and 3, cut the plate to pass the pipe through it,
remove sharp edge left on the base pan.
TUBING ROUTE
2. Insert the fan coil unit piping and drain pipe through
the hole.
3. Tape the tubing, drain hose, and connecting cable.
4. For the horizontal piping, make sure that are laid
along the groove at the back of the unit and secure
the piping using the piping holders (2 pieces) before
fixing to the mounting plate.
3. Fare un foro di diametro di 6.4 millimetri, 32.0 millimetri di profondità sulla parete.
4. Insere i tasselli a parete.
5. Fissare la dima e controllare se c'è rigidezza.
6. Fare un foro da 70.0 millimetri di diametro a destra a
sinistra dell’unità ed assicurisi che il foro sia in discesa un po'inclinato.
7. Se il foro è irregolare si prega di fornirsi di un manicotto per l’assemblaggio dei tubi per impedire pericoli
come i topi che mordono i cavi di collegamento.
4. TUBAZIONI E SCARICO CONDENSA
1. Ruotare le tubazioni e lo scarico verso il foro d’uscita.
Ci sono tre uscite possibili della tubazione. Per le
uscite 1 e 3, tagliare le piastrine per far passare il
tubo attraverso esse, rimuovere la bave residua sui
bordi del basamento.
USCITE DELLA TUBAZIONE
2. Infilare le tubazioni e il tubo di scarico nel foro.
3. Nastrare le tubazioni, il tubo flessibile di drenaggio ed
il cavo di collegamento.
4. Per le tubazioni orizzontali, assicurarsi che siano
poste lungo la scanalatura sulla parte posteriore del
l'unità e che siano fissate le tubazioni usando i fermi
(2 pezzi) prima del fissaggio alla dima di montaggio.
Fare un foro dall’interno di 70.0
mm di diametro aiutandosi con
tazza da muro.
Drill a piping hole with 70.0 mm
diameter concrete drill or hole saw
front indoor side.
Forare dall’esterno.
Drill from the outside.
Inserire manicotto (non fornito).
Set wall-pipe and caps (not supplied)
Muro / Wall
Muro / Wall
Spina da parete / Wall Plug
Vite lunga
Long screw
Piastra di montaggio / Mounting Plate
Punta trapano, diametro:6.4 mm; lunghezza 32.0 mm
Drill diameter 6.4 mm depth 32.0 mm holes
Fissare il giunto di supporto e controllare la rigidezza
Secure mounting plate and check stiffness
Muro / Wall
interno / indoor
esterno
outdoor
Trapano / Drilling Machine
T azza da muro / Hole saw
Cappuccio / Cap
Manicotto / Wall pipe
BASSO / DOWN
PARTE POSTERIORE / BACK SIDE
PARTE SINISTRA/ LEFT SIDE
Gancio
Lower hook
Dettagli di A / Detail of A
A
Muro / Wall
Fascetta / Taping
Piastra di montaggio
Mouting plate
Dima di montaggio
Mouting plate
Vista posteriore unità / Back side of the unit
Cavo elettrico / Electrical cable
Tubo di scarico / Drain hose
Note: Porre il tubo di drenaggio come indicato sotto
Lay the drain hose as shown below.
Tubazione
Water piping
Piastra di montaggio
Mouting plate
Muro / Wall
6

AIR CONDITIONING
HHW 07÷32
5. Secure the unit to the mounting plate.
6. Connect the chill water piping and make sure that the
seals are fitted neatly.
7. Connect the drain hose and tape over the connecting
parts.
8. Ensure that the drain hose has no traps or dips to
embed the water flow.
9. Carefully seal any wall opening from weather to avoid
any ingress of water.
OUTSIDE OF THE WALL
5. FIELD PIPING CONNECTIONS
Note: The water lines must be installed level in both the
horizontal and vertical plane.
INSULATION OF PIPES:
1. The pipe insulation should cover both INLET and
OUTLET pipes as shown below.
2. Use the insulation of polyethylene foam minimun of 6
mm. in thickness.
6. HOW TO REMOVE THE FRAME GRILLE
1. Set the horizontal louver to horizontal position.
2. Remove the 3 or 4 screw covers (depend on the
model) of the frame grille as shown in the illustration
below and then remove the mounting screws.
3. Open the front panel by grasping the panel at the
side rounded groove and pulling it towards you.
4. Remove the remaining screw located at the center. (on
some models there is one more screw on the right side).
5. Grasp the lower part of the frame grille and pull it out.
5. Assicurarsi l'unità sia collegata alla dima di montaggio.
6. Collegare le tubazioni dell'acqua fredda ed assicurarsi
che le guarnizioni siano collocate correttamente.
7. Collegare il tubo di scolo e nastrare le parti di connessione.
8. Accertarsi che il tubo di drenaggio non abbia ostacoli
e si immetta nello csarico dell’acqua.
9. Sigillare con attenzione l'apertura nella parete per evitare che con il tempo si crei qualche perdita d’acqua.
FUORI DELLA PARETE
5. COLLEGAMENTI IDRAULICI
Nota:Le linee d’acqua devono essere installate a livello
sia nel piano orizzontale che in quello verticale.
ISOLAMENTO DEI TUBI:
1. L'isolamento del tubo deve coprire sia i tubi in ingres-
so che quelli in uscita.
2. Usare tubazioni con un isolamento di almeno 6 mm di
spessore.
6. COME RIMUOVERE ED INSTALLARE LA
GRIGLIA FRONTALE
1. Regolare l’aletta orizzontale nella posizione orizzontale.
2. Rimuovere 3 o 4 coperture delle viti (secondo il
modello) dalla griglia della struttura come indicato qui
sotto e poi rimuovere le viti di montaggio.
3. Aprire il pannello anteriore afferrando il pannello late-
ralmente nella scanalatura arrotondata e tirare.
4. Rimuovere la vite restante situata al centro. (su alcuni
modelli c’è un’altra vite sulla parte di destra).
5. Afferrare la parte inferiore della struttura ed estrarla.
Collegamenti di connesione
Interconnecting wiring
Accoppiamento del tubo
Pipe coupling
Tubo scarico
Drain hose
Fissaggio
Saddle
Tubo scarico
Drain hose
Fissaggio
Saddle
Stucco
Putty
SBAGLIATO / WRONG
Salita
Up slope
Sifone
Trap
Immerso
Dip
Modello
CONNESIONI ACARTELLA / FLARE NUT CONNECTION
Model
ENTRATA ACQUA / WATER INLET USCITA ACQUA / WATER OUTLET
07
12.00 mm 12.00 mm
10
16
15.88 mm 15.88 mm
21
26
18.00 mm 18.00 mm
32
Uscita acqua
Water out
Ingresso acqua
Water in
YES
NO
NO
Isolamento / Insulation
Isolamento / Insulation
7
Nastro
Tape
Ingresso acqua
Water in
Uscita acqua
Water out
Ingresso acqua
Water in
Uscita acqua
Water out

AIR CONDITIONING
HHW 07÷32
HOW TO INSTALL THE FRAME GRILLE ON
THE FAN COIL UNIT
Install the frame grille in the opposite order of "HOW TO
REMOVE THE FRAME GRLLE". When the frame grille
is removed and mount again, take the following actions:
before fastening the screws (6 screws, depend on the
model), be sure to hook the top inside 3 or 4 locks of the
frame grille. Close the front panel and tight the gap left
between the frame grille by pushing the location 1 , 2
, 3 and 4 until a "click" sound hears.
- If cooling (dry) operation is made without closing the
front panel properly, dew can be deposited on the front
grille surface. In additional if the gap between the front
panel and the frame grille become wider, will spoil the
appearance.
COME INSTALLARE LA GRIGLIA FRONTALE
Installare la griglia nella sequenza opposta a “COME
RIMUOVERE LA GRIGLIA”. Quando la griglia è stata
rimossa e deve essere rimontata, intraprendere le
seguenti azioni: prima del fissaggio delle viti (6 viti a
seconda del modello), assicurarsi dell’aggancio della
parte superiore all'interno di 3 o 4 fermi della griglia.
Spingere la griglia e fissarla premendo nei punti 1 , 2 ,
3 e 4 fino a sentire un "click".
- se si fa funzionare in freddo la macchina e il pannello
anteriore non è chiuso correttamente potrebbe depositarsi dell’acqua sulla superficie anteriore della griglia.
Inoltre un divario evidente tra il pannello anteriore e la
griglia rovina l’immagine del prodotto.
Copertura vite / Screw cover
Copertura vite / Screw cover
Coperture viti / Screws
Griglia / Frame grille
Griglia / Frame grille
Coperture viti / Screws
Coperture viti / Screws
Coperture viti / Screws
Coperture viti / Screws
Griglia / Frame grille
Per i modelli 7-10 / For models: 7-10
Per i modelli 16-21 / For models: 16-21
Per i modelli 26-32 / For models: 26-32
Per i modelli 26-32 / For models: 26-32
8

7. CHECKING THE DRAINAGE
1. Pour a glass of water Into the drain pan.
2. Ensure that the water flows out from the drain hose of
fan coil unit.
8. WIRING CONNECTIONS
1. After removing the front grille, connect the field
wiring.
2. Remove the wire retainer.
3. Insert the connecting cable (according to local norms)
into pipe hole on the wall.
4. Length of connecting cable insulation to be removed.
5. Insert the connecting cable fully into the terminal
block and secure it by screw tightly.
6. Secure the connecting cable.
7. CONTROLLO DEL DRENAGGIO
1. Versare un bicchiere d’acqua nella vaschetta di scolo.
2. Accertarsi che l'acqua fluisca fuori dal tubo di scolo
dell’unità fan coil.
8. COLLEGAMENTI ELETTRICI
1. Dopo la rimozione della griglia anteriore, colleghare i
collegamenti del campo.
2. Rimuovere il fermo.
3. Inserire il cavo di collegamento (secondo la normativa
vigente) nel foro sulla parete.
4. Rimuovere la parte isolante del filo di connessione.
5. Inserire completamente il cavo di collegamento nel
blocchetto terminale e fissarlo con una vite.
6. Fissare il cavo di collegamento.
Scarico vaschetta / Drain pan
Tubo scarico
Drain hose
Griglia
Frame grille
Morsettiera
Terminal block
Scheda di controllo
Control box
Basamento
Base pan
Fermacavo
Wire retainer
Griglia
Frame grille
Morsettiera
Terminal block
Scheda di controllo
Control box
Basamento
Base pan
Fermacavo
Wire retainer
Cavo di isolamento
Insulation cable
Filo isolato
Insulation cable
Collegare i cavi alla scheda madre
Connecting wires to te Main PCB
Morsettiera
Terminal block
Per i modelli: 07, 10
For the model: 07, 10
9
AIR CONDITIONING
HHW 07÷32

AIR CONDITIONING
HHW 07÷32
ATTENZIONE:
- Assicurarsi di spegere l’alimentazione prima di aprire la
griglia per assistenza.
- Riferirsi sempre agli schemi elettrici presenti in questo
manuale.
- Verificare le normative elettriche della zona ed altre
specifiche sui collegamenti.
PRESA D’ ALIMENTAZIONE
Connettere l’unità ad un’adeguata presa d’alimentazione.
(tensione di voltaggio ±10% durante il funzionamento)
9. SPURGO DELL’ARIA
1. Dopo il collegamento delle tubazioni d’acqua di ingresso
e uscita alle tubazionidi alimentazione principali, accendere l'interruttore principale e regolare l'unità sulla modalità COOLING. Riferirsi al manuale di funzionamento.
2. Aprire la valvola di ingresso dell'acqua e allagare lo
scambiatore.
3. Controllare i collegamenti per vedere se ci sono perdite
d'acqua, e se non si verifica alcuna perdita aprire la valvola di spurgo usando il cacciavite e fermandola con una
chiave inglese standard (no. 10);sfiatare l’aria all’interno
dello scambiatore. Quando si effettua questa operazione
prestare attenzione a non toccare i fili elettrici.
4. Chiudere la valvola di spurgo aria quando non compaio-
no più bolle .
5. Aprire la valvola di uscita dell'acqua.
CAUTION:
- Be sure to turn off the main power supply before open
the frame grille for servicing.
- Always refer to the wiring diagrams supplied with this
manual.
- Check local electrical codes and also any specific
wiring codes.
POWER OUTLET
Connect the unit to adequate power outlet.
(Rating voltage ± 10% during operation).
9. AIR PURGING
1. After connecting the water inlet and outlet pipes to the
main supply lines, turn on the main breaker and operate the unit on COOLING mode. Please refer to the
operation manual.
2. Open the water inlet valve and flood the coil.
3. Check all connection for water leak, if no leak found
open the purging valve by using standard head screw
driver and support with an open end wrench (No. 10),
then purge the air trap inside the coil. When prefoming this, take care not to get touch with the electrical
parts.
4. Close the purging valve when there are no bubbles
appears.
5. Open the water outlet valve.
Apertura
Open
Apertura con chiave
Open end wrench (No.10)
Cacciavite capo standard
Standard head screw driver
Collegare i cavi alla scheda madre
Connecting wires to te Main PCB
Morsettiera
Terminal block
Per i modelli: 16, 21, 26,32
For the model: 16,21,26,32
10
Presa di alimentazione / Power outlet
Interrutore magnetotermico
Time delay fuse or 5A 07, 10, 16, 21, 26, 32
circuit breaker
Presa d’alimentazione
3 poli 2 poli per l’alimentazione e 1 per la terra
Power outlet 2Pfor the power and 1P for the earth terminal
3 pole

AIR CONDITIONING
HHW 07÷32
Collegamenti interni motore ventola
modelli: 07/10
Indoor fan motor connection
models: 07/10
Collegamenti velocità ventilatore:
alta (BK), medio (GR), basso (YL).
Indoor fan speed connection:
high (BK), medium (GR), low (YL).
Prima velocità / 1st speed (BK/Nero/Black)
Seconda velocità / 2nd speed (GR/Verde/Green)
Terza velocità / 3rd speed (YL/Giallo/Yellow)
LEGENDA / LEGEND:
AUX: Interruttore ausiliario / Auxiliary switch
DB: Scheda display / Display board
ID: Termistore bobina interna / Indoor coil thermi-
stor
IFM: Motore ventilatore interno / Indoor fan motor
RM: Sensore stanza / Room sensor
SM: Motore passo passo / Step motor
TB: Morsettiera / Terminal block
WCV: Valvola controllo acqua / Water control valve
WIR: Unità remota con filo (opzionale) / Wired
remote unit (optional)
WLR: Unità remota senza fili / Wireless remote unit
LEGENDA MORSETTIERA
TERMINAL BLOCK LEGEND
6: Fase / Live connection
5: Neutro / Neutral connection
4: Neutro / Neutral connection
3: Controllo valvola 3 vie / Water control valve connec-
tion
2: Collegamento a massa-terra / Earth connection
COLORI FILI / WIRE COLOURS
BK: Nero / Black
BL: Blu / Blue
BR: Marrone / Brown
GR: Verde / Green
RD: Rosso / Red
WH: Bianco / White
YL: Giallo / Yellow
NOTE / NOTES:
1 : I collegamenti devono essere provati e messi a punto dall’installatore
Wiring dotted to be fitted by installer
2 : L’unità deve essere installata secondo la regolazione nationale dei collegamenti.
The unit shall be installed according to national wiring regulation.
10. SCHEMI ELETTRICI 10. WIRING DIAGRAMS
Modelli: 07, 10. Models: 07, 10.
11

AIR CONDITIONING
HHW 07÷32
Collegamenti interni motore ventola
Indoor fan motor connection
Modelli/Models 16
Collegamenti velocità ventilatore alta (GR)
media (YL), bassa (BL)
Indoor fan soeed connection: high (GR)
medium (YL), low (BL).
Modelli/models: 21,26,32;
Collegamenti velocità ventilatore: alta (BK)
media (YL), bassa (BL).
Indoor fan speed connection. high (BK)
medium (YL), low (BL).
Prima velocità / 1st speed (BK/Nero/Black
Seconda velocità / 2nd speed (GR/Verde/Green)
Terza velocità / 3rd speed (YL/Giallo/Yellow)
Quarta velocità / 4th speed (BL/Blu/Blue)
LEGENDA / LEGEND:
AUX: Interruttore ausiliario / Auxiliary
switch
DB: Scheda display / Display board
ID: Termistore bobina interna / Indoor coil
thermistor
IFM: Motore ventilatore interno / Indoor fan
motor
RM: Sensore stanza / Room sensor
SM: Motore passo passo / Step motor
TB: Morsettiera / Terminal block
WCV: Valvola controllo acqua / Water con-
trol valve
WIR: Unità remota con filo (opzionale) /
Wired remote unit (optional)
WLR: Unità remota senza fili / Wireless
remote unit
LEGENDA MORSETTIERA
TERMINAL BLOCK LEGEND
6: Fase / Live connection
5: Neutro / Neutral connection
4: Neutro / Neutral connection
3: Controllo valvola 3 vie / Water control valve
connection
2: Collegamento a massa-terra / Earth connection
COLORI FILI / WIRE COLOURS
BK: Nero / Black
BL: Blu / Blue
BR: Marrone / Brown
GR: Verde / Green
RD: Rosso / Red
WH: Bianco / White
YL: Giallo / Yellow
NOTE / NOTES:
1 : I collegamenti devono essere provati e messi a punto dall’installatore
Wiring dotted to be fitted by installer
2 : L’unità deve essere installata secondo la regolazione nationale dei collegamenti.
The unit shall be installed according to national wiring regulation.
10. SCHEMI ELETTRICI 10. WIRING DIAGRAMS
Modelli: 16, 21, 26, 32. Models: 16, 21, 26, 32.
12

AIR CONDITIONING
HHW 07÷32
13
12. GUIDA DEL TELECOMANDO
DESCRIZIONE E FUNZIONI DEL TELECOMANDO
NOTA:
- Assicurarsi che non ci siano ostruzioni fra il ricevitore
ed il telecomando.
- Il segnale del telecomando può essere ricevuto alla
distanza fino ad un massimo di di circa 6,4 m.
- Non far cadere il telecomando.
- Non mettere alcun liquido sul telecomando e non metterlo direttamente sotto la luce solare o in zone molto
calde.
- Rimuovere le batterie quando non si usa il telecomando per molto tempo.
- Il telecomando dovrebbe essere posto a più di 1 m
dalla TV o da qualsiasi altro apparecchio elettrico.
12. REMOTE CONTROL OPERATION GUIDE
NAME AND FUNCTION OF REMOTE CONTROLLER
NOTE:
- Be sure that there are no obstructions between receiver and remote controller.
- The remote control signal can be received at the distance of up to about 21Ft.
- Don’t drop or throw the remote controller.
- Don’t put any liquid in the remote controller and don’t
put it directly under the sunlight or any place where is
very hot.
- Remove batteries when the remote controller is not in
use for a long time.
- The remote controller should be place 3Ft. or more
away from TV. or any other electric appliances.
11. LED DI STATO DELL’UNITÀ 11. LED MODE INDICATORS
INDICA TORE IMPOSTAZIONE FUNZIONE
INDICATOR LIGHT REMOTE SETTING FUNCTION
Rosso-Verde / Red-Green COOL Solo freddo
Cooling operation only
Rosso-Spento / Red-Off DRY Controllo umidità, livello acqua,
ventilatore spento
Humidity control, water flow, low fan
Rosso-Rosso / Red-Red HEAT Solo caldo
Heating operation only
Rosso-Spento / Red-Off FAN Solo operazioni di ventilazione
Fan operation only
Rosso-Lampeggiante / Red-Blinking AUTO Selezione tra Heat e Cool dipendente
dalla temperatura della camera e
quella impostata. La spia lampeggian
te indicache la macchina sta aspet-
tando di raggiungere la temperatura
impostata dall’utente.
Auto selection between heat & cool
dependent on room temp & set
temp. Blinking light indicates fan coil
waiting for ewt to reach proper
temp to satisfy set point.
Settaggio temperatura / Set temperature
Modi di operazione / Operation modes
Apertura aletta uscita aria / Louver angle
Funzioni di velocità / Sleep function
Indicatore di trassmissione / Trasmission indicator
Indicatore velocità ventilatore / Fan speed indicator
Regolatore ritardo temporizzatore/ Delay timer setting

AIR CONDITIONING
HHW 07÷32
BUTTONS AND FUNCTIONS
1. TRANSMISSION SOURCE
- Infra red transmission source.
2. POWER BUTTON
- Press to turn the air conditioner from OFF to ON or
vice versa. (Red LED Ieft,will lit to indicate the control is
on).
3. MODE BUTTON
- To select desired operation mode. It will switch from
one to another as shown.
COOL - Cooling Operation
DRY - Humidity control
HEAT - Heating operation
FAN - Fan only. No cooling capability
AUTO - Operation Mode will be selected automatically bet-
ween HEA T and COOLmode, depends on the room
temperature and SET the temperature.
4. FAN BUTTON
- To select desired Fan speed. It will switch from one to
another as shown.
- When the previous fan speed be AUTO FAN under
COOL, HEAT and AUTO mode, LOW fan speed will be
setected when switch to FAN mode. Upon return to
either COOL, HEAT or AUTO mode, then AUTO FAN
will be restarted.
5. TEMPERATURE SETTING BUTTONS
- Press to increase set temperature.
- Press to decrease set temperature.
- Press and simultaneously to toggle between
°C and °F display mode.
- Temperature range: 16°C to 30°C in °C display mode
60°F to 86°F in °F display mode
PULSANTI E FUNZIONI
1. TRASMETTITORE
- La trasmissione avviene attraverso i raggi infrarossi.
2. PULSANTE SI ACCENSIONE / SPEGNIMENTO
- Premere per accendere o spegnere il condizionatore.
(Il LED rosso di sinistra si illumina per indicare che il
controllo è attivato).
3. MODALITÀ
- Per selezionare le modalità di funzionamento. La macchina passerà da una modalità all’altra come indicato:
COOL - Raffredamento
DRY - Deumidificazione
HEAT - Riscaldamento
FAN - Solo ventilazione. Nessuna possibilità di
raffreddamento.
AUTO - Il modo di funzionamento sarà selezionato
automaticamente fra HEA T e COOL,
secondo la temperatura ambiente e la temperatura
impostata.
4. VENTILATORE
- Per selezionare la velocità del ventilatore. Passerà da
una all’ altra come indicato.
- Quando la velocità del ventilatore è AUTO FAN in
COOL, HEAT e AUTO;passando a FAN si attiva la
velocità minima (LOW). Ritornando alla modalità
COOL, HEAT o AUTO si ripristina la funzione automatica del ventilatore (AUTOFAN).
5. PULSANTI IMPOSTAZIONE DELLATEMPERATURA
- Premere per incrementare la temperatura.
- Premere per diminuire la temperatura.
- Premere e simultaneamente per passara alla
visualizzazione in °C e °F.
- Intervallo di temp. : 16°C a 30°C
60°F a 86°F
Sequenza di selezione modo / Mode selection sequence (COOL)
Sequenza di selezione modo / Mode selection sequence (HEAT/COOL)
Sequenza velocità ventilatore / Fan speed sequence
(a) modo visualizzazione °C
°C display mode
(a) modo visualizzazione °F
°F display mode
14

AIR CONDITIONING
HHW 07÷32
6. DELAY TIMER SETTING
- To set the Delay Timer, press or button.
- Press to increase delay time by 1.
- Press to decrease delay time by 1.
- Maximun delay timer setting is 18 hours.
- Press cancel button or set back the timer to zero or
press the POWER button to cancel the timer.
7. CANCEL BUTTON
- To cancel the delay timer setting.
8. LOUVER BUTTON
Two different functions available:
1. To set the Louver stop position. Four angle are availa-
ble. The sequence is as below:
2. To set the Louver swing. The sequence is as below:
9. SLEEP BUTTON
- To toggle the sleep mode ON to OFF or vice versa.
- This Sleep mode is not available under DRY or FAN
mode.
- The set temperature is automatically adjusted to
provide comfortable sleep.
TRANSMISSION INDICATOR
- Blink twice to indicate that transmission is taking
place.
- Beeps at Air-Conditioner unit acknowledge receive
of information.
HOW TO INSERT THE BATTERIES
1. Remove the cover from the back of remote controller.
2. Use 2 (two) AAA size batteries.
3. Re-attach the cover.
6. PULSANTI PER L’IMPOSTAZIONE DELTEMPORIZZATORE
- Per impostare il temporizzatore premere o .
- Premere per aumentare il tempo di 1.
- Premere per diminuire il tempo di 1.
- La temporizzazione massima è 18 ore.
- Premere il pulsante di annullamento o regolare indietro
il temporizzatore a zero o premere il bottone POWER
per annullare il temporizzatore.
7. CANCELLAZIONE
- Per annullare la regolazione del temporizzatore.
8. PULSANTE ALETTA
Due funzioni differenti disponibili:
1. Per regolare la posizione di arresto dell’aletta. Sono
disponibili quattro angolature. La sequenza è la
seguente:
2. Per regolare l'oscillazione dell’aletta. La sequenza è
la seguente:
9. PULSANTE FUNZIONE NOTTURNA
- Per attivare o disattivare la modalità notturna.
- Questa modalità non è disponibile quando sono attivate le modalità DRY e FAN.
- La temperatura è impostata automaticamente per fornire un riposo piacevole.
INDICATORE DELLA TRASMISSIONE
- Lampeggia due volte per indicare che la trasmissione sta avvenendo.
- I beep segnalano che il condizionatore sta ricevendo le informazioni.
COME INSERIRE LE BATTERIE
1. Rimuovere la copertura dalla parte posteriore del telecoman-
do.
2. Utilizzare 2 (due) batterie del formato AAA.
3. Riattaccare la copertura.
Scompartimento batteie
Battery compartment
Batterie AAA
AAA Battery
Coperchio
Cover
15

13. USER NOTICES
AIR CONDITIONING
HHW 07÷32
13. AVVISI PER L ’UTENTE
La terra deve essere collegata. Non collegare il filo
della terra ai tubi del gas o dell'acqua, parafulmini
o masse a terra della linea telefonica.
The ground must be connected. Don’t connect the
earth wire to water or gas pipes, lightning rods and
telephone earth lines.
Selezionare la temperatura adatta. Mantenere la
temperatura ambiente minore di 5°C rispetto all’esterno (in freddo).
Select the most appropriate temperature. Keep the
room cooler than outside about 5 °C in cooling mode.
Non lasciare le finestre e le porte aperte a lungo
mentre funziona il condizionatore.
Don’t leave windows and doors open while operating air conditioner for a long time.
La direzione dell'aria può essere controllata.
Rivolgere l’aletta verso il basso per il riscaldamento e verso l'alto per il raffreddamento
The air direction can be adjusted appropriately.
The louver adjusted downward at heating operation and upward at cooling operation.
Spruzzare acqua sul condizionatore può causare
cortocircuiti e malfunzionamenti.
Splashing water on the air conditioner can cause
an electric shock and malfunction.
Non lasciare che gli animali si espongano direttamente al flusso d’aria prodotto dal condizionatore.
Può essere causa di brutti disturbi.
Don't blow the wind to plant and animals directly. It
can cause bad imfluence to them.
Non usare il condizionatore per altri scopi come
ascigare i panni, conservante gli alimenti, ecc.
Don’t use the air conditioner for other purposes
such as drying cloths, preserving foods, etc.
16
Il condizionatore dovrebbe funzionare con una tensione tra 195-250V 1ph.
Altrimenti la valvola e la scheda di controllo si danneggiano.
Air conditioner should be operated with the voltage
in range of 195-250V Iph. Otherwise, reversing
valve and controller will damage.

AIR CONDITIONING
HHW 07÷32
L'UNITÀ NON FUNZIONA IMMEDIATAMENTE?
Se si riavvia il condizionatore entro 3 minuti dallo spegnimento, o dopo aver cambiato la modalità durante il funzionamento. Un dispositivo di protezioneè attivo per bloccare il funzionamento dell’unità per 3
minuti.
UNIT DOES NOT OPERATE IMMEDIATELY?
If you restart the air conditioner within 3 minutes after turning it off, or changing the mode during operation. A protective device will work to shut down off the unit for 3 minutes.
ODORE INSOLITO CHE PROVIENE DALL'UNITÀ?
Gli odori presenti nella stanza, come quelli dalla moquette o dalla mobilia, possono essere riprodotti dall'unità.
UNUSUAL SMELL COMING FROM THE UNIT?
Odors present in the room, such as those from the carpet or furniture, may emitted from the unit.
SI SENTE UN SIBILIO DURANTE IL FUNZIONAMENTO?
Può essere avvertito un leggero rumore durante il funzionamento dell'unità o subito dopo il suo spegnimento. È il suono dell’acqua circolante.
HISSING SOUND HEAR DURING OPERATION?
A soft, swishing noise can be heard during operation or immediately after the unit is turned off. This is
the sound of circulating refrigeranted water.
EMISSIONE DI NEBBIA DURANTE IL FUNZIONAMENTO IN RAFFREDDAMENTO?
Se l'aria della stanza è raffreddata velocemente il flusso di aria fredda può sembrare foschia.
MIST IS EMMITTED DURING COOLING OPERATION?
Because the air in the room is cooled rapidly by the cold wind and It looks like fog.
AIR CONDITIONER DOESN’T OPERATE AT ALL
- Has the power been shut down?
- Is the wiring loose?
- Is the leakage protection is operation?
- Is voltage higher than 250V or lower than 195V?
- Is the TIMER ON in operation?
COOLING (HEATING) EFFICIETCYIS NOT GOOD
- Is set temp. suitable?
- Is air inlet or outlet obstructed?
- Are air filters dirty?
- Is Indoor fan speed set at low speed?
- Is there any other heat source in your room?
- Is there arge number of people Inside the room?
WIRELESS REMOTE CONTROLLER IS NOT
FUNCTIONING
- Is the remote control unit out of effective distance to the fan coil unit?
- Replace the worn out batteries of remote controller?
Are there any obstructions between the wireless remote controller and the signal receptor?
IL CONDIZIONATORE NON FUNZIONA
- Si è tolta l’alimentazione?
- Ci sono collegamenti allentati?
- La protezione di perdita funziona?
- Il voltaggio è inferiore a 195V o superiore a
250V?
- È in funzione il temporizzatore?
IL RENDIMENTO IN RAFFREDDAMENTO (O
IN RISCALDAMENTO) NON È BUONO.
- La temperatura impostata è adatta?
- L’ingresso o l’uscita d’aria sono ostruiti?
- Il filtro d'aria è sporco?
- La velocità del ventilatore interno è bassa?
- C’è qualche altra fonte di calore nella vostra stanza?
- La stanza è troppo affollata?
IL TELECOMANDO NON FUNZIONA
- La distanza a cui si trova il telecondo è eccessiva?
- Le batterie del telecomando sono scariche?
- C’è qualche ostruzione tra il telecomando e l’unità?
CHIEDERE ASSISTENZA SPECIFICA
Se l'unità non funziona e tutti gli indicatori LED stanno
lampeggiando.
CAUSA: qualche sensore di temperatura è in corto-circuito o circuito aperto .
14. NOTE SUPPLEMENTARI SUL FUNZIONAMENTO
È NORMALE CHE SI VERIFICHINO LE SEGUENTI SITUAZIONI:
14. ADDITIONAL NOTES ON OPERATION
THE FOLLOWING ARE NORMALCONDITION FOR THE UNIT:
BEFORE CALLING FOR SERVICE
If the unit appears to be malfunctioning, check the following points before calling for service.
PRIMA DI RICHIEDERE ASSISTENZA
Se non sembra che l'unità non funzioni correttamente,
verificare le seguenti condizioni prima di chiamare l’assistenza.
NEED QUALIFIED PERSONEL ASSISTANCE
If the unit not functioning and all LED lamp indicators
are blinking.
CAUSES: Any of the Temperature sensors was OPEN
or SHORT.
17

15. CARE AND MAINTENANCE
CAUTION:
- Turn off the power and pull the power plug before cleaning the air conditioner,
- Don't sprinkle water on the fan coil unit for cleaning.
- Wipe the unit with a dry soft cloth, or a slightly moistened with water or cleaner.
CLEANING THE AIR FILTERS
(Recomended once every three weeks):
1. Open the deco panel by grasping at the side rounded
groove and pulling it towards you.
2. Hold the tabs of air filter and raise it slightly ,and then t ake it
out.
3. To clean the dust adhering the air filters, you can use
either vacuum cleaner or wash them with water and dry
it in the shade. NOTE: Never use water above 45°C it
could cause deformation or discoloration.
4. Reinsert the air filters with side marked "FRONT" facing for-
ward you.
PREPARATION BEFORE USE:
1. Be sure that no obstruction in the air outlet and intake
vents.
2. Cheked that whether ground wire is properly connected or not.
3. Replace filters If necessary.
MAINTENANCE AFTER USE:
1. Clean filters and other parts.
2. Turn off the main If not In use.
15. CURA E MANUTENZIONE
ATTENZIONE:
- Spegnere l'alimentazione prima della pulizia del condizionatore.
- Non spruzzare direttamente acqua sull'unità.
- Asciugare l’unità con un panno liscio asciutto, o inumidito con un po' d’acqua o di detergente.
PULIZIA DEI FILTRI D’ARIA
(Raccomandata una volta ogni tre settimane):
1. Aprire il pannello frontale afferrandolo dalla scanalatura arrotondata laterale e tirandolo.
2. Tenere le linguette del filtro d'aria, sollevarlo ed estrarre il
filtro.
3. Per pulire la polvere che si attacca al filtro si può
usare un’aspirapolvere o lavarlo con acqua ed asciugarlo tutto.
NOTA: L’acqua non deve superare i 45°C perchè
potrebbe creare deformazione o lo sbiadimento.
4. Reinsere il filtro con la scritta “FRONT” di fronte a voi.
PREPARAZIONE PRIMA DELL'USO:
1. Assicurarsi che non ci siano ostruzioni lungo lo scarico e sulla presa d’aria.
2. Verificare che il filo di messa a terra sia collegato correttamente.
3. Sostituite i filtri se necessario.
MANUTENZIONE DOPO L’UTILIZZO:
1. Pulire i filtri e gli altri componenti.
2. Togliere la corrente se non si usa la macchina.
18
AIR CONDITIONING
HHW 07÷32

I dati riportati nella presente documentazione sono so la men te
indicativi. Il costruttore si ri ser va la facoltà di ap por ta re in qualsiasi
momento tutte le modifiche ri te nu te ne ces sa rie.
The data indicated in this manual is purely indicative. The manufacturer reserves the right to modify the data whenever it is
considered necessary.
Via Gettuglio Mansoldo (Loc. La Macia)
37040 Arcole
Verona - Italy
Tel. +39 - 045.76.36.585 r.a.
Fax +39 - 045.76.36.551 r.a.
www.maxa.it
e-mail: maxa@maxa.it
A I R C O N D I T I O N I N G
 Loading...