

Page 1
GB
NOTE: ALL THE PROMOTION STICKERS NEED TO BE TAKEN OUT OF THE PRODUCT BEFORE USE.
QUICK REFERENCE GUIDE
WHEN THE PRODUCT IS OFF OR IN STANDBY MODE, while opening or closing the door a beep will signal, and all the function key will be visible on control panel. Or you can press the touch selector, all
the function key will be visible on it.
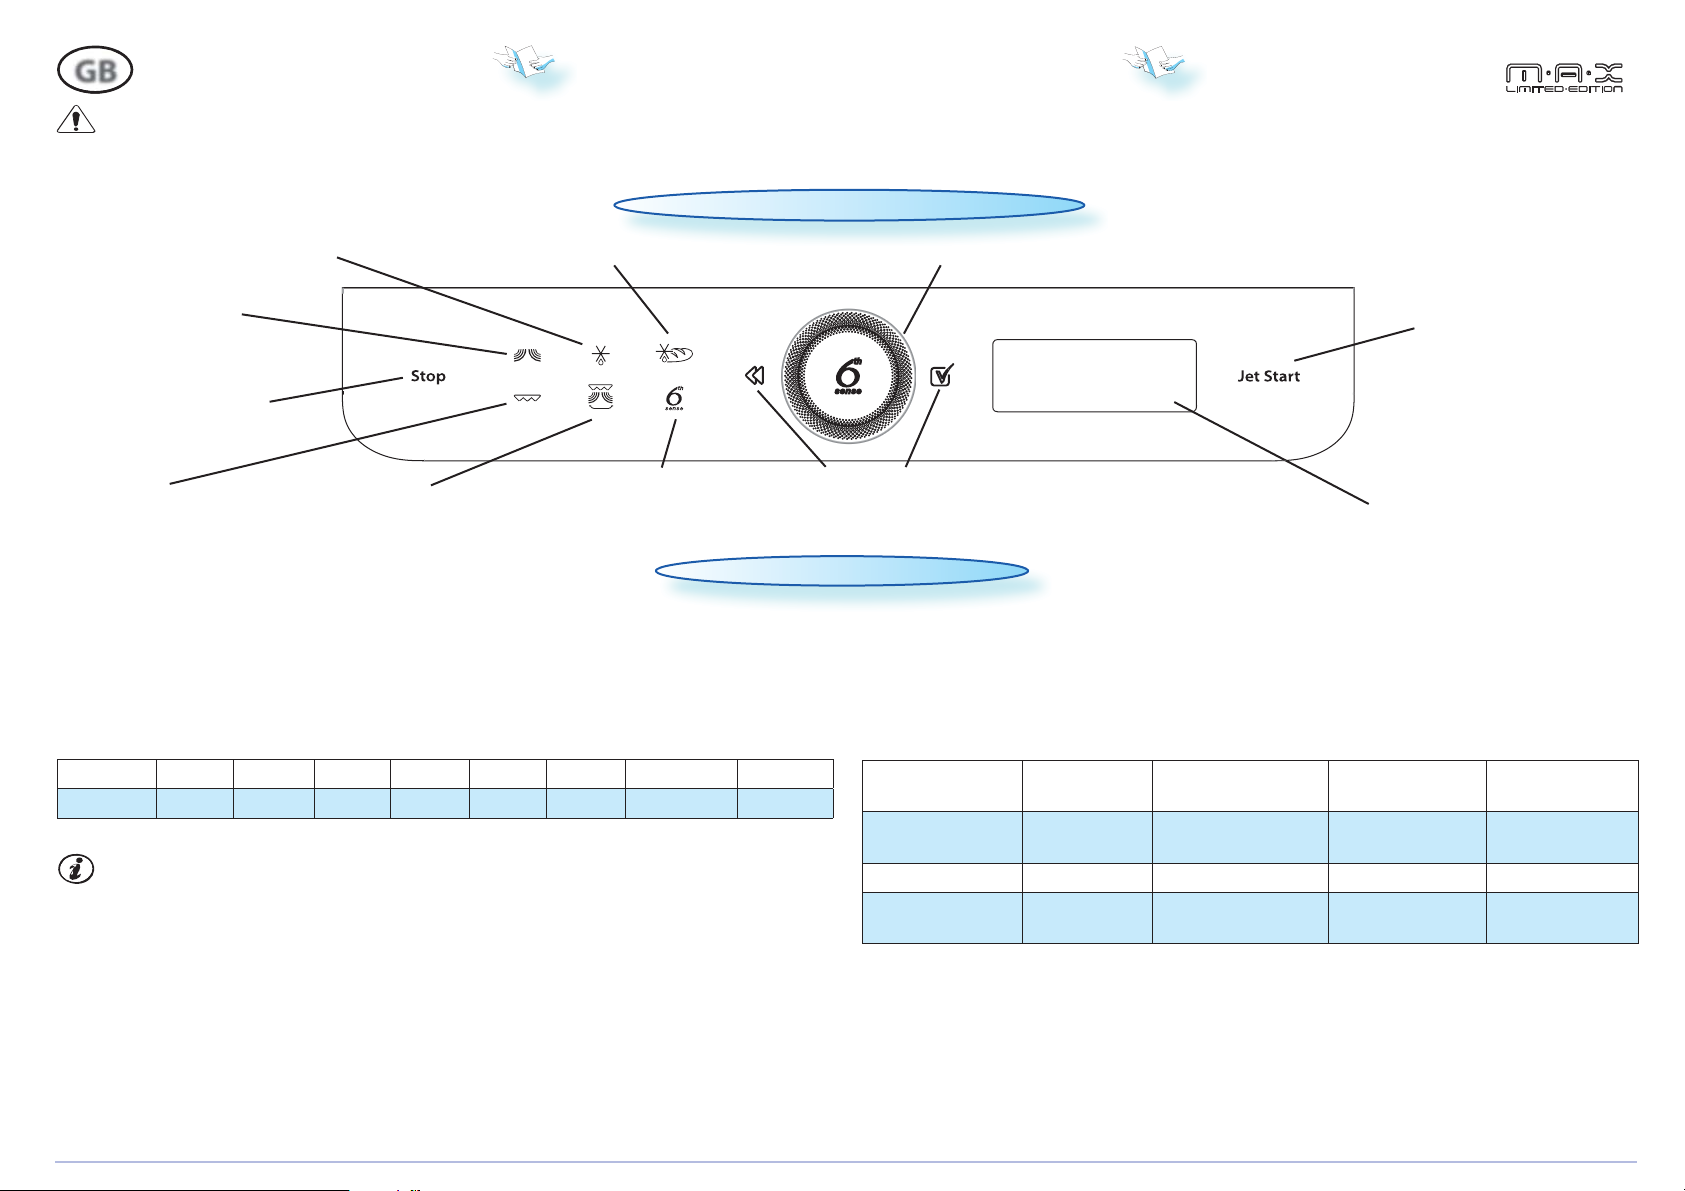
CONTROL PANEL
J
ET DEFROST BUTTON
Use to select Jet Defrost function.
C
RISP DEFROST BUTTON
Use to select Defrosting Bread function.
C
APACITIVE TOUCH SELECTOR
Use to adjust the cook time, cook power(for MW), class food, weight, cook function and setting.
MICROWAVE BUTTON
Use to set the desired
microwave power level.
S
TOP BUTTON
Press to stop or reset any of
the oven functions.
GRILL BUTTON
Use to select Grill function.
RISP BUTTON
C
Use to select Crisp function.
TH SENSE BUTTON
6
Use to select 6th Sense Crisp or
6th Sense Steam function.
ACK / CONFIRM ATION BUTTON
B
Use to select or go back in the selection of a function.
ET START B UTTON
J
Use to start the cooking
process or invoke the Jet
Start function.
IGITAL DISPLAY
D
The display includes a 24-hour
clock, symbols and text.
SETTING
W
HEN THE PRODUCT IS initially plugged into the power source, a selection of settings automatically appear to enable you to adjust/customize values such as Language, Clock, Volume and Eco mode.
IF YOU WISH TO change any setting, you can keep the Stop button pressed for 3 seconds to reach it.
Set Language
TURN TOUCH SELECTOR to select the desired language.
q
PRESS CONFIRM ATION BUTTON to confirm selection.
w
ITEMS123456 7 8
Languages English Francais Italiano Deutsch Svenska Espanol Nederlands Cestina
ALL LANGUAGE NAMES are written in it’s original language.
Set Clock
TURN TOUCH SELECTOR to set the actual time-of-day.
q
PRESS CONFIRM ATION BUTTON to confirm selection.
w
NOTE: IT GIVES YOU 10 MINUTES to complete the setting of the Clock.
Set Volume
TURN TOUCH SELECTOR to select the Volume.
q
PRESS CONFIRM ATION BUTTON to confirm selection.
w
VOLUME VOLUME HIGH
Buttons (all touch
buttons)
Central Jewel 100% 50% 20% 0%
Alerts, Alarms &
Reminders
100 % 100 % 50% 0%
100 % 100 % 100 % 100 %
VOLUME MEDIUM
DEFAULT
VOLUME LOW SILENT
ECO Mode
TURN TOUCH SELECTOR to select Activated or Deactivated.
q
PRESS CONFIRM ATION BUTTON to confirm selection.
w
OTE: ECO MODE Deactivated is Default.
N
WHEN ECO MODE IS SET, the clock will not be visible when the product is in Standby.
Page 2

GB
QUICK REFERENCE GUIDE
COOK & REHEAT WITH MICROWAVES
USE THIS FUNCTIO N for normal cooking and reheating, such as vegetables, sh, potatoes and meat.
PRESS THE MICROWAVE BUTTON repeatedly to se-
q
lect the power.
PRESS CONFIRMATION BUTTON to con rm.
w
TURN THE TOUCH SELECTOR to adjust the cooking
e
time.
PRESS THE JET START BUT TON.
r
Y
OU CAN PRESS the back button if you wish to
return to previous setting before pressing Jet
start button.
MICROWAVES ONLY
OWER SUGGESTED USE:
P
COOK-REHEAT Jet Power
COOK-REHEAT
COOK-MELT
DEFROST
SOFTENING 90 W S
500 W
350 W SIMMERING STEWS, melting butter.
160 W DEFROSTING. Softening butter, cheeses.
COOKING of sh, meat, vegetables etc.
MORE CAREFUL COOKING e.g. high protein sauces, cheese and egg dishes and to nish
cooking casseroles.
OFTENING Ice cream.
NCE THE COOKIN G PROCESS HAS BEEN STARTED:
O
The time can easily be increased in 30-second
steps by pressing the Jet Start button. Each press
increases the time with 30
seconds. You may also alter
the time by rotating the
nger on the central touch
selector to increase or decrease the time.
AMBIENT LIGHT
UNDERNEATH THE PRODUCT there is a White ambient light which reflects off the underlying surface.
The white light should be present when the product is in setup state or when a cooking process has
finished.
T
HE AMBIENT LIGHT should change color depending on the active process:
GREEN LIGHT (“healthy”), Shown during the cooking process for: 6th Sense Steam.
RED LIGHT (“heated cooking”), Shown during the cooking process for: MW, Grill, Combi, 6th Sense
Crisp, Manual Crisp, Crisp Defrost.
BLUE LIGHT (“cool defrosting”), Shown during the cooking process for: Jet Defrost.
NOTE: THE AMBIENT LIGHT wil be deactivate when ECO Mode is activated.
DEMO MODE
How to activate Demo Mode: While the oven is in normal mode, open the door, press Stop button,
press and hold the Jet Start button for 8 seconds until you hear a beep. The oven will show “Demo
Mode activated” .
How to deactivate Demo Mode: Open the door, press Stop button, press and hold the Jet Start
button for 8 seconds until you hear a beep. The Demo Mode function will be deactivated.
OTE: THE DEMO MODE will be activated under the language selected.
N
PAUSE OR STOP COOKING
TO PAUSE COO KING:
THE COOKING CAN BE PAUS ED to check, turn or stir the food by opening the door. The setting will exit to
standby mode after 10 minutes.
T
O CONTI NUE COOKI NG:
C
LOSE THE DOOR and press the Jet Start button ONCE. The cooking is resumed from where it was paused.
I
F YOU DON’T WAN T TO CONTINU E COOKING:
REMOVE THE FOOD, close the door and press the STOP button.
NOTE: After cooking ends, the fan and cavity lamp is on before pressing STOP button, it’s normal.
A BEEP WILL SIGNAL once a minute for 10 minutes when the cooking is nished. Press the STOP button or open
the door to cancel the signal.
CHILD LOCK/TOUCH LOCK
THIS AUTOMATIC SAFETY FUN CTION IS ACTIVATED 2
MINUTES AFTER the oven has returned to
“stand by mode“. In this mode the door
are locked.
HE DOOR MUST BE OPENED AND CLOSED e.g. putting food
T
into it, before the safety lock is released. Else the
display will show
“DOOR“.
THIS FUNCTION IS USED for quick reheating of food
with a high water content such as clear soups,
co ee or tea.
PRESS JET START BUT TON.
q
THIS FUNCTION AUTO MATICALLY STARTS with maximum
microwave power level and the cooking time set
to 30 seconds. Each additional press increases the
time with 30 seconds. You may also alter the time
by rotating the nger on the central touch selector to increase or decrease the time after the
function has started.
P
RESSING THE JET START BUT TON TWICE will increase
the time by 30 seconds.
JET START
Page 3

GB
QUICK REFERENCE GUIDE
JET DEFROST
USE THIS FUNCTIO N for defrosting Meat, Poultry and Fish. JET Defrost should only be used if the net
weight is between 100 g- 1.5 kg.
A
LWAYS PLACE THE FOOD on the glass turntable.
PRESS THE JET DEFROST BUTTON.
q
TURN THE TOUCH SELECTOR to adjust the weight
w
of the food.
PRESS THE JET START BUT TON.
e
M
IDWAY THROUGH THE DEFROSTING PROCESS the oven
stops and prompts you to TURN FOOD .
Open the door.
Turn the food.
Close the door and restart by pressing the Jet
Start button.
NOTE: THE OVEN CONT INUES AUTO MATICALLY after 2 min.
if the food hasn’t been turned.
FROZEN FOODS:
IF THE WEIGHT IS LESS THAN OR GREATER THAN RECOMMEND-
ED WEIGHT: Follow the procedure for “Cook &
Reheat with microwaves” and choose 160
W when defrosting.
I
F THE FOOD IS WARM ER than deep-freeze tem-
perature (-18°C), choose lower weight of
the food.
IF THE FOOD IS COLD ER than deep-freeze temperature (-18°C), choose higher weight of
the food.
GRILL
USE THIS FUNCTIO N TO quickly give a pleasant brown surface to the food.
PRESS THE GRILL BUTTON.
q
TURN THE TOUCH SELECTOR to adjust the cooking time.
w
PRESS THE JET START BUT TON.
e
D
URING THE COOKI NG, It is possible to adjust the cooking time by turning the touch selector.
E
NSURE THAT THE UTENSILS used are heat resistant and ovenproof before grilling with them.
D
O NOT USE PLASTIC utensils when grilling. They will melt. Items of wood or paper
are not suitable either.
CRISP
O
USE THIS FUNCTIO N TO cook quiches, pizzas and
other dough based food. Also ideal for roasting
meat, sh and frying bacon, eggs, potatoes, etc.
PRESS THE CRISP BUTTON.
q
TURN THE TOUCH SELECTOR to adjust the cooking
w
time.
PRESS CONFIRMATION BUTTON to con rm. Then a
e
message appears
the crisp plate.
PRESS THE JET START BUT TON.
r
YOU CAN PRESS back button if you wish to return to
previous setting before pressing Jet start button.
T IS NOT POSSIBLE TO CHANGE OR SWITCH the Power level
I
or Grill on/o , when using the Crisp function.
D
URING COOKI NG TIME, It is possible to adjust the
cook time by turning the touch selector.
T
HE OVEN AUTOM ATICALLY uses Microwaves and Grill
in order to heat the Crisp-plate. This way the
Crisp-plate will rapidly reach its working temperature and begin to brown and crisp the food.
Informing the users to use
NLY USE the supplied Crisp plate with this func-
tion. Other available Crisp plates on
the market will not give the correct
result when using this function.
NSURE that the Crisp-plate is correctly placed
E
in the middle of the Glass turntable.
HE OVEN AND THE CRISP-PLATE become very hot
T
when using this function.
D
O NOT PLACE THE HOT CRISP-PLATE on any surface
susceptible to heat.
E CAREFUL, NOT TO TOUCH the ceiling beneath
B
the Grill element.
U
SE OVEN MITTENS
or the special Crisp handle supplied when removing the hot Crisp-plate.
GRILL COMBI
U
SE THIS FUNCTIO N TO cook such food as Gratins,
Lasagne, Poultry and Baked potatoes.
PRESS THE GRILL BUTTON FIRST, and press MW but-
q
ton, then display will show the “COMBI FUNCTION“ .
TURN TOUCH SELECTOR to select the power.
w
PRESS CONFIRMATION BUTTON to con rm.
e
TURN TOUCH SELECTOR to adjust the cooking
r
time.
PRESS JET START BUTTON.
t
YOU CAN PRESS back button if you wish to return to previous setting before pressing Jet start button.
DURING COOK ING TIME, It is possible to adjust the cook time by turn the touch selector or press start
botton.
ENSURE THAT THE UTENSILS used are heat resistant and ovenproof before grilling with them.
OWER SUGGESTED USE:
P
350 - 500 W C
160 - 350 W C
160 W C
90 W G
0 W B
GRILL COMBI
OOKING Poultry & Lasagne
OOKING Fish & frozen gratins
OOKING Meat
RATINATING fruit
ROWNING only during cooking
O NOT USE PLASTIC utensils when grilling. They will melt. Items of wood or paper
D
are not suitable either.
Page 4

GB
QUICK REFERENCE GUIDE
6TH SENSE STEAM
USE THIS FUNCTIO N FOR such food as vegetables, Frozen vegetables, fish fillets, fruits.
ALWAYS USE SUPPLIED STEAMER when using this function.
PRESS THE 6TH SENSE BUTTON mode position.
q
TURN TOUCH SELECTOR to select 6th Sense Steam.
w
PRESS CONFIRMATION BUTTON to con rm.
e
TURN TOUCH SELECTOR to select the food type.
r
PRESS CONFIRM ATION BUTTON to con rm. Two messages appear to remind you to use the steamer and
t
add water to steamer.
PRESS JET STAR T BUTTON.
y
Y
OU CAN PRESS back button if you wish to return to previous setting.
THE STEAMER IS designed to be used with microwaves only!
NEVER USE IT with any other function at all.
U
SING THE STEAMER in any other function may cause damage.
ALWAYS ENSURE THAT the turntable is able to turn freely before starting the oven.
ALWAYS PLACE the steamer on the Glass Turntable.
FOOD CLASS AMOUNT HINTS
VEGETABLES
q
FROZEN VEGETABLES
w
FISH FILETS
e
FRUITS
r
300
G - 400G
PLACE IN STEAM GRID. Add 100ml water in bottom and
cover with lid.
ALLOW TO STAND for 1 - 2 minutes. Add 100ml water in
bottom and cover with lid.
DISTRIBUTE FILLETS EVENLY on the steam grid. Interlace thin
parts. Allow to stand for 1 - 2 minutes, after cooking.
Add 100ml water in bottom and cover with lid.
PLACE IN STEAM GRID. Add 100ml water in bottom and
cover with lid.
6TH SENSE CRISP
U
SE THIS FUNCTIO N TO cook Pizzas, French Fries, Quiche, and Chicken nuggets. This function is used only for
frozen ready-made food.
D
PRESS THE 6TH SENSE BUTTON mode position.
q
TURN TOUCH SELECTOR to select 6th Sense Crisp.
w
PRESS CONFIRMATION BUTTON to con rm.
e
TURN TOUCH SELECTOR to select the food type.
r
PRESS CONFIRMATION BUTTON to con rm. Then a
t
message appears
the crisp plate.
PRESS JET START BUT TON.
y
Y
OU CAN PRESS back button if you wish to return to
previous setting.
FOOD CLASS AMOUNT HINTS
PIZZA, FROZEN
q
FRENCH FRIES,
w
FROZEN
QUICHE FROZEN
e
CHICKEN NUGGETS/
r
WINGS, FROZEN
FOR FOOD NOT LISTED IN THIS TABLE and if the weight is lesser or greater than recommended weight, you
should follow the procedure for the manual Crisp function.
Informing the users to use
For pizzas with crust.
Spread out the fries in an even layer on the crisp plate. Sprinkle with
salt if crispier fries are desired. The fries can be stirred when the time
300400G
is displayed.
Remove package and place the Quiche on the crisp plate.
Spread out the Chicken wings in an even layer on the crisp plate. The
chicken Nuggets can be stirred when the time is displayed.
O NOT PLACE any containers or wrappings on
the Crisp plate!
NLY USE the supplied Crisp plate with this func-
O
tion. Other available Crisp plates on the market
will not give the correct result when using this
function.
USE OVEN MITTENS or the special
Crisp handle supplied when re-
moving the hot Crisp-plate.
ONLY THE FOOD IS TO be placed on the
Crisp plate.
CRISP DEFROST
USE THIS FUNCTIO N TO Defrost crispy bread. Crisp Defrost should only be used if the net weight is between
50g- 400g.
PRESS THE CRISP DEFROST BUTTON.
q
TURN THE TOUCH SELECTOR to select the weight.
w
PRESS CONFIRMATION BUTTON to con rm. Then a message appears to inform you to use the crisp plate.
e
PRESS JET START BUT TON to preheating of the Crisp plate. When the temperature has been reached, a
r
message informs you to insert the food (bread).
ADD FOOD(BREAD) and press start button.
t
IF YOU DO NOT open and close door in add food stage, the cooking can not be resumed and continue
cooking.
TECHNICAL SPECIFICATION
MODEL MAX109
UPPLY VOLTAGE 230 V/50 HZ
S
RATE D POWER INPUT 150 0 W
USE 10 A (UK 13 A)
F
MW OUTPUT POWER 700 W
RILL 650 W
G
UTER DIMENSIONS (HXWXD) 360 X 392 X 350
O
INNER DIMENSIONS (HXWXD) 149 X 290 X 290
W10415284
 Loading...