

Page 1

E H-110 F
INSTRUCTION MANUAL
使用说明书
使用說明書
● Prior to using, read this instruction manual.
● Keep this instruction manual.
● It is prohibited to reproduce the contents of this manual without permission.
● The information herein is subject to change without prior notice.
●
在使用之前,请务必阅读本使用说明书。
●
请妥善保存本使用说明书。
●
未经许可,禁止复制本说明书的内容。
●
本说明书中的信息如有更改,恕不另行通知。
●
在使用之前,請務必閱讀本使用說明書。
●
請妥善保存本使用說明書。
●
未經許可,禁止複製本說明書的內容。
●
本說明書中的資訊如有更改,恕不另行通知。
EH19484 (00/01)
ELECTRONIC STAPLER
电动订书机
電動釘書機
Page 2

2
CONTENTS
CONTENTS
BE SURE TO READ THE FOLLOWING
INTRODUCTION ......................................................................................................
3
NOTATION OF MANUAL ..........................................................................................
3
PRECAUTIONS FOR USE ......................................................................................
4
DISCLAIMER ...........................................................................................................
5
BEFORE USE
PACKAGE CONTENTS............................................................................................
6
MAIN FUNCTIONS OF OPERATING SECTION AND LAMPS ................................
6
NAME OF EACH SECTION .....................................................................................
7
STAPLING AUTOMATICALLY
............................................................
8
STAPLING MANUALLY
......................................................................
9
STAPLING ON THE CORNER
.............................................................
10
SHIFTING THE PAPER CROSSWISE TO STAPLE AT TWO POSITIONS
....
11
REPLACING (LOADING) THE STAPLE REFILLS
..............................
12
CLEARING JAMMED STAPLES
.........................................................
15
TROUBLESHOOTING
.........................................................................
17
ABOUT THE MACHINE
.......................................................................
18
SPECIFICATIONS ....................................................................................................
18
Page 3
3
BE SURE TO READ THE FOLLOWING
BE SURE TO READ THE FOLLOWING
INTRODUCTION
Thank you very much for purchasing our electronic stapler.
Prior to using the stapler, read the manual thoroughly for safe and correct operation.
NOTATION OF MANUAL
■
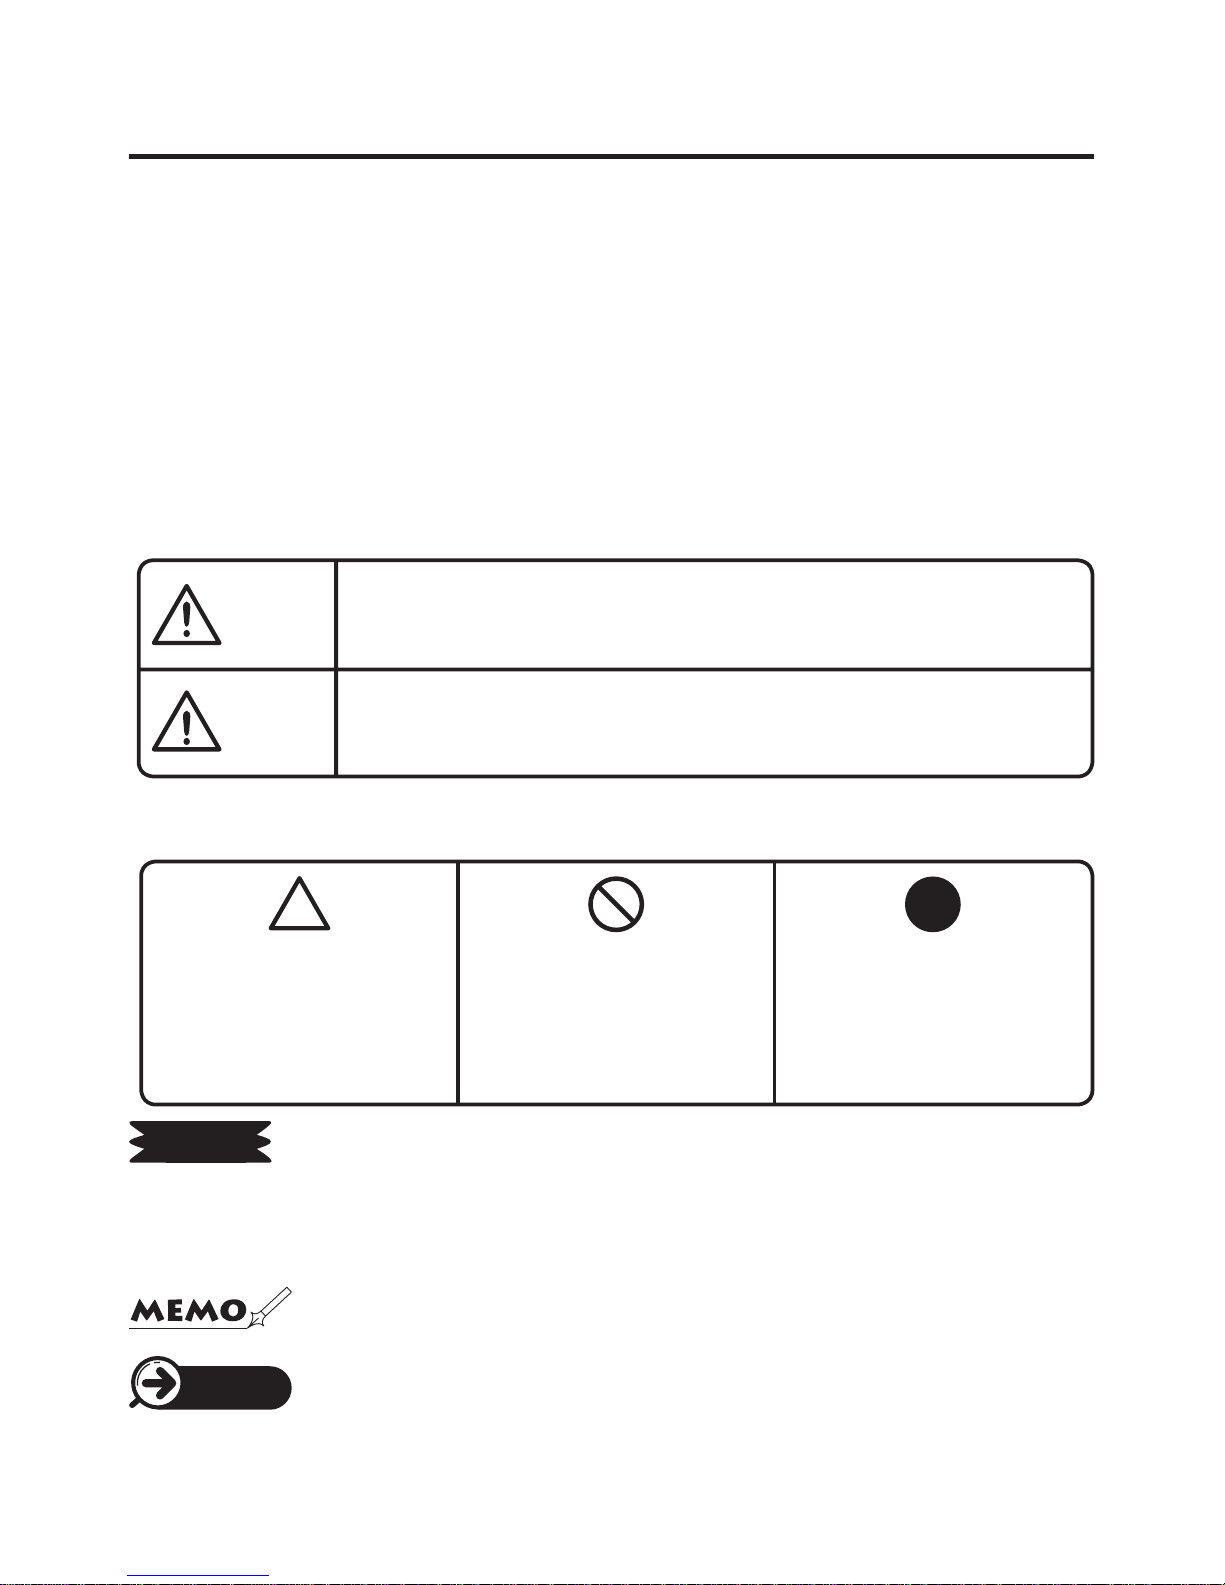
INDICATIONS
This instruction manual and stapler use various indications to help you use this machine
safely and properly. The following describes those indications.
WARNING
Negligence could lead to serious injury or death.
CAUTION
Negligence could lead to an injury, damage of your property, or
cause loss of created data.
■
SYMBOLS
Describes operations that may cause damage to the machine and require a repair, or operations
that require resetting the machine, etc., to restore the condition of the machine.
REQUEST
Describes the points of operation and tips.
■
PAGE
Describes a reference page in case a description is provided on a
different page.
Denotes “What you
should be aware of.”
An indication in or near this
symbol shows a specic
caution.
Denotes “What you
must not do.”
An indication in or near this
symbol shows a specic
prohibition.
Denotes “What you
must do.”
An indication in or near this
symbol shows a specic
instruction.
Page 4

4
BE SURE TO READ THE FOLLOWING
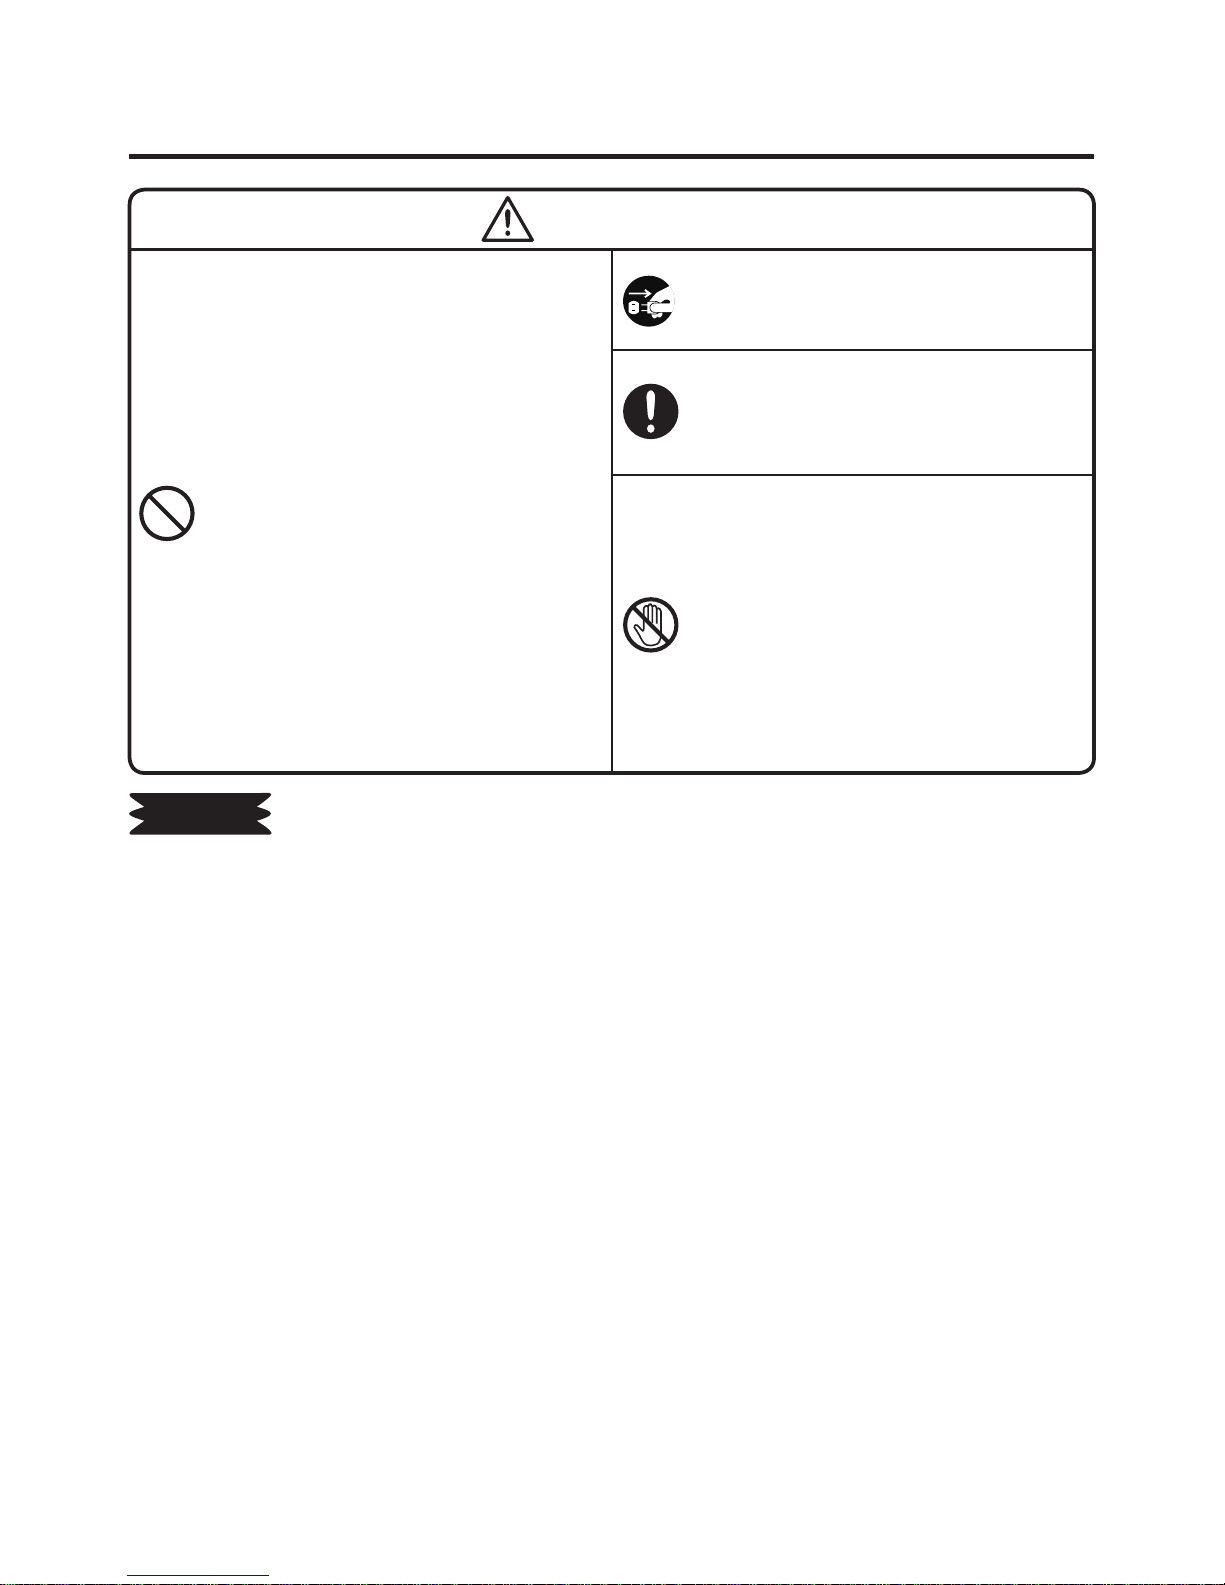
PRECAUTIONS FOR USE
WARNING
●
Do not turn over the main body.
It could cause a re or electric shock.
●
Do not insert foreign substances such as
ngers, pens, or wire into this machine.
It could damage the machine or cause a re,
electric shock, injury, or burn.
●
Never put your hand or an object into the
staple outlet port.
It could not only cause a mechanical trouble,
but endanger you physically.
●
Be sure to use an accompanying power
cord.
It could cause a re or electric shock.
●
Obtain power directly from a single plug
socket. Avoid connecting many wires to
one plug socket.
It could cause a re.
●
Do not process a power cord.
It could cause a re or electric shock.
●
Do not place any heavy material on a power
cord.
The cord could be broken and cause a re or
electric shock.
●
Do not use a power cord in a bundled state.
It could cause a re or damage the machine
due to heat generation. Be sure to unbundle
the cord.
●
Do not connect/disconnect a power plug
with a wet hand.
It could cause an electric shock.
●
Do not operate the machine with a wet
hand or in wet clothes.
It could cause an electric shock.
●
Do not place paper or cloth on or over the
machine with the power cord connected to
a plug socket.
It could cause a re or damage the machine.
●
When disconnecting the power plug, be
sure to hold the plug to disconnect instead
of directly pulling a power cord.
The cord could be broken and cause a re or
electric shock.
●
Do not splash water or chemicals on the
machine.
In case water, etc. enters inside the machine
by any chance, disconnect the power plug
from the plug socket immediately and ask your
dealer for repair. If used in that state, it could
cause a mechanical trouble, re or electric
shock.
●
Do not operate the machine, if it is out of
order.
If it is operated in an out-of-order state, such as
it is smoking, emitting an abnormal sound, or
smelling funny, it could cause a re or electric
shock.
Disconnect the power plug immediately
from a plug socket and contact your dealer
for a repair.
●
When replacing staple rells or clearing
jammed staples, be sure to disconnect a
power plug from the plug socket.
It could cause an injury when the stapler is
abruptly activated.
●
When relocating an installation site, be
sure to disconnect a power plug from a
plug socket.
If relocated with the power plug connected
to the plug socket, the plug or cord could be
damaged, resulting in a re or electric shock.
●
Never disassemble or modify this machine.
It could damage the machine or cause a re,
electric shock, or injury.
●
Be sure to ground the machine.
If short-circuited by any chance, it could cause
a re or electric shock.
●
Clean the power cord plug regularly.
Dust on the plug could cause a re or damage
the machine.
●
Never touch a stapling position sensor
(red).
The machine could be activated to injure you.
Page 5
5
BE SURE TO READ THE FOLLOWING
CAUTION
●
Do not install the machine on a place that is not
level. Do not install in an unstable place such
as on a rickety stand or inclined surface.
It could cause an injury or damage the machine
because it might fall or drop.
●
Do not use the machine in a place exposed
to direct sunlight, high temperature and high
humidity or dew condensation.
It could cause operational instability or damage to
the machine.
●
Do not share the plug socket with equipment
(air conditioner, refrigerator, microwave, ofce
automation equipment and so on) that requires
a large capacity.
The voltage drop could cause the machine to
malfunction.
●
Do not press the manual button when there is
no paper at the ▼ mark position on the front
cover.
It could damage the machine or cause a staple jam.
●
Use only uncoated printing paper.
It could damage the machine or cause a staple jam.
●
When the machine is not used for a long
period of time, be sure to disconnect the
power plug from a plug socket for safety.
●
When moving the machine, hold its bottom
to carry.
It could cause an injury or damage the machine.
●
Do not insert ngers into the stapling area.
It could cause an injury.
●
The tip of a staple is pointed and sharp.
Handle with utmost care.
It could cause an injury.
●
When replacing staple rells, never touch
inside the machine (where a cartridge is
contained).
It could cause an injury or burn.
REQUEST
☆
In order to prevent problems with the machine, observe the following precautions.
1. Install and store this machine away from the following places:
①
Any place that catches direct sunlight or is located close to a heat source
②
Any place that has dust or high humidity
③
Any place that is not level or that is subject to vibration or impact
④
Any place that the temperature goes below 10ºC (50ºF) or over 35ºC (95ºF)
2. Use only MAX No. 110FE Staple Rells.
3. Use a dry cloth to clean dirt off of the machine. Do not use organic solvents and chemicals
(thinner, benzene, alcohol, etc.). They may deform or discolor the machine.
4. This machine does not staple when the rear cover is opened because of safety. Close the rear
cover correctly when stapling.
5. Do not staple with no paper set at the ▼ mark position on the front cover. It could damage the
machine or cause a staple jam.
6. Do not double staple at the already stapled position. It could damage the machine or cause a
staple jam.
7. When using curled or warped paper, undo it before inserting into the machine.
8. Do not staple a punched hole. It could damage the machine or cause a staple jam.
DISCLAIMER
We will take no responsibility for any damage caused by not observing the
instructions in this manual, any damage or lost prot caused by an unserviceable
condition.
Page 6

6
BEFORE USE
BEFORE USE
PACKAGE CONTENTS
Unpack and check that the following items are all included.
⑤
Instruction manual
②
Power cord (3-pin plug)
①
EH-110F
* Be sure to connect a
grounding conductor
to a 3-pin plug
socket.
The plug is different
depending on each model.
③
Cartridge
* Already set in the main
body.
④
Staple refills
(No. 110FE)
* Already set in
the cartridge.
MAIN FUNCTIONS OF OPERATING
SECTION AND LAMPS
Selector switch: A switch to select Auto (automatic stapling) or Manual (manual stapling)
LED indication lamps:
Illuminated in green: Ready to operate.
Illuminated in red: Replace the staple rells.
Blinking in green: Feed a staple.
Blinking in red: Clear jammed staples.
Illuminated in orange: Set the cartridge in the
main body.
START button: Used for manually stapling the
paper or feeding a staple.
PAGE 12
PAGE 14
PAGE 15
Indications on Top of Main Body
Selector switch
START button
LED indication lamp
Page 7
7
BEFORE USE
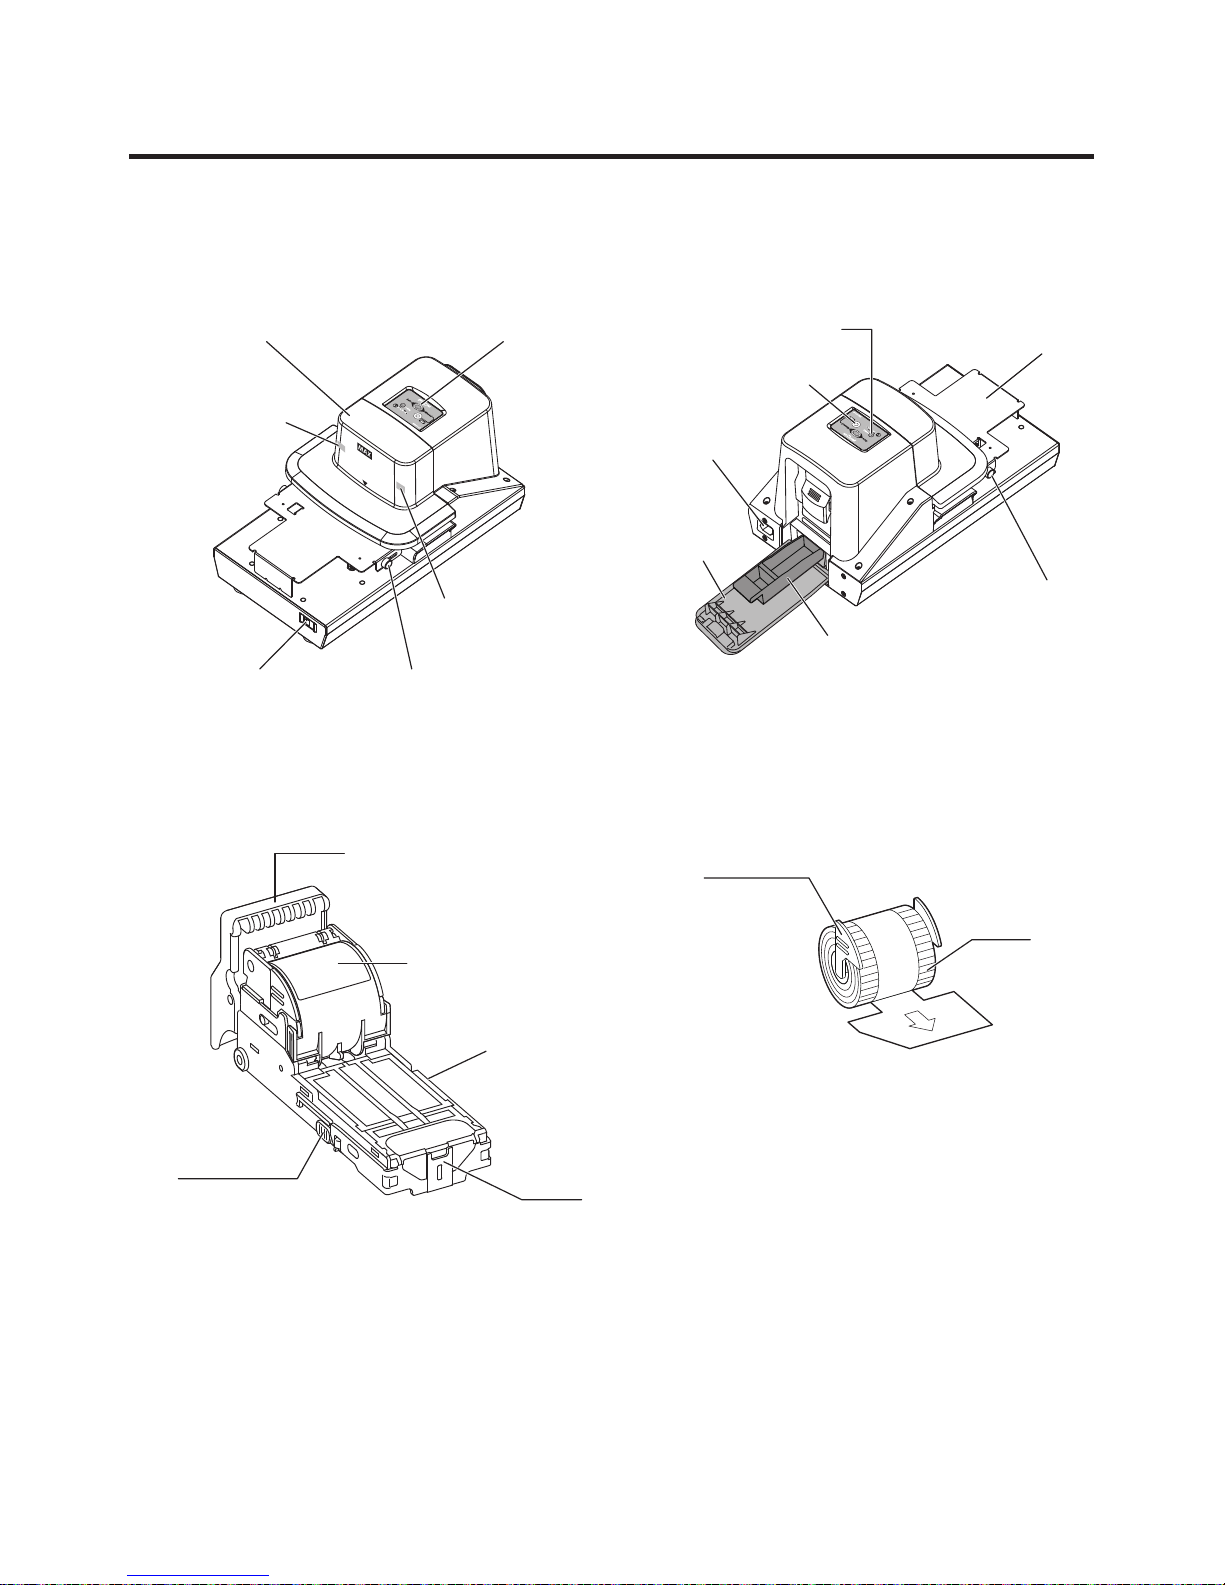
NAME OF EACH SECTION
[Front of the Main Body]
[Back of Main Body]
[Cartridge]
[Staple rells (consumable)]
Preparation
The cartridge and staple refills have already been set in the main body. Connect the
power cord to the power cord connection port of the main body and the plug socket, and
turn on the power switch. Once the green LED indication lamp is illuminated, the machine
is ready for operation.
Power switch
Selector switch
Front cover
Depth control slider
Stapling
position sensor
(red)
Stapling position
sensor (red)
Paper
table
LED indication lamp
START button
Staple trim tray
Depth control
slider
Rear cover
Power cord
connection port
Lever
Staple cover
Lock button
Face
plate
Lock button
Plastic rell
Staple
Page 8

8
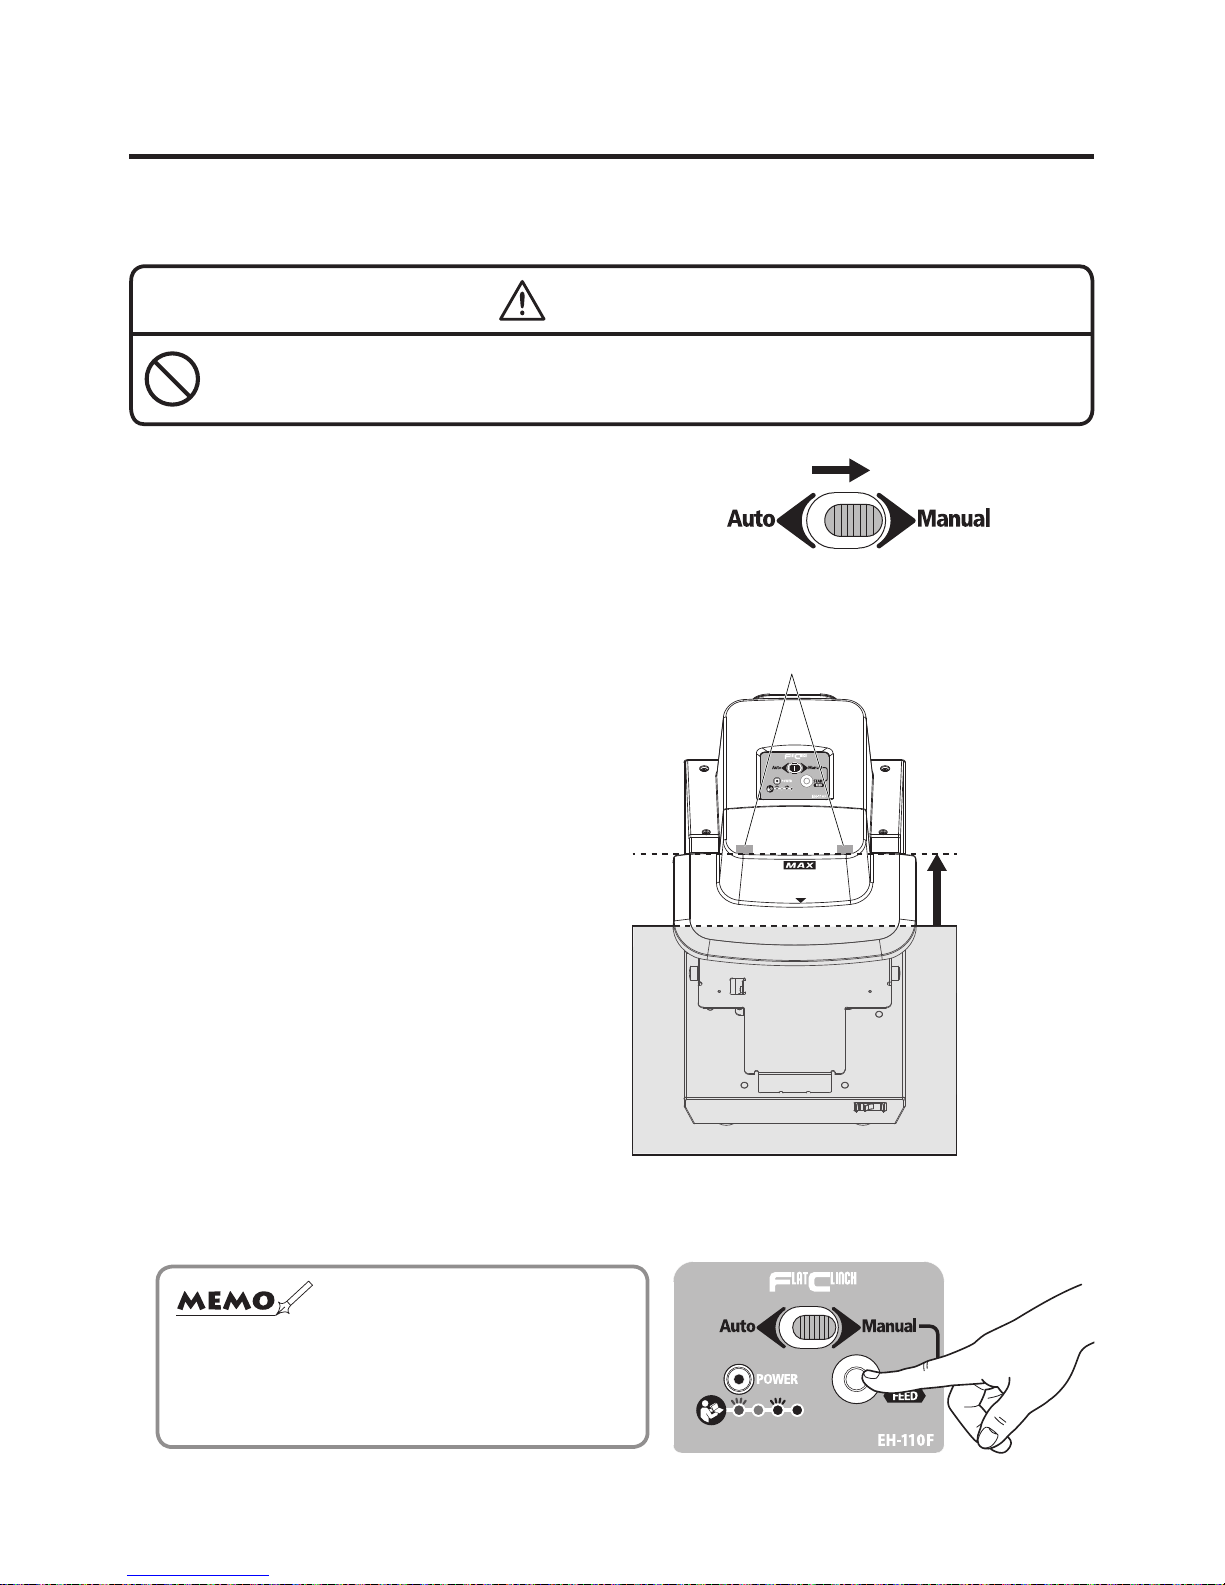
STAPLING AUTOMATICALLY
STAPLING AUTOMATICALLY
Insert the paper and the machine staples it automatically.
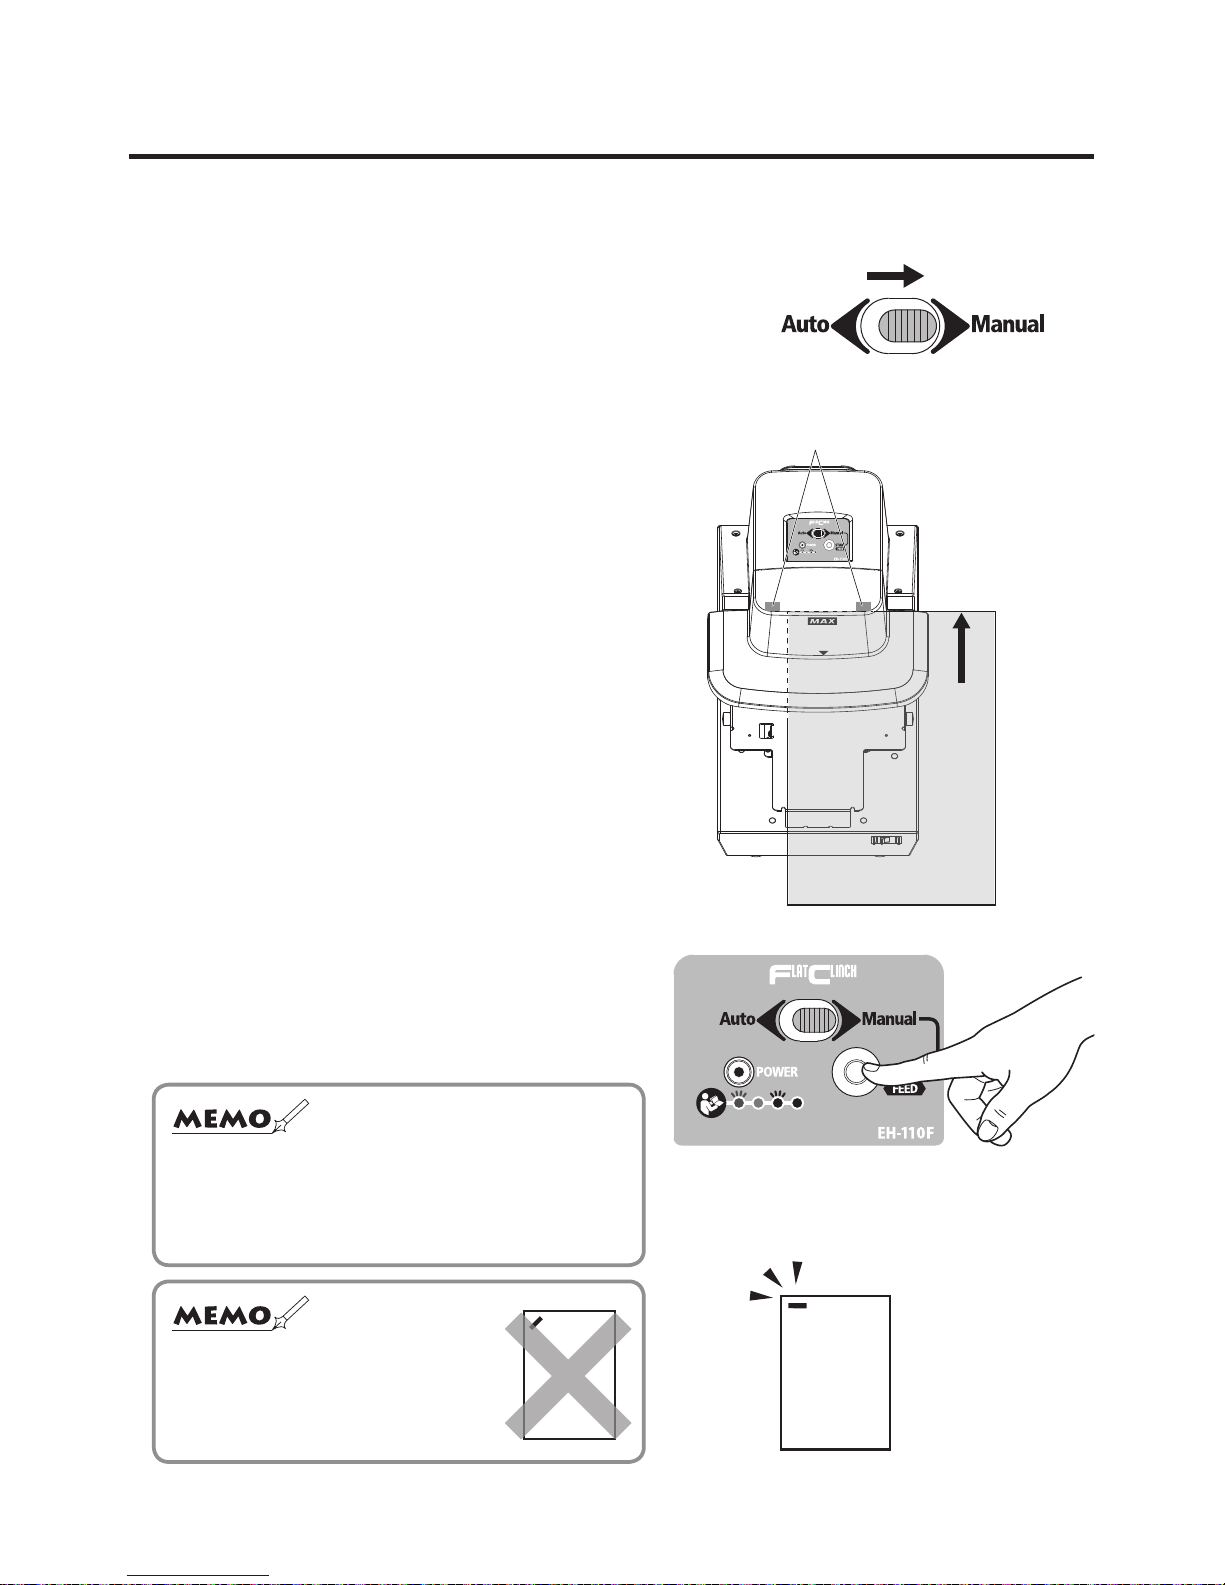
1
Slide the selector switch to the “Auto”, which is
located on top of the main body.
2
Stapling depth is adjustable within a range of
approx. 3 to 23 mm (1/8" to 7/8"). Loosen the
right and left knobs of the depth control slider to
move it as illustrated. Adjust it to your desired
depth and tighten the knobs.
CAUTION
Do not loosen the knobs more than
necessary.
It could damage the machine.
3
The mark ▼ on the front of the main body is the center of the stapling position. Move
the paper to the right and left to set your desired position. When this is done, use the
guideline of the paper table as required.
(See “Stapling at Two Positions”.)
4
Once the stapling position is decided, insert the paper gently into the main body. It will
be automatically stapled.
Depth control
slider
Loosen
Tighten Loosen
Tighten
Center of the stapling
position
PAGE 11
WARNING
Never touch the stapling position sensor (red).
The machine could be activated and cause
an injury.
Stapling position sensor
☆
The machine is provided with two stapling position sensors on the right
and left. In case of automatic stapling, the machine is not activated
unless these two sensors recognize the paper simultaneously.
Page 9
9
STAPLING MANUALLY
STAPLING MANUALLY
Press the START button to staple. When you do not want to staple automatically (always
want to press the button to staple), use the manual button.
CAUTION
Do not press the manual button when there is no paper at the ▼ mark position.
It could damage the machine or cause a staple jam.
1
Slide the selector switch to the “Manual”,
which is located on top of the main body.
2
Insert the paper slowly until it comes
into contact with the stapling position
sensor.
3
Press the START button.
The paper is stapled.
Stapling position sensor
Insert as far as
the stapling position
sensor.
☆
The machine is not activated by pressing the
START button, unless the paper is in contact with
either the right or left stapling position sensor.
Page 10
10
STAPLING ON THE CORNER
STAPLING ON THE CORNER
To staple on the corner, align the edge of the paper with the ▼ mark position.
1
Slide the selector switch to the “Manual”,
which is located on top of the main body.
2
Insert the paper slowly until it comes into
contact with either the right or left stapling
position sensor.
3
Press the START button.
Now, you are nished with stapling on
the corner.
Stapling position sensor
Insert as far as
either the right
or left stapling
position sensor.
☆
The machine is not activated by pressing the
START button, unless the paper is in contact with
either the right or left stapling position sensor.
☆ The paper cannot be
obliquely stapled.
Page 11
11
SHIFTING THE PAPER CROSSWISE TO STAPLE AT TWO POSITIONS
SHIFTING THE PAPER CROSSWISE TO STAPLE AT TWO POSITIONS
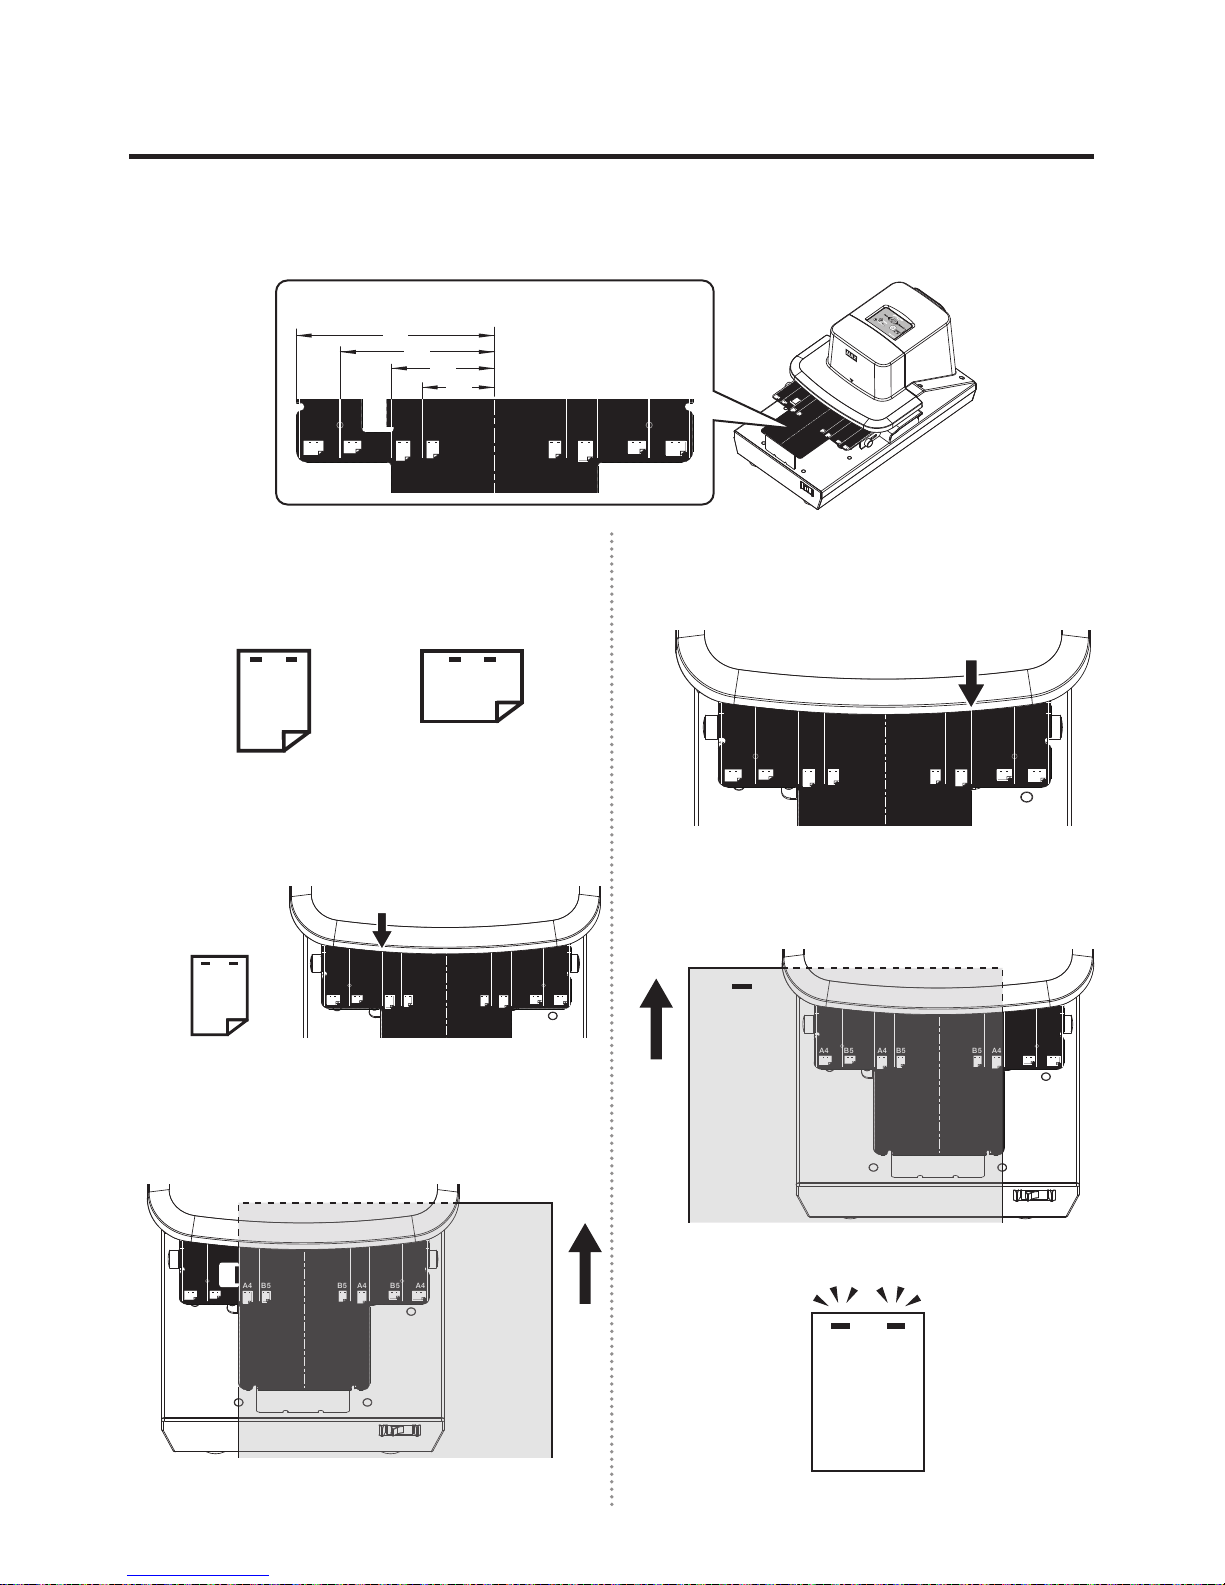
By working along the line of the paper table, the paper can be stapled at suitable positions at equal intervals (such
as avoiding a punched hole). (The B5-sized vertical paper cannot be automatically stapled. Staple it manually.)
1
Check the paper size (A4 or B5) and the
stapling position (vertical or horizontal).
HorizontalVertical
2
Staple twice. First, align the paper with a
corresponding line on one side.
A4 A4B5 B5A4 A4B5 B5
This line
(Example)
For the A4-sized
vertical paper
3
Insert the paper gently into the main body.
Staple at the rst position. (In case of
manual stapling, press the START button.)
A4 A4B5 B5A4 A4B5 B5
4
Now, staple at the second position. Align the
paper with the other corresponding line.
A4 A4B5 B5A4 A4B5 B5
This line
5
Insert the paper gently into the main body. (In
case of manual stapling, press the START button.)
A4 A4B5 B5A4 A4B5 B5
You are nished with stapling at two positions.
A4
A4B5
B5A4
A4B5
B5
A4 A4B5 B5A4 A4B5 B5
Paper table
Unit: mm
95
75
50
35
Page 12
12
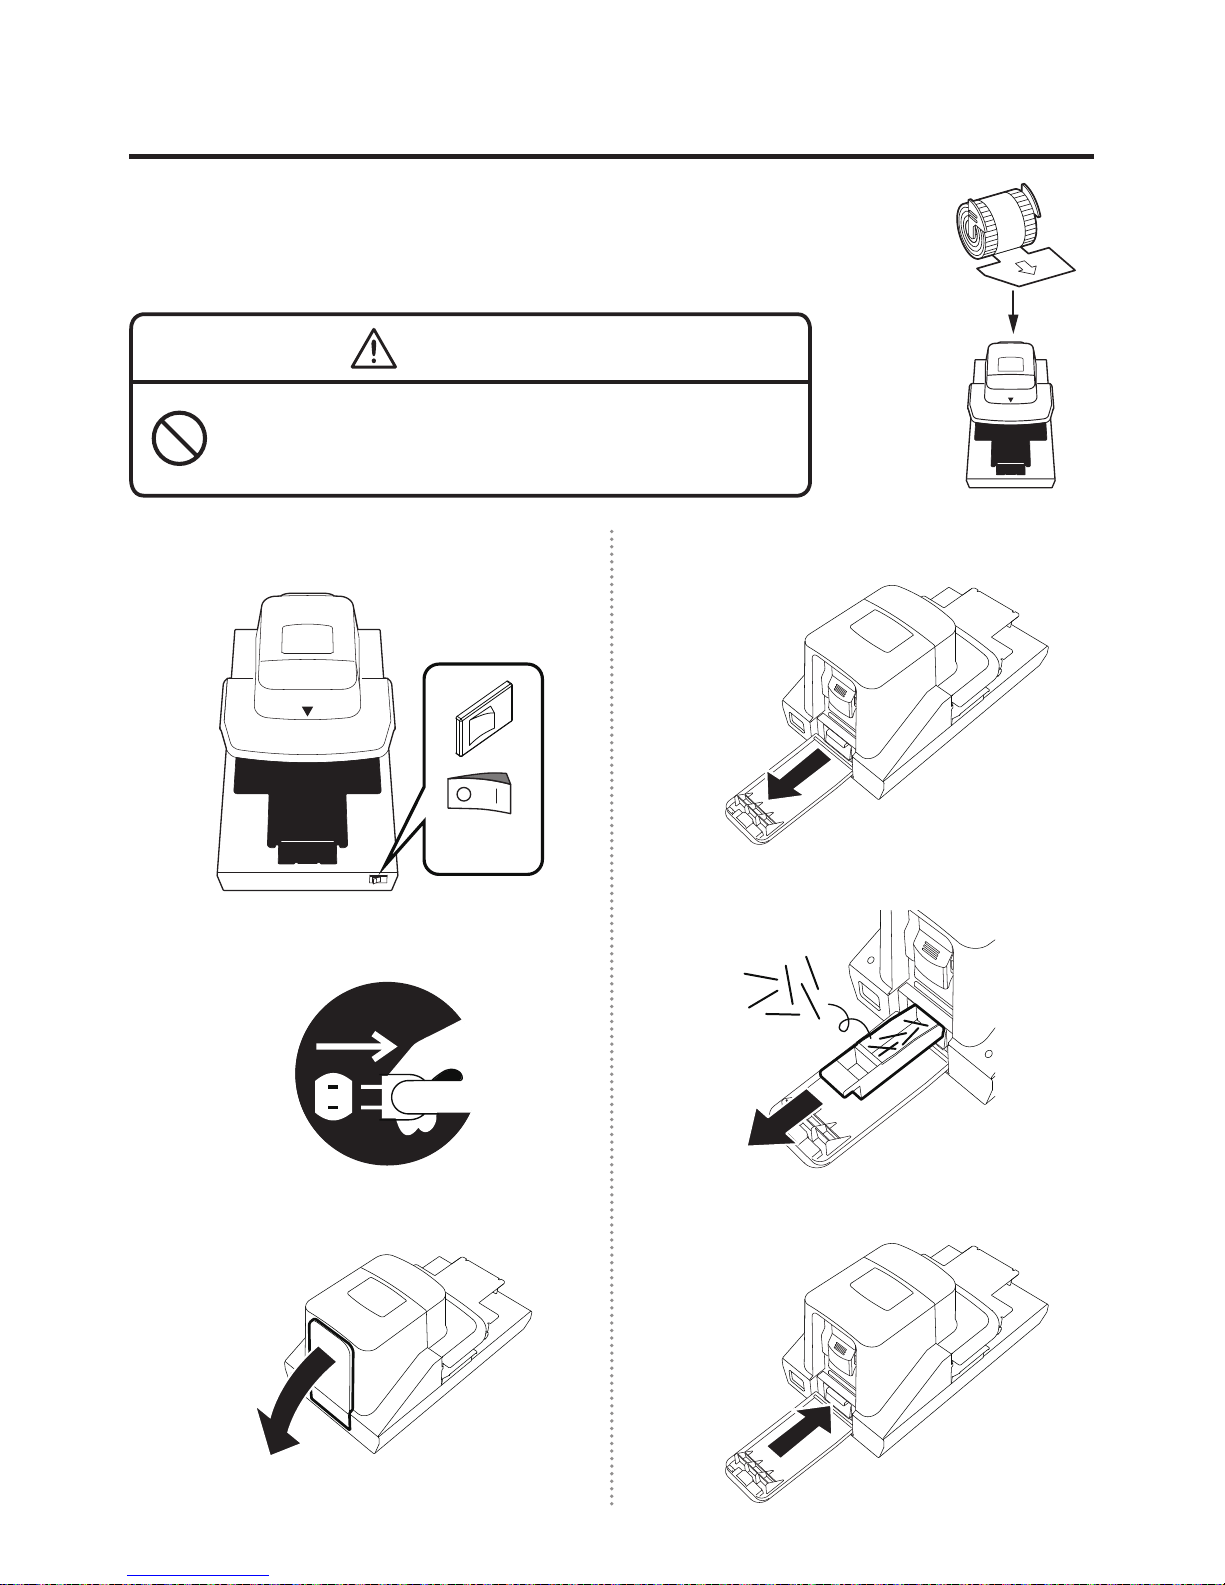
REPLACING (LOADING) THE STAPLE REFILLS
REPLACING (LOADING) THE STAPLE REFILLS
Once the machine runs out of the staples in the cartridge, the red LED
indication lamp is illuminated on the top of the machine “in order to
inform you to replace the staple rells”, disabling stapling operation even
if the paper is inserted. Replace the staple rells in the following manner.
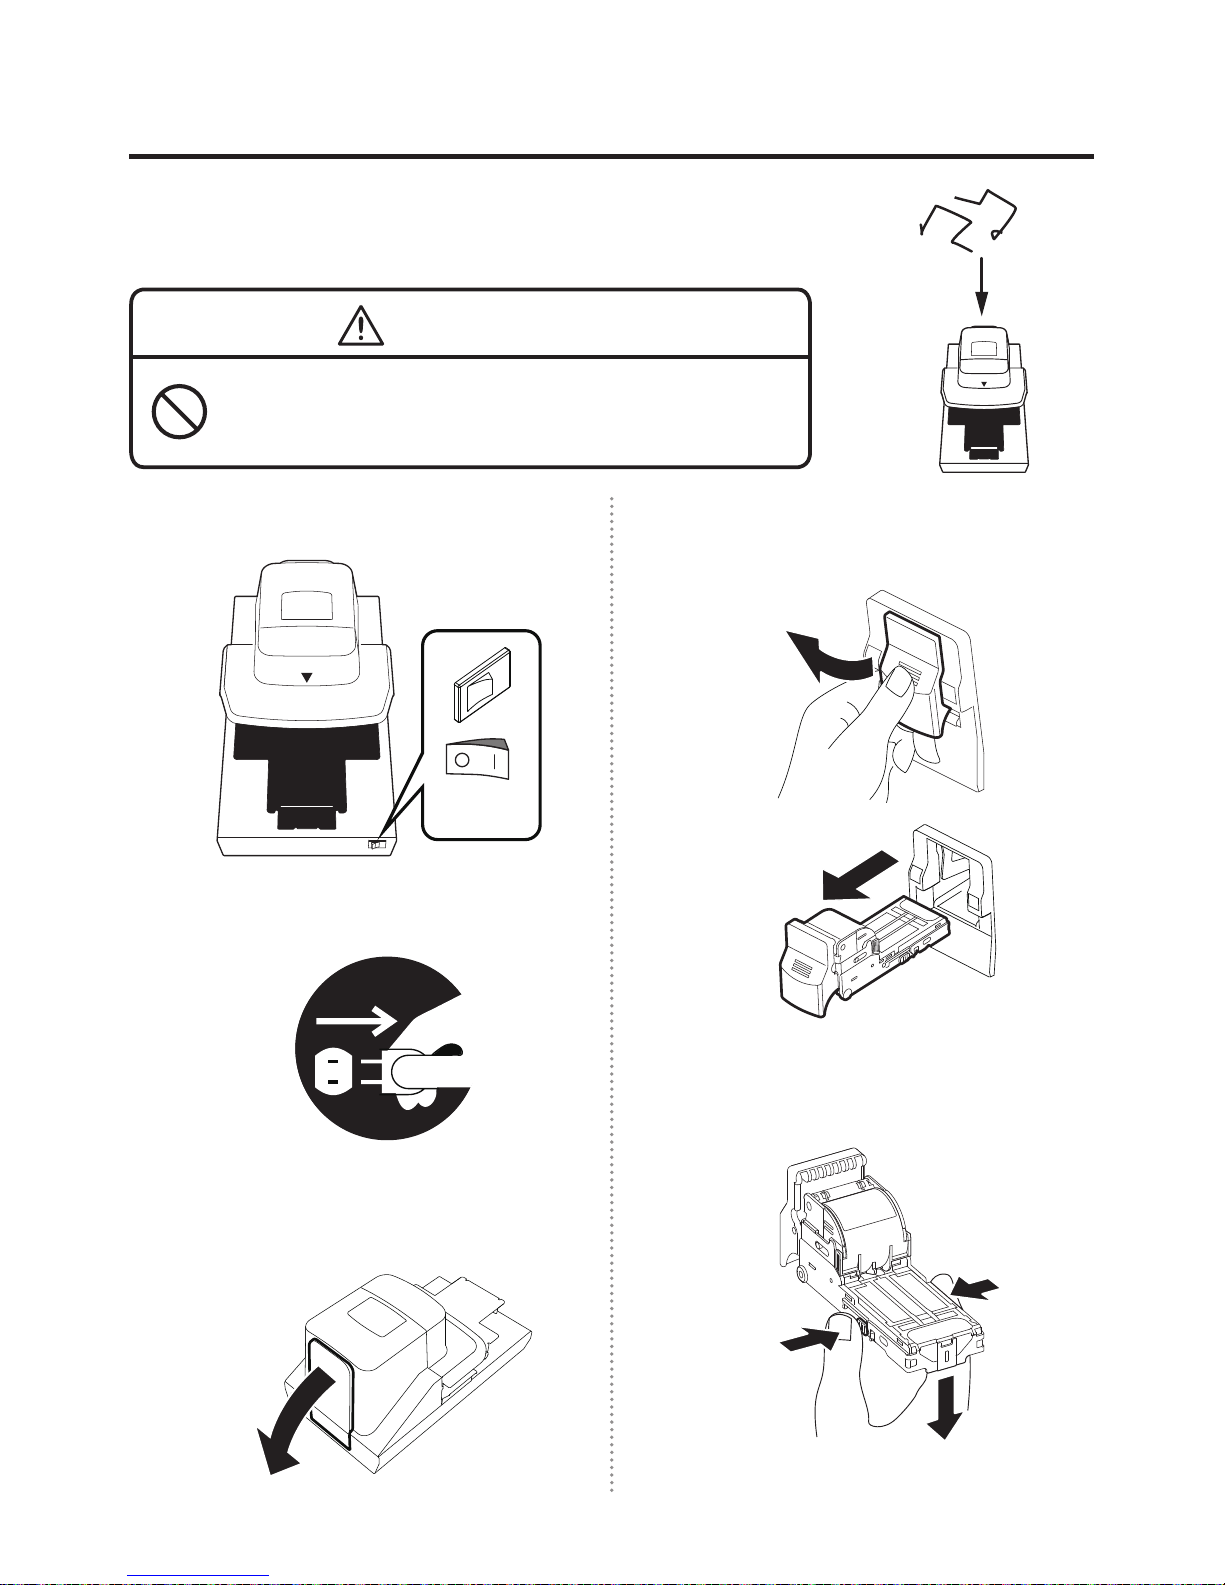
WARNING
When replacing the staple rells, be sure to turn off the power
switch and disconnect the power plug from the plug socket.
It could cause an injury when the stapler is abruptly activated.
1
Turn off the power switch.
OFF!
2
Disconnect the power plug.
3
Open the rear cover on the back of the main body.
4
Pull out the staple trim tray.
5
Remove the staples from inside the staple trim tray.
6
Put back the staple trim tray.
Staple
rell
Page 13
13
REPLACING (LOADING) THE STAPLE REFILLS
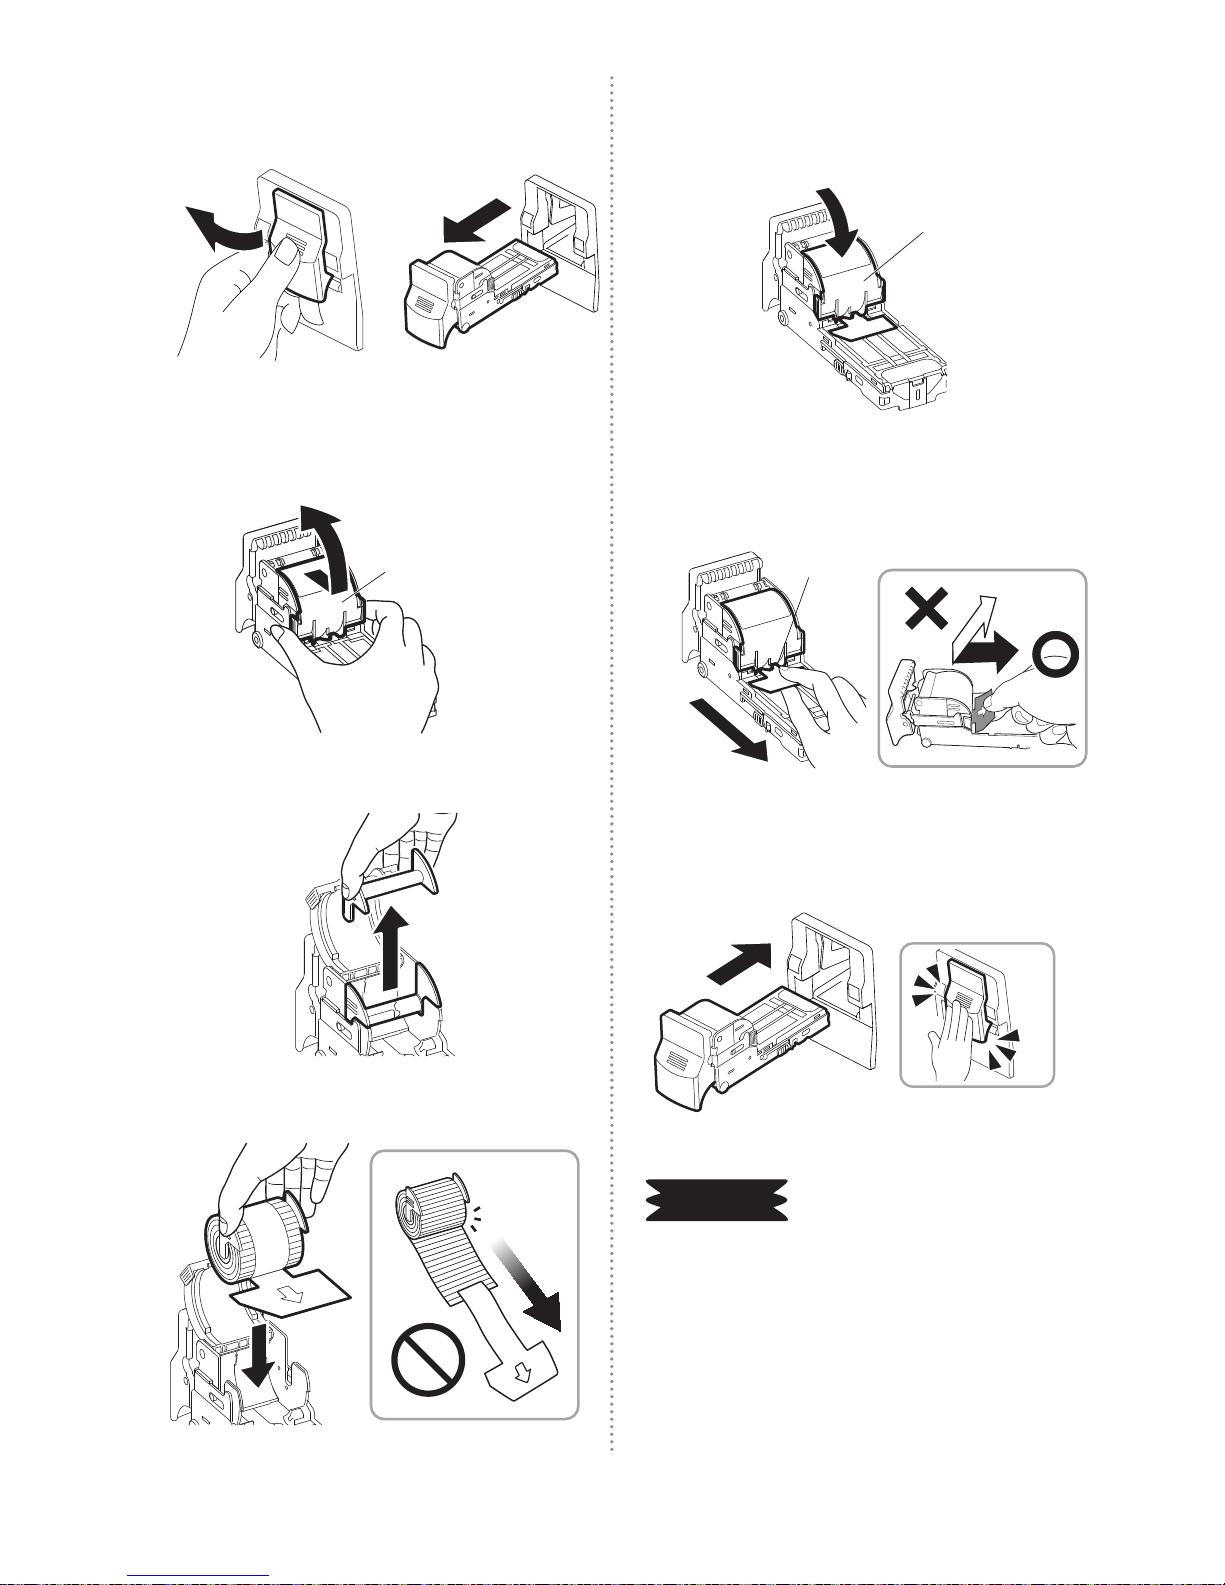
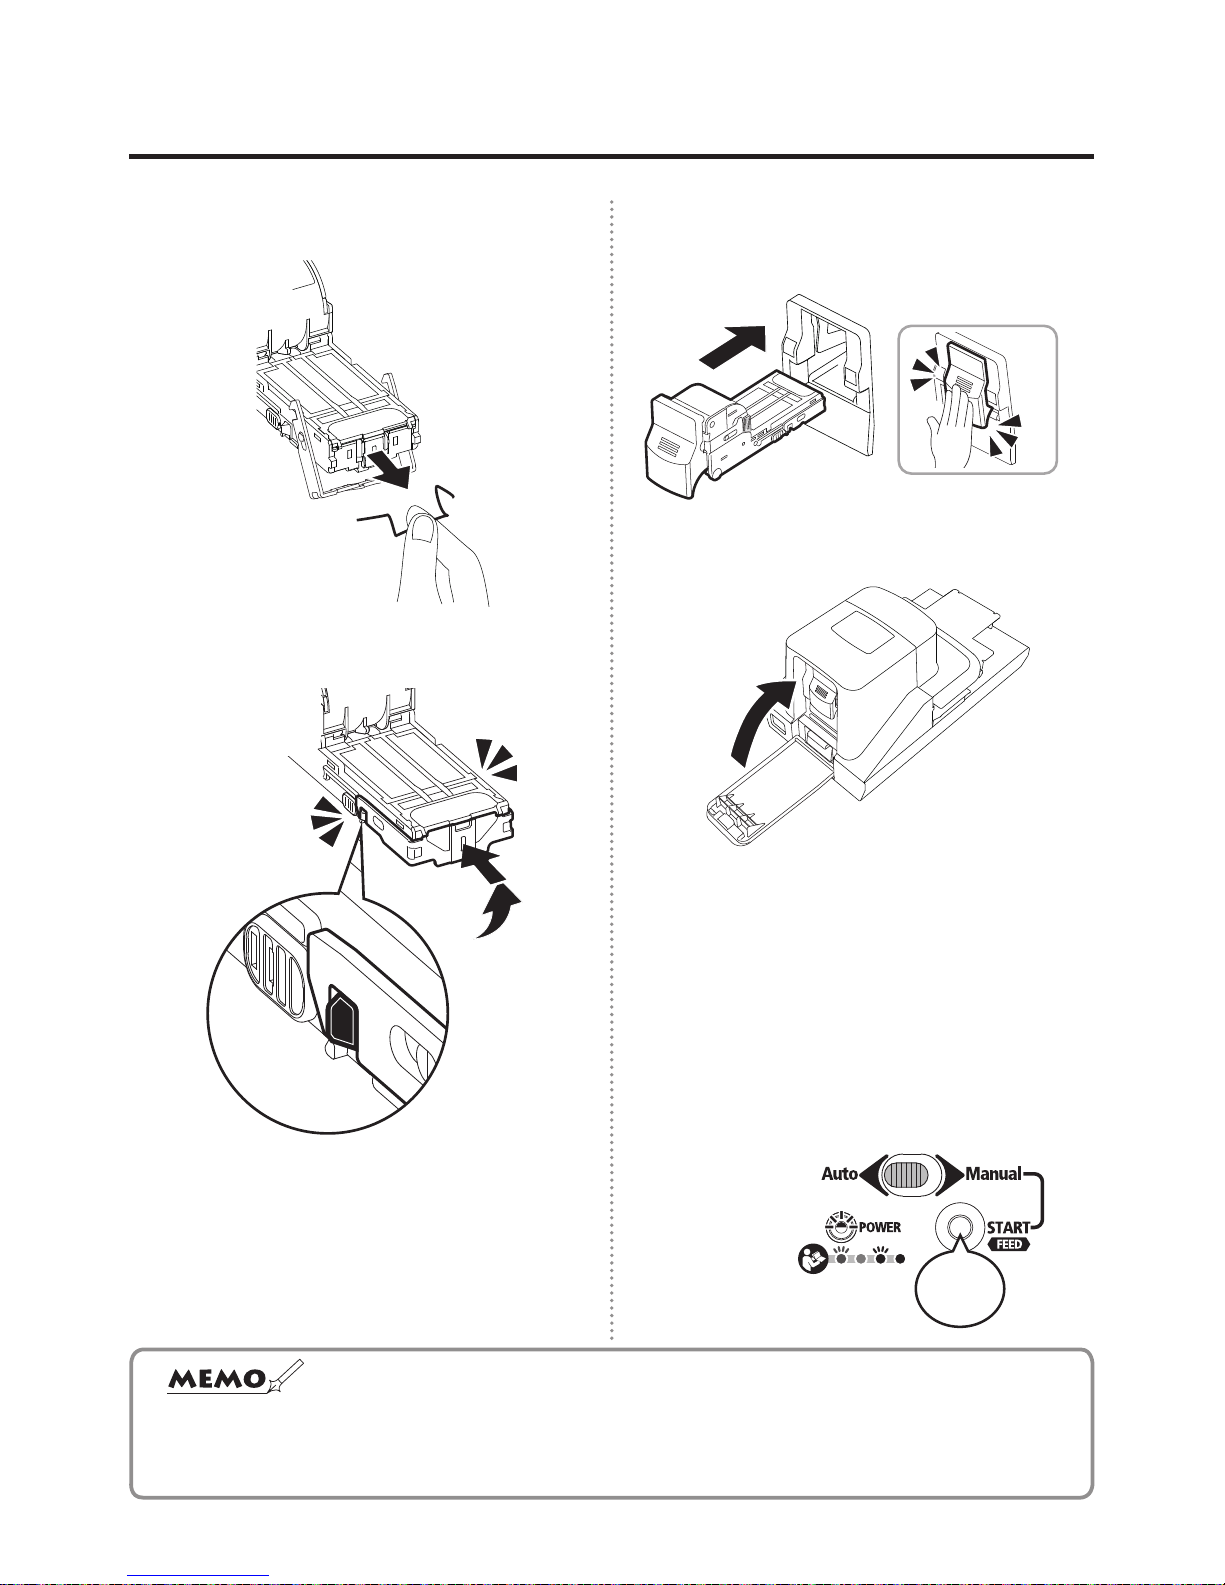
7
Pull cartridge lever to gently pull out the
cartridge.
8
Pull the staple cover towards the
cartridge lever and open it upward.
Staple cover
9
Remove the plastic rell.
10
Set the staple rells (No. 110FE).
11
Close the staple cover rmly until it
“clicks”.
①
Staple cover
12
Pull out and remove the staple rells
xing tape.
②
Fixing tape
13
Attach the cartridge. When this is
done, push it in rmly until it “clicks”.
Clicks
REQUEST
When the staple rells are replaced, be
sure to remove the staples from inside
the staple trim tray. It could damage the
machine.
Page 14
14
REPLACING (LOADING) THE STAPLE REFILLS
14
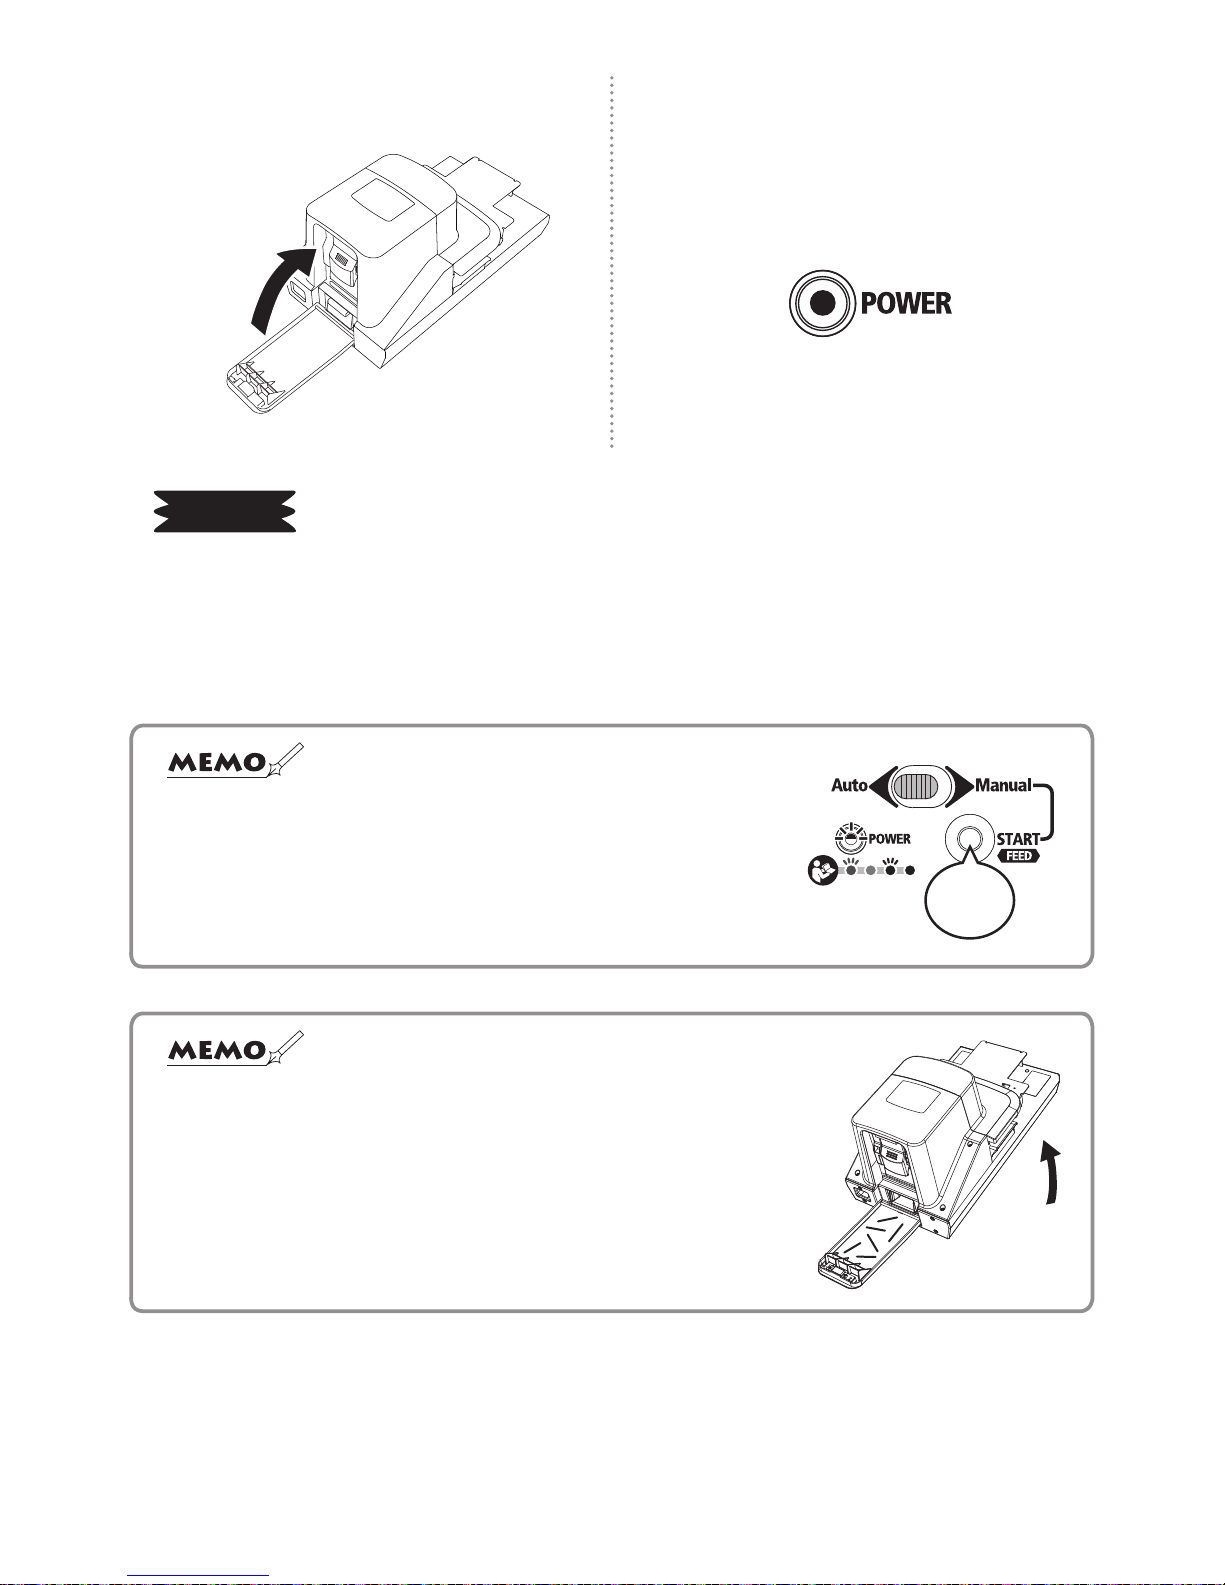
Close the rear cover.
15
Connect the power plug, turn on the
power switch, check that the green LED
indication lamp is illuminated, and then,
use the machine.
REQUEST
1. Use MAX genuine staple rells “No. 110FE”.
2. Do not set broken short staples, deformed ones or waste ones in the cartridge again to reuse
them. It could damage the machine or cause a staple jam.
3. When the staple rells are replaced, be sure to remove the staples from inside the staple trim
tray. It could damage the machine.
☆
Immediately after replacing the staple rells, the green LED indication
lamp may blink, requiring staple feed operation. Hold down the START
button (approx. 3 seconds) to feed the staple. Continuous operating
sound will be heard, but this is because the staple rell is moving to
the stapling position, not a mechanical problem.
Hold
down
☆ If it is difcult to insert the tray, cut staples may have spilled
inside the stapler.
Remove the remaining staples by leaning the main body
approx. 60°, while opening the rear cover and taking out the
staple trim tray.
Page 15
15
CLEARING JAMMED STAPLES
CLEARING JAMMED STAPLES
If the staples jam, remove them as follows:
1
Turn off the power switch
.
OFF !
2
Disconnect the power plug.
3
Open the rear cover on the back of the
main body.
4
Pull the cartridge lever to gently pull
out the cartridge.
5
Press the lock buttons on both sides at
the same time to open the face plate.
①
①
②
WARNING
To clear the jammed staples, be sure to turn off the power
switch and disconnect the power plug from the plug socket.
It could cause an injury when the stapler is abruptly activated.
Page 16
16
CLEARING JAMMED STAPLES
6
Remove the jammed staples.
7
Push back the face plate until it “clicks”.
①
②
Clicks
Clicks
8
Attach the cartridge. When this is
done, push it in rmly until it “clicks”.
Clicks
9
Close the rear cover.
10
Connect the power plug, turn on the power
switch, check that the green LED indication
lamp is blinking, and hold down the START
button (approx. 3 seconds). Continuous
operating sound will be heard, but this is
because the staple rell is moving to the
stapling position, not a mechanical problem
.
☆ If the jammed staples cannot be cleared in the above-mentioned procedure,
disconnect the power plug immediately from the plug socket and ask your dealer or
distributor for repair.
Hold
down
Page 17
17
TROUBLESHOOTING
TROUBLESHOOTING
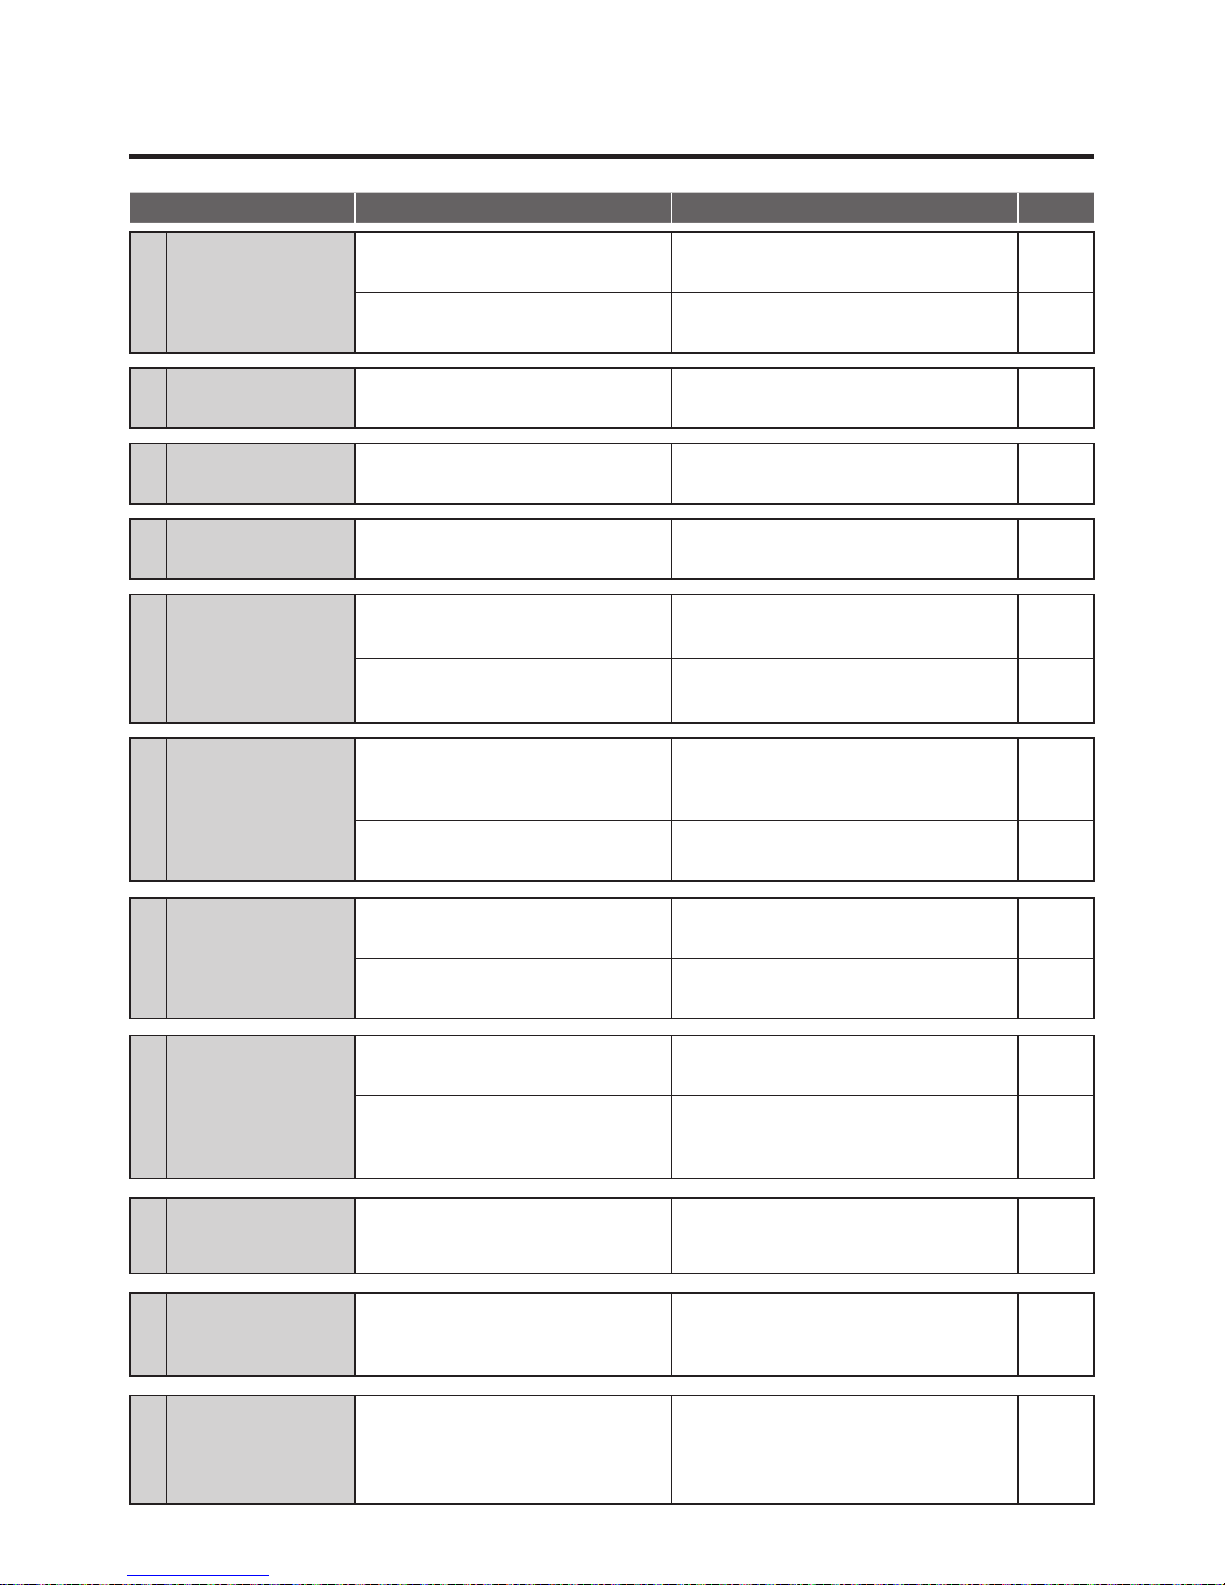
Phenomenon Check Point Remedy
See Page
1
The machine is not
energized by turning
on the power switch.
Check if the power cord is rmly
connected.
Connect the power cord. -
Check if the rear cover is rmly
closed on the back of the main body.
Close the rear cover on the back of the
main body.
P14
2
The red LED indication
lamp is illuminated.
The staples may have run out.
Follow the appropriate reference
procedure.
P12
3
The orange LED indication
lamp is illuminated.
Check if the cartridge is rmly set.
Open the rear cover on the back of the
main body to re-set the cartridge.
P13
4
The green LED indication
lamp is blinking.
The staples may have not been fed.
Hold down the START button for approx.
3 seconds to feed the staples.
P14
5
The green LED
indication lamp is still
blinking after feeding
the staples.
The staples may be jamming at the
end of the cartridge
.
Follow the appropriate reference
procedure.
P15
They may be non-original
consumable goods (No. 110FE)
.
Check if MAX staple rells No. 110FE
are used.
P18
6
The red LED
indication lamp is
blinking.
The driving part may have not
returned to a normal position.
Remove the residual paper if any. Then,
turn off the power switch and on again.
-
The staples may be jamming at the
end of the cartridge.
Follow the appropriate reference
procedure.
P15
7
The paper is not
stapled by pressing
the START button.
Check if the selector switch is set to
MANUAL.
Set the selector switch to MANUAL. P9
The paper may not be in contact
with the stapling position sensor.
Bring the paper into contact with both or
either right or left stapling position sensor.
P9
8
The paper is not
stapled when
inserted.
Check if the selector switch is set to
AUTO.
Set the selector switch to AUTO. P8
The paper may not be in contact
with both the right and left stapling
position sensors.
Bring the paper into contact with both the
right and left sensors. The paper is not
stapled by contacting only one sensor.
P8
9
The cartridge cannot
be removed.
The driving part may have not
returned to a normal position.
Remove the residual paper if any. Then,
turn off the power switch and on again.
-
10
Stapling operation is
performed, but the
paper is not stapled.
The staples may be jamming at the
end of the cartridge.
Follow the appropriate reference
procedure.
P15
11
After clearing the jammed
staples, stapling operation
is performed, but the
paper is not stapled.
The staples may be jamming at the
staple leg cutting section.
Disconnect the power plug immediately
from the plug socket and contact your
dealer or distributor for repair.
-
Page 18

18
ABOUT THE MACHINE
ABOUT THE MACHINE
SPECIFICATIONS
Model name MAX Electronic Stapler EH-110F
Capacity
2 to 110 sheets (64 g/m2, 16-lb.bond)
2 to 100 sheets (80 g/m
2
, 20-lb.bond)
Stapling speed
2 staples per second
Stapling system
Automatic staple feed system
Throat depth
Adjustable approx. 3 to 23 mm
(1/8" to 7/8")
Dimensions
242 mm (W) x 393 mm (D) x 210 mm (H)
(9-9/16" x 15-1/2" x 8-5/16")
Weight 7.6 kg (16.76 lbs)
* The design and specications are subject to change without prior notice.
REQUEST
1. The stapling capacity described in the product specications is exerted when the PPC paper (80 g/m2)
is used. This number of sheets may not be stapled depending on the type of paper. In that case, do not
staple by force.
2. If the machine is used continuously for a long time, the motor may be heated, disabling stapling
operation. In that case, stop using the machine for 30 minutes or more to cool down the motor.
3. Operate the machine with less than 100 sheets of paper (80 g/m
2
, 20-lb.bond). If it is operated beyond
its capacity, it may break down.
Rated current
2.5 A
Power source
AC 100-240 V, 50-60 Hz
Working Temperature
and Humidity ranges
10ºC-35ºC (50ºF-95ºF), Below 80% RH
Staple rells
used
MAX Staple Rells No. 110FE
(Contains a guaranteed minimum of 4,000 staples.)
To order the staple rells, contact your dealer
where you purchased the machine.
The following statement is only effective for the USA market.
FCC Notice
(Class A: EH-110F)
Note: This equipment has been tested and found to comply with the limits for a Class A digital
device, pursuant to part 15 of the FCC Rules. These limits are designed to provide reasonable
protection against harmful interference when the equipment is operated in a commercial
environment. This equipment generates, uses, and can radiate radio frequency energy and, if not
installed and used in accordance with the instruction manual, may cause harmful interference to
radio communications.
Operation of this equipment in a residential area is likely to cause harmful interference in which
case the user will be required to correct the interference at his own expense.
MAX USA CORP.
ADDRESS : 257 East 2nd Street Mineola, NY 11501, U.S.A.
PHONE : (516)741-3151 FAX : (516)741-3272
Page 19

Page 20

20
目录
目录
请确保阅读以下内容
介绍 ...................................................................
21
使用说明书中的标识符号 .................................................
21
安全须知 ...............................................................
22
免责声明 ...............................................................
23
使用前
包装明细 ...............................................................
24
操作组件和指示灯的主要功能 .............................................
24
组件名称 ...............................................................
25
自动装订
....................................................
26
手动装订
....................................................
27
侧角装订
....................................................
28
双位装订
....................................................
29
更换(装填)针排
............................................
30
清理堵塞的订书针
............................................
33
故障排除
....................................................
35
设备资料
....................................................
36
规格 ...................................................................
36
Page 21

21
请确保阅读以下内容
请确保阅读以下内容
介绍
非常感谢您购买我公司生产的电动订书机。
在使用本订书机前,请仔细阅读本使用说明书,确保安全正确的操作。
使用说明书中的标识符号
■
标识说明
本说明书采用了各种不同的标识说明,以帮助您安全、正确地使用本设备。以下是对这
些标识说明的描述。
警告
疏忽可能会导致严重人身伤害或死亡。
小心
疏忽可能会导致人身伤害、财产受损或数据丢失。
■
标识符号
描述可能会导致设备损坏并需要维修的操作,或为了恢复设备工况,需要重置设备的操作。
备忘
描述操作要点和技巧。
在其它页面提供相关描述的情况下,对参考页面进行描述。
表示“注意事项”。
该符号内或附近的标识说明
表示具体注意事宜。
表示“禁止事项”。
该符号内或附近的标识说明
表示具体禁止事宜。
表示“必做事项”。
该符号内的标识说明表示具
体指令事宜。
Page 22

22
请确保阅读以下内容
安全须知
警告
●请勿翻转主机。
否则可能会引起火灾或触电。
●请勿将手指、钢笔或线缆等异物插入本设备。
否则可能会损坏设备,或引起火灾触电,或烧
伤。
●请勿将手部或其它物体放入设备出针口。
否则可能会导致机械故障,并造成人身伤害。
●请确保使用产品附带的电源线。
否则可能会引起火灾或触电。
●请直接从单插插座中获取电源,避免在单个插
座中连接过多线缆。
否则可能会引起火灾。
●请勿对电源线做出改动。
否则可能会引起火灾或触电。
●请勿在电源线上放置任何重物。
否则可能会损坏电源线、引起火灾或导致触
电。
●请勿缠绕电源线。
否则因此产生的热量可能会引起火灾或损坏设
备。请务必不要缠绕电源线。
●请勿用湿手拔插电源插头。
否则可能导致触电。
●请勿用湿手或湿布操作设备。
否则可能导致触电。
●设备电源线与插座连接时,请勿将纸张或衣物
放于设备之上。
否则可能会引起火灾或损坏设备。
●断开电源连接时,请务必握住电源插头。请勿
拉拽电源线。
否则可能会损坏电源线、引起火灾或导致触
电。
●请勿将水或化学品溅洒在设备上。
若水或其它异物进入设备,请立即断开电源插
头与插座的连接,并联系设备经销商进行修
理,否则可能会机械故障,引起火灾或导致触
电。
●设备出现异常时,请勿操作设备。
若在冒烟、发出异响或出现怪味等异常状态下
操作设备,可能会引起火灾或导致触电。
这种情况下请立即断开电源插头与插座的连
接,并联系设备经销商进行修理。
●更换针排或清理堵塞的订书针时,请务必断开
电源。
否则订书机可能会突然地起动,导致人身伤
害。
●重新移动安装位置时,请务必断开电源插头与
插座的连接。
若在插座连接电源插头的情况下移动设备,则
可能导致电源线损坏,从而引起火灾或触电。
●禁止拆卸或改装本设备。
否则可能会引起火灾、触电或人身伤害。
●请务必为设备做好接地。
否则如果出现短路情况,则可能导致火灾或触
电。
●定期清理电源线插头。
否则插头上的灰尘可能会引起火灾或损坏设
备。
●禁止触碰红色的装订位置传感器。
否则可能导致设备启动,带来人身伤害。
Page 23

23
请确保阅读以下内容
小心
●请将设备安装在平整位置,不得将其安装于摇
摆支架或倾斜表面等不稳定的位置。
否则可能导致设备坠落,从而引起人身伤害或
损坏设备。
●请勿在阳光直射、温度高,湿度大或结露的位
置使用设备。
否则可能会导致设备工作不稳定或损坏。
●请勿与用电容量较大的设备(如空调、冰箱、
微波炉、办公自动化设备等)共用电源插座。
否则电压会下降,从而导致设备故障。
●设备前盖▼标志位置处无纸时,请勿按下“手
动”按钮。
否则可能损坏设备或导致卡针。
●仅可以使用未涂布印刷纸。
否则可能损坏设备或导致卡针。
●若设备长期不用,为安全起见,请务必断开电
源插头与插座之间的连接。
●搬运设备时,请抓牢设备底部。
否则可能
会
导致人身伤害或损坏设备。
●请勿将手指放入装订区。
否则可能会导致人身伤害。
●订书针尖部突出锋利,处置时应格外小心。
否则可能会导致人身伤害。
●更换针排时,请勿触碰设备内部(内含针
盒)。
否则可能会导致人身伤害或灼伤。
☆为了防止设备出现问题,请务必遵守下列注意事项。
1. 安装和储存设备时应远离以下场所 :
①任何阳光能够直射或靠近热源的场所
②任何具有灰尘或湿度大的场所
③任何表面不平整,或容易振动或冲击的场所
④任何气温低于10°C(50°F)或高于 35°C(95°F)的场所
2.仅使用美克司(MAX)110FE针排。
3. 使用干抹布清洁设备上的灰尘。请勿使用有机溶剂和化学品(稀释剂、苯、酒精等),否则可能
导致设备变形或褪色。
4. 为安全起见,后盖打开时,设备不会进行装订。装订时请正确关闭后盖。
5. 设备前盖▼标志位置处无纸时,请勿进行装订,否则可能损坏设备或导致卡针。
6. 请勿在已装订处再次装订,否则可能损坏设备或导致卡针。
7. 使用卷曲或翘曲的纸张时,请在将其插入设备前进行还原处理。
8.不要在装订孔上装订,否则可能损坏设备或导致卡针。
免责声明
若用户因未遵守本手册中之说明而导致设备损坏,或由于设备无法使用而导致任何损
失,我公司对此将不负任何相关责任。
Page 24

24
使用前
使用前
包装明细
打开包装后请检查是否内含以下元件。
⑤ 使用说明书② 电源线 ( 三孔插头 )① EH-110F
* 三孔插座务必连接有
接地线。
各型号设备的电源插头有
所不同。
③针盒
* 已装入主机。
④针排
(件号 110FE)
* 已装入针盒。
操作组件和指示灯的主要功能
选择开关:该开关可选择自动(自动装订)模式或手动(手动装订)模式。
LED灯:
绿灯亮:准备工作。
红灯亮:更换针排。
绿灯闪:输送订书针。
红灯闪:清理卡针。
橙色灯亮:将针盒装入主机。
开始按钮:用来手动装订纸张或输送订书针。
主机上部的标识
选择开关
(自动) (手动)
(开始)
(输送)
(电源)
开始按钮
LED 灯
Page 25

25
使用前
组件名称
[主机前部]
[主机后部]
[针盒]
[针排(消耗品)]
准备工作
针盒和针排装入主机之后,将电源线与主机电源线接口和电源插座连接,并打开电源开
关。绿色LED指示灯亮起后,设备准备工作。
电源开关
选择开关
前盖
深度控制滑块
装订位置传感器
(红色)
装订位置传感器
(红色)
纸张座
LED 灯
开始按钮
针槽
深度控制滑块
后盖
电源线插口
杠杆
订书针护盖
锁紧钮
面板
锁紧钮
塑料针排辊
订书针
Page 26

26
自动装订
自动装订
插入纸张后,设备自动装订。
1
滑动位于主机顶部的选择开关至“自动”位置。
2
设备装订深度可在约3至23mm(1/8"至7/8")
的范围内进行调节。如图所示,松开左右两侧的
深度控制滑块旋钮,在调整至所需深度后拧紧旋
钮。
小心
请勿过度拧松旋钮。
否则可能损坏设备。
3
主机前方标记▼是装订的中心位置。可左右移动纸张设定您想要的位置。该步骤结束
后,请按需查看纸张座的使用指南。
(查看“双位置装订”。)
4
装订位置确定后,将纸张小心插入主机。设备将开始自动装订。
(自动) (手动)
深度控制滑块
拧松
拧紧
拧紧
拧松
装订中心位置
警告
禁止触碰红色的装订位置传感器。
否则可能导致设备启动,带来人身伤害。
装订位置传感器
☆设备在左右两侧安装了两个装订位置传感器。在自动装订情况下,只有这
两个传感器同时识别纸张,设备才可启动。
备忘
Page 27

27
手动装订
手动装订
按下“开始”按钮以进行装订。如果您不希望使用自动装订模式,而希望通过按钮来装订,
则请使用“手动”按钮。
小心
请勿在标记▼处没有纸张时按下“手动”按钮。
否则可能损坏设备或导致卡针。
1
滑动位于主机顶部的选择开关至“手动”位置。
2
缓慢插入纸张,直到纸张接触装订位置传感器。
3
按下“开始”按钮,设备开始装订纸张。
(自动) (手动)
装订位置传感器
插入纸张,直到接触
装订位置传感器。
备忘
☆在纸张没有接触设备左侧或右侧的装订位置传
感器前,按下“开始”按钮不能启动设备。
Page 28

28
侧角装订
侧角装订
需要在纸张侧角处装订时,应先将纸张边缘与▼标记位置对齐。
1
滑动位于主机顶部的选择开关至“手动”位置。
2
缓慢插入纸张,直到纸张接触设备右侧或左侧
装订位置传感器。
3
按下“开始”按钮便可完成侧角装订。
(自动) (手动)
装订位置传感器
插入纸张,直到接触
设备右侧或左侧装订
位置传感器。
☆ 在纸张没有接触设备左侧或右侧的装订位置传
感器前,按下“开始”按钮不能启动设备。
备忘
备忘
☆ 纸 张 不 可 倾 斜 装订。
Page 29

29
横向移动纸张以进行双位装订
双位装订
纸张应与纸张座标线对齐,以便以相等间距进行装订(如躲避装订孔)。(B5纸不可自动垂
直装订,请使用手动模式。)
1
检查纸张尺寸(A4或B5)和装订位置
(垂直或水平)。
垂直装订 水平装订
2
装订两次。首先,请将纸张与一侧的对应
标线对齐。
A4 A4B5 B5A4 A4B5 B5
(举例)
A4 纸垂直装订
这条标线
3
将纸张缓慢插入主机,之后在第一个位置装
订。(手动装订时请按“开始”按钮。)
A4 A4B5 B5A4 A4B5 B5
4
现在可在第二个位置装订,将纸张与其
它对应标线对齐。
A4 A4B5 B5A4 A4B5 B5
这条标线
5
将纸张缓慢插入主机,之后在第二个位置装
订。(手动装订时请按“开始”按钮。)
A4 A4B5 B5A4 A4B5 B5
双位装订完成了。
A4
A4B5
B5A4
A4B5
B5
A4 A4B5 B5A4 A4B5 B5
单位:mm
95
75
50
35
纸张座
Page 30

30
更换(装填)针排
更换(装填)针排
若针盒中的订书针耗尽,设备顶部的红色LED灯将亮起,以提醒更
换针排。在此情况下,即使插入纸张,亦不会进行装订。请按照
以下指示更换针排。
警告
更换针排时,请务必切断电源开关,并将插头从插座中拔出。
否则订书机可能会突然起动,导致人身伤害。
1
关闭电源开关。
关闭 !
2
拔掉电源插头。
3
打开主机背面的后盖。
4
拉出针槽。
5
移除针槽中的订书针。
6
将针槽放回原处。
针排
Page 31

31
更换(装填)针排
7
拉动针盒拉杆,缓慢将针盒拉出。
8
将订书针护盖向针盒拉杆方向拉动,并向
上打开。
订书针护盖
9
拆掉塑料针排辊。
10
安装针排(件号110FE)。
11
将订书针护盖关闭牢固,直到其咬合为
止。
①
订书针护盖
12
拉出并移除定位胶带。
②
定位胶带
13
将针盒搭在设备上,之后牢固推入其
中,直到咬合为止。
咬合
更换针排时,请务必移除针槽内的订书针,
否则可能会损坏设备。
Page 32

32
更换(装填)针排
14
关闭后盖。
15
连接电源插头并打开电源开关,检查绿
色LED灯是否点亮,没有问题后便可使
用设备。
(电源)
1.请使用美克司原装针排“件号110FE”。
2.请勿将折断、变形或废弃的订书针装入针盒重新利用,否则可能会损坏设备或卡针。
3.更换针排时,请务必先清除针槽中的订书针,否则可能损坏设备。
备忘
☆ 更换针排后,绿色 LED 灯可能马上闪亮,要求使用者进行输送工
作。这时请按住“开始”按钮(约三秒钟)以输送订书针。使用
者将听到设备连续操作的声音,这是因为针排正移至装订位置,
而不是设备出现机械故障。
按住
备忘
☆ 出现难以将针盒装入机身的情况,很可能是因为针槽中溢出的针
遗留在机身中了。
请打开后盖,保持针槽取出的状态,并将机身倾斜 60°,把机身
中的针取出。
Page 33

33
清理堵塞的订书针
清理堵塞的订书针
若出现卡针,请按照以下指示进行清理:
1
关闭电源开关。
关闭 !
2
拔掉电源插头。
3
打开主机背面的后盖。
4
拉动针盒拉杆,缓慢将针盒拉出。
5
同时按下两侧的锁紧钮,打开面板。
①
①
②
警告
清理堵塞的订书针时,请务必关闭电源开关,并将插头从插
座中拔出。
否则订书机可能会突然起动,导致人身伤害。
Page 34

34
清理堵塞的订书针
6
清除堵塞的订书针。
7
将面板推回,直到咬合为止。
①
②
咬合
咬合
8
将针盒搭在设备上,之后牢固推入其
中,直到咬合为止。
咬合
9
关闭后盖。
10
连接电源插头并打开电源开关,检查绿
色LED灯是否点亮。若没有问题,则请
按住“开始”按钮(约三秒钟),使用
者将听到设备连续操作的声音,这是因
为针排正移至装订位置,而不是设备出
现机械故障。
按住
备忘
☆如果使用上述方法无法清理堵塞的订书针,则请您立即将电源插头从插座中拔出,并要求设备经
销商或分销商进行修理。
Page 35

35
故障排除
故障排除
故障现象 检查点 解决措施
查看页面
1
打开电源开关后设备
没有电。
检查电源线是否紧固连接。 连接电源线。 -
检查后盖是否紧固扣于主机后部。 将后盖扣于主机后部。 32页
2
红色 LED 灯亮。 订书针可能耗尽。 请遵照适当参考方法处理。 30页
3
橙色 LED 灯亮。 检查针盒是否紧固安装。 打开主机后部的后盖,重新安装针盒。 31页
4
绿色 LED 灯闪亮。 订书针可能未输送订书针。
按住“开始”按钮约3秒钟,以输送订书
针。
32页
5
输送订书针后,绿色
LED 灯仍然闪亮。
订书针可能在针盒末端堵塞。 请遵照适当参考方法处理。 33页
订书针可能不是原装耗材
(件号110FE)。
检查设备是否使用的是美克司(MAX)
110FE针排。
36页
6
红色 LED 灯闪亮。
驱动部件可能没有回到正常位置。
如有剩余纸张,请进行清理,之后关闭
并再次打开电源开关。
-
订书针可能在针盒末端堵塞。 请遵照适当参考方法处理。 33页
7
按下“开始”按钮后,
设备不进行装订。
检查选择开关是否设为手动模式。 将选择开关设为手动模式。 27页
纸张可能未接触装订位置传感器。
使纸张接触左右两侧的位置传感器,或
接触其中一个。
27页
8
纸张插入后,设备不
进行装订。
检查选择开关是否设为自动模式。 将选择开关设为自动模式。 26页
纸张可能未接触左右两侧的装订位置
传感器。
使纸张接触左右两侧的位置传感器。若
仅接触一个传感器,设备将不进行装
订。
26页
9
针盒无法拆卸。 驱动部件可能没有回到正常位置。
如有剩余纸张,请进行清理,之后关闭
并再次打开电源开关。
-
10
设备执行装订工作,
但纸张并没有装订。
订书针可能在针盒末端堵塞。 请遵照适当参考方法处理。 33页
11
清理堵塞的订书针
后,设备执行装订工
作,但纸张并没有装
订。
订书针可能在出针口堵塞。
立即将电源插头从插座中拔出,并联系
设备经销商或分销商进行修理。
-
Page 36

36
设备资料
设备资料
规格
型号名称 美克司电动订书机EH-110F
装订能力
2至110张普通复印纸(64g/m
2
,16-lb)
2 至 1 0 0 张 普 通 复 印 纸( 8 0 g / m
2
,20-lb)
装订速度 每秒2颗订书针
装订系统 订书针自动输送系统
装订深度 约3至23m m(1/8"至7/8")可调节
尺寸
242mm(宽)x393mm(厚)x210mm(高)
(9-9/16"x15-1/2"x8-5/16")
重量 7.6kg(16.76lbs)
* 设备设计或规格如有更改,恕不另行通知。
1.产品规格中所描述的装订能力指的是设备在使用普通复印纸(80g/m2)情况下的装订能力。设备
是否能达到该装订能力取决于纸张类型。在此情况下,请勿强行进行装订。
2.在长时间持续装订的情况下,由于电机可能会发烫,本设备可能会停止装订。在此情况下,停
止操作30分钟或更长时间,以便电机冷却。
3.设备不可装订100张以上的纸张(80g/m2,20-lb)。若超出设备能力进行操作可能会导致设备损坏。
额定电流 2.5A
电源 交流100-240V,50-60Hz
工作温度及湿度范围工 作 温 度 为 1 0 °C 至 3 5 °C ( 5 0 °F 至 9 5 °F ) ,
相对湿度低于80%
针排
美克司110FE针排
(保证最低含4,000颗订书针)
请到所在区域/经销商处购买针排。
《电子信息产品污染控制标识(10 年标识)的说明》
本标识适用于在中华人民共和国销售的电子信息产品。
本标识中央的数字表示本产品的环境保护对应的年数。
产品编号: EH 91913
产品名称: EH-110F
本产品废弃的时候,请遵照环境保护局的指示进行。
有毒有害物质或元素名称及含量标识表
部件名称
有毒有害物质或元素
铅(Pb) 汞(Hg) 镉(Cd)
六价铬
(Cr Ⅵ)
多溴联苯
(PBB)
多溴二苯醚
(PBDE)
金属底座
金属紧固件
订书机组件
电路板组件
线缆组件
其它部件
×
×
×
×
×
○
○
○
○
○
○
○
○
○
○
○
○
○
○
○
○
○
○
○
○
○
○
○
○
○
○
○
○
○
○
○
○ : 表示该有毒有害物质在该部件所有均质材料中的含量均在 SJ/T 11363-2006 规定的限量要求以下。
× : 表示该有毒有害物质至少在该部件的某一均质材料中的含量超出 SJ/T-11363- 2006 规定的限量要求。
Page 37

Page 38

38
目錄
目錄
請確實閱讀以下內容
介紹 ...................................................................
39
使用說明書中的識別符號 .................................................
39
安全須知 ...............................................................
40
免責聲明 ...............................................................
41
使用前
包裝明細 ...............................................................
42
操作面板和指示燈的主要功能 .............................................
42
各部位名稱 .............................................................
43
自動裝訂
....................................................
44
手動裝訂
....................................................
45
角釘裝訂
....................................................
46
定位裝訂
....................................................
47
更換(裝填)釘書針
...........................................
48
清理卡針
....................................................
51
故障排除
....................................................
53
產品規格
....................................................
54
規格 ...................................................................
54
Page 39

39
請確實閱讀以下內容
請確實閱讀以下內容
介紹
非常感謝您購買MAX CO., LTD.生產的電動釘書機。
在使用本釘書機前,請仔細閱讀本使用說明書,確保安全正確的操作。
使用說明書中的標示符號
■
標示說明
本說明書採用了各種不同的標示說明,以說明您安全、正確地使用本機器。
以下是對這些標示符號說明的描述。
警告
疏忽可能會導致嚴重人身傷害或死亡。
小心
疏忽可能會導致人身傷害、財產受損或資料丟失。
■
標示符號
描述可能會導致機器損壞並需要維修的操作,或為了恢復機器狀況,需要重置機器的操作。
備忘
描述操作要點和技巧。
在其它頁面提供相關描述的情況下,對參考頁面進行描述。
表示“注意事項”。
該符號內或附近的標識說明
表示具體注意事宜。
表示“禁止事項”。
該符號內或附近的標識說明
表示具體禁止事宜。
表示“必做事項”。
該符號內的標識說明表示具
體指令事宜。
Page 40

40
請確實閱讀以下內容
安全須知
警告
●請勿於通電中翻轉主機。
否則可能會引起火災或觸電。
●請勿將手指、鋼筆或線纜等異物插入本機器。
否則可能會損壞機器,或引起火災觸電,或燒
傷。
●請勿將手部或其它物體放入機器裝訂處。
否則可能會導致機器故障,並造成人身傷害。
●請確保使用產品附帶的電源線。
否則可能會引起火災或觸電。
● 請直接從單插插座中獲取電源,避免在單插座
中連接過多線纜。
否則可能會引起火災。
●請勿對電源線做出更改變動。
否則可能會引起火災或觸電。
●請勿在電源線上放置任何重物。
否則可能會損壞電源線、引起火災或導致觸
電。
●請勿纏繞電源線。
否則因此產生的熱量可能會引起火災或損壞機
器。請務必不要纏繞電源線。
●請勿用濕手拔插電源插頭。
否則可能導致觸電。
●請勿用濕手或濕布操作機器。
否則可能導致觸電。
● 電源線與插座連接時,請勿將紙張或衣物等其
他物品放於機器之上。
否則可能會引起火災或損壞機器。
● 斷開電源線與插座連接時,請務必握住電源插
頭。請勿拉扯電源線。
否則可能會損壞電源線、引起火災或導致觸
電。
●請勿將水或化學品濺灑在機器上。
若水或其它異物進入機器,請立即斷開電源插
頭與插座的連接,並聯繫機器經銷商進行修
理,否則可能會機器故障,引起火災或導致觸
電。
●機器出現異常時,請勿操作機器。
若在冒煙、發出異響或出現怪味等異常狀態下
操作機器,可能會引起火災或導致觸電。
這種情況下請立即斷開電源插頭與插座的連
接,並聯繫機器經銷商進行修理。
●更換釘書針或清理堵塞的釘書針時,請務必斷
開電源。
否則釘書機可能會突然地起動,導致人身傷
害。
●重新移動安裝位置時,請務必斷開電源插頭與
插座的連接。
若在插座連接電源插頭的情況下移動機器,則
可能導致電源線損壞,從而引起火災或觸電。
●禁止拆卸或改裝本機器。
否則可能會引起火災、觸電或人身傷害。
●請務必為機器做好接地。
否則如果出現短路情況,則可能導致火災或觸
電。
●定期清理電源線插頭。
否則插頭上的灰塵可能會引起火災或損壞機
器。
●禁止觸碰紅色的觸動開關。
否則可能導致機器啟動,帶來人身傷害。
Page 41

41
請確實閱讀以下內容
小心
●請將機器安裝在平整位置,不得將其安裝於搖
擺支架或傾斜表面等不穩定的位置。
否則可能導致機器墜落,從而引起人身傷害或
損壞機器。
●請勿在陽光直射、溫度高,濕度大或結霜的位
置使用機器。
否則可能會導致機器工作不穩定或損壞。
●請勿與用電容量較大的設備(如空調、冰箱、
微波爐、辦公自動化機器等)共用電源插座。
否則電壓會下降,從而導致機器故障。
●機器前蓋▼標誌位置處無紙時,請勿按下
“手動”按鈕。
否則可能損壞機器或導致卡針。
●僅可以使用未塗布印刷紙。
否則可能損壞機器或導致卡針。
●若機器長期不用,為安全起見,請務必斷開電
源插頭與插座之間的連接。
●搬運機器時,請抓牢機器底部。
否則可能會導致人身傷害或損壞機器。
●請勿將手指放入裝訂區。
否則可能會導致人身傷害。
●釘書針尖部突出鋒利,處置時應格外小心。
否則可能會導致人身傷害。
●更換釘書針時,請勿觸碰機器內部(內含針
盒)。
否則可能會導致人身傷害或灼傷。
☆為了防止機器出現問題,請務必遵守下列注意事項。
1. 安裝和存放機器時應遠離以下場所:
①任何陽光能夠直射或靠近熱源的場所
②任何具有灰塵或濕度大的場所
③任何表面不平整,或容易振動或衝擊的場所
④任何氣溫低於 10°C(50°F)或高於 35° C(95°F)的場所
2. 僅使用美克司(MAX)110FE 釘書針。
3. 使用乾抹布清潔機器上的灰塵。請勿使用有機溶劑和化學品(稀釋劑、苯、酒精等),否則可能
導致機器變形或褪色。
4. 為安全起見,後蓋打開時,機器不會進行裝訂。裝訂時請正確關閉後蓋。
5. 機器前蓋▼標誌位置處無紙時,請勿進行裝訂,否則可能損壞機器或導致卡針。
6. 請勿在已裝訂處再次裝訂,否則可能損壞機器或導致卡針。
7. 使用捲曲或翹曲的紙張時,請在將其推入機器前整理平整。
8. 不要在裝訂孔上裝訂,否則可能損壞機器或導致卡針。
免責聲明
若用戶因未遵守本手冊中之說明而導致機器損壞,或由於機器無法使用而導致任何
損失,本公司對此將不負任何相關責任。
Page 42

42
使用前
使用前
包裝明細
打開包裝後請檢查是否內含以下配件。
⑤ 使用說明書② 電源線 ( 三孔插頭 )① EH-110F
* 三孔插座務必連接有
接地線。
各型號機器的電源插頭有
所不同。
③針盒
* 已裝入主機。
④釘書針
(件號 110FE)
* 已裝入針盒。
操作面板和指示燈的主要功能
選擇開關:該開關可選擇自動(自動裝訂)模式或手動(手動裝訂)模式。
LED 燈:
綠燈亮:準備工作。
紅燈亮:更換針排。
綠燈閃:輸送訂書針。
紅燈閃:清理卡針。
橙色燈亮:將針盒裝入主機。
開始按鈕:用來手動裝訂紙張或輸送釘書針。
主機上部的標識
選擇開關
(自動) (手動)
(開始)
(輸送)
(电源)
開始按鈕
LED 燈
Page 43

43
使用前
各部位名稱
[主機前部]
[主機後部]
[針盒]
[釘書針(消耗品)]
準備工作
針盒及釘書針裝妥之後裝入主機,將電源線與主機電源線介面和電源插座連接,並打開電
源開關。綠色LED指示燈亮起後,機器準備工作即完成。
電源開關
選擇開關
前蓋
深度調整鈕
觸動開關(紅色)
觸動開關(紅色)
放紙台
LED 燈
開始按鈕
針槽
深度調整鈕
後蓋
電源線插座
拉桿
釘書針護蓋
鎖緊鈕
面板
鎖緊鈕
釘針塑膠輪
釘書針
Page 44

44
自動裝訂
自動裝訂
插入紙張後,機器自動裝訂。
1
將選擇開關撥至“自動”位置。
2
釘書機裝訂深度約3至23mm(1/8" 至 7/8")。
如圖所示,鬆開左右兩側的深度調整鈕,再調整
至所需深度後轉緊即可。
小心
請勿過度轉鬆或轉緊深度調整鈕。
否則可能損壞機器。
3
主機前方標記▼是裝訂的中心位置。可左右移動紙張設定您想要的位置。
使用前,可先查看放紙台的使用說明。(查看“定位裝訂”。)
4
裝訂位置確定後,將紙張小心推入主機。機器將開始自動裝訂。
(自動) (手動)
深度調整鈕
轉鬆
轉緊
轉緊
轉鬆
裝訂中心位置
警告
禁止觸碰紅色的觸動開關。
否則可能導致機器啟動,帶來人身傷害。
觸動開關
☆機器在左右兩側安裝了兩個觸動開關。在自動裝訂情況下,只有左右兩個
觸 動 開 關 同 時 碰 觸, 機 器 才 會 啟 動。
備忘
Page 45

45
手動裝訂
手動裝訂
如果您不希望使用自動裝訂模式,而希望通過按鈕來裝訂,則請使用“手動”按鈕。
按下“開始”按鈕以進行裝訂。
小心
請勿在標記▼處沒有紙張時按下“手動”按鈕。否則可能損壞機器或導致卡針。
1
將選擇開關撥至“手動”位置。
2
緩慢推入紙張,直到紙張接觸觸動開關。
3
按下“開始”按鈕,機器開始裝訂紙張。
(自動) (手動)
觸動開關(左右各一)
推入紙張,直到接觸
到觸動開關。
備忘
☆ 在紙張沒有接觸機器左側或右側的觸動開關前,
按下“開始”按鈕不會啟動機器。
Page 46

46
角釘裝訂
角釘裝訂
需要在紙張側角處裝訂時,應先將紙張邊緣與▼標記位置對齊。
1
將選擇開關撥至“手動”位置。
2
緩慢推入紙張,直到紙張接觸機器右側或
左側的觸動開關。
3
按下“開始”按鈕便可完成角釘裝訂。
(自動) (手動)
觸動開關(左右各一)
推入紙張,直到接觸
機器右側或左側的觸
動開關。
☆ 在紙張沒有接觸機器左側或右側的觸動開關前,
按下“開始”按鈕不能啟動機器。
備忘
備忘
☆ 紙 張 不 可 傾 斜 裝 訂。
Page 47

47
定位裝訂
定位裝訂
紙張應與紙張座標線對齊,以便以相等間距進行自動裝訂(如躲避裝訂孔)。
(B5紙不可自動垂直裝訂,請使用手動模式。)
1
檢查紙張尺寸(A4或B5)和裝訂位置
(垂直或水準)。
垂直裝訂 水平裝訂
2
裝訂兩次。首先,請將紙張與一側的對應
標線對齊。
A4 A4B5 B5A4 A4B5 B5
(舉例)
A4 紙垂直裝訂
這條標線
3
將紙張緩慢推入主機,之後在第一個位置
自動裝訂。(手動裝訂時請按“開始”按
鈕。)
A4 A4B5 B5A4 A4B5 B5
4
現在可在第二個位置裝訂,將紙張與其
它對應標線對齊。
A4 A4B5 B5A4 A4B5 B5
這條標線
5
將紙張緩慢推入主機,之後在第二個位置自
動裝訂。(手動裝訂時請按“開始”按鈕。)
A4 A4B5 B5A4 A4B5 B5
定位裝訂完成了。
A4
A4B5
B5A4
A4B5
B5
A4 A4B5 B5A4 A4B5 B5
單位:mm
95
75
50
35
紙張座
Page 48

48
更換(裝填)釘書針
更換(裝填)釘書針
若針盒中的釘書針耗盡,機器頂部的紅色LED燈將亮起,以提醒更
換釘書針。在此情況下,即使推入紙張,亦不會進行裝訂。請按
照以下指示更換釘書針。
警告
更換釘書針時,請務必切斷電源開關,並將插頭從插座中拔
出。否則釘書機可能會突然起動,導致人身傷害。
1
關閉電源開關。
關閉 !
2
拔掉電源插頭。
3
打開主機背面的後蓋。
4
拉出針槽。
5
移除針槽中已裁斷釘書針腳。
6
將針槽放回原處。
釘書針
Page 49

49
更換(裝填)釘書針
7
拉動針盒拉杆,緩慢將針盒拉出。
8
將釘書針護蓋向針盒拉杆方向拉動,並
向上打開。
訂書針護蓋
9
拆掉釘書針塑膠輪。
10
安裝釘書針(件號110FE)。
11
將釘書針護蓋關閉牢固,直到其咬合為
止。
①
釘書針護蓋
12
拉出並移除定位膠帶。
②
定位膠帶
13
將針盒搭在機器上,之後牢固推入其
中,直到咬合為止。
咬合
更換釘書針時,請務必移除針槽內的已裁斷
釘書針腳,否則可能會損壞機器。
Page 50

50
更換(裝填)釘書針
14
關閉後蓋。
15
連接電源插頭並打開電源開關,檢查綠
色LED燈是否點亮,沒有問題後便可使
用機器。
(電源)
1. 請使用美克司原廠釘書針“件號110FE”。
2. 請勿將折斷、變形或廢棄的釘書針裝入針盒重新利用,否則可能會損壞機器或卡針。
3. 更換釘書針時,請務必先清除針槽中已裁斷釘書針腳,否則可能損壞機器。
備忘
☆ 更換釘書針後,綠色 LED 燈可能馬上閃亮,要求使用者進行輸
送工作。這時請按住“開始”按鈕(約三秒鐘)以輸送釘書針。
使用者將聽到機器連續操作的聲音,這是因為釘書針正移至裝訂
位置,而不是機器出現故障。
按住
備忘
☆ 如果發生難以將針盒推入機器的情形,可能是因為有殘餘的針遺
留在機器內。
請打開後蓋,將針盒取出、將機器後方傾斜 60°,並將機器內的
釘針取出。
Page 51

51
清理卡針
清理卡針
若出現卡針,請按照以下指示進行清理:
1
關閉電源開關。
關閉 !
2
拔掉電源插頭。
3
打開主機背面的後蓋。
4
拉動針盒拉杆,緩慢將針盒拉出。
5
同時按下兩側的鎖緊鈕,打開面板。
①
①
②
警告
清理卡住的釘書針時,請務必關閉電源開關,並將插頭從插
座中拔出。
否則釘書機可能會突然起動,導致人身傷害。
Page 52

52
清理卡針
6
清除卡針。
7
將面板推回,直到咬合為止。
①
②
咬合
咬合
8
將針盒放於在機器上,之後平穩推入
其中,直到咬合為止。
咬合
9
關閉後蓋。
10
連接電源插頭並打開電源開關,檢查綠
色LED燈是否點亮。若沒有問題,則請
按住“開始”按鈕(約三秒鐘),使用
者將聽到機器連續操作的聲音,這是因
為釘書針正移至裝訂位置,而不是機器
出現故障。
備忘
☆ 如果使用上述方法無法清理堵塞的釘書針,則請您立即將電源插頭從插座中拔出,並要求機器經銷
商 或 分 銷 商 進 行 修 理。
按住
Page 53

53
故障排除
故障排除
故障現象 檢查點 解決措施
查看頁面
1
打開電源開關後機器
沒有電。
檢查電源線是否緊固連接。 連接電源線。 -
檢查後蓋是否正常關閉於主機後部。 將後蓋再次關閉於主機後部。 50頁
2
紅色 LED 燈亮。 釘書針可能耗盡。 請遵照適當參考方法處理。 48頁
3
橙色 LED 燈亮。 檢查針盒是否正常安裝。 打開主機後部的後蓋,重新安裝針盒。 49頁
4
綠色 LED 燈閃亮。 釘書針可能未輸送至裝訂位置。
按住“開始”按鈕約3秒鐘,以輸送釘書
針至裝訂位置。
50頁
5
輸送釘書針後,綠色
LED 燈仍然閃亮。
釘書針可能在針盒末端堵塞。 請遵照適當參考方法處理。 51頁
釘書針可能不是原廠耗材
(件號110FE)。
檢查機器是否使用的是美克司(MAX)
110FE 釘書針。
54頁
6
紅色 LED 燈閃亮。
機器可能沒有回到正常定位。
請清理放紙台上的紙張後,關閉電源,
並再次打開電源開關。
-
釘書針可能在針盒末端堵塞。 請遵照適當參考方法處理。 51頁
7
按下“開始”按鈕後,
機器無裝訂動作。
檢查選擇開關是否設為手動模式。 將選擇開關設為手動模式。 45頁
紙張可能未接觸觸動開關。
使紙張接觸左右兩側的觸動開關,或
接觸其中一個。
45頁
8
紙張推入後,機器無
裝訂動作。
檢查選擇開關是否設為自動模式。 將選擇開關設為自動模式。 44頁
紙張可能未同時接觸左右兩側的觸
動開關。
使紙張同時接觸左右兩側的觸動開關。
若僅接觸其一個觸動開關,機器將不進
行裝訂。
44頁
9
針盒無法拆卸。 機器可能沒有回到正常定位。
請清理放紙台上的紙張後,關閉電源,
並再次打開電源開關。
-
10
機器執行裝訂工作,
但紙張並沒有裝訂。
( 不出針 )
釘書針可能在針盒末端卡針。 請遵照適當參考方法處理。 51頁
11
清理卡住的釘書針
後,機器執行裝訂工
作,但紙張並沒有裝
訂。( 不出針 )
釘書針可能在出針口堵塞。
立即將電源插頭從插座中拔出,並聯繫
機器經銷商或分銷商進行修理。
-
Page 54

54
產品規格
產品規格
規格
型號名稱 美克司電動釘書機 EH-110F
裝訂厚度
2至110張普通複印紙(64g/m
2
)
2至100張普通複印紙(80g/m
2
)
裝訂速度 2 針/秒
裝訂系統 釘書針自動輸送系統
裝訂深度 約3至23mm(1/8" 至7/8")可調節
尺寸
242mm(寬)x 393mm(厚)x 210mm(高)
(9-9/16" x 15-1/2" x 8-5/16")
重量 7.6kg (16.76lbs)
* 機器設計或規格如有更改,恕不另行通知。
1. 產品規格中所描述的裝訂能力指的是機器在使用普通複印紙(64g/m2)情況下的裝訂能力。
機器是否能達到該裝訂能力取決於紙張類型。在此情況下,請勿強行進行裝訂。
2. 在長時間持續裝訂的情況下,由於馬達可能會發燙,本機器可能會停止裝訂。在此情況下,
停止操作 30 分鐘或更長時間,以便馬達冷卻。
3. 機器不可裝訂110張以上的紙張(64g/m2,)。若超出機器能力進行操作可能會導致機器損壞。
標準電流 2.5A
電源 交流100-240V, 50-60Hz
工作溫度及濕度範圍工作溫 度為10°至 35°C(50°F至95°F)相對
濕度低於 80%
釘書針
美克司110FE 釘書針
(4,000支釘書針)
請到所在區域/經銷商處購買釘書針。
Page 55

Page 56

・This instruction manual is subject to change without notice due to functional enhancement.
.
Head Office
MAX CO., LTD.
6-6, NIHONBASHI HAKOZAKI-CHO, CHUO-KU, TOKYO, JAPAN
POST CODE: #103-8502
TELEPHONE: (81)3-3669-8131 FAX: (81)3-3669-7104
URL: http://www.max-ltd.co.jp/int/ (GLOBAL Site)
Subsidiary / Importer for European country
MAX EUROPE BV
CAMERASTRAAT 19, 1322 BB ALMERE, THE NETHERLANDS
TELEPHONE: (31)-36-546-9669 FAX: (31)-36-536-3985
URL: http://www.max-europe.com
Subsidiary / Importer for USA
MAX USA CORP.
257 EAST 2ND STREET, MINEOLA, NEW YORK 11501, U.S.A.
TELEPHONE: (516)741-3151 FAX: (516)741-3272
URL: http://www.maxusacorp.com
Subsidiary / Importer for China
MAX (SHANGHAI) CO.,LTD.
ROOM 1505, BLOCK E, JIN HONGQIAO GUANGCHANG,
NO. 2, LANE 686, WUZHONG ROAD,
MINHANG DISTRICT, SHANGHAI, PROC
TELEPHONE:(86)21-3133-8105 FAX:(86)21-3133-8107
Subsidiary / Importer for HongKong
MAX CO., (HONG KONG) LTD.
7-B CHUAN KEI FTY BLDG., 15-23,KIN HONG ST.,
K
WAI CHUNG, NEW TERRITORIES, HONG KONG
TELEPHONE:(852)2426-2106 FAX:(852)2480-4242
Subsidiary for South Asian Country
MAX ASIA PTE. LTD.
101, CECIL STREET, NO.16-01 TONG ENG BUILDING,
SINGAPORE 069533
TELEPHONE:(65)6226-2180 FAX:(65)6226-2182
 Loading...