

Page 1
INSTRUCTION
MODEL
# ET-706 PROF'ESSIONAL
REMOTE
MANUAL
COOKING THERMOMETER
Introduction
Congratulations
thermometer. You
you
even in
Components
your purchase
on
will now be able to remotely monitor
home.
l. I -receiverunit
2- 1-transmitterunit
3. i -
detachable siainless
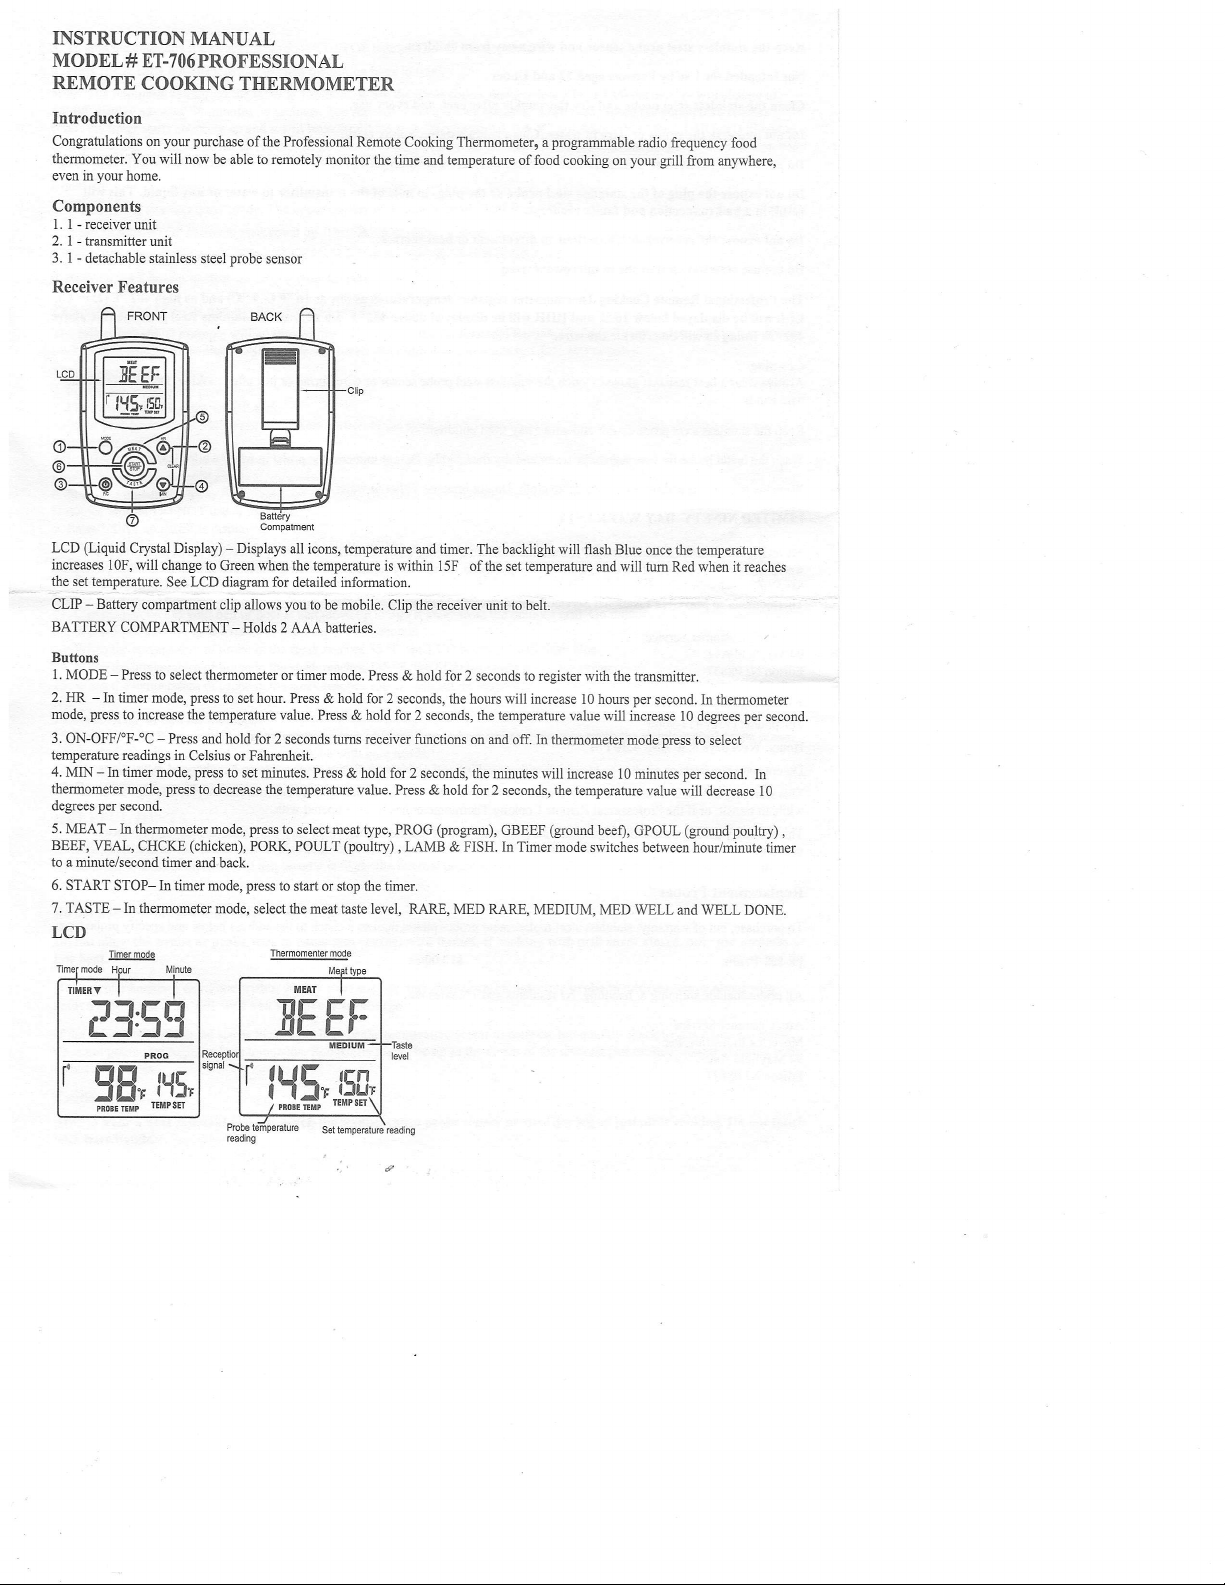
Receiver
LCD
Features
(Liquid
incremes 10F,
tgmlerature.
!9t
the
CLIP - Battery
BATTERY
COMPARTMENT
Crysta1 Display)
will change to
steel
See LCD
compartment clip allows
Buttons
l.
MODE
Press to
select thermometer or timer mode.
-
2. HR
In timer mode,
-
press
mode,
3.
temperature
4.
thermometer mode,
degrees
5. MEAT
BEEF,
to
6. START
7. TASTE - In themometer
to increase the
ON-OFFfF-"C
readings in
MIN
In timer mode,
-
per
second.
In themometer
-
VEAL, CHCKE
a minute/second timer and.back.
STOP- In timer mode,
press
Press and
-
Celsius or Fahrenheit.
prcss
press
to decrease the temperature
(chicken),
LCD
Timermode
ofthe Professional
probe
sensor
Displays
-
Green when the temperatue is
diagram for detailed infomation.
all icons, temperature and timer.
you
2 AAA
-Holds
Remote Cookilg Thermometer,
to be mobile. Clip the receiver
batteries.
to set hour. Press & hold
temperature value. Press
&
hold for 2 seconds tums receiver
to set minutes. Press
press
mode,
to
PORK, POULT
press
to start or stop the timer.
mode, select the meat taste
Thermomenlermode
& hold for 2 seconds,
meat
select
(poultry)
value. Press
type, PROG
the time md temperature
The backlight will
within 15F of the set temperature
unit to belt.
Press & hold for 2
for 2 seconds, the hours
hold
for 2 seconds, the temperature
functions on and
seconds to register with the
will increase 10 homs
off. In thermometer mode
the minutes will increase
& hold for 2 seconds, the temperahre
(program),
LAMB & FISH.
,
GBEEF
In Timer mode switches
level, RARE, MED RARE,
programrlable
a
of food cookhg
flash Blue once the temperature
value will increase
(gromd
MEDIUM, MED
radio
frequency food
your grill
on
and will tum Red
10 minutes
beef), GPOUL
from aryvhere,
transmitter.
per
second. In thermometer
10 degrees
Dress to select
per
value will
(gromd
between hom/miaute timer
WELL and WELL DONE.
when it rcaches
per
second.
second.
In
decrease l0
pouhy)
,
Page 2
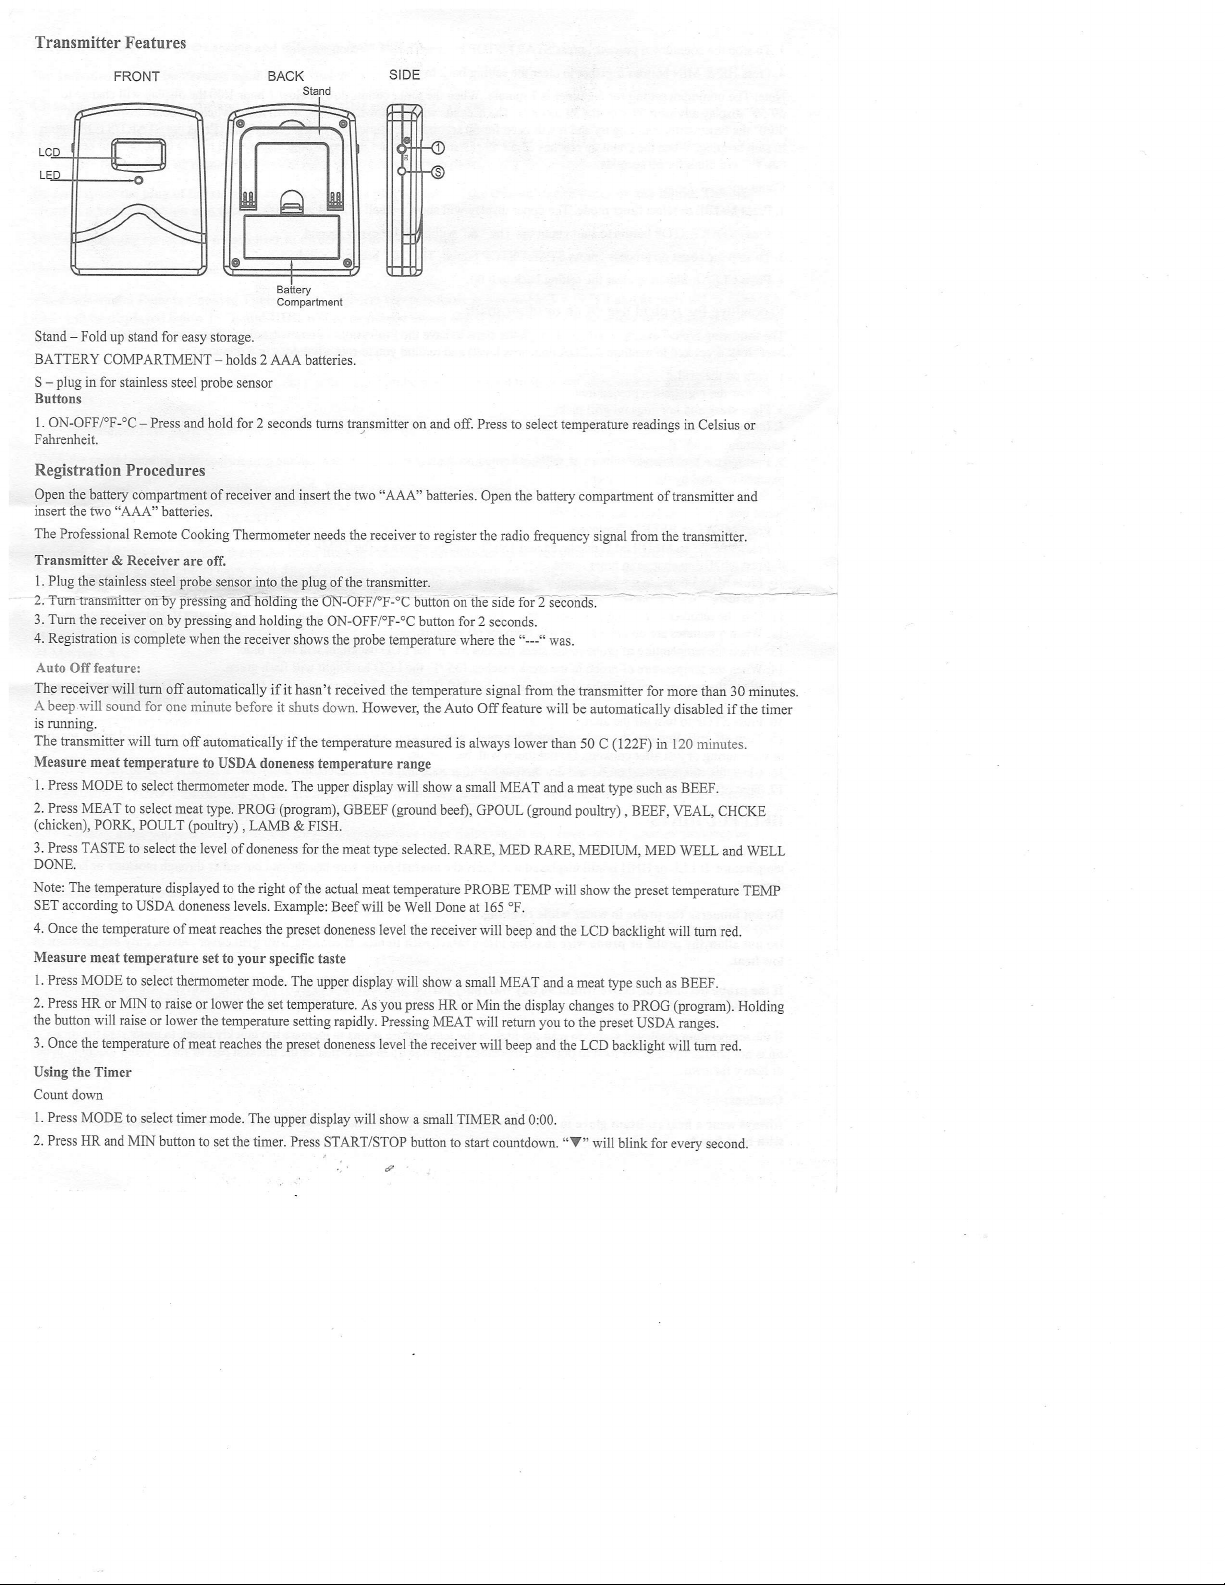
Transmitter
Features
FRONT
Stand
Fold up
stard for easy storage.
-
BATTERY
S
Buttons
1. ON-OFFf
ratremelr.
Registration
Open
insed the
The Professional
Transmitter
1 . Plug the
2. Turn
3. Tm the
4. Registration
plug
in for stahless
-
the
battery comparhnent
two "AAA"
stainless steel
transffittfl
receiver
COMPARTMENT
F-"C
Press and
-
Procedures
Remote Cooking
& Receiver are
mby
on by
is complete
Auto Offfeahre:
The receiver
A beep
is
running.
The tarsmitter
Measure meat
1.
Press MODE to
2. Press
(chicken),
3. Press
will tum
will sound for
will tum
temperature
select themometer
MEAT to
select meat tlpe.
PORI!
POULT
TASTE to select
DONE.
Note: The temperatue
SET according
4. Once the temperatue
Measure
1. Press MODE to
2. Press
the button
3.
Once the temperature
Using tbe Timer
Count dom
1. Press
2. Press HR
to USDA doneness
meat temperature
select themometer
HR or MIN
to raise or lower
will raise or lower the
MODE to
select timer mode. The
and MIN button
BACK
Compartment
holds
2 AAA batteries.
-
probe
steel
sensor
hold for 2 seconds tums trmsmitter
of receiver and insert the
batteries.
Thermometer needs the
off.
probe
sensor hto the
pressing
an? holding the
pressing
and
when the receiver
offautomatically
one minute
offautomatically
holding the
shows the
if it hasn't
before it shuts
if the temperature
to USDA doneness
mode. The
(program),
PROG
(poultry),
the level
displayed to the right
ofmeat reaches the
ofmeat reaches
LAMB & FISH.
of doneness for the meat
of the actual meat temperatue
levels. Example:
preset
your
set to
specilic taste
mode. The
the set temperature.
temperature
setting rapidly. Pressing
preset
lhe
upper display
to set the timer. Press
SIDE
ffi
on and off. Press to
two "AAA" batteries.
receiver to register the
plug
of the transmitter.
ON-OFF/Tr-'C
ON-OFF/"F-"C button for 2
probe
received the temperature
dom. However, the
temperature range
upper display
GBEEF
Beefwill
doneness level
upper display will
doneness level the receiver
will show a smal1 TIMER
START/STOP
bunon on lbe side lor 2
temperatue
measued is
will show a small
(ground
type selected. RARE,
be Well Done at 165
the receiver will
you press
As
button to start countdown.
select temperatue readings
Open the battery compartment
radio frequency
seconds.
where the'1-J'was.
signai from
Auto Off feature
always lower than
MEAT and a meat
beef), GPOUL
MED RARE,
PROBE
TEMP will
oF.
beep and the LCD
show a small MEAT
HR or Min the
display changes to PROG
MEAT will retum
will
beep and the LCD
and 0:00.
signal ftom the trmsmitter.
seconds.
the transmitter
will be automatically
(122F)
50 C
type such as BEEF.
(ground
poultry)
MEDIUM, MED
show the
backlight will tum
and a meat type
you
preset
to the
backlight will tum red.
"V"
will blink for every
in Celsius or
of transmitter md
for more than 30 minutes.
disabled if the
in 120
minutes.
BEEF,
VEAL,
,
CHCKE
WELL and WELL
preset
temperature
red.
such as BEEF.
(program).
USDA rmges.
second.
timer
TEMP
Holding
Page 3

3. To stop the comtdown
4. Press HR & MiN buttons together to clear the setting back
minimum
Note: The
59'59" display advising 59 minutes 59 seconds. The seconds
0'00" the timer starts counting up and it will beep for 60 seconds.
to
stop beeping. When
process , press
setting for the timer is 1 minute. When the timer counts down below t hour 1:00
START/STOP
button. The "V" becomes solid.
to
0:00.
will be shown counting down then. When the countdown reaches
the
count up
reaches 23:59:59
(59
The timer md "AV" wi1l blink. Press the START/STOP button
seconds are not displayed) the display
will tm to 0:00, the unit beeps and
the
display
will
change
"AV" will blink for 60 seconds.
Count up
1. Press MODE to
2. Press STARTiSTOP button to start count up.
3. To stop the count up
4. Press CLEAR button to clear the setting back to 0:00.
Procedure for typical use on an outdoor
The following typical example will
beefsteak is cooked to medium
1. Tum on the
2. Follow the registration
3. Place steak and hot dogs on
probe
4. lnsed
temperature is 45
5. Position the
pinched/crushed
the hmsmitter away from heat source of
6. Stand
is not waterproof DO NOT use in the rain.
Press MEAT
7.
8. Press TASTE so MEDIUM is displayed and 150
9. Press MODE to change to timer mode.
10. Press MIN 5 times to set for 5 minutes so that 0:05
back tb thermometer mode.
1 1. Clip the receiver to
i2.
13. When the temperature ofprobe in the steak reaches 55
14.
minutes
When
I
When the temperature ofprobe in
timer mode. The upper display will show a small
select
The "A" will blfuk for every second.
process
press
START/STOP button.
,
grill:
go
through the steps to have the Professional Remote Cooking Thermometer
(USDA
doneness level) and
grill.
sensor into the center ofthickest
probe
procedures.
oF.
sensor wire so
grill
by the
so
cover.
BEEF is displayed.
your
belt or
the receiver will beep for 60 seconds.
are up
grill
rack.
it
portion
not come into contact with flames and exit
will
grill.
pocket
and move up to
the
reaches 135
steak
ofthe steak.
DO NOT
will
'F
is
The
remind
be shown
displayed.
300
ft
the
'F
the LCD backlight will flash
'F
15.Whenthetemperatureofprobeinthesteakreachesl50'F MEDIIJ\4thereceiverwillbeepandtheLCDbacklighlwillflash
red.
16. Press
t 5 . Tum off
wire
or
durhg orjust
16. Clean the stainless steel
17. Tum off the
STOP to
grill.
tum
offthe alert.
Remove the
after
transmitter
probe
sensor from steak.
Do not touch with bare hands.
cooking.
probe
and dry thoroughly after each
Always wear a heat resistant
HE,LPFTJLHINTS
Ifthe receiver and/or the
temperature. IfLLL or HI{I{ is still displayed it is likely
damage.
Do not immerse the
Do not allow the
transmitter
probe
in water while cleaning,
probe
probe
or
low heat
probe
If the
becomes defectiye within 90
return address and we will send
Ifthe temperatwe displayed seems
poking
tip is not
healy fat areas.
or
through the food to outside. Reposition
Cautions:
Always wear a heat resistant
glove
with bare hands,
LLL or IIHH iastead ofthe
display
to come into contact with flames. If cooking with
wire
day warranty
you
probe
new
to read too high or the temperatue seems to increase
the htemal
period please
no charge.
the
probe
to touch the stainless steel
TIMER md 0:00.
becomes solid.
"A"
you
you
to rotate hot dogs in 5 minutes.
alert
Avoid touchhg bone or hea\y fat areas. Assume the meat
grill
the
put
trmsmitter on closed cover or under the cover. The transmitter
as the TEMP SET.
Press START/STOP to
away from the
LCD
and every use.
probe
outdoor
backlight
probe
temperature,
wire has shorted out either through moisture or
return defective
start
grill.
will flash blue.
glove
to touch the stainless steel
wait for
probe
too
tip in the center of the thickest
probe
sensor or wire during or
area without being
swface
the countdown. Press MODE
Go indoors ifdesired.
green.
probe
probe
to reach room
grill
cover closed, only use medium or
to address below along with
quickly
cheek to make sure the
part
food. Avoid touchhg bone
of
just
after cooking.
Do not touch
to
to when a
to
sensor
heat
probe
go
Page 4

Keep the
stainless steel
probe
sensor and wire away from children.
Not Intended for Use by Persons aged 12 and Under
Clean the stainless
Do not immerse the
Do not use the receiver
Do not expose the
result
in a bad connection and faulty readings.
probe
steel
probe
or wire
transmitter in
or
plug
ofthe stainless steel
thoroughly
and dry
in
water. Clean using a damp, soapy cloth,
after each
and
the rain. They are not waterproof.
probe
plug-in
the
or
every use.
hole
the transmitter to
of
Do not expose the receiver or transmitter to direct heat or heat surface.
Do not use stainless steel
The Professional Remote
LLL will be displayed
oF.
482
Doing
so will deteriorate
probe
Cooking
below
in microwave
oven.
Thermometer registers temperatures as low as 16'F
16
and HHII
'F
the
will be displayed
wire.
above 482
'F.
Do not
use
Cleaning
Always wear a heat resistant
bare hands.
Keep the stainless steel
Wash the metal
probe
glove
to touch the stainless steel
probe
sensor and
wire
away liom chiidren.
tip with hot soapy water and dry thoroughly. Do not immerse the
Wipe the transmitter and receiver with damp cloth. Do not immerse
LIMITED
NINETY DAYWARRAN'TY
probe
sensor or wire during or
either in water.
probe
Maverick lndustries Inc. warrants the Professional Remote Cooking Themometer to be fiee
workmanship for a
Maverick
ThErmomelealo-lvfnerick's National
period
Customer Service by mril
of90 days, from date ofpurchase. Should any repairs or servicing under this wananty be required, contact
phory&l1rstou"ttoo.
g
Sewice Center
Iocated
o4.* to
as fbllows:
pq.t
*4 .np
4"
Maverick Customer Service
94 MayfieldAve.
Edison NJ 08837
w.maverickhousewares.com
Telephone: (132)
Hours: Weekdays 8:30 AM- 4:30 PM
Do not send any
This wananty is VOID ifinstructions for
while in transit;
This
wananty
provuce.
4 | 7 -9666
parts
product
or
if the Professional
or
gives you
specific legal rights and
to Maverick without callilg and obtaidng a Retum Authoriation
not followed;
use are
Remote Cooking Thermometer has been tampered with.
you
for accidental damage; for cornmercial use; for damage incuned
may also have
other
rights
which vary from state to state
any liquid. This will
water or
(-
9
and as high 482
"C)
the
stainless steel
just
after cooking. Do not touch with
probe
il water while cleaning.
parts,
in
of defects
p.ofgt
Number and instructions.
materials md
or
'F
sensor
province
(250
to
'C).
above
Replacement Probes
purchase.
To
PR-008 Probe
All
prices
oul ofwananty,
include
shipping & handling. NJ residents add 7o/o salestzx.
Attn Customer Service
Maverick hdustries, Inc.
94 Mayfield Ave.
Edison NJ 08837
stainless steel
replacement
probes please
$12.00/ea
mail us a check to the address below and specifl
probe
type
 Loading...