

Page 1
Cautions:
Always wear a heat resistant glove to touch the stainless steel probe sensor or wire during or just after cooking.
Do not touch with bare hands.
Keep the stainless steel probe sensor and wire away from children.
Clean the stainless steel probe and dry thoroughly after each and every use.
Do not use the receiver or transmitter in the rain. They are not waterproof.
Do not expose the plug of the stainless steel probe or the plug in hole of the transmitter to water or any liquid.
This will result in a bad connection and faulty readings.
Do not expose the receiver or transmitter to direct heat or surface.
Do not use stainless steel probe in microwave oven.
The Remote Wireless BBQ Rotisserie Thermometer registers temperatures as low as 32 °F (0 °C) and as high
212 °F (100 °C). “---“ will be displayed below 32 °F and above 212 °F. Do not use the stainless steel probe sensor
above 410 °F. Doing so will deteriorate the wire.
Cleaning
Always wear a heat resistant glove to touch the stainless steel probe sensor or wire during or just after cooking.
Do not touch with bare hands.
Keep the stainless steel probe sensor and wire away from children.
Wash the metal probe tip with hot soapy water and dry thoroughly. Do not immerse the probe in water while cleaning.
Wipe the transmitter and receiver with damp cloth. Do not immerse either in water.
INSTRUCTION MANUAL
MODEL ET-75
REMOTE WIRELESS
BBQ ROTISSERIE THERMOMETER
Introduction
Congratulations on your purchase of the Remote Wireless BBQ Rotisserie Thermometer, a programmable radio
frequency food thermometer. You will now be able to remotely monitor the time and temperature of food cooking on
your spinning rotisserie from anywhere.
Components
1. 1 - black receiver unit with detachable stand
2. 1 - black transmitter unit with detachable mounting bracket and
rubber spacers
3. 1 - detachable stainless steel probe sensor
4. 4 - AAA batteries
5. 4 – pairs of assorted probe wire clips
6. 1 – small thumb screw collar
7. 1 – large thumb screw collar
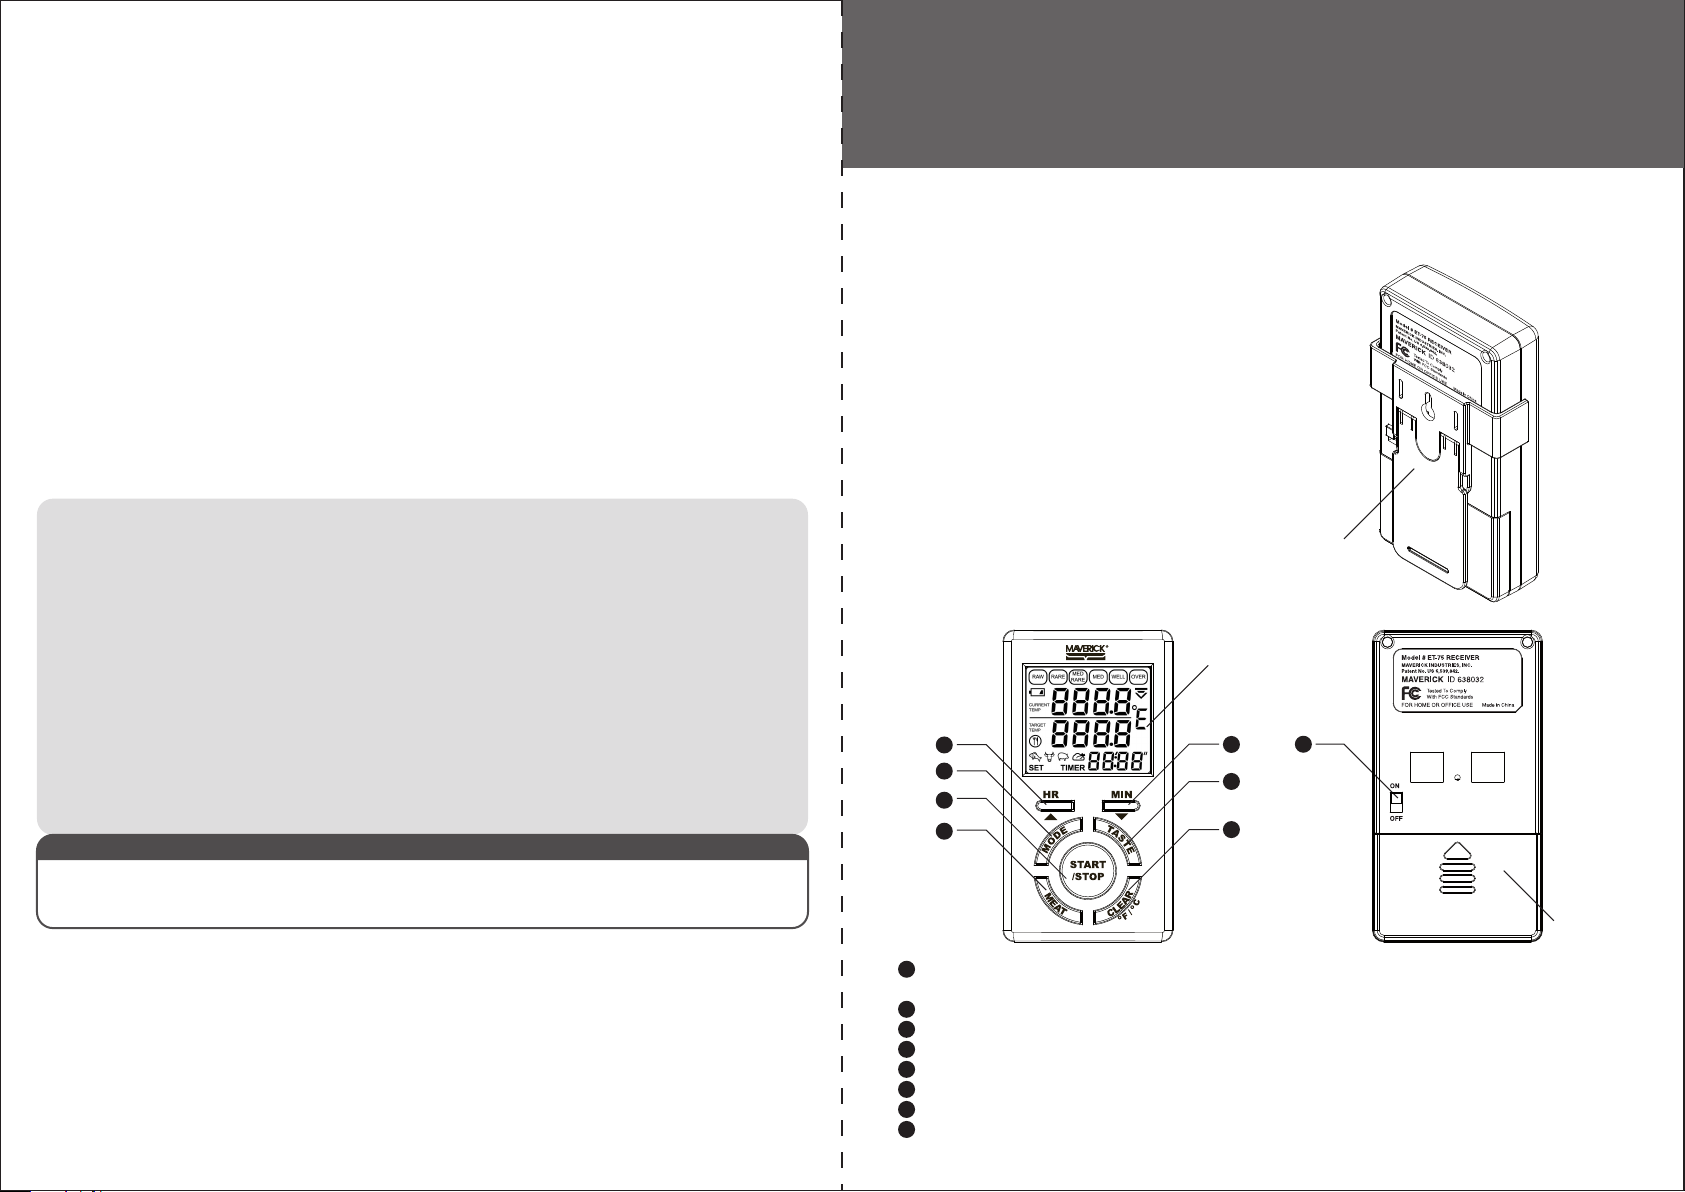
Receiver Features
LCD (Liquid Crystal Display) –
Displays all icons, temperature and time.
LIMITED NINETY DAY WARRANTY
Maverick Industries Inc. warrants the Remote Wireless BBQ Rotisserie Thermometer to be free of defects in parts,
materials and workmanship for a period of 90 days, from date of purchase. Should any repairs or servicing under
this warranty be required, contact Maverick Customer Service by mail or phone for instructions on how to pack and ship
the Remote Wireless BBQ Rotisserie Thermometer to Maverick's National Service Center located as follows:
Maverick Customer Service
94 Mayfield Ave.
Edison NJ 08837
Telephone: (732) 417-9666
Hours: Weekdays 8:30 AM- 4:30 PM
Do not send any parts or product to Maverick without calling and obtaining a Return Authorization Number and instructions.
This warranty is VOID if instructions for use are not followed; for accidental damage; for commercial use; for damage incurred while
in transit; or if the Remote Wireless BBQ Rotisserie Thermometer has been tampered with.
This warranty gives you specific legal rights and you may also have other rights which vary from state to state.
Warning:
Changes or modifications to this unit not expressly approved by the party responsible for compliance could void the user’s authority to operate the equipment.
This device complies with Part 15 of the FCC Rules.
Operation is subject to the following two conditions: (1) this device may not cause harmful interference, and (2) this device must accept any
interference received, including interference that may cause undesired operation.
NOTE:
This equipment has been tested and found to comply with the limits for a Class B digital device, pursuant to Part 15 of the FCC Rules. These limits are
designed to provide reasonable protection against harmful interference in a residential installation. This equipment generates, uses and can radiate radio
frequency energy and, if not installed and used in accordance with the instructions, may cause harmful interference to radio communications.
However, there is no guarantee that interference will not occur in a particular installation. If this equipment does cause harmful interference to radio or
television reception, which can be determined by turning the equipment off and on, the user is encouraged to try to correct the interference by one or more
of the following measures:
• Reorient or relocate the receiving antenna.
• Increase the separation between the equipment and receiver.
• Connect the equipment into an outlet on a circuit different from that to which the receiver is connected.
• Consult the dealer or an experienced radio/TV technician for help.
www.maverickhousewares.com
84-638-M01-001
BATTERY COMPARTMENT –
Holds 2 AAA batteries.
STAND –
Swings out and allows you to stand the receiver on tabletop or
clip to your belt and walk around
LCD
6
1
5
4
7
2
3
Buttons
1 MODE – Switches between USDA preset doneness
temperature mode, SET mode and TIMER mode.
2 TASTE – In USDA preset mode switches between RAW, RARE, MED RARE, MED, WELL tastes.
3 CLEAR /°F/°C – In TIMER mode it clears timer display to 0’00” and in all other modes changes between °F & °C.
4 MEAT – In USDA preset mode switches between Fish, Beef, Pork and Poultry.
5 START/STOP – Starts and stops the timer in TIMER mode.
6 HR/▲ - In SET mode it increases the set temperature and in TIMER mode it increases hours.
7 MIN/▼- In SET mode it decreases the set temperature and in TIMER mode it increases minutes.
8 ON/OFF – Turns receiver functions on and off.
Stand
8
Battery
Compartment
Page 2
Transmitter Features
DETACHABLE MOUNTING BRACKET – Mounts transmitter to handle of rotisserie
BATTERY COMPARTMENT – holds 2 AAA batteries.
LED – Flashes when signal is being sent to receiver
S – plug in for stainless steel probe sensor
1
ON
OFF
S
LED
Battery
compartment
Buttons
1. ON/OFF – on normal operation with full function. Off turns transmitter off.
Registration Procedures
Open the battery compartment of receiver and insert the two “AAA” batteries. Open the battery compartment of
transmitter and insert the two “AAA” batteries.
The Remote Wireless BBQ Rotisserie Thermometer needs the receiver to register the radio frequency signal from
the transmitter.
Transmitter & Receiver are off.
1. Plug the stainless steel probe sensor into the plug in of the transmitter.
2. Turn the receiver on by sliding switch on the rear of the receiver from OFF to ON.
3. Turn transmitter on by sliding switch on the rear of the transmitter from OFF to ON. This needs to be done
within 60 seconds of turning on the receiver in order for the receiver to register the signal from the transmitter.
If it doesn’t beep within 5-10 seconds slide switch OFF wait a few seconds and then switch back ON.
4. Registration is complete when the unit beeps and the probe temperature appears on the receiver LCD where
the “----“ was.
Measure meat temperature to USDA doneness temperature range
1. Press MODE to select USDA temperature mode. The LCD will display a fish icon in the lower left hand corner.
2. Press MEAT to select meat type. Fish, Beef, Pork and Poultry
3. Press TASTE to select the level of doneness for the meat type selected. RAW, RARE, MED RARE, MED, WELL
will be displayed at the very top of the LCD.
4. Once the temperature of meat reaches the preset doneness level the receiver will beep
Measure meat temperature set to your specific taste
1. Press MODE to SET mode. 120.0 will appear as default set temperature to the right of Target Temp.
2. Press HR/▲ or MIN/▼ to raise or lower the set temperature. Holding the button will raise or lower the temperature
setting rapidly. The temperature is set when the digits stop flashing.
3. Once the temperature of meat reaches the preset doneness level the receiver will beep.
Using the Timer
Count down
1. Press MODE to select TIMER mode. The LCD will show a small TIMER and 0:00 in the lower right hand corner.
2. Press HR/▲ and MIN/▼ button to set the timer. Press START/STOP button to start countdown.
3. To stop the countdown process, press START/STOP button.
4. Press and hold the CLEAR button for 3 seconds to clear the setting back to 0:00.
Procedure for typical use on a grill rotisserie:
The following typical example will go through the steps to have the Remote Wireless BBQ Rotisserie Thermometer
alert you to when a eye round roast is cooked to medium (USDA doneness level) and remind you to rotate hot dogs
in 5 minutes.
1. Follow the registration procedure.
2. Determine if the small or large thumbscrew collar fits your spit.
3. With the thumbscrew section up thread the probe and wire through the collar.
4. Slide the thumb screw collar and probe wire onto spit toward handle with thumbscrew closest to handle. Be sure
to have the probe wire along the flat of area of the spit so it will slide smoothly.
5. Attach spit forks and put the eye round on the center of the spit.
6. Position the spit on grill with the spit end sliding into motor. The thumbscrew collar should rest on the grill
spit support. Tighten the thumbscrew.
7. Insert probe sensor into the center of thickest portion of the roast.
8. Position the probe sensor wire so they will not come into contact with flames or become entangled by clipping it to
the spit with two of the probe wire clips.
9. Clamp the transmitter onto the end of the handle. Use the rubber strips inside the clamp if your spit handle has a
smaller diameter than the clamp provided.
10. Plug the probe jack into the transmitter.
11. Make sure the transmitter, probe wire and roast spin on the grill freely and nothing becomes tangled.
12. Press MODE on the receiver so you are in USDA preset mode.
13. Press MEAT until the BEEF icon is displayed.
14. Press TASTE until the MED icon appears and 160.0 will be shown as the TARGET TEMP.
15. Press MODE twice to change to TIMER mode.
16. Press MIN 5 times to set for 5 minutes so that 5’00” is displayed. Press START/STOP to start the countdown.
Press MODE to go back to thermometer mode.
17. Turn on the grill to medium heat, turn on the rotisserie motor and put the hot dogs on the grill rack.
18. Clip the receiver to your belt or pocket and move up to 100 ft away from the outdoor grill. Go indoors if desired.
19. When 5 minutes are up the receiver will beep for 20 seconds and the DISH with FORK and KNIFE icon will be
displayed to advise you to rotate the hot dogs. Press START/STOP button to turn off the alert..
20. When the temperature of probe in the roast reaches MEDIUM the receiver will beep continuously and the DISH
with FORK and KNIFE icon will be displayed.
21. Press START/STOP to turn off the alert.
22. Turn off grill. Remove the spit from grill. Remove the probe sensor from the roast. Always wear a heat resistant
glove to touch the stainless steel probe sensor or wire during or just after cooking. Do not touch with bare hands.
23. Turn off transmitter and receiver units. Disconnect transmitter from spit handle.
24. Clean the stainless steel probe and dry thoroughly after each and every use.
HELPFUL HINTS
There is a Low Battery icon in the upper left hand corner of the LCD that is displayed if the battery power is low.
The unit can still operate normally but it is recommended to replace the battery as soon as possible.
If the probe measures temperatures above 212 °F (100 °C) the temperature display will be “---.-“, OVER will be
displayed and the unit will beep
Do not immerse the probe in water while cleaning.
Do not allow the probe or probe wire to come into contact with flames. If cooking with grill cover closed,
only use medium or low heat.
If you are getting faulty temperature reading most of the time it is problem with the probe or probe wire. Return the
defective probe to address below along with return address and we will send you new probe no charge.
If the temperature displayed seems to read too high or the temperature seems to increase too quickly check to make
sure the probe tip is not poking through the food to outside. Reposition the probe tip in the center of the thickest part
of food. Avoid touching bone or heavy fat areas.
Count up
1. Press MODE to select TIMER mode. The LCD will show a small TIMER and 0:00 in the lower right hand corner.
2. To start the count up process, press START/STOP button.
3. Press and hold the CLEAR button for 3 seconds to clear the setting back to 0:00.
 Loading...