

Page 1
BLUE IS POWERED BY A PERMANENTLY INSTALLED 6.6V RECHARGEABLE LITHIUM ION BATTERY (INCLUDED). BATTERY CAPACITY: 1100 mAh
THE CONTROLLER IS POWERED BY A PERMANENTLY INSTALLED 3.7V RECHARGEABLE LITHIUM POLYMER BATTERY (INCLUDED). BATTERY CAPACITY: 450 mAh
USB POWER SOURCE REQUIRED.
DISPOSE OF BATTERIES SAFELY.
COLORS AND DECORATIONS MAY VARY.
THE USB CABLE IS NOT A TOY.
INTERACTIVE DINOSAUR, CONTROLLER, AND POWER CHARGER CONFORMS TO THE SAFETY REQUIREMENTS OF ASTM F963.
BLUE ES ALIMENTADA CON UNA BATERÍA DE IONES DE LITIO RECARGABLE DE 6.6 Vcc PERMANENTEMENTE INSTALADA (INCLUIDA). CAPACIDAD DE LA
BATERÍA: 1100 mAh
EL TRANSMISOR ESTÁ ALIMENTADO CON UNA BATERÍA DE POLÍMEROS DE LITIO RECARGABLE DE 3.7 Vcc PERMANENTEMENTE INSTALADA (INCLUIDA).
CAPACIDAD DE LA BATERÍA: 450 mAh
REQUIERE SUMINISTRO ELÉCTRICO USB.
DESECHAR LAS BATERÍAS GASTADAS APROPIADAMENTE.
LOS COLORES Y DECORACIONES PUEDEN VARIAR.
EL CABLE USB NO ES UN JUGUETE.
EL DINOSAURIO INTERACTIVO, TRANSMISOR Y CARGADOR ELÉCTRICO CUMPLEN CON LAS NORMAS DE SEGURIDAD DE ASTM F963.
BLUE EST ALIMENTÉE PAR UNE PILE AU LITHIUM-ION RECHARGEABLE DE 6,6 V INSTALLÉE DE FAÇON PERMANENTE (INCLUSE). CAPACITÉ DE LA PILE :
1100 mAh
LA TÉLÉCOMMANDE EST ALIMENTÉE PAR UNE PILE AU LITHIUM-POLYMÈRE RECHARGEABLE DE 3,7 V INSTALLÉE DE FAÇON PERMANENTE (INCLUSE).
CAPACITÉ DE LA PILE : 450 mAh
SOURCE D'ALIMENTATION USB REQUISE.
JETER LES PILES USÉES DANS UN CONTENEUR RÉSERVÉ À CET USAGE.
LES COULEURS ET LES MOTIFS PEUVENT VARIER.
LE CÂBLE USB N'EST PAS UN JOUET.
LE DINOSAURE, LA TÉLÉCOMMANDE ET LE CHARGEUR SONT CONFORMES À LA NORME DE SÉCURITÉ ASTM F963.
THE TOY IS ONLY TO BE CONNECTED TO CLASS II EQUIPMENT BEARING THE FOLLOWING SYMBOL:
EL JUGUETE SÓLO ESTÁ DISEÑADO PARA CONECTARSE A EQUIPO DE CLASE II QUE LLEVA EL SIGUIENTE SÍMBOLO:
CE JOUET DOIT ÊTRE BRANCHÉ UNIQUEMENT À UN ÉQUIPEMENT DE CLASSE II PORTANT LE SYMBOLE SUIVANT :
8+
2.4
GHz
©2018 Mattel. ® and ™ designate U.S. trademarks of Mattel, except as noted. ® et ™ désignent des marques de Mattel aux États-Unis, sauf indication contraire. Mattel Australia Pty., Ltd., Richmond, Victoria.
3121.Consumer Advisory Service - 1300 135 312. Mattel East Asia Ltd., Room 503-09, North Tower, World Finance Centre, Harbour City, Tsimshatsui, HK, China. Tel.: (852) 3185-6500. Diimport & Diedarkan Oleh:
Mattel Southeast Asia Pte. Ltd. , No 19-1, Tower 3 Avenue 7, Bangsar South City, No 8, Jalan Kerinchi, 59200 Kuala Lumpur, Malaysia. Tel: 03-33419052. Mattel, Inc. 636 Girard Avenue, East Aurora, NY 14052,
U.S.A. Consumer Services 1-800-524-8697. Importado y distribuido por Mattel de México, S.A. de C.V., Miguel de Cervantes Saavedra No. 193, Pisos 10 y 11, Col. Granada, Delegación Miguel Hidalgo, C.P. 11520,
México, Ciudad de México. R.F.C. MME-920701-NB3. Tels.: 59-05-51-00 Ext. 5206 ó 01-800-463-59-89. Mattel Chile, S.A., Avenida Américo Vespucio 501-B, Quilicura, Santiago. Tel.: 1230-020-6213. Servicio al
consumidor Venezuela: Tel.: 0-800-100-9123. Mattel Argentina, S.A., Curupaytí 1186, (1607) - Villa Adelina, Buenos Aires. Tel.: 0800-666-3373. Mattel Colombia, S.A., Calle 123#7-07 P.5, Bogotá. Tel.:
01800-710-2069. Mattel Perú, S.A., Av. Juan de Arona # 151, Centro Empresarial Juan de Arona, Torre C, Piso 7, Oficina 704, San Isidro, Lima 27, Perú. RUC: 20425853865. Reg. Importador: 02350-12-JUE-DIGESA.
Tel.: 0800-54744. E-mail Latinoamérica: servicio.clientes@mattel.com. Mattel Canada Inc., Mississauga, Ontario L5R 3W2. You may call us free at/ Composez sans frais le 1-800-524-8697. Mattel Europa B.V.,
Gondel 1, 1186 MJ Amstelveen, Nederland. Mattel South Africa (PTY) LTD, Office 102 I3, 30 Melrose Boulevard, Johannesburg 2196.
CAUTION:
SURFACES MAY BECOME HOT AND CAUSE
BURNS IF ELECTRONICS GET WET.
TO PREVENT ENTANGLEMENT, KEEP ALL
HAIR AWAY FROM THE WHEELS.
Jurassic World is a trademark and copyright of Universal Studios and Amblin Entertainment, Inc. Licensed by Universal Studios. All Rights Reserved. • Jurassic World est une marque de commerce protégée par
les droits d'auteur de Universal Studios et Amblin Entertainment, Inc. Sous licence de Universal Studios. Tous droits réservés.
WWW.MATTEL.COM/JURASSICWORLD
PRECAUCIÓN:
LA SUPERFICIE SE PUEDE CALENTAR Y
CAUSAR QUEMADURAS SI LAS PIEZAS
ELECTRÓNICAS SE MOJAN. PARA
PREVENIR UN ENREDO, MANTÉN EL
CABELLO ALEJADO DE LAS RUEDAS.
MISE EN GARDE :
LES SURFACES PEUVENT DEVENIR CHAUDES ET
CAUSER DES BRÛLURES SI LES COMPOSANTS
ÉLECTRONIQUES SONT MOUILLÉS. POUR ÉVITER
TOUT ENCHEVÊTREMENT, N’APPROCHEZ PAS
LES CHEVEUX DES ROUES.
FLY56_3A70G1
1101972979-3LA
™
ALPHA TRAINING BLUE
TRAINER’S MANUAL • MANUAL DEL ENTRENADOR • GUIDE DU DRESSEUR
FOR INDOOR USE ONLY. • SOLO PARA USO BAJO TECHO. • POUR UTILISATION À L’INTÉRIEUR UNIQUEMENT.
IMPORTANT: PLEASE READ ALL INSTRUCTIONS BEFORE OPERATING BLUE.
IMPORTANTE: LEE LAS INSTRUCCIONES ANTES DE USAR A BLUE.
IMPORTANT : VEUILLEZ LIRE TOUTES LES INSTRUCTIONS AVANT D’UTILISER BLUE.
Page 2

TABLE OF CONTENTS
222222
CONTENTS
™
ALPHA TRAINING BLUE
CONTROLLER OVERVIEW
GETTING STARTED
- CHARGING
- PAIRING
- BATTERY CHECK
- VOLUME CONTROL
OVERVIEW
3
4
5
6
GUARD MODE
TRAINING MODE
TOTAL CONTROL MODE
PROWL MODE
UPDATES & FAQS
CONSUMER INFORMATION
10
11
17
18
19
21
2
2
Page 3
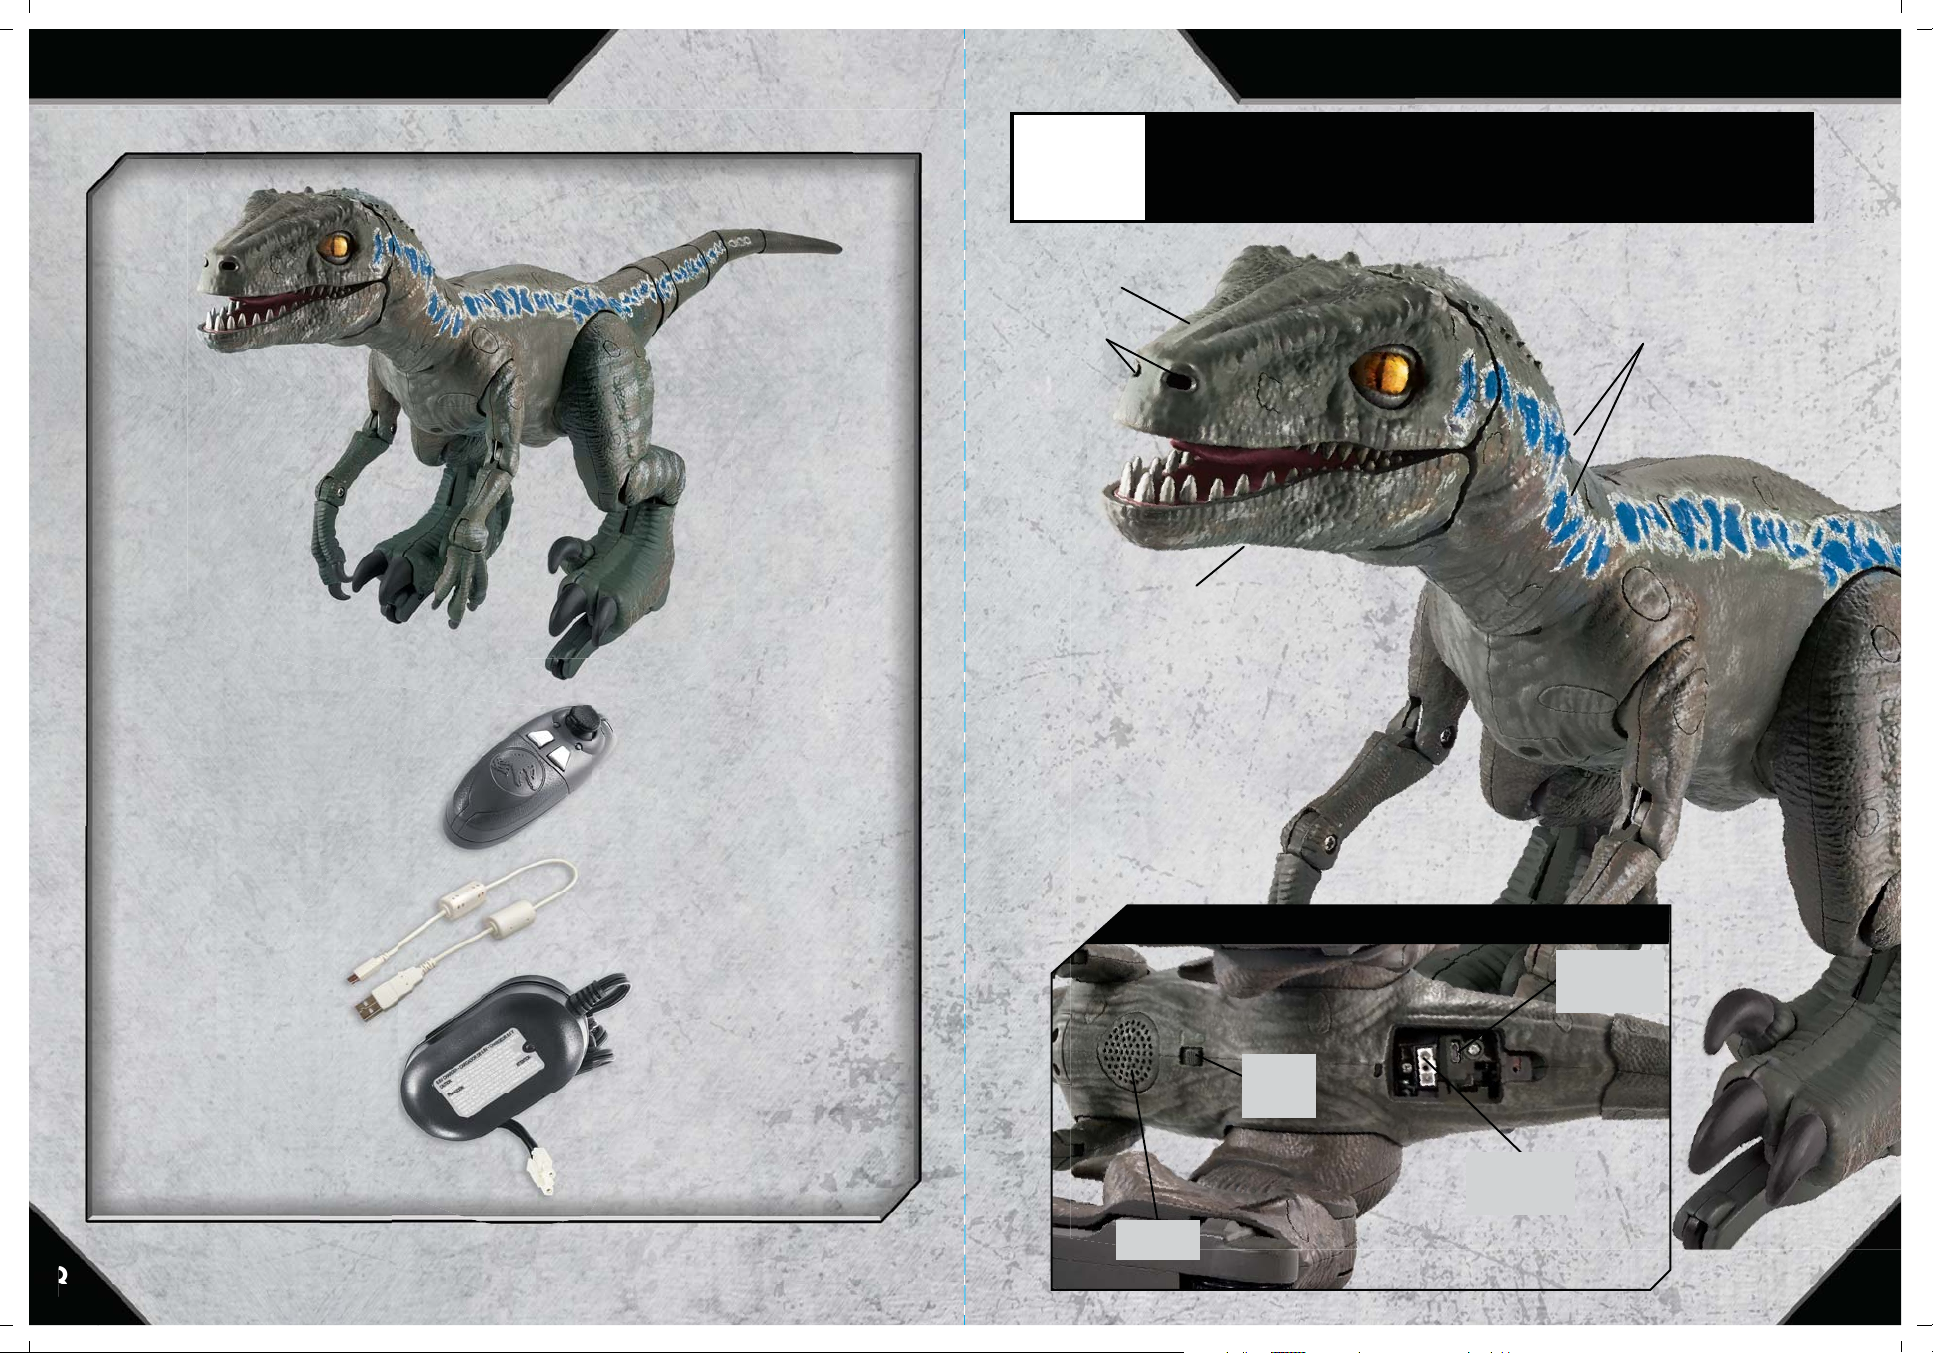
CONTENTS ALPHA TRAINING BLUE™ OVERVIEW
OWEN’S
TIPS
PETTING SENSOR
MOTION SENSORS
PETTING SENSOR
Always stand in front of Blue when you are training her. Blue responds
best to commands given within her sight.
MICROPHONES
BOTTOM VIEW
MICRO USB
CONNECTOR
POWER
SWITCH
COLORS AND DECORATIONS MAY VARY.
SPEAKER
CHARGER
CONNECTOR
3 4
Page 4
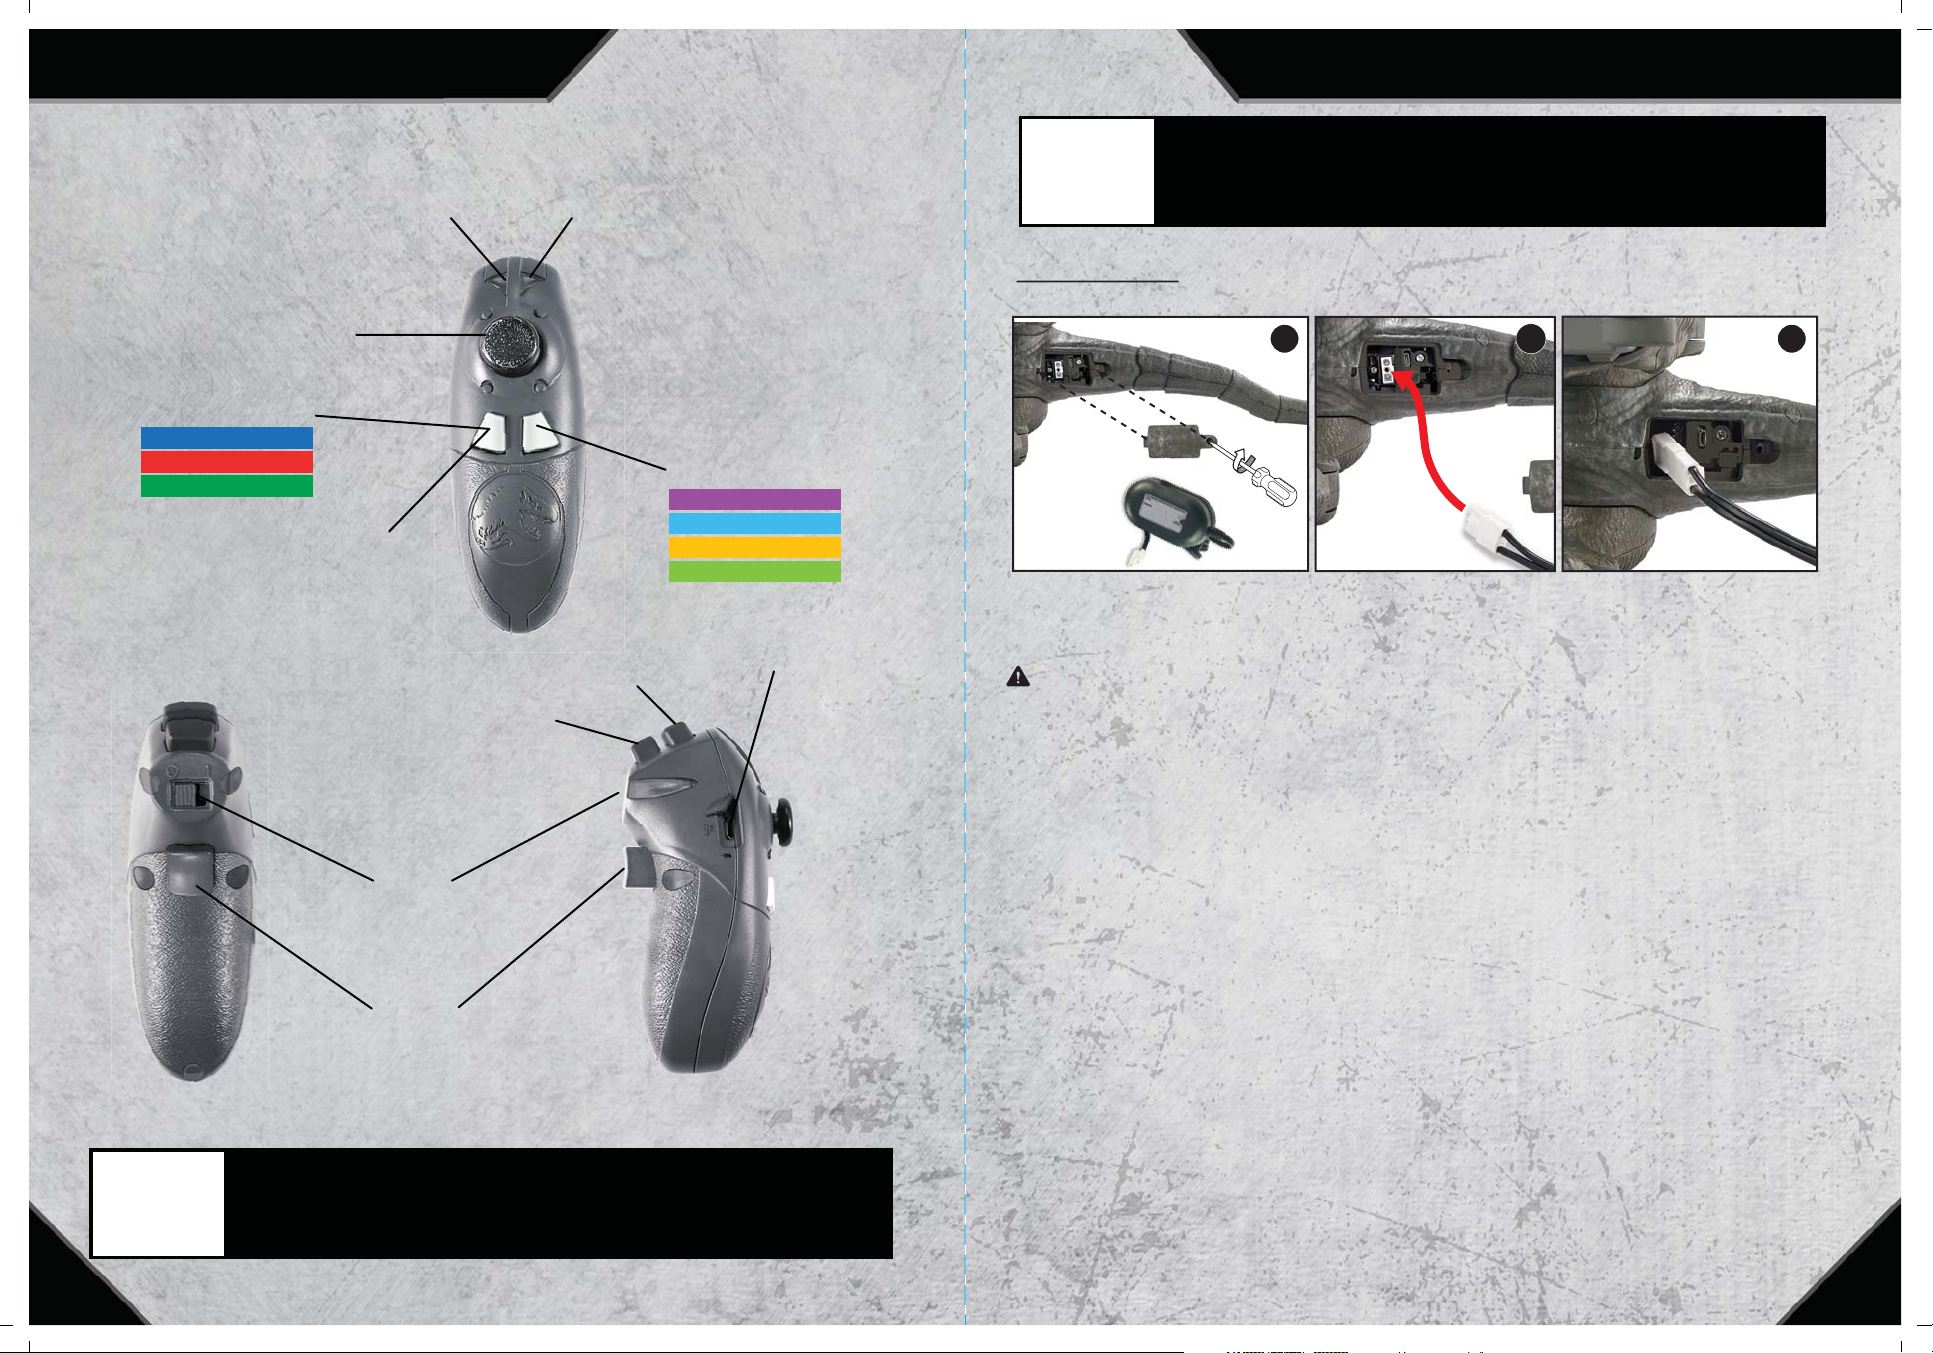
CONTROLLER OVERVIEW GETTING STARTED
LED INDICATORS:
Display mood/training level/mode/battery
levels through different colored LEDs.
JOYSTICK:
Control different movements in
each mode.
MOOD SELECTOR:
NEUTRAL
HOSTILE
FRIENDLY
TRAINING LEVEL CHECK:
To check achieved level in
TRAINING MODE.
TREAT
BUTTON
QUICK CONTROL BUTTON:
Press and hold to quickly enter
TOTAL CONTROL MODE.
POWER
SWITCH
CLICKER
BUTTON
BACK VIEW SIDE VIEW
MODE SELECTOR:
GUARD
TRAINING
TOTAL CONTROL
PROWL
USB CONNECTOR:
Lift the cover when
recharging the
controller.
OWEN’S
Check for an update before getting started by plugging into your computer.
Just make sure to follow all on-screen directions when you do so.
TIPS
See page 19 for complete updating instructions.
CHARGING
ALPHA TRAINING BLUE
Before first use, you MUST charge Blue with the included 6.6V charger and charge the
controller with the included USB cable. Please follow these instructions:
CAUTION: Use only the charger included with Blue. Do not use any other charging source.
IMPORTANT: Blue’s micro USB port is for updates only. It is not a charger!
1. Switch off Blue before charging.
2. Plug the charger into a standard wall outlet.
3. Access Blue’s battery compartment from the bottom torso and unscrew the battery cover with a Phillips
head screwdriver (not included).
4. Connect the charger wire to Blue’s charger connector. Make sure the two connectors are
tightly snapped together.
5. A red LED will light up on the charger to indicate the battery is charging.
6. The battery can be charged in about 35 minutes. Charging time may vary.
7. A green LED will light up on the charger to indicate the charging is complete.
8. Charging the battery for more than what is recommended will not give you a longer running time.
9. To disconnect wires, push down on the connector clip and pull apart.
10. Unlike alkaline batteries, where the power loss is gradual, a Li-ion battery will run for its normal running
time (around 35 minutes) and then lose most of its power at once. It is now time to recharge the battery.
11. After use, the battery will be hot! Wait at least 20 minutes until the battery cools before recharging.
Recharging a warm or hot battery will greatly reduce the number of times your battery can be recharged.
12. The battery door must be closed, or Blue will not run.
™
a
b
c
OWEN’S
You can manually control Blue
’
s head movements by moving the controller
in various directions in TOTAL CONTROL MODE.
TIPS
5 6
Page 5

GETTING STARTED GETTING STARTED
CHARGING
CONTROLLER
a
The controller is powered by a permanently installed LiPo battery, and it must be fully
charged before first use.
1. Switch off the controller before charging.
2. Plug the supplied USB cable into a powered USB port.
3. Begin charging by uncovering the USB port and plugging the charging cable firmly into the
USB port on the side of the controller.
4. The red LED will change to green when charging is complete.
5. Hold the charging plug and gently pull it out of the port when the charge is complete. NEVER
pull on the cable, as this may cause the cable to break.
6. Disconnect the USB cable from the controller before play.
b
c
PAIRING
1. Turn on Blue using the power switch.
2. Turn on the controller .
3. The LED indicator on the controller will begin flashing white. Pairing is complete when
the flashing stops and LEDs display default Mood and Mode (blue and purple LEDs). If
the LED indicator does not stop flashing after around 10 seconds, switch off the controller
and Blue, then try again.
NOTE: If the controller battery charge is low, it will slowly pulse the LEDs red twice and then
go to sleep.
a
b
c
b
ca
7
8
Page 6

training levels, Blue will be more aggressive
L
Wh
h
e
QUICK CO
S
DE
GUARD MODEGETTING STARTED
BATTERY CHECK
BLUE BATTERY
LEVEL INDICATOR
MOOD SELECTOR:
NEUTRAL
HOSTILE
FRIENDLY
Press and hold both the MOOD and MODE SELECTOR buttons on the controller for a few seconds.
The controller LEDs will light up and the LED color will indicate Blue’s battery level. Press any other
button to return to normal play.
LED COLOR BATTERY LEVEL
GREEN
YELLOW
RED
MODE SELECTOR:
GUARD
TRAINING
TOTAL CONTROL
PROWL
50% or Above
20% - 49%
19% or Below
VOLUME CONTROL
In GUARD MODE, all of Blue’s sensors are engaged. When movement is detected within 6 inches to 1 foot
(16 to 30 centimeters) in front of her, the controller will vibrate, and Blue will respond to controller
commands. Use your controller to move her and react to the intruder. Blue’s mood (whether she is friendly
or hostile) will depend on how far along in the training process you are. If you haven’t completed all the
training levels, Blue will be more aggressive.
.
MOOD
SELECTOR
MOOD
INDICATOR:
NEUTRAL
HOSTILE
FRIENDLY
MODE
O
INDICATOR:
GUARD
MODE
Press the MODE SELECTOR
button until the MODE
INDICATOR turns PURPLE
to enter GUARD MODE.
MODE
SELECTOR
TREAT
BUTTON
QUICK CONTROL
BUTTON
TREAT
a
QUICK
CONTROL
BUTTON
Press and hold both the TREAT and QUICK CONTROL buttons on the controller for a few
seconds to enter volume control. Both controller LEDs will turn white. Then push the joystick
up or down to control the volume and Blue will play a sound for the new volume setting. Press
any other button to return to normal play.
OWEN’S
BUTTON
b
Blue works best on smooth, flat surfaces and indoors. She finds some
carpet to be uncomfortable and might not move well on it.
9
TIPS
LOUDER
SOFTER
CLICKER BUTTON
CONTROL HER MOOD: Press the MOOD SELECTOR once to change her mood. You can see her
mood shown by the color of the MOOD INDICATOR.
Leave Blue in your room. When she detects motion in front of her, the
OWEN’S
WEN’
TIPS
eave Blue in your room.
controller will vibrate. You can use the QUICK CONTROL BUTTON to
controller will vibrate. You can use the
control her reaction.
en she detects motion in front of her, t
NTROL BUTTON to
10
Page 7

TRAINING MODETRAINING MODE
Training Blue takes time and patience. Start as a beginner. Train and learn to level up, so you and Blue can
interact. Unlock features and actions as your training skills improve.
When you level up, your new level color will flash 5+ times, and the controller will vibrate.
CONTROLLER SETTING
TRAINING
LEVEL
INDICATOR
JOYSTICK
TRAINING
LEVEL CHECK
MODE INDICATOR:
TRAINING MODE
Press the MODE
SELECTOR button
until the MODE
INDICATOR turns
BLUE to enter
TRAINING MODE.
MODE
SELECTOR
TREAT
BUTTON
QUICK CONTROL BUTTON
CLICKER BUTTON
The first step to training Blue is learning how to feed her treats and petting her. Once you
have learned how to use feeding or petting as reinforcements, follow the training guide
table to unlock more features!
LEVEL 1
REINFORCEMENTS
TREATS
Press the TREAT BUTTON and Blue will
catch and enjoy the treat.
If you press and hold the TREAT BUTTON,
Blue will follow your controller movement
until you release the button.
TRAINING LEVEL CHECK
TRAINING
LEVEL
INDICATOR
PETTING
Hold down the TRAINING LEVEL CHECK button on the controller.
Check how well Blue has been trained with the color shown on the
TRAINING LEVEL INDICATOR.
TRAINING LEVEL
CHECK BUTTON
AND
HOSTILE FRIENDLY
Pet Blue’s nose and/or under her chin and she will respond.
11 12
Page 8

TRAINING MODE TRAINING MODE
h
TRAINING GUIDE
Treat.
1
Pet both ways.
2
a
b
OWEN’S
TIPS
Follow the training guide and complete every action in each level
before moving on to the next.
LEVEL 2LEVEL 1 LEVEL 3 LEVEL 4
HEAD TURNSREINFORCEMENTS BODY TURNS ROARING
Look UpPet
Press clicker x1. Press clicker x1. Press clicker x1. Press clicker x1. Press clicker x1. Press clicker x1.
1
Move controller UP
2
from the center.
Look Down Look Right Look Left Turn Right
1
Move controller DOWN
2
from the center.
1
Move controller to
2
the RIGHT.
1
Move controller to
2
the LEFT.
1
Rotate controller to the
2
RIGHT.
1
Rotate controller to the
2
LEFT.
Turn Left
ROARING
ROAR
Roar
Hold UP the controller
1
and press clicker
Move controller DOWN.
2
x2.
a
AND
b
Give reinforcement after each training when Blue stops moving.
3
OWEN’S
TIPS
During the training process, you will
experience successes and failures. When you
are training Blue effectively, the controller
will flash green and vibrate. If she does not
understand your commands, the controller
will flash red and vibrate. Keep trying!
Feed her a treat.
a
OR OR
b
Pet her head.
Pet her chin.
13 14
Page 9

TRAINING MODE TRAINING MODE
TRAINING GUIDE (CONTD.)
LEVEL 5 LEVEL 6 LEVEL 7
MOVEMENT SPINNING
Move Forward Move Back Move Right Move Left Spin Right
Press clicker x2. Press clicker x2. Press clicker x2. Press clicker x2. Press clicker x3. Press clicker x3.
1
Move controller UP
2
from the center.
1
Move controller DOWN
2
from the center.
1
Move controller to
2
the RIGHT.
1
Move controller to
2
the LEFT.
1
Move controller to
2
the RIGHT.
1
Move controller to
2
the LEFT.
ATTACK
Spin Left Attack
Hold UP the controller
1
and press clicker
Move controller DOWN.
2
a
x3.
Give reinforcement after each
3
training when Blue stops moving.
OWEN’S
TIPS
Blue listens for clicker commands and will look in the direction of the sounds she hears. If Blue
isn’t responding to you, make sure you’re within 3 feet (1 meter) of her microphones and that she
is not in motion or making a sound.
Feed her a treat.
eed her a
a
OR
b
Pet her head.
Pet her chin.
OR
b
15 16
Page 10

TOTAL CONTROL MODE PROWL MODE
In TOTAL CONTROL MODE, you can control Blue’s animatronic movements.
1. Use the joystick on top of the controller to make her eyes and mouth move.
2. Use hand motions to move her head.
MODE INDICATOR:
TOTAL CONTROL MODE
Press the MODE SELECTOR button
until the MODE INDICATOR turns
YELLOW to enter TOTAL
CONTROL MODE.
EYES & MOUTH MOVEMENTS
BLINK EYES
EYES LEFT EYES RIGHT
OPEN MOUTH
In PROWL MODE, use the joystick on top of the controller to walk Blue around.
MODE INDICATOR:
PROWL MODE
Press the MODE SELECTOR
button until the MODE INDICATOR
turns GREEN to enter PROWL MODE.
17
BODY & HEAD MOVEMENTS
BODY & NECK UP
HEAD RIGHTHEAD LEFT
BODY & NECK DOWN
The farther you push,
the faster Blue will move.
OWEN’S
TIPS
SPEED
DIRECTIONS
FORWARD
LEFT RIGHT
BACKWARD
To keep Blue from falling, practice speed control when making turns or changing
directions. Don’t be afraid to slow down!
18
Page 11

UPDATES & FAQS UPDATES & FAQS
UPDATES
To check for periodic updates to Blue’s functionality:
Turn Blue off. Then open Blue’s battery cover and connect her to your computer with the included micro
USB cable.
Go to www.mattel.com/jurassicworld and follow the on-screen prompts.
cba
NOTE: Disconnecting Blue during update phase can cause her serious harm. DO NOT disconnect
her until the enhancement is complete!
FAQS
Q. Blue is not responding.
A. Make sure the controller and Blue are both turned on and fully charged.
Q. How do I know if an update is available?
A. Log on to www.mattel.com/jurassicworld every few months to check for update
availability.
Q. Blue is fully charged but not responding to commands.
A. Check and see that the battery cover is closed and secured with a Phillips head
screwdriver (not included).
QUICK TIPS
(1) When Blue starts to lose power, she may lose functionality or performance. If Blue’s
batteries get too low, she will automatically turn off. It’s time for a recharge. Blue’s running
time may change depending on your operating style and operating environment.
(2) Radio interference can affect Blue’s performance. Interference can be caused by other R/C
vehicles running on the same frequency, electrical wires, large buildings, and other Wi-Fi or
Bluetooth sources. Try to stay away from these!
(3) Don’t store Blue near heat or in direct sunlight. Always turn switches OFF before storage.
(4) Don’t operate Blue in sand or through water or snow. Do not immerse in water. If Blue does
get wet, wipe her with a towel and allow to dry completely overnight.
(5) Make sure you are operating on a smooth surface. Blue is not intended for outdoor use or
on carpeted surfaces.
(6) When exposed to an electrostatic source, the product may malfunction. To resume normal
operation, turn Blue off then on again. This should reset Blue and let you resume normal
operation.
(7) If this does not correct the issue, you may need to do a factory reset. This will also reset your
Training Mode to Level 1. To do a factory reset, turn Blue on and turn the controller off. Then,
on the controller, press and hold the Mood Selector and the Treat Button. Continue to hold
the two buttons as you turn on the controller for a minimum of 3 seconds. When you hear
Blue and the controller flashes both LEDs white, then within 5 seconds touch the top Petting
Sensor to activate the factory reset.
(8) If Blue tips over, she will stop functioning and emit a sound. Reposition Blue on her hind legs
to resume normal play.
(9) Occasionally check Blue
or other debris.
(10) If you don
either of her head sensors.
’
t pay attention to Blue, she will go into sleep mode. To restart Blue, you can touch
’
s wheels to ensure that they haven’t been contaminated with hair
2 3 41
More FAQS can be found at www.mattel.com/jurassicworld.
19
5
20
Page 12

CONSUMER INFORMATION CONSUMER INFORMATION
Note to Adults: To ensure that the child’s play is both safe and fun, please review all
operating instructions and safety rules with your child.
• NEVER roam Blue on the street! She is an indoor dinosaur!
• DO NOT pick up Blue while she is in motion.
• Only pick up Blue by her belly and not by her head or tail.
• The toy is not intended for children under 8 years old.
• Keep fingers, hair, and loose clothing away from Blue while she is switched ON.
• Never disassemble or attempt to modify Blue.
• Operating range is up to 12 feet (3.6 meters).
• When not in use, turn off Blue.
• If Blue is wet, thoroughly dry before next use.
• Regularly examine all wires and connectors. In the event of damage, do not use.
RECHARGEABLE BATTERY SAFETY INFORMATION
WARNING: Read all safety warnings and instructions. Failure to follow the warnings and
instructions may result in electric shock, fire, and/or serious injury.
(a) Prevent unintentional starting. Ensure the switch is in the off-position before connecting to battery
pack, picking up, or carrying the product. Carrying the product with your finger on the switch or
energizing products that have the switch on invites accidents.
(b) Disconnect the battery pack from the product before making any adjustments, changing accessories,
or storing product. Such preventive safety measures reduce the risk of starting the product
accidentally.
(c) Recharge only with the charger specified by the manufacturer. A charger that is suitable for one type
of battery pack may create a risk of fire when used with another battery pack.
(d) Use products only with specifically designated battery packs. Use of any other battery packs may
create a risk of injury and fire.
(e) When battery pack is not in use, keep it away from other metal objects, like paper clips, coins, keys,
nails, screws, or other small metal objects, that can make a connection from one terminal to another.
Shorting the battery terminals together may cause burns or a fire.
(f) Under abusive conditions, liquid may be ejected from the battery; avoid contact. If contact
accidentally occurs, flush with water. If liquid contacts eyes, additionally seek medical help. Liquid
ejected from the battery may cause irritation or burns.
(g) Do not use a battery pack or product that is damaged or modified. Damaged or modified batteries may
exhibit unpredictable behavior resulting in fire, explosion, or risk of injury.
(h) Do not expose a battery pack or product to fire or excessive temperature. Exposure to fire or
temperature above 130 °C may cause explosion.
(i) Follow all charging instructions and do not charge the battery pack or product outside of the
temperature range specified in the instructions. Charging improperly or at temperatures outside of the
specified range may damage the battery and increase the risk of fire.
(j ) Have servicing performed by a qualified repair person using only identical replacement parts. This will
ensure that the safety of the product is maintained.
(k) Do not modify or attempt to repair the product or the battery pack (as applicable) except as indicated
in the instructions for use and care.
NOTE TO ADULTS
• Rechargeable battery pack should only be charged by an adult.
• Periodically examine this product for damage to the plug, housing, or other parts that may result in the
risk of fire, electric shock, or injury. If the product is damaged, do not use it.
• The battery charger is not a toy.
• This battery charger is intended to be correctly oriented in a vertical or floor mount position.
• Periodically examine this battery charger for damage to the cord, housing, or other parts that may
result in the risk of fire, electric shock, or injury. If the battery charger is damaged, do not use it.
LiPo (LITHIUM POLYMER) BATTERY INFORMATION
Fully charge the battery before storing for an extended period of time (6 months or longer). Periodic
charging every few months is recommended to extend battery life when not in use. Do not store near
heat or in direct sunlight.
’
• Do not disassemble the controller
LiPo battery. For proper recycling, follow local Lithium Polymer battery recycling guidelines.
• Do not recharge the controller if it feels hot. Allow it to cool before recharging.
• The controller is only to be charged using the cable supplied.
• Do not attempt to use or charge the controller if it shows signs of leakage or corrosion.
• If the controller gets wet, thoroughly dry before using or charging again.
• Regularly examine all wires and connectors. In the event of damage, discontinue use.
s permanently installed LiPo (Lithium Polymer) battery. It is a sealed
BATTERY DISPOSAL
Unlike NiCd (Nickel-Cadmium) rechargeable batteries, your Li-ion battery pack requires no special
procedures or precautions for disposal. However, as with all products, you should dispose of your
battery pack in an environmentally responsible and considerate manner.
Shielded cables must be used with this unit to ensure compliance with the Class B
FCC limits.
21 22
 Loading...