

Matsut(ec'
MARINE
GPS/SBAS
NAVIGATOR
HP.33
Do
not
open
the
equipment.
Only
qualified
personnel
should
work
inside
the
equipment.
Do
not
disassemble
or
modify
the
equipment.
Fire,electrical
shock
or
serious
injury
can
result.
lmmediately
turn
off
the
power
at
the
switchboard
if
the
equipment
is
emitting
smoke
or
fire.
Continued
use
of
the
equipment
can
cause
fire
or
electrical
shock.Contact
a
Matsutec
agent
for
service.
Use
the
proper
fuse.
Use
of
a wrong
fuse
can
damage
the
equipment
or cause
fire.
899u1e
the
power
supply
is
compatible
with
the
equipment.
lncorrect power
supply
may
cause
the
equipment
to
overheat.
The
useable
temperature
range
for
the
antenna
unit
is
-25C
to Z0C; -15C
to
55C
for
the
display
unit.
Use
of the
equipment
out
of those
ranges
may
damage
the
equipment.

Do
not
open
the
cover
unless
totally
i*ili"t
with
electrical
circuits
and
service
manual.
lmproper
handling
can
result
in
electrical
shock.
Turn
off
the
power
at
the
switchboard
before
beginning
the
installation'
Fire
or
electrical
shock
can
result
if
the
power is
left
on.
Be
sure
that
the
Power
suPP|Y
is
compatible
with
the
voltage
rating
ot
tne
equipment.
Connection
of
an
incorrect
power
supply
can
cause
fire
or
equiPment
damage.The
voltage
rating
of
the
equipment
appears
on
the
label
above
the
power connector.
Use
the
ProPer
fuse.
Use
of
a
wrong
fuse
can
damage
the
eqpipment
or
cause
fire'
Obacrt
te
fttofrg
conrPass
s af
e
OiitatuO
fr:rrr
rerftrence
to
a
magn:ficcoP
Slmdrd
ilnN
Steering
compass
Displa!,
unit
Ofilm
0.55
m
TABLE
OF
CONTENTS
1.
ilt
TABLE
OF CONTENTS
5.2.2 How to set a destination waypritftoqgh
tte 1ist.........
............5-2
5.3 How to Set
Route
as
Destination..-.....--..---.-
......................5-2
5.4 How to Cancel Destination..
.......5-3
'
5.4.1 How to cancel
destination vyith
fE cus(r-------.-
.....5-3
5.4.2
How to cancel destination throrrgtr fie Isi---------
.....5-4
6. ALARMS ...........6-1
7-1
8. MAINTENANCE,
TROUBLESHOOT!NG......
8-1
INDEX
iv
tN-1

FOREWORD
A
Word
to
the
Owner
of
the
Hp_33
Ogatlatons
on
your
choice
of
the
Hp_33
GpS
Navigator.
fuover
10
years
Matsutec
has
enjoyed
an
enviabre
reputation
for
innovative
td
@endabte marine
electronics
is
furthereo
by
our
extensive
global
network
of
agents
and
d"alerc.
Yurnavigator
is
designed
and
constructed
to
meet.the
rigorous
demands
of
the
marine
environ-
-r1
tlowever,
no
machine
can
perform
its
intended
funJtion
,nr".,
installed,
operated
and
Ei&tined
properlv.
Please
careiurv
,."rd
;;J;br;
il;#ffinded
procedures
for
instara_
fur,
operation
and
maintenance.
ubm,H
appreciate
feedback
from you,
the
end-user,
about
where
we
are
achieving
our
lrrposes.
lnak
you
for
considering
and
purchasing
Matsutec
equipment.
Fefrrres
II-
min.features
of
the
Hp_33
are
as
shown
below.
'
*ftfi-resolution
color
LCD,4'3"sunlight
viewable
color
LCD
GoTo
track
navigation
-
WAAS
capability
'
$rage
for
10,000
waypoints,
100
routes
and
3,000
track points
'
Alrrrs:
Anivar/Anchor,
XTE
(cross-track
Error),
Trip,
odometer,
Time,
wAuAS
and
Speed
'
lkl
overboard
feature
records
position
at
time
of
man
overboard
and
provides
continuous
up-
d*s
of
range
and
bearing
when
n"rigrti;;i;;;
;dilffi;:
:
ll*nre
Highway
display
provides
a
graphic
presentation
of
boat,s progress
toward
a
waypoint.
'
lJserarogrammabre
nav
data
disprays
provide
anarog
and
digitar
navigation
data.
'
ilavigation
data
output
to
the
autopilot
when
connecting.
'
uYaypoint
and
route
data
can
be
uploaded
from
a
pc
and
downloaded
to
a
pc.
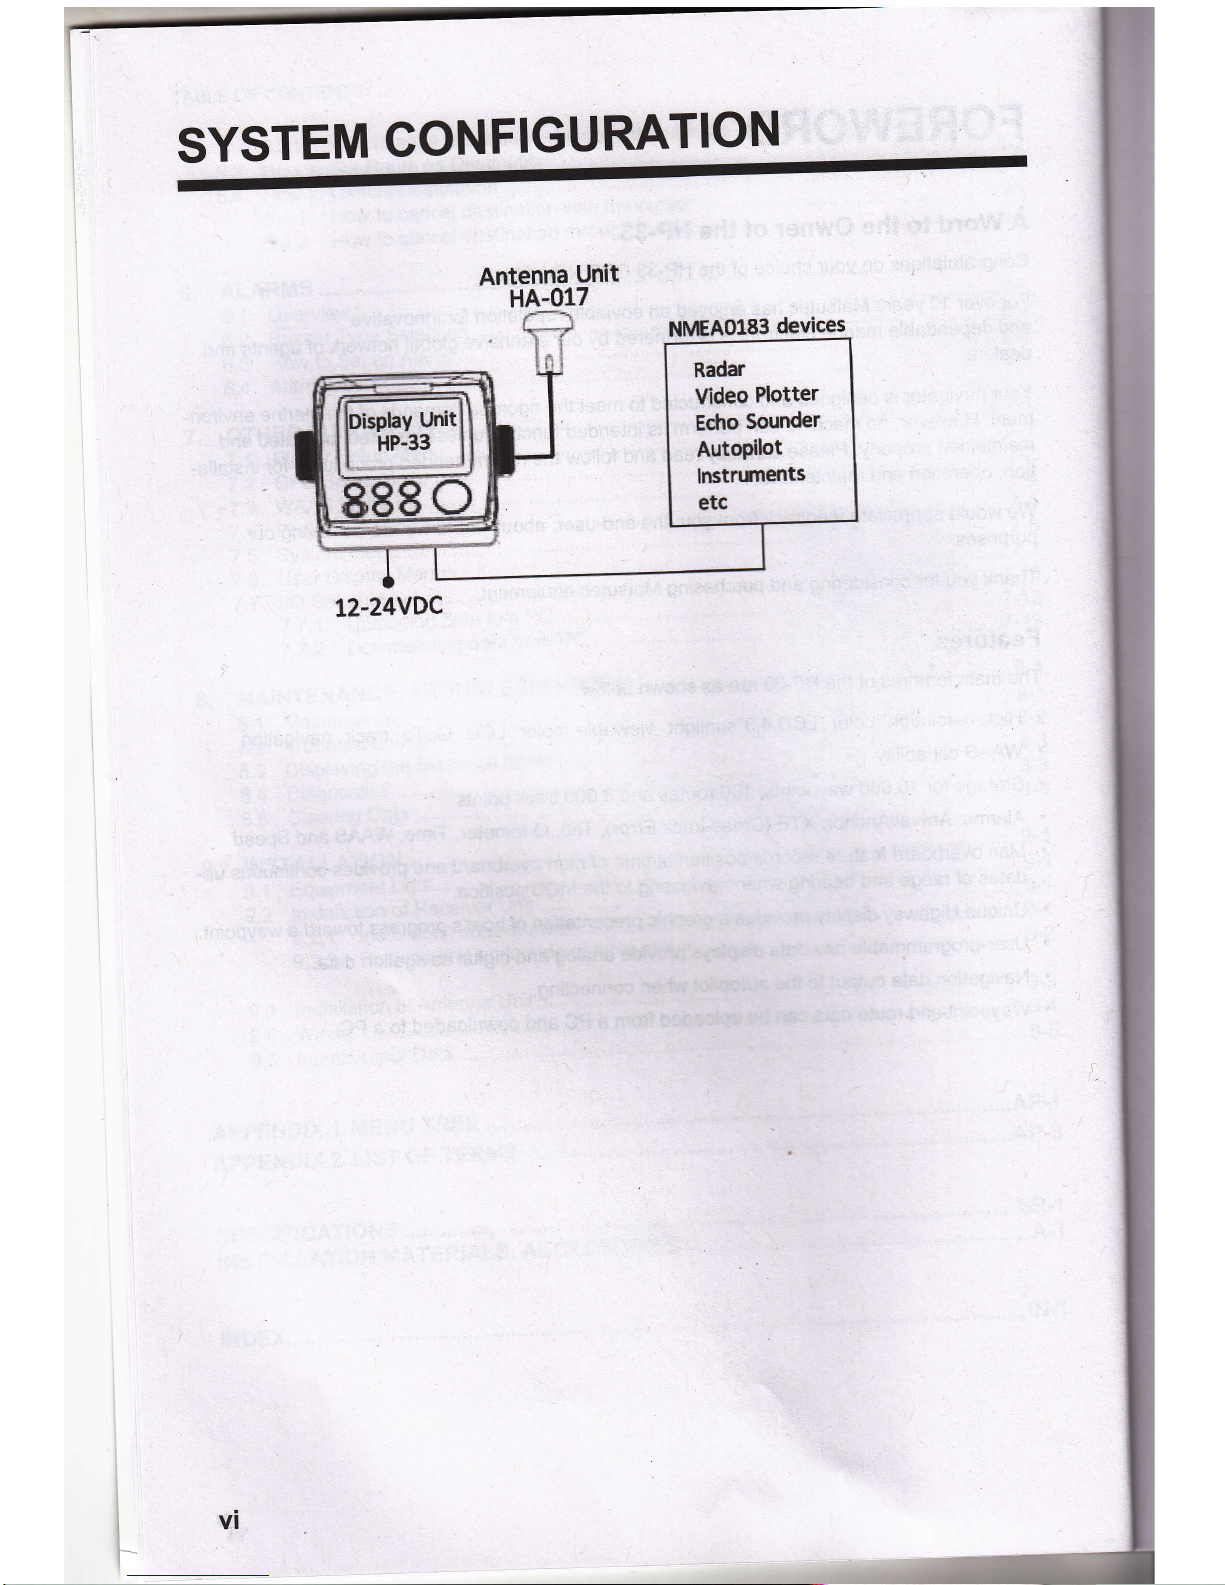
SYSTEM
CONFIGURATION
Antenna
Unit
HA-017
Nt{8A0183
devices
Radar
Video
Plotter
Edro
Sounder
AutoPilot
[Bfftmilts
etc
12-24VDC
l
I
t_
l-
1.
OPERATIONAL
OVERVIEW
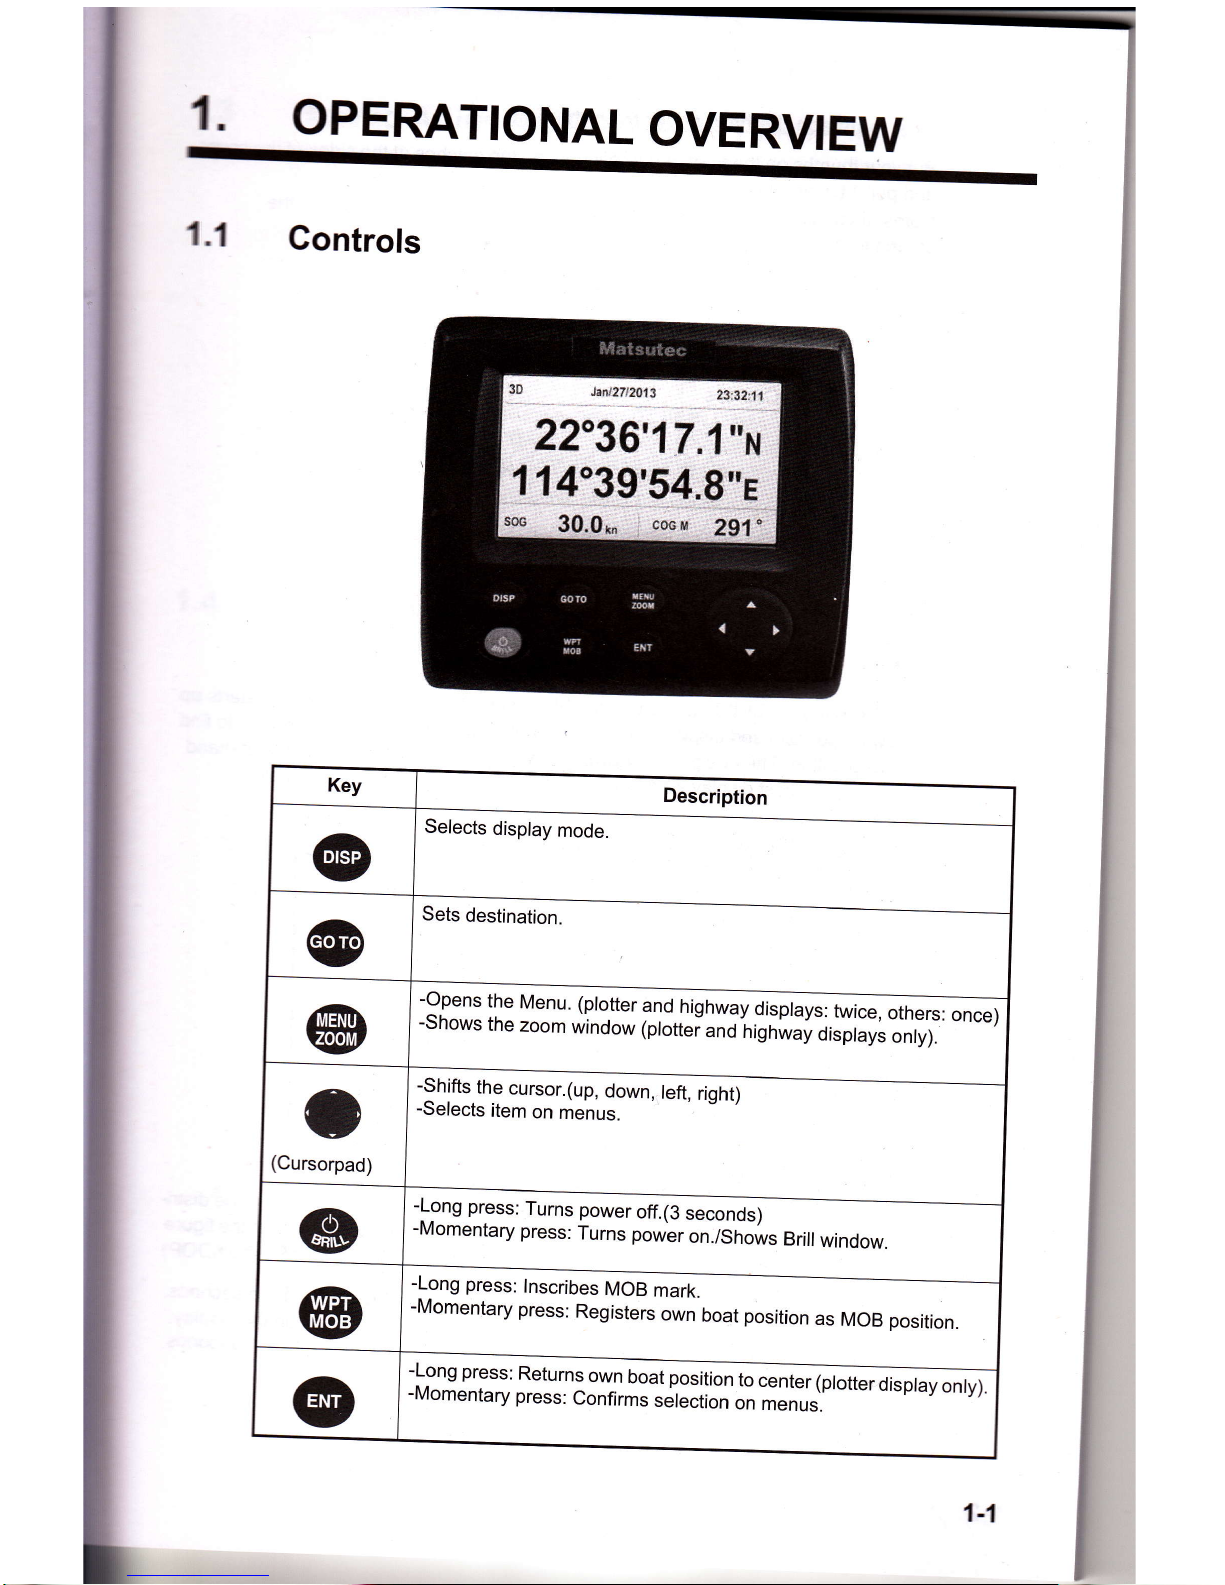
1.1
Controls
-o.pens
the
Menu.
(ptotter
g1d
highwav
offi
-Shows
the
zoom
window
(ptotteland
iigh;i"iiirpr"y;;;fi:
-
'*,
o
(Cursorpad
-Shifts
the
cursor.(up,
down,
left,
right)
-Selects
item
on
menus.
-Long
press:
Turns
power
off.(3
seconds)
-Momentary
press:
Turns power
on./Shows
Brill
window.
-Long
press:
lnscribes
MOB
mark.
-Momentary
press:
Registers
own
boat
position
as
MOB position.
-Long
press:
Returns
own
boat
position
to@
-Momentary
press:
Confirms
selection
";;;;;"
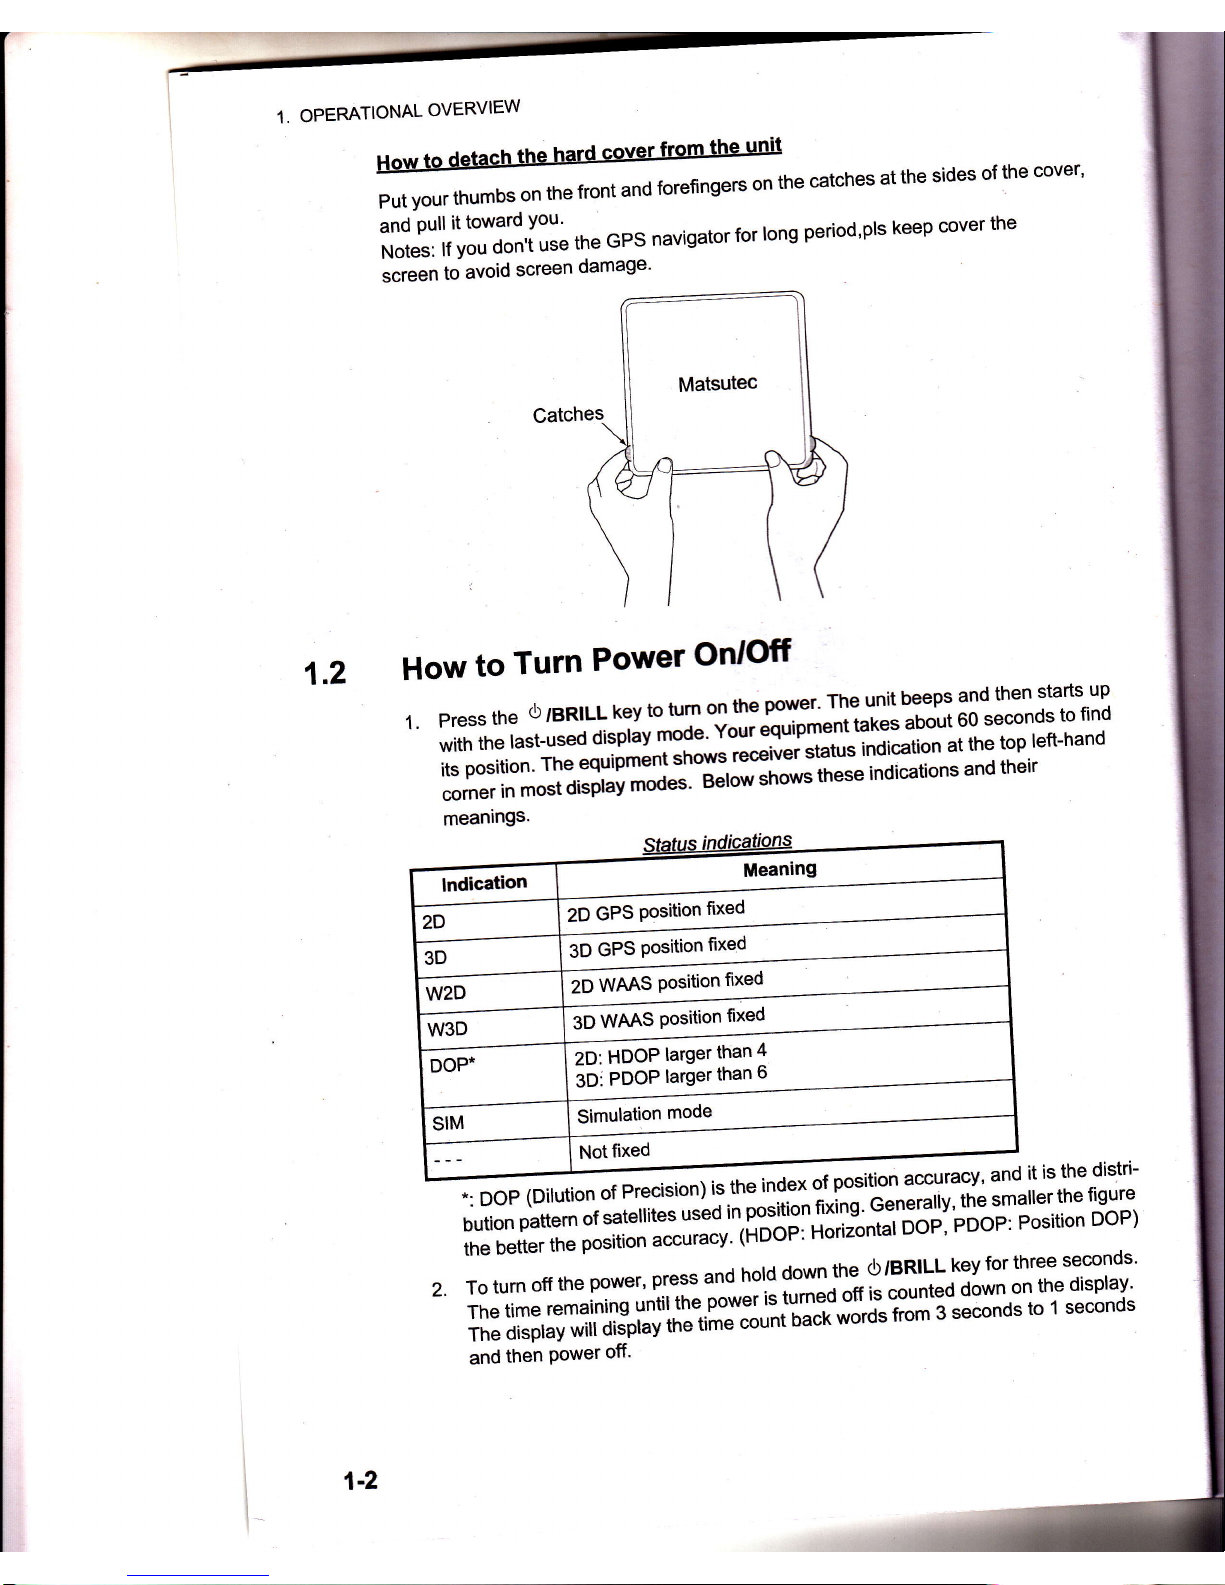
How
to
detach
the
hard
cover
from
the
unit
Putyourthumbsonthefrontandforefingersonthecatchesatthesidesofthecover,
il1JJ'[:,",I;::'[l;
*"
GPS
navigator
ror
rons
period'prs
keep
cover
the
screen
to
avoid
screen
damage'
1.2
How
to
Turn
Power
On'O'tr
1.
press
the
o
Bntuu
kev
to
t,l
Ttr"ror'
The
unit
beeps
and
then
starts
up
withtherast-usedil;;r,,,."*jlT.Il5afr*trJ:ii.:ffiti-T#'
*n:tr;X:S'iim'ffi[im;;
indication
s
and
the
i
r
meanings'
Catches
2.
;"?3I,9,1'JlT:"1#i:l::L;rri'l.$i:*^"r"9'Jl"#:"J'iH'fHlbution
pattem
of
s3fellites
useo
rn
Puurtt\,I
"^";;n.i;Op,'pOOp'
Position
DOP)
,*i"{"itn"
position
accuracy'
(HDOP:
Hori;
To
turn
off
the
power,
press
and
h"|d
:::1,t1?||'T:i:.-:l*T
lii1',HT,,T:[?ff
1"1',1i:r"-l:yT^i'il[Hfi5'"::]ft
:iiT$::Iil;
H:Xffi
,liffi
,iil3r"Tr'il:-ilHffi
ffi
ff
;il-"ro*gsecondsto'rseconds
i.
i:'
&,;
s{
ffi
ffi
2D
GPS
Position
frxed
SO
CPS
Position
frxed
io
wnns
Position
fixed
3D
wms
Gition
fxed
ZO,
ffOOP
larger
than
4
3D:
PDOP
larger
than
ti
Simulation
mode
1-2
and
then
Power
off'
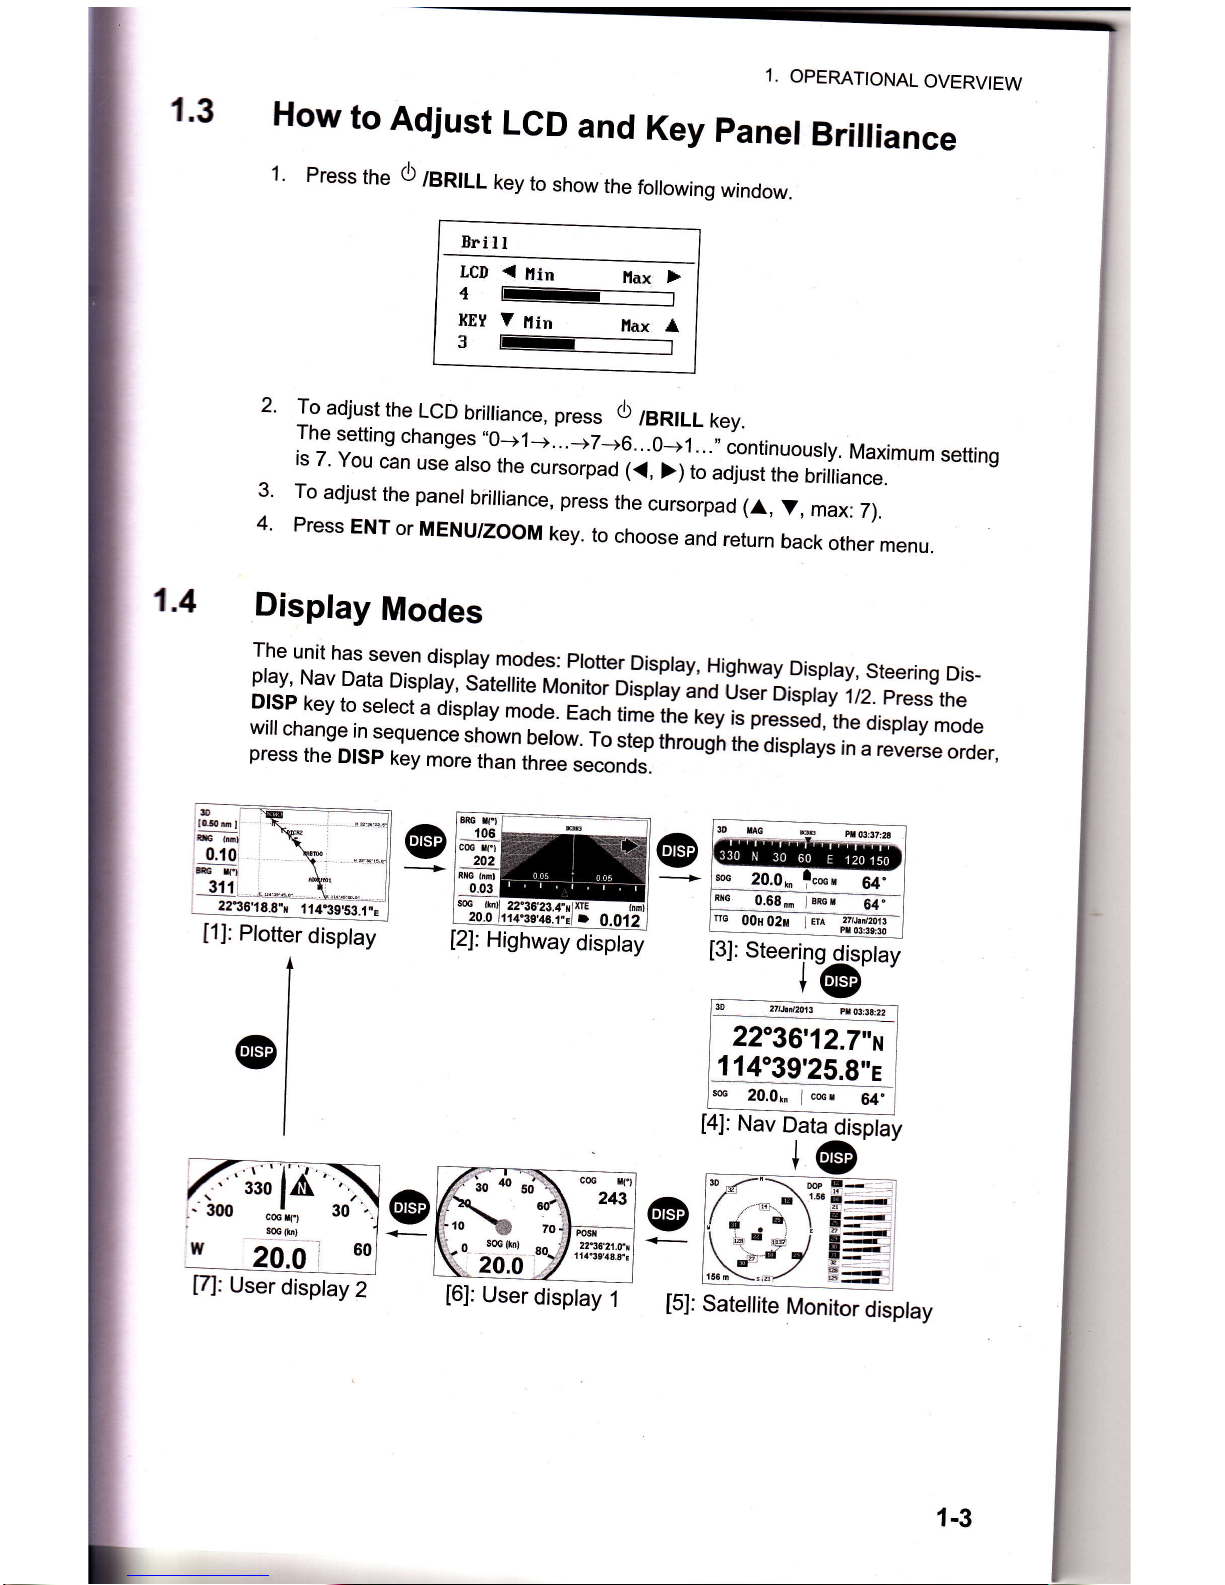
1.3
1.4
1.
OPEMTIONAL
OVERVIEW
How
to
Adjust
LGD
and
Key
panel
Brilliance
1.
Press
the
O
/BruLL
key
to
show
the
following
window.
ErilI
LCD
{
ttin
llax
F
{ l-------t
IilY
7
fiin
Hax
I
3 t------l
2.
3.
4.
To
adjust
the
LCD
briiliance,
pr"""
O
/BRILL
key.
The
setting
changes "0-->1-+...-+7-6..^Oj..."
iontinuousry.
Maximum
setting
is
7.
You
can
use
atso
the
cursorpad
f
J
>l
i"
adjust
the
briiliance.
To
adjust
the
panel
brilliance,
press
the
cursorpad
(A,
V,
max:
T).
Press
ENT
or
MENU/ZOOM
key.
to
choose
and
return
back
other
menu.
Display
Modes
[1]:
Plotter
disptay
The
unit
has
seven
dispray
modes:
protter
Dispray,
Highway
Dispray,
steering
Dis_
play,
Nav
Data
Dispray,
sateflite
rr,|onitoioi"pray
and
User
Dispray
,1/2.
press
the
DISP
key
to
serect
a
dispray
mode.
Each
tim!
tne
key
is
pressJo,ine
oisptay
mode
will
change
in
sequence
shown
berow
r"
"i"p
through
the
disprays
in
a reverse
order,press
the
DlSp
key
more
than
three
secondJ
o
loge
I
ft
rml
0.10
Grt
c
BRG
*] I
n1
2Q2
nXG
lnml
0_03
SG
4'3e?6.1.E1.
0,012
[2]:
Highway
disptay
'.0
.
.J\
t*zd,
-10
70
..-o sG(h)
.
20.0.,__Y
n1.s18.8\
[6]:
User
disptay
1
3Dk
*
03:37:a
ffi
64'
-
64"
sG
20.0,
fcmu
RxG
0.68,.
mil
nc
00H
02il
I
ET;
Pf,
ss
20.05
lcrcr 64'
[4]:
Nav
Oata
Oisptay
t@
rD,f
"-'\
mp
I
@
-,
/
=\
r'si-
ftP
,
=
_E 1 --<
'.
_-{
P r--
l\E /
,
r156n
\-,d/ ;:
1-3
31' a-
v,!
oE.a
2236'18.8"r
tt*"gSSS.i;.
30
zlJ.
t&t3
Jms
_l
2236'12.7"i1
11439,25.g"e
I
,';;
ld,
[5]:
Satettite
Monitor
disptay

1.
OPEMTIONAL
OVERVIEW
Plotter
Disolay
The
plotter
display
can
trace
own
boati
s
track,
Please
see
below
Picture'
Cursor
Wavooint
mark
.
(Sha'Pe
selectabte)
(displaYed
for
aPProx'
seven
seconds)
I
Own
boat
mark
Receiver
status
Course
bar
Horizontal
disPlaY
range
scale
Range
to
cursor*
Bearing
to
cursor*
Cursor Position
(When
cursor
rs
nor
displayed'it
will
display
own
boafs
position')
*
:coG
and
s-oc-
r"g1m
?i?sJfl
J".3t
ti3[,?]30
range
to
cursor
wnen
i
14

1.
OPEMTIONAL
OVERVIEW
Hbhway
Display
The
highway
display
provides
a 3-D view
of
own boat
toward
the
destination.
{IE
(Crosstrack
error)
scale and
arrow mark
Anow
shifts
with
boat's
XTE.
When
the arrow
is
aligned
with
the
center line
the
boat is on
course.
The
arrow
blinks if
boat's XTE
is
greater
than
XTE
scale range.
"N
(North)"
is
displayed,
instead
of the arrow,
at the
center
of the
scale when
no
destination
is
set.
Bearing
from
own
boat
to
destination
waypoint
Speed
over
ground
Direction
to steer
(to
return to
course)
Steer
right.
l:
Steer left.
Destination
waypoint
name
Course
over
ground
Current
position
DigitalXTE
indication
(in
nautical
miles)
Own
boat mark
The
boat mark
displays
course
as follows:
When
no waypoint
is
set;
The mode
is North-up
and
the arrow
shows
boat's
course.
When
a waypoint
is set;
The
arrow shows
boat's
cou rse towards
destination.
Range
from
own
boat
to
destination
waypoint
SOG
(knll
2236'23.4"xtXTE
20.0
t{4"39'46.1"e
D
"g6,23.4"piXTE
{nml
"39'46.1"s
D
0.01
2
1.
OPEMTIONAL
OVERVIEW
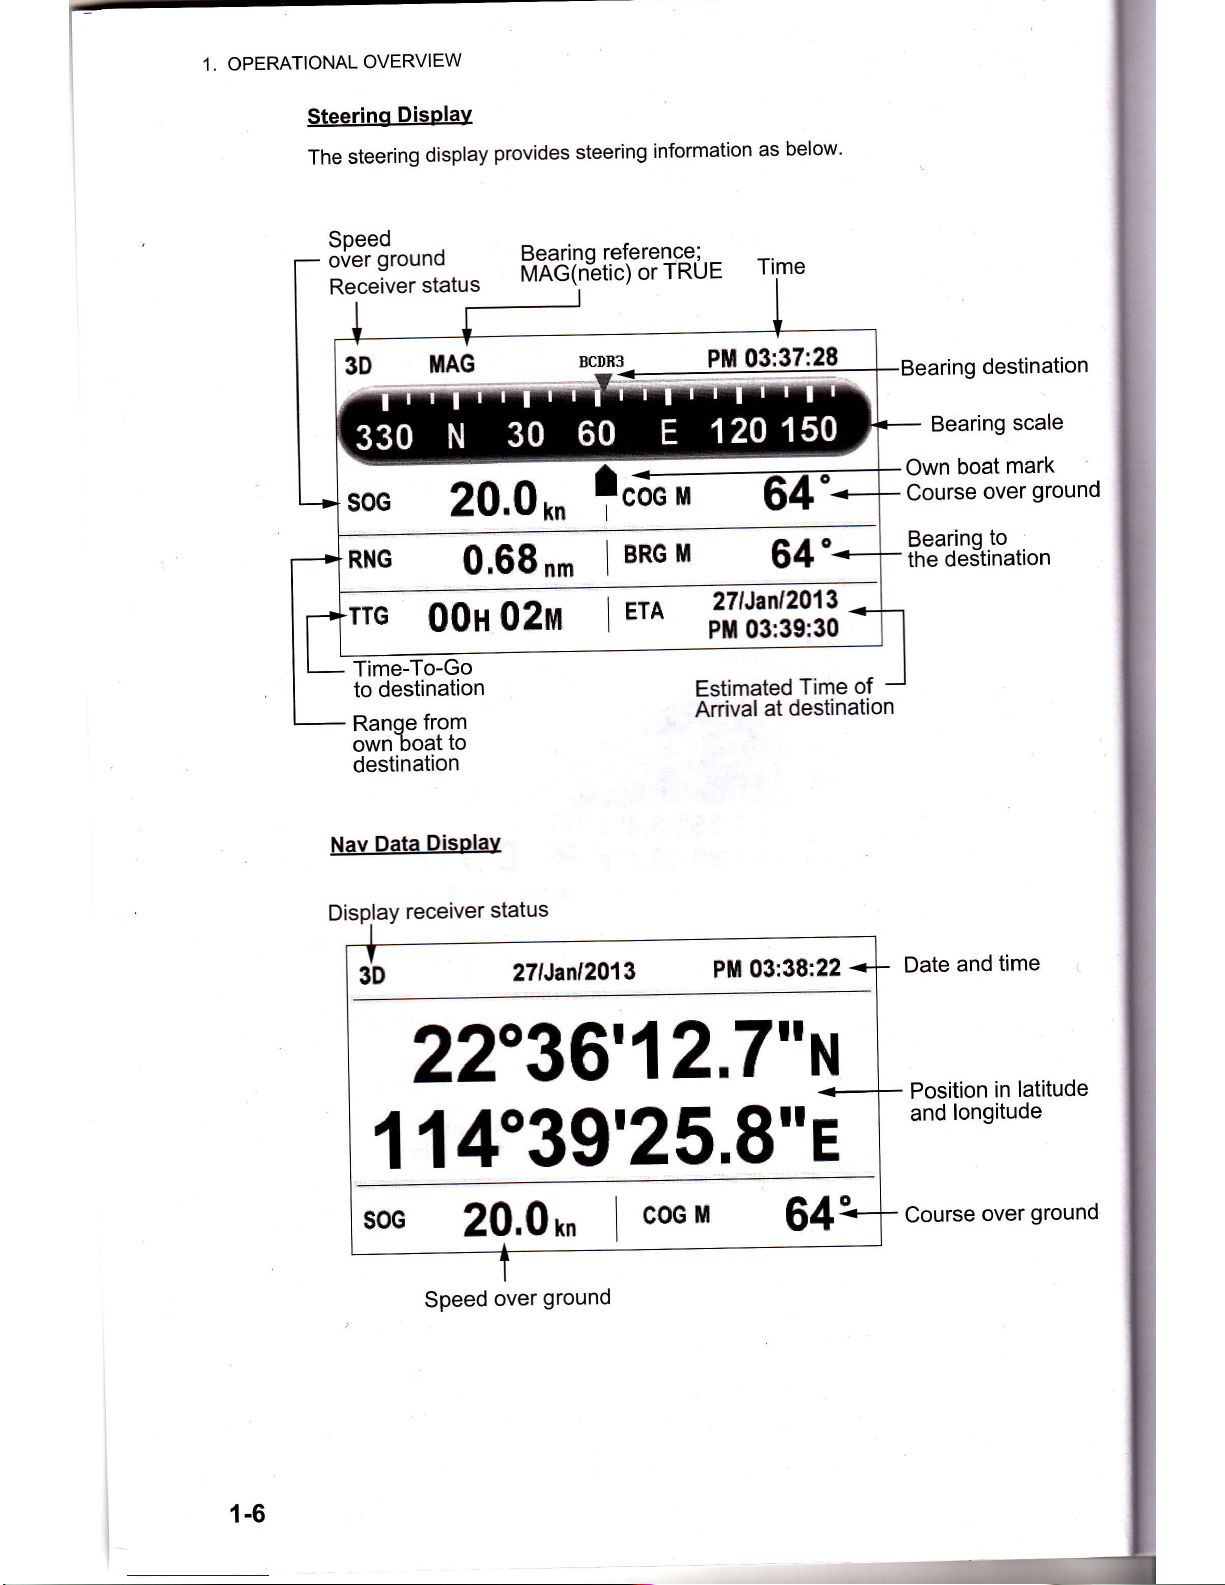
Steerinq
Disolay
The
steering
display
provides
steering
information
as
below'
Speed
over
ground
Receiver
status
Bearino
reference;
MAG(n%ti;)
oiinue
rime
Time-To-Go
to
destination
Ranoe
from
ownboat
to
destination
Nav
Data
Disolay
Estimated
Time
of
Anival
at
destination
destination
Bearing
scale
Own
boat
mark
Course
over
ground
Bearing
to
the
destination
Date
and
time
Position
in
latitude
and
longitude
Course
over
ground
3D
nAG
,q*
Ff*
03:37;28
soc
20.0
m
rcoc
u
RNc
0,68
n,
BRG
rl
m
OOuOenr
I
ETA
,'l'efrl||
3'D
27lJanl2013
PH
03:38:22
22"36'12,7"H
114039'25,8"E
20.0
rn
I
coc
H
Speed
over
ground
1-6
1.
OPERATIONAL
OVERVIEW
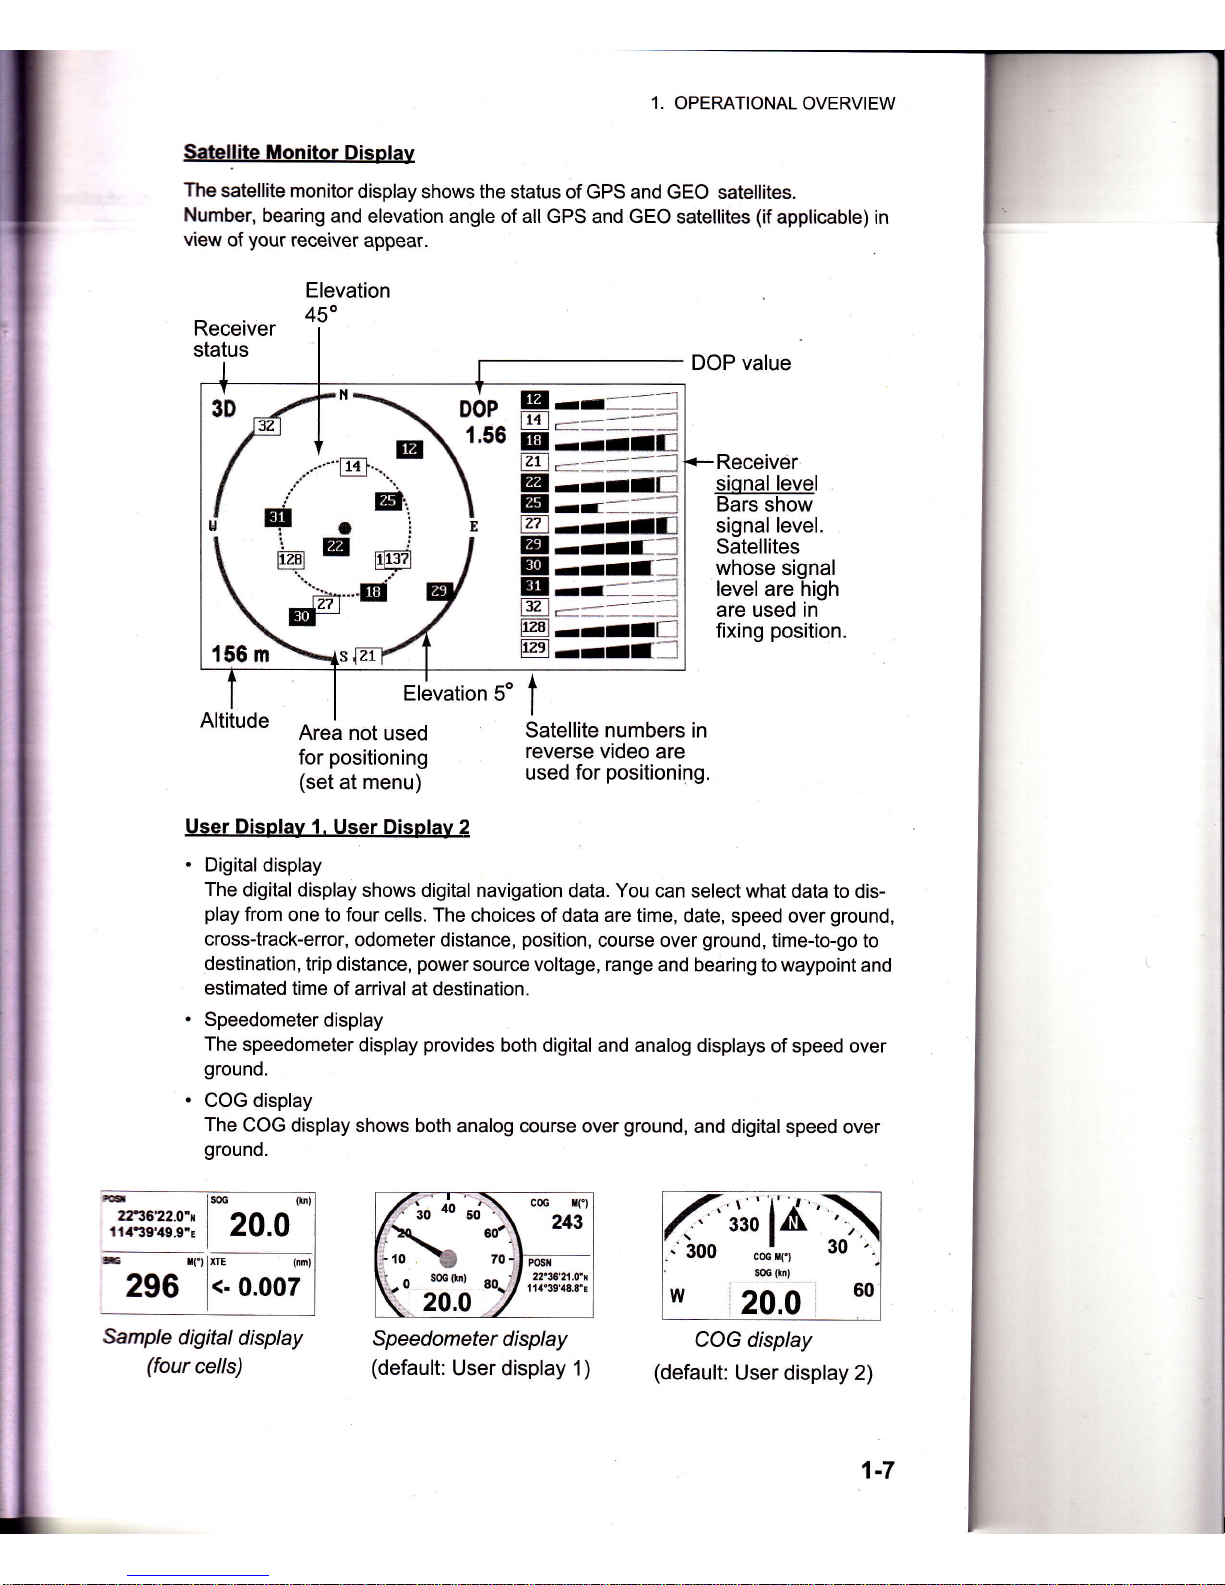
Satellite
Monitor
Display
The
satellite
monitor
display
shows the status of GPS and
GEO satellites.
Number,
bearing
and
elevation angle of all GPS
and
GEO
satellites
(if
applicable) in
view
of
your
receiver
appear.
Elevation
45"
DOP value
Receiver
siqnal
level
Bars
show
signal level.
Satellites
whose signal
level are high
are used in
fixing
position.
Area not
used
for
positioning
(set
at menu)
Satellite numbers in
reverse video
are
used
for
positioning.
User Disolav 1.
User Displav 2
.
Digitaldisplay
The
digital display
shows digital navigation
data.
You
can select
what data to dis-
play
from
one to four cells. The
choices of data are time,
date, speed over
ground,
cross-track-error,
odometer distance,
position,
course over
ground,
time-to-go to
destination,
trip
distance,
power
source voltage, range
and bearing
to waypoint and
estimated
time
of arrival at destination.
.
Speedometer
display
The
speedometer
display
provides
both digital and analog displays
of speed over
ground.
.
COG display
The
COG
display shows both
analog course over
ground,
and digital
speed over
ground.
f,':o
u,
.,i\
'*^.:l''
f
**\_1
-o
soc(h)
eo-'/,fi:i!,ii!:;
(
20.0 /
{33oiA\
.
ioo
"*',.,
30
'
-
svv
coc [f)
soc
{t.}
w
'20,a
60
COG display
Sample
digitaldisplay
(four
cells)
Speedometer
display
(default:
User display 1)
g
E
@
E
@
E
@
a
q
E
E
@
@
*.'-.
-_:
-in-.*
l
r*-***-**-J
rrIIf-1
r::-.-.*-l
rrII[l
rr,-=I*I
rrllfl
rrIflI
rrlf-l
-I--
I
tr=l----,-]
rrII[]
rril'_l
t6
lsoc
(b)
,fiI3:?3:3::
|
20.0
e-
rrtlxrr
tnm)
296
<-
o.oo7
User display 2)

1. OPERATIONAL
OVERVIEW
1.5
Menu
Overview
Most
operations
of
your
unit
are
operated
through
the
menu'
Below
is
a
quick
introduction
to how
to select
a
menu
and
change
menu
settings.
lf
you
get
lost
in
operation,
press
.
the
MENU/ZOOM
key
to
get
back
to the
main
menu'
l.PresstheMENUtzooMkeyonceortwicetodisplaythemainmenu.
Press
once:
Steering
display,
nav
data
display,
satellite
monitor
disp|ay,
user
dis-
PlaY
112.
Press
twice:
Plotter
display'
highway
display
Note:FollowingexplanationtakesthemenusfortheplotterdisplayaSanexam-
ple.
Ship
Io
Center*
Boutes
Plotter
SetuP
Alarns
llessages
Delete
GPS
SetuP
T,IAAS
rttffiE0]ll
.C"rrt"lrB.*
tElfl:Enter
l/Y:Select
2.
3.
.'
tn[.3il0,28'oWl'frsJf
diesseO
at
the
Plotter
disPlaY'
You
can
Press
A or
V
to select
an
item,
and
press the
ENT
key,
Press
ENT.
For
example,
select
[Plotter
Setup]
and
press
the
ENT
key'
l1enu
)Plotter
SetuP
+i------+:-
Auto
iragioint
Entrg(CttGl
tEil
60
"
10 s
C0G
Line
:
0n
C,G/B*G
fef..
:
llag
t'lqgrrEtic
Uariatiarn
:
Auto
ll 3
o
l,tf
ilane
;
llisP Goto
IIG/f,IA
6pD
:
Auto
60
s
Press
A
or
V
to select
option
desired'
For
example,
select
ICOG/BRG
ref']
Press
the
ENT
keY
'
A window
shows
the
options
for
the
item
selected'
6.
Press
A
or
V to
select
option
desired'
7.
Press
the
ENT
keY
.
8.
Press
the
MENU/ZOOM
key
twice
to
close
the
menu
and
return
4.
5.
l
1-8
back
to
main
menu.
1.6
1.
OPERATIONAL
OVERVIEW
lbrb enbr alphanumeric
data
Sane
rnenu operations
require
you
to
enter alphanumeric
data
(A
to Z, 0
to 9) and
silfiols
(&,
-,
#,'
,
-,
>
and space).
The
procedure
which
follows shows
how to enter
{hanumeric
data.
For example,
to
change
the
waypoint
name 1WP0008"
to
"CNSZ",
dotp
follows:
t)
Press A or
V to select
"C".
2)
Press
),
and
press
A or
V to select
"N".
3)
Press
),
and
press
A or
V to
select
"S".
4) Press
),
and
press
A or
V
to
select
"Z".
5)
Press
),
and
press
A or
V to select
"
"(space).
6) Press
),
and
press
A or
V to select
"
"
(space).
7) Press the
ENT key.
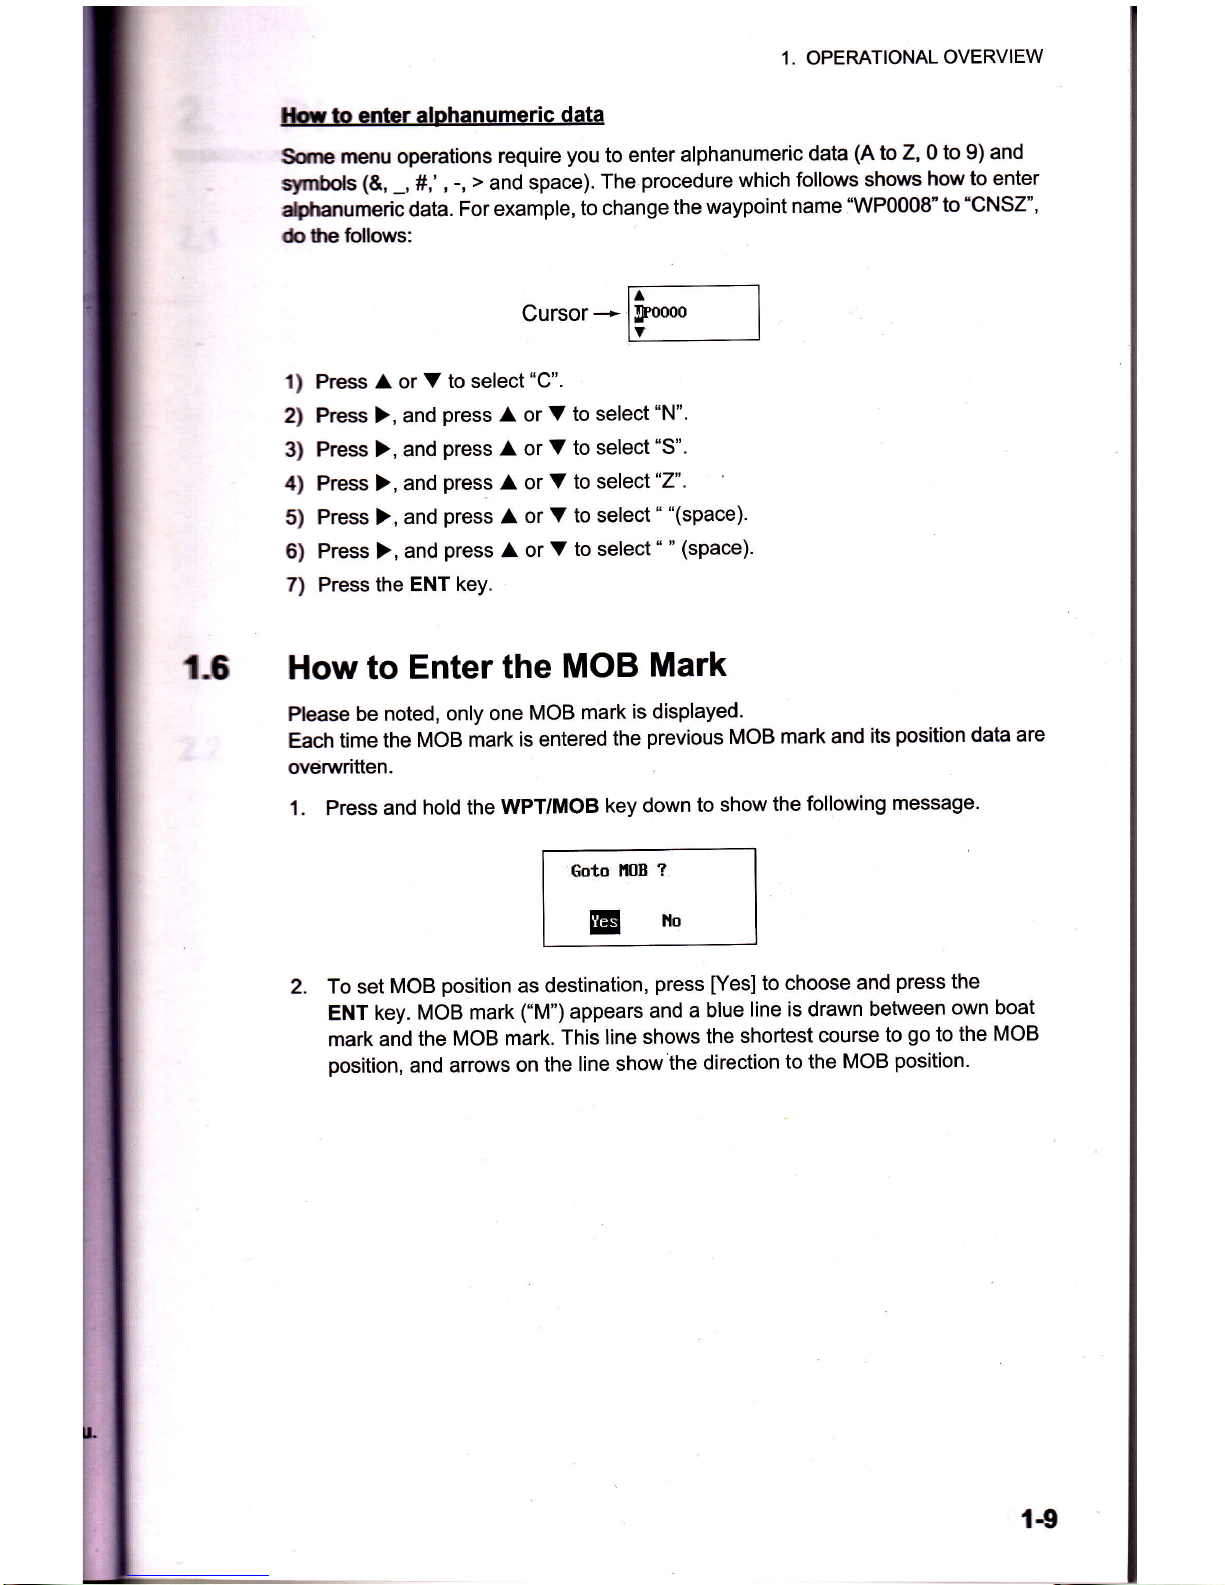
How to
Enter
the
MOB
Mark
Pbase be noted,
only one
MOB
mark
is displayed.
Each
time the
MOB mark
is entered
the
previous
MOB
mark and
its
position
data are
ovenrriften.
1.
Press and
hold the
WPT/MOB
key down
to
show
the
following
message.
Eoto
ilIIE
?
EHo
2.
To set MOB
position
as destination,
press
[Yes]
to choose
and
press
the
ENT
key.
MOB mark
("M")
appears
and
a blue
line is drawn
between
own boat
mark and
the
MOB mark.
This
line
shows
the
shortest
course
to
go
to
the MOB
position,
and
arrows
on
the line
show
the
direction
to the MoB
position.
1€
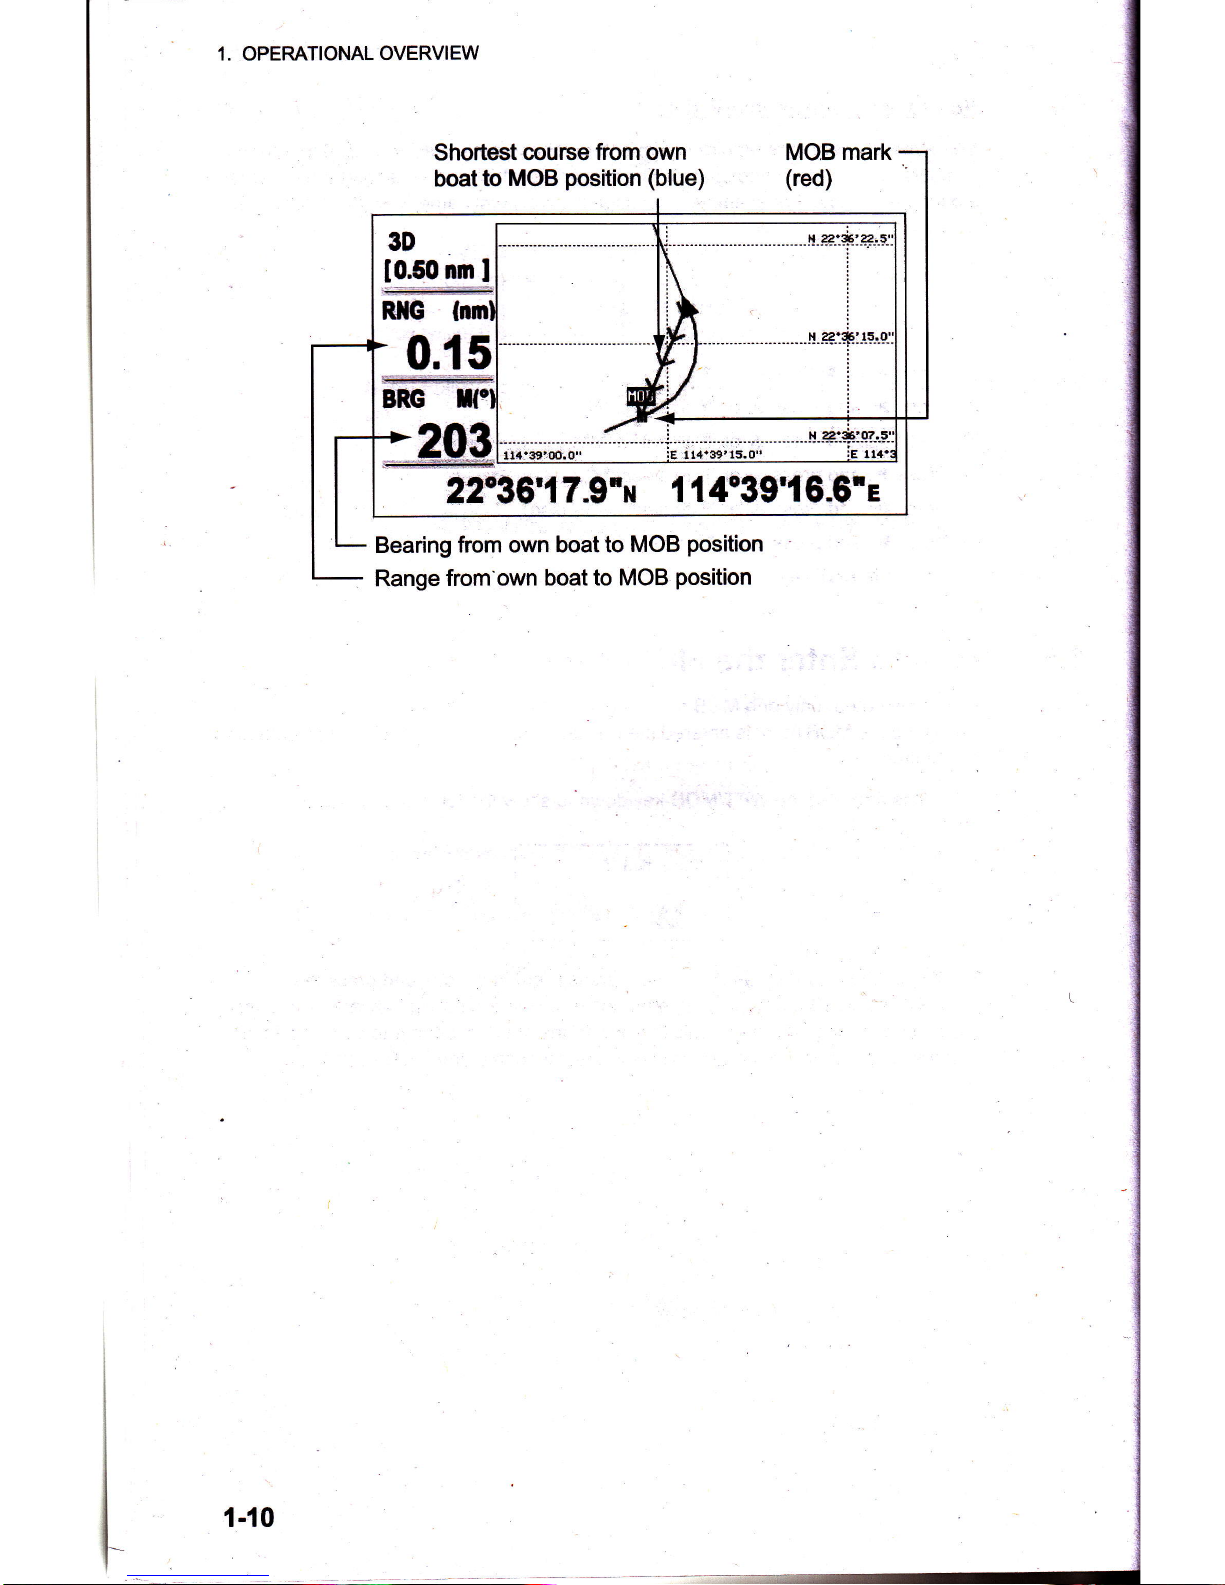
1. OPERATIONAL OVERVIEW
Shortest course
from own
boatto
MOB
position
(blue)
Bearing
from own boatto MOB
position
Range
from'own
boat to MOB
position
MOB mark
(red)
1-10
PLOTTER
DISPLAY OVERVIEW
l.l
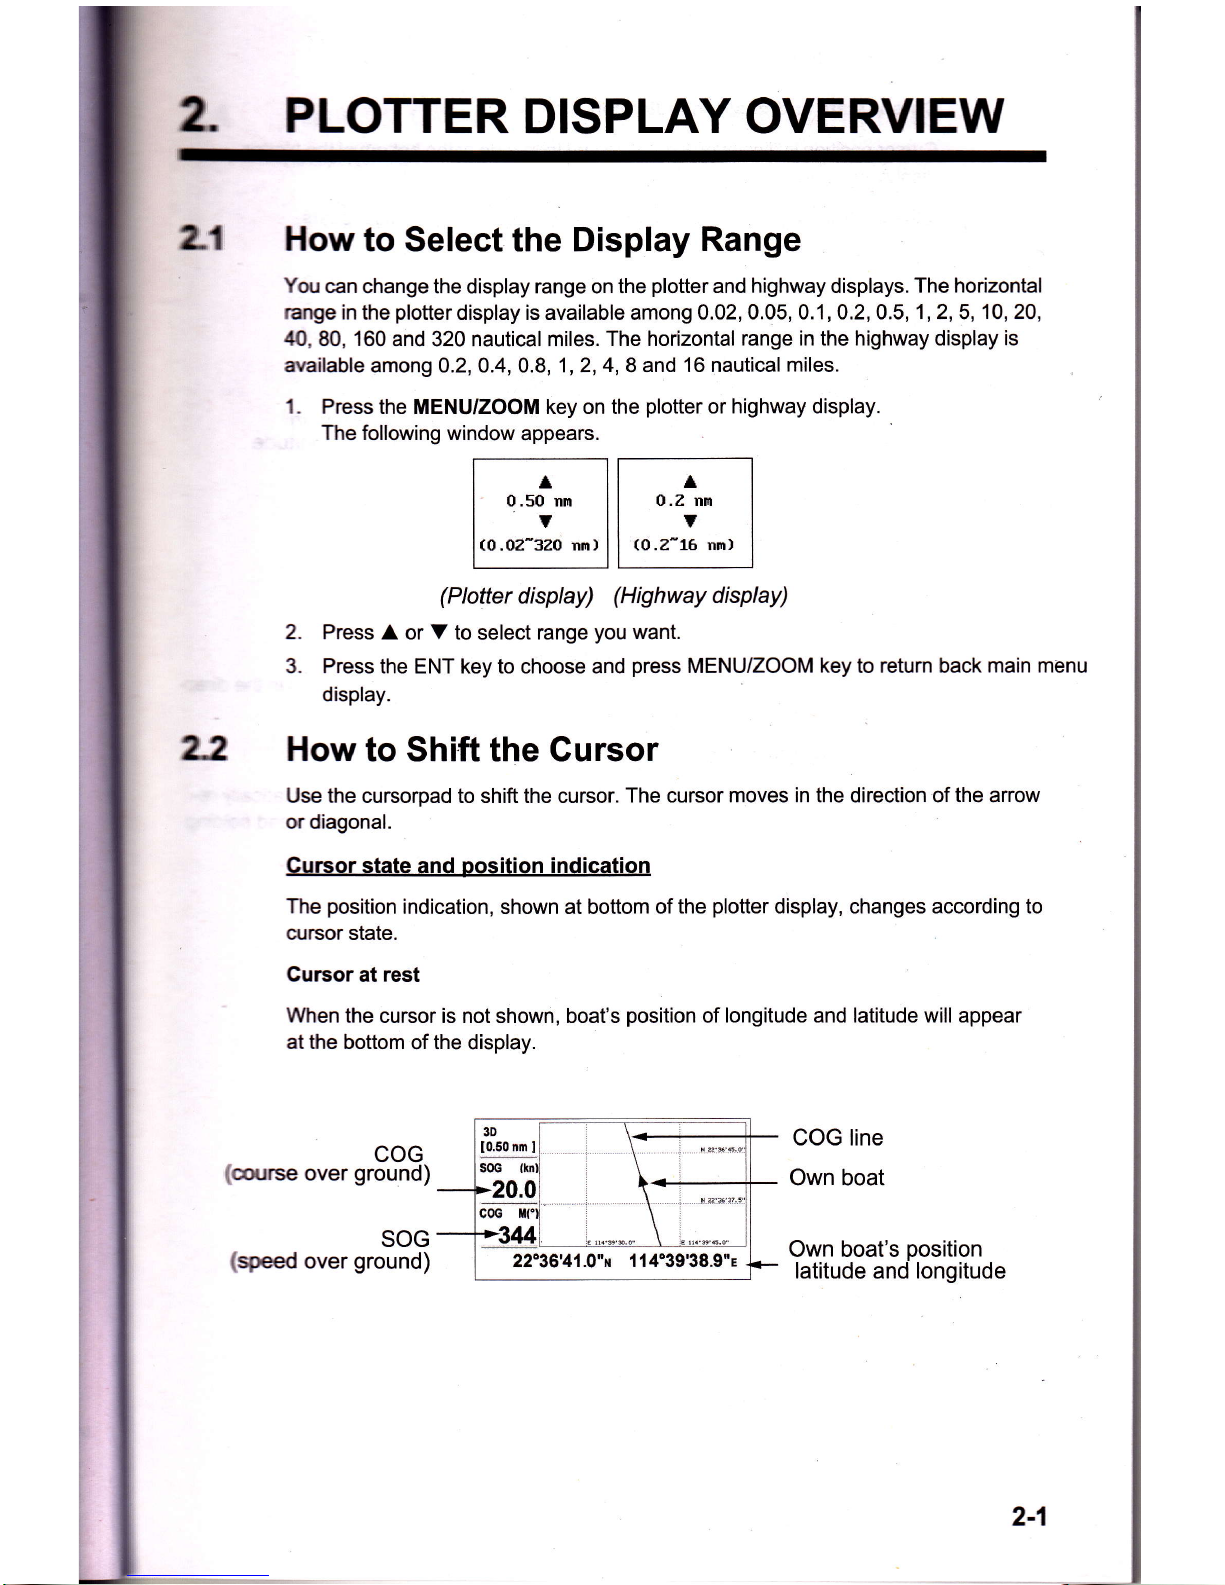
How
to Select the Display
Range
You
can change
the display range on
the
plotter
and highway displays.
The horizontal
range
in the
plotterdisplay
is available among
0.02,0.05, 0.1,0.2,0.5,1,2,5,
10,20,
40,
80, 160 and
320
nautical miles. The horizontal
range in the highway display is
available
among 0.2,0.4,0.8,1,2,4, 8
and 16 nautical
miles.
1. Press
the MENU/ZOOM key on the
plotter
or highway display.
The following window
appears.
t--^----]t--;---l
I
o.son,
ll
o.znm
I
l,o.o*Jo
,',
ll
,..-I
.,,
I
(Plotter
display)
(Highway
display)
2.
Press A or V to
select
range
you
want.
3.
Press
the ENT key to choose and
press
MENU/ZOOM
key
to
return
back
main menu
display.
How
to Shift the Gursor
Use the cursorpad to shift the cursor.
The cursor moves in the direction of
the
arrow
or diagonal.
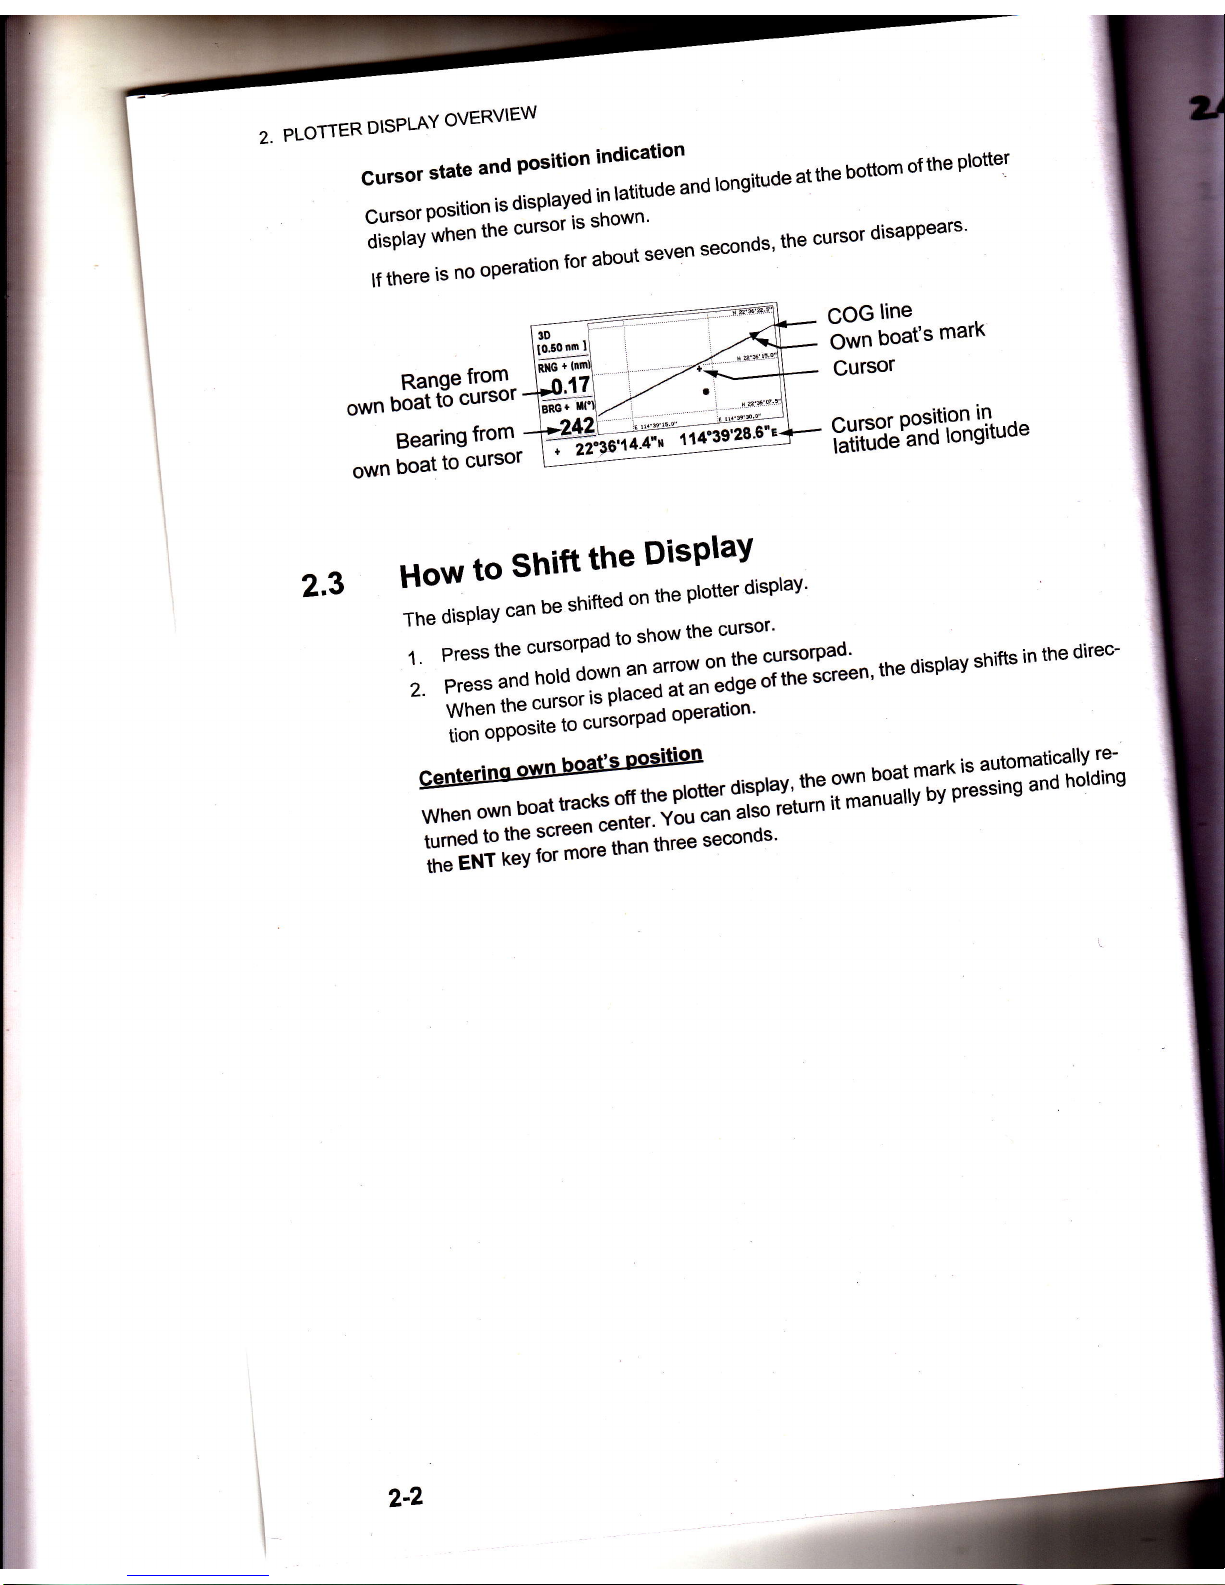
Cursor state
and oosition
indication
The
position
indication, shown at bottom of
the
plotter
display, changes according to
cursor state.
Cursor
at
rest
When the
cursor is not shown, boat's
position
of
longitude and latitude will appear
at the bottom
of
the
display.
22
COG
COG line
Own boat
Own boat's
position
latitude and longitude
rlcourse
over
ground)
SOG
(speed
over
ground)
2-1
PLOTTER
DISPLAY
OVERVIEW
::XrT["":ff'l'J:'::;'l'Jndronsitudeatthebottomortheprotter
*'"
:]]
::"*'ffi",
]llll""u"
n
second
s'
the
cursor
d
i sappears
Range
from-
own
boat
to
Gursor
Bearing
from
own
boat
to
cursor
COG
line
Own
boafs
marx
Cursor
f,,t[i3t%Ti'"3lJLuou
2,3
How
to
shift
the
Display
av
-rn"
O,**,
can
be
shifted
on
the
plotter
display'
1.
Press
the
cursorpad
to
show
the
cursor'
;
ft*f:
*lt*J1,*t**
i'
ffTil;"'
the
disprav
shins
in
the
direc
iion
oPPosite
to
cursotl'ro"
-'--
iH:::lffi
[i:3:fl"ffi
fl
:IJfi;
liEl,[
ff
;'J
;lH;;"
three
seconds
l
L
\
I
\
2-2
l-
2-3
2. PLOTTER DISPLAY
OVERVIEW
2.1
How
to Change The
Track Plotting
lnterval,
Stop
Re-
cording
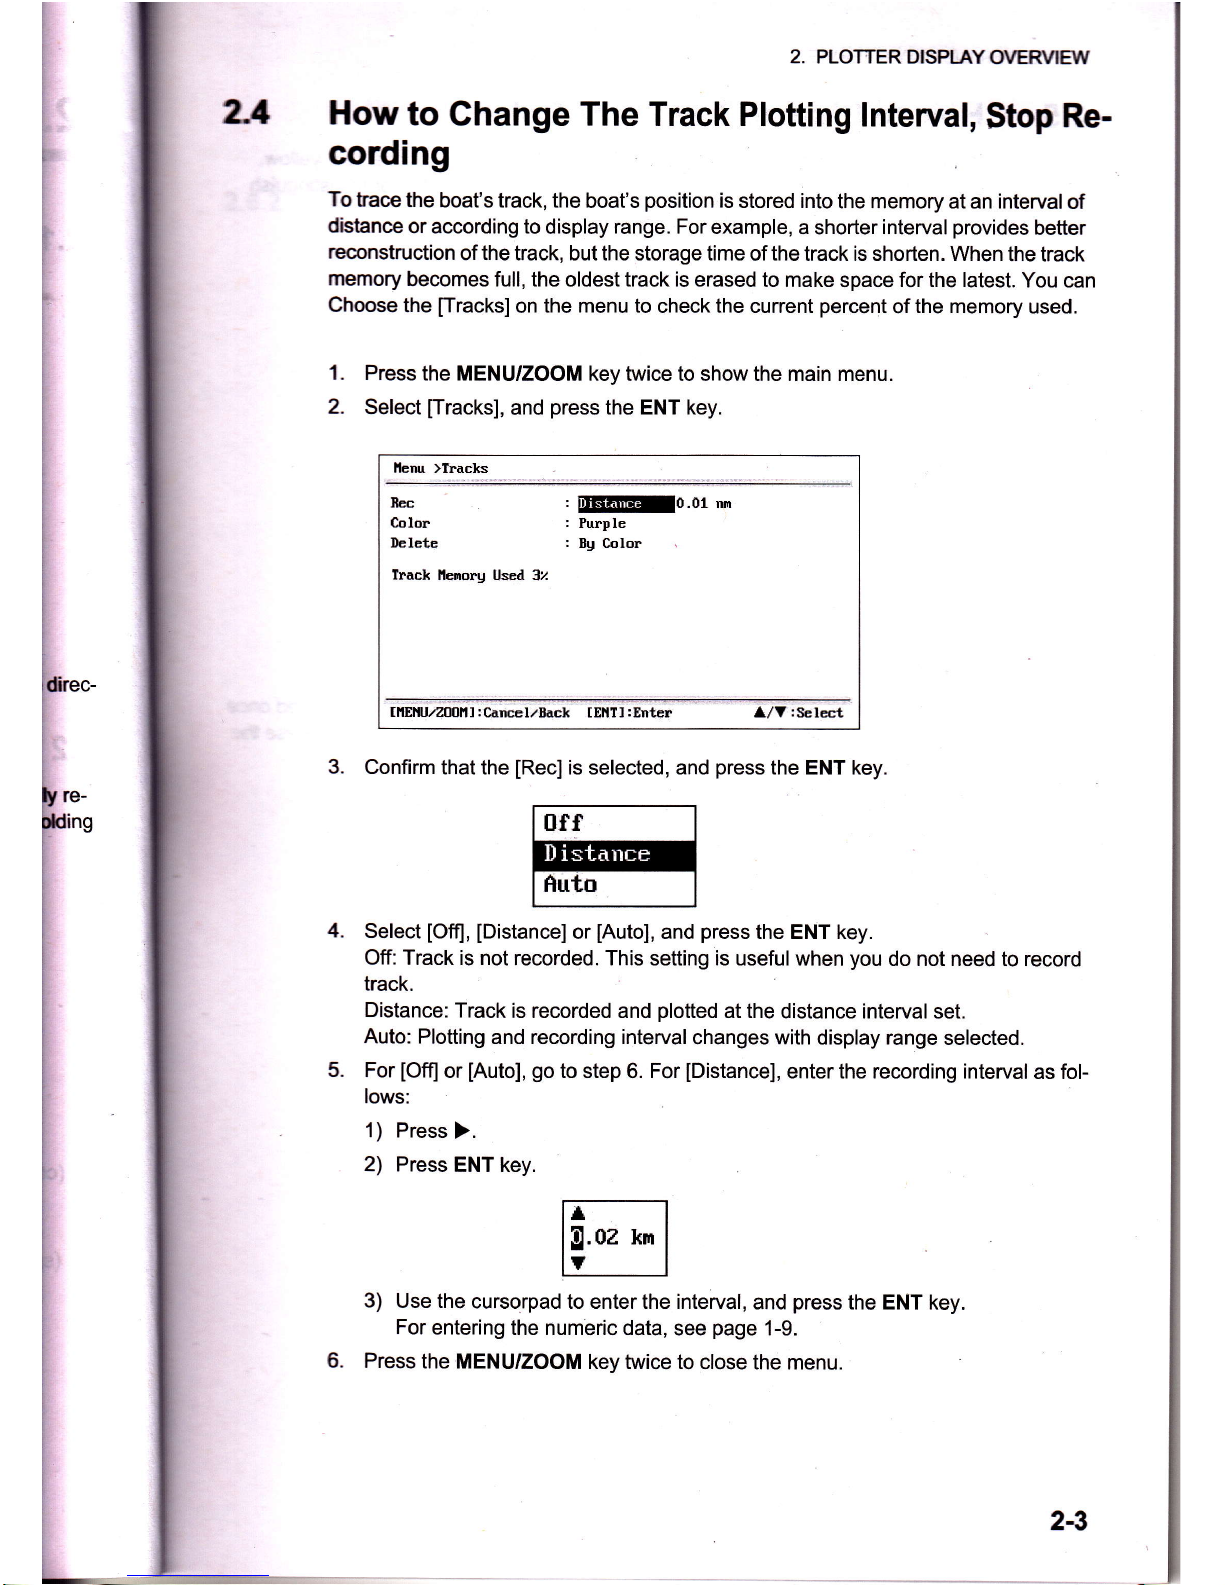
To
tace the
boat's track, the
boat's
position
is
stored into
the memory at an interval
of
distance
or according to
display
range. For
example, a
shorter
interval
provides
better
reconstruction
of
the
track, but the storage time
of
the
track is shorten. When
the track
memory
becomes
full, the
oldest
track is erased
to make
space
for the latest.
You can
Choose
the
[racks]
on
the menu to
check the current
percent
of
the memory
used.
Press
the MENU/ZOOM
key twice to show the main menu.
Select
[Tracks],
and
press
the ENT key.
lleru )Tracks
nrc
: liElEllllil0,01
nm
Color
:
Purple
Delete
:
Bg Color
Track
llEnoru
UsE.l 32
UtEtlU./2001'lI:Cancel./Eack IEllTl:Enter A/V
:SelEt
3.
Confirm
that the
[Rec]
is selected, and
press
the ENT key.
Iff
fluto
Select
[Off], [Distance]
or
[Auto],
and
press
the ENT key.
Off: Track is not
recorded. This setting is usefulwhen
you
do not need to record
track.
Distance:
Track
is recorded and
plotted
at the
distance interval set.
Auto: Plotting
and recording intervalchanges
with display range
selected.
For
[Off]
or
[Auto],
go
to step 6. For
[Distance],
enter the recording interval
as fol-
lows:
1)
Press
).
2)
Press
ENT key.
3)
Use the
cursorpad to enter the interval,
and
press
the ENT
key.
For
entering
the numeric data,
see
page
1-9.
Press
the MENU/ZOOM
key twice to close
the menu.
1.
2.
4.
2. PLOTTER DISPLAY
OVERVIEW
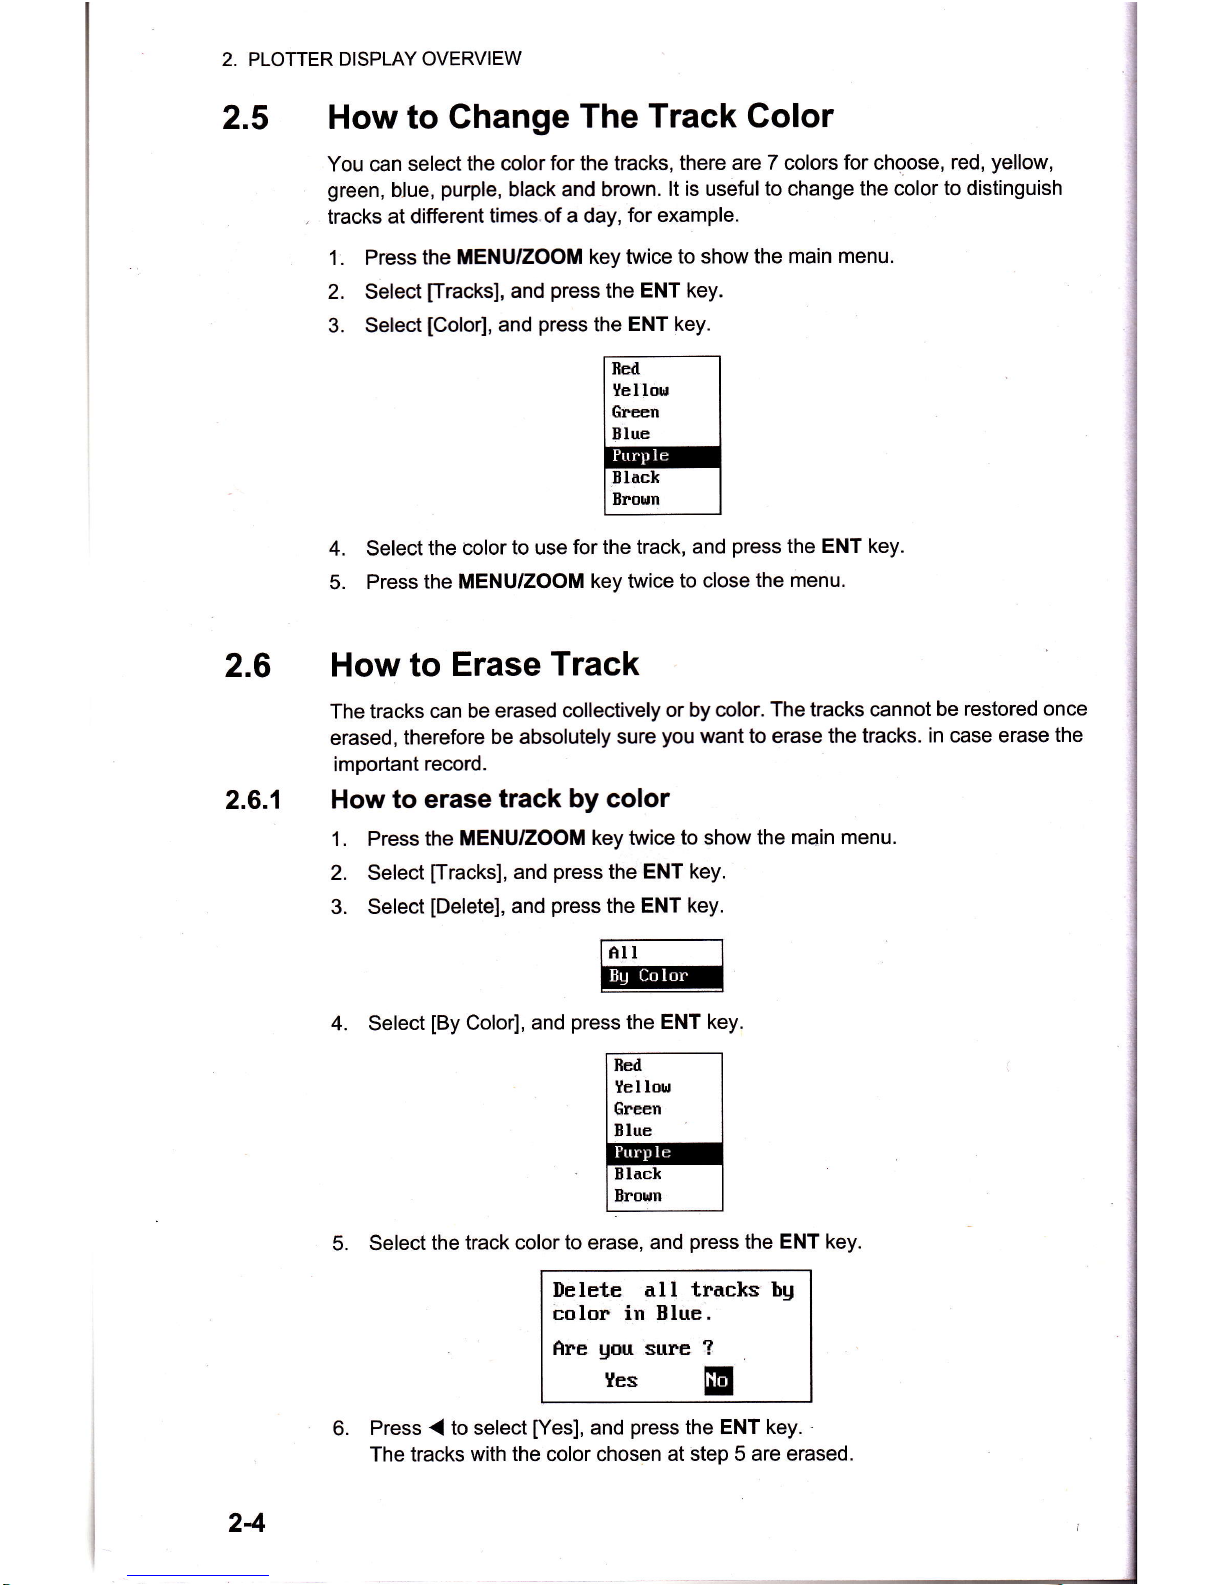
2.5 How to
Ghange
The
Track Color
You can
select
the color for the tracks,
there are 7 colors
for
choose,
red,
yellow,
green,
b"lue,
purple,
black and brolrrn.
lt is useful to change
the color
to
distinguish
.
tracks at
different
times.of a day,
for example.
1. Press
the MENUfZOOM
key twice
to
show
the main
menu.
2. Select
[racks],
and
press
the
ENT key.
3. Select
[Color],
and
press
the
ENT key.
2.6
2.6.1
4. Select
the color
to use
for the track, and
press
the ENT key.
5.
Press the
MENU/ZOOM
key twice
to close
the menu.
How to
Erase
Track
The tracks
can be
erased collectively
or by color.
The tracks cannot
be restored once
erased,
therefore
be absolutely sure
you
want
to
erase
the tracks.
in case erase
the
important
record.
How to
erase
track by color
1. Press
the MENUIZOOITI
key twice
to show the main
menu.
2. Select
[-racks],
and
press
the ENT
key.
3. Select
[Delete],
and
press
the ENT
key.
4. Select
[By
Color],
and
press
the
ENT key.
5. Select
the
track color to erase, and
press
the ENT
key.
Ilelete all
tracks hg
color in Elue.
Are
gnu
sure ?
Ies
E
Press { to select
[Yes],
and
press
the ENT
key.
The tracks with
the
color chosen
at step 5 are erased.
24
2.
PLOTTER
DISPLAY OVERVIEW
Note:
To
cancel, select
[No]
at this
step.
7.
Press
the MENU/ZOOM
key twice to
close the menu.
How
to
erase
all tracks
1.
Press
the MENU/ZOOM
key
twice to show the main menu.
2. Select
[Tracks],
and
press
the
ENT key.
3. Select
[Delete],
and
press
the ENT key.
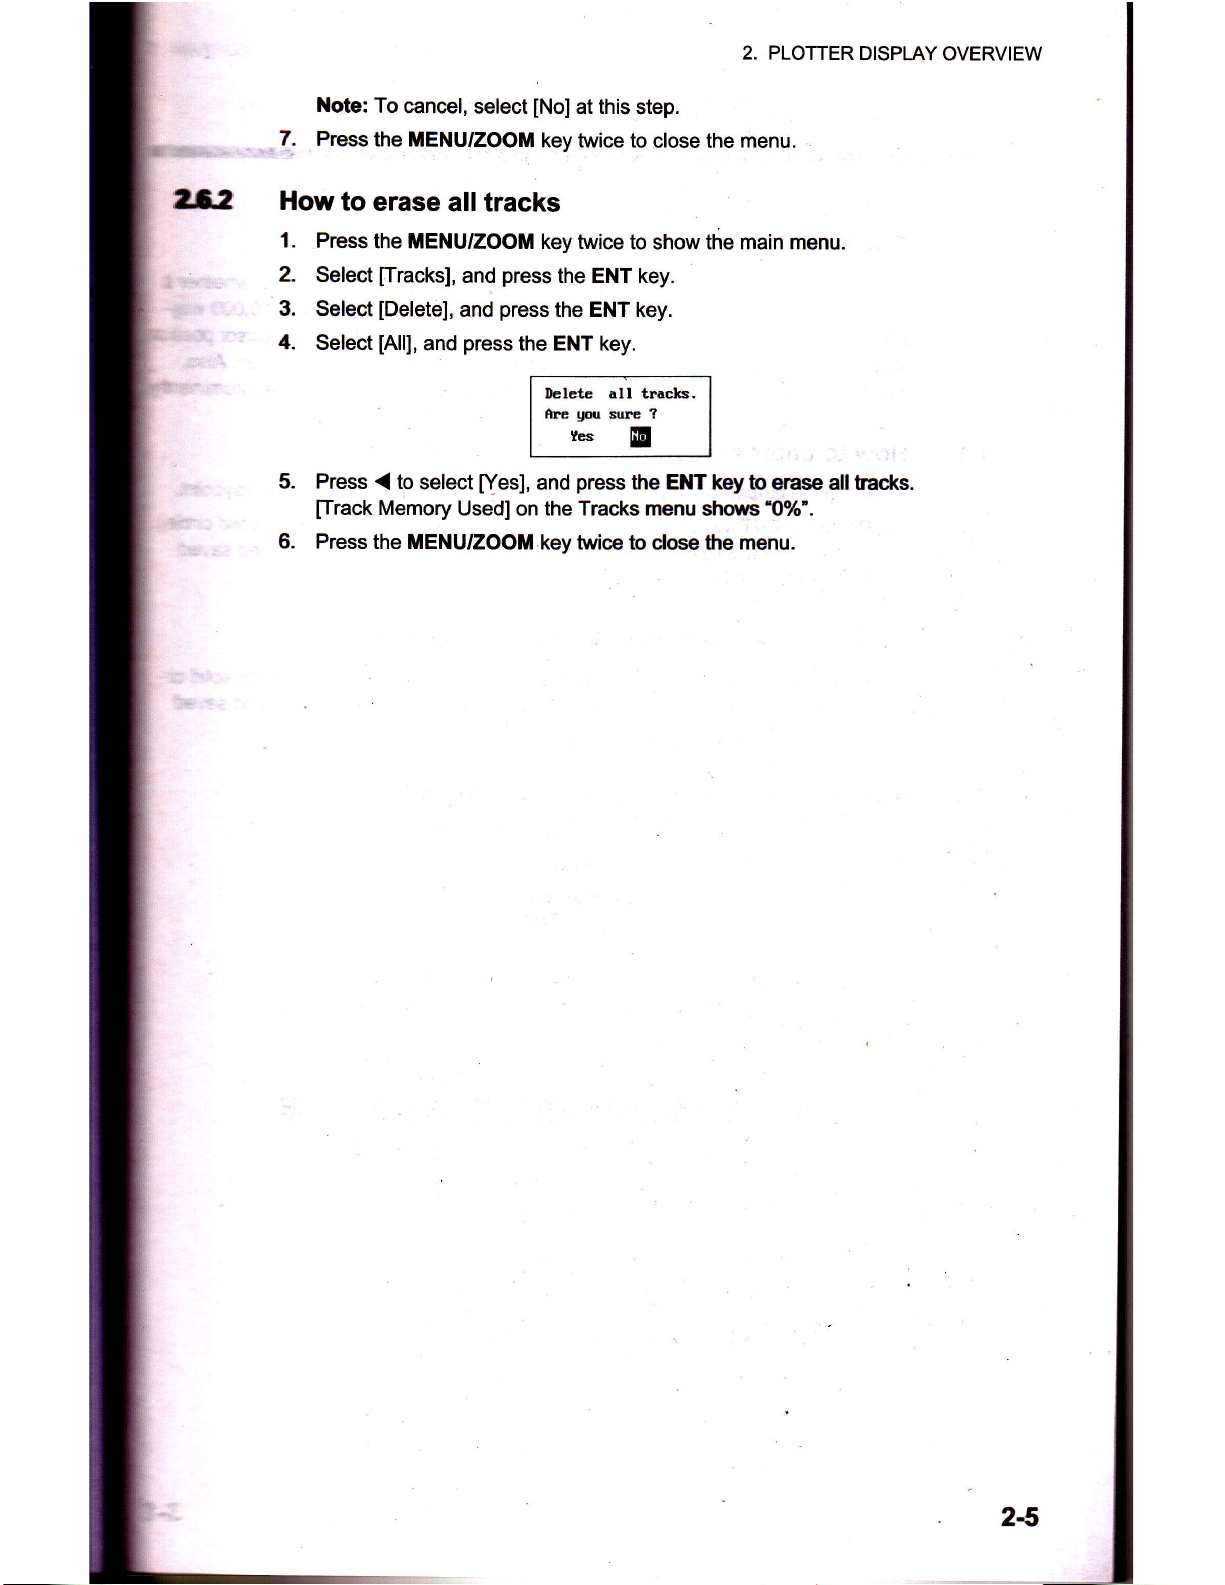
4.
Select
[All],
and
press
the ENT key.
Press
{
to
select
[Yes],
and
press
the ENT key
b erase all hacks.
fi-rack
Memory
Used]
on
the Tracks menu
shows'0%".
Press
the MENU/ZOOM
key twice
to close the
menu.
Delete all traclcs.
fire
gou
sure
?
Ies
E
WAYPOINTS
3.1
3.1.1
3.1.2
3.1.3
How
to
Enter
WaYPoints
ln
navigation
terminology
a
waypoint
is a
particular
location
on
a
voyage,
whether
it
oe
a starting,
intermediate
or
destination
waypoint.
Your
unit
can
store
10,000
way-
points.
Waypoints
can
be entered
on
the
plotter
display
by
4 conditions:
at
cursor
position'
at
own
boat's
position,
through
the
waypoints
list
and
at
the
MOB
position'
Also,
waypoints
can
be
entered
automatically
when
your
boat
changes
course
prominently'
How
to
enter
a
waypoint
with
the
cursor
1.
Move
the
cursorpad
to
place
the
cursor
on
the
location
desired
for a
waypoint.
2.
Press
the
ENT
key to
enter
the
waypoint
mark
(default shape:
green
solid
circle)'
This
waypoint
is
named
with
the
update
unused
waypoint
number,
and
saved
to
the
waYPoint
list.
How
to
enter
a
waypoint
at
own
boat
position
Press
the
WPT/MOB
key
to enter
the
waypoint
mark
(default shape:
green
solid
cir-
cle).
This
waypoint
is
named
with
the
update
unused
waypoint
number,
and
saved
to
the
wayPoint
list.
How
to
enter
a
waypoint
through
the
list
1.
Press
the
MENU|ZOOM
key
to show
the
main
menu'
2.
Select
[WaYPoints],
and
key.
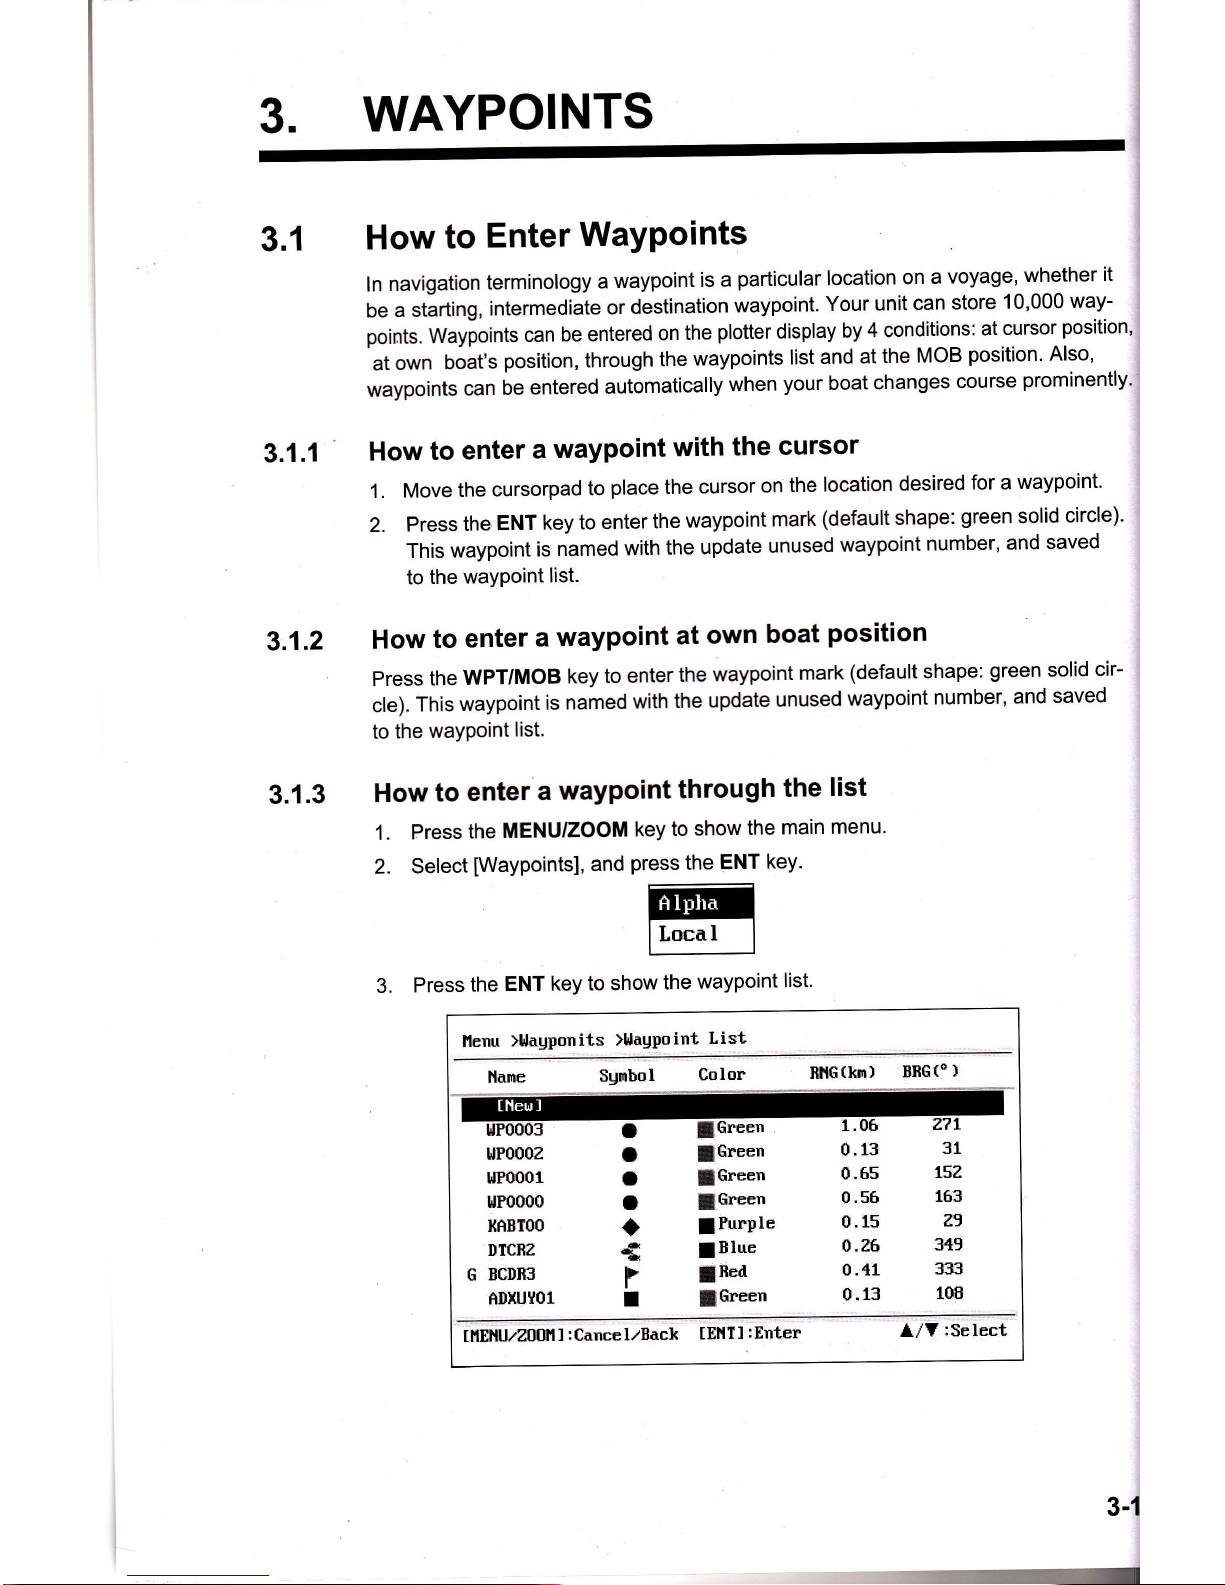
3.
Press
the
ENT
key
to show
the
waypoint
list.
press
the
ENT
ffi
)l,lagponits
)UagPoint
List
Sgmbol
Cplor
nHG(knr)
BffG(o
)
UP000z
lJP0001
1,tP0000
I(f,BTOO
I}ICBZ
G
BCDB3
AIIXUYOl
31
tEZ
163
Z9
3,t9
333
108
t
I
I
+
r
t
lGreen
JGreen
lGreen
!Purple
!Blue
f
Eed
JGreen
0.13
0.65
0.56
0.15
0.26
0.
{1
0,13
tilEHU/z0t]fl
I
:Cance
lrBack
[EI{TI:fnter
l/?':Select

b
rfunits
>{ag1nirt List }Uagpoint Info.
h:
t-r
:
oh:
Irt:
h:
H
:
-(h,
:
-(.1
:
ry
F
lned
?z":tr''52.Z"H
11{o40'05 .3"f,
0B:25 26Deo12
0.65
tsz
,E
l. ffimHlNeilrl
b chosen, and
press
the ENT key.
Ttp
default name, LaULon
and
Comment
are as
follows:
llilE: Tie
update unused waypoint
number.
l it
1on:
Cunent own boat
position
Gonment Cunent date/time
To
clnnge the waypoint name,
press
the
ENT key.
Cursor*
G Press the
cursorpad to change the
waypoint
name
(max.
8 characters).
t-
To cfnnge the mark
shape, select
[Symbol]
and
press
the ENT
key.
5.
&
g-
Sdect a mark desired, and
press
the
ENT key.
To
cfiange the mark color, select
[Color],
and
press
the
ENT key.
trd--_l
I Ye I lor,r I
Ic**n I
I
ttu.
I
Eil
I
Elact
I
I
Eroun
I
Select a color
desired, and
press
the ENT key.
To
change the
position,
do as
follows:
1)
Select
[Lat],
and
press
the
ENT key.
2) Enter
latitude,
and
press
the ENT key.
3)
Press V
to select
[Lon],
and
press
the
ENT key.
4) Enter
longitude, and
press
the ENT
key.
10.
11.
l
I
I
I
__"1
l
$ooor
?
12.
13.
14.
15.
16.
3.
WAYPOINTS
To
change
the
comment,
serect
[comment]
and
press
the
ENT
key.
Enter
the
comment,
and
press
the
ENT
key'
Press
the
MENU'ZOOM
key
to
register
the
new
waypoint
into
the
list'
To
register
other
waypoints'
repeat
steps
4
through
14'
Pressthe
MENU'ZOOM
key
severaltimes
to
close
the
menu'
3.1.4
How
to
enter
waypoints
automatically
;d
automaticallywhen
yourcourse
"h?n'91"^lI
a
specified
de-
waypoints
can
be
entet
-.--^^r.,
r^rarerinn the wav'oints
recorded
on
an
out-
ffi
Y?[,:'i,ilff
""1':::1!Iiiit"^"i]'::i';;ffiff
;:[";ffi
::iJ:1?$fl lX?""
gree.
This
function
is
useTul
I(JI
ItivEroerv
'""-r"
"i "ria
for
automatic
entering
of
ward
voyage
when
you
return
home'
To
set
th
wayPoints,
do
the
following:
Press
the
MENU/ZOOM
key
twice
to
show
the
main
menu'
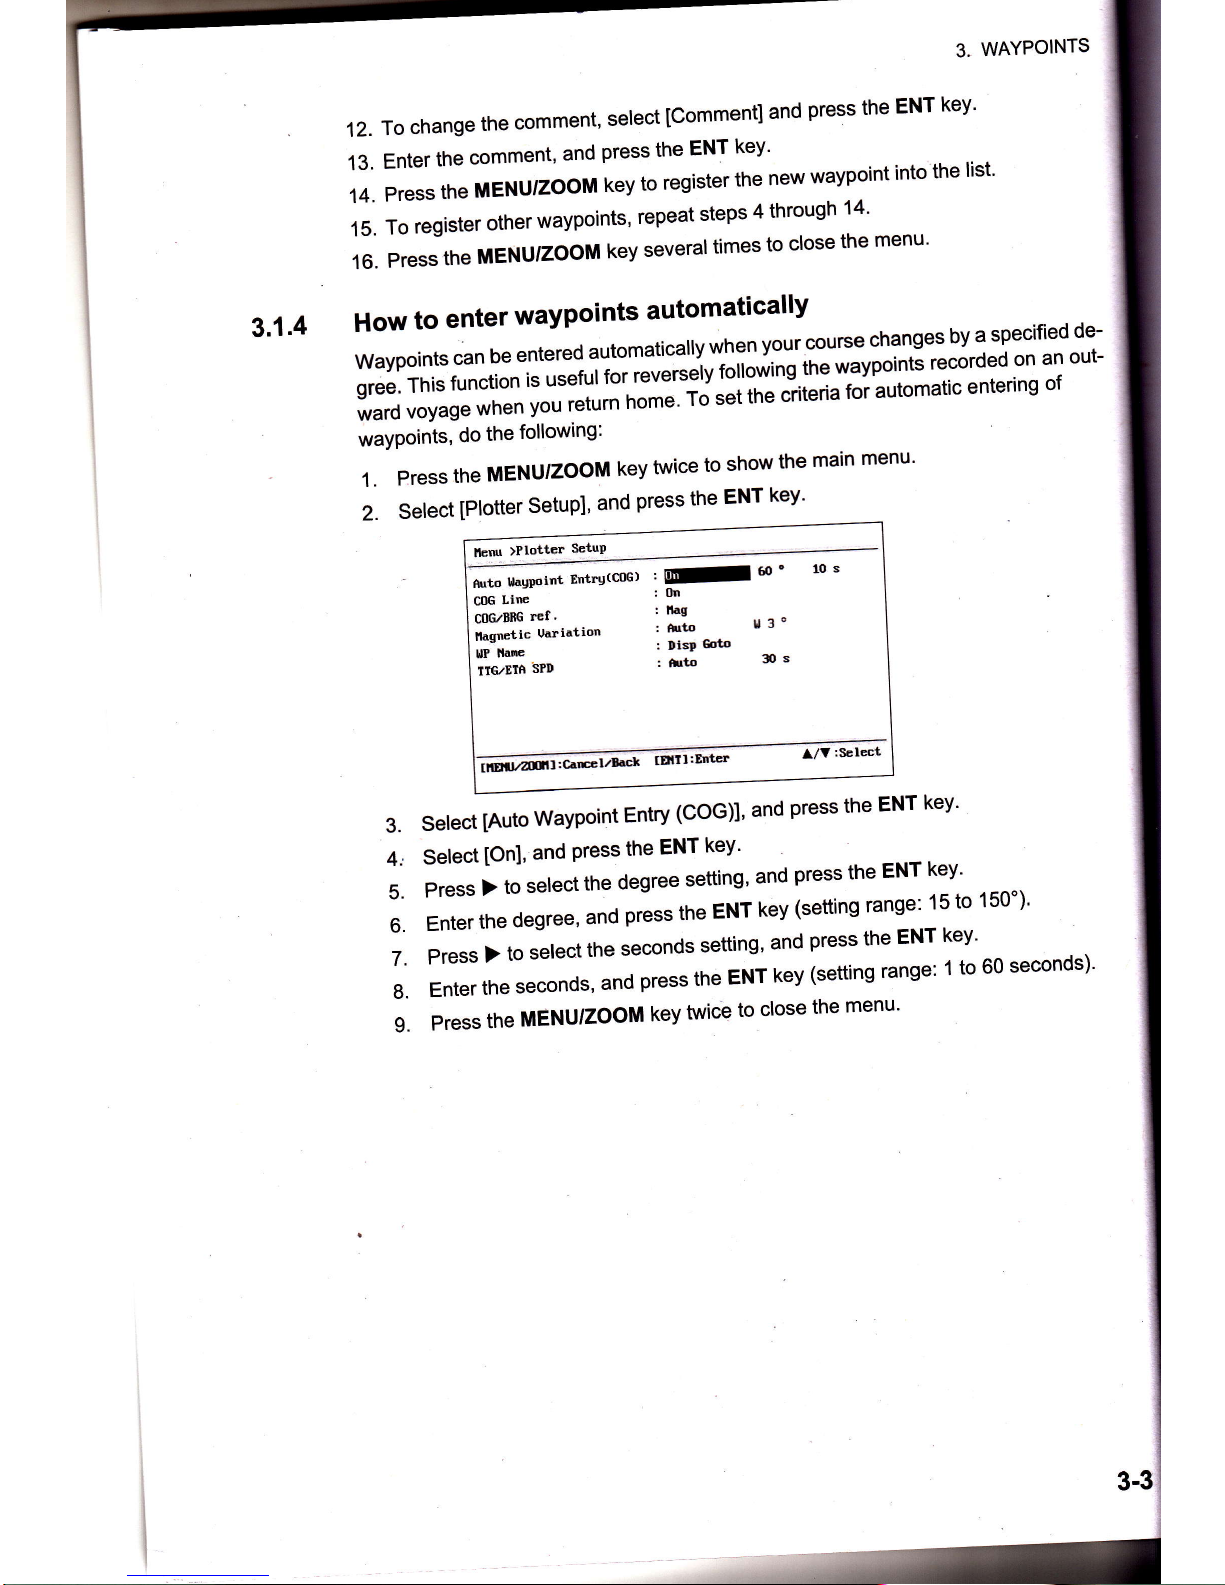
Select
[Plotter
Setup],
and
press
the
ENT
key'
1.
2.
Heru
>Plottu
Se-tuP
turto
l,taupoint
Ettrg(C0G)
coc
LiE
coG/BnG
Ef
.
ilagnetic
Uariation
Uf
Nane
IIG/EIfi
SPD
,E[-
60
"
1o
s
:0n
: ltag
:
hrto
I3o
r
DisD
Goto
:irto
Ss
ilolzzmrr,c"*r'rna'
TETII:EIIB
A/V:Screct
3.
4,,
5.
6.
7.
8.
I.
Select
[Auto
Waypoint
Entry
(COG)]'
and
press
the
ENT
key'
Select
[On],
and
Press
the
ENT
keY'
Press
)
to
select
the
degree
setting'
and
press
the
ENT
key'
Enter
the
degree,
"nO
p'""
the
ENT
key
(setting
range:
15
to
150')'
Press
)
to
select
the
seconds
setting'
and
press
the
ENT
key'
Enter
the
seconds,
and
press
the
ENT
key
(setting
range:
1
to
60
seconds)'
Press
the
MENU'ZOOM
key
twice
to
close
the
menu'

t-
2
tlou
to
Display
Waypoint
Name
Yqr
crr
display
waypoint
names
as follows:
Press
the
TENU/ZOOM
key
twice
to
show
the
main
menu.
Sdect
[Plotter
Setup],
and
press
the
ENT
key.
lb[r
>Plotter
Setup
firti
s,ulEirt
3n'trU(C0G)
:
off
60
o
10
s
CtE
Lim
I
lln
ClEzBffG
ref.
:
nag
llagrctic
Uariation
!
Auto
!,
:
o
u llnre
,
EEf
IIG/EIA
SPD
:
Auto
30
s
tltEu/Anfi
I
:cdncclzf,act
tfnit
tfnte"
l,/?:Select
e
Sebct
[WP
Name],
and
press
the
ENT
key.
Flect
[Disp
Goto],
[Disp
Ail]or
[Disp
Route],
and
press
the
ENT
key.
Disp
Goto:
Displays
only
the
destination
waypoint
name.
Disp
All:
Displays
all waypoint
names.
Disp
Route:
Displays
allwaypoint
names
in
the
route
when
it is
set as
destination.
Prress
the
MENU/ZOOM
key
twice
to
close
the
menu.

3.3
3.3.1
3.3.2
3.
WAYPOINTS
How
to
Edit
Waypoints
Waypoint
position,
name, mark shape
and comment
can be edited
on
the
plotter
dis-
play
or through
the
waYPoint
list.
Note:
When
the
waypoint
chosen
is set
as
the destination,
the message
"Change
The
Waypoint.
Are
you
sure?"
appears.
How
to
edit
waypoints
on
the
plotter
display
Press
the cursorpad
to
place
the
cursor
on
the waypoint
to edit.
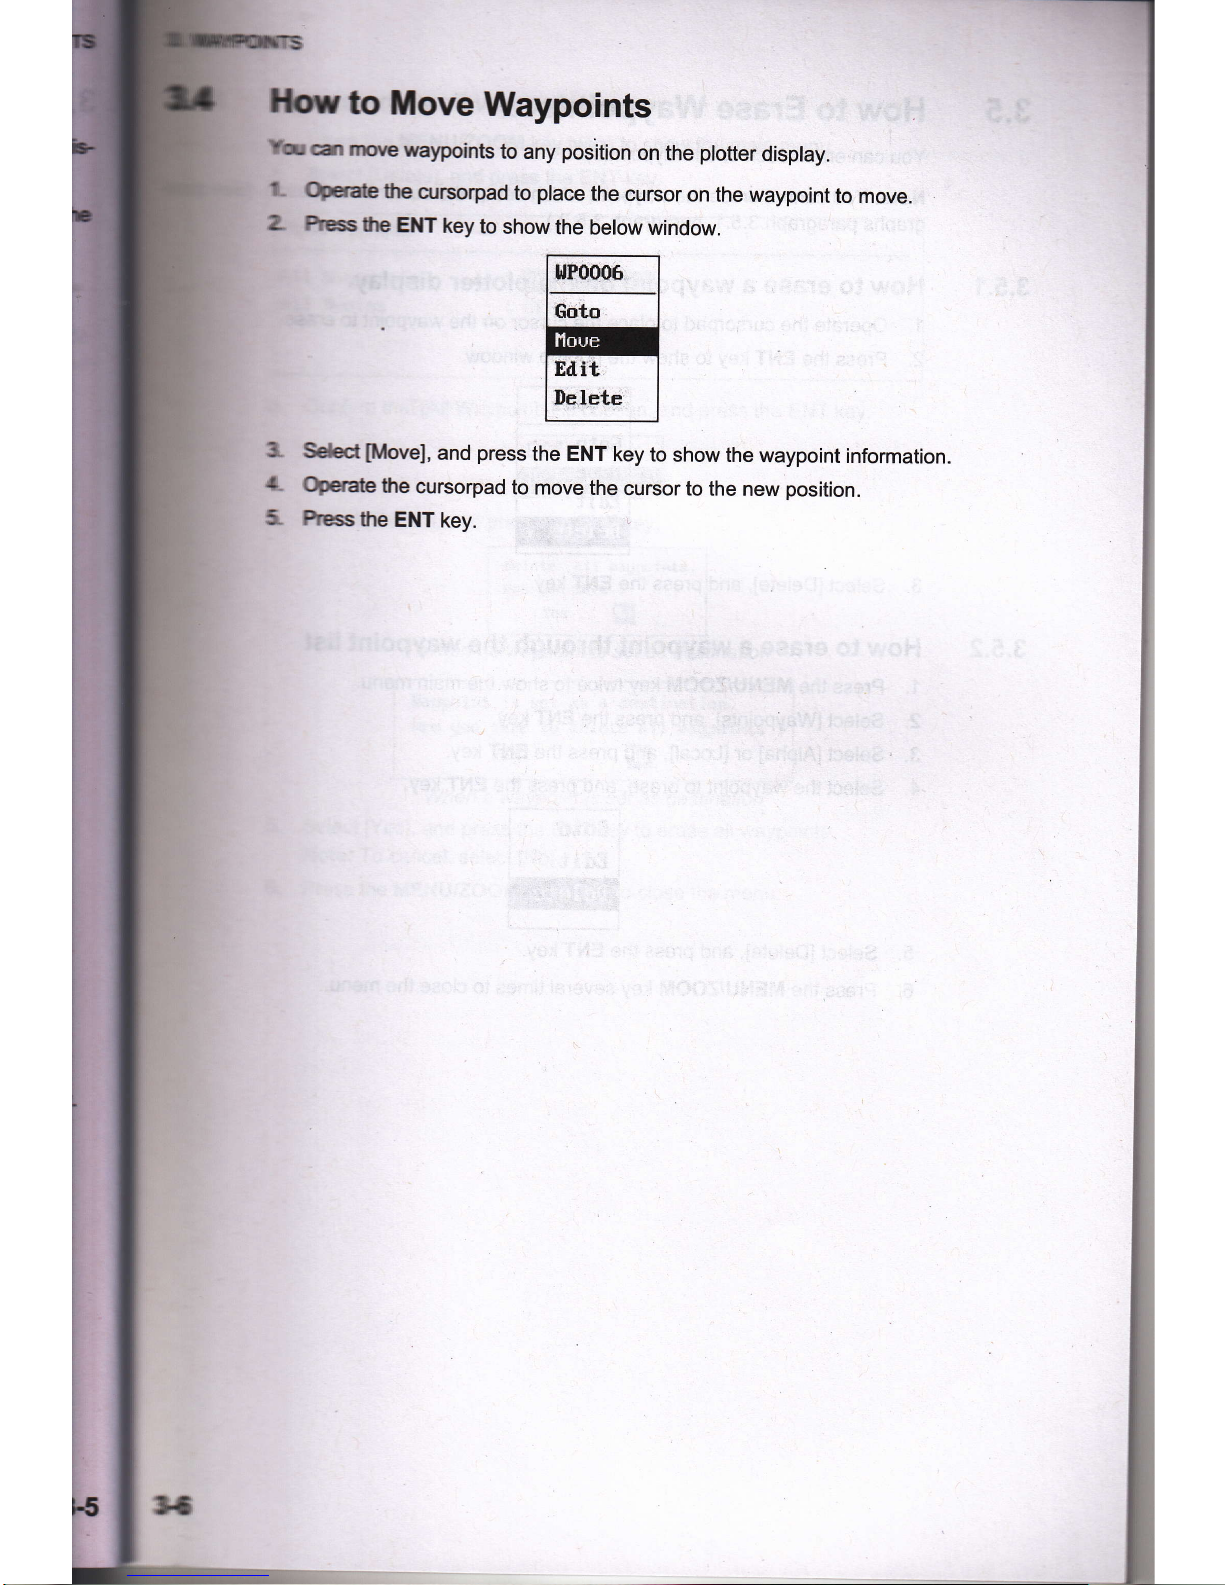
Press
the
ENT
key to show
the
below
window.
3D
[0.50
nm
I
B]{G
+
{
.,,,,[.r!,i,
BRG
+
222
+
22o36'14-4'r
,l
{
4"39'33.5'e
3.
Select
[Edit],
and
press
the ENT
key
to show
the
waypoint
information.
4. Edit
the
waypoint
(see
the
paragraph
3.1.3).
5.
Press
the
MENU/ZOOM
key to
return
to the
plotter
display.
How
to edit
waypoints
through
the
list
1. Press
the
MENU/ZOOM
key twice
to show
the
main
menu.
2. Select
[Waypoints],
and
press
the ENT
key.
3. Select
[Alpha]or
[Local],
and
press
the ENT
key.
Alpha:
The list
shows
waypoints
in alpha
order'
Local:
The list shows
waypoints
order
the nearest
to the
furthest'
4. Select
the
waypoint
to edit,
and
press
the ENT
key to show
the
below
window.
5.
6.
7.
Select
[Edit],
and
press
the ENT
key
to show
the waypoint
information.
Edit the
waypoint
data
(see
the
paragraph
3.1.3).
Press
the MENU/ZOOM
key several
times
to close
the menu.
ffove
Waypolnts
lmemypoints
to any
position
on the
plotter
display.
tnqrrsorpad
to
place
the cursor
on
the waypoint
to move.
IE
EilT
key
to
show
the
below window.
filwel,
and
press
the ENT
key to
show the
waypoint
information.
tte
arrsorpad
to move
the
cursor to
the new
position.
the
ENT
key.

3.
WAYPOINTS
How
to
Erase
WaYPoints
You
can
erase
eacfi
or all
waypoint(s).
Note:
you
cannot
tirase
the
waypoint
which
set
as
the
current
destination.
(See
graphs
paragraph 3-5.1,
paragraph
3'5'2.)
3.5.1
How
to
enase
a
waypoint
on
the
plotter
display
1. Operate
lhe
cursorpad
to
place
the
cursor
on
the waypoint
to erase'
2.
Press
tre
EI{T
key
b show
the
pop-up
window'
3.5.2
3.
Select
[Delete],
and
press
the
ENT
key.
How
to
erase
a
waypoint
through
the
waypoint
list
1.
Press
the
MENU/'ZOOM
key
twie
to
show
the
main
menu'
2.
Select
[Waypoints],
and
press
the
EllT
key.
3.
Select
[Alphal
or
[Locali,
and
press
the
Et{T
key'
4. Select
the
waypoint
to erase,
and
press
the
ENT
key'
5.
Select
[Delete],
and
prcss
the
ENT
key.
6.
Press
the
MENUIZOOT
key several
times
to close
the
menu'

ilil b erase
all waypoints
N- Press tte f,ENU/'ZpOM
key twice
to show
the
main
menu.
L Sded
[Delete],
and
press
the ENT
key.
1- )*lete
I lugpnints
I htEs
'ry
:
0ff
a
Cmfirm
that
[AllWaypoints]
is chosen,
and
press
the
ENT
key'
{-
Sdect
[Delete],
and
press
the
ENT
key.
Ilelete
all
uagpoints.
Are
gou
sirre
?
Ies
E
When no
waypoint
is sef
as
destination
llagpoint
is
set as
a destination.
Are
gou
sure
to
delete
all
r,lagpoints
?
E
Ies
When a waypoint
is sef as
destination
Select
[Yes],
and
press
the
ENT
key to
erase
all
waypoints.
Iote: To cancel,
select
[No].
Press the MENU/ZOOM
key twice
to close
the menu.
5-
6-

I
4.
ROUTES
ln many cases a trip from
one
place
to another involves
several course changes,
quiring
a series of waypoints
which
you
navigate
to, one after another. The
seq
of
waypoints leading
to the ultimate destination is
called a route.
Your
unit can
matically
advance to the next waypoint on a route,
so
you
do not have to change
destination
waypoint
repeatedly.
How to Greate a New Routes
You
can store
up to 100 routes,
and a
route
can
have
30 waypoints. A
route is
con-
structed
with the
waypoints
you
have entered.
Wavooint
(lntermedjate point)
4,1
1.
2.
3.
Wavooint
(Arrivblpoir
Wavooint
(lntermediate
point)
./
Wavooint
(lntermediate point)
Sample route
Press
the MENU/ZOOM key twice to
show the main menu.
Select
[Routes],
and
press
the ENT key.
Press the ENT
key to show the route list.
ilenu >nutes )noote Ltst
llar
Corrent TLDG(kn)
llunter
tllElltlrzlloll
:
darce izBack
l/Y:$eIect

ffitn ftat
[New]
is
chosen, and
press
the ENT key to
show the
route infonna-
hr
tr }l{tGs
>}urte List }Xoute
Info,
b:
h.:
Iotal.LEG O,00 In 0Points
tEG
(kn)
BRG
(o.)
1
ItEllzZfiIlI
:Cancel/Eack
tElltl
:Eriter
ll?
:Select
S Press the
ENT key to
change
the route name.
Operate
the cursorpad
to enter
the route name, and
press
the ENT key
(maxi-
mrm:
six characters).
Ress Y
then ENT key.
A
Operate the
cursorpad to enter the comment
(maximum:
18
characters).
g-
hess Y
to move the
cursor
to
['1],
and
press
the ENT key.
a
T.
10.
11.
12.
13.
11-
15.
Confirm
that
[Add]
is
chosen, and
press
the ENT key.
Select
[Alpha]
or
[Local],
and
press
the ENT
key
to show the waypoint list.
Sdect the
waypoint to
add
to the route, and
press
the ENT
key.
The
chosen waypoint
(as
the starting
point)
is registered
to
[1].
Press V
to select
[2],
and
press
the
ENT key.
Repeat
steps 10 through 13
to complete
the route.
Press
the
MENU/ZOOM key
severaltimes
to close the menu.
I
EToool
Y
I
Y

4.2
4,2.1
4.
ROUTES
How
to
Edit
Routes
You
can
edit
the
route
created'
Note:Whentherouteissetascurrentroutenavigation,themessage''Routeissetas
"
olttin"tion'
Are
you
sure?"
appears'
How
to
replace
a
waypoint
in
a
route
1.
Press
the
MENU'ZOOM
key
twice
to
show
the
main
menu'
2.
Select
[Routes]'
and
press
the
ENT
key'
3.
Select
lAlpha]
"'ii""''f
'
and
press
the
ENT
key
to
show
the
route
list'
4.
Select
the
route
to
edit'
"nf11the|NT
kev'
I eoto I
Eil
I
Delete
I
ll
5.
Select
[Edit]'
and
press
the
ENT
key
to
show
the
route
list'
6.
Select
the
waypoint
to
replace'
and
press
the
ENT
key'
lcmttg" I
=-
lili:ql
7.
Select
[Change]'
and
press
the
ENT
key'
8.
Select
Wpnal'
[Uocatl'
and
press
the
ENT
key
to
show
the
waypoint
list'
9.
Select
the
new
waypoint'
and
press
the
ENT
key'
10.
press
the
MENUriooM
key
severar
times
to
crose
the
menu'
How
to
delete
a
waypoint
from
a
route
1.
press
the
MENU/ZOOM
key
twice
to
show
the
main
menu'
2.
Select
[Routes]'
and
press
the
ENT
key'
3.
Select
[Alpha]
or
[Uocat]'
and
press
the
ENT
key
to
show
the
route
list'
4.
Select
the
route
to
edit'
and
press
the
ENT
key'
5.
Select
[Edit],
and
press
the
ENT
key
to
show
the
route
information'
6.
Select
the
waypoint
to
delete
from
the
route'
and
press
the
ENT
key'
7.
Select
[Delete]'
and
press
the
ENT
key'
B.
Press
the
MENU'ZOOM
key
severaltimes
to
close
the
menu'
l
4.2.2
i
41

]lilb
insert
a waypoint
in
a
route
Toisert
a
waypoint
in a route,
do the following:
Press
the ilENU/ZOOM
key
twice to show the main menu.
Sc{ect
[Routes],
and
press
the ENT key.
Sdect
[Alpha]
or
[Local],
and
press
the
ENT
key to show the route list.
Sdect the route
to edit,
and
press
the ENT
key.
Sdect
[Edit],
and
press
the ENT key to
show
the route list.
Sdect the waypoint
which will
come after
the waypoint to
be
inserted,
and
press
the ENT key.
Sdect
[Add],
and
press
the ENT key.
Sdect
[Alpha]
or
[Local],
and
press
the ENT key to show the waypoint list.
Select the waypoint,
and
press
the ENT key.
Press
the MENUIZOOM key
several times
to
close
the menu.
t-
L
3.
1-
e
6-
t.
E.
9.
t0.
]lou
to temporarily
deselect a waypoint in a route
Yqr
can temporarily
deselect
an unnecessary
waypoint from a route.
Using
the route
ctffi in
the illustration
shown below as an exampie, deselect the
second
interme-
ft waypoint.
CNSZ
(Starting
point)
lntermediate ooint 2
(wPr
002)
lntermediate
point
1
(wPT
oo1)
|
SINGP
Fyou
reconstruct
the route
without the second intermediate
point
it would
look like the
fustation
below.
WPT
OO2
sKtP
*002'
o
WPT
OO1
CNSZ
WPT
OO3
I.
Press
the MENU/ZOOM
key twice to
show
the main menu.
2. Select
[Routes],
and
press
the ENT key.
3.
Select
[Alpha]
or
[LocalJ,
and
press
the ENT key to select the route
list.
1.
Select the route
to edit,
and
press
the ENT key.
5.
Select
[Edit],
and
press
the ENT
key to shsw the route information.
6. Select
the waypoint
to skip, and
press
the
ENT
key.
7.
Select
[SkipJ,
and
press
the ENT key to show
"X"
next to
the waypoint
chosen at
step 6.

4.3.1
4.3.2
4. ROUTES
8.
Press
the
MENU/ZOOM
key
severaltimes
to
close
the
menu'
Note:
To
restore
waypoint
to a
route,
select
[Skip
Offl
at step
7, and
press
the
ENT
key.
How
to
Erase
a
Route
You
can
erase
routes
individually
or
collectively'
How
to
erase
a
route
through
the
route
list
Note:
The
route
used
as
route
navigation
can
not
be
erased'
1.
Press
the
MENU/ZOOM
key
twice
to show
the
main
menu'
2.
Select
[Routes],
and
press
the
ENT
key'
3.Select[Alpha]or[Local],andpresstheENTkeytoshowtheroutelist.
4.
Select
the
route
to erase,
and
press
the
ENT
key'
5.
Select
[Delete],
and
press
the
ENT
key
to
erase
the
route
chosen
at step
4'
6.
Press
the
MENU/ZOOM
key severaltimes
to close
the
menu'
How
to
erase
all
routes
1.
Press
the
MENU/ZOOM
key
twice
to
show
the
main
menu'
2.
Select
[Delete],
and
press
the
ENT
key'
3.
Select
[All
Routes],
and
press
the
ENT
key'
4.
Select
[Delete],
and
press
the
ENT
key
to
show
the
following
message.
Ilelete
all
routes;
fire
golr. sure
?
Yes
E
When
no route
is
set as
destination
ffoute
is
set
as
destination.
Are
gou
sure
to
itelete
all
routes
?
Ies
E
When a route
is
set
as destination
Select
[Yes],
and
press
the
ENT
key
to erase
all
routes'
Note:
To cancel,
select
[No].
Press
the
MENU/ZOOM
key
twice
to close
the
menu'
5.
6.

DESTINATION
trL*dion
can be set
by
four
methods
:
by cursor, by waypoint,
by
route
and by
nn
pc*-titm.
Previous
destination is cancelled
whenever
a new destination is
set.
nESitg
by MOB
position
is
described
in
chapter
1. When
setting a destination, a
Uphe b shown
between
own boat and the destination selected. Also, the range
d bsiq from
own
boat to the destination are shown at the left-hand side of the screen.
3D
1050
nm
I
N 22.36.',22.5"
H ?2'36'15.O!',
L14139t,45-tr'l
RIG
(nm
0.10
BRG
311
22"39',{
g-g'x
{
,l
4"39'53-{'e
How
to Set Destination by Gursor Position
Yor
can set
a destination
at
the
position
with no waypoint. This
destination
is
called
qicft
Poinf.
On
the
plofter
display,
operate
the cursorpad to
place
the
cursor on the
location
desired
for
destination.
Press
the
GO TO key
to enter the
waypoint as the
quick point.
The
quick
waypoint
is shown with a
green
solid circle, and named
as
"QP".
This
point
is
saved in
the waypoint list automatically.
Cancel
the destination,
referring to section 5.4,
when
arriving at the waypoint.
IG:
The
quick
point
set is erased
when
a
new
one
is
entered.
T-
L
3-

5.
DESTINATION
5.2
How
to
Set
Destination
by
Waypoint
Youcansetawaypointasdestinationbyusingthecursororthewaypointslist.
5.2.1
How
to
set
a
destination
waypoint
with
the
cursor
l.ontheplotterdisptay,operatethecursorpadtoplacethecursoronthewaypoint
wnicn-v'ou
want
to
set
as
the
destination'
2.
Press
the
ENT
keY'
5.2.2
3.
Select
[Goto],
and
press
the
ENT
key'
4.
Cancel
tne
destination
referring
to
section
5'4
when
arriving
at
the
waypoint'
How
to
set
a
destination
waypoint
through
the
list
1.
Press
the
MENUIZOOM
key
twice
to-1now
the
main
menu'
2.
Select
[Waypoints]'
and
press
the
ENT
key
'ri,
::::tilffiilfi'rt,'"d
press
the
ENr
kev
to
show
the
wavpoint
tist
5.
6.
How
to
Set
Route
as
Destination
You
can
set
a
route
as
destination
through
the
list'
l.PresstheMENU,zooMkeytwicetoshowthemainmenu.
2.
Select
[Route]'
and
press
the
ENT
key'
I
I
5.3
ffiEonxc-"*tBack
tEl.trl
:Enter
l/V:Setect
103.?
z?o
0.26
99
5-2

lt-
5.
DESTIT{ATIC{
t
Srr"EtlAbtal
or
[Local],
and
press
the ENT key;
h >hrt6 >Borte
List
lhE
Corrent ILf,G(kr)
ltuntm
tlEtvzulll:carEel/nack tEilrl;Enter
llv:selmt
SerecttE route
to set as a destination,
and
press
the ENT
key.
@
Irait I
I o"r.r. I
ll
S€lect
[Goto],
and
press
the ENT
key.
Sebct
[Fonrard]
or
[Reverse].
Forrard:
Follows
waypoints
in
order
registered
(1-+2-+3...)
Reterse:
Follows
waypoints
in reverse order
registered
(30 (when
maximum en-
bred)
-+29-+28...-->1)
Presstte
ENT key
to show
the
plotter
display.
The
destination
route is shown with
waypoints
connected with legs.
Carcd the
destination referring
to section 5.4
when
arriving at
the waypoint.
lhb
chanoe
the following direction
after vou set a
route
as
destination
tftr
you
start doing the route destination,
you
can change the following direction,
Fruardl+lReversel
or vice versa. Place the cursor on a
leg
of
the route, and
press
It EXT
key to show
the
following
pop-up
window. Select
[Reverse]
(or
[Forward]).
Tlsr,
select
[Yes]
and
press
the
ENT key.
llG: lf
your
boat
has
not
yet
arrived at
the fustwaypoint in the route, the current
route
desilinatbn is
cancelled if
you
select
[Reverse]
(or[Foruvard]).
Setthe
route destination
again.
How
to
Cancel
Destination
Yq.r
can
cancel destination by using the cursor, or through the list.
How
to cancel
destination
with
the cursor
1-
On the
plofter
display, operate the cursorpad
to
place
the cursor on the
waypoint
(route)
set as the current destination.
5-
&
7-
&
f.,fi
5€

5.
DESTINATION
5.3
Caneel
Boute
ltauigation'
Are
gou
sure
?
Ies
E
Cancel
Goto'
fire
gou
sure
?
tes
E
{r,
l"rrxe
Jesl'
and
press
the
ENT
key'
-:
iarr:B
select
[No]'
'e,
wayPoint
destination)
(for
route
navigation)
tht
to
cancel
destination
through
the
list
T
;!rss
fE
IENUZOOM
key
twice
to
show
the
main
menu'
L
sflmffi
'rtra,r,ointsl
(or
[Routes])'
and
press
the
ENT
key
twice'
Sflmf,
f,e
*ai,toint
(route)
set
as
the
*t*^t
d"tt't"t"l
*.$$$""
Edit
De
lete
SW
fi,
[smdiil+6
(for
route
navigation)
ENT
keY.
":el
ffoute
'lu
sulrE
l{auigation.
'l
E
Hiltl
dno
rou
dttrtr
d,ril$o
"
FilrilEm
Z
SuhrlrmH
r
5-2
ro
close
the
menu'

A1ARMS
Overview
There
are
total
nine
alarm
conditions
which
generate
both
audio
and visual
alarms:Anival
*rm'
Anchor
watch
alarm,
XTE
(cross-Track
Error)
alarm,
speed
alarm,
speed
B6ed
ouput
alarm,
WAAS
alarm,
Time
alarm,
Trip
alarm
and
odometer
alarm.
llhen
an
alarm
setting
is
violated,
lhe
buzzer
sounds
and
the name
of
the
offending
darrn
and
the
alarm
icon
appear
on
the
display
(alarms
other
than
Speed
Based
out-
tr
t).
You
can
silence
the buzzer
and
remove
the
alarm
name
indication
by
pressing
any
key-
The
alarm
icon
remains
on
the
screen
until the
reason
for
the alarm
is
cleared.
Alarm
icon
(flashing)
Alarm
message
Lr-r
triua
xr
$Gcd
s
libir
&Her
UftllrZlffl
I
z
C ance
I zBack
l/V:Select
To
know
which
alarm
has
been
happened,
do
the following procedure.
1.
Press
the
MENU/ZOOM
key
twice
to
show
the
main
mehu.
?.
Select
[Messages],
and
press
the
ENT
key.
llerr
)Ilessages
O
XI}
fiLANT!
IllElu,/ZOOHI:CancelzBack
ffnf
t:inter
l/V
:Select
Example
alarm
message
The
display
shows
the
names
of offending
alarms.
krir
km
0ff
0ff
0ff
0ff
0ff
0ff
1.15
kn
0 .000
kra
0.0 knlh
00:00
n
0

6. ALARMS
Messaqe
and
meaninos
ment
trouble'
See
section
8'3'
6.2
Buzzer
TyPe
Selection
The
buzzer
sounds
whenever
an
alarm
setting
is violated.
You
can
select
the
type
of
buzzer
as
follows:
1.
Press
the
MENU/ZOOM
key
twice
to
show
the
main
menu'
2.
Select
[Alarms],
and
press
the
ENT
key'
3.
Select
lBuzzerl,
and
press
the
ENT
key'
Select
buzzer
type,
and
press
the ENT
key'
Short:
A short
beeP
sounds.
Long:
Three
long
beePs
sound.
Coniinuous:
Continuous
long
beeps
sound
until
a
key
is
pressed'
Press the
MENU/ZOOM
key
twice
to
ctose
the
menu'
6.3
How
to
Set
an
Alarm
Set
alarms
as
below:
Note:
For
the
Anchor
alarm,
press
the
wPT/MOB
key
to enter
the
waypoint
at
own
boat's
position, and
set
it as
destination
referring
to
paragraph 5'2'1'
1. Press
the
MENU/ZOOM
key
twice
to
show
the
main
menu'
4.
5.
6-2
The
boat
is off
its
intended
course
by
the
range
set'
The time
set
has
come.
The boat's
speed
is
higher
than
the
range
set'
The
boat
is approaching
the arrival
area'
The
boat
has
traveled
further
than
the
preset
trip
distance'
The
boat
has.traveled
the
total
distance
set'
The boat
has
moved
a certain
distance
(when it should
be
at
WAAS
signal
cannot
be
found.
NO WMS
SIGNAL!

6. ALARMS
L Select
[Alarms],
and
press
the
ENT
key'
lLrr
>6lars
Dua=,t
krir.nlzfirrchor
xtf,
Seed
ffiti
Iire
Irip
Odmter
il
firr iua I
0n
Bff
0ff
0ff
0ff
uff
0.50
*n
0.010
kn
0.O
kn.ah
os:*8
I
krrt
0km
ttlEtWZtlUllI
:CancelzEack
tElllI
:Enter
l1V:Select
3.
Select
an
alarm
item,
and
press
the
ENT
key'
4-
Do one
of
the
following:
(Anival/Anchor)
1) Select
[Arrival]
or
[Anchor],
and
press
the
ENT
key'
2\
Press
)
and
ENT
keY.
3)
Enter
the
alarm
area,
and
press
the
ENT
key'
(XIE,
Speed,
TriP and
Odometer)
1) Select
[On],
and
press
the
ENT
key'
2)
Press )
and
ENT
keY.
3)
Enter
the
value,
and
press
the
ENT
key'
(WAAS)
Select
[On],
and
Press
the
ENT
keY.
[Iime)
1) Select
[On],
and
press
the
ENT
key.
2)
Press )
and
ENT
keY
in
order.
3)
Enter
the
time, and
press
the
ENT
key'
4) For
12-hour
clock,
press
)
and
ENT
key'
5)
Select
[AM]
or
[PM],
and
press
the
ENT
key'
(Speed
Based
OutPut)
1) Select
[On],
and
press
the
ENT
key'
2)
Press
)
and
ENT
keY.
3)
Enter
the speed
at
which
to
close
the
contact
signal,
and
press
the
ENT
key'
4) Press
V
and
ENT
keY.
5)EnterthespeedtoopenthecontactSignal,andpresstheENTkey.
5.
Press
the
MENUIZOOM
key
twice
to close
the
menu'
Nde
1: To cancelan
alarm,
select
[Ofl
at
1) on
step
4'
ilote
2: You
can
activate
the
arrival
alarm
or the
anchor
watch
alarm;
they
cannot
be
activated
together.
6-3

6.
ALARMS
6.4
Alarm
DescriPtions
Arrival
alarm
The
arrival
alarm
informs
you that
"*l
!:ilis
approaching'a
destination
waypoint'
The
area
that
defines
""
i"ra
zone
is
that
of
a
circle
which
you
approach
from
the
outside
of
the
circle'
#il;;ii
'"'i'"t"
if
your
boat
enters
the
circle'
D
Own
boat's
position
Alarm
setting
Destination
waYPoint
K
'
Alarm
released
boat's
W,
Alarm
released
{ow
the
arrival
alarm
works
How
ffie
arnva'
at'7tt"
Ytv'r'e
Anchor
watch
alarm
:hat
your
boat
is
movin$
when
it
''h?'uld
The
anchor
watch
alarm
sounds
to
warn
you.l
be
at
rest.
Before
*o,"gin"'"""no,
*rt"n
"rrr.,'r"t
current
position
as
destination
wayPoint.
Alarm
setting
Destination
wayPoint
How
the
anchor
watch
alarm
works
64

6.
AT.Arc
il-
rlE
XTE
(Gross-Track
Errorl alarm
The
XTE
alarm warns
you
when own boat
is off its intended course.
Destination
waypoint
-o
'Alarm
setting
W
Alarm released
How
the XTE alarm
works
Soeed
alarm
The
speed alarm alerts
you
when the boat's
speed
is higher than the
alarm range set.
WAAS
alarm
This
alarm
alerts
you
when the
WAAS signal
is lost. Note that On cannot
be chosen
if
[Mode]
in
Menu>WAAS
is
set
to GPS.
Time alarm
The
time
alarm works
like
an
alarm clock,
releasing
audio and visual
alarms when the
time
entered has come.
Trio
alarm
The
trip alarm tells
you
when
your
boat
has traveled
further than the
preset
trip dis-
tance.
Odometer
alarm
This
alarm alerts
you
when
your
boat has
traveled the total distance
you
set.
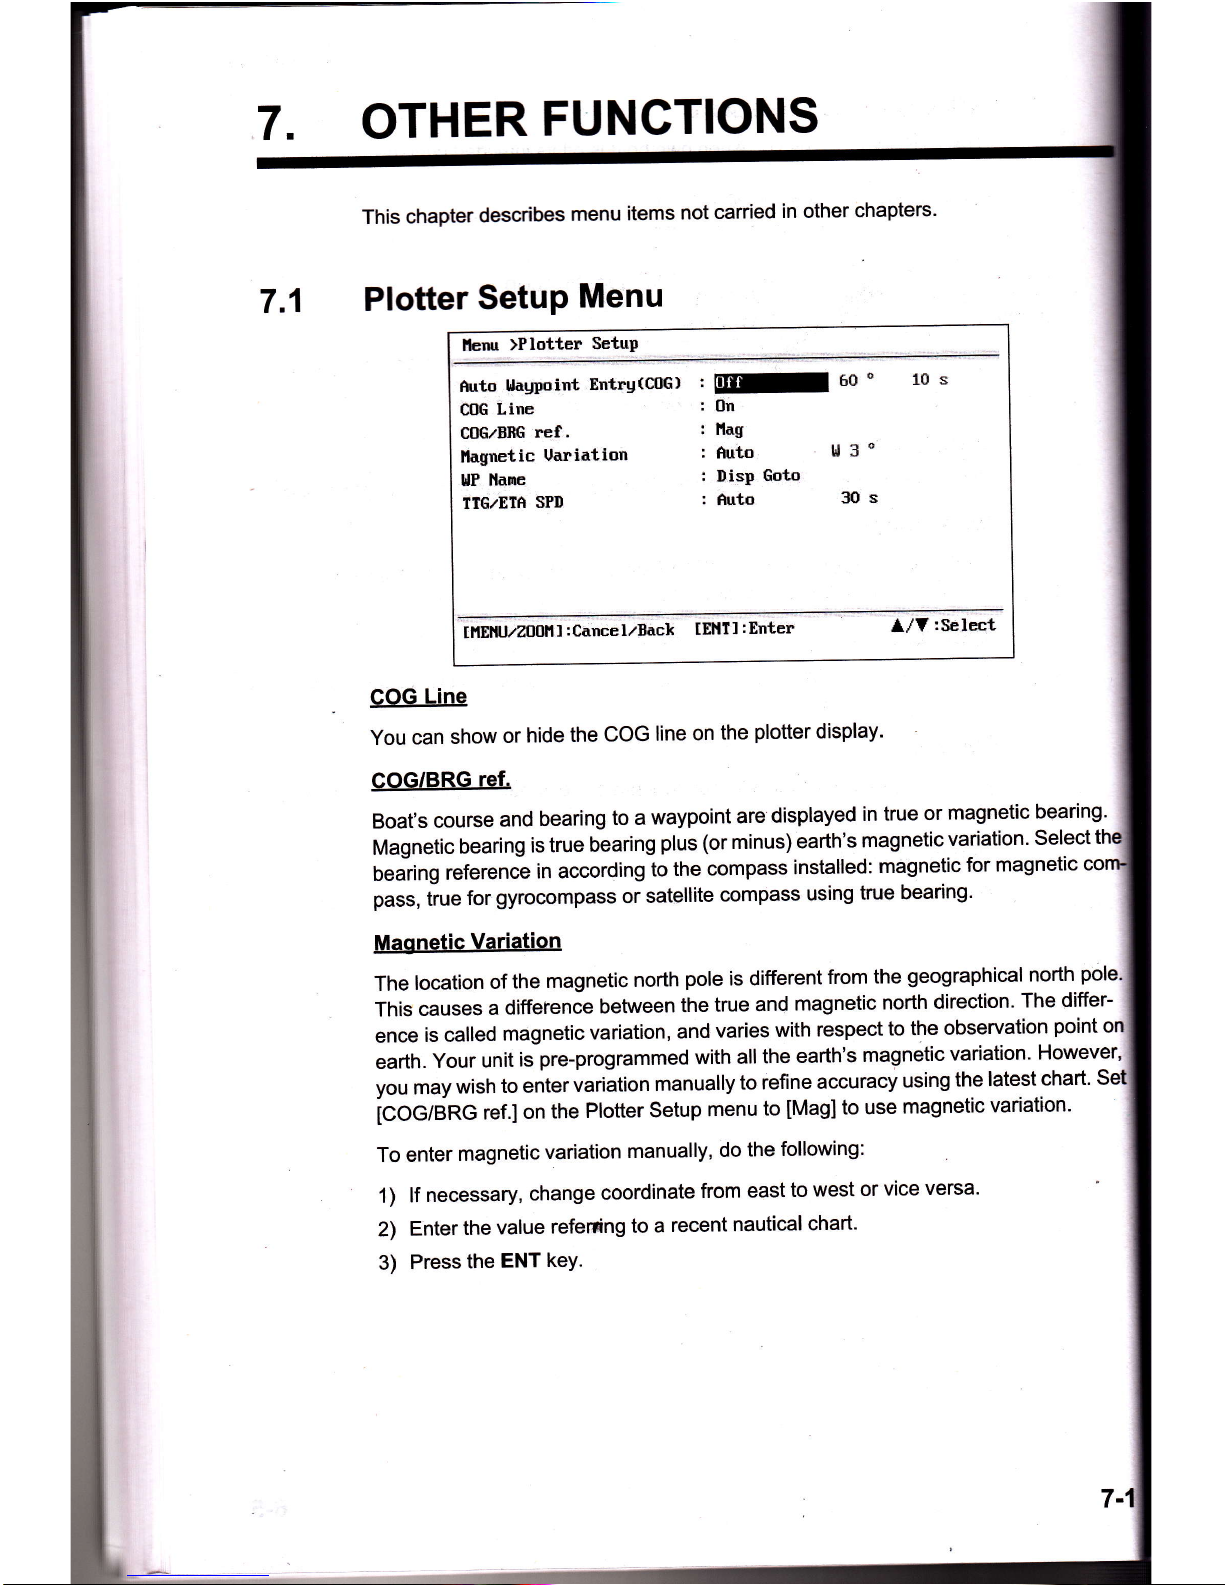
OTHER
FUNCTIONS
This
chapter
describes
menu
items
not
carried
in other
chapters'
7,1
Plofter
SetuP
Menu
llerur
)Plotter
SetuP
ftrto
llaypuint
EntrgtC[G)
t
ry
50'
C'G
Line
:
0n
C0GzBBG
ref.
:
lld$
llagnetic
Uariation
:
fiuto
lil
3
o
NP
llanre
:
DisP
Goto
ITG,/Effi
SFII
:
fiuto
30
s
10s
IilEilt
/Zn0HI
:CancelrBack
[EllTI
:Enter
l/Y
:SelEct
COG
Line
You
can
show
or
hide
the
COG
line
on
the
plotter
display'
COG/BRG
ref.
Boat's
course
and
bearing
to a
waypoint
are
displayed
in true
or
magnetic
bearing'
Magnetic
bearing
is true
bearing
plus
(or minus)
earth's
magnetic
variation.
select
tt
Uearing
reference
in according
to
the
compass
installed:
magnetic
for
magnetic
pass,
tiue
for
gyrocompass or
satellite
Gompass
using
true
bearing'
Maonetic
Variation
The
location
of
the
magnetic
north
pole
is different
from
the
geographical
north
pole
This
causes
a
difference
between
the
true
and
magnetic
north
direction.
The
differ-
ence
is called
magnetic
variation,
and
varies
with
respect
to
the observation
point
earth.
Your
unit
is
pre-programmed
with all
the
earth's
magnetic
variation'
However'
you
may
wish
to enter
variition
manually
to refine
accuracy
using
the
latest
chart'
Se
icoodnc
ref.l
on
the
Plotter
Setup
menu
to
[Mag]
to use
magnetic
variation.
To enter
magnetic
variation
manually,
do
the
following:
1)
lf
necessary,
change
coordinate
from east
to west
or
vice
versa.
2)
Enter
the
value
refening
to
a
recent
nautical
chart'
3)
Press
the
ENT
keY.
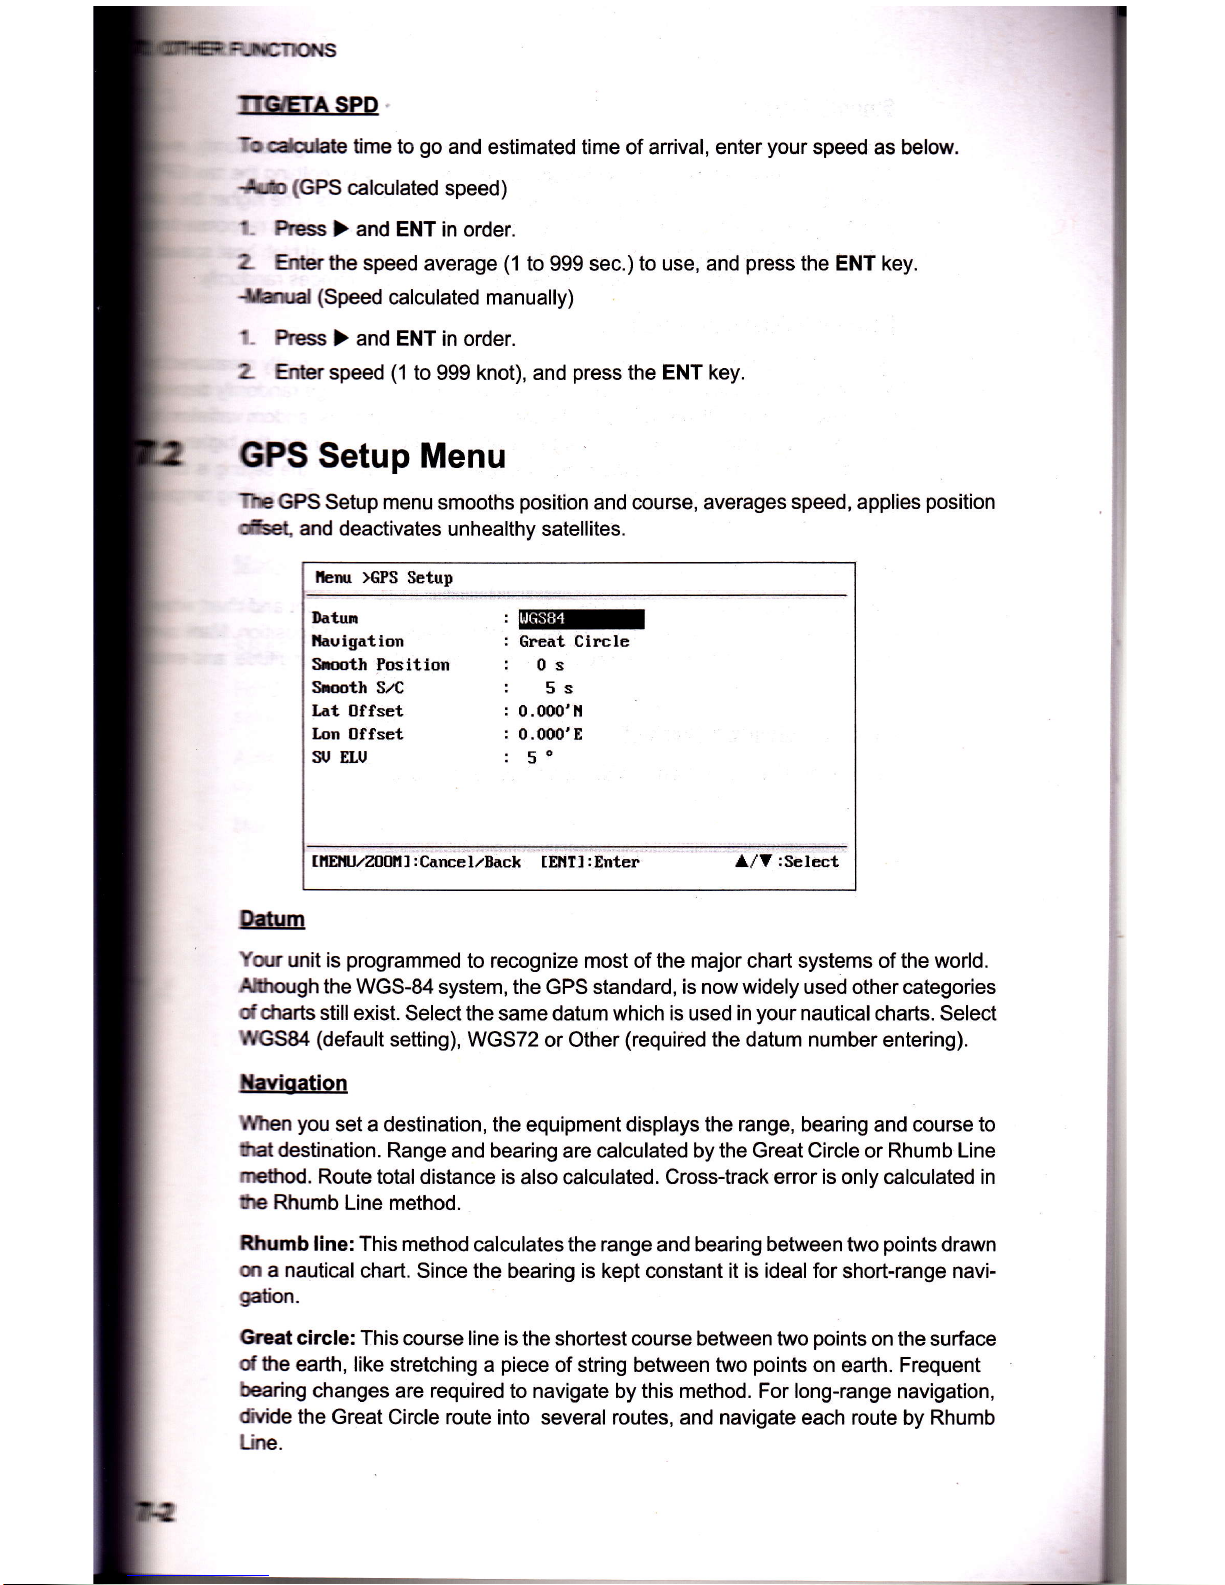
TTGETA
SPD
k*date
time to
go
and
estimated time of arrival, enter
your
speed as below.
tkt5
(GPS
calculated
speed)
t-
Press
>
and ENT in order.
L furthe
speed average
(1
to
999 sec.)to
use, and
press
the ENT key.
Srrd
(Speed
calculated manually)
l-
Ress
> and ENT in order.
L fur speed
(1
to 999 knot), and
press
the
ENT key.
GPS
Setup
Menu
TtE
GPS
Setup menu smooths
position
and course, averages
speed,
applies
position
Get,
and deactivates
unhealthy satellites.
lbru >GPS
Setup
Ihtun
llauigatiou
fuoth Position
Smth
S./C
Iat 0ffset
Ipn Offset
SJ ELU
,ry
:
Great Circle
:
0s
:
5s
:
0.000'li
r
0.000'E
:
5o
tllElL/Z00lll
:CnncelzBick
[Ellll
:Enter
l.,/V iSelect
Ildrm
Yq.n
unit is
programmed
to recognize most of the major chart systems of the world.
Alhough
the WGS-84
system, the
GPS
standard, is now
widely
used other categories
dcharts
stillexist.
Selectthe same datum which is used in
your
nautical charts. Select
IreSS4 (default
setting), WGS72
or Other
(required
the datum number
entering).
Xavioation
When
you
set a destination, the
equipment
displays the range, bearing
and
course to
lhst
destination.
Range and bearing
are calculated
by the Great Circle
or
Rhumb Line
meftod.
Route
total distance is
also calculated.
Cross-track error is only calculated in
trp
Rhumb
Line method.
Rhumb
line: This method
calculates the range and bearing between two
points
drawn
sr
a nautical
chart. Since the bearing is kept constant it is ideal for
short-range
navi-
galion.
Great
circle: This
course
line
is the shortest course between two
points
on the surface
dthe
earth, like
stretching a
piece
of string between two
points
on
earth. Frequent
bearing
changes
are
required
to navigate by this method. For long-range navigation,
dvide
the Great
Circle route into several routes, and navigate
each route by Rhumb
Une.
7.
OTHER
$nodr
Pcition
yurEntre
receMng
condition
is
unfavorable,
the
GpS fix
may
change
randomly,
rfte
boat is
dead
in water.
This
change
can
be reduced
by
smoothing,the
raw
fues.
The
setting
range is
from
0
(no
smoothing)
to
999 seconds.
The
higher
the
tirg
the more
smoothed
the raw
data,
however
too
high
a setting
slows
response
to
change
in latitude
and longitude.
This
is especially
noticeable
at high
boat
'0'
is
the normal
setting; increase
the
setting if
the
Gps fix
changes
randomly.
Smooth
S/C
(speed/course)
During
position
fixing,
your
boat's velocity (speed
and course)
is
direcfly
measured
receiving
GPS satellite
signals.
The
raw
velocity
data may
change
randomly
ing
on receiving
conditions
and
otherfactors.
You
can reduce
this random
variation
increasing
the
smoothing.
Like
with latitude
and longitude
smoothing,
the higher
speed
and
course smoothing
the more
smoothed
the
raw
data. lf
the
setting is
too
high,
however,
the response
to speed
and course
change
slows.
The
setting range
from
0
(no
smoothing)
to
9999
seconds.
Lat Offset.
Lon
Offset
lf
there is
the
error between
the
positions
shown
on
your
equipment
and chart
when
docking
at a
pier,
you
may
apply
an
offset to
latitude
and longitude
position.
Mark
boat's
position
on the
chart to
calculate
the error
with latitude
and longitude,
and
the
values.
SV
ELV
(satellite
elevation)
Set
the minimum
elevation
of
satellites
to use
to fix
position.
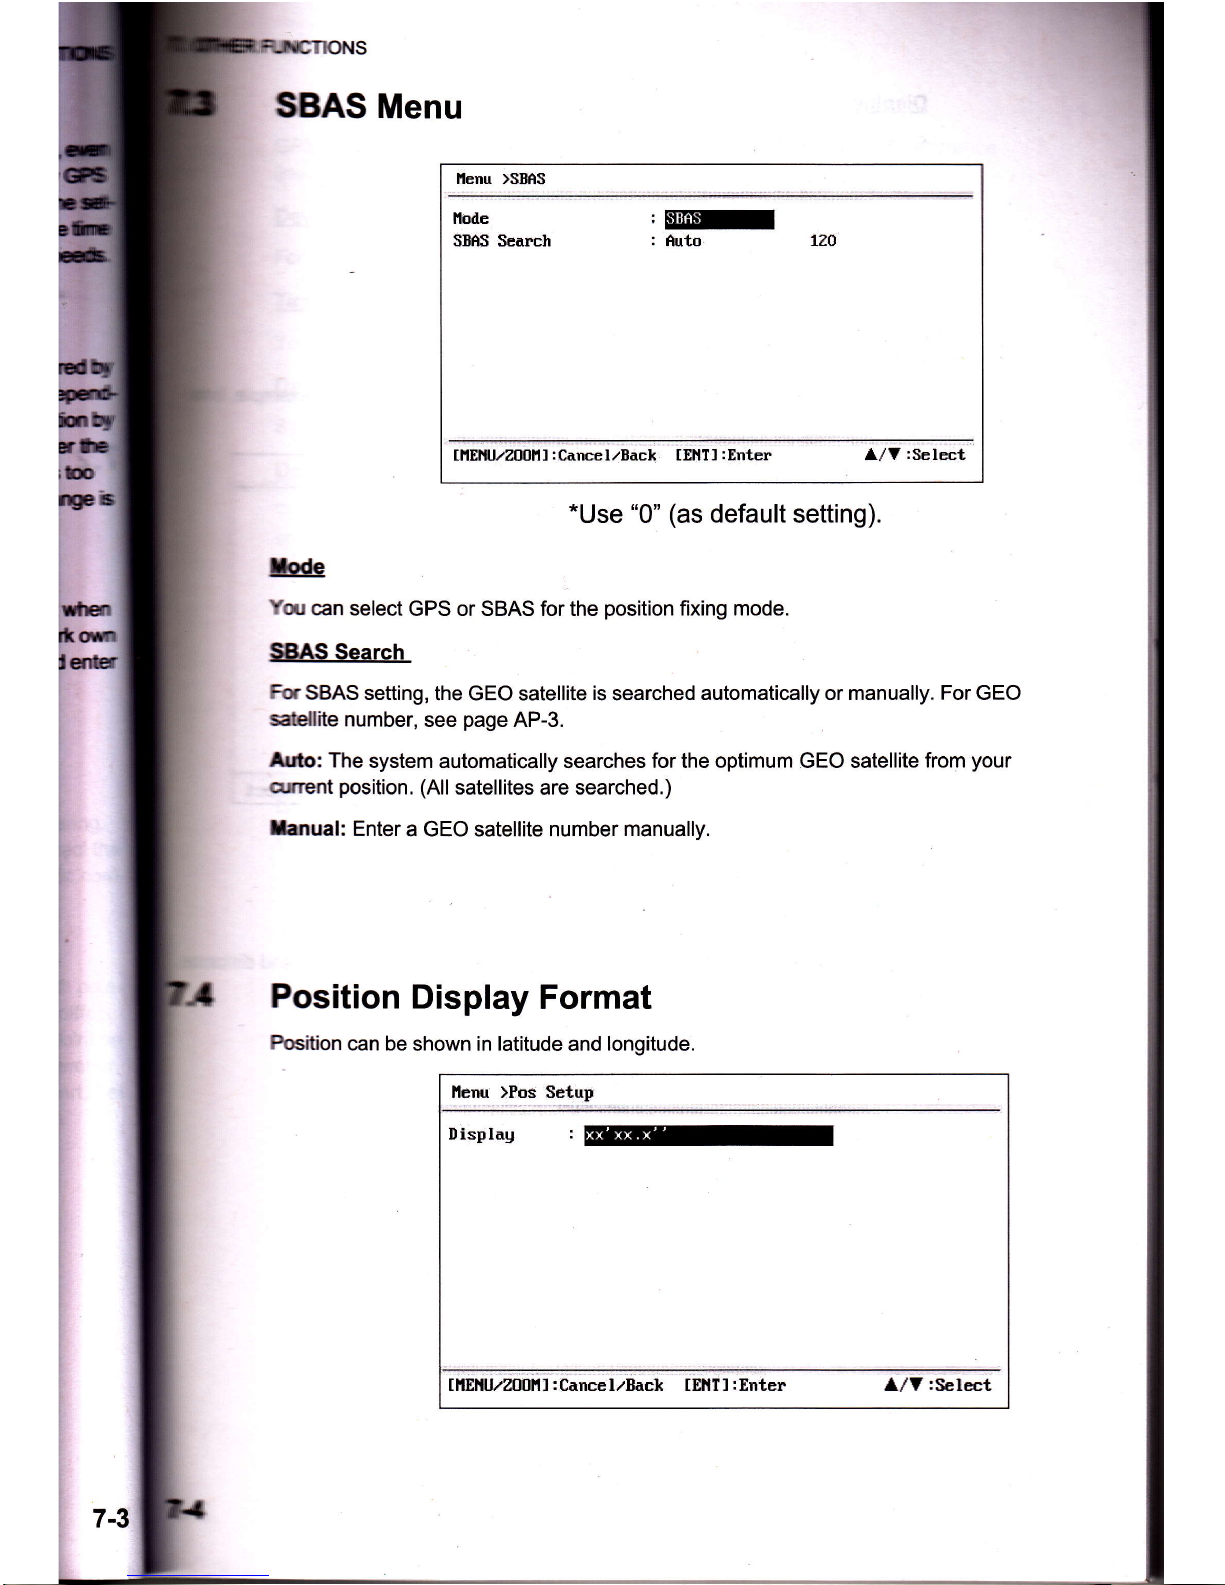
SBAS
Menu
llenu )SBfiS
l'loile
SBAS
Search
'ry
:
Auto 130
tilEilU/Z00|'ll:CanceluBack
tEllTl:Enter
l/V
:Select
*Use
"0"
(as
default
setting).
Iode
Yqr
can select
GPS or SBAS for the
position
fixing mode.
SBAS
Search
For
SBAS
setting,
the GEO satellite
is
searched
automatically or manually. For GEO
satellite
number,
see
page
AP-3.
Arto: The
system automatically searches for the optimum
GEO
satellite
from
your
qrrrent
position.
(All
satellites
are searched.)
Ianual:
Enter
a GEO satellite number
manually.
Position
Display
Format
Position
can be
shown
in latitude
and
longitude.
llenu )Pos Setup
Ilisplag
:
t H$tu/200il I
:
Cance I rBack t Et{T I
:
Enter A/V:Select

DisolaY
Select
the
Position
format'
.
xx.)oo(':
Shows
UL
position
with
no
seconds'
.
xx':o<.t':
Displays
UL
position
with
seconds'
7.5
SYstem
Menu
lntheSystemmenu,youcancustomizevariousdisplaysettings,forexample'
and
date
formats,
etc'
Ileg
BeeP
Language
Units
Iirne
tlffset
Dagligltt
Sauing
line
,Iine
DisPlag
Ilate
llisPlag
:
English
:
tqn,lrnrh
:
+
B:00
:
tlff
: tZHsur
:
IIIIrl'llt/Il
II€no
Self
Test
Beset
Lla
:Se
iect
Key
Beeo
This
item
turns
the
key
beep
on
or
off'
Units
The
Units
item
lets
you
select
the
unit
of
measurement
for
range'
speed
and
from
the
units
shown
below'
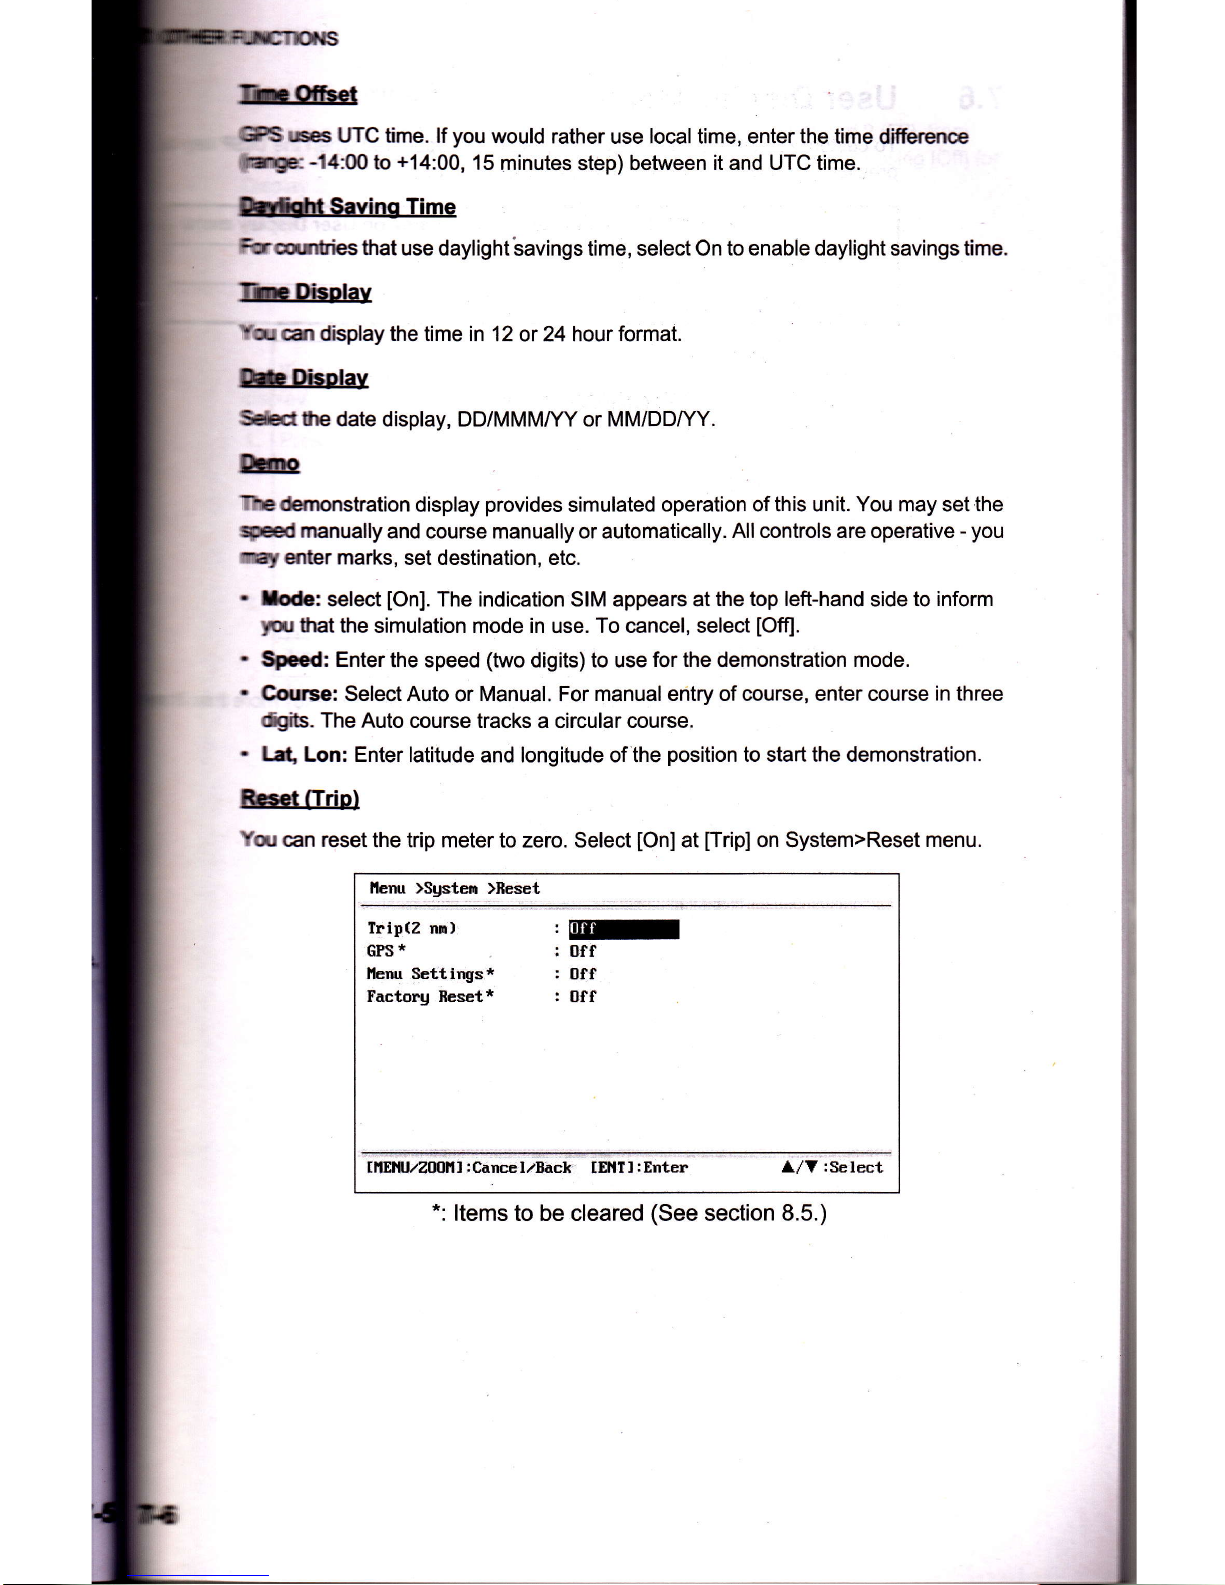
fin
Offset
GPS r,pes
UTC time.
lf
you
would rather
use
local
time, enter
the
time differenoe
iillltrgr:
-14:00
to
+14:00,
15 minutes step) between it and UTC time.
Drfsht
Saving Time
Fururnties
that
use daylight'savings
time, select On
to enable daylight
savings
time.
Thn
Disptay
v
,r 6t
display the time in 12
or 24hour
format.
Ib
Disolay
Sel€ctthe
date display, DD/MMMffY or MM/DD|/Y.
tlrno
?rc
demonstration
display
provides
simulated
operation of this unit.
You
may set
the
speed manually
and course manually or automatically.
All controls are operative
-
you
rnay
enter marks,
set destination, etc.
.
fode:
select
[On].
The indication SIM appears at
the top left-hand
side
to inform
you
that the
simulation mode in use. To cancel, select
[Offl.
Speed:
Enter the
speed
(two
digits) to use
for the demonstration mode.
Course:
Select Auto
or
Manual. For manual entry of course, enter course
in three
dQits.
The Auto
course tracks a circular course.
.
Lat,
Lon: Enter latitude
and longitude of
the
position
to start the demonstration.
Rcset
ffrip)
Yqr
can reset the
trip meter to zero. Select
[On]
at
[Trip]
on System>Reset menu.
llenu )$gstem
)fieset
Irip(Z
nn)
GPS
*
l'lenu Settings*
Factorg Heset*
,ry
:
Off
:
off
:
Off
IITENU/Z00i{!
:
Cancel/Back [EllT]
:
Enter
l/Y:Select
Items to be cleared
(See
section
8.5.)

7.6 User
Display
Menu
To customize
user displays,
which are
[6]
and
[7]
appeared
when the DISP
key
b
pressed (see
section
1.4), use the User
Display menu.
llenu illser
Displag
Displag 1
,E@
Ilisplag
2
:
C0G
tilEHUzZ0OHI:CancelzBack
tEHf
I:f,nter
l,/Y
:Select
Note:
You can show
the User Display
menu by
pressing
the ENT
key more
than
seconds
at the
User display
1
(display
[6])
and
2
(171).
DISP key is
pressed
Item
name on User
Display menu
User
display
1
Display
[6]
Display
1
User
display
2
Display
[7]
Display
2

tlfll-€c
FUNCTIONS
DisPlaY
1.
Disolav
2
YoucanselectitemstoshowontheUserdisp|ay1(displayt6])and2(t4)'frorn
among
digitaldata,
speedomete'
u1O
COO
(see-page
1-7)'
When
choosing
lOtrlftr
Display
2,
for
example'
the
display
[7]
is
not
shown'
For[Digital],youcandisplayonetofouritemsofdigitalnavigationdataontheuser
display.
l.Press}andENTkeyinordertoshowthefollowingwindow.
2.Selectthescreendivision,whichisthenumberofdatatodisplay'andpressthe
ilJJSl;r,
now
rooks
somethins
rike
the
one
shown
berow,
showins
data
choices
and
screen
division
selected'
srthree
XTE:
Cross-track
error
TTG:
Time
to
go
(to destination)
ETA:
Estimated
time
to
arrival
(to destination)
WPT:
Range
and
bearing
to
waYPoint
None:
No
disPlaY
t'tr*u
>U="*
Displag
)Displag
1
)Data
Select
-
B
:soc
I n I
n
I
s
:
BBG
l-----f-----l
p
:xrE
I
.
I
'
I
ffirmort
tcnncelzBack
tEllTI
:Erter
l/V:Select
*:
Depending
on
the
selection
at
step
'z'
E
H
ffi
3.
Select
tA],
tBl,
tClor
tDl,
and
press
the
ENT
kev'
ODO:
Odometer
distance
Trip:TriP
distance
Time:
Time
Date:
Date
POSN:
Position
Volts:
Power
voltage
SOG:
SPeed
over
ground
COG:
Course
over
ground
RNG:
Range
BRG:
Bearing
7-7
7€

7.
OTHERF
t'
Repeat
stsPe
-
lisplay
1
(display
[6])
and
2
(rud
l",;:.,"Tilrffii*"',':,:::'fl:
u,",
o,.o'",
1
or
2
desired,
and
OO"
lect
data'
and
Press
the
ENT
-..---...----
1oDo:
odometer
distance
+{E,?AT-J!"J
"l:'
iip,
ft,p
distance
'
'-'
i;
destination)
Time:
Time
ETA:
Lstimated
time
to
Date:
Date
arrival
(to
destination)
"tliin,
Position,.-^-
WpT:
Range
and
bearing
XtsE1
H:::
:*?"i::::^
*".",'i,I3IJ0","x.
COG:
Course
over
ser
ect
the
ite
m
.
"llY;ll,i
::"r",:r'ffIllt,"*
RePeat
stePs
2
and
3
t
3.
4.
S#iffirhsr'',;'ffit:l'
vou
can
serect
the
ranse
ror
the
speedometer
ffi,.ffi

lfO
Setup
Menu
taypoint and route
data can
be uploaded
from
your
unit
to a
PC, or downloadedtom
a FC b
your
unit.
Tlge are two kinds of
data
for route
data:
route
data
and
route
comment
data.
liEnu >I/l
Setup
Data(BSZ3z)*
,EE[
Itata(BS4ZZ)*
:
GpS
lil'lEA 0183 Uer.sion*
:
2.3
Saue
IIPIzSIE
->
PC
I€ad
t{FI/nTE
(-
PC
Iiring
Info. ilnEA
0103
*
l/V:Select
,
*:
See
chaPter9.
h: No
position
fix is available
during
uploading
or
downloading.
S:ilino
for communication
software
on
PC
Bad Rate
38400
bps
Ctwacter
Length
8 bit
Farity
None
Sbp Bit
1 bit
FbwControl
XON/OEF

7.
OI}CR
1:
Waypoint
tatitude
2:
N/S
3:
Waypoint
longitude
4:
EIW
5:
Waypoint
name
(1
to
g
characters)
6:
Waypoint
color
(NULL/O:
black,
1:
red,
2:
yeltow,
3:
green,
4:
brown,
5:
purple,
6:
blue)
7:
Waypoint
comment
!',Q_.lsee
below.),,+
0
to
13
characters)
tiH:lTtriffiil;*l'.*';'sr'
o'rs
0x71
throusil;;
are
arways
-r-olowing
characters
can
be
used
for
comments:
_ABCDEFGHTJKLMNO_PQRSTUWXyZOl2:4567_89&0+_7=z>(space)
0x10:
o
@q,
ox11:t@r,
oriz,i'6ir,,
ortg,J@,,
-,,oioio,3
@u,
0x15:
i@v,
0x16::rr
@w,0x17:S@x,
0x1g:{D
@y,Ox1g:
I
@z
8:
Flag
marking
waypoint
(A:
displayeO,
i:
t,tot
displayed)
9:
UTC
(Atways
NULL)
10:
Day
(Always
NULL)
11:
Month
(Always
NULL)
12:Year
(Always
NULL)
,m
1^
t
z
3
4
5
6
7
8-_iiT
7-11

F-riurgTloNS
Route
data format
X.X,
1
<cR><LF>
Number of sentences
required for
one
complete route data
(1
to 6)See
note.
Number
of sentences
currently
used
(1
to
6)
Message mode
(Always
set to
"C".)
4:
Route No.
(1
to 100)
5 to
12:
Waypoint
name
(1
to 8 characters,
length
of
each waypoint
name
is fixed to
7 byte)
1st bYte:
"-"
(hYPhen)=
skip ON,
" "
(sPace)=
skiP OFF
After 2nd byte:
Waypoint
name
(1
to
8 characters)
Hote:
A route can contain
max.30
waypoints
and
GPRTE
sentence
.fior
one route data
may exceed
80 byte
limitation.
ln this case,
route
data is
divided
into several GPRTE
sentences
(max. 4
sentences).
This
value
shows
the
number of sentences
route data
has been divided.
Route
comment
data format
PFEC, GPrtc,
X,
E,
c--c
<CR><LF>
123
Route
No.
(1
to 100)
2: Route comment
(Max.
18 characters,
variable
length)
3: Route
name
(Max.
6 characters,
variable
length)
End
of sentence
$PFEC,
GPxfr,
CTL,
E
<CR><LF>
c--c
a
x.x'
1,
9j'
234
,
i
l
l
l
I
I
j
i
I
I
I
I
I
I
j

7.7.1
UPloading
data
to
a
PG
,1.
Connect
a
Pc
to
your
HP-33,
referring
to
the
interconnec{ion
diagram
atthe
of
this
manual'
2.
Press
the
MENU/ZOOM
key
twice
to
show
the
main
menu'
3.
Select[
l/O
Setup],
and
press
the
ENT
key'
4.
Select
[Save
WPT/RTE
->
PCI'
and
press
the
ENT
key'
llenu
>I/O
Setup
>Saue
llPI/nIE
->
PC
AII
UfI/nTD
uill
be saued
to
PC'
Set PC
port to 3B400bps.
0bit'
!-n'
sl'
$auing
Start
?
Ies
u
rEnter
.-
'_";i-
i,
'ii':!ril
ial
tilEl{uzzllull
I
:
CancellBack
IEITI I
5.Press{toselect[Yes],andpresstheENTkeytostarttheuploading.
6.
When
the
completion
message
appears'
press
any
key
to
finish'
Downloading
data
from
PC
Note
that
allwaypoint
and
route
data
stored
in
the
HP-33
will
be
deleted
when
data
downloaded
from
PC.
l.ConnectaPCtoyourHP-33,referringtotheinterconnectiondiagramatthe
of
this
manual.
2.
Press
the
MENUTZOOM
key
twice
to show
the
main
menu'
3.
Select
[llO
Setup],
and
press the
ENT
key'
4.
Select
[Load
WPT/RTE
<-
PC],
and
press
the
ENT
key'
lle$tr.>I./B
Setup
>Load.UPI/RTE
{-
FC
Current
$PI/BIE
uill
be
erascd
and
load
FC
iota'
Set
fC
port to
3S'l00DPs,
8bit,
P-n'
st'
Loaalins
Start
?
r
iltEHllliE&l
I
:carce lrBack
ifilTt:Enter
l/V:Select
Press{toselect[Yes],andpresstheENTkeytostartthedownloading.
After
the
completion
message
appears,
press
any
key
to
finish'
7.7.2
5.
6.

i
lffirg.
I
t
MAINTENANCE,
TROUBLE'
SHOOTING
Maintenance
Regutar
maintenance
is
important
to
maintain
performance'
Check
the
following
poi"nt.
to
help
maintain
performance'
.Checkthatconnectorsontherearpanelarefirmlytightenedandfreeofrust.
.Checkthatthegroundsystemisfreeofrustandtnegrounowireistightlyfastened.
.
Check
that
battery
terminals
are
clean
and
free
of
rust'
.Dustordirtmayberemovedfrom^thercabinetwithsoftcloth'Water.dilutedmildde-
tergent
may
be
,r"oY,t'o-"rirlJ.
oo
r.ror
#;il;1
cleaners
to
clean
the
disptay
unit;
they
may
remove
paint
and
markings'
.
Wipe
the
LCO
caretuffy
to
prevent
scratching'
using
tissue
paperand
an
LCD
clean-
er'Toremoveoi'toiJaitdeposits'':":li;DctJaner'wipingslowlvwithtissue
paper
so
r"
to
oi'JrJJth";[;';"r
;;n;;;;'r':o'j:lY*
the
sart
or
dirt
will
not
scratch
*";iL]ilot
rr"
,otr"nts'sucn
as
thinner'
acetone
or
benzene
for
cleaning'
erso'
Jo
not
use
degreas"t;;"*";
'ot'tion'
as
they
can
strip
the
coating
from
the
LCD'
ffieLCDisapproximately50,00ohours.Theactualnumberofhoursde--
pends
on
"toi""t
tiLilf
i'l'"';;;,1i11v"tim**
tn"
brilliance
cannot
be
raised
sur-
flciently,
ask
your
o""i"t
about
replacement'
I
i
I
hdwrren
data's
i
I
ftnrn
atthe
back
i
i
i
7-13
8-1

8.
MAINTENANCE,
TROUBLESHOOTING
8.2
Troubleshooting
This section
provides
simple
troubleshooting
procedures
which
the user
can
followl
restore
normal
operation.
lf
you
cannot
restore
normal
operation,
do not
attemptb
cfreck
inside
the
unit.
Any
trouble
should
be
referred
to a
qualified
technician.
Check
that
power
cable
is firmly
fastened.
You
cannot
turn on
the
Power.
Check
for damaged
power
cable
and
connector.
Check
whether
the
volt
output
is
over
9V.
less 9
\1,
can
not
power
on.
Press
the
<b
/BRtl-l-
key
several
times
to adjust
the
brilliance.
No
picture
appears.
Turn
off and
on
the
power.
lf
no change,
ask
your
dealer.
There
is
no response
when a
keY
is
pressed.
Check
that antenna
connector
is firmly
fastened.
Position
is
not fixed
within
90 sec-
onds.
Check
the
number
of satellites
on
Satellite
Monitor
display.
lf there
are
two or
less,
check
for
obstruc-
tions
between
antenna
unit and
satellites.
Check
that
the
correct
geodetic
chart
system
is se-
lected
on
the
GPS Setting
screen.
Position
is wrong.
Enter
position
offset
on
the GPS
Setting
screen.
Check
Magnetic
Variation
on
the
Plotter
Setup
Bearing
is wrong.
8-2

8-
IrlAtnts----'
DisPlaYing
the
lrllessage
Board
'5#:ff
l;ffilnilH:il'""J:ll;:tH:"sff
fi
lll";;[i]"Tl*
Diagnostics
--
-
^Af,r
innrrt datd,
GPs
core'
kevboard
and
LcD
rhediasnos-"-1":i:T*'"H[:t'H}#'lt:t^'?1"ffi
:#:Xii'i'"'ti*n""'-
per{ormance'
The
use
'll
,r"r.
the
MENUIZooM
kev
twice
to
show
the
menu'
2
Select
[Svstem]'
and
press
tt:::lfl;".
',
::::,';:;;",.,,
"""'""'
""'*T'
t":":iJ#
l:nil::NGaPPears'iry
4.
cnil
rz
*-i
5
olc
ok
$**:ltlll:llllffiii
il-ffiTTE
":
*
'-9
KeY
test
field
G
C
il-eaning,
remedY
R"qu""t
service'
Request
service'
Request
service'
XX:
Program
version
No'
8-3
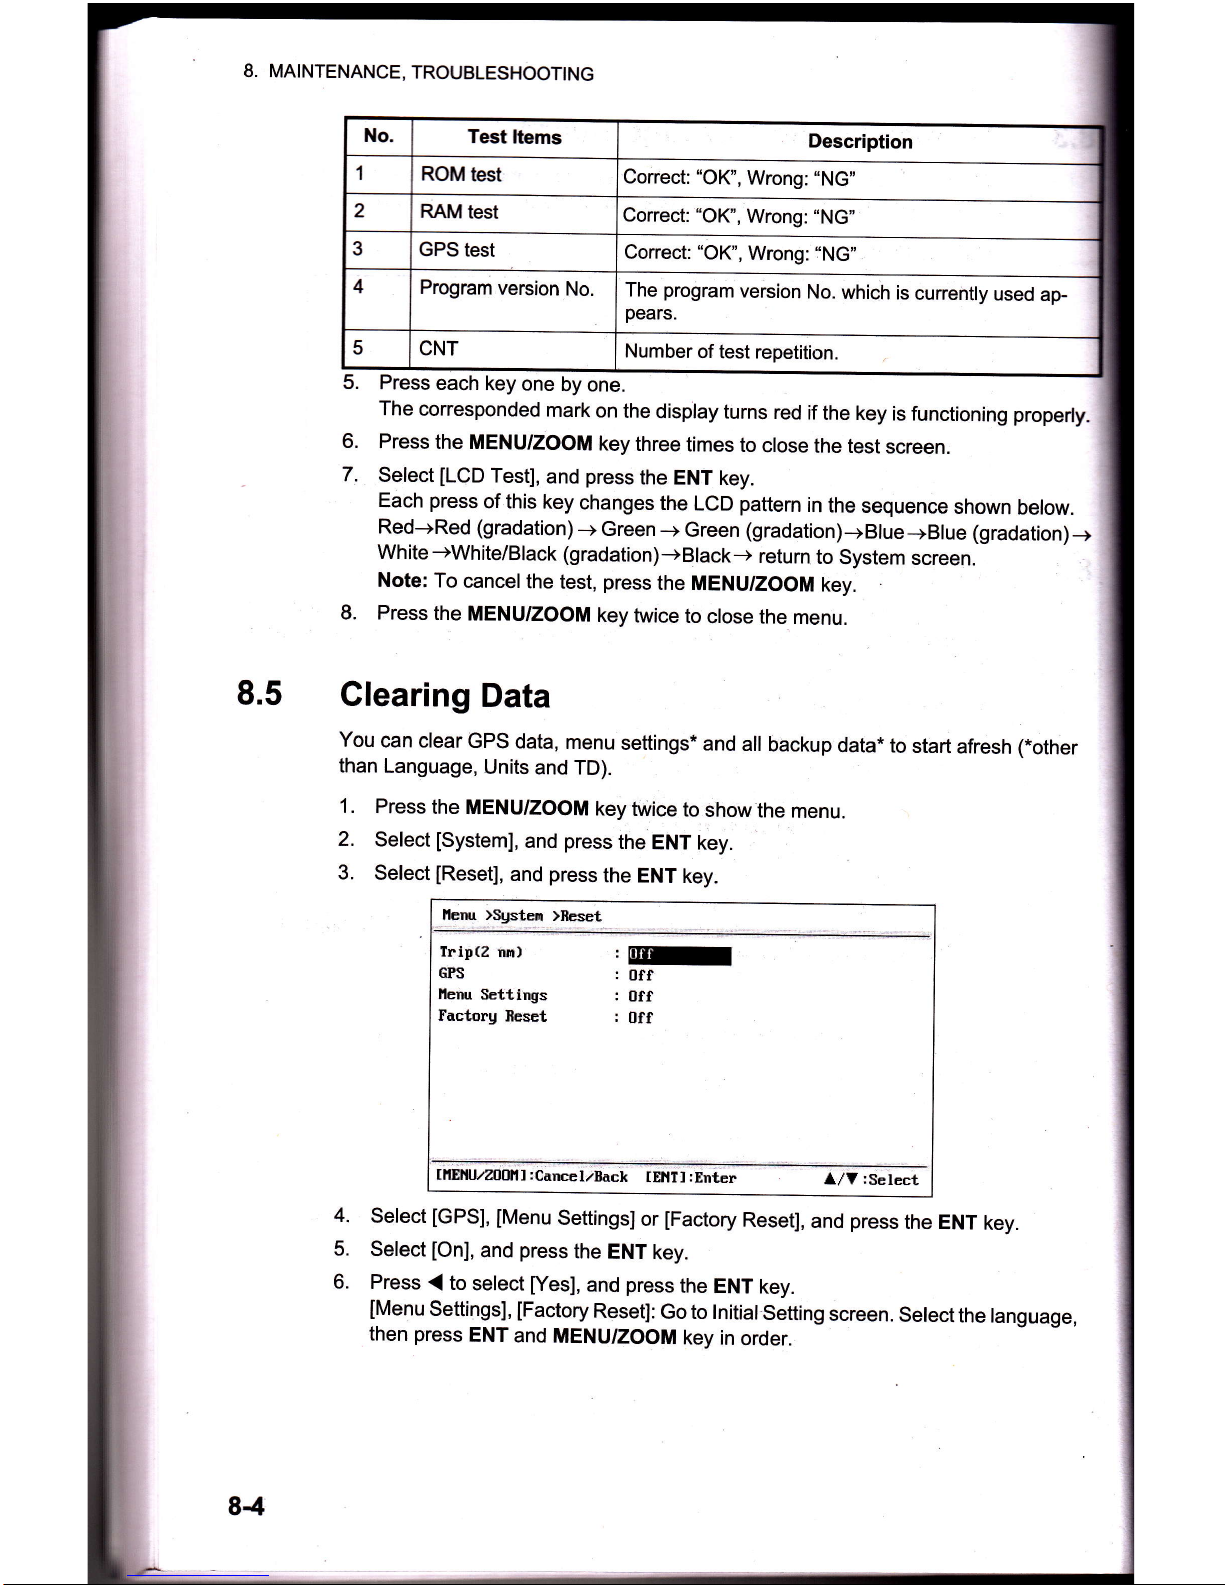
8. MAINTENANCE,
TROUBLESHOOTING
5.
Press
each
key
one
by one.
The corresponded
mark
on
the display
turns
red
if
the key
is functioning properly-
6.
Press
the MENU/zooM
key
three
times
to
crose
the test
screen.
.
7.
Select
[LCD
Test],
and
press
the ENT
key.
Each
press
of this
key
changes
the
LCD
pattern
in
the
sequence
shown
below.
Red-+Red (gradation)
-+
Green
-+
Green
(gradation)-+Blue-+Blue
(gradation)-+
Wh ite
-+White/Black
(gradation)
-+
Black
-+
retu
rn
to
System
screen.
Note:
To
cancelthe
test,
press
the MENU/ZOOM
key.
8. Press
the
MENU/ZOOM
key
twice
to
close
the menu.
8.5
Clearing
Data
You
can clear
GPS
data,
menu
settings*
and
all
backup
data*
to
start
afresh
(*other
than
Language,
Units
and TD).
1. Press
the MENU/ZOOM
key
twice
to
show
the
menu.
2.
Select
[System],
and
press
the
ENT
key.
3.
Select
[Reset],
and
press
the ENT
key.
lleru
)Sgsten
*eset
%
Tript2
ira)
|
ry
GP'S
:
off
llenu
Settings
:
Uff
Factorg
fieset
:
Off
4.
select
[GPS],
[Menu
settings]
or
[Factory
Reset],
and
press
the ENT
key.
5.
Select
[On],
and
press
the
ENT
key.
6. Press
.(
to
select
[Yes],
and
press
the ENT
key.
[Menu
Settings],
[Factory
Reset]:
Go to tnitiat
setting
screen.
Select
the tanguage,
then
press
ENT
and
MENU/ZOOM
key
in
order.
84
Description
Correct:
"OK",
Wrong:
"NG"
Correct:
"OK",
Wrong:
"NG"
Correct:
"OK",
Wrong:
:'NG"
The
program
version
No.
which
is
currenfly
used
ap
pears.
Number
of test repetition.

9.2
g2-1
INSTALLATION
Equipment
Lists
lnstallation
of Receiver
Unit
lnstallation
consideration
The receiver
unit can be installed
on
a
desktop,
underside of table
or in a
panel.
Refer
to the outline
drawings
at the end
of
this manualfor
installation instructions.
When
se-
lecting
a mounting
location,
keep in mind
the
following
points:
.
Locate
the unit away from
exhaust
pipes
and vents.
.
The mounting
location
should be well ventilated.
.
Mount the
unit where
shock and vibration are minimal.
Slandard
Suooly
Name
Type
Code No.
otv
Remarks
Main
unit HP.33
1
Antenna
Unit
HA-017
1 w/10
m
cable
lnstallation
Materials
1 set
Accessories
1 set
$t

r"
FrrlIJrTII[
9.2.2
Locate
the
unit away
fiom
equipment
wtricfr
gpn-erates
electormgnc{b
fieHs
as
a motor or
generator
Allow
sufficient
maintenance
space
at the
sides
and rear
of the unit
and leane
ficient
slack in
cables,
to facilitate
maintenance
and
servicing.
observe
compass
safe
distances
noted
on
page
iito
prevent
interference
to
a
netic
compass.
'
Locate
the unit
away from
direct
sunlight. An
LCD
may
black out if
it is
exposed
direct
sunlight for
a long
time.
'
The
optimalviewing
distance is
0.6 m.
select
a suitable
mounting
location
ering
the distance.
Desktop
and
underside
of table mount
1.
Unscrew
knobs
to dismount
the receiver
unit from
the hanger.
2. Prepare four
pilot
holes
(for
5x20 selftapping
screws)
at the mounting
location-
3.
Fix
the hanger
to the mounting
location
with
four
selftapping
screws
(sx2o,
plied).
4.
Attach
cables
to the
back
of the receiver
unit.
5.
Set the receiver
unit to
the hanger,
and fasten
knobs
to
fix it.
9-2
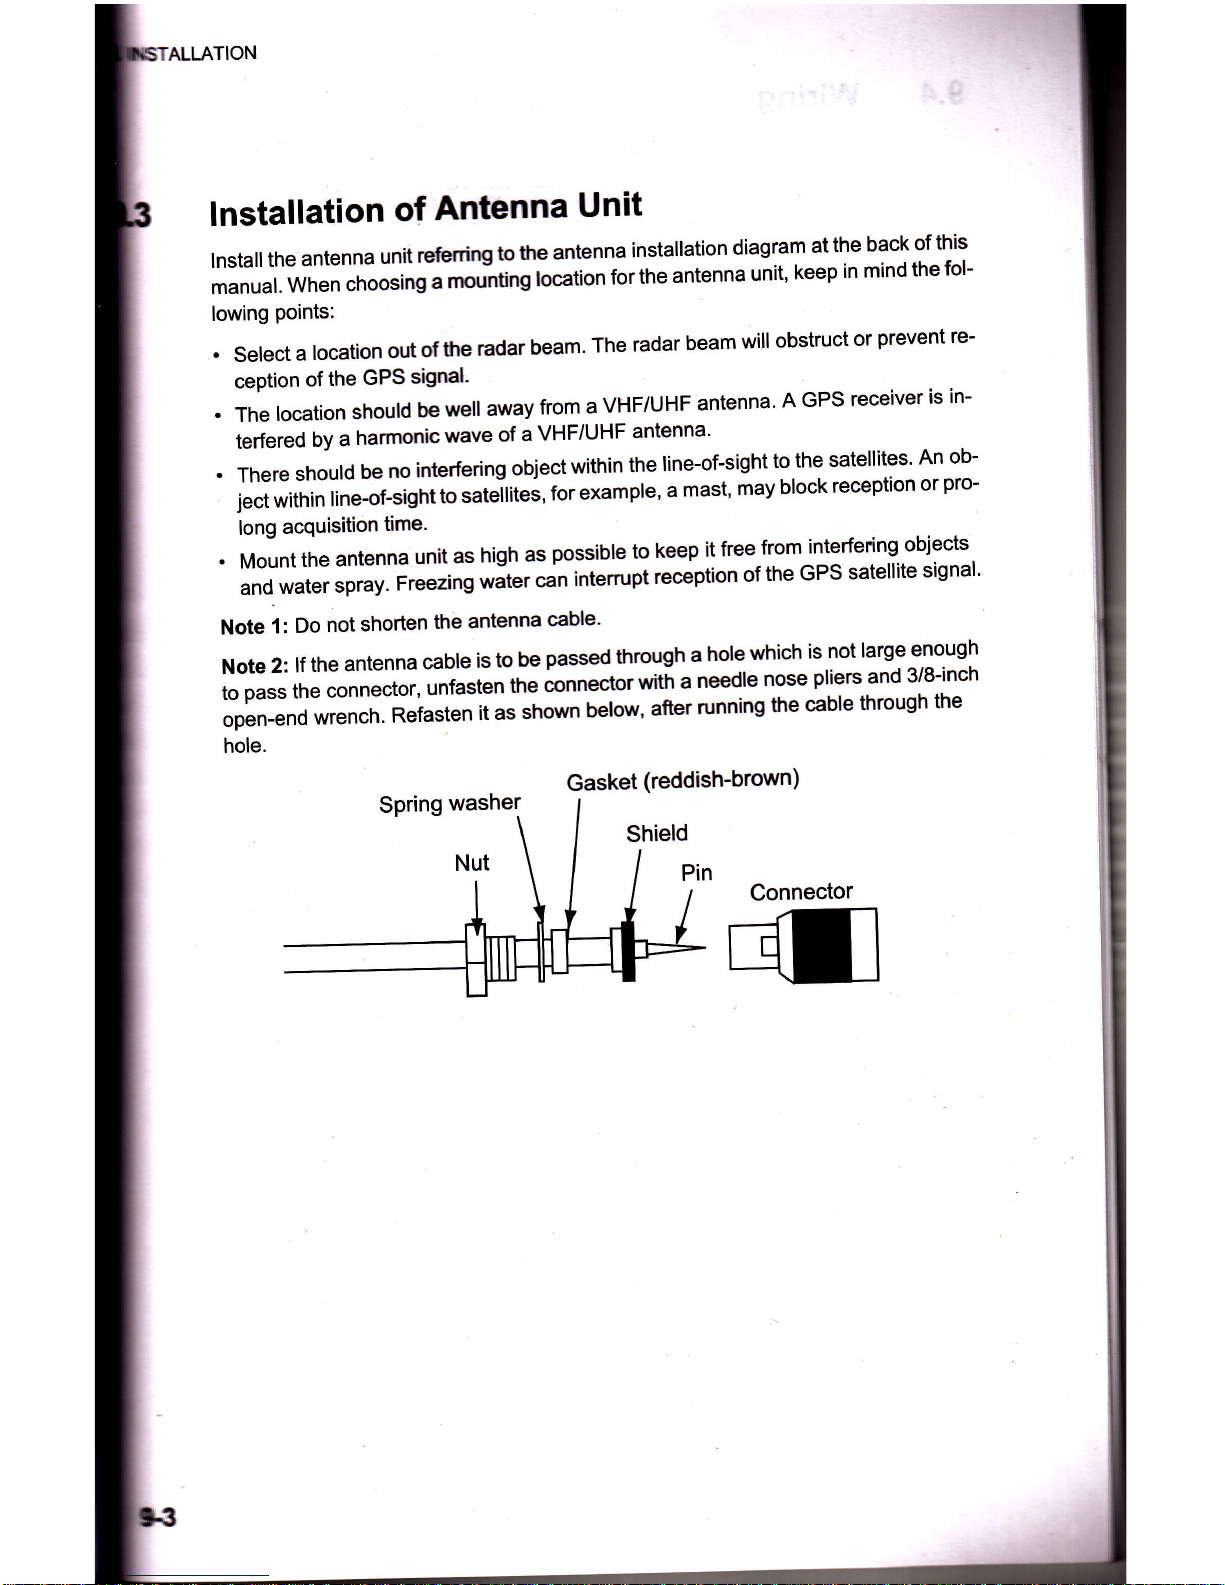
ALLATION
lnstallation
of
Antenna
Unit
lnstall
the
antenna
unit
refenirg
to
the
antenna
installation
diagram
at
the
back
of
this
manual.
when
choosing
;
;;tng
location
for
the
antenna
unit,
keep
in
mind
the
fol-
lowing
Points:
.
select
a
location
out
of
the
radar
beam.
The
radar
beam
will
obstruct
or
prevent
re-
ception
of
the
GPS
signal'
.ThelocationshouldbewellawayfromaVHF/UHFantenna'AGPSreceiverisin-
terfered
by
a
harmonic
wave
of
a
VHF/UHF
antenna'
.Thereshouldbenointerferingobjectwithintheline-of-sighttothesatellites.Anob-
ject
within
line-of-sight
to
""t"ttit"i,
for
example,
a
mast,
may
block
reception
or
pro-
long
acquisition
time.
.
Mount
the
antenna
unit
as
high
as
possible
to
keep
it
free
from
interfering
objects
andwaterspray.FreezingwatercanintemrptreceptionoftheGPSsatellitesignal'
Note
1:
Do
not
shorten
the
antenna
cable'
Note2:lftheantennacableistobepassedthroughaholewhichisnotlargeenough
topasstheconnector,unfastentheconnecto'*it,"needlenosepliersand3/8-inch
open-endwrench.Refastenitasshownbelow'afterrunningthecablethroughthe
hole.
Gasket
(reddish-brown)
Connector
t

9.
INSTALLA
9.4
Wiring
0183
*i:#a-j::+
nterface
T
Z
ffiII-
txD
.GIID,
ilIIEA
I
Pin
1:
Zl
3:
*:
5:
ID-H
$-c
sD-
ffD-
sG*
l
l
as{22
ns2:tz
Power
DCL2V-24V
@
wutrel+1
@
aucrl-1
NMEA
DATA
PORT
GPS
ANT
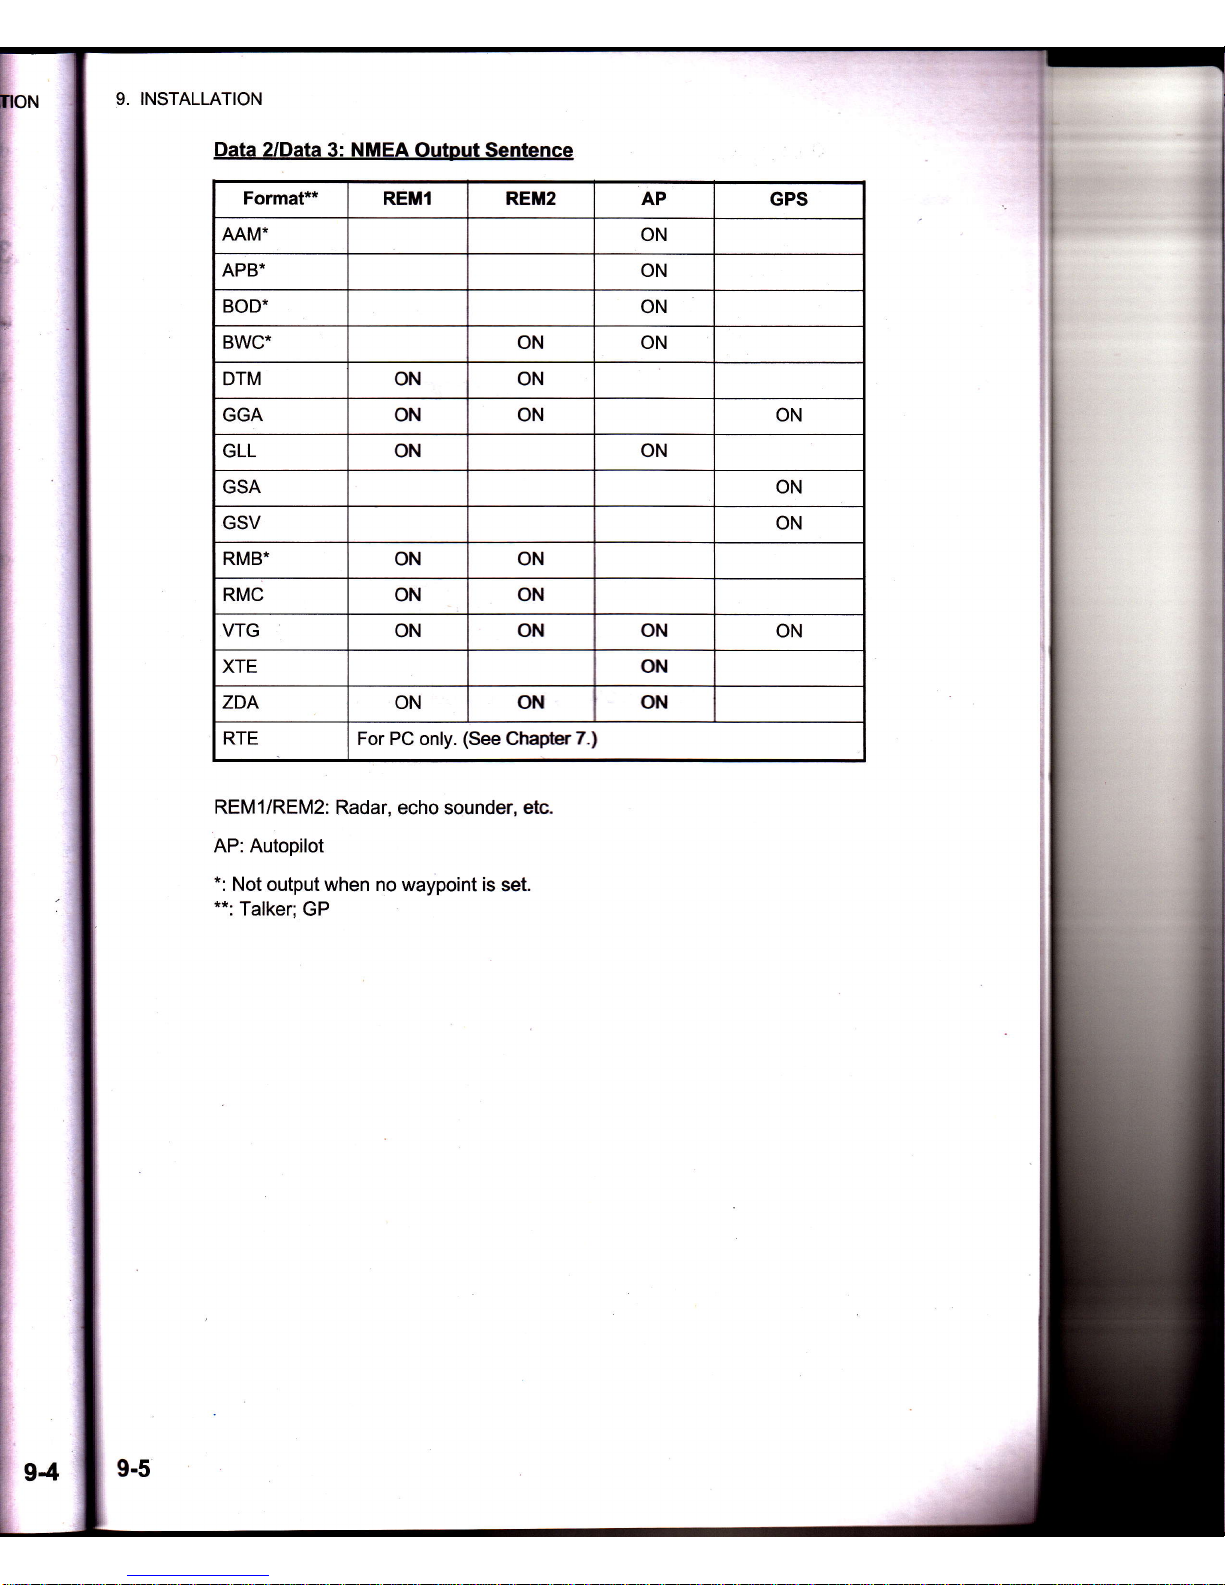

9.
INST,
Outout
settino
Press
the
MENUTZOOM
key
twice
to
show
the
main
menu'
Select
[/O
Setup],
then
press
the
ENT
key'
Select[Data2],[Data3]or[NMEA0183Version]dependingontheequipmeri
connected.
1.
2.
3.
4.
Press
the
ENT
key.
one
of
the
following
screens
appears
depending
on
the
selected
at
steP
3.
"
Dataz/Dalas"
"NMEAo1
83
Version"
5.
Press
A
or
V to
select
the
oPtion'
REM1,
2:
Output
data
to
radar,
echo
sounder'
AP:
OutPut
data
to an
autoPilot'
GPS:
Output
GPS
data
(used
for
the
service)
2.0,3.0:selecttheNMEAversionofexternalequipment'lfyouareunsureof
versionnumber,tryootrrandsglecttheonewhichsuccessfullyoutputsdata.
6.
Press
the
ENT
keY.
7.
Press
the
MENU/ZOOM
key
twice
to
close
the
menu'

PENDX
1
MENU
TREE
Tracks
waYRointslfn:f
Routes
a{"!:"?
Ship
To
Center
(only
when
the
plotter
display
is
shown)
Bold:
Default
setting
AP.1

APPENDIX
1 MENU
TREE
Ges
setunp
t
t
Datum
(WGS84)
Navigation
(Rhumb
Line, Greal
Circle)
Smooth
Position
(0
to 999
s, 0 s)
Smooth
S/C
(0
to 9999
s,
5 s)
Lat Offset
(0.000
N/S to 9.999
N/S, 0.000_'M
Lon
Offset'(0.000
EAA/
to 9.999
E|W,0.000'q
sv
ELV
(5
tb 90", 5')
SBAS
Mode
(WAAS,
GPS)
-
L
SBAS
Search
(Auto,
Manual;
120
to 138)
User
Disprayl
BgElSy
I
[Bi3ll3i;
3333f3#"i:?:"'33'3fl0-20'
0'40'
o-80\
Pos Setup
-
Display
(xx.xxx',xx'xx.x")
Key
Beep
(Off,
On)
Language
(English,
others)
Units
(nm-kn,
km-km/h,
sm-mph)
Time Offset
(-14:00
to
+14:00;
-8:00)
Daylight
Saving
Time
(Off,
On)
Time
Display
(12Hours,
24Hours)
Date
Disirlav
(Doluultrt
NY,
MMIDD/YY
Demo
Mode
(Off,
On)
F
Speed
(0
to 99
kn;20
kn)
l-
Cburse'(Aufo,
Manual;
0 to
359"
)
1-
Lat
(N/S;
38
08'N)
L
Lon
(EIW;123"00'W
Self
Test
(system
lesf,
LCD
Test)
_ _ .
Reset
Trip
(0.00
nm)
(Off,
On)
F
GPS
(Off,
On)
l-
Menu Settings
(Off,
On)
L
Factory
Reset
(Off,
On)
l/O Setup-
Dala
2
(REMI,
REM2,
AB GPS)
l-
Data 3
(REMI,
REM2,
AP, GPS)
l-
NMEAo183
Version
(2.0,
3.0\
F Save
WPT/RTE
->
PC
l- toad
WPT/RTE
<-
PC
LWiring
lnfo. NMEA
0183
AP-2

APPENDIX
2
LIST
OF
TERMS
The following
table
shows
the
terms
used
in
GP-33'
Meaning
Meaning
il"-.r-qvmhols
Terms/SYmbols
Lat
Latitude
ara
*
e
€d,rI/SP
Waypoints
Longitude
A,
I
Own
Boat
Lon
Man
Overboard
M,
Mag
Magnetic
>)>
+
Sfrortest
course
to
the
Cursor
MAR
March
MAY
May
ot
to
Irove
MM
(MMM)
Month
2D
zu
\)ro
Pvottrvr
t
rr'\
;h;m;::r+'h; fiY
mph
mile
per hour
3D
yveruv.. "'-
o
^^aitinn
fi
N
North
W2D
fiv
nm
NauticalMile
W3D
NMEA
Naationa
Uarine
Electronics
Association
AP
Autopilot
April
-
August
ffien!g
APR
OCT
October
AUG
Odo
Odometer
Auto
Automatlc
D...-*',ri,1nl'ril'rtionOf Precision
Brill
Rrilliance
YLJWr
Position
Bearing
Pos
BRG
ref.
Reference
Cmnt
lUommem
Quick
Point
COG
ffi6ys1 Ground
Ql'
REM
Remote
DD
uay
December
RNG
Range
Route
Demo,
SIM
fll-i+"rtinn lvlode
RTE,
KI
S
Sorrth
Disp
seconds
S
Src
DOP
lJllutlon
\Jl
East
-
Speed/Course
E
SEP
September
ELV
Enter
^f
Arrival
SM
Statute
Mile
ENT
SOG
Speed
Over
Ground
ETA
February
SPD
Speed
FEB
True
\J
TD
Time
Difference
GPS
Time
To
Go
lnpuUOutPut
TTG
r/o
Volt
Voltage
West
HDOP
Horizontal
Dilutlon
uI
Precision
W
WAAS
JAN
January
Wide
Area
Augmentation
System
JUL
July
June
WPT,
WP
WayPoint
JUN
XTE
-Cross
Track
Error
km
Ktlomerer
Year
knot
KN

Matsutec'
1
GEI{ERAL
1.1 Dtsplay
system
1.2
Display
mode
1.3 Memory
capacity
1.4
Storage
capacity
1.5
Alarms
1.6
Display
scale
Plotter
display
Highway
display
2
GPS
REGEIVER
2.1 Receiving
channels
GPS
SBAS
2.2 Rx frequency
2.3 Rx
code
2.4 Position
fixing
system
2.5 Position
accuracy
GPS
SBAS
Tracking
velocity
Position
fixing
time
Position
update interval
SPECIFICATIONS
OF
GPS NAVIGATOR
HP.33
2.6
2.7
2.8
4.3-inch
color LCD
Plotter,
Steering,
Highway,
NAV data,
Destination,
User display
Track:
3,000
pts,
Waypoint:
10,000
pts
w/ comment
(13
character)
100 routes
w/
30 waypoint each
Arrival and
anchor watch,
Cross track error,
Odometer alarm,
Ship's
speed, Timer, Trip,
SBAS, Voltage
0.0210.05/0. 1
I 0.2t0.51 1
t2t 5t
1
0t 20 I 40
I 80 I 1 60/320 N M
0.21 0.4t 0.81 1 t02l4/8/'r 6 N M
50
channels
3 channel
1575.42MH2
C/A code,
SBAS
Allin view,
8-state Kalman
filter
2.5 m
(95%
of the time,
2drms)
2 m
(95o/o
of the
time, 2drms)
500 m/s
Within
32 s
(cold
start)
1s
NMEAO183:2
ports
NMEAO183
Ver2.0
and RS-232C
AAM,APB,BOD,BWC,BWR,DTM,GGA,GLL,GSV,
RMB,
RMC,RTE,
VTG,XTE,ZDA
3 INTERFACE
3.1
Number
of
port
3.2 Serialoutput
Data sentences
sP-l
i
';.'
MatsuteG'
5
5.1
POWER
SUPPLY
12-24YDC:0.24-0.12
A
ENVIRONMENTAL
CONDITION
Ambient
temPerature
Antenna
unit
-25'C
to
+70'C
Receiver
unit
-15'C
to
+55'C
Relative
humiditY
93%
at
40'C
Degree
of
Protection
lP56
UNIT
COLOR
Antenna
unit
Receiver
unit
I
L
T
!,
5.2
5.3
N9.5
N2.5
6
6.1
6.2
i
I
RTE.
I
SP
.2

INDEX
I
lnsert
a waypoint in
a route.....
..................
4-4
lN-1

?[?T-
:
1,2
Yy ",,
u""0............
...................
...i-i
e
spo
.,.'..........',.'.,.........
.'..........,.?-2
ori"'
i"
"'
pc.....................
.......;!;3
""""'.........,.1.....,..,...........,..,..1_7
alarm
..............6_5
::::::;
-:
7-4
key
"""""..... ..
..--.............
.......1-1
Track
Eror)
alarm
..................6_s
 Loading...