

Matsushita LSM40-2 User Manual
LENNOX HEARTH PRODUCTS
KITS AND ACCESSORIES
750,184M REV. B
05/2006
H5051 DASK-LSM40-2 Dual Arch Screen Kit, LSM40-2
H5052 SK-LSM40-2 Classic Screen Kit, LSM40-2
H5053 ASK-LSM40-2 Arch Screen Kit, LSM40-2
H5054 DASK-LSM45-2 Dual Arch Screen Kit, LSM45-2
H5055 SK-LSM45-2 Classic Screen Kit, LSM45-2
H5056 ASK-LSM45-2 Arch Screen Kit, LSM45-2
LENNOX HEARTH PRODUCTS
INSTALLATION INSTRUCTIONS FOR DECORATIVE SCREEN KITS FOR USE WITH MONTEBELLO®
DAVE LENNOX SIGNATURE COLLECTION MODELS LSM40-2 & LSM45-2 DIRECT VENT GAS FIREPLACES
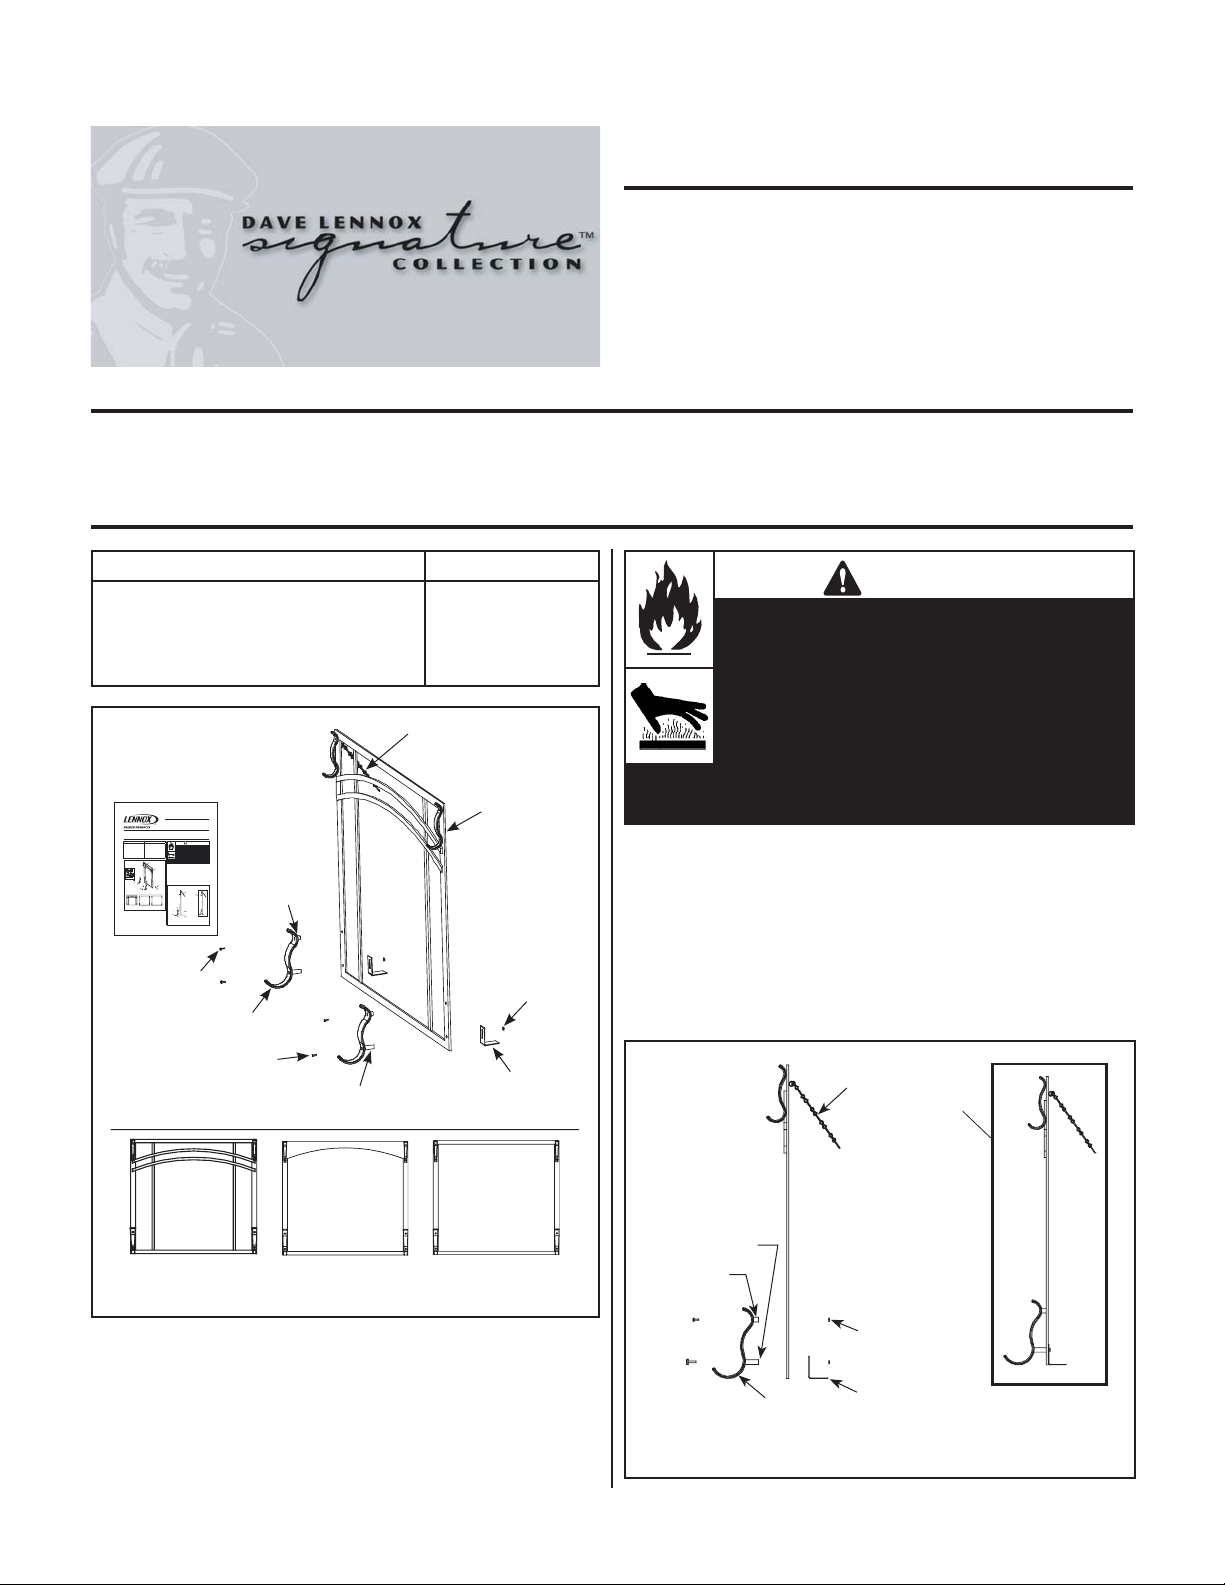
Kit Contents: Tools Required:
1 Ea. Screen Assembly
2 Ea. Bottom Legs
2 Ea. Long Screws
2 Ea. Short Screws
2 Ea. Long Spacers
Kit Contents
(dual arch screen shown)
Instruction Sheet
LENNOX HEARTH PRODUCTS
KITS AND ACCESSORIES
750,184M REV. A
H2229 DASK-LSM40 Dual Arch Screen Kit, LSM40-2
04/2006
H2230 SK-LSM40 Screen Kit, LSM40-2
H2231 ASK-LSM40 Arch Screen Kit, LSM40-2
H2232 DASK-LSM45 Dual Arch Screen Kit, LSM45-2
H2233 SK-LSM45 Screen Kit, LSM45-2
H2234 ASK-LSM45 Arch Screen Kit, LSM45-2
INSTALLATION INSTRUCTIONS FOR DECORATIVE SCREEN KITS FOR USE WITH MONTEBELLO
DAVE LENNOX SIGNATURE SERIES MODELS LSM40-2 & LSM45-2 DIRECT VENT GAS FIREPLACES
Kit Contents: Tools Required:
1 Ea. Screen Assembly
2 Ea. Bottom Legs
2 Ea. Long Screws
2 Ea. Short Screws
2 Ea. Long Spacers
2 Ea. Short Spacers
4 Ea. Nuts
2 Ea. L- Brackets
1 Ea. Instruction Sheet
Kit Contents
(dual arch screen shown)
Instruction Sheet
LENNOX HEARTH PRODUCTS
KITS AND ACCESSORIES
750,184M REV. NC
H2229 DASK-LSM40 Dual Arch Screen Kit, LSM40
3/2005
H2230 SK-LSM40 Screen Kit, LSM40
H2231 ASK-LSM40 Arch Screen Kit, LSM40
H2232 DASK-LSM45 Dual Arch Screen Kit, LSM45
H2233 SK-LSM45 Screen Kit, LSM45
H2234 ASK-LSM45 Arch Screen Kit, LSM45
INSTALLATION INSTRUCTIONS FOR DECORATIVE SCREEN KITS FOR USE WITH MONTEBELLO
DAVE LENNOX SIGNATURE SERIES MODELS LSM40 & LSM45 DIRECT VENT GAS FIREPLACES
INSTALLATION INSTRUCTIONS
Kit Contents:Tools Required:
Step 1 Using an 7/32” Allen Wrench and 7/16” Nut Driver, loosely as-
1 ea. Screen Assembly
7/32” Allen Wrench
semble the parts as shown in Figure 1 and Figure 2(do not
2 ea. long screws
7/16” Nut Driver
tighten yet).
2 ea. short screws
2 ea. long spacers
Step 2 Adjust the L-Bracket to height needed for this installation (slot
2 ea. short spacers
allows up to 1 inch vertical adjustment). When you are satisfi ed
4 ea. nuts
that the screen will stand stable in front of the fi replace, then
2 ea. L- brackets
tighten the nuts on both sides (snug only - do not over tighten).
1 ea. Instruction Sheet
Step 3 Place the assembled freestanding screen in front of the fi replace
when in use, in a close proximity to the glass door assembly.
Screen
Instruction Sheet
Assembly
Side View
Assembly
Completed
Screen
Assembly
Front Side
Fireplace Side
short spacers
Nuts
short screws
Long Spacers
Short Spacers
Nuts
Short
Contoured Legs
Long Screws
L- Bracket
Contoured Leg
L- Brackets
Long Spacers
Figure 2 - Assemble Legs & L-Brackets to Screen
Figure 1 - Kit Contents (dual arch screen shown)
GENERAL INFORMATION
Spacers
These optional decorative freestanding fi rescreen panels are designed to
enhance the beauty of the fi rpleplace and to provide some protection from
any accidental contact with the hot glass surface.
Dual Arch Screen
Arch ScreenScreen
Figure 3 - Screen Styles
NOTE: DIAGRAMS & ILLUSTRATIONS NOT TO SCALE.
Lennox Hearth Products reserves the right to make changes at any time, without notice, in design, materials, specifi cations, prices and the discontinuance of colors, styles and products.
Consult your local distributor for fi replace code information.
LENNOX HEARTH PRODUCTS
Printed in U.S.A. © LENNOX HEARTH PRODUCTS 2005
1110 West Taft Avenue
Orange, CA 92865
Page 1 of 1
P/N 750,184M REV. NC 3/2005
Short Screws
Contoured Legs
Long Screws
Dual Arch Screen
Screen
Figure 1
GENERAL INFORMATION
These optional decorative freestanding fi rescreen panels are designed
to enhance the beauty of the fi replace and helps prevent direct human
contact with the hot glass surface.
A chain is also provided for additional safety. When attached to the
fi replace, it helps prevent the screen from tipping.
Short Screws
®
WARNINGS
7/32” Allen Wrench
7/16” Nut Driver
Hot! Do not touch! These decorative screen
panels are NOT heat guards.
The glass behind the
and will retain
screens will be hot during operation
heat for a while after shutting off the appliance
.
Severe burns may result. Carefully supervise
children in the same room as appliance.
• As with any similar heating appliance, surfaces of the
Chain
frame, the door and appliance can become very hot.
INSTALLATION INSTRUCTIONS
Screen
Assembly
Step 1 Using a 7/32” allen wrench and 7/16” nut driver, loosely assemble
the parts as shown in Figure 1 and Figure 2(do not tighten yet).
Step 2 Adjust the L-bracket to the height needed for this installation (slot
allows up to 1 inch vertical adjustment). When you are satisfi ed
that the screen will stand stable in front of the fi replace, then
tighten the nuts on both sides.
Nuts
Side View
L- Brackets
Chain
Assembly
Long Spacers
Completed
Screen
Assembly
Fireplace Side
Front Side
Long Spacer
Arch Screen
Short Spacer
Nut
L- Bracket
Contoured Leg
Figure 2 - Assemble Legs & L-Brackets to Screen
1
NOTE: DIAGRAMS & ILLUSTRATIONS ARE NOT TO SCALE.
Contoured Legs
2 Ea. Short Spacers
4 Ea. Nuts
2 Ea. L- Brackets
1 Ea. Instruction Sheet
Short
Spacers
7/32” Allen Wrench
7/16” Nut Driver
Chain
Screen
Assembly
Nuts
Hot! Do not touch! These decorative screen
panels are NOT heat guards.
screens will be hot during operation
heat for a while after shutting off the appliance
Severe burns may result. Carefully supervise
children in the same room as appliance.
• As with any similar heating appliance, surfaces of the
frame, the door and appliance can become very hot.
INSTALLATION INSTRUCTIONS
Step 1 Using a 7/32” allen wrench and 7/16” nut driver, loosely assemble
the parts as shown in Figure 1 and Figure 2 (do not tighten yet).
Step 2 Adjust the L-bracket to the height needed for this installation (slot
allows up to 1 inch vertical adjustment). When you are satisfi ed
that the screen will stand stable in front of the fi replace, then
tighten the nuts on both sides.
WARNINGS
The glass behind the
and will retain
.
Long Screws
L- Brackets
Arch Screen
Dual Arch Screen
Long Spacers
Screen
Figure 1
GENERAL INFORMATION
These optional decorative freestanding fi rescreen panels are designed
to enhance the beauty of the fi replace and helps prevent direct human
contact with the hot glass surface.
A chain is also provided for additional safety. When attached to the
fi replace, it helps prevent the screen from tipping.
NOTE: DIAGRAMS & ILLUSTRATIONS ARE NOT TO SCALE.
Chain
Assembly
Completed
Screen
Assembly
Front Side
Fireplace Side
Long Spacer
Short Spacer
Nut
Contoured Leg
L- Bracket
Figure 2 - Assemble Legs & L-Brackets to Screen
Side View
1
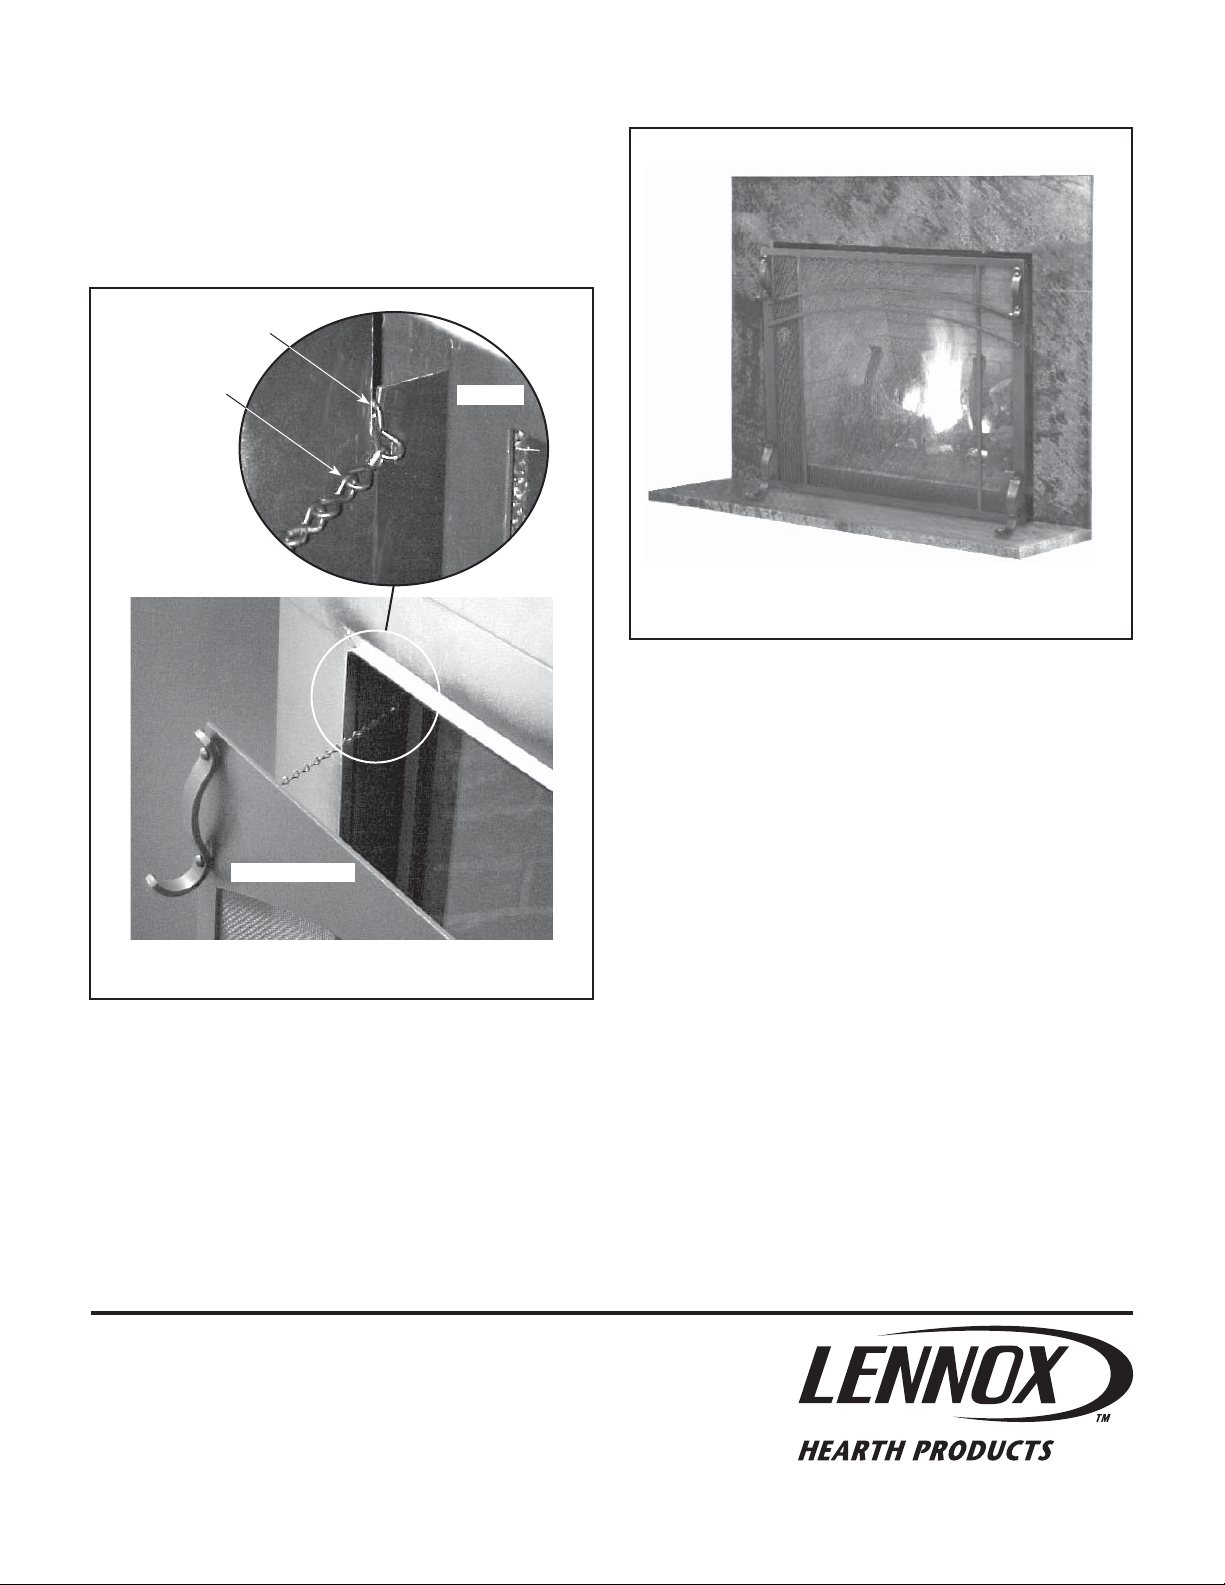
Step 3 Place the assembled freestanding screen in front of the fi replace
in a close proximity to the glass door assembly.
Step 4 Hook the chain to the unit by dropping the free end of chain in the
slot provided on the left side of modesty panel. Check to be sure
that the chain is attached securely. See Figure 3.
Slot on Left Side
of Fireplace
Chain
Screen Assembly
Figure 3 - Attach Chain
Fireplace
Figure 4 - Completed Installation
Note: The “no-tip” chain feature provided with this screen is designed
to work with the following Montebello™ models:
H4793 LSM40MN-2
H4794 LSM40MP-2
H4797 LSM40EN-2
H4795 LSM45MN-2
H4796 LSM45MP-2
H4798 LSM45EN-2
If you have a previously released model of the Montebello™, there will
not be a slot on the fi replace for the chain to attach to.
NOTE: DIAGRAMS & ILLUSTRATIONS ARE NOT TO SCALE.
Lennox Hearth Products reserves the right to make changes at any time, without notice, in
design, materials, specifi cations, prices and the discontinuance of colors, styles and products.
Consult your local distributor for fi replace code information.
Printed in U.S.A. © LENNOX HEARTH PRODUCTS 2005
2
P/N 750,184M REV. B 05/2006
1110 West Taft Avenue
Orange, CA 92865
 Loading...