

Matsunichi Communication R and D T706 Users Manual

T706 User Manual
Using Y our Tiny Book
TM

This User Manual will guide you through the initial setup and hardware features of
your TINY BOOK.
User Manual Sections:
A. Introducing the Tiny Book
Tiny Book
TM
Do's and Don'ts
B. Getting to know your Tiny Book
TM
TM
Hardware Features and Use
C. Getting Started
Initial Setup
D. Using your Tiny Book
TM
Tiny BookTM Programs and Utilities
Notes and Warnings
NOTE: Extra information that may be useful.
WARNING: Please follow this information carefully for the safe and proper
function of your Tiny Book
TM
.
A. Introducing the Tiny BookTM
r
Charging Your Batteries
Before use, please charge your Tiny Book
TM
for 8
hours. This will help extend the lifetime of the
battery.
A fully charged battery pack can power your Tiny
TM
for about 3-4 hours. Running time may vary
Book
depending on use. Video playback, Wi-Fi use, and
similar applications may shorten the available time.
NOTE: The battery charges as long as the AC adapter is plugged in an AC powe
source.
WARNING: DO NOT LEAVE YOUR Tiny BookTM TO CHARGE OVERNIGHT OR
LEAVE IT PLUGGED INTO AN AC POWER OUTLET FOR LONG PERIODS OF
TIME TO AVOID OVERHEATING OF NOTEBOOK.
Safety Precautions
The following safety precautions will increase the lifespan of your Tiny Book
all instructions and warnings listed in this guide. Do not attempt to open or take apart
your Tiny Book
TM
. If there are any problems with your Tiny BookTM, refer all servicing to
qualified personnel or contact our service hotline to find information for the nearest
TM
. Follow

service center.
• Do not place the device on unstable surfaces. Always make sure that the device
is operating on an even or balanced area.
• Do not use any chemical liquids on the display panel or the surface of the device.
• Do not expose to dusty or dirty environments.
• Do not press on or apply excessive force to the display panel.
• Do not operate the device on your lap or any part of your body for extended
periods to prevent injury from heat dissipated by the device.
• Do not place or drop anything on the device as this may break the display panel.
• Do not put or force foreign objects into the vents or open holes on the device.
Foreign objects may disrupt the power within the device and cause damage.
• Do not expose or use the device near liquids, water or excessive moisture.
• When there is an electrical storm, avoid using any electrical devices since
electrical current supply could be unstable.
• Do not expose to strong magnetic or electrical fields.
• Do not expose your device to extreme heat.
• Properly shut down the device after using.
• Do not cover the device while it is powered ON. Keep materials away that would
reduce the air circulation within the device.

Transportation Precautions
When travelling with a Tiny Book
move. This will prevent damage to the hard disk and to other internal hardware.
NOTE: Be sure to turn OFF your device before closing the display panel. Do not
close the display panel while the device is ON.
TM
, be sure to turn OFF your device when on the
Airport Precautions
Contact your airline or your flight attendant if you plan to use your Tiny Book
airplane for any rules or restrictions for electronic device use onboard. There are three
main airport security devices used:
X-ray Machines ( mostly used to check items on a conveyer belt),
Magnetic or Metal detectors ( used on people for security checks), and
Hand Held Magnetic Devices.
NOTE: Make sure to turnoff your Wi-Fi w hen on the plane as this may disrupt the
airline communication.
WARNING: Do not expose your device to magnetic devices as this may damage
your laptop.
TM
on the
B. Getting to know your Tiny Book
Get to know your Tiny Book
TM
TM
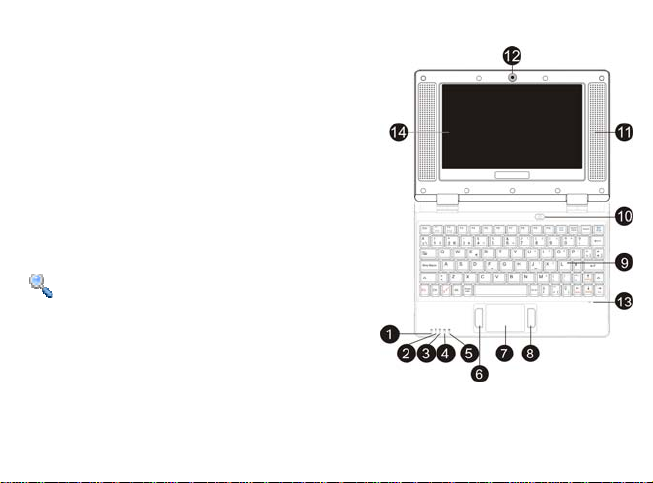
1-5 Status Indicators
(1) Power ON LED (Blue)
(2) Power DC& Charger LED (Red &Green)
(3) Wireless LAN Activity (Blue)
(4) Number Lock (Blue)
(5) Caps Lock (Blue)
6-8 Touchpad and Buttons
The touchpad surface (7) senses finger touch
movement to move the cursor on the screen. The
buttons (6 & 8) allow for click and right-click.
9 Keyboard
Note: Keyboard may differ by location.
10 Power Button
Press the switch once to turn on and hold it to turn
OFF the Tiny Book
TM
.
11 Built-in Speakers
12 Camera (on selected models)
The built-in camera takes pictures or records
video.

13 Built-in Microphone
The built-in microphone allow users to talk to
other people via VOIP
(Voice-Over-Internet-Protocol) using MSN, or
record their voice.
14 Display Panel
The Tiny Book
TM
uses a TFT LCD to produce a
clear and sharp picture.
NOTE: Use a soft cloth with water to clean the display panel.Do not use any
liquid chemical to clean the display panel.

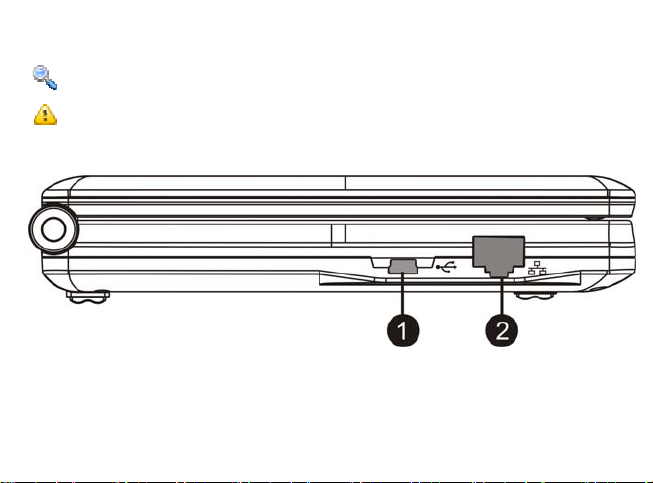
Right Side View
1 Headphone Output Jack
3.5mm stereo headphone jack is used to connect the audio out signal to amplified
speakers or headphones. Using this jack automatically disables the built-in speakers.
2 Microphone Input Jack (Mic In)
3.5mm mono microphone jack is used to connect an external microphone or
other audio devices. Using this jack automatically disables the built-in microphone.
Use this feature for video conferencing, voice narrations, or simple audio recordings.
3-4 USB Port (2.0 Full Speed)
The Universal Serial Bus is compatible with USB 2.0 or USB 1.1 devices。
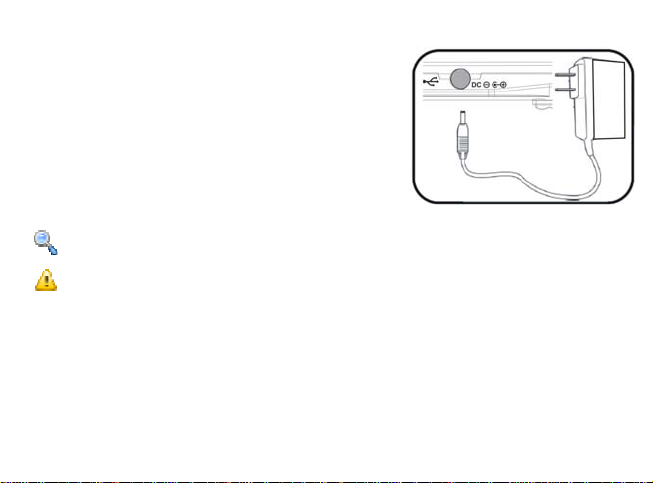
5 Power (DC) Input
The supplied power adapter converts the AC power supplied to DC power for the Tiny
BookTM to use. Power supplied through the use of this jack powers the Tiny Book
r
and charges the internal battery pack.
NOTE: Do not use other power adapters, please use the supplied power adapte
to prevent damage to the Tiny BookTM.
WARNING: THE ADAPTER MAY BECOME VERY HOT, DO NOT COVER THE
ADAPTER WHEN IN USE AND DO NOT TOUCH WITH BARE SKIN.
Left Side View
1 Mini USB Sync Connector
The mini USB port can be used to sync your device with your desktop or laptop
computers. Data transfer and application installation on your Tiny Book
TM
are made
easy.
2 LAN Port
TM
The LAN port (10/100M Bit) supports
standard Ethernet connection to a local network.
See Chapter 3-1 for connection settings and configurations instructions.
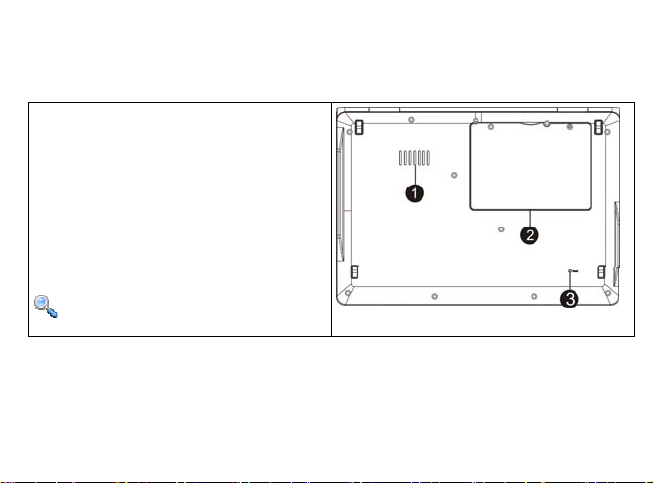
Bottom View
1 Ventilation Openings
These openings allow for cooling excess
heat from the unit.
2 Main Battery Compartment
The Tiny Book
TM
uses a lithium battery.
3 Reset Button
Press the reset button to restart the
computer if it is not responding.
NOTE: This button does not restore
the original factory settings.
 Loading...