

Page 1

Page 2

2
Never use your TV/VCR if it
is damaged in any way.
Always place your TV/VCR
on a flat level surface
avoiding anywhere which
may be subject to strong
vibration.
Do not remove any
fixed covers as this
may expose
dangerous voltages.
Temperature - Avoid extremes
of temperature, either hot or
cold, place your TV/VCR well
away from heat sources such as
radiators or gas/electric fires.
Ventilation - The ventilation
holes on the top and sides of
your unit prevent it from over
heating. Do not block or cover
these holes - especially with cloth
or paper.
Your TV/VCR is supplied
with an approved 13
amp fused mains plug.
When replacing the
fuse always use a
5 amp (BS 1362)
approved type.
To obtain a replacement fuse
contact your store.
Never use this plug if the fuse cover is
missing. To obtain a replacement fuse
cover contact your store.
If the mains sockets in your home differ
or are not suitable for the type of plug
supplied, then the plug should be cut
from the mains lead and a suitable type
fitted. You must use a 13 amp plug
(BS 1363) and fit a 5 amp fuse (BS
1362).
If any other type of plug is used a 5
amp fuse must be fitted, either in the
plug, adaptor or at the distribution
board.
Please refer to the wiring
instructions on page 38 of this
book.
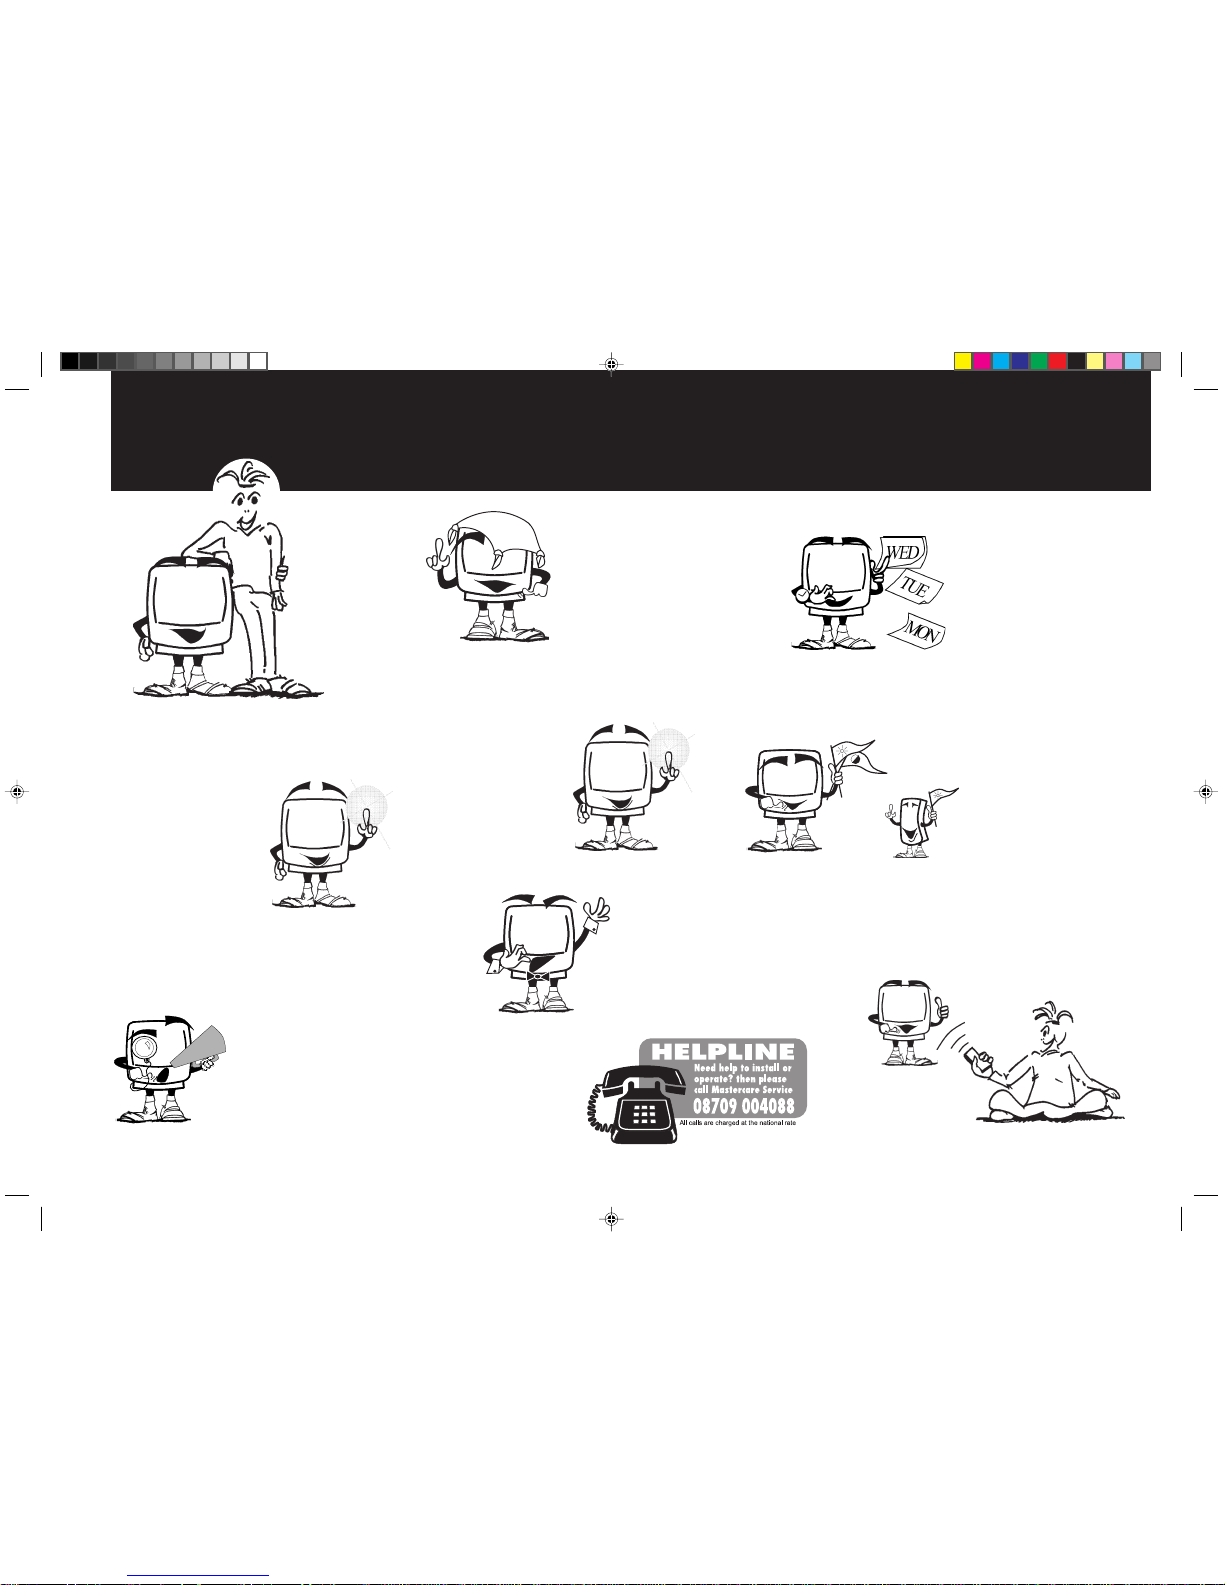
Please read these instructions before attempting to use your
combined television and video cassette recorder (TV/VCR)
Moisture - Do not allow your TV/VCR to be
exposed to rain, moisture or dust. If any liquid is
spilt into your TV/VCR it can cause serious
damage. If you spill any liquid into your TV/VCR
switch it off at the mains immediately. Contact
your store immediately.
Weather - It is
advisable to unplug
the aerial during an
electrical storm.
Batteries are easily
swallowed by young
children. Do not
allow young children
to play with the
remote control unit.
Interference - Do not place your TV/VCR on or near appliances which may cause
electromagnetic interference (TV or HI-FI speakers). If you do, it may adversely affect the
working of the unit, causing erratic playback distorting picture or sound.
5451401A/02-05 8/25/99, 06:58 PM2
Page 3
3
Features of your TV/VCR
Video index search system
automatically records marks on
the tape whenever you start a
recording.
These marks are located by
your TV/VCR so that you can
go straight to your desired
recording without having to
keep stopping and viewing your tape.
Get to know your
combined 14"
(34cm) colour
television and video
cassette recorder
with on screen
programming.
Your TV/VCR marked
"HQ" (high quality)
incorporates VHS high
quality technology.
A built-in detail
enhancer is used to
boost the recorded
signal and provide
maximum picture quality in playback.
Automatic repeat play system will
automatically play back the same
tape repeatedly. Your TV/VCR is
pre-set to standard play but you may
extend the recording time of your video
tapes by using the long play feature.
Your TV/VCR includes a
Security PIN code feature that
can prevent unauthorised use of
your TV after it has been
disconnected from the mains
supply for 30 minutes or longer.
Your TV/VCR is
designed to playback
NTSC colour tape.
(The format usually
used in America
and Japan)
The built-in timer allows
automatic unattended recording
of up to 8 TV programmes
within 1 month. Using the serial
facility you can easily record a
programme which is broadcast
at the same time every day or
every week. Timer recordings
can be programmed and confirmed on screen.
The on screen display allows precise
remote control adjustment of brightness,
contrast, colour, and
sharpness. When you select a
channel or make other changes,
your TV/VCR will show an
indicator on the screen for a few
seconds.
On screen programming allows easy
every day use of the functions you
use most often.
5451401A/02-05 2/6/99, 3:25 PM3
Page 4
4
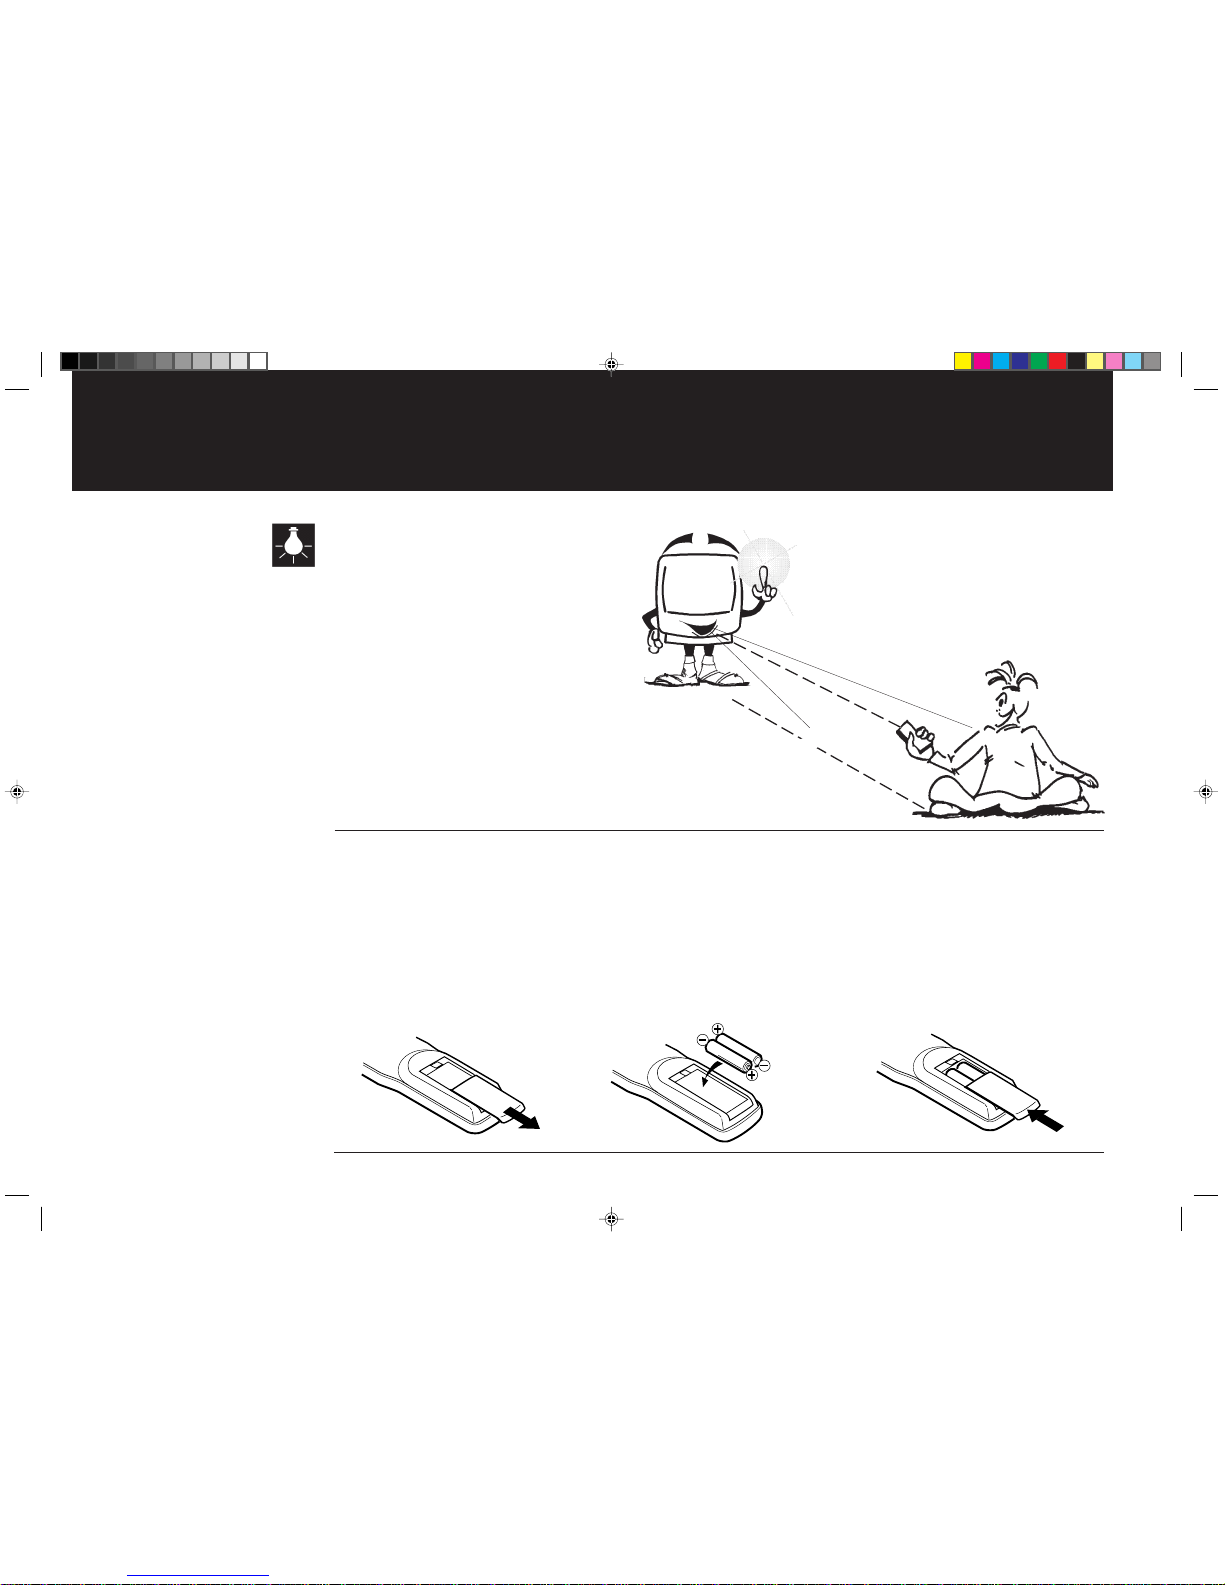
Useful background information
5 metres
30
o
30
o
Remote control operation may become
erratic if:
Direct sunlight, fluorescent lamp,
standard household lamp (incandescent)
or any other strong light source shines
on the remote sensor.
When there is an obstacle between
your TV/VCR and the remote control.
If you try to operate your TV/VCR from
a distance greater than 5 metres.
If you try to operate your TV/VCR away
from the normal viewing angle (over 30
o
either side of the remote sensor).
If you have any difficulty inserting the batteries in the remote control please refer to your Quick Start guide of this
instruction book.
Push and lift the battery cover on the back of the remote control. Use two AAA / R03 / MN2400 size batteries
for the remote control. Insert the batteries according to the polarity illustration inside the battery compartment.
Make sure + matches + and – matches –.
The batteries may last approximately one year depending on how much the remote control is used. For best performance it is
recommended that batteries are replaced on a yearly basis, or when remote control operation becomes erratic.
Do not mix old and new batteries or different types.
Weak batteries can leak and severely damage your remote control. Always remove batteries immediately when they
become weak, or if your TV/VCR is not to be used for a long time.
How to insert batteries
5451401A/02-05 8/25/99, 06:58 PM4
Page 5

5
38
21
6
Contents
Setting up your combined Television
and Video Cassette Recorder
This will explain how to set up your Television and
Video Cassette Recorder for all its uses.
13
Television operation
This will explain how to use all the features of the Colour Television.
Page
Page
Page
Video Cassette Recorder operation
This will explain how to use all the features of the
Video Cassette Recorder.
Fault finding
If you encounter difficulty using your Television and Video
Cassette Recorder some of the most common problems are
explained.
Your instruction book is divided into four sections.
Page
5451401A/02-05 8/25/99, 06:58 PM5
Page 6
6
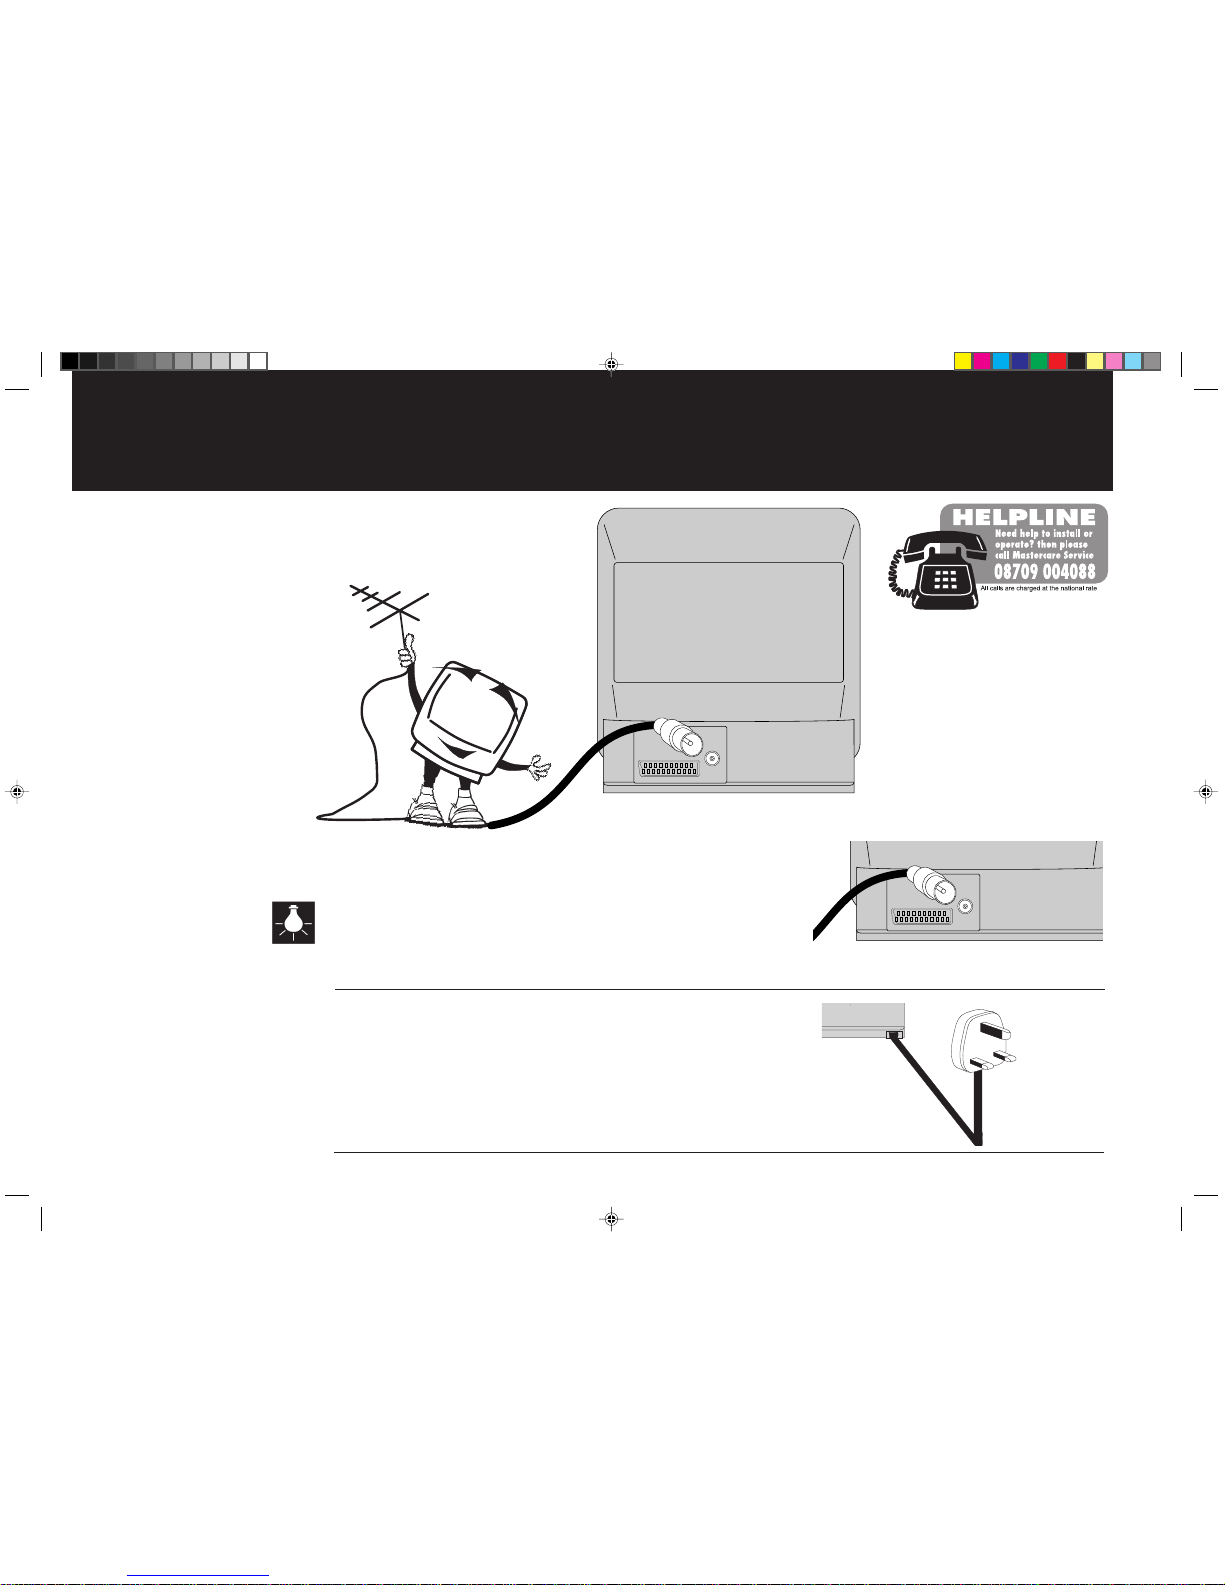
To complete your installation you will need to connect your TV/VCR to an aerial
(not supplied)
.
Installing your TV/VCR
1
Insert the aerial
(not supplied)
into the aerial socket of your TV/VCR.
The type of aerial required depends on the position of your home, its distance from the
transmitter and local interference. If you do not have an aerial and you are uncertain of
what to buy, you should seek the advice of a local aerial contractor.
2
Plug your TV/VCR into a mains supply (AC).
IN
IN
5451401A/06-11 8/25/99, 06:55 PM6
Page 7
7
IN
LNB IN
OUT
IN
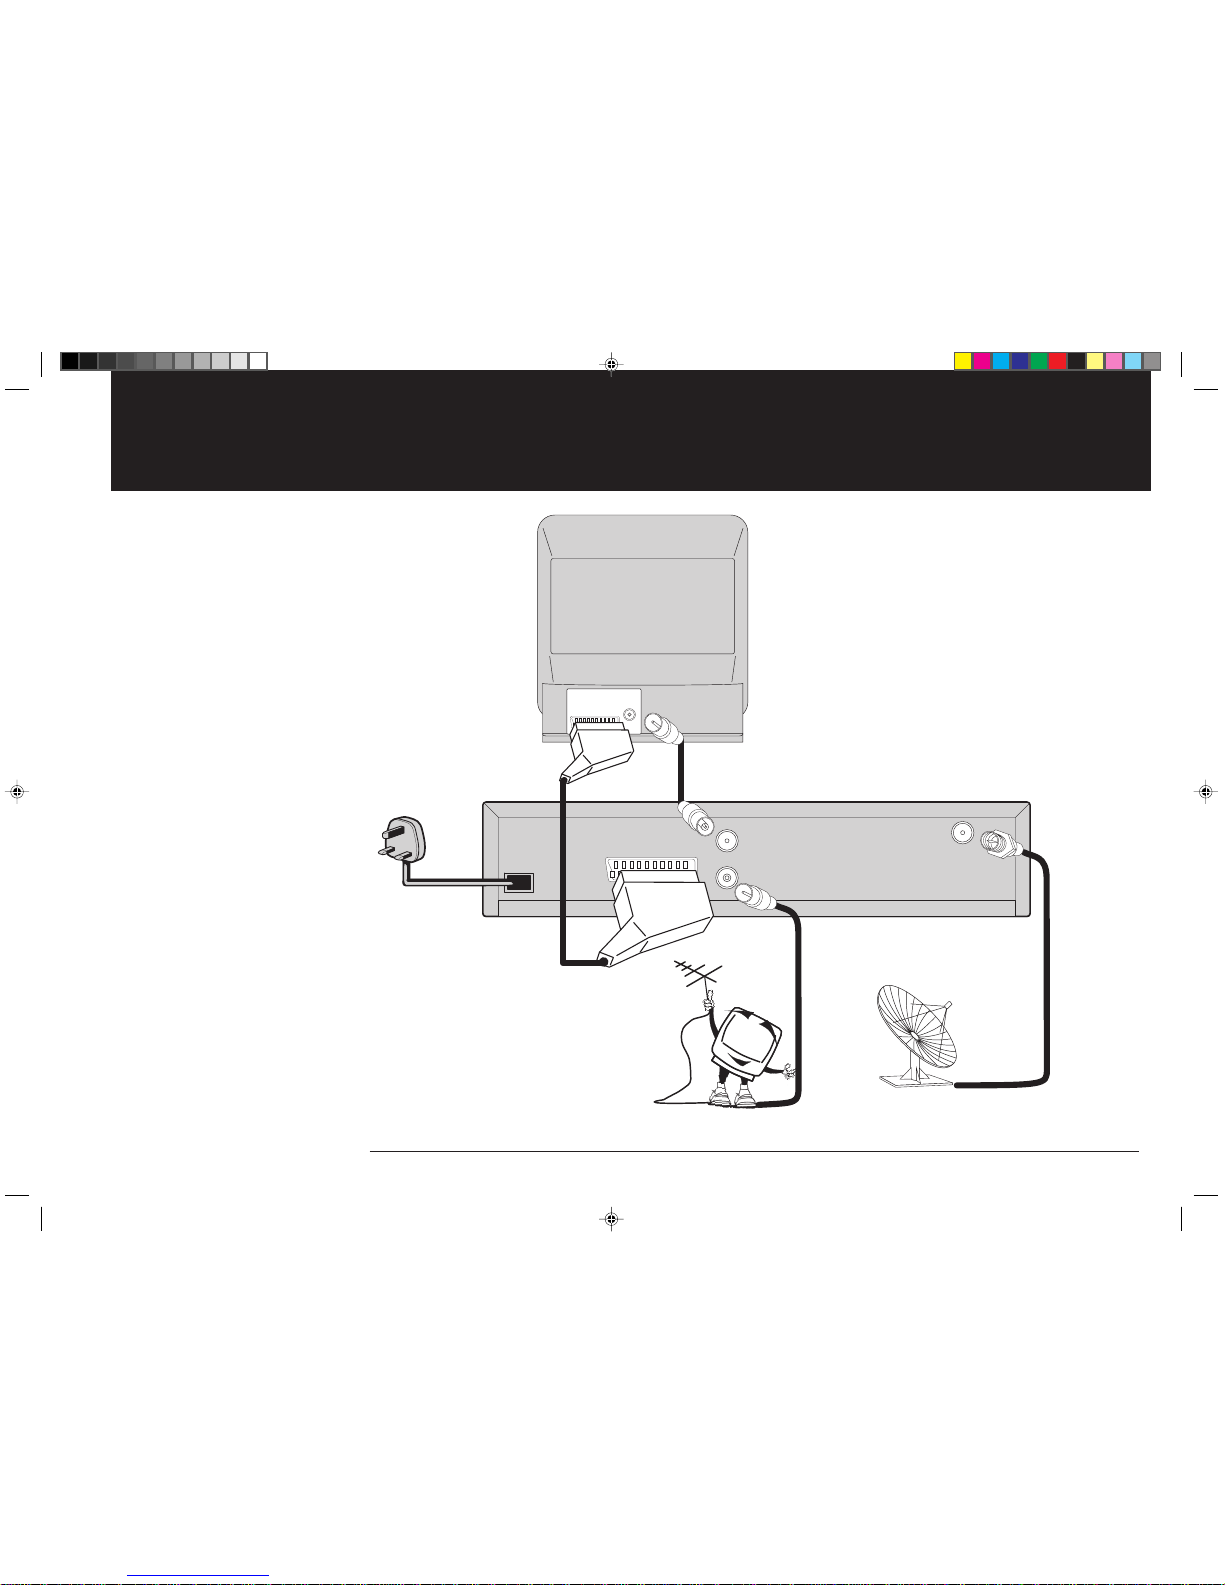
Connecting your TV/VCR to a Satellite system using a SCART lead
Your TV/VCR is installed. Turn to the next page to see how to tune in TV stations.
Due to the wide variety of satellite receivers, decoders and systems available, the connection diagram given on this page
is only a basic guide. If you require a more detailed explanation please refer to your satellite system instructions.
Satellite dish
(not supplied)
SCART lead
(not supplied)
Satellite receiver/decoder
(not supplied)
All connections must be made
with both your TV/VCR and
satellite receiver unplugged from
the mains supply.
Back view of your TV/VCR
If you wish to view your
satellite system using a
SCART lead you must select
the channel marked AV by
pressing 0 button twice.
Partmaster our accessories and
spares service can supply any
additional connection cables you
may require.
Telephone 01442 888444 and ask
for a quotation.
Aerial
(not supplied)
Connection cable
(not supplied)
Satellite in (LNB)
(screw thread 'F'
connector)
5451401A/06-11 2/6/99, 7:22 PM7
Page 8
8
4
2
3
How to set the clock
The date digit will flash.
Press REW or F.FWD until the current date is
displayed.
Store the date setting by pressing STOP.
The day shown after the date might not be right until the correct
month and year have been set.
Select the SYSTEM SETUP screen
Select the CLOCK SET screen
Enter the current date
Your TV/VCR is fitted with a 24 hour clock and a year 2000 compliant calendar. You will be unable to use your TV/VCR
properly unless the time and date is set and keeping time correctly. Please note that you will be unable to select TIMER
REC
SET or ON/OFF TIMER SET from the main menu until you have set the CLOCK.
Press MENU. The main menu will appear on your TV screen.
Press the PLAY or STOP buttons to highlight "SYSTEM
SETUP" then press ENTER.
The TV picture will go slightly darker when a menu appears,
this is to make the menus easier to read."
Press PLAY or STOP to select "CLOCK SET".
Press ENTER, the "CLOCK SET" screen will appear.
SELECT :
TIMER REC SET
CH TUNING
AUTO REPEAT
PIN CODE REGISTRATION
ENTER
EXIT
: ENTER
: MENU
OFF
TV SETUP
SYSTEM SETUP
SELECT :
SYSTEM SETUP
CLOCK SET
LINGUA/LENGUA
ENTER
EXIT
: ENTER
: MENU
LANGUAGE/SPRACHE/LANGUE
SELECT :
CLOCK SET
DATE
TIME
SET
OK: ENTER
:
YEAR
MONTH
/ 0–9
EXIT
23 SUN
0:00
2000
1
: MENU
1
Make sure that your TV/VCR is properly installed.
Press the MAIN POWER switch on the front of your
TV/VCR to the on position.
Press the ON button on the front of your TV/VCR or
the remote control.
Press the POWER ON buttons on the front of your TV/VCR
PHONES
POWER
ON
V
O
5451401A/06-11 2/6/99, 3:26 PM8
Page 9
9
8
The minute digit will flash.
Press REW or F.FWD until the current minute is
displayed.
Store your setting by pressing ENTER.
The CLOCK SET screen will disappear and the time and
date will be displayed for 5 seconds.
6
7
The current date and time is now set in your TV/VCR's memory.
How to set the clock
Your TV/VCR will NOT timer record if the clock is not set. After a power failure or being
unplugged from the mains the clock and all programmed settings will continue to operate
for approximately 30 minutes. If the power failure lasts for more than 30 minutes
all TIMER RECORD, TIMER and CLOCK settings will be lost.
Enter the current year
5
The month digit will flash.
Press REW or F.FWD until the current month is
displayed.
Store the month setting by pressing STOP.
Enter the current month
The year digit will flash.
Press REW or F.FWD until the current year is
displayed.
Store the year setting by pressing STOP.
Enter the current hour
The hour digit will flash.
Press REW or F.FWD until the current hour is
displayed.
(Your TV/VCR uses a 24hr clock)
Store the hour setting by pressing STOP.
Enter the current minutes
SELECT :
CLOCK SET
DAY
TIME
SET
OK: ENTER
:
YEAR
MONTH
/ 0–9
EXIT
23 SAT
0:00
1999
10
: MENU
SELECT :
CLOCK SET
DAY
TIME
SET
OK: ENTER
:
YEAR
MONTH
/ 0–9
EXIT
23 SAT
11:00
1999
10
: MENU
SELECT :
CLOCK SET
DAY
TIME
SET
OK: ENTER
:
YEAR
MONTH
/ 0–9
EXIT
23 SAT
11:30
1999
10
: MENU
SELECT :
CLOCK SET
DAY
TIME
SET
OK: ENTER
:
YEAR
MONTH
/ 0–9
EXIT
23 MON
0:00
2000
10
: MENU
5451401A/06-11 8/25/99, 06:56 PM9
Page 10
10
1
How to tune in television stations
Before you can view a television station it must be tuned into your TV/VCR's memory, this section will show you
how to achieve this. You cannot tune TV channels if an aerial
(not supplied)
is not connected.
2
Select CH TUNING
If you do not press a key within 1 minute your TV/VCR will remove the tuning menu.
Press MENU on your remote control. The main
control menu will appear.
Press PLAY or STOP on your remote control until
the square next to “CH TUNING“ starts to flash.
Press ENTER on your remote control.
Press F.FWD to search up the waveband or REW to
search down the waveband.
Each time a station is found the search will stop.
Press REW or F.FWD to continue searching until the
station you want is found.
Press ENTER to store the station you have selected.
Search for your required station
SELECT :
TIMER REC SET
CH TUNING
AUTO REPEAT
PIN CODE REGISTRATION
ENTER
EXIT
: ENTER
: MENU
OFF
TV SETUP
SYSTEM SETUP
----
------------------
CH 1
SEARCH
OK
:
: ENTER
/ F.TUNE :
EXIT:MENU
------
=
CH 1
SEARCH
OK
EXIT:MENU
: ENTER
----------------
/ F.TUNE :
:
5451401A/06-11 8/25/99, 06:56 PM10
Page 11

11
6
If at a later date you wish to skip an unwanted channel
when using CH/TRACKING up ( ) or down ( ),
press CANCEL on the remote control.
The channel number will flash when skip is selected for that
channel.
To cancel the skip function, type in the channel
number i.e. 2 and press CANCEL. The channel
number will cease to flash.
4
5
Press MENU three times to clear the display
How to tune in television stations
Your TV/VCR is now tuned in and ready to watch.
Press CANCEL to skip the channel
Repeat stages 3 - 4 for tuning other channels.
Press MENU three times to remove the tuning
menu from the screen.
It is highly recommended that
you store the stations you tune in
the order shown in the table below.
BBC 1 channel 1
BBC2 channel 2
ITV channel 3
CHANNEL 4 channel 4
CHANNEL 5 channel 5 (if receivable)
SATELLITE channel 6 (if fitted)
Select required channel number
3
Should you need to make the picture even clearer and
sharper, press PLAY or STOP.
When you have a clear crisp picture store this setting
by pressing ENTER.
Press PLAY or STOP to select your required
channel number (1~80).
Press ENTER to store the channel number.
Use the channel guide on the left for guidance.
Manually fine tune the picture
------
=
CH
OK
CH 1
----------------
/ 0–9
:
: ENTER
EXIT:MENU
CH 1
------
CH 1
SEARCH
OK
EXIT:MENU
: ENTER
----------------
/ F.TUNE :
:
5451401A/06-11 8/25/99, 06:57 PM11
Page 12
12
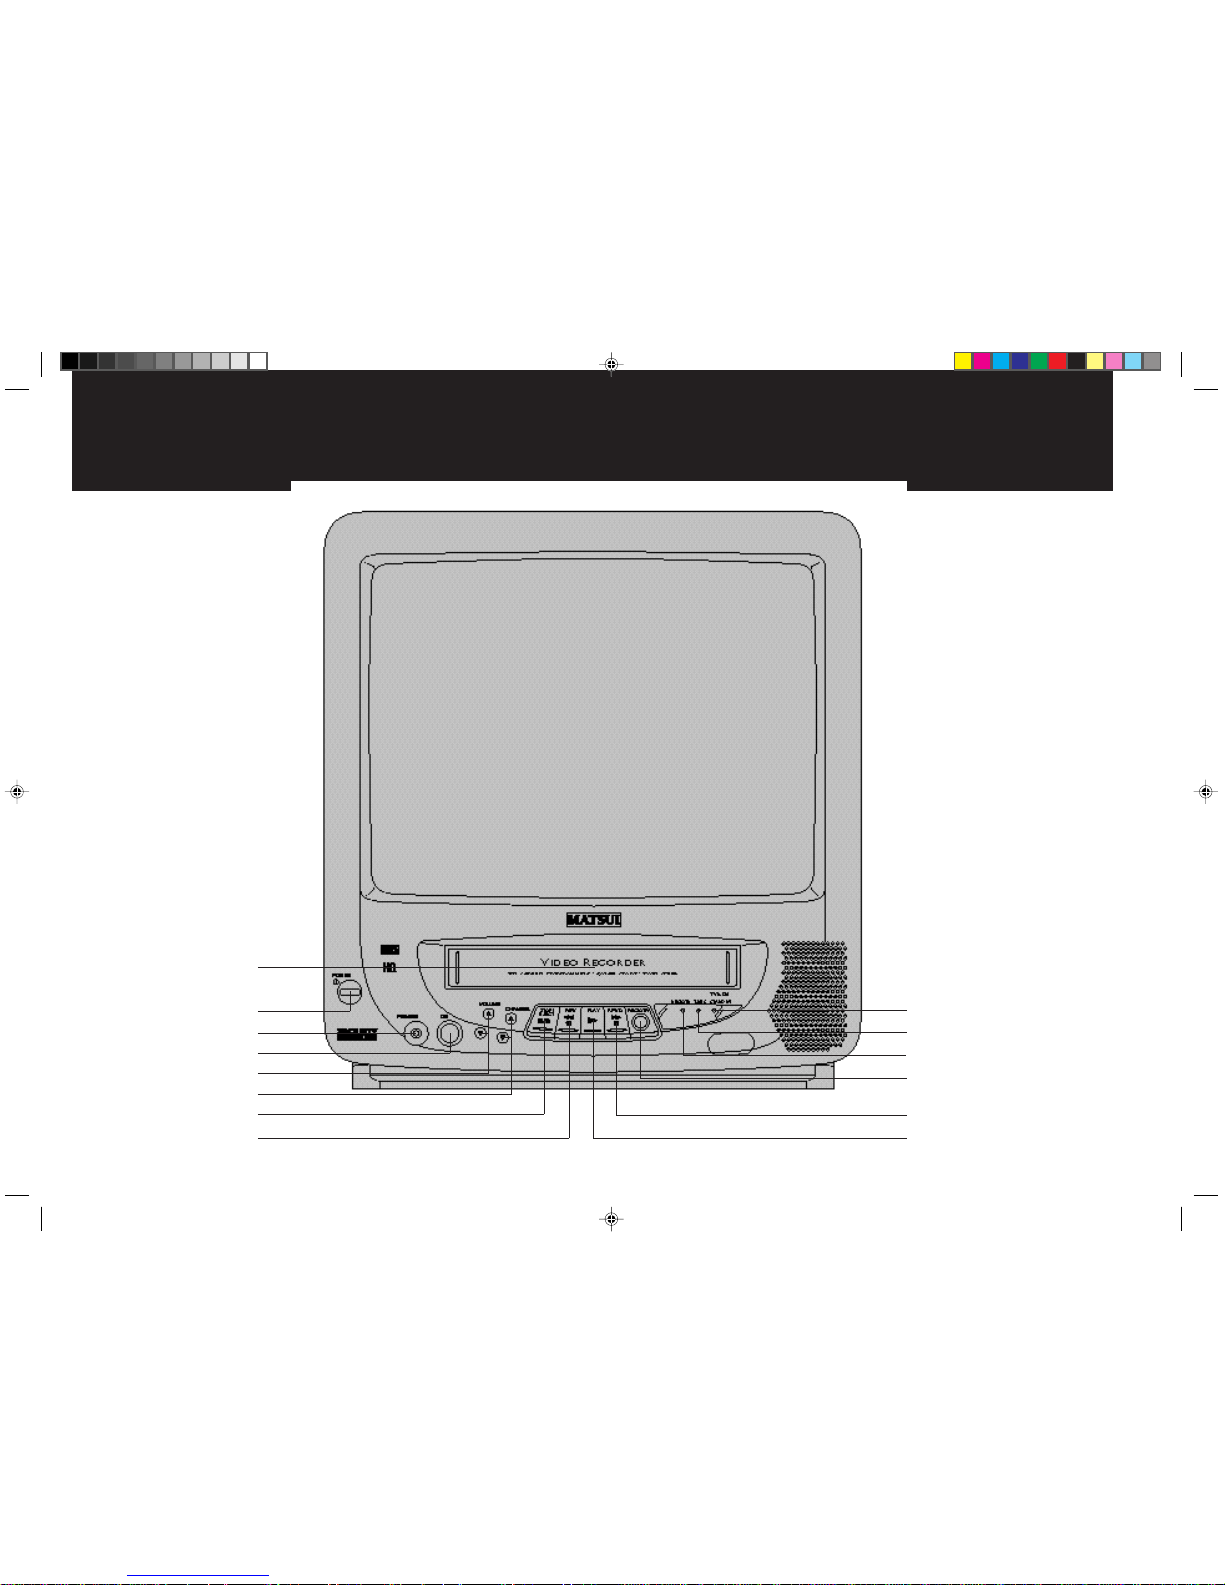
Get to know your TV/VCR
Each button listed in this section has the same function as its corresponding button on the remote control.
Cassette compartment
Playback button
MAIN POWER switch
Record and One touch record
(OTR) button
Volume Up/Down buttons
Channel selection buttons
Headphone socket
Stop and tape eject button
Power ON button
Stand by indicator
Timer REC indicator
REC/OTR indicator
F.FWD (Fast Forward) button
REW (Rewind) button
5451401A/12-13 8/25/99, 06:54 PM12
Page 13

13
13
TV operation...
Basic TV operation
Selecting a channel.............................................................. 14
Adjusting the sound............................................................ 15
How to mute sound........................................................... 15
Call ......................................................................................... 15
Headphone socket.............................................................. 15
Advanced TV operation
Adjusting the picture.......................................................... 16
ON and OFF Timer............................................................ 18
Sleep Timer .......................................................................... 20
5451401A/12-13 8/25/99, 06:54 PM13
Page 14

14
Selecting a channel
These methods of selection are used for both TV and VCR operation.
3
1
Switch on your TV/VCR then press ON on the set or on the remote control
Make sure that your TV/VCR is properly installed.
Press MAIN POWER switch on the front panel, the
red standby indicator will light.
Switch on your TV/VCR by pressing ON on the front
panel or on the remote control.
When a channel is selected the channel number is displayed in the
top right corner of the screen
Press the numbered buttons to select channels.
When selecting channels, press the numbered buttons. For
example, for channel 3 press 3, for channel 25 press
2
then
5.
Press CH/TRACKING up ( ) or down ( ) to
select channels in sequence; e.g. 1, 2, 3, 4 etc.
2
To put your TV/VCR into standby mode, press ON
on the remote control. The red standby indicator will
light.
The ON button on the remote control doesn't switch the set
off completely, it only switches it to standby mode. To turn
your television off completely, switch off POWER and unplug the
television at the wall socket.
Select channels in sequence using CH up or down
CH 1
CH 2
The STANDBY indicator will light
PHONES
POWER
ON
VOL
/
OTR T.REC STAND BY
TVR180
5451401A/14-15 2/6/99, 3:28 PM14
Page 15

15
The sound level can be adjusted by using VOLUME
( )
and ( )
The sound can be temporarily switched off using MUTE
2
Press MUTE to switch off the sound.
When the sound is switched off the mute symbol will appear
on screen.
Press MUTE a second time or press VOLUME up
( ) or down ( ) to switch the sound back on.
1
Press VOLUME up ( ) or down ( ) to adjust
the sound level.
The next pages describe in greater detail how to operate your TV.
Adjusting the volume and call feature
3
Press CALL on the remote control; the TV screen will
display the current time, channel and any other
information (e.g. tape counter, record sign).
The info display will not disappear unless you press CALL again.
Plug your headphones in the headphone socket
4
The socket will only accept a jack plug the size of that
found on a normal pair of personal cassette player
headphones (3.5mm).
When used, the speaker of your TV/VCR will be
disconnected.
Always remove the headphones after use for normal viewing.
If stereo headphones are used,
sound may only be apparent
through one speaker. If this
happens try a stereo/mono adaptor (not
included) or check the operation of your
headphones for independent volume or
balance control.
Press CALL for channel information
17
VOLUME
MUTE
ON
11:30 SAT
–01 : 30 : 21 LP
CH 1
INDEX
OTR
5:00
PHONES
POWER
ON
V
O
5451401A/14-15 2/6/99, 3:28 PM15
Page 16

16
Adjusting the picture
The picture settings have been adjusted by the factory under optimum signal reception conditions, however conditions may not be
the same in your area. After turning on your television, allow it to warm up for a few minutes before making any adjustments. Should
you wish to reset picture controls back to factory settings press CANCEL. (When picture adjustment bar is on the screen.)
3
2
1
Press the REW or F.FWD buttons to adjust the brightness of the picture
Press ENTER to display the brightness bar;
press REW or F.FWD to adjust the brightness of the
picture.
Select the picture features
Press MENU on your remote control. The on screen
display will appear.
Press PLAY or STOP on your remote control to
highlight “TV SETUP”.
Press ENTER on your remote control.
Press PLAY or STOP to highlight “PICTURE”.
Press MENU for the on screen display
SELECT :
TIMER REC SET
CH TUNING
AUTO REPEAT
PIN CODE REGISTRATION
ENTER
EXIT
: ENTER
: MENU
OFF
TV SETUP
SYSTEM SETUP
ENTER
SELECT :
PICTURE
EXIT
: ENTER
: MENU
ON/OFF TIMER SET
TV SETUP
ON
BRIGHTNESS
0
SET
INITIAL
NEXT:: ENTER
EXIT : MENU
: CANCEL
:
5451401A/16-21 8/25/99, 06:50 PM16
Page 17

17
6
5
Adjusting the picture
4
Press ENTER to display the sharpness bar; press
REW or F.FWD to adjust the sharpness of the
picture.
In weak reception areas, the picture may appear more pleasing when
sharpness is set at a lower level.
Press ENTER to display the contrast bar; press
REW or F.FWD to adjust the contrast of the picture.
Press ENTER to display the colour bar; press REW
or F.FWD to adjust the colour of the picture.
Press the REW or F.FWD buttons to adjust the contrast of the picture
Press the REW or F.FWD buttons to adjust the colour of the picture
Press the REW or F.FWD buttons to adjust the sharpness of the picture
These methods of adjusting the picture are used for both TV and VCR operation.
Pictures appear sharpest in the daytime by increasing the
contrast. In the evening (when surroundings are darker) try
reducing the contrast to obtain the best picture.
7
Press MENU three times to clear the display.
Memorised factory settings can be reset by pressing the CANCEL button when
any of the picture adjustment bars are on screen.
CH 1
ON
CONTRAST
0
SET
INITIAL
NEXT:: ENTER
EXIT : MENU
: CANCEL
:
ON
COLOUR
0
SET
INITIAL
NEXT:: ENTER
EXIT : MENU
: CANCEL
:
ON
SHARPNESS
0
SET
INITIAL
NEXT:: ENTER
EXIT : MENU
: CANCEL
:
5451401A/16-21 8/25/99, 06:51 PM17
Page 18

18
3
The on timer feature allows you to automatically turn on your TV/VCR at a set time. The on timer will turn on
your TV/VCR everyday at the same time and select the same channel.
The off timer allows you to turn off your TV/VCR at a set time. You can set the off timer in conjunction with the
on timer. Please note the on/off timer is NOT the same as the video timer record feature.
Timer functions
Enter the hour
2
1
Press PLAY or STOP until the square next to “ON/
OFF TIMER SET” starts to flash.
Press ENTER to display the timer menu.
Select the on/off timer menu
The square next to “ON TIMER” will flash.
Press ENTER to select the on timer. The hour
digit will flash.
Press PLAY or STOP to enter the hour at which
you want your TV/VCR to automatically switch on.
Remember your TV/VCR uses a 24 hour clock.
Press MENU on your remote control. The on screen
display will appear.
Press PLAY or STOP on your remote control to
highlight “TV SETUP”.
Press ENTER on your remote control.
4
Press F.FWD. The minute digit will flash.
Press PLAY or STOP to enter the minute at which
you want your TV/VCR to automatically switch on.
Confirm your selection by pressing F.FWD.
Enter the minutes
SELECT :
TIMER REC SET
CH TUNING
AUTO REPEAT
PIN CODE REGISTRATION
ENTER
EXIT
: ENTER
: MENU
OFF
TV SETUP
SYSTEM SETUP
Select the TV SETUP menu
SELECT :
ON/OFF TIMER SET
7:00
ON TIMER
OFF TIMER
SETOK:
: ENTER
SUN–SAT
CH 1
0:00
CANCEL
CANCEL
EXIT : MENU
ON/OFF TIMER SET
7:45
ON TIMER
OFF TIMER
SUN–SAT
CH 1
0:00
CANCEL
CANCEL
SELECT :
SETOK:
: ENTER
EXIT : MENU
TV SETUP
ENTER
SELECT :
PICTURE
EXIT
: ENTER
: MENU
ON/OFF TIMER SET
5451401A/16-21 8/25/99, 06:51 PM18
Page 19

19
5
4
7
Set the on timer
Timer functions
The automatic switch on and off functions will only operate the TV .
You may set the off timer
Remember if you are to leave your TV/VCR unattended for a long
period of time then for safety reasons you must unplug your unit
from the mains supply.
6
Press PLAY or STOP to activate your on timer.
The word “CANCEL” will change to “SET” when the
timer is activated.
If you wish to cancel the timer on function press PLAY or STOP
again until the word “CANCEL” is displayed.
The channel digit will flash.
Press PLAY or STOP to enter the channel you wish to
display when your TV/VCR switches on.
Confirm your selection by pressing F.FWD.
If you wish to set the off timer press ENTER and
repeat stages 2 - 6.
Once you have set the timer(s) press MENU three
times then switch your TV/VCR to standby by
pressing the ON button on the remote control.
If no off time is set approximately 4
hours after the timer turns on your
TV/VCR your unit will turn off again,
this prevents your unit from playing
continuously. If you wish to continue
viewing after automatic switch on,
press any button on the remote
control.
The date digit will flash.
Press PLAY or STOP to select either the every day or
every week options.
Confirm your selection by pressing F.FWD.
If you make a mistake during setting
the on/off timer, press REW or
F.FWD to select the information you
want to change and the press PLAY
or STOP to change it.
Enter the channel
Enter the date
ON/OFF TIMER SET
7:45
ON TIMER
OFF TIMER
MON–FRI
CH 2
0:00
CANCEL
CANCEL
SELECT :
SETOK:
: ENTER
EXIT : MENU
ON/OFF TIMER SET
7:45
ON TIMER
OFF TIMER
SUN–SAT
CH 2
0:00
CANCEL
CANCEL
SELECT :
SETOK:
: ENTER
EXIT : MENU
ON/OFF TIMER SET
7:45
ON TIMER
OFF TIMER
MON–FRI
CH 2
0:00
SET
CANCEL
SELECT :
SETOK:
: ENTER
EXIT : MENU
ON/OFF TIMER SET
7:45
ON TIMER
OFF TIMER
MON–FRI
CH 2
11 : 30
SET
SET
SELECT :
SETOK:
: ENTER
EXIT : MENU
5451401A/16-21 8/25/99, 06:51 PM19
Page 20

20
Sleep function
The sleep function allows you to automatically switch your television into standby after a preset amount of time (up
to 120 minutes). In addition should you fall asleep or leave your TV/VCR unattended it will automatically switch into
standby 15 minutes after the end of transmissions.
1
2
Repeated presses of SLEEP will decrease the sleep timer in 10 minute
intervals from 120 minutes to 10 minutes.
1st press .......... 120 minutes.
2nd press......... 110 minutes.
. . .etc................ . . . 100, 90, 80.
When you have set the sleep timer your TV/VCR will return to a normal
picture and automatically switch off after the preset sleep time.
To set the sleep timer press SLEEP.
“SLEEP 120” will appear on screen.
The display will clear in five seconds and your TV/VCR
will switch off automatically after 120 minutes.
Use ON on the remote control to switch your TV/VCR on after sleep timer has switched it off.
Each press of SLEEP will decrease the sleep timer
Press SLEEP to set the sleep timer
3
SLEEP
120
ON
SLEEP
110
ON
To cancel the sleep timer set the sleep timer to 0.
The display will clear in five seconds and your TV/VCR
will not switch off automatically.
SLEEP
0
ON
To cancel sleep timer press SLEEP until “SLEEP 0” is displayed
The sleep function will not affect any TV/VCR record settings,
only the picture will shut off after the sleep time passes.
5451401A/16-21 8/25/99, 06:51 PM20
Page 21

21
21
Basic video operation
How to insert and play a tape.......................................... 22
Visual rewind and forward................................................ 23
Rapid rewind and fast forward ........................................ 23
How to stop and remove a tape..................................... 23
Pause...................................................................................... 24
Manual and automatic tracking ........................................ 24
Counter display with zero return................................... 25
How to record a TV programme
Instant record ...................................................................... 26
Timer record ....................................................................... 28
Checking or cancelling timer recordings....................... 30
Video index search ............................................................. 31
How to set the security protection
Setting the user registration............................................. 32
How to connect a video camera or
another VCR to your TV/VCR
Connections......................................................................... 34
How to select the language .............................................. 36
Wiring instruction and SCART socket information ... 37
Help and Specification
Fault finding table ................................................................ 38
Specifications........................................................................ Back cover page
Video operation...
5451401A/16-21 8/25/99, 06:51 PM21
Page 22

22
2
3
1
Only use VHS video cassette tapes.
How to play a video cassette
Make sure your TV/VCR is properly installed and switched
on.
Insert a pre-recorded cassette.
When you insert a video cassette with the record protection
tab removed (for example a pre-recorded cassette from a
video hire shop) playback will start straight away.
Press the PLAY button if your tape does not start to
play automatically.
The tape will start playing and the play symbol will appear on
the TV/VCR screen.
If you wish to view the TV station you were watching before you
started playing a tape press TV MONITOR. To return to
viewing your tape press TV MONITOR again.
If you wish your TV/VCR to rewind to the beginning of a tape
once it has finished playing and start to play again.
Press MENU to select the main menu. Press PLAY or
STOP until the square next to "AUTO REPEAT" "ON" or
"OFF" starts to flash.
Press ENTER to select "ON" or "OFF". Press MENU to
clear the screen.
PAL
Your VCR can playback Video tapes recorded in the NTSC Colour
System (TV system usually used in America and Japan) on PAL 60Hz
TV (TV system used in the United Kingdom). To play the NTSC tape
press PLAY.
Your VCR will playback Video tapes recorded using NTSC Standard
play, Long play (LP) and Extended play (EP). However there will be a
deterioration in sound quality in the Long play and Extended play
modes.
SELECT :
TIMER REC SET
CH TUNING
AUTO REPEAT
PIN CODE REGISTRATION
ENTER
EXIT
: ENTER
: MENU
ON
TV SETUP
SYSTEM SETUP
/
5451401A/22-25 8/25/99, 06:48 PM22
Page 23

23
6
The next page will explain some more useful features of your TV/VCR's operation.
4
How to play a video cassette
If you do not press STOP the tape will continue until it reaches the end.
The auto rewind facility will automatically rewind the tape to the beginning.
Your TV/VCR will then automatically eject the cassette.
LP
SP
FF
5
To rapid rewind or forward the tape, press
STOP; then press either REW or F.FWD.
If you wish to see the tape programme during rewind or forward
mode, press REW or F.FWD again. The backward or the
forward visual search picture will be seen on the screen. Press
again to return to the rewind or forward mode.
Press STOP to stop playing your video cassette.
The tape will stop and the TV channel you viewed via your TV/VCR
before you started to play your video cassette will be displayed on the
TV.
Press EJECT on the front of your TV/VCR or on
the remote control and your tape will be ejected.
Tape will stop and TV will revert to displaying a TV channel
You will not be able to view the contents of the cassette during rapid rew or f.fwd
The sound is muted during picture
search. During picture search
you may see white lines across the
screen or a distorted picture. This is
quite normal and does not mean
there is anything wrong with the
tape or your TV/VCR.
The speed of the search time depends on the speed used
during recording, either standard play (SP) or long play
(LP).
1st press .......... 5 times normal speed (NTSC 3 times)
2nd press......... 7 times normal speed (NTSC 5 times)
1st press .......... 7 times normal speed
2nd press......... 13 times normal speed
Return to normal playback by pressing PLAY.
To visually rewind or forward the tape (picture
search) the tape must be playing; press either REW
or F.FWD.
5451401A/22-25 8/25/99, 06:49 PM23
Page 24

24
VCR features
Your TV/VCR is equipped with useful features to enhance your viewing.
4
3
2
1
When playing a tape, press PAUSE to view
a still picture.
The sound is muted during pause.
Pause is automatically changed to play after
being held for 5 minutes to prevent damaging
the tape.
Press PLAY to resume playback.
When a tape is played, the digital auto tracking system
automatically adjusts the tracking to obtain the best
possible picture.
If white lines appear during playback or the picture
starts to shake you may adjust the tracking manually.
Press the TRACKING + or – buttons to obtain the
best possible picture.
To resume automatic tracking, press the ATR button
on the remote control.
The picture may have white lines across it when paused
The auto tracking indicator will appear on
screen then disappear after 5 seconds
The presence of white lines on the screen is an indication of poor tracking
AUTO TR.
-----
=
MANUAL TR.
CH:
----------------
5451401A/22-25 8/25/99, 06:49 PM24
Page 25

25
Your VCR has a counter which can display the actual amount of time (in hours, minutes and seconds) a tape has been
played. The Zero return feature allows you to set the counter to 00:00:00 at any point in the tape and then rewind and
start playing from that point when you press the ZERO RETURN button.
1
Press CALL to display the counter.
The counter displays how much time (in hours, minutes
and seconds) has elapsed since the point at which you
started playing a tape. The counter advances one second
at a time.
2
Press COUNTER RESET to reset the counter to
00:00:00
When you load a tape, the counter will reset.
If you rewind the tape from 00:00:00 a minus sign will be
displayed in front of the counter.
The counter advances one second at a time
Reset the counter
The counter will stop when blank sections of tape are detected
Counter and Zero return
11:30 SAT
01 : 03 : 21 LP
CH 1
11:30 SAT
00 : 00 : 00 LP
CH 1
3
4
When the VCR is not playing press ZERO
RETURN, the tape will rewind until the counter
reaches 00:00:00 automatically.
This feature is useful for returning to a point in a tape
you wish to view again.
When you rewind, fast forward or play through
blank sections of tape, the counter will stop
counting.
11:30 SAT
00 : 00 : 00 LP
CH 1
The tape will stop at 00:00:00 on the counter
11:30 SAT
00 : 07 : 18 LP
CH 1
5451401A/22-25 8/25/99, 06:49 PM25
Page 26

26
How to record and view the same TV programme
The one touch recording feature provides a simple and convenient way to make instant and timed recordings.
3
1
2
Press the numbered buttons or CH/TRACKING up
( ) or down ( ) on the remote control to select the
channel to be recorded.
When selecting channels, press the numbered buttons. For example, for
channel 3 press 3, for channel 25 press
2 then
5.
Make sure that your TV/VCR is properly installed.
Press the MAIN POWER switch on the front of your
TV/VCR.
Then press the ON button on the front of the TV/VCR
or on the remote control
Insert a blank tape.
If the erase protection tab has been removed from
the tape, you will not be able to make a recording.
Select the channel to be recorded
Press the POWER ON buttons on the front of your TV/VCR
When recording is taking place you will only be able to view the channel
that you have selected to record.
CH 1
PHONES
POWER
ON
VO
5451401A/26-29 2/6/99, 3:31 PM26
Page 27

27
6
5
4
How to record and view the same TV programme
Press STOP to end recording.
If the erase protection tab has
been removed, the tape will eject
when the REC/OTR button is
pressed.
Press STOP to end recording
Start recording
Press SP/LP to select either standard play (SP) or
long play (LP).
Press REC/OTR for continuous recording.
Additional presses of the REC/OTR button will
allow you to record in timed intervals (displayed on
the screen), up to a maximum of 5 hours, at the end
of which your VCR will stop recording.
1st press ........... continuous recording
2nd press......... 30 minutes
3rd press ......... 1 hour
4th press.......... 1 hour 30 minutes
5th press.......... 2 hours
6th press.......... 3 hours
7th press.......... 4 hours
8th press.......... 5 hours
Press PAUSE to avoid recording
unwanted material. REC/OTR indicator
will flash in the pause mode.
Press PAUSE again to continue
recording.
Pause the tape to avoid recording unwanted material
ON
CH 1
INDEX
OTR
0:30
When the tape speed LP is
selected, the recording time can
be set up to 10 hours.
Pause will operate during
continuous recording only.
Pause will be released after 5
minutes and continuous recording
will stop to prevent damage to
the tape or the video head.
5451401A/26-29 8/25/99, 06:21 PM27
Page 28

28
Timer recordings allow you to programme your VCR so that it will record at preset times. The built-in timer allows
unattended recording of up to 8 programmes within 1 month.
T imer r ecordings
3
1
2
Make sure that your VCR is properly installed and
that you have successfully tuned in all your required
TV stations and given them channel numbers.
e.g.
Insert a blank tape.
If the erase protection tab has been removed from
the tape, you will not be able to make a recording.
Make sure that the clock is showing the correct
present time.
Press MENU. The main menu will appear.
Press PLAY or STOP to select the TIMER REC SET
menu.
Press ENTER to select the timer screen.
Select the timer screen
You will not be able to select the TIMER REC SET menu until the clock has been set.
When recording is taking place you will onl y be able to view the channel
that you have selected to record.
BBC1 - CH 1
BBC2 - CH 2
ITV - CH 3
Channel 4 - CH 4
Channel 5 - CH 5
(if you are in a channel 5 reception area)
Satellite - CH 6
SCART socket - CH AV
Select the next available timer position (blank
dotted line) by pressing PLAY or STOP then
press ENTER.
SELECT :
TIMER REC SET
CH TUNING
AUTO REPEAT
PIN CODE REGISTRATION
ENTER
EXIT
: ENTER
: MENU
OFF
TV SETUP
SYSTEM SETUP
Select a recording position
------ --:-- --:-- -- -
------ --:-- --:-- -- -
------ --:-- --:-- -- -
------ --:-- --:-- -- -
------ --:-- --:-- -- -
------ --:-- --:-- -- -
------ --:-- --:-- -- -
------ --:-- --:-- -- -
SELECT :
EXIT :MENU
/ ENTER
5451401A/26-29 8/25/99, 06:21 PM28
Page 29

29
6
5
4
If you make a mistake during the setting procedure press PLAY or STOP to select the
information you want to change and then press REW or F.FWD to change it.
Store your selection
If you have a satellite connected
via the Scart socket, and wish
to record from it select channel
AV in setting the channel.
Timer recordings
Please note your TV/VCR uses a
24 hour clock.
If any timer record stage is not completed within 1 minute you will have to start again.
When you have finished setting all your recordings press
ENTER.
If you wish to make more than one recording repeat steps 3 - 6.
You may set up to 8 programmes in the same way.
Press MENU twice to clear the screen. Press TIMER REC
for Timer Recording will be displayed on the screen.
Press REW or F.FWD to select the desired day or
every day or every week setting.
Confirm setting by pressing STOP.
Your TV/VCR's timer record feature includes a number of
weekly settings. eg. instead of setting a specific date you can set
the VCR to record MO-FR at the same time every day - This can
be useful if you have a favourite programme at a regular time.
Your TV can be switched on or in
standby during recording.
Set the desired start hour and minutes, end hour and
minutes, channel and tape speed as in step 4.
7
Press TIMER REC to store your selection. The T-REC
indicator will light. After completing all timer record
programmes your VCR will switch itself off.
You will not be able to set further timer recordings after you have
pressed TIMER REC. To set further timer recordings press
TIMER REC (the indicator light will go out); make your selection;
press TIMER REC (the indicator will light).
SELECT :
TIMER REC SET
DATE
CH
SET
OK: ENTER
:
END
START
/ 0–9
EXIT
23 SAT
1
: MENU
SPEED SP
11:30
11:30
Select the date
SELECT :
TIMER REC SET
DATE
CH
SET
OK: ENTER
:
END
START
/ 0–9
EXIT
23 SAT
1
: MENU
SPEED
SP
20:00
21:00
Select your settings
Store your programme
20 00 21 00 1 SP
23 SAT
EXIT :MENU
/ ENTER
------ --:-- --:-- -- -
------ --:-- --:-- -- -
------ --:-- --:-- -- -
------ --:-- --:-- -- -
------ --:-- --:-- -- -
------ --:-- --:-- -- -
------ --:-- --:-- -- -
::
SELECT :
/
OTR T.REC STAND BY
TVR180
5451401A/26-29 2/6/99, 3:31 PM29
Page 30

30
3
You can easily check the details and cancel or make corrections for timer programmes.
Checking and cancelling timer programmes
1
If the timer rec has been activated, now press TIMER
REC to deactivate the timer. The T.REC indicator will
disappear.
Press PROGRAM, the timer program screen will be
displayed. All timer programme details will be displayed.
2
Press CANCEL to cancel a setting or ENTER to alter an existing one
Press PROGRAM again, the TV on/off timer set
screen will be displayed.
If you wish to alter the programmed on/off timer set,
select the on timer or off timer then adjust the contents
as described on pages 18-19.
By pressing PROGRAM the timer programmes will be displayed
Your recordings will only work when timer record is switched ON.
20 00 21 00 1 SP
23 30 2 30 5 LP
7007 30 2 LP
23 SAT
EXIT :MENU
/ ENTER
------ --:-- --:-- -- -
------ --:-- --:-- -- -
------ --:-- --:-- -- -
------ --:-- --:-- -- -
------ --:-- --:-- -- -
::
SELECT :
5 FRI
::
SU SA
::
-
20 00 21 00 1 SP
23 30 2 30 5 LP
7007 30 2 LP
23 SAT
CLEAR
/ ENTER
------ --:-- --:-- -- -
------ --:-- --:-- -- -
------ --:-- --:-- -- -
------ --:-- --:-- -- -
------ --:-- --:-- -- -
::
SELECT
5 FRI
::
SU SA
::
-
EXIT :MENU
:
:
CANCEL
Press PROGRAM twice to display the on/off timer programmes
If you want to cancel or alter an existing timer programme,
press PLAY or STOP to select the programme.
Press CANCEL. The pre-set programme will be cancelled.
OR
Press ENTER. You may then adjust the contents of the
selected timer programme.
ON/OFF TIMER SET
7:45
TIMER
OFF TIMER
MON–FRI
CH 2
11 : 30
SET
SET
SELECT :
SETOK:
: ENTER
EXIT : MENU
ON
4
After checking timer details press PROGRAM to clear
the screen.
If there are other timer record programmes remaining the
TIMER REC button must be pressed to reactivate them.
The T-REC indicator will light. If you do not reset the
timer rec facility the remaining timer record programmes
will be ignored and the recording will not take place.
Press TIMER REC to reset the timer
E
C/OTR T.REC STAND BY
TVR180
D
5451401A/30-31 2/6/99, 3:32 PM30
Page 31

31
1
3
2
Video index search system
Your TV/VCR may not be able to find index marks on old or worn out video tapes.
Press F.FWD or REW.
Your VCR will skip over the selected number of index
marks and will start playback at the selected mark.
Please note the tape speed will NOT be as fast as normal
rewind or fast forward speeds because your TV/VCR has to
look for the index marks on the video tape.
Select the number of index marks to be skipped by
using the numbered buttons (1-9).
Press index
To search for an index mark; or skip over a number of
index marks: Press NDEX during stop or playback.
When you record an index mark at the very beginning of a
tape, the mark may not be found.
During an index search, the tape may stop and begin to play at
a slightly different location.
Select the number of index marks to be skipped
Your TV/VCR will attempt to playback from your selected index mark
The video index search system enables you to locate the beginning of any recording made on your TV/VCR.
Your TV/VCR automatically records index marks on the tape whenever a recording is started.
19
-
EXIT
SEARCH
INDEX 1
:
:
INDEX
:
NO.
19
-
EXIT
SEARCH
INDEX 4
:
:
INDEX
:
NO.
19
-
EXIT
SEARCH
INDEX 4
:
:
INDEX
:
NO.
5451401A/30-31 8/25/99, 07:12 PM31
Page 32

32
PHONES
POWER
ON
VO
Setting the security protection
In an effort to fight crime, we have equipped your TV/VCR with security protection. When activated your TV/VCR
is protected against unauthorised use. You cannot operate the unit if you forget the PIN code. Please
ensure that you keep a record of the PIN code in a safe place, in case you forget it.
3
2
1
Press MENU. The main control menu will appear.
Press PLAY or STOP to select the "PIN CODE
REGISTRATION" menu.
Press ENTER to display the pin code registration
screen.
Press the POWER ON buttons on the front of your TV/VCR
Press PLAY or STOP to select the "OWNER'S
NAME".
Then press ENTER.
Press PLAY or STOP until the desired letter is
displayed.
Each press of PLAY or STOP changes the letter as follows;
Store the letter by pressing REW or F.FWD.
You can enter up to 20 letters.
Press ENTER to register your name.
If you make a mistake in registering the owner's name and PIN code press CANCEL.
Make sure that your TV/VCR is properly installed.
Press the MAIN POWER switch on the front of your
TV/VCR to the on position.
Press the ON button on the front of your TV/VCR or
the remote control.
The user registration screen will appear
Register your name
SELECT :
TIMER REC SET
CH TUNING
AUTO REPEAT
PIN CODE REGISTRATION
ENTER
EXIT
: ENTER
: MENU
OFF
TV SETUP
SYSTEM SETUP
A
(space)
...
-
Z
/
0
.
...
9
MARK
PIN CODE REGISTRATION
OWNER' S NAME
PROTECT
PIN CODE
SELECT :
ENTER
CLEAR
: ENTER
: CANCEL
EXIT:MENU
OFF
5451401A/32-33 2/6/99, 3:33 PM32
Page 33

33
Setting the security protection
If the unit needs to be serviced, make sure that the security protect
function is OFF, otherwise you will be charged for resetting this feature.
4
6
5
Press PLAY or STOP to select the "PIN CODE".
Then press ENTER.
Press REW or F.FWD or numbered buttons (0-9) to
enter the PIN code. (4 digits)
Your PIN code can be a combination of any 4 numbers.
Press ENTER to register the PIN code.
If you forget your PIN code, telephone 08709 004088 for your local Mastercare service centre.
Press PLAY, STOP, REW or F.FWD to select the
"PROTECT" "ON" or "OFF".
Then press ENTER.
The security protect function will be activated.
Press MENU to clear the display.
If you turn off the MAIN POWER switch on the front of the
unit or unplugged from the mains supply for more than 30
minutes, the PIN code screen will appear on the screen when
you next turn on the unit.
Enter your PIN code using the numbered buttons on the
remote control.
If you enter the correct PIN code, "PIN CODE OK" will be
displayed on the screen. You can operate the unit.
If you enter the wrong PIN code, "PIN CODE ERROR" will
be displayed on the screen, and you can try again.
If you enter the wrong PIN code more than 3 times, the unit will be
locked and you cannot operate. To unlock the unit you must disconnect
the mains supply and wait for more than 30 minutes. Reconnecting the
mains supply after this time will allow you to enter the PIN code again.
Register the PIN code
Select protect "ON"
Enter your PIN code
The PIN code screen
will only appear on the
screen when the power
failure lasts for more than 30
minutes (approximate).
Write down your PIN
code number on the
card provided and
keep it in a safe place.
Please note: In the event of
losing your PIN code you will
be charged by Mastercare to
reset your TV/VCR.
To cancel the security protect
function select protect "OFF".
MARK GREEN
PIN CODE REGISTRATION
OWNER' S NAME
PROTECT
PIN CODE
SELECT :
ENTER
CLEAR
: ENTER
: CANCEL
EXIT:MENU
1234
OFF
/0-9
MARK GREEN
PIN CODE REGISTRATION
OWNER' S NAME
PROTECT
PIN CODE
SELECT :
ENTER : ENTER
EXIT:MENU
1234
ON
/
PIN CODE
SELECT :
CLEAR : CANCEL
ENTER : ENTER
/0-9
5451401A/32-33 8/25/99, 07:11 PM33
Page 34

34
How to connect your TV/VCR to another VCR
If you connect your TV/VCR to another VCR it is possible to duplicate a pre-recorded tape. Please note that the picture
quality will not be as good as that on the original tape. Make sure all appliances are unplugged from the mains
supply and switched off before you attempt to connect the relevant connection leads.
Your TV/VCR
Second VCR
Link your TV/VCR and second
VCR with a SCART lead
(not supplied)
It is an infringement of the Copyright, Designs and Patents Act 1956, 1988
chapter 48
and the Performers Protection Act 1958-72 to copy Records, Pre-recorded Cassettes,
Pre-recorded video tapes and compact discs or to re-record them in any form without permission of the Copyright owners.
Aerial
(not supplied)
Insert the tape you wish to
record ON into your TV/VCR.
Select the AV channel (CH AV)
by pressing the 0 button twice on
your TV/VCR.
Insert the tape you wish to record
FROM into the second VCR.
Press the play button on the
second VCR.
Press the REC/OTR button on
your TV/VCR.
Recording will start.
IN
OUT
IN
5451401A/34-35 2/6/99, 7:23 PM34
Page 35

35
How to connect your TV/VCR to a video camera
If you connect your TV/VCR to a Video camera it is possible to duplicate a pre-recorded tape. Please note that the
picture quality will not be as good as that on the original tape. Make sure all appliances are unplugged from the
mains supply and switched off before you attempt to connect the relevant connection leads.
It is an infringement of the Copyright, Designs and Patents Act 1956, 1988
chapter 48
and the Performers Protection Act 1958-72 to copy Records, Pre-recorded
Cassettes, Pre-recorded video tapes and compact discs or to re-record them in any form without permission of the Copyright owners.
Your TV/VCR
SCART lead with appropriate
connectors suitable for your
video camera
(not supplied)
Playback
from a video
camera.
Insert the tape you wish to
record ON into your TV/VCR.
Select the AV channel (CH AV) by
pressing the 0 button twice on your
TV/VCR.
Insert the tape you wish to record
FROM into the video camera.
Press the REC/OTR button on
your TV/VCR.
Press the play button, on the video
camera; playback and recording will
start.
5451401A/34-35 8/25/99, 07:09 PM35
Page 36

36
3
1
2
How to select the language
Press PLAY or STOP to select desired language.
Store the language by pressing ENTER.
Press MENU to clear the screen.
Select the SYSTEM SETUP screen
Select the LANGUAGE screen
Select the language
This feature allows you to select the language you wish your TV on screen display to appear in.
Press MENU. The main control menu will appear on
your TV screen.
Press PLAY or STOP until the square next to the
"SYSTEM SETUP" starts to flash, then press ENTER.
Press PLAY or STOP to select "LANGUAGE".
Press ENTER, the LANGUAGE screen will appear.
SELECT :
TIMER REC SET
CH TUNING
AUTO REPEAT
PIN CODE REGISTRATION
ENTER
EXIT
: ENTER
: MENU
OFF
TV SETUP
SYSTEM SETUP
SELECT :
SYSTEM SETUP
CLOCK SET
LINGUA/LENGUA
ENTER
EXIT
: ENTER
: MENU
LANGUAGE/SPRACHE/LANGUE
SELECT :
LANGUAGE/SPRACHE/LANGUE
LINGUA/LENGUA
ENGLISH
DEUTSCH
FRANCAIS
ITALIANO
ESPANOL
OK : ENTER
When you plug the AC mains lead for the first time, the main
control menu will be skipped and the language screen will be
displayed. This is not a fault, please select desired language first.
5451401A/36-40 8/25/99, 07:08 PM36
Page 37

37
The wires in your TV/VCR mains lead are coloured in accordance with the
following:-
The wire which is coloured Blue must be
connected to the terminal in the plug which is marked with the letter N or
coloured Black.
The wire which is coloured Brown must be connected to the terminal in
the plug which is marked with the letter L or coloured Red.
No connection must be made to the earth terminal of the plug.
You must use a 13 amp plug
(BS 1363)
, and fit a 5 amp fuse
(BS 1362)
.
If any other type of plug is used a 5 amp fuse must be fitted, either in the
plug, adaptor or at the distribution board.
Wiring instruction and SCART socket information
Warning: If the mains plug is cut
from the mains lead of this appliance
the plug must be destroyed. A mains
plug with bared wires is hazardous if
engaged in a mains output socket.
Cord grip
Brown
(Live)
Blue
(Neutral)
5 amp fuse
If your Satellite system is not displayed when you switch it on you
must select the channel labelled CH AV by repeatedly pressing
CH/TRACKING up ( ) or down ( ) or pressing 0 button
twice.
However if your Satellite system is constantly displayed and no
matter what button you press you cannot view another channel you
need to purchase an additional lead which will allow you to
manually switch the signal on and off. . .
. . .If you wish to purchase this cable please contact Partmaster,
our spares accessories service.
Simply telephone 01442 888444 and ask for a quote.
21 Pin SCART terminal
1. Audio output (right)
2. Audio input (right)
3. Audio output (left)
4. Audio earth
5. Blue earth
6. Audio input (left)
7. Blue In
8. Switching voltage (out)
9. Green earth
10. Date line 2
11. Green In
12. Date line 1
13. Red earth
14. Reserved
15. Red In
16. Blanking signal
17. Video earth
18. Blanking signal earth
19. Video output
20. Video input
21. Shield/earth
If your TV/VCR is connected to a
Satellite system using a full facility
SCART lead it will automatically be
displayed when your Satellite system is
switched on. When using a SCART
lead the Satellite station should
automatically be displayed without you
having to select the AV channel.
19171513119753121
2018161412108642
5451401A/36-40 8/25/99, 07:08 PM37
Page 38

38
Before requesting service please check the following points
SYMPTOM
SOLUTION
No part of this publication may be reproduced, stored
in a retrieval system or transmitted in any form or by
any means, without the prior permission in writing of
Dixons Stores Group, nor be otherwise circulated in
any form of binding or cover other than that in which is
published and without a similar condition including this
condition being imposed on the subsequent purchaser.
CAUSE
If the problem still exists
after checking the points
on this page, please call
the Mastercare Service
Helpline on the number
below.
Please note:If a Mastercare
engineer is requested to inspect this
TV/VCR and if the product is found
not to be faulty, or the instruction
book has not been followed, our
product guarantee is not applicable
and a fee will be charged.
rewoprothgilybdnatsoN ?nideggulpRCV/VTruoysI t.eltuoCAnaotnigulpdnasesufkcehC
ehtnosehctiwsrewopehtdesserpuoyevaH
?NOottinuruoyfoTNORF
llad/ornallawtarewopniamnohctiwS
t.inuruoynosehctiws
whennevekrowtonseodredroceR
nosithgilybdnats
t.ilsirotacidniT.REC f.footdrocerremitteS
ruoyedisnidemrofsahnoitasnednocerutsioM
R.CV/VT
s.ruohwefatiaW
dnuoson,erutcipoN d.eggulpnusiRCV/VTruoY t.eltuoCAnaotnigulpdnasesufkcehC
tonronekorbsidselnoitcennoclaireA
d.etcennoc
ynaecalperdnasnoitcennoclaireakcehC
s.elbacnekorb
ehtnosehctiwsrewopehtdesserpuoyevaH
?NOottinuruoyfoTNORF
lladnallawtarewopniamnohctiwS
t.inuruoynosehctiws
e.lbuortnoitatsylbissoP yawalaireaevomrolennahcrehtonayrT
e.cnerefretnifoecruosmorf
dnuosroop,koerutciP ronoitisopmuminimtateslortnocemuloV
d.esserpneebsahnottubMUTE
e.mulovehtesaercnI
onroruolocroop;noitpecerrooP
ruoloc
tonronekorbsidaelnoitcennoclaireA
d.etcennoc
ynaecalperdnasnoitcennoclaireakcehC
s.daelnekorb
e.lbuortnoitatsylbissoP yawalaireaevomrolennahcrehtonayrT
e.cnerefretnifoecruosmorf
d.etsujdatonsilortnocruoloC Ajust colour (See page 17).
5451401A/36-40 8/25/99, 07:08 PM38
Page 39

39
Before requesting service please check the following points
1
SYMPTOM
SOLUTIONCAUSE
krowtonseodgnidroceR sahbatnoitcetorproredrocerruoyniepatoN
e.ttessacoedivmorfdevomerneeb
revoepatevisehdaecalP.epatoedivtresnI
p.agnoitcetorpdrocer
f.fodehctiwssiRCV/VT bothdnallawtarewopniamnohctiwS
t.inuruoynosehctiwspower on
krowtonseoddrocerremiT aneebsaherehtroylreporptestonsikcolC
e.ruliafrewop
e.taddnaemittnerructeS
TIMERroyltcerroctestonsemitdnednatratS
d.esserpneebtonsahREC
eesotkool,semitdnednatratsehtkcehC
t (See page 29).ilsithgilT-RECehtfi
krowtonseodlortnocetomeR lortnocetomerehtsdrawotgnitnioptonsitI
R.CV/VTruoynorosnes
t.inuruoytalortnocetomermiA
ootmorftinuruoyetarepootgniyrterauoY
thgilnustceridthgirbyrevsierehtroyawaraf
lortnocetomerRCV/VTotnognillafmoorni
r.osnes
t.hgilecudeR.sertem5nihtiwetarepO
m.aebfohtapnielcatsbO m.aebfohtapraelC
–dna+eht;yltcerrocnidetresnieraseirettaB
d.nuorayawgnorwehteraseitiralop
y.ltcerrocseirettabtresnI
k.aeweraseirettaB s.eirettabecalpeR
kcabyalpni'wons'roruolocON
erutcip
y.triderasdaehoediV eeftuollacA.rennigneeracretsaMallaC
d.egrahceblliw
d.egamadronrowsiepaT e.patrehtonayrT
foegnarehtdnoyebstnemtsujdagnikcarT
t.iucricgnikcartcitamotua
CH/ehtgnisuyllaunamgnikcarttsujdA
ns.ottubTRACKING
5451401A/36-40 8/25/99, 07:08 PM39
Page 40

40
X
TELEVISION
Picture Tube: ..................................................14" (34cm "V") measured diagonally, 90˚ degree deflection
Television System:..........................................CCIR: 625 lines 50 fields PAL I
Tuner: ..............................................................Electronic Tuner
Receiving coverage: .......................................UHF Channel Frequencies 21-69
Audio Output Power: ...................................1.5W
Speaker: ...........................................................3.8 x 6.3cm, 8 ohm
VCR
Video recording system: ...............................VHS, 2 Rotary Heads Helical Scanning System
Luminance: FM azimuth recording
Head:................................................................Video: 2 Rotary Heads
Audio/Control: 1 Stationary Head
Erase: 1 Full Track Erase
Colour signal:..................................................Converted sub-carrier phase shift recording
Audio Track:...................................................1 track
Tape format: ...................................................12.65mm high density tape
Tape speed:.....................................................SP: 23.39 mm/s (NTSC 33.35 mm/s) LP: 11.69mm/s
Rewind and Fast Forward time:................... F.FWD: 3' 40", REW: 2' 50" with E-180 cassette
Input level:.......................................................Video: 1.0Vp-p, 75 ohm unbalanced
Audio: 500mV, 50k ohm unbalanced
Output level:...................................................Video: 1.0Vp-p, 75 ohm unbalanced
Audio: 500mV, 1K ohm unbalanced
GENERAL
Power supply: .................................................AC230V ~ 50Hz
Power consumption: .....................................55W
Operating Temperature:...............................5˚C to 40˚C
Dimensions: ....................................................362mm (W) x 370.5mm (D) x 382mm (H)
Weight:............................................................12.8kg
Nominal specifications
5451401A
98.06
5451401A/36-40 8/25/99, 07:08 PM40
 Loading...