

Page 1
UNDERCOUNTER FREEZER
INSTRUCTION MANUAL
UNDERBYGGNADSFRYS
BRUKSANVISNING
GB
SE
FRITTSTÅENDE FRYSEBOKS
INSTRUKSJONSHEFTE
KAAPPIPAKASTIN
KÄYTTÖOHJE
FRYSER UNDERSKAB
BRUGSANVISNING
NO
FI
DK
U N D E R COUNTER FREEZER
INSTRUCTION MANUAL
MUF988W/WE/WEA
MUF988S/SE
MUF988W_WE_WEA_S_SE_IB_5L_final110512_door change.indb 1 12/05/2011 7:00 PM
Page 2
Innhold
NO
Introduksjon til din nye fryseboks ............................................................ 13
– Før bruk ............................................................................................. 13
nstallere din nye fryseboks ....................................................................... 13
– Plassering .......................................................................................... 13
– Få døren til å åpne seg motsatt vei .................................................... 14
– Bringe det frittstående kjøleskapet i vater ......................................... 15
– Rengjøring før bruk ........................................................................... 15
Komme i gang .......................................................................................... 16
– Slå fryseboksen på ............................................................................. 16
– Justere temperaturen ........................................................................ 16
– Hurtig frysing .................................................................................... 16
– Lyder inne i fryseboksen ....................................................................16
– Handle frossenmat ............................................................................ 17
– Forberedelser før frysing ................................................................... 17
– Tine frossenmat ................................................................................ 18
Rengjøring ............................................................................................... 19
– Avising............................................................................................... 19
– Gjøre rent inne i fryseboksen .............................................................19
– Gjøre rent på utsiden av fryseboksen ................................................. 19
– Rengjøringstips ................................................................................. 19
Vedlikehold .............................................................................................. 20
Avhending ............................................................................................... 20
Spesikasjoner ......................................................................................... 21
Sikkerhet .................................................................................................. 49
Contents
GB
Introduction your New Freezer ................................................................... 4
– Before Use ........................................................................................... 4
Install your New Freezer ............................................................................. 4
– Location............................................................................................... 4
– Reversing the Door Swing ................................................................... 5
– Levelling the Undercounter Larder ......................................................6
– Cleaning Before Use............................................................................. 6
Getting Started .......................................................................................... 7
– Switching on your Freezer ................................................................... 7
– Adjusting the Temperature .................................................................. 7
– Fast Freezing........................................................................................7
– Noises inside the Freezer! .................................................................... 7
– Shopping for frozen foods.................................................................... 8
– Preparations for Freezing ..................................................................... 8
– Thawing frozen food ............................................................................ 9
Cleaning ................................................................................................... 10
– Defrosting ......................................................................................... 10
– Cleaning Inside the Freezer ................................................................ 10
– Cleaning of the Outside of the Freezer ............................................... 10
– Cleaning Tips .....................................................................................10
Maintenance ............................................................................................11
Disposal ................................................................................................... 11
Specication ............................................................................................ 12
Safety Warnings ....................................................................................... 49
Innehåll
SE
Introduktion till din nya frys ..................................................................... 22
– Innan användning ............................................................................. 22
Installera din nya frys ............................................................................... 22
– Placering ........................................................................................... 22
– Vända håll på dörren ......................................................................... 23
– Gör ytan på skåpet jämn .................................................................... 24
– Rengör innan användning .................................................................24
Komma igång .......................................................................................... 25
– Sätta på din frys ................................................................................ 25
– Justera temperaturen ........................................................................ 25
– Snabbinfrysning ................................................................................ 25
– Oväsen inuti frysen ............................................................................ 25
– Att köpa frusen mat ........................................................................... 26
– Förberedelser för infrysning .............................................................. 26
– Upptining av fryst mat ...................................................................... 27
Rengöring ................................................................................................ 28
– Avfrostning ........................................................................................ 28
– Rengöring inuti frysen ....................................................................... 28
– Rengöring av utsidan på frysen ......................................................... 28
– Rengöringstips .................................................................................. 28
Underhåll .................................................................................................29
Avfall ........................................................................................................ 29
Specikationer .........................................................................................30
Säkerhet ................................................................................................... 49
Sisältö
FI
Uuden pakastimesi esittely ...................................................................... 31
– Ennen käyttöä ................................................................................... 31
Uuden pakastimesi asennus ..................................................................... 31
– Paikka ................................................................................................ 31
– Oven avaamispuolen vaihtaminen .................................................... 32
– Laitteen tasoittaminen ...................................................................... 33
– Puhdistus ennen käyttöä ................................................................... 33
Näin pääset alkuun .................................................................................. 34
– Pakastimen käynnistys ......................................................................34
– Lämpötilan säätäminen .................................................................... 34
– Pikapakastus ..................................................................................... 34
– Pakastimen sisäinen ääni .................................................................. 34
– Pakasteiden ostaminen ..................................................................... 35
– Esivalmistelut .................................................................................... 35
– Pakasteiden sulatus ........................................................................... 36
Puhdistus ................................................................................................. 37
– Sulatus .............................................................................................. 37
– Pakastimen sisätilojen puhdistus ...................................................... 37
– Pakastimen ulkokuoren puhdistus ..................................................... 37
– Puhdistusvinkkejä ............................................................................. 37
Ylläpito .................................................................................................... 38
Hävitys .....................................................................................................38
Määritteet ................................................................................................ 39
Turvallisuus .............................................................................................. 49
MUF988W_WE_WEA_S_SE_IB_5L_final110512_door change.indb 2 12/05/2011 7:00 PM
Page 3

Indholdsfortegnelse
DK
Introduktion til Deres nye Fryser .............................................................. 40
– Før brug ............................................................................................. 40
Installering af Deres nye fryseskab ........................................................... 40
– Placering ........................................................................................... 40
– Ændring af døråbningen.................................................................... 41
– Sørg for, at Deres fryseskab er i vater. Brug et vaterpas ...................... 42
– Rengør skabet før brug ...................................................................... 42
Ibrugtagning ............................................................................................ 43
– Tænd for fryseren ............................................................................... 43
– Juster temperaturen .......................................................................... 43
– Hurtig Indfrysning ............................................................................. 43
– Støj i fryseren .................................................................................... 43
– Indkøb af frosne madvarer ................................................................. 44
– Forberedelse til frysning .................................................................... 44
– Optøning af frosne madvarer ............................................................. 45
Rengøring ................................................................................................ 46
– Afrimning ......................................................................................... 46
– Rengøring inde i fryseren ................................................................. 46
– Rengøring af fryseren udvendig ....................................................... 46
– Rengøringstips ................................................................................. 46
Vedligeholdelse ....................................................................................... 47
Bortskaelse ............................................................................................ 47
Specikationer .........................................................................................48
Sikkerhed .................................................................................................49
MUF988W_WE_WEA_S_SE_IB_5L_final110512_door change.indb 3 12/05/2011 7:00 PM
Page 4
44
GB
Introduction your New Freezer
Install your New Freezer
Location
When selecting a position for your Freezer you should make sure the floor is flat and firm, and the room is
well ventilated with an average room temperature of between 16ºC and 32ºC. Avoid locating your Freezer
near a heat source, eg. cooker, boiler or radiator. Also avoid direct sunlight as it may affect the acrylic
coating and increase the electrical consumption. Extreme cold ambient temperatures may also cause the
appliance not to perform properly. This Freezer is not designed for use in a garage or outdoor installation.
Do not drape the Freezer with any covering. When installing, ensure that 2cm (3/4”) of free space is left at
the sides. The Freezer door can open to the right or the left, depending on what better suits the location.
If you want to have the door swing reversed, we recommend you to contact the Service Centre or a
qualified technician to assist you. You should only try to reverse the door yourself if you believe that you
are qualified to do so.
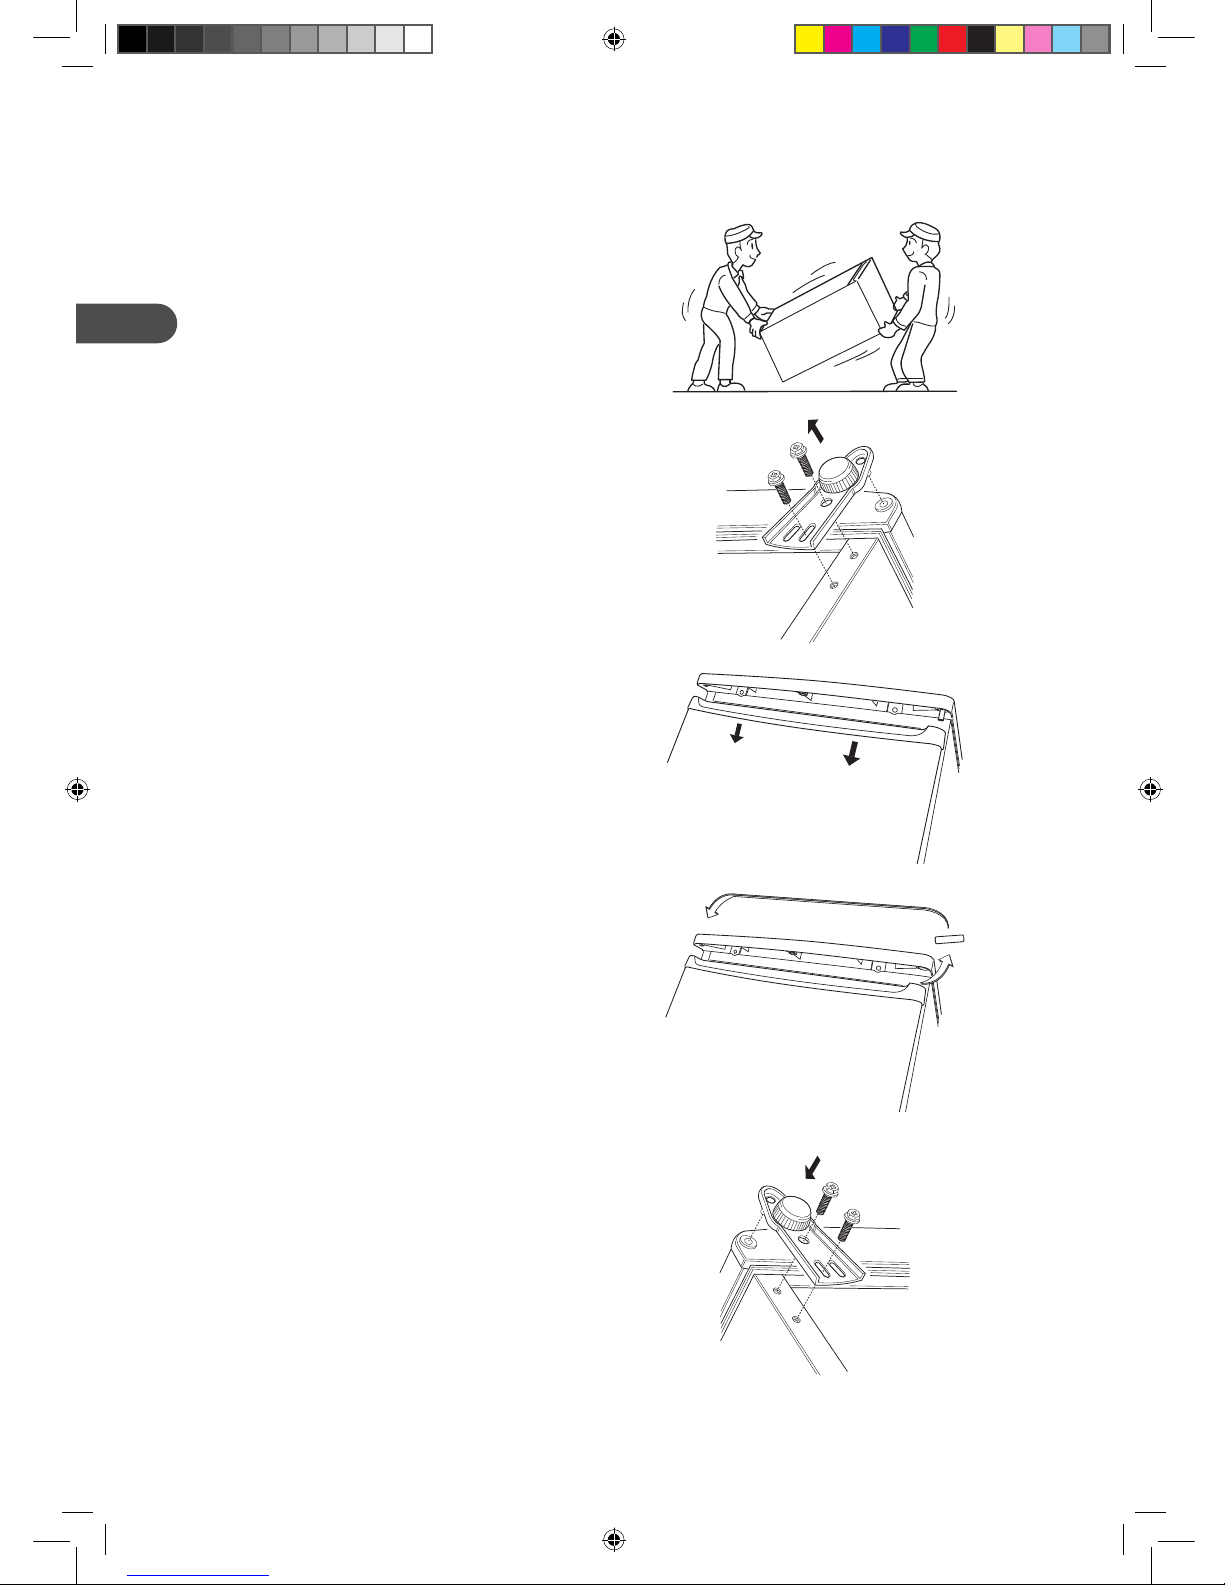
• Take the door off as it is necessary to tilt the Freezer backward. You should rest the freezer
on something solid so that it will not slip during the door change process. DO NOT lay the
Freezer flat as this may damage the coolant system.
• Ensure the Freezer is unplugged and empty.
• We recommend that 2 people handle the Freezer during assembly.
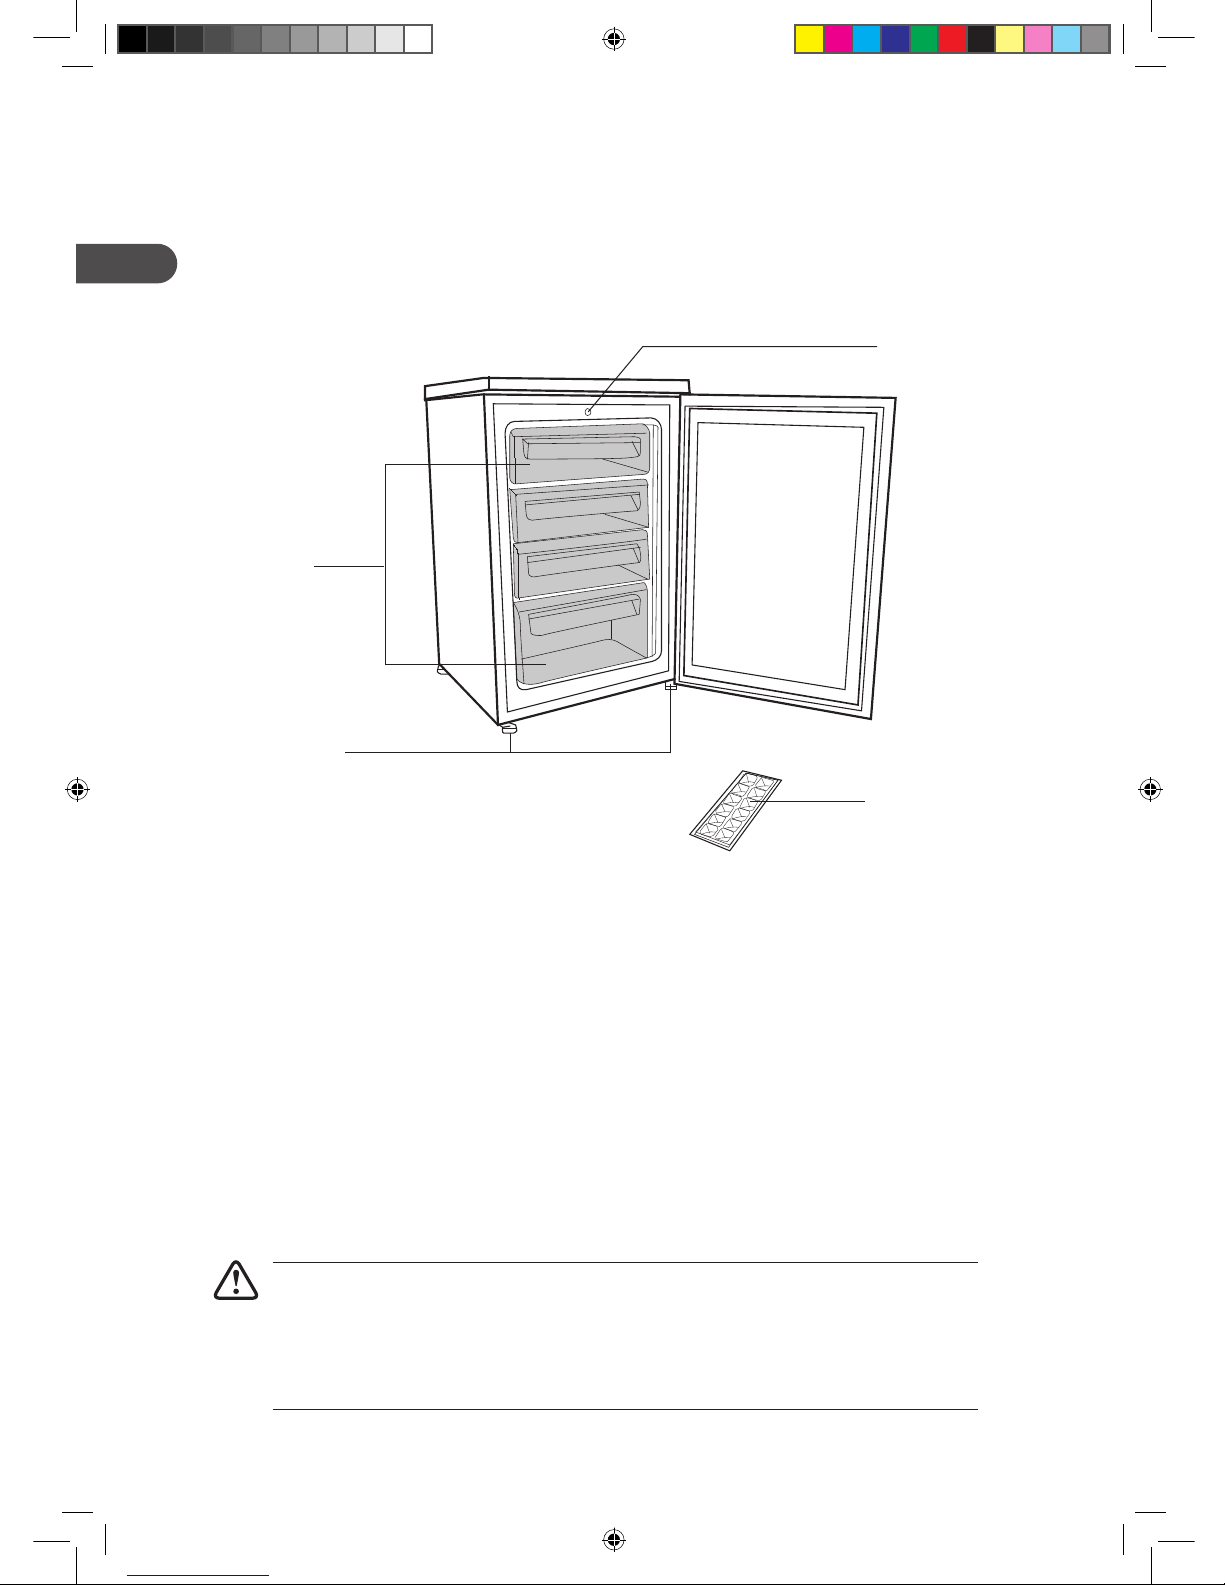
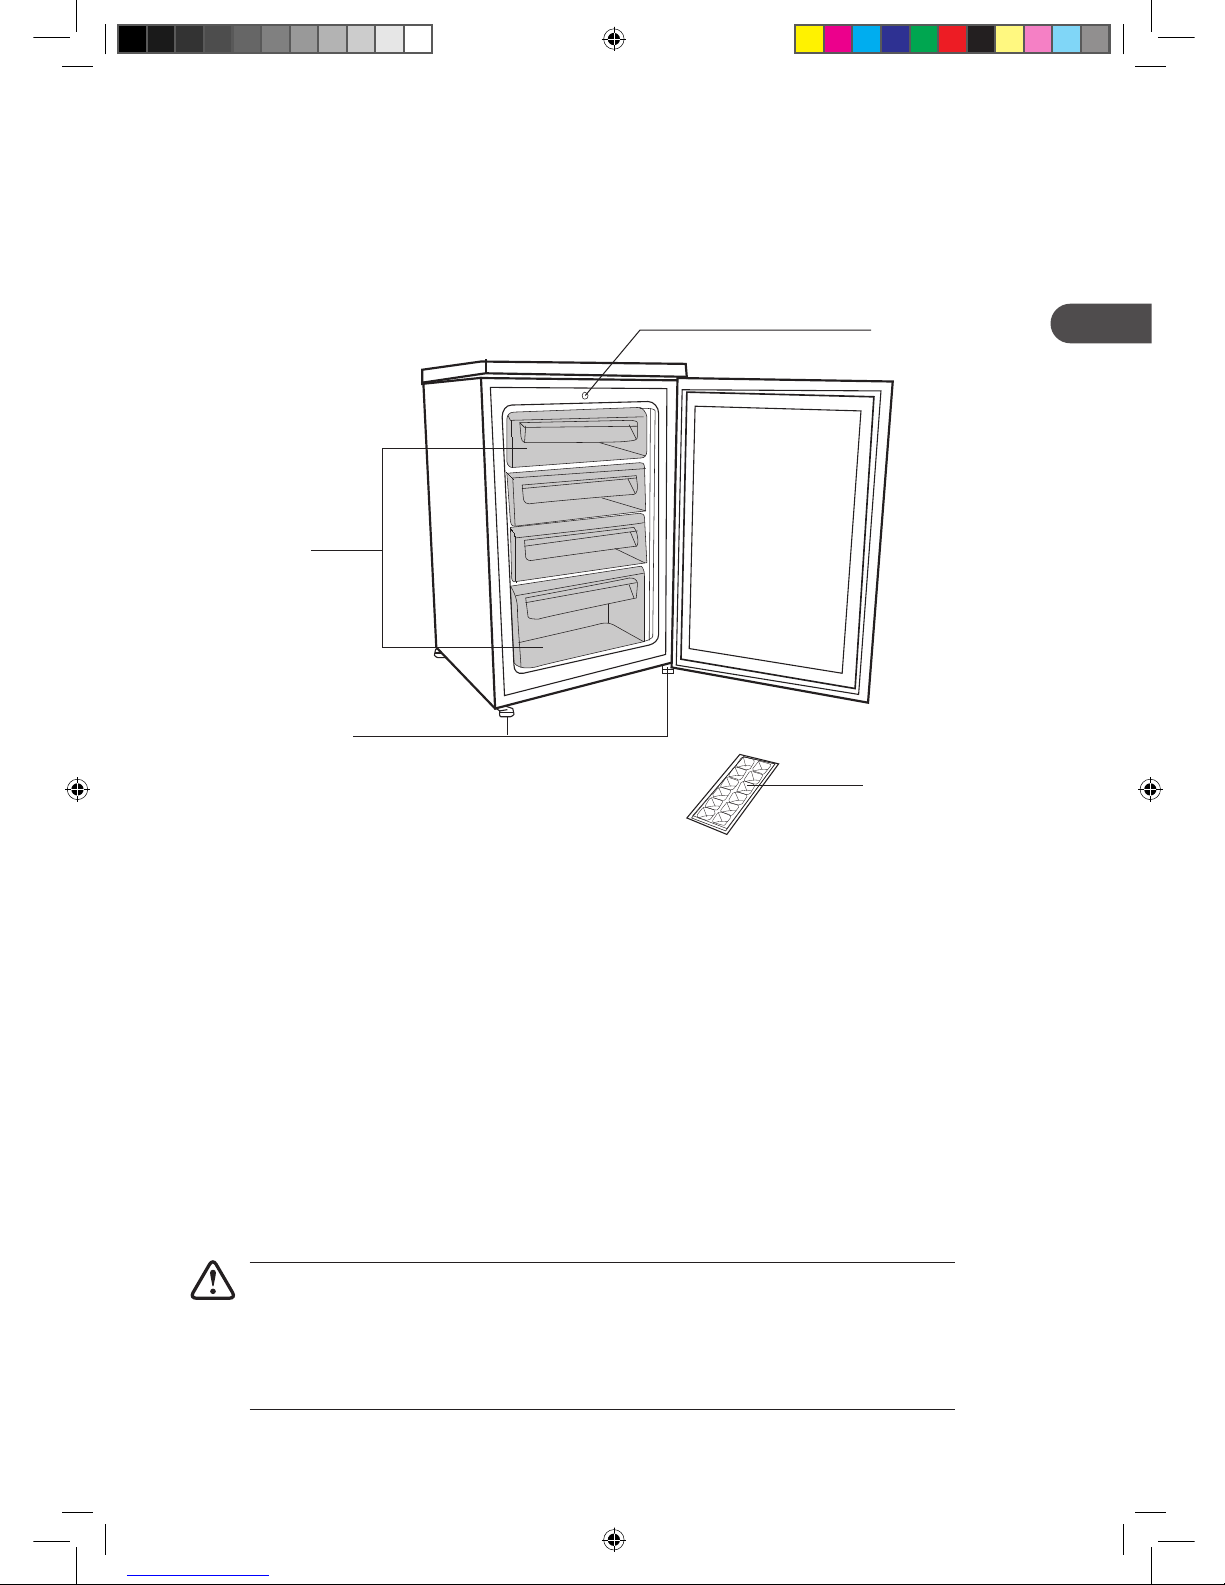
Control panel
Ice tray
Freezer
Baskets
Levelling feet
Before Use
Please read these instructions carefully before using your new Matsui Freezer.
The freezer is for indoor, domestic use only
MUF988W_WE_WEA_S_SE_IB_5L_final110512_door change.indb 4 12/05/2011 7:00 PM
Page 5

55
GB
Reversing the Door Swing
To change the opening direction yourself, please follow these instructions:
1. Tilt the unit carefully. 2 people are
required to tilt the unit during the door
reversing process.
3. Slide the door down and remove away
from the unit.
4. Remove the top hinge pin inside the
door and refit on the opposite side.
5. Slide the door back on to the top hinge.
Screw the bottom hinge into place on
the new side.
2. Remove the screws and hinge bracket
from the base.
MUF988W_WE_WEA_S_SE_IB_5L_final110512_door change.indb 5 12/05/2011 7:00 PM
Page 6
66
GB
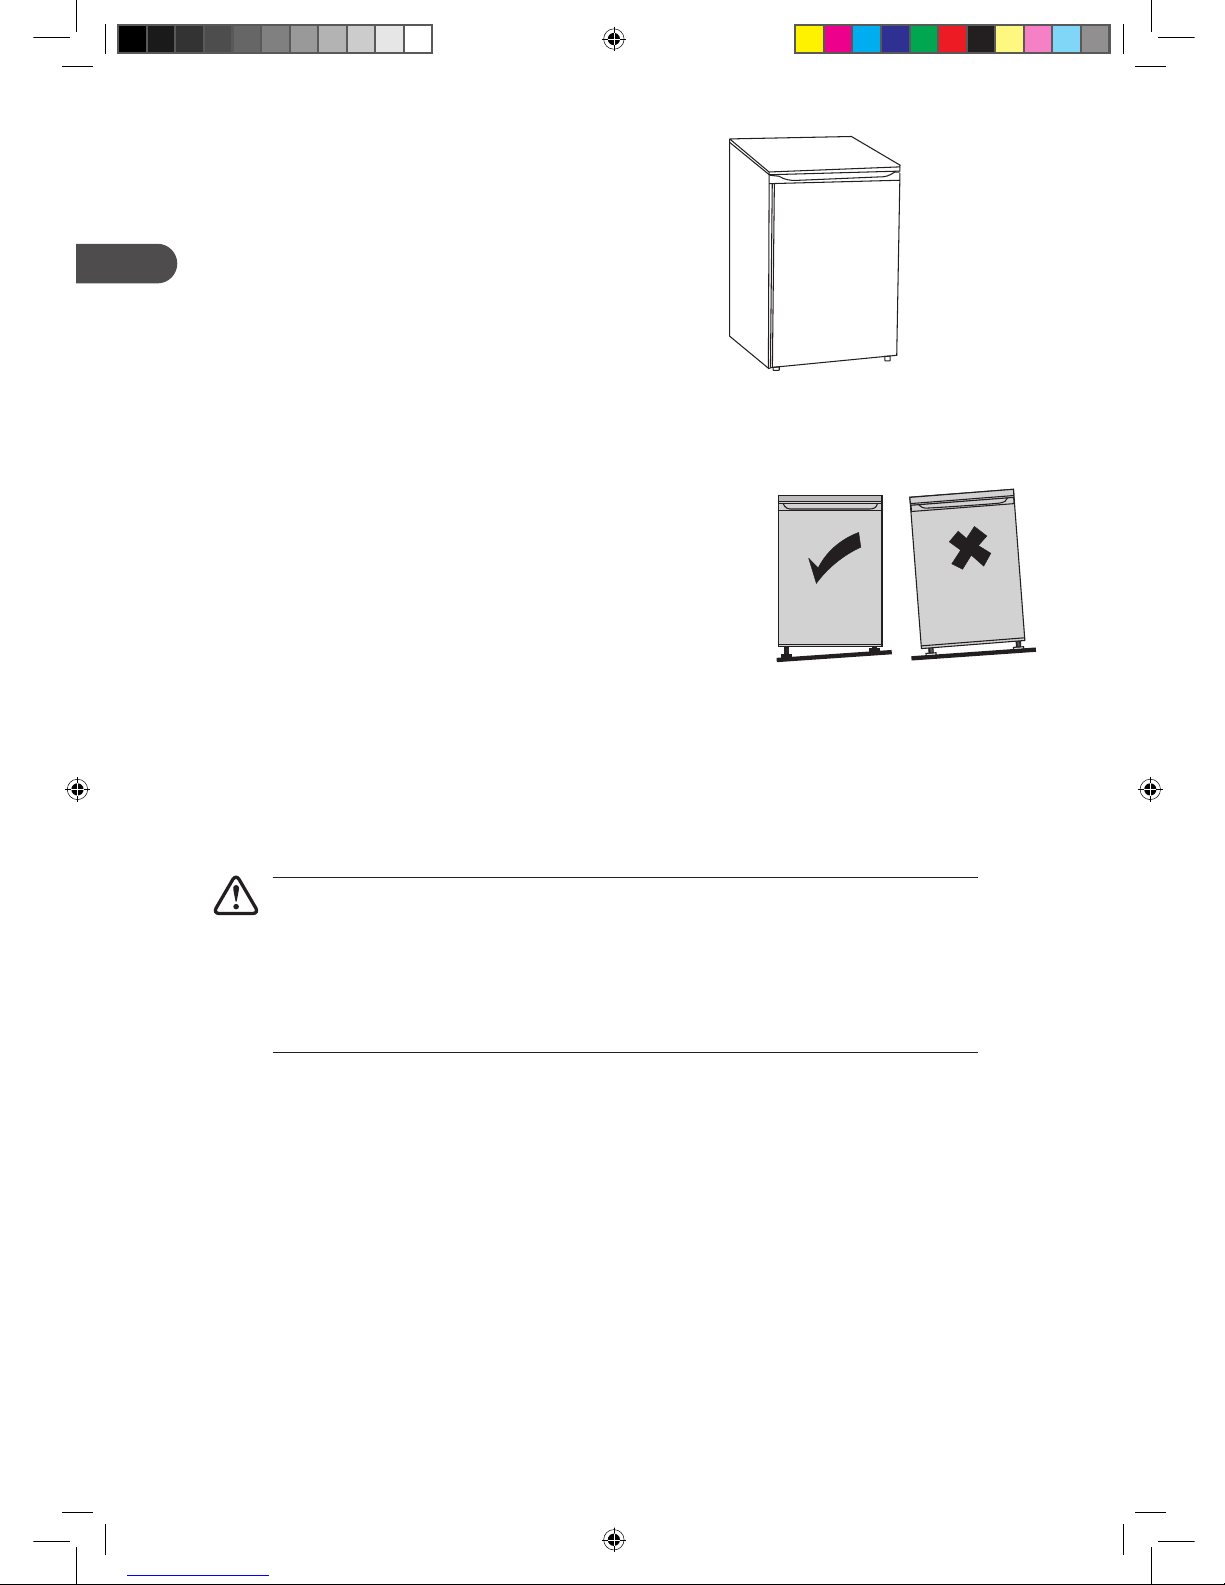
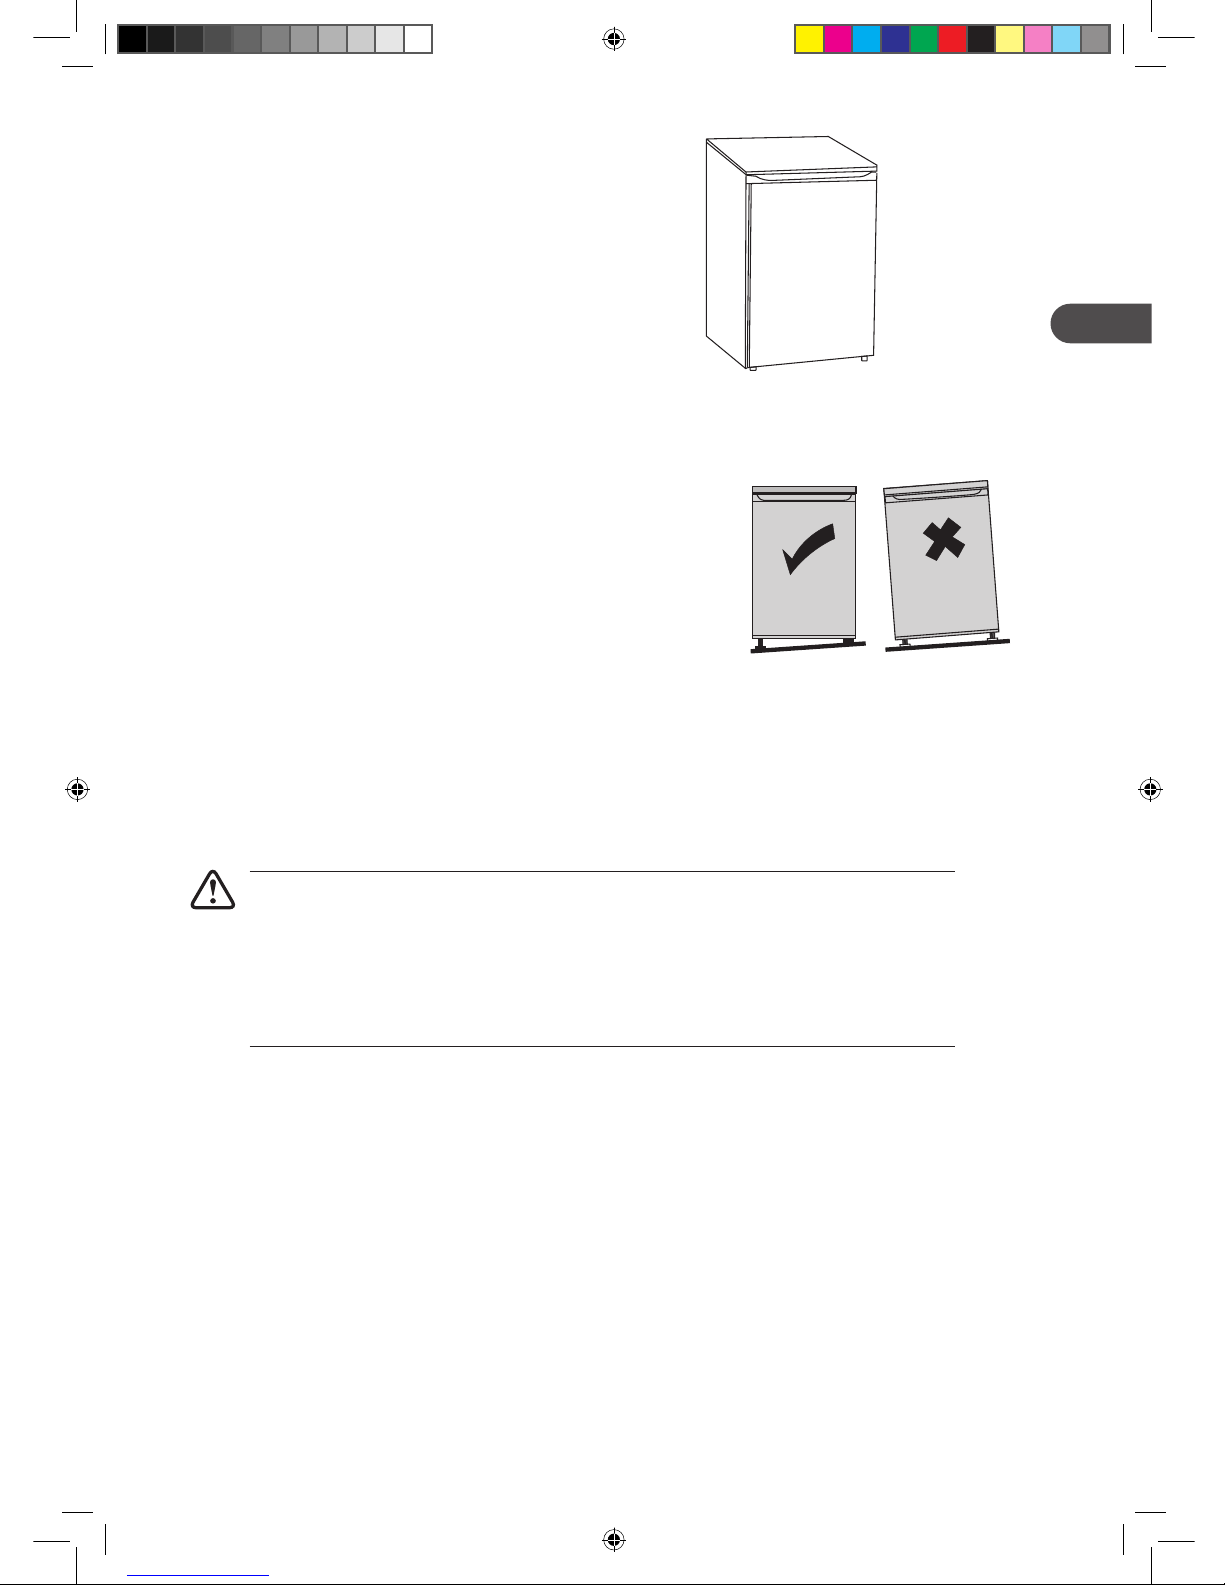
1. Remove the screws at the rear of top cover Levelling the Undercounter Larder
Remove the packaging support form the base of the appliance and
replace with the 2 leveling feet. Make sure the appliance is level.
Use the leveling feet at the front. If the appliance is not level, the
doors and magnetic seal alignments will be affected.
Cleaning Before Use
Wipe the inside of the Freezer with a weak solution of bicarbonate soda. Then rinse with warm water using
a ‘wrung-out’ sponge or cloth. Wash the shelf in warm soapy water and dry completely before replacing in
the fridge. Clean the exterior of the fridge with a damp cloth.
If you require more information refer to the CLEANING section.
• Before Plugging in YOU MUST
Check that you have a socket which is compatible with the plug supplied with the
fridge.
• Before Switching On!
Do not switch on until two hours after moving the Freezer.
The coolant fluid needs time to settle.
Tools required: Philips style screwdriver / Flat bladed screwdriver / Hexagonal Spanner
6. Check that the door is aligned
horizontally and vertically and that the
seals are closed on all sides before finally
tightening the bottom hinge. Re-adjust
the levelling feet.
MUF988W_WE_WEA_S_SE_IB_5L_final110512_door change.indb 6 12/05/2011 7:00 PM
Page 7
77
GB
Getting Started
Switching on your Freezer
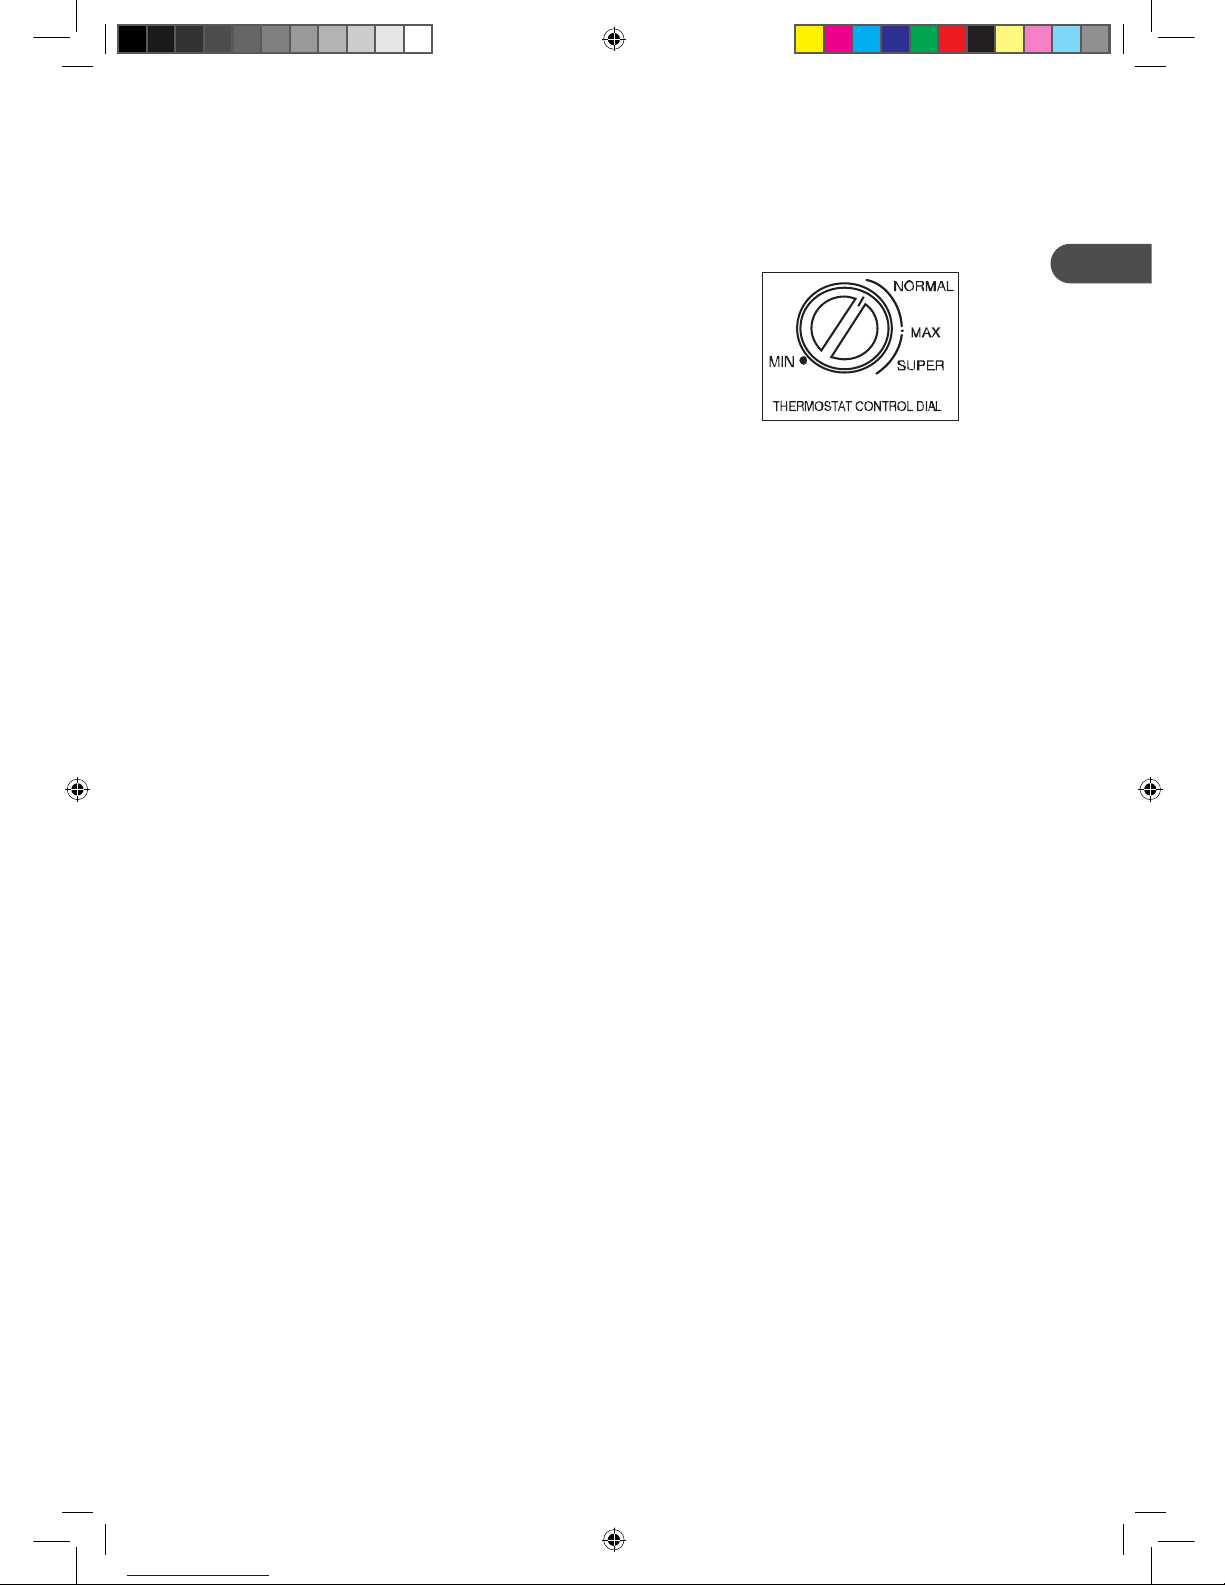
1. Before connecting the freezer to the mains supply make sure that
the thermostat control dial is set at position in the MIN, of which
MIN is Off.
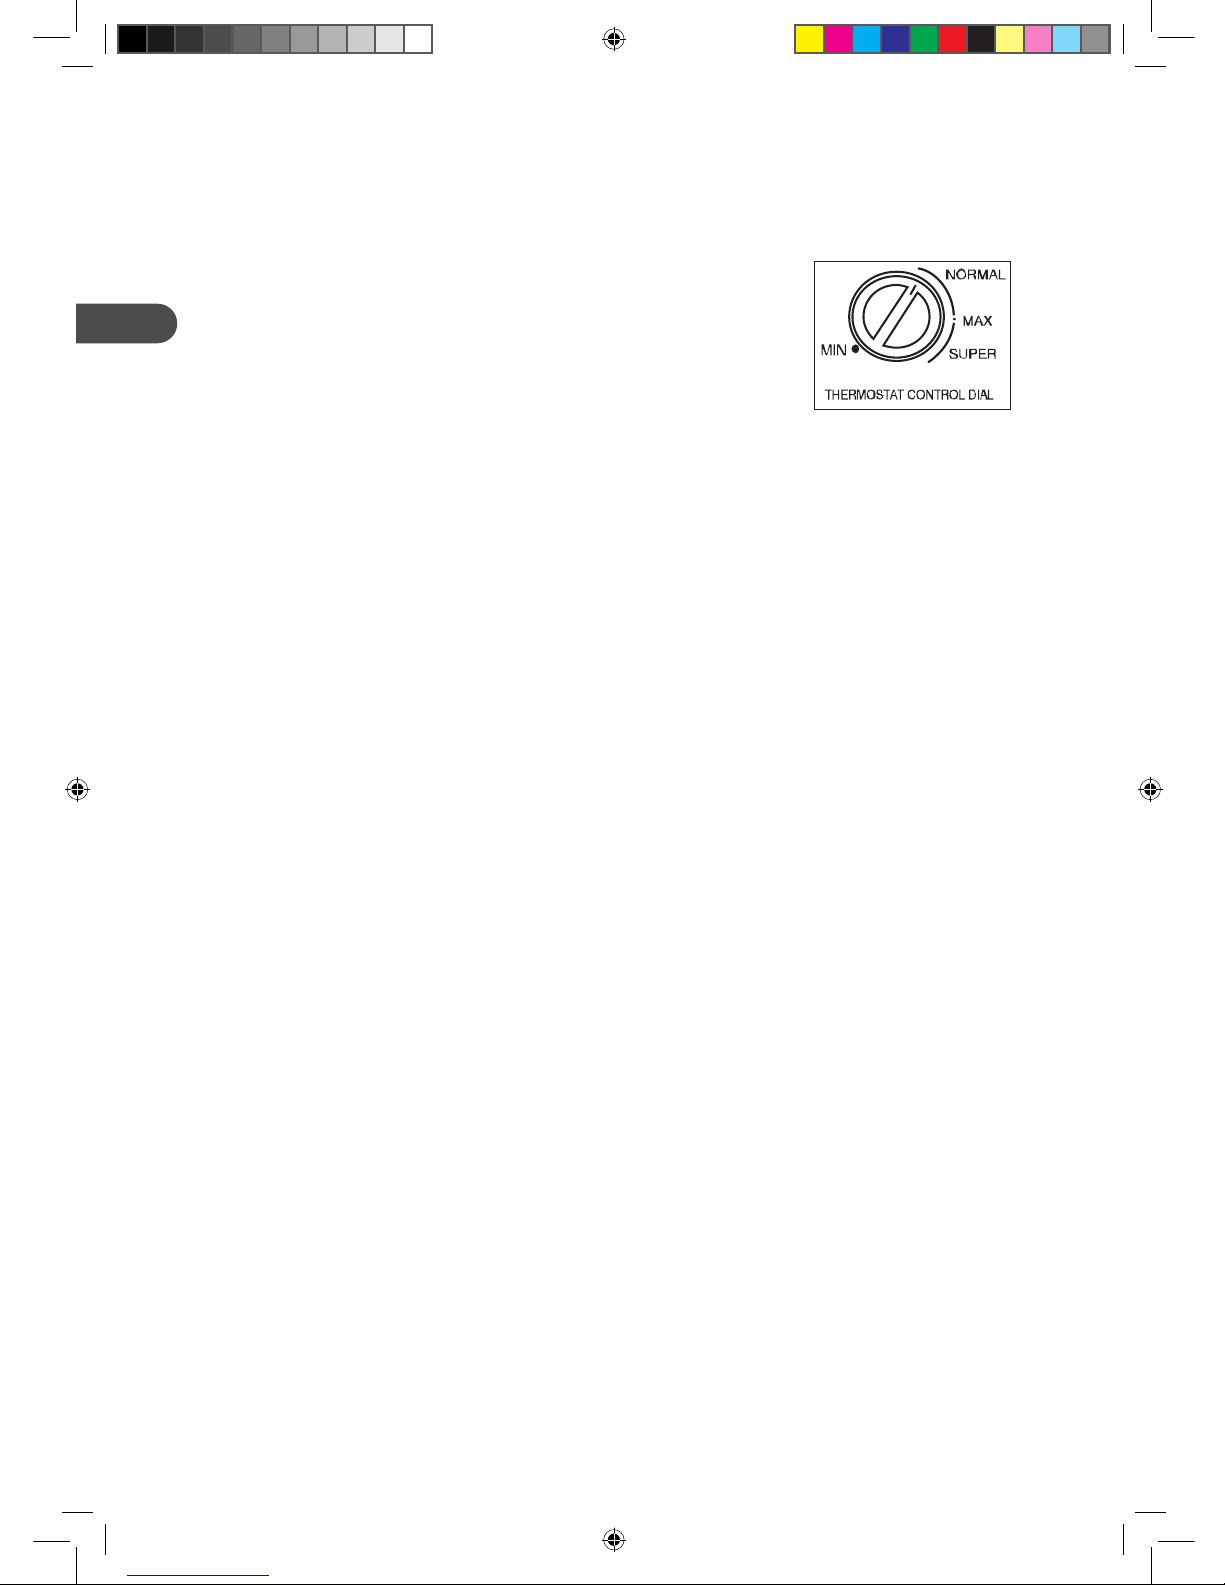
2. Turn the thermostat knob clockwise to set it to the desired
position. Please note that the coldest temperature is SUPER.
3. To ensure the Freezer is cool enough to sufficiently freeze your
food wait 24 hours before filling with food.
Adjusting the Temperature
The internal temperature of your Freezer is controlled by a thermostat. SUPER position makes the freezer
coldest and it is used for Fast Freezing. The recommended position is between MIN and MAX, but it should
be adjusted according to the environment. The appliance may not operate correctly if it is in a particularly
hot or cold room or if the door is opened often or for prolonged periods.
Fast Freezing
Fresh food should be frozen as quickly as possible. Setting SUPER makes your freezer operate the coldest
(approximately -28ºC ) continuously. It helps to quickly freeze and retain more of the goodness of your
food. Freezing will be completed after 24 hours. Then turn the thermostat control dial back to NORMAL
(-18ºC ). Never freeze large quantities of fresh food at one time.
Noises inside the Freezer!
If you have not owned an Freezer before, you may notice that it makes some rather unusual noises. Most
of these are perfectly normal, but you should be aware of them!
Gurgling, whooshing
These noises are caused by the circulation of the refrigerant liquid in the cooling system. It has become
more pronounced since the introduction of CFC free gases. This is not a fault and will not affect the
performance of your Freezer.
Humming, purring or pulsating
This is the compressor motor working, as it pumps the refrigerant around the system.
MUF988W_WE_WEA_S_SE_IB_5L_final110512_door change.indb 7 12/05/2011 7:00 PM
Page 8
88
GB
Shopping for frozen foods
• Your freezer is 4-star.
• When you are buying frozen food, check the storage guidelines on the packaging. You will be able to
store each item of frozen food for the period shown against the 4-star rating. This is usually the period
stated as “Best before” on the front of the packaging. The maximum freezing capacity of this reezer is
4kg in 24 hours.
• Check the temperature of the frozen food cabinet in the shop where you buy your frozen foods. It
should show a temperature lower than -18ºC.
• Take a quick look at the frozen food package and make sure it is in perfect condition.
• Always buy frozen products last on your shopping trip or visit to the supermarket. Try to keep frozen
food together whilst shopping and on the journey home as this will help to keep the food cold.
• Don’t buy frozen food unless you can freeze it straight away. Specially insulated bags can be bought
from most supermarkets and hardware shops. These bags can keep frozen food frozen longer.
Preparations for Freezing
• Use quality food and handle it as little as possible. Freeze food in small quantities as it freezes faster,
takes less time to thaw and enables you to control the quantity you need better.
• Leave cooked food to cool completely. Chill food in a fridge before freezing if possible.
• Consider how you will want to cook the food before freezing it.
• Don’t freeze food in metal containers if you may want to microwave it straight from the freezer.
• Use special freezer bags, freezer film, polythene bags, plastic containers, and aluminium foil (heavy
duty grade only). If in doubt, double wrap your food. Don’t use aluminium foil for acidic foods, e.g.
citrus fruits. Don’t use thin cling film, glass, nor used food containers without cleaning.
• Exclude as much air from the container as possible. You could buy a special vacuum pump which sucks
excessive air out of the packaging.
• Leave a small amount of air space when freezing liquids to allow expansion.
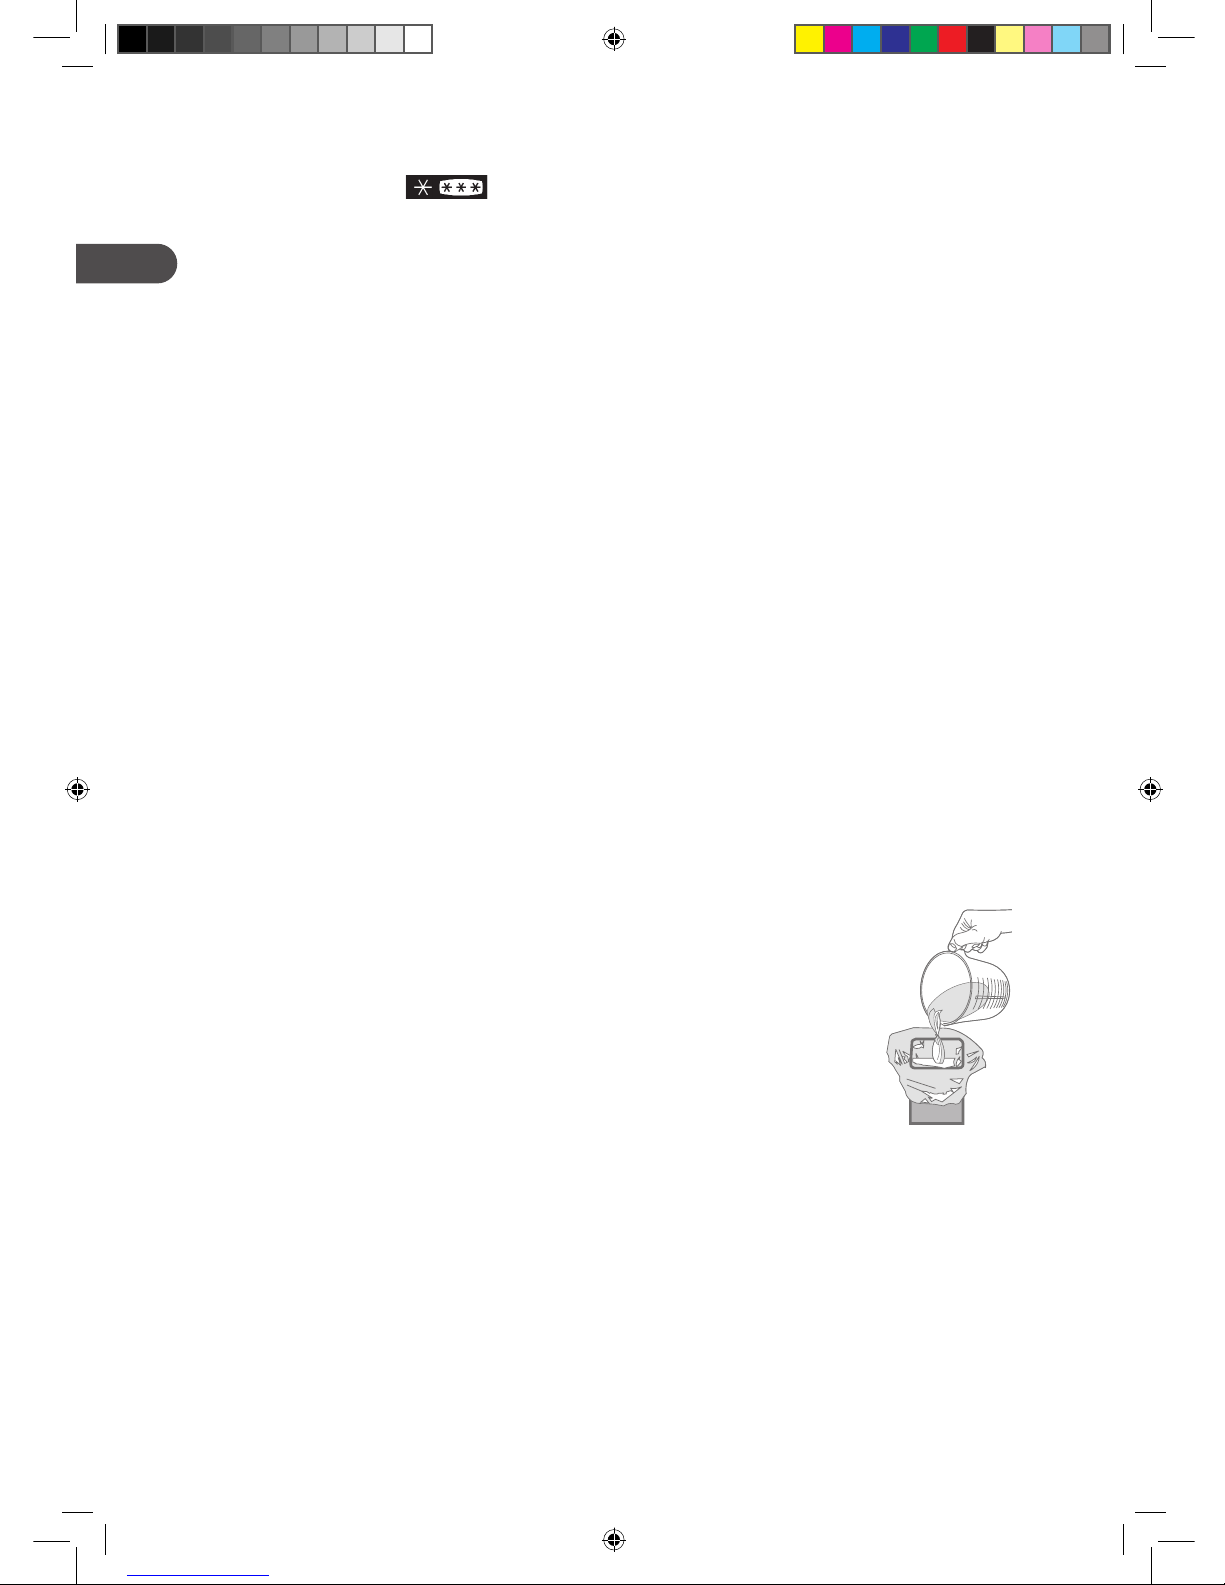
• You can use the space in the freezer most efficiently if you freeze liquids (or
solids with liquids, e.g. stew) in square blocks. This is known as “Preforming”.
Pour the liquid into a polythene bag which is inside a square sided container.
Freeze it, and then remove it from the container and seal the bag.
• Label your frozen foods as they will look the same when in frozen state. Use
special freezer tapes, labels and pens with different colours. This allows you to
easily organise and to effectively use the freezer. Write the contents and date;
otherwise the frozen food might exceed the storage time and this could cause
food poisoning. Please refer to your food packaging for the recommended
storage time.
• You may also add the weight and cooking notes, e.g. “thaw first”, “cook from frozen” and keep
a separate log of what is in each drawer. This will save opening the door and searching around
unnecessarily.
MUF988W_WE_WEA_S_SE_IB_5L_final110512_door change.indb 8 12/05/2011 7:00 PM
Page 9
99
GB
Thawing frozen food
1. Take out from the freezer and uncover the frozen food. Let it thaw at room temperature. Don’t forget
that thawing in a warm area encourages the growth of bacteria and low temperature cooking may not
destroy dangerous bacteria.
2. Drain off and throw away any liquid lost during thawing.
3. Always make sure there are no ice-crystals in the food before cooking, particularly with meat. These
crystals indicate that the food is not fully thawed.
4. Cook food as soon as possible after thawing.
5. Many microwaves and ovens have a defrost setting. To avoid bacterial build up, only use these if you
intend to cook the food immediately afterwards.
• Never refreeze anything that has been thawed out unless you cook it again, to kill off
harmful bacteria. Never re-freeze thawed shellfish.
• Re-seal packs properly after removing items. This prevents drying or freezer-burn and a
build up of frost on any remaining food.
MUF988W_WE_WEA_S_SE_IB_5L_final110512_door change.indb 9 12/05/2011 7:00 PM
Page 10
1010
GB
Cleaning
Defrosting
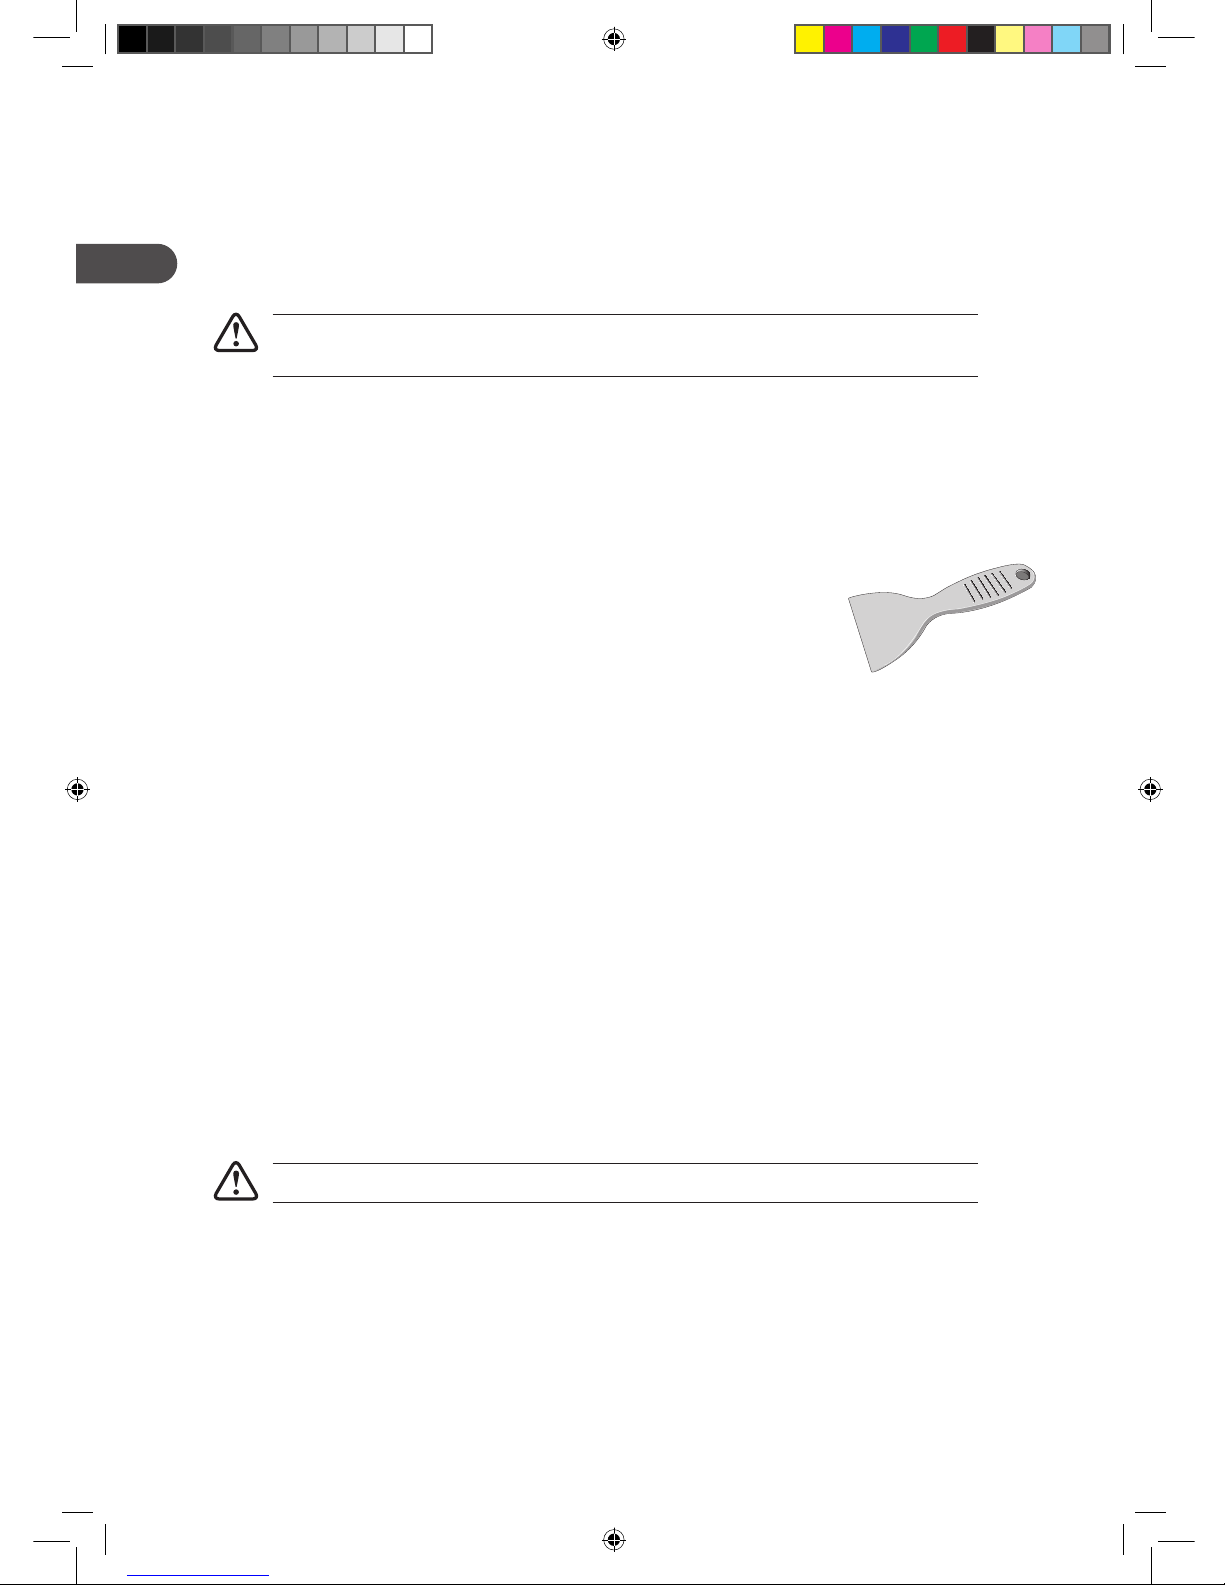
Frost will build up in the Freezer after the unit has been used for a period of time. Scrape away the frost
using a plastic scraper.
Do not use a metal or sharp instrument to scrap away the frost, nor should you use any
electrical appliances to aid defrosting.
Approximately once per year or when the frost layer exceeds 5cm (2”), defrosting should be carried out.
Choose a time when the stock of frozen food is low and proceed the following:
1. Take out the frozen food, turn the freezer off at the mains supply and leave the door open. Ideally, the
frozen food should be put into another freezer or refrigerator. If this is not possible, wrap the food in
several sheets of newspaper or large towels and then a thick rug or blanket to keep it cool.
2. Place a shallow bowl or pan below the freezer. Scrap away the frost using
the plastic scraper. Thawing of the remainder can be speeded up by
placing a bowl of hot water inside the freezer cabinet and closing the
door. As the solid frost loosens, scrap it away with the plastic scraper and
remove.
3. When defrosting is complete, clean your freezer’s interior and exterior.
Cleaning Inside the Freezer
You should clean the freezer internally with a weak solution of bicarbonate of soda. Then rinse it with warm
water using a ‘wrung-out’ sponge or cloth.
Wipe the freezer dry before replacing the basket. Plug in and switch on the mains supply.
Cleaning of the Outside of the Freezer
Use standard furniture polish to clean the freezer exterior. Make sure that the door is closed, to prevent
polish getting on the magnetic door seal or inside the cabinet.
Cleaning Tips
Defrost when food stocks are low.
Do not use harsh cleaners, scouring pads or solvents to clean any part of the larder fridge.
MUF988W_WE_WEA_S_SE_IB_5L_final110512_door change.indb 10 12/05/2011 7:00 PM
Page 11

1111
GB
Maintenance
Moving your Undercounter Freezer
Care when handling
Hold the Freezer around its sides or base when moving it. Under no circumstances should it be lifted by
holding the edges of the top surface.
Location
Do not locate your Freezer near a heat source, eg. cooker boiler or radiator. Also avoid direct sunlight in
outbuildings or sun lounges.
Leveling the Undercounter Freezer
Make sure that the Undercounter Freezer is level. Use the adjustable levelling feet at the front. If the Freezer
is not level, the doors and magnetic seal alignments will be affected.
Do not turn on the Undercounter Freezer for 2 Hours
After the Freezer is in place, it needs to be left for 2 hours. The coolant fluid needs time to settle.
Installation
Don’t cover or block the vents or grilles of your freezer.
Servicing
Repairs and maintenance of the appliance should only be performed by an authorized, qualified
technician.
Disposal
Old appliances still have some residual value. An environmentally friendly method of disposal will ensure
that valuable raw materials can be recovered and used again. The refrigerant used in your appliance and
insulation materials require special disposal procedures. Ensure that none of the pipes on the back of
the appliance are damaged prior to disposal. Up to date information concerning the disposal of your old
appliance and packaging from the new one can be obtained from your local council office.
If disposing of an old Freezer break off any old locks or latches as a safeguard.
MUF988W_WE_WEA_S_SE_IB_5L_final110512_door change.indb 11 12/05/2011 7:00 PM
Page 12
1212
GB
Specification
Rated voltage (V): 230
Rated frequnecy (Hz): 50
Input Current (A): 0.7
Freezer Volume 79
Net Capacity (liters):
(Cubic Feet) 2.8
Weight (kg): 32
Product Dimension (W x D x H) mm 845 x 545 x 570 mm
Refrigerant (weight): 40g
Features and Specification are subject to change without prior notice.
MUF988W_WE_WEA_S_SE_IB_5L_final110512_door change.indb 12 12/05/2011 7:00 PM
Page 13
13
NO
Introduksjon til din nye fryseboks
Installere din nye fryseboks
Plassering
Når du velger en plassering for ditt nye apparat, bør du sørge for at gulvet er flatt og sikkert, og at rommet
er godt ventilert med en gjennomsnittlig romtemperatur på mellom 16 ºC og 32 ºC. Plasser apparatet
borte fra direkte sollys og varmekilder (komfyr, ovn, radiator osv.). Direkte sollys kan skade akrylbelegget
og varmekilder kan øke strømforbruket. Ekstremt kalde temperaturer i omgivelsene kan også føre til at
apparatet ikke fungerer som det skal.
Denne enheten er ikke designet for bruk i en garasje eller noen annen utendørs installasjon. Unngå å
plassere apparatet på fuktige steder. Det må installeres slik at apparatet har minst 10 cm (2,5”) klaring
rundt seg og sidene har 2 cm (3/4”) klaring. Apparatets dør kan enten åpnes til høyre eller venstre,
avhengig av hva som passer deg. Se side 5 hvis du ønsker at døren skal gå motsatt vei. Ikke bre noen form
for deksel over apparatet.
• Ta døren av hvis det er nødvendig for å vippe fryseboksen bakover. Du bør støtte
fryseboksen på noe solid og plassere noe under hjulene slik at den ikke glir mens døren
byttes ut. IKKE legg fryseboksen helt flatt, da dette kan skade kjølesystemet.
• Sørg for at støpselet er trukket ut av stikkontakten og at apparatet er tomt.
• Det anbefales at du får noen til å hjelpe deg.
KONTROLLPANEL
ISBRETT
FRYSEKORGER
JUSTERINGSFØTTER
Før bruk
Les disse instruksjonene nøye før du bruker din nye Matsui fryseboks.
Fryseren er kun ment for innendørs hjemmebruk.
MUF988W_WE_WEA_S_SE_IB_5L_final110512_door change.indb 13 12/05/2011 7:00 PM
Page 14
14
NO
Få døren til å åpne seg motsatt vei
1. Still enheten forsiktig på skrå. Det kreves
2 personer for å skråstille enheten når
døren skal reverseres.
3. Skyv døren ned og fjern den fra enheten.
4. Fjern den øvre hengselpinnen og sett på
motsatt siden.
5. Skyv døren tilbake igjen på det øvre
hengslet. Skru det nedre hengslet på
plass på den nye siden.
2. Fjern skruene og hengselbraketten fra
fotstykket.
MUF988W_WE_WEA_S_SE_IB_5L_final110512_door change.indb 14 12/05/2011 7:00 PM
Page 15
15
NO
Bringe det frittstående kjøleskapet i vater
Fjern emballasjen fra bunnen av apparatet og erstatt med
de 2 justeringsføttene. Sørg for at apparatet er i vater. Bruk
justeringsføttene foran. Hvis apparatet ikke er i vater, vil det ha
innvirkning på dørene og de magnetiske lukkemekanismene.
Rengjøring før bruk
Tørk av innsiden av apparatet med en svak natronoppløsning. Skyll deretter med varmt vann ved hjelp
av en fuktig svamp eller klut. Vask kurvene og hyllene i varmt såpevann og tørk godt før de settes inn i
kjøleskapet. De eksterne delene av kjøleskapet kan rengjøres med bonevoks.
Hvis du vil ha mer informasjon, se delen om rengjøring på side 6.
• Før du setter i kontakten, MÅ DU
Kontrollere at du har en stikkontakt som er forenlig med støpselet som følger med
apparatet. Hvis ikke, rådfør deg med en kvalisert tekniker for hjelp.
• Før kjøleskapet slås på!
IKKE SLÅ PÅ FØR TO TIMER ETTER AT KJØLESKAPET HAR BLITT FLYTTET
Kjølevæsken trenger tid til å stabilisere seg.
Nødvendige verktøy: Phillips skrutrekker / Flat skrutrekker / Sekskantet skrunøkkel
6. Se etter at døren har riktig innretning
både vannrett og loddrett samt at
forseglingene er lukket på alle sidene før
du til slutt strammer det nedre hengslet.
Juster nivåføttene på nytt.
MUF988W_WE_WEA_S_SE_IB_5L_final110512_door change.indb 15 12/05/2011 7:00 PM
Page 16
16
NO
Komme i gang
Slå fryseboksen på
1. Før du setter støpselet i stikkontakten, sørg for at termostaten
står på MIN; MIN betyr av.
2. Skru termostatbryteren med klokken for å stille den til ønsket
posisjon. Den kaldeste temperaturen er SUPER.
3. For å sikre at fryseboksen er kald nok til å fryse maten din
skikkelig, vent i 24 timer før du fyller den med mat.
Justere temperaturen
Den innvendige temperaturen i apparatet ditt kontrolleres av en termostat. Posisjonen SUPER gjør
apparatet kaldest, og den brukes for hurtig frysing. Anbefalt posisjon er mellom Min og Max, men bør
justeres i henhold til omgivelsene. Det er ikke sikkert apparatet fungerer som det skal hvis det er i et
spesielt kaldt eller varmt rom eller hvis døren åpnes ofte eller i lengre perioder.
Hurtig frysing
Fersk mat bør fryses så raskt som mulig. Innstillingen SUPER får fryseboksen til å arbeide kontinuerlig
og bli kaldere (ca. -28 ºC ). Den vil derfor fryse raskere og holde maten din ferskere. Frysingen vil være
komplett etter 24 timer. Skru termostaten tilbake til posisjonen NORMAL for å la fryseboksen returnere til
normal temperatur (-18 ºC ). Frys aldri store mengder fersk mat på en gang.
Lyder inne i fryseboksen
Hvis du ikke har eid et kjøleskap eller en fryseboks før, kan du legge merke til at de lager noen uvanlige
lyder. De fleste av disse er helt normale, men du bør være oppmerksom på dem.
Klukking, susing
Disse lydene forårsakes av kjølevæskens sirkulasjon i kjølesystemet. De har blitt mer hørbare etter
introduksjonen av KFK-frie gasser. Dette er ikke en feil og vil ikke påvirke fryseboksens ytelse.
During, summing eller vibrering
Dette er kompressormotoren som arbeider; den pumper kjølevæsken rundt i systemet.
MUF988W_WE_WEA_S_SE_IB_5L_final110512_door change.indb 16 12/05/2011 7:00 PM
Page 17

17
NO
Handle frossenmat
• Dette er en 4-stjerners fryseboks.
• Når du kjøper frossenmat, se på oppbevaringsinstruksjonene på pakken. Du vil kunne oppbevare hver
frossenmatvare i tidsperioden som vises på 4-stjernersrangeringen. Dette er vanligvis tidsperioden som
kalles ”Best før” foran på pakken. Maksimum frysekapasitet for dette apparatet er 4 kg på 24 timer. Ikke
legg fersk mat i fryseboksen som overstiger denne vekten.
• Kontroller temperaturen i frysedisken i butikken der du kjøper frossenmat. Den skal vise en lavere
temperatur enn -18 ºC.
• Ta en rask titt på frossenmatpakken og sørg for at den er i perfekt stand.
• Kjøp alltid frosne produkter sist på handlerunden. Prøv å oppbevare frossenmaten sammen mens du
handler og på reisen hjem, da dette vil bidra til å holde maten kaldere.
• Ikke kjøp frosne varer med mindre du kan fryse dem med en gang. Spesielle isolerte poser kan kjøpes
fra de fleste supermarkeder og jernvarehandler. Disse holder frossenmat kald lenger.
Forberedelser før frysing
• Bruk kvalitetsmat og håndter den så lite som mulig. Frys mat i små mengder; da fryser den fortere,
bruker mindre tid på å tine og du kan spise den i ønsket mengde.
• La tilberedt mat kjøle seg helt ned. Avkjøl maten i et kjøleskap før frysing, hvis mulig.
• Tenk over hvordan du ønsker å tilberede maten før du fryser den.
• Ikke frys mat i metallbeholdere hvis du ønsker å tine den i mikrobølgeovn.
• Bruk spesielle fryseposer som du får kjøpt på supermarkedet, frysefolie, polyetylenposer,
plastbeholdere, aluminiumsfolie (kun den tykkeste typen, hvis i tvil, pakk dobbelt). Ikke bruk
aluminiumsfolie eller syreholdig mat (som sitrusfrukter). Ikke bruk tynn plastfolie eller glass. Ikke
anvend brukte matbeholdere (med mindre de er grundig rengjort på forhånd).
• Slipp ut så mye luft som mulig fra beholderen. Du kan kjøpe en spesiell vakuumpumpe som suger
ekstra luft ut av forpakningen.
• La det være et lite luftrom når du fryser væsker, slik at de kan utvide seg.
• Du kan utnytte plassen i fryseboksen mest effektivt hvis du fryser væsker (eller
fast føde med væske, slik som gryteretter) i firkantede blokker. Dette er kjent
som ”preforming”. Hell væsken i en polyetylenpose inni en firkantet beholder.
Frys den slik, fjern den deretter fra beholderen og forsegle posen.
• Mange matvarer ser like ut i frossen tilstand, så nøye merking vil hjelpe deg til
å huske hva en vare er. Mat som oppbevares for lenge kan gi matforgiftning.
Du kan kjøpe spesiell frysetape til bruk i lave temperaturer. Denne tapen er
tilgjengelig i hvitt, så hvorfor ikke bruke den til å skrive innholdet på? Du kan
kjøpe spesielle frysemerker og penner. Merkene kommer i ulike farger, som
kan hjelpe deg til å bruke fryseboksen effektivt. Du kan for eksempel bruke rød fargekode på kjøtt og
grønn fargekode på grønnsaker. Hvis du bruker ulik fargekode for hver årstid, kan det hjelpe deg til å
rotere frossenmaten mer effektivt.
• Skriv på innholdet og datoen. Hvis du er veldig organisert, kan du tilføye vekten og merknader om
tilberedning, slik som ”tin først” eller ”tilbered fra frossen tilstand” og føre en separat ”logg” på hva som
er i hver skuff. Dette vil spare deg for å åpne døren for ofte og unødvendig leting, slik at fryseboksen
holder seg kald nok.
MUF988W_WE_WEA_S_SE_IB_5L_final110512_door change.indb 17 12/05/2011 7:00 PM
Page 18

18
NO
Tine frossenmat
1. Tin ved romtemperatur. Ikke glem at tining på et varmt sted kan føre til bakterievekst.
2. Sil vekk og fjern eventuell væske som går tapt under tining.
3. Sørg alltid for at det ikke er iskrystaller i maten før tilberedning, spesielt i kjøtt. Disse krystallene
tyder på at maten ikke er helt tint. De fører til lavere temperaturer ved tilberedning. Lavere
tilberedningstemperaturer kan medføre at farlige bakterier ikke drepes.
4. Tilbered maten så snart som mulig etter tining.
5. Mange mikrobølgeovner og bakerovner har et tiningsprogram. For å unngå bakteriedannelse, bruk kun
disse hvis du akter å tilberede maten umiddelbart etterpå.
• Frys aldri på nytt noe som har blitt tint, med mindre du koker det på nytt for å drepe
skadelige bakterier. Frys aldri tinte skalldyr på nytt.
• Forsegle forpakninger ordentlig etter deg når du fjerner varer fra forpakninger i
fryseboksen. Dette hindrer uttørking eller “frysebrenning” og at det danner seg frost på
maten som ligger igjen.
MUF988W_WE_WEA_S_SE_IB_5L_final110512_door change.indb 18 12/05/2011 7:00 PM
Page 19

19
NO
Rengjøring
Avising
Etter en tidsperiode vil det bygge seg opp frost i fryseboksen. På kort sikt skal frosten skrapes vekk med et
kjøkkenredskap i plast.
Ikke bruk metallgjenstander eller skjæreredskaper, og ikke bruk elektriske apparater for å
påskynde avisingen.
Fullstendig avising av apparatet vil imidlertid være nødvendig ca. en gang i året dersom frostlaget overgår
5 cm (2”) for å opprettholde fryseboksens effektivitet. Dette skal utføres dersom frostlaget ikke kan skrapes
vekk, eller hvis det begynner å skape problemer for oppbevaring. Velg en tid da du har små mengder med
frossenmat og gjør som følger:
1. Ta ut frossenmaten, trekk støpselet ut av stikkontakten og la døren
stå åpen. Ideelt skal frossenmaten legges i en annen fryseboks eller
et kjøleskap. Hvis dette ikke er mulig, pakk straks maten inn i flere lag
med aviser eller store håndklær og deretter et tykt pledd eller teppe og
oppbevar den på et kjølig sted.
2. Plasser en flat bolle eller panne under fryseboksen. Skrap vekk så mye av frostlaget som mulig med en
plastskrape. Tiningen av resten kan påskyndes ved å plassere boller med varmt vann inne i fryseskuffen
og lukke døren. Når den solide frosten løsner, bryt den løs med plastskrapen og fjern.
3. Når avisingen er fullført, rengjør fryseboksen som beskrevet i avsnittet RENGJØRING.
Gjøre rent inne i fryseboksen
Du bør rengjøre fryseboksen innvendig med en svak natronoppløsning. Skyll den deretter med varmt vann
ved hjelp av en oppvridd svamp eller klut. Tørk fryseboksen med en klut før du setter kurven inn igjen. Sett
i stikkontakten igjen.
Gjøre rent på utsiden av fryseboksen
Bruk standard møbelpuss for å rengjøre utsiden av fryseboksen. Sørg for at døren er lukket for å hindre at
det kommer møbelpuss inn i den magnetiske dørforseglingen eller inn i skapet.
Rengjøringstips
Avis når du har lite mat i fryseboksen.
Ikke bruk sterke rengjøringsmidler, skurefiller eller løsemidler for å rengjøre noen del av
fryseboksen.
MUF988W_WE_WEA_S_SE_IB_5L_final110512_door change.indb 19 12/05/2011 7:00 PM
Page 20

20
NO
Vedlikehold
Flytte fryseboksen
Håndter forsiktig
Hold rundt sidene på fryseboksen eller i bunnen når du flytter den. Den skal ikke under noen
omstendigheter løftes ved at du holder i de øverste kantene.
Plassering
Ikke plasser fryseboksen nær en varmekilde, f.eks. en komfyr, varmtvannsbeholder eller radiator. Unngå
også direkte sollys i uthus eller hagestuer.
Bringe fryseboksen i vater
Sørg for at fryseboksen er i vater. Bruk de roterende justeringsføttene foran. Hvis apparatet ikke er i vater,
vil det ha innvirkning på dørene og de magnetiske lukkemekanismene.
Ikke slå fryseboksen på før etter 2 timer
Når fryseboksen er på plass, la den være i fred i 2 timer. Kjølevæsken trenger tid til å stabilisere seg.
Installasjon
Ikke dekk til eller blokker ventiler eller ristene på apparatet.
Reparasjoner
Reparasjoner og vedlikehold av apparatet skal kun utføres av en autorisert, kvalifisert tekniker.
Avhending
Gamle apparater har fremdeles verdi. En miljøvennlig avhendingsmetode vil sikre at verdifulle råmaterialer
kan gjenvinnes og brukes på nytt. Kjølevæsken som brukes i apparatet og isolasjonsmaterialer krever
spesielle avhendingsprosedyrer. Sørg for at ingen av rørene på baksiden av apparatet er skadet før
avhending. Oppdatert informasjon angående alternativer for avhending av det gamle apparatet ditt samt
emballasje fra det nye kan fås fra kommunen.
Hvis du skal kaste en gammel fryseboks, bryt av eventuelle gamle låser eller smekklåser som en
sikkerhetsforanstaltning.
MUF988W_WE_WEA_S_SE_IB_5L_final110512_door change.indb 20 12/05/2011 7:00 PM
Page 21

21
NO
Spesifikasjoner
Nominell nettspenning (V): 230
Nominell frekvens (Hz): 50
Strømstyrke (A): 0,7
Fryseboksens volum: 79
Nettokapasitet (liter):
(kubikkfot) 2,8
Vekt (kg): 32
Produktets størrelse (H x B x D) mm 845 x 545 x 570
Kjølevæske (vekt): 40
Vekten og størrelsen er omtrentlige. Da vi bestreber oss på stadig å forbedre produktene våre, kan vi
endre spesifikasjoner og designer uten forhåndsvarsel.
MUF988W_WE_WEA_S_SE_IB_5L_final110512_door change.indb 21 12/05/2011 7:00 PM
Page 22

22
SE
Introduktion till din nya frys
Installera din nya frys
Placering
När du väljer plats för din nya frys bör du se till att golvet är platt och hårt, och att rummet är välventilerat
med en medeltemperatur på mellan 16ºC och 32ºC. Placera din frys borta från direkt solljus och
värmekällor (spis, värmeapparat, element, etc.). Direkt solljus kan påverka ytan i akryl och värmekällor
kan öka elektrisk konsumtion. Extremt kalla temperaturer kan också förorsaka att apparaten inte fungerar
perfekt. Den här enheten är inte designad för att användas i ett garage eller andra utomhusbyggnader.
Undvik att placera apparaten på fuktiga platser. Den måste också installeras så att apparaten har ett 10
cm (2.5”) avstånd och vid sidorna 2 cm (3/4”). Dörren till apparaten kan antingen öppnas åt höger eller åt
vänster, beroende på vad som passar dig. Se sidan 5 om du vill att dörren ska öppnas åt andra hållet. Täck
inte över din apparat med något material.
• När du ska ta bort dörren är det nödvändigt att luta skåpet bakåt. Du bör låta frysen luta
mot något stabilt och placera något under hjulen så att den inte glider när du ska ändra
dörren. LÄGG DEN INTE ner eftersom kylsystemet kan förstöras.
• Se till att strömmen till apparaten är urdragen och att den är tom.
• Vi rekommenderar att du har någon som assisterar dig.
KONTROLLPANEL
ISLÅDA
FRYSLÅDOR
UTJÄMNINGSFÖTTERA
Innan användning
Läs igenom de här instruktionerna väl innan du använder din nya Matsui frys.
Frysen är endast till för hemma-användning och för inomhusbruk
MUF988W_WE_WEA_S_SE_IB_5L_final110512_door change.indb 22 12/05/2011 7:00 PM
Page 23

23
SE
Vända håll på dörren
1. Luta enheten försiktigt. Två personer
krävs för att luta enheten under
processen med att vända dörren.
3. Låt dörren glida ned och ta bort den från
enheten.
4. Ta bort det övre gångjärnets och
montera på motsatt sida.
5. Skjut tillbaka dörren på det övre
gångjärnet. Skruva fast bottengångjärnet
på plats på den nya sidan.
2. Ta bort skruvarna och gångjärnskonsolen
från basen.
MUF988W_WE_WEA_S_SE_IB_5L_final110512_door change.indb 23 12/05/2011 7:00 PM
Page 24

24
SE
Gör ytan på skåpet jämn
Ta bort packningen från nedre delen av apparaten och ersätt
med 2 utjämningsfötter. Se till att apparaten står rakt och jämnt.
Använd de främre utjämningsfötterna. Om apparaten inte står
jämnt kan dörren och de magnetiska plomberingarna påverkas.
Rengör innan användning
Torka insidan av frysen med en svag lösning med bikarbonat. Skölj sedan med varmt vatten genom att
använda en fuktig svamp eller trasa. Diska lådorna och hyllorna i varmt tvåligt vatten och torka ordentligt
innan du flyttar runt dem inuti frysen. De externa delarna på frysen kan rengöras med vaxpoleringsmedel.
Om du behöver mera information om rengöring gå till sidan 6.
• Innan du sätter på strömmen MÅSTE DU
Kontrollera att du har en kontakt som är kompatibel med den kontakt som följer med
apparaten. Om inte, rådgör med en kvalicerad tekniker för assistans.
• Innan du sätter på den!
SÄTT INTE PÅ FRYSEN FÖRRÄN TVÅ TIMMAR SENARE EFTER ATT DU HAR FLYTTAT KYLEN.
Den kalla vätskan behöver tid att sätta sig.
Verktyg som behövs: Phillips typ av skruvmejsel / Minusmejsel / Insexnycke
6. Kontrollera att dörren hänger rätt
horisontellt och vertikalt och att
tätningen är stängd på båda sidorna
innan det undre gångjärnet slutligen dras
fast. Justera de höjbara fötterna.
MUF988W_WE_WEA_S_SE_IB_5L_final110512_door change.indb 24 12/05/2011 7:00 PM
Page 25

25
SE
Komma igång
Sätta på din frys
1. Innan du ansluter din frys till huvudströmmen se till att
termostaten är inställd på MIN, då MIN står för avstängd.
2. Vrid på termostaten medsols för att ställa in önskad position.
Se till att den kallaste temperaturen är SUPER.
3. Vänta 24 timmar innan du fyller den med mat för att se till att
frysen är tillräckligt kall.
Justera temperaturen
Den interna temperaturen i din apparat kontrolleras av en termostat. Positionen SUPER gör apparaten
kallast och används för snabbinfrysning (se snabbinfrysningsavsnittet nedan). Den rekommenderade
positionen är mellan Min och Max men bör justeras mot omgivningen. Apparaten fungerar kanske inte
korrekt om den är placerad i ett extremt varmt eller kallt rum eller om dörren öppnas ofta eller under
längre perioder.
Snabbinfrysning
Färsk mat bör frysas så snabbt som möjligt. Genom att ställa in på SUPER kommer din frys att fungera och
bli kallare (ungefär -28ºC). Den kommer därför att frysas snabbare och bevara maten bättre. Frysningen
är total efter 24 timmar. Vrid tillbaka termostatvredet till NORMAL, för att tillåta frysen att gå tillbaka till
normal temperatur (-18ºC). Frys aldrig in stora kvantiteter av färsk mat på en gång.
Oväsen inuti frysen
Om du inte har ägt en kyl eller frys tidigare, märker du att det förekommer en hel del ovanliga ljud. De
flesta TERMOSTAT av de här är alldeles normala, men du bör iakktta dem.
Kluckande, svischande
De här ljuden kommer från cirkulationen av kylvätskan i kylsystemet. Den märks mera efter introduktionen
av CFC-fria gaser. Det här är inte ett fel och kommer inte att påverka användningen av din frys.
Brummande, kurrande eller dunkande
Det här är kompressormotorn som låter när den pumpar runt kylvätskan i systemet.
MUF988W_WE_WEA_S_SE_IB_5L_final110512_door change.indb 25 12/05/2011 7:00 PM
Page 26

26
SE
Att köpa frusen mat
• Din frys är 4-stjärnig.
• När du köper frusen mat, titta på lagringsinformationen på förpackningen. Du kan lagra varje bit frusen
mat under perioden som står angiven under den 4-stjärniga rankingen. Det här är vanligtvis perioden
som angivs ”Bäst före” på framsidan av förpackningen. Den maximala fryskapaciteten för den här
apparaten är 4 kg på 24 timmar. Placera inte mera ofryst mat än den angivna gränsen.
• Kontrollera temperaturen i frysdisken där du köper din frusna mat. Den bör visa en temperatur lägre än
-18ºC.
• Kontrollera snabbt packeteringen till din frusna mat och se till att den är i fint skick.
• Köp alltid frusen mat sist på din shoppingrunda eller när du besöker affären. Försök att placera frusen
mat tillsammans när du handlar och på hemvägen eftersom det hjälper dig att hålla maten kall.
• Köp inte frusen mat om du inte kan frysa den på en gång. Särskilda isolerade påsar kan köpas på de
flesta affärer. De här håller frusen mat frusen under längre tid.
Förberedelser för infrysning
• Använd kvalitetsmat och handha den så lite som möjligt. Frys mat i små kvantiteter så att den fryses
snabbare, tar mindre tid att tina och gör att du kan äta den i den kvantitet som du behöver.
• Se till att lagad mat har kylts ner ordentligt. Om möjligt, kyl mat i en kyl innan du fryser den.
• Tänk över hur du vill laga maten innan du fryser den.
• Frys inte mat i metallbehållare om du vill lägga maten i mikrovågsugn direkt när du har tagit den från
frysen.
• Använd särskilda fryspåsar tillgängliga från matäffärer, frysfilm, påsar av polythene, plastbehållare,
aluminiumfolie (endast bra kvalitet, om du är osäker, lägg folien dubbel). Använd inte aluminiumfolie
för syrarik mat (såsom citrusfrukter). Använd inte tunn plastfolie eller glas. Använd inte använda
matbehållare (om du inte har rengjort dem väl först).
• Ta bort så mycket luft från behållaren som möjligt. Du bör inhandla en särskild vakumpump som suger
ut onödig luft från emballaget.
• Lämna en liten mängd “luft” när du fryser vätska, så att den kan expandera.
• You can use the space in the freezer most efficiently if you freeze liquids (or
solids with liquids, e.g. stew) in square blocks. This is known as “Preforming”.
Pour the liquid into a polythene bag which is inside a square sided container.
Freeze it, and then remove it from the container and seal the bag.
• Olika slags mat ser likadan ut när den är fryst, så noggrann märkning
hjälper dig att inte glömma bort vad det är. Lagringstider som
överskrids kan förorsaka matförgiftning. Du kan köpa särskild frystejp
att användas i låga temperaturer. Den här tejpen finns vit, och du kan
använda den för att skriva vad innehållet är. Du kan köpa särskilda frysetiketter och pennor. Etiketter
finns i olika färger, vilket kan hjälpa dig att använda din frys mera effektivt. Du kan t.ex. använda rött för
kött och grönt för grönsaker. Genom att använda en annan färg för varje kvartal på året kan du rotera
och använda din frusna mat mera effektivt.
• Skriv ner innehållet och datum. Om du är väldigt organiserad lägg till vikt och anteckningar såsom på
vilket sätt maten har tillagats som t.ex. ”tina först”, eller ”tillagas som fryst” och håll en separat ”logg” på
vad som finns i varje låda. Det här kan spara tid när du öppnar frysdörren och söker i onödan, och du
kan se till att frysen bevaras tillräckligt kall.
MUF988W_WE_WEA_S_SE_IB_5L_final110512_door change.indb 26 12/05/2011 7:00 PM
Page 27

27
SE
Upptining av fryst mat
1. Tina den i rumstemperatur. Glöm inte att upptining i värme kan öka risken att bakterier ökar.
2. Sila och släng all vätska som förloras i upptiningsprocessen.
3. Se till att det inte finns iskristaller i maten innan tillagning, särskilt med mat. De här kristallerna
indikerar att maten inte är helt tinad och resulterar i lägre temperaturer när du tillagar. Lägre
temperaturer kan göra att farliga bakterier inte dör.
4. Laga maten så snabbt som möjligt efter upptining.
5. Många mikrovågsugnar och ugnar har upptiningsinställningar. För att undvika att bakteria byggs upp,
använd endast de här om du tänker laga maten direkt efteråt.
• Återfrys aldrig något som har tinats upp om du inte tänker tillaga det igen, för att döda
skadliga bakterier. Återfrys aldrig tinade skaldjur.
• Återförslut behållare ordentligt efter att du har tagit ut mat. Det förhindrar att mat torkar
eller blir ”frysbränd” och att mat bygger upp frost på mat som blir kvar.
MUF988W_WE_WEA_S_SE_IB_5L_final110512_door change.indb 27 12/05/2011 7:00 PM
Page 28

28
SE
Rengöring
Avfrostning
Efter en tid kommer frost att bildas i frysen. Temporärt kan man skrapa bort den med hjälp av en
plastskrapa.
Använd inte en metallskrapa eller ett instrument i olika mönster för att ta bort frost.
En fullständig avfrostning är däremot fullt nödvändig ca. en gång per år, eller om frostlagret överskrider
5cm (2”) för att underhålla frysens effektivitet. Det bör göras om frost byggts upp och inte kan skrapas
bort, eller om det leder till påverkan av matförvaringen. Välj en tid då du har ett litet lager av fryst mat och
iaktta följande:
1. Ta ut den frysta maten, stäng av huvudströmmen på frysen och lämna dörren öppen. Idealiskt är att
förvara den frysta maten i en annan frys eller kyl. Om det inte är möjligt, vira först in maten i flera
tidningspapper och sedan en tjock filt eller material och håll maten förvarad på en sval plats.
2. Placera en låg skål eller kastrull under frysen. Skrapa bort så mycket
frost som möjligt genom att använda en plastskrapa. För att tina den
återstående isen kan man placera kastruller med varmt vatten inuti
frysen och stänga dörren. När den fasta frosten lossnar, ta då bort den
med plastskrapan och kasta den.
3. När avfrostningen är klar, rengör din frys som beskrivet i RENGÖRING.
Rengöring inuti frysen
Du bör rengöra insidan av frysen med en svag lösning av bikarbonat. Skölj sedan med varmt vatten med
hjälp av en “urvriden” svamp eller trasa.
Torka frysen torr innan du sätter tillbaka lådorna.
Sätt i kontakten och slå på strömmen.
Rengöring av utsidan på frysen
Använd standard rengöringsmedel för att rengöra frysen utvändigt. Se till att dörren är stängd, för att
förhindra att rengöringsmedel hamnar på de magnetiska dörrplomberingarna eller inuti skåpet.
Rengöringstips
Avfrosta när du har lite fryst mat lagrad.
Använd inte skarpa rengöringsverktyg, svampar eller rengöringsmedel för att rengöra delar
av skåpet.
MUF988W_WE_WEA_S_SE_IB_5L_final110512_door change.indb 28 12/05/2011 7:00 PM
Page 29

29
SE
Underhåll
Flytta din frys
Iaktta försiktighet när du flyttar den
Håll frysen om dess sidor eller nertill när du flyttar den. Under inga omständigheter bör den lyftas upp
genom att hålla kring hörnen på frysen längst upp.
Placering
Placera inte din frys nära en värmekälla, eg. spis, värmepanna eller element. Undvik också direkt solljus i
yttre byggnader eller solverandor.
Gör frysen stadigr
Se till att frysen står stabilt. Använd de roterande utjämningsfötterna framtill. Om frysen inte står jämnt,
kan dörren och de magnetiska plomberingarna påverkas.
Sätt inte på frysen på 2 timmar
Efter att frysen står på plats, måste den lämnas ifred i 2 timmar. Kylvätskan behöver tid att sätta sig.
Installation
Täck inte över och blockera inte ventilerna eller gallren på din apparat.
Service
Reparationer och underhåll på frysen bör endast utföras av en auktoriserad, kvalificerad tekniker.
Avfall
Gamla apparater har fortfarande en del värde. En miljövänlig metod för avfall kommer att försäkra
att råmaterial kan återvinnas och användas igen. Kylvätskan som använts i den här apparaten och
isoleringsmaterialen kräver särskilda avfallsrutiner. Se till att ingen av rören på baksidan skadas innan
avfallshantering sker. Uppdaterad information angående alternativ för avfallshantering av gamla apparater
och packetering från nya apparater kan du får hos ditt lokala informationskontor.
Om du gör dig av med din frys se till att gamla lås och reglar förstörs innan som en säkerhetsåtgärd.
MUF988W_WE_WEA_S_SE_IB_5L_final110512_door change.indb 29 12/05/2011 7:00 PM
Page 30

30
SE
Specifikationer
Volt (V): 230
Frekvens (Hz): 50
Ineffekt ström (A): 0,7
Volym på frysen 79
Nettokapacitet (liter):
(Kubikfot) 2,8
Vikt (kg): 32
Produktdimension (H x V x D) mm 845 x 545 x 570
Kylvätska (vikt): 40
Vikt och dimensioner är ungefärliga. Eftersom vi försöker förbättra våra produkter kan specifikationer
och design ändras utan föregående meddelande.
MUF988W_WE_WEA_S_SE_IB_5L_final110512_door change.indb 30 12/05/2011 7:00 PM
Page 31

313131
FI
Uuden pakastimesi esittely
Uuden pakastimesi asennus
Paikka
Varmista, että pakastimelle valitsemasi paikka on tasainen ja tukeva, ja että huone, jossa pakastin
sijaitsee, on hyvin ilmastoitu, ja että sen keskilämpötila on 16-32 ºC. Varmista, ettei laite ole suorassa
auringonvalossa tai lämmönlähteen (kuten uunin, lämmittimen, pariston yms.) lähettyvillä. Suora
auringonvalo voi vahingoittaa laitteen akryylipinnoitusta, ja laitteen lähellä sijaitsevat lämmönlähteet
saattavat lisätä laitteen energiankulutusta. Liian kylmät sääolosuhteet saattavat myös vaikuttaa
negatiivisesti laitteen suorituskykyyn. Tätä laitetta ei ole suunniteltu käytettäväksi autotallissa tai muissa
ulkotiloissa. Vältä laitteen säilyttämistä kosteissa tiloissa. Tämän vuoksi laite tulisi aina asentaa vähintään
10:n senttimetrin päähän takaseinästä ja kahden senttimetrin päähän sivuseinistä. Laitteen ovi avautuu
niin oikealle kuin vasemmallekin riippuen käyttötarpeistasi. Lisätietoja oven puolen vaihtamisesta löydät
sivulta 5. Älä päällystä laitetta
• Laitetta tulee kallistaa taaksepäin oven poistamiseksi. Laita pakastin lepäämään jotakin
tukevaa pintaa vasten ja aseta jotain pyörien alle, ettei pakastin pääse liukastumaan oven
vaihdon yhteydessä.
• Varmista, että laitteen virta on kytketty pois päältä ja että se on tyhjä.
• Käytä apuhenkilöä tarvittaessa
OHJAUSPANEELI
JÄÄTARJOTIN
PAKASTINKORIT
TASAUSJALAT
Ennen käyttöä
Ole ystävällinen ja lue tämä käyttöohje huolellisesti ennen Matsui-pakastimen käyttöönottoa.
Pakastin on tarkoitettu ainoastaan sisätiloissa käytettäväksi ja kotikäyttöön
MUF988W_WE_WEA_S_SE_IB_5L_final110512_door change.indb 31 12/05/2011 7:00 PM
Page 32

323232
FI
Oven avaamispuolen vaihtaminen
1. Kallista laitetta varovasti. Kaksi henkilöä
tarvitaan kallistamaan laitetta oven
kätisyyden vaihtamisen aikana.
3. Liu’uta ovea alas ja irrota se laitteesta.
4. Irrota ylä tappi ja kiinnitä vastakkaisella
puolella.
5. Liu’uta ovi takaisin yläsaranalle.Ruuvaa
alasarana paikalleen uudelle puolelle.
2. Poista ruuvit ja saranakannake jalustasta.
MUF988W_WE_WEA_S_SE_IB_5L_final110512_door change.indb 32 12/05/2011 7:00 PM
Page 33

333333
FI
Laitteen tasoittaminen
Poista laitteen pohjassa sijaitseva tuki ja kiinnitä kaksi tasoitusjalkaa.
Varmista, että laite on tasapainossa. Käytä tasoitusjalkoja laitteen
etuosassa. Jos laite ei ole tasapainossa, laitteen ovi ja sen
magneettinen eriste saattavat vaurioitua.
Puhdistus ennen käyttöä
Pyyhi laitteen sisäosat laimealla ruokasoodaliuoksella. Huuhtele pinnat puhdistuksen jälkeen vetisellä
sienellä tai rätillä. Pese korit ja hyllyt läpimällä saippuavedellä ja kuivaa täydellisesti ennen kuin asetat
ne takaisin paikoillensa. Laitteen ulko-osat voit puhdistaa käyttäen vahakiillotinta. Lisätietoja laitteen
puhdistuksesta löydät sivulta 6.
• Ennen kuin kytken laitteen virran, SINUN
TÄYTYY tarkastaa, että laitteen pistoke on sopiva virranjakajaasi. Jos näin ei ole, ole
ystävällinen ja ota yhteys ammattitaitoiseen sähkömieheen, joka voi auttaa sinua
asentamaan uuden pistokkeen.
• Ennen virrankytkemistä!
ÄLÄ KYTKE LAITTEEN VIRTAA ENNEN KUIN KAKSI TUNTIA ON KULUNUT SEN
LIIKUTTAMISESTA.
Laitteen jäähdytysnesteen tasaantuminen vie aikaa.
Tarvitset: Ristipää ruuvimeisseli / Talttapää ruuvimeisseli / Jakoavain
6. Tarkista, että ovi on kohdistettu vaakaja pystysuunnassa. ja ettätiivisteet ovat
kiinni kaikilla puolilla ennen kuin kiristät
alasaranan lopullisesti. Säädä säätöjalka
uudelleen.
MUF988W_WE_WEA_S_SE_IB_5L_final110512_door change.indb 33 12/05/2011 7:00 PM
Page 34

343434
FI
Näin pääset alkuun
Pakastimen käynnistys
1. Ennen pakastimen virrankytkemistä varmista, että laitteen
termostaatti on MIN-asennossa, mikä tarkoittaa, että pakastin on
kytketty pois päältä.
2. Käännä termostaatin säädintä myötäpaivään asettaaksesi
haluamaasi asentoon. Huomaa, että SUPER on kylmin
mahdollinen lämpötila.
3. Varmistaaksesi, että pakastin on tarpeeksi kylmä, tulee sinun
odottaa 24 tuntia ennen kuin täytät sen ruualla.
Lämpötilan säätäminen
Laitteen sisäistä lämpötilaa säädellään termostaatin avulla. Laite saavuttaa kylmimmän mahdollisen
lämpötilan SUPER-asennossa, ja tämä tila on tarkoitettu pikapakastusta varten (lisätietoja löydät kohdasta
Pikapakastus). Suositeltava asento on jossain minimi- ja maksimi lämpötilojen välillä, mutta säädä lämpötila
olosuhteisiin sopivaksi. Laite ei välttämättä toimi täydellisesti, jos se sijaitsee liian kuumassa tai kulmassa
ilmanalassa tai jos sen ovi avataan usein tai jätetään auki pitäksi aikaa.
Pikapakastus
Tuore ruoka tulisi pakastaa pikimmiten. Super-asennossa pakastin kylmenee nopeasti (noin -28 ºC). Näin
ruokaa jäätyy nopeammin ja säilyttää enemmän ruuan tärkeitä ravintoaineita. Ruoka on jäätynyt 24:n
tunnin kuluttua. Palauttaaksesi pakastimen lämpötilan normaaliksi (-18 ºC), käännä termostaatin säädin
takaisin NORMAL-asentoon. Älä koskaan pakasta suuria määriä tuoretta ruokaa samaan aikaan.
Pakastimen sisäinen ääni
Jos tämä on ensimmäinen omistamasi pakstin, tulet pian huomaamaan, että se päästä varsin epätavallisia
ääniä. Suurin osa näistä on täysin normaaleja, mutta sinun tulisi kuitenkin tarkkailla niitä.
Kurlaus, suhina
Nämä äänet syntyvät jäähdytinnesteen kiertäessä jäähdytysjärjestelmää. Ääni on aikaisempaa
voimakkaampi CFC-vapaiden kaasujen käyttöönoton jälkeen. Tämä ei ole vika eikä vaikuta laitteen
suorituskykyyn.
Hurina, hyrräys ja pumppaus
Nämä äänet tulevat laitteen moottorista, kun se pumppaa kylmäainettaa laitteeseen.
MUF988W_WE_WEA_S_SE_IB_5L_final110512_door change.indb 34 12/05/2011 7:00 PM
Page 35

353535
FI
Pakasteiden ostaminen
• Pakastimesi on neljän tähden pakastin.
• Kun ostat paksteita, tarkasta pakkauksen säilytysohjeet. Valmiste säilyy pakastimessasi pakkauksen
neljän tähden merkinnän mukaisesti. Tämä tarkoittaa yleensä pakkauksen etupuolella sijaitsevaa
”Parasta ennen” –merkintää. Laiteen maksimi pakastuskyky on 4 kiloa vuorokaudessa. Ole ystävällinen,
äläkä laita tätä enempää tuoretta ruokaa pakastimeen samalla kerralla.
• Tarkasta ruokakauppasi pakastimen lämpötila. Sen tulisi olla –18 ºC tai alempi.
• Tarkasta, että pakasteen pakkaus on hyväkuntoinen.
• Osta aina pakasteet viimeisenä ostoksiasi tehdessäsi. Pidä pakasteet lähekkäin ostosten teon aikana ja
kotimatkalla, koska tämä auttaa pitämään ne kylminä.
• Älä osta pakasteita, ellet aio pakastaa niitä välittömästi. Voit ostaa eristettyjä kauppakasseja useimmista
supermarketeista ja rautakaupoista. Tällainen auttaa pitäämään pakasteet kylminä pidempään.
Esivalmistelut
• Osta korkealaatuista ruokaa ja käsittele sitä mahdollisimman vähän ennen pakastusta. Pakasta pieniä
määriä kerrallaan; ruoka jäätyy nopeammin, sulaa nopeammin ja näin voit myös syödä sopivan kokoisia
annoksia.
• Anna lämpimän ruuan jäähtyä täysin. Jäähdytä ruokaa jääkaapissa ennen pakastamista.
• Mieti, miten aiot valmistaa ruuan ennen pakastamista.
• Älä pakasta ruokaa metalliastiassa, jos aiot sulattaa sen mikroaaltouunissa.
• Käytä pakastamiseen tarkoitettuja pakastepusseja, pakastuskelmua, muovipusseja, muovisia
säilytysastioita, alumiinifoliota (ainoastaan vahvaa, jos olet epävarma, kääri kahdesti). Älä käytä
alumiinifoliota hapollisten ruokien (kuten sitrushedelmien) säilöntää (ellei ole puhdistettu hyvin
etukäteen).
• Poista pakkauksesta mahdollisimman paljon ilmaa. Voit hankkia erityisen vakuumipumpun, mikä imee
ylimääräisen ilman ulos pakkauksesta.
• Jätä hieman ”laajentumisvaraa” nesteitä pakastettaessa.
• Voit säästää pakastimen säilytystilaa pakastamalla nesteitä (tai kiinteitä
nesteitä, kuten pataruokia) kuutioina. Tätä kutsutaan ”esimuokkaamiseksi”.
Kaada neste kuution muotoisen astian sisällä olevaan muovipussiin. Pakasta
ruoka näin sulkematta pussia, ota sitten pussi ulos astiasta ja sulje pussi.
• Useat ruaat muistuttavat ulkoisesti toisiaan pakastettuina, joten huolelliset
merkinnät pakkauksessa auttavat muistamaan, mitä kukin pakkaus sisältää.
Vanhan ruuan syöminen saatta johtaa ruokamyrkytykseen. Voit ostaa
pakastusteippiä käytettäväksi alhaisissa lämpötiloissa. Teippiä saa valkoisena,
ja siihen voi helposti merkitä pakkauksen sisällön. Myös pakaste-etikettejä ja –kyniä on saatavilla.
Etikettejä saatavilla eri väreissä, mikä puolestaan helpottaa ruokien lajittelua. Voit esimerkiksi merkitä
lihan punaisilla ja kasvikset vihreillä etiketeillä.
• Voit myös jakaa vuoden neljään osaan, ja merkitä tiettynä aikana pakastetut ruuat tietyn värisillä
etiketeillä. Lisäksi voit merkitä ruuan painon sekä lisätietoja, kuten ”sulata ensin” tai ”paista jäätyneenä”,
ja pidä erillistä ”lokikirjaa” siitä, mitä kukin pakastimen hylly sisältää. Näin voit välttää oven avaamisen
turhaan pitkiksi ajoiksi, kun etsit tavaroita pakastimesta.
MUF988W_WE_WEA_S_SE_IB_5L_final110512_door change.indb 35 12/05/2011 7:00 PM
Page 36

363636
FI
Pakasteiden sulatus
1. Sulata, kunnes ruoka on saavuttanut huoneen lämpötilan. Muista, että ruuan sulattaminen lämpimässä
edistää bakteerien kasvua.
2. Kaada pois kaikki sulatuksen tuloksena muodostunut neste.
3. Varmista ennen paistamista, että ruoka, varsinkin liha, ei sisällä jäähilettä. Nämä hileet merkitsevät, että
ruoka ei ole täysin sulanut. Ne alentavat todellista kuumennuslämpötilaa. Alempi kuumennuslämpötila
ei välttämättä tuhoa vaarallisia bakteereja.
4. Valmista ruoka mahdollisimman pian sulatuksen jälkeen.
5. Useissa mikroaaltouuneissa ja uuneissa on sulatustoiminto. Käytä näitä ainoastaan, jos aiot valmistaa
ruaan välittömästi sulatuksen jälkeen välttääksesi bakteerin muodostusta.
• Välttääksesi vaarallisten bakteerien muodostusta, älä koskaan pakasta uudelleen jo
kertaalleen sulatettuja tuotteita, ellet aio kuumentaa niitä uudelleen. Älä koskaan pakasta
uudelleen jo kertaalleen sulatettuja mereneläviä.
• Sulje pakkaus huolellisesti, kun laitat sen takaisin pakkaseen. Voit näin välttää tuotteen
kuivumisen tai pilaantumisen, tai jään kerääntymisen.
MUF988W_WE_WEA_S_SE_IB_5L_final110512_door change.indb 36 12/05/2011 7:00 PM
Page 37

373737
FI
Puhdistus
Sulatus
Pakastimen sisätiloihin kerääntyy ajan kuluessa. Voit aika ajoin poistaa ylimääräistä jäätä muovisella
apuvälineellä.
Älä käytä metallisia tai teräviä esineitä tai sähkölaitteita jään poistamiseen.
Pakastin tulee kuitenkin sulattaa täydellisesti noin kerran vuodessa tai jos jääkerros ylittää viiden
senttimetrin paksuuden, muuten pakastimen toimintakyky heikkenee. Sulatus tulee suorittaa, ellei jäätä
voidaa enää raaputtaa irti tai jos jäätä on niin paljon, että se häiritsee ruuan säilömistä. Paras ajankohta
sulatukselle on silloin, kun pakkasessa on vähän pakasteita. Tee seuraavasti:
1. Ota pakasteet ulos pakkasesta, irrota laite virranjakajasta ja jätä ovi auki. Laita pakasteet joko toiseen
pakkaseen tai ainakin jääkaappiin. Jos tämä ei kuitenkaan ole mahdollista, kääri ruuat sanomalehtien
ja paksujen pyyhkeiden sisään ja tämän jälkeen vielä paksun maton tai peiton sisään pitääksesi se
kylmänä.
2. Laita matala astia tai pannu pakastimen alle. Raaputa mahdollisimman
paljon jäätä käyttäen apuna muovista apuvälinettä. Voit edistää
sulamisprosessia laittamalla kuumalla vedellä täytettyjä astioita
pakastimen sisään ja sulkemalla oven. Kun kiinteä jää alkaa irrota, ota se irti
muovista apuvälinettä käyttäen.
3. Kun sulatus on suoritettu, puhdista laitteen sisätilat PUHDISTUS-kohdan ohjeiden mukaisesti.
Pakastimen sisätilojen puhdistus
Pakastimen sisätilat tulisi puhdistaa käyttäen laimeata ruokasoodaliuosta. Huuhtele pinnat puhdistuksen
jälkeen vetisellä sienellä tai rätillä. Kuivaa pakastin ennen kuin laitat hyllyt takaisin paikoilleen. Kiinnitä laite
virranjakajaan.
Pakastimen ulkokuoren puhdistus
Voit puhdistaa pakastimen ulkokuoren käyttäen tavallista huonekalukiillotetta. Varmista, että ovi on
suljettu, jottei vaha pääsisi magneettiseen ovieristeeseen tai laitteen sisätiloihin.
Puhdistusvinkkejä
Sulata, kun pakkaseessa on vähän ruokaa.
Älä käytä hankaavia puhdistusaineita tai hankaavia sieniä, äläkä käytä liuotteita pakastimen
tai sen osien puhdistuksessa.
MUF988W_WE_WEA_S_SE_IB_5L_final110512_door change.indb 37 12/05/2011 7:00 PM
Page 38

383838
FI
Ylläpito
Pakastimen liikuttaminen
Käsittele varovasti
Pidä kiinni pakastimen sivuista tai pohjasta liikuttaessasi sitä. Älä koskaan nosta pakastinta pitäen kiinni
laitteen yläpinnan reunasta.
Paikka
Varmista, ettei pakastin ole lämmönlähteen (kuten uunin, lämmittimen, pariston yms.) lähettyvillä. Vältä
myös suoraa auringonvaloa ulkorakennuksissa tai aurinkohuoneissa.
Pakastimen tasaus
Varmista, että pakastin on tasapainossa. Käytä tasaukseen laitteen etuosassa sijaitsevia pyöriviä
tasausjalkoja. Jos pakastin ei ole tasapainossa, sen ovet ja niiden magneettiset eristenauhat saattavat
vahingoittua.
Älä kytke laitteen virtaa ennen kuin kaksi
tuntia on kulunut edellisestä liikuttamisesta. Laitteen jäähdytysnesteen tasaantuminen vie aikaa.
Asennus
Älä peitä laitteen tuuletusaukkoja tai ritilöitä.
Huolto
Laitetta saa huoltaa ja korjata ainoastaan ammattitaitoinen ja virallinen sähkömies.
Hävitys
Loppuunkäytetystä laitteesta voidaan vielä käyttää tiettyjä osia. Laitteen ympäristöystävällinen hävitys
tapahtuu ottamalla irti arvokkaat ja uudelleen käytettävät materiaalit. Laitteen jäähdytysnesteen ja
eristemateriaalien hävitys vaatii erikoistoimenpiteitä. Varmista, että laitteen takaosassa sijaitsevat putket
eivät ole vahingoittuneet, ennen kuin hävität laitteen. Ajankohtaista lisätietoa laitteen ja sen pakkauksen
hävitysmenetelmistä saat oman kuntasi jätteenkäsittelyviranomaisilta.
Irrota kaikki lukot ja haat ennen pakastimen hävitystä.
MUF988W_WE_WEA_S_SE_IB_5L_final110512_door change.indb 38 12/05/2011 7:00 PM
Page 39

393939
FI
Määritteet
Jännite (V): 230
Taajuus (Hz): 50
Kantavirta (A): 0,7
Pakastimen kapasiteetti 79
Netto kapasiteetti (litroja):
(Kuutio jalkoja) 2,8
Paino (kg): 32
Laitteen ulkoiset mitat (K x L x S) mm 845 x 545 x 570
Jäädytysneste (paino): 40
Paino ja mitat ovat noin lukuja. Koska pyrimme jatkuvasti parantamaan tuotteitamme, saatamme
muuttaa sen määritteitä ja muotoilua ilman varoitusta.
MUF988W_WE_WEA_S_SE_IB_5L_final110512_door change.indb 39 12/05/2011 7:00 PM
Page 40

40
DK
Introduktion til Deres nye Fryser
Installering af Deres nye fryseskab
Placering
Vær opmærksom på, at skabet placeres på et fladt og tørt gulv, og at der er tilstrækkelig ventilation i
rummet med en gennemsnitstemperatur mellem 16ºC og 32ºC. Skabet bør ikke placeres et sted, hvor
det er udsat for direkte sollys og ikke være i nærheden af varmekilder (komfur, radiator o.l.) Direkte sollys
kan påvirke akrylbelægningen, og varmekilder kan øge forbruget af elektricitet. Ekstrem kulde kan også
forårsage, at fryseskabet ikke virker korrekt. Denne fryser er ikke designet til at bruge i en garage eller
andre steder udendørs. Undgå at placere skabet et sted, hvor det udsættes for fugt. Det bør derfor placeres
således, at der er mindst 10 cm (2.5”) afstand og 2cm (3/4”) ved siderne. Døren til fryseskabet kan enten
åbnes til højre eller til venstre, afhængig af, hvad der ønskes. Læs side 5, hvis De ønsker at ændre på dette.
Undgå at tildække Deres fryseskab.
• Tag døren af, det er nødvendigt at tippe skabet baglæns. De bør lade fryseren hvile på et
fast grundlag, således at den ikke glider under dørændrings processen. Læg IKKE skabet
helt fladt, da dette kan skade kølesystemet.
• Sikr Dem, at skabet er tomt
• Vi anbefaler, at De har en anden person til at hjælpe.
KONTROLPANEL
STERNINGEBAKKE
FRYSERKURVE
JUSTERINGSFØDDER
Før brug
Læs venligst disse instruktioner omhyggeligt, før Deres nye Matsui fryseskab tages i brug.
Fryseskabet er kun til indendørs brug, anvendelse i private husholdninger
MUF988W_WE_WEA_S_SE_IB_5L_final110512_door change.indb 40 12/05/2011 7:00 PM
Page 41

41
DK
Ændring af døråbningen
1. Tilt forsigtigt enheden. Det kræver 2
personer at tilte enheden, når døren skal
vendes om.
3. Skub døren nedad og fjern den fra
enheden.
4. Fjern stiften i det øverste hængsel og sæt
det på den anden side.
5. Sæt døren tilbage på det øverste
hængsel. Skrue det nederste hængsel på
plads på den nye side.
2. Fjern skruerne og hængslerne fra
grundelementet.
MUF988W_WE_WEA_S_SE_IB_5L_final110512_door change.indb 41 12/05/2011 7:00 PM
Page 42

42
DK
Sørg for, at Deres fryseskab er i vater. Brug et vaterpas
Fjern indpakningsmaterialet fra bunden af skabet og erstat det med
de 2 fødder. Kontroller at skabet er i vater. Anvend stilleskruerne
forrest. Hvis skabet ikke står i vater, vil dørene og den magnetiske
tætslutning påvirkes.
Rengør skabet før brug
Aftør skabet indvendig med en tynd blanding af vand og natron. Rens derefter med varmt vand på en
svamp eller en klud. Vask kurve og hylder i varmt sæbevand og lad det tørre helt, før det sættes på plads
i køleskabet. De udvendige dele af køleskabet kan rengøres med voksbaseret rengøringsmiddel. Hvis
yderligere oplysninger ønskes, henvises De til kapitlet om rengøring side 6.
• Før elektrisk tilslutning, SKAL MAN
Sikre sig, at stikkontakten passer til stikket, som De k med skabet. Hvis dette ikke er
tilfældet, bør De tale med en autoriseret elektriker og få hjælp der.
• Før elektrisk tilslutning!
TILSLUT TIDLIGST TO TIMER EFTER, AT SKABET ER BLEVET FLYTTET.
Kølemidlet har brug for tid til at sætte sig.
Nødvendigt værktøj: Phillips type skruetrækker / Fladt bladet skruetrækker / Heksagonal skruenøgle
6. Tjek om døren passer vandret og lodret
og at den lukker ordentligt sammen,
før du strammer det nederste hængsel.
Genjuster foden.
MUF988W_WE_WEA_S_SE_IB_5L_final110512_door change.indb 42 12/05/2011 7:00 PM
Page 43

43
DK
Ibrugtagning
Tænd for fryseren
1. Før fryseren forbindes til strøm, sæt termostatkontrollen til MIN,
hvilket er mindste fryseposition.
2. Drej termostatknoppen med uret til den ønskede position.
Bemærk, at den koldeste temperatur er SUPER.
3. Vent mindst 24 timer med at komme madvarer i fryseren for at
sikre, at nedkølingen er sket.
Juster temperaturen
Den indvendige temperatur kontrolleres af en termostat. SUPER indstilling er den koldeste og bruges til
hurtig indfrysning (Se Hurtig Indfrysning afsnit nedenfor). Den anbefalede position er mellem MIN og
MAX, men bør justeres efter, hvor skabet er placeret. Skabet vil ikke fungere korrekt, hvis rummet er for
koldt, for varmt, eller hvis døren åbnes ofte eller i lang tid
Hurtig Indfrysning
Friske madvarer bør nedfryses hurtigst muligt. Indstillingen SUPER får fryseren til at fryse konstant og
blive koldere (ca. -28ºC). Maden vil derfor blive nedfrosset hurtigere uden at miste smag og vitaminer.
Nedfrysningen vil være færdig efter 24 timer. Drej derefter termostaten tilbage til NORMAL, hvorefter
fryseren vil gå tilbage til den normale temperatur (-18ºC). Man bør aldrig nedfryse store mængder mad på
samme tid.
Støj i fryseren
Hvis De ikke tidligere har haft en fryser eller et køleskab, vil De finde, at der fremkommer nogle temmelig
usædvanlige lyde. De fleste af disse er helt normale, men De bør kende dem.
Boblende, klukkende
Denne type støj er forårsaget af cirkulation af kølemidlet. Det er blevet mere udtalt siden introduktionen af
CFC fri drivgasser. Dette er ikke en fejl og vil ikke påvirke driften af Deres fryser.
Brumme-, spinde- og pulserende lyde
Disse lyde er kompressorens motor, som pumper kølemiddel rundt i systemet.
MUF988W_WE_WEA_S_SE_IB_5L_final110512_door change.indb 43 12/05/2011 7:00 PM
Page 44

44
DK
Indkøb af frosne madvarer
• Deres fryser er 4 stjernet.
• Når De køber frosne madvarer, bør De se på retningslinierne for opbevaring, som der står på pakken.
De vil kunne opbevare den frosne vare i den tid, som er nævnt under 4 stjernet. Dette vil normalt være
det tidspunkt, som der står under ‘Bedst før’, foran på pakningen. Den maksimale frysekapacitet for
dette apparat er 4 kg i 24 timer. Undlad at sætte flere friske madvarer end her nævnt ind på en gang.
• Kontroller temperaturen i frysesektionen i den forretning, hvor De køber Deres frosne madvarer. Den
bør være lavere end -18ºC.
• Se på den frosne madvares indpakning og sikr Dem, at indpakningen er i god stand.
• De bør altid købe frosne produkter som det sidste på Deres indkøbstur eller i supermarkedet. Prøv at
holde de frosne madvarer samlet, mens De køber ind og på turen hjem, da dette vil hjælpe til med at
holde varerne koldere.
• Undlad at købe frosne madvarer, hvis De ikke kan fryse det med det samme. Specielle isolerende poser
kan købes i de fleste supermarkeder eller hos isenkræmmeren. Disse poser holder frosne varer kolde
længere.
Forberedelse til frysning
• Anvend kvalitetsfødevarer og berør dem så lidt som muligt. Frys maden i små portioner. Det fryser
hurtigere, tager mindre tid at optø og gør det muligt at optø den portion, De har brug for.
• Lad tilberedt mad afkøle helt. Afkøl maden i et køleskab før frysning, hvis det er muligt.
• Overvej, hvordan maden skal tilberedes før indfrysningen.
• Frys ikke mad i metalbeholdere i tilfælde af, at De ønsker at sætte maden i mikrobølgeovnen direkte fra
fryseren.
• Brug specielle fryseposer, som kan købes i supermarkedet, frysefilm, polyætylen poser,
plastikbeholdere, aluminiumsfolie (kun kraftig kvalitet, hvis De er i tvivl, indpak med dobbelt lag).
Anvend ikke aluminiumsfolie til syreholdige varer (som f.eks. citrus frugt). Undlad at bruge tynd
plastikfilm eller glas. Brug ikke brugte beholdere (med mindre de er grundigt rengjorte først).
• Fjern så meget luft fra beholderen som muligt. Man kan købe en speciel
vakuumpumpe, som suger ekstra luft ud af pakningen.
• Lad en smule ekstra plads være, når man fryser væsker, da disse udvides under
frysningen.
• Pladsen i fryseren kan anvendes mest effektivt, hvis De fryser væsker (eller
ting som stuvninger) i firkantede blokke. Dette kan at præforme. Hæld væsken i
en polyætylen pose, som er placeret indeni en firkantet beholder. Indfrys det
sådan, fjern derefter den frosne vare fra beholderen og luk posen.
• Mange madvarer ser ens ud, når de er frosne, så omhyggelig mærkning vil hjælpe med at huske
indholdet. For gamle madvarer kan forårsage madforgiftning. Man kan købe speciel frysetape, der kan
anvendes i lave temperaturer. Denne slags tape findes I hvidt, hvorfor ikke anvende det til at skrive
indholdet på. Man kan også købe specielle frysemærkater og penne. Mærkater findes i forskellige
farver, som kan hjælpe Dem til at bruge Deres fryser effektivt. For eksempel kan man farvekode kød
som rødt og grøntsager som grønt. Hvis man bruger en forskellig farve mærkat i hvert kvartal i året, vil
man også nemmere kunne finde de ældste madvarer.
• Skriv indhold og dato. Hvis De er virkelig organiseret, kan De tilføje vægt samt notits sådan som ”optøs
først” eller ”tilberedes fra frys” og have en specielt logbog over indholdet i hver skuffe. Dette vil spare
tid med at åbne døren og lede, med det resultat, at fryseren forbliver kold nok.
MUF988W_WE_WEA_S_SE_IB_5L_final110512_door change.indb 44 12/05/2011 7:00 PM
Page 45

45
DK
Optøning af frosne madvarer
1. Optø ved stuetemperatur. Husk, at optøning et varm sted fremmer vækst af bakterier.
2. Dræn og smid al væske væk, som er fremkommet under optøningen.
3. Man skal sikre sig, at der ikke er iskrystaller i maden før tilberedning, specielt med kød. Krystallerne
indikerer, at maden ikke er helt optøet. Dette resulterer i lavere temperaturer under tilberedningen. Der
er risiko for, at lavere tilberedningstemperaturer ikke dræber farlige bakterier.
4. Tilbered maden snarest muligt efter optøning.
5. Mange mikrobølge- og andre ovne har optøningsfunktion. For at undgå bakterier, bør man kun bruge
disse, hvis man vil tilberede maden umiddelbart efter
• Man bør aldrig genfryse noget, som har været optøet, med mindre man tilbereder det på
ny for at dræbe bakterier. Skaldyr bør aldrig genindfryses.
• Luk pakninger rigtigt efter, at De har taget madvarer ud. Dette forebygger indtørring og
forfrysninger og lagring af frost på den resterende portion.
MUF988W_WE_WEA_S_SE_IB_5L_final110512_door change.indb 45 12/05/2011 7:00 PM
Page 46

46
DK
Rengøring
Afrimning
Efter en vis tid vil frost opbygges i fryseren. Som et midlertidigt remedium, kan frosten skrabes væk ved at
bruge en plastik skraber fra Deres køkkenskuffe
Undlad at bruge noget skarpt eller af metal og anvend ikke elektriske midler til at hjælpe
med afrimningen.
Total afrimning af fryseren vil imidlertid blive nødvendig en gang om året, eller hvis frostlaget bliver større
end 5cm (2”) for at holde fryseren effektiv. Dette bør gøres, hvis frostlaget ikke kan skrabes væk, eller hvis
det begynder at være et problem med plads. Vælg et tidspunkt, hvor der ikke er så meget i fryseren og
fortsæt som følger: to
1. Tag de frosne madvarer ud, afbryd strømmen ved hovedafbryderen og lad
døren stå åben. Hvis det er muligt, bør de frosne varer placeres i en anden
fryser eller køleskab. Hvis dette ikke er muligt, indpak frostvarerne først i
adskillige lag avispapir eller store håndklæder og dernæst et tykt tæppe
og placer det hele et koldt sted.
2. Sæt en skål eller en gryde ind i fryseren. Skrab så meget af den løse frost
væk som muligt ved brug af en plastikskraber. Optøningen af det resterende frost kan gøres hurtigere
ved at sætte skåle med varmt vand ind i fryseren og lukke døren. Efterhånden som den faste masse
løsnes, skub det af med plastikskraberen og fjern det.
3. Når afrimningen er afsluttet, rengør fryseren som beskrevet under RENGØRING.
Rengøring inde i fryseren
Fryseren bør rengøres med en svag opløsning af natron. Derefter renses med varmt vand ved at brug en
svamp eller en klud.
Lad fryseren blive helt tør, før kurvene sættes på plads igen. Sæt stikket i og tilslut hovedafbryderen.
Rengøring af fryseren udvendig
Anvend almindelig møbel rengøringsmiddel til rengøring af fryseren udvendig. Vær sikker på, at døren er
lukket for at undgå, at midlet kommer på den magnetiske lukning eller ind i fryseren.
Rengøringstips
Afrim, når der kun er lidt i fryseren.
Anvend ikke skrappe rengøringsmidler, skuresvampe eller lignende til rengøring af fryseren.
MUF988W_WE_WEA_S_SE_IB_5L_final110512_door change.indb 46 12/05/2011 7:00 PM
Page 47

47
DK
Vedligeholdelse
Flytning af fryseren
Vær forsigtig under flytning
Hold fryseren ved siderne eller bund, når den flyttes. Den må under ingen omstændigheder løftes ved at
holde kanten ved overfladen.
Placering
Deres fryser bør ikke placeres nær en varmekilde som for eksempel komfur, kedel eller radiator. Undgå
direkte sollys i udlænger og udestuer.
Sæt fryseren i vater
Sikr Dem, at fryseren er i vater. Anvend justeringsfødderne foran. Hvis fryseren ikke er i vater, vil døre og
den magnetiske lukning være påvirket.
Start ikke fryseren de første 2 timer
Efter at fryseren er sat på plads, bør den stå i mindst 2 timer, således at kølemidlet kan stabiliseres.
Installation
Undlad at dække eller blokere ventilation eller rist til Deres fryser.
Service
Reparationer og vedligehold af fryseren bør kun foretages af en autoriseret tekniker.
Bortskaffelse
Gamle skabe er ikke værdiløst affald. Gamle skabe indeholder værdifulde stoffer, der kan genanvendes.
Kølemidlet, der er brugt i Deres skab og isoleringsmaterialer kræver specielle. Vær opmærksom på, at ingen
af rørene på bagsiden af fryseren er beskadigede før bortskaffelsen. De nyeste informationer vedrørende
mulighederne for bortskaffelse af Deres gamle fryser og indpakningsmateriale kan oplyses hos Deres
lokale offentlige kontorer.
Ved bortskaffelse af en gammel fryser, fjern alle gamle låse og hængsler som en sikkerhedsforanstaltning.
MUF988W_WE_WEA_S_SE_IB_5L_final110512_door change.indb 47 12/05/2011 7:00 PM
Page 48

48
DK
Specifikationer
Oplyst Volt (V): 230
Oplyst frekvens (Hz): 50
Indgående strømstyrke (A): 0,7
Fryser volumen: 79
Nettokapacitet (liter):
(Kubikfod) 2,8
Vægt (kg): 32
Produkt Dimension (H x B x D) mm 845 x 545 x 570
Kølemiddel (vægt): 40
Vægt og dimensioner er omtrentlige. Da vi kontinuerligt arbejder på at forbedre vores produkter, kan
specifikationer og design ændres uden forudgående information.
MUF988W_WE_WEA_S_SE_IB_5L_final110512_door change.indb 48 12/05/2011 7:00 PM
Page 49

Safety Warnings
GB
• Do not use electrical appliances such as a hair dryer or heater to
defrost your freezer.
• Do not store inflammable gases or liquids inside your freezerl.
• This appliance is not intended for use by persons (including
children) with reduced physical, sensory or mental capabilities, or
lack of experience and knowledge, unless they have been given
supervision or instruction concerning use of the appliances by a
person responsible for their safety.
• Children should be supervised to ensure that they do not play with
the appliance.
• If the supply cord is damaged it must be replaced by the
manufacturer, its service agent, or similarly qualified persons in
order to avoid a hazard.
Säkerhet
SE
• Använd inte elektriska apparater såsom hårtork eller element för att
frosta av kylen.
• Förvara inte brandfarliga gaser eller vätskor inuti din frys.
• Denna apparat är inte avsedd att användas av personer (inklusive
barn) med nersatta fysiska, sensorisk a eller mentala förmågor, eller
bristfällig erfarenhet och kunsk ap, såvida de inte övervakas eller får
instruktioner angående hur apparaten ska användas av en person
som ansvarar för deras säkerhet.
• Barn måste övervakas för att säkerställa att de inte leker med
apparaten.
• Om strömförsörjningskabeln är skadad måste den ersättas av
tillverkaren, dess service klient eller liknande kvalificerade personer
för att undvika fara.
Sikkerhed
DK
• Brug ikke elektrisk udstyr som f.eks. en hårtørrer eller varmeapparat
til at afrime Deres fryser.
• Opbevar ikke brændbare drivgasser eller væsker inde I Deres fryser.
• Dette apparat er ikke beregnet til brug af personer (heriblandt
børn) med nedsatte fysiske, sanselige eller mentale evner, eller med
mangel på erfaring og kendskab, med mindre de er under opsyn
eller anvisning med hensyn til brug af apparater af en person med
ansvar for deres sikkerhed.
• Børn bør være under opsyn for at sikre, at de ikke leger med
apparatet.
• Hvis strømledningen er ødelagt, skal den skiftes af producenten, en
reparatør eller en autoriseret person for at undgå fare.
Sikkerhet
NO
• Ikke bruk elektriske apparater slik som en hårføner eller ovn for å
avise fryseboksen.
• Ikke oppbevar brannfarlige gasser eller væsker inne i fryseboksen.
• Dette apparatet er ikke tiltenkt brukt av personer (inkludert
barn) med nedsatt førlighet, sensoriske eller mentale evner, elle
rmed manglende erfaring og kunnskap, med mindre de har fått
opplæring i bruk av apparatet av en person som er ansvarlig for
deres sikkerhet.
• Barn bør kun bruke apparatet under tilsyn, for å sikre at de ikke
leker med apparatet.
• Hvis tilførselsledningen er ødelagt må den byttes av forhandleren,
forhandlerens reparatør eller lignende kvalifiserte personer, for å
forhindre fare.
Turvallisuus
FI
• Älä käytä sähkölaitteita, kuten hiustenkuivaajaa tai lämpöpatteria
pakastimen sulatukseen.
• Älä säilytä paloherkkiä k aasuja tai nesteitä pakastimen sisällä.
• Fysiikaltaan, tuntoaisteiltaan tai henkiseltä kunnoltaan heikentyneet
henkilöt (lapset mukaan luk ien) eivät saa käyttää tätä laitetta ilman
heidän turvallisuudestaan vastaavan henkilön ohjausta. Laitetta ei
saa myöskään saa käyttää ilman asiantuntemusta ja laitetuntemusta
ennen ohjauksen tai opastuksen saamista.
• On pidettävä huoli, etteivät lapset leiki laitteella.
• Jos virtajohto on viallinen, sen vaihtaminen täytyy tehdä
valmistajan, palvelun tarjoavan agentin tai vastaavan koulutetun
henkilön kautta, vaaran välttämiseksi.
IT IS HAZARDOUS FOR ANYONE OTHER THAN AUTHORISED
SERVICE PERSONNEL TO CARRY OUT SERVICING OF REPAIRS
WHICH INVOLVE THE REMOVAL OF COVERS.
DET ÄR FARLIGT FÖR ALLA UTOM AUKTORISERAD
SERVICEPERSONAL ATT UTFÖRA SERVICE ELLER REPARATIONER
VILKET INVOLVERAR BORTTAGNING AV HÖLJEN.
DET ER FARLIGT FOR ANDRE EN AUTORISERET
SERVICEPERSONALE AT UDFØRE SERVICERING ELLER
REPARATIONER, SOM INDEBÆRER FJERNELSE AF DÆKSLER.
DET ER FARLIG FOR ALLE ANDRE ENN AUTORISERT SERVICEPERSONALE Å UTFØRE VEDLIKEHOLD ELLER REPARASJONER
SOM INNEBÆRER FJERNING AV DEKSLER.
TÄTÄ LAITETTA SAA HUOLTAA JA KORJATA AINOASTAAN
VIRALLINEN HUOLTOMIES.
TO AVOID THE RISK OF AN ELECTRICAL SHOCK DO NOT ATTEMPT REPAIRS YOURSELF.
FÖR ATT UNDVIKA RISKEN FÖR ELEKTRISK CHOCK FÖRSÖK
INTE ATT REPARERA DEN HÄR APPARATEN SJÄLV.
FOR AT UNDGÅ RISIKO FOR ELEKTRISK CHECK FORSØG IKKE
AT REPARERE FRYSEREN SELV.
FOR Å UNNGÅ RISIKO FOR ELEKTROSJOKK, IKKE FORSØK Å
REPARERE APPARATET SELV.
ÄLÄ KOSKAAN YRITÄ ITSE KORJATA LAITETTA, KOSKA SE SAATTAA JOHTAA SÄHKÖISKUVAARAAN.
MUF988W_WE_WEA_S_SE_IB_5L_final110512_door change.indb 49 12/05/2011 7:00 PM
Page 50

MUF988W_WE_WEA_S_SE_IB_5L_final110512_door change.indb 50 12/05/2011 7:00 PM
Page 51

MUF988W_WE_WEA_S_SE_IB_5L_final110512_door change.indb 51 12/05/2011 7:00 PM
Page 52

DSGRetailLtd•MaylandsAvenued•HemelHempsteadd•
Herts•HP27TGd•England
GB
This symbol on the product or in the instructions means that your electrical and electronic
equipment should be disposed at the end of its life separately from your household waste.
There are separate collection systems for recycling in the EU.
For more information, please contact the local authority or your retailer where you purchased
the product.
NO
Dette symbolet på produktet eller i instruksjonene betyr at det elektriske og elektroniske
utstyret ikke skal kastes sammen med husholdningsavfallet ved endt levetid.
I EU-landene nnes det separate innsamlingssystemer til resirkulering.
Kontakt lokale myndigheter eller forhandleren du kjøpte produktet av for ytterligere
informasjon.
SE
Den här symbolen på produkten eller i instruktionerna betyder att den elektriska och
elektroniska utrustningen ska slängas separat från annat hushållsavfall när den inte fungerar
längre.
Inom EU nns separata återvinningssystem för avfall.
Kontakta lokala myndigheter eller din återförsäljare för mer information.
FI
Tämä tuotteeseen tai ohjeisiin merkitty symboli tarkoittaa, että sähkölaitteet ja elektroniikka
on hävitettävä käyttöikänsä päättyessä erillään kotitalousjätteestä.
EU:ssa on kierrätystä varten erilliset keruujärjestelmät.
Jos haluat lisätietoja, ota yhteys paikallisiin viranomaisiin tai tuotteen myyneeseen liikkeeseen.
DK
Dette symbol på produktet eller i vejledningen betyder, at det udtjente elektriske eller
elektroniske udstyr ikke må bortskaes sammen med husholdningsaald.
I EU-lande ndes der separate indsamlingssystemer til genbrug.
Kontakt de lokale myndigheder eller forhandleren for at få yderligere information.
(P.N.:MUF988W-SE-003)
MUF988W_WE_WEA_S_SE_IB_5L_final110512_door change.indb 52 12/05/2011 7:00 PM
 Loading...