

Page 1
A
B
C
1
2
A
B
C
D
1
2
日期
签字
底图总号
旧底图总号
描校
描图
借(通)用件登记
日期
日期
标准化
处数
工艺
审核
设计
标记
更改文件号
审定
批准
校对
签名
张
第
张
共
广东美的集团股份有限公司
数
量
阶段标记
量重
比例
D
美的洗涤电器制造有限公司
REV.
1
1
1
01
英文用户手册
英国
M12FDW09(9240AY)
MATSUI
技术要求
印刷颜色为
该用户手册里的彩色图片也按黑白制作
规格为
如果供应商的排版需要加空白页 请加在最后
:
1. PANTONEBLACKC
2.
3. A4
4. ,
105G双铜
6710003314
Page 2

Page 3

This manual contains Safety Instructions,
Operating Instructions, Installation
Instructions and Hints and Tips.
Carefully read it before using the
dishwasher. It will help you to use and
maintain the dishwasher properly.
..................1
ControlPanel........................2
Dishwasher Features . . . . . . . . . . . . . . . . . 2
WashCycleTable.................... 3
TurningOntheAppliance..............3
Salt................................4
Detergent...........................5
RinseAid.............. ............. 6
Loading the Dishwasher Rack . . . . . . . . 7-8
FilteringSystem.....................10
CaringfortheDishwasher.............11
AboutElectricityconnection.......... 12
Before calling f or service. . . . . . . . . . 14,15
Faultcodes.........................16
Congratulatio ns on the purchase of your new Matsui Dishwasher.
Before commencing the installation and set up, please check that
you have all the items and familarise yourself with this Instruction
Manual.
Congratulations
Page 4
11
This appliance must be earthed. In the event
of a malfunction or breakdown, earthing will
reduce the risk of electric shock by providing a
path of least resistance for electric current. This
appliance is equipped with a cord having an
equipment-earthing conductor and an earthing
plug. The plug must be plugged into an appropriate
outlet that is installed and earthed in accordance
with all local standard and requirements.
Improper connection of the equipmentearthing conductor can result in a risk
of electric shock. Check with a qualified
electrician or service representative if you
are in doubt whether the appliance is
properly earthed. Do not modify the plug
provided with the appliance. If the plug
does not fit properly to the outlet, please
have a qualified electrician to install a
proper outlet.
Keep children away from detergent and rinse aid, keep
children away from the open door of the dishwasher,
there could still be some detergent left inside.
Do not abuse, sit on, or stand on the door or dish
rack of the dishwasher.
Do not wash plastic items unless they are marked
dishwasher safe or the equivalent. For plastic
items n
ot so marked, check the manufacturer's
recommendations.
Use only detergentand rinse additives designed
for an automatic dishwasher. Never use soap,
laundry detergent, or hand washing detergent
in your dis hwasher. Keep these products out of
the reach of children.
During installation, the power supply cord must not
be excessively or dangerously bent or flattened.
The door should not be left in the open position
since this could presenta tripping hazard.
Do not tamper with controls.
Do not place any heavy objects on the door
when it is open. The appliance could tip forward.
When loading items to be washed:
1) Locate sharp items so that they are not likely to
damage the door seal;
2) Warning: Knives and other utensils with sharp
points must be loaded inthe basket with their
points down or placed ina horizontal position.
If the supply cord is damaged, it must be replaced
by the manufacturer or its service agent or a
similarly qualified person in order to avoid a
hazard.
Pleasedispose of packing materials properly.
Use the dishwasher only for its intended function.
Remove the door to the washing compartment when
removing an old dishwasher from service or discarding it.
Dishwasher detergents are strongly alkaline, they
can be extremely dangerousif swallowed. Avoid
contact with skin and eyes and keep childrenaway
from the dishwasher when the door is open.
Check that the detergent receptacle is empty after
completion of the wash cycle.
Other means for disconnection from the supply
must be incorporated in the fixed wiring with at
least 3mm contact separation in all poles.
The appliance is to be connected to the water mains
using new hose sets. Oldhose-sets should not be
reused.
The maximumnumber of place settings to be washed
is 12.
The maximum permissible inlet waterpressureis 1Mpa.
The minimum permissible inlet water pressure is 0.04Mpa.
Do not operate your dishwasher unless all
enclosure panels are properly in place. Open
the door very carefully if the dishwasher is
operating, there is a risk of water squirting out.
This appliance is not intended for use by persons
(including children) with reduced physical, sensory
or mental capabilities, or lack of experience and
knowledge, unless they have been given supervision
or instruction concerning use of the appliance by a
person responsible for their safety.
Children should be supervised to ensure that they
do not play with the appliance.
If the supply cord is damaged, it must be
replaced by the manufacturer, its service agent,
or similarlyqualified persons in order to avoid
a hazard.
Page 5
To get the best performance from your dishwasher, read all operating instructions before using it for the
first time.
2
11
12
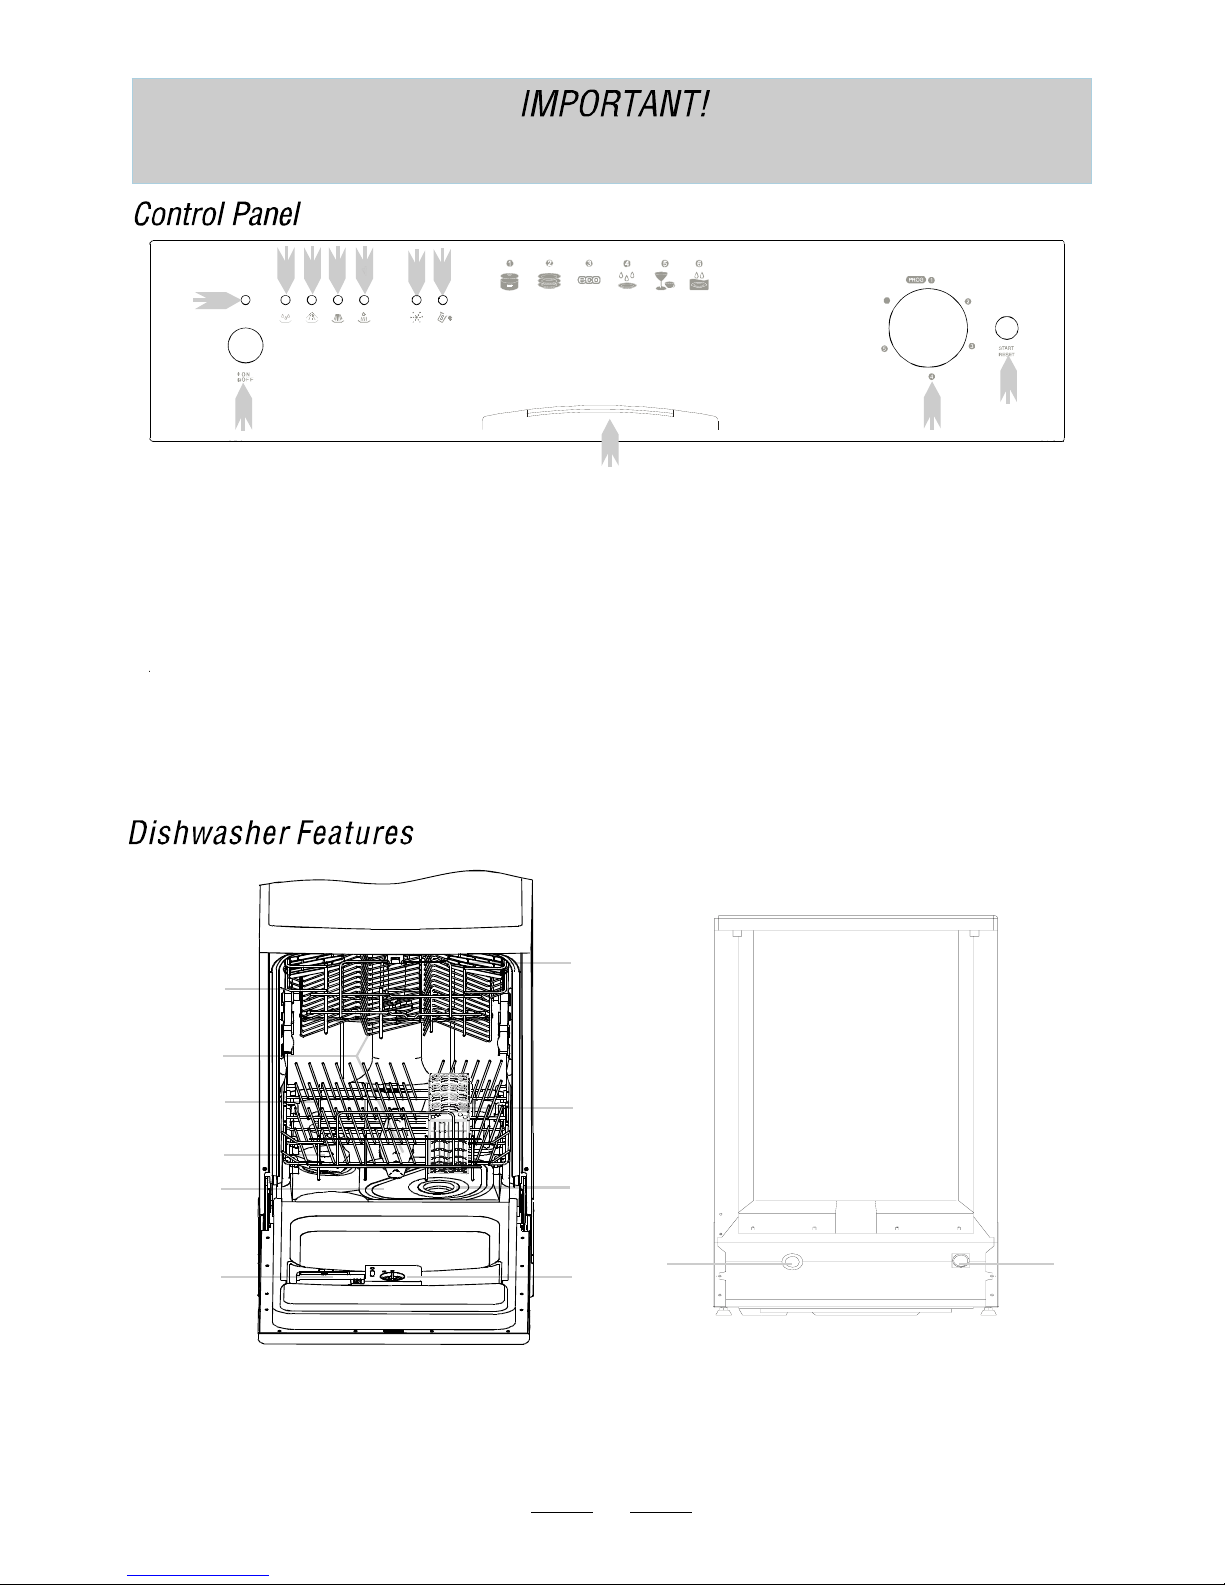
9 Power Light : when the dishwasher is
power o n.
To illuminate
10 Salt Warning Light : when the softener
needs refilling.
To illuminate
11 Rinse Aid Warning Light :To illuminate when the
rinse aid dispenser needs refilling.
7 Washing Program Selector: Turn the dial clockwise
to select washing cycles.
1 Pre-rinse light: pre-rinse.
To
illuminate when
2 Wash light: wash.
To
illuminate when
3 Rinse light: rinse.
To
illuminate when
4 Drying light: drying.
To
illuminate when
5 Door Handle: To open the door.
6 Start / Reset Button: To start or pause the
dishwasher, the one of four program lights will
when start.
illuminate
8 ON/OFF Button: To turn ON/OFF the dishwasher.
see the section entitled "change a program".Please
21
10
11
6
5
8
9
7
43
RINSESTRONG NORMAL ECONOMY RAPID SOAK
6
1
2
3
4
5
6
7
8
9
10
Upper Rack
Spray Arms
Lower Rack
SaltReservoir
Detergent Dispenser
Cutlery BasketMain Filter
CupShelf
5
6
7
8
Rinse Aid Reservoir
Coarse Filter
Drain hose connector
Inlet hose connector
9
10
12
11
3
2
14
NOTE:
This model features an unique washing program memory
system. The current wash program will not be cancelled
despite disconnecting the dishwasher from the mains power.
Page 6
3
Pots, plates, glasses and
lightly soiled pans.
Normallysoiled.
Pre-wash
-wash
Wash(47 ℃)
Rinse (70 ℃)
Drying
Pre
Pots, plates, casserole dishes.
Dishes that havebeen sitting
with dried food on them for
awhile.
Plates. glasses, and bowls.
Lightly soiled.
Normal
Strong
Economy
Main wash(25 g)
Pre-wash
-wash( 0℃
Wash(50 ℃)
Rinse
Rinse (70 ℃)
Drying
Pre 5 )
Wash (40 ℃)
Rinse (60 ℃)
Drying
Wash (45 ℃)
Rinse (70 )
Drying
℃
Normal W ash
(EN 50242)
For dishes that need to be
rinsed and dried only.
Rinse
To rinse dishes that you plan
to wash later that day.
Soak
Pre-wash
Ashorterwashforlightly
soiled loads that do not
needdrying.
Rapid
Wash (40 ℃)
Rinse (55 ℃)
Rinse
Pre-wash(5 g)
Main wash(25 g)
Pre-wash(5 g)
Main wash(25 g)
Main wash(25 g)
Main wash(20 g)
X
X
X
4
Insert the mainsplug into the mains socket.
The mains supply is 220-240VAC 50Hz. Make sure that
the water supply is turned on to full pressure.
1
Pull out the lower and upper racks, load the dishes and
push the racks back. It is recommended to load the lower
rack first, then the upper one.
3
Make sure the door is properly.closed
Pour in the detergent (see the sections for Salt, Detergent
and Rinse Aid ).
5
6
7
8
Press the ON/OFF button.
Press the button to start washing cycle.
Start/Reset
Press ON/OFF button again to turn off the dishwasher
when the washing cycle is completed.
Select your desired wash program by turning the dial
to the respective washing cycle.
2
Select Rapid programme. Run the dishwasher for the firsttime without any detergent or dishes to rinse out any residue or moisture.
Water is p our into the Dishwasher to perform testing at the time of shi pment from the factory, so there may be drops of water
or condensation in the appliance. This is not an indication of a malfunction.
If all the lights are blinking, the machine is out of order. Please turn off the dishwasher, disconnect it from the mains power
and disconnect it from the water inlet. Call a qualified technician.
Page 7

4
Please follow the steps below to pour the salt into the salt reservoir.It must be set to correspond with the water
hardness level in your area.
If the water in your area is hard, deposits will form on your dishes and utensils. This appliance contains a salt reservoir for
you to reduce the hardness of water.
1. The salt warning light will illuminate when the reservoir is running out of salt
and requires re-filling.
2. The salt warning light will cease to illuminate within a few days depending on
how quickly the salt dissolves.
3. Be careful not to overfill the reservoir. Wipe up any spills.
Fig 1 Fig 2
1. Remove the lower basket and unscrew the reservoir cap. (Fig 1)
2. Fill the reservoir with approximately 500ml of water (first use only).
3. Place the funnel provided over the salt reservoir. (Fig 2)
4. Place approximately 1.2kg of salt depending on the brand used.
5. Clean any excess salt from around the reservoir opening and then
screw thecap on firmly.
6. Run the rapid wash programme immediately (without any crockery in
the dishwasher) to removeany traces of salt from the compartment.
1. Open the door slightly to check if the unit has dispensed of
the detergent or detergent tablet. This will depend on how
long the washing cycle was running for.
2. If the detergent dispenser lid is opened, we suggest you
to allow the wash cycle to finish.
3. If the detergent dispenser lid is still closed,press
Start/Reset button for more than 3 seconds. This will cancel
the current programme.
4. Close the dishwasher door and re-select the washing
program by turning the program dial.
5. Press Start/Reset button again to start washing.
Please follow the steps below to change the wash programme
once the washing cycle has already started.
The controlpanelshowsthestatus of thedishwasher.
a) All the program lights are off when the unit is on stand by
mode.
b) When the Program light is on but not blinking, the unit is
on pause.
c) When the Program light is blinking, the unit is running.
NOTE: If you open the dishwasher's doo r during the washing
cycle and then close it, the dishwasher will continue the
current washing programme after 10 seconds. However, if the
door is not closed correctly after 1 minute, the dishwasher will
make an audible sound at 1 minute intervals.
Page 8

5
dH
mmol/l
0~140~8 0~1.4
/
0
/
14~398~22 1.4~3.9
-
20 60
39~8022~45 3.9~8
Mid
40 30
>80>45 >8
+
60 20
fH
0~10
10~28
28~56
>56
Clark
WATER HARDNESS
Selector Position
Salt consumption
(gram/cycle)
Auto nomy
(cycles/ 1.2k gs)
1°dh(German degree) = 1.25mmol /l
1°fh(French degree) = 0.1788mmol/l
1°clark(British degree) = 1.78mmol/l
Only use detergents specifically designed for use in dishwashers. No countertopdetergentor bleach can be used.
To be more environmentallyfriendly, please use no more than the correctamount of detergent.
Dishwasher detergent and detergent tablet are irritants.
Please keep out of the reach of children.
-Irritatingtoeyes.
- Avoid contact with eyes. In case of contact with eyes,
rinse immediately with plenty of water and seek medical
advice.
- If swallowed, seek medical advice immediately.
Pre-wash
detergent
chamber
Main wash
detergent
chamber
Adding the detergent or detergent tablet
Please follow the steps below to fill the detergent dispenser.
1. Push the button on the lid of the detergent dispenser in the
direction of the arrow until the flap springs open.
2. Fill the detergent dispenser with detergent powder or insert
the detergent tablet. The markings indicates the dosing level.
TIP: You can choose to add a detergent tablet alone or to add
detergent power to both main wash detergent chamber and
the pre-wash detergentchamber for your selected wash cycle.
1. All programmeswith prewash need an additional detergent
dosage (please refer to the wash cycle table)that must be
placed in the pre-wash detergent chamber. This detergent will
take effect during the pre-wash phase.
2. Close the lid firmly so that it clicks into place.
1. Remove the lower basketand unscrew the reservoir cap.
2. There is an arrow shaped indicatorin thereservoir, which allows youto turn.
You may turn it to the "-" or "+" settings based on the water hardness in your area.
It is recommended that adjustments should be made in accordance with the foll ow in g chart.
To optimise and customise the level of salt consumption, please follow the steps below to adjust the salt consumption.
Page 9

6
If there is no rinse aid warning light in the control panel, you can judge the amount of rinse aid by the following means. The
black dot on the rinse aid dispenser indicates the amount of rinse aid in the dispenser. As the rinse aid diminishes, the size of
the black dot decreases. You should never let the rinse aid get below 1 / 4 full.
As the rinse aid diminishes, the size of the black dot on the rinse
aid level indicator changes, as illustrated below.
Full
3/4full
1/2full
1 / 4 full - Should refill to eliminate spotting
Emp ty
The rinse aid reservoir has 6 settings. Both the recommended setting and the factory settingis "4."
If the dishes are not drying properly or are spotted, adjust the dial to the next higher number until
your dishes are spot-free.
Rinse aid helps to ensure water does not cling and leave marks on
crockery during the drying phase and helps crockery to dry faster after
it has been washed. Only pour rinse aid that is for domestic dishwashers
into the reservoir. This model is designed to use liquid rinse aids only.
Please follow the steps below to pour the rinse aid into the storage
reservoir, and the amount will dispense automatically.
1. Turn the cap and open as indicated in Fig 1.
2. When the cap open marking is aligned, you may lift the cap up.
3. Pour in the rinse aid until the level indicator turns completely black
in colour and close the cap.
Be careful not to overfill the reservoir. Wipe up any spills. The
approximate volume of the rinse aid reservoir is 110ml.
NOTE: If the water hardness in your area is soft, you may not need to
use rinse aid as it may cause white film to develop on your dishes.
Rinse aid warning light will illuminate when the reservoir is running
out of rinse aid and requires re-filling.
Alternatively, you can judge the amount of rinse aid by checking the
rinse aid indicator right next to the reservoir's cap. Whenthe
indicator is black, it means it is full. When it is clear, it means it is
almost empty.
Fig1
Fig3
Fig2
Page 10

7
Scrape off anylarge amounts of left-over food. It is not necessary to rinse the dishes underrunning water.
Place objects in the dishwashe r in the following way:
1.Items such ascups, glasses, pots/pans, etc. are placed upside down.
2.Curve items, or those with recesses, should be at a slant so that water can run off.
3.They are stacked securely and cannot tip over.
4.Theydo not prevent thespray arms from rotating while washing takes place.
Very small items should not be washed in the dishwasher as they could easily fall out ofthe rack.
Removing the dishes
To prevent water dripping from the upper onto the dishes in the lower , we suggest that you empty the lower
first and then the upper .
rack rack rack
rack
The upper is designed to hold more delicate and lighter dishware such as glasses, coffee and tea cup and saucers, as
well as plates, small bowls and shallow pans(aslong as they are not too dirty).
Position the dishes and cookware so that they will not get moved by the spray of water.
The height of the upper can be adjusted by increasing/decreasing the heightofthewheelsalongtherails.
For the placement method of the upper , please refer to the illustrations in "Adjusting the Upper R " section.
rack
rack
rack ack
The height of the upper rack can be adjusted in order to create more space for largeutensilsbothforthe upper/ lower rack.
The upper rack can be adjusted for height by placing the wheelson different height of the rails.
Long items, serving cutlery, s alad servers and knives should be placed on t he shelf so that they do not obstruct the rotationof the
spray arms.The shelf can be folded back or removed when not required for use.
1
Cups
2
Small serving bowl
3
Large serving bowl
4
Glasses
Saucers
5
6
Dish
Dessert dishes
7
1
1
4
1
7
2
3
5
6
1
4
1
4
1
Page 11

8
Ovalplatter
10
Soup plates
Dessert dishes
7
9
Dinner plates
11
Silverware basket
1010
8
99
77
7
8
We suggest that you place large and difficult to clean items into the lower : such as pots, pans, lids, serving dishes
and bowls, asshown in the figure below.
It is preferable to placeserving dishes and lids on the side of the in order to avoid blocking the rotati on of the
top spray arm.
rack
rac k
Pots, serving bowls, etc, must always be placed upside down.
Deep pots should be slanted to allow water to flow out.
The bottom so that larger or more pots and pans can be loaded.
features folding spikes
Please note:
For better stacking of pots and pans, the spikes can be folded down as picturebelow.
● Items such as cups, glasses, pots, pans, and etc. should stand upside down.
● Curved items or those with recesses should be at a slant so that water can runoff.
● Please stack your dishes securely and ensure they will not tip over.
● Ensure your dishes will not prevent the spray arms from rotating while washing takes place.
● Very small items should not be washed in the dishwasher as they could easily fall out of the rack.
Page 12

9
Wooden cutlery and utensils-these will leach out and become unsightly.
Sensitiveornamental glasses, craft utensil and vases, special antique or irretrievable utensils. These ornaments are not
dishwasher-proof.
Plastic parts sensitive to hot water.
Copper and tin utensils.
Utensils which are soiled with ash, wax, lubricating grease or ink.
Absorbent materials such as sponges and cloths.
Aluminium and silver parts have a tendency to discolour and fade during the wash cycle. Even some types of glass may turn
cloudy after many wash cycles.
Consider buying utensilswhichare identified as dishwasher-proof.
Possible causes:
Type of glass or manufacturing process.
Chemicalcompositionof detergent.
Water temperature and duration of dishwasher programme.
Suggestions:
Use glassware or porcelain dishes that have been marked 'dishwasher-proof' by the manufacturer .
Use a mild detergent that is described as 'kindto dishes'. If necessary, seek further information from detergent manufacturers.
For particular items, select a low temperature programme.
To prevent damage, take glass and cutleryout of the dishwasher as soon as possible after the programme has ended.
When the working cycle has finished, a tone will sound for for 8 seconds. Turnofftheappliance
by pressing the ON/OFF button and openthe door of the dishwasher. Wait a few minutes before
unloading the dishwasher to avoid handling the dishes and utensils while they are still hot and
more susceptible to breakage. They will also dry better.
6
Cutlery should be placed in the cutlery basket with handles at the bottom. If the rack has side baskets, the spoon should
be loaded individually into the appropriate slots, especially long utensils should be placed in the horizontal position at the
front of the basket as shown.
Teaspoons
4
Soup spoons
2
Forks
1
Serving forks
8
Serving spoons
6
Knives
5
3
Dessert spoons
7
Gravy ladles
Do not let any item extend
through bottom.
2
4
525
32
3
2
1
1
1
1
1
555
4
5554
632367
3
2
3
4
555
1
1
1
1
1
5
4
2
2
3
33
33
2
2
3
2
2
1
4
4
4
4
8
4
4
4
1
Page 13

10
The filter prevent larger remnants of food or other objects from getting inside the pump. This residue can
occasionally clog up the filters.
The filter system consists of a coarse filter,a flat (Main filter)
And a microfilter(Fine filter).
Main filter
Food and soil particles trapped by this filter are pulverized by a
special jet on the lower spray arm and washed down the
drain.
Coarse filter
Larger items, such as pieces of bone or glass, that could clog
the drain are trapped in the coarse filter. To remove an item
caught in this filter, gently squeeze the taps on the top of this
filter and lift it out.
Fine filter
This filter holds food residue in the sump area and prevents it
from being redeposited on the dishes during a cycle.
- Inspect the filters for obstructions every time the dishwasher has been used.
- By unscrewing the coarse filter, you can remove the filter system. Remove any food remnants and clean the
filters under running water.
2
3
1
2
3
step1:Unscrew the C
,
and then gently lift it up
oarse filter
step2:Gently lift the Main filter up
step 3: Gently lift the Fine filter up
NOTE:
1
To install the filter system back, please do the following:
1. Gently insert the Fine filter back to the Filtering System.
2. Gently insert the Main Filterback to the Filtering System.
3. Gently insert the Coarse Filter back to the Filtering System, and screw back the Filter Cylinder securely.
1
2
3
Page 14

11
If your dishwasher is left in an unheated place over the winter, ask a service technician to:
Cut off electrical power to the dishwasher.
Turn off the water supp ly and disconnect the water
inlet pipe from the water valve.
Drain water from the inlet and water valve.pipe
(Use a pan to catch the water.)
Reconnect the water inlet to the
water valve.
pipe
Remove the filter in the tub the bottom
and use a sponge to soak up water
in sump.
5
4
3
2
1
Never use a spray cleaner to clean the door panel as it may damage the door lock andelectrical components.
Abrasive agents or some paper towelshouldnot be used because of the risk of scratching or leaving spots on the
stainless steel surface.
To clean the edge around the door, you should use only a soft warm, damp cloth.Toavoid
penetration of water into the door lock and electrical components, do not use a spray cleaner
of any kind.
Also, never use abrasive cleaners or scouring pads on the outer surfaces because they will
scratch the finishing. Some paper towels may also scratch or leave marks on the surface.
After every wash, turn off the water supply to the
appliance and leave the door slightly open so th at
moisture andodours are not trapped inside.
Before cleaning or performing maintenance, always
remove the mains plug from the mains socket.
To clean the exterior and rubber parts of the dishwasher,
do not use solvents or abrasivecleaningproducts.
Only use a cloth with warm soapy water.
To remove spotsor stains fromthesurface of the
interior, use a cloth dampenedwith water with a little
white vinegar, or a cleaning product m ade spe cifically
for dishwashers.
It is recommended that you run a wash cycle with the
dishwasher empty and then remove the plug from the
mains socket, turn off the water supply and leave the
door of the appliance slightly open. This will help the
door seals tolast longer and prevent odoursfrom
forming within the appliance.
If the appliance must be moved, try to keep it in the vertical
position. If absolutely necessary, it can be positioned on
its back.
One of the factors that cause odors to form in the
dishwasher is food that remains trapped in the seals.
Periodicallyclean the seals with a damp sponge to prevent
this from occurring.
It is necessary to clean the spray arms regularly for hard water chemicals will clog the spray arm jets and bearings.
To remove the upper spray arm, screw off the nut clockwise then remove
the arm.
Remove the upper spray arm
To removethe lower spray arm, pull out .thespray arm upward
Remove the lower spray arm
Wash the arms
Wash the arms in soapy and warm water and use a soft brush to clean
the jets. Replace them after rinsing them thoroughly.
Page 15

12
Please see the rating label to know the rating voltage and connect the dishwasher to the appropriate power supply. Use required
fuse 13 amp. Fused electrical supply is required-copper wire only. Time delay fuse or circuit breaker recommended and provide
separate circuit serving only this appliance. Outlet should be placed in adjacent cabinet.
Ensurethe voltage and frequency of the power beingused correspond to thoseon
the rating plate.Only insert the plug into an electrical socket which is earthed properly. If the
electrical socket to which the appliance must be connected is not appropriate for the ,
replace the socket, rather than using a adaptors or the like as they could cause overheating
and burns.
plug
For all the built-in models and some free standing models(when you take off the top board and
put the unit into the cabinet), a condensation strip must be fitted to the underside of the worktop
above your dishwasher to protect it against any moisture. Its purpose is to deflect steam rising from
your appliance to protect your worktop's underside.
•
•
•
•
The strip is located inside your dishwasher.
Ensure the surface is clean prior to sticking to
underside of the worktop.
Separate the backing paper from the strip.
Stick to the underside of the worktop.
Note: Failure to attach strip could result in damage to the underside of your work surface!
Connect the coldwater supply hose to a threaded 3/4(inch) connector and make surethat it is
fastened tightly in place.
If the water pipes are new or have not been used for an extended period of time, let the water
runs to make sure that the water is clear and free of impurities. If this precaution is not taken,
there is a risk that the water inlet can get blockedand damage theappliance.
The water supply to the appliance can also be connected to the house hot waterline
( system, heating system), as long as it does not exceed a temperature of 60 C.
In this case, the wash cycle time will be shortened by about 15 minutes and thewash
efficiency slightly reduced.
The connection must be made to the hot water line following the same procedures as those
for the connection to the cold water line.
centralised
Connector of ModelⅡ
Condensation strip
Page 16

Position the appliance in the desired location. The back should rest against the wall behind it, and the sides, along the adjacent
cabinets or wall. The dishwasher is equipped with water supply and drain hoses that canbe positioned to the right or the left to
facilitate proper installation.
Once the dishwasher is positioned, adjustthe screws at the bottom of the dishwasher to
level and to adjust the height of theappliance.
The appliance should not be inclined more than 2 .
13
Insert the drain hose pipe with a minimum diameter of 4 cm, or let it run into the
Use the
The free end of the hose must be at a height between 40 and 100cm and must not be immersed in water.
to the drainage sink. Ensure the water inlet
and drain hoses are not kinked or squashed. U-shaped drain hose holder to secure your drain hose and to avoid bending.
φ4cm
If the sink is 100cm or higher from the floor, the excess water in hoses cannot be drained directly into the sink. It will be necessary to drain
excess water from hoses into a bowl or suitable container that is held outside and lower than the sink.
The waste pipe must only be connected to the foul drains and notthe surface water drainage system.
Page 17

Fuse blown, or the
circuit is disconnected
Replace fuse or reset circuit breaker. Remove any other
appliances sharing the same circuit with the dishwasher
Sound fro m sprayers and detergent cup op ening.
Utensils are not secure
in the baskets or something
small has droppe d into
the basket
Ensure ev erything is secured in the dishwasher.
Motor hums Dishwasher has not been used regularly. If you do not use it
often, remember to set it to fill and pump out every week,
which will help keep the seal moist.
Improper detergent
Spilled rinse agent Always wipe up rinse agent
spills immediately.
Detergent with
colorant was used
Make sure that the detergent used is without colorant.
Rinse agent dispenser
is empty
Make sure that the rinse agent dispenser is filled.
Improper program
Improper rack loading Make sure that the action of the detergent dispenser and
spray arms are not blocked by large dishware.
Extremely hard water
Low inlet
temperature
Overloading the
dishwasher
Improper loading
Old or damp powder
detergent
Empty rinse agent
dispenser
Incorrect dosage of
detergent
To remove spots from glassware:
Take out all metal utensils out of the dishwasher.
Do not add detergent.
Choose the longest cycle.
Start the dishwasher and allow it to run for about
18 to 22 minutes, then it will be in the main wash.
Open the door to pour 2 cups of white vinegar
into the bottom of the dishwasher.
Close the door and let the dishwa sher complete
the cycle. If the vinegar does not work: Repeat
as above, except use 1/4 cup (60 ml)of citric acid
crystals instead of vinegar.
Some audible sounds are
normal
'
Make sure the dishwasher is turned on and the door is
closed securely.
Check that the water supply is connected properly and
the water is turned on.
Make sure the power cord is properly plugged into the
mains socket.
Power supply is not
turned on
Water pressure is low
'
Overflow
The system is designed to detect an overflow. When it
does, it shuts off the circulation pump and turns on the
drain pump. Please contact a qualif ied technician for
assistant.
Select program with heavy cleaning option.
Use only the special dishwasher detergent to avoid suds.
If this occurs, open the dishwasher and let suds evaporate.
14
Page 18

Combination of soft
water and too much
detergent
Use less detergent if you have soft water and select a
shorter cycle to wash the glassware.
Tea or coffee stains Using a solution of 1/2 cup of bleach and 3 cups warm water
to remove th e stains by hand.
Iron deposits in water
can cause an overall film
You have to call a water softener company for a special filter.
Hard water minerals To clean the interior, use a damp sponge with dishwasher
detergent and wear rubber gloves. Never use any cleaner other
than dishwasher detergent for the risk of foaming or suds.
Dial is not in the
position
OFF
Turn the Dial to the
OFF position and slide the door latch to the
left.
Dishes block detergent
cups
Re-load the dishes properly.
Normal phenomenon
There is some steam coming through the vent by the door latch
during drying and water draining.
Aluminum utensils have
rubbed against dishes
Use a mild abrasive cleaner to eliminate those marks.
'
This is normal A small amount of clean water around the outlet on
the tub bottom at the back of the tub keeps the water
seal lubricated.
Be careful not to overfill the rinse aid dispenser.
Spilled rinse aid could cause oversudsing and lead
to overflowing. Wipe away any spills with a damp cloth.
Make sure the dishwasher is level.
Overfill dispenser or rinse
aid spills
Dishwasher isn t level
'
15
Page 19

RATED VOLTAGE: 230V / 50Hz RATED POWER: 1930W
A RATED ENERGY EFFICIENCY A RATED WASH PERFORMANCE
A RATED DRYING PERFORMANCE 12 PLACE SETTINGS
6 WASH PROGRAMMES TWO-SPRAY ARMS
ELECTRONIC CONTROL HEIGHT ADJUSTABLE UPPER BASKET
Drying light flicker
Rinse light flicker
Wash l ight flicker
Possible Causes
Remedy
* Water tap is not turned on.
* Low water pressure (<0.04MPa).
* Flow meter is broken.
* The wire termin al w hich conne ct the
flow meter is loosen.
* Drain hose kinked.
*Filterclogged.
* The tank is leaking
* The hose is leaking.
* The temperature sensor is broken.
* Heater element is broken.
* The wire terminal connected to the heater
is loosen.
* The wire terminal connected to the
temperature sensor is broken.
Turn on the water tap.
Turn on t he water tap and ensure full
opening position.
* Disconect from the mains.
* Disconnect the water inlet.
*CalltheService.
Check drain hose (see section'Drain
hose connection').
Clean thefilter (see section'Filtering
System').
* Disconect from the mains.
* Disconnect the water inlet.
*CalltheService.
This symbol on the product or in the instructions means that your electricalandelectronic
equipment should be disposed at the end of itslifeseparately from your household waste. There
are separate collection systems for recycling in the EU. For more information, please contact the
local authority or your retailer where you purchased the product.
16
DIMENSION: 600X580X820(MM)
Page 20

 Loading...