

Page 1

DTR3 A
Free to View Digital TV Receiver
(Note: Not suitable for subscription services)
Quick Start Guide
Important Notice:
Before unpacking this product further...
...did the Local Store check your postcode for reception?
Telephone number for your local store is on your till receipt, or visit
www.mastercare.co.uk
Should your store not be able to help, please check the following Website Links for
Digital Terrestrial signal coverage:
www.freeview.co.uk
www.dtg.org.uk/consumer
Please note: In order to receive quality digital signals you may need
an aerial upgrade.
There are 3 main reasons why you may need to upgrade your aerial:
1. Your current aerial and cabling may not be able to receive all the digital
channels due to their age and condition.
2. In your location the digital channels may be transmitted on a different
frequency to your existing analogue signals and you may need a different
type of aerial to receive them.
3. The new digital channels may be transmitted from a new transmitter and if
this is the case the aerial would have to be re-aligned. Alternatively you
could add a second aerial to your system.
For further information contact the digital helpline on:
08700 100 484
(open Mon-Fri 8.30-8, Sat 9-6, Sun 9-5.30)
all calls charged at National Rate
Page 2
Getting Started
Unpack your free to view digital receiver and check for the following accessories.
User Guide
Remote Control
2 x 1,5 V AAA Batteries
1. Disconnect the power to all your existing equipment.
2. Place the product in preferred position.
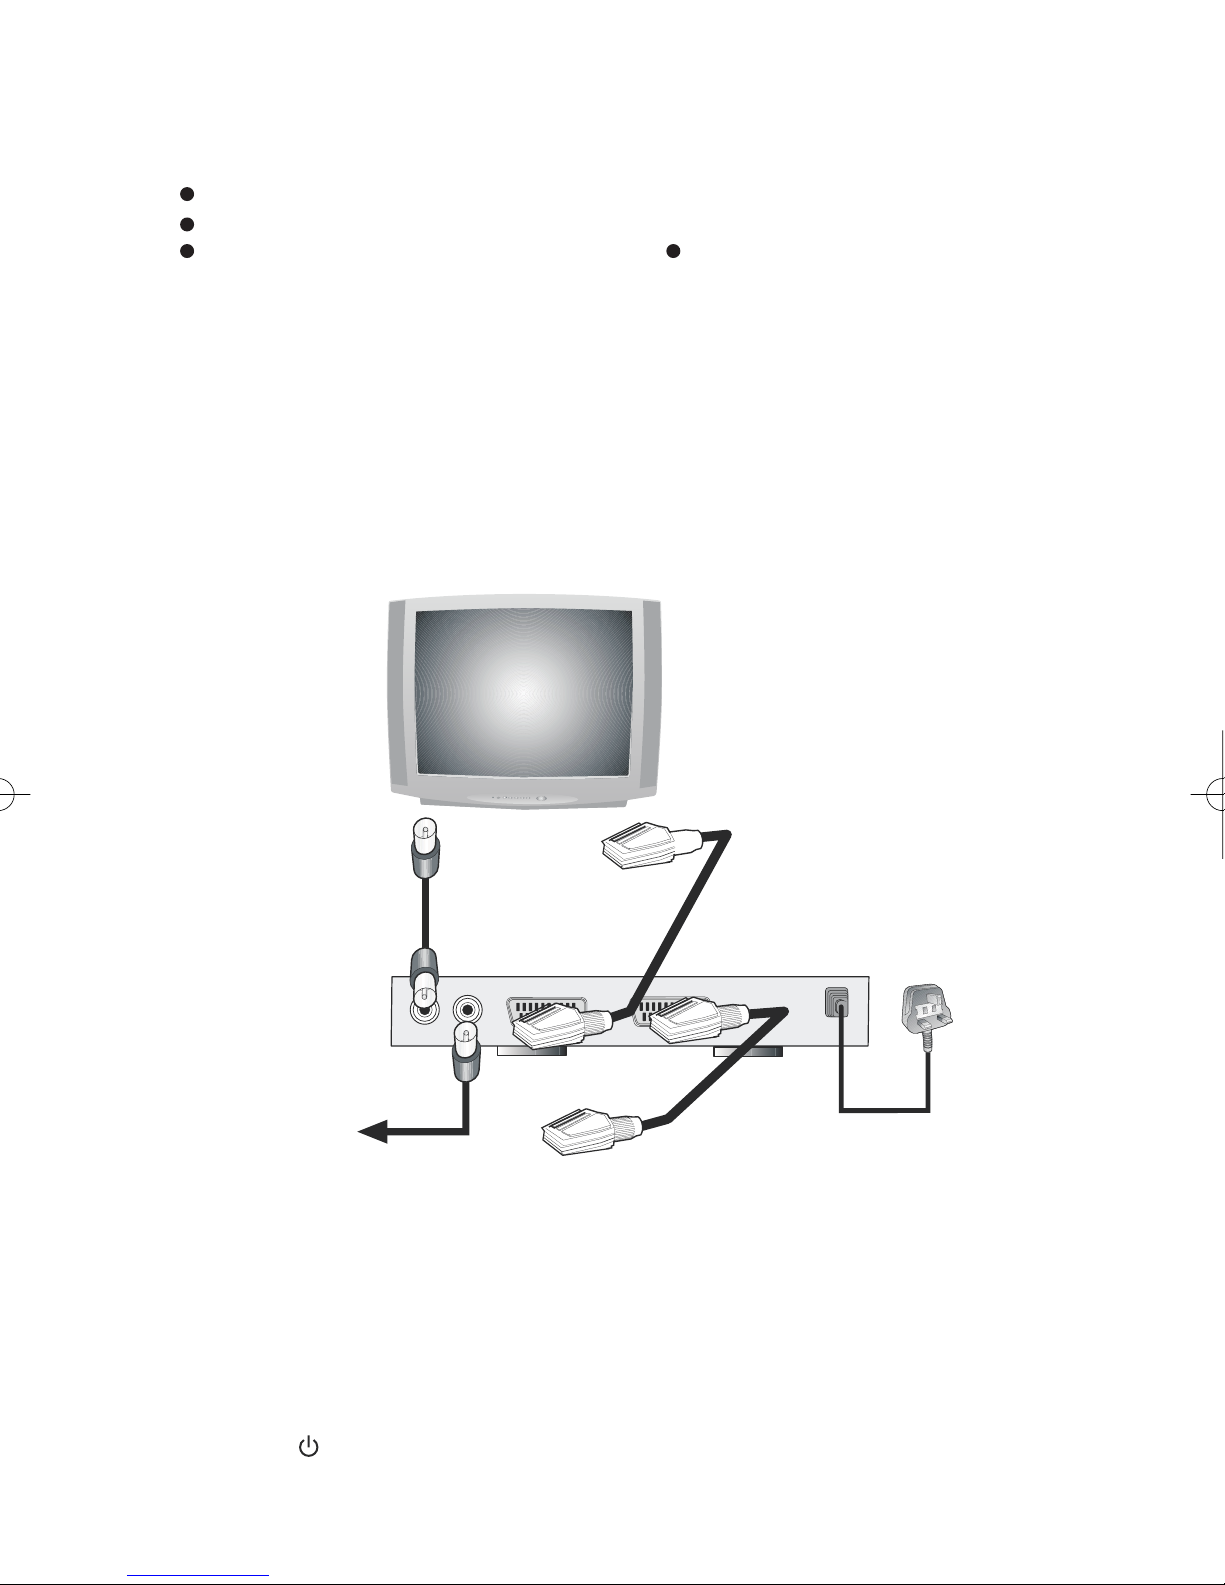
3. Connect all equipment as shown in the diagram below:
NOTES:
a) If you wish to connect to a VCR and/or DVD then please refer to the additional connection
diagrams shown in the main User Guide).
b) Both live and recorded digital terrestrial television programmes are watched at a lesser
quality via the TV aerial input only. To view via SCART, press the AV button on your TV
remote control.
(for remote control)
1 x RF (aerial) Lead
TV
aerial
IN
To TV aerial
TV
scart
IN
To VCR
SCART leads (not
supplied)
4. Insert the batteries into the remote control, making sure they are
positioned the correct way round.
5. Finally, once all the connections have been made, connect the power
and switch on all your equipment.
Switching on your Digital Receiver
The indicator on the front of the receiver will glow red.
Press the
STANDBY button on the Digital Receiver remote control. The
indicator light will now glow green.
Page 3

Tuning in (Note: You may need to press the AV button on your TV remote
control until you can see your receiver’s menus on your TV screen.)
Because this is the first time that the receiver has been used there are
no channels stored in the receiver’s memory.
If the menu below automatically appears, go straight to step 5...)
•
If the menu above does not appear on your TV screen...
•
1. Press the MENU button and the ‘Main Menu’ will appear.
2. Press button to highlight ‘Settings’ and press SELECT.
3. Press button to highlight ‘Installation’ and press SELECT.
4. Press button to highlight ‘First Time Installation’ and press SELECT.
5. You will be asked if you want to delete all channels and settings. Press the
/ buttons to highlight ‘Yes’ and press SELECT.
6. Press the / buttons on the remote contol to select the type of TV you
have connected to your Digital Receiver Choose between either 4:3
(standard) or 16:9 (widescreen) and then press SELECT to confirm.
7. The next menu will ask if you want to start the automatic search. Press
the / buttons to highlight ‘Yes’ and press SELECT.
8. Your Digital Receiver will now automatically search for all available
channels. Please be patient, this process will take a few minutes. When
completed, the first channel of the channel list is displayed and you can
now watch digital terrestrial television using the P+/P- buttons on your
remote control.
Reception Issues
If less than 10 channels are found, picture freezes, blanking out or blocking
•
occurs, please re-check all connections and repeat the automatic tuning
procedure.
Persistant problems with setting up your receiver could be caused by
•
incorrect signal levels. Your aerial system may need re-alignment or to be
upgraded. Contact your retailer for details. Alternatively you can call the
Digital Helpline on:
9-5.30, all calls charged at National Rate).
08700 100 484(open Mon-Fri 8.30-8, Sat 9-6, Sun
Page 4

ADDITIONAL INFORMATION:
REPEATED CHANNELS
Depending on the reception conditions in your particular area, you
may find that the list of channels found includes one or more
reapeated names. This is because the receiver may detect and store
some channels, including those it cannot receive clearly, from
adjacent areas alongside the strong channels from a transmitter
nearby.
This is not a problem and the weaker channels can be deleted from
the receiver later, as described in the ‘ADVANCED OPERATION Editing the channel list’ section of the main User Guide.
NO SIGNAL
If no digital terrestrial television broadcasts are found, the receiver will
display the following message:
If this happens refer to the Troubleshooting Guide at the back of the
main User Guide.
STANDBY
When you have finished watching digital terrestrial TV, you may wish
to save power and switch the receiver to standby by pressing the
STANDBY button on the Digital Receiver remote control.
Notes: Although your Digital Receiver can remain powered up continuously
(even when the TV is turned off) without harm to the television or itself, we
recommend you turn it off at the mains overnight or when your receiver is not
going to be used for long periods of time. This will save energy (and your
money). You will not have to re-install the receiver when it is turned on again.
Please be aware that when the receiver is switched off at the mains you will
not be able to receive any ‘over air downloads’ however these only occur
rarely and you can easily download them manually. For further instructions
please see main User Guide.
 Loading...