

Page 1

DIGITAL AUDIO PLAYER
MAT 101MR/102MR/105MR/110MR/120MR
INSTRUCTION MANUAL
Page 2

1
Attention : if the player is used for illegally copying or distributing the software and music
that are protected by intellectual property rights, the user must take all legal responsibility
for such actions .
The manufacturer importer or dealer cannot be held responsible for accidental damage due
to inappropriate use of the player.
Safety Warning
● Do read the operating instructions before you attempt to use the equipment.
● Do ensure that all electrical connections (including the mains plug, extension leads and
inter-connections between the pieces of equipment) are properly made and in accordance
with the manufacturers instructions.
● Do consult your dealer if you are ever in doubt about the installation, operation or safety of
your equipment.
● Don't remove any fixed covers as this may expose dangerous voltages.
● Don't obstruct the ventilation openings of the equipment with items such as newspapers,
tablecloths,curtains,etc.Overheating will cause damage and shorten the life of the equipment.
● Don't allow electrical equipment to be exposed to dripping or splashing, or objects filled
with liquids, such as vases, to be placed on the equipment.
● Don't place hot objects or naked flame sources such as lighted candles or nightlights on,
or close to equipment. High temperatures can melt plastic and lead to fires.
● Don't continue to operate the equipment if you are in any doubt about it working normally,
or if it is damaged in any way-switch off, withdraw the mains plug and consult our dealer.
● Don't use equipment so that you are distracted from the requirements of traffic safety.
Page 3

2
Content
Controls ………………………………………………………………………………. 4
Player …………………………………………………………………………………..5
The MP3 player supports lyric files in LRC format ………………………………..5
Power On & Power off ………………………………………………………………..6
Main menu ……………………………………………………………………………..7
Music …………………………………………………………………………………...7
1. Play list……………………………………………………………………………7
2. Enter ……………………………………………………………….. ……………7
3. Modes switch ……………………………………………………………….. …..8
4. Tracks select ……………………………………………………………….. …...8
5. Control Menu at playing, pause mode …………………………………………8
Volume ……………………………………………………………………………9
Loop ……………………………………………………………………………….9
A-B loop …………………………………………………………………………..9
Sound effect mode ……………………………………………………………....9
File Delete …………………………………………………………………..……10
Delete all ……………………………………………………………………..….10
6. Control Menu at stop mode ………………………………………………….....11
Record ………………………………………………………………………………....11
1. Start recording ………………………………………………………………..…11
2. File Types ………………………………………………………………………..11
3. Pause ……………………………………………………………….. …………..12
Play ………………………………………………………………………………...…..12
1. Play ……………………………………………………………………………….12
2. Control Menu under playing, pause mode ……………………………………13
3. Control Menu at stop mode ………………………………………………..….12
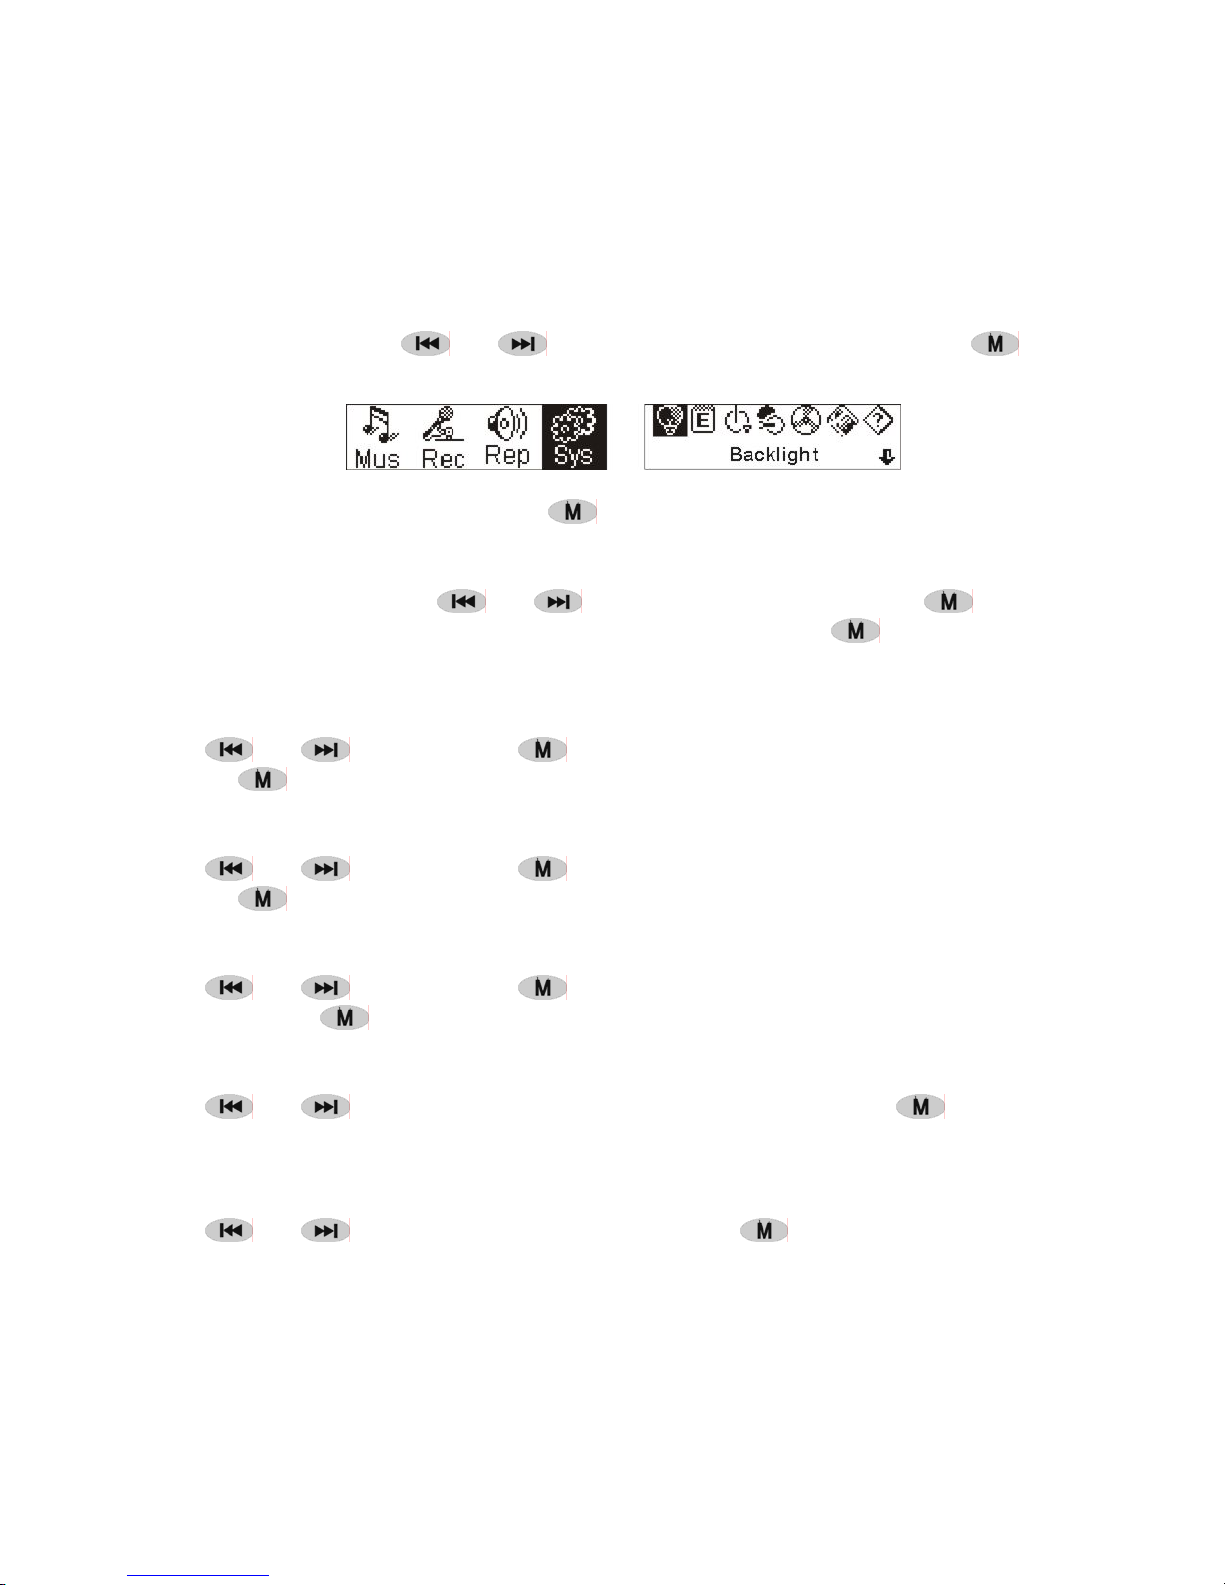
System …………………………………………………………………………….…. .13
1. Enter ……………………………………………………………………………...13
2. Select & enter each options ………………………………………………….. 13
Time of recording …………………………………………………………….…13
Backlight time ……………………………………………………………….…..13
Languages ……………………………………………………………………... 13
Page 4

3
Power off setting ………………………………………………………………... 13
Contrast ………………………………………………………………………….. 13
Record file types ………………………………………………………………… 13
Storage ……………………………………………………………………….. .... 14
Firmware vision …………………………………………………………………. 14
USB disk ……………………………………………………………………………..… 14
Software upgrading ………………………………………………………………….... 14
Disconnecting from the PC ………………………………………………………..…. 17
DRM……………………………………………………………………………………… 18
Trouble shooting and specifications ……………………………………………….... 21
Page 5

4
● Controls
1.
Volume up:Press to increase the volume during playback.
2.
Volume down: Press to decrease the volume during playback.
3.
Record
4.
Play/Power on/Power off
5.
FFWD/Next
6.
Rew/Last
7.
Menu: Enter the selected submenu or return to the main menu
8.
Lock: Lock or unlock the keys.
Page 6

5
● Player
Lyric display
This player supports LRC files to display the lyrics with the music(MP3 files only).
The icon
will change to if the song has a LRC file.
The MP3 player supports lyric files in LRC format.
1. Prepare a MP3 or WMA music, for example, happymusic.mp3.
2. Download a lyric file from internet. The lyric file must have to be with an extension file
name LRC. For example, happymusic-2004.lrc.
How to know the lyric file exists or not?
Page 7

6
3. Rename the lyric file. For example, happymusic.lrc. It is to make sure the lyric
filename is same as the corrosponding music filename.
4. Copy the lyric file & music file to the MP3 player.
5. Disconnect the MP3 player.
6. Use Skip buttons to select the music file, for example, adc.mp3. Press play button to play.
7. The LRC icon would appears, and the lyric would display Synchronously on OLED
while the music is being playback.
Note: The MP3 player supports LRC format only.
Note: If the lyric does not synchronize with the music, please download one better lyric
file from internet and try again.
Note: Make sure the MP3 music and LRC file is located in same directory and the
filename is same. If not, the MP3 player can not recognize the lyric file.
Power Display
Indicates the power is full at 1.5v; indicates the power is decreasing;
indicates you need replace the battery immediately.
● Power on/Power off
Power on: Turn power on by pressing
. A welcome picture is displayed on LCD, as:
Notice: Music mode is the default mode after power on action.
Power off: To power off press and hold
. A strip is displayed on LCD, as:
Release the key when the strip is full.
Notice: Power off action is invalid while recording.
Page 8

7
● Main Menu
To enter the main menu press and hold
or press briefly while recording.
Music Recording Play System
● Music
1. Play list
Choose “Music” in the menu to enter the folder.
Play list information, As the picture under.
Press / to select 4 mode: Play all,Artist, Album, Songs,.
Four mode:
Play all
Play all songs starting from “Artist” type, then”Album”, then”Songs”
Artist
Songs in the selected artist list
Album
Songs in the selected album list
Songs
Songs in the selected ID3 list
Exit Exit play list menu
2. Enter
To select 'Music' by pressing
or at main menu then press .
Music Recording Play System
The music file exists, the display shows as:
The submenu “play all” under “Artist””Album””Songs” mode :
Enter “Artist””Album””Songs” mode and press / to select one ,and then press “menu ”to
enter “play all” , the unit will play all songs which sorted out according to filter orders of each mode.
Page 9

8
No music file exists, the display shows as
To return to menu mode press and hold .
Notice:After power on action,the music mode is the default mode.
3. Modes switch
While stop or pause , press
to play.
Stop mode Pause mode
Playing mode
Press
to pause while playing
4. Tracks select:
While stop, pause or playing, press
for last track, press for next track;
press and hold
for FF, press and hold for REW.
While stop, press
to play the selected track.
While pause , the selected track is played automatically .
5. Control Menu in playback or in pause mode
While playing or pause, press
to enter the Control Menu, as:
Press or to select the sub-menu and press to enter. Choose 'exit',
press
to exit the Control Menu and return to play mode.
Page 10

9
Volume
Enter the interface of 'Volume adjusting', press
or to adjust the volume.
Press
to return to Play mode.(Press and hold to return to the Main Menu.)
To change Volume value directly press or while playing.
Loop
Enter the interface of 'Loop 'mode, as the picture shows:
Six modes:
Normal Stop playing after the current file finished.
Rep one repeat playing a single music
Rep all repeat playing all the music
Random playing the music in current file folder randomly
Shuffle
playing the music in current file folder randomly. It will not stop if you are
not press the key.
Intro Play the first 15 seconds of all the music in current file folder
Press or to select the right mode. Press to return to the Playmode.
(Press and hold
to return to the Main Menu.)
A-B loop
Press
(A-B) to set a start point, then press the same key to set an end point in the
course of playing or recording. The machine will be in A-B mode and Start A-B play
track. Cancel it by pressing
(A-B) again.
Sound effect mode
Enter the interface of 'Sound effect mode', as the picture under:
Five kinds of sound effects can be chosen.Press or to select a mode.
Page 11

10
Normal,.Rock,Jazz,Clasic, .Pop,Press to return to the Playmode. (Press and hold
to return to the Main Menu.)
File Delete
Select the ' Delete the file', as the picture under:
Press
to enter the interface as the picture shows. (Press and hold to return
to the Main Menu.)
Press or to select'YES' or 'NO'. Choosing 'YES', press to ensure deleting
the selected file and then return to the Playmode. (It will not delete the file and return to
the Main Menu if you press and hold
.)
Choosing 'No', press
, the machine will not delete the selected current file and
then return to the Playmode.
Delete All
Note: Deleting files will only delete the MP3/WMA files the unit can find. It will not
delete the folder or files in folders that exceed the file limitation. To delete these
file/folders you will need to use Windows Explorer delete function.
Select the 'Delete All', as the picture under:
Press to enter the interface as the picture shows. (Press and hold to return to the
Main Menu.)
Page 12

11
Press or to select 'YES' or 'NO'. Choosing 'YES', press to start
deleting all files and then return to the Play mode. (Press and hold
to return to the
Main Menu.)
6. Control Menu at stop mode
Press
to enter the control menu at stop mode.
Not all control menu option will be available.To see all control menu option see
chapter 4.
● Record
1. Start recording
There are two ways to start recording.
A. Press
or key to select 'Record' in the Main Menu . As the picture under:
Press to start recording. As the picture under:
B. Press (A-B) to start recording directly from stop mode.
Press
to stop recording.
2. Record file types
There are two types of recording Optimized and Longest. Optimized is for general use
but has a larger file size, Longest is suitable for voice recording only.
Page 13

12
3. Pause
Press
(A-B) to pause recording:
Press (A-B) again to continue recording:
● Play recorded
To play the recorded files.
1. Play
Press
or to select 'Replay' in the Main Menu. Press to enter
replay mode.
There are recorded files stored in the machine.
Press
to play the recorded file, and press key again to pause . Press to
select the previous file, press and hold
for fast backwards. Press to select
the next file, press and hold
for fast forword.
Press and hold
to return to the Main Menu while of playing recorded files.
2. Control Menu under playing, pause mode
Please read chapter 'Music' for further references of being related with the particular
operations.
3. Control Menu at stop mode
Please read chapter 'Music' for further references of being related with the particular
operations.
Page 14
13
● System
1. Enter
At Main Menu, press
or to select'System' or press and hold to enter
the 'System' menu.
At 'System' menu, press and hold
to return to the Main Menu.
2. Select & enter each options
At 'system' menu, press
or to select menu items. Press to enter the
setting interface. (for example: Choosing 'Exit' , then press
to exit 'System'
menu and return to the Main Menu.)
Backlight time
Press
or to set. Press to save and return to the 'system setting'. (Press
and hold
to save and return to the Main Menu.)
Languages
Press
or to set. Press to save and return to the 'system setting'. (Press
and hold
to save and return to the Main Menu.)
Power off setting
Press
or to set. Press key to save and return to the 'system setting'.
(Press and hold
to save and return to the Main Menu.)
Contrast
Press
or to set the contrast level of the screen. Press key to save
and return to 'system setting'.
Record file types
Press or to set the types of record. Press to save and return to 'system
setting'.
Page 15

14
Storage space
Check the storage space available. Press
to return to the interface of 'system
setting'. (Press and hold
to return to the Main Menu.)
Software version
Check model and version of the machine. Press
to return to the interface of
'system setting'. (Press and hold
to save and return to the Main Menu.)
● USB disk
This machine has a function as a standard USB disk and it can support Windows
ME ,2000,XP system without installing drivers. If you use Win98, you should install the
driver first.
How to connect with PC? Connect the MP3 and PC with the USB plug. There are three
status screens you can see when the connection is successful.
1. waiting
2. download
3. upload
● Software upgrading
This machine can use the software tool that installs in the computer when installing
the drivers to upgrade and maintain the system firmware.
1. Run the firmware upgrade software.
Initializing SigmaTel MSCN firmware download
Searching for the MP3 player
Page 16

15
2. Connect the player to the USB port and ensure the connection is successful. Press
the power on/off key and click the 'Start' of PC software, the system begins to
upgrade automatically. As the picture shows:
Page 17

16
3. upgrading. As the picture shows:
4. upgrading is done. There will be a notice appeared on the player as follows:
Firmware upgrading is used for improving and maximising the capability of the product.
It will not affect the normal running if you do not use the firmware upgrading.
Do not disconnect the product while upgrading as this could damage the product.
Page 18

17
Disconnecting from the PC
1. Click the
icon the PC tray.
2. Click the pop-up message.
3. Click the " OK" button and physically disconnect the USB cable.
Note:
1. If the tray icon is hidden. Click the " Display hidden icon " to the left of the system tray
to view it.
2. When using some application programs such as Windows Explorer or Windows
Media Player, safe removal may not be available. Please close the applications
before doing safe removal.
stop USB Mass storage Device-Drive(E:)
Page 19

18
Recording and replaying DRM-licensed files
NOTE:
The use of Digital Rights Management (DRM) determines which
rights on a file, e.g. a song, the user purchases. It is thus possible to
specify how often or how long a piece of music can be used and
whether it may be transferred to a portable player. For this purpose
the file is encrypted. The user requires a licence to be able to use
the file.
This player is DRM-compatible and thus enables the replay of
licence protected music downloads.
Further information on DRM can be obtained through the Windows
Media Player - website (http://www.microsoft.com/windows/
windows media/de/drm/default.aspx) or from your Online-MusicDownload provider.
DRM-protected files can be transferred to your Audio-Player with the
Windows Media Player (from version 9.0).
Operation
1.Connect the player to the PC.
2.Install the latest version of the Windows Media Player on your PC.
3.Purchase the desired title from an Online-Music-Download
provider of your choice.
4.Download the desired pieces of music by following the instructions
of the chosen provider. We recommend the folder "My Own
Files\My Own Music" as storage location.
5.Open the Windows Media Player, e.g. Windows Media Player 10
(Fig.10 to Fig.12).
6.From the menu bar choose the "Tools" menu and here the menu
option "Options".
Page 20

19
7.In the menu window choose the tab "Devices".
8.Select the unit "Portable Device" and confirm your selection with
"OK".
Page 21

20
9.In the Windows Media Player choose the menu option “Synch”
followed by "Edit Playlist".
10.Click on the the music pieces to be transferred to the player with
the mouse and confirm your selection with "OK".
11.Select "Start Synch". After the synchronizing process is finished
the music is available on your player.
Page 22

21
● Trouble shooting and specifications
1.To ensure the battery is inserted correctly. No power supply.
2.To ensure the machine is power on..
1.Check the volume to see if it is set to 0 value .
2.Ensure there s no problem with the connection of the
earphone.
No sound from the
earphone.
3.If there is only noise left without normal sound, please check
the MP3 files to see if it was damaged.
Something wrong with the
characters on the screen.
Ensure that you choose the correct language.
1.Check the USB lead to ensure it is not been damaged and
the connection is fine.
2.The installation of driver is OK.
Music can not be
downloaded properly
3. No more space availble.
Shape & Size 86x33x20mm
Weight 27.5g (Batteries are not included.)
Display FST LCD (128x32), backlight,
USB format USB full speed
Memory (128M,256M,512M,1G,2G)NAND Flash
Power supply AAA alkaline battery
Sampling make:8KHZ, 32KHZ Record
Record format: WAV format
Music format MP3, WMA, WAV
Suitable temperature 0-50 degree
Language selecting English,French,Spanish,German,Italian
Operating system Win98SE/WinME/WinNT/Win2000/WinXP/Mac
English,French,Spanish,Italian,Czech,Hungarian,Polish,Danish,Norwegian,Finnish,Swedish
Page 23

22
This symbol on the product or in the instructions means that your
electrical and electronic equipment should be disposed at the end of life
separately from your household waste.
There are separate collection systems for recycling in the EU.
For more information, please contact the local authority or your retailer
where you purchased the product.
Visit Partmaster.co.uk today for the easiest way to buy electrical spares and accessories.
With over 50,000 products in stock we can deliver direct to your door the very next day.
Visit www.partmaster.co.uk
or call
0870 6001 338
(UK customers only)
Calls charged at National Rate.
Page 24

DIGITÁLNÍ AUDIOP EHRÁVA
MAT 101MR/102MR/105MR/110MR/120MR
NÁVOD K POUŽITÍ
Page 25

UpozornČní : Pokud je pĜehrávaþ používán k nelegálnímu kopírování nebo distribuci
softwaru a hudby, které jsou chránČny zákony o duševním vlastnictví, uživatel pĜebírá
veškerou právní odpovČdnost za toto jednání.
Výrobce, dovozce nebo prodejce neodpovídá za poškození v dĤsledku nesprávného
používání pĜehrávaþe.
Bezpeþnostní upozornČní
Ɣ Než se pokusíte zaĜízení použít, pĜeþtČte si návod k použití.
Ɣ PĜesvČdþete se, zda jsou všechna elektrická zapojení (vþetnČ napájecí zástrþky,
prodlužovacího kabelu a propojení mezi jednotlivými pĜístroji) správná a v souladu
s pokyny výrobce.
Ɣ V pĜípadČ jakýchkoliv pochyb o instalaci, provozu nebo bezpeþnosti vašeho zaĜízení se
obraĢte na vašeho prodejce.
Ɣ NeodstraĖujte žádné pevnČ instalované kryty, protože by se mohla odkrýt nebezpeþná napČtí.
Ɣ Nezakrývejte ventilaþní otvory zaĜízení pĜedmČty jako jsou noviny, ubrusy, závČsy, atd.
PĜehĜátí zpĤsobí poškození a zkrátí životnost zaĜízení.
Ɣ ChraĖ
pĜedmČty jako napĜ. vázy.
Ɣ Na zaĜízení nebo do jeho blízkosti neumísĢujte horké pĜedmČty nebo zdroje otevĜeného
plamene, jako napĜ. svíþky nebo kahany. Vysoké teploty mohou roztavit plast a zpĤsobit požár.
Ɣ Pokud máte pochybnosti o normálním fungování pĜístroje nebo je pĜístroj jakkoliv poškozen,
dále ho NEPOUŽÍVEJTE - vypnČte ho, vytáhnČte síĢovou zástrþku a poraćte se s prodejcem.
Ɣ Nepoužívejte toto zaĜízení tak, aby odvádČlo vaši pozornost potĜebnou k dodržování
bezpeþnosti provozu.
te elektrické zaĜízení pĜed kapající nebo stĜíkající vodou a nepokládejte na nČj
1
Page 26

Obsah
Ovládání .....................................................................................................................4
P ehráva ...................................................................................................................5
Tento p ehráva MP3 podporuje textové soubory ve formátu LRC ........................... 5
Vypínání a zapínání....................................................................................................6
Main Menu (Hlavní menu) ..........................................................................................7
Hudba .........................................................................................................................7
1. Play list.....................................................................................................................7
2. Enter (Vstup).........................................................................................................
3. P epínání mezi režimy .............................................................................................8
4. Výb r stop................................................................................................................9
5. Ovládání v pr b hu p ehrávání a v režimu pozastavení .........................................9
Hlasitost.............................................................................................................9
Opakování .........................................................................................................9
A-B Opakování ........................................................................................................10
Režim Zvukové efekty .............................................................................................10
Smazání souboru.....................................................................................................10
Delete All (Odstranit všechny) ................................................................................11
6. Ovládání v režimu zastaveno ...............................................................................11
Record (Záznam zvuku) ...........................................................................................11
1. Za n te nahrávat...................................................................................................11
2. Typy soubor .........................................................................................................12
3. Pozastavit ..............................................................................................................12
P ehrávání ................................................................................................................12
1. P ehrát ...................................................................................................................12
2. Ovládání v pr b hu p ehrávání a v režimu pozastavení .......................................13
3. Ovládání v režimu zastaveno ................................................................................13
System (Nastavení) ..................................................................................................13
1. Enter (Vstup)..........................................................................................................13
2. Zvolte a zadejte jednotlivé možnosti nastavení .....................................................13
Doba nahrávání ......................................................................................................14
Doba podsvícení.....................................................................................................14
Jazyky.....................................................................................................................14
...8
2
Page 27

Power off (Nastavení automatického vypnutí).................................................14
Kontrast..................................................................................................................14
Typy souborĤ pro nahrávání...................................................................................14
Ukládání..................................................................................................................15
Verze programového vybavení...............................................................................15
USB disk...................................................................................................................15
Aktualizace softwaru.................................................................................................15
Odpojování od PC....................................................................................................19
DRM..........................................................................................................................20
ěešení možných problémĤ a specifikace..................................................................23
3
Page 28

Ɣ Ovládání
1.
2.
3.
4.
5.
6.
7.
8.
Zvýšení hlasitosti: stisknČte pro zvýšení hlasitosti v prĤbČhu pĜehrávání
Snížení hlasitosti: stisknČte pro snížení hlasitosti v prĤbČhu pĜehrávání
Record (Záznam)
PĜehrát/Zapnout/Vypnout
Procházení dopĜedu/Další
Procházení dozadu/PĜedchozí
Menu: Vstupte do zvoleného menu nebo návrat do hlavního menu
Lock (Zámek): zamknČte nebo odemknČte tlaþítka
4
Page 29

Ɣ PĜehrávaþ
N
p
t
Displej
ýíslo skladby
Režim opakování
Rychlost
Ĝehrávání/Formá
Režim
Skladba/interpret &
text písnČ
Režim opakování
Rychlost
pĜehrávání/Formát
Režim
Jméno souboru
astavení ekvalizéru
Indikátor pĜehrávání / pozastavení
Doba pĜehrávání
Indikátor
nabití
baterie
PĜehrávaþ záznamĤ
ýísloskladby
Doba pĜehrávání
Indikátor
nabití
baterie
Zobrazení textu písnČ
Tento pĜehrávaþ podporuje soubory LRC pro zobrazování textĤ s hudbou (jen
soubory MP3).
Jakpoznat, zda textový soubor existuje þi
Ikona
se zmČní na pokud má skladba textový LRC soubor.
Tento MP3 pĜehrávaþ podporuje soubory LRC pro zobrazování textĤ s hudbou.
1. PĜipravte soubor MP3 nebo WMA, napĜ. happymusic.mp3.
2. StáhnČte soubor s textem ke skladbČ z Internetu. Textový soubor musí být souborem
5
Page 30

s pĜíponou LRC. NapĜíklad happymusic-2004.lrc.
3. PĜejmenujte soubor s textem. NapĜíklad happymusic.lrc. Tím se zajistí, že název
souboru s textem se bude shodovat s názvem hudebního soubrou.
4. PĜehrajte hudební i textový soubor do pĜehrávaþe.
5. Odpojte pĜehrávaþ MP3.
6. Použijte tlaþítka pro procházení (Skip) a zvolte hudební soubor, napĜ. adc.mp3. StisknČte
tlaþítko pĜehrát
7. MČla by se objevit ikona LRC, a text by se mČl zobrazit synchronnČ na OLED bČhem
pĜehrávání hudby.
Poznámka: PĜehrávaþ MP3 podporuje pouze formát LRC.
Poznámka: Pokud slova nejsou synchronizována s hudbou, stáhnČte lepší soubor
s textem z Internetu a proces opakujte.
Poznámka: UjistČte se, že soubory MP3 a LRC jsou ve stejné složce. Pokud ne,
pĜehrávaþ nedokáže rozpoznat soubor LRC
Indikátor nabití baterie
Signalizuje, že baterie je nabitá pĜi 1,5V indikuje, že napájecí napČtí klesá;
Signalizuje, že je tĜeba okamžitČ vymČnit baterii.
Ɣ Vypínání a zapínání
Zapnutí: ZapnČte stisknutím tlaþítka
UpozornČní: Režim pĜehrávání je pĜednastavený jako výchozí po zapnutí pĜehrávaþe.
Vypnutí: Pro vypnutí stisknČte a podržte.
Tlaþítko pusĢte až bude proužek plný
UpozornČní: Funkce power off nefunguje v prĤbČhu nahrávání
. Na displeji se zobrazí se následující obrázek:
. Na LCD displeji se zobrazí proužek:
6
Page 31

Main Menu (Hlavní menu)
Pro vstup do hlavního menu stiskn te a držte nebo stiskn te krátce
v pr b hu p ehrávání.
Hudba Nahrávání P ehrát Nastavení
Music (Hudba)
1. Play list
Choose “Music” in the menu to enter the folder.
Play list information, As the picture under.
Press / to select 4 mode: Play all,Artist, Album, Songs,.
Four mode:
Play all Play all songs starting from “Artist” type, then”Album”, then”Songs”
Artist Songs in the selected artist list
Album Songs in the selected album list
Songs Songs in the selected ID3 list
Exit Exit play list menu
Vedlejší menu „Přehrát vše“ v režimu „Hudebník“, „Album“ a „Skladby“:
Vstupte do režimu „Hudebník“, „Album“ nebo „Skladby“ a stiskněte / a
zvolte jednu možnost. Potom stiskněte „Menu“ a zadejte „Přehrát vše“. Přístroj
přehraje všechny skladby, které jsou seřazené podle filtru nastaveného pro
každý režim.
7
Page 32

8
2. Enter (Vstup)
Pro výb
r režimu Hudba stiskn te
nebo a poté .
Hudba Nahrávání P
ehrát Nastavení
Hudební soubor existje, na displeji se objeví:
Pokud nejsou v p ehráva i hudební soubory, objeví se na displeji:
Pro návrat do hlavního menu stiskn te a podržte .
Upozorn
ní: Režim Hudba je p ednastavený jako výchozí po zapnutí p ehráva e.
3. P
epínání mezi režimy
V režimu zastavení nebo pozastavení stiskn
te
pro p ehrání.
Režim zastaveno Režim pozastaveno
Page 33

Režim pĜehrávání
StisknČte
4. VýbČr stop:
V režimu zastaveno, pozastavení, pĜehrávání stisknČte
stopu,
stisknČte a držte
V režimu zastaveno stisknČte
V režimu pozastaveno se zvolená stopa pĜehraje automaticky.
5. Ovládací menu v prĤbČhu pĜehrávání nebo pozastavení
V prĤbČhu pĜehrávání nebo pozastavení, stisknČte
StisknČte nebo pro zvolení pod-menu a stisknČte pro vstup. Zvolte Exit
(Návrat) a stisknČte
Hlasitost
PĜejdČte na rozhraní pro „Volume adjusting” (Nastavení hlasitosti), stisknČte
pro nastavení hlasitosti. StisknČte pro návrat do režimu pĜehrávání. (StisknČte a
podržte
pro pozastavení v prĤbČhu pĜehrávání
pro pĜesun na pĜedchozí
pro následující, stisknČte a držte pro rychlé procházení vpĜed,
pro rychlé procházení dozadu.
pro pĜehrání zvolené stopy.
pro vstup do ovládacího menu.
pro návrat do režimu pĜehrávání
pro návrat do hlavního menu)
nebo
Pro pĜímé nastavení hlasitosti v prĤbČhu pĜehrávání stisknČte nebo .
9
Page 34

Opakování
PĜejdČte na rozhraní pro režim „Loop” (Opakování), jak znázorĖuje obrázek:
Šest režimĤ:
Normální Zastaví se, až se pĜehraje aktuální soubor.
Single loop
(Opakovat
stopu)
All loop
(Opakovat vše)
Random
(Náhodné
pĜehrávání)
Random loop
(Opakované
náhodné
pĜehrávání).
Browse
(Procházet)
OpakovanČ pĜehraje zvolenou stopu
OpakovanČ pĜehraje všechny soubory
PĜehraje hudbu v náhodném poĜadí
Bude opakovanČ pĜehrávat hudbu v náhodném poĜadí.
PĜehraje prvních 15 vteĜin z každé skladby v aktuální složce
StisknČte nebo pro výbČr zvoleného režimu. StisknČte pro návrat do
režimu pĜehrávání. StisknČte a podržte
pro návrat do hlavního menu)
A-B Opakování
StisknČte
(A-B) pro nastavení poþáteþního bodu, potom stisknČte totéž tlaþítko pro
nastavení koncového bodu v prĤbČhu pĜehrávání a nahrávání. ZaĜízení bude v režimu
A-B a spustí pĜehrávání stopy A-B. Zrušte dalším stisknutím tlaþítka
(A-B).
Režim zvukových efektĤ
PĜejdČte na rozhraní pro „Sound effect mode” (Režim zvukových efektĤ), jak je
znázornČno na dalším obrázku:
Je možné vybrat jeden z pČti zvukových efektĤ. Pro zvolení režimu stisknČte nebo .
10
Page 35

Normal, Rock,Jazz, Classic, Pop. Pro návrat do režimu PĜehrávání stisknČte .
(StisknČte a podržte
Smazání souboru
Zvolte "Delete the file", viz následující obrázek:
pro návrat do hlavního menu.)
Pro pĜechod na rozhraní stisknČte
podržte
StisknČte nebo pro výbČr 'YES' (Ano) or 'NO'(Ne). Zvolení „YES” (ANO): stisknČte
pro zajištČní vymazání zvoleného souboru a pak návrat do režimu PĜehrávání. (Stisknete-li
a podržíte
Zvolení „No” (Ne): stisknČte
pak se vrátí do režimu Playmode (PĜehrávání).
Delete All (Odstranit všechny)
Poznámka: Vymazání souborĤ vymaže jen ty soubory MP3/WMA, které je pĜístroj schopen
Zvolte „Delete All” (Vymazat všechny), jak je znázornČno na dalším obrázku:
pro návrat do Main Menu (Hlavní menu.)
, nebude soubor vymazán a nevrátíte se do Hlavního menu [Main Menu].)
, pĜístroj nevymaže zvolený aktuální soubor a
nalézt. Nevymaže adresáĜ ani soubory v adresáĜích, které pĜesahují mezní
délku. Pro vymazání tČchto adresáĜĤ/souborĤ budete muset použít funkci
PrĤzkumníku Windows Vymazat.
tak, jak je to znázornČno na obrázku. (StisknČte a
11
Page 36

StisknČte pro pĜechod na rozhraní jak je znázornČno na obrázku. (StisknČte a podržte
pro návrat do Hlavního menu.)
StisknČte nebo pro zvolení „YES” (ANO) nebo „NO” (NE). Pro zvolení „YES” (ANO),
stisknČte
(Play). (StisknČte a podržte
6. Menu Control (Ovládání) v režimu Stop
StisknČte
K disposici nebudou všechny nabídky z menu ovládání. Zobrazení všech nabídek menu
ovládání viz kapitolu 4.
Ɣ Record (Záznam zvuku)
1. SpuštČní nahrávání
Nahrávání je možné spustit dvČma zpĤsoby.
A. StisknČte
Podle následujícího obrázku:
pro spuštČní vymazání všech souborĤ a poté návrat do režimu PĜehrávání
pro návrat do Hlavního menu.)
pro vstup do menu ovládání v režimu Stop.
nebo tlaþítko pro zvolení „Record” (Nahrávání) v Hlavním menu.
StisknČte pro spuštČní nahrávání. Podle následujícího obrázku:
B. StisknČte (A-B) pro spuštČní nahrávání pĜímo z režimu Zastavení.
StisknČte
pro zastavení nahrávání.
12
Page 37

2. Typy nahrávaných souborĤ
Existují dva typy nahrávání, a to Optimized (Optimalizované) a Longest (Nejdelší).
Optimalizované je urþeno pro všeobecné použití, ale má soubory o vČtší velikosti;
Nejdelší je vhodné jen pro nahrávání hlasových signálĤ (voice).
3. Pozastavit
StisknČte
StisknČte (A-B) znovu pro pokraþování v nahrávání:
Ɣ PĜehrání nahraných souborĤ
Pro pĜehrání nahraných souborĤ.
1. PĜehrát
StisknČte
pro vstup do režimu pĜehrání.
(A-B) pro pĜerušení nahrávání:
nebo pro zvolení „Replay” (PĜehrát) z Hlavního menu. StisknČte
Nahrané soubory jsou uloženy do pĜístroje.
StisknČte pro pĜehrání nahraného souboru, a stisknČte tlaþítko znovu pro
pozastavení. StisknČte
pro rychlý posun zpČt. StisknČte
pro rychlý posun dopĜedu.
StisknČte a podržte
2. Menu Control (Ovládání) pĜi pĜehrávání, režim pozastavení
Pro nalezení dalších odkazĤ souvisejících s konkrétními operacemi si pĜeþtČte kapitolu Hudba.
pro vybrání pĜedchozího souboru, stisknČte a podržte
pro zvolení dalšího souboru, stisknČte a podržte
pro návrat do Hlavního menu bČhem pĜehrávání nahraných souborĤ.
13
Page 38

3. Ovládání v režimu zastaveno
Pro nalezení dalších odkazĤ souvisejících s konkrétními operacemi si pĜeþtČte kapitolu Hudba.
Ɣ Systém
1. Enter
V Hlavním menu stisknČte
stisknČte a podržte
pro vstup do menu „System”.
nebo pro zvolení „System” (Nastavení) nebo
V menu „System” stisknČte a podržte
2. Zvolte & pĜejdČte do každé z nabídek
V menu „System” stisknČte
pro pĜechod na rozhraní nastavení. (napĜíklad: Zvolte „Exit” (Návrat), pak stisknČte
pro ukonþení menu „System" a návrat do Hlavního menu.)
nebo pro zvolení menu položek. StisknČte
pro návrat do Hlavního menu.
14
Page 39

Doba podsvícení (Backlight)
StisknČte
(nastavení systému). (StisknČte a podržte
Jazyky
Pro nastavení stisknČte
(nastavení systému). (StisknČte a podržte
Nastavení automatického vypnutí
StisknČte
setting” (nastavení systému). (StisknČte a podržte
Kontrast
StisknČte
pro uložení a návrat na „system setting" (nastavení systému).
Typy souborĤ pro nahrávání
StisknČte
návrat na „system setting” (nastavení systému).
nebo pro nastavení. StisknČte pro uložení a návrat do „system setting”
pro uložení a návrat do Hlavního menu.)
nebo . StisknČte pro uložení a návrat do „system setting”
pro uložení a návrat do Hlavního menu.)
nebo pro nastavení. StisknČte tlaþítko pro uložení a návrat do „system
pro uložení a návrat do Hlavního menu.)
nebo pro nastavení úrovnČ kontrastu displeje. StisknČte tlaþítko
nebo pro nastavení typĤ nahrávky. StisknČte pro uložení a
15
Page 40

Prostor v pamČti
PĜekontrolujte, jaký prostor v pamČti máte k dispozici. StisknČte
rozhraní „system setting” (nastavení systému). (StisknČte a podržte
Hlavního menu.)
Verze softwaru
OvČĜte model a verzi pĜístroje. StisknČte
(nastavení systému). (StisknČte a podržte
Ɣ Disk USB
Tento pĜístroj funguje jako standardní USB disk a mĤže podporovat systém Windows
ME ,2000,XP bez nutnosti instalace ovladaþĤ. Používáte-li Win98, mČli byste nejdĜíve
instalovat ovadaþ.
Jak se pĜipojit na PC? PĜístroj MP3 pĜipojte na PC pĜes zdíĜku USB. Když je pĜipojení
úspČšné, mĤžete uvidČt jednu ze tĜí stavových obrazovek.
1. þekání
2. stahování
pro návrat na rozhraní „system setting”
pro uložení a návrat do Hlavního menu.)
pro návrat na
pro návrat do
3. pĜehrávání do PC
Ɣ Auktualizace software
Tento pĜístroj mĤže používat programovací nástroj, který se instaluje do poþítaþe pĜi
instalaci ovladaþĤ, pro aktualizaci a zachování programového vybavení systému.
16
Page 41

1. SpusĢte software pro aktualizaci programového vybavení.
Inicializace stažení programového vybavení SigmaTel MSCN
Vyhledání pĜehrávaþe MP3
2. PĜipojte pĜehrávaþ na USB port a ovČĜte, že pĜipojení je úspČšné. StisknČte tlaþítko
hlavního vypínaþe a kliknČte na „Start“ poþítaþového programu; aktualizace systému
se spustí automaticky, jak je znázornČno na obrázku:
17
Page 42

3. Probíhá aktualizace, jak je znázornČno na obrázku:
4. ProvádČní aktualizace je ukonþeno. Na pĜehrávaþi se zobrazí následující oznámení:
18
Page 43

Aktualizace programového vybavení se používá ke zlepšení a umožnČní maximálního
využívání tohoto výrobku.
Nepoužijete-li aktualizaci programového vybavení, nebude to mít žádný vliv na jeho normální
funkci.
Dokud probíhá aktualizace, neodpojujte výrobek, protože tím by mohlo dojít k poškození výrobku.
Odpojení od PC
1. KliknČte na ikonu
2. KliknČte na pop-up zprávČ.
3. KliknČte na tlaþítko „OK“ a fyzicky odpojte kabel USB.
Zastavte ZaĜízení velkokapacitní pamČti USB-jednotku(E:)
na lištČ PC.
Poznámka:
1. Je-li ikona skrytá, pro její zobrazení kliknČte na „Display hidden icon” (Zobrazit skryté
ikony) vlevo od zásobníku systému.
2. PĜi používání nČkterých aplikaþních programĤ jako je PrĤzkumník Windows nebo
Windows Media Player nemusí být možné provést bezpeþné odstranČní. PĜed
provádČním bezpeþného odstranČní zavĜete aplikace.
19
Page 44

Nahrávání a reprodukce souborĤ chránČných DRM licencí
POZNÁMKA:
DRM (Digital Rights Management) urþuje, jaká práva k souboru, napĜ.
písniþce, si uživatel zakoupil. Je tak možné urþit jak þasto nebo jak
dlouho mĤže být urþitá hudba používána a zda mĤže být zkopírována
na pĜenosný pĜehrávaþ. Za tímto úþelem je soubor zašifrován. Aby
bylo možné soubor pĜehrát, potĜebuje uživatel licenci.
Tento pĜehrávaþ je kompatibilní s DRM a umožĖuje tedy reprodukci
stažené hudby, která je chránČna licencí.
Další informace, týkající se DRM, mĤžete získat na internetových
stránkách Windows Media Playeru
(http://www.microsoft.com/windows/windowsmedia/cs/drm/default.as
px) nebo od vašeho poskytovatele stahované hudby.
Soubor chránČný DRM licencí mĤžete zkopírovat na váš audio
pĜehrávaþ pomocí Windows Media Playeru (od verze 9.0).
Postup
1. PĜipojte pĜehrávaþ k poþítaþi.
2. Nainstalujte na váš poþítaþ nejnovČjší verzi Windows Media Playeru.
3. Zakupte od nČkterého poskytovatele hudebních souborĤ
požadovanou písniþku.
4. PĜi nahrávání požadované hudby postupujte podle pokynĤ
zvoleného poskytovatele. Jako místo pro uložení doporuþujeme
zvolit adresáĜ „Dokumenty\Moje hudba“.
5. SpusĢte Windows Media Player, napĜ. Windows Media Player 10
(obr. 10 až 12).
6. Na panelu nabídek vyberte nabídku „Nástroje“ a v této nabídce
vyberte „Možnosti“.
20
Page 45

7. V dialogovém oknČ vyberte záložku „ZaĜízení“.
8. Zvolte „PĜenosné zaĜízení“ a svĤj výbČr potvrćte tlaþítkem „OK“
21
Page 46

9. Ve Windows Media Playeru vyberte z nabídky „Soubor“ položku
„Kopírovat“, „Kopírovat do pĜenosného zaĜízení“ a v zobrazeném
oknČ „Upravit seznam stop“.
10. Myší klepnČte na skladbách, které chcete pĜenést do pĜehrávaþe a
výbČr potvrćte tlaþítkem „OK“.
11. Zvolte „Kopírovat“. Po ukonþení procesu kopírování je hudba
dostupná na vašem pĜehrávaþi.
22
Page 47

Ɣ Vyhledávání a odstraĖování závad a specifikace
1.OvČĜte, že baterie je vložena správnČ.Žádné napájecí napČtí.
2.OvČĜte, že pĜístroj je zapnutý.
Ze sluchátek nevychází
žádný zvuk.
Podivné zobrazení textu na
displeji.
Hudbu nelze ĜádnČ
stáhnout
Tvar a velikost 86x33x20mm
Hmotnost 27.5g (Baterie nejsou souþástí balení.)
Displej FST LCD (128x32), podsvícení,
USB Formát USB full speed
PamČĢ (128M,256M,512M,1G,2G)NAND Flash
Napájení AAA Alkalická baterie
Formát hudebních souborĤ MP3, WMA, WAV
Vhodný teplotní rozptyl 0-50°C
Nastavení jazykĤ Anglicky, francouzsky, holandsky
Operaþní systém Win98SE/WinME/WinNT/Win2000/WinXP/Mac
1.OvČĜte hlasitost (volume), zda není nastavena na hodnotu 0.
2.OvČĜte, zda problém není v pĜipojení sluchátek.
3.Je-li slyšet jen šum bez normálního zvuku, ovČĜte, jestli
nejsou poškozené soubory MP3.
OvČĜte, jestli jste zvolili správný jazyk.
1.OvČĜte, zda není poškozený USB kabel a že jeho pĜipojení je
v poĜádku.
2.OvČĜte, zda je v poĜádku instalace ovladaþe.
3. Nedostatek volného místa
Vzorkovací kmitoþet:8KHZ, 32KHZ Record (Záznam)
Formát pro nahrávání: Formát WAW
Angličtina,Francouzština,Španělština,Italština,Čeština,Maďarština,Polština,Dánština,Norský,Finština,Švédština
Tento symbol na výrobku nebo v instrukcích znamená, že vaše elektrické
nebo elektronické zaĜízení musí být zlikvidováno na konci své životnosti
oddČlenČ od domácího odpadu.
V EU existují oddČlené sbČrové systémy pro recyklaci.
Více informací získáte na vašem místním úĜadČ nebo v obchodČ, kde jste
tento výrobek zakoupili.
23
Page 48

DIGITAL LYDAFSPILLER
MAT 101MR/102MR/105MR/110MR/120MR
BETJENINGSVEJLEDNING
Page 49

Bemærk: Hvis afspilleren bruges til ulovlig kopiering eller distribution af software og musik,
der er beskyttet af immaterielle rettigheder, skal brugeren påtage sig hele det juridiske
ansvar for sådanne handlinger.
Producenten, importøren eller forhandleren kan ikke holdes ansvarlig for hændelige skader
som følge af uhensigtsmæssig brug af afspilleren.
Sikkerhedsadvarsel
Ɣ Sørg for at læse betjeningsvejledningen, før udstyret tages i brug.
Ɣ Sørg for, at alle elektriske tilslutninger (herunder stikkontakten, forlængerledninger og
sammenkoblinger af udstyr) er korrekt foretaget og i overensstemmelse med
producentens anvisninger.
Ɣ Spørg forhandleren til råds, hvis du er i tvivl om installation, betjening eller sikkerhed i
forbindelse med udstyret.
Ɣ Fjern ikke faste afskærmninger, eftersom dette kan blotlægge farlige spændingsførende
dele.
Ɣ Bloker ikke udstyrets ventilationsåbninger med genstande som f.eks. aviser, duge,
gardiner o.l. Overophedning forårsager skader og forkorter udstyrets levetid.
Ɣ Udsæt ikke elektrisk udstyr for stænk eller sprøjt, og placer ikke væskefyldte genstande
som f.eks. vaser på udstyret.
Ɣ Lad ikke udstyret komme i kontakt med eller i nærheden af varme genstande eller åben ild
som f.eks. tændte stearinlys eller vågelamper. Høje temperaturer kan smelte plast og føre
til ildebrand.
Ɣ Afbryd brugen af udstyret, hvis du er i tvivl, om det fungerer normalt, eller hvis det er
beskadiget på nogen måde. Sluk udstyret, tag det ud af stikkontakten, og kontakt
forhandleren.
Ɣ Brug ikke udstyret på en måde, der afleder din opmærksomhed fra trafikken og sætter
sikkerheden over styr.
1
Page 50

Indholdsfortegnelse
Betjeningsknapper......................................................................................................4
Afspiller.......................................................................................................................5
MP3-afspilleren understøtter filer med tekst i LRC-format ........................................5
Strøm..........................................................................................................................6
Hovedmenu ...............................................................................................................7
Music [musik] ............................................................................................................7
1. Play list.................................................................................................................... 7
2. Åbn ..................................................................................................................... 8
3. Tilstandsknap .....................................................................................................8
4. Nummervalg .......................................................................................................9
5. Kontrolmenu i afspilnings- eller pausetilstand ....................................................9
Volumen [lydstyrke] ...........................................................................................9
Loop [løkke] .......................................................................................................9
A-B-løkke ..........................................................................................................10
Sound effect-tilstand [lydeffekt] .........................................................................10
Filsletning ..........................................................................................................10
Delete all [slet alt] ............................................................................................11
6. Kontrolmenu i stoptilstand ................................................................................12
Record [optag] ........................................................................................................12
1. Start optagelse .................................................................................................12
2. Optagefiltyper ...................................................................................................12
3. Pause ................................................................................................................12
Afspil .......................................................................................................................13
1. Play [afspil] .......................................................................................................13
2. Kontrolmenu i afspilnings- eller pausetilstand ..................................................13
3. Kontrolmenu i stoptilstand..................................................................................13
System ....................................................................................................................13
1. Åbn ................................................................................................................... 13
2. Vælg og åbn hvert punkt .................................................................................. 14
Baglystid ..........................................................................................................14
Sprog ...............................................................................................................14
2
Page 51

Power off setting [automatisk slukning]............................................................ 14
Contrast [kontrast] ...........................................................................................14
Optagefiltyper ...................................................................................................14
Storage space [lager] ........................................................................................15
Firmware ..........................................................................................................15
USB-disk .................................................................................................................15
Softwareopgradering ...............................................................................................15
Frakobling fra pc .....................................................................................................19
Fejlfinding og specifikationer ...................................................................................19
19
3
Page 52

Ɣ Betjeningsknapper
1.
2.
3.
4.
5.
6.
7.
8.
Øg lydstyrke: Tryk for at øge lydstyrken under afspilning.
Mindsk lydstyrke: Tryk for at mindske lydstyrken under afspilning.
Optag
Afspil/tænd/sluk
Frem/næste
Tilbage/forrige
Menu: Åbn den valgte undermenu, eller gå tilbage til hovedmenuen
Lås: Lås tasterne, eller lås dem op.
4
Page 53

Ɣ Afspiller
d
Display
Nummer
Løkketilstan
Bithastighed/format
Programtilstand
Sang/kunstner&tekst
EQ-indstilling
Afspil/pause-indikator
Spilletid
Strøm
Optagefilafspiller
Nummer
Løkketilstand
Bithastighed/format
Programtilstand
Filnavn
LRC-display
Denne afspiller understøtter LRC-filer, så teksten kan vises sammen med musikken (kun
MP3-filer).
Spilletid
Strøm
Sådan finder du ud af, om der findes en LRC-fil.
Ikonet ændres til , hvis sangen har en LRC-fil.
MP3-afspilleren understøtter filer med tekst i LRC-format.
1. Forbered en MP3- eller WMA-musikfil, f.eks. happymusic.mp3.
2. Download den filbaserede tekst fra internettet. Filen skal have filtypebetegnelsen
LRC. Eksempel: happymusic-2004.lrc.
5
Page 54

3. Omdøb filen. Eksempel: happymusic.lrc. Dette er for at sikre, at filnavnet på
LRC-filen er det samme som på musikfilen.
4. Kopier LRC- og musikfilen til MP3-afspilleren.
5. Frakobl MP3-afspilleren.
6. Brug 'spring'-knapperne til at vælge musikfilen, f.eks. adc.mp3. Tryk på
afspilningsknappen for at spille den.
7. LRC-ikonet vises, og teksten vises synkront på OLED-displayet, mens musikken
afspilles.
Bemærk: MP3-afspilleren understøtter kun LRC-format.
Bemærk: Hvis teksten ikke synkroniseres med musikken, kan du downloade en bedre
LRC-fil fra internettet og prøve igen.
Bemærk: Sørg for, at MP3-musikken og LRC-filen ligger i samme mappe, og at filnavnet
er det samme. Hvis det ikke er tilfældet, kan MP3-afspilleren ikke genkende
LRC-filen.
Strøm
angiver, at strømkapaciteten er fuld på 1,5 V. angiver, at strømkapaciteten er ved
at svinde.
Ɣ Tænd og sluk
angiver, at batteriet skal udskiftes med det samme.
Tænd: Tænd afspilleren ved at trykke på
Bemærk: Musiktilstand er standardtilstanden, når afspilleren tændes.
Sluk: Hold
Slip knappen, når bjælken er fuld.
Bemærk: Det er ikke muligt at slukke afspilleren, mens den optager.
nede for at slukke afspilleren. En bjælke vises på LCD-skærmen som:
.
Et velkomstbillede vises på LCD-skærmen som:
6
Page 55

Hovedmenu
Hvis du vil åbne hovedmenuen, skal du holde nede eller trykke kortvarigt på ,
mens du optager.
Music [musik] Recording [optagelse] Play [afspil] System
Music
1. Play list
Choose “Music” in the menu to enter the folder.
Play list information, As the picture under.
Press / to select 4 mode: Play all,Artist, Album, Songs,.
Four mode:
Play all Play all songs starting from “Artist” type, then”Album”, then”Songs”
Artist Songs in the selected artist list
Album Songs in the selected album list
Songs Songs in the selected ID3 list
Exit Exit play list menu
Undermenuen “play all” (Spil alle) under tilstandene “Artist” (Kunstner),
“Album” (Album) og ”Songs) (Sange):
Vælg tilstanden “Artist” (Kunstner), “Album” (Album) og “Songs” (Sange) og
tryk / for at vælge en. Tryk dernæst ”menu” (menu) for at vælge ”play all”
(spil alle). Enheden vil nu afspille alle sange, sorteret efter filtrene for hver tilstand.
7
Page 56

2. Åbn
Vælg 'Music' ved at trykke på eller på hovedmenuen, og tryk derefter på .
Music [musik] Recording [optagelse] Play [afspil] System
Musikfilen eksisterer, og displayet ser ud, som følger:
Musikfilen eksisterer ikke, og displayet ser ud, som følger:
For at vende tilbage til menutilstanden skal du holde nede.
Bemærk: Når afspilleren tændes, er musiktilstanden standardtilstanden.
3. Tilstandsknap
Tryk på
Stoptilstand Pausetilstand
for at spille fra stop- eller pausetilstand.
8
Page 57

Afspilningstilstand
Tryk på
3. Nummervalg:
Under stop-, pause- eller afspilningstilstand skal du trykke på
nummer eller
Hold
I stoptilstand skal du trykke på
I pausetilstand spilles det valgte nummer automatisk.
4. Kontrolmenu i afspilnings- eller pausetilstand
Tryk på
Tryk på eller for at vælge undermenuen, og tryk på for at åbne den.
Vælg 'exit' [afslut], og tryk på
afspilningstilstand.
Volume [lydstyrke]
Åbn grænsefladen for lydstyrkeregulering, og tryk på
lydstyrken. Tryk på
at vende tilbage til hovedmenuen).
for at holde pause i afspilningen
for at gå til næste nummer.
nede for at spole frem, og hold nede for at spole tilbage.
for at spille det valgte nummer.
under afspilning eller pause for at åbne kontrolmenuen som:
for at afslutte kontrolmenuen og vende tilbage til
for at vende tilbage til afspilningstilstand. (Hold nede for
for at gå til sidste
eller for at ændre
Hvis du vil ændre lydstyrkeværdien direkte, skal du trykke på eller under afspilningen.
Loop [løkke]
Åbn grænsefladen i 'Loop'-tilstand [løkke] som vist på billedet:
9
Page 58

Seks tilstande:
Normal Stop afspilningen, når den aktuelle fil er slut.
Single loop [enkelt løkke] Gentag afspilning af enkelt musiksektion
All loop [konstant løkke] Gentag afspilning af al musikken
Random [tilfældigt] Afspil musikken i den aktuelle filmappe i tilfældig rækkefølge
Random loop [tilfældig
løkke]
Browse [gennemlyt] Spil de første 15 sekunder af al musik i den aktuelle filmappe
Gentag musikken i den aktuelle filmappe i tilfældig rækkefølge
Tryk på eller for at vælge den ønskede tilstand. Tryk på for at vende
tilbage til afspilningstilstand. (Hold
nede for at vende tilbage til hovedmenuen).
A-B-løkke
Tryk på (A-B) for at angive et startpunkt, og tryk derefter på samme knap for at
angive et slutpunkt i løbet af afspilningen eller optagelsen. Afspilleren er i A-B-tilstand og
starter A-B-afspilningsnummeret. Annuller tilstanden ved at trykke på
(A-B) igen.
Sound effect-tilstand [lydeffekt]
Åbn grænsefladen i 'Sound effect'-tilstand som vist på billedet:
Der kan vælges fem typer lydeffekter. Tryk på eller for at vælge en tilstand:
Normal, Rock, Jazz, Classic [klassisk], Pop. Tryk på
afspilningstilstand. (Hold
nede for at vende tilbage til hovedmenuen).
for at vende tilbage til
Filsletning
Vælg ' Delete the file' [slet filen] som vist på billedet herunder:
Tryk på
for at åbne grænsefladen som vist på billedet. (Hold nede for at
vende tilbage til hovedmenuen).
10
Page 59

Tryk på eller for at vælge 'YES' [ja] eller 'NO' [nej]. Hvis du vælger 'YES', skal du
trykke på
afspilningstilstand. (Hvis du holder
hovedmenuen).
for at sikre, at den valgte fil slettes, hvorefter du vender tilbage til
nede, slettes filen ikke, og du vender tilbage til
Hvis du vælger 'No', skal du trykke på
du vender derefter tilbage til afspilningstilstand.
Delete All [slet alt]
Bemærk: Når du vælger at slette filer, slettes kun de MP3/WMA-filer, afspilleren kan
finde. Mapper eller filer i mapper, der overstiger filbegrænsningen, slettes
ikke. Hvis du vil slette disse filer/mapper, skal du bruge slettefunktionen i
Windows Stifinder.
Vælg ' Delete All' [slet alt] som vist på billedet herunder:
Tryk på for at åbne grænsefladen som vist på billedet. (Hold nede for at vende
tilbage til hovedmenuen).
Tryk på eller for at vælge 'YES' [ja] eller 'NO' [nej]. Hvis du vælger 'YES', skal du
trykke på
afspilningstilstand. (Hold
for at starte sletningen af alle filer og derefter vende tilbage til
nede for at vende tilbage til hovedmenuen).
. Den aktuelt valgte fil slettes ikke, og
11
Page 60

6. Kontrolmenu i stoptilstand
Tryk på
Ikke alle punkter på kontrolmenuen er tilgængelige. Læs kapitel 4 for at få vist alle
punkter på kontrolmenuen.
Ɣ Record [optag]
1. Start optagelse
Der er to måder at starte en optagelse på.
A. Tryk på knappen eller for at vælge 'Record' i hovedmenuen. Se billedet herunder:
Tryk på for at starte optagelsen. Se billedet herunder:
for at åbne kontrolmenuen i stoptilstand.
B.Tryk på (A-B) for at starte optagelsen direkte fra stoptilstand.
Tryk på
2. Optagefiltyper
Der er to typer optagelse: Optimized [optimeret] og Longest [længst]. Optimized er til
generel brug, men har en større filstørrelse, mens Longest kun egner sig til
stemmeoptagelse.
3. Pause
Tryk på
Tryk på (A-B) igen for at fortsætte optagelsen:
for at standse optagelsen.
(A-B) for at holde pause i optagelsen:
12
Page 61

Ɣ Afspil
Sådan spilles optagede filer.
1. Play [afspil]
Tryk på
åbne afspilningstilstand.
Optagede filer lagres i afspilleren.
eller for at vælge 'Replay' [afspil] i hovedmenuen. Tryk på for at
Tryk på
pause. Tryk på
Tryk på
Hold
2. Kontrolmenu i afspilnings- eller pausetilstand
Læs kapitlet 'Music [musik]' for at få yderligere oplysninger om bestemte funktioner.
3. Kontrolmenu i stoptilstand
Læs kapitlet 'Music [musik]' for at få yderligere oplysninger om bestemte funktioner.
Ɣ System
1. Åbn
Tryk på
for at åbne menuen 'System'.
Hold
for at afspille den optagede fil, og tryk på knappen igen for at holde
for at vælge den forrige fil, og hold nede for at spole tilbage.
for at vælge den næste fil, og hold nede for at spole frem.
nede for at vende tilbage til hovedmenuen, mens der afspilles optagede filer.
eller i hovedmenuen for at vælge 'System', eller hold nede
nede i menuen 'System' for at vende tilbage til hovedmenuen.
13
Page 62

2. Vælg og åbn hvert punkt
Tryk på
for at åbne indstillingsgrænsefladen. (Eksempel: Vælg 'Exit' [afslut], og tryk derefter
på
Baglystid
Tryk på
og vende tilbage til 'system setting' [systemindstilling]. (Hold
indstillingen og vende tilbage til hovedmenuen).
Sprog
Tryk på
og vende tilbage til 'system setting' [systemindstilling]. (Hold
indstillingen og vende tilbage til hovedmenuen).
Automatisk slukning
Tryk på
indstillingen og vende tilbage til 'system setting' [systemindstilling]. (Hold
at gemme indstillingen og vende tilbage til hovedmenuen).
eller i menuen 'system' for at vælge menupunkter. Tryk på
for at afslutte menuen 'System' og vende tilbage til hovedmenuen).
eller for at indstille punktet. Tryk på for at gemme indstillingen
eller for at indstille sproget. Tryk på for at gemme indstillingen
eller for at indstille punktet. Tryk på knappen for at gemme
nede for at gemme
nede for at gemme
nede for
Kontrast
Tryk på
for at gemme indstillingen og vende tilbage til 'system setting' [systemindstilling].
Optagefiltyper
Tryk på
indstillingen og vende tilbage til 'system setting' [systemindstilling].
eller for at indstille skærmens kontrastniveau. Tryk på knappen
eller for at indstille optagetyperne. Tryk på for at gemme
14
Page 63

Lagerplads
Kontroller, hvor meget lagerplads der er tilgængelig. Tryk på
grænsefladen for 'system setting' [systemindstilling]. (Hold
tilbage til hovedmenuen).
Firmware
Kontroller afspillerens model og version. Tryk på
grænsefladen for 'system setting' [systemindstilling]. (Hold
indstillingen og vende tilbage til hovedmenuen).
Ɣ USB-disk
Denne afspiller fungerer som en USB-standarddisk og understøtter operativsystemerne
Windows ME, 2000, XP uden installation af drivere. Hvis du bruger Win98, skal du først
installere driveren.
Sådan sluttes afspilleren tilen pc. Sæt MP3-afspilleren i et USB-stik på pc'en. Der er tre
statusskærme, du kan se, når forbindelsen etableres.
1. venter
for at vende tilbage til
for at vende tilbage til
nede for at vende
nede for at gemme
2. download
3. upload
Ɣ Softwareopgradering
Denne afspiller kan bruge de softwareværktøjer, som installeres i computeren under
installation af drivere til opgradering og vedligeholdelse af systemets firmware.
1. Kør firmwareopgraderingssoftwaren.
15
Page 64

Initialisering af SigmaTel MSCN-firmwaredownload
Søgning efter MP3-afspilleren
2. Sæt afspilleren i USB-porten, og kontroller, at den tilsluttes korrekt. Tryk på knappen
power on/off [tænd/sluk], og klik på 'Start' i pc'ens software. Systemet begynder
automatisk langsomt at opgradere. Se billedet herunder:
16
Page 65

3. Opgradering. Se billedet herunder:
4. Opgraderingen er gennemført. Følgende meddelelse vises på afspilleren:
17
Page 66

Firmwareopgradering bruges til forbedring og maksimering af produktets kapacitet.
Det har ikke indflydelse på den normale drift, hvis du ikke bruger firmwareopgraderingen.
Frakobl ikke produktet under opgraderingen, da det kan beskadige produktet.
Frakobling fra pc
1. Klik på ikonet
2. Klik på pop op-meddelelsen
3. Klik på knappen "OK", og tag USB-kablet ud.
[Stop USB-lagerenhed, drev (E:)]
i pc-bakken.
stop USB Mass storage Device-Drive(E:)
Bemærk:
1. Hvis bakkeikonet er skjult. Klik på "Display hidden icon" [vis skjult ikon] til venstre for
systembakken for at få vist ikonet.
2. Sikker fjernelse er ikke tilgængelig i alle programmer. Det gælder f.eks. Windows
Stifinder og Windows Media Player. Luk programmerne, før proceduren til sikker
fjernelse udføres.
18
Page 67

Optagelse og genafspilning af DRM-godkendte filer
NB:
Digital Rights Management (DRM) bestemmer hvilke rettigheder til en fil,
f.eks. en sang, brugeren køber. Det er derfor muligt at angive hvor ofte,
eller hvor længe et musiknummer kan bruges og om det kan overføres til
en bærbar afspiller. Til dette formål er filen krypteret. Det er et krav at
brugeren har en licens for at kunne bruge filen.
Denne afspiller er kompatibel med DRM og det er derfor muligt at genafspille
downloaded musik der er beskyttet af en licens.
Yderligere information om DRM kan indhentes på Windows
Media Player’s webside (http://www.microsoft.com/windows/
windows media/de/drm/default.aspx) eller fra din musikudbyder
på internettet.
DRM-beskyttede filer kan overføres til din Audio-afspiller med
Windows Media Player (fra version 9.0).
Ibrugtagning
1.Tilslut afspilleren til PC’en.
2.Installer den nyeste version af Windows Media Player på din PC.
3.Køb den ønskede titel fra en musikudbyder på internettet
efter eget valg.
4.Download de ønskede musiknumre ved at følge instruktionerne
fra den valgte udbyder. Vi anbefaler mappen “Mine
filer\Min musik” til at gemme filerne i.
5.Åben Windows Media Player, f.eks. Windows Media Player 10
(fig.10 til fig.12).
6.Fra menubjælken vælges menuen “Funktioner” og herefter menuvalget
“Indstillinger”.
19
Page 68

7.I menuvinduet vælges knappen “Enheder”.
8.Vælg “Bærbar enhed” og bekræft dit valg med
“OK”.
20
Page 69

9.I Windows Media Player menuen vælges “Synk”
fulgt af “Rediger afspilningsliste”
10.Klik med musen på de musiknumre der skal overføres til afspilleren
og bekræft dit valg med “OK”.
11.Vælg “Start Synk”. Efter synkroniseringsforløbet er afsluttet
kan du afspille musikken på din afspiller.
21
Page 70

Ɣ Fejlfinding og specifikationer
1. Kontroller, at batteriet er sat rigtigt i.Ingen strømforsyning.
2. Kontroller, at afspilleren er tændt.
Ingen lyd fra
hovedtelefonerne.
Der er noget galt med
tegnene på skærmen.
Musik downloades ikke
korrekt
Form og størrelse 86 x 33 x 20 mm
Vægt 27,5 g (uden batterier).
Display FST LCD (128 x 32) med baglys
USB-format USB (fuld hastighed)
Hukommelse (128 MB, 256 MB, 512 MB, 1 GB, 2GB) NAND Flash
Strømforsyning AAA-alkalinebatteri
Musikformat MP3, WMA, WAV
Temperatur 0-50 grader
Sprog Engelsk, fransk og hollandsk
Operativsystem Win98SE/WinME/WinNT/Win2000/WinXP/Mac
1. Kontroller, at lydstyrken ikke er indstillet til 0.
2. Kontroller, at der ikke er problemer med forbindelsen til
hovedtelefonerne.
3. Hvis der kun lyder støj i stedet for normal lyd, skal du
kontrollere, om MP3-filerne er beskadiget.
Kontroller, at du har valgt det rigtige sprog.
1. Kontroller USB-kablet for at sikre, at det ikke er beskadiget,
og at forbindelsen er i orden.
2. Driverinstallationen er i orden.
3. Der er ikke mere plads tilgængelig.
Samplingfrekvens: 8 kHz, 32 kHzOptagelse
Optagelsesformat: WAV-format
Engelsk,Fransk,Spansk,Italiensk,Tjekkisk,Ungarsk,Polsk,Dansk,Norsk,Finsk,Svensk
Dette symbol på produktet eller i vejledningen betyder, at det udtjente
elektriske eller elektroniske udstyr ikke må bortskaffes sammen med
husholdningsaffald.
I EU-lande findes der separate indsamlingssystemer til genbrug.
Kontakt de lokale myndigheder eller forhandleren for at få yderligere
information.
22
Page 71

REPRODUCTOR DE AUDIO DIGITAL
MAT 101MR/102MR/105MR/110MR/120MR
Manual de instrucciones
Page 72

Atención : si se utiliza el reproductor para copiar o distribuir ilegalmente software y música
protegidos por derechos de propiedad intelectual, el usuario se hará totalmente responsible
de sus acciones.
Ni el fabricante, ni el importador, ni el distribuidor se harán responsables de daños
accidentales por uso indebido del reproductor.
Advertencia de seguridad
Ɣ Lea atentamente las instrucciones antes de utilizar el equipo.
Ɣ Asegúrese de que se han efectuado correctamente todas las conexiones eléctricas (incluida
la toma de la red, los plomos de extensión y las interconexiones entre las partes del equipo)
de acuerdo acuerdo con las instrucciones del fabricante.
Ɣ Consulte a su distribuidor si tiene alguna duda sobre la instalación,
funcionamiento o seguridad de su equipo.
Ɣ No elimine las cubiertas fijas, ya que podría quedar expuesto a voltajes peligrosos.
Ɣ No obstaculice las aberturas de la unidad con diarios, servilletas, cortinas, etc. El
sobrecalentamiento dañará y acortará la vida útil de la unidad.
Ɣ No exponga el equipo eléctrico a gotas ni salpicaduras, ni lo deje debajo o cerca de objetos
con líquido, como jarrones.
Ɣ No coloque objetos calientes o llamas sin protección, como velas encendidas, encima o cerca
del equipo. Las altas temperaturas podrían derretir el plástico y llevar a un incendio.
Ɣ Deje de utilizar el equipo si tiene dudas sobre su normal funcionamiento, o si está dañado.
Desactívelo, retire el cable de la toma y consulte con su distribuidor.
Ɣ No utilice la unidad cuando le pueda distraer de las necesidades de la seguridad vial.
1
Page 73

Contenido
Controles ...................................................................................................................................4
Reproductor ...............................................................................................................................5
El reproductor MP3 admite archivos con la letra de las canciones en formato LRC.................5
Encendido y apagado ................................................................................................................6
Menú principal ...........................................................................................................................7
Música .......................................................................................................................................7
1. Play list........................................................................................................................... 7
2. Introducir......................................................................................................................... 8
3. Cambio de modo .............................................................................................................8
4. Selección de pistas..........................................................................................................9
5. Menú de control durante los modos de reproducción o pausa........................................9
Volumen .........................................................................................................................9
Repetición .......................................................................................................................9
Repetición A-B0 ............................................................................................................10
Modo de efectos de sonido ...........................................................................................10
Eliminación de archivos.................................................................................................10
Eliminar todas................................................................................................................11
6. Menú de control durante el modo de parada .................................................................11
Grabar......................................................................................................................................11
1. Comienzo de la grabación .............................................................................................11
2. Tipos de archivo ............................................................................................................12
3. Pausar ...........................................................................................................................12
Reproducir ...............................................................................................................................12
1. Reproducir ..................................................................................................................... 12
2.Menú de control durante los modos de reproducción o pausa ......................................13
3. Menú de control durante el modo de parada..................................................................13
Sistema....................................................................................................................................13
1. Introducir ........................................................................................................................13
2. Selección e introducción cada opción ............................................................................13
Tiempo de grabación ......................................................................................................14
Tiempo de la retroiluminación.........................................................................................14
Idiomas ...........................................................................................................................14
2
Page 74

Ajuste del apagado.........................................................................................................14
Contraste........................................................................................................................14
Tipos de archivo de grabación........................................................................................14
Almacenamiento.............................................................................................................15
Versión de firmware........................................................................................................15
Disco USB........................................................................................................................15
Actualización de software.................................................................................................15
Desconexión del PC.........................................................................................................18
DRM..................................................................................................................................19
Resolución de problemas y especificaciones técnicas....................................................22
3
Page 75

Ɣ Controles
1.
2.
3.
4.
5.
6.
7.
8.
Más volumen: Pulse para aumentar el volumen durante la reproducción.
Menos el volumen: Pulse para disminuir el volumen durante la reproducción.
Grabar
Reproducir/Encendido/Apagado
Avance rápido / Siguiente
Rebobinado / Anterior
Menú: Accede al submenú seleccionado o vuelve al menú principal
Bloqueo: Bloquea o desbloquea las teclas.
4
Page 76

Ɣ Reproductor
Modo de
repetición
Tasa de bits / formato
Modo de programa
Canción / Artista y letra
Modo
aleatorio
Pantalla
Número de
Ajuste del ecualizador
Indicador de reproducción
Tiempo de reproducción
Pila
Número de pista
Tasa de bits / formato
Modo de programa
Nombre de archivo
Tiempo de reproducción
Pila
Visualización de la letra
Este reproductor admite archivos LRC para mostrar la letra con la música (solo
archivos MP3).
¿Cómo saber si el archivo tiene la letra de la canción?
El icono
cambiará a si la canción cuenta con un archivo LRC.
El reproductor MP3 admite archivos con la letra de las canciones en formato LRC.
1.Prepare una canción MP3 o WMA, como por ejemplo happymusic.mp3.
2.Descargue de Internet el archivo con la letra. El archivo con la letra debe contar con
5
Page 77

una extension LRC. Por ejemplo, happymusic-2004.lrc.
3.Cambie el nombre del archivo con la letra. Por ejemplo, happymusic.lrc. Asegúrese
de que el nombre de archivo con la letra corresponde al nombre de archivo de la
canción.
4.Copie el archivo con la letra y la canción al reproductor MP3.
5.Desconecte el reproductor MP3.
6.Utilice los botones de salto para seleccionar la canción, como por ejemplo, adc.mp3.
Pulse el botón de reproducción para reproducir el archivo.
7.Aparece el icono LRC y la letra se muestra en sincronía con la canción en la pantalla
LED mientras se reproduce la música.
Nota: El reproductor MP3 sólo reproduce el formato LRC.
Nota: Si la letra no se sincroniza con la música, descargue un archivo mejor con la letra
y vuelva a intentarlo.
Nota: Asegúrese de que la canción MP3 y el archivo LRC estén situados en la misma
carpeta y con el mismo nombre de archivo. De lo contrario, el reproductor MP3
puede no reconocer el archivo con la letra.
Visualización de la energía de la pila
Indica que la pila está llena, a 1,5v; indica que la energía está disminuyendo;
indica que necesita sustituir la pila de inmediato.
Ɣ Encendido / apagado
Encendido: Encender al pulsar
Advertencia: El modo de música es el predeterminado tras encender la unidad.
Apagado: Para apagar, mantenga pulsado
Suelte la tecla cuando se haya completado la barra.
Advertencia: No se puede apagar la unidad mientras se está grabando.
Ɣ Menú principal
. Se muestra una imagen de bienvenida en el LCD:
. Se muestra una barra en el LCD:
6
Page 78

Para acceder al menú principal, mantenga pulsado o pulse brevemente durante
la grabación.
Sistema de reproducción de música
Música
1. Play list
Choose “Music” in the menu to enter the folder.
Play list information, As the picture under.
Press / to select 4 mode: Play all,Artist, Album, Songs,.
Four mode:
Play all Play all songs starting from “Artist” type, then”Album”, then”Songs”
Artist Songs in the selected artist list
Album Songs in the selected album list
Songs Songs in the selected ID3 list
Exit Exit play list menu
El submenú “Tocar todas” en el modo “Artista”,"Álbum" y ”Canciones”:
Entrar al modo “Artista” ”Álbum” y ”Canciones” y presionar / para seleccionar uno,
y luego presionar “menu” para ingresar a “Tocar todas”, la unidad tocará todas las canciones
clasificadas según las instrucciones de filtro de cada modo.
7
Page 79

2. Introduzca
Seleccione 'Music' (Música) pulsando
continuación, pulse
Sistema de reproducción de música
Si hay canciones, se muestra:
Si no hay canciones, se muestra:
Para volver al modo de menú, mantenga pulsado .
Aviso: Tras encender la unidad, el modo de música es el predeterminado.
3. Cambio de modo
.
o en el menú principal y, a
Mientras esté parado o pausado, pulse
Modo parada Modo pausa
Modo de reproducción
Pulse
para pausar durante la reproducción
para reproducir.
8
Page 80

4. Selección de pistas:
Mientras esté parado, pausado o reproduciendo, pulse
pulse
para la pista siguiente; mantenga pulsado para avance rápido,
para la pista anterior,
pulse y mantenga pulsado
para reproducir la pista seleccionada. Mientras esté pausado, se reproduce la pista
seleccionada automáticamente.
5. Menú de control durante la reproducción o la pausa
Mientras se esté reproduciendo o pausado, pulse
control, como se muestra:
Pulse o para seleccionar el submenú y pulse para entrar. Elija 'exit' (salir)
y pulse
Volumen
Para acceder a la interfaz de ajuste del volumen, pulse
Pulse
menú principal).
para salir del Menú de control y volver al modo de reproducción.
para volver al modo de reproducción (mantenga pulsado para volver al
para rebobinar. Mientras esté parado, pulse
para acceder al menú de
o para ajustar el volumen.
Para cambiar el valor del volumen directamente, pulse o durante la reproducción.
Repetición
Acceda a la interfaz del modo 'Loop' (Repetición), como se muestra en la imagen:
Seis modos:
9
Page 81

Normal Parar la reproducción una vez acabado el archivo actual.
Single loop
(Repetición
simple)
All loop
(Repetición
total)
Random
(Aleatoria)
Random loop
(Repetición
aleatoria)
Muestra
Repetición de una sola canción
Repetición de todas las canciones
Reproducir aleatoriamente todas las canciones de la carpeta actual
Reproducir aleatoriamente todas las canciones de la carpeta actual. No
parará si no se pulsa la tecla.
Reproduce los primeros 15 segundos de todas las canciones de la carpeta
actual
Pulse o para seleccionar el modo que desee. Pulse para volver al modo de
reproducción (mantenga pulsado
para volver al menú principal).
Repetición A-B
Pulse
(A-B) para establecer un punto de inicio, y, a continuación, la misma tecla para
establecer un punto de finalización durante la reproducción o grabación. La unidad estará
en el modo A-B y comenzará a reproducir la pista A-B. Cancele pulsando
(A-B) de
nuevo.
Modo de efectos de sonido
Acceda a la interfaz del modo 'Sound effect mode' (Modo de efectos de sonido), como se
muestra en la imagen:
Se puede escoger entre cinco efectos de sonido. Pulse o para seleccionar un
modo. Normal, Rock, Jazz, Clasic, Pop. Pulse
(mantenga pulsado
para volver al menú principal).
para volver al modo de reproducción
Eliminación de archivos
Seleccione 'Delete the file' (Eliminar el archivo), como se muestra a continuación:
10
Page 82

Pulse
para volver al menú principal).
Pulse o para seleccionar 'YES' (Sí) o 'NO'. Si elije 'YES' (Sí), pulse para
confirmar la eliminación del archivo seleccionado y volver al modo de reproducción
(no eliminará el archivo y volverá al menú principal si mantiene pulsado
para acceder a la interfaz, como se muestra a continuación (mantenga pulsado
).
Si elije 'No', pulse
volverá al modo de reproducción.
ELIMINAR TODAS
Nota: La eliminación sólo funcionará con los archivos MP3/WMA que pueda encontrar
la unidad. No eliminará las carpetas o archivos que sobrepasen la limitación de archivos.
Para eliminar estos archivos / carpetas, tendrá que usar el Explorador de Windows.
Seleccione 'Delete All' (Eliminar todos), como se muestra a continuación:
Pulse para acceder a la interfaz, como se muestra a continuación (mantenga pulsado
para volver al menú principal).
Pulse o para seleccionar 'YES' (Sí) o 'NO'. Si elije 'YES' (Sí), pulse para
comenzar a eliminar todos los archivos y volver al modo de reproducción (mantenga pulsado
para volver al menú principal).
, y la unidad no eliminará el archivo seleccionado actualmente y
11
Page 83

6. Menú de control durante el modo de parada
Pulse
No estarán disponibles todas las opciones del menú de control. Para ver todas las
opciones del menú de control, consulte el capítulo 4.
Ɣ Grabar
1. Comienzo de la grabación
Hay dos métodos de comenzar la reproducción.
A. Pulse
Como se muestra a continuación:
para acceder al menú de control en el modo de parada.
o la tecla para seleccionar 'Record' (Grabar) en el menú principal.
Pulse
B. Presión (A-B) para comenzar a grabar directamente desde el modo de parada.
Pulse
2. Tipos de archivo de grabación
Hay dos tipos de grabación: optimizada y larga duración. Optimizada es para uso
general, con un tamaño de archivo más grande, mientras que larga duración sólo es
válida para la grabación de voz.
3. Pausar
Presión
Pulse (A-B) de nuevo para continuar con la grabación:
para comenzar la reproducción. Como se muestra a continuación:
para parar la grabación.
(A-B) para pausar la grabación:
12
Page 84

Ɣ Reproducir grabaciones
Para reproducir los archivos grabados.
1. Reproducir
Pulse
Pulse
En la unidad hay archivos guardados.
o para seleccionar 'Replay' (Volver a reproducir) en el menú principal.
para acceder al modo de volver a reproducir.
Pulse
Pulse
Pulse
rápido. Mantenga pulsado
archivos grabados.
2. Menú de control durante los modos de reproducción o pausa
Lea el capítulo 'Music' (Música) para más saber más sobre las funciones relacionadas.
3. Menú de control durante el modo de parada
Lea el capítulo 'Music' (Música) para más saber más sobre las funciones relacionadas.
Ɣ Sistema
1. Introducir
En el menú principal, pulse
pulsado
para reproducir el archivo grabado, y vuelva a pulsar la tecla para pausar.
para seleccionar el archivo anterior. Mantenga pulsado para rebobinar.
para seleccionar el archivo siguiente. Mantenga pulsado para avanzar
para volver al menú principal mientras se reproduzcan los
o para seleccionar 'System' (Sistema) o mantenga
para accceder al menú 'System' (Sistema).
En el menú 'System' (Sistema), mantenga pulsado
para volver al menú principal.
13
Page 85

2. Seleccione e introduzca cada opción
En el menú 'System' (Sistema), pulse
menú. Pulse
(Salir), pulse a continuación
menú principal).
Tiempo de la retroiluminación
Pulse
'System setting' (Ajustes del sistema) (mantenga pulsado
menú principal).
Idiomas
Pulse
'System setting' (Ajustes del sistema) (mantenga pulsado
menú principal).
Ajuste del apagado
Pulse
menú 'System setting' (Ajustes del sistema) (mantenga pulsado
y volver al menú principal).
o para ajustar esta opción. Pulse para guardar y volver al menú
o para ajustar esta opción. Pulse para guardar y volver al menú
o para ajustar esta opción. Pulse la tecla para guardar y volver al
para acceder a la interfaz de ajustes. (por ejemplo: Si elije 'Exit'
para salir del menú 'System' (Sistema) y volver al
o para seleccionar las opciones del
para guardar y volver al
para guardar y volver al
para guarder
Contraste
Pulse
para guardar y volver al menú 'System setting' (Ajustes del sistema).
Tipos de archivo de grabación
Pulse
menú 'System setting' (Ajustes del sistema).
Espacio de almacenamiento
Compruebe que hay suficiente espacio disponible. Pulse
'System setting' (Ajustes del sistema) (mantenga pulsado
principal).
o para ajustar el nivel de contraste de la pantalla. Pulse la tecla
o para ajustar los tipos de grabación. Pulse para guardar y volver al
14
para volver al menú
para volver al menu
Page 86

Versión del software
Compruebe el modelo y la versión de la unidad. Pulse
'System setting' (Ajustes del sistema) (mantenga pulsado
al menú principal).
Ɣ Disco USB
Esta unidad funciona como un disco estándar USB y admite Windows ME, 2000, XP
sin instalar controladores. Si utiliza Win98, debería instalar previamente el controlador.
¿Cómo conectar al PC? Conecte el MP3 y el PC mediante el cable USB. Hay tres
pantallas de estado posibles cuando la conexión sea correcta.
1. espera
2. descarga
3. subida
para volver al menú
para guardar y volver
Ɣ Actualización de software
Esta unidad puede utilizar la herramienta instalada en el ordenador junto a los
controladores para actualizar y mantener el firmware del sistema.
1. Ejecute la actualización de firmware.
15
Page 87

Inicializando la descarga del firmware de SigmaTel MSCN. Buscando el reproductor MP3
2. Conecte el reproductor al puerto USB y asegúrese de que la conexión funcione
correctamente. Pulse la tecla de apagado/encendido y haga clic en 'Start' (Inicio)
del sistema operativo. El sistema comienza a actualizarse automáticamente. Como
se muestra a continuación:
16
Page 88

3. Actualizándose. Como se muestra a continuación:
4. La actualización se ha completado. En el reproductor aparecerá un aviso, como se
muestra a continuación:
17
Page 89

La actualización de firmware sirve para mejorar y maximizar las capacidades del producto.
Si no actualiza el firmware, el normal funcionamiento del aparato no se verá afectado.
No desconecte el producto mientras se actualiza, ya que la unidad podría verse dañada.
Desconexión del PC
1. Haga clic en el icono
2. Haga clic en el mensaje emergente
de la bandeja del sistema.
Extracción segura de Dispositivo de almacenamiento
Nota:
masivo USB – Unidad (E:)
3. Haga clic en el botón " OK" (Aceptar) y desconecte físicamente el cable USB.
1. Si el icono de la bandeja está oculto: Haga clic en "Display hidden icon" (Mostrar iconos
ocultos) a la izquierda de la bandeja del sistema para mostrarlo.
2. Mientras esté utilizando ciertos programas, como el Explorador de Windows o el
Reproductor de Windows Media, es posible que la extracción segura no esté disponible.
Cierre las aplicaciones antes de ejecutar la extracción segura.
18
Page 90

Grabar y reproducir archivos con licencia DRM
NOTA:
El uso de DRM (Administración de Derechos Digitales) determina los
derechos que adquiere el usuario sobre un archivo, p.ej. una canción.
De esta manera, es posible especificar con qué frecuencia o por cuánto
tiempo se puede utilizar una pieza de música y si puede ser
transferida a un reproductor portátil.
El archivo se encripta para este fin.
El usuario necesita una licencia para poder utilizar
el archivo.
Este reproductor es compatible con DRM y, por esta razón,
permite la reproducción de música descargada
protegida con licencia.
Puede obtener más información sobre DRM en el sitio web
del Reproductor de Windows
Media (http://www.microsoft.com/windows/
windows media/de/drm/default.aspx) o de su proveedor de
descarga de música online.
Puede transferir los archivos protegidos con DRM a su reproductor de audio con
el Reproductor de Windows Media (desde la versión 9.0).
Funcionamiento
1.Conecte el reproductor a su PC.
2.Instale la versión más reciente del Reproductor de Windows Media en su PC.
3.Adquiera los títulos de su elección del proveedor de música online que desee.
4.Descargue las piezas de música que desee de acuerdo con las instrucciones del
proveedor elegido. Recomendamos guardarlas en la carpeta "Mis Documentos\Mi
Música".
5.Abra el Reproductor de Windows Media, p.ej. el Reproductor de Windows Media 10
(Fig.10 hasta Fig.12).
6.En la barra del menú, elija "Herramientas" y luego
"Opciones".
19
Page 91

7.En la ventana del menú, elija "Dispositivos".
8.Seleccione "Dispositivo portátil " y haga clic en "Aceptar" para confirmar su
selección.
20
Page 92

9.En el Reproductor de Windows Media, elija la opción del menú
“Sincronizar” seguido por "Modificar lista de reproducción".
10.Haga clic en las piezas de música a ser transferidas al reproductor
usando el ratón y haga clic en “Aceptar” para confirmar su selección.
11.Seleccione "Iniciar sincronización". Después de terminar el proceso de
sincronización, la música está disponible en su reproductor.
21
Page 93

Ɣ Resolución de problemas y especificaciones técnicas
1.¿La pila está correctamente introducida? No hay alimentación.
2.¿La unidad está encendida?
No hay sonido.
Hay algún problema con los
caracteres de la pantalla.
La música no se puede
descargar adecuadamente
Dimensiones 86 x 33 x 20 mm
Peso 27,5 g (pilas no incluidas)
Pantalla FST LCD (128x32), retroiluminada
Formato de USB Velocidad completa
Memoria (128 Mb, 256 Mb, 512 Mb, 1 Gb, 2Gb) NAND Flash
Alimentación Pila alcalina AAA
Formato de reproducción MP3, WMA, WAV
Temperatura de
funcionamiento
Idiomas disponibles Inglés, francés y holandés
Sistema operativo Win 98SE / Win ME / Win NT / Win 2000 / Win XP / Mac
1.¿El volumen está a 0?
2.Asegúrese de que el problema no reside en la conexión con
los auriculares.
3.Si sólo se escucha ruido, sin sonido normal, compruebe que
los archivos MP3 no estén dañados.
¿Ha elegido el idioma correcto?
1.¿El cable USB está dañado? ¿La conexión es buena?
2.¿La instalación del controlador se ha completado
correctamente?
3. ¿Hay espacio suficiente?
Muestreo: 8 KHz, 32 KHz Grabar
Formato de grabación: WAV
Entre 0-50º C
Inglés,Francés,Español,Italiano,Checo,Húngaro,Polonés,Danés,Noruego,Finlandés,Sueco
22
Page 94

Este símbolo que puede aparecer en el producto o en las instrucciones indica que
el aparato electrónico o eléctrico no deberá desecharse al final de su vida con el
resto de los desechos domésticos sino por separado.
En la UE existen sistemas de recogida selectiva para el reciclado.
Para más información, póngase en contacto con las autoridades locales o el
comercio donde haya adquirido el producto.
23
Page 95

DIGITAALINEN SOITIN
MAT 101MR/102MR/105MR/110MR/120MR
KÄYTTÖOPAS
Page 96

Huomio: jos soitinta käytetään immateriaalioikeuksilla suojatun ohjelmiston tai musiikin
laittomaan kopiointiin tai jakamiseen, käyttäjän on hyväksyttävä täysi oikeudellinen vastuu
tällaisista toimista.
Valmistaja, maahantuoja ja jälleenmyyjä eivät ole vastuussa tapaturmavahingoista, jotka
aiheutuvat soittimen asiattomasta käytöstä.
Varoitus
Ɣ Lue käyttöohjeet ennen laitteen käyttöä.
Ɣ Varmista, että kaikki sähkökytkennät (mukaan lukien sähköjohdon pistoke, jatkojohdot ja
laitteiden väliset kaapelit) on tehty oikein ja valmistajan ohjeiden mukaan.
Ɣ Ota yhteys jälleenmyyjääsi, jos et ole varma laitteen asennuksesta, käytöstä tai
turvallisuudesta.
Ɣ Älä irrota mitään kiinteitä suojuksia, sillä sisällä saattaa olla vaarallinen jännite.
Ɣ Älä peitä laitteen ilmanvaihtoaukkoja esimerkiksi sanomalehdellä, pöytäliinalla, verhoilla
jne. Ylikuumeneminen aiheuttaa vaurioita ja lyhentää laitteen käyttöikää.
Ɣ Älä altista sähkölaitteita pisaroille tai roiskeille äläkä sijoita laitteen päälle mitään nestettä
sisältäviä esineitä, kuten maljakoita.
Ɣ Älä sijoita laitteen päälle tai lähelle mitään kuumia esineitä tai avoliekkiä, kuten palavia
kynttilöitä tai yövaloja. Korkeat lämpötilat saattavat sulattaa muovin ja aiheuttaa tulipalon.
Ɣ Lopeta laitteen käyttö, jos se ei tunnu toimivan normaalisti tai jos se on vaurioitunut jollain
tavalla. Katkaise laitteen virta, irrota virtajohto pistorasiasta ja ota yhteys jälleenmyyjään.
Ɣ Muista liikenneturvallisuus aina käyttäessäsi laitetta.
1
Page 97

Sisällys
Säätimet ...............................................................................................................................4
Soitin.....................................................................................................................................5
Tämä MP3-soitin tukee LRC-muotoisia lyriikkatiedostoja ....................................................5
Virran kytkentä ja katkaisu....................................................................................................6
Päävalikko ............................................................................................................................7
Musiikki.................................................................................................................................7
1. Play list..........................................................................................................................7
2. Avaaminen....................................................................................................................8
3. Tilan valinta...................................................................................................................8
4. Raidan valinta ...............................................................................................................9
5. Ohjausvalikko toisto- ja taukotilassa.............................................................................9
Äänenvoimakkuus .......................................................................................................9
Silmukka ......................................................................................................................9
A–B-silmukka...............................................................................................................10
Äänitehostetila.............................................................................................................10
Tiedoston poisto ..........................................................................................................10
Poista kaikki.................................................................................................................11
6. Ohjausvalikko pysäytystilassa ......................................................................................12
Tallennus ..............................................................................................................................12
1. Tallennuksen aloitus .....................................................................................................12
2. Tiedostotyypit................................................................................................................12
3. Tauko............................................................................................................................12
Toisto....................................................................................................................................13
1. Toisto ............................................................................................................................13
2. Ohjausvalikko toisto- ja taukotilassa.............................................................................13
3. Ohjausvalikko pysäytystilassa ......................................................................................13
Järjestelmä ...........................................................................................................................13
1. Avaaminen....................................................................................................................13
2. Vaihtoehtojen valinta.....................................................................................................14
Tallennusaika ..............................................................................................................14
Taustavalon aika .........................................................................................................14
Kielet ..........................................................................................................................14
2
Page 98

Virran katkaisun asetus ...............................................................................................14
Kontrasti .....................................................................................................................14
Tallennuksen tiedostotyypit .........................................................................................14
Tallennus .....................................................................................................................14
Laiteohjelmiston versio................................................................................................14
USB-levy...............................................................................................................................15
Ohjelmistopäivitys.................................................................................................................15
Irrottaminen tietokoneesta ....................................................................................................19
Vianmääritys ja tekniset tiedot..............................................................................................19
20
23
3
Page 99

Ɣ Säätimet
1.
toiston aikana.
2.
toiston aikana.
3.
4.
5.
6.
7.
8.
Volume up (äänenvoimakkuus ylös): lisää äänenvoimakkuutta painamalla
Volume down (äänenvoimakkuus alas): alenna äänenvoimakkuutta painamalla
Record (tallennus)
Play/Power on/Power off (toisto / virran kytkentä / virran katkaisu)
FFWD/Next (selaus eteenpäin / seuraava)
Rew/Last (selaus taaksepäin / edellinen)
Menu (valikko): avaa valitun alivalikon tai palaa päävalikkoon
Lock (lukitus): lukitsee tai avaa näppäimet.
4
Page 100

Ɣ Soitin
Näyttö
Raidan numero
Silmukkatila
Siirtonopeus/formaatti
Ohjelmointitila
Kappale/artisti ja
lauluteksti
Silmukkatila
Siirtonopeus/formaatti
Ohjelmointitila
Tiedoston nimi
Ekvalisaattorin asetus
Toiston/tauon ilmaisin
Toistoaika
Virta
Tallennettujen tiedostojen toisto
Raidan numero
Toistoaika
Virta
Lyriikkanäyttö
Tämä soitin tulee LRC-tiedostoja, jotka mahdollistavat laulutekstien näytön (vain
MP3-tiedostot).
Mistä tietää, onko lyriikkatiedosto olemassa vai ei?
Kuvake
vaihtuu kuvakkeeksi , jos kappaleessa on LRC-tiedosto.
5
 Loading...