

Page 1

Safety and Regulatory Information
USA Notice
FCC Part 15: This equipment has been tested and found to comply with the
limits for a class B digital device, pursuant to Part 15 of the FCC Rules. These limits
are designed to provide reasonable protection against harmful interference in a residential installation. This equipment generates, uses, and can radiate radio frequency
energy and, if not installed and used in accordance with the instructions, may cause
harmful interference to radio communications. However, this notice is not a guarantee that interference will not occur in a particular installation.
CAUTION: To comply with the limits for the class B device, pursuant to Part 15
of the FCC Rules, this device must be installed in computer equipment certified to
comply with the Class B limits.
All cables used to connect the computer and peripherals must be shielded and
grounded. Operation with non-certified computers or non-shielded cables may result
in interference to radio or television reception.
Any changes or modifications not expressly approved by the grantee of this device could void the user’s authority to operate the device.
Page 2

MOTHERBOARD User’s Manual
II
COPYRIGHT: This publication, including all photographs, illustrations and software, is protected under international copyright laws, with all rights reserved. Neither this
manual, nor any of the material contained herein, may be
reproduced without the express written consent of the manufacturer.
© February 2000
DISCLAIMER: The information in this document is
subject to change without notice. The manufacturer makes no
representations or warranties with respect to the contents
hereof and specifically disclaims any implied warranties of
merchantability or fitness for any particular purpose.
Document Version: 1.0
Page 3

MOTHERBOARD User’s Manual
Table of Contents
1: Motherboard Features ...................................................1
Package Contents & Options ........................................2
Main Features................................................................3
Layout & Port Positions ................................................ 7
2: Configuration & Installation .........................................9
Hardware Configuration................................................9
Configuring The Jumpers..........................................9
Installing A CPU.....................................................12
Installing System Memory......................................18
Installing Options....................................................20
Installing The Motherboard ........................................21
Installing in a System Housing................................21
System Housing Connections .................................23
Disk Drive Connections .......................................... 24
Other Connections...................................................26
Checking The Installation .......................................30
Support Software.........................................................30
3: Using The Motherboard..............................................36
System Controls ..........................................................36
Front Panel Features................................................36
Connecting External Peripherals.................................38
Connecting Peripherals to Conventional Ports....... 38
Connecting USB Peripherals...................................40
Installing Expansion Cards .........................................41
Installing PCI Cards................................................41
Installing A Modem Riser Card ..............................44
Upgrading System Memory ........................................45
4: The System BIOS & CMOS Setup Utility.................. 46
The System BIOS........................................................46
The CMOS Setup Utility.............................................47
5: Troubleshooting & Technical Summary.....................58
Troubleshooting ..........................................................58
General Troubleshooting.........................................58
Support Software Problems.....................................60
Battery Replacement ...............................................60
Technical Summary ....................................................61
Jumper Settings.......................................................61
CPU Options ...........................................................62
System Memory Specification ................................62
III
Page 4

MOTHERBOARD User’s Manual
How This Manual
Is Organized
This manual is divided in to five sections with the
following topics:
1: Motherboard Features
Describes the main features of the motherboard
and the location of important components on the
motherboard.
2: Configuration & Installation
Information on changing the motherboard’s default hardware configuration, installing a CPU
and system memory and installing the motherboard in a system housing.
3: Using The Motherboard
Contains pointers and useful information on using
the motherboard’s features once it is installed.
4: The System BIOS & CMOS Setup Utility
Explains how to use the CMOS Setup Utility and
notes important points on changing the default
configuration.
5: Troubleshooting & Technical Summary
Has a brief section on troubleshooting motherboard problems and has a summary of the board
setup information for the experienced user.
IV
The manual is designed to provide useful explanations where needed while making it easy to find
basic information without a lot of searching.
Page 5

Motherboard Features
1
Motherboard Features
This chapter lists what you should find in the
packing box, introduces your motherboard’ s fea-
tures and indicates the position of components
What’s In This
Chapter:
Package Contents
& Product Options
Main Features
Board Layout &
Port Positions
you may need to know about. Please review this
chapter to familiarize yourself with the basic in-
formation about your motherboard.
The motherboard uses the SiS 630 chipset and the
SiS 950 Super I/O chip. The 630 chipset has video
display, audio and LAN functions integrated into
the chipset, so separate cards or onboard chips are
not required. The motherboard is also available
with an 8MB SDRAM video display memory ca-
che that enhances display performance. The 950
I/O chip provides a full set of I/O ports on the
board which connect to port brackets that mount
in the system case.
The motherboard also has a two flexible configu-
ration features – there are two CPU sockets, a Slot
1 and a Socket 370 to allow flexible CPU selection
and upgrading. There are also two power supply
connectors on the board to allow the use of either
AT or ATX power supplies.
The motherboard also comes with full software
driver support for the 630 chipset on a convenient
CD-ROM Support Disk. The Support Disk has a
user-friendly installation interface and also in-
cludes some useful utility software.
1
Page 6

MOTHERBOARD User’s Manual
1
Package Contents & Options
Your motherboard package should include the
items listed here. If any thing is missing or damaged, please contact the vendor you bought it from
to resolve the problem. If you purchased a board
with optional features or equipment, please check
the options list. You should find:
• The motherboard
• IDE connector cable (supports UDMA/66)
• Floppy disk drive connector cable
• Serial port bracket (2 ports: COM1/COM2)
• VGA & Printer port bracket
• Audio & Game port bracket
• PS/2 mouse port bracket
• This User’s Manual
• Support software CD-ROM disk
• PC-Cillin User’s Manual
Optional Items:
• LAN port bracket (requires optional LAN fea-
ture onboard)
• Modem Riser card (separate purchase)
2
Page 7

Motherboard Features
1
Main Features
This motherboard a full set of system features
built onto the board.
AT Form Factor
This motherboard has a Baby AT circuit board
that integrates system I/O ports onto the board
and uses any standard Baby AT or AT system
housing. All I/O ports except the AT keyboard
connector are on port brackets that connect to the
motherboard with attached ribbon cables.
SiS 630 Chipset
The SiS 630 chipset supports many system fea-
tures onboard including video display and audio
circuitry. It also supports UDMA66 EIDE data
transfer mode. The chipset supports FrontSide Bus
(FSB) speeds of 66 100 or 133MHz. The board
also has an optional display cache for the onboard
video display and supports up to PC133 SDRAM
memory modules.
CPU Support
This motherboard has a Slot 1 CPU socket that
supports any Intel Slot 1 CPU running at speeds
from 233MHz to 667MHz including SECC Cele-
ron, Pentium II and Pentium III processors.
The motherboard also has a Socket 370 ZIF sock-
et for PPGA Celeron and FCPGA Pentium III
CPUs running at speeds up to 733Mhz.
The CPU operating speed is set in the BIOS firm-
ware based on the autodetected external clock
speed.
3
Page 8

MOTHERBOARD User’s Manual
1
Integrated I/O
This motherboard has a full set of integrated I/O
ports. The external ports are mounted on port
brackets that connect to the board. They include a
parallel port, two serial ports, a VGA port, a
game/MIDI port and three audio jacks.
There are also pin connectors on the board for
optional port brackets for PS/2 keyboard and
mouse ports and two USB ports as well as for a
separately-purchased IrDA port module. If you
install an infrared port, the second serial port is
disabled.
A 10/100 BaseT network interface with an RJ-45
interface on a port bracket is available as an onboard factory-installed option. You must purchase
the correct board model to get this option.
Onboard Peripheral Interfaces
There are connectors for two IDE channels and a
floppy disk drive interface on the motherboard.
The board supports two floppy disk drives. The
two IDE channels support two devices each for a
total of four devices. All IDE data transfer modes
are supported including all PIO modes and Ultra
DMA33 and 66 modes for a maximum data transfer rate of 66MB per second. The motherboard
comes with one floppy and one IDE cable. The
IDE cable supports all IDE modes and devices.
System Memory
The motherboard has two sockets for 168-pin 3.3V
non-buffered SDRAM DIMM memory modules.
4
You can use PC100 or PC133 memory. PC66
memory is not supported. You can install any
combination of DIMMs from 16MB to 256MB
for a maximum system memory of 512MB.
Page 9

Motherboard Features
Embedded 2D/3D Video Display
1
The SiS 630 chipset has embedded video display
and optional display cache.
The embedded 128-bit video display supports both
2D and 3D display graphics. It is AGP 2.0 com-
pliant and runs at 100MHz. The display circuitry
uses a shared memory architecture that allows a
maximum of 32MB of main memory to act as a
frame buffer. The embedded controller supports
resolutions up to 1920 x 1200 at 16M colors with
up to 2048 x 2048 Texture size and a virtual desk-
top up to 4096 x 4096. The video controller also
supports hardware DVD acceleration and direct
DVD to TV playback.
Display drivers are supplied on the Support Disk
that comes with the motherboard.
Onboard 32-bit Audio
The SiS 630 chipset onboard audio comes with
audio drivers that are supplied on the Support
Disk. The audio subsystem uses the Line-In, Mic
and Line-Out jacks on the audio port bracket to
connect to external devices and also uses either of
the onboard CD-ROM audio-in connectors to
process audio from a CD-ROM drive.
The onboard audio uses an AC’97 audio CODEC.
This reduces noise to improve audio quality and
performance and also improves voice synthesis
and recognition.
Expansion Options
This motherboard has three 32-bit Revision 2.2
PCI expansion slots for PCI expansion cards. All
slots are Bus Master capable.
5
Page 10

MOTHERBOARD User’s Manual
1
The motherboard’s MR slot supports a Modem
Riser card that has data/fax modem and other
telephony features. Such cards are available as a
separate purchase. Ask your motherboard vendor
for details.
ACPI Ready
ACPI (Advanced Configuration and Power Interface) support provides energy saving functions for
operating systems that support ACPI such as
Windows 98. An ACPI-capable system can use
the ACPI OnNow feature to turn off system
peripherals and wake the system up from Suspend
mode via several means including pointing device
movement and key commands.
Award BIOS
This motherboard uses the Award PnP BIOS and
the CMOS Setup Utility which allows setting of
various system hardware parameters. The CMOS
Setup Utility has an easy-to use interface and supports software clock frequency control.
Virus Protection
This motherboard comes with two forms of computer virus protection. When enabled, the antivirus feature in the Award BIOS protects the primary hard disk drive’ s boot sector and partition
table. The motherboard also comes with PC-cillin,
an anti-virus software utility for Microsoft Windows 9x and 2000. The software is located on the
Support Disk that comes with the motherboard.
6
Page 11

Motherboard Features
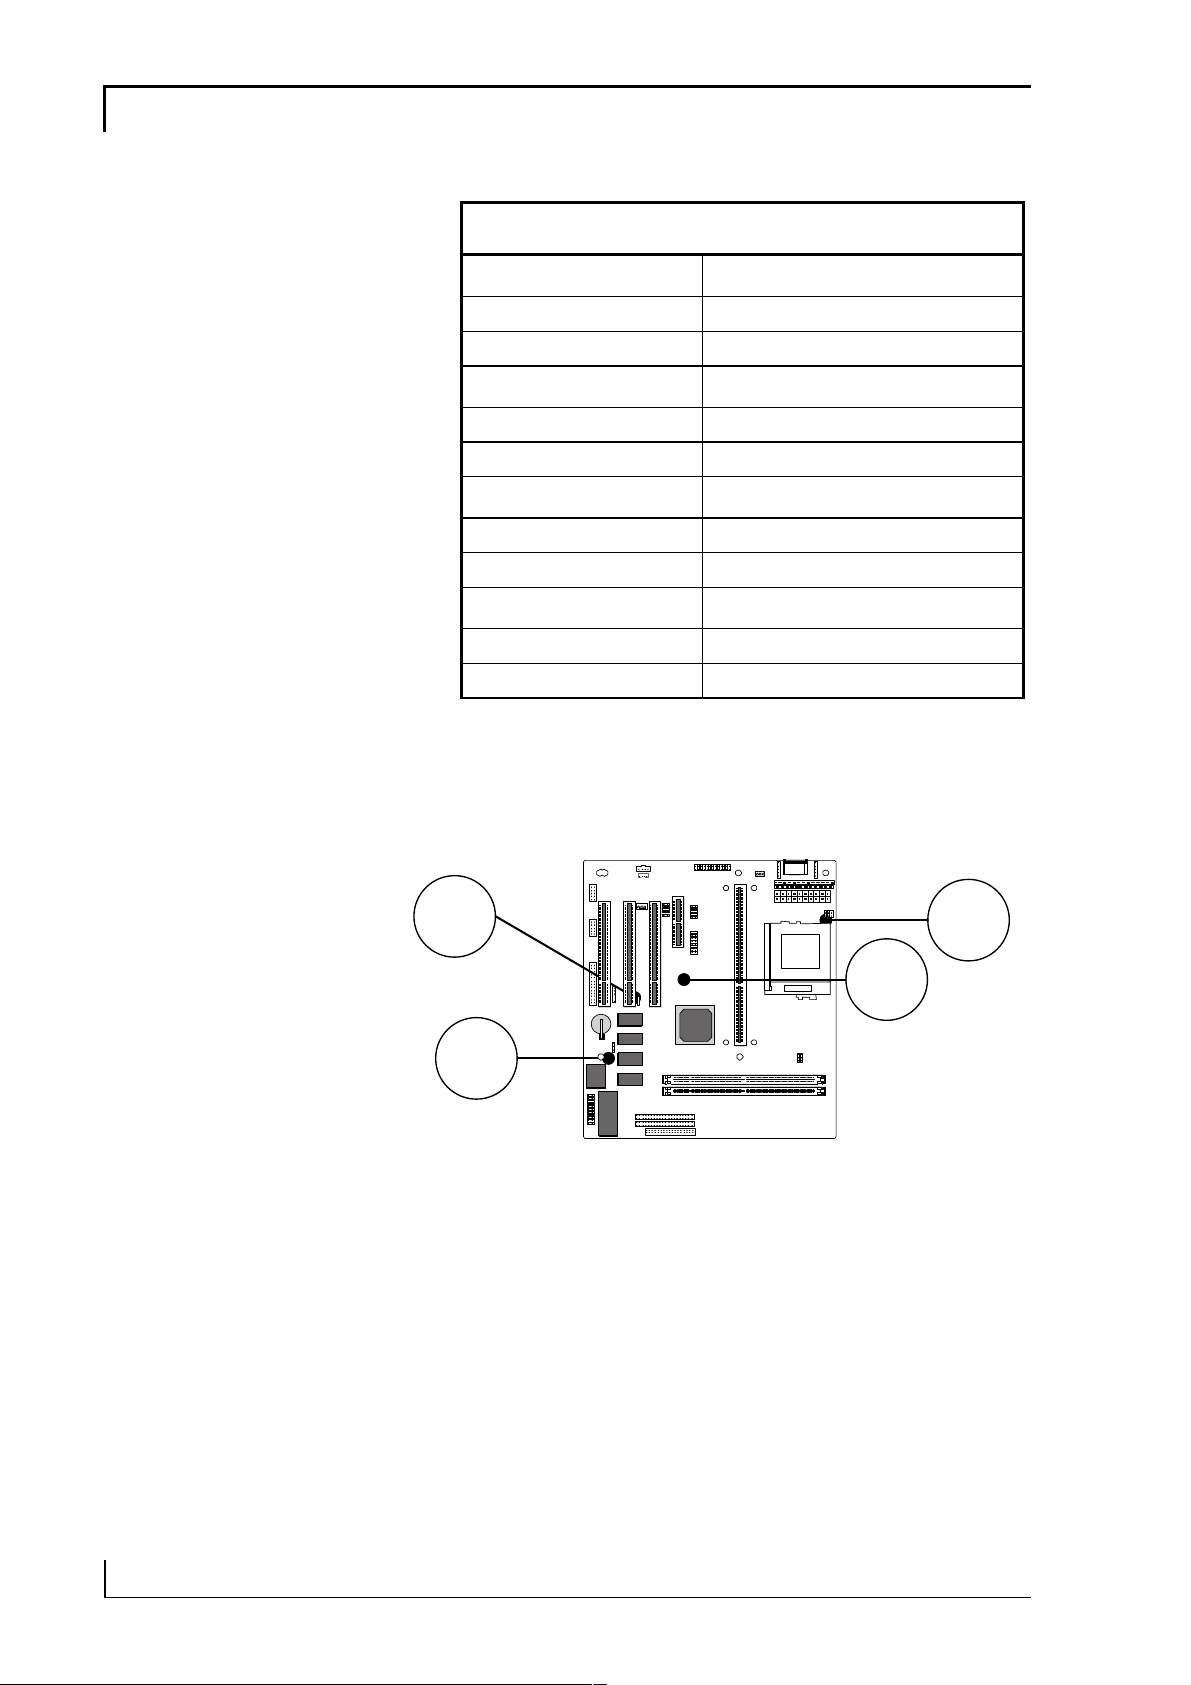
Layout & Port Positions
The figure at right shows the layout of the moth-
erboard with the components you might need to
locate labeled.
Component Description
1: MR Riser Modem Riser slot
2: PCI 1,2,3 32-bit PCI expansion slots
3: Slot 1 Slot 1 CPU socket
4: Socket 370 Socket 370 CPU socket
5: DIMM1, DIMM2 168-pin memory module slots
1
6: FDC Floppy disk drives connector
7: IDE1, IDE2 Primary and Secondary IDE channel connectors
8: ATX Power ATX power supply connector
9: AT Power AT power supply connector
10: AT Keyboard AT Keyboard connector
11: PS/2 KB PS/2 keyboard port bracket connector
12: PS/2 MS PS/2 mouse port bracket connector
13: Audio Audio port bracket connector
14: LAN LAN port bracket connector
15: VGA VGA port bracket connector
16: USB USB port bracket connector (bracket optional)
17: CD-ROM CD-ROM audio-in connectors
18: IrDA Connector for optional infrared port
19: SYS, CPU FAN CPU and System cooling fans power connectors
20: COM 1 & 2 Connectors for serial port bracket
21: Print Parallel port bracket connector
22: JP1 CPU Type
23: JP6 Thermal Monitor selector
24: JP9 Clear CMOS
25: JP27 Power supply selector
7
Page 12

MOTHERBOARD User’s Manual
5
1
20
21
17
19
2
18 25
16
1
24
14
15
1213
10
19
3
4
11
9
8
22
23
7
6
8
Page 13

Configuration & Installation
2
Configuration & Installation
This chapter explains how to configure the moth-
erboard, install a CPU and system memory and
has basic information on installing the mother-
What’s In This
Chapter:
Hardware Configuration
Installing the
Motherboard
Installing Support
Software
board in a system housing or “chassis”. We then
explain how to install the support software that
comes on the Support Disk. If the board is already
installed in a system, you may want to review this
chapter or you can skip it and go to the next chap-
ter which covers some post-installation topics.
Hardware Configuration
There are three steps to configure the mother-
board hardware before installing it in a system
housing: configuring the jumper switches, in-
stalling a CPU and installing system memory.
Configuring The Jumpers
This motherboard has four jumper switches. All
the jumpers come preset to default settings. You
may not need to change any of the settings. Please
note that once the motherboard is installed, you
should always turn your computer off and disco n-
nect the power cord before changing any jumper
settings. In all cases, you should always take pre-
cautions against static electric damage to sensitive
components. The default settings are listed in the
following table.
9
Page 14
MOTHERBOARD User’s Manual
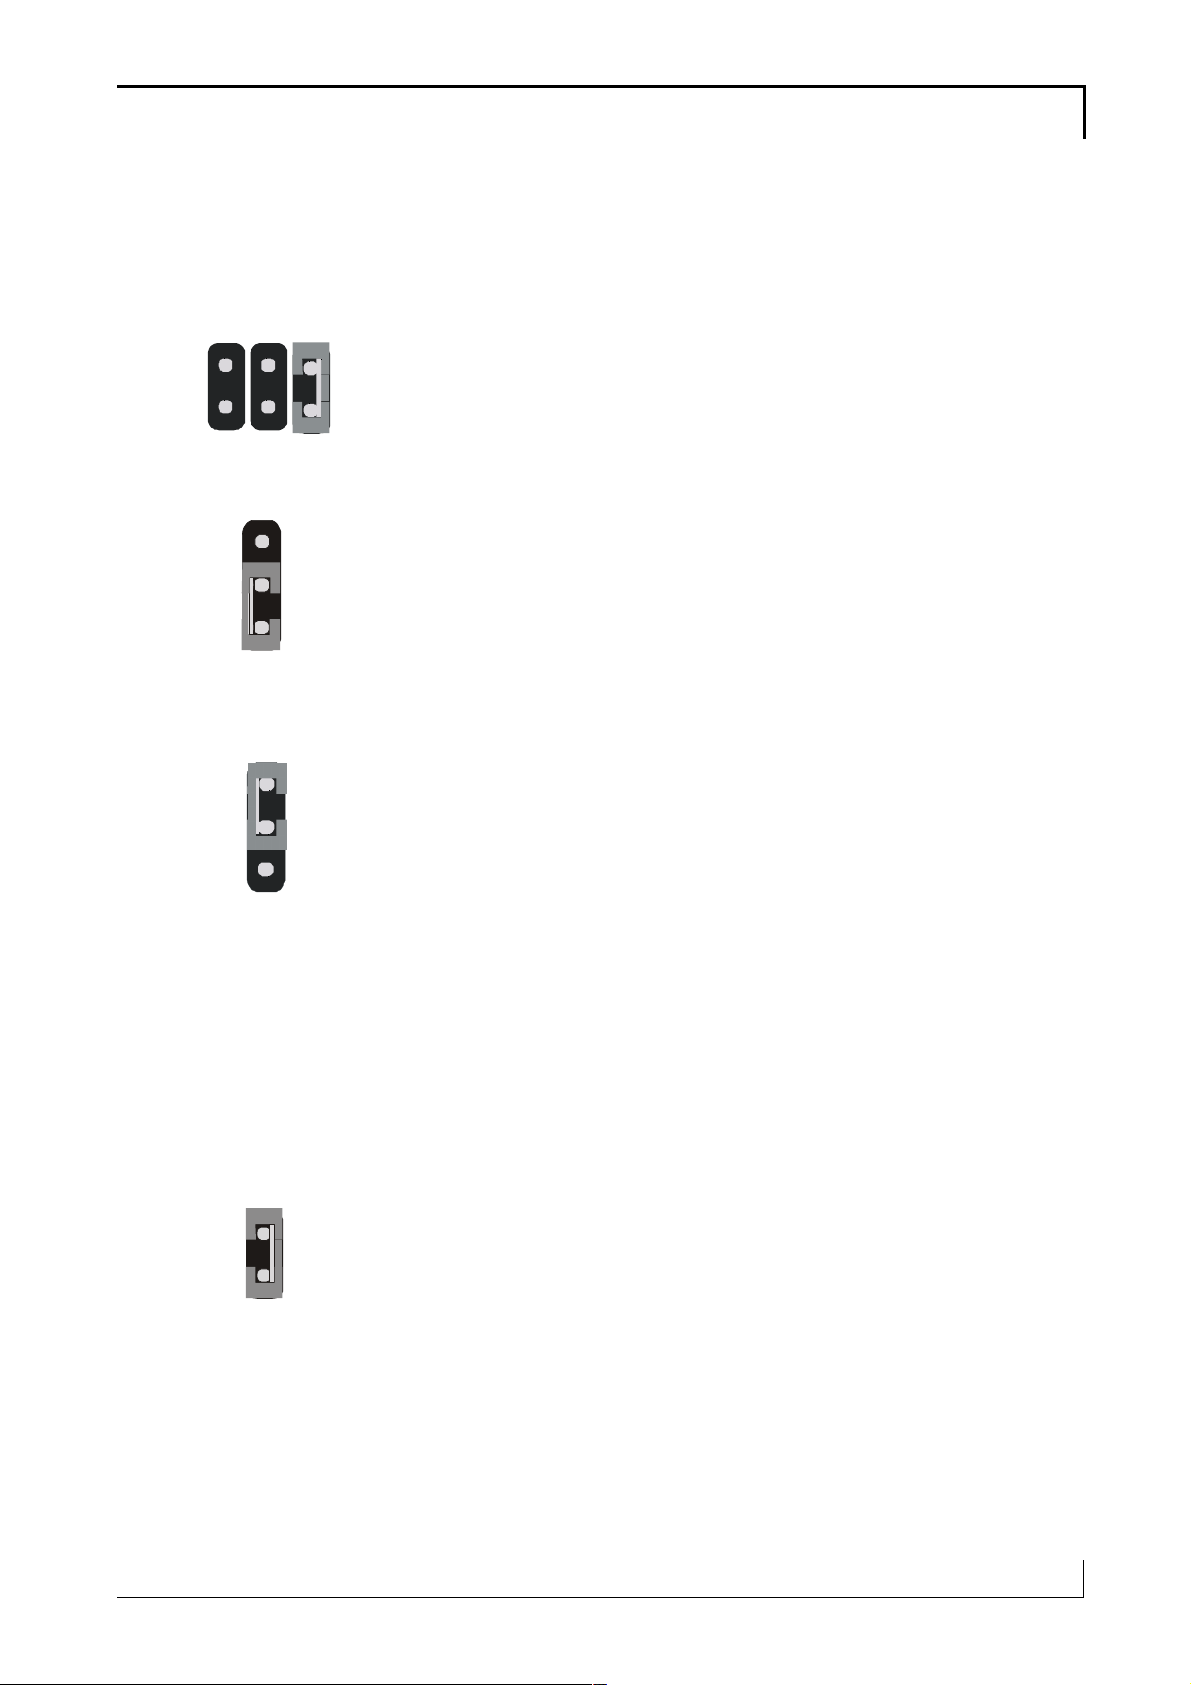
Jumper Setting Summary
Default settings
are in bold
JP1 CPU Type
1-2 Slot1
5-6 Socket370
JP6 Thermal Monitor
1-2 Socket 370
2-3 Slot1
JP9 Clear CMOS
1-2 Clear CMOS
2-3 Normal
JP27 Power Supply
Open AT power supply
Short ATX power supply
JP9
JP1
JP27
JP6
10
Page 15
Configuration & Installation
2
Jumper Functions
This is sections explains the functions performed
by the jumper switches.
JP6
JP9
4
2
4
2
JP1
2
JP1: CPU Type Selector
This jumper selects the CPU type. Set it according
to which kind of CPU you will install, a Socket
370 PPGA or FCPGA or any Slot 1 CPU. The
default setting is Slot370.
JP6: Thermal Monitor Selector
This jumper selects which thermal monitor will be
active, the one for the Socket 370 or the one for
the Slot 1 socket. Set it according to which socket
will be used. The setting should match the JP1
and JP10 settings. The default setting is Slot370.
JP9: Clear CMOS
This jumper is a trouble shooting jumper that al-
lows you to clear the system configuration record
that is created by the Award BIOS CMOS Setup
Utility and stored in CMOS memory. You only do
JP27
this if the system has become unbootable due to
incorrect settings or a corrupted configuration re-
cord and you can’t access the CMOS Setup Utility.
Please refer to the section on Troubleshooting in
Chapter 5 for information on how to do this. The
default setting for this jumper is Normal.
JP27: Power Supply Selector
JP27 selects between the AT and ATX power sup-
ply connectors on the motherboard. The default
setting Short for an ATX power supply.
11
Page 16
MOTHERBOARD User’s Manual
Installing A CPU
This motherboard has an Intel Slot 1 CPU socket.
If you purchased a CPU packaged by Intel, follow
the installation instructions that come with it. In
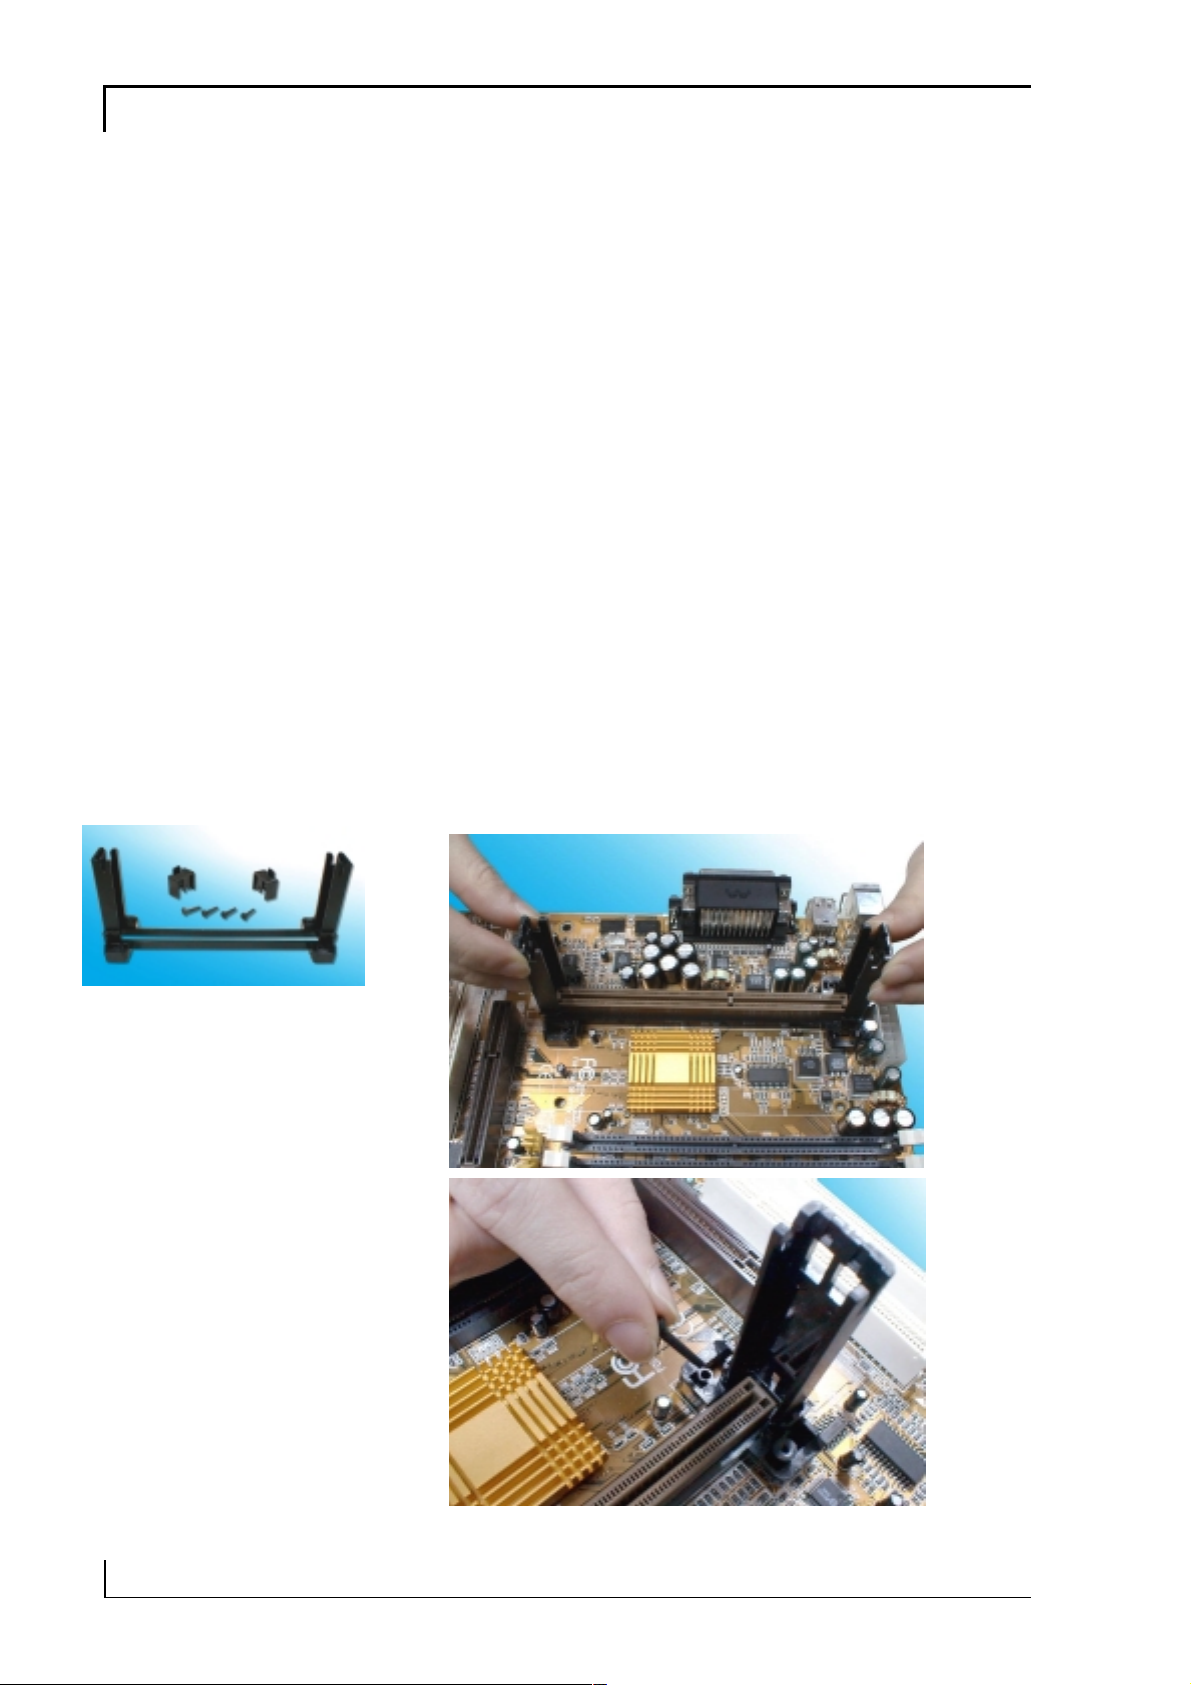
any case, please review the following generic instructions. You must install the CPU Retention
Module that comes with the motherboard first.
Please Note:
The pictures in
this section are
generic and are
not of the motherboard this
manual is about.
Make sure you take precautions against static electric damage.
1. Install the CPU Retention Module.
Place the module over the Slot 1 socket and
press it into the mounting holes. It will only fit
in one orientation.
Insert the module retaining pins into the four
corner receptacles on the module and press
them into the holes until they are secured.
Caution:
Once you get a pair
of Retention Module,
which has a pair of
copper plate on it,
the copper plate has
to attach to the hole
with grounding pad
(Silver) on the
motherboard.
12
Page 17
Configuration & Installation
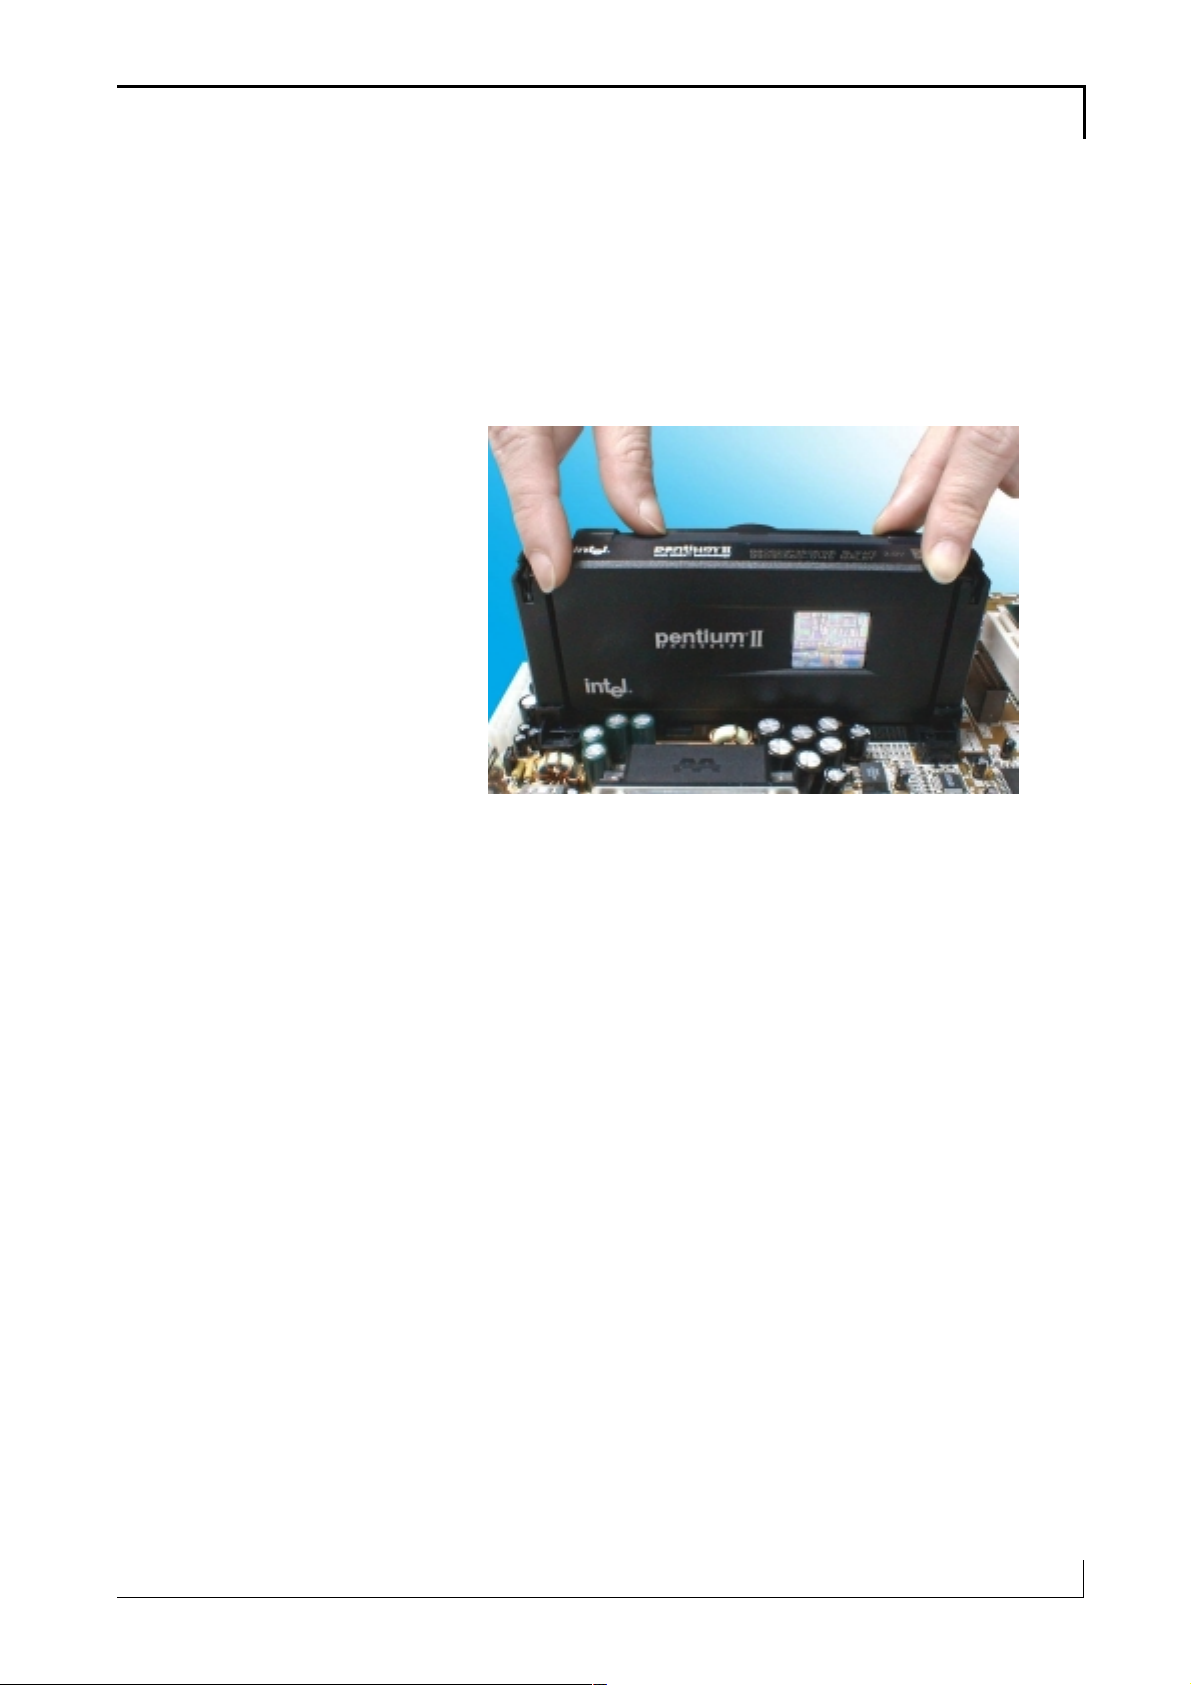
2. Insert the CPU in the Slot 1.
Note that the Slot 1 socket has two sections of
different lengths. Orient the CPU to the socket.
Slide the CPU into the Retention Module
guide rails and press the CPU into the socket
2
3. Install the retaining caps.
Press a retaining cap onto the top of each Re-
tention Module guide rail to secure the CPU
in the Slot 1 socket. The caps will snap in
place.
13
Page 18
MOTHERBOARD User’s Manual
4. Attach the heatsink/fan assembly.
Assemblies vary, follow the instructions that
come with the heatsink/fan.
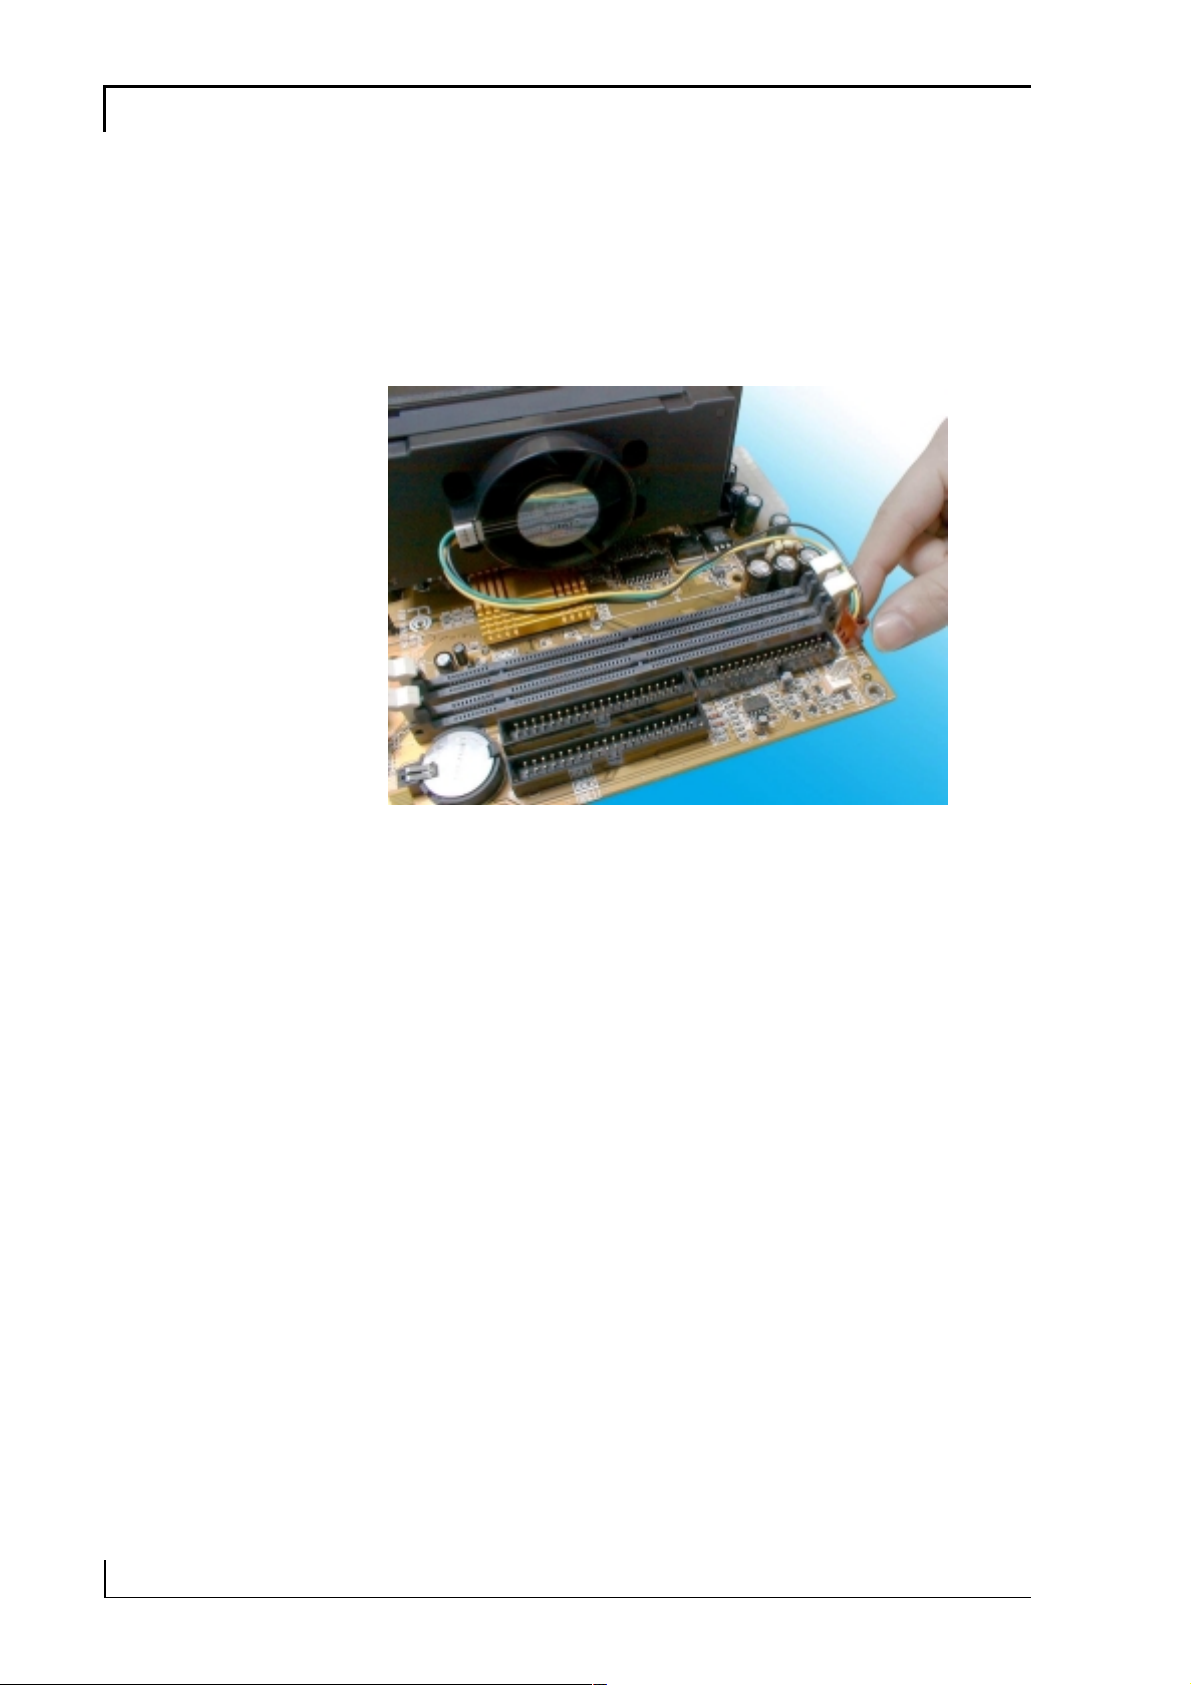
5. Connect the power lead from the fan to the
CPU FAN connector on the motherboard.
14
Page 19
Configuration & Installation
2
You can install an Intel PPGA or FCPGA CPU in
the motherboard’s Socket 370. If you purchased a
CPU packaged by Intel, follow the installation
instructions that come with it. In any case please
review the following generic instructions which
are the same for both CPU types. Make sure you
Please Note:
The pictures in
this section are
generic and are
not of the motherboard this
manual is about.
take precautions against static electric damage to
the CPU.
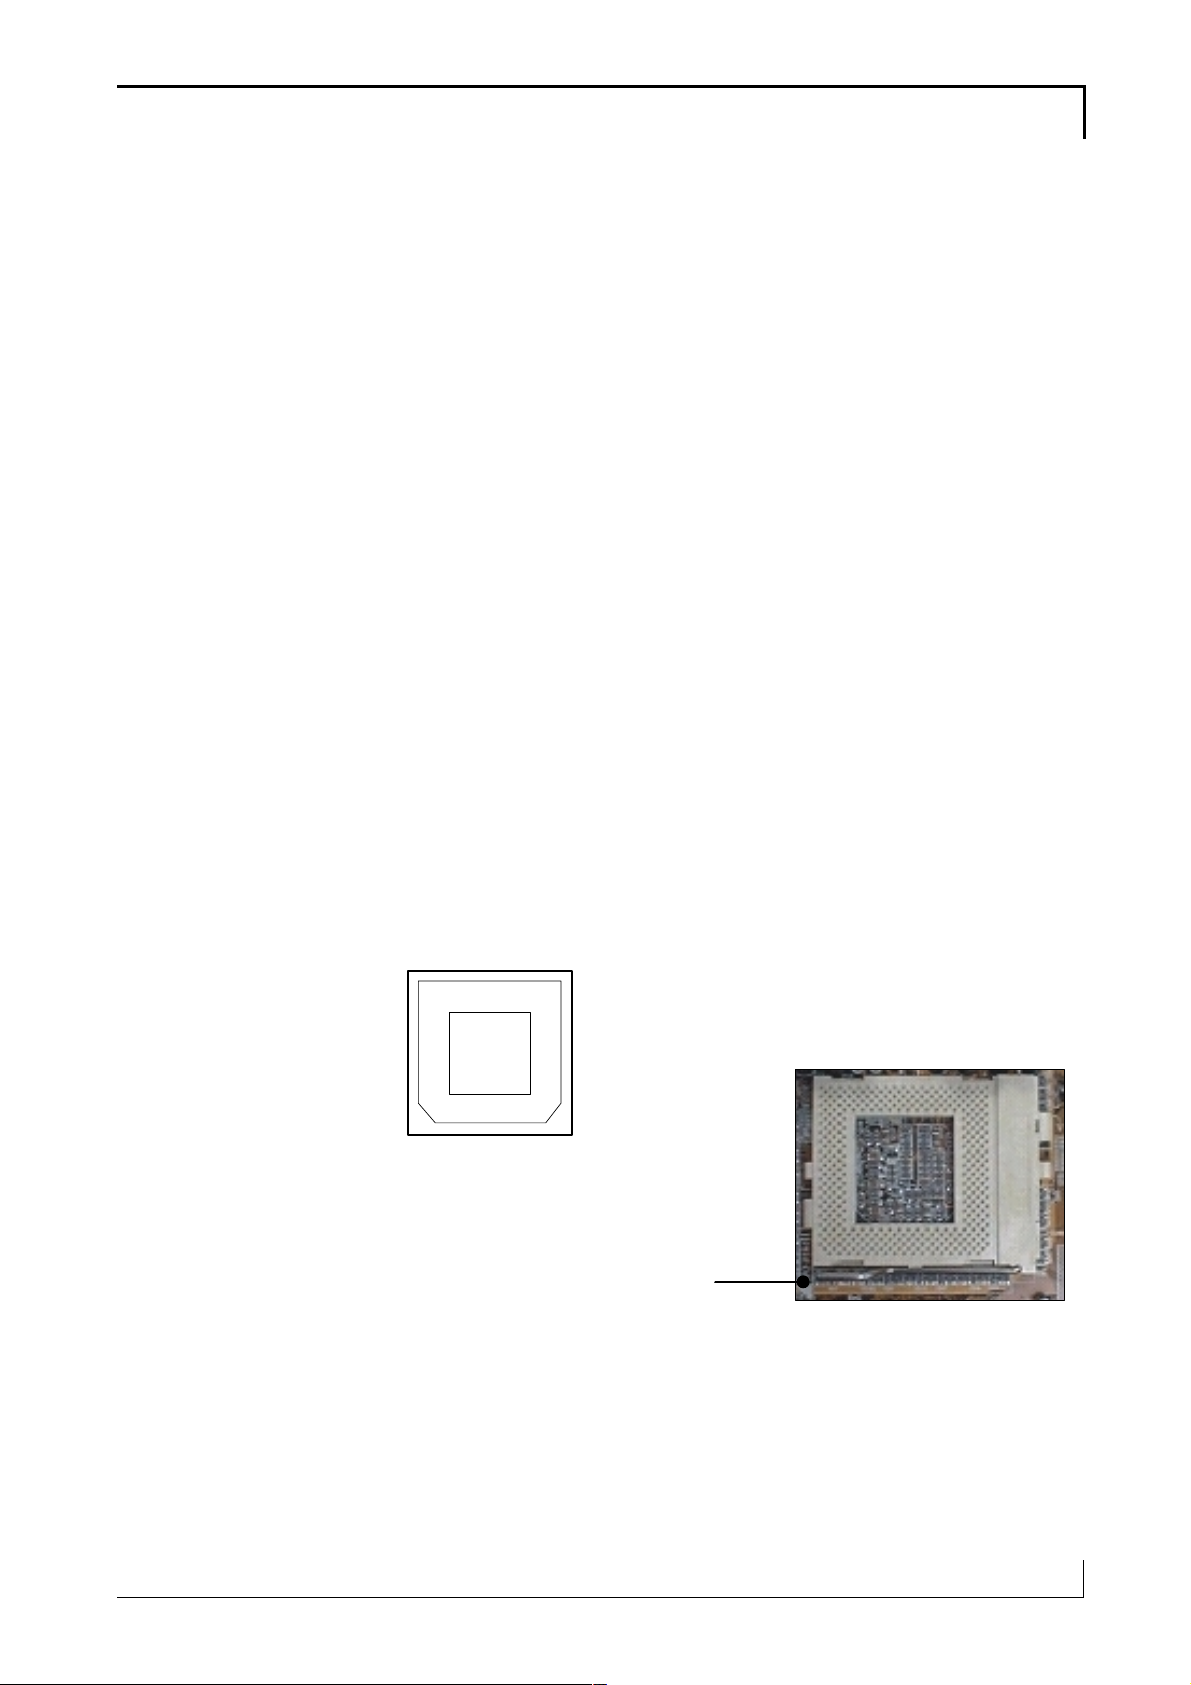
1. The CPU will only fit into the socket in one
orientation. Look at the top of the CPU with
and note the two angled corners where some
pins are missing. On the other two corners the
pins form a 90
º angle.
2. Locate the PGA370 socket on the motherboard and identify the socket’s Pin 1 position
at the end of the socket actuating lever (or
“handle”). Note the angled corners of the pin
receptacles on that side of the socket.
CPU
Pin 1 side
370 Socket
Pin 1
Pin 1
15
Page 20
MOTHERBOARD User’s Manual
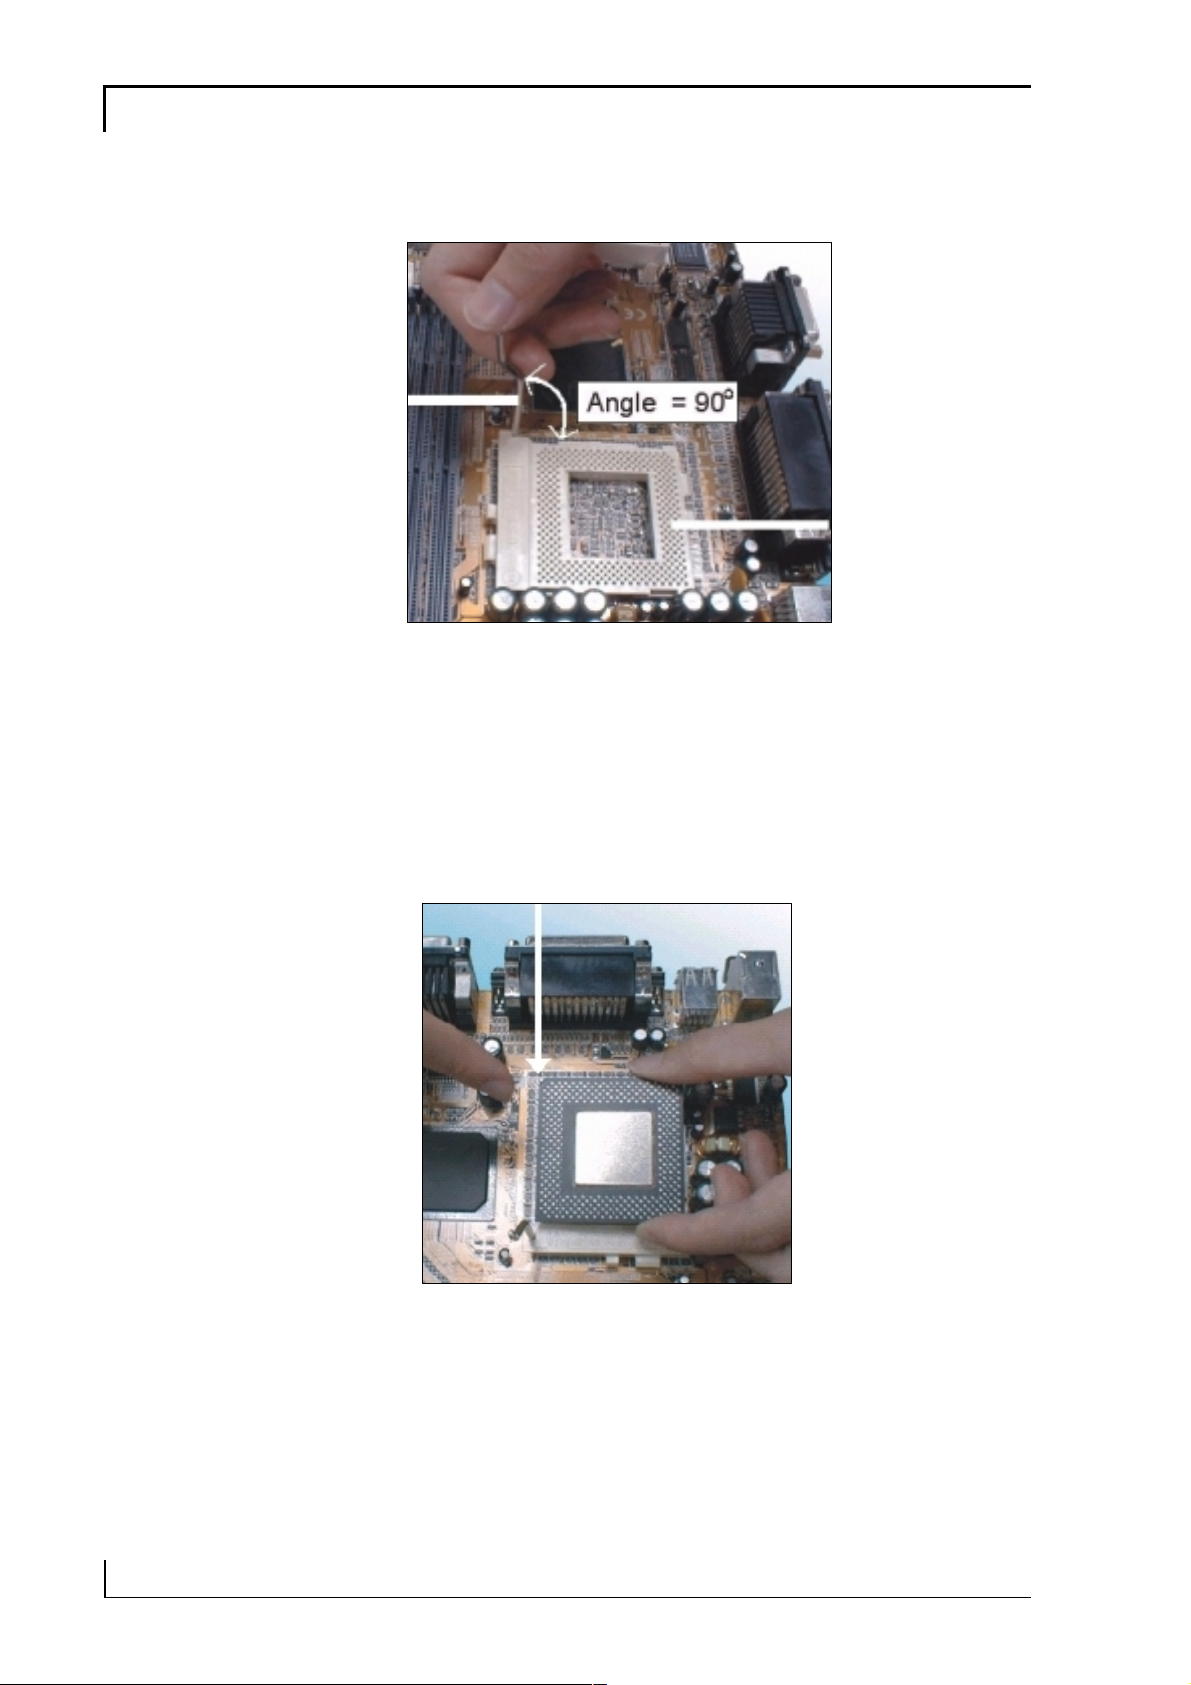
3. Raise the socket lever to a 90º angle.
4. Insert the CPU in the socket so that the angled
pin corners match the angled pin receptacle
corners. The CPU will only insert in the correct orientation. Don’t force it. If it doesn’t go
in easily, check and make sure you’ve got the
CPU correctly oriented.
16
Page 21

Configuration & Installation
5. Lower the socket lever and press it back into
place to lock the CPU in the socket.
2
You will also need to install a heatsink/fan devices on top of the CPU. If you purchased an Intel
CPU in retail packaging use the fan that comes in
the package. If you a purchased a CPU that
doesn’t come with a fan, you will need to purchase one separately. Follow the installation instructions and plug the fan power connector onto
the CPU FAN power connector near the PGA370
socket.
17
Page 22

MOTHERBOARD User’s Manual
Installing System Memory
There are two system memory sockets on the
motherboard. They use 3.3Volt, non-buffered
SDRAM DIMMs (Dual In-line Memory Module).
This motherboard uses either PC100 or PC133
DIMMs. The motherboard will automatically detect and configure the installed memory. This
means you can use PC100 memory even if the
external clock frequency used by the CPU is
66MHz. You can install any size DIMM from
16MB to 256MB in either socket in any order for a
total of 512MB.
Installing DIMMs
The DIMM sockets have three edge connector
sections divided by spacers with a crossbar. The
crossbars match cut-outs in the DIMMs so that
only the correct type of module can be installed.
The cutouts vary by module type. Make sure you
use the correct module type as noted above. When
installing memory, you should take precautions
against static electric damage to sensitive components on the modules and the motherboard. To
install a module does as follows:
1. Press the socket retaining latches down to create full access to the socket.
2. Align the DIMM to the socket so that its edge
connector matches the socket’s connectors.
The three sections are of different lengths to
make the correct orientation obvious.
18
3. Lightly press the DIMM into the socket at a
90º to the motherboard. Make sure the mo dule and the socket are lined up correctly.
Page 23

Configuration & Installation
4. Press the DIMM fully into the socket. The
retaining latches will rotate upwards and
should fit into the corresponding notches on
the DIMM. Press the latches into place if ne cessary. If the latches won’t insert properly into
the module notches push them back and try
inserting the DIMM again. When the latches
are fully in place the DIMM is properly installed.
2
Depending on the module size and the total capacity you want to install, you may install memory in only one or both sockets. For example, to
install 128MB of system memory you can install
either one 128MB DIMM in one socket or two
64MB modules using both sockets. We recommend that you use the largest module that fits
your installation plans so that you can leave the
second socket open for later upgrades.
If you want to upgrade system memory after the
motherboard is installed you can install additional
memory in the empty socket. If there is no empty
socket, you will need to remove at least one module and replace it with the upgrade module. In
some cases, you may need to remove both modules to allow installing your intended configuration. To remove a DIMM do as follows.
19
Page 24

MOTHERBOARD User’s Manual
1. Make sure the computer is turned off and unplugged.
2. Press down on the retaining latches to release
the module and push it partially out of the
socket.
3. Carefully remove the module from the socket,
preferably grasping it by the top corners of the
circuit board.
Installing Options
To install any optional hardware such as the Modem Riser card or optional Infrared port you must
first install the motherboard in a system housing.
Please refer to the Other Connections portion of
the next section.
20
Page 25

Configuration & Installation
2
Installing The Motherboard
This section is a brief generic explanation of how
to install the motherboard in a system housing
(“case” or “chassis”) and connect other internal
system components to it. If you are not experienced at installing and assembling computer
hardware we recommend you consider having a
qualified service technician install and assemble
your system for you. If you will do the work you rself, make sure to take precautions against damage
from static electric discharge while installing and
connecting components.
Installing in a System Housing
Since housing designs vary considerably the section provides general guidelines and notes the basic requirements. This motherboard is a Baby AT
board that requires either a Baby AT or AT case
(chassis) and power supply. The case should come
with mounting hardware for the motherboard and
at least basic instructions on how to install a
motherboard. It is advisable to check the case before you by it and confirm that it has adequate
hardware and instructions. If you are upgrading
the motherboard in a system you already own,
you will need to make sure your system case can
accommodate this motherboard.
This is the basic procedure to install the motherboard:
1. Check over the hardware and instructions that
came with the system housing and make sure
everything is there and that you understand
the instructions.
21
Page 26

MOTHERBOARD User’s Manual
2. Attach whatever mounting hardware is needed
to the case. Some cases support more than one
motherboard form factor, for example Baby
AT, Micro ATX and ATX. Identify the
mounting points that match as many of the
mounting holes on the motherboard as possible and install hardware at those points. Some
cases use both metal nut-headed screws and
plastic spacers with a pointed end that inserts
in a mounting hole on the motherboard. The
spacers fit into slots in the motherboard
mounting plate.
3. Install a port cover panel if necessary (for hybrid AT/ATX cases). Follow the instructions
that came with the case and make sure you
use a cover panel for the AT board.
4. Line the motherboard mounting holes up with
the appropriate attachment points on the
motherboard mounting plate. If you had to install plastic spacers in some holes, make sure
they fit into their slots as you align the board.
5. Use the mounting screws and washers that
came with the system case to attach the motherboard to the mounting plate. Seat the screws
firmly but not to tightly.
With the motherboard installed, you can now attach internal system components including wire
leads from the system case and disk drive or other
22
cables and port brackets.
Page 27

Configuration & Installation
2
System Housing Connections
You will need to connect several wires from the
system housing to the motherboard. These include
leads for functions on the housing’s front panel
and the power connector from an AT or ATX
power supply and any system cooling fans.
Connecting Front Panel Leads
System housings usually have several system controls and indicators mounted on the front panel.
This motherboard supports several of these standard features via the J20 Switch & Indicator panel
connector. The supported features and the pins
J20 they connect to are shown in the following
table and figures.
SPEAKER
P21
P22
K-LOCK
Pin Name Description
1 – 2 PWBT Power Button
3 – 4 RST Reset switch
5 – 6 PWR LED Power status light
7 – 8 HDD LED HDD activity light
9 – 10 Reserved NA
,
PWR
LED
ACPI
LED
,
PWR
LED
,,
HDD
LED
PWBT
,,
RST
P1
P2
11 – 12 ACPI LED Suspend indicator
14 16 18 PWR LED Power LED (3-pin)
20 22 K-LOCK Key Lock
15 17 19 21 SPEAKER Chassis speaker
23
Page 28

MOTHERBOARD User’s Manual
Connecting AT or ATX Power
The power connector from the ATX power supply
is a rectangular plastic connector with multiple
wires running back to the power supply. It plugs
onto the ATX power connector on the motherboard. The connector will only plug on one way,
so if it won’t plug on easily, turn it around and try
again. Make sure the power supply is unplugged
when you connect the power lead.
An AT power supply has two leads with connectors that plug onto the AT power connector. Make
sure the black wires are in the middle after you
plug them onto the board.
Fan Out
+5V
Connecting Cooling Fans
There are two connectors on the motherboard for
connecting power leads from system cooling fans
mounted in the system housing. The system
housing may already have such a fan installed. If
so, you should connect it to the nearest connector
on the motherboard. Many cases have a space to
install a standard cooling fan. The fan power leads
will only plug on one way so you can’ t connect
them incorrectly.
GND
Disk Drive Connections
This motherboard has three connectors for disk
drives, one for up to two floppy disk drives and
two EIDE connectors which can connect to two
24
IDE devices each for a total of four. The motherboard comes with two ribbon connector cables,
one floppy cable and one IDE cable.
Page 29

Configuration & Installation
r
2
Connecting Floppy Disk Drives
The motherboard floppy disk drive controller connector uses the narrower (34-pin) of the two supplied cables. There are three connectors on the
Board end
Pin 1 side
Drive B:
Drive A:
cable, one at each end and one in the middle,
more towards one end. The end with two connectors closer together goes to the disk drives. The
other end connects to the motherboard.
Always connect the Pin 1 side of the ribbon cable
(the colored edge) to the Pin 1 side of the cable
connector on the motherboard or device. The Pin
1 corner is marked on the motherboard and drives
usually have it marked in some way. The rule of
thumb for drives is that the Pin 1 side of the connector is on the drive power connector side .
The end drive connector on the ribbon cable is for
floppy disk drive Drive A: and the middle connector is for Drive B:. The supplied cable only supports 1.44MB floppy disk drives.
Board end
Pin 1 side
Slave
Maste
Connecting IDE Devices
The motherboard EIDE device controller connector uses the wider (40-pin) of the two supplied cables. There are three connectors on the cable, one
at each end and one in the middle, more towards
one end. The end with two connectors closer together goes to the IDE devices. The other end
connects to the motherboard.
25
Page 30

MOTHERBOARD User’s Manual
Always connect the Pin 1 side of the ribbon cable
(the colored edge) to the Pin 1 side of the cable
connector on the motherboard or device. The Pin
1 corner is marked on the motherboard and IDE
devices usually have it marked in some way. The
rule of thumb for IDE devices is that the Pin 1
side of the connector is on the drive power connector side.
The end drive connector on the ribbon cable is for
the Master IDE device and the middle connector
is for the Slave device. The supplied cable supports
IDE devices in all modes.
If you want to install devices on the second IDE
channel, you will need to purchase an additional
IDE ribbon cable. If you want to use IDE devices
that use the UDMA66 data transfer mode, you
will need to get an IDE cable that specifically supports UDMA/66 like the supplied cable.
Other Connections
There are several other connection points on the
motherboard which you will or may need to use.
These include the port bracket connectors, the
connectors for CD-ROM drive audio input and
the IR port connector.
The PS/2 Mouse Port Bracket
The PS/2 Mouse port bracket plugs onto the MS
connector on the motherboard. Mount the port
26
bracket in an expansion slot opening that doesn’ t
block an expansion slot and plug the cable connector onto the connector on the motherboard. The
connector will only plug on in one orientation so
you can’t get it wrong.
Page 31

Configuration & Installation
The Serial Port Bracket
The serial port bracket plugs onto the COM1 and
COM2 connectors on the motherboard. Mount
the port bracket in an expansion slot opening that
doesn’ t block an expansion slot and plug the ribbon cable connectors onto the connectors on the
motherboard. The connectors will only plug on in
one orientation so you can’t get it wrong.
The VGA & Parallel Port Bracket
The VGA and parallel port bracket connects to the
VGA and PRINT connectors on the motherboard.
Mount the port bracket in an expansion slot
opening that doesn’t block an expansion slot and
2
plug the ribbon cable connectors onto the connectors on the motherboard. The parallel connector
will only plug on in one orientation so you can’ t
get it wrong. Match the Pin 1 positions on the ribbon cable and board connectors for the correct
orientation.
The Audio Port Bracket
The audio port bracket plugs onto the AUDIO
connector on the motherboard. Mount the port
bracket in an expansion slot opening that doesn’ t
block an expansion slot and plug the ribbon cable
connector onto the connector on the motherboard.
The connector will only plug on in one orientation
so you can’t get it wrong.
27
Page 32

MOTHERBOARD User’s Manual
CD-ROM Audio Input
There are two audio input connectors for a CDROM. Plug the audio cable from a CD-ROM
drive into the connector that matches the connector on the end of the cable. If there is more than
one CD-ROM drive installed in the system you
can connect an additional drive to the unused
connector. Only one audio source at a time will
play through the onboard audio subsystem.
The Optional LAN Port Bracket
The LAN port bracket plugs onto the LAN connector on the motherboard. Mount the port bracket in an expansion slot opening that doesn’t block
an expansion slot and plug the ribbon cable connector onto the connector on the motherboard.
Match the Pin 1 positions on the ribbon cable and
board connectors for the correct orientation.
The Optional IR Port
This connector is for an infrared wireless communications port. Connect a separately purchased
port to the IrDA connector. Make sure to orient
the Pin 1 side of the port connector to the Pin 1
on the onboard connector. The Pin 1 position is
marked on the motherboard. You will also need to
configure the port in the CMOS Setup Utility. You
do this by setting the UART Mode Select line in
5
1
the Integrated Peripherals section to the appropriate setting for your device and setting the configu-
IrDA
ration lines below it if necessary. Follow the di-
28
rections that come with the IR port to install it.
Page 33

Configuration & Installation
2
Cable bracket Setting
We stromgly recommend that cable bracket installing had better follow the suggestion as below.
View of back side
12345678
Audio
Game
Por t
N.A
VGA
/
Pr inter
Por t
Lan
Por t
MR
Ca r d
PCI
Ca r d
PCI
Ca r d
COM / PS2
or
PCI ca r d
29
Page 34

MOTHERBOARD User’s Manual
Checking The Installation
Once you have installed and connected internal
peripherals -- most likely at least a hard disk drive,
a floppy disk drive and a CD-ROM drive – check
and make sure everything is correctly and firmly
connected or installed. After that, assemble the
system housing and connect a monitor, keyboard
and mouse or other pointing device. Plug the
power cord into the power supply and plug it into
a surge-protected power outlet.
Turn on the computer. The POST (Power On Self
Test) will run and should display the correct
memory total. The default BIOS settings should
automatically detect and configure any floppy disk
drives and IDE devices as well as assign resources
for any expansion cards you may have installed. If
you encounter a problem, reboot and run the
CMOS Setup Utility by pressing the delete key. If
you need help using the utility, see Chapter 4. The
system should now be ready to install an Operating System on the hard disk drive and the necessary support software from the Support Disk.
Support Software
All versions of this motherboard come with a
software Support Disk that has both support software and bundled software on it. The Support
Disk is for an entire range of motherboards. There
is more software on the Support Disk than is used
by this motherboard, so don’t be confused by the
30
software that doesn’t apply. A n Operating System
must be installed on the primary system hard disk
drive before you can install support software. Most
of the support software is for Microsoft Windows
95, 98 or NT as these are the operating Systems
most likely to be used with this motherboard.
Page 35

Configuration & Installation
2
Installing the Support Software
The Support Disk is set to run automatically. The
disk has an installation interface that will appear
when you load the disk in the CD-ROM drive.
You can then make selections from the menu that
appears by clicking on an item with the mouse.
You can also use the arrow keys on the keyboard
to make a selection and then press the Enter key.
The installation interface has a number of nested
levels. The top level, which you see when the disk
loads looks like the following figure. You can exit
the level you are in either by clicking on the Exit
bar, selecting it and pressing the Enter key or by
pressing the Esc key. The top level Exit bar closes
the installation program.
You will need to install the SiS 630 support software under the SiS Series heading. Installing the
other bundled software is optional.
31
Page 36

MOTHERBOARD User’s Manual
Main screen
Main menu
32
Page 37

Configuration & Installation
SiS Support Software
Under the SiS Series heading you will need to
click on the SiS 630 bar to access the software for
this board. To install software, click on or select
the appropriate item and press the Enter key. Follow the installation instructions that appear.
There are three items in the SiS 630 driver section:
VGA, LAN and Audio. You must install the VGA
driver for the operating system you are using. The
LAN has information on LAN driver installation
and the Audio driver installation program runs
automatically when you click on that item.
2
SiS menu
SiS630 menu
33
Page 38

MOTHERBOARD User’s Manual
VGA Display Drivers
The VGA Driver section has a submenu for various versions of Windows including 9x, NT 4.0
and 2000. Choose the driver for the OS you are
using.
VGA menu
Audio Driver Software
To install the audio software, click on the Audio
Driver bar or select it and press the Enter key.
Follow the installation instructions that appear.
You should only install the audio software in the
SiS 630 section. DO NOT install anything from
the Audio Driver item in the main menu of the
installation program.
34
Page 39

Configuration & Installation
2
Installing Bundled Software
The Support Disk also has some utility software
on it. The free Adobe Acrobat Reader is supplied
for viewing files in the Acrobat PDF format, including online manuals. The PC-cillin 98 antivirus software is bundled with this motherboard to
enhance your system’ s protection from computer
virus infection. To install either software utility,
click on or select the appropriate item and press
the Enter key. Follow the installation instructions
that appear.
35
Page 40

MOTHERBOARD User’s Manual
3
What’s In This
Chapter:
System Controls
Connecting
External
Peripherals
Installing Expansion Cards
Upgrading System
Memory
Using The Motherboard
This chapter covers a few points on how some of
the motherboard features impact use of the computer it is installed in. This includes using system
control features, connecting external peripherals,
installing expansion cards and upgrading system
memory.
System Controls
There are several system controls that either connect to the motherboard from the front panel of
the system housing or work through the keyboard
or pointing device.
Front Panel Features
System housings vary in design, so a particular
system case may not support all the features on
the motherboard. Most housing do support the
majority of these features however. The location
and appearance of these features will vary according to the housing design.
The Power Button
The power switch on an ATX case is likely to be a
power button that can do more than function as
an on/off switch. You can set how the power button works in the BIOS CMOS Setup Utility. The
button can either function as instant on/off or as
suspend/off after 4 second delay. You can config-
36
ure the power button under the Soft-OFF by
PWR-BTTN line in the Power Management Setup
section of the CMOS Setup Utility.
AT power supplies do not support this feature.
Page 41

Using The Motherboard
The Reset Switch
A reset switch is standard to almost all PCs.
Pushing the switch will cause the computer to do
a “hard” restart. If the computer hangs during
operation and becomes unresponsive to other controls, you can restart the computer using this
switch. Don’t use it if the computer is operating
normally. You should always shut down from
within the Operating System. Only use reset as a
last resort and instead of turning the computer off
and then back on.
The Suspend Button
An external Suspend button appears on some
3
cases. Pushing the button will cause the system to
enter whatever power-saving suspend or “Sleep”
mode it is configured to enter. In suspend mode
the computer may appear to be turned off, but is
in fact just in a low power mode. Don’ t turn the
computer off when it is suspended. Pushing the
button while the system is suspended will resume
or “Wake Up” the system and cause it to return to
its previous state.
Indicator Lights
The motherboard supports several indicator lights
that may be present on the front panel of the sy stem housing. These include a Power LED, a Hard
Disk Drive LED and a Suspend LED.
• Power LED: Lights when the system is on
• Hard Disk Drive LED: Flashes when the hard
disk drive is being accessed
• Suspend LED: Lights when the system is in
power saving Suspend or “ACPI” mode
37
Page 42

MOTHERBOARD User’s Manual
3
Connecting External Peripherals
This section covers information on connecting
external peripheral equipment to the computer via
the motherboard’s onboard ports. This motherboard has a full complement of external ports including all standard I/O ports and a VGA video
display port.
Connecting Peripherals to
Conventional Ports
It is safest to turn the computer off before connecting or disconnecting any external peripherals.
The “conventional” ports on this motherboard are
color-coded according to the PC99 standard. This
allows for easier system setup when using similarly color-coded peripheral cable connectors. The
port colors and functions are as follows:
• Parallel port [Burgundy]: Generally used for
connecting a printer. Usually configured as
LPT1. Can also connect to other devices designed to use this port. More than one device
can be connected to the port by using a “passthrough” cable. The port supports multiple
modes and is configurable via the BIOS
CMOS Setup Utility in the Integrated
Peripherals section of the utility. Any device
connected will also require Operating System
driver support.
38
Page 43

Using The Motherboard
• Serial ports [Teal]: Used for connecting modems, printers and other serial devices. The
port supports multiple address configurations
and is configurable via the BIOS CMOS Setup
Utility in the Integrated Peripherals section of
the utility. Any device connected will also require Operating System driver support.
• Keyboard port [Purple]: For a PS/2compatible keyboard.
• Mouse port [Green]: For a PS/2-compatible
pointing device. Driver support for basic
pointing devices such as a standard 2-button
mouse is not required under Windows. Enhanced pointing devices require a driver for
3
their added functionality.
• Audio jacks:
• Audio Line Out [Lime]: Uses a mini-plug
cable connector to output to external
audio, either speakers or an amplifier.
• Audio Line In [Light Blue]: Uses a mini-
plug cable connector to receive audio input from an external source such as an
audio CD or MP3 player.
• Microphone [Pink]: Uses a mini-plug ca-
ble connector to receive audio input from
a microphone.
• Game/MIDI port [Gold]: This port can functions as either a Game port or as a MIDI port.
The port is configurable via the BIOS CMOS
Setup Utility in the Integrated Peripherals section of the utility. The default configuration
for this port is as a Game port. If you configure the port as a MIDI port, it will need to use
either IRQ 5 or 10.
39
Page 44

MOTHERBOARD User’s Manual
3
Connecting USB Peripherals
The motherboard has support for two Universal
Serial Bus ports. There is a pin connector on the
board for an optional USB port bracket that you
can purchase separately if you want to use the
USB feature.
You can connect USB devices to either the USB
ports directly or to a bus-powered or self-powered
USB hub which provide more ports. The bus
provides limited power. A powered hub increases
the number of powered devices you can connect
to the bus. Some USB devices may also have their
own power source. USB devices are “hot swappable” which means you don’ t have to turn the
computer off before connecting or disconnecting a
USB device. USB supports up to 127 devices.
USB is an interface for peripherals that use a relatively low data transfer speed, such as USB keyboards, pointing devices, scanners, printers, modems and other telephony devices and game devices. USB also supports MPEG-1 and MPEG-2
digital video. It has a maximum transfer rate of
12Mbits per second, which is equivalent to 1.5MB
per second. To use the USB feature, the computer
must use an Operating System that supports it.
For example, all versions of Microsoft Windows
from Windows 95 OSR2 and later support USB.
Earlier versions of Windows do not support USB.
40
Page 45

Using The Motherboard
3
Installing Expansion Cards
This section has some general information on installing expansion cards on the motherboard. This
motherboard has five standard PCI expansion
slots. The slots are all 32-bit PCI Revision 2.2
compliant and are all Bus master capable. There is
another special slot for an optional Modem Riser
card. Note that there are no legacy ISA slots on
this motherboard.
Installing PCI Cards
There are several issues that affect your choice and
installation of expansion cards on the motherboard. These include Bus Master drivers, Plug and
Play and system power and resource considerations.
Bus Master Drivers
The PCI expansion slots are all Bus Master capable. The Bus Master feature can substantially improve system performance and also is used by the
onboard IDE channels. To make use of this feature under Windows 95 you will need to install the
default Windows 95 Bus Master driver. Later ve rsion of Windows do need a separate Bus Master
driver to take advantage of this capability.
41
Page 46

MOTHERBOARD User’s Manual
3
Plug and Play
It is likely that any PCI card you will install on the
motherboard will be Plug and Play (PnP) compliant. Plug and Play is a design specification for expansion cards that allows the system to automatically assign and manage resources for installed
expansion cards rather than requiring manual configuration as in pre-PnP designs. Any new expansion cards you install are more than likely to be
PnP compliant. Some old PCI cards might possibly not be. Where you have the option, we suggest
not installing cards that are not PnP compliant as
it simplifies the management of system resources.
System Resources & Power Limitations
Many expansion cards require the use of system
resources such IRQ and DMA channels. By design, all PCs have a limited number of these resources and their proper configuration is fundamental to proper system operation. As noted in
the previous section, the PnP feature handles the
management of system resources. The problem is
that these resources are finite. If you install
enough expansion cards and connect enough devices that use system resources to the various ports,
it is possible to run out of these resources. While
IRQs can be shared, there is a limit to doing so.
Resource conflicts and problems can result in operation problems.
42
Page 47

Using The Motherboard
If you have a lot of cards installed and devices
connected it is a good idea to check the system
resource status. For example, if you are running
Windows 98, you can use the System Information
utility to examine system resource assignments.
An average configuration is unlikely to encounter
this problem so it is not something to be concerned about.
Power Considerations
The system power supply has a fixed electrical capacity measured in watts. If you install numerous
internal peripherals and expansion cards, for example four IDE devices, a SCSI card and internal
SCSI peripherals, it is possible to exceed the ca-
3
pacity of the power supply. Be aware of the total
wattage capacity of the power supply in the system and make sure that you don’t install more devices than it can handle.
Installing Cards
When the motherboard is installed in a system
housing the expansion slots all line up with access
openings in the rear of the case. These will be
covered with either individual slot covers or metal
plates. To install a card you have to remove the
slot cover.
Refer to the instructions that come with the expansion card you want to install for detailed information on installing the card and any special
considerations and instructions. For most new
cards, the hardware installation is simple. Always
turn off and unplug the computer before you install any expansion card.
43
Page 48

MOTHERBOARD User’s Manual
3
Driver & Other Software
Many cards will require the installation of driver
or other software. Follow the software installation
instructions that come with the card. It is a good
idea to make sure that you have the most recent
driver for the card. In some cases, there may be an
updated driver on the company’s web site. If you
have Internet access, it is a good idea to check for
an updated driver before installing the card.
Installing A Modem Riser Card
The special Modem Riser slot is for a separately
purchased Modem Riser telephony card. The card
provides a V.90 modem and other telephony features and installs in the same way as a conventional expansion card although the slot is smaller.
The card has two external RJ-11 phone jacks on it,
one for Line-in and the other to connect out to a
telephone set. You should receive driver software
for the card. The driver software may only support
a limited number of Operating Systems so check
that the driver supports your OS before you buy
the card. Follow the instructions that come with
the card to install it.
44
Page 49

Using The Motherboard
3
Upgrading System Memory
There is a full explanation of how to install system
memory in Chapter 2. Please refer to it if you
need information on the installation procedure.
This motherboard uses 3.3V unbuffered SDRAM
168-pin DIMMs with SPD. It requires at least
PC100 SDRAM modules. It can also use PC133
DIMMs. The system will automatically detect the
memory clock speed and the speed can be different from the external clock frequency used by the
CPU.
If both sockets are occupied, you will need to remove one or both modules to install an upgrade. If
you’re only removing one module, always remove
the one with the smaller capacity.
45
Page 50

MOTHERBOARD User’s Manual
4
What’s In This
Chapter:
The System BIOS &
CMOS Setup Utility
This section explains what the system BIOS does
System BIOS
CMOS Setup Utility
and has a summary of the CMOS Setup Utility.
The System BIOS
This motherboard uses the Award system BIOS.
The system BIOS (Basic Input Output System) is
firmware -- software stored on a chip -- that is
permanently stored on the motherboard’s Flash
ROM chip.
The BIOS is a set of routines which function as an
interface between the Operating System and the
system hardware. It supports the installed
peripherals and provides internal services such as
the realtime clock produces time and date data.
When the system is starting up, the BIOS tests the
system and prepares the computer for operation
by checking the CMOS memory where the system
configuration information is stored and retrieving
information on the configuration settings. When it
is finished it loads the operating system and passes
control of the system to it.
The system configuration information that the
BIOS retrieves from CMOS memory is recorded
there by the CMOS Setup Utility.
46
Page 51

System BIOS & CMOS Setup Utility
4
The CMOS Setup Utility
This section explains the CMOS Setup Utility
program. The utility is permanently stored in the
Flash ROM chip on the motherboard. It creates a
record of the motherboard and some system configuration information and stores it in batterysupported CMOS memory. This configuration
record must be intact and accurate in order for the
motherboard to operate correctly.
After an explanation of how to operate the utility
there is a summary of the various sections of the
utility. Normally, once your system is set up, you
should have little or no need to use the utility.
Using the CMOS Setup Utility
This section explains how to access and use the
CMOS Setup Utility interface.
Accessing The CMOS Setup Utility
When you turn on your computer, a message appears on the screen indicating you can run the
Setup program by pressing the Del key -- it’ s on
the keypad and the Delete key performs the same
function. The message appears at the end of the
POST (Power On Self Test).
If you want to run Setup but you don’t respond in
time before the message disappears, you can reset
the system by pressing the Ctrl + Alt + Delete
keys at the same time, or by pushing the system
Reset button. The message will then reappear.
After you press the Del or Delete key the program
menu screen will appear, displaying the Setup
utility section names and some command instructions.
47
Page 52

MOTHERBOARD User’s Manual
4
CMOS Setup Utility - Copyright ( C ) 1984-1999
Standard CMOS Features
Advanced BIOS Features
Advanced Chipset Features
Integrated Peripherals
Power Management Setup
PnP/PCI Configurations
PC Health Status
Esc : Quit ↑ ↓ → ← : Select Item
F10 : Save & Exit Setup
Time, Date, Hard Disk Type….
Frequency/Voltage Control
Load Fail-Safe Defaults
Load Optimized Defaults
Set Supervisor Password
Set User Password
Save & Exit Setup
Exit Without Saving
Menu Commands
If you look at the lower portion of the screen illustration, you’ ll see a section that lists the control
commands for this level of the program. You execute a command by pressing the key for that
command. The program commands are :
• Quit: This command will close the Setup program when you press the ESC key.
• Save & Exit Setup: This will save the current
settings and close the Setup program when
you press the F10 key.
• Select Item: You can use the arrow keys on
your keyboard to move around the screen and
select a menu item. An item is highlighted
when it is selected.
The section at the bottom of the screen displays a
48
brief explanation of a highlighted menu item’s
function.
Page 53

System BIOS & CMOS Setup Utility
There are fourteen items on the main screen:
• Standard CMOS Setup: Date, time, disk drive
setup, video display and error handling.
• Advanced BIOS Features: Boot-up and drive
options and system feature customization
• Advanced Chipset Features: Advanced cache,
system memory and display cache settings.
• Integrated Peripherals: Settings for the IDE
channels, onboard ports, audio, LAN and
video memory
• Power Management Setup: Sets up the power
management features or enables ACPI.
4
• PNP/PCI Configurations: PCI bus, system
resource and LAN boot ROM settings and
SCSI detection.
• PC Health Status: CPU and cooling fan and
voltage status monitor readouts and system
Shutdown temperature threshold setting.
• Frequency/Voltage Control: Autodetect and
manual settings for CPU, memory and PCI
clock settings and the CPU multiplier.
• Load Fail-Safe Defaults: Loads minimum settings from the BIOS ROM.
• Load Optimized Settings: Loads optimized
settings from the BIOS ROM.
• Set Supervisor Password: Sets a system password which is configured by the Security Option item in Advanced BIOS Features Setup.
• Set User Password: Sets a system password
which is configured by the Security Option
item in Advanced BIOS Features Setup.
49
Page 54

MOTHERBOARD User’s Manual
4
• Save & Exit Setup: Saves the current settings
and exits the program.
• Exit Without Saving: Discards any changes
made and exits the program.
To enter a section of the Setup program, highlight
a menu item by moving to it with the arrow keys
and press the Enter key to load that item. The
submenu screen for the selected section will appear. All the main screen items that have submenus are marked with an arrowhead at their left.
Submenu Commands
The CMOS Setup Utility has an additional set of
interface commands for the submenus.
There is a self-explanatory list of interface commands listed at the bottom of each submenu
screen. There are also commands for he help system and the default setting options.
General Help
Pressing the F1 key brings up context-sensitive
help where available to explain many menu items.
Default Settings
There are two types of default settings, Fail-Safe
and Optimized. The system loads the Optimized
Defaults the first time the motherboard starts up
after it is installed in a system and autodetects system devices to create a system configuration –record which it stores in CMOS memory. You can
50
then customize the settings further. The optimized
settings are designed to provide better system performance.
Page 55

System BIOS & CMOS Setup Utility
4
The Fail-Safe Defaults are minimum settings that
will get the board up and running if you are trying
to troubleshoot a problem and suspect that the
BIOS may be involved.
Interface Conventions
There are several interface conventions that improve the program’s ease-of-use. There are also
some features of the CMOS Setup Utility’s interface that are important to be aware of.
Scrollable Menus
In several submenus, there are more menu entries
than can appear on the screen at the same time.
These submenus have a scroll bar in the center of
the screen to indicate this. You can scroll down
the list by using the down arrow key.
Menu Options Pop-up
The second convention is that pressing the Enter
key when a submenu item is highlighted will cause a window with a list of all available options for
that item to appear. This convenience feature adds
considerably to the program’s ease-of-use.
Item-Dependent Settings
You will note that some menu items are grayedout. Many of these are dependent on a previous
item in the submenu. The appropriate setting in
the governing item will activate the grayed-out
items below to configure the governing item’ s selected option. There are also some submenu items
that lead to subsections of the submenu.
51
Page 56

MOTHERBOARD User’s Manual
4
Menu Subsections
The Standard CMOS Features and PnP/PCI Configurations both have submenu items with manual
configuration subsections. They are marked by
“Press Enter” in the option field. Highlighting
them and pressing the Enter key brings up the
subsection. Set resource control to Manual to access the one in PnP/PCI Configurations.
Main Menu Item Pointers
These are a few pointers on the main menu items.
Standard CMOS Features
Set the system Date and Time here. You can
manually configure IDE devices in submenu sections by device position. The floppy Drive A: is set
to 1.44MB by default.
Advanced BIOS Features
Set BIOS-level anti-virus feature. Set the POST to
run quickly. Change the boot order and device
here. You can set the first, second and third device
the system will try to boot from among a selection
of nine boot device options. Set the Security Option based on passwords you have entered. OS/2
memory setting if you are running OS/2.
Advanced Chipset Features
We recommend not changing the defaults. You
can adjust the AGP aperture size. Select the correct power supply type, AT or ATX.
52
Integrated Peripherals
Change I/O port configurations here. If you need
more IRQs, disable unused ports here.
Page 57

System BIOS & CMOS Setup Utility
4
You can disable the SiS onboard audio, network
interface and soft modem support from here. You
can also disable the USB from here if you’re not
using it.
Set Game and MIDI port addresses here.
The video display shared memory setting is in this
section. The default setting is for 8MB. The setting range is from 2MB to 64MB. You can increase video display memory to allow higher resolution and color settings.
Power Management Setup
Enable ACPI and or customize settings here. You
set power management options for any OS that
doesn’t support OS power management here. You
can also configure the Wake-up on LAN feature
and set the system to turn on a modem telephone
line rings. You can also set the system to wake-up
at a specific time and/or date using the Resume by
Alarm feature.
The item options for setting up power management for non-ACPI compliant Operating Systems
are explained below.
ACPI function
Default: Enabled
When Enabled, an ACPI OS controls power man-
agement.
Video Off Option
Default: Susp,Stby - > Off
Sets in which modes the display gets turned off.
The default is Suspend and Standby modes.
Video Off Method
Default: DPMS
This determines the manner in which the monitor
is blanked.
53
Page 58

MOTHERBOARD User’s Manual
4
V/H SYNC+ Blank: This selection will cause the
system to turn off the vertical and horizontal sync.
ports and write blanks to the video buffer.
Blank: This option only writes blanks to the
screen video buffer.
DPMS: Initial display power management sig-
naling so that OS can control the display.
MODEM Use IRQ
Default: 3
This item tells the system which IRQ n the mo-
dem is using.
The choice: 3,4,5,7,9, 10,11,N/A.
HDD Off After
Default: Disable
You can set any IDE hard disk drives to turn off
after a set period of system inactivity, measured
in minutes, up to 15 minutes. All other devices
remain active.
IRQ Settings
We suggest leaving these set to the default settings.
Power Button Override
Default: Instant-off
Under ACPI, the system can be turned off me-
chanically (by the power button) or it can use a
software power off.
54
Page 59

System BIOS & CMOS Setup Utility
4
This item allows you to define a software power
off using the power button. If the value is set to
Instant-Off, the power button will automatically
cause a software power off. If the value is set to
Delay 4 Sec the power button must be held down
for a full four seconds to cause a software power
off. If the system has been turned off by software,
the system can be resumed by a LAN, Modem or
Alarm wake up signal.
Power Up Controls
Default: Enabled
In Suspend mode, the system will wake up if an
installed modem receives a ring signal from the
telephone line, or if there is a Power Management
Event in the MAC or on the PCI bus. You
shouldn’t need to change these settings.
Resume by Alarm
Default: Disabled
When this is Enabled, the two lines below it will
become active. Date (of Month) Alarm and Time
(hh:mm:ss) Alarm allow you to set the date
and/or time when the system will wake up.
PnP/PCI Configurations
We recommend not changing the defaults. The
VGA IRQ item auto-assigns an IRQ for both the
onboard and a PCI display card that requires an
one (most don’ t). The LAN Boot ROM feature
can be enabled from here.
PC Health Status
You can set the CPU warning and shutdown temperatures here or use the defaults.
55
Page 60

MOTHERBOARD User’s Manual
4
Frequency/Voltage Control
Normal use requires no changes to the defaults.
You set some options manually, but we don’ t recommend changing these settings unless you
know what you are doing. Some settings could
result in shortening the life of or damaging the
CPU and could lead to CPU failure.
Setting Passwords
You can install a Supervisor Password and a User
Password. If someone logs on as a Supervisor,
they have full access to the system and can restrict
access granted to someone who logs on as User.
For example, a Supervisor can restrict a User from
entering the CMOS Setup Utility.
To install a Supervisor or User Password, follow
these steps:
1. Highlight the item Supervisor or User password
in the main menu and press Enter.
2. The password dialog box will appear.
3. If you are entering a new password, carefully
type in the password. You cannot use more than
eight characters or numbers. Passwords are casesensitive. Press Enter after you have typed in the
password. If you are deleting a password that is
already installed just press Enter when the password dialog box appears.
4. The system will ask you to confirm the new
password by asking you to type it in a second time.
Carefully type the password again and press Enter,
56
or just press Enter if you are deleting a password
that is already installed.
5. If you have used the correct format, the pass-
word will be installed.
Page 61

System BIOS & CMOS Setup Utility
If you decide not to set a password after bringing
up the password entry window, press the Enter
key, not Esc to exit the password entry window.
4
57
Page 62

MOTHERBOARD User’s Manual
5
Troubleshooting &
Technical Summary
This chapter has two sections, Troubleshooting
and a Technical Summary. The troubleshooting
What’s In This
Chapter:
Troubleshooting
Technical
Summary
section covers some basic things you can do in the
event that you encounter problems using the
motherboard in your system. The Technical
Summary is a compilation of the motherboard’ s
configuration specifications to serve as a quick
reference for experienced Users who just want to
look at a summary of the setup information presented in greater detail in the manual.
Troubleshooting
This section has three parts, General Troubleshooting, Support Software Problems and Battery
Replacement.
General Troubleshooting
Once the motherboard is properly configured and
installed in a system, it should work without trouble. If the board does operate properly when you
first try to use it in the system, it is likely that it is
either incorrectly configured or there are connection problems. You always check the most basic
possibilities first to troubleshoot a problem. Check
the following:
• Make sure the computer and monitor are
plugged in and turned on.
• Check all external connections including
monitor, keyboard and mouse and ensure they
a properly connected.
58
Page 63

Troubleshooting & Technical Summary
If there is still a problem check the following:
• Run the CMOS Setup Utility, load the Optimized Defaults, save and exit to restart the
computer. If there’s still a problem:
• Turn off and unplug the computer.
• Press the installed DIMMs into the sockets to
make sure they’re fully seated.
• Make sure the CPU is correctly installed.
• Check all hardware configuration settings on
the motherboard and ensure they are correct.
• Make sure you use the right cables to connect
internal peripherals and that the peripherals
are correctly connected. Pay particular atten-
5
tion to the Master/Slave positions on IDE cables. If you have installed a UDMA66 device,
make sure you have connected it to the motherboard with an UDMA66-compliant cable to
ensure maximum performance.
• Make sure any expansion cards are correctly
installed and fully seated in the PCI slots.
• Reassemble the system and try again.
If the problem persists after you have done all of
the things above, consult your vendor.
59
Page 64

MOTHERBOARD User’s Manual
5
Support Software Problems
There is a variety of software on the Support Disk.
If you install the wrong software, the motherboard
and the system may not operate properly.
Make sure you check the following:
• VGA driver: You must install the correct driver for the operating System you are using.
• Audio driver: Check that you have installed
the correct driver. Do not install anything from
the Audio section of the main menu. Only i nstall from the Audio Driver section of the SiS
630 driver software.
Battery Replacement
This motherboard uses a CR2032 Lithium coin
battery to maintain the system configuration record created by the BIOS CMOS Setup Utility.
The battery should last for several tears. If the ba ttery fails, the system will not be able to retain the
system settings and will not operate properly. If
this happens, do as follows:
• Turn off and unplug the system.
• Open the system and locate the battery on the
motherboard.
• Remove the old battery and dispose of it
properly.
• Install the replacement battery with the positive side (marked with a + sign) face up.
60
• Reassemble the system and reload the Optimized Defaults in the CMOS Setup Utility.
Page 65

Troubleshooting & Technical Summary
Technical Summary
This section combines the setup specifications in
the manual in one place for quick reference.
Jumper Settings
These are the settings for this motherboard.
Jumper Setting Summary
5
Default settings
are in bold
JP1 CPU Type
1-2 Slot1
5-6 Slot370
JP6 Thermal Monitor
1-2 Socket 370
2-3 Slot1
JP9 Clear CMOS
1-2 Clear CMOS
2-3 Normal
JP27 Power Supply
Open AT power supply
Short ATX power supply
JP9
JP1
JP6
JP27
61
Page 66

MOTHERBOARD User’s Manual
5
CPU Options
This motherboard can use any Intel Slot 1 CPU
running at speeds from 233MHz to 600MHz.
These include SECC Celeron, Pentium II and
Pentium III CPUs. The external clock frequency is
automatically detected in the default hardware
configuration. Frequency control is in the Frequency/Voltage Control Section of the BIOS
CMOS Setup Utility.
External clock speeds of 66MHz, 100MHz and
133MHz are available by jumper setting. Note that
not all Slot 1 CPUs support all external speeds.
An incorrect setting can result in CPU failure. The
Autodetect setting prevents this possibility and is
the recommended setting.
This motherboard can also use any Intel PPGA or
FCPGA Socket 370 CPU running at speeds from
300MHz to 600MHz. The external clock frequency is automatically detected in the default hardware configuration. Frequency controls are in the
Frequency/Voltage Control Section of the BIOS
CMOS Setup Utility.
System Memory Specification
This motherboard uses 3.3V unbuffered SDRAM
168-pin DIMMs with SPD. It requires at least
PC100 SDRAM modules. It can also use PC133
DIMMs. The system will autodetect the DIMM
clock.
62
 Loading...