

Page 1

Matrox RT.X2
User Guide
May 27, 2008
v
Y10979-301-0360
Page 2

Trademarks
Matrox Electronic Systems Ltd. ....................................... Matrox®, Axio™, DigiSuite™, EZ-MXF™, Flex CPU™, Flex GPU™,
Mx.tools™, RT.X2™
®
Adobe Systems Inc.......................................................... Adobe
Apple Computer, Inc. ....................................................... Apple
Autodesk, Inc. ................................................................. Autodesk
eyeon Software Inc. ........................................................ Fusion®
International Business Machines Corpora tion .................. IBM
Microsoft Corporation ...................................................... Microsoft®, ActiveMovie®, DirectShow®, DirectX®, Windows®,
NewTek, Inc .................................................................... LightWave 3D
Panasonic (Matsushita Electric Industrial Co.)..................Panasonic®, DVCPRO™, DVCPRO50™, DVCPRO HD™
PCI-SIG ........................................................................... PCI-SIG
RealNetworks, Inc. .......................................................... RealNetworks
Sony Corporation ............................................................ Sony
Victor Company of Japan, Limited (JVC) .......................... JVC™, D-9™, HDV™
All other nationally and internationally recognized trademarks and tradenames are hereby acknowledged.
, After Effects®, Encore®, Flash®, Photoshop®, Premiere®,
Clip Notes™, Soundbooth™
®
, FireWire™
®
, 3ds Max®, Combustion
®
®
, VGA
Windows Media
®
®
,Windows Vista
®
®
, PCI Express®, PCIe®, PCI-X®, PCI™
®
, RealMedia™
, XDCAM®, Blu-Ray Disc™, DVCAM™, HDV™, XDCAM EX™
®
®
Copyright © 2008 Matrox Electronic Systems Ltd. • All rights reserved.
Disclaimer Matrox Electronic Systems Ltd. reserves the right to make changes in specifications at any time and without notice. The in-
formation provided by this document is believed to be accurate and reliable. However, no responsibility is assumed by Matrox Electronic
Systems Ltd. for its use; nor for any infringements of patents or other rights of third parties resulting from its use. No license is granted
under any patents or patent rights of Matrox Electronic Systems Ltd.
Unauthorized recording or use of broadcast television programming, video tape, or other copyrighted material may violate copyright laws.
Matrox Electronic Systems Ltd. assumes no responsibility for the illegal duplication, use, or other acts that infringe on the rights of copyright
owners.
Matrox Electronic Systems Ltd.
1055 St. Regis Blvd., Dorval, Quebec, Canada H9P 2T4
Tel: (514) 685-2630 Fax: (514) 685-2853 World Wide Web: www.matrox.com
Page 3

Contents
Chapter 1
Introducing Matrox RT.X2
Welcome to Matrox RT.X2 ...............................................................2
Matrox RT.X2 SD key features ...............................................................2
Matrox RT.X2 and RT.X2 LE key features ..............................................2
About this manual ............................................................................ 3
Style conventions...................................................................................3
How video formats are expressed ........................................................4
Other documentation .......................................................................4
Chapter 2
Working with .mxf, .mp4, and .avi Files
Working with native .mxf files in Adobe Premiere Pro
and After Effects.............................................................................6
Steps for using .mxf files in your projects ..............................................6
Working with native XDCAM EX (.mp4) files in
Adobe Premiere Pro.......................................................................7
Displaying information for clips in Windows Explorer ......................8
Thumbnails preview ...............................................................................8
Additional file details in Windows XP ......................................................8
Creating Matrox EZ-MXF files for playback with
VFW applications............................................................................9
Panasonic P2 folder structure.............................................................. 10
Creating Matrox EZ-HDV AVI files for playback of
large HDV clips with VFW applications..........................................11
Converting a 32-bit .tga sequence to an .avi file with alpha ......... 12
Chapter 3
Defining Your Adobe Premiere Pro Settings
A note about running other programs with Adobe Premiere Pro.. 16
Setting your system’s volume levels ............................................. 16
For Windows Vista ............................................................................... 16
For Windows XP ...................................................................................17
Loading project presets................................................................. 18
Setting up your scratch disks ........................................................ 19
Page 4

ii
Displaying warnings in Adobe Premiere Pro’s Events panel..........19
Mixing interlaced and progressive clips in a project......................19
Mixing SD and HD clips in a project .............................................. 20
Defining your General settings .......................................................21
Selecting options for accelerated Premiere Pro effects....................... 24
Specifying your video output settings .................................................. 25
Selecting your DV-1394 output settings ............................................... 27
Defining your Video Rendering settings ........................................ 27
Defining your Capture settings...................................................... 28
Specifying your video capture settings ................................................ 28
Specifying your audio capture settings ................................................ 31
Notes about capturing to Matrox .m2v files ........................................ 34
Capturing HDV material on Matrox RT.X2 SD ............................... 35
Exporting to a Matrox .avi file........................................................ 36
Selecting your MPEG-2 I-frame settings....................................... 39
Selecting your MPEG-2 IBP settings ..............................................41
Exporting using Matrox Media Encoder ........................................ 43
Exporting using Matrox Clip Notes................................................ 44
Setting up Matrox DV/HDV device control .................................... 44
Exporting your sequence to tape .................................................. 45
Preparing your tapes for recording...................................................... 45
Avoiding missing frames when exporting to DV tape .......................... 45
Exporting to DV tape using DV-1394 device control ............................ 46
Creating an SD project in 16:9 format ........................................... 47
Chapter 4
Setting Up Realtime Effects with Adobe Premiere Pro
Available effects ............................................................................ 50
How to apply a Matrox video effect in Adobe Premiere Pro..........51
How to apply a Matrox video transition in Adobe Premiere Pro ....51
Transforming your clip................................................................... 52
Using the transform controls ...............................................................52
Transforming a clip in the Program Monitor......................................... 54
Contents
Page 5

Cropping your clip..........................................................................55
Using Select Crop ................................................................................56
Applying a mask to your effect ...................................................... 57
Using Select Mask ...............................................................................58
Creating a primary color correction...............................................59
Using Split View ................................................................................... 61
Working with Split View in the Program Monitor .................................. 61
Using RGB curves................................................................................63
Adjusting tonal range ...........................................................................65
Using the color balance graph .............................................................66
Performing an auto balance ................................................................69
Matching colors between two clips ..................................................... 70
Using the luma mapping graph............................................................72
Creating a secondary color correction..........................................74
Using the selective key graph .............................................................. 79
Creating a color pass effect ................................................................84
Creating a 3D DVE effect ...............................................................85
Creating a 4-corner pin effect .......................................................88
Creating a blur/soft focus effect....................................................90
Overview of the chroma key effects.............................................. 91
Creating a chroma key or chroma key shadow effect ..................92
Using the chroma key graph to modify key colors and
perform an auto key ...........................................................................95
Creating a cube effect ...................................................................98
Creating a crystallize effect .......................................................... 101
Creating a garbage matte effect ................................................. 103
Creating an impressionist effect.................................................. 105
Creating a lens flare effect .......................................................... 108
Overview of the luma key effect ................................................... 110
Creating a luma key effect.............................................................111
Using the luma key graph ................................................................... 112
Creating a mask effect ................................................................. 114
Creating a mask blur effect .......................................................... 116
iii
Contents
Page 6

iv
Creating a mask mosaic effect .................................................... 118
Creating a move & scale effect....................................................120
Creating an old movie effect ........................................................122
Creating a page curl effect ..........................................................126
Creating a pan & scan effect .......................................................128
Creating a ripple effect.................................................................130
Creating a shadow effect .............................................................132
Creating a shine effect .................................................................134
Creating a sphere effect ..............................................................138
Creating a surface finish effect ....................................................140
Creating a track matte effect.......................................................143
Creating a twirl effect...................................................................145
Creating a wipe transition ............................................................146
Using the Matrox chroma clamper effect ....................................148
Selecting your speed control method ..........................................148
About Adobe Premiere Pro’s fixed effects...................................148
Matrox RT.X2 realtime guidelines ................................................149
Supported graphics formats .............................................................. 150
Limitations ......................................................................................... 150
Chapter 5
Using Matrox RT.X2 with Video for Windows Programs
Overview.......................................................................................152
Using VFW programs without the RT.X2 hardware......................152
Before you start rendering ...........................................................153
Selecting color space conversion options ......................................... 154
Rendering material to a Matrox VFW .avi file...............................156
Configuring the Matrox MPEG-2 I-frame codecs ...............................157
Chapter 6
Using the Matrox WYSIWYG Plug-ins
Overview.......................................................................................160
Configuring the Matrox WYSIWYG Control Panel.........................160
Contents
Page 7

Required steps to use the WYSIWYG plug-ins ............................ 162
Adobe After Effects ........................................................................... 162
Adobe Photoshop.............................................................................. 162
Autodesk 3ds Max............................................................................. 162
Autodesk Combustion ....................................................................... 162
eyeon Fusion ..................................................................................... 162
NewTek LightWave 3D ...................................................................... 163
Chapter 7
Monitoring Your Matrox RT.X2 System
Using X.info to display RT.X2 information .................................... 166
Monitoring your Adobe Premiere Pro memory usage........................ 166
Displaying system information ........................................................... 166
Displaying hardware information........................................................ 168
Monitoring your RT.X2 card’s operating temperatures ...................... 169
Enabling and disabling the Matrox hardware-accelerated effects
in Adobe Premiere Pro ..................................................................... 169
Error notification ................................................................................ 169
Appendix A
Understanding Standard and Advanced Pulldown
Overview ...................................................................................... 172
Standard 2:3 pulldown ................................................................. 172
Matrox RT.X2 implementation of standard reverse pulldown .............173
Advanced 2:3:3:2 pulldown ......................................................... 173
Matrox RT.X2 implementation of advanced reverse pulldown ............174
v
Appendix B
Matrox RT.X2 Workflows
Overview ...................................................................................... 176
Working with SD “24P” material .................................................. 176
486p @ 23.98 fps workflow example .................................................. 177
Working with HD projects ............................................................ 178
1440 × 1080i/p workflow example.........................................................179
720p workflow example..................................................................... 180
Capturing HDV and SD material to edit in SD on Matrox RT.X2 ... 181
Contents
Page 8

vi
Capturing HDV and SD material on Matrox RT.X2 SD ..................182
Using the Matrox MPEG-2 I-frame HD codec ..............................183
MPEG-2 I-frame HD codec workflow example for offline editing....... 183
MPEG-2 I-frame HD codec workflow example for online editing....... 185
Using Matrox RT.X2 to edit Matrox Axio offline HD projects........186
Supported video compression formats ........................................ 187
Supported master output formats................................................188
Appendix C
Matrox RT.X2 Customer Support
Getting the most support .............................................................190
Registration ....................................................................................... 190
Keep up to date with our web site .................................................... 190
Contacting us .................................................................................... 190
Appendix D
Matrox RT.X2 Glossary
Glossary of terms .........................................................................192
Index ..................................................................................... 205
Contents
Page 9

Chapter
1
Introducing Matrox RT.X2
This chapter outlines some of
the features of the Matrox
RT.X2 product line, and
describes the available Matrox
RT.X2 documentation.
Page 10

2
Welcome to Matrox RT.X2
Matrox RT.X2 products let you get maximum productivity from Adobe Premiere
Pro, and are ideal for corporate communicators, event videographers, project
studios, educational facilities, and digital filmmakers. Matrox RT.X2 SD is for
users who want to deliver in SD only, while Matrox RT.X2 and RT.X2 LE give
you the flexibility to edit, view, and output HDV and SD material.
Matrox RT.X2 SD key features
The following are key features of Matrox RT.X2 SD:
• Realtime multi-layer editing of video, graphics, and effects.
• Realtime Matrox Flex CPU effects, including color correction, speed
changes, chroma/luma keying, and many more.
• Realtime and accelerated Matrox Flex GPU effects, including 3D DVEs,
blur/glow/soft focus, shine, and many more.
• Native DV/DVCAM, DVCPRO, and MPEG-2 4:2:2 I-frame SD editing.
• Realtime downscaling of HDV 1080i/p clips in an SD project.
• Realtime mixed-format multi-camera editing in an SD project.
• Realtime playback of 32-bit MPEG-2 I-frame SD .avi files with alpha.
• Accelerated media encoding, including export to DVD, Flash Video, and
Adobe Clip Notes.
• WYSIWYG plug-ins for many popular compositing and animation
programs, such as Adobe After Effects, Adobe Photoshop, and Autodesk
Combustion.
• DV-1394, composite, S-Video, and SD analog component video input and
output.
Matrox RT.X2 and RT.X2 LE key features
The following are key features of Matrox RT.X2 and RT.X2 LE:
• Realtime, mixed-format, multi-layer workflows that combine HD and SD
material from analog and digital sources.
• Realtime Matrox Flex CPU effects, including color correction, speed
changes, chroma/luma keying, and many more.
• Realtime and accelerated Matrox Flex GPU effects, including 3D DVEs,
blur/glow/soft focus, shine, and many more.
• Native HDV and MPEG-2 4:2:2 I-frame HD editing.
• Native DV/DVCAM, DVCPRO, and MPEG-2 4:2:2 I-frame SD editing.
• Realtime playback of 32-bit MPEG-2 I-frame .avi files with alpha.
Chapter 1, Introducing Matrox RT.X2
Page 11

• Native .mxf file support for Panasonic P2 (SD and 720p formats) in Adobe
Premiere Pro and After Effects.
• Matrox EZ-MXF utility for native .mxf file support in Video for Windows
(.avi file) applications.
• Realtime mixed-format multi-camera editing.
• Realtime high-quality hardware downconverting for SD output of an HD
project.
• Accelerated media encoding, including export to DVD, Flash Video, and
Adobe Clip Notes.
• WYSIWYG plug-ins for many popular compositing and animation
programs, including Adobe After Effects, Adobe Photoshop, and Autodesk
Combustion.
• DV-1394, composite, S-Video, and SD/HD analog component video input
and output.
• Full-resolution DVI output for previewing the video output on a DVI
monitor that accepts digital input, such as an inexpensive digital flat-panel
display. (Not supported on RT.X2 LE.)
About this manual
This manual explains how to use Matrox RT.X2 with the provided Matrox
software, including how to use your RT.X2 system with Adobe Premiere Pro.
3
¦NoteThroughout the Matrox RT.X2 documentation, the term “RT.X2” refers
to RT.X2, RT.X2 LE, and RT.X2 SD, unless indicated otherwise.
Style conventions
The following style conventions are used in this manual:
• When an operation is different between Windows Vista and Windows XP,
the operating system is displayed in brackets after the operation. For
example, right-click
• The names of files, directory paths, and manuals appear in italics. For
example:
$ The data is stored in the sample.wav file.
$ The file is located in your C:\Windows\System directory.
$ Please refer to your Matrox RT.X2 Installation Manual.
• Menus and commands that you need to choose are displayed in the form
Menu > Command. For example, File > Save means click File in the
menu bar, then click
• The names of keys are displayed in small capital bold letters, such as the
CTRL key.
Computer (Vista) or My Computer (XP).
Save in the menu that appears.
About this manual
Page 12

4
• A plus (+) sign is used to indicate combinations of keys and/or mouse
operations. For example:
$ CTRL+C means to hold down the CTRL key while pressing the C key.
$ SHIFT+click means to hold down the SHIFT key while you click an item
with the mouse.
How video formats are expressed
With the exception of NTSC and PAL, all SD and HD video formats are
expressed in the Matrox RT.X2 documentation and dialog boxes as follows:
VRp or i @ n fps
Where:
• VR is the vertical resolution. For 1440×1080 video, however, both the
horizontal and vertical resolutions are specified.
• p or i represents either progressive or interlaced video.
• @ n fps is the frame rate in frames per second.
Here are some examples:
• 486p @ 23.98 fps Represents 720× 486 progressive video at 23.98 frames
per second.
• 720p @ 59.94 fps Represents 1280×720 progressive video at 59.94
frames per second.
• 1440x1080i @ 29.97 fps Represents 1440×1080 interlaced video at 29.97
frames per second. This format is used for HDV 1080i material.
• 1080i @ 29.97 fps Represents full-size 1920×1080 interlaced video at
29.97 frames per second.
Other documentation
In addition to this user guide, the following Matrox RT.X2 documents are
available:
• Matrox RT.X2 Quick Installation Guide Provides brief installation
instructions to help you quickly set up your Matrox RT.X2 system.
• Matrox RT.X2 Installation Manual Provides detailed instructions for
installing your Matrox RT.X2 hardware and software, including how to
connect your external devices to the RT.X2 breakout box.
• Matrox RT.X2 Release Notes Provides any important last-minute
information and operational limitations.
Chapter 1, Introducing Matrox RT.X2
Page 13

Chapter
Working with .mxf, .mp4, and .avi Files
This chapter shows you how to
work with .mxf, .mp4, and .avi
files on Matrox RT.X2.
2
Page 14

6
Working with native .mxf files in Adobe Premiere Pro and After Effects
¦NoteMatrox RT.X2 SD does not support working with .mxf files.
Matrox RT.X2 supports the MXF file format, which allows you to use .mxf files
that are created with the Panasonic P2 camera (in SD and 720p formats) directly
in Adobe Premiere Pro and After Effects without having to convert the files to the
traditional AVI file format.
¡ Important When using a Panasonic P2 camera to shoot material at 486p @
23.98 fps for use with Matrox RT.X2, you must set the camera to Advanced mode
(486/24pA).
Steps for using .mxf files in your projects
1 Connect your Panasonic P2 device to your Matrox RT.X2 computer as per
your device’s instructions.
¦NoteIf you have a PCMCIA card reader in your computer, you can use it
to load your P2 memory card for use with Matrox RT.X2. However, the device
must show up in Windows as a drive.
2 You can either edit directly from the P2 device or from the computer’s hard
drive. If you choose to edit your .mxf clips from the computer, copy the
Panasonic P2 folder structure to your computer’s hard drive. For information
regarding the Panasonic P2 folder structure, see “Panasonic P2 folder
structure” on page 10.
3 Import the native .mxf files into Adobe Premiere Pro’s Project panel like any
other file. To help you select your shots you can enable thumbnail view, and
add details for your .mxf files in Windows Explorer, or Premiere Pro’s
Import or Get Properties dialog box. For more information on displaying
.mxf file information, see “Displaying information for clips in Windows
Explorer” on page 8.
4 Edit your project with the native .mxf files from the Project panel, applying
effects, and mixing the .mxf files with other clips as you see fit.
5 Add Adobe After Effects compositing with a simple copy and paste or
import the .mxf files into After Effects and edit them as you see fit.
¦NoteMatrox RT.X2 does not support exporting to an .mxf file.
Chapter 2, Working with .mxf, .mp4, and .avi Files
Page 15

Working with native XDCAM EX (.mp4) files in Adobe Premiere Pro
¦NoteMatrox RT.X2 SD does not support XDCAM EX files.
Matrox RT.X2 supports realtime playback of Sony XDCAM EX 1080i/p and
720p .mp4 files in Adobe Premiere Pro. Both 1080i/p HQ-mode (1920× 1080)
and 1080i/p SP-mode (1440×1080) clips are supported in your 1080i/p projects,
and will be automatically scaled to your project’s frame size as needed. For
example, when you import XDCAM EX 1080i @ 29.97 fps HQ-mode
(1920× 1080) clips to a 1440×1080i @ 29.97 fps project, the clips are
automatically downscaled to 1440×1080. Realtime downscaling of XDCAM EX
1080i/p SP-mode clips in SD projects is also supported as explained in “Mixing
SD and HD clips in a project” on page 20.
¦NoteInstead of importing XDCAM EX clips directly to your Adobe Premiere
Pro projects, you should copy the clips from your XDCAM EX device to your
computer’s hard drive.
7
Working with native XDCAM EX (.mp4) files in Adobe Premiere Pro
Page 16

8
Displaying information for clips in Windows Explorer
Matrox RT.X2 extends the functionality of Windows Explorer by allowing you to
easily view and manage your .mxf and .avi files by providing thumbnail previews
(Vista and XP) and additional file details (XP only).
¦NoteYou can view thumbnails and additional details for .mxf and .avi files in
any application where you can choose the thumbnails or details view, such as
Adobe Premiere Pro’s
Thumbnails preview
Matrox RT.X2 allows you to view thumbnails of .mxf and .avi files in Windows
Explorer. The thumbnail will display the first frame of the clip. Without Matrox
RT.X2, only the default Windows icon would appear. In a folder containing .mxf
or .avi files, enable the thumbnails view as follows:
Import dialog box.
• In Windows Vista, choose
Large Icons, except Small Icons.
¦NoteIn Windows Explorer, ensure that Always show icon, never
thumbnails
• In Windows XP, choose
is cleared in Organize > Folder and Search Options > View.
View > Tiles or any of the icon options, such as
View > Thumbnails.
Additional file details in Windows XP
On a Windows XP system, Matrox RT.X2 lets you add additional details for .mxf
and .avi files in Windows Explorer.
°To add clip details in Windows Explorer:
1 Start Windows Explorer, and ensure that the details view is selected for the
appropriate folder by choosing
View > Details.
Chapter 2, Working with .mxf, .mp4, and .avi Files
Page 17
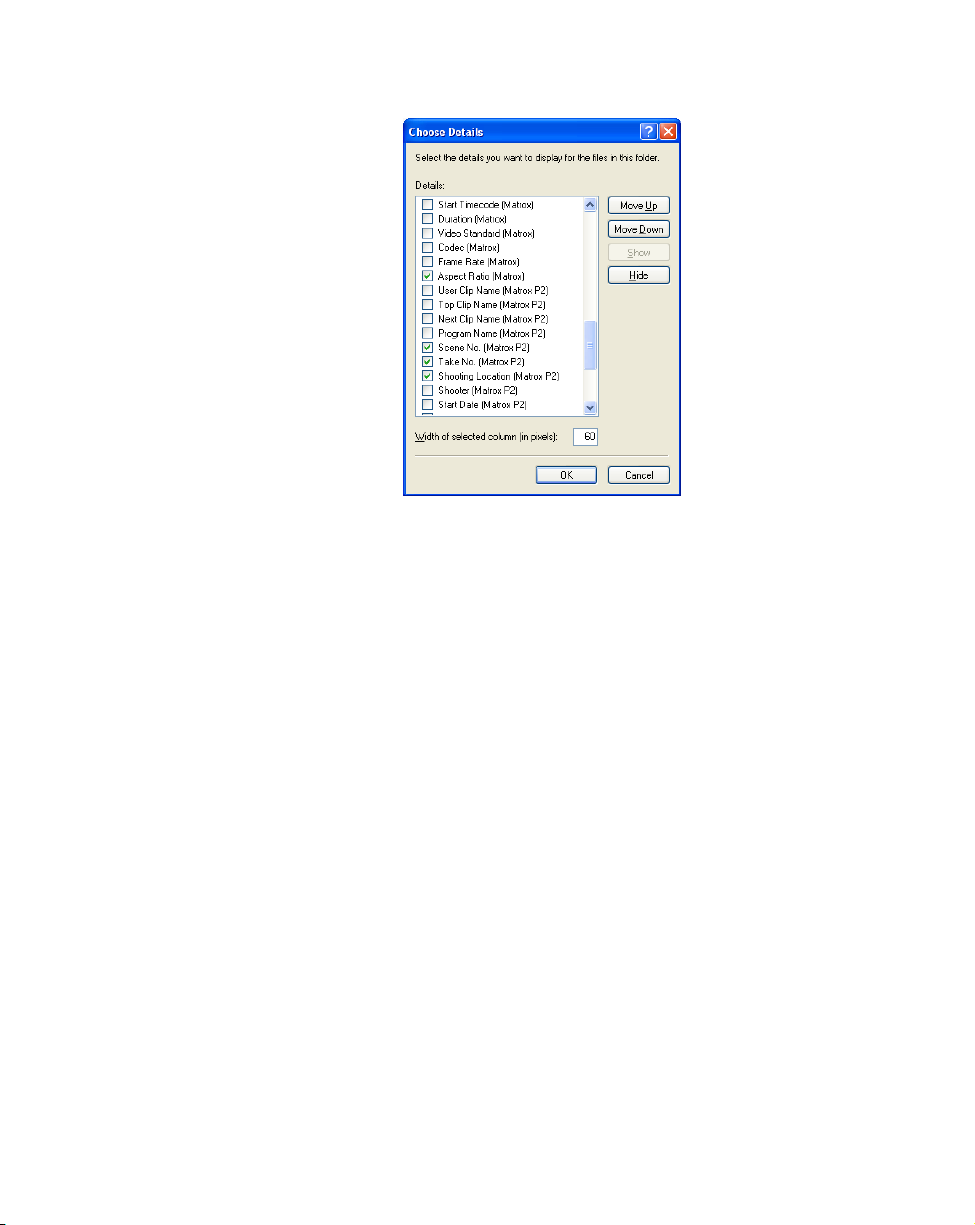
2 Choose View > Choose Details.
3 In the Choose Details dialog box, select the check boxes corresponding to
the desired “Matrox” or “Matrox P2” details. Detail names followed by
“Matrox P2” are specific to Panasonic P2 files (for example, User Clip
Name, Shooter, Shooting Location, and Scene No.).
4 Click OK.
5 To apply the change to all folders, choose Tools > Folder Options >
View > Apply to All Folders
.
9
Creating Matrox EZ-MXF files for playback with VFW applications
¦NoteThe Matrox EZ-MXF utility is not available on RT.X2 SD because
Matrox RT.X2 SD does not support .mxf files.
Many animation, compositing, and motion graphics applications used by video
editors read Video for Windows (VFW) .avi files, but these applications are not
designed to read .mxf files. The Matrox EZ-MXF utility creates a very small
reference .avi file, along with the associated mono .wav files, from an .mxf file
without modifying the contents of your original .mxf file or its metadata. Your
VFW application plays the created .avi and .wav files, which reference the
original .mxf file.
Remarks
• Windows Media Player does not support .mxf files. You can therefore use the
Matrox EZ-MXF utility to create reference .avi and .wav files for your .mxf
files that you want to play back using Windows Media Player.
Creating Matrox EZ-MXF files for playback with VFW applications
Page 18
10
•For .mxf files that have a frame size of 1440×1080, the created reference .avi
files will have a frame size of 1920×1080 and a 1.333 pixel aspect ratio. To
display these .avi files correctly in Adobe After Effects or Adobe Premiere
Pro, you’ll need to use the
Interpret Footage command to change the pixel
aspect ratio to 1.0.
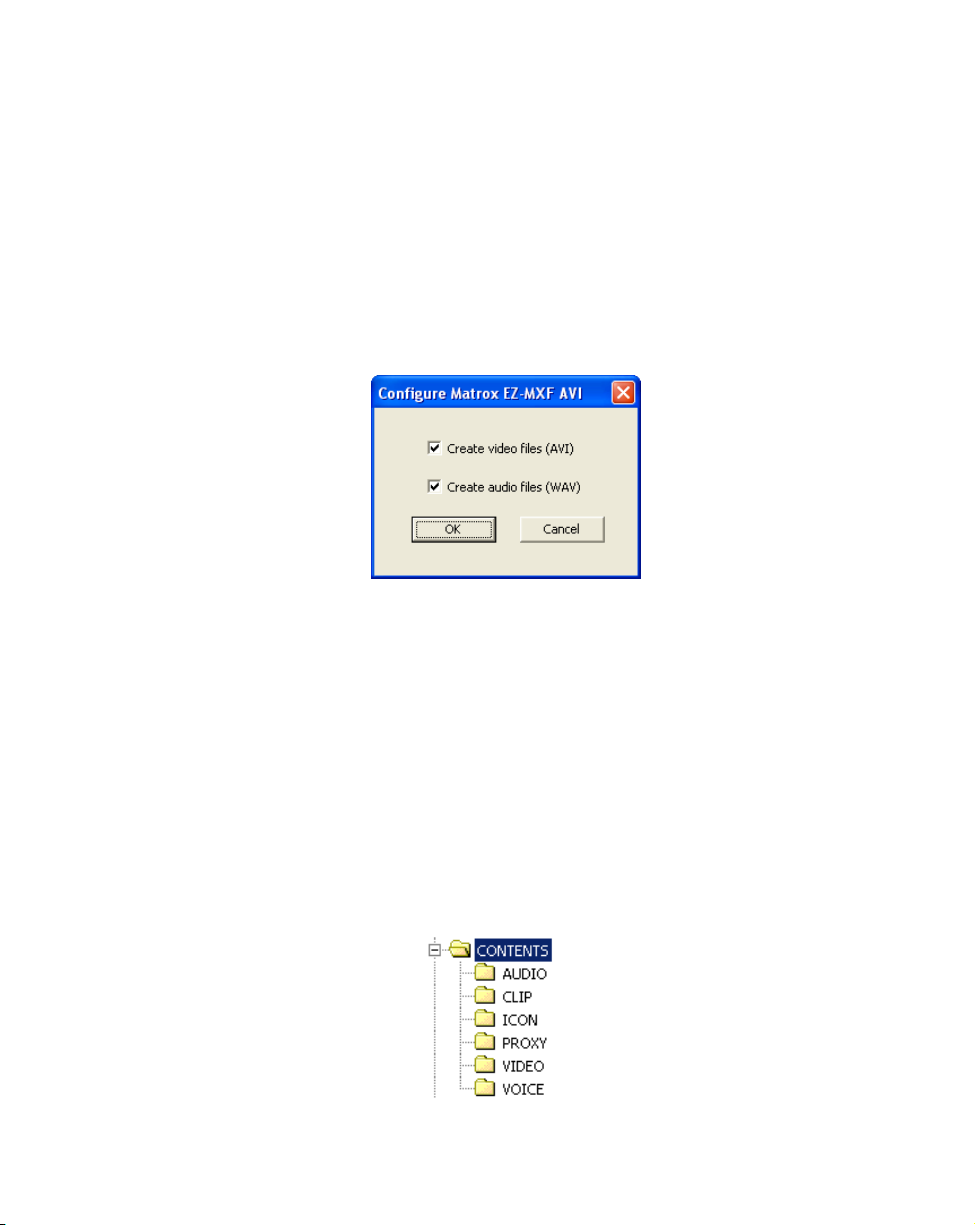
You can configure Matrox EZ-MXF to create only video files, only audio files, or
both types of files. By default, Matrox EZ-MXF is set to create both video and
audio files.
°To create Matrox EZ-MXF files:
1 In Windows Explorer, right-click the desired .mxf file (or selected files), and
choose
2 In the Configure Matrox EZ-MXF AVI dialog box, specify the type of files
you want to create (video and/or audio), and click
¦NoteThe file type settings will remain in effect until you change them.
Matrox EZ-MXF AVI > Configure.
OK.
3 Right-click the desired .mxf file (or selected files), and choose Matrox
EZ-MXF AVI > Create
. The reference .avi and .wav files are created as per
the folder structure for Panasonic P2 as explained in the next section.
¡ Important Once the Matrox EZ-MXF files are created, do not change the
location or name of the referenced .mxf files or your VFW program won’t be
able to locate your .mxf material. If this occurs, Matrox RT.X2 will display
an appropriate error message.
Panasonic P2 folder structure
Panasonic P2 files are organized in a specific folder structure as follows:
Chapter 2, Working with .mxf, .mp4, and .avi Files
Page 19
When you select an .mxf file in the VIDEO folder, Matrox EZ-MXF looks for any
associated audio .mxf files in the AUDIO folder, and creates the reference .avi and
associated .wav files in the VIDEO folder. For example, if you select the file
00001A.mxf from the VIDEO folder, the reference .avi file (00001A.avi) and all
associated audio files, such as 00001A00.Mono.wav and 00001A01.Mono.wav,
will be created in the VIDEO folder. For more information on the P2 naming
convention and folder structure, see your Panasonic P2 documentation.
¦NoteIf you select an audio .mxf file from the AUDIO folder, only the mono
.wav file will be created, and it will be in the AUDIO folder.
Creating Matrox EZ-HDV AVI files for playback of large HDV clips with VFW applications
The file size limit for playing back HDV .avi files in VFW applications is 2 GB.
For example, when you play back a large HDV .avi file in Adobe After Effects,
the clip stops playing at the 2-GB point. To overcome this limitation, you can use
the Matrox EZ-HDV AVI utility to create small .avi files, and the associated
mono .wav files, that reference your large HDV clips. These reference HDV .avi
and .wav files will play back completely in your VFW application.
¦NoteFor HDV clips that have a frame size of 1440× 1080, the created
reference HDV .avi files will have a frame size of 1920× 1080 and a 1.333 pixel
aspect ratio. To display these files correctly in Adobe After Effects or Adobe
Premiere Pro, you’ll need to use the
pixel aspect ratio to 1.0.
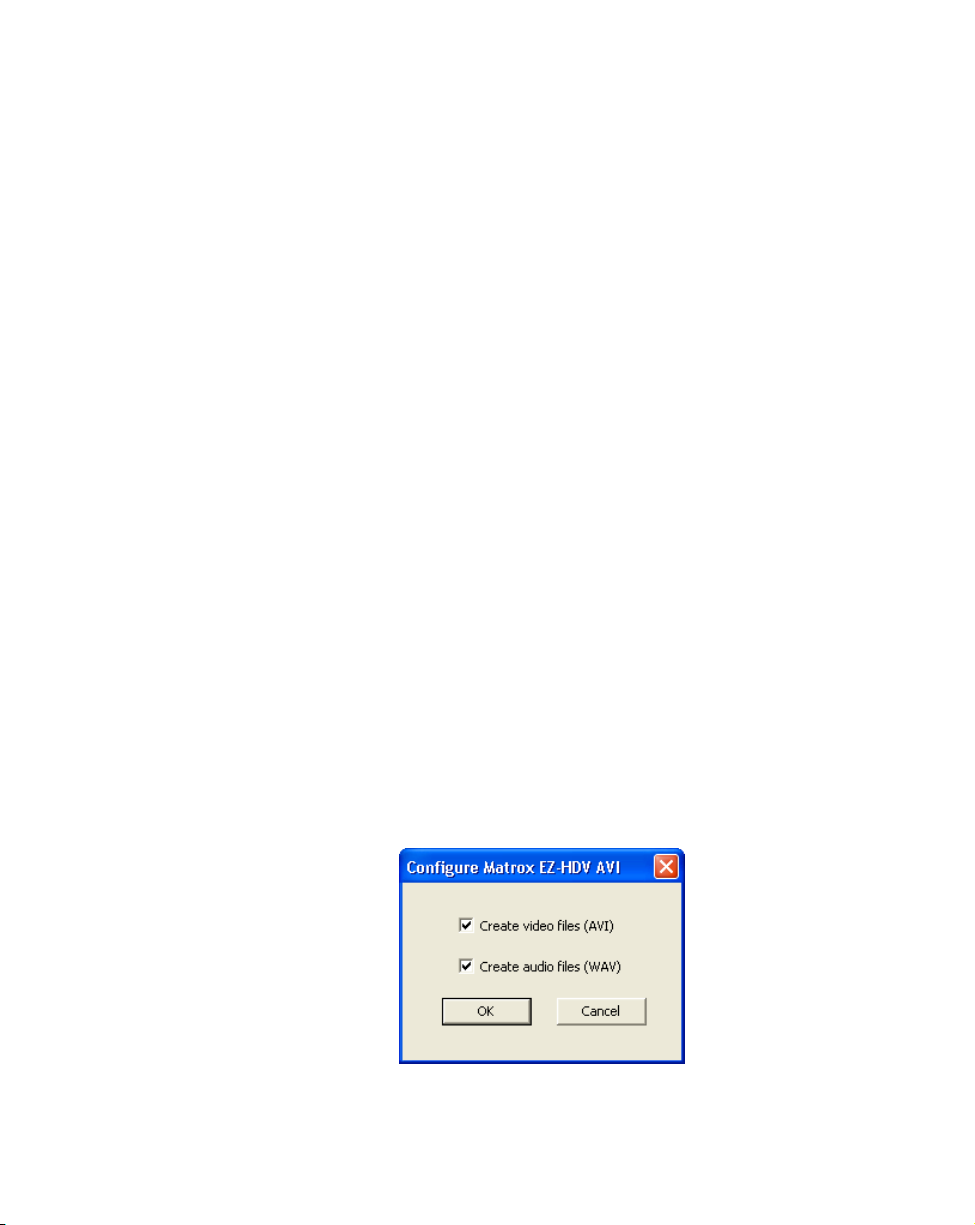
You can configure Matrox EZ-HDV AVI to create only video files, only audio
files, or both types of files. By default, Matrox EZ-HDV AVI is set to create both
video and audio files.
Interpret Footage command to change the
11
°To create Matrox EZ-HDV AVI files:
1 In Windows Explorer, right-click the desired HDV .avi file (or selected
files), and choose
2 In the Configure Matrox EZ-HDV AVI dialog box, specify the type of files
you want to create (video and/or audio), and click
Creating Matrox EZ-HDV AVI files for playback of large HDV clips with VFW
Matrox EZ-HDV AVI > Configure.
OK. The created reference
Page 20

12
files will be named Filename_Ref.avi, Filename_Ref.Mono1.wav, and
Filename_Ref.Mon2.wav. For example, if you’re creating both video and
audio files for a file named Demo.avi, your reference files will be named
Demo_Ref.avi, Demo_Ref.Mono1.wav, and Demo_Ref.Mono2.wav (only
mono reference .wav files can be created for stereo HDV clips).
¦NoteThe file type settings will remain in effect until you change them.
3 Right-click the desired HDV .avi file (or selected files), and choose Matrox
EZ-HDV AVI > Create
the same folder as your source .avi files.
¡ Important Once the Matrox EZ-HDV AVI files are created, do not change the
location or name of the referenced HDV .avi files or your VFW program won’t
be able to locate your original HDV clips. If this occurs, Matr
display an appropriate error message.
. Your reference .avi and .wav files will be created in
ox RT.X2 will
Converting a 32-bit .tga sequence to an .avi file with alpha
Matrox RT.X2 allows you to create a single .avi file with alpha from a 32-bit .tga
sequence. The created .avi file will contain the alpha-key information, which
means that when you place the file on the timeline in Adobe Premiere Pro, the
clip will be automatically keyed. Having only one file simplifies management
and makes it easier to include the composition in your final edit.
¦NoteYou can convert 32-bit uncompressed or RLE-compressed .tga files to an
.avi file with alpha.
When selecting only one .tga file, the program automatically detects other files
with the same base name in the same folder (for example, demo001.tga,
demo002.tga, etc.), and uses these files to create the .avi file. When multiple .tga
files are selected, only the selected files will be taken to build the .avi file. The
.avi file will be created with the following naming convention:
Base Name_Compressor_Output Format.avi
For example, if the base name for your converted .tga sequence is demo, the
compressor is
NTSC 4:3, the created .avi file will be named
demo_MPEG-2_I-frame_NTSC_4_3.avi.
You can create HD and SD .avi files with alpha in Matrox MPEG-2 I-frame
format. On Matrox RT.X2 SD, however, only the SD files are supported.
Chapter 2, Working with .mxf, .mp4, and .avi Files
Matrox MPEG-2 I-frame+ Alpha, and the output format is
Page 21
°To create an .avi file with alpha from a .tga sequence:
1 In Windows Explorer, right-click the selected .tga file(s), choose Matrox
AVI + Alpha
format, such as
> Select Format, and then click the desired .avi output video
1440x1080i @ 29.97 fps.
¦NoteFormats that are not supported by your Matrox RT.X2 hardware are
identified with an asterisk (*) in the list. If you create an .avi file using an
unsupported format, it will not play back in real time on your Matrox RT.X2
system.
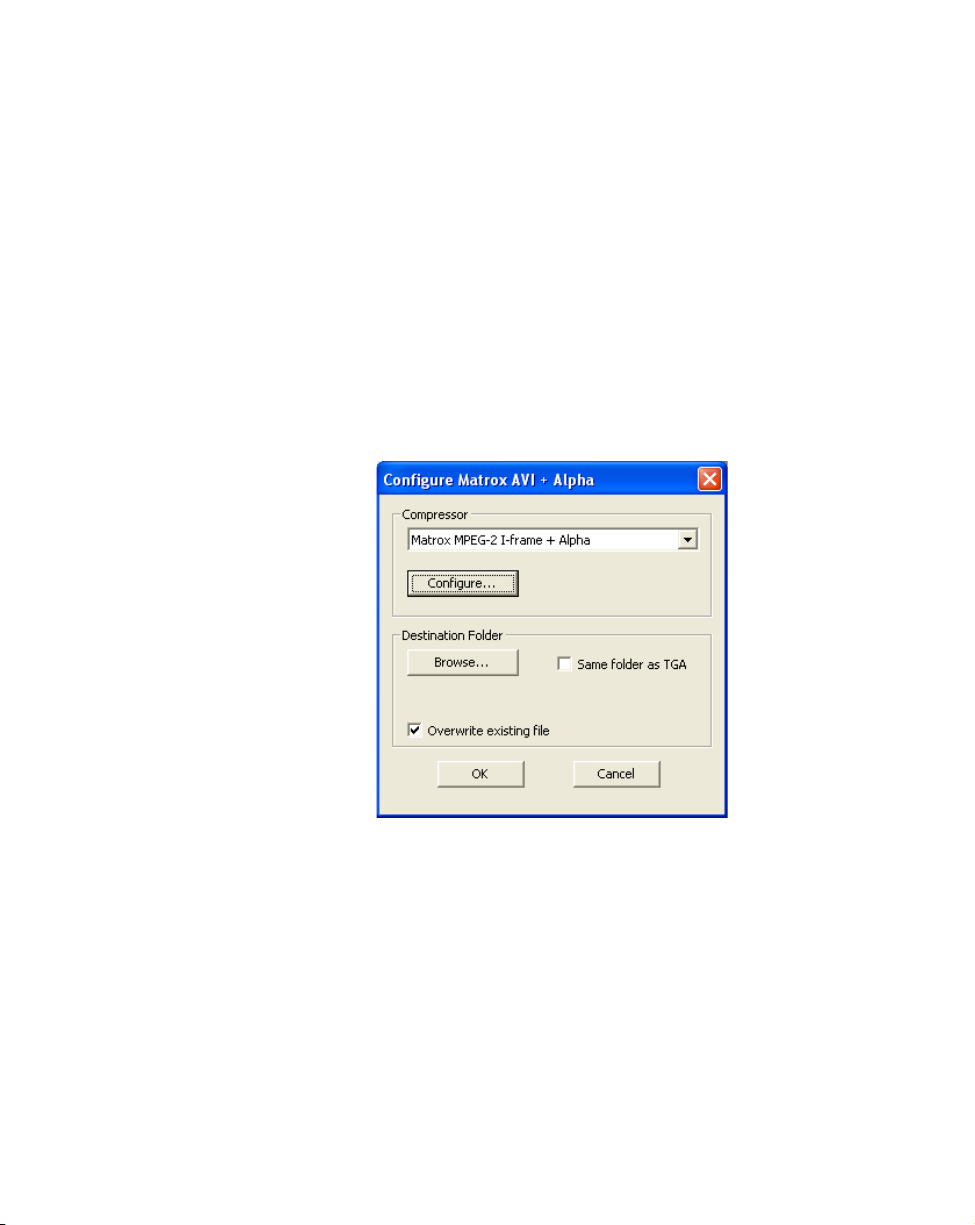
2 Right-click the selected .tga file(s), and choose Matrox AVI + Alpha >
Configure
.
¦NoteOnce set, the output format and configuration settings apply to all
subsequent .tga sequences that you convert to .avi files. However, if you select
a 1440× 1080i/p output format, the compressor for the .tga to .avi conversion
will automatically be set to
Matrox MPEG-2 I-frame HD + Alpha.
13
3 From the Compressor list, select the compression format you want for your
.avi file.
¦NoteAlthough the Matrox uncompressed formats are available, you cannot
play back uncompressed clips in real time on your Matrox RT.X2 system.
$ Matrox MPEG-2 I-frame + Alpha Renders video to MPEG-2
intra-frame format with alpha using the 4:2:2 Profile @ Main Level at a
selected data rate (SD resolution only).
$ Matrox MPEG-2 I-frame HD + Alpha Renders video to MPEG-2
intra-frame format with alpha using the 4:2:2 Profile @ High Level at a
selected data rate (HD resolution only).
Converting a 32-bit .tga sequence to an .avi file with alpha
Page 22

14
4 Click the Configure button to specify various options for the MPEG-2
I-frame compression. The configuration options are the same as when you
capture or export video using Adobe Premiere Pro (see “Selecting your
MPEG-2 I-frame settings” on page 39).
5 Under Destination Folder, either select Same folder as TGA, or click
Browse to specify where the .avi file will be created. Select Overwrite
existing file
if you want to overwrite any .avi file with the same name in the
specified folder.
6 Right-click the selected .tga file(s), and choose Matrox AVI + Alpha >
Convert to AVI
.
Chapter 2, Working with .mxf, .mp4, and .avi Files
Page 23

Chapter
Defining Your Adobe Premiere Pro
3
Settings
This chapter explains how to
define various settings for
using Matrox RT.X2 with Adobe
Premiere Pro. This includes
specifying your project and
export settings.
Page 24

16
A note about running other programs with Adobe Premiere Pro
For the best performance, you shouldn’t run any other programs at the same time
as Adobe Premiere Pro. If you choose to do so, however, make sure that you start
Adobe Premiere Pro and open your Matrox RT.X2 project before starting the
other programs. Otherwise, Adobe Premiere Pro may fail to start. If this happens,
quit all programs and then restart Adobe Premiere Pro.
¥Tip When Adobe Premiere Pro is running, you can monitor your Adobe
Premiere Pro memory usage. To do this, hold your mouse pointer over the
Matrox X.info ( ) icon. For details on using Matrox X.info, see Chapter 7,
“Monitoring Your Matrox RT.X2 System.”
Setting your system’s volume levels
To properly capture and play back audio in Adobe Premiere Pro, make sure
you’ve set appropriate recording and playback volume levels for your system as
follows:
For Windows Vista
1 Right-click the speaker icon on the Windows taskbar and choose Playback
Devices
¥Tip If you don’t see the speaker icon, right-click the Windows taskbar and
choose
click
2 From the list of available devices, double-click the device that you want to
use with your Matrox RT.X2 system.
3 Click the Levels tab, and for each of the controls (Line-in, Microphone,
etc.) make sure the volume slider is at an appropriate level, such as at
midpoint. As well, make sure that each control is not muted.
¦NoteIf you have an active audio stream connected to an input on your audio
card via the RT.X2 breakout box, you must mute the input to avoid hearing
the audio when you’re not working in Premiere Pro.
.
Properties, click the Notification Area tab, select Vo lu me , and
OK.
4 Click OK, and click the Recording tab.
5 From the list of available devices, double-click the device (input) that you
want to use as the audio source, such as
system.
6 Click the Levels tab, and make sure the volume slider is at an appropriate
level, such as at midpoint.
Chapter 3, Defining Your Adobe Premiere Pro Settings
Line-in, with your Matrox RT.X2
Page 25

7 Repeat steps 5 and 6 for every audio input source that you intend to use with
your Matrox RT.X2 system. For example, if you intend on recording audio
from a microphone, set the volume levels for the
8 Click OK.
9 Click OK to close the dialog box.
Microphone input.
For Windows XP
1 Double-click the speaker icon on the Windows taskbar.
¥Tip If you don’t see the speaker icon on your Windows taskbar, run
Sounds and Audio Devices from the Windows Control Panel, select Place
volume icon in the taskbar
2 Choose Options > Properties.
3 From the Mixer device list, make sure that the audio device you want to use
with your Matrox RT.X2 system is selected.
4 Select the Playback option, then select all check boxes in the list. Click OK.
5 For each of the controls (Line-in, Wave , etc.), make sure the Vol um e sliders
are at an appropriate level, such as at half-level. As well, clear all the
check boxes.
¦NoteIf you have an active audio stream connected to an input on your audio
card via the RT.X2 breakout box, you must mute the input to avoid hearing
the audio when you’re not working in Premiere Pro.
, then click OK.
Mute
17
6 Choose Options > Properties.
7 Select the Recording option, then select all check boxes in the list. Click
OK.
8 For each of the controls (Line-in, Microphone, etc.), make sure the
Vol ume sliders are at an appropriate level, such as at half-level. As well, if
available, clear all the
9 Close the dialog box.
Mute check boxes.
Setting your system’s volume levels
Page 26

18
Loading project presets
The Matrox realtime plug-in for Adobe Premiere Pro includes project presets that
you can load to immediately apply appropriate Matrox RT.X2 settings. For more
information about using the Matrox project presets for working with different
types of projects, see Appendix B, “Matrox RT.X2 Workflows.”
°To load a Matrox project preset:
1 Start Adobe Premiere Pro and click the New Project icon. The New
Project
2 From the appropriate Matrox folder (Matrox - SD to create an SD project,
or
type of project you want to create. For example, if you want to create an
NTSC project in which you’ll capture clips to DV/DVCAM format and work
in a standard 4:3 editing environment, expand the
folders under
Remarks
$ Matrox RT.X2 SD supports creating SD projects only. Therefore, the
$ Matrox HD presets are provided for capturing HDV material. Make sure
3 From the Location list, select where you want to save the project on your
A/V drive.
4 In the Name box, specify a name for your project.
5 Click OK to apply the settings.
dialog box appears.
Matrox - HD to create an HD project), select the preset that matches the
Matrox - SD, then select the DV preset.
Matrox HD presets are not available on RT.X2 SD.
you select the appropriate preset for your HDV footage, such as the
1440x1080i 29.97 fps HDV
1080/60i format, or the
footage was shot in Sony 1080/50i format. On RT.X2 SD, you can capture
HDV material in an SD project as explained in “Capturing HDV material
on Matrox RT.X2 SD” on page 35.
NTSC and Standard
Matrox
preset if your footage was shot in Sony
Matrox 1440x1080i 25 fps HDV preset if your
Chapter 3, Defining Your Adobe Premiere Pro Settings
Page 27

Setting up your scratch disks
When specifying the location of your scratch disks in Adobe Premiere Pro, make
sure you follow the recommendations in your Adobe Premiere Pro User Guide.
For example, always store your video and audio files on an A/V drive.
°To specify your scratch disks:
1 Choose Edit > Preferences > Scratch Disks.
2 Under Scratch Disks, select an appropriate A/V drive letter for each scratch
disk type.
¥Tip To enhance performance, store your media cache files on a drive
separate from your video files.
3 Click OK to save your preferences.
¡ Important Make sure that you specify the same scratch disk settings for all
your projects. This will help shorten the amount of time it takes to open new or
existing projects.
Displaying warnings in Adobe Premiere Pro’s Events panel
Matrox RT.X2 uses Adobe Premiere Pro’s Events panel to issue certain error
messages and warnings. To display these, choose
information about using the
documentation.
Events panel, see your Adobe Premiere Pro
Window > Events. For more
19
Mixing interlaced and progressive clips in a project
When editing on Matrox RT.X2, you can mix interlaced and progressive clips in
the same project, as long as the clips have the same frame size and frame rate.
Both the interlaced and progressive clips will play back in real time. For example,
when working in an NTSC project you can import NTSC clips as well as 486p @
29.97 fps clips, and 1440×1080p @ 29.97 fps clips to which you’ve applied
realtime scaling as explained in “Mixing SD and HD clips in a project” on
page 20.
You should be aware, however, that when you apply effects to clips that have a
scanning mode (progressive or interlaced) that doesn’t match your project, some
undesirable artifacts may appear in your clips.
Setting up your scratch disks
Page 28

20
Mixing SD and HD clips in a project
Matrox RT.X2 supports realtime playback of SD clips in an HD project, and HD
clips in an SD project. To do this, however, the clips must be scaled to your
project’s frame size. If you want the scaling to be performed when you import the
clips into your project, choose
Default scale to frame size. This option does not affect clips that have already
been imported into your project. To scale individual clips in a sequence,
right-click the clip in the
Because you can also mix interlaced and progressive clips that have the same
frame size and frame rate in a project, when you apply realtime scaling to a clip it
will play back in real time even if the clip’s scanning mode (interlaced or
progressive) doesn’t match your project.
Depending on your project’s video format, realtime scaling of clips is supported
as shown in the following table:
Project video format Supported realtime scaling of clips
NTSC Downscale 1440 ×1080i/p @ 29.97 fps
PAL Downscale 1440 ×1080i/p @ 25 fps
486p @ 23.98 fps Downscale 1440 ×1080p @ 23.98 fps
486p @ 29.97 fps Downscale 1440 ×1080i/p @ 29.97 fps
576p @ 25 fps Downscale1440 ×1080i/p @ 25 fps
1440 × 1080i @ 25 fps Upscale PAL and 576p @ 25 fps
1440 × 1080i @ 29.97 fps Upscale NTSC and 486p @ 29.97 fps
1440 × 1080p @ 23.98 fps Upscale 486p @ 23.98 fps
1440 × 1080p @ 25 fps Upscale PAL and 576p @ 25 fps
1440 × 1080p @ 29.97 fps Upscale NTSC and 486p @ 29.97 fps
Edit > Preferences > General and select
Timeline panel and choose Scale to Frame Size.
Remarks
Realtime scaling is not supported for the following:
$ Matrox offline HD clips.
$ Matrox .avi files with alpha.
$ Sony XDCAM EX 1080p @ 23.98 fps SP-mode (1440×1080) .mp4 files
in an SD project.
$ Sony XDCAM EX 1080i/p HQ-mode (1920× 1080) .mp4 files in an SD
project.
Chapter 3, Defining Your Adobe Premiere Pro Settings
Page 29
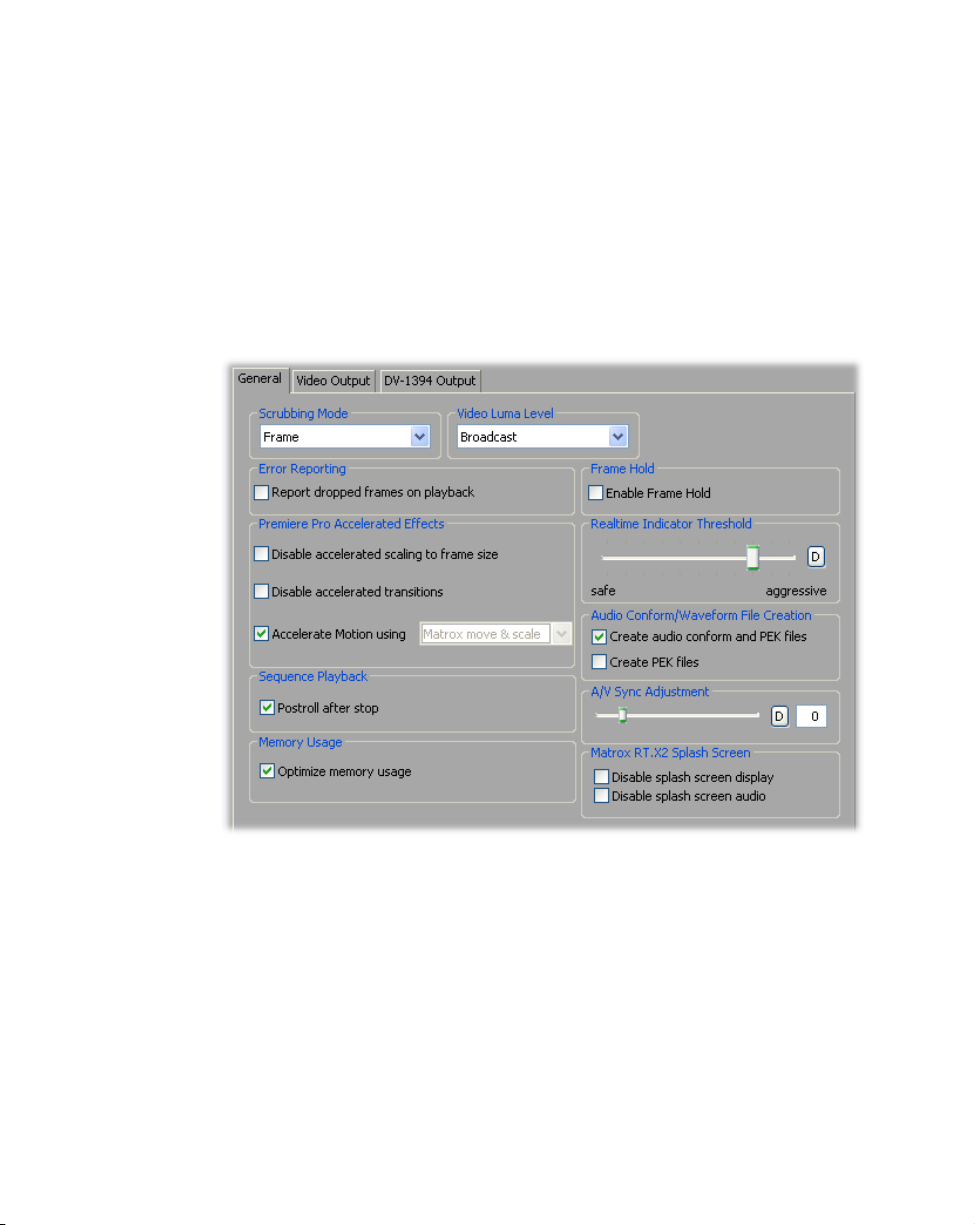
Defining your General settings
The Matrox Playback Settings dialog box has several pages that you can use to
specify various settings for editing in Adobe Premiere Pro on Matrox RT.X2.
When you select a Matrox project preset, such as
editing mode is automatically set for your project, and many settings are
optimized for editing on Matrox RT.X2.
°To specify your General settings on Matrox RT.X2:
1 Choose Project > Project Settings > General and click the Playback
Settings
2 Click the General tab.
button.
DV Standard, a Matrox
21
3 Under Scrubbing Mode, select Frame, 1st Field, or 2nd Field to indicate
whether you want to display frames or only one field when you scrub a
sequence in the
Timeline panel. For example, you may want to scrub the
first or second field to eliminate the flickering that can be seen in your
picture when you pause while scrubbing interlaced video. Scrubbing fields
can also be used to check for any dropped fields that may have occurred in
your video during a telecine process.
¦NoteIf you choose to scrub fields when working with progressive scan
video, you won’t normally see a difference between scrubbing the first or
second field.
Defining your General settings
Page 30

22
4 Under Video Luma Level, select the type of processing that you want to be
applied to luminance levels in your video when rendering and previewing
video in a sequence:
$ Broadcast Processes video using the standard legal range of luminance
levels for broadcast video. Any super black or super white luminance levels
(that is, levels that fall below the standard black level or exceed the standard
white level) are clipped.
$ Post Production Processes video for post production. Any super black
or super white luminance levels in your video are retained.
5 Under Error Reporting, select Report dropped frames on playback if
you want to be warned each time frames are dropped when you play back
video from the
Timeline panel. Otherwise, clear this option.
¦NoteOnce playback of the sequence has stopped, a red bar will appear over
segments of the sequence that have dropped frames (even if you don’t choose
to report dropped frames).
6 Under Frame Hold, select Enable Frame Hold if you want to use Adobe
Premiere Pro’s Frame Hold to freeze on a particular frame of a clip in a
sequence. When you do this, any Frame Hold effects applied to your clips
will require rendering. If you’ve selected
Enable Frame Hold and
encounter repeated frames when playing back nested sequences or clips with
negative speed changes, or you find that segments are identified with a red
bar that don’t actually require rendering, you can clear this option. When
you do this, however, any Frame Hold effects you’ve applied will be ignored.
7 Under Premiere Pro Accelerated Effects, you can select various options
for your realtime/accelerated Premiere Pro effects. For example, you can
choose to disable certain features and specify how you want your Motion
effects to be processed. For details, see “Selecting options for accelerated
Premiere Pro effects” on page 24.
8 Under Realtime Indicator Threshold, drag the slider to set the threshold at
which Matrox RT.X2 determines that a segment in the
Timeline panel is
realtime. Drag to the left to set a lower (safer) threshold, or to the right to set
a higher (more aggressive) threshold. For example, if you find that Matrox
RT.X2 does not identify any segments as being non-realtime (that is, with a
red bar) and you have dropped frames when you export your project to tape,
you can set a safer threshold to force more segments to require rendering and
avoid having dropped frames. Alternately, if you find that some segments are
identified with a red bar but they don’t have dropped frames, you can set a
more aggressive threshold.
9 Under Audio Conform/Waveform File Creation, indicate whether or not
you want audio conform and .pek (waveform) files to be created when you
import clips to your project:
Chapter 3, Defining Your Adobe Premiere Pro Settings
Page 31

$ Create audio conform and PEK files Creates both audio conform and
.pek files.
$ Create PEK files Creates only the .pek files (audio conform files won’t
be created).
You can clear either one or both of these options to indicate that you don’t
want audio conform and/or .pek files to be created for clips imported into your
project (files may still be created for certain types of clips). This provides faster
editing of your project immediately after importing clips because resources
aren’t being used for the file generation. However, because Premiere Pro needs
the .pek files to draw the audio waveforms for your clips, you won’t see the
waveforms in the
Timeline panel.
¦NoteDepending on the content of your project, choosing not to create audio
conform files may cause dropped frames. For any change to these options to
take effect, you’ll need to restart Premiere Pro and open your project again.
10 Under Sequence Playback, clear Postroll after stop if you don’t want any
postroll when you stop the playback of a sequence. When you do this, the
playback will stop at the current-time indicator, and you’ll see a slight jump
in the video output when the playback stops (but the correct frame will be
displayed).
11 Under A/V Sync Adjustment, drag the slider to adjust the A/V
synchronization of clips played back in a sequence. If your audio starts later
than the associated video, increase the A/V sync value. Alternately, if your
audio starts before the associated video, decrease the A/V sync value. Be
aware that if you decrease the value too much, you may experience audio
crackling.
12 Under Memory Usage, select Optimize memory usage to reduce the
amount of system memory that Matrox RT.X2 allocates to work with your
project. Although this optimizes memory usage, the changes in memory
management could affect realtime performance depending on the content of
your project. If you experience dropped frames, try clearing this option to
see if the performance improves.
13 Under Matrox RT.X2 Splash Screen, select Disable splash screen
display
if you don’t want the Matrox RT.X2 splash screen to be displayed
on your computer and video monitors when you first open your project after
starting Premiere Pro. Select
Disable splash screen audio if you’d like to
disable the audio associated with the Matrox RT.X2 splash screen.
14 Click OK to save your settings and return to the Project Settings dialog
box.
23
Defining your General settings
Page 32

24
Selecting options for accelerated Premiere Pro effects
To select your options for processing accelerated Premiere Pro effects on Matrox
RT.X 2 :
1 Choose Project > Project Settings > General and click the Playback
Settings
2 Click the General tab.
3 Under Premiere Pro Accelerated Effects, select the options you want:
$ Disable accelerated scaling to frame size Select this if you want to
$ Disable accelerated transitions Select this if you’d like to disable the
$ Accelerate Motion using Select this if you’d like realtime/accelerated
button.
disable the realtime playback of clips that are scaled to your project’s frame
size as explained in “Mixing SD and HD clips in a project” on page 20.
When you apply a DVE or other effect that resizes a realtime scaled clip,
the full-screen image is resized, including any letterbox or pillarbox black
bars. By disabling the accelerated scaling to frame size, any black bars in
your scaled clips will become transparent, but your scaled clips will require
rendering.
realtime/accelerated playback of Premiere Pro transitions that support this
feature. Because Matrox RT.X2 emulates Premiere Pro’s non-realtime
version of these transitions, if you don’t like the emulation you can disable
the accelerated transitions to revert to Premiere Pro’s non-realtime version
that requires rendering.
playback of Premiere Pro Motion effects. You can then select one of the
following to determine how you want the Motion effects to be processed:
• Matrox move & scale Maps the Motion effects to the Matrox
CPU-based move & scale effect, which gives the best results if you only
want to create picture-in-picture effects without rotation. If you apply
rotation when you set up a Motion effect, it will require rendering.
• Matrox 3D DVE Maps the Motion effects to the Matrox
hardware-accelerated 3D DVE effect, which supports rotation. The
picture, however, won’t be as sharp as when you map the Motion effects
Chapter 3, Defining Your Adobe Premiere Pro Settings
Page 33

to the Matrox move & scale effect. You can map to the Matrox 3D DVE
effect only if you have a display card that supports the Matrox
hardware-accelerated effects. For more information, see “Enabling and
disabling the Matrox hardware-accelerated effects in Adobe Premiere
Pro” on page 169.
4 Click OK to save your settings and return to the Project Settings dialog
box.
Specifying your video output settings
You can specify various settings to configure your video output signals from the
RT.X2 breakout box.
°To specify your video output settings:
1 Choose Project > Project Settings > General and click the Playback
Settings
2 Click the Video Output tab.
button.
25
3 Under Master Output Format, select the video format you want for all
video outputs from the RT.X2 breakout box. Depending on your project’s
video format, you may not be able to change the master output format.
4 If the Aspect Ratio Conversion list is available, such as when the video
output for an HD project is downconverted to NTSC or PAL, select one of
the following settings for the video output:
$ 16x9 Letterbox Outputs the widescreen 16:9 picture in letterbox mode
by adding black bars at the top and bottom of the picture for display on a
standard 4:3 television screen.
$ Anamorphic Outputs the widescreen 16:9 picture as horizontally
compressed 4:3 video, which retains the picture’s full vertical resolution
for display on a widescreen television. To display the video with the correct
Defining your General settings
Page 34

26
proportions on an NTSC or PAL monitor, select the 16:9 display setting on
the monitor.
5 If the Pulldown Method list is available, select the pulldown method you
want to be applied to your output video (
2:3:3:2
). You should select Advanced 2:3:3:2 only if you’ll be recording
Standard 2:3 or Advanced
to a DV-1394 device that supports this pulldown method. Depending on your
project’s frame rate and the current master output format, a pulldown method
may automatically be selected.
6 Under Analog Setup (NTSC), select the setup level you want for your
NTSC analog video:
$ 0 IRE Applies a setup level of 0 IRE. You should select this option only
when working with a commercial DV-1394 device that uses the Japanese
analog NTSC setup of 0 IRE. For example, if the video appears too bright
when you play back DV clips on your NTSC monitor, you can change the
setup to 0 IRE to output your DV clips at the correct brightness.
$ 7.5 IRE Applies the standard NTSC setup level of 7.5 IRE.
7 Under Analog Output Type, select the type of analog video output you
want. If you’re outputting SD analog video, you can select
Component or
Composite & S-Video. If you’re outputting HD analog video, the analog
output type will be set to
8 Select Allow Super White to allow the highest luminance level of your
video output to exceed the standard maximum white level. Select
Super Black
to allow the lowest luminance level of your video output to fall
Component.
Allow
below the standard black level.
¦NoteSuper white and super black should not be allowed when producing
your final video production for broadcast.
9 Click OK to save your settings and return to the Project Settings dialog
box.
Chapter 3, Defining Your Adobe Premiere Pro Settings
Page 35

Selecting your DV-1394 output settings
You can choose to output a sequence from the Timeline panel over the 1394
interface to perform an export to DV tape, and select the format you want for
your DV-1394 output.
¦NoteThese settings are not needed to export to an HDV device, and the
DV-1394 Output page won’t be available if you’re working with a
1440×1080i/p project.
°To select your DV-1394 output settings:
1 Choose Project > Project Settings > General and click the Playback
Settings
2 Click the DV-1394 Output tab.
3 Select Enable 1394 output for export to tape if you want your sequence
to be output over the 1394 interface when you perform an export to tape (that
is, when you choose
your sequence to the DV-1394 device connected to your RT.X2 system.
¡ Important Because this option requires additional system resources, you
may find that when this option is selected some effects that were previously
realtime will drop frames and require rendering (you’ll see a red bar over
these segments in your sequence). Therefore, you should select this option
only when you want to export your sequence to DV tape. When you perform
the export to tape, Adobe Premiere Pro will render the segments identified
by the red bar.
4 From the Output Format list, select the format you want for the DV-1394
output. For example, to record to a standard DV device, select
DV/DVCAM
5 Click OK to save your settings and return to the Project Settings dialog
box.
button.
File > Export > Export to Tape). This lets you record
Matrox
.
27
Defining your Video Rendering settings
When you select a Matrox project preset, your Video Rendering settings for
editing on Matrox RT.X2 are automatically set for you. You can specify
additional Video Rendering settings as explained in your Adobe Premiere Pro
documentation.
Defining your Video Rendering settings
Page 36

28
Defining your Capture settings
The Matrox Capture Settings dialog box has pages that you can use to specify
your settings for capturing video and audio in Adobe Premiere Pro on Matrox
RT.X 2 .
Remarks
• When you specify your capture settings on Matrox RT.X2, VU meters will
be displayed to let you monitor your audio input levels. For more
information, see “Monitoring audio levels for capture” on page 33.
• Although Matrox RT.X2 SD supports only SD projects, you can capture
HDV material in an SD project using Adobe Premiere Pro’s HDV capture
feature (instead of Matrox’s capture feature) as explained in “Capturing
HDV material on Matrox RT.X2 SD” on page 35.
Specifying your video capture settings
Matrox RT.X2 lets you capture your video to various formats depending on your
project’s video format. For example, if you’re working with an SD project (such
as NTSC), you can capture to a DV format, such as DVCPRO, to create .avi files
for use in your Premiere Pro projects.
When working with an SD project, you can also choose to capture video to an
.m2v file for DVD authoring using Adobe Encore. These .m2v files are not
supported in your Matrox projects, but are supported in Adobe Encore. For
details about specific limitations when capturing to Matrox .m2v files, see “Notes
about capturing to Matrox .m2v files” on page 34.
°To specify your settings for capturing video in Adobe Premiere Pro on
Matrox RT.X2:
1 Choose Project > Project Settings > Capture.
2 From the Capture Format list, select Matrox AVI to capture to an .avi file,
or
Matrox M2V to capture to an .m2v file (for SD projects only).
3 Click the Configure button, then click the Video Capture Settings tab.
Chapter 3, Defining Your Adobe Premiere Pro Settings
Page 37

4 Under Input Device, select one of the following devices:
$ RT.X2 or RT.X2 SD to capture material from an analog source connected
to your RT.X2 breakout box.
¦NoteAnalog input is not supported for 486p @ 23.98 fps and 29.97 fps,
576p @ 25 fps, 1440× 1080p, and 720p projects.
$ DV-1394 to capture material from a DV-1394 device connected to your
RT.X2 breakout box.
5 If you selected the RT.X2 breakout box as your input device, from the Input
Source
list, select the type of input you want to capture (Component,
Composite, or S-Video). This will be set to Component when capturing
analog video for an HD project (not supported on RT.X2 SD).
Remarks
$ If you selected DV-1394 as your input device, the name of the DV-1394
device connected to your breakout box will appear in the
$ If Matrox RT.X2 can’t detect your source device when you start a capture,
Input Source box.
you’ll receive an error message. Either black video will be captured or the
capture won’t be able to start until a valid input signal is present. In either
case, you must make sure that your source device is switched on and
properly connected to the breakout box to properly capture the video.
$ Matrox RT.X2 sets the Input Format to NTSC or PAL for an SD project.
If you’re working with a 1440× 1080i project, your analog source video
must be full-size 1080i (1920×1080), but it will be captured to 1440× 1080i
format.
6 From the Input Aspect Ratio list, select the aspect ratio of your source
video (4:3 or 16:9). For example, to capture video that was recorded using
the standard TV screen format, select
recorded using the widescreen 16:9 format, select
capture settings for an HD project, the
4:3. To capture video that was
16:9. If you’re defining
Input Aspect Ratio will be set to
16:9.
7 Under Capture Format, select your desired capture format from the list. If
you’re capturing to an .avi file from a DV-1394 device, video will be
captured to native DV or HDV format (the
Capture Format will be set to
Native DV/HDV). If you’re capturing to an .m2v file, the Capture Format
will be set to
Matrox MPEG-2 IBP.
¦NoteThe capture formats that are available in the Capture Format list
depend on your project’s video format. For more information, see “Supported
video compression formats” on page 187.
29
$ Matrox DV/DVCAM Captures video to DV or DVCAM format.
$ Matrox DVCPRO Captures video to DVCPRO format.
Defining your Capture settings
Page 38

30
$ Matrox MPEG-2 I-frame Captures video to MPEG-2 intra-frame format
using the 4:2:2 Profile @ Main Level at a selected data rate (SD resolution
only). For the best results when capturing video clips on which you’ll be
applying chroma key effects, you should use this codec instead of a DV
codec.
$ Matrox MPEG-2 I-frame HD Captures video to MPEG-2 intra-frame
format using the 4:2:2 Profile @ High Level at a selected data rate (HD
resolution only). This is the only capture format available to capture analog
video for a 1440× 1080i project.
8 If you’re capturing to a Matrox MPEG-2 format, click the Configure button
to configure your MPEG-2 settings. For details on the available settings, see
“Selecting your MPEG-2 I-frame settings” on page 39, or “Selecting your
MPEG-2 IBP settings” on page 41. Once you’ve configured your settings,
click
OK to return to the Matrox Capture Settings dialog box.
9 Select Use Automatic Gain Control (AGC) if you want the gain of your
composite or S-Video input signal to be adjusted automatically to
compensate for very bright or dark images. This improves the brightness or
contrast of your picture.
10 Click OK to save your settings and return to the Project Settings dialog
box.
Chapter 3, Defining Your Adobe Premiere Pro Settings
Page 39

Specifying your audio capture settings
You can specify various audio capture settings, such as to specify your input
source and the type of audio files (either stereo .wav or mono .wav) that you want
to create when capturing audio on Matrox RT.X2.
Remarks
• When you capture to an .avi file on Matrox RT.X2, the clip’s video and audio
are saved to the .avi file, and the clip’s audio is also saved to one or more
separate .wav files. You could choose to edit the separate .wav files using
audio post-processing software, such as Adobe Soundbooth.
• When you capture to an .m2v file on Matrox RT.X2, the clip’s associated
audio is always saved to one or more separate stereo .wav files.
°To specify your settings for capturing audio in Adobe Premiere Pro on
Matrox RT.X2:
1 Choose Project > Project Settings > Capture.
2 From the Capture Format list, select Matrox AVI to capture to an .avi file,
or
Matrox M2V to capture to an .m2v file (for SD projects only).
3 Click the Configure button, then click the Audio Capture Settings tab:
31
4 If you selected the RT.X2 breakout box as your video input device (see
“Specifying your video capture settings” on page 28), you must also select
the source from which you want to capture audio. Your audio source must
match the audio input where you connected the cable labeled TO AUDIO
CARD IN from your RT.X2 breakout box as explained in your Matrox RT.X2
Installation Manual. For example, if you plugged the TO AUDIO CARD IN
connector into the Line-In jack (or corresponding jack) on your sound card,
select
Line-In from the Input Source list.
Defining your Capture settings
Page 40

32
Remarks
$ If all available audio inputs don’t appear in the Input Source list, select
List all audio inputs. If your audio input connection does not appear in
the list, you must unplug the TO AUDIO CARD IN connector and connect
it to an audio input on your sound card that appears in the list.
$ If your analog audio source appears with an * beside it in the list, your sound
card does not have matching audio inputs and outputs. In this case, choose
the audio source with an * that matches your audio input, make sure that
your source is playing back audio, and click
Advanced Settings. In the
provided dialog box, select an analog audio passthrough. If you can hear
audio, then you’ve selected the correct analog audio source and
passthrough. If you can’t hear audio, try selecting a different analog audio
source and/or passthrough.
$ The Capture Format (bit-depth) for your captured audio files is set to
16-bit.
5 If you don’t want the VU meters to be displayed each time you configure
your Matrox RT.X2 capture settings or open the
capture, clear
Show VU meters. This option is selected by default. For
Capture panel to start a
details on using the VU meters, see “Monitoring audio levels for capture” on
page 33.
6 Under Capture Files, indicate whether you want to capture to stereo or
mono audio files, and select which channels you want to save to separate
.wav files.
$ From the File Type list, select Stereo to save your captured audio to stereo
.wav files, or
capturing an .m2v clip, the
$ From the Filename lists, select which stereo pairs or mono channels you
Mono to save your captured audio to mono .wav files. If you’re
File Type will be set to Stereo.
want to save to your .wav files. When capturing from a DV-1394 device,
you can capture up to two stereo files or up to four mono files. Select
None
if you don’t want a particular .wav file to be created. When Matrox RT.X2
saves each .wav file, it assigns a .Stereo.wav or .Mono.wav suffix to the base
name you gave for the associated video file. For example, if you’ve named
your video file MyFile.avi, the associated stereo audio files would be named
MyFile.Stereo1.wav, MyFile.Stereo2.wav, etc.
Remarks
$ The channels that you choose to save to the first stereo.wav file or first two
mono.wav files will be embedded in the associated .avi file. When you
import your .avi file to the
Project panel, the clip’s separate .wav files will
also be imported, and the embedded audio in the .avi file will be ignored.
The clip’s .avi file and first associated .wav file, however, will appear as a
single Movie clip in your project. The embedded audio in the .avi file will
Chapter 3, Defining Your Adobe Premiere Pro Settings
Page 41

be used only if the .avi file does not have any associated .wav files.
Therefore, if you perform audio post processing on your .avi files, make
sure you delete the associated .wav files so that only the embedded audio
in the .avi files will be used in your project.
$ When performing an audio-only capture, Matrox RT.X2 supports capture
of only one stereo pair. Your first stereo or first two mono channels will be
saved to a single stereo .wav file (any other channels will be ignored). When
RT.X2 saves the .wav file of an audio-only capture, it does not assign the
.Stereo.wav suffix to the filename.
7 Click OK to save your settings and return to the Project Settings dialog
box.
Monitoring audio levels for capture
If you select
time you configure your Matrox RT.X2 capture settings or open the
Show VU meters on the Audio Capture Settings page, each
Capture
panel to start a capture in Adobe Premiere Pro, VU meters will be displayed to let
you monitor the levels of your currently selected audio input source.
Clipping detectors
Peak level indicators
33
As you play your audio source, the color of the input level is green at or below
–12 dBSF, yellow between –12 and –6 dBFS, and red above –6 dBFS. The
clipping detectors will “light up” (become red) whenever audio clipping occurs.
The peak level indicators are thin lines that show the highest level recently
reached. These indicators will show the peak level for about two seconds or until
a higher peak level is reached.
If needed, adjust the audio level on your source device to keep the average input
level between –30 and –10 dBSF. You can also use Windows Volume Control to
adjust your audio input levels as explained in “Setting your system’s volume
levels” on page 16.
Defining your Capture settings
Page 42

34
Notes about capturing to Matrox .m2v files
When capturing to Matrox .m2v files, keep the following points in mind:
• Automatic scene detection (Scene Detect) is not supported, but batch capture
is supported.
• The associated .wav files for your .m2v clips are not automatically imported
to the
Project panel.
• When performing a batch capture of .m2v clips, the captured video and audio
clips won’t be automatically imported to the
clips using batch capture, the captured clips will be imported automatically
only if you choose to delete the original media files from disk.
• It’s recommended that you don’t add handles (extra frames) to your captured
.m2v clips. If you do, the handles will be appropriately trimmed from the
video when you add the clip to your sequence, but the handles won’t be
trimmed from the associated audio.
• An associated .xmp metadata file is created for all captured and logged
(offline) .m2v clips. These files are created in your specified video capture
folder, and contain time code and other information that you provided for
your .m2v clips, such as tape name, description, and scene. You can open the
.xmp files in Adobe Bridge. Take care not to delete the .xmp files and always
keep them with their associated .m2v files. Otherwise, you won’t be able to
batch capture logged .m2v clips, and the time code information won’t appear
for your .m2v clips in the
Project panel.
Project panel. If you recapture
Chapter 3, Defining Your Adobe Premiere Pro Settings
Page 43

Capturing HDV material on Matrox RT.X2 SD
On Matrox RT.X2 SD, you can capture native HDV 1080i/p (1440×1080i/p)
material over the 1394 interface in an SD project using Adobe Premiere Pro’s
HDV capture feature. Depending on your project’s video format, you can
capture:
• HDV 1080i/p @ 29.97 fps material in an NTSC or 486p @ 29.97 fps project.
• HDV 1080i/p @ 25 fps material in a PAL or 576p @ 25 fps project.
• HDV 1080p @ 23.98 fps material in a 486p @ 23.98 fps project.
Your HDV clips will be downscaled when you scale the clips to your project’s
frame size for realtime playback as explained in “Mixing SD and HD clips in a
project” on page 20.
°To capture HDV 1080i/p material on Matrox RT.X2 SD:
1 Make sure that your HDV device is properly connected to the 1394 port on
your Matrox RT.X2 breakout box.
2 Choose Project > Project Settings > Capture.
3 From the Capture Format list, select HDV Capture, and click OK.
4 Choose Edit > Preferences > Device Control.
5 From the Devices list, select DV/HDV Device Control.
6 Click Options and make sure that your device control options are correctly
set as explained in your Adobe Premiere Pro documentation.
7 Click OK to save your settings.
8 Capture your HDV clips as explained in your Adobe Premiere Pro
documentation.
35
Capturing HDV material on Matrox RT.X2 SD
Page 44

36
Exporting to a Matrox .avi file
Several software codecs are included with Adobe Premiere Pro so that you can
export your video to different formats. Your Matrox RT.X2 system adds several
Matrox codecs to the ones included with Premiere Pro. Because the Matrox
codecs use your RT.X2 hardware to accelerate rendering, they can export video
much faster than when you use a software codec.
The supported formats for exporting to a Matrox .avi file depend on your
project’s video format as follows:
Project video format Supported export format(s)
NTSC NTSC
PAL PAL
486p @ 23.98 fps 486p @ 23.98 fps or NTSC
486p @ 29.97 fps 486p @ 29.97 fps or NTSC
576p @ 25 fps 576p @ 25 fps or PAL
720p @ 23.98 fps 720p @ 23.98 fps, 720p @ 59.94 fps, 486p @ 23.98 fps, or
NTSC
720p @ 25 fps 720p @ 25 fps, 720p @ 50 fps, 576p @ 25 fps, or PAL
720p @ 29.97 fps 720p @ 29.97 fps, 720p @ 59.94 fps, 486p @ 29.97 fps, or
NTSC
720p @ 50 fps 720p @ 50 fps or PAL
720p @ 59.94 fps 720p @ 59.94 fps or NTSC
1440 × 1080i @ 25 fps 1440× 1080i @ 25 fps or PAL
1440 × 1080i @ 29.97 fps 1440 × 1080i @ 29.97 fps or NTSC
1440 × 1080p @ 23.98 fps 1440 × 1080p @ 23.98 fps, 1440 × 1080i @ 29.97 fps, 486p
@ 23.98 fps, or NTSC
1440 × 1080p @ 25 fps 1440 × 1080p @ 25 fps, 576p @ 25 fps, or PAL
1440 × 1080p @ 29.97 fps 1440 × 1080p @ 29.97 fps, 486p @ 29.97 fps, or NTSC
For example, if you have an NTSC project, you must select an NTSC codec. If
you have a 1440 ×1080i @ 29.97 fps project, you can select a 1440 × 1080i @
29.97 fps codec to export to HD format, or you can select an NTSC codec to
downconvert the HD video to NTSC (this includes appropriate color space
conversion from HD to SD). RT.X2 SD supports exporting to SD format only.
°To export your sequence to a Matrox .avi file:
1 Choose File > Export > Movie. Click the Settings button, and from the
File Type
2 From the Range list, select an export range, then select any additional export
list, select Matrox AVI.
options.
Chapter 3, Defining Your Adobe Premiere Pro Settings
Page 45

3 From the menu on the left side of the dialog box, choose Video.
4 From the Compressor list, select the compression format you want for your
exported file.
¡ Important The Matrox codecs are listed in all supported SD and HD
formats. The format is shown in brackets beside the codec name, such as
[NTSC]. Make sure you select a Matrox codec in one of the supported video
formats for your project as listed in the above table.
$ Matrox DV/DVCAM Renders video to DV or DVCAM format.
$ Matrox DVCPRO Renders video to DVCPRO format.
$ Matrox MPEG-2 I-frame Renders video to MPEG-2 intra-frame format
using the 4:2:2 Profile @ Main Level at a selected data rate (SD resolution
only).
$ Matrox MPEG-2 I-frame HD Renders video to MPEG-2 intra-frame
format using the 4:2:2 Profile @ High Level at a selected data rate (HD
resolution only).
5 If you selected Matrox MPEG-2 I-frame or Matrox MPEG-2 I-frame HD,
click the
Configure button to select your MPEG-2 I-frame settings. For
details on the available settings, see “Selecting your MPEG-2 I-frame
settings” on page 39.
6 From the Pixel Aspect Ratio list, select the setting that matches the aspect
ratio of your material:
$ D1/DV NTSC (0.9) For NTSC or 486p material that uses the standard
TV screen format. If you’re downconverting HD video to NTSC or 486p
format, the video will be exported in letterbox mode.
$ D1/DV Widescreen 16:9 (1.2) For NTSC or 486p material that uses the
widescreen 16:9 format. If you’re downconverting HD video to NTSC or
486p format, the video will be exported as anamorphic (horizontally
compressed 4:3) video.
$ D1/DV PAL (1.067) For PAL or 576p material that uses the standard TV
screen format. If you’re downconverting HD video to PAL or 576p format,
the video will be exported in letterbox mode.
$ D1/DV PAL Widescreen 16:9 (1.422) For PAL or 576p material that
uses the widescreen 16:9 format. If you’re downconverting HD video to
PAL or 576p format, the video will be exported as anamorphic (horizontally
compressed 4:3) video.
$ Square pixels (1.0) For all HD material (except 1440× 1080i/p) that is
not downconverted.
$ HD Anamorphic 1080 (1.333) For all 1440× 1080i/p material that is not
downconverted.
37
Exporting to a Matrox .avi file
Page 46

38
7 It’s recommended that you do not select Recompress. This retains the
quality of your video. It also optimizes the speed of the export because
realtime video segments that have no effects will be copied directly to disk
without recompression, assuming that the compression and video format of
your video clips matches the format to which you’re exporting.
8 Choose OK to save your export settings.
¦NoteExported audio will be embedded in your .avi file and also saved as
one or more separate .wav files in the same folder as your .avi file. Matrox
RT.X2 does not support audio-only exports to an .avi file.
Chapter 3, Defining Your Adobe Premiere Pro Settings
Page 47

Selecting your MPEG-2 I-frame settings
When you select the Matrox MPEG-2 I-frame or Matrox MPEG-2 I-frame HD
format to capture or export your video using Adobe Premiere Pro, you can
specify various settings for the MPEG-2 I-frame compression.
°To select your MPEG-2 I-frame settings:
1 Click the Configure button. This displays a dialog box similar to the
following:
2 Drag the Data Rate slider until your desired data rate is displayed. The
higher the data rate you select, the better the video quality will be. The range
of available data rates depends on whether you’re using the Matrox MPEG-2
I-frame HD or SD format.
¡ Important Depending on the capabilities of your system, you may drop
frames if you select a data rate higher than about 90 Mb/sec.
3 To apply advanced settings to your MPEG-2 I-frame file, click the
Advanced button.
¦NoteThe default advanced settings should provide good results for most
applications. We recommend that you change these settings only when needed
for special purposes.
39
4 Under Rounding Type, select one of the following:
$ MPEG-2 Rounds the AC coefficients up to the nearest whole number
when calculating the quantization coefficient.
$ Matrox Custom Truncates the AC coefficients to the lowest whole
number when calculating the quantization coefficient. In some cases, this
setting may yield less artifacts in graphics.
5 Under DC Precision, select the bit-depth precision of the DC intra block.
Selecting your MPEG-2 I-frame settings
Page 48

40
¦NoteThe higher the DC precision value that’s used to capture or render
your video, the more likely that the DC content will be increased at the expense
of the AC content in the encoded stream. This may result in lowering the
overall quality of the compressed stream at a specified data rate.
6 Under Zig Zag Type, select one of the following:
$ Regular Sets the regular (default) zig zag scanning pattern of the AC
coefficient of the DCT block as defined in the ISO/IEC 13818-2 (figure
7-2) specification documentation.
$ Alternate Set s an alternate z ig zag scanni ng pattern of the AC coefficient
of the DCT block as defined in the ISO/IEC 13818-2 (figure 7-3)
specification documentation. Use this setting when capturing or rendering
video at a high data rate (that is, at a data rate of about 25 Mb/sec for SD
video, or 90 Mb/sec or higher for HD video).
7 Select the Force Frame-based DCT setting to render macroblocks as
frames rather than as fields. In some cases, graphics will yield less artifacts if
this option is selected.
8 Click OK to save your settings.
Chapter 3, Defining Your Adobe Premiere Pro Settings
Page 49

Selecting your MPEG-2 IBP settings
When capturing video to a Matrox .m2v file using Adobe Premiere Pro, the
capture format is set to Matrox MPEG-2 IBP. You can specify various settings for
the MPEG-2 IBP compression.
°To select your MPEG-2 IBP settings:
1 Click the Configure button. This displays a dialog box similar to the
following:
41
2 Under Data Rate (Mb/sec), you can select the encoding type and data rate
for the MPEG-2 IBP compression.
$ Encoding type From this list, select one of the following:
• Constant bit rate (CBR) Video is compressed at your selected target
data rate, which is useful when you need to limit or predict the size of
your .mxf file. However, if your video is very complex (such as scenes
with many colors or sharp edges), you’ll need to select a high data rate
to avoid having frames of very blocky video in your file.
Selecting your MPEG-2 IBP settings
Page 50

42
• Variable bit rate (VBR) Video is compressed at varying data rates
based on the complexity of the video. The target data rate you select is
used as the average data rate for the compression.
$ Min, Tar g et , and Max sliders Use these sliders to select your desired data
rate. The higher the target data rate you select, the better the video quality
will be. Only the
bit rate (CBR)
Tar ge t slider will be available if you selected Constant
. If you selected Variable bit rate (VBR), all three sliders
will be available so that you can set the minimum, target, and maximum
data rates for the video compression.
3 Under GOP Structure, you can customize the GOP structure for the
MPEG-2 IBP compression as follows:
$ GOP length Determines the number of frames in the GOP (Group of
Pictures).
$ Subgroup length Determines the subgroup length of B-frames and
P-frames in the GOP, after the initial I-frame. For example, a subgroup of
3 appears as “BBP,” and a subgroup of 2 appears as “BP.” The available
subgroup lengths depend on your selected GOP length.
4 Under Profile, the 4:2:0 profile is selected, which uses 4:2:0
luminance/chrominance sampling and is suitable for broadcast transmission
and distribution on DVD.
5 Under Motion Estimation, drag the slider to adjust the quality of the
motion estimation used for the video compression. The default setting gives
good results for most video. However, if you have a lot of fast motion in your
video, such as fast-paced sports footage, you can get better results by
dragging the slider to the right (towards
Slow/High quality). This improves
the quality of the motion estimation, but decreases the speed of the video
compression. Alternately, if you have mostly slow-paced video, you may
want to drag the slider to the left (towards
Fast/Low quality) to decrease
the quality of the motion estimation and speed up the video compression.
6 Click OK to save your settings.
Chapter 3, Defining Your Adobe Premiere Pro Settings
Page 51

Exporting using Matrox Media Encoder
You can use Matrox Media Encoder to export clips from a sequence in the
Timeline panel to various formats for specific media delivery, such as Windows
Media or RealMedia streaming media format, or MPEG-2 format for DVD or
Blu-ray Disc. For example, you can use Matrox Media Encoder to export video
from your sequence to an MPEG-2 Elementary (.m2v) file that’s suitable for use
with Adobe Encore. Matrox Media Encoder provides the same export formats as
Adobe Media Encoder, and benefits from hardware acceleration on Matrox
RT.X 2 .
To avoid having inverted fields in your exported files when exporting material for
DVD or Blu-ray Disc, you must select the appropriate field order for the export
according to your projects’s video format as shown in the following table:
Project video format Field order
NTSC Lower
PAL Upper
486p @ 23.98 fps and 29.97 fps None (Progressive)
576p @ 25 fps None (Progressive)
720p @ 23.98 fps, 25 fps, 29.97 fps, 50 fps,
and 59.94 fps
1440 × 1080i @ 25 fps and 29.97 fps Upper
1440 × 1080p @ 23.98, 25, and 29.97 fps None (Progressive)
None (Progressive)
43
°To export material using Matrox Media Encoder:
1 Start Adobe Premiere Pro and open the project from which you want to
export material.
2 If you want to export only part of your sequence, drag the ends of the work
area bar so that it extends over the length of the area you want to export.
3 Choose File > Export > Matrox Media Encoder.
4 Select the export format you want from the Format list. For example, to
export material for DVD, select
5 Select a preset from the Preset list that matches the type of export you want
MPEG2-DVD.
to perform (a summary of the settings will be displayed in the
Settings
6 If you selected an MPEG-2 DVD or Blu-ray Disc export format, click the
Video tab and make sure that the appropriate field order is selected as shown
dialog box).
in the above table.
7 Click OK, specify a name, location, and export range for the export, then
click
Save.
Exporting using Matrox Media Encoder
Export
Page 52

44
The export settings are the same as provided for Adobe Media Encoder. For
details on using these settings, see your Adobe Premiere Pro documentation.
Exporting using Matrox Clip Notes
You can use Matrox Clip Notes to perform an accelerated export of your
sequence to a PDF file. For example, you can export your sequence to Windows
Media format and have the video embedded in a PDF file that you can send to
reviewers for their comments.
To export material to Matrox Clip Notes, select the sequence you want to export
and choose
same as provided for Adobe Clip Notes. For details on exporting to a Clip Notes
PDF, see your Adobe Premiere Pro documentation.
File > Export > Matrox Clip Notes. The export settings are the
Setting up Matrox DV/HDV device control
Matrox DV/HDV device control lets you control DV-1394 devices when
capturing or exporting material to tape in Adobe Premiere Pro.
¦NoteTo capture HDV material on Matrox RT.X2 SD, you must use Adobe
Premiere Pro’s DV/HDV device control as explained in “Capturing HDV
material on Matrox RT.X2 SD” on page 35.
°To set up Matrox DV/HDV device control:
1 Choose Edit > Preferences > Device Control.
2 From the Devices list, select Matrox DV/HDV Device Control.
3 Click Options and make sure that your device control options are correctly
set as explained in your Adobe Premiere Pro documentation (the options are
the same as those provided for Adobe Premiere Pro’s DV/HDV device
control).
4 Click OK to save your settings.
You can now use device control when capturing or exporting material over the
1394 interface (make sure that your device is set to Remote or VTR mode). For
details on how to capture material in Adobe Premiere Pro, see your Adobe
Premiere Pro documentation. For information about exporting material to tape
using device control, see the next section.
Chapter 3, Defining Your Adobe Premiere Pro Settings
Page 53

Exporting your sequence to tape
Your Matrox RT.X2 system lets you export your Adobe Premiere Pro sequence to
tape using DV-1394 or RS-422 device control. You can use Matrox DV/HDV
device control to control DV-1394 devices. For RS-422 devices, you can use
Adobe Premiere Pro’s serial device control as explained in your Adobe Premiere
Pro documentation.
Preparing your tapes for recording
To use device control, the tape on which you’ll be recording your material must
contain continuous and consecutive time code. You can stripe your entire tape
with time code by recording black video for the duration of the tape.
¦NoteThe format of your DV tape must match the format you’re recording. For
example, if you set your DV-1394 device to record in DV/DVCAM format, your
tape must be striped entirely in DV/DVCAM format. Mixed format tapes are not
supported.
Avoiding missing frames when exporting to DV tape
When performing an export to tape on some DV-1394 devices, a delay may occur
between the time the device starts recording and the time that Adobe Premiere
Pro starts to play back your project. This may result in the first video frames of
your project not being recorded to tape. To ensure that your export to DV tape
does not miss any frames, you can delay the playback of the project that you are
exporting.
45
To do this, you will need to do a test export with your DV-1394 device to
determine the number of frames that are missing from the start of your project on
the DV tape. In the Adobe Premiere Pro
Delay Movie Start and enter the number of frames you’ve determined are
missing from your project multiplied by 4 (to convert the value to quarter
frames). If needed, adjust this amount until you obtain a frame-accurate or near
frame-accurate export to tape.
¦NoteIf your exported video is frame-accurate, but you’re missing audio at the
start of your project on the DV tape, simply add a few frames of black and silence
at the start of the sequence. If you do this, you may not need to use the
Movie Start
.
E x po r t To Ta p e dialog box, select
Delay
Exporting your sequence to tape
Page 54

46
Exporting to DV tape using DV-1394 device control
You can use Matrox DV/HDV device control when exporting your Adobe
Premiere Pro sequence to a DV-1394 device. DV-1394 export to HDV, however,
is not supported for 720p projects.
°To export your sequence to tape over the 1394 interface:
1 Open the project and activate the sequence you want to export to tape.
2 Make sure your DV-1394 device is properly connected and turned on.
3 Unless you’re exporting to an HDV device, make sure that you’ve enabled
the DV-1394 output for export to tape and selected a DV-1394 output format
as explained in “Selecting your DV-1394 output settings” on page 27.
¦NoteIf you’re exporting to an HDV device, Premiere Pro will detect that
you’re using an HDV device when you perform the export to tape and the
video will be exported in native HDV format. (Matrox RT.X2 SD does not
support exporting to an HDV device.)
4 If you’re using a camcorder, switch it to VTR mode.
5 Load a striped recordable tape into your DV-1394 device.
6 Make sure that you’ve set up Matrox DV/HDV device control as explained in
“Setting up Matrox DV/HDV device control” on page 44.
7 Choose File > Export > Export to Tape.
For information about exporting your sequence to tape using Adobe Premiere
Pro, see your Adobe Premiere Pro documentation.
Chapter 3, Defining Your Adobe Premiere Pro Settings
Page 55

Creating an SD project in 16:9 format
When editing on Matrox RT.X2, you can choose to work with SD source video
that’s been recorded in either the 4:3 standard TV screen format, or the
widescreen 16:9 format.
°To create an SD project in 16:9 format on Matrox RT.X2, do the following:
1 Record your video onto tape with your camera set to the widescreen 16:9
format. The video will be recorded as horizontally compressed 4:3
(anamorphic) video.
2 Start Adobe Premiere Pro and select the appropriate Matrox widescreen
preset (such as
create on Matrox RT.X2 will be displayed with the correct proportions when
viewed in 16:9 format.
3 Capture your video clips as you normally would. Select the 16:9 display
option on your NTSC or PAL video monitor to “unsquish” the video and
play it back in widescreen format without distortion.
4 If you create animations, titles, or graphics for your project using a program
that lets you set the pixel aspect ratio, use the appropriate setting for 16:9
display:
$ For NTSC or 486p video, set the pixel aspect ratio to 1.185.
$ For PAL or 576p video, set the pixel aspect ratio to 1.422.
If you can’t set the pixel aspect ratio, create your image at 864×486 for
NTSC or 486p video, or at 1024×576 for PAL or 576p video. After you’ve
created your image, resize only its width to 720. When you resize the image,
your text or graphic will appear elongated on your computer screen.
DVCPRO Widescreen). This ensures that the effects you
47
5 Edit your project as you would a standard 4:3 project.
¦NoteBe aware that if your video monitor is displaying in 4:3 format, certain
effects may appear elongated because of the horizontal scaling. Setting your
monitor to 16:9 will display the effects with the correct proportions.
6 Record your finished project onto tape. Remember that you’ll need a
monitor capable of displaying material in 16:9 format to properly view your
master tape.
Creating an SD project in 16:9 format
Page 56

48
Your notes
Chapter 3, Defining Your Adobe Premiere Pro Settings
Page 57

Chapter
4
Setting Up Realtime Effects
with Adobe Premiere Pro
This chapter explains how to
set up realtime effects using
the Matrox realtime plug-in for
Adobe Premiere Pro.
Page 58

50
Available effects
The Matrox realtime plug-in for Adobe Premiere Pro lets you:
• Set up spectacular realtime Matrox effects and transitions. The plug-in
includes color corrections, chroma keys, luma keys, 3D DVEs, page curls,
shadows, and many more effects.
¦NoteCertain effects will be available only if you have a display card that
supports the Matrox hardware-accelerated effects. For more information, see
“Enabling and disabling the Matrox hardware-accelerated effects in Adobe
Premiere Pro” on page 169.
• Change various effect settings, and add or modify keyframes to customize
your effects.
• Transform and crop your realtime effects.
• Create realtime graphics overlays using single-frame graphics files with an
alpha-key channel.
• Set up certain Adobe Premiere Pro effects in real time, including fades
(Video Opacity), DVEs (Motion), Black & White, Timecode, and Garbage
Matte effects.
• Apply realtime speed changes to video clips.
• Set up many Adobe Premiere Pro transitions in real time when using SD
video, or accelerate many Adobe Premiere Pro transitions when using HD
video.
• Use and modify clips that have Matrox Flex CPU effects applied to them
interchangeably between Adobe Premiere Pro and Adobe After Effects. For
example, you can apply a Matrox color correction to your clip in Adobe
Premiere Pro and import that clip into Adobe After Effects and vice versa.
The effect will remain intact, and can be modified in both applications.
Realtime means that you can play back and record your effects onto tape without
having to render them. This gives you creative freedom to experiment with
different effects and change your mind as often as you want. You’ll instantly see
the changes you make on your video monitor. Effects in Adobe Premiere Pro
other than those listed above are not realtime, and therefore require rendering.
For guidelines on setting up your realtime effects, see “Matrox RT.X2 realtime
guidelines” on page 149.
When you install Matrox Mx.tools, all the Matrox effects are added to Adobe
Premiere Pro, and the Matrox Flex CPU effects are added to Adobe After Effects.
You set up Matrox effects in your productions the same way as other effects
included with your Adobe software. For example, you apply a Matrox transition
to your clips in Adobe Premiere Pro just as you would any other type of
Chapter 4, Setting Up Realtime Effects with Adobe Premiere Pro
Page 59

transition, except that the controls provided let you create a Matrox transition, as
is explained in this chapter.
For instructions on how to apply effects to your productions in Adobe Premiere
Pro or Adobe After Effects, refer to your Adobe documentation.
¡ Important To use the Matrox realtime plug-in for Adobe Premiere Pro, you
must have defined your Adobe Premiere Pro settings for use with your Matrox
RT.X2 system, as explained in Chapter 3, “Defining Your Adobe Premiere Pro
Settings.”
How to apply a Matrox video effect in Adobe Premiere Pro
The Matrox realtime plug-in for Adobe Premiere Pro allows you to apply many
realtime video effects to your clips. To apply a Matrox video effect to a clip, drag
the desired effect from the
Effects panel onto the clip in the Timeline panel.
51
By default, the Matrox video effects are found in the
Effects
¥Tips
.
• You can also apply preconfigured Matrox video effects found in the Matrox
Effect Presets
• If you can’t see the
see the
Effect Controls panel, choose Window > Effect Controls.
bin under Presets.
Effects panel, choose Window > Effects. If you can’t
Matrox bin under Video
How to apply a Matrox video transition in Adobe Premiere Pro
In Adobe Premiere Pro, the Matrox wipe transitions are found in the Matrox bin
under
Video Transitions in the Effects panel.
There are numerous methods to create transitions in Premiere Pro. Use the
method that works best for you to apply your Matrox wipes. For information on
applying transitions, see your Adobe Premiere Pro documentation.
How to apply a Matrox video effect in Adobe Premiere Pro
Page 60

52
Transforming your clip
Many of the Matrox effects allow you to adjust the scale, position, and rotation of
a clip by applying various transform settings. You can adjust the transform
settings in two ways:
• Use the transform controls in the
you want.
• Work directly in Adobe Premiere Pro’s Program Monitor
For example, click the desired transform button (
or Rotation Center Offset), then click and drag within the Program
Monitor to make your adjustments. To do this, you’ll need to activate the
transform controls for use in the Program Monitor. For more information,
see “Transforming a clip in the Program Monitor” on page 54.
¦NoteIf you are working with the Matrox crystallize, shadow, mask, mask
blur, mask mosaic, or shine effect, the transform settings will apply only to
your mask or shadow and not the entire clip.
Effect Controls panel to adjust the settings
using your mouse.
Position, Scale, Rotation,
Using the transform controls
To apply various transform settings to your clip using the transform controls in
the
Effect Controls panel, click the triangle next to the Transform property to
expand it:
You can enter the values you want in the text boxes or drag the appropriate
sliders.
•
(X, Y, Z) Position Use these controls to position your clip on the x
(horizontal), y (vertical), and z (depth) axes. Values of (0,0,0) pixels align
the center of your clip with the center of the screen, and positions are
measured from this point. You can enter positive or negative pixel values to
move your clip right or left (x), up or down (y), and forward or backward (z).
Chapter 4, Setting Up Realtime Effects with Adobe Premiere Pro
Page 61

• (X, Y) Scale Use these controls to make your clip smaller or larger.
Y
X
Z
Y
X
Z
Full-screen size is represented as 100%. You can shrink your clip to 0% or
enlarge it to 1000%. Note, however, that by enlarging your clip, the
resolution may become blurry. You can adjust the size controls individually,
or if you select
Adjusting the percentage on the x and y axes changes your clip’s width and
height, respectively.
¦NoteSome effects, like Matrox surface finish, include a Z Scale property
that allows you to adjust the depth of the effect.
•
(X, Y, Z) Rotation Use these controls to set the number of times the clip
spins. Each rotation of 360° produces one spin on the selected axis. You can
have positive or negative rotation from -360° to 360°.
•
(X, Y, Z) Rotation Center Offset Use the Rotation Center Offset
controls to set the pivot point, or center of rotation, of your clip on the x
(horizontal), y (vertical), and z (depth) axes. When
applied, your clip spins around this point. You can use positive or negative
pixel values to offset your clip on each axis.
In the illustrations below, notice how different
rotation of the cube.
Fixed Aspect Ratio, you only need to adjust the x axis.
Rotation settings are
Offset values can affect the
53
Figure 1: Offset at 0,0,0
In Figure 1, the
where the x, y, and z axes meet. In Figure 2, the
to 100, thus moving the cube and the pivot point to the right, so when the cube is
rotated, it has a wider arc when spinning around the axes.
Offset values are (0,0,0), so the center of rotation for the cube is
Figure 2: Offset at 100,0,0
Offset value for the x axis is set
Transforming your clip
Page 62

54
Transforming a clip in the Program Monitor
You can use your left mouse button to resize, position, and rotate your clip
directly in the Program Monitor. Effects that support transforming a clip in the
Program Monitor have the Transform icon to left of the effect name in the
Effects Controls panel.
Transf orm icon
¦NoteWhen working with some effects, the Transform icon lets you
manipulate your clip directly in the Program Monitor to set up your effect instead
of adjusting transform settings as explained in this section.
To activate the transform controls in the Program Monitor, click the Transform
icon or the name of the Matrox effect in the
manipulation mode buttons will appear in the upper left corner of the Program
Monitor:
Position
Scale
Rotation
Effect Controls panel. The direct
Precision Mode
Rotation
Center Offset
Select the transform setting you want to adjust by clicking the appropriate button
(
Posit ion , Scale, Rotation, or Rotation Center Offset). Precision Mode is
available only in the Program Monitor and allows you to make precise
adjustments with the currently selected transform setting.
The following table shows the available mouse controls for working in the
Program Monitor.
Action Result
Left mouse button Adjusts x and y axes
SHIFT+left mouse button, drag left or right Adjusts x axis only
SHIFT+left mouse button, drag up or down Adjusts y axis only
CTRL+left mouse button, drag up or down Adjusts z axis only
For example, if you want to alter the position of your clip on the y axis only, first
click the
Position button, then press and hold SHIFT while dragging the mouse
up or down in the Program Monitor.
Chapter 4, Setting Up Realtime Effects with Adobe Premiere Pro
Page 63

Cropping your clip
Many of the Matrox effects allow you to apply crop settings to your clip. To
apply crop settings, click the triangle next to
¦NoteIf you’re applying a Matrox effect that doesn’t provide the Crop
property, you can apply realtime cropping to your clip using Adobe Premiere
Pro’s crop effect (available in the
Video Effects bin under Transform). The
Premiere Pro crop effect will remain realtime unless you enable the
option. For more information about using Premiere Pro’s crop effect, see your
Adobe Premiere Pro documentation.
Crop to expand the property list.
55
Zoom
The controls under
values you want in the text boxes or drag the appropriate sliders (
To p , Bottom).
•
Crop Left Crops the left edge of your clip.
•
Crop Right Crops the right edge of your clip.
Crop let you crop any edge of your clip. You can enter the
Left, Right,
• Crop Top Crops the top edge of your clip.
•
Crop Bottom Crops the bottom edge of your clip.
Select Crop Displays a dialog box in which you can apply your crop
•
settings. For details, see “Using Select Crop” on page 56.
•
Stretch to original size Select this to stretch the cropped area to the
original size of your clip. For the Matrox cube effect, this option is not
available because the cropped area is automatically stretched to fit the
original size.
Cropping your clip
Page 64

56
Using Select Crop
To apply crop settings to your clip using the Select Crop dialog box, click the
triangle next to the
button:
¦NoteWhen working with the Matrox cube effect, Select Crop is available
only for the primary source.
Select property to expand it, then click the Select Crop
The
Select Crop dialog box allows you to crop your clip in two ways:
• Click and drag directly in the
Select Crop window to create the rectangular
cropping area.
To resize your cropping area, drag any side of the rectangle. For example,
drag the right side of the rectangle to crop the right edge of your clip. To
resize the entire cropping area at once, drag one of the corners (the corner
that’s diagonally opposite the corner you are moving will remain stationary).
•Use the
Left, Right, To p, and Bottom controls to crop any edge by a given
number of pixels. You can enter values in the text boxes or drag the sliders to
resize your crop area. For example, drag the
Left slider to crop the left edge
of your clip.
Chapter 4, Setting Up Realtime Effects with Adobe Premiere Pro
Page 65

Applying a mask to your effect
Many of the Matrox effects allow you to add a mask to define the area where you
want to apply your effect. For example, you may want to apply a color correction
to only one area of your clip and leave the rest of the clip untouched.
57
Adding a mask to the chroma or luma key effect and selecting
Outside Mask
lets you disable keying in the area outside the mask so that only
Transparent
the underlying image appears outside the mask. For example, you can define a
mask area where you want the keying to be performed, and show only your
underlying image outside the mask. This is useful if you’re having problems
keying on an area at the edges of your foreground image.
°To adjust the mask properties:
Click the triangle next to Mask to expand the property list.
The properties under
Mask let you control the area on the clip where you want to
apply the mask. You can enter the values you want in the text boxes or drag the
appropriate sliders (
•
Left Adjusts the left edge of your mask.
•
Right Adjusts the right edge of your mask.
Left, Right, To p, and Bottom).
• To p Adjusts the top edge of your mask.
•
Bottom Adjusts the bottom edge of your mask.
Select Mask Displays a dialog box in which you can apply your mask
•
settings (see “Using Select Mask” on page 58).
•
Invert Inverts the mask so that your effect is applied outside the mask,
instead of within the mask.
Applying a mask to your effect
Page 66
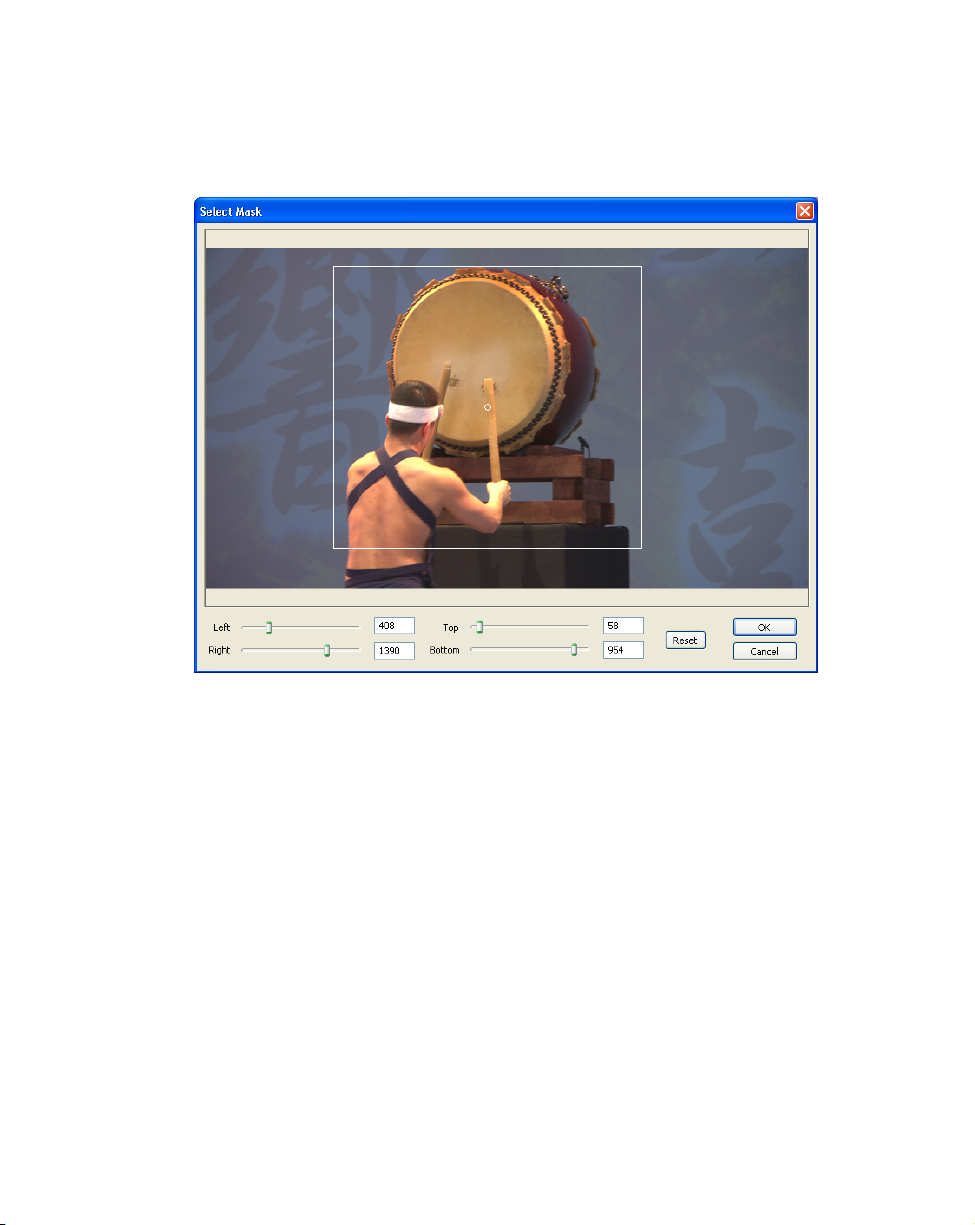
58
Using Select Mask
To apply a mask to your Matrox effect using the Select Mask dialog box, click
the triangle next to the
button:
Select property to expand it, then click the Select Mask
The
Select Mask dialog box allows you to apply a mask in two ways:
• Click and drag directly in the
Select Mask window to create the rectangular
area where you wish to apply the mask.
You can resize the mask area by dragging any side of the rectangle. For
example, dragging the right side of the rectangle adjusts the right edge of the
mask area. To resize the entire mask area at once, drag one of the corners
(the corner that’s diagonally opposite the corner you are moving will remain
stationary).
•Use the
Left, Right, To p, and Bottom controls to adjust any edge of your
mask by a given number of pixels. You can enter values in the text boxes or
drag the sliders to resize your mask area. For example, drag the
adjust the left edge of your mask area.
Chapter 4, Setting Up Realtime Effects with Adobe Premiere Pro
Left slider to
Page 67

Creating a primary color correction
Color correction is important for all productions, whether you want to achieve
continuity when cutting between shots, ensure broadcast safe levels, or establish
and emphasize a “look.” Matrox color correction provides basic proc amp
control, three-way color correction complete with master, shadows, midtones,
and highlights control, and input and output level control. You can also easily
match colors with a reference shot. For more information about color matching,
see “Matching colors between two clips” on page 70.
¥Tip Adobe Premiere Pro includes a workspace setup that is optimized for
working with clips and effects to facilitate color correction. To prepare your
workspace for color correction, choose
Correction
°To set up a Matrox primary color correction:
.
Click the triangle next to Matrox Color Correction (Primary) or Matrox Color
Correction (Primary - Advanced)
Window > Workspace > Color
to expand the property list.
59
¦NoteThe RGB Curves and Tonal Range settings are available only with the
advanced versions of the Matrox primary and secondary color correction effects.
Because the advanced versions of these effects require additional system
resources, you should apply them only if you want to use the
Tonal Range settings.
Enable Split View Select this option to split your clip into two sections in
•
RGB Curves or
the Program Monitor and on your video monitor. One section will display
your clip as you adjust the color correction controls, and the other section of
Creating a primary color correction
Page 68

60
the clip will remain unchanged. For more information, see “Using Split
View ” on page 61.
¡ Important This option is for preview only. You should clear it before you
render your clip, otherwise the split will appear in your video output.
•
Proc Amps The processing amplifier (proc amp) controls allow you to
adjust different aspects of your clip:
$ Hue Adjusts the tint of the colors in the image.
$ Saturation Adjusts the saturation (vividness) of the image’s colors.
$ Contrast Adjusts the difference in luminance between the lightest and
darkest areas of the image.
$ Brightness Adjusts the level of black in the image.
RGB Curves Lets you use curves to adjust the red, green, and blue color
•
channels of your clip individually, or use a master curve to adjust all color
channels simultaneously. For more information, see “Using RGB curves” on
page 63.
•
Color Balance These controls let you adjust the mixture of colors in your
clip.
$ Tonal Range Allows you to fine-tune the tonal ranges of your clip by
reducing the range of pixels included for shadows, midtones, or highlights.
For more information, see “Adjusting tonal range” on page 65.
$ Graphical Allows you to see a graphical representation of your changes
when you adjust the color balance settings. You can also modify most of
the color balance
settings directly within the graph. For more information,
see “Using the color balance graph” on page 66.
$ Numerical Lets you adjust your color balance settings numerically by
entering values in the text boxes, or by dragging the corresponding sliders.
You can adjust the
• Master (Hue, Saturation, and Luminance) Affects all areas of your
Hue, Saturation, and Luminance for each tonal range.
clip from the lightest white to the darkest black.
• Shadows (Hue, Saturation, and Luminance) Affects the darkest
areas of your clip.
• Midtones (Hue, Saturation, and Luminance) Affects the areas with
tones between the darkest and lightest areas of your clip.
• Highlights (Hue, Saturation, and Luminance) Affects the lightest
areas of your clip.
• Luma Mapping
$ Graphical Allows you to see a graphical representation of your changes
when you adjust the luma mapping settings. You can also modify the
Chapter 4, Setting Up Realtime Effects with Adobe Premiere Pro
Page 69

luminance of your clip directly within the graph. For more information, see
“Using the luma mapping graph” on page 72.
$ Numerical Lets you adjust the luma mapping settings numerically by
entering values in the text boxes, or by dragging the corresponding sliders.
• Input Levels (Black and White) These controls let you fine-tune your
clip’s brightness and contrast by changing the luminance value that
represents black, white, or gray. Doing so expands or compresses the
range of luminance levels in your clip, which increases or decreases your
clip’s tonal range.
For example, by increasing the black value, you set black in your clip to
a higher luminance value, which compresses the luminance range and
darkens your clip proportionally.
• Output Levels (Black and White) These controls let you map the
values under
Input Levels to any level of black and white. You can
reduce contrast in your clip, or reverse the luminosity of your clip by
setting black to a higher value than white.
• Gamma Use this to adjust the midtones in your clip without adjusting
black or white.
•
Mask Allows you to apply a mask to your effect. For more information,
see “Applying a mask to your effect” on page 57.
Using Split View
The Split View option allows you to split your clip in two for preview on your
Program Monitor and your video monitor. One section displays your clip as you
adjust the color correction controls, while the other section of the clip remains
unchanged.
61
There are two ways to enable Split View. You can select the
option in the
Program Monitor
Effect Controls panel, or work directly in Adobe Premiere Pro’s
using your mouse.
Enable Split View
Working with Split View in the Program Monitor
To activate the Split View controls in the Program Monitor, click the Transform
icon ( ) beside the name of the Matrox color correction effect
Controls
panel. The Split View button will appear in the upper left corner of the
Program Monitor:
Split View button
Enable Split View by clicking the Split View button. You can then drag the
handles on the corners of the split rectangle to define the area you want to split.
You can also drag the split rectangle to move it to a specific region of your clip.
Creating a primary color correction
in the Effect
Page 70

62
The area within the split view rectangle will display any color correction you
make, while the area outside remains unchanged.
In the following example, the split view rectangle has been moved to display the
color correction in the area surrounding part of the Chinese character on the wall:
Remarks
• The Split View option is for preview only. You should disable it before
rendering your material, otherwise the split will appear in your video output.
• If you are working in Adobe After Effects, you should enable
mode so that any movement of the split rectangle is reflected in the
Composition panel as it occurs.
• If you enable Split View and create a mask outside the split view rectangle,
you will not be able to see it. The mask will only be visible when you move
the split view rectangle directly over it. If you invert a mask that is not in the
split view rectangle area, the whole clip will be inverted since the mask is
ignored.
Chapter 4, Setting Up Realtime Effects with Adobe Premiere Pro
Live Update
Page 71

Using RGB curves
¦NoteThe RGB Curves settings are available only with the advanced versions
of the Matrox primary and secondary color correction effects.
With RGB curves, you can individually adjust the red, green, and blue color
channels across the entire tonal range of your clip, or adjust all three color
channels simultaneously with a master curve. RGB curves allow you to achieve
color effects that would be difficult, if not impossible, to achieve using the
Balance
channels in each tonal range. For example, you can easily add a red, green, or
blue tint to your clip, or use the master curve as a way to adjust the brightness and
contrast of your clip.
Each curve is displayed on a grid with the horizontal axis representing the input
or current pixel value, and the vertical axis representing the output value of the
pixel after the curve adjustment is applied. By default, a curve starts as a straight
line with two end points, one at the bottom left of the grid (shadows), and the
other at the top right of the grid (highlights). Before any adjustments are made,
each point on the curve has the same input and output value.
settings, and also give you a high degree of control over the color
Color
1
63
0
0 Default end point
(shadows)
1 Default end point
(highlights)
Creating a primary color correction
Page 72

64
Click the R, G, or B button to select the curve corresponding to the color channel
you want to adjust, or click the
the curve to obtain your desired effect. For example, click the
Master button for the master curve, and then drag
R button and drag
the top right end point towards the top left of the grid to increase the slope of the
curve and add red to the clip. Drag that same point towards the bottom right of
the grid to decrease the slope of the curve and remove red from the clip. Clicking
the
Enable button will show/hide any adjustments you have made to the RGB
channels at any time (you do not need to click
Enable to start adjusting the
curves).
¥Tip For increased precision, hold down the ALT key while you drag the curve,
or the
CRTL key to change your cursor into a crosshair that will help you align
your curve to the grid.
You can add up to 14 control points to each curve in addition to the two default
end points. These control points act as anchors that allow you to lock your curve
so adjustments can be applied only to specific tonal ranges. Click on a curve to
add control points, and hold the
SHIFT key while clicking a control point to
delete it (end points cannot be deleted). Adjusting the points in the top right area
of the grid affects highlights, the middle area affects midtones, and the bottom
left area affects shadows. For example, the following S-shaped master curve adds
contrast in the midtones range, without creating any completely black or white
areas.
Chapter 4, Setting Up Realtime Effects with Adobe Premiere Pro
Page 73

If you want to reset the Master, R, G, or B curve to its default setting at any time,
click the appropriate Reset button.
Red curve Reset button
¥Tip By applying a mask to your clip, you can adjust the RGB channels for that
specific area of your clip, or invert the mask to isolate that same area from being
affected by your RGB adjustments.
Adjusting tonal range
¦NoteThe To na l R an g e settings are available only with the advanced versions
of the Matrox primary and secondary color correction effects.
Using the tonal range curves allows you to fine-tune the range of pixels that are
affected when you make a color correction to the shadows, midtones, or
highlights of your clip using the color balance graph. For more information, see
“Using the color balance graph” on page 66.
The histogram shows the distribution of pixels in each tonal range of your clip. In
the following example, the histogram represents a clip with a high amount of
shadows (left), a lesser amount of midtones (middle), and an even lesser amount
of highlights (right).
65
0 1 2
0 Shadows 1 Midtones 2 Highlights
Click the
corresponding to the tonal range you want to adjust, and then drag the curve as
desired to reduce the number of pixels to be included in each tonal range.
¦NoteYou cannot increase the number of pixels in a tonal range. For example,
you can’t extend the shadows curve into the highlights range.
Shadows, Midtones, or Highlights button to select the curve
Creating a primary color correction
Page 74

66
Using the color balance graph
The color balance graph allows you to modify the Color Balance settings for
each tonal range directly within the color maps. You can also perform an auto
balance or a color match using the buttons beneath the color maps. For more
information, see “Performing an auto balance” on page 69 and “Matching colors
between two clips” on page 70. Depending on which color map you use, you can
adjust your clip globally, or only the shadows, midtones, or highlights.
You can drag the handle in the center of any color map to adjust the color balance
(
Hue and Saturation) for a specific tonal range, such as to adjust the color
balance globally throughout your clip using the
color balance of only the shadows using the
Master color map, or adjust the
Shadows color map. Drag the
handle toward a color you want to increase in your clip, or away from a color you
Chapter 4, Setting Up Realtime Effects with Adobe Premiere Pro
Page 75

want to decrease. For example, if you move the handle towards red, you also
decrease cyan by the same amount, as shown in the following diagram:
MAGENTA
RED
67
YELLOW
GREEN
BLUE
CYAN
¥Tip For increased precision, hold down the ALT key while you drag the handle.
If you want to reset the color balance (
Hue and Saturation) setting, click the
Reset Color Balance button under the color map you are using.
Reset Color
Balance button
To adjust the luminance for a tonal range, drag the corresponding luminance
slider under the appropriate color map. For example, if you want to adjust the
Creating a primary color correction
Page 76
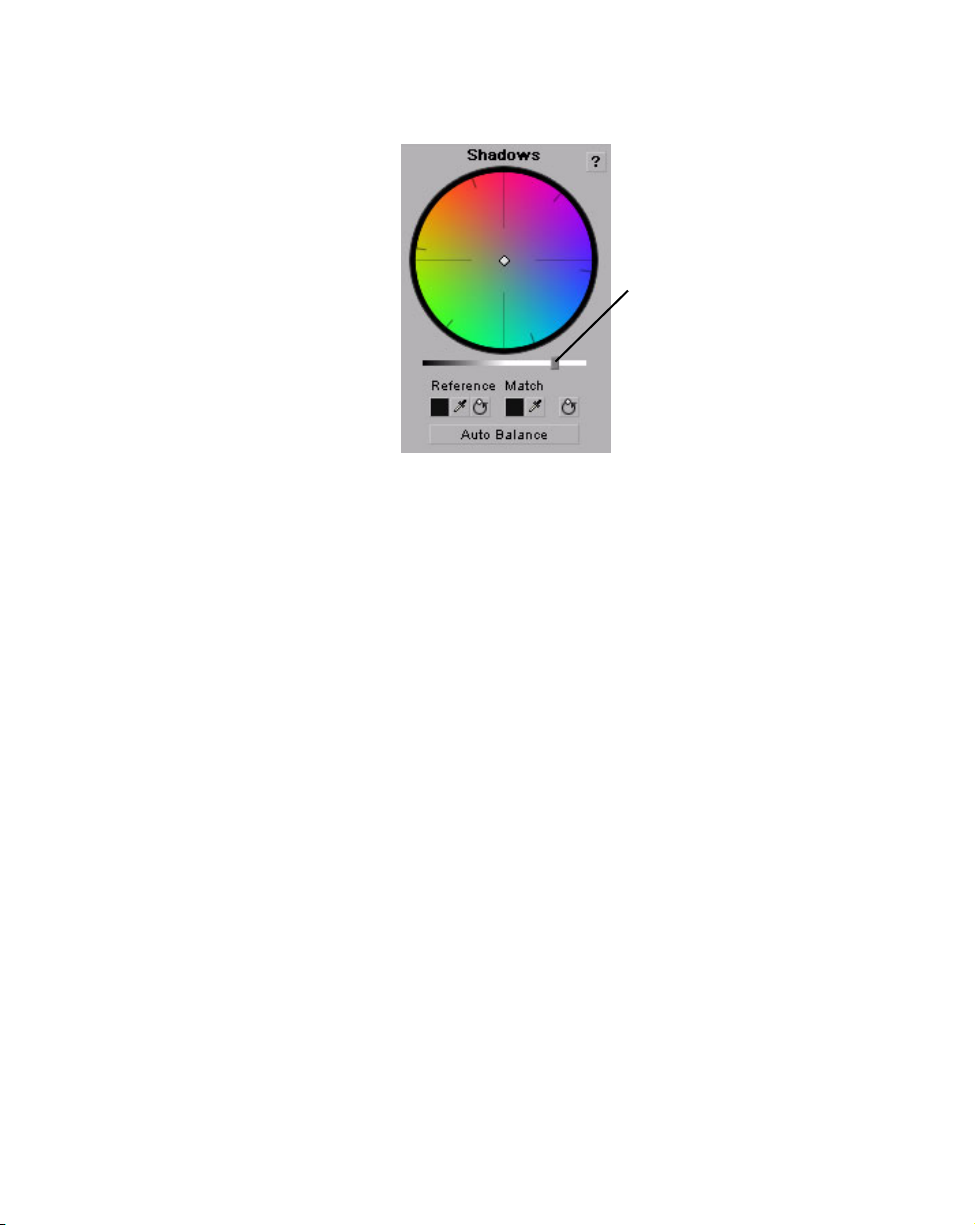
68
luminance for only the shadows, drag the luminance slider under the Shadows
color map.
Luminance
slider
Chapter 4, Setting Up Realtime Effects with Adobe Premiere Pro
Page 77

Performing an auto balance
Before matching colors, you can perform an auto balance on your target clip to
automatically apply a color shift to your clip to compensate for different lighting
conditions. To do this, click the
color map and use the eyedropper to select the area you want to correct in your
clip. For example, to balance your clip’s highlights, click the
button under the
Highlights color map, and click (or click and drag) on the
lightest area of your clip. The auto balance is performed immediately.
Auto Balance button under the corresponding
Auto Balance
69
Auto Balance
button
¦NoteTo perform an auto white balance, click the Auto White Balance button
under the
Master color map, and click (or click and drag) on a white or light gray
area of your clip.
Creating a primary color correction
Page 78

70
Matching colors between two clips
You can perform a color match to match colors between two clips (such as skin
tone, sky, etc.). The color match lets you select colors from a reference clip to
match to your target clip. You can affect the colors globally (
Shadows, Midtones, or Highlights.
You can select the colors for your reference color and match color by either
clicking the Color Picker button or the eyedropper.
Master), or just the
Color Picker button
Eyedropper
The eyedropper can be used in two ways:
$ Click the eyedropper button and click on the desired color in your clip.
$ Click the eyedropper button and click and drag anywhere on your clip to
create a rectangular area containing the color you want to select. The
selected color will be an average of the pixel information contained within
the rectangle.
°To perform a color match:
1 Prepare your workspace for color correction by choosing Window >
Workspace > Color Correction
2 Open your target clip (clip that contains the colors you want to correct) in the
.
Source Monitor.
¦NoteFor best results when using a target clip that has multiple effects
applied to it, create a nested sequence and open it in your Source Monitor
before performing the color match. For more information about creating
nested sequences, see your Adobe Premiere Pro documentation.
3 Apply the Matrox Color Correction effect to your target clip on the
timeline.
4 Use the controls under the Reference Monitor to move to a frame in your
reference clip that contains the colors you want to match.
5 Use the controls under the Source Monitor to go to the frame in your target
clip that contains the colors you want to match to your reference clip.
Chapter 4, Setting Up Realtime Effects with Adobe Premiere Pro
Page 79

6 Select a reference color from your reference clip by using the Reference
Color eyedropper under the color map you want to affect (
Shadows, Midtones, or Highlights).
Reference Color eyedropper
Master,
For example, to match a very dark color in your reference clip to your target
clip, click the Reference Color eyedropper under the
Shadows color map,
and click (or click and drag) on the desired color in your reference clip.
7 Select a match color from your target clip in the Source Monitor window by
using the Match Color eyedropper under the corresponding color map
(
Master, Shadows, Midtones, or Highlights).
Match Color eyedropper
71
Creating a primary color correction
Page 80

72
Using the luma mapping graph
To modify your luma mapping values directly in the graph, click the triangle next
to the
Luma Mapping Graphical property to expand it:
•
Map This is the default view when you first expand the Graphical
property. You can drag the handles in the graph to adjust the
Output levels for black and white, as well as the Gamma.
Input and
3
4
2
0
1
0 Input
Black
Level
Chapter 4, Setting Up Realtime Effects with Adobe Premiere Pro
1 Input
White
Level
2 Output
Black
Level
3 Output
White
Level
4 Gamma
Page 81

• Plot Click this button to plot the luminance values in the current frame of
your clip to the histogram (the plot will reflect any color correction changes
you’ve made). Each luminance value present in your image appears as a
vertical line in the histogram. A longer line indicates a higher amount of
pixels in your image of that line’s luminance value. You can drag the handles
in the graph to adjust the
well as the
Gamma.
Input and Output levels for black and white, as
3
4
2
73
0
0 Input
Black
Level
Auto Black Click this to define the darkest pixels in your clip as black.
•
The intermediate luminance values are proportionally redistributed.
• Auto White Click this to define the lightest pixels in your clip as white.
The intermediate luminance values are proportionally redistributed.
¦NoteIf you want to restore the default luminance values at any time, click
the Restore Default Values button.
1 Input
White
Level
2 Output
Black
Level
1
3 Output
White
Level
Restore
Default Values
button
4 Gamma
Creating a primary color correction
Page 82

74
Creating a secondary color correction
Matrox secondary color correction offers all the properties found in Matrox
primary color correction, with the added capability of limiting the color
correction to a specific range of pixels using the selective key properties. For
example, secondary color correction can be used to change the color of a dress,
deepen the background sky color, or to achieve an effect where only one object or
person remains in color while the rest of the image becomes black and white. For
details on how to isolate a color and make the rest of the clip black and white, see
“Creating a color pass effect” on page 84.
¥Tip Adobe Premiere Pro includes a workspace setup that is optimized for
working with clips and effects to facilitate color correction. To prepare your
workspace for color correction, choose
Correction
°To set up a Matrox secondary color correction:
.
Click the triangle next to Matrox Color Correction (Secondary) or Matrox
Color Correction (Secondary - Advanced)
Window > Workspace > Color
to expand the property list.
¦NoteThe RGB Curves and Tonal Range settings are available only with the
advanced versions of the Matrox primary and secondary color correction effects.
Because the advanced versions of these effects require additional system
resources, you should apply them only if you want to use the
Tonal Range settings.
Chapter 4, Setting Up Realtime Effects with Adobe Premiere Pro
RGB Curves or
Page 83

• Enable Split View Select this option to split your clip into two sections in
the Program Monitor and on your video monitor. One section will display
your clip as you adjust the color correction controls, and the other section of
the clip will remain unchanged. For more information, see “Using Split
View ” on page 61.
•
Proc Amps The processing amplifier (proc amp) controls allow you to
adjust different aspects of your clip:
$ Hue Adjusts the tint of the colors in the image.
$ Saturation Adjusts the saturation (vividness) of the image’s colors.
$ Contrast Adjusts the difference in luminance between the lightest and
darkest areas of the image.
$ Brightness Adjusts the level of black in the image.
•
RGB Curves Lets you use curves to adjust the red, green, and blue color
channels of your clip individually, or use a master curve to adjust all color
channels simultaneously. For more information, see “Using RGB curves” on
page 63.
•
Color Balance These controls let you adjust the mixture of colors in your
clip.
$ Tonal Range Allows you to fine-tune the tonal ranges of your clip by
reducing the range of pixels included for shadows, midtones, or highlights.
For more information, see “Adjusting tonal range” on page 65.
$ Graphical Allows you to see a graphical representation of your changes
when you adjust the color balance settings. You can also adjust and modify
most of the color balance
settings directly within the graph. For more
information, see “Using the color balance graph” on page 66.
$ Numerical Lets you adjust your color balance settings numerically by
entering values in the text boxes, or by dragging the corresponding sliders.
You can adjust the
• Master (Hue, Saturation, and Luminance) Affects all areas of your
Hue, Saturation, and Luminance for each tonal range.
clip from the lightest white to the darkest black.
• Shadows (Hue, Saturation, and Luminance) Affects the darkest
areas of your clip.
• Midtones (Hue, Saturation, and Luminance) Affects the areas with
tones between the darkest and lightest areas of your clip.
• Highlights (Hue, Saturation, and Luminance) Affects the lightest
areas of your clip.
• Luma Mapping
$ Graphical Allows you to see a graphical representation of your changes
when you adjust the luma mapping settings. You can also modify the
75
Creating a secondary color correction
Page 84

76
luminance of your clip directly within the graph. For more information, see
“Using the luma mapping graph” on page 72.
$ Numerical Lets you adjust your luma mapping settings numerically by
entering values in the text boxes, or by dragging the corresponding sliders.
• Input Levels (Black and White) These controls let you fine-tune your
clip’s brightness and contrast by changing the luminance value that
represents black, white, or gray. Doing so expands or compresses the
range of luminance levels in your clip, which increases or decreases your
clip’s tonal range.
For example, by increasing the black value, you set black in your clip to
a higher luminance value, which compresses the luminance range and
darkens your clip proportionally.
• Output Levels (Black and White) These controls let you map the
values under
Input Levels to any level of black and white. You can
reduce contrast in your clip, or reverse the luminosity of your clip by
setting black to a higher value than white.
• Gamma Use this to adjust the midtones in your clip without adjusting
black or white.
•
Mask Allows you to apply a mask to your effect. For more information,
see “Applying a mask to your effect” on page 57.
•
Selective Key The selective key settings allow you to apply the color
correction effect to a specific range of pixels in your clip. Performing a
selective key is similar to performing a chroma or luma key, however, with a
selective key you are applying color correction to the keyed area instead of
transparency. For example, if you use the selective key properties to select
red as your
in your clip. You can enable each keyer (
Hue color, the color correction will be applied to the red regions
Hue, Saturation, and Luma)
individually, or enable all three at the same time to get the desired results.
$ Graphical Allows you to see a graphical representation of your changes
when you adjust the selective key
Numerical settings. You can also modify
the settings directly within the graph and perform an auto key. For more
information, see “Using the selective key graph” on page 79.
$ Numerical Lets you adjust your key settings numerically by entering
values in the text boxes, or by dragging the corresponding sliders.
• Hue Key This type of key lets you select areas to be keyed (affected by
the color correction) based on their hue.
$ Enable Select this to enable the Hue Key properties and hue key
indicator in the selective key graph.
$ Hue Use this to rotate the indicator around the perimeter of the color
spectrum so that you can select different hues (colors) on which to key.
Chapter 4, Setting Up Realtime Effects with Adobe Premiere Pro
Page 85

$ Aperture Use this to widen or narrow the aperture of the indicator
to increase or decrease the range of colors on which you want to key.
$ Softness Sets the amount of softness applied to the range of colors
specified in the aperture region.
• Saturation Key This lets you select colors to be keyed (affected by the
color correction) based on their saturation value. Pale colors have a low
saturation value, while vivid colors have a high saturation value.
$ Enable Select this to enable the Saturation Key properties and
saturation key indicator in the selective key graph.
$ Low Clip Use this to select the lower saturation values to be keyed.
$ Low Gain Use this to set the range of saturation values you want to
be partially affected based on the value set by the
As you increase the
Low Gain setting, more pixels are partially
affected by the color correction. If you decreas e the
Low Clip control.
Low Gain control,
less pixels are partially affected.
A
Low Gain setting of 100 provides the widest range for maximum
color correction. Alternately, a gain setting of 0 creates a key where
saturation values are either completely affected or left untouched. You
can think of the
Low Gain control as defining an “Affected to
Untouched” range for keying the pale colors in your image.
$ High Gain This control is similar to the Low Gain setting, except
you use it to set the range of higher saturation values you want to be
partially affected based on the value set by the
you increase the
High Gain setting, less pixels are partially affected
by the color correction. If you decrease the
pixels are partially affected.
You can think of the High Gain control
High Clip control. As
High Gain setting, more
as defining an “Untouched to Affected” range for keying the vivid
colors of your image.
$ High Clip This control is similar to Low Gain, except you use it to
select the higher saturation values to be keyed.
¦Note The values you can select using the Low Clip and Low Gain
controls are dependent on the
High Clip and High Gain controls, and
vice versa. This prevents the low and high controls from keying on the
same values.
77
• Luma Key This type of key lets you select areas to be keyed (affected
by the color correction) based on their luminance value.
$ Enable Select this to enable the Luma Key properties and luma key
indicator in the selective key graph.
$ Low Clip Use this to select the lower (darker) luminance values to
be keyed. A
Low Clip setting of 0 represents black, and a setting of
Creating a secondary color correction
Page 86

78
255 represents white. Intermediate settings represent different shades
of gray, from very dark to very light gray.
$ Low Gain Use this to set the range of luminance values you want
to be partially affected based on the value set by the
As you increase the
Low Gain setting, more luminance values become
Low Clip control.
partially affected by the color correction.
A
Low Gain setting of 100 provides the widest range for maximum
color correction. Alternately, a gain setting of 0 creates a key where
the luminance values are either completely affected or left untouched.
You can think of the
Low Gain control as defining an “Affected to
Untouched” range for keying the dark areas of your image.
$ High Gain This control is similar to Low Gain, except you use it
to set the range of luminance values you want to be partially affected
based on the value set by the
High Clip control. You can think of the
High Gain control as defining an “Untouched to Affected” range for
keying the lighter areas of your image.
$ High Clip This control is similar to Low Clip, except you use it to
select the higher (brighter) luminance values to be keyed.
¦Note The values you can select using the Low Clip and Low Gain
controls are dependent on the
High Clip and High Gain controls, and
vice versa. This prevents the low and high controls from keying on the
same luminance values.
• Invert Key Select this to invert the key selection, giving you the
opposite result of what you originally selected.
• Show Key as Output Select this to display the matte used to define
your selective key region. This enables you to further refine your key.
Areas that are completely affected by the color correction are white,
untouched areas are black, and gray areas are partially affected.
• Expand Outside Mask Applies the color correction settings outside
the mask area. This setting is especially useful when setting up a color
pass effect where you have several objects of the same color but want to
retain the color for only one object. For more information, see “Creating
a color pass effect” on page 84.
Chapter 4, Setting Up Realtime Effects with Adobe Premiere Pro
Page 87

Using the selective key graph
The selective key graph allows you to modify your selective key settings (Hue
Key
, Saturation Key, and Luma Key) directly in the graph. You can also
perform an auto key.
•
Map This is the default view when you first expand the graphical property.
You can drag the handles to move the indicator to different regions in the
graph to adjust the
In order to see the indicator and handles, you have to enable the key setting
you want to use. For example, if you want to adjust the
you need to click the
Enable
the
option in the Hue Key numerical properties. In the following graph,
Hue properties have been enabled.
Hue Key, Saturation Key, and Luma Key settings.
Hue Key properties,
Hue button in the selective key graph or select the
79
Plot Click this button to plot the colors and luminance values that are
•
present in the current frame of your clip. You can drag the handles to move
the indicator to different regions in the graph to adjust the
Saturation Key
, and Luma Key properties. The luma plot histogram shows
Creating a secondary color correction
Hue Key,
Page 88

80
each luminance value present in your image as a vertical line. A longer line
indicates a higher amount of pixels in your image of that line’s luminance
value.
•
Hue Click this button to enable or disable the Hue Key properties (Hue,
Aperture and Softness). When enabled you will be able to see the Hue
Key
indicator and handles to modify the Hue Key properties in the selective
key graph.
2
1
0
1
2
0 Hue 1 Aperture 2 Softness
•
Sat Click this button to enable or disable the Saturation Key properties
(
Low Clip, Low Gain, High Gain, and High Clip). When enabled you will
Chapter 4, Setting Up Realtime Effects with Adobe Premiere Pro
Page 89

be able to see the Sat Key indicator and handles to modify the Saturation
Key
properties in the selective key graph.
81
0
12
3
0 Low Clip 1 Low Gain 2 High Gain 3 High Clip
•
Lum Click this button to enable or disable the Luma Key properties (Low
Clip
, Low Gain, High Gain, and High Clip). When enabled you will be
able to see the
properties in the selective key graph.
Lum Key indicator and handles to modify the Luma Key
12
0
0 Low Clip 1 Low Gain 2 High Gain 3 High Clip
¥Tip For both the Saturation Key and Luma Key properties, you can lock
and move all the handles at the same time in the selective key graph by
pressing
lock and move either the
and High Clip handles.
SHIFT and then dragging any handle. If you press CTRL you can
Low Clip and Low Gain handles or High Gain
3
Creating a secondary color correction
Page 90

82
¦NoteIf you want to reset the hue, saturation, and luma key properties to the
default settings at any time, click the appropriate Reset button.
Saturation Key
Reset button
•
Show Key Click this button to display the matte used to define your
selective key region. This enables you to further refine your key. Areas that
are completely affected by the color correction are white, untouched areas
are black, and gray areas are partially affected.
•
Auto Key Click this button to automatically key on the most common
color at the current frame (except gray). Selecting
for the
Hue Key, Saturation Key, and the Luma key properties.
Auto Key affects values
Alternately, you can use the auto key eyedropper to select a color on which
you want to key.
Auto key
eyedropper
• The auto key eyedropper can be used in two ways:
$ Click the eyedropper button and click on a color on which you want to key.
$ Click the eyedropper button and click and drag anywhere on your clip to
create a rectangular area containing the color on which you want to key.
The selected color will be an average of the pixel information contained
within the rectangle.
You can further refine your auto key color by using the plus and minus eyedroppers.
Plus and minus
eyedroppers
For example, if you selected light red as your auto key color and would like a
dark red color in your clip to be included in the auto key, you can use the
plus eyedropper to select that dark red in your clip. To remove colors from
your auto key, use the minus eyedropper.
¦NoteThe Show Key mode and any color correction applied will be
temporarily deactivated in the Program Monitor when using an eyedropper.
Chapter 4, Setting Up Realtime Effects with Adobe Premiere Pro
Page 91

This allows you to see the original colors of your clip before any modifications
were made.
•
Indicator Click this button to turn the indicator lines on or off.
•
Handles Click this button to turn the handles for the indicator lines on or
off.
83
Creating a secondary color correction
Page 92

84
Creating a color pass effect
You can use the Matrox secondary color correction to create a color pass effect to
convert your clip to black and white, with the exception of one specified color.
This can be useful if you want to isolate a single color to make it prominent.
In the following example, the pink color of the girl’s shirt has been retained,
while the rest of the clip has been converted to black and white:
Pink shirt is isolated,
while the rest of clip is
grayscale.
°To perform a color pass effect:
1 Click the Auto Key eyedropper in the selective key graph and click and drag
anywhere on your clip to create a rectangular area containing the color you
want to isolate.
2 Under Proc Amps, set the Saturation to 0.
3 Select Invert Key.
If you have more than one object of the same color but you want to isolate only
one of those objects, you can apply a mask and use the
option to isolate the area that contains the color you want to remain intact. For
example, if you have a clip that has two roses that are the same red and you
would like only one of them to remain red, you can do the following.
Expand Outside Mask
°To perform a color pass effect using the Expand Outside Mask option:
1 Click the auto key eyedropper in the selective key graph and click and drag
anywhere on your clip to create a rectangular area containing the color you
want to isolate.
2 Under Proc Amps set the Saturation to 0.
3 Select Invert Key.
4 Apply a mask surrounding the colored object you want to remain intact (see
“Applying a mask to your effect” on page 57).
5 Select Expand Outside Mask.
Chapter 4, Setting Up Realtime Effects with Adobe Premiere Pro
Page 93

Creating a 3D DVE effect
The Matrox 3D DVE effect lets you position your clips anywhere in 3D space
while adding soft edges and rounded borders with color gradients in real time.
¦NoteIf you want to create a picture-in-picture effect, the move & scale effect
will provide a sharper picture (see “Creating a move & scale effect” on
page 120). To apply rotation to your effect, you must use the 3D DVE effect.
°To set up a Matrox 3D DVE effect:
Click the triangle next to Matrox 3D DVE to expand the property list.
85
Transform Use these properties to apply or change various transform
•
settings, such as the position, scale, and rotation settings of your clip. For
more information, see “Transforming your clip” on page 52.
•
Border Settings Allow you to create a border or soft edge on your clip.
$ Border Outside Softness Lets you adjust the softness of the edge of
your clip or outside edge of your border. The higher the softness value, the
less sharp the edge becomes. If your clip is skewed, you may get more
desirable results using the
$ Border Outside Skewed Softness If you altered your clip so that the
Border Outside Skewed Softness control.
perspective is skewed, you should use this option to apply softness to the
edges of your clip.
Creating a 3D DVE effect
Page 94

86
C
$ Border Type Allows you to select the type of border you want (None,
Flat, Gradient, or Alpha Edge). Click the triangle on the right to expand
the list of border types.
lick here to
select your
border type
¦NoteThe Alpha Edge border type is for use with alpha-keyed graphics
only.
$ Border Width Use this control to adjust the border along the X and Y
axes simultaneously. The higher the value, the wider your border becomes.
If you clear
$ X Border Width Use this control to adjust the border along the X axis.
Fixed Aspect Ratio, you can adjust each axis individually.
The higher the value, the wider your border becomes.
$ Y Border Width Use this control to adjust the border along the Y axis.
The higher the value, the wider your border becomes.
$ Border Inside Softness Sets the border softness on the inside edge of
your border. The higher the softness value, the less sharp the edge or border
becomes.
$ Border Outside Color Use the color picker or eyedropper to select the
color you want for your border, or the outside edge of your border if you
selected
$ Border Outside Transparency Sets the transparency of your border, or
outside edge of your border if you selected
Gradient as your border type.
Gradient as your border type.
Levels range from opaque (0) to fully transparent (100).
¦NoteThe next two properties (Border Inside Color and Border Inside
Transparency
) are available only if you selected Gradient as your border
type.
$ Border Inside Color Use the color picker or eyedropper to set the inside
color of your border, which will create a gradient between this color and
the outside color of your border.
$ Border Inside Transparency Sets the transparency of the inside color
of your border.
$ Round Corner Size Allows you to round the corners on the edges of
your border.
$ Corner Point Offset Allows you to move the position of the corner
points of your border so that you can create various shapes for your 3D
DVE. Negative values bring the corner points towards the center of the clip,
while positive values move the corner points outward.
Chapter 4, Setting Up Realtime Effects with Adobe Premiere Pro
Page 95

• Crop Allows you to crop the edges of your clip. For more information, see
“Cropping your clip” on page 55.
Enhance Sharpness Lets you adjust the sharpness of your clip.
•
87
Creating a 3D DVE effect
Page 96

88
Creating a 4-corner pin effect
The Matrox 4-corner pin effect lets you anchor each corner of a video or graphics
clip onto points in an underlying clip, even if the underlying clip is angled or
skewed. You could use this effect, for example, to overlay a video clip onto an
underlying clip of a television screen.
°To set up a Matrox 4-corner pin effect:
Click the triangle next to Matrox 4-corner Pin to expand the property list.
To p Le ft and Top Right Corner Use these controls to horizontally and
•
vertically position the top left and right corners of your clip.
•
Bottom Left and Bottom Right Corner Use these controls to
horizontally and vertically position the bottom left and right corners of your
clip.
¥Tip You can easily position each corner of your clip directly in the
Program Monitor. To do this, click the Transform icon ( ) beside
Matrox 4-corner Pin in the Effect Controls panel. A cursor will appear at
each corner of your clip in the Program Monitor. Drag these cursors to
position the corners of your clip.
•
Edge Softness Lets you apply softness to the edges of your clip. If your
clip is skewed, you may get more desirable results using the
Softness
•
Skewed Edge Softness If you altered your clip so that the perspective is
skewed, you should use this option to apply softness to the edges of your
clip.
¡ Important Skewed Edge Softness is not supported on clips where any
corner is positioned beyond the boundaries of another corner. In order for the
Skewed Edge Softness to work correctly, your clip should be a flat plane
with four visible corners.
•
Crop Allows you to crop the edges of your clip. For more information, see
“Cropping your clip” on page 55.
control.
Skewed Edge
Chapter 4, Setting Up Realtime Effects with Adobe Premiere Pro
Page 97

• Preview Settings You can select the following options for previewing
your effect:
$ Show Cursors Displays a diamond-shaped cursor at each corner of your
clip on your video monitor only. These cursors can help you precisely
determine where each corner is located. Each corner has a different colored
cursor as follows:
• Top Left: Red
• Top Right: Green
• Bottom Left: Blue
• Bottom Right: Orange
$ Show Color Frame Only Displays a semi-transparent shape that
represents the clip to which you are applying the 4-corner pin effect. This
is useful if you’re positioning an alpha-keyed title, for example, and you
need to see the edges of the clip.
$ Color To select a different color for the color frame, use the color picker
button or the eyedropper.
¥Tip The Show Color Frame Only option is provided as a viewing aid
while setting up your 4-corner pin effect. However, you can choose to leave
it selected to create a unique lighting effect, such as to create a flashlight
beam.
•
Enhance Sharpness Lets you adjust the sharpness of your clip.
89
Creating a 4-corner pin effect
Page 98

90
Creating a blur/soft focus effect
The Matrox blur/soft focus effect lets you create unique effects and simulate
camera defocus.
°To set up a Matrox blur/soft focus effect:
Click the triangle next to Matrox Blur/Soft Focus to expand the property list.
Blur Amount Use this to change the amount of blurring in your clip.
•
Source Blend Factor Use this to superimpose the original image on top
•
of your clip after you’ve applied blurring. A value of zero will show only the
blur result, and a value of 100 will show only the original image. Anything in
between will result in a blending of the blurring with the original image,
therefore creating a soft focus effect.
•
Lock Colors Select this option to proportionally increase or decrease the
red, green, and blue color gain. For example, any adjustments you make to
the
Red Color Gain will be used for the green and blue color gain as well.
Red Color Gain Lets you increase or decrease the red present in your
•
image.
• Green Color Gain Lets you increase or decrease the green present in your
image.
• Blue Color Gain Lets you increase or decrease the blue present in your
image.
Crop Allows you to crop the edges of your clip. For more information, see
•
“Cropping your clip” on page 55.
¦NoteIf you are working in HD, the blur/soft focus effect may require
rendering based on certain setting combinations.
Chapter 4, Setting Up Realtime Effects with Adobe Premiere Pro
Page 99

Overview of the chroma key effects
You can use the Matrox realtime plug-in to apply a chroma key or chroma key
shadow effect to make certain areas of a foreground image transparent based on a
color in that image, so that an underlying image can show through.
In the following example of a chroma key effect, our foreground image is a video
clip of a woman sitting in front of a green backdrop, and our underlying image is
a video clip of a sand dune:
+
91
Foreground image
By chroma keying on the particular shade of green in the backdrop of the
foreground image, the backdrop area becomes transparent and the corresponding
area of the underlying image shows through in the composite image as follows:
Underlying image
=
Result of chroma key
¡ Important The chroma key shadow effect includes controls for fine-tuning
shadows in your effect. It is best to use the chroma key shadow effect when you
are performing a chroma key without any additional effects. If you want to apply
additional effects to your chroma key, you will get more desirable results by
using the chroma key effect without shadow controls. For example, if you want to
apply a DVE to your chroma key, you should use the chroma key effect and not
the chroma key shadow effect.
Overview of the chroma key effects
Page 100
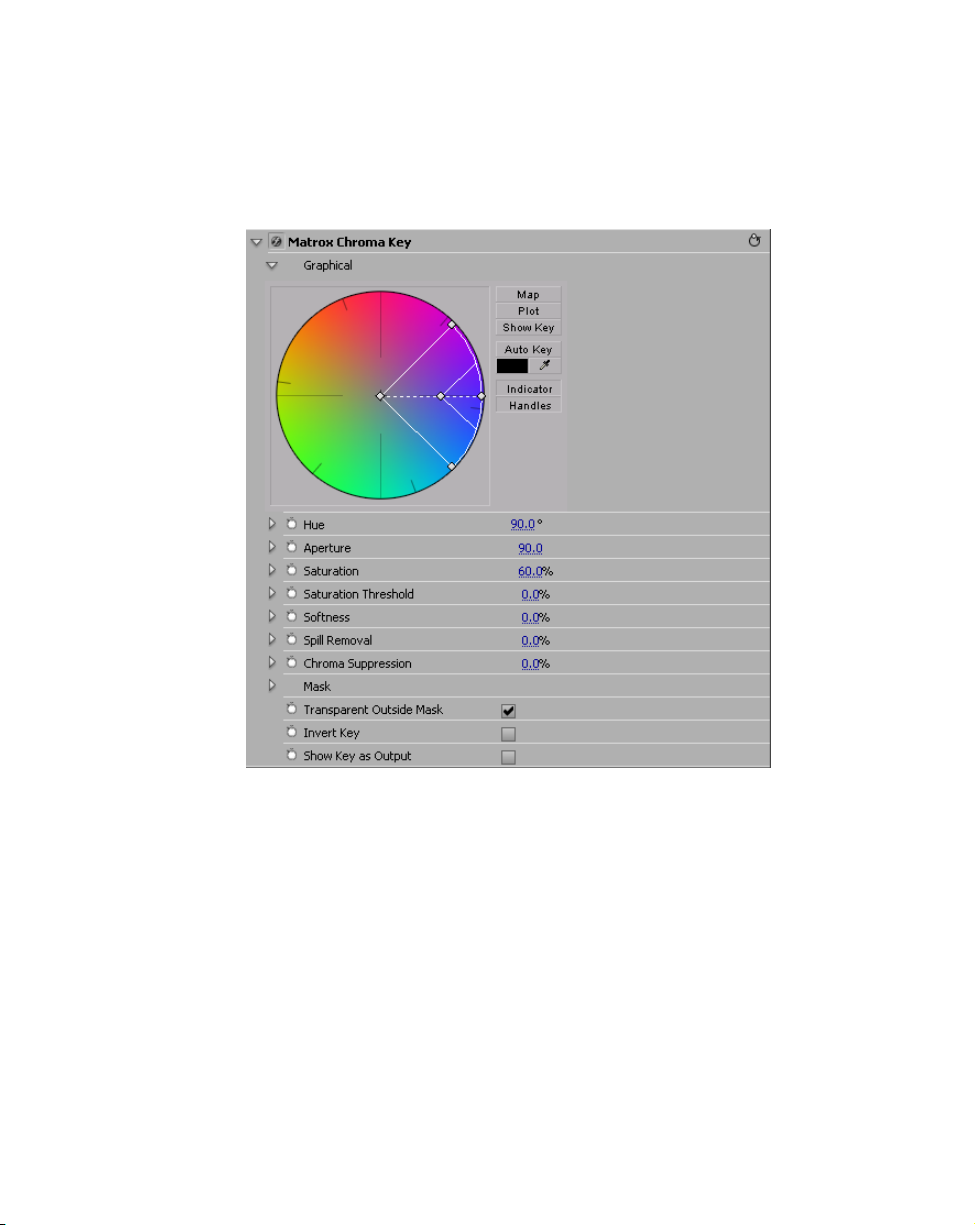
92
Creating a chroma key or chroma key shadow effect
To set up a Matrox chroma key or chroma key shadow effect, click the triangle
next to
Matrox Chroma Key/Matrox Chroma Key Shadow to expand the
property list:
•
Graphical Provides a graphical representation of the chroma key controls
that you can use to select your key colors, and also lets you perform an auto
key.
$ Map Lets you select your key colors within a circular graph that contains
a color spectrum.
$ Plot Displays a plot of the colors present in your clip so that you can
select the particular colors on which you want to key.
$ Show Key Click this button to display the matte used to create your key
effect. This enables you to further refine your key. For example, when you
display the matte, your key color (such as green) appears as black, and
opaque areas appear as white. If you notice some white spots that you want
to key, you can adjust the key controls until the undesired white spots
disappear.
Chapter 4, Setting Up Realtime Effects with Adobe Premiere Pro
 Loading...