

Page 1

Matrox MXO2
Installation and User Guide
(Mac OS version)
November 13, 2009
v
Y11080-201-0181
Page 2

Trademarks
Matrox Electronic Systems Ltd. ...........................................................................Matrox®, CompressHD™, Matrox 4VANC™,
Matrox MAX
Adobe Systems Inc..............................................................................................Adobe®, After Effects®, Encore
Apple Inc.............................................................................................................Apple®, Final Cut Pro®, Final Cut Studio®,
iPhone
Mac OS
Boris FX, Inc........................................................................................................ Boris FX®, Media 100
Computer Prompting and Captioning Co. (CPC)....................................................MacCaption
GeBE Computer & Peripherie GmbH ....................................................................Boinx Software
HDMI Licensing LLC. ..........................................................................................HDMI
Intel Corporation .................................................................................................Intel
Panasonic (Matsushita Electric Industrial Co.)......................................................Panasonic®, DVCPRO™, DVCPRO HD™,
VariCa m
Personal Computer Memory Card International Association (PCMCIA) ..................PCMCIA™, ExpressCard
PCI-SIG ...............................................................................................................PCI-SIG®, PCIe
RED Digital Cinema Camera Company ................................................................RED
Sonic Solutions ...................................................................................................Sonic™, Sonic Solutions™, Roxio™, Roxio Toast
Sony Corporation ...............................................................................................Sony®, Betacam™, Blu-ray Disc™, HDV™,
XDCAM
Telestream, Inc. ..................................................................................................Telestream®, Episode
Victor Company of Japan Limited (JVC)...............................................................JVC™, HDV
HDMI, the HDMI logo and High-Definition Multimedia Interface are trademarks or registered trademarks of HDMI Licensing LLC. All other
nationally and internationally recognized trademarks and tradenames are hereby acknowledged.
™
™
, MXO
™
, iPod®, Leopard®, Mac®, MacBook®,
®
, QuickTime®, Xserve
™
™
™
®
®
®
™
®
, XDCAM EX
™
™
®
®
®
®
®
™
Copyright © 2009 Matrox Electronic Systems Ltd. • All rights reserved.
Disclaimer Matrox Electronic Systems Ltd. reserves the right to make changes in specifications at any time and without notice.
The information provided b y this document is believed to be accurate and reliable. However, no responsibility is assume d by Matrox
Electronic Systems Ltd. for its use; nor for any infringements of patents or other rights of third parties resulting from its use. No
license is granted under any patents or patent rights of Matrox Electronic Systems Ltd.
Unauthorized recording or use of broadcast television programming, video tape, or other copyrighted material may violate copyright
laws. Matrox Electronic Systems Ltd. assumes no responsibility for the illegal duplication, use, or other acts that infringe on the
rights of copyright owners.
Matrox Electronic Systems Ltd.
1055 St. Regis Blvd., Dorval, Quebec, Canada H9P 2T4
Tel: (514) 685-2630 Fax: (514) 685-2853 World Wide Web: www.matrox.com
Page 3

Matrox License Agreement, Warranty, and Service
A. Matrox software license agreement for single-user products
By installing the software, you, the original purchaser, indicate your acceptance of these terms. If you do not
agree to the terms of this agreement, please return your Matrox product to your Matrox representative.
This Matrox soft ware, any includ ed sample images and other files (the "Software"), is copyrigh ted by Matrox
Electronic Systems Ltd. All rights are reserved. You are granted a license to use the Software only, subject to the
following restrictions and limitations:
1 The license is to you the original purchaser only, and is not transferable without written permission of Matrox.
2 You may install the Software on an unlimited number of computers owned or leased by you in any location.
However, you must use the Software on a single computer owned or leased by you at a time in conjunction for
the purpose of operating the Matrox hardware.
3 For the purposes of clarity, notwithstanding the fact that you may install the Software on more than one
computer owned or leased by you, you may not use the Software on more than a single machine at a time,
even if you own or lease more than one machine, without the express written consent of Matrox.
4 You may make back-up copies of the Software for your own use only, subject to the use limitations of this
license.
5 You may not engage in, nor permit third parties to engage in, any of the following:
a Providing or disclosing the Software to third parties.
b Providing use of the Software in a computer service business, network, time-sharing, multiple CPU, or
multi user arrangement to users who are not individually licensed by Matrox.
c Making alterations or copies of any kind in the Software (except as specifically permitted above).
d Attempting to disassemble, decompile, or reverse-engineer the Software in any way.
e Granting sublicenses, leases, or other rights in the Software to others.
f Making copies, or verbal or media translations of the user's guide.
g Making telecommunication data transmissions of the Software.
Matrox reserves the right to terminate this license without prejudice to any additional recourses Matrox may have
against you if you violate any of its terms and conditions.
i
B. Software limited warranty
MATROX WARRANTS TO YOU, THE ORIGINAL PURCHASER, WHO PROVIDES AN ADEQUATE
PROOF OF PURCHASE, THAT THE MEDIA ON WHICH THE SOFTWARE IS RECORDED IS FREE
FROM DEFECTS IN MATERIALS AND WORKMANSHIP UNDER NORMAL USE, AND THAT THE
SOFTWARE WILL PERFORM SUBSTANTIALLY AS DESCRIBED IN THE RELATED
DOCUMENTATION PROVIDED BY MATROX FOR A PERIOD OF NINETY (90) DAYS FROM THE DATE
OF PURCHASE.
MATROX PROVIDES YOU THE SOFTWARE AND RELATED DOCUMENTATION ON AN "AS IS" BASIS
WITHOUT ANY WARRANTY OF ANY KIND, EITHER EXPRESSED OR IMPLIED, INCLUDING BUT
NOT LIMITED TO ANY IMPLIED WARRANTY OF MERCHANTABILITY, NON-INFRINGEMENT OR
FITNESS FOR A PARTICULAR PURPOSE AS WELL AS THE WARRANTY AGAINST HIDDEN OR
LATENT DEFECTS, ALL OF WHICH MATROX SPECIFICALLY DISCLAIMS (AND YOU, THE
ORIGINAL PURCHASER, BY ACCEPTING THE PRODUCT, SPECIFICALLY ACCEPTS SUCH
DISCLAIMER AND WAIVER) TO THE MAXIMUM EXTENT PERMITTED BY LAW. THE ENTIRE RISK
AS TO THE RESULTS AND PERFORMANCE OF THE SOFTWARE IS ASSUMED BY YOU. SHOULD
THE SOFTWARE PROVE DEFECTIVE, YOU (AND NOT MATROX, ITS DISTRIBUTORS OR DEALERS)
ASSUME THE ENTIRE COST OF ALL NECESSARY SERVICING, REPAIR OR CORRECTION.
MATROX DOES NOT WARRANT THAT THE OPERATION OF THE SOFTWARE WILL BE
UNINTERRUPTED OR ERROR-FREE, THAT DEFECTS IN THE SOFTWARE WILL BE CORRECTED, OR
Matrox License Agreement, Warranty, and Service
Page 4

ii
THAT THE SOFTWARE WILL MEET YOUR REQUIREMENTS OR PERFORM WITH ANY
HARDWARE OR SOFTWARE PROVIDED BY THIRD PARTIES.
C. End-user re gistration
Before using your Matrox product, please take a moment to register your product in the Matrox Support
section of our web site at www.matrox.com/video/support. The information you provide will assist Matrox
to quickly diagnose and correct any problem that might arise when using the product. Only registered end
users are entitled to customer support.
D. Hardware limited warranty
MATROX WARRANTS TO YOU, THE ORIGINAL PURCHASER, WHO PROVIDES AN ADEQUATE
PROOF OF PURCHASE, THAT THE MATROX HARDWARE PRODUCTS WILL BE FREE FROM
FACTORY DEFECTS FOR A PERIOD OF THREE (3) YEARS FROM THE DATE OF PURCHASE.
MATROX WILL REPAIR OR REPLACE, AT THE CHOICE OF MATROX, THE MATROX
HARDWARE PRODUCTS WHICH PROVE TO BE DEFECTIVE DURING THE WARRANTY
PERIOD, PROVIDED THAT THEY ARE RETURNED TO MATROX, SUBJECT TO THE
FOLLOWING LIMITATIONS:
Matrox's limited warranty covers only those defects which arise as a result of normal use of the hardware
and does not apply to any:
$ improper or inadequate maintenance;
$ incompatibilities due to the user's hardware or software applications with or in which the Matrox
product interfaces;
$ product of a special or custom-made nature;
$ unauthorized modification or misuse;
$ improper installation, misapplication or negligence;
$ operation outside the product's environmental specifications;
$ improper site preparation or maintenance;
$ software;
$ other causes that do not relate to a product defect;
$ defects or damage suffered as a result of force majeure (including theft);
$ defects or damage suffered as a result of normal wear and tear, and/or
$ stolen goods.
If Matrox receives from you, during the applicable warranty period notice of a defect in a warranted
hardware product and the defective Matrox product in question, Matrox shall at its sole option, either repair
or replace the product, and shall return the repaired product or a replacement product within a reasonable
delay. The replacement product may not be new, provided that it has functionality at least equal to that of
the product being replaced. This warranty is valid in any country where Matrox hardware products are
distributed by Matrox or its authorized dealers.
This limited warranty statement gives you specific legal rights. You may also have other rights which vary
from state to state in the United States, from province to province in Canada, and from country to country
elsewhere in the world.
E. Limitations of warranty
EXCEPT FOR THE SOFTWARE LIMITED WARRANTY AND HARDWARE LIMITED WARRANTY
STATEMENTS, NEITHER MATROX NOR ANY OF ITS THIRD PARTY SUPPLIERS MAKES ANY
OTHER WARRANTY OF ANY KIND, WHETHER EXPRESSED OR IMPLIED, WITH RESPECT TO
MATROX PRODUCTS. MATROX SPECIFICALLY DISCLAIMS (AND YOU, BY ACCEPTING THE
MATROX PRODUCT, SPECIFICALLY ACCEPTS SUCH DISCLAIMER AND WAIVES) ALL OTHER
Matrox License Agreement, Warranty, and Service
Page 5

WARRANTIES, EITHER EXPRESSED OR IMPLIED, INCLUDING BUT NOT LIMITED TO THE IMPLIED
WARRANTIES OF MERCHANTABILITY AND FITNESS FOR A PARTICULAR OR INTENDED
PURPOSE OR USE AND THE WARRANTY AGAINST LATENT DEFECTS, WITH RESPECT TO THE
HARDWARE AND/OR SOFTWARE. MATROX FURTHER DISCLAIMS ANY WARRANTY THAT
MATROX PRODUCTS, IN WHOLE OR IN PART, WILL BE FREE FROM INFRINGEMENT OF ANY
THIRD PARTY INTELLECTUAL PROPERTY OR PROPRIETARY RIGHTS.
TO THE EXTENT THAT THESE LIMITED WARRANTY STATEMENTS ARE IN CONSISTENT WITH
THE LAW OF THE LOCALITY WHERE YOU PURCHASED THE MATROX PRODUCT, THESE LIMITED
WARRANTY STATEMENTS SHALL BE DEEMED MODIFIED TO BE CONSISTENT WITH SUCH
LOCAL LAW. UNDER SUCH LOCAL LAW, CERTAIN LIMITATIONS OF THESE LIMITED WARRANTY
STATEMENTS MAY NOT APPLY TO YOU.
TO THE EXTENT ALLOWED BY LOCAL LAW, THE REMEDIES PROVIDED IN THESE LIMITED
WARRANTY STATEMENTS ARE YOUR SOLE AND EXCLUSIVE REMEDIES.
F. Limitations of liability
EXCEPT FOR THE OBLIGATIONS SPECIFICALLY SET FORTH IN THE SOFTWARE LIMITED
WARRANTY AND HARDWARE LIMITED WARRANTY STATEMENTS, IN NO EVENT SHALL
MATROX BE LIABLE FOR ANY DIRECT, INDIRECT, SPECIAL, INCIDENTAL, CONSEQUENTIAL,
FORESEEABLE OR UNFORESEEABLE, OR PUNITIVE DAMAGES, WHETHER BASED ON
CONTRACT, TORT, DELICT OR ANY OTHER LEGAL THEORY AND WHETHER ADVISED OF THE
POSSIBILITY OF SUCH DAMAGES, AND/OR DAMAGES ARISING FROM THE LOSS OF USE, DATA,
PRODUCTION REVENUE AND/OR PROFIT OF IN CONNECTION WITH THE MATROX PRODUCT OR
ANY BUSINESS INTERRUPTION. WITHOUT PREJUDICE TO THE FOREGOING, ANY LIABILITY OF
MATROX FOR ANY BREACH OF WARRANTY SHALL BE LIMITED TO THE AMOUNT PAID BY YOU
FOR THE DEFECTIVE HARDWARE IN QUESTION.
TO THE EXTENT ALLOWED BY LOCAL LAW, MATROX'S ENTIRE LIABILITY AND YOUR
EXCLUSIVE REMEDY SHALL BE THE REPAIR OR REPLACEMENT OF ANY DEFECTIVE PRODUCT
DURING THE WARRANTY PERIOD. MATROX DOES NOT OFFER ANY OTHER WARRANTY WITH
RESPECT TO MATROX HARDWARE OR SOFTWARE OR ANY OTHER HARDWARE OR SOFTWARE.
YOU SHALL BE RESPONSIBLE FOR ALL APPLICABLE TAXES, DUTIES AND CUSTOMS FEES ON
ANY REPLACEMENT UNIT, AS WELL AS ALL TRANSPORT, INSURANCE, STORAGE AND OTHER
CHARGES INCURRED ON ALL RETURNED PRODUCTS.
iii
G. Indemnification disclaimer
Matrox disclaims and shall have no obligation to indemnify or defend you or any third party in respect of any
actual or alleged infringement of any actual or pending patents, copyright or other intellectual property rights.
Matrox shall have no liability arising out of any such actual or alleged intellectual property infringement.
MATROX SPECIFICALLY MAKES NO REPRESENTATION AND DISCLAIMS ALL EXPRESS OR
IMPLIED WARRANTIES OF MERCHANTABILITY, FITNESS FOR A PARTICULAR PURPOSE AND
NONINFRINGEMENT.
Matrox License Agreement, Warranty, and Service
Page 6

iv
H. Procedure for returning goods
No returned goods, for service or otherwise, will be accepted without prior authorization from Matrox. To
obtain return authorization, contact Matrox Customer Support (see the contact information at
www.matrox.com/video/support). Once approved, Matrox will contact you with your Returned
Merchandise Authorization (RMA) number. Matrox cannot be responsible for units returned without an
RMA number. Matrox will advise you of the shipping address. The packaging must indicate the RMA
number on the outside. It is strongly recommended that a copy of the original packing slip which states the
serial number of the items you're returning be included with the returned merchandise. This will speed up
processing.
Each individual, returned unit or group of units MUST have an RMA number issued by Matrox. Matrox
must authorize the number of units grouped under one RMA number. Any units received without prior
approval by Matrox will be returned to you freight collect.
You shall be responsible for the cost of consolidated freight (one way only) for warranty units from your
location to the location designated by Matrox. Once repaired, Matrox will incur the cost of consolidated
freight for warranty units to your location.
Matrox License Agreement, Warranty, and Service
Page 7

Contents
Chapter 1
Introducing Matrox MXO2
Welcome to Matrox MXO2 ................................................................... 2
Matrox MXO2 system requirements .................................................... 2
Supported programs .................................................................................. 2
Check our website for equipment information............................................ 3
Battery requirements and guidelines for MXO2................................... 3
About this manual................................................................................. 4
Style conventions ....................................................................................... 4
How video formats are expressed ............................................................. 4
Last-minute information.............................................................................. 4
Chapter 2
Installing Your Matrox MXO2 Hardware and Software
Before installing your Matrox hardware............................................... 6
Start with a functioning system................................................................... 6
Avoid costly damage .................................................................................. 6
Installing your Matrox PCIe adapter ..................................................... 6
Installing your PCIe host adapter (for desktops)..........................................7
Installing your PCIe host ExpressCard/34 adapter (for laptops) ..................7
Removing your PCIe host ExpressCard/34 adapter ................................... 8
Installing your Matrox MXO2 software ................................................. 8
Updating your MXO2 firmware ................................................................... 8
Removing your Matrox MXO2 software ............................................... 9
Removing MXO2 presets and Easy Setups from Final Cut Pro .................. 10
Chapter 3
Connecting External Devices to Matrox MXO2
Available MXO2 connections...............................................................12
MXO2 video connections........................................................................... 12
MXO2 audio connections .......................................................................... 12
Powering MXO2................................................................................... 12
MXO2 power functionality.......................................................................... 12
Connecting MXO2 to your Mac system...............................................14
Page 8

vi
MXO2 RS-422 serial connection ......................................................... 15
Typical Matrox MXO2 connections ..................................................... 16
Analog component video connections ...................................................... 16
Digital video connections............................................................................17
Chapter 4
Connecting External Devices to Matrox MXO2 Rack
Available MXO2 Rack connections .....................................................20
MXO2 Rack video connections .................................................................20
MXO2 Rack audio connections .................................................................20
Rack mounting your MXO2 Rack ........................................................20
Powering MXO2 Rack .........................................................................22
MXO2 power functionality .........................................................................22
Connecting MXO2 Rack to your Mac system .....................................23
MXO2 Rack RS-422 serial connection ................................................24
Typical Matrox MXO2 Rack connections ............................................25
Analog component video connections ......................................................25
Digital video connections...........................................................................26
Chapter 5
Connecting External Devices to Matrox MXO2 LE
Available MXO2 LE connections .........................................................28
MXO2 LE video connections .....................................................................28
MXO2 LE audio connections .....................................................................28
Powering MXO2 LE .............................................................................28
MXO2 LE power functionality ....................................................................28
Connecting MXO2 LE to your Mac system .........................................30
MXO2 LE RS-422 serial connection.................................................... 31
Typical Matrox MXO2 LE connections ................................................32
Analog component video connections ......................................................32
Digital video connections...........................................................................33
Chapter 6
Connecting External Devices to Matrox MXO2 Mini
Available MXO2 Mini connections .......................................................36
MXO2 video and audio connections ..........................................................36
Contents
Page 9

Powering MXO2 Mini .......................................................................... 36
MXO2 Mini power supply and adapter plugs ............................................ 36
Connecting MXO2 Mini to your computer .......................................... 38
Connecting S-Video devices to MXO2 Mini........................................ 39
Typical Matrox MXO2 Mini connections ............................................. 40
Analog component video connections ..................................................... 40
HDMI video connections ........................................................................... 41
Chapter 7
Configuring Your MXO2 System
Defining your MXO2 settings .............................................................. 44
Specifying your general settings ............................................................... 45
Specifying your genlock settings .............................................................. 46
Specifying your A/V input settings .............................................................47
Specifying your A/V input settings (MXO2 Mini) ........................................ 50
Specifying your video output settings ....................................................... 52
Specifying your video output settings (MXO2 Mini) .................................. 54
Specifying your audio output settings ........................................................ 57
Matrox 4VANC closed caption capture and playback .............................. 58
Viewing MXO2 information ........................................................................ 61
vii
Chapter 8
Calibrating Your HDMI Monitor for Video
Overview............................................................................................. 64
Loading and displaying color bars...................................................... 64
Calibrating your HDMI monitor ........................................................... 65
Chapter 9
Using Matrox MXO2 with Supported Programs
Matrox MXO2 Easy Setups for Final Cut Pro...................................... 70
Loading a Matrox MXO2 Easy Setup .........................................................70
Creating a Matrox MXO2 Easy Setup ........................................................70
Matrox MXO2 presets for Final Cut Pro .............................................. 71
Creating and editing MXO2 sequence presets .......................................... 71
Creating and editing MXO2 capture presets ............................................. 71
Creating and editing MXO2 device control presets ................................... 72
Contents
Page 10

viii
Specifying settings for capturing and playing back closed
captioning in Final Cut Pro .................................................................73
Settings for capturing Matrox 4VANC closed captioning ........................... 73
Settings for playing back closed captioning............................................... 73
Specifying your video and audio output device settings ....................74
Specifying settings for Final Cut Pro .......................................................... 74
Specifying settings for Adobe After Effects ...............................................75
Ensuring frame-accurate capture and edit-to-tape using
Final Cut Pro.......................................................................................75
Setting your capture settings .................................................................... 76
Setting your edit-to-tape settings.............................................................. 76
Chapter 10
Using the Matrox MAX H.264 Codec
Overview .............................................................................................80
Activating and deactivating the Matrox MAX H.264 codec ................80
Matrox MAX H.264 settings in Apple Compressor.............................82
Assigning a Matrox MAX H.264 setting .....................................................82
Creating a custom Matrox MAX H.264 setting ..........................................83
Matrox MAX H.264 settings in Final Cut Pro and QuickTime Pro .......93
Assigning a Matrox MAX H.264 Compressor setting in Final Cut Pro ........93
Specifying settings for exporting to QuickTime in Final Cut Pro and
QuickTime Pro ..........................................................................................94
Appendix A
Understanding Pulldown
Overview .............................................................................................98
2:3:2:3 pulldown (standard)................................................................98
2:3:3:2 pulldown (advanced) ..............................................................99
Appendix B
Matrox MXO2 Connectors
Inputs ................................................................................................ 102
MXO2 inputs............................................................................................ 102
MXO2 Rack inputs ................................................................................... 103
MXO2 LE inputs....................................................................................... 104
MXO2 Mini inputs .................................................................................... 105
Input connector descriptions ................................................................... 106
Contents
Page 11

Input connector descriptions (MXO2 Mini) .............................................. 108
Outputs ..............................................................................................109
MXO2 outputs ......................................................................................... 109
MXO2 Rack outputs .................................................................................110
MXO2 LE outputs ..................................................................................... 111
MXO2 Mini outputs ................................................................................... 112
Output connector descriptions ................................................................. 113
Output connector descriptions (MXO2 Mini) ............................................115
Appendix C
Matrox MXO2 Supported Input and Capture Formats
Supported input formats.................................................................... 118
Supported input formats (MXO2 Mini) ............................................... 118
Supported capture formats............................................................... 119
Supported capture formats (MXO2 Mini) ..........................................120
Appendix D
Matrox MXO2 Supported
Output Formats
Video formats supported on MXO2 outputs......................................122
Video formats supported on MXO2 Mini outputs ..............................123
Supported Main and SD video output formats ..................................124
Supported Main and SD video output formats (MXO2 Mini) .............126
ix
Appendix E
Matrox MXO2 Specifications
Matrox MXO2 specifications .............................................................128
General.................................................................................................... 128
Connections ............................................................................................ 128
Environmental specifications ................................................................... 132
Matrox MXO2 Rack specifications ....................................................132
General.................................................................................................... 132
Connections ............................................................................................ 133
Environmental specifications ................................................................... 136
Matrox MXO2 LE specifications ........................................................137
General.................................................................................................... 137
Connections ............................................................................................ 137
Environmental specifications ....................................................................141
Contents
Page 12

x
Matrox MXO2 Mini specifications ......................................................141
General .................................................................................................... 141
Connections ............................................................................................. 141
Environmental specifications ................................................................... 144
Matrox PCIe host adapter specifications.......................................... 145
Matrox PCIe host ExpressCard/34 adapter (for laptops) ........................ 145
Matrox PCIe host adapter (for desktops) ................................................ 145
Appendix F
Matrox Customer Support
How to get Matrox customer support .............................................. 148
Registration ............................................................................................. 148
Keep up to date with our website ........................................................... 148
Contacting us .......................................................................................... 148
Index ......................................................................................... 149
Contents
Page 13

1
Introducing Matrox MXO2
This chapter lists the MXO2
system requirements, details
the battery requirements and
guidelines, and describes the
MXO2 documentation.
Page 14

2
Welcome to Matrox MXO2
Matrox MXO2 connects to your Mac Pro or MacBook Pro to provide
broadcast-quality input/output, monitoring, and up/down/cross conversion to
streamline your workflow with Apple Final Cut Studio. MXO2 provides built-in
surround sound monitoring, as well as the flexibility to map any audio track in
Final Cut Pro to any audio output. Through the use of proc amp controls (hue,
chroma, contrast, brightness, and blue-only), you can adjust and control your
HDMI monitor exactly as you would a broadcast HD/SD monitor. This control
turns your HDMI monitor into a true-color video display with accurate color
representation so that you can use your HDMI monitor even for color grading.
For Matrox MXO2 products with Matrox MAX technology, the dedicated
hardware processor accelerates the creation of H.264 files for Blu-ray Disc, the
web, and mobile devices.
Matrox MXO2 system requirements
Matrox MXO2 requires a Mac system or Apple Xserve system with the
following configuration:
• Intel-based Mac Pro, MacBook Pro, or Apple Xserve
• Mac OS X v10.5 or later.
• One free PCIe slot on the Mac Pro or Xserve to install the Matrox PCIe host
adapter, or one free ExpressCard/34 slot on the MacBook Pro to install the
Matrox PCIe host ExpressCard/34 adapter.
• If using MXO2 with Final Cut Studio 2 or later, you need 2 GB of RAM
when working with compressed HD and uncompressed SD sources, or 4 GB
of RAM when working with uncompressed HD sources.
• We recommend an HDMI monitor that supports 1920×1080 for previewing
all HD formats, and “dot-by-dot” mode for 1:1 pixel mapping.
.
Supported programs
• Apple Final Cut Pro v6.0.5 or later, Motion v3.0.2 or later, Color v1.0.4 or
later.
• Adobe After Effects and Encore CS4.
• Roxio Toast v10.0.2 or later.
• CPC MacCaption v4.1.4 or later.
• Boinx Software BoinxTV v1.3 or later.
• Softron MovieRecorder v1.2.6 or later, OnTheAir Video v2.4.6 or later, and
OnTheAir Video Express v1.0.2 or later.
• ToolsOnAir Just:In version 1.010 or later.
• Media 100 Suite version 1.0 or later.
Chapter 1, Introducing Matrox MXO2
Page 15

• For Matrox MAX H.264 encoding:
$ Apple Compressor v3.0.5 or later (required for Blu-ray Disc).
$ Apple QuickTime Pro v7.6 or later, Apple Final Cut Pro v6.0.5 or later,
Adobe After Effects CS4, Adobe Encore CS4, Apple Motion v3.0.2 or
later, Apple Qmaster v3.0.5 or later, Telestream Episode and Episode Pro
v5.3 or later, Media 100 Suite version 1.0 or later, or other
QuickTime-based video applications.
Check our website for equipment information
For up-to-date information about recommended computer systems, batteries, and
other MXO2-compatible devices, check the Matrox MXO2 Support section of
our website at www.matrox.com/video/support.
Battery requirements and guidelines for MXO2
¦NoteThis section does not apply to Matrox MXO2 Rack and Matrox MXO2
Mini as they cannot be powered by a battery.
As an alternative to using an AC outlet, you can use a battery to power Matrox
MXO2 or MXO2 LE. To avoid damage to your MXO2 system and peripheral
devices when using a battery, please observe the following requirements and
guidelines. For instructions on how to connect a battery, see “Powering MXO2”
on page 12 or “Powering MXO2 LE” on page 28.
• Use a standard self-protected (fused) battery with a nominal voltage of 12V,
13.2V, or 14.4V. A higher-voltage battery will damage your MXO2 system.
• Disconnect MXO2 from the battery when not in use. Do not leave MXO2
connected to the battery when not in use as this may damage your MXO2
system and/or battery.
• Do not power your MXO2 using your vehicle’s battery via the power socket.
3
²Caution To avoid damage to your MXO2 system and peripheral devices, use a
Matrox-recommended battery. For a list of batteries recommended for use with
your MXO2, visit the Matrox MXO2 Support section of our website at
www.matrox.com/video/support.
Battery requirements and guidelines for MXO2
Page 16

4
About this manual
This manual provides you with information about installing and using your
Matrox MXO2 hardware and software, including how to configure your Matrox
MXO2 for use with supported programs, such as Final Cut Pro and Adobe After
Effects.
Style conventions
The following style conventions are used in this manual:
• The names of files, folders, and manuals appear in italics. For example:
$ The data is stored in the Sample Movie file.
$ The file is located in the Clips folder.
$ Please refer to your Final Cut Pro User’s Manual.
• Menus and commands that you need to choose are displayed in the form
Menu > Command. For example, File > Save means click File in the
menu bar, then click
How video formats are expressed
With the exception of NTSC and PAL, all SD and HD video formats are
expressed in the Matrox MXO2 documentation as follows:
VRp or i or PsF at n fps
Where:
• VR is the vertical resolution. For 1440× 1080 video, however, both the
horizontal and vertical resolutions are specified.
• p or i or PsF represents either progressive, interlaced, or progressive
segmented frame video.
• n fps is the frame rate in frames per second.
Save in the menu that appears.
Here are some examples:
• 486p at 23.98 fps Represents 720×486 progressive video at 23.98 frames
per second.
• 720p at 59.94 fps Represents 1280× 720 progressive video at 59.94 frames
per second.
• 1440x1080i at 29.97 fps Represents 1440×1080 interlaced video at 29.97
frames per second. This format is used for HDV 1080i material.
• 1080i at 29.97 fps Represents full-size 1920×1080 interlaced video at
29.97 frames per second.
Last-minute information
Any important information that wasn’t available for inclusion in this manual by
publication time is provided to you in the Matrox MXO2 Release Notes.
Chapter 1, Introducing Matrox MXO2
Page 17

2
Installing Your Matrox MXO2
Hardware and Software
This chapter describes how to
install the Matrox MXO2
hardware and software.
Page 18

6
Before installing your Matrox hardware
Read the followinginformation carefully before attempting to install Matrox
hardware on your Mac system.
Start with a functioning system
Before attempting any Matrox MXO2 installation, you should have a Mac
computer system with Mac OS X fully installed and functioning smoothly. This
will avoid potential problems later on.
Avoid costly damage
Static electricity from your body can damage your Matrox PCIe host adapter or
your computer. Although you may not notice it, static electricity is generated
every time you move. It’s often too small to cause a spark, but it can still cause
damage to sensitive electronic components or at least reduce their lifespan.
To avoid damage, please observe the following precautions:
• Do not remove your Matrox PCIe host adapter from its antistatic bag until
you’re ready to install it. Before removing the card, place the package within
easy reach of the area where you intend to perform the installation.
• You should avoid touching the chips and other components on the circuit
board. Try to handle the card by its edges.
• Try to work in an area where the relative humidity is at least 50%.
• Do not wear wool or synthetic clothing. These fabrics tend to generate more
static electricity than cotton, which is best for this kind of work.
• Turn off the power switches on your computer and its connected
components.
Once you’ve opened your computer, drain static electricity from your body by
touching a bare metal surface on your computer chassis before you install or
remove any parts of your system. If you have a grounding wrist strap, use it while
handling and installing any components in your computer.
Installing your Matrox PCIe adapter
The Matrox PCIe adapter is the interface between your MXO2 and Mac system.
Matrox provides dedicated adapters for use with Mac desktops or laptops. Use
the Matrox PCIe host adapter with your Mac Pro or Apple Xserve system, and
the Matrox PCIe host ExpressCard/34 adapter with your MacBook Pro laptop.
Chapter 2, Installing Your Matrox MXO2 Hardware and Software
Page 19
Installing your PCIe host adapter (for desktops)
The Matrox PCIe host adapter is a standard low-profile PCIe x1 card designed to
operate in an Intel-based Mac Pro or Apple Xserve system. For detailed
instructions on how to perform the following steps, refer to your Mac Pro or
Xserve documentation.
1 Shut down your Mac Pro or Xserve, unplug the power cord and all the cables
from the unit, and open the Mac Pro or Xserve chassis.
2 Insert the Matrox PCIe host adapter in an available PCIe slot in your Mac
Pro or Xserve, and secure the adapter into place.
3 Close your Mac Pro or Xserve chassis, and reconnect the power cord and all
the cables to the unit.
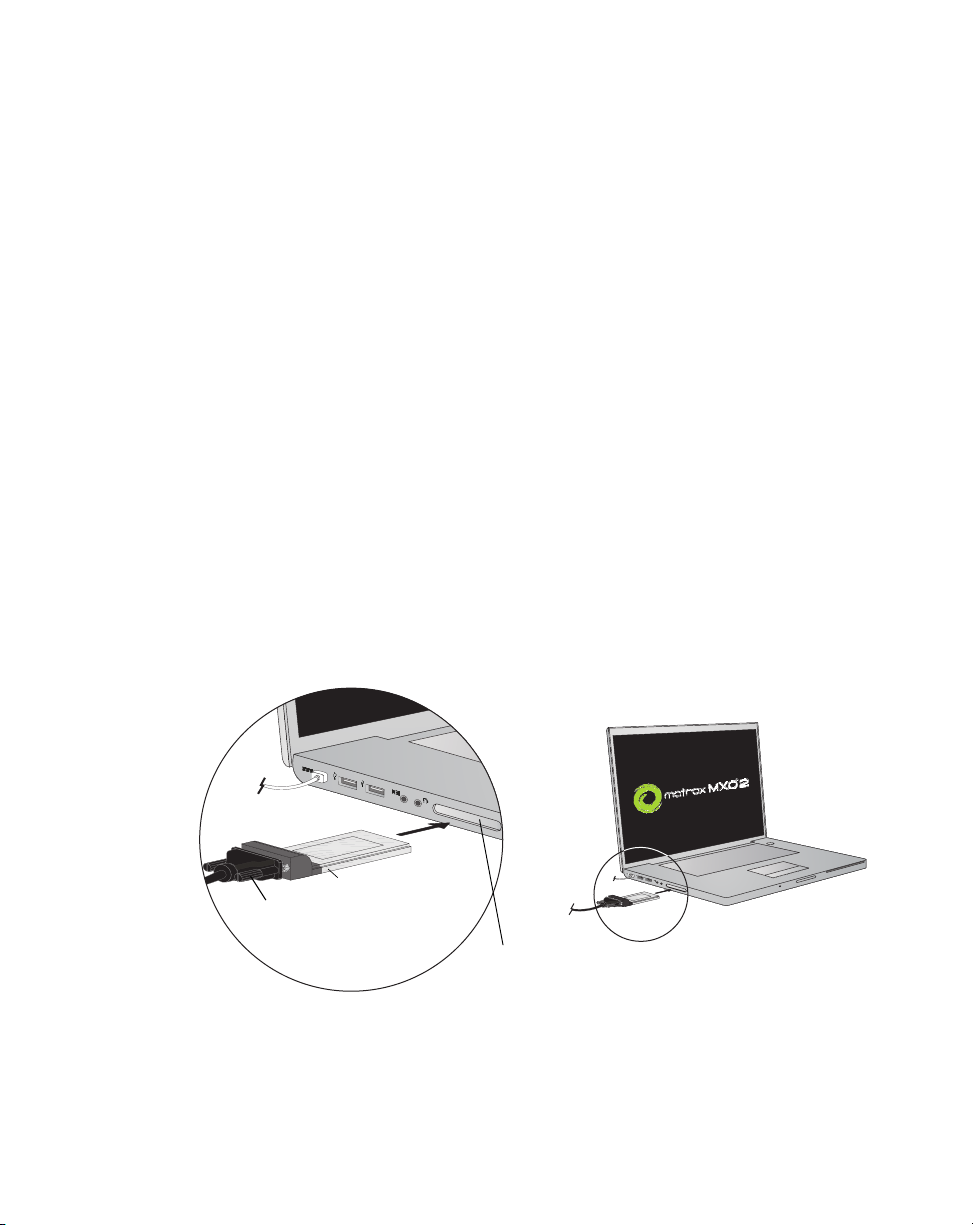
Installing your PCIe host ExpressCard/34 adapter (for laptops)
The Matrox PCIe host ExpressCard/34 adapter is designed to operate in your
MacBook Pro’s ExpressCard/34 slot. You can install the Matrox PCIe host
ExpressCard/34 adapter when your MacBook Pro is on or off. Connect the
Matrox PCIe cable to the host ExpressCard/34 adapter, and then insert the host
adapter in your MacBook Pro’s ExpressCard/34 slot until the adapter clicks into
place. For details on how to safely remove your Matrox PCIe host
ExpressCard/34 adapter from your MacBook Pro, see “Removing your PCIe host
ExpressCard/34 adapter” on page 8.
7
A
PCIe
cable
A
Matrox PCIe
ExpressCard/34
adapter
ExpressCard/34 slot
Installing your Matrox PCIe adapter
Page 20

8
Removing your PCIe host ExpressCard/34 adapter
You can remove the Matrox PCIe host ExpressCard/34 adapter from your
MacBook Pro when your MacBook Pro is on or off. However, you must power
off the card before removing it.
¡ Important Do not disconnect the PCIe cable from the Matrox PCIe host
ExpressCard/34 adapter when your MacBook Pro is running. Instead, remove the
adapter from your MacBook Pro with the Matrox PCIe cable attached.
1 From the menu bar, click the ExpressCard icon ( ).
2 Click Power off Card.
3 Remove the Matrox PCIe host ExpressCard/34 adapter from your MacBook
Pro’s ExpressCard/34 slot.
Installing your Matrox MXO2 software
You can install the MXO2 software on a computer with or without the MXO2
hardware connected. If you plan on working with Apple Final Cut Pro, Apple
Compressor, or other QuickTime-based applications, you should install those
applications before installing the MXO2 software. To download and install the
latest version of the MXO2 software, visit the MXO2 Support section of our
website at www.matrox.com/video/support. You can also contact your MXO2
dealer for the latest software.
Updating your MXO2 firmware
When you install the MXO2 software while your MXO2 hardware is powered
and connected to your Mac system, the software installation automatically
verifies the firmware on your MXO2 hardware and updates it if required.
However, if you install the MXO2 software on your Mac system without a
powered MXO2 connected, your MXO2 hardware may have a firmware version
that is not supported by the installed MXO2 software. If your MXO2 hardware
has an incompatible firmware version when you later connect the MXO2
hardware to your Mac system, the Matrox MXO2 preferences window options
will be unavailable and a message regarding the incompatibility between the
MXO2 software and MXO2 firmware will appear on the
MXO2 information” on page 61), along with a
button.
To update the MXO2 firmware from the MXO2 preferences window, make sure
your MXO2 hardware is powered and connected to your computer, and then click
Launch firmware updater on the Info pane to run the Matrox Firmware
Updater. You’ll be required to shut down your system, with your MXO2 powered
and connected to your computer, to complete the firmware update. If updating the
Chapter 2, Installing Your Matrox MXO2 Hardware and Software
Launch firmware updater
Info pane (see “Viewing
Page 21

firmware for Matrox MXO2 Mini, you must unplug your MXO2 Mini from the
AC outlet, and then re-plug it before restarting your system.
²Caution Do not disconnect or power off MXO2, or interrupt the firmware update
during the update process. Doing so may damage your MXO2 hardware.
Alternately, you can update your MXO2 firmware by running the Matrox
Firmware Updater from the Finder window as follows:
1 With your Mac system shut down, supply power to your MXO2, and connect
it to your Mac system.
2 Start your computer.
3 In the Finder menu, choose File > New Finder Window.
4 Choose Applications > Matrox MXO2 Utilities, and double-click the
firmware updater file to run the Matrox Firmware Updater. You’ll be
required to shut down your system, with your MXO2 powered and
connected to your computer, to complete the firmware update. If updating
the firmware for Matrox MXO2 Mini, you must unplug your MXO2 Mini
from the AC outlet, and then re-plug it before restarting your system.
Removing your Matrox MXO2 software
1 In the Finder menu, choose File > New Finder Window.
2 Choose Applications > Matrox MXO2 Utilities, and double-click the
software uninstaller file.
3 In the uninstaller dialog box, select or clear the Delete the Matrox
software user preferences
in the Matrox MXO2 preferences window will be removed from your
computer. Clear this option if you wish to keep your current MXO2 user
settings for a future MXO2 software installation.
4 Click Continue.
5 Enter your administrator password, and click OK to remove the MXO2
software from your computer.
option. When selected, all current user settings
9
Removing your Matrox MXO2 software
Page 22

10
Removing MXO2 presets and Easy Setups from Final Cut Pro
After uninstalling the Matrox MXO2 software, the MXO2 presets (sequence,
capture, device control) and Easy Setups may still appear in Final Cut Pro.
Perform the following steps to remove the MXO2 presets and Easy Setups from
Final Cut Pro.
¡ Important Final Cut Pro will return to default settings after removing the
MXO2 presets and Easy Setups.
1 Quit Final Cut Pro.
2 In the Finder menu, choose Go > Home.
3 Choose Library > Preferences.
4 In Preferences, drag the com.apple.FinalCutPro.plist file to the Trash. If
com.apple.FinalCutPro.plist does not appear in the Preferences folder,
proceed to the next step.
¡ Important Do not empty the Trash until instructed to do so.
5 In Preferences, open the Final Cut Pro User Data folder.
6 In Final Cut Pro User Data, drag the Final Cut Pro N Prefs.fcset, Final Cut
Pro Obj Cache.fcmch, and Final Cut Pro Prof Cache.fcpch files to the Trash.
¦NoteThe N in Final Cut Pro N Prefs.fcset refers to Final Cut Pro’s version
number.
7 Open Final Cut Pro and ensure that it is running properly. If it is, empty the
Trash.
8 Reset your Final Cut Pro settings, such as scratch disk, keyboard, and
sequence settings.
Chapter 2, Installing Your Matrox MXO2 Hardware and Software
Page 23

3
Connecting External Devices to
Matrox MXO2
This chapter shows how to
supply power and connect
external devices to Matrox
MXO2.
Page 24

12
¦NoteThis chapter details how to connect external devices to Matrox MXO2
only. For another MXO2 product, see Chapter 4, “Connecting External Devices
to Matrox MXO2 Rack”, Chapter 5, “Connecting External Devices to Matrox
MXO2 LE”, or Chapter 6, “Connecting External Devices to Matrox MXO2
Mini.”
Available MXO2 connections
Matrox MXO2 features a full compliment of professional inputs and outputs, and
allows you to connect multiple devices for up to five user-selectable simultaneous
video outputs.
MXO2 video connections
• One HD HDMI input and one HD/SD HDMI output, both with up to eight
channels of embedded audio support. The HDMI input/output supports YUV
and RGB devices.
• One HD/SD SDI input and two HD/SDI outputs with up to eight channels of
embedded audio. Both SDI outputs simultaneously output the same video
and embedded audio.
• One HD/SD analog component input/output, one S-Video input/output, and
one composite input/output.
• Analog black burst reference input.
MXO2 audio connections
• Two balanced analog XLR inputs (stereo pair).
• Four balanced analog XLR outputs (two stereo pairs).
• One AES/EBU stereo input/output.
• Two unbalanced analog RCA inputs (stereo pair).
• Six unbalanced analog RCA outputs (for surround sound monitoring).
Powering MXO2
Supply power to MXO2 using an AC outlet via the Matrox external power supply
and a power cord, or using a battery via the Matrox battery power cable. Matrox
MXO2 connects to the battery via a 4-pin XLR connector. For information on
how to connect your battery to portable video equipment, such as Matrox MXO2,
contact the battery manufacturer. Before connecting MXO2 to a battery, please
read the “Battery requirements and guidelines for MXO2” on page 3.
MXO2 power functionality
MXO2 features a power button that you can use to manually turn the MXO2 on
and off. However, when power is supplied to MXO2 and it is connected to your
Mac system, the MXO2 will turn on or off automatically when you start up or
Chapter 3, Connecting External Devices to Matrox MXO2
Page 25
shut down your Mac system. That is, when you shut down your Mac system, your
MXO2 turns off. Starting up your Mac system turns your MXO2 on. To manually
turn your MXO2 on, press the power button. To turn off your MXO2, press and
hold the power button for at least two seconds.
¡ Important When MXO2 is connected to a Mac system that is running, do not
disconnect MXO2 from its power source, or power off MXO2. Shut down your
Mac system before removing power from MXO2. If using a battery to power
MXO2, ensure that the battery is sufficiently charged.
MXO2
(side view)
13
External
power supply
Power button
Power cord
OR
Female 4-pin
XLR cable
²Caution When
disconnecting the power
supply from MXO2,
make sure that you slide
back the casing on the
connector to release the
locking mechanism.
Matrox battery
power cable
Battery on a
universal battery
adapter
To AC
outlet
Powering MXO2
Page 26
14
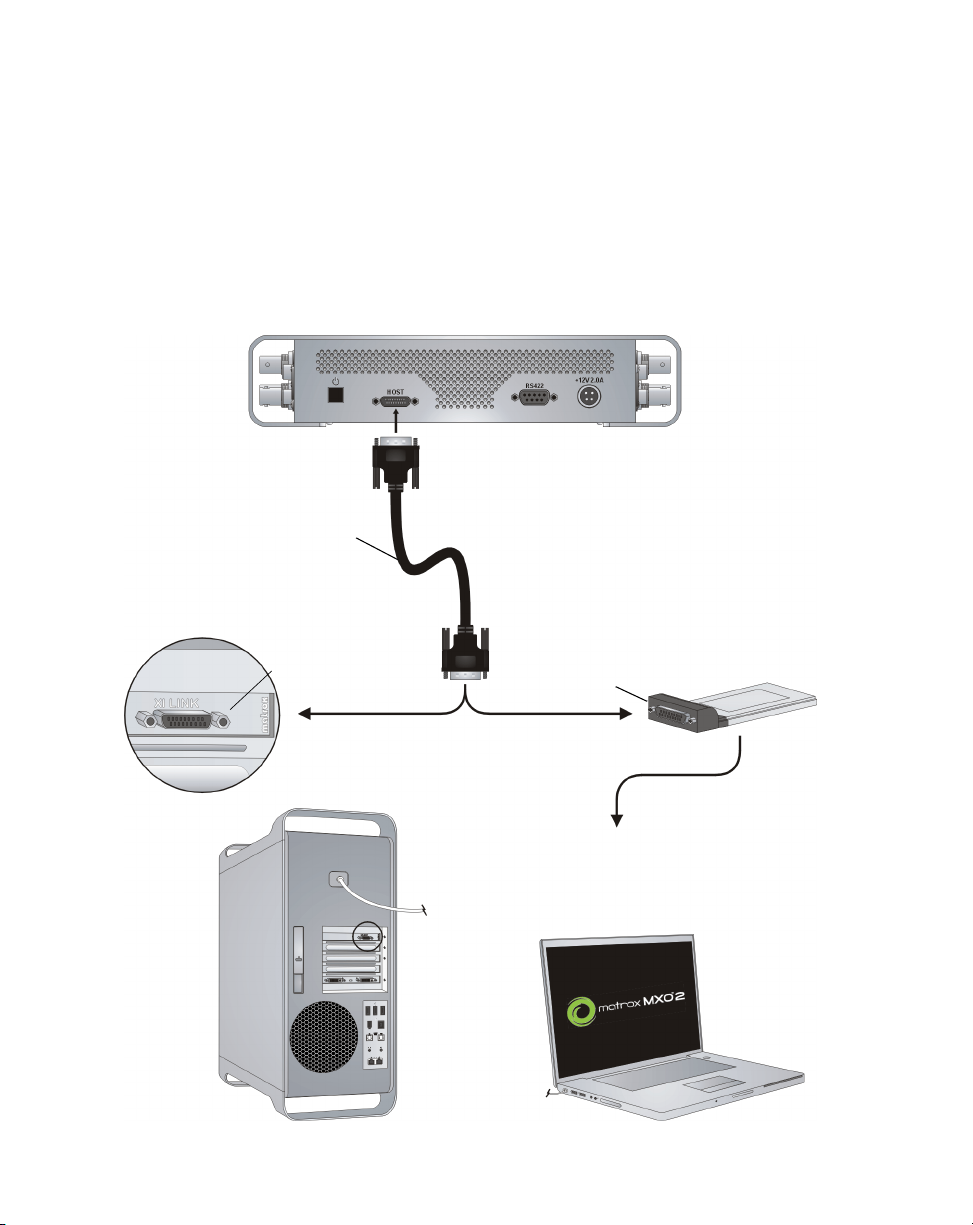
Connecting MXO2 to your Mac system
Connect MXO2 to your Mac Pro or MacBook Pro using the Matrox PCIe cable.
For MXO2 to be detected on a Mac Pro system, power must be supplied to
MXO2 (see “Powering MXO2” on page 12), and it must be connected to your
Mac Pro before starting up your computer.
¡ Important Do not disconnect the Matrox PCIe cable from the adapter, or
MXO2, when your Mac system is running. To safely remove the Matrox PCIe
host Expresscard/34 adapter, see “Removing your PCIe host ExpressCard/34
adapter” on page 8.
MXO2
(side view)
A
PCIe cable
Matrox PCIe
host adapter
²Caution Ensure proper orientation
when connecting the PCIe cable to avoid
damaging the cable or host connector.
Matrox PCIe host
ExpressCard/34
adapter
OR
To your MacBook Pro’s
ExpressCard/34 slot (see “Installing
your PCIe host ExpressCard/34
adapter (for laptops)” on page 7).
A
Chapter 3, Connecting External Devices to Matrox MXO2
Page 27
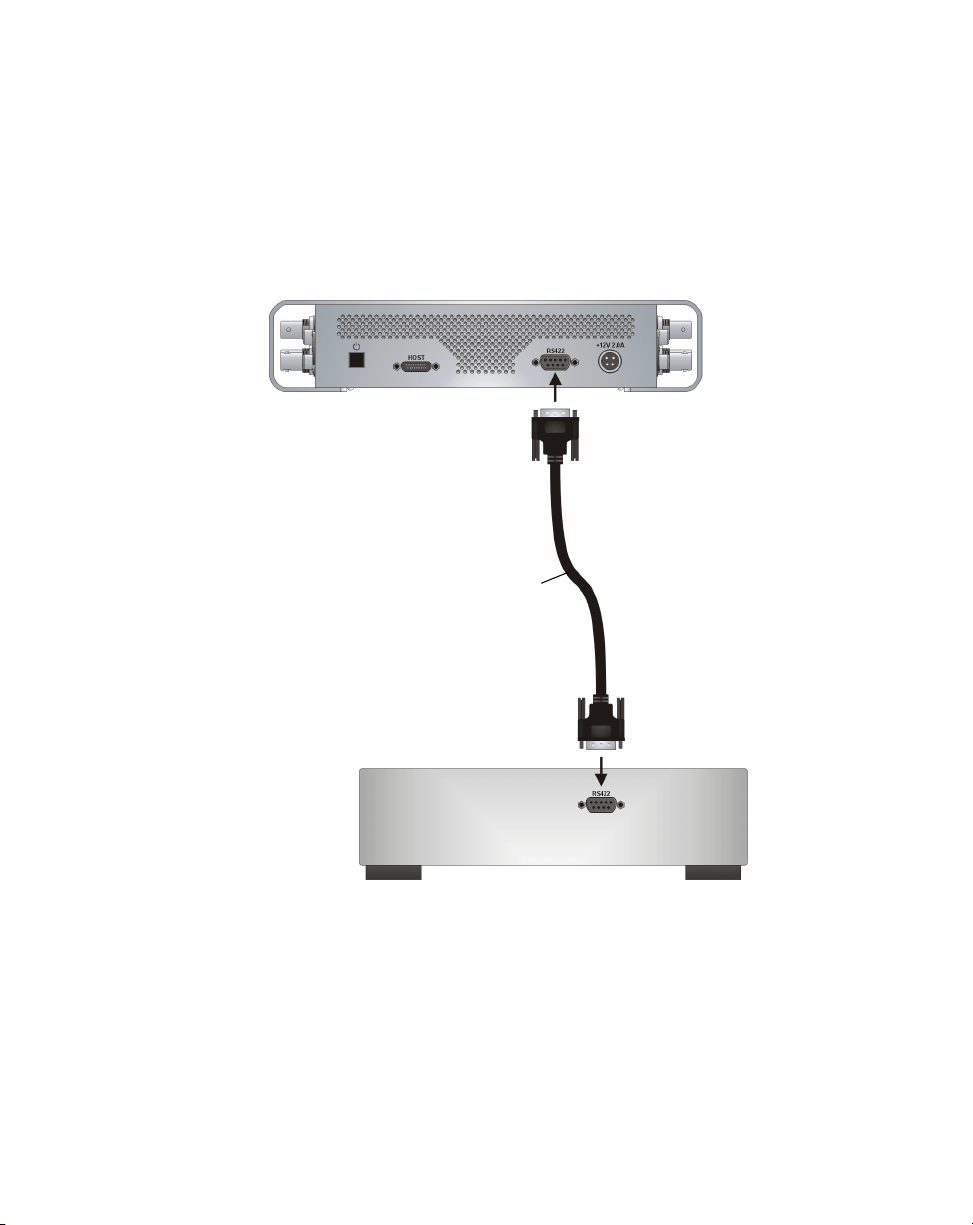
MXO2 RS-422 serial connection
MXO2’s RS-422 serial connector allows an application, such as Final Cut Pro, to
control a device that uses the RS-422 SMPTE time code protocol, such as a VTR
or digital disk recorder, to ensure frame-accurate capture and edit-to-tape. For
details on how to ensure accurate device control with Final Cut Pro, see
“Ensuring frame-accurate capture and edit-to-tape using Final Cut Pro” on
page 75.
RS-422 serial cable
15
MXO2
(side view)
RS-422 device
MXO2 RS-422 serial connection
Page 28

16
Typical Matrox MXO2 connections
In the following typical connection examples, we’ve connected a monitor to view
the signal that will be recorded, and separate source and record decks. You may,
however, use the same deck as both your source and record device by making the
input and output connections to a single deck. For details on the Matrox MXO2
connectors, see Appendix B, “Matrox MXO2 Connectors.”
Analog component video connections
In this illustration, we’re using analog component connectors for video, XLR
connectors for audio, and an HDMI connector for video monitoring. The video is
genlocked using MXO2’s internal genlock.
MXO2 Inputs
Source
(Deck 1)
MXO2 Outputs
HDMI
monitor
Chapter 3, Connecting External Devices to Matrox MXO2
Recorder
(Deck 2)
Page 29
Digital video connections
In this illustration, we’re using SDI connectors for video and audio, an SDI
connector for video monitoring, and we’re monitoring the audio on a surround
sound speaker system through RCA connectors. The video is genlocked using a
tri-level sync generator.
17
Tri-leve l
sync
generator
Source
(Deck 1)
MXO2 Inputs
MXO2 Outputs
Recorder (Deck 2)Video monitor Surround sound
speaker system
Typical Matrox MXO2 connections
Page 30

18
Your notes
Chapter 3, Connecting External Devices to Matrox MXO2
Page 31

4
Connecting External Devices to
Matrox MXO2 Rack
This chapter shows how to
rack mount, supply power, and
connect external devices to
Matrox MXO2 Rack.
Page 32

20
¦NoteThis chapter details how to connect external devices to Matrox MXO2
Rack only. For another MXO2 product, see Chapter 3, “Connecting External
Devices to Matrox MXO2”, Chapter 5, “Connecting External Devices to Matrox
MXO2 LE”, or Chapter 6, “Connecting External Devices to Matrox MXO2
Mini.”
Available MXO2 Rack connections
Matrox MXO2 Rack features a full compliment of professional inputs and
outputs, and allows you to connect multiple devices for up to five user-selectable
simultaneous video outputs.
MXO2 Rack video connections
• One HD HDMI input and one HD/SD HDMI output, both with up to eight
channels of embedded audio support. The HDMI input/output supports YUV
and RGB devices.
• One HD/SD SDI input and two HD/SDI outputs with up to eight channels of
embedded audio. Both SDI outputs simultaneously output the same video
and embedded audio.
• One HD/SD analog component input/output, one S-Video input/output, and
one composite input/output.
• One analog black burst reference input and loop-through output.
MXO2 Rack audio connections
• Four balanced analog XLR inputs (two stereo pairs).
• Eight balanced analog XLR outputs (four stereo pairs).
• Two AES/EBU stereo inputs/outputs.
Rack mounting your MXO2 Rack
Use the supplied rackmount brackets to mount your Matrox MXO2 Rack to a
standard 19-inch rack. The rackmount brackets can be used to either front or rear
mount your MXO2 Rack. You can also mount MXO2 Rack so that it’s recessed
to allow more space for cables. MXO2 Rack takes up two vertical rack unit
spaces.
1 Unpack the two rackmount brackets and their eight mounting screws.
²Caution Use only the screws supplied with your MXO2 Rack to attach the
rackmount brackets to your MXO2 Rack. If you use screws that are larger or
longer than the ones supplied, you can damage your equipment.
2 Depending if you want to front or rear mount your MXO2 Rack, position the
rackmount brackets so that the bracket face is either towards the front
(connector side) or the back of your MXO2 Rack.
Chapter 4, Connecting External Devices to Matrox MXO2 Rack
Page 33

3 MXO2 Rack can be recess mounted to allow extra space for connectors and
cables. Depending on your mounting needs, align the screw holes on each
rackmount bracket with the desired screw holes on either side of the MXO2
Rack.
Front rackmounting
Rackmount
bracket
MXO2 Rack
Rear rackmounting
21
Recessed rackmounting
²Caution For stability and safety, whichever mounting method you choose,
make sure to fasten each rackmount bracket to MXO2 Rack using all four
supplied screws.
4 Using a hand screwdriver only (no power screwdrivers), carefully tighten
each screw until snug. Do not overtighten!
5 Fasten your MXO2 Rack to the standard 19-inch rack as per your rack’s
instructions.
Rack mounting your MXO2 Rack
Page 34

22
Powering MXO2 Rack
You can power MXO2 Rack using an AC outlet and an IEC-C13 power cord.
MXO2 power functionality
When power is supplied to MXO2 Rack and it is connected to your Mac system,
the MXO2 Rack will turn on or off automatically when you start up or shut down
your Mac system. That is, when you shut down your Mac system, your MXO2
Rack turns off. Starting up your Mac system turns your MXO2 Rack on.
¡ImportantWhen MXO2 Rack is connected to a Mac system that is running,
do not disconnect MXO2 Rack from its power source. Shut down your Mac
system before removing power from MXO2 Rack.
MXO2 Rack
IEC-C13
power cord
To A C
outlet
Chapter 4, Connecting External Devices to Matrox MXO2 Rack
Page 35

Connecting MXO2 Rack to your Mac system
Connect MXO2 Rack to your Mac Pro or MacBook Pro using the Matrox PCIe
cable. For MXO2 Rack to be detected on a Mac Pro system, power must be
supplied to MXO2 Rack (see “Powering MXO2 Rack” on page 22), and it must
be connected to your Mac Pro before starting up your computer.
¡ Important Do not disconnect the Matrox PCIe cable from the adapter, or
MXO2 Rack, when your Mac system is running. To safely remove the Matrox
PCIe host Expresscard/34 adapter, see “Removing your PCIe host
ExpressCard/34 adapter” on page 8.
MXO2 Rack
²Caution Ensure proper orientation
when connecting the PCIe cable to avoid
damaging the cable or host connector.
PCIe cable
23
A
Matrox PCIe
host adapter
Matrox PCIe host
ExpressCard/34
adapter
OR
To your MacBook Pro’s
ExpressCard/34 slot (see “Installing
your PCIe host ExpressCard/34
adapter (for laptops)” on page 7).
A
Connecting MXO2 Rack to your Mac system
Page 36

24
MXO2 Rack RS-422 serial connection
The Matrox MXO2 Rack RS-422 serial connector allows an application, such as
Final Cut Pro, to control a device that uses the RS-422 SMPTE time code
protocol, such as a VTR or digital disk recorder, to ensure frame-accurate capture
and edit-to-tape. For details on how to ensure accurate device control with Final
Cut Pro, see “Ensuring frame-accurate capture and edit-to-tape using Final Cut
Pro” on page 75.
RS-422 device
RS-422 serial cable
MXO2 Rack
(partial view)
Chapter 4, Connecting External Devices to Matrox MXO2 Rack
Page 37

Typical Matrox MXO2 Rack connections
In the following typical connection examples, we’ve connected a monitor to view
the signal that will be recorded, and separate source and record decks. You may,
however, use the same deck as both your source and record device by making the
input and output connections to a single deck. For details on the Matrox MXO2
Rack connectors, see Appendix B, “Matrox MXO2 Connectors.”
Analog component video connections
In this illustration, we’re using analog component connectors for video, XLR
connectors for audio, and an HDMI connector for video monitoring. The video is
genlocked using MXO2’s internal genlock.
Recorder (Deck 2)
25
HDMI
monitor
MXO2 Rack (partial view)
MXO2 Rack (partial view)
Source
(Deck 1)
Typical Matrox MXO2 Rack connections
Page 38

26
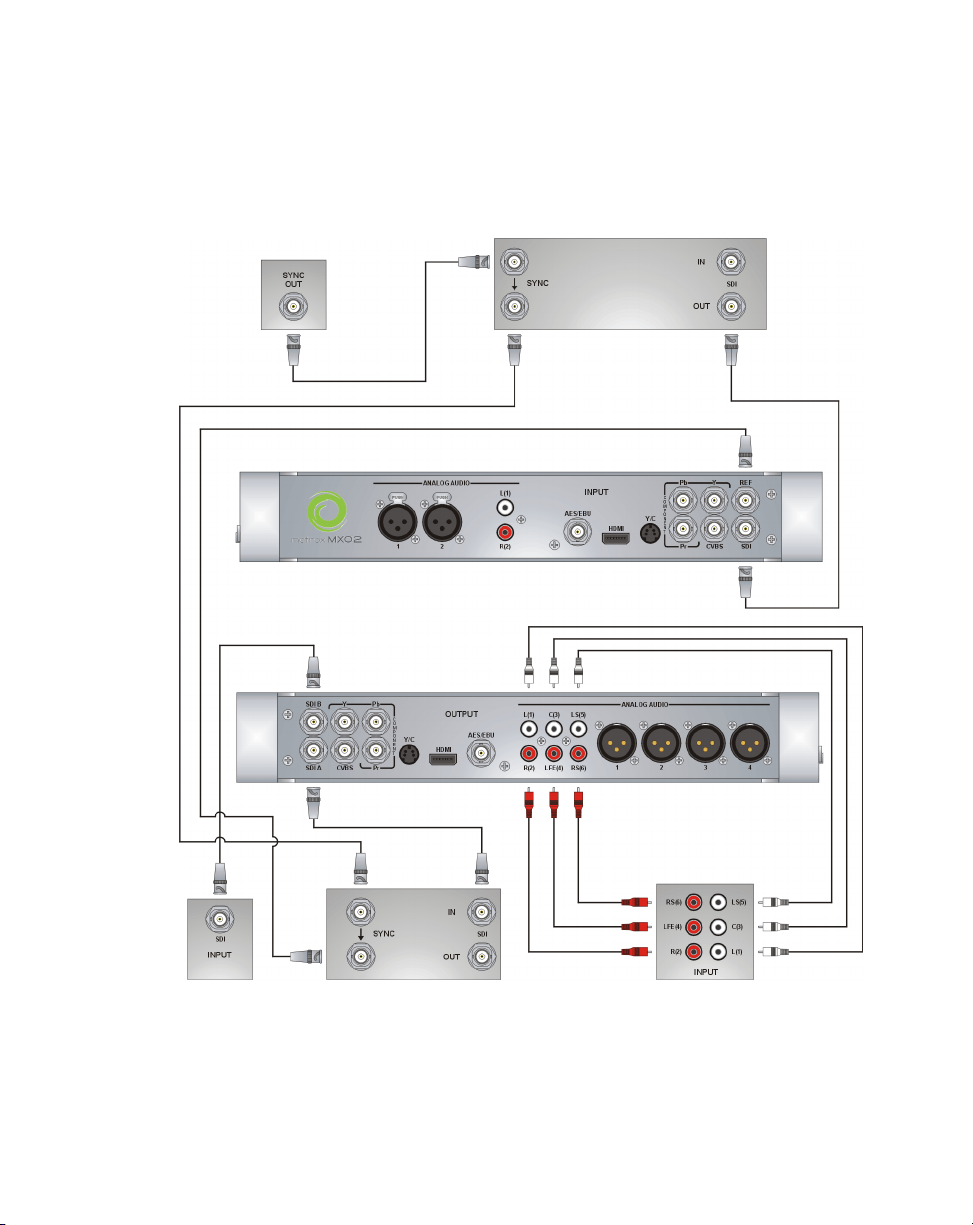
Digital video connections
In this illustration, we’re using SDI connectors for video and audio, an SDI
connector for video monitoring, and we’re monitoring the audio on a surround
sound speaker system through XLR connectors. The video is genlocked using a
tri-level sync generator.
Surround sound
speaker system
MXO2 Rack (partial view)
MXO2 Rack (partial view)
Tri-level
sync
generator
Recorder
(Deck 2)
To another device’s
reference input. If not used,
terminate the signal with a
BNC 75-ohm terminator.
Source
(Deck 1)
Video
monitor
Chapter 4, Connecting External Devices to Matrox MXO2 Rack
Page 39

5
Connecting External Devices to
Matrox MXO2 LE
This chapter shows how to
supply power and connect
external devices to Matrox
MXO2 LE.
Page 40

28
¦NoteThis chapter details how to connect external devices to Matrox
MXO2 LE only. For another MXO2 product, see Chapter 3, “Connecting
External Devices to Matrox MXO2”, Chapter 4, “Connecting External Devices to
Matrox MXO2 Rack”, or Chapter 6, “Connecting External Devices to Matrox
MXO2 Mini.”
Available MXO2 LE connections
Matrox MXO2 LE features a full compliment of professional inputs and output,
and allows you to connect multiple devices for up to five user-selectable
simultaneous video outputs.
MXO2 LE video connections
• One HD HDMI input and one HD/SD HDMI output, both with up to eight
channels of embedded audio support. The HDMI input/output supports YUV
and RGB devices.
• One HD/SD SDI input and two HD/SDI outputs with up to eight channels of
embedded audio. Both SDI outputs simultaneously output the same video
and embedded audio.
• One HD/SD analog component input/output, one S-Video input/output, and
one composite input/output.
• Analog black burst reference input.
MXO2 LE audio connections
• Two balanced analog XLR inputs/ouputs (stereo pair).
• Two unbalanced analog RCA inputs/ouputs (stereo pair).
Powering MXO2 LE
Supply power to MXO2 LE using an AC outlet via the Matrox external power
supply and a power cord, or using a battery. Matrox MXO2 LE connects to the
battery via a 4-pin XLR connector. For information on how to connect your
battery to portable video equipment, such as Matrox MXO2 LE, contact the
battery manufacturer. Before connecting MXO2 LE to a battery, please read the
“Battery requirements and guidelines for MXO2” on page 3.
MXO2 LE power functionality
MXO2 LE features a power button that you can use to manually turn the
MXO2 LE on and off. However, when power is supplied to MXO2 LE and it is
connected to your Mac system, the MXO2 LE will turn on or off automatically
when you start up or shut down your Mac system. That is, when you shut down
your Mac system, your MXO2 LE turns off. Starting up your Mac system turns
your MXO2 LE on. To manually turn your MXO2 LE on, press the power button.
Chapter 5, Connecting External Devices to Matrox MXO2 LE
Page 41

To turn off your MXO2 LE, press and hold the power button for at least two
seconds.
¡ Important When MXO2 LE is connected to a Mac system that is running, do
not disconnect MXO2 LE from its power source, or power off MXO2 LE. Shut
down your Mac system before removing power from MXO2 LE. If using a
battery to power MXO2 LE, ensure that the battery is sufficiently charged.
MXO2 LE
(side view)
29
External
power supply
Power button
Power cord
OR
Female 4-pin
XLR cable
Battery on a
universal battery
adapter
To A C
outlet
Powering MXO2 LE
Page 42

30
Connecting MXO2 LE to your Mac system
Connect MXO2 LE to your Mac Pro or MacBook Pro using the Matrox PCIe
cable. For MXO2 LE to be detected on a Mac Pro system, power must be
supplied to MXO2 LE (see “Powering MXO2 LE” on page 28), and it must be
connected to your Mac Pro before starting up your computer.
¡ Important Do not disconnect the Matrox PCIe cable from the adapter, or
MXO2 LE, when your Mac system is running. To safely remove the Matrox PCIe
host Expresscard/34 adapter, see “Removing your PCIe host ExpressCard/34
adapter” on page 8.
MXO2 LE
(side view)
A
PCIe cable
Matrox PCIe
host adapter
²Caution Ensure proper orientation
when connecting the PCIe cable to avoid
damaging the cable or host connector.
Matrox PCIe host
ExpressCard/34
adapter
OR
To your MacBook Pro’s
ExpressCard/34 slot (see “Installing
your PCIe host ExpressCard/34
adapter (for laptops)” on page 7).
A
Chapter 5, Connecting External Devices to Matrox MXO2 LE
Page 43

MXO2 LE RS-422 serial connection
MXO2 LE’s RS-422 serial connector allows an application, such as Final Cut
Pro, to control a device that uses the RS-422 SMPTE time code protocol, such as
a VTR or digital disk recorder, to ensure frame-accurate capture and edit-to-tape.
For details on how to ensure accurate device control with Final Cut Pro, see
“Ensuring frame-accurate capture and edit-to-tape using Final Cut Pro” on
page 75.
RS-422 serial cable
31
MXO2 LE
(side view)
RS-422 device
MXO2 LE RS-422 serial connection
Page 44

32
Typical Matrox MXO2 LE connections
In the following typical connection examples, we’ve connected a monitor to view
the signal that will be recorded, and separate source and record decks. You may,
however, use the same deck as both your source and record device by making the
input and output connections to a single deck. For details on the Matrox
MXO2 LE connectors, see Appendix B, “Matrox MXO2 Connectors.”
Analog component video connections
In this illustration, we’re using analog component connectors for video, XLR
connectors for audio, and an HDMI connector for video monitoring. The video is
genlocked using MXO2 LE’s internal genlock.
MXO2 LE Inputs
Source
(Deck 1)
MXO2 LE Outputs
HDMI
monitor
Chapter 5, Connecting External Devices to Matrox MXO2 LE
Recorder
(Deck 2)
Page 45

Digital video connections
In this illustration, we’re using SDI connectors for video and audio, an SDI
connector for video monitoring, and we’re monitoring the audio on a surround
sound speaker system through an HDMI connector. The video is genlocked using
a tri-level sync generator.
33
Tri-le ve l
sync
generator
Source
(Deck 1)
MXO2 LE Inputs
MXO2 LE Outputs
Recorder (Deck 2)Video monitor Surround sound
speaker system
Typical Matrox MXO2 LE connections
Page 46

34
Your notes
Chapter 5, Connecting External Devices to Matrox MXO2 LE
Page 47

6
Connecting External Devices to
Matrox MXO2 Mini
This chapter shows how to
supply power and connect
external devices to Matrox
MXO2 Mini.
Page 48

36
¦NoteThis chapter details how to connect external devices to Matrox MXO2
Mini only. For another MXO2 product, see Chapter 3, “Connecting External
Devices to Matrox MXO2”, Chapter 4, “Connecting External Devices to Matrox
MXO2 Rack”, or Chapter 5, “Connecting External Devices to Matrox MXO2
LE.”
Available MXO2 Mini connections
Matrox MXO2 Mini provides inputs and outputs for connecting external devices,
including HDMI, analog component, S-Video, and composite video devices.
MXO2 video and audio connections
• One HD HDMI input and one HD/SD HDMI output, both with up to eight
channels of embedded audio support. The HDMI input/output supports YUV
and RGB devices.
• One HD/SD analog component input/output, or one S-Video input/output
and one composite input/output.
¦NoteS-Video input/output is available by using the provided S-Video
adapters (see “Connecting S-Video devices to MXO2 Mini” on page 39).
• Two unbalanced analog RCA audio inputs/outputs (stereo pair).
Powering MXO2 Mini
You can supply power to MXO2 Mini using an AC outlet via the Matrox external
power supply cable. To turn MXO2 Mini off, unplug the Matrox external power
supply cable from the AC outlet while your computer is shut down.
¡ Important When MXO2 Mini is connected to a computer that is running, do
not disconnect MXO2 Mini from its power source. Shut down your computer
before removing power from MXO2 Mini.
MXO2 Mini power supply and adapter plugs
MXO2 Mini provides an external power supply cable with international adapter
plugs for use in different regions:
• To remove an adapter plug from the Matrox power adapter, hold down the
button labeled PUSH on the power adapter, and then slide the adapter plug
up until it releases from the power adapter.
• To insert an adapter plug into the Matrox power adapter, ensure that the
adapter plug is properly aligned with the corresponding slot on the power
adapter, and then slide the adapter plug down into the power adapter until it
locks into place.
Chapter 6, Connecting External Devices to Matrox MXO2 Mini
Page 49

37
1
Adapter
plug
Power
adapter
0
Removing an adapter plug Inserting an adapter plug
MXO2 Mini
To A C
outlet
Power supply
cable
Powering MXO2 Mini
Page 50

38
Connecting MXO2 Mini to your computer
Connect MXO2 Mini to your Mac Pro or MacBook Pro using the Matrox PCIe
cable. For MXO2 Mini to be detected on your Mac Pro, power must be supplied
to MXO2 Mini (see “Powering MXO2 Mini” on page 36), and it must be
connected to your computer before starting up your system.
¡ Important Do not disconnect the Matrox PCIe cable from the adapter, or
MXO2 Mini, when your Mac system is running. To safely remove the Matrox
PCIe host Expresscard/34 adapter, see “Removing your PCIe host
ExpressCard/34 adapter” on page 8.
²Caution Ensure proper orientation
when connecting the PCIe cable to avoid
damaging the cable or host connector.
MXO2 Mini
PCIe cable
A
Matrox PCIe
host adapter
Matrox PCIe host
ExpressCard/34
adapter
OR
To your MacBook Pro’s
ExpressCard/34 slot (see “Installing
your PCIe host ExpressCard/34
adapter (for laptops)” on page 7).
A
Chapter 6, Connecting External Devices to Matrox MXO2 Mini
Page 51

Connecting S-Video devices to MXO2 Mini
To support S-Video connections on MXO2 Mini, your MXO2 Mini kit includes
two S-Video adapter cables (one for S-Video input and one for S-Video output).
¦NoteWhen you connect an S-Video device to MXO2 Mini, you won’t be able
to connect an analog component device at the same time.
To S-Video OUT connector
on source device
S-Video adapter
cable
39
MXO2 Mini
To S-Video IN connector on
output device
Connecting S-Video devices to MXO2 Mini
Page 52

40
Typical Matrox MXO2 Mini connections
In the following typical connection examples, we’ve connected a monitor to view
the signal that will be recorded, and separate source and record decks. You may,
however, use the same deck as both your source and record device by making the
input and output connections to a single deck. For details on the Matrox MXO2
Mini connectors, see Appendix B, “Matrox MXO2 Connectors.”
Analog component video connections
In this illustration, we’re using component connectors for video, RCA connectors
for audio, and an HDMI connector for video monitoring. The video is genlocked
to the input source using MXO2 Mini’s built-in genlock.
Source
(Deck 1)
MXO2 Mini
HDMI
monitor
Chapter 6, Connecting External Devices to Matrox MXO2 Mini
Recorder
(Deck 2)
Page 53

HDMI video connections
In this illustration, we’re using HDMI for video, RCA connectors for audio, and
S-Video for video monitoring. The video is genlocked to the input source using
MXO2 Mini’s built-in genlock.
¦NoteWhen using HDMI connections, the embedded uncompressed HDMI
audio is also available.
Source
(Deck 1)
41
S-Video
monitor
MXO2 Mini
Recorder
(Deck 2)
Typical Matrox MXO2 Mini connections
Page 54

42
Your notes
Chapter 6, Connecting External Devices to Matrox MXO2 Mini
Page 55

7
Configuring Your MXO2 System
This chapter explains how to
configure your MXO2 settings.
Page 56

44
Defining your MXO2 settings
This section describes the settings in the MXO2 preferences window for all
MXO2 products. The MXO2 preferences window allows you to specify various
settings for working with MXO2. You can also view information about your
MXO2, such as the serial number and software version.
Depending on your MXO2 hardware, some of the options described in this
chapter may not be available, and your Matrox MXO2 preferences window may
not appear exactly as shown.
Remarks
• Before defining your settings, make sure that you’ve installed your MXO2
hardware, powered your MXO2, and connected your MXO2 to your Mac
system.
• If you have an MXO2 product with Matrox MAX technology, the MXO2
inputs and outputs will not be available when creating H.264 files using the
Matrox MAX H.264 codec. This limitation, however, does not apply if your
system includes a Matrox CompressHD card. In this case, the Matrox MAX
H.264 codec on your CompressHD card will always be used for the
encoding, and your MXO2 inputs and outputs will be available when
creating H.264 files. For details on using the Matrox MAX H.264 codec, see
Chapter 10, “Using the Matrox MAX H.264 Codec.”
Chapter 7, Configuring Your MXO2 System
Page 57

Specifying your general settings
You can specify general settings for working with Matrox MXO2. These settings
are applied to the MXO2 video inputs and outputs.
1 From the Apple menu, click System Preferences, and then click the
Matrox MXO2 or Matrox MXO2 Mini icon.
2 Click General.
45
3 Under Luminance Levels, select Allow super white to allow the highest
luminance level of your video to exceed the standard maximum white level.
Select
Allow super black to allow the lowest luminance level of your video
to fall below the standard black level.
¦NoteSuper white and super black should not be allowed when producing
your final video production for broadcast.
4 Under Setup Level, select the pedestal setting that you want for your NTSC
analog video from the
$ 7.5 IRE Applies the standard NTSC pedestal of 7.5 IRE.
$ 0 IRE Applies a pedestal of 0 IRE. You should select this option when
Analog NTSC pedestal menu:
working with a commercial DV device that uses the Japanese analog
NTSC pedestal of 0 IRE. For example, if the video appears too bright
when you play back DV clips on your NTSC monitor, you can change the
pedestal to 0 IRE to output your DV clips at the correct brightness.
¦NoteIf your device has a different NTSC pedestal for input and output, you
can switch the pedestal setting as needed before capturing or recording to tape.
Defining your MXO2 settings
Page 58

46
Specifying your genlock settings
¦NoteThis section does not apply to Matrox MXO2 Mini.
You can select the source to which you want to genlock all devices connected to
your MXO2 system, as well as adjust the timing offset for all MXO2 video
outputs.
1 From the Apple menu, click System Preferences, and then click the
Matrox MXO2 icon.
2 Click Genlock.
3 Select Use external genlock source (REF) if you connected an external
analog genlock source to MXO2’s REF/REF IN connector, such as a
bi-level analog black burst for SD or a tri-level sync for HD. If you don’t
have an external genlock source connected to MXO2, clear this option to
genlock to MXO2’s internal reference signal during playback, and genlock
to your capture source during capture (see “Specifying your A/V input
settings” on page 47).
Remarks
$ When capturing RGB material from a DVI source using MXO2’s HDMI
input, you must use an external genlock source.
$ When capturing video with digital closed captioning (see “Matrox
4VANC closed caption capture and playback” on page 58), you must
genlock to your capture source and not an external genlock source. Clear
this option to genlock to your capture source.
Chapter 7, Configuring Your MXO2 System
Page 59

To indicate whether or not MXO2 is presently locked to your external
genlock source, the status will be displayed next to the
menu as
4 From the Genlock format menu, select the video format of your external
Locked or Not locked.
Genlock format
genlock source.
¡ Important To ensure good output results, make sure that your genlock
source’s video format is compatible with the MXO2 video output format.
5 Use the horizontal and vertical settings under Video Output Timing Offset
to adjust the timing of the video output relative to your external genlock
source. This lets you compensate for cable delays within your system.
Specifying your A/V input settings
This section specifies the A/V input settings for Matrox MXO2, MXO2 Rack,
and MXO2 LE. For MXO2 Mini, see “Specifying your A/V input settings
(MXO2 Mini)” on page 50.
You can select the MXO2 video and audio inputs to be used as your capture
source. Only one video and audio input source can be used at a time. You can
also capture your video to a different format than your source video by enabling
scaling on the input. For descriptions of the MXO2 inputs, see “Inputs” on
page 102. For a list of the input and capture formats that are supported on MXO2,
and to view the MXO2 input scaling options, see Appendix C, “Matrox MXO2
Supported Input and Capture Formats.”
47
¦NoteThe HDMI video input does not support SD video for capture. When
capturing RGB material from a DVI source using MXO2’s HDMI input, you
must use an external genlock source (see “Specifying your genlock settings” on
page 46).
1 From the Apple menu, click System Preferences, and then click the
Matrox MXO2 icon.
Defining your MXO2 settings
Page 60

48
2 Click A/V Input.
3 Under Input Source, select the type of input that you want to capture for
Video and Audio.
Remarks
$ The SDI embedded audio option can be used only with the SDI video
input option.
$ When capturing from an HDMI source, only uncompressed embedded
audio is supported.
4 If the format to which you want to capture does not match the format of your
source video, select
Scale input for capture, and then specify your source
video’s format (see step 5). MXO2 will either upscale, downscale, or
cross-convert to the desired capture format. For example, select
for capture
if your source video is 720p at 59.94 fps and you want to
Scale input
capture to 1080i at 59.94 fps. For a list of the input and capture formats that
are supported on MXO2, and to view the MXO2 input scaling options, see
Appendix C, “Matrox MXO2 Supported Input and Capture Formats.”
¦NoteIf Scale input for capture is not selected, your capture format must
match your source video’s format. However, if you want to capture 720p at
23.98 fps video from a 720p at 59.94 fps source (MXO2 input), scaling on the
input is not required, but you must specify a frame offset value (see step 7).
5 If you selected Scale input for capture in step 4, select the format of your
source video (MXO2 input) from the
Source format list:
Chapter 7, Configuring Your MXO2 System
Page 61

¦NoteDepending on the input type selected in step 3, some options may not
be available.
$ SD 4:3 Select this option for standard 4:3 NTSC or PAL video. When
upscaling to HD, the video is captured in pillarbox format.
$ SD 16:9 Select this option for widescreen 16:9 NTSC or PAL video.
When upscaling to HD, the video is captured in anamorphic format.
$ 720p Select this option for 720p video.
$ 1080 Select this option for 1080i or 1080PsF video.
6 From the HD to SD aspect ratio menu, select the aspect ratio conversion
option to be used when capturing to SD from an HD video source:
$ Letterbox Captures the widescreen 16:9 picture as letterbox video by
adding black bars at the top and bottom of the picture for display on a
standard 4:3 television screen.
$ Center cut Captures the widescreen 16:9 picture for display on a
standard 4:3 television screen by evenly cropping the left and right edges
of the picture.
$ Anamorphic Captures the widescreen 16:9 picture as horizontally
compressed 4:3 video, which retains the picture’s full vertical resolution
for display on a widescreen television. To display the video with the
correct proportions on an NTSC or PAL monitor, select the 16:9 display
setting on the monitor.
7 If you’re capturing 720p at 23.98 fps video from a 720p at 59.94 fps source
that was originally acquired using a standard 2:3:2:3 pulldown, MXO2
performs a reverse 2:3:2:3 pulldown to reconstruct the original 23.98 fps
video. For MXO2 to do so, you must specify where your capture In point is
relative to the start of the pulldown sequence using the
offset
slider.
720p 59.94 to 23.98
¡ Important If capturing 720p at 23.98 VariCam material, you don’t need to
specify your capture In point. However, you must select the
Var i Ca m ca p tu r e
option as explained in step 8.
Enable
In the following example, the capture In point is at the fourth frame of the
sequence, therefore the frame offset value is 3.
¦NoteIf you’re performing an open-ended capture without a specified In
point, you may need to try different offset values before getting the desired
result.
720p at 59.94 fps video frames (2:3:2:3 pulldown)
49
Offset:
0123456789
Capture In point
Defining your MXO2 settings
Page 62

50
8 If using MXO2’s SDI input to capture Panasonic VariCam 720p at 23.98
material, that is output at 720p at 59.94 by your VariCam device, select
Enable VariCam capture. MXO2 will remove the redundant (filler) frames
from the VariCam input during capture and reconstruct the original 720p at
23.98 video.
¦NoteTo capture VariCam material, you must select SDI as your video input
source (see “Specifying your A/V input settings” on page 47).
Specifying your A/V input settings (MXO2 Mini)
This section specifies the A/V input settings for Matrox MXO2 Mini. For
MXO2, MXO2 Rack, or MXO2 LE, see “Specifying your video output settings”
on page 52.
You can select the MXO2 Mini video and audio inputs to be used as your capture
source. Only one video and audio input source can be used at a time. You can
also capture your video to a different format than your source video by enabling
scaling on the input. For descriptions of the MXO2 Mini inputs, see “Inputs” on
page 102. For a list of the input and capture formats that are supported on MXO2
Mini, and to view the MXO2 Mini input scaling options, see Appendix C,
“Matrox MXO2 Supported Input and Capture Formats.”
¦NoteThe HDMI video input does not support SD video for capture.
1 From the Apple menu, click System Preferences, and then click the
Matrox MXO2 Mini icon.
2 Click A/V Input.
Chapter 7, Configuring Your MXO2 System
Page 63

3 Under Input Source, select the type of input that you want to capture for
Video and Audio.
4 If the format to which you want to capture does not match the format of your
source video, select
Scale input for capture, and then specify your source
video’s format (see step 5). MXO2 Mini will either upscale, downscale, or
cross-convert to the desired capture format. For example, select
for capture
if your source video is 720p at 59.94 fps and you want to
Scale input
capture to 1080i at 59.94 fps. For a list of the input and capture formats that
are supported on MXO2 Mini, and to view the MXO2 Mini input scaling
options, see Appendix C, “Matrox MXO2 Supported Input and Capture
Formats.”
¦NoteIf Scale input for capture is not selected, your capture format must
match your source video’s format.
5 If you selected Scale input for capture in step 4, select the format of your
source video (MXO2 input) from the
Source format list:
¦NoteDepending on the input type selected in step 3, some options may not
be available.
$ SD 4:3 Select this option for standard 4:3 NTSC or PAL video. When
upscaling to HD, the video is captured in pillarbox format.
$ SD 16:9 Select this option for widescreen 16:9 NTSC or PAL video.
When upscaling to HD, the video is captured in anamorphic format.
$ 720p Select this option for 720p video.
$ 1080 Select this option for 1080i or 1080PsF video.
6 From the HD to SD aspect ratio menu, select the aspect ratio conversion
option to be used when capturing to SD from an HD video source:
$ Letterbox Captures the widescreen 16:9 picture as letterbox video by
adding black bars at the top and bottom of the picture for display on a
standard 4:3 television screen.
$ Center cut Captures the widescreen 16:9 picture for display on a
standard 4:3 television screen by evenly cropping the left and right edges
of the picture.
$ Anamorphic Captures the widescreen 16:9 picture as horizontally
compressed 4:3 video, which retains the picture’s full vertical resolution
for display on a widescreen television. To display the video with the
correct proportions on an NTSC or PAL monitor, select the 16:9 display
setting on the monitor.
51
Defining your MXO2 settings
Page 64

52
Specifying your video output settings
This section specifies the video output settings for Matrox MXO2, MXO2 Rack,
and MXO2 LE. For MXO2 Mini, see “Specifying your video output settings
(MXO2 Mini)” on page 54.
MXO2 features simultaneous video outputs that allow you to send your video to
a variety of devices at the same time. MXO2 provides two separate video output
channels to choose from: main channel and SD channel. The video output
settings allow you to set the main channel’s video format, assign a video channel
to an MXO2 output, and define the channel’s behavior. You can also select other
settings such as the scrub and pause method, and calibrate your HDMI monitor
for video.
For a list of the supported video output formats for the MXO2 main and SD
channels, and the supported video formats for the MXO2 outputs, see Appendix
D, “Matrox MXO2 Supported Output Formats.”
1 From the Apple menu, click System Preferences, and then click the
Matrox MXO2 icon.
2 Click Video Output.
3 From the Set main channel format to menu, you can select the video
output format that you want for the MXO2 main channel. For a list of the
supported video output formats for the MXO2 main and SD channels, see
“Supported Main and SD video output formats” on page 124.
$ Follow application Sets the main channel’s video output to match your
project’s video output format, or to a compatible format for your project.
Chapter 7, Configuring Your MXO2 System
Page 65

For example, if your project’s video output is NTSC, the MXO2 main
channel will be set to NTSC as well. If your project’s video output is 720p
at 23.98 fps, the MXO2 main channel will be set to the compatible 720p at
59.94 fps output format.
$ SD Sets the main channel’s video output to SD. This will be either
NTSC or PAL, depending on your project’s video output frame rate. For
example, a 720p at 23.98 fps project will be output as NTSC, and a 720p
at 25 fps project will be output as PAL.
$ 720p Sets the main channel’s video output to 720p at a frame rate
compatible with your project’s video output frame rate.
$ 1080 Sets the main channel’s video output to a 1080i or 1080PsF
format, depending on your project’s video output format.
$ 1080i 59.94 from 23.98 Use this option when your project’s video
output has a frame rate of 23.98 fps, and you want to set the main
channel’s video output to 1080i at 59.94 fps (a pulldown will be applied to
the video output).
¦NoteWhen a pulldown is required to convert 23.98 fps video for output,
you can select the pulldown method that you want to use (see step 5).
4 Under Channel Selection, select the video channel (main or SD) that you
want for your MXO2 analog (composite, S-Video, and component) and SDI
outputs:
$ Main channel Outputs your project’s video as defined for the main
channel (see step 3).
$ SD channel Outputs your project’s video as NTSC or PAL, depending
on your project’s video output frame rate.
Remarks
$ The HDMI output always outputs the main channel. To output SD on the
HDMI output, you must define the main channel in step 3 as
$ The SD channel is not available when outputting 1080PsF at 23.98 fps on
SD.
the main channel (see “Supported Main and SD video output formats” on
page 124).
5 Under Channel Behavior, select the Pulldown method that you want to
be applied to the video output when required to convert 23.98 fps video. For
information on the available pulldown methods, see Appendix A,
“Understanding Pulldown.”
6 Under Channel Behavior, select the 16:9 to SD aspect ratio conversion
option to be used when downconverting 16:9 material to SD, or when
outputting SD 16:9 material:
53
Defining your MXO2 settings
Page 66

54
$ Letterbox Outputs the widescreen 16:9 picture in letterbox mode by
adding black bars at the top and bottom of the picture for display on a
standard 4:3 television screen.
$ Center cut Outputs the widescreen 16:9 picture by evenly cropping the
left and right edges of the picture for display on a standard 4:3 television
screen.
$ Anamorphic Outputs the widescreen 16:9 picture as horizontally
compressed 4:3 video, which retains the picture’s full vertical resolution
for display on a widescreen television. To display the video with the
correct proportions on an NTSC or PAL monitor, select the 16:9 display
setting on the monitor.
7 Under Miscellaneous, select First field, Second field, or Both fields
from the
Scrub and pause menu to indicate whether you want to display
both fields or only one field when pausing video playback or scrubbing the
timeline in your project. For example, you may want to scrub the first or
second field to eliminate the flickering that can be seen in your picture when
you pause while scrubbing interlaced video.
8 From the Set HDMI output to menu, select YUV or RGB to set the type of
video that is sent from MXO2’s HDMI output. For example, select
RGB if
your MXO2’s HDMI output is connected to an HDMI device that accepts an
RGB signal.
9 From the Set component output to menu, select YUV or RGB to set the
type of video that is sent from MXO2’s component (Y, Pb, Pr) output. For
example, select
RGB if your MXO2’s component output is connected to a
device that accepts an RGB signal.
10 Click the Calibrate button to display proc amp controls that you can use to
calibrate your HDMI monitor for video (see Chapter 8, “Calibrating Your
HDMI Monitor for Video”).
Specifying your video output settings (MXO2 Mini)
This section specifies the video output settings for Matrox MXO2 Mini. For other
MXO2 products, see “Specifying your video output settings” on page 52.
MXO2 Mini features simultaneous video outputs that allow you to send your
video to a variety of devices at the same time. MXO2 Mini provides two separate
video output channels to choose from: main channel and SD channel. The video
output settings allow you to set the main channel’s video format, assign a video
channel to an MXO2 Mini output, and define the channel’s behavior. You can
also select other settings such as the scrub and pause method, and calibrate your
HDMI monitor for video.
Chapter 7, Configuring Your MXO2 System
Page 67

For a list of the supported video output formats for the MXO2 Mini main and SD
channels, and the supported video formats for the MXO2 Mini outputs, see
Appendix D, “Matrox MXO2 Supported Output Formats.”
1 From the Apple menu, click System Preferences, and then click the
Matrox MXO2 Mini icon.
2 Click Video Output.
55
3 From the Active analog output menu, select the type of connection that
you want to use for MXO2 Mini’s Y, Pb, and Pr output connectors (see
“Outputs” on page 109).
¦NoteWhen you connect an analog component device to MXO2 Mini, you
won’t be able to connect an S-Video or composite device at the same time. If
you’re outputting HD analog component video, the composite and S-Video
outputs will be invalid.
4 From the Set main channel format to menu, you can select the video
output format that you want for the MXO2 Mini main channel. For a list of
the supported video output formats for the MXO2 Mini main and SD
channels, see “Supported Main and SD video output formats (MXO2 Mini)”
on page 126.
$ Follow application Sets the main channel’s video output to match your
project’s video output format, or to a compatible format for your project.
For example, if your project’s video output is NTSC, the MXO2 main
channel will be set to NTSC as well. If your project’s video output is 720p
Defining your MXO2 settings
Page 68

56
at 23.98 fps, the MXO2 main channel will be set to the compatible 720p at
59.94 fps output format.
$ 720p Sets the main channel’s video output to 720p at a frame rate
compatible with your project’s video output frame rate.
$ 1080 Sets the main channel’s video output to a 1080i or 1080PsF
format, depending on your project’s video output format.
5 Under Channel Selection, select the video channel (main or SD) that you
want for your MXO2 Mini analog (composite, S-Video, and component) and
HDMI outputs:
$ Main channel Outputs your project’s video as defined for the main
channel (see step 3).
$ SD channel Outputs your project’s video as NTSC or PAL, depending
on your project’s video output frame rate.
¦NoteOn the HDMI output, NTSC and PAL video is output as 486p and
576p respectively (see Appendix D, “Matrox MXO2 Supported Output
Formats”).
6 Under Channel Behavior, select the Pulldown method that you want to
be applied to the video output when required to convert 23.98 fps video. For
information on the available pulldown methods, see Appendix A,
“Understanding Pulldown.”
7 Under Channel Behavior, select the 16:9 to SD aspect ratio conversion
option to be used when downconverting 16:9 material to SD, or when
outputting SD 16:9 material:
$ Letterbox Outputs the widescreen 16:9 picture in letterbox mode by
adding black bars at the top and bottom of the picture for display on a
standard 4:3 television screen.
$ Center cut Outputs the widescreen 16:9 picture by evenly cropping the
left and right edges of the picture for display on a standard 4:3 television
screen.
$ Anamorphic Outputs the widescreen 16:9 picture as horizontally
compressed 4:3 video, which retains the picture’s full vertical resolution
for display on a widescreen television. To display the video with the
correct proportions on an NTSC or PAL monitor, select the 16:9 display
setting on the monitor.
8 Under Miscellaneous, select First field, Second field, or Both fields
from the
Scrub and pause menu to indicate whether you want to display
both fields or only one field when pausing video playback or scrubbing the
timeline in your project. For example, you may want to scrub the first or
second field to eliminate the flickering that can be seen in your picture when
you pause while scrubbing interlaced video.
Chapter 7, Configuring Your MXO2 System
Page 69

9 From the Set HDMI output to menu, select YUV or RGB to set the type of
video that is sent from MXO2’s HDMI output. For example, select
RGB if
your MXO2’s HDMI output is connected to an HDMI device that accepts an
RGB signal.
10 Click the Calibrate button to display proc amp controls that you can use to
calibrate your HDMI monitor for video (see Chapter 8, “Calibrating Your
HDMI Monitor for Video”).
Specifying your audio output settings
MXO2’s simultaneous audio outputs allow you to send your audio to a variety of
devices at the same time. You can also map any audio track in your application to
any MXO2 audio output. For descriptions of the MXO2 outputs, see “Outputs”
on page 109.
1 From the Apple menu, click System Preferences, and then click the
Matrox MXO2 or Matrox MXO2 Mini icon.
2 Click Audio Output.
57
¦NoteThe available MXO2 audio outputs depend on your MXO2 hardware.
3 Select or clear the Enable audio mapping option. If this option is cleared,
your application’s audio track outputs will be routed to the corresponding
MXO2 audio outputs by default. For example, when you output audio tracks
as Pair 1/2 from your application, the audio will be routed to the
corresponding 1/2 MXO2 audio outputs.
Defining your MXO2 settings
Page 70

58
4 If you selected the Enable audio mapping option, for each of the MXO2
outputs, select the desired audio pair from your application.
Matrox 4VANC closed caption capture and playback
¦NoteMatrox 4VANC closed caption is available on Matrox MXO2, MXO2
Rack, and MXO2 LE only.
If you have an SDI video source that contains digital closed caption data in the
VANC (vertical ancillary data space), MXO2’s Matrox 4VANC technology lets
you capture the closed caption data as an audio track using MXO2’s SDI input,
along with the video. The Matrox 4VANC audio track that contains the closed
caption data can then be used in a video application, such as Final Cut Pro, to
play back closed captioning through an MXO2 SDI or analog output.
The Matrox 4VANC technology preserves the SDI VANC closed caption data
during capture by encoding the data into the audio stream using audio track eight.
The resulting file is an uncompressed 24-bit 48 kHz audio file that contains the
closed caption data. You can also create a Matrox 4VANC closed caption audio
file using supported captioning software, such as CPC MacCaption. You can add
a Matrox 4VANC closed caption audio file to any project timeline in your video
application. The Matrox 4VANC audio file can also be transported and stored on
any video/audio device as an audio track.
When using MXO2’s SDI input for capture, you can choose to use audio track
eight to preserve the closed caption data that is in your source video’s VANC.
Because audio track eight is used for capturing closed captioning, that channel
will not be available for capturing audio.
¦NoteClosed caption data that is present in line 21 of a video’s VBI (vertical
blanking interval) is not transferred to an audio track because it is captured by
MXO2 as part of the video signal.
When using an MXO2 SDI or analog output for playback, you can choose to
retrieve and output the Matrox 4VANC closed caption data from your video
application. The closed caption data is retrieved from audio track eight and
output using an MXO2 SDI or analog output. When Matrox 4VANC technology
is being used, track eight is muted during playback, therefore it will not be
available for playing back audio. For playback, MXO2 lets you choose whether
to embed the closed caption data in your HD/SD video’s VANC, or in Line 21 of
the VBI portion of SD video.
The next section describes how to enable closed captioning during capture and
playback on MXO2.
Chapter 7, Configuring Your MXO2 System
Page 71

Enabling closed caption capture and playback
1 From the Apple menu, click System Preferences, and then click the
Matrox MXO2 icon.
2 Click Captioning.
59
3 Under Matrox 4VANC Capture, select Preserve SDI VANC closed
Captioning using audio track 8
to capture the digital closed caption data
from your source video’s VANC using SDI audio track eight.
¦NoteTo capture digital closed captioning, you must select SDI as your
video input source (see “Specifying your A/V input settings” on page 47 ). You
must also genlock to your capture source and not an external genlock source
(see “Specifying your genlock settings” on page 46).
4 Under Matrox 4VANC Playback, select Retrieve closed captioning
from audio track 8
to retrieve the Matrox 4VANC closed caption data from
track eight in your video application, and play back the video with closed
captioning using an MXO2 SDI or analog output.
Defining your MXO2 settings
Page 72

60
5 If you selected Retrieve closed captioning from audio track 8 in step 4,
specify where you want the closed captioning data to be embedded in the
video signal during playback:
¦NoteSince MXO2 features simultaneous outputs, you can select more than
one option.
$ Embed in SDI VANC (HD/SD) Use this option if you want to play
back HD or SD video from MXO2’s SDI output, and embed the closed
captioning data in your video’s VANC.
$ Embed in SDI Line 21 (SD) Use this option if you want to play back
SD video from MXO2’s SDI output, and embed the closed captioning
data on Line 21 of the VBI (vertical blanking interval) portion of your
video signal.
$ Embed in analog Line 21 (SD) Use this option if you want to play
back SD video from any of MXO2’s analog outputs (component, S-Video,
and composite), and embed the closed captioning data on Line 21 of the
VBI (vertical blanking interval) portion of your video signal.
Remarks
• To preview HD video with closed captioning on an SD monitor, you must set
the output that is connected to your monitor to SD (see “Specifying your
video output settings” on page 52), and select either
or Embed in analog Line 21 (SD).
(SD)
Embed in SDI Line 21
• For information on how to set your Final Cut Pro settings to capture and play
back Matrox 4VANC closed captioning, see “Specifying settings for
capturing and playing back closed captioning in Final Cut Pro” on page 73.
Chapter 7, Configuring Your MXO2 System
Page 73

Viewing MXO2 information
To view your MXO2’s serial number, firmware version, and software version:
1 From the Apple menu, click System Preferences, and then click the
Matrox MXO2 or Matrox MXO2 Mini icon.
2 Click Info.
61
¦NoteIf a message appears indicating an unsupported firmware version on your
MXO2 hardware, you must update the MXO2 firmware as explained in
“Updating your MXO2 firmware” on page 8.
Defining your MXO2 settings
Page 74

62
Your notes
Chapter 7, Configuring Your MXO2 System
Page 75

8
Calibrating Your HDMI Monitor
for Video
This chapter explains how to
calibrate your HDMI monitor for
use with HD and SD video.
Page 76

64
Overview
Matrox MXO2 turns your HDMI monitor into a true-color video display for use
with HD and SD video. Controls for hue, chroma, contrast, brightness, and
blue-only let you adjust and control your HDMI monitor exactly as you would a
broadcast HD/SD video monitor.
¦NoteMXO2’s HDMI output supports 1:1 pixel mapping for accurate
monitoring of HD and SD video. However, your HDMI monitor must support
1920×1080 to preview all HD formats, and “dot-by-dot” mode for 1:1 pixel
mapping
.
HDMI monitor calibration requires you to:
1 Load and output color bars to your HDMI monitor.
2 Calibrate your HDMI monitor using MXO2’s proc amp controls.
Loading and displaying color bars
Color bars are used to calibrate your HDMI monitor. Depending on the
application that you use to output the color bars to your HDMI monitor, you can
use either the Matrox HD and SD color bars, or those supplied by a third-party
application, such as Final Cut Pro.
1 Ensure that your HDMI monitor is connected to MXO2’s HDMI output, turn
the HDMI monitor on, and allow it to warm up for about 20 or 30 minutes.
2 From an MXO2-supported QuickTime video application, such as Final Cut
Pro or After Effects, depending on the video standard for which you want to
calibrate your HDMI monitor, load and play back an HD or SD color bars
clip. You can choose one of the Matrox calibration color bars found in
Applications > Matrox MXO2 Utilities > Calibration Files, or one of
the color bars supplied by the application.
Remarks
$ If using Final Cut Pro to display color bars, you must select an MXO2
Easy Setup for your project and then make sure that the selected color
bars clip matches your project’s sequence setting. For more details, see
Chapter 9, “Loading a Matrox MXO2 Easy Setup.”
$ For 486p or 576p video, you can use an NTSC or PAL color bars clip.
3 Set your application’s video output device setting to output to MXO2 (see
“Specifying your video and audio output device settings” on page 74).
¦NoteIn your application, select the output setting that matches your clip’s
format. For Final Cut Pro, select the MXO2 video playback setting that
matches your project’s sequence setting.
4 With the color bars clip visible on your HDMI monitor, pause the color bars
clip in your application.
Chapter 8, Calibrating Your HDMI Monitor for Video
Page 77

5 Calibrate your HDMI monitor as detailed in the next section.
Calibrating your HDMI monitor
Use the MXO2 proc amp controls to adjust and control your HDMI monitor’s
color temperatures for accurate color grading and monitoring of HD and SD
video.
1 Load and output color bars to your HDMI monitor as detailed in the previous
section.
2 From the Apple menu, click System Preferences, and then click the
Matrox MXO2 or Matrox MXO2 Mini icon.
3 Click Video Output.
4 From the Set main channel format to menu, select Follow application.
5 Under Miscellaneous, click Calibrate.
65
6 For each of the Hue, Chroma, Contrast, and Brightness controls, click the
Reset button, and ensure that the Blue only option is cleared.
7 Drag the Chroma slider all the way to the left so that the color bars are
shades of black and white.
8 Before settings the black level, make sure that Allow super black is
selected in your general settings (see “Specifying your general settings” on
page 45). Set the proper black level by adjusting the
Brightness control and
looking at the three pluge bars (see Figure 1 on page 67). The middle and left
pluge bars should be black and blend into one another, with no visible
Calibrating your HDMI monitor
Page 78

66
dividing line between them, and the right pluge bar should be a
barely-visible dark gray bar as shown below:
¦NoteThe room lighting may affect your perception of this setting.
Therefore, you may need to readjust the
Brightness setting if the room
lighting changes.
9 To set the proper white level, move the Contrast slider all the way up, and
then back down until the white bar (see Figure 1 on page 67) just begins to
change. The correct setting is the point just before the white bar goes from
pure white to showing a hint of gray. You’re now ready to calibrate the
colors.
10 Click the Reset button beside Chroma to set the chroma to its midpoint.
11 Select Blue only to remove the red and green elements from the color bars.
The color bars should now be alternating bars of gray and black (see
Figure 2 on page 67).
¦NoteYou can also use the Blue only option to check for noise in a video
clip.
12 Adjust the Hue control until the two middle gray bars are the same shade as
their sub-bars (see Figure 2 on page 67).
13 Adjust the Chroma control until the two outer gray bars are the same shade
as their sub-bars (see Figure 2 on page 67). The four gray bars and their
sub-bars should be of equal intensity, and the three black bars and their
sub-bars should be completely black.
14 Clear the Blue only option. If you’re satisfied with the proc amp settings,
click
Accept to save them, or take a note of the settings for future use.
Chapter 8, Calibrating Your HDMI Monitor for Video
Page 79

Figure 1: Color bars
67
White barSub-bar
Pluge bars
Figure 2: Calibrated color bars in blue-only mode
Calibrating your HDMI monitor
Page 80

68
Your notes
Chapter 8, Calibrating Your HDMI Monitor for Video
Page 81

9
Using Matrox MXO2
with Supported Programs
This chapter explains how to
define various settings for
using all MXO2 products with
Final Cut Pro and other
supported programs.
Page 82

70
Matrox MXO2 Easy Setups for Final Cut Pro
The Matrox MXO2 QuickTime video output component for Final Cut Pro
includes predefined MXO2 Easy Setups that you can load to immediately apply
appropriate sequence, capture, device control, and A/V output preset settings for
use with MXO2. You can also create a custom MXO2 Easy Setup for Final Cut
Pro. For detailed information on Easy Setups, see your Final Cut Pro
documentation.
Loading a Matrox MXO2 Easy Setup
1 Open Final Cut Pro and choose Final Cut Pro > Easy Setup.
2 From the drop down menu in the Easy Setup window, select the Matrox
MXO2 Easy Setup that matches the format of your project. For example, if
you’re working with NTSC material, select
NTSC 10-bit 48kHz
3 Click Setup to load the settings.
.
Creating a Matrox MXO2 Easy Setup
1 Open Final Cut Pro and choose Final Cut Pro > Audio/Video Settings.
2 On the Summary pane, select the settings for your new MXO2 project
preset. To be compatible with Matrox MXO2, you must select a
preset for each of the easy setup options (Sequence Preset,
MXO2
Capture Preset, Device Control Preset, Video Playback, and Audio
Playback
control preset, see “Matrox MXO2 presets for Final Cut Pro” on page 71.
3 Click Create Easy Setup.
4 Type a Name and Description, and then click Create.
5 In the Save dialog box, save the new MXO2 Easy Setup to a location on
your computer.
¡ Important By default, the path is set to \Library\Application
Support\Final Cut Pro System Support\Custom Settings. If you save your
Easy Setup somewhere else on your computer, the Easy Setup will not
appear in the Easy Setup list, and may be lost if the MXO2 software is
re-installed.
6 In the Audio/Video Settings window, click OK.
). To create a new Matrox MXO2 sequence, capture, or device
Matrox MXO2 Uncompressed
Matrox
Chapter 9, Using Matrox MXO2 with Supported Programs
Page 83

Matrox MXO2 presets for Final Cut Pro
You can create a new MXO2 sequence, capture, and device control preset, or edit
an existing preset. For detailed information on presets, see your Final Cut Pro
documentation.
Creating and editing MXO2 sequence presets
1 Open Final Cut Pro and choose Final Cut Pro > Audio/Video Settings.
2 Click the Sequence Presets tab.
3 Select the sequence preset that you want to use as a starting point for
creating a new preset, or select the sequence preset that you want to edit.
4 Click Duplicate to create a new preset, or click Edit.
¡ Important If you click Edit, the preset that you selected in step 3 will be
overwritten.
5 In the Sequence Preset Editor window, select your settings. To be
compatible with Matrox MXO2, you must select
Audio Settings on the General pane.
6 Type an appropriate Name and Description.
7 Click OK.
8 If you’re editing a sequence preset, click OK in the Audio/Video Settings
window to save your edits.
48 kHz and 24-bit under
71
Creating and editing MXO2 capture presets
1 Open Final Cut Pro and choose Final Cut Pro > Audio/Video Settings.
2 Click the Capture Presets tab.
3 Select the capture preset that you want to use as a starting point for creating a
new preset, or select the capture preset that you want to edit.
4 Click Duplicate to create a new preset, or click Edit.
¡ Important If you click Edit, the preset that you selected in step 3 will be
overwritten.
5 In the Capture Preset Editor window, select your settings. To be
compatible with Matrox MXO2, the capture preset must have the following
settings:
$ Under QuickTime Video Settings, select a Matrox Digitizer and Input
setting that matches the format to which you want to capture. If the
capture format does not match the format of your source video that is
connected to MXO2’s input, you must enable scaling on the input in
MXO2 (see “Specifying your A/V input settings” on page 47). For a list
of the capture formats that are supported on MXO2, see Appendix C,
“Matrox MXO2 Supported Input and Capture Formats.”
Matrox MXO2 presets for Final Cut Pro
Page 84

72
¦NoteA General Error message may appear when you select the digitizer.
If this occurs, you will not be able to set the
Preset Editor
message, and under
window. To set the capture input option, close the error
QuickTime Video Settings, click Advanced. In the
Input option from the Capture
Video window, click Source, select the Matrox MXO2 setting that matches
the format to which you want to capture, and then click
$ Under QuickTime Audio Settings, from the Device menu, click
OK.
Matrox MXO2 Audio Input.
6 Type an appropriate Name and Description.
7 Click OK.
8 If you’re editing a capture preset, click OK in the Audio/Video Settings
window to save your edits.
Creating and editing MXO2 device control presets
¦NoteMatrox MXO2 Mini does not support device control.
A Matrox MXO2 device control preset is required only when using the MXO2
RS-422 serial connector for device control.
1 Open Final Cut Pro and choose Final Cut Pro > Audio/Video Settings.
2 Click the Device Control Presets tab.
3 Select the device control preset that you want to use as a starting point for
creating a new preset, or select the device control preset that you want to
edit.
4 Click Duplicate to create a new preset, or click Edit.
¦NoteIf you click Edit, the preset that you selected in step 3 will be
overwritten.
5 In the Device Control Preset Editor window, select your settings. To be
compatible with Matrox MXO2, the device control preset must have the
following settings:
$ From the Audio Mapping menu, click 8 Channels.
$ From the Port menu, click Matrox MXO2 RS-422 Port.
6 Type an appropriate Name and Description.
7 Click OK.
8 If you’re editing a device control preset, click OK in the Audio/Video
Settings
window to save your edits.
Chapter 9, Using Matrox MXO2 with Supported Programs
Page 85

Specifying settings for capturing and playing back closed captioning in Final Cut Pro
¦NoteMatrox MXO2 Mini does not support closed captioning.
MXO2 lets you capture and play back video with digital closed captioning using
the Matrox 4VANC technology (see “Matrox 4VANC closed caption capture and
playback” on page 58). To ensure proper capture and playback of digital closed
captioning when using Final Cut Pro, you must observe the following settings.
For more information about any of the features mentioned in this section, see
your Final Cut Pro documentation.
Settings for capturing Matrox 4VANC closed captioning
When capturing using MXO2’s SDI input, MXO2 uses audio track eight to
preserve the closed caption data from your video’s VANC (vertical ancillary data
space). Prior to capturing, you must enable track eight in Final Cut Pro as
follows:
1 Open Final Cut Pro, and load an MXO2 Easy Setup (see “Loading a Matrox
MXO2 Easy Setup” on page 70).
2 Choose File > Log and Capture.
3 In the Log and Capture window, click the Clip Settings tab.
4 In the audio area of the Clip Settings tab, enable track eight.
73
¦NoteSee also “Ensuring frame-accurate capture and edit-to-tape using Final
Cut Pro” on page 75 for general capture settings for Final Cut Pro.
Settings for playing back closed captioning
During playback, MXO2 retrieves the closed caption data from the Matrox
4VANC audio track that is assigned to audio output eight in Final Cut Pro. Set
your playback settings as follows:
1 Open Final Cut Pro, and load an MXO2 Easy Setup (see “Loading a Matrox
MXO2 Easy Setup” on page 70).
2 Choose Sequence > Settings.
3 On the General pane, under Audio Settings, select 48 kHz from the Rate
menu, and
4 On the Audio Outputs pane, enable eight channels of audio for your
sequence by selecting
as
Dual Mono, and then set the Downmix value to 0 for track eight.
5 Click OK.
6 Choose Final Cut Pro > User Preferences.
Specifying settings for capturing and playing back closed captioning in Final
24-bit from the Depth menu.
8 from the Outputs menu, set tracks seven and eight
Page 86

74
7 On the General pane, select Medium or High from the Audio Playback
Quality
8 Assign the audio track that contains the Matrox 4VANC closed caption data
on your timeline to audio output eight.
Remarks
• To preserve the integrity of the closed caption data for playback, do not
manipulate the audio track that contains the closed caption data in any way.
For example, do not adjust the audio gain or balance, or add audio effects to
the tracks.
•See also “Specifying your video and audio output device settings” on
page 74 for general video and audio output settings for Final Cut Pro.
menu, and then click OK.
Specifying your video and audio output device settings
The following sections explain how to specify your video and audio output
device settings for Final Cut Pro and Adobe After Effects. Many programs share
similar output device settings as Adobe After Effects, however, you should refer
to your program’s documentation for more details.
¦NoteIf you want to play back video that contains Matrox 4VANC closed
captioning, see “Settings for playing back closed captioning” on page 73.
Specifying settings for Final Cut Pro
1 Open Final Cut Pro and choose View > Video Playback, and select the
Matrox MXO2 setting that matches your project’s sequence setting.
2 Choose View > Audio Playback, and select Matrox MXO2 Audio
Output
¦NoteIf Audio Follows Video is enabled in the Audio Playback menu,
Matrox MXO2 Audio Output will be automatically enabled once you’ve
selected an MXO2 setting for video playback.
3 Enable Final Cut Pro’s external video by choosing View > External
Video > All Frames
Chapter 9, Using Matrox MXO2 with Supported Programs
.
.
Page 87

Specifying settings for Adobe After Effects
1 Open Adobe After Effects and choose After Effects > Preferences >
Video Preview
2 From the Output Device menu, select Matrox Video Output.
3 From the Output Mode menu, select the setting that matches the format of
your composition. For example, if you’re working with an NTSC project,
select
Matrox MXO2 - NTSC YUV 8-bit.
4 For Output During, select Previews and Interactions.
5 Click OK to save your settings.
.
75
Ensuring frame-accurate capture and edit-to-tape using Final Cut Pro
¦NoteMatrox MXO2 Mini does not support device control.
Matrox MXO2 device control lets you control an RS-422 device, such as a VTR
or digital disk recorder, for frame-accurate capture and edit-to-tape. For detailed
information on capture and edit-to-tape, see your Final Cut Pro documentation.
¦NoteIf you want to capture video with closed captioning, see “Settings for
capturing Matrox 4VANC closed captioning” on page 73.
Ensuring frame-accurate capture and edit-to-tape using Final Cut Pro
Page 88

76
Setting your capture settings
For frame-accurate capture using Final Cut Pro with Matrox MXO2, set the
capture settings as follows:
1 Open Final Cut Pro and choose File > Log and Capture.
2 In the Log and Capture window, click the Capture Settings tab.
3 From the Device Control menu, select a Matrox MXO2 device control
preset. To create or edit an MXO2 device control preset, see “Creating and
editing MXO2 device control presets” on page 72.
4 From the Capture/Input menu, select a Matrox MXO2 capture preset. To
create or edit an MXO2 capture preset, see “Creating and editing MXO2
capture presets” on page 71.
5 To set your audio capture settings, including which MXO2 audio input
channels you want to capture, click the
settings in the
Audio section. For information on how to set your audio
Clip Settings tab and specify your
channel settings for capture, see your Final Cut Pro documentation.
Setting your edit-to-tape settings
For frame-accurate edit-to-tape using Final Cut Pro with Matrox MXO2, set the
edit-to-tape settings as follows:
1 Open Final Cut Pro and choose File > Edit To Tape.
2 In the Ed it To Ta p e window, click the Device Settings tab.
3 From the Device Control menu, select a Matrox MXO2 device control
preset. To create or edit an MXO2 device control preset, see “Creating and
editing MXO2 device control presets” on page 72.
4 If you’ll be performing an insert edit, from the Capture/Input menu, select
a Matrox MXO2 capture preset that is compatible with your tape. This is
required to allow you to preview your tape to see what the edit will look like
in Final Cut Pro’s
preset, see “Creating and editing MXO2 capture presets” on page 71.
¦NoteTo preview video from your tape, you must connect video and audio
outputs from your recorder to the corresponding inputs on MXO2, and then
set the MXO2 A/V input settings accordingly (see “Specifying your A/V input
settings” on page 47).
5 To avoid having black frames recorded at the end of an insert edit, make sure
that
Editing, instead of Mastering, is selected as the edit-to-tape mode. To
do this, in the
Editing from the Mode menu.
6 When performing an edit-to-tape on some RS-422 devices, a delay may
occur between the time that Final Cut Pro starts to play back your project
and the time the device starts recording. To ensure that your edit-to-tape does
Edit to Tape window. To create or edit an MXO2 capture
Edit To Tape window, click the Video tab, and then select
Chapter 9, Using Matrox MXO2 with Supported Programs
Page 89

not miss any frames, you can delay the playback of your project by adjusting
the
Playback Offset setting for the device control preset that you selected in
step 3 (see “Creating and editing MXO2 device control presets” on page 72).
77
Ensuring frame-accurate capture and edit-to-tape using Final Cut Pro
Page 90

78
Your notes
Chapter 9, Using Matrox MXO2 with Supported Programs
Page 91

10
Using the Matrox MAX H.264 Codec
This chapter explains how to
use the Matrox MAX H.264
codec that is available on
Matrox MXO2 products with
MAX technology for exporting
material to Blu-ray and other
media formats.
Page 92

80
Overview
If you have an MXO2 product with Matrox MAX technology, you can quickly
and easily create H.264 files for Blu-ray Disc and other media formats using the
Matrox MAX H.264 codec. You can take advantage of all the familiar settings in
your preferred application, and use the Matrox MAX predefined settings or
customize your own settings. As an added benefit, the Matrox MAX technology
lets you directly export to higher-quality H.264 Blu-ray compliant files from
Compressor. You can also use the Matrox MAX H.264 settings in other
QuickTime-based applications, such as Apple Final Cut Pro and QuickTime Pro,
to accelerate the encoding of H.264 material.
Remarks
• Non-Matrox compression options that are available in Compressor and other
QuickTime-based applications are not optimized to use MXO2 to accelerate
H.264 encoding. As a result, the use of non-Matrox options in a supported
application may result in increased encoding times.
• The MXO2 inputs and outputs will not be available when creating H.264
files using the Matrox MAX H.264 codec. This limitation, however, does not
apply if your system includes a Matrox CompressHD card. In this case, the
Matrox MAX H.264 codec on your Matrox CompressHD card will always
be used, and your MXO2 inputs and outputs will be available when creating
H.264 files.
Activating and deactivating the Matrox MAX H.264 codec
Your Matrox MXO2 product with Matrox MAX technology is designed to work
with Apple Compressor and other QuickTime-based applications, such as Apple
Final Cut Pro and QuickTime Pro.
In order for you to use your MXO2 with MAX product with the supported
applications, you must activate the Matrox MAX H.264 codec.
¡ Important Apple Compressor and other QuickTime-based applications must
be closed before activating/deactivating the Matrox MAX H.264 codec. Make
sure to deactivate the Matrox MAX H.264 codec if you want to use another codec
to encode your video.
°To activate or deactivate the Matrox MAX H.264 codec:
1 Make sure that all QuickTime-based applications are closed.
2 From the Apple menu, click System Preferences, and then click the
Matrox MXO2 or Matrox MXO2 Mini icon.
Chapter 10, Using the Matrox MAX H.264 Codec
Page 93

3 Click MAX.
4 Click Activate or Deactivate beside Matrox MAX H.264 codec.
Remarks
$ If you receive a message saying that you need to restart your system at
this point, you may still have an instance of Apple Compressor or another
QuickTime-based application running in the background. Check your
system’s
then click
Activity Monitor, locate the program that is still running, and
Force quit. You can then activate/deactivate the Matrox MAX
H.264 codec.
$ If your system includes a Matrox CompressHD card, and you activate the
Matrox MAX H.264 codec from the MXO2 preferences window, the
Matrox MAX H.264 codec on your Matrox CompressHD card will be
used to create H.264 files.
81
Activating and deactivating the Matrox MAX H.264 codec
Page 94

82
Matrox MAX H.264 settings in Apple Compressor
The Matrox MAX H.264 component for Apple Compressor includes predefined
Matrox MAX H.264 settings that you can assign to immediately apply
appropriate compression settings for delivering H.264 files for Blu-ray, the web,
and mobile devices. For most deliverables, you can use one of the predefined
Matrox MAX H.264 settings in Compressor (see“Assigning a Matrox MAX
H.264 setting” on page 82). However, if you require a custom setting, see
“Creating a custom Matrox MAX H.264 setting” on page 83. For detailed
information on settings and other Compressor-related subjects, see your Apple
Compressor documentation.
The Matrox MAX H.264 Blu-ray settings encode video only. Audio is not
encoded by the Matrox MAX H.264 codec when creating H.264 elementary
streams for Blu-ray. To include audio when exporting to Blu-ray format, you
must assign a separate audio setting to your source media file. However, audio is
encoded by the Matrox MAX H.264 codec when creating QuickTime files for the
web and mobile devices.
The Matrox MAX H.264 elementary stream files that you create for Blu-ray Disc
using Compressor can be imported directly to Adobe Encore CS4 and Roxio
Toast without having to transcode the files.
Assigning a Matrox MAX H.264 setting
This section describes how to assign a Matrox MAX H.264 setting to your source
file in Apple Compressor. The Matrox MAX H.264 settings include the
predefined settings installed with your MXO2 software, and any custom settings
that you create (see “Creating a custom Matrox MAX H.264 setting” on
page 83).
The predefined Matrox MAX H.264 settings that are installed with your MXO2
software are located in Compressor’s
Matrox MAX H.264 Settings
separated into three folders: Blu-ray, Fast Encode, and High-Quality:
Blu-ray Use these settings for all Blu-ray deliverables.
•
¦NoteFor compatibility with most Blu-ray players and Adobe Encore CS4,
the predefined Matrox MAX H.264 settings for Blu-ray use a simple GOP
structure.
•
Fast Encode Use these settings for fast encoding of QuickTime files.
These settings leverage your system’s resources with the MXO2 hardware,
resulting in faster than realtime encoding.
Chapter 10, Using the Matrox MAX H.264 Codec
Settings window, under Custom >
. The predefined Matrox MAX H.264 settings are
Page 95

• High-Quality Use these settings for high-quality encoding of QuickTime
files. With these settings, the encoding is performed entirely by the MXO2
hardware, which frees your system’s resources for other tasks.
°To assign a Matrox MAX H.264 setting:
1 In Apple Compressor, add the source media file that you want to export as an
H.264 file to the
2 Drag the desired Matrox MAX H.264 setting from the Settings window to
your source media file (job) in the
3 If you’re exporting to Blu-ray format and you want to export audio as well,
Batch window in Compressor.
Batch window.
you must add a separate audio setting to your
provides predefined audio settings for each of the Matrox settings, however,
you can choose to use another audio setting.
4 Choose a destination for your job’s targets and submit your batch as you
would normally.
Creating a custom Matrox MAX H.264 setting
You can create a custom Matrox MAX H.264 setting in Apple Compressor using
one of the two methods described in this section. The method you choose
depends on your deliverable. You can create a custom setting for delivering
H.264 files for either Blu-ray (.264) or QuickTime (.mov). Once you create a new
Matrox MAX H.264 setting, you can assign it to your source file in Apple
Compressor using the steps described in “Assigning a Matrox MAX H.264
setting” on page 82.
83
Batch window. Matrox
Specifying settings for H.264 elementary stream files
(Blu-ray)
Use this encoding method when an H.264 elementary stream file is required,
such as for Blu-ray. The encoded file’s extension will be .264.
1 In Apple Compressor, click the Create a new setting button in the
Settings window, and then click Matrox MAX H.264 (.264).
¦NoteYou can also select and duplicate an existing Matrox MAX H.264
setting that you want to use as a starting point for creating the new setting.
2 In the Inspector window, type a Name and Description.
Matrox MAX H.264 settings in Apple Compressor
Page 96

84
3 On the Encoder pane of the Inspector window, make sure that File Format
is set to
click
Matrox MAX H.264 (.264), and Extension is set to 264, and then
Options.
4 Under Source Settings, specify the settings for your source video:
$ Frame size Enter your source video’s actual frame size
(horizontal× vertical). Keep in mind that some files are not full raster. For
example, a DVCPRO HD 720p file is 960×720 and not 1280× 720.
¦NoteThe frame size must be between 32×32 and 4094×2047, and the
horizontal value must be an even number.
$ Pixel aspect ratio Specify your source video’s pixel aspect ratio,
according to your source video’s frame size. You can select a pixel aspect
ratio from the list, or enter a custom decimal value.
$ Color space Select your source video’s color space.
$ Field order Select your source video’s field order:
• Progressive Select this for all progressive video.
• Top field first Select this for interlaced video that displays the top
field before the bottom field, such as for PAL and 1080i video.
• Bottom field first Select this for interlaced video that displays the
bottom field before the top field, such as for NTSC video.
Chapter 10, Using the Matrox MAX H.264 Codec
Page 97

5 Under Compression Settings, select the compression settings that you
want to be used to encode your video:
$ H.264 Level Select the H.264 level that you want for your encoded
video.
85
H.264 level
Maximum
Frame size
Maximum
Frame rate
(fps)
Maximum
Data rate
(Mb/sec)
2.0 320×240 29.97 2
3.0 720×480 29.97 10
4.0 1920×1080 29.97 20
4.1 1920×1080 29.97 50
4.2 1920×1080 59.94 50
¡ Important Use H.264 level 4.0 if you want to create Matrox MAX H.264
files intended for mass replication of Blu-ray Discs. You can use either level
4.0 or 4.1 if you want to author and burn individual copies that are
compatible with Blu-ray Disc players.
$ Frame size Specify the frame size that you want for your encoded
video. You can select a frame size from the list, or select
Custom and
enter a frame size (horizontal×vertical). If entering a custom frame size,
the minimum frame size is 64×64, and the maximum frame size depends
on the selected H.264 level. The horizontal and vertical values must be
even numbers.
¦NoteThe available frame sizes in the list depend on the selected H.264 level.
If the compression frame size differs from your source video’s frame size,
MXO2’s onboard scaler will either upscale or downscale your source video.
$ Pixel aspect ratio If you entered a custom compression frame size,
specify a pixel aspect ratio for your encoded video. You can select a pixel
aspect ratio from the list, or enter a custom value:
• Custom Enter a custom pixel aspect ratio using a decimal value.
• Square Use this for video that will be displayed on a computer, or
when exporting to 1280×720 or 1920×1080.
• NTSC (4:3) Sets the pixel aspect ratio to 4:3 using 720×480 pixels.
• NTSC (16:9) Sets the pixel aspect ratio to 16:9 using 720×480
pixels.
• PAL ( 4 : 3 ) Sets the pixel aspect ratio to 4:3 using 720×576 pixels.
• PAL (16:9) Sets the pixel aspect ratio to 16:9 using 720×576 pixels.
Matrox MAX H.264 settings in Apple Compressor
Page 98

86
• DVCPRO HD 720p Sets the pixel aspect ratio to 16:9 using 960×720
pixels.
• DVCPRO HD 1080i 59.94 Sets the pixel aspect ratio to 16:9 using
1280×1080 pixels.
• DVCPRO HD 1080i 50 / HDV Sets the pixel aspect ratio to 16:9
using 1440×1080 pixels.
$ Color space If you entered a custom compression frame size, specify a
color space for your encoded video.
$ Frame rate Select the frame rate that you want for your encoded video.
$ Algorithm Select the entropy coding method to be used during
compression:
• CABAC Uses the CABAC coding method, and defines the video
stream as H.264 Main profile.
• CAVLC Uses the CAVLC coding method, and defines the video
stream as H.264 Baseline profile when
Distance between P frames
is set to 1. Otherwise, the video stream is defined as H.264 Main
profile. This method is not supported when encoding to a frame size
that has a width greater than 720.
$ Average data rate Enter the average amount of data, in Mb/s or Kb/s,
that will be transferred by MXO2’s variable bitrate video encoder. The
minimum and maximum data rates depend on the selected H.264 level.
¦NoteIf you’ll be using Adobe Encore CS4 or Apple Compressor 3.5 to burn
the encoded H.264 file for Blu-ray, the maximum H.264 level and data rate
accepted by these applications for Blu-ray authoring is H.264 level 4.1 at 35
Mb/s (Encore) and H.264 level 4.1 at 30Mb/s (Compressor).
$ De-interlace video Select this option if your source video is interlaced
and you want to de-interlace your video before encoding. This option can
be used to display your encoded video on a monitor that displays lines
progressively, such as an LCD or computer monitor. For all other
instances, make sure this option is not selected.
$ Retain aspect ratio when scaling If your source video must be scaled
for encoding, and its aspect ratio does not match your selected
compression aspect ratio, select this option to maintain your source
video’s aspect ratio. If this option is selected, MXO2 will encode your
source video as pillarbox video when encoding to a larger aspect ratio, or
letterbox video when encoding to a smaller aspect ratio. If this option is
not selected, MXO2 will encode your source video as anamorphic video.
6 Under GOP Structure, specify the GOP structure settings that you want the
Matrox MAX H.264 codec to use to encode your video:
Chapter 10, Using the Matrox MAX H.264 Codec
Page 99

$ Simple GOP Offers a fixed structure in how frames are referenced, and
may be more easily decoded than advanced GOPs.
$ Advanced GOP (short/long) An advanced GOP has more structural
flexibility than a simple GOP, is capable of using more reference frames,
and therefore may provide better overall compression. For a “short”
advanced GOP, the distance between P frames is always 4, and for a
“long” advanced GOP, the distance between P frames is always 8.
¡ Important An H.264 elementary stream file for Blu-ray that was created
using an advanced GOP structure may not be compatible with some Blu-ray
players, and may cause stability issues in Adobe Encore CS4 when burning a
Blu-ray Disc. For compatibility with most Blu-ray players and Adobe
Encore CS4, we recommend using a simple GOP structure when encoding to
Blu-ray.
$ GOP size Select the GOP size in frames (must be a multiple of the
distance between P frames). The GOP size can be either 2048, or an
integer value between 3 and 254.
¦NoteWhen creating an H.264 elementary stream file for Blu-ray, the GOP
size must be less than one second of video. For example, if the frame rate that
you want for your encoded video is 29.97 fps, the GOP size must be 29 frames
or less.
$ Distance between P frames Select the number of frames between P
frames that you want for your GOP structure. This setting can be changed
for a simple GOP structure only.
7 Click Save.
87
Specifying settings for QuickTime files
Use this encoding method to deliver H.264 files for QuickTime for the web, and
for use with Apple TV, iPod, iPhone, and other QuickTime-based devices. The
encoded file’s extension will be .mov.
1 In Apple Compressor, click the Create a new setting button in the
Settings window, and then click Matrox MAX H.264 (.mov).
¦NoteYou can also select and duplicate an existing Matrox MAX H.264
setting that you want to use as a starting point for creating the new setting.
2 In the Inspector window, type a Name and Description.
Matrox MAX H.264 settings in Apple Compressor
Page 100

88
3 On the Encoder pane of the Inspector window, make sure that File Format
is set to
click
4 On the Source Settings pane, specify the settings for your source video:
$ Frame size If the frame size that you want for your encoded video is
Matrox MAX H.264 (.mov), and Extension is set to mov, and then
Options.
the same as your source video’s frame size, enter your source video’s
actual frame size (horizontal×vertical). The frame size must be between
32×32 and 4094× 2047, and the horizontal value must be an even number.
If your source video must be scaled for encoding, use one of the following
two methods:
• High-Quality Enter your source video’s actual frame size. With this
method, the encoding is performed entirely by the MXO2 hardware,
which frees your system’s resources for other tasks.
• Fast Encode Enter the frame size that you want for your encoded
video, instead of your source video’s frame size. For example, if your
source video’s frame size is 1280×720 and you want to encode your
video at 720× 480, enter 720× 480 as the source frame size. The frame
size that you want for your encoded video is set on the
Compression
pane (see step 5). This method leverages your system’s
Video
resources with the MXO2 hardware for faster than realtime encoding.
¦NoteWhen entering the frame size, keep in mind that some files are not full
raster. For example, a DVCPRO HD 720p file is 960×720 and not 1280×720.
$ Pixel aspect ratio Select the pixel aspect ratio that corresponds to the
frame size that you entered for the source. You can select a pixel aspect
ratio from the list, or enter a custom decimal value.
Chapter 10, Using the Matrox MAX H.264 Codec
 Loading...