

Page 1
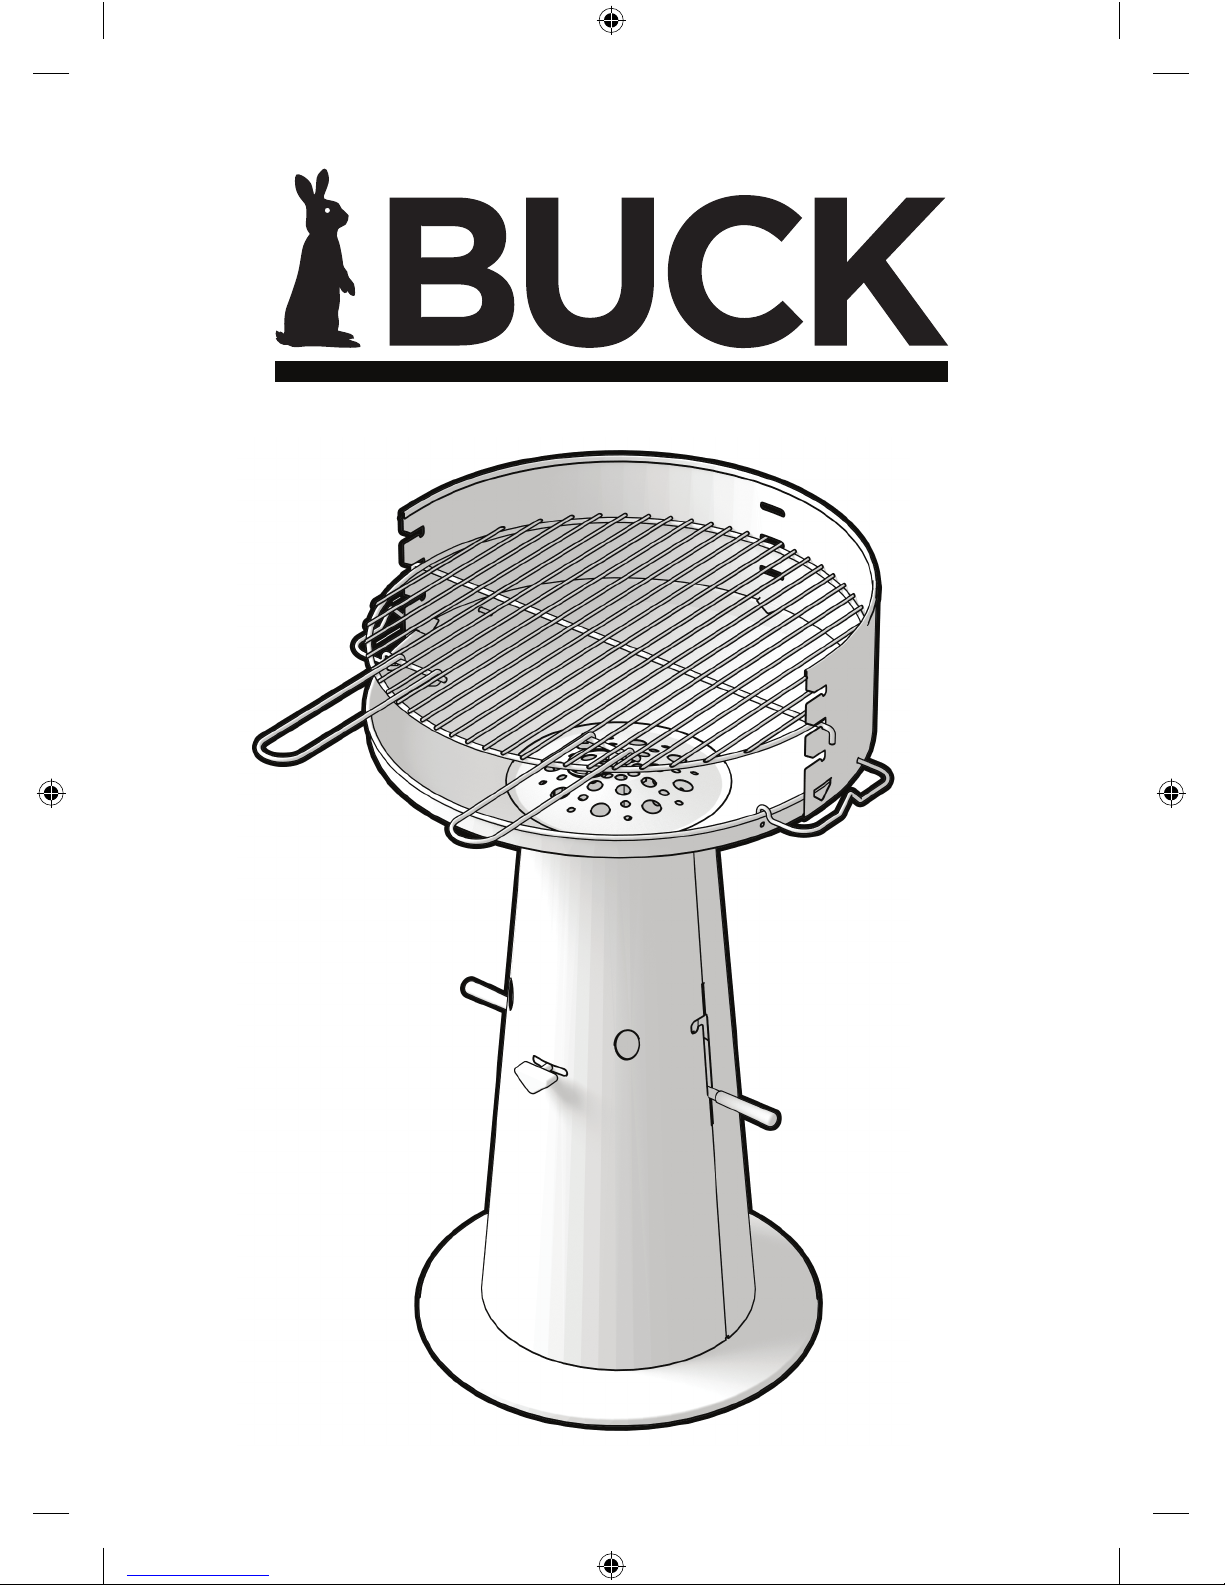
USER MANUAL - BRUKSANVISNING - MODE D’EMPLOI
matro user manual24_SV_01.indd 1 13/11/12 18:09
Page 2

GENERAL INFO - ALLMÄN INFORMATION - INFOrmation générale
BUCK barbecue
PRODUCED BY/TILLVERKARE/FABRIQUÉ PAR:
MATRO N.V.
BREDASTRAAT 124
2060 ANTWERPEN
BELGIUM
REFERENCES/REFERENSER:
•MR. BLACK: 77.BUCKBB – BAR CODE/STRECKKOD/CODE-BARRE = 5412368201152
•MR. BLUE: 77.BUCKB – BAR CODE/STRECKKOD/CODE-BARRE = 5412368201114
•MR. YELLOW: 77.BUCKY – BAR CODE/STRECKKOD/CODE-BARRE = 5412368201121
•MR. WHITE: 77.BUCKW – BAR CODE/STRECKKOD/CODE-BARRE = 5412368201138
•MR. ORANGE: 77.BUCKO – BAR CODE/STRECKKOD/CODE-BARRE = 5412368201145
•MR. STEEL: 77.BUCKS – BAR CODE/STRECKKOD/CODE-BARRE = 5412368201251
•BUCK JUNIOR BLACK: 77.BUCKJB – BAR CODE/STRECKKOD/CODE-BARRE = 5412368201213
•BUCK JUNIOR WHITE: 77.BUCKJW – BAR CODE/STRECKKOD/CODE-BARRE = 5412368201206
matro user manual24_SV_01.indd 2 13/11/12 18:09
Page 3
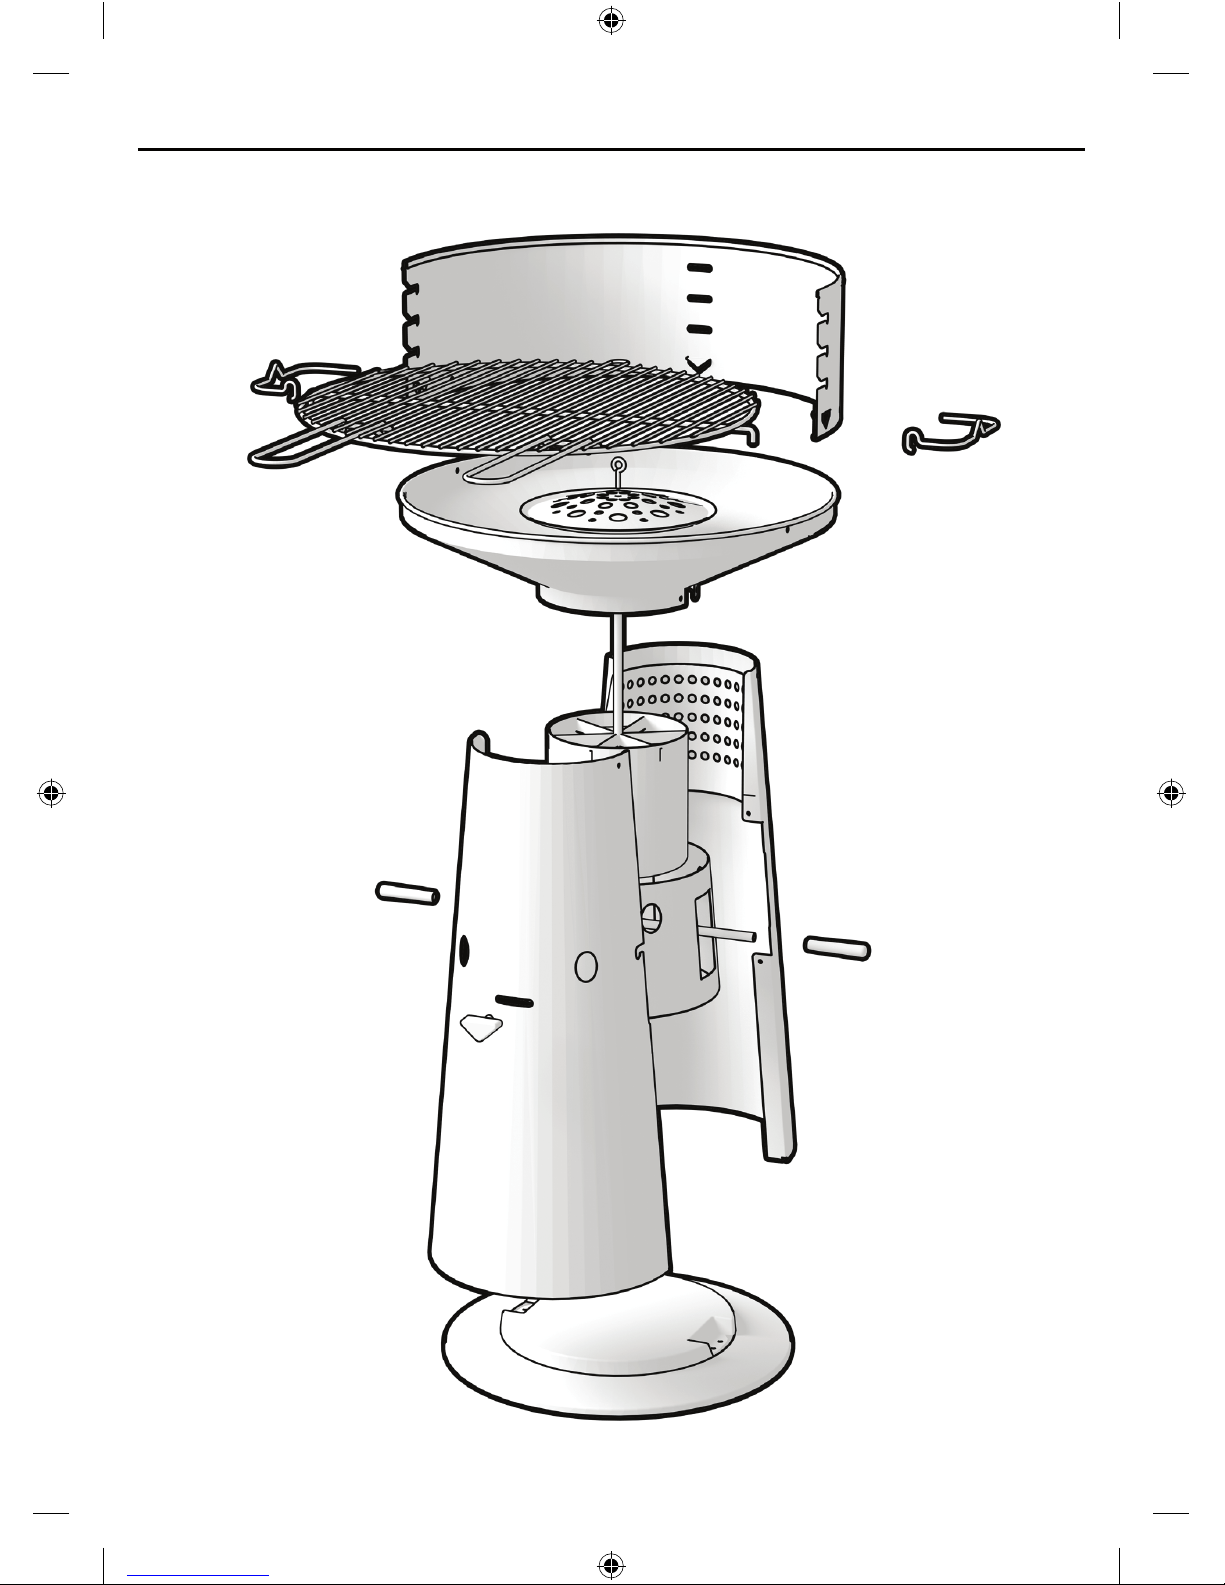
EXPLODED VIEW -SPRÄNGSKISS - VUE ECLATée
matro user manual24_SV_01.indd 3 13/11/12 18:09
Page 4
USER MANUAL - BRUKSANVISNING - MODE D’EMPLOI
BUCK, the best guest at your barbecue
Invite BUCK to your garden this summer for the tastiest and happiest barbecue parties. Not
only will BUCK grill your T-bone steaks, sardines or daring culinary experiments, he will
put a smile on everyone’s face even when not in use, thanks to his disarming designer look.
Mr Black, Mr Blue, Mr Green, Mr White, Mr Orange and Mr Steel are model guests, easy to
get along with: after cooking, use the “easy ash removal system” (patent pending) to release
the coals and ashes in the blink of an eye. Moreover, BUCK is quick and easy to set up.
BUCK, din hedersgäst på grillfesten
Bjud in BUCK till din trädgård i sommar för de läckraste och trevligaste grillfesterna. Inte
nog med att BUCK grillar dina T-bonestekar, sardiner eller andra kulinariska experiment,
han drar dessutom till sig beundrande blickar även när han står oanvänd, tack vare sin
stiliga och genomtänkta design.
Mr Black, Mr Blue, Mr Green, Mr White, Mr Orange och Mr Steel är de idealiska gästerna,
alltid lätta att komma överens med. När du har grillat färdigt använder du bara vårt patentsökta ”easy ash removal system” för att snabbt och lätt göra dig av med kolrester och aska.
BUCK är dessutom mycket enkel att montera.
BUCK, un invité de marque à votre barbecue
Cet été, BUCK s’invite dans votre jardin pour des barbecues délicieux et festifs. BUCK
grille votre steak, vos sardines ou vos expérimentations culinaires les plus osées. Et même
lorsqu’on ne s’en sert pas, son look original fait tourner bien des têtes.
Mr Black, Mr Blue, Mr Green, Mr White, Mr Orange et Mr Steel sont des invités modèles :
après utilisation, vous pouvez retirer les cendres en un clin d’œil grâce au « easy ash removal system » (en attente de brevet). Cerise sur le gâteau, BUCK est facile et rapide à monter.
ENGLISH
FRANCAIS
SVENSKA
matro user manual24_SV_01.indd 4 13/11/12 18:09
Page 5
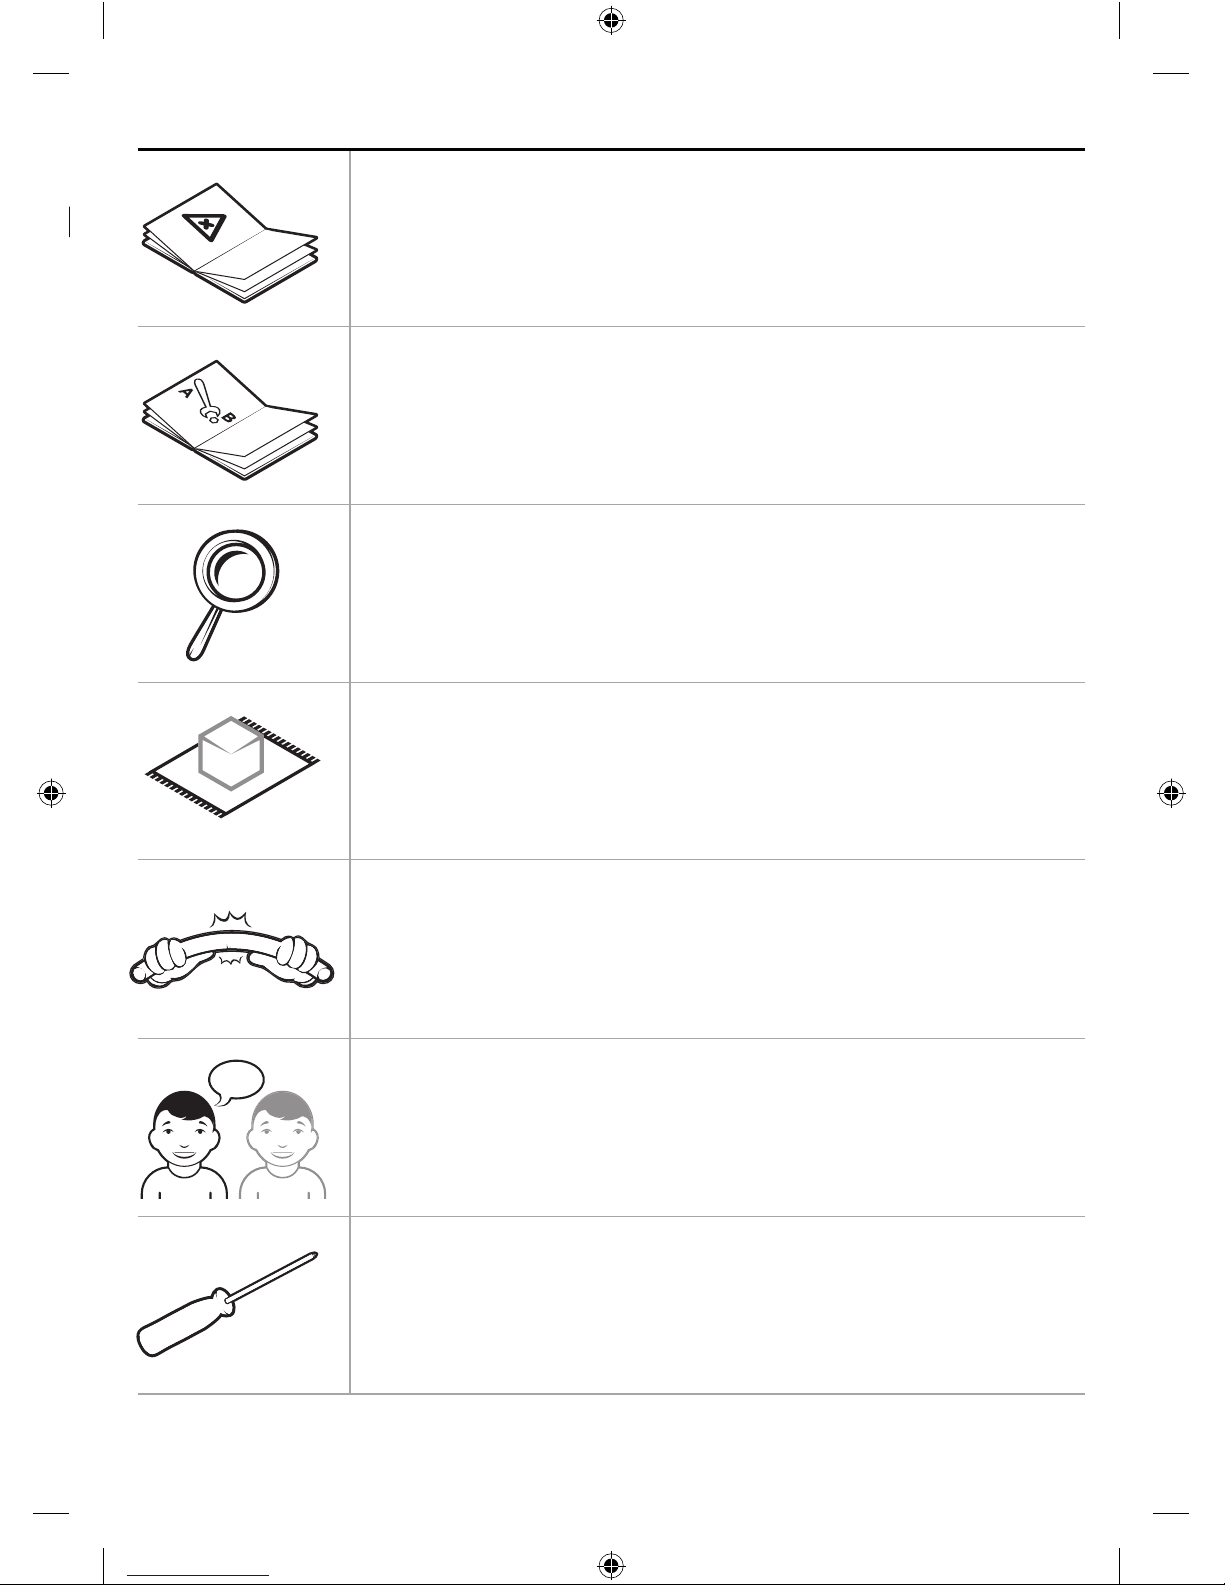
•Firstreadallsafetyinstructionsandtheusermanualcarefully.
•Läs noga igenom alla säkerhetsanvisningarna och bruksanvisningen innan
du börjar.
•Lisez attentivement le mode d’emploi et les consignes de sécurité.
•Readtheinstructionsbeforeassemblingthebarbecueandfollowthem
accuratelyduringtheprocess.
•Läs igenom anvisningarna innan du monterar grillen, och följ dem sedan
noga för varje arbetsmoment.
•Lisez les instructions de montage avant de commencer l’assemblage et
suivez les attentivement pendant le montage.
•Checkthepartslist.Ifanypartsaremissingcontactyourstore.
•Inventera innehållet med hjälp av detaljlistan och tillbehörslistan. Kontakta
butiken om något skulle saknas.
•Vérifiez la liste des pièces à monter. Si il y a des manquants, contactez le
magasin.
•Workonasoftsurfacetoavoidscratchesonthebarbecue.
•Utför monteringen på ett mjukt underlag för att undvika repor i grillen.
•Exécutez le montage sur une surface douce afin d’éviter d’endommager les
pièces du barbecue.
•Don’tuseexcessiveforce.Donotforce-tpartsorboltsiftheyappear
nottot.
•Ta inte i för hårt. Försök inte att tvinga några delar eller skruvar på plats om
de inte verkar passa.
•N’utilisez pas une force extrême et ne forcez pas les pièces pendant le montage, si elles ne semblent pas s’emboiter.
•Ifnecessary,enlistsomeone’shelp.
•Be någon om hjälp om det behövs.
•Si nécessaire, demandez l’aide d’une tierce personne.
•UseaPZ2screwdriverforallbolts.
•Använd en skruvmejsel av typ PZ2 till alla skruvar.
•Utilisez un tournevis PZ2 pour toutes les vis.
!!! IMPORTANT !!! VIKTIGT!!!
HELP!
matro user manual24_SV_01.indd 5 13/11/12 18:09
Page 6
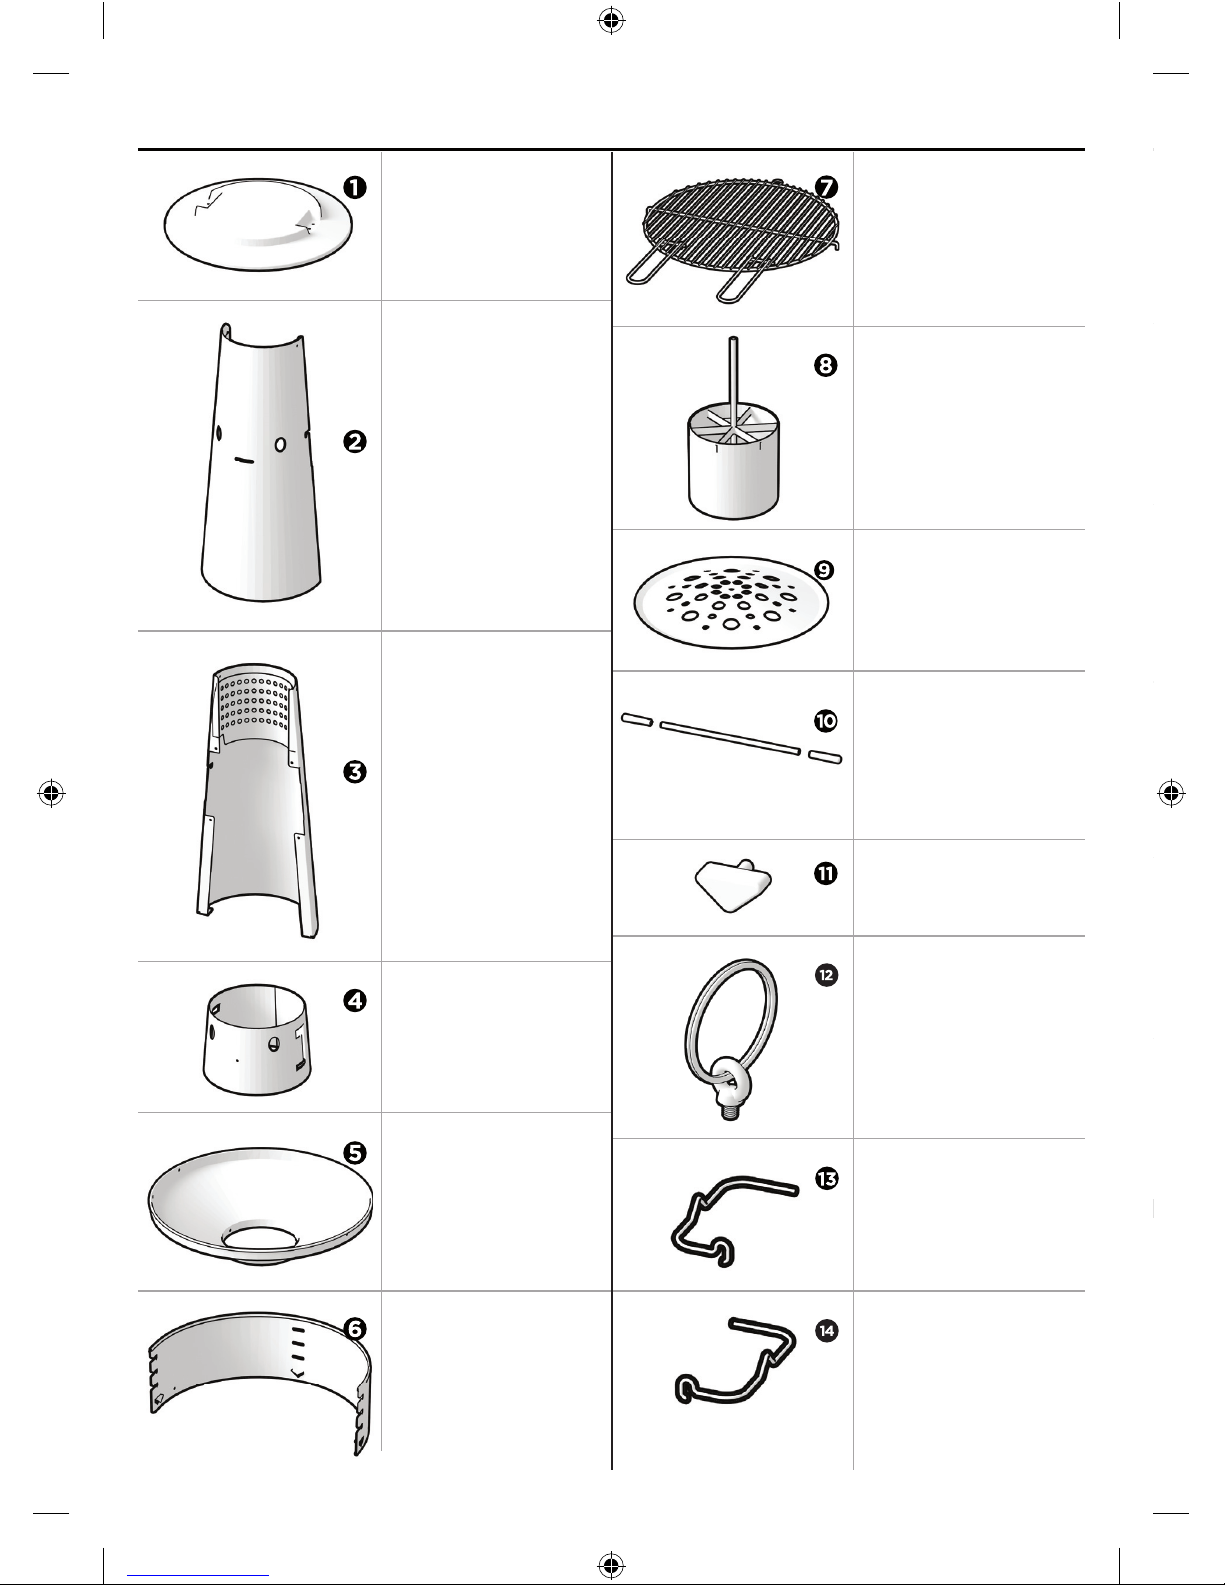
BOTTOM PLATE
BOTTENPLATTA
PIED
COOKING GRILL
GRILLGALLER
GRILLE DE CUISSON
ASH CUP
ASKLÅDA
BAC À CENDRES
(CENDRIER)
CHARCOAL GRILL
KOLGALLER
GRILLE À COMBUSTIBLE
LIFTING BAR
+ 2 HANDLES
BARRE HORIZONTALE
2 POIGNÉES INCLUS
LYFTSTÅNG +
2 HANDTAG
NOSE HANDLE
HANDTAG (NÄSA)
POIGNÉE (NEZ)
LIFTING RING +
EYE BOLT
LYFTRING +
ÖGLESKRUV
RONDELLE + VIS
À ŒILLET
TOOL HOOK LEFT
TOOL HOOK RIGHT
CROCHET
D’ACCESSOIRES
(GAUCHE)
CROCHET
D’ACCESSOIRES
(DROITE)
REDSKAPSHAKE
(VÄNSTER)
REDSKAPSHAKE
(HÖGER)
FRONT PILLAR
KONENS FRAMDEL
PILLIER CONIQUE
AVANT
BACK PILLAR
KONENS BAKDEL
PILIER CONIQUE
ARRIÈRE
AIR INLET
LUFTINTAG
MANCHON DE VENTILATION
FIRE BOWL
GRILLSKÅL
VASQUE-FOYER
WIND SHIELD
VINDSKÄRM
PARE-VENT
MAIN PARTS List - DETALJLISTA - LISTE DES Pièces
Check the parts list. If
any parts are missing
contact your store.
matro user manual24_SV_01.indd 6 13/11/12 18:09
Page 7
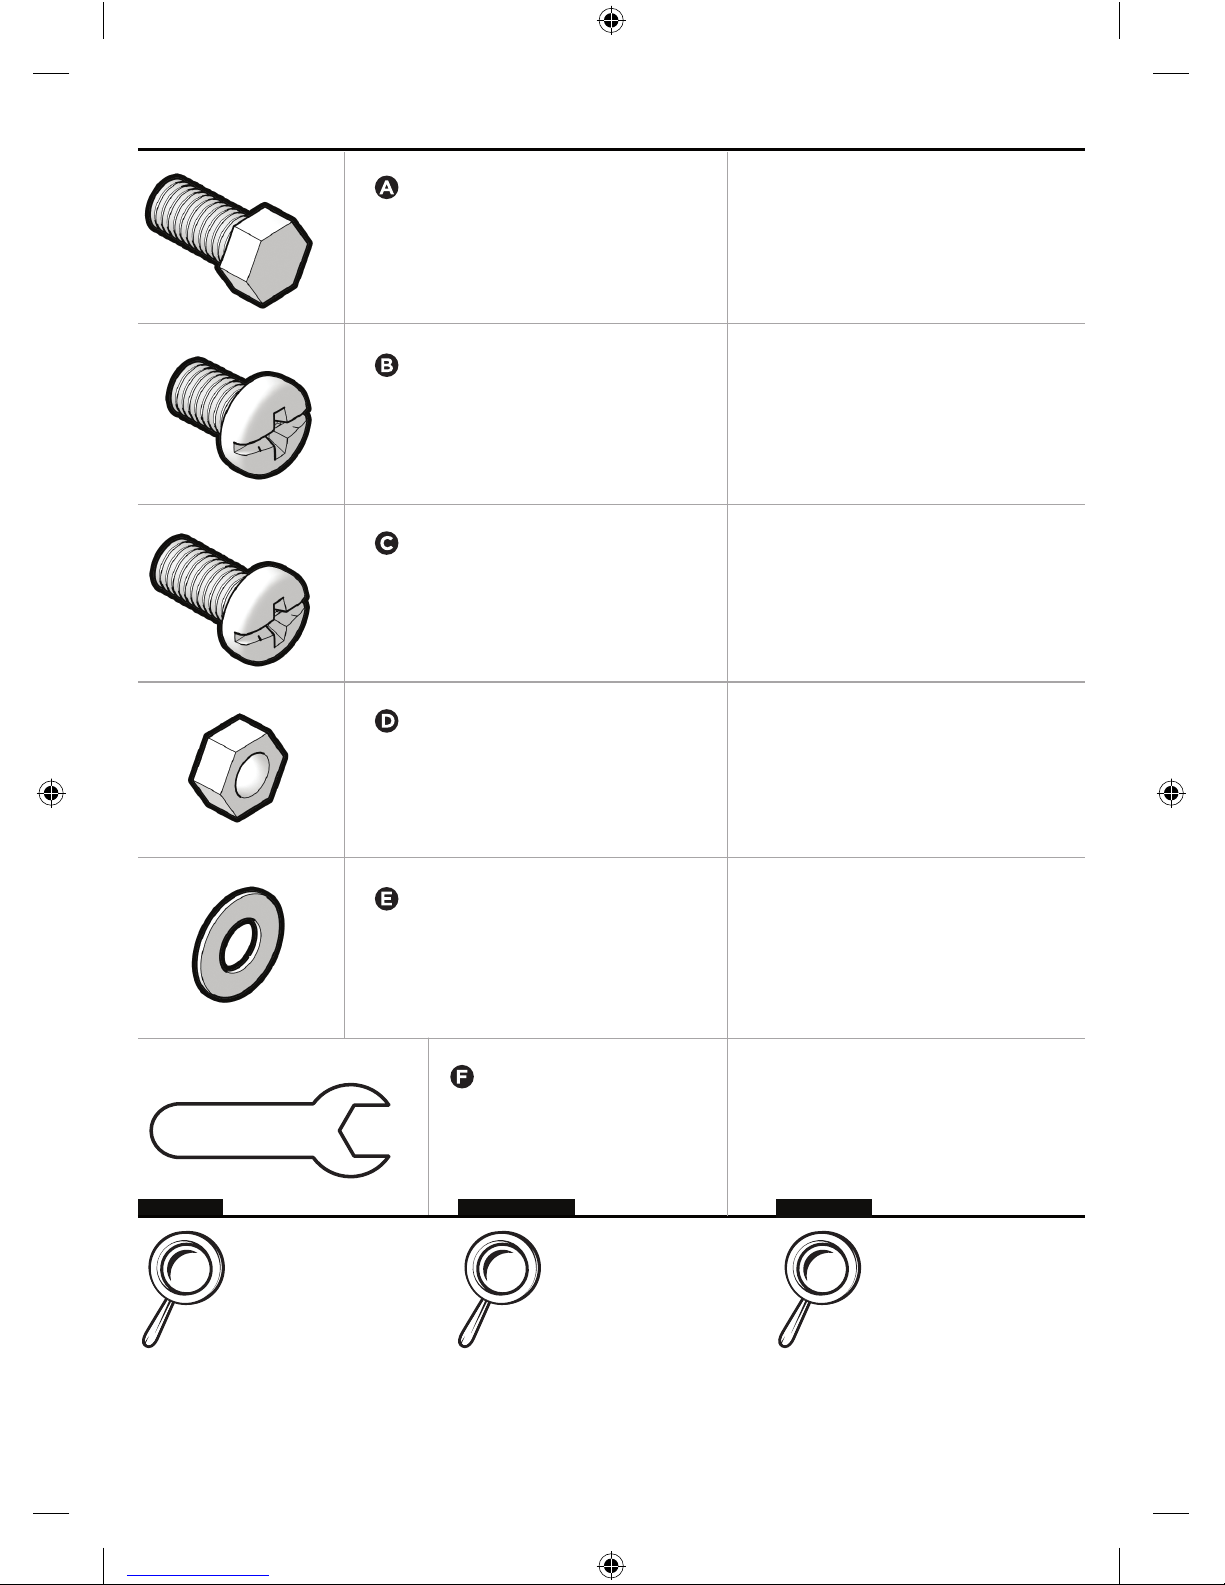
HEX BOLTS
SEXKANTSSKRUVAR
BOULONS
SHORT SCREWS
KORTA SKRUVAR
VIS COURTES
LONG SCREWS
LÅNGA SKRUVAR
VIS LONGUES
HEX NUTS
SEXKANTSMUTTRAR
ECROUS
WASHERS
BRICKOR
RONDELLES
SPANNER
MONTERINGSNYCKEL
X5
X4
X4
X6
X14
X1
ENGLISH
FRANCAIS
SVENSKA
ACCESSORIES LIST - TILLBEHÖRSLISTA - LISTE DES ACCESSOIRES
Check the parts list. If
any parts are missing
contact your store.
Vérifiez la liste des
pièces détachées. S’il
y a des manquants,
contactez le magasin.
Inventera med hjälp
av detaljlistan och
tillbehörslistan.
Kontakta butiken om
något skulle saknas.
matro user manual24_SV_01.indd 7 13/11/12 18:09
Page 8
ENGLISH
ENGLISH
FRANCAIS
SVENSKA
ASSEMBLY INSTRUCTIONS - MONTERINGSANVISNINGAR
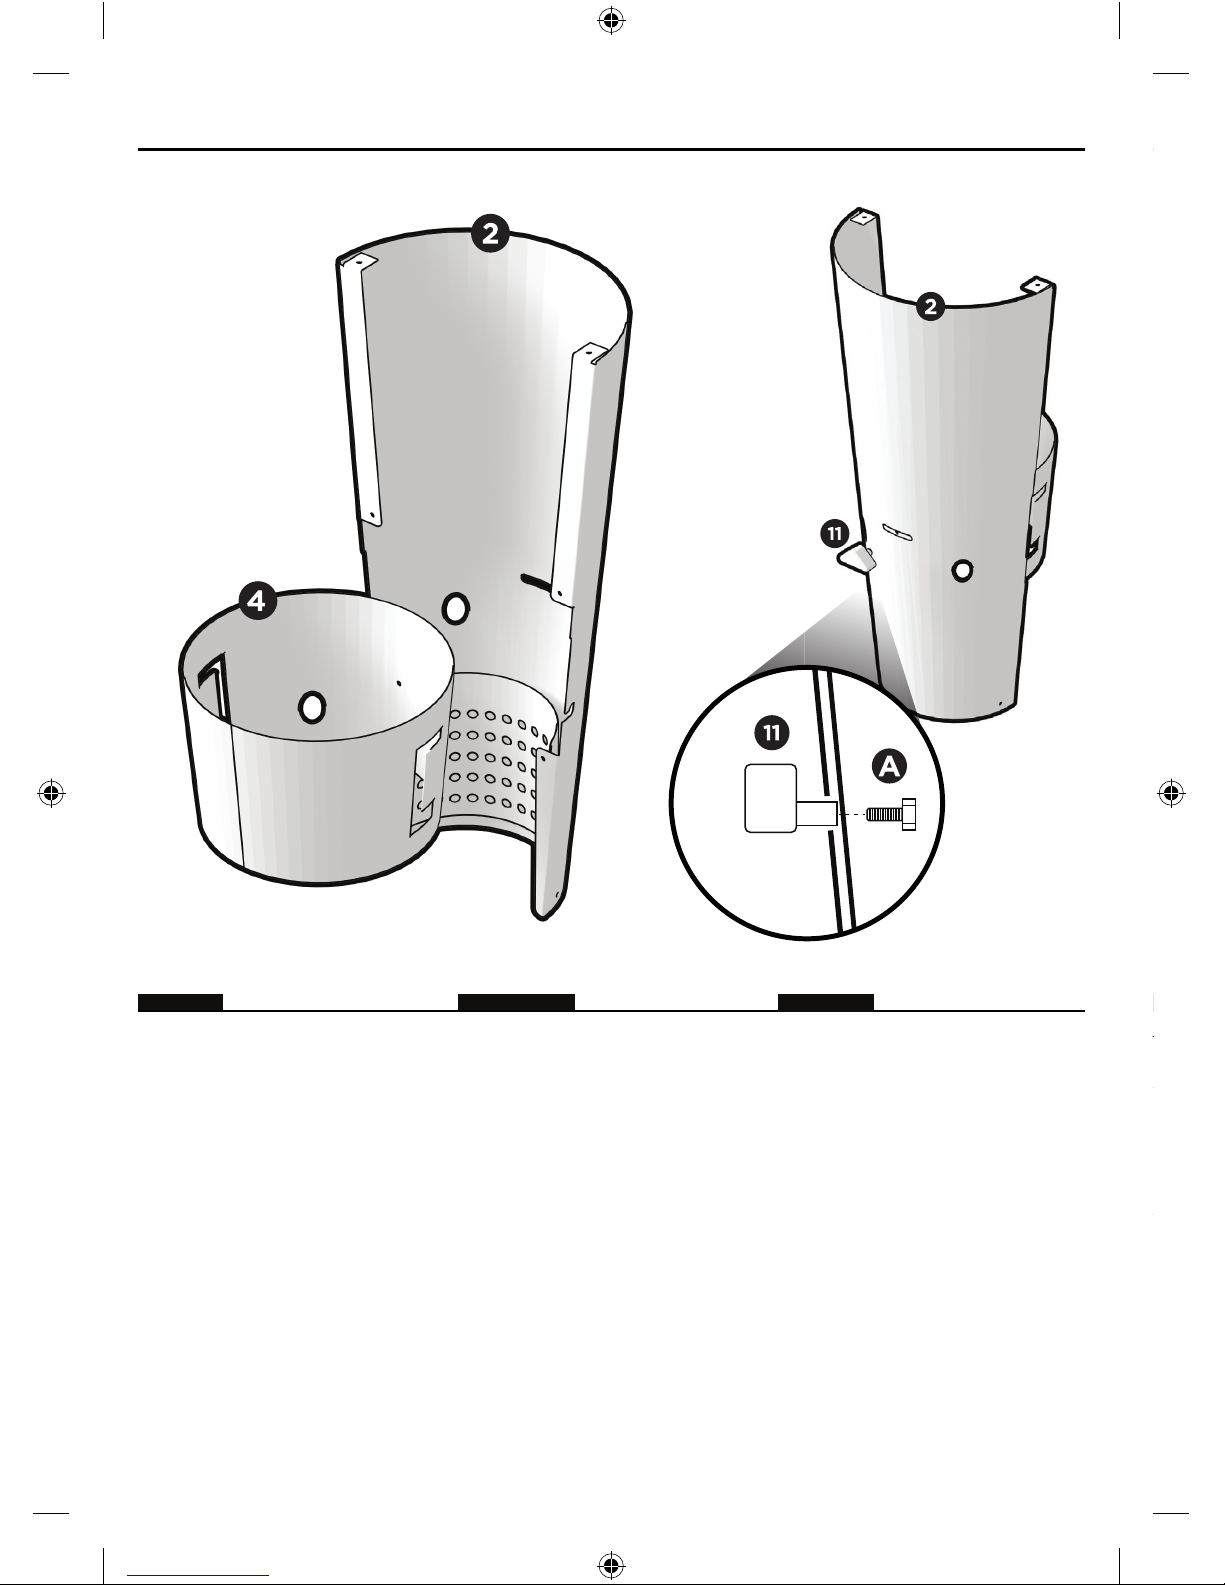
Put the front pillar (2) upside down
on a soft surface (e.g. a carpet) and
place the air inlet
(4) with the hole
for the nose handle facing the front
of the pillar and aligned with the
opening in the front pillar. Then fi x
the 2 parts together with the nose
handle
(11) and a hex bolt (A)
(see detail). Make sure all parts are
fi xed as illustrated above (keep in
mind the pillar is upside down).
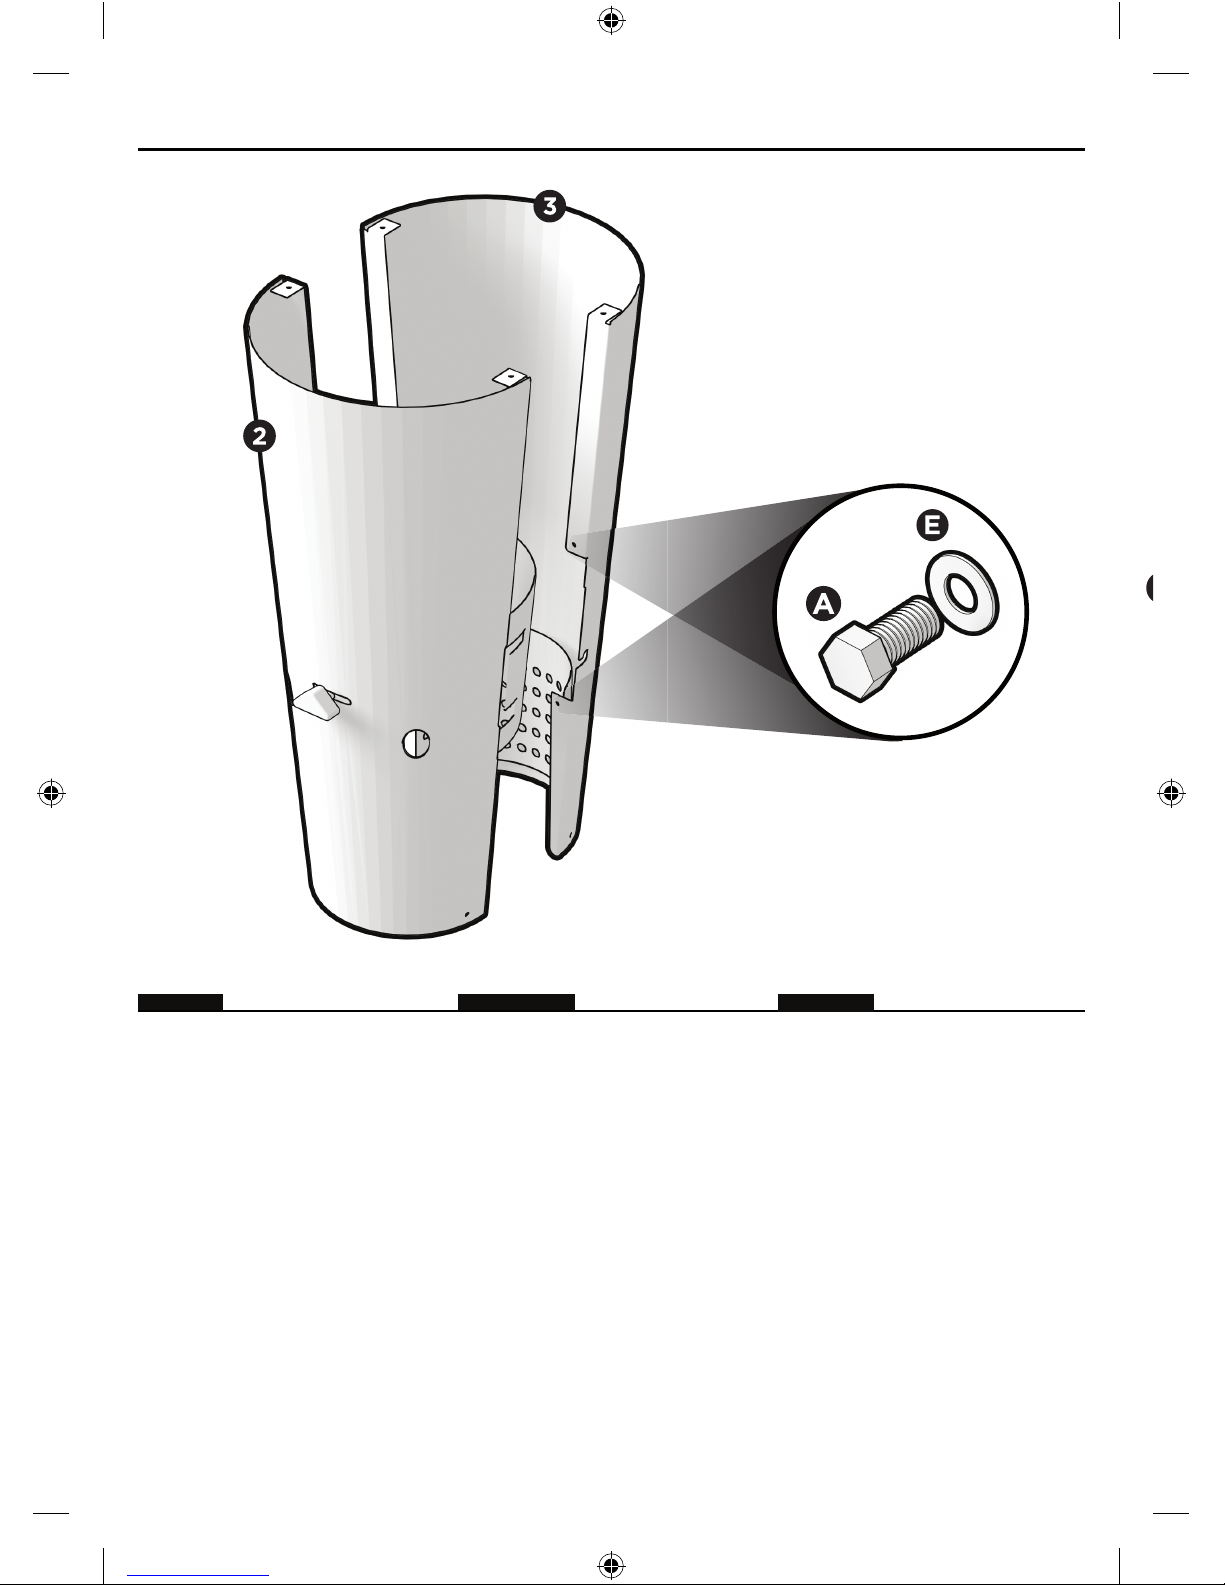
Attach the back pillar (3) to the
front pillar
(2) by screwing 4 hex
bolts
(A) with the washers (E)
into the 4 pre-threaded holes as
indicated on the image above.
Screw in the hex bolts in the
following order: left top side, left
bottom side, right bottom side, right
top side or reversed.
Placez le pilier conique (2) sur sa
tête sur une surface douce (p.ex.
un tapis) et placez le manchon de
ventilation
(4) avec l’excavation
pour la poignée (nez)
(11) dans
la direction du pilier conique
avant et conformément avec
l’ouverture dans le pilier conique
avant. Attachez les deux pièces
avec la poignée (nez) et un boulon
(A) comme indiqué sur le dessin.
Soignez à ce que toutes les pièces
soient montées dans la même
direction comme indiqué sur
le dessin (Penser-y que le pilier
conique est à ce moment-là sur sa
tête).
Placera konens framsida (2) upp
och ned på ett mjukt underlag (t.ex.
en matta) och placera luftintaget
(4) med hålet för handtaget
(näsa) vänt mot konens framsida,
och passa in det mot öppningen
i konens framsida. Fäst de två
delarna i varandra med handtaget
(näsa) (11) och en sexkantsskruv (A)
(se förstoringen). Kontrollera att
alla delar är korrekt fästa som på
bilden ovan (kom ihåg att konen är
uppochnedvänd).
STEP 1
STEP 2
matro user manual24_SV_01.indd 8 13/11/12 18:09
Page 9
INSTRUCTIONS D’ASSEMBLAGE - ASSEMBLY INSTRUCTIONS
ENGLISH
FRANCAIS
SVENSKA
Attach the back pillar (3) to the
front pillar
(2) by screwing 4 hex
bolts
(A) with the washers (E)
into the 4 pre-threaded holes as
indicated on the image above.
Screw in the hex bolts in the
following order: left top side, left
bottom side, right bottom side, right
top side or reversed.
Fixez le pilier conique avant (2) à
l’arrière du pilier
(3) au moyen des
4 boulon
(A) en n’oubliant pas les
rondelles
(E) comme indiqué sur
le dessin. Faites attention à l’ordre
suivant : dessus-gauche, dessousgauche, dessus-droit, dessous-droit.
En sens contraire est aussi possible.
Fäst konens baksida (3) i konens
framsida (2) genom att skruva
in fyra sexkantsskruvar (A) med
brickor (E) i de 4 på förhand
gängade hålen som på bilden ovan.
Skruva in sexkantsskruvarna i
följande ordning: överst till vänster,
nederst till vänster, nederst till
höger, överst till höger, eller i
omvänd ordning.
STEP 2
matro user manual24_SV_01.indd 9 13/11/12 18:09
Page 10
ENGLISH
ENGLISH
FRANCAIS
SVENSKA
ASSEMBLY INSTRUCTIONS - MONTERINGSANVISNINGAR
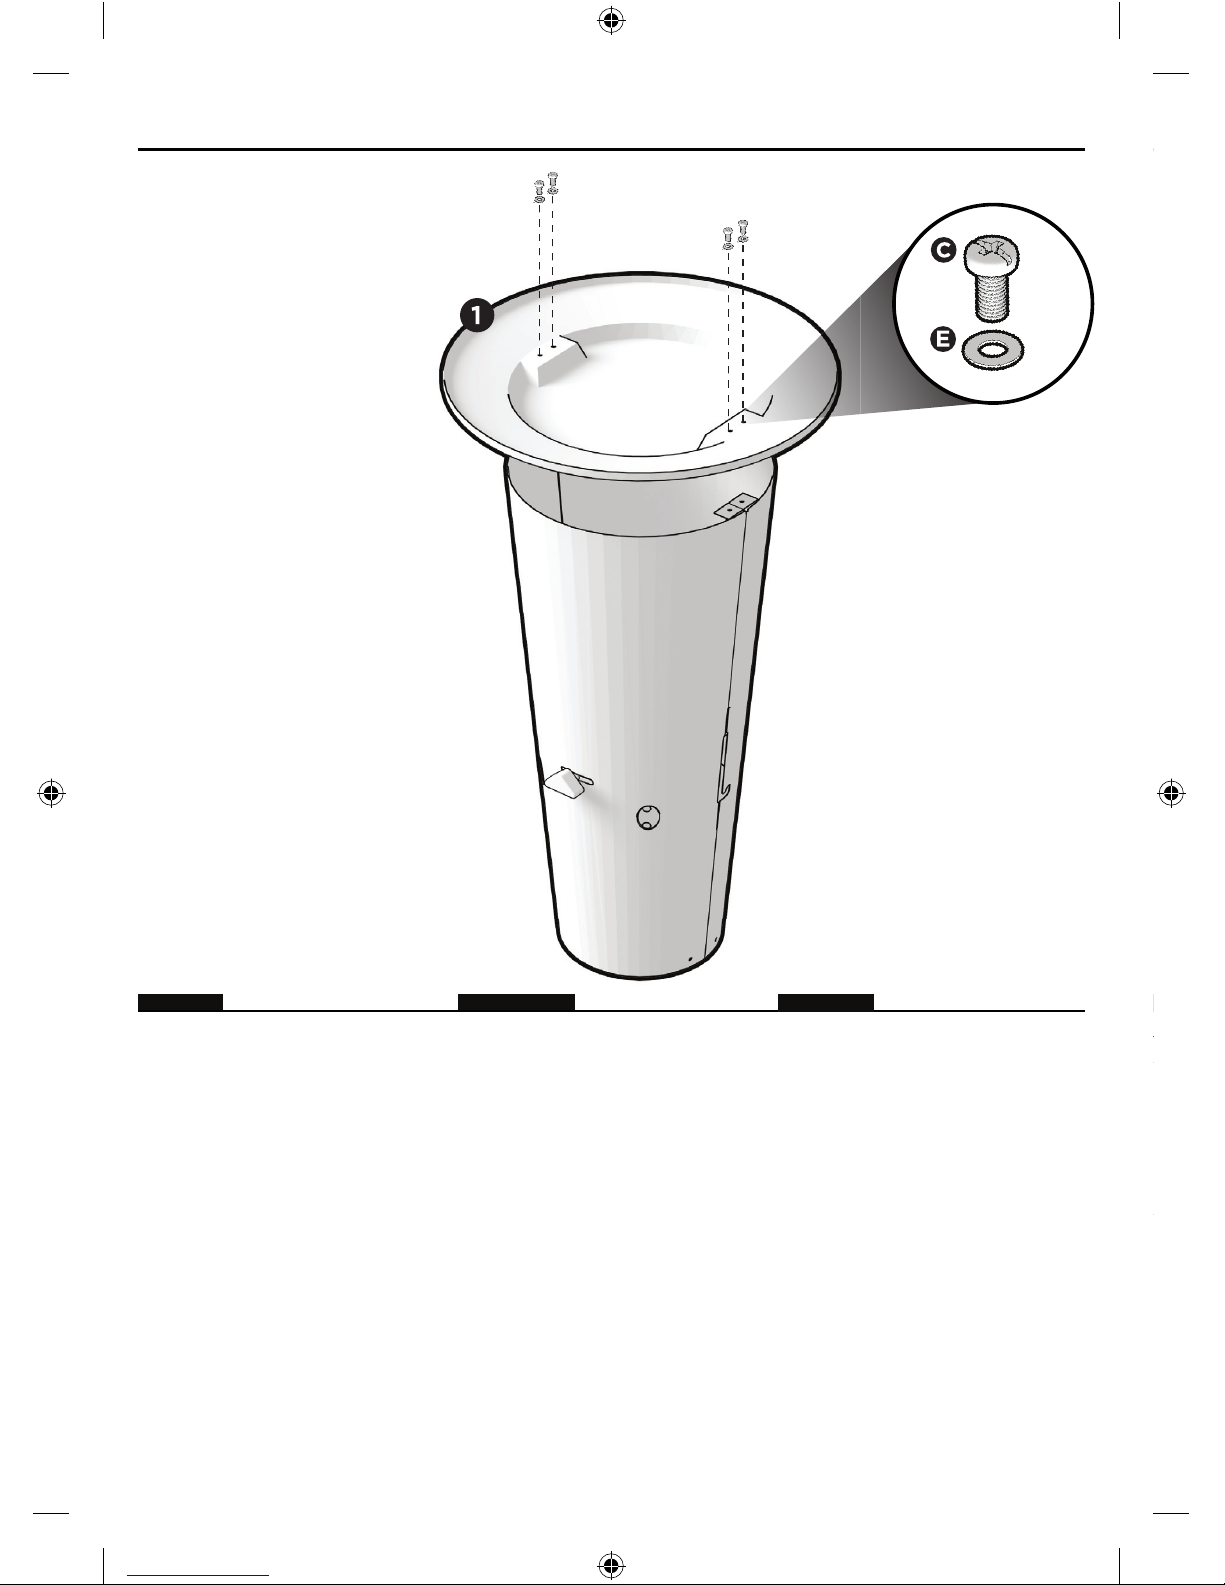
Attach the bottom plate (1) by
using 4 long screws
(C) and 4
washers
(E).
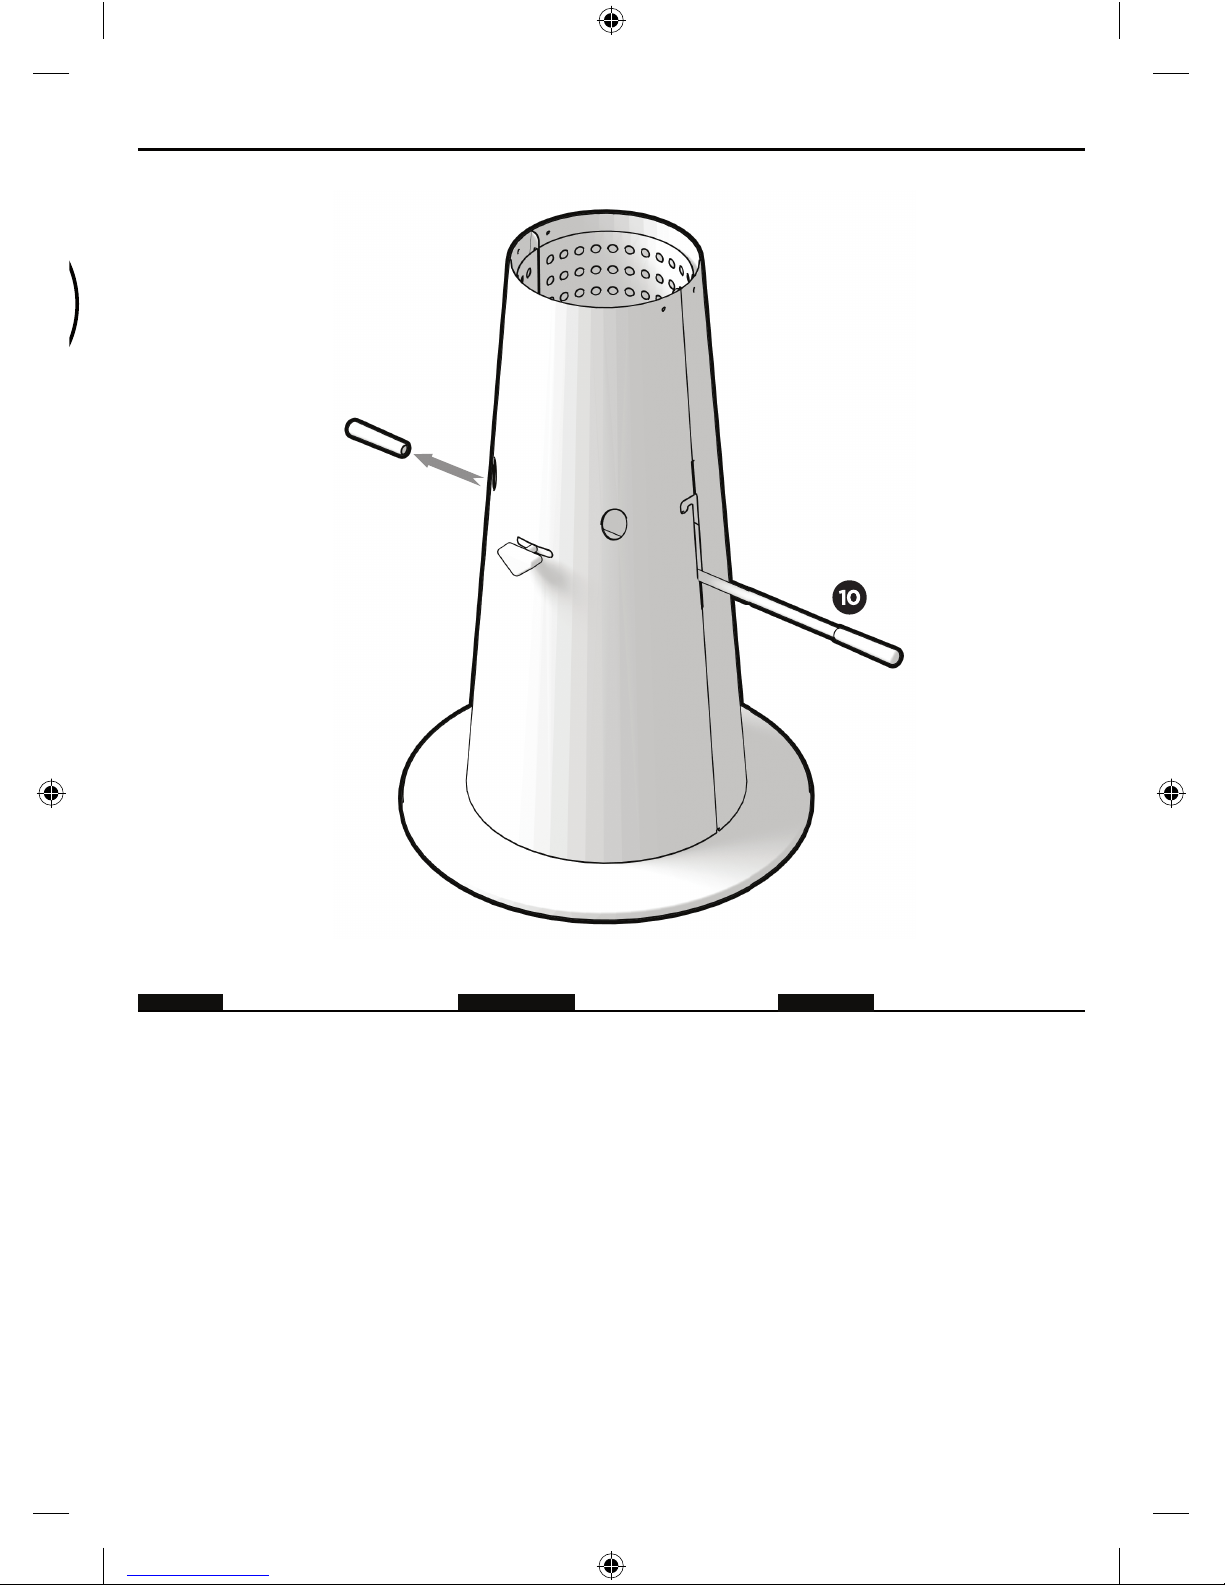
Put the assembly upright (the
bottom plate is now on the fl oor).
Slide one of the two end handles off
of the lifting bar
the bar through the pillar and the
air inlet as illustrated above. When
this is done, put the end handle
back into place.
Attachez le pied (1) sur le pilier
conique avec 4 vis longues
(C) y
compris 4 rondelles
(E) pendant
que le pilier conique est encore sur
sa tête.
Sätt fast bottenplattan (1) med
hjälp av 4 långa skruvar (C) och 4
brickor (E).
STEP 3
STEP 4
matro user manual24_SV_01.indd 10 13/11/12 18:09
Page 11
INSTRUCTIONS D’ASSEMBLAGE - ASSEMBLY INSTRUCTIONS
ENGLISH
FRANCAIS
SVENSKA
Put the assembly upright (the
bottom plate is now on the fl oor).
Slide one of the two end handles off
of the lifting bar
(10). Now stick
the bar through the pillar and the
air inlet as illustrated above. When
this is done, put the end handle
back into place.
Renverser l’ensemble en le
remettant sur pied. Glissez une des
deux poignées de la tige
(10) et
pousser la tige à travers le pilier
et le manchon d’aération comme
indiqué sur le dessin. Lorsque
la tige est à sa place, glissez la
poignée de retour sur la tige.
Vänd allt du har monterat hittills
upprätt (så att bottenplattan
hamnar på golvet). Drag loss ett
av de två ändhandtagen från
lyftstången (10). För in stången
genom konen och luftintaget,
som på bilden ovan. Sätt sedan
ändhandtaget på plats igen.
STEP 4
matro user manual24_SV_01.indd 11 13/11/12 18:09
Page 12
STEP 5
STEP 6
YESNO!
ENGLISH
ASSEMBLY INSTRUCTIONS - MONTERINGSANVISNINGAR
ENGLISH
FRANCAIS
SVENSKA
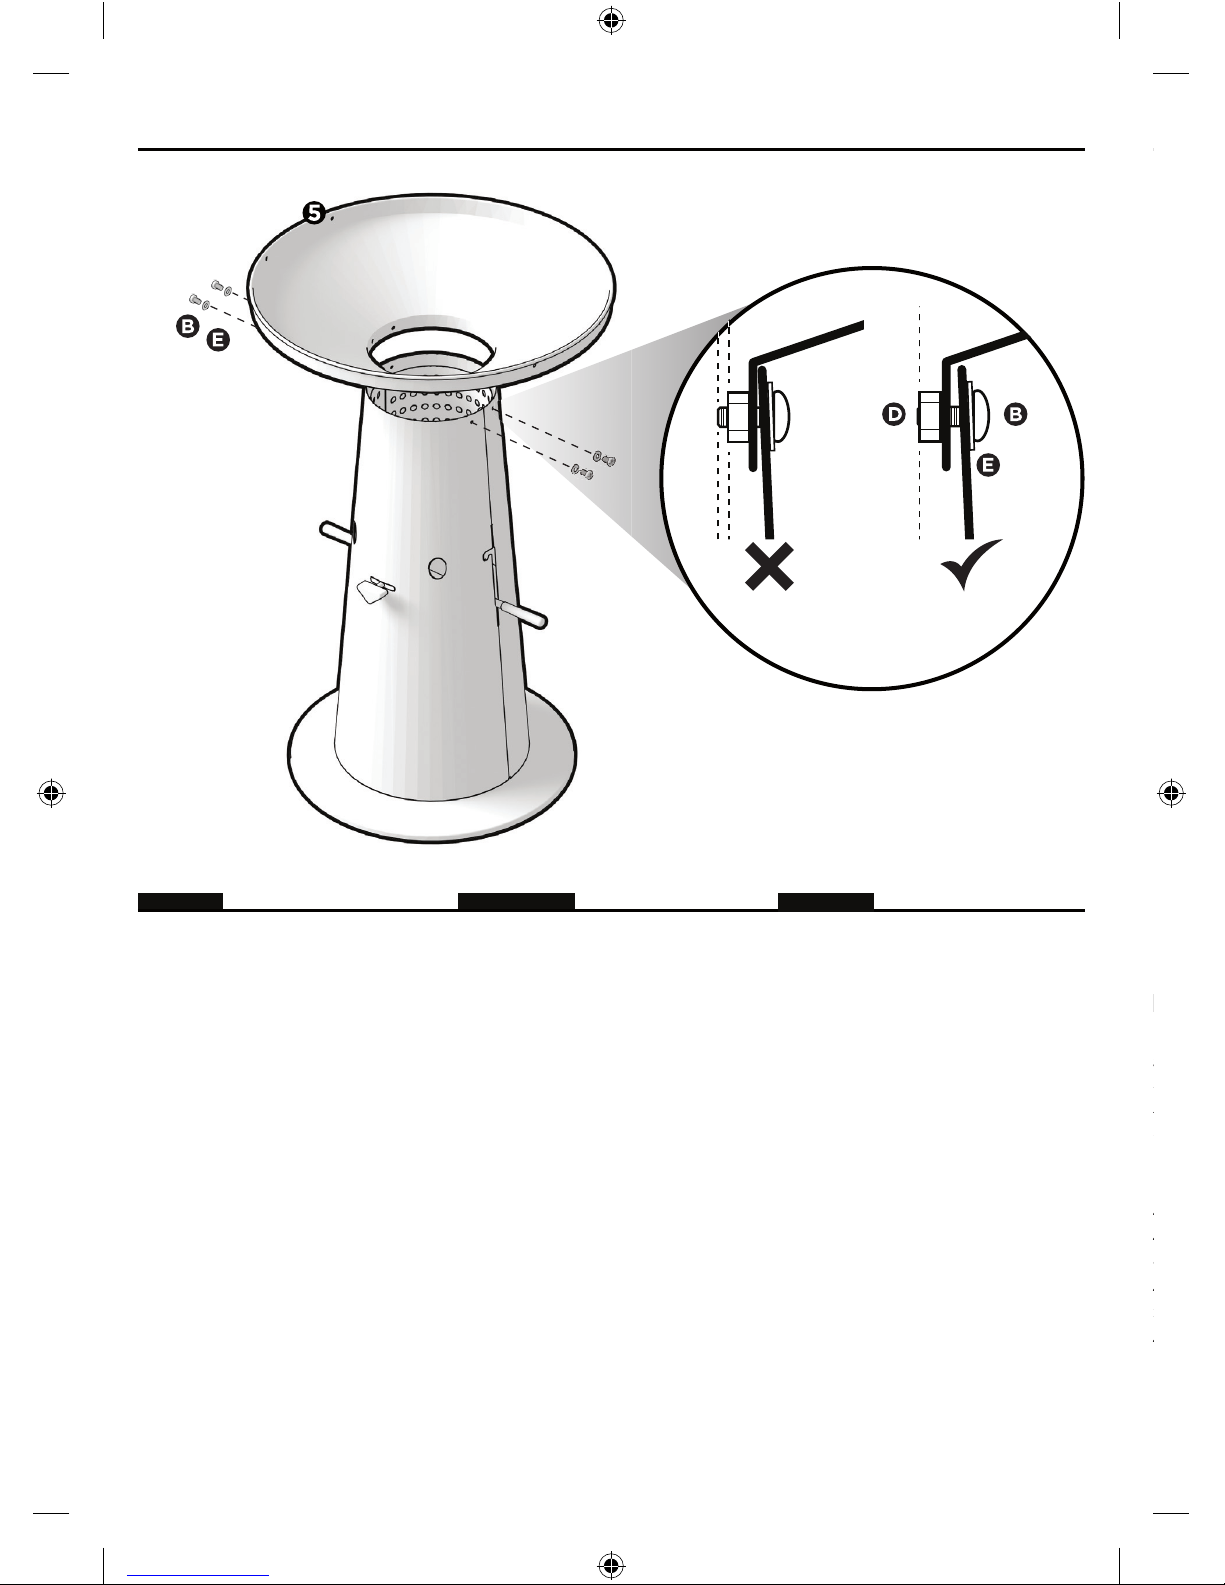
Place the fi re bowl (5) in the top
of the pillar. Make sure the 4 holes
in the top rim of the fi re bowl are
located on the centre line and to the
front of the barbecue. Turn the fi re
bowl until the 4 holes in the bottom
rim are properly aligned with the 4
holes in the top of the pillar. Use the
4 short screws
(B) with the washers
(E) and the 4 hex nuts (D) to fi x
the fi re bowl onto the pillar.
IMPORTANT: Screw the nuts
onto the bolts until they are
completely fl ush with the bolts’
heads and not further than that
(see detail above).
Placez la vasque-foyer
(5) sur le
dessus du pilier conique de sorte
que les 2 trous du bord supérieur
de la vasque se trouvent en
ligne médiane et 2 trous du bord
supérieure se trouvent à l’avant du
barbecue. Ajustez alors la vasque
de telle façon que les 4 trous du
bord inférieur correspondent aux
4 trous du pilier conique. Utilisez 4
vis courtes
(B) avec rondelles (E)
et écrous
(D) pour fi xer la vasque
sur le pilier conique.
IMPORTANT: ne serrez pas les
vis à fond dans les écrous mais
de telle sorte que le bout de la vis
ne dépasse pas le boulon et fasse
une surface plane avec celui-ci,
comme repris sur le dessin et
sur le diagramme ci-avant (ceci
pour garantir l’usage facile du
cendrier, voir étape 7).
Placera grillskålen (5) ovanpå
konen. Se till att de 4 hålen i
grillskålens övre kant är placerade
över mittlinjen och vända mot
grillens framsida. Vrid grillskålen
tills de 4 hålen i den nedre kanten
ligger dikt an över de 4 hålen
i konens övre kant. Skruva fast
grillskålen på konen med de 4 korta
skruvarna (B) samt brickor (E) och
de 4 sexkantsskruvarna (D).
VIKTIGT! Skruva på muttrarna
på skruvarna tills de är helt
parallella med skruvarnas
ändar, men inte längre än så (se
förstoringen på bilden ovan).
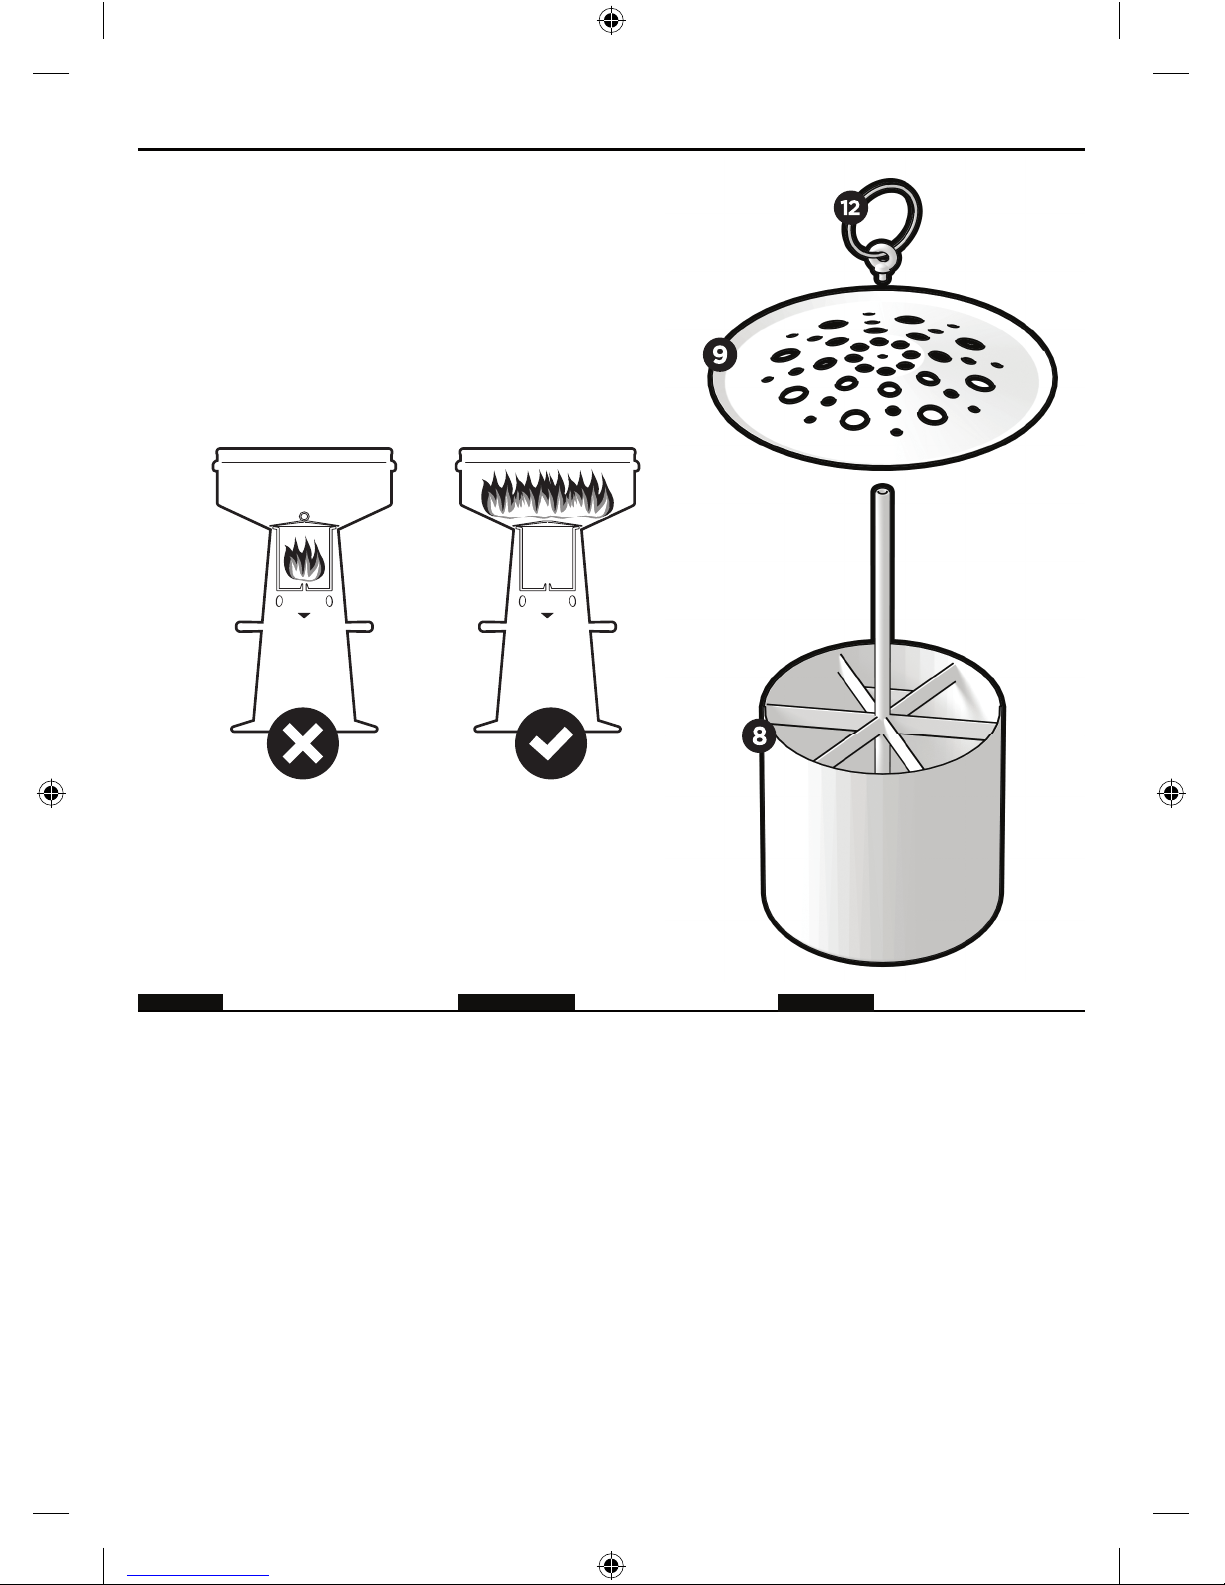
Take the ash cup (8), the charcoal
grill
(9) and the lifting ring + eye
bolt
(12) to make the ash cup unit.
Now assemble it by screwing the
charcoal grill onto the ash cup with
the eye bolt.
IMPORTANT:
Do not use the “Easy Ash Removal
System” to light your Buck!
Do not place any paper, wood or
fi re lighters in the pillar of your
Buck!
matro user manual24_SV_01.indd 12 13/11/12 18:09
Page 13
INSTRUCTIONS D’ASSEMBLAGE - ASSEMBLY INSTRUCTIONS
STEP 6
ENGLISH
FRANCAIS
SVENSKA
Take the ash cup (8), the charcoal
grill
(9) and the lifting ring + eye
bolt
(12) to make the ash cup unit.
Now assemble it by screwing the
charcoal grill onto the ash cup with
the eye bolt.
IMPORTANT:
Do not use the “Easy Ash Removal
System” to light your Buck!
Do not place any paper, wood or
fi re lighters in the pillar of your
Buck!
Prenez le cendrier
(8) la grille à
combustible
(9) l’anneau + la vis à
œillet
(12) pour monter le cendrier.
Utilisez la vis à œillet pour attacher
la grille au cendrier.
IMPORTANT:
N’utilisez pas le “Easy Ash
Removal System” pour allumer
votre Buck!
Ne placez pas du bois, du papier
ou des produits d’allumage dans
le pilier!
För monteringen av asklådan
behöver du asklådan (8), kolgallret
och lyftringen + ögleskruven (12).
Sätt samman delarna genom att
skruva på kolgallret på asklådan
med hjälp av ögleskruven.
VIKTIGT!
Använd inte “Easy Ash Removal
System” för att tända din Buck!
Lägg inte papper, trä eller
tändblock i konen på din Buck!
YES !
JA!
OUI !
NO !
NEJ!
NON !
matro user manual24_SV_01.indd 13 13/11/12 18:09
Page 14
STEP 7
STEP 8
ENGLISH
ENGLISH
FRANCAIS
SVENSKA
ASSEMBLY INSTRUCTIONS - MONTERINGSANVISNINGAR
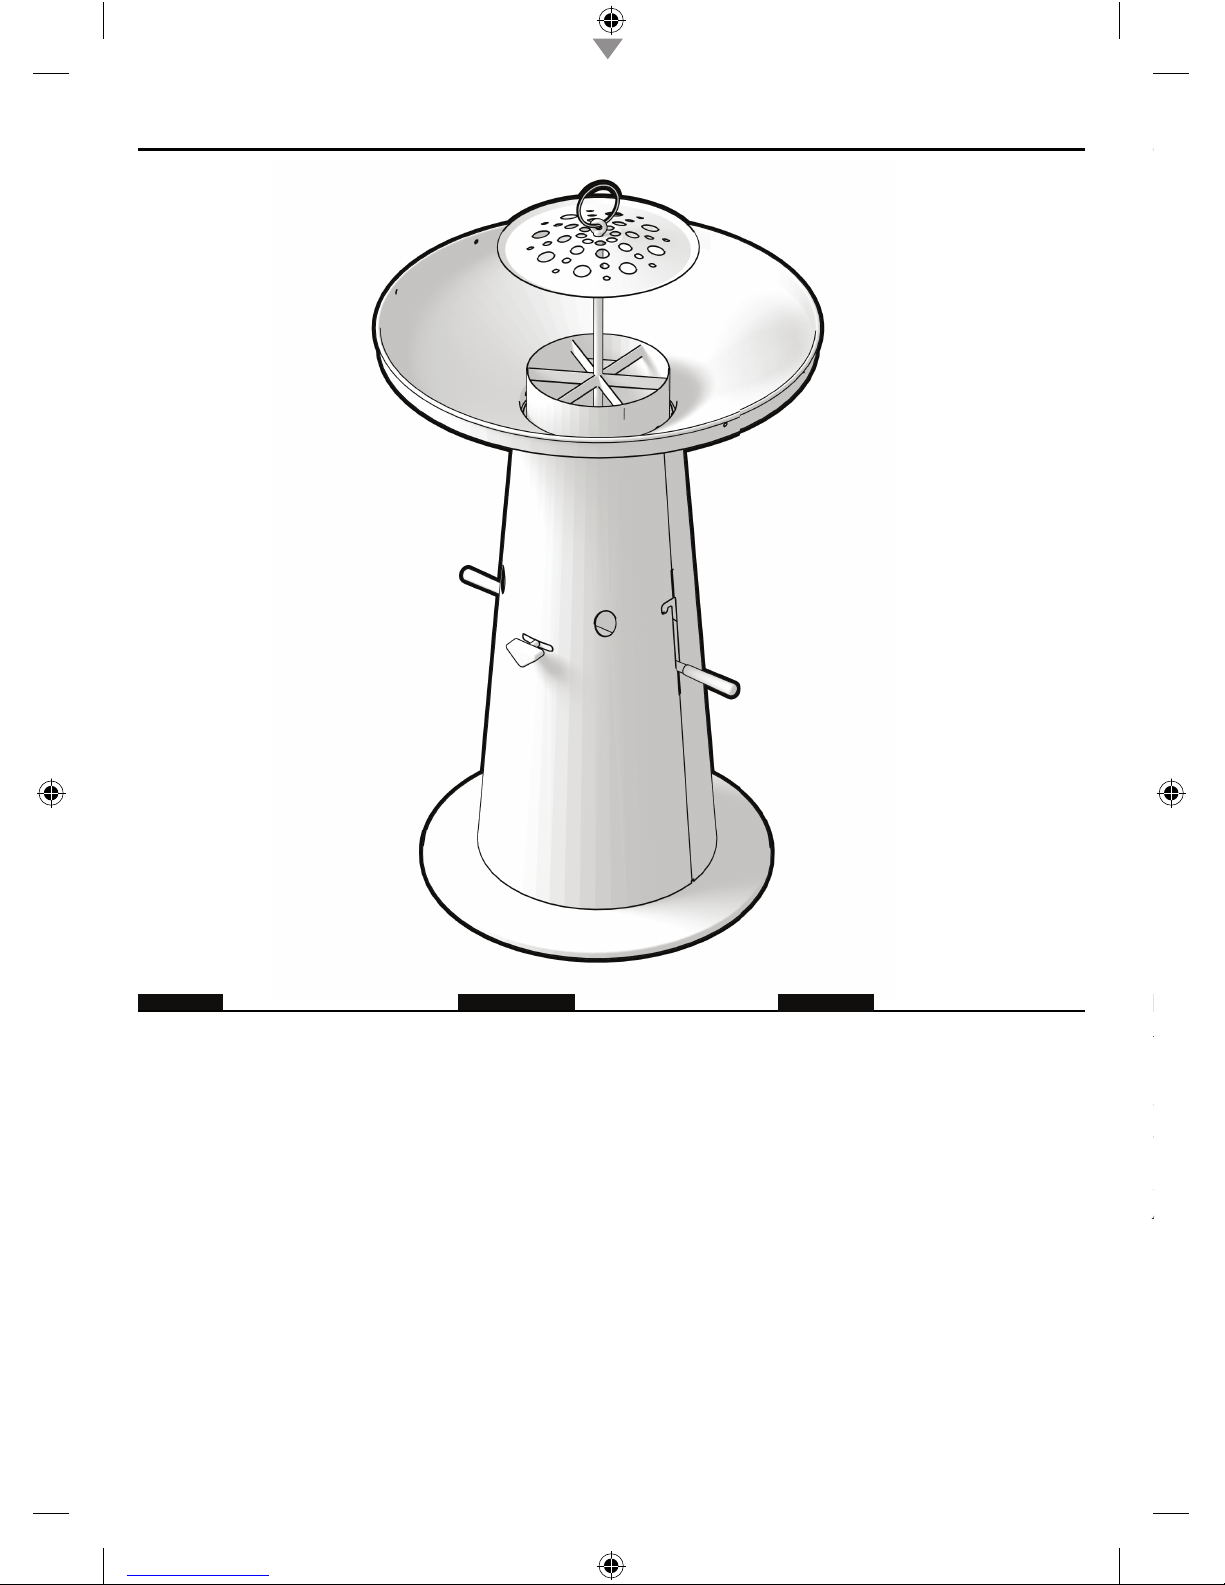
Drop the ash cup unit carefully into
the main body of the barbecue.
If necessary, turn the ash cup
back and forth until a clear
passage in and out of the
barbecue is obtained.
Place the wind shield (6) on
the top rim of the fi re bowl
as illustrated above. Press the
windshield down fi rmly until the
small metal clips are fi xed around
the upper border. Shift it until the
holes on the 2 bottom front sides are
properly aligned with the holes on
the centre of the fi re bowl’s top rim.
The tool hooks can now be placed
as described in step 9.
Glissez prudemment le cendrier en
le descendant dans le dessus du
pilier conique.
Tournez le cendrier si nécessaire
jusqu’à ce qu’il prenne sa place
et puisse être enlevé facilement
et glisser librement dans le pilier
conique (voir étape 5).
För varsamt ned asklådan genom
mittdelen av grillen.
Vrid vid behov asklådan fram och
tillbaka för att få den att passera
hela vägen genom grillen.
matro user manual24_SV_01.indd 14 13/11/12 18:09
Page 15
INSTRUCTIONS D’ASSEMBLAGE - ASSEMBLY INSTRUCTIONS
STEP 8
ENGLISH
FRANCAIS
SVENSKA
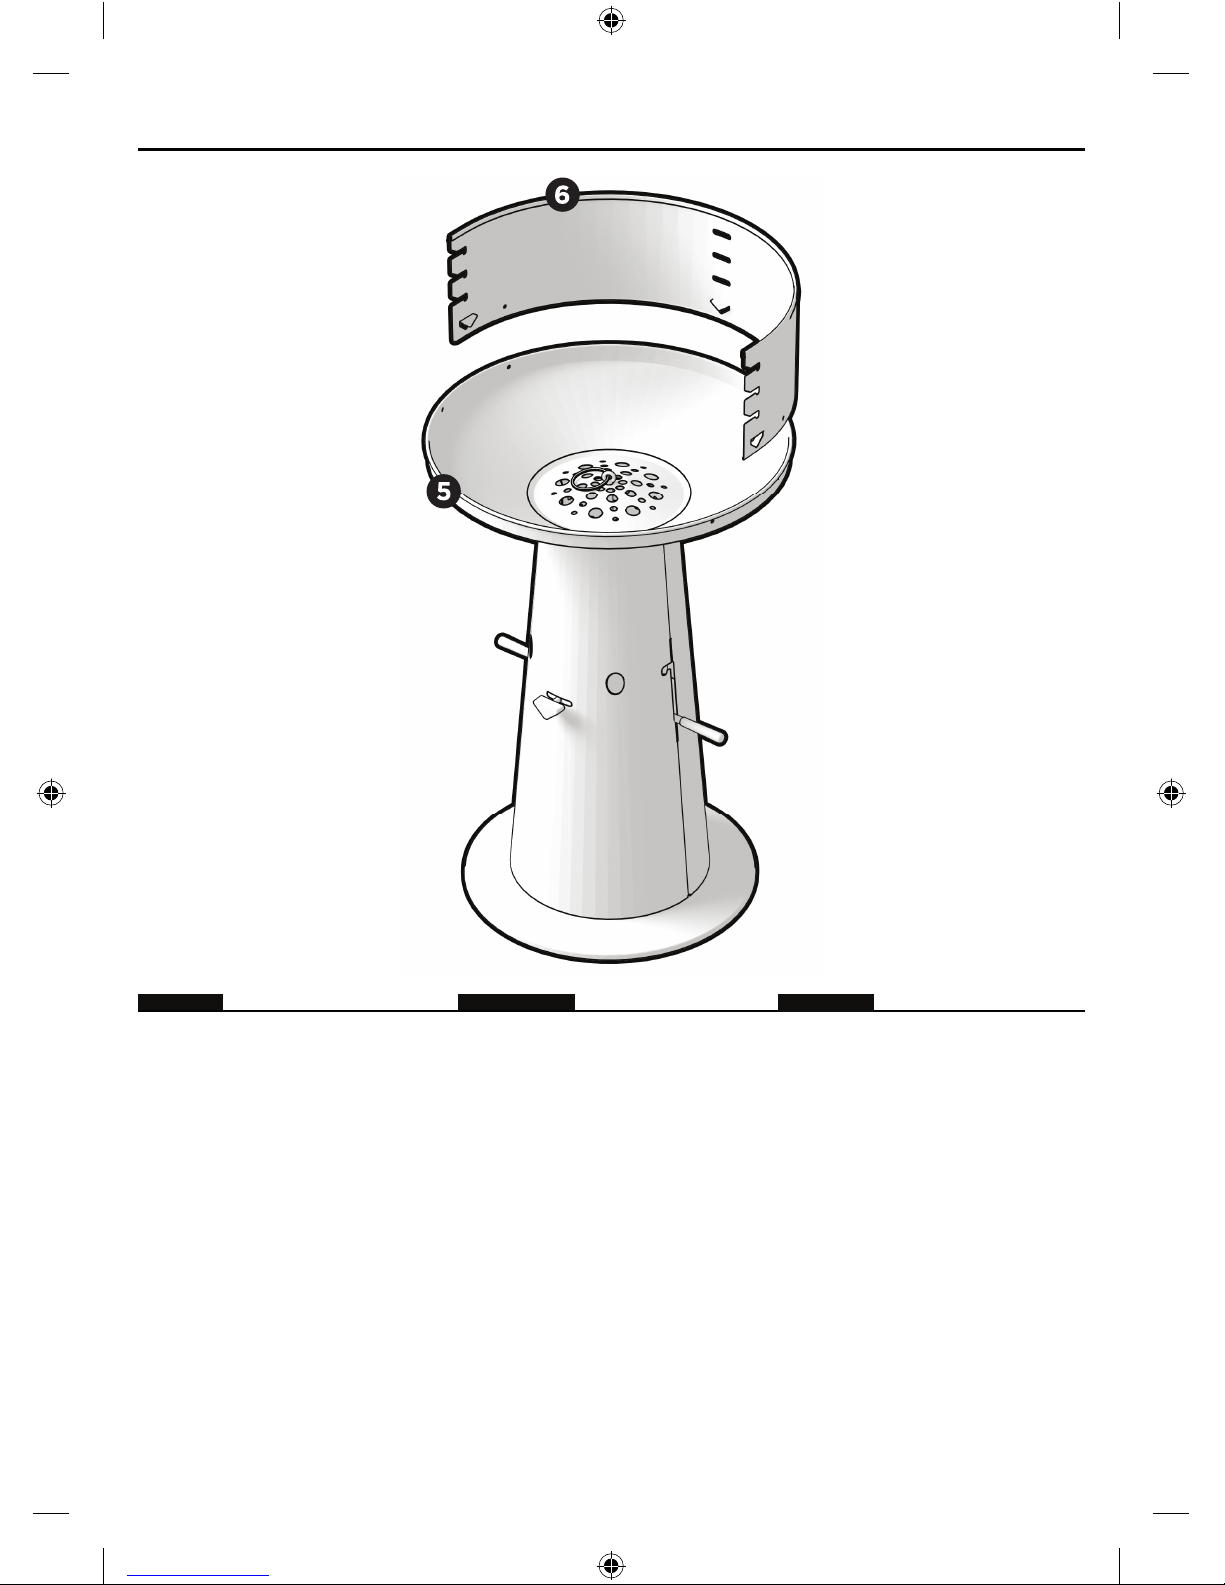
Place the wind shield (6) on
the top rim of the fi re bowl
(5)
as illustrated above. Press the
windshield down fi rmly until the
small metal clips are fi xed around
the upper border. Shift it until the
holes on the 2 bottom front sides are
properly aligned with the holes on
the centre of the fi re bowl’s top rim.
The tool hooks can now be placed
as described in step 9.
Fixez le pare-vent (6) sur le bord
supérieur de la vasque-foyer
(5)
comme indiqué sur le dessin et
en appuyant vers le bas de sorte
que les 4 crochets métalliques se
coincent solidement sur le bord.
Positionnez le pare-vent de telle
façon que les 2 trous en bas du
pare-vent correspondent avec les 2
trous de la vasque qui se trouvent
en ligne médiane afi n d’y fi xer
les crochets d’accessoires comme
décrit étape 9.
Placera vindskärmen (6) ovanför
grillskålens överkant (5) som på
bilden ovan. Pressa vindskärmen
nedåt med ett stadigt tryck, tills
de små metallfl ikarna hamnar
på plats runt skålens överkant.
Justera vindskärmen tills hålen
på vindskärmens två främre delar
befi nner sig rakt över hålen i mitten
av grillskålens överkant. Nu kan
redskapshakarna sättas fast enligt
anvisningarna i steg 9.
matro user manual24_SV_01.indd 15 13/11/12 18:09
Page 16
STEP 9
STEP 10
ENGLISH
ENGLISH
FRANCAIS
SVENSKA
ASSEMBLY INSTRUCTIONS - MONTERINGSANVISNINGAR
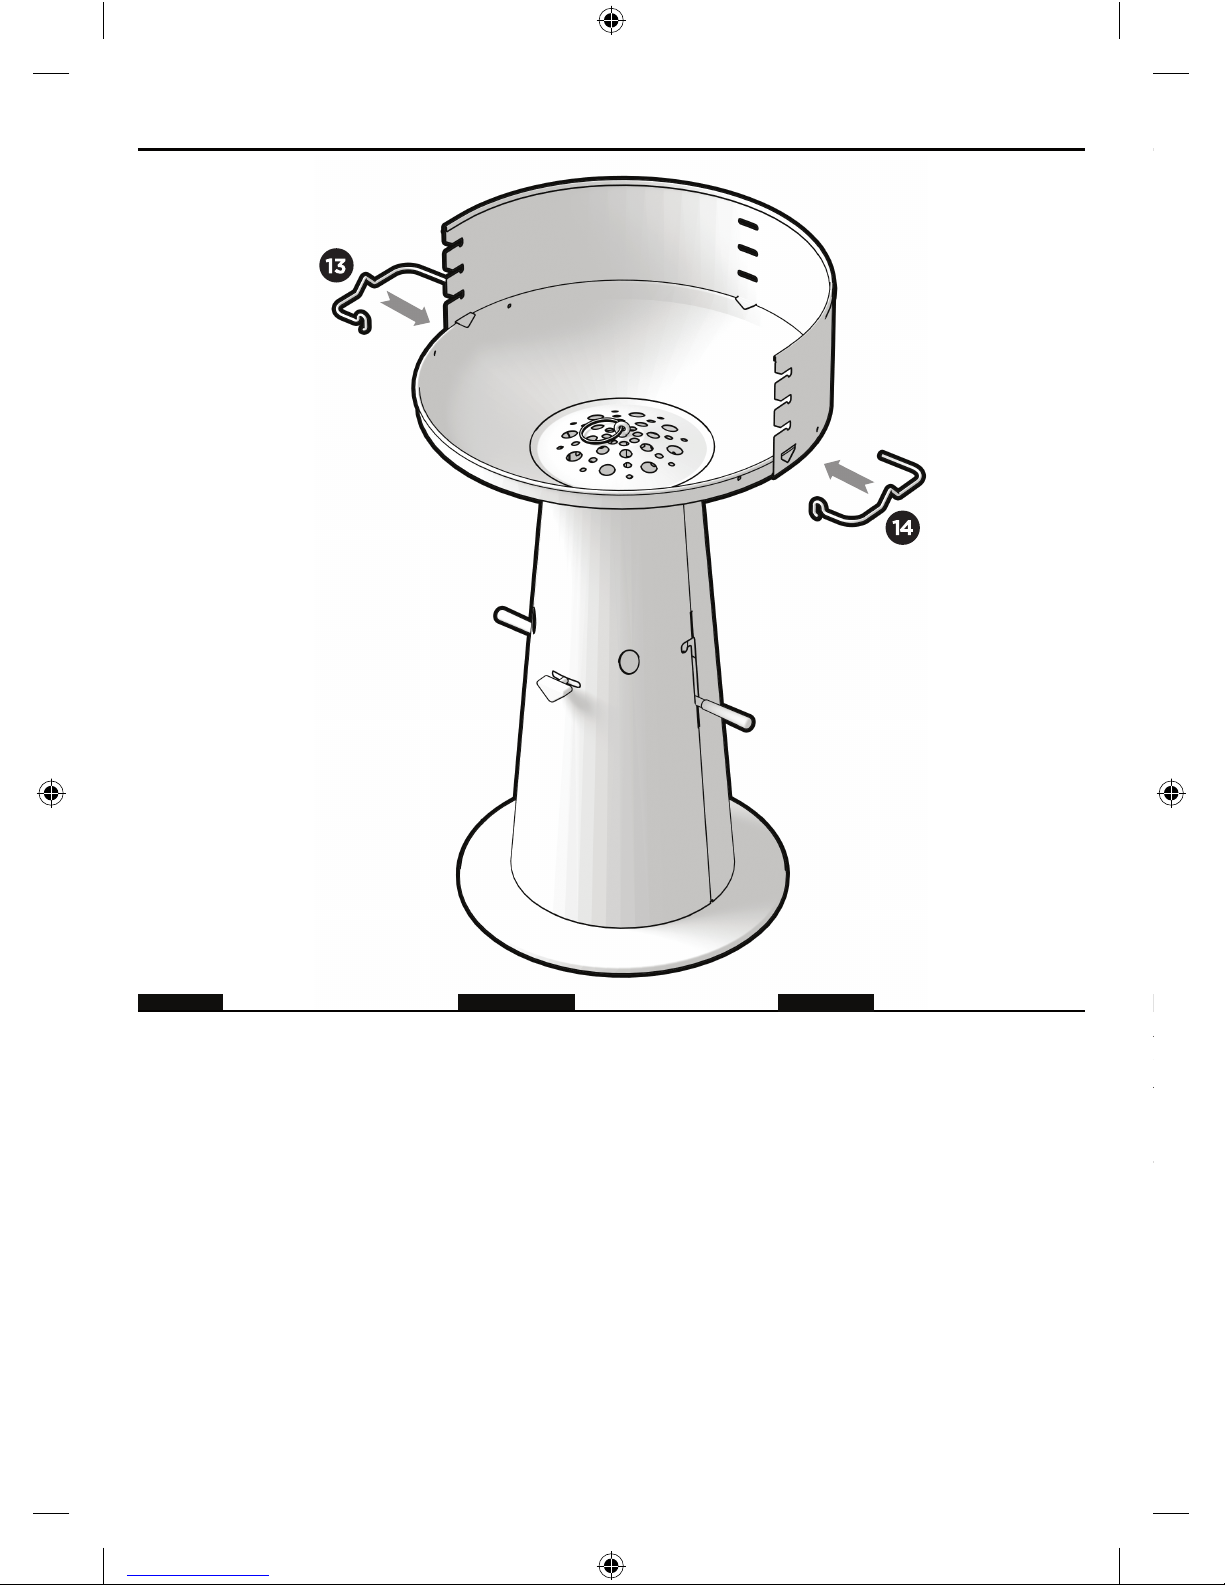
The tool hooks (13 & 14) are put
into place as described hereafter
(same for both sides): fi rst slide
the long straight end of the hook
through the hole in the wind shield
(and in the fi re bowl). Then rotate,
lift and press down the curled part
of the tool hook to make it snap into
the front hole of the fi re bowl’s top
rim.
These hooks should be used only
for hanging barbecue tools and
utensils, NOT for lifting the
barbecue!!!
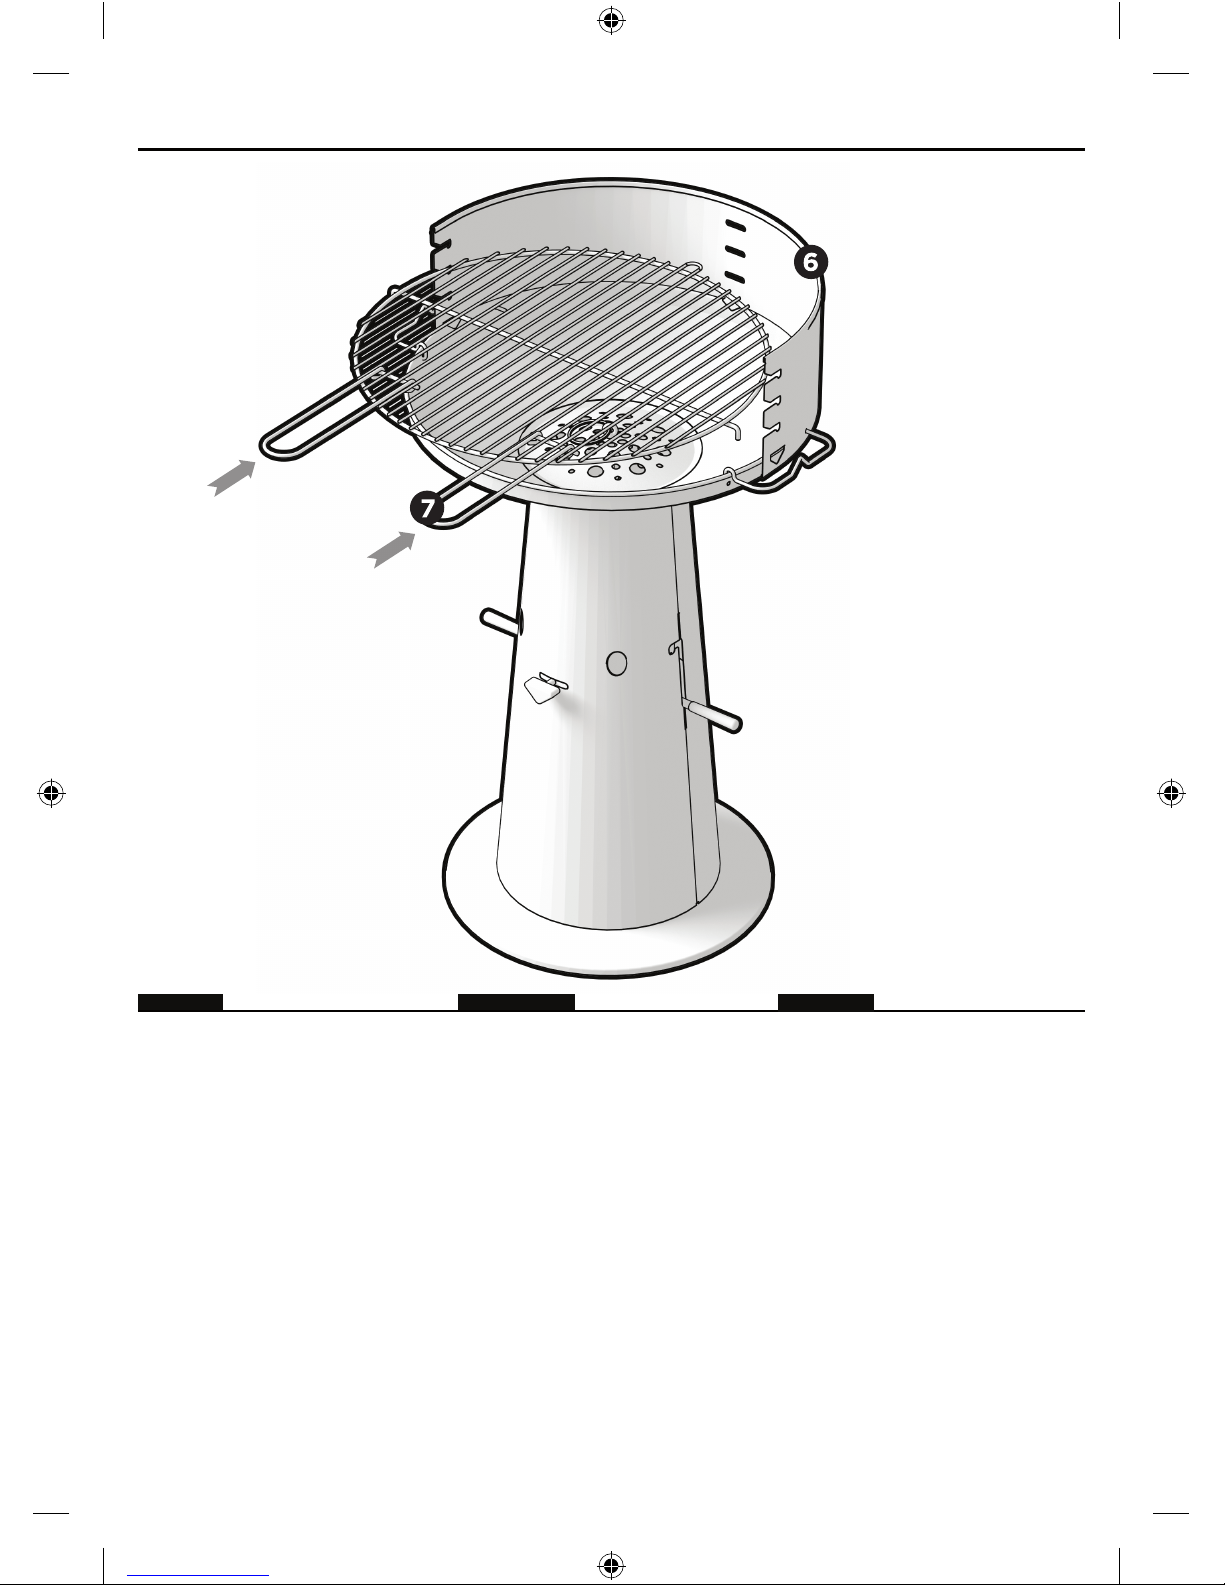
Put the cooking grill (7) into place
according to the illustration above.
Make sure it’s placed horizontally;
the hole and the notches in which
the grill is inserted should be on the
same horizontal level.
Glissez les crochets d’accessoires
(13 & 14) à leur place de façon
suivante : enfoncez d’abord la tige
longue dans le trou du pare-vent
et de la vasque et puis glissez
le crochet recourbé dans le trou
intérieur de la vasque.
Ces crochets sont uniquement
destinés à accrocher des
accessoires et ne peuvent pas
server de poignées pour déplacer
ou porter le barbecue!!!
Redskapshakarna (13 & 14) sätts
på plats på följande sätt (samma
tillvägagångssätt för bägge
sidor): skjut först in den långa
raka änden av haken genom hålet
i vindskärmen (och i grillskålen).
Rotera sedan, lyft och tryck ned den
bockade delen av redskapshaken
så att den kommer på plats i
det främre hålet på grillskålens
överkant.
Dessa hakar är endast avsedda
för att hänga grillredskap och
tillbehör på, och INTE för att
lyfta grillen!
matro user manual24_SV_01.indd 16 13/11/12 18:09
Page 17
INSTRUCTIONS D’ASSEMBLAGE - ASSEMBLY INSTRUCTIONS
STEP 10
ENGLISH
FRANCAIS
SVENSKA
Put the cooking grill (7) into place
according to the illustration above.
Make sure it’s placed horizontally;
the hole and the notches in which
the grill is inserted should be on the
same horizontal level.
Placer la grille de cuisson (7)
dans le pare-vent de telle façon
que le tout soit en parfaite position
horizontale. Pour obtenir cette
position, utilisez les ouvertures et
les crochets de fi xation de la grille
de même niveau pour une fi xation
horizontale
Sätt grillgallret (7) på plats i
vindskärmen enligt bilden ovan,
och kontrollera att det sitter helt
vågrätt; hålet och jacken gallret
placeras i ska vara i höjd med
varandra.
matro user manual24_SV_01.indd 17 13/11/12 18:09
Page 18
STEP 11
IMPORTANT PRECAUTIONS
•Do not use spirit, petrol or similar liquids to light the barbecue or to speed up or (re)start the
burning process.
•Use only firelighters which correspond to the EN 1860-3 norm. MATRO recommends using the
SOL® firelighters.
•Use only charcoal, coconut briquettes or charcoal briquettes (later referred to as ‘solid fuel’)
which accord to the EN 1860-2 norm. MATRO recommends using the solid fuels by SOL®. Wood
or paper are NOT a suitable solid fuel, as the extreme temperatures (up to 1.000°C ) can cause
irreparable damage to certain parts.
•Never use the barbecue indoors.
•Always make sure the barbecue is placed on a stable and fully horizontal surface, which is
certainly heat-resistant.
•Do not use the barbecue near inflammable or meltable objects or materials. Be careful with
inflammable clothing: keep a safe distance.
•Always keep children and animals at a safe distance.
•The barbecue must only be used under constant supervision of an adult. He needs to be near the
barbecue at all times.
•Use the barbecue only if the ash cup is placed correctly.
•This barbecue will become very hot. Do not move it while burning or when it’s not completely
cooled down. Abuse and misuse can cause serious injuries (burns).
•Make sure the flames do not touch the food directly. Do not put any food on the grill before the
solid fuel is covered with a thin layer of grey ashes.
•MATRO suggests using an aluminium tray or a similar receptacle to prepare food which can leak
oil or fat, as this causes flare-ups.
•MATRO recommends keeping a fire extinguisher or a bucket with water or sand near the burning
barbecue.
•Do not use the “Easy Ash Removal System” to light your Buck!
•Do not place any paper, wood or fire lighters in the pillar of your Buck!
FIRST USE
•Leave hot, live coals burning for at least 30 minutes before using the barbecue for the first time.
Don’t put the cooking grill on the barbecue before the solid fuel is covered with a thin layer of
grey ashes.
GENERAL INSTRUCTIONS
•Remove the chromed cooking grill. (FYI: don’t put it back until the barbecue is ready for use)
•Place the solid firelighters in the ash cup’s compartment or on the charcoal grill (in the fire bowl).
Light them with an appropriate tool (e.g. XL matches).
•If you’re using lighter liquids, follow the producer’s instructions on the packaging precisely.
•Shovel some solid fuel into the fire bowl. Don’t use too much: max. 75%.
•Once the solid fuel is burning, use an appropriate tool to spread it out evenly. Be careful not to
burn yourself!
•Wait until the solid fuel is covered with a thin layer of grey ashes. This takes approximately 30
minutes.
•Place the cooking grill at your desired height. Make sure it’s in a stable and safe position. (cf.
Assembly instructions)
•Always use appropriate barbecue accessories to put the food on the cooking grill.
ENGLISH
FRANCAIS
SVENSKA
ASSEMBLY INSTRUCTIONS - MONTERINGSANVISNINGAR
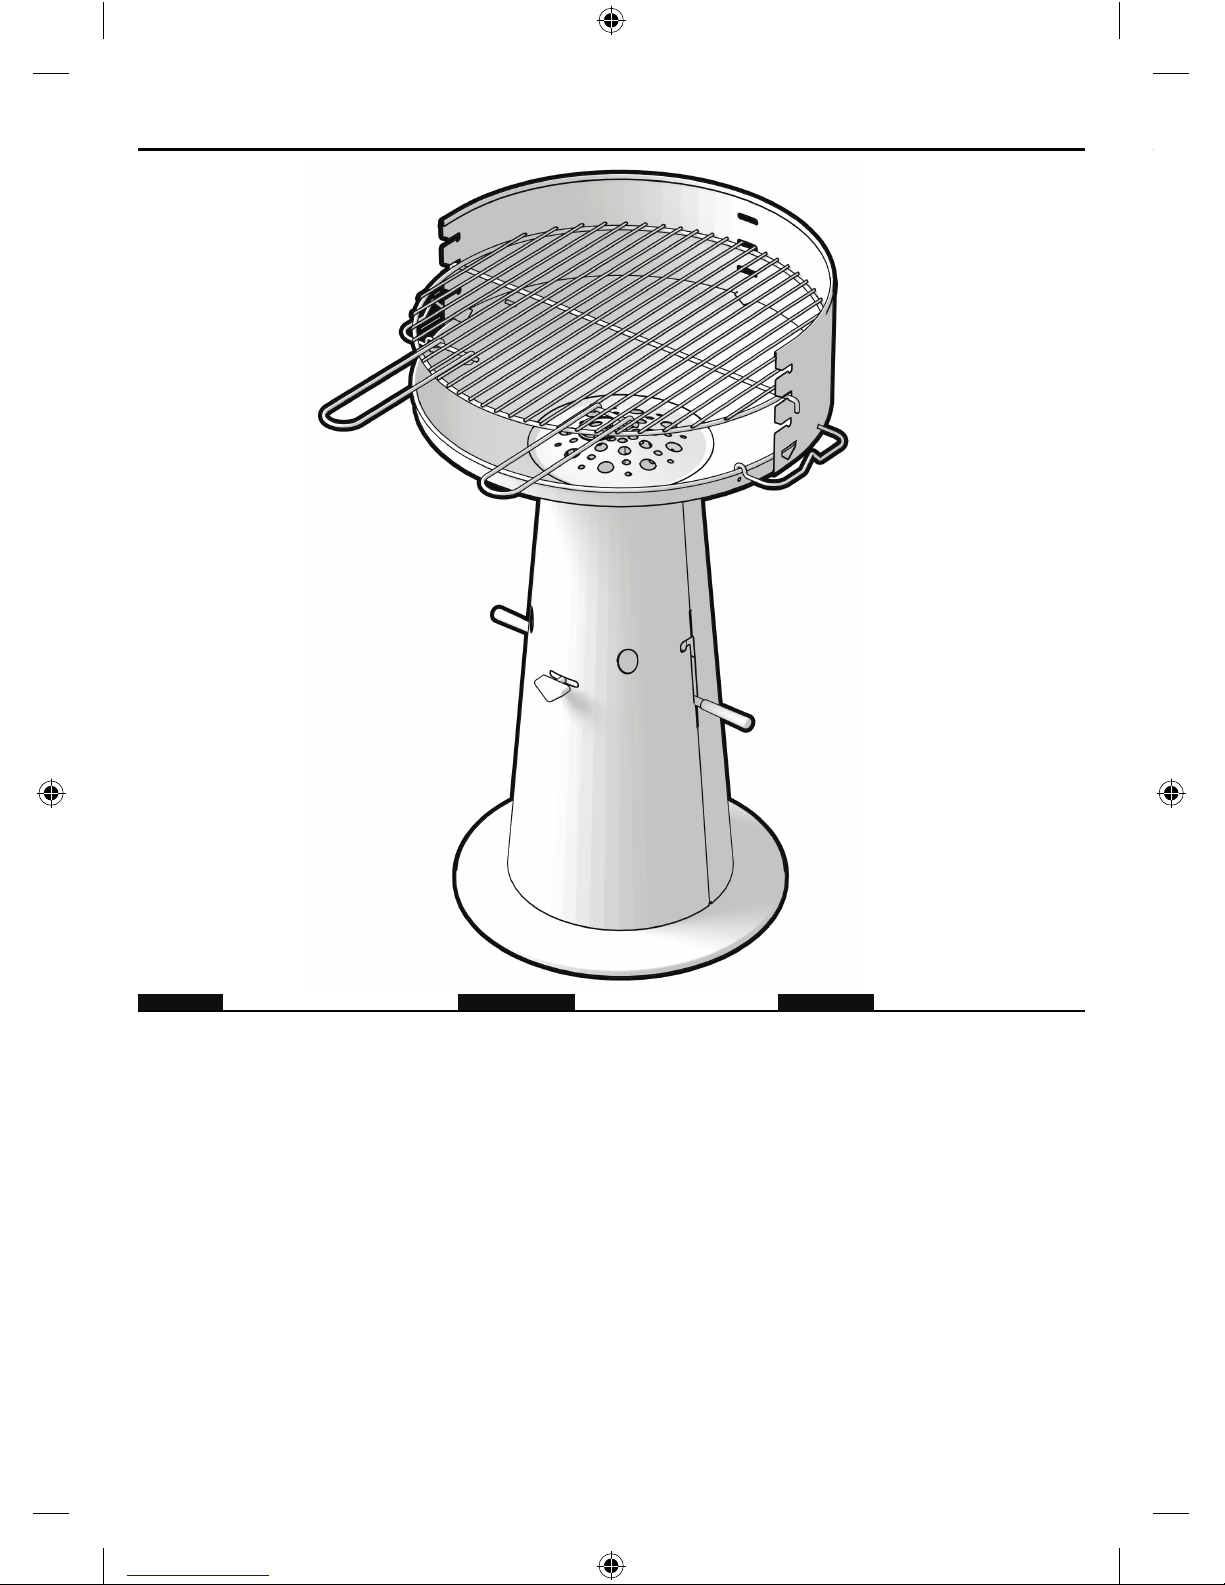
The Buck barbecue is now complete.
Please read the user manual
carefully, before lighting your
barbecue!
You are now ready to enjoy your
Buck barbecue.
Le barbecue Buck est maintenant
entièrement monté.
Lisez attentivement le mode
d’emploi avant de commencer
votre barbecue!
Vous pourrez ensuite jouir
totalement de votre barbecue
Buck.
Din Buck-grill är nu
färdigmonterad.
Vi uppmanar dig att noggrant
läsa igenom bruksanvisningen
innan du tar grillen i bruk!
Allt är nu klart för att börja
använda din nya Buck-grill.
matro user manual24_SV_01.indd 18 13/11/12 18:09
Page 19

INSTRUCTIONS FOR USE - ENGLISH
IMPORTANT PRECAUTIONS
•Do not use spirit, petrol or similar liquids to light the barbecue or to speed up or (re)start the
burning process.
•Use only firelighters which correspond to the EN 1860-3 norm. MATRO recommends using the
SOL® firelighters.
•Use only charcoal, coconut briquettes or charcoal briquettes (later referred to as ‘solid fuel’)
which accord to the EN 1860-2 norm. MATRO recommends using the solid fuels by SOL®. Wood
or paper are NOT a suitable solid fuel, as the extreme temperatures (up to 1.000°C ) can cause
irreparable damage to certain parts.
•Never use the barbecue indoors.
•Always make sure the barbecue is placed on a stable and fully horizontal surface, which is
certainly heat-resistant.
•Do not use the barbecue near inflammable or meltable objects or materials. Be careful with
inflammable clothing: keep a safe distance.
•Always keep children and animals at a safe distance.
•The barbecue must only be used under constant supervision of an adult. He needs to be near the
barbecue at all times.
•Use the barbecue only if the ash cup is placed correctly.
•This barbecue will become very hot. Do not move it while burning or when it’s not completely
cooled down. Abuse and misuse can cause serious injuries (burns).
•Make sure the flames do not touch the food directly. Do not put any food on the grill before the
solid fuel is covered with a thin layer of grey ashes.
•MATRO suggests using an aluminium tray or a similar receptacle to prepare food which can leak
oil or fat, as this causes flare-ups.
•MATRO recommends keeping a fire extinguisher or a bucket with water or sand near the burning
barbecue.
•Do not use the “Easy Ash Removal System” to light your Buck!
•Do not place any paper, wood or fire lighters in the pillar of your Buck!
FIRST USE
•Leave hot, live coals burning for at least 30 minutes before using the barbecue for the first time.
Don’t put the cooking grill on the barbecue before the solid fuel is covered with a thin layer of
grey ashes.
GENERAL INSTRUCTIONS
•Remove the chromed cooking grill. (FYI: don’t put it back until the barbecue is ready for use)
•Place the solid firelighters in the ash cup’s compartment or on the charcoal grill (in the fire bowl).
Light them with an appropriate tool (e.g. XL matches).
•If you’re using lighter liquids, follow the producer’s instructions on the packaging precisely.
•Shovel some solid fuel into the fire bowl. Don’t use too much: max. 75%.
•Once the solid fuel is burning, use an appropriate tool to spread it out evenly. Be careful not to
burn yourself!
•Wait until the solid fuel is covered with a thin layer of grey ashes. This takes approximately 30
minutes.
•Place the cooking grill at your desired height. Make sure it’s in a stable and safe position. (cf.
Assembly instructions)
•Always use appropriate barbecue accessories to put the food on the cooking grill.
matro user manual24_SV_01.indd 19 13/11/12 18:09
Page 20

HOW TO USE THE AIR INLET
•When lighting the barbecue, the holes should be half to completely opened. By sliding the nose
handle to the left or right, the air flow can be regulated.
•The intensity of the fire is adjusted by opening or closing the ventilation holes.
•If you wish to speed up the fire going out, close the holes.
INSTRUCTIONS AFTER USE
•Move the ash cup upwards by using the lifting bar. Lock the bar by lifting it into the small notches
that were designed for this.
•Brush all remains (ashes + solid fuel) into the ash cup using an appropriate tool (e.g. steel brush).
•Don’t remove the ash cup before the unit has cooled down completely.
•Lift the ash cup carefully by pulling the lifting ring and throw its contents into a dustbin or an
appropriate garbage container.
•Please store the barbecue inside or at least in a covered area to avoid rust formation. MATRO
strongly recommends using the available Buck cover.
WARRANTY
•Your Buck barbecue comes with a two-year warranty, from the date of purchase. This warranty
only covers manufacturing faults under the condition that the barbecue is used correctly at home
(as described above). Only receipts which state the date of purchase unambiguously will be
accepted.
•The warranty does not cover wear from normal use at home. This includes (among other things
but not exclusively):
» deformation and discoloration of certain parts due to the heat or thermal shocks which
occur while using or cleaning the barbecue.
» any rust formation caused by exposure to or storage in humid circumstances.
» all damages to the surface coating caused by scrubbing tools.
•We don’t consider minor irregularities such as small droplets in the varnish coating, the
deformation of parts to a tolerable extent or certain small parts that are not completely
enamelled, as manufacturing faults. They are therefore not covered by the warranty.
VIKTIGA FÖRSIKTIGHETSÅTGÄRDER
•Använd inte sprit, bensin eller liknande vätskor för att tända grillen, för att få elden att brinna
häftigare eller för att tända elden om den har slocknat.
•Använd endast tändningsdon som överensstämmer med normen EN 1860-3. MATRO
rekommenderar grilltändare av märket SOL©.
•Använd endast kol, kokosnötsbriketter eller kolbriketter (benämns från och med nu ”fast
bränsle”) som överensstämmer med normen EN 1860-2. MATRO rekommenderar fast bränsle
från SOL©. Trä och papper är INTE lämpliga fasta bränslen, eftersom den extrema hettan (upp till
1 000 °C) kan förorsaka skador som inte går att reparera på vissa delar.
•Använd aldrig grillen inomhus.
•Kontrollera före varje användning att grillen står på ett stabilt, fullständigt vågrätt och
värmetåligt underlag.
•Använd inte grillen i närheten av lättantändliga eller smältbara föremål eller material. Var försiktig
med lättantändliga kläder och håll alltid behörigt säkerhetsavstånd.
•Grillen får endast användas under ständig uppsikt av en vuxen. Denne vuxne måste alltid befinna
sig i närheten av grillen.
•Använd grillen enbart när asklådan sitter korrekt på plats.
•Denna grill blir mycket het. Flytta den inte medan den brinner eller inte har svalnat. Felaktig
användning kan ge allvarliga brännskador.
•Se till att lågorna inte är i direktkontakt med maten. Lägg ingen mat på grillen förrän det fasta
bränslet har täckts av ett tunt lager grå aska.
•MATRO föreslår att en aluminiumbricka eller liknande används vid grillning av mat som kan läcka
olja eller fett, eftersom detta kan leda till att elden flammar upp.
•MATRO rekommenderar att du alltid har en brandsläckare eller hink med vatten eller sand
bredvid grillen när den är tänd.
•Använd inte ”Easy Ash Removal System” för att tända din Buck!
•Placera inget papper, trä eller andra tändmedel i konen på din Buck!
FÖRSTA ANVÄNDNINGSTILLFÄLLET
•Låt heta, glödande kol brinna i minst 30 minuter innan du använder grillen för första gången.
Placera inte grillgallret på grillen förrän det fasta bränslet är täckt av ett tunt lager grå aska.
ALLMÄNNA ANVISNINGAR
•Ta bort det förkromade grillgallret. (OBS! Lägg inte tillbaka det förrän grillen är färdig att
användas)
•Placera det fasta bränslet i facket på asklådan eller på kolgallret (i grillskålen). Tänd med lämpligt
tändmedel (t.ex. långa tändstickor).
•Om du använder tändvätska, följ tillverkarens anvisningar på förpackningen till punkt och pricka.
•Häll lite fast bränsle i grillskålen. Använd inte för mycket: max 75 %.
•När det fasta bränslet brinner använder du ett passande redskap för att sprida ut det jämnt. Var
försiktig så att du inte bränner dig!
•Vänta tills det fasta bränslet är täckt av ett tunt lager grå aska. Detta tar cirka 30 minuter.
•Placera grillgallret på önskad höjd. Kontrollera att det befinner sig i en stabil och säker position.
(se monteringsanvisningarna).
•Använd alltid passande grillredskap när du placerar maten på grillgallret.
INSTRUCTIONS FOR USE - ENGLISH
matro user manual24_SV_01.indd 20 13/11/12 18:09
Page 21

BRUKSANVISNING – SVENSKA
VIKTIGA FÖRSIKTIGHETSÅTGÄRDER
•Använd inte sprit, bensin eller liknande vätskor för att tända grillen, för att få elden att brinna
häftigare eller för att tända elden om den har slocknat.
•Använd endast tändningsdon som överensstämmer med normen EN 1860-3. MATRO
rekommenderar grilltändare av märket SOL©.
•Använd endast kol, kokosnötsbriketter eller kolbriketter (benämns från och med nu ”fast
bränsle”) som överensstämmer med normen EN 1860-2. MATRO rekommenderar fast bränsle
från SOL©. Trä och papper är INTE lämpliga fasta bränslen, eftersom den extrema hettan (upp till
1 000 °C) kan förorsaka skador som inte går att reparera på vissa delar.
•Använd aldrig grillen inomhus.
•Kontrollera före varje användning att grillen står på ett stabilt, fullständigt vågrätt och
värmetåligt underlag.
•Använd inte grillen i närheten av lättantändliga eller smältbara föremål eller material. Var försiktig
med lättantändliga kläder och håll alltid behörigt säkerhetsavstånd.
•Grillen får endast användas under ständig uppsikt av en vuxen. Denne vuxne måste alltid befinna
sig i närheten av grillen.
•Använd grillen enbart när asklådan sitter korrekt på plats.
•Denna grill blir mycket het. Flytta den inte medan den brinner eller inte har svalnat. Felaktig
användning kan ge allvarliga brännskador.
•Se till att lågorna inte är i direktkontakt med maten. Lägg ingen mat på grillen förrän det fasta
bränslet har täckts av ett tunt lager grå aska.
•MATRO föreslår att en aluminiumbricka eller liknande används vid grillning av mat som kan läcka
olja eller fett, eftersom detta kan leda till att elden flammar upp.
•MATRO rekommenderar att du alltid har en brandsläckare eller hink med vatten eller sand
bredvid grillen när den är tänd.
•Använd inte ”Easy Ash Removal System” för att tända din Buck!
•Placera inget papper, trä eller andra tändmedel i konen på din Buck!
FÖRSTA ANVÄNDNINGSTILLFÄLLET
•Låt heta, glödande kol brinna i minst 30 minuter innan du använder grillen för första gången.
Placera inte grillgallret på grillen förrän det fasta bränslet är täckt av ett tunt lager grå aska.
ALLMÄNNA ANVISNINGAR
•Ta bort det förkromade grillgallret. (OBS! Lägg inte tillbaka det förrän grillen är färdig att
användas)
•Placera det fasta bränslet i facket på asklådan eller på kolgallret (i grillskålen). Tänd med lämpligt
tändmedel (t.ex. långa tändstickor).
•Om du använder tändvätska, följ tillverkarens anvisningar på förpackningen till punkt och pricka.
•Häll lite fast bränsle i grillskålen. Använd inte för mycket: max 75 %.
•När det fasta bränslet brinner använder du ett passande redskap för att sprida ut det jämnt. Var
försiktig så att du inte bränner dig!
•Vänta tills det fasta bränslet är täckt av ett tunt lager grå aska. Detta tar cirka 30 minuter.
•Placera grillgallret på önskad höjd. Kontrollera att det befinner sig i en stabil och säker position.
(se monteringsanvisningarna).
•Använd alltid passande grillredskap när du placerar maten på grillgallret.
matro user manual24_SV_01.indd 21 13/11/12 18:09
Page 22

IMPORTANTES PRECAUTIONS GéNéRALES
•Ne pas utiliser d’alcool, essence ou autres combustibles pour allumer ou réactiver l’allumage de
votre barbecue.
•Utilisez seulement des produits d’allumage qui sont conforme à la norme EN 1860-3. MATRO
vous recommande l’usage des produits d’allumage SOL®.
•Utilisez exclusivement du charbon de bois ou des briquettes de coco/charbon de bois (décrites
plus loin comme ”combustible”) qui sont conforme à la norme EN 1860-2 . MATRO recommande
l’utilisation des combustibles SOL®. Du bois ne convient pas comme combustible, vu les
températures extrêmes (jusqu’à 1000°C) qui peuvent provoquer des dégâts irréparables à
certains accessoires.
•N’utilisez jamais le barbecue à l’intérieur d’une maison ou bâtiment.
•Placez toujours le barbecue sur un sol stable et horizontal, qui peut certainement supporter des
températures élevées.
•Ne pas disposer le barbecue dans les parages d’objets qui peuvent fondre ou prendre feu.
•Eloignez les enfant et les animaux (domestiques) de votre barbecue.
•N’utilisez le barbecue que sous la surveillance d’une personne adulte. Cette personne doit
toujours être présente pendant et après l’usage et ce jusqu’à l’extinction ou l’élimination du
combustible ou ses restants.
•N’utilisez le barbecue que si le cendrier est correctement placé.
•Le barbecue atteindra des températures élevées : ne déplacez jamais le barbecue lorsque celui-ci
fonctionne ou n’est pas complètement refroidi. Un usage inadapté ou incorrect peut provoquer
de sérieuses brûlures.
•Prenez soin que les aliments ne soient pas en contact direct avec les flammes. Avant de griller vos
aliments, attendez que le combustible soit recouvert d’une fine couche de cendres blanches.
•Lorsque de l’huile ou de la graisse dégoulinent de vos aliments, nous vous conseillons d’utiliser
un plateau d’aluminium ou réceptacle quelconque afin d’éviter des flammes.
•MATRO vous conseille d’avoir sous la main un extincteur ou un seau d’eau/sable dans les parages
du barbecue.
•Ne portez pas de vêtements légèrement inflammables lors de votre barbecue.
•N’utilisez pas le “Easy Ash Removal System” pour allumer votre Buck!
•Ne placez pas du bois, du papier ou des produits d’allumage dans le pilier!
PREMIER USAGE
•Laissez le barbecue brûler pendant au moins 30 min. avec le combustible incandescent avant
que vous ne disposiez des aliments sur la grille de cuisson.
INSTRUCTIONS GéNéRALES
•Enlevez la grille chromée du dessus du barbecue.
•Placez le produit d’allumage dans la case prévue dans le cendrier, ou sur la grille à combustible
du foyer et allumez-le avec précaution au moyen de matériel adéquate (ex. des longues
allumettes).
•Remplissez la cuve du foyer avec une couche de combustibles jusqu’à 75 % de sa capacité (lisez
jusqu’au bord supérieur de la cuve).
•Lorsque le combustible est brûlant, étalez-le dans la cuve avec un instrument qui convient. Faites
attention à ne pas vous brûler! Le combustible est prêt à l’usage lorsque une fine couche de
cendres blanches s’y est formée. MATRO vous recommande d’attendre au moins 30 min. avant
de déposer des aliments sur la grille de cuisson.
SÅ HÄR ANVÄNDER DU LUFTINTAGET
•Hålen ska vara halvöppna eller fullständigt öppna när du tänder grillen. Luftflödet regleras genom
att skjuta handtaget (näsan) åt vänster eller höger.
•Eldens intensitet justeras genom att öppna eller stänga ventilationshålen.
•Om du vill att elden ska slockna snabbare, stäng hålen.
EFTER ANVÄNDNING
•Dra upp asklådan med hjälp av lyftstången. Lås stången genom att lyfta upp den på de små
jacken som är specifikt avsedda för detta.
•Borsta ned alla rester (aska + fast bränsle) i asklådan med passande verktyg (t.ex. stålborste).
•Ta inte bort asklådan förrän grillen har svalnat fullständigt.
•Lyft upp asklådan försiktigt genom att dra i lyftringen och kasta innehållet i en soptunna eller ett
annat passande sopkärl.
•Förvara grillen inomhus, eller åtminstone under tak, för att undvika att den rostar. MATRO
rekommenderar starkt det tillgängliga Buck-skyddet.
GARANTI
•Din Buck-grill kommer med två års garanti från inköpsdatum. Denna garanti omfattar endast
tillverkningsfel på villkor att grillen används korrekt för hemmabruk (så som beskrivs ovan).
Endast kvitton som entydigt visar inköpsdatumet godkänns.
•Garantin omfattar inte slitage till följd av normalt hemmabruk. Detta inkluderar bland annat (men
inte endast):
- deformering och missfärgning av vissa delar på grund av hetta eller plötsliga
temperaturförändringar
(termisk chock) som uppstår vid användning eller rengöring av grillen.
- rostbildning som har förorsakats av exponering för, eller förvaring i, fuktiga miljöer
- alla skador på ytbeläggningen som förorsakats av skrubbning.
•Mindre oregelbundenheter, t.ex. små bucklor i ytbeläggningen, delar som är deformerade i
tolerabel utsträckning eller vissa smådelar som inte är fullständigt emaljerade betraktas inte som
tillverkningsfel. Därför omfattas de inte av garantin.
BRUKSANVISNING – SVENSKA
matro user manual24_SV_01.indd 22 13/11/12 18:09
Page 23

MODE D’EMPLOI - FRANçAIS
IMPORTANTES PRECAUTIONS GéNéRALES
•Ne pas utiliser d’alcool, essence ou autres combustibles pour allumer ou réactiver l’allumage de
votre barbecue.
•Utilisez seulement des produits d’allumage qui sont conforme à la norme EN 1860-3. MATRO
vous recommande l’usage des produits d’allumage SOL®.
•Utilisez exclusivement du charbon de bois ou des briquettes de coco/charbon de bois (décrites
plus loin comme ”combustible”) qui sont conforme à la norme EN 1860-2 . MATRO recommande
l’utilisation des combustibles SOL®. Du bois ne convient pas comme combustible, vu les
températures extrêmes (jusqu’à 1000°C) qui peuvent provoquer des dégâts irréparables à
certains accessoires.
•N’utilisez jamais le barbecue à l’intérieur d’une maison ou bâtiment.
•Placez toujours le barbecue sur un sol stable et horizontal, qui peut certainement supporter des
températures élevées.
•Ne pas disposer le barbecue dans les parages d’objets qui peuvent fondre ou prendre feu.
•Eloignez les enfant et les animaux (domestiques) de votre barbecue.
•N’utilisez le barbecue que sous la surveillance d’une personne adulte. Cette personne doit
toujours être présente pendant et après l’usage et ce jusqu’à l’extinction ou l’élimination du
combustible ou ses restants.
•N’utilisez le barbecue que si le cendrier est correctement placé.
•Le barbecue atteindra des températures élevées : ne déplacez jamais le barbecue lorsque celui-ci
fonctionne ou n’est pas complètement refroidi. Un usage inadapté ou incorrect peut provoquer
de sérieuses brûlures.
•Prenez soin que les aliments ne soient pas en contact direct avec les flammes. Avant de griller vos
aliments, attendez que le combustible soit recouvert d’une fine couche de cendres blanches.
•Lorsque de l’huile ou de la graisse dégoulinent de vos aliments, nous vous conseillons d’utiliser
un plateau d’aluminium ou réceptacle quelconque afin d’éviter des flammes.
•MATRO vous conseille d’avoir sous la main un extincteur ou un seau d’eau/sable dans les parages
du barbecue.
•Ne portez pas de vêtements légèrement inflammables lors de votre barbecue.
•N’utilisez pas le “Easy Ash Removal System” pour allumer votre Buck!
•Ne placez pas du bois, du papier ou des produits d’allumage dans le pilier!
PREMIER USAGE
•Laissez le barbecue brûler pendant au moins 30 min. avec le combustible incandescent avant
que vous ne disposiez des aliments sur la grille de cuisson.
INSTRUCTIONS GéNéRALES
•Enlevez la grille chromée du dessus du barbecue.
•Placez le produit d’allumage dans la case prévue dans le cendrier, ou sur la grille à combustible
du foyer et allumez-le avec précaution au moyen de matériel adéquate (ex. des longues
allumettes).
•Remplissez la cuve du foyer avec une couche de combustibles jusqu’à 75 % de sa capacité (lisez
jusqu’au bord supérieur de la cuve).
•Lorsque le combustible est brûlant, étalez-le dans la cuve avec un instrument qui convient. Faites
attention à ne pas vous brûler! Le combustible est prêt à l’usage lorsque une fine couche de
cendres blanches s’y est formée. MATRO vous recommande d’attendre au moins 30 min. avant
de déposer des aliments sur la grille de cuisson.
matro user manual24_SV_01.indd 23 13/11/12 18:09
Page 24

•Placez correctement la grille chromée sur le barbecue. Contrôlez que la grille soit bien fixée et
stable (cf. instructions de montage).
•Placez les aliments sur la grille de cuisson à l’aide de matériel requis.
UTILISATION DU SYSTEME DE VENTILATION
•A l’allumage du barbecue, les orifices de ventilation doivent être à moitié ou totalement ouverts.
Le réglage d’air se fait en glissant la poignée (nez) à gauche ou à droite.
•Pour régler l’intensité du foyer, vous pouvez ouvrir ou fermer les orifices d’aération.
•Pour accélérer l’extinction du barbecue, vous pouvez fermer les orifices de ventilation.
INSTRUCTIONS APRES UTILISATION (‘EASY ASH REMOVAL’)
•Placer le cendrier dans la position la plus élevée en dirigeant la barre horizontale (les deux
poignées de part et d’autre de la colonne conique) vers le haut en la fixant dans sa position la
plus élevée dans les excavations prévues.
•Brossez les cendres et les restants de combustible dans le cendrier avec un accessoire approprié
comme p.ex. une brosse en acier.
•Attendez que le barbecue et son contenu soient complètement refroidis avant que vous
n’enleviez le cendrier.
•Sortir (en le soulevant) le cendrier du barbecue au moyen de l’anneau et verser les cendres et le
combustible dans un conteneur approprié ou une poubelle.
•Pour éviter la formation de rouille, MATRO vous conseille de ranger votre barbecue à l’intérieur
ou au moins sous un auvent. L’idéal est de protéger le barbecue en le couvrant d’une housse
disponible en accessoire, la housse Buck.
•Il est possible après de nombreuses utilisations que de petites quantités de cendres/combustible
restent collées sur la base de la colonne conique. Enlevez alors le cendrier, démontez la
vasque-foyer et versez les cendres en retournant la colonne conique dans un seau à ordures.
ATTENTION: n’exécutez ceci que si le barbecue est complètement refroidi.
GARANTIE
•Ce barbecue est garanti deux ans à partir de la date d’achat. Cette garantie n’est valable que sur
des défauts de fabrication et sous condition d’un usage domestique normal et correct, comme
décrit ci-avant. Pour pouvoir bénéficier de cette garantie, vous devez être en possession du bon
d’achat avec date indiscutable du jour de l’achat.
•L’usure par un usage domestique normal n’est pas couvert par la garantie et englobe e.a. mais
non exclusivement : déformation et altération de couleur du barbecue ou -accessoires suite
à une accumulation de chaleur ou de chocs thermiques pendant l’usage ou le nettoyage du
barbecue. La formation de rouille sur le barbecue et les accessoires suite à une exposition à de
l’humidité (air humide inclus) durant l’emploi n’est pas couvert par la garantie. Le nettoyage ou le
rangement et l’usage de produits d’entretien fortement abrasifs ou outils ne sont également pas
couverts par la garantie.
•De petites irrégularités, comme des gouttes dans la peinture (laque), déformations d’accessoires
dans des tolérances acceptables et des petits défauts de non–couverture de l’émail ne sont pas
considérés comme défauts de fabrication et donc non couverts par la garantie.
MODE D’EMPLOI - FRANçAIS
matro user manual24_SV_01.indd 24 13/11/12 18:09
 Loading...