

Matrix Telecom NAVAN CNX200, NAVAN CNX244, NAVAN CNX208 3G2, NAVAN CNX244 3G2, NAVAN CNX226 2G Quick Start Manual
...
NAVAN CNX200
Quick Start


NAVAN CNX200
Office-in-a-Box Solution for Small Businesses
Quick Start

Documentation Disclaimer
Matrix ComSec reserves the right to change the product design, specifications, components,
product information and operating instructions, without prior notice.
This is a general documentation for all models/configurations of the product. The product may not
support some of the features/facilities described in this document.
Matrix ComSec makes no warranties with respect to this documentation and disclaims any
implied warranties. While every reasonable effort has been made to ensure accuracy of content in
this document, Matrix ComSec assumes no responsibility for errors or omissions in this
document. No liability is assumed for damages, costs, expenses resulting from unauthorized
modifications or repairs to the product, and failure to use information or to comply with the
installation, operation and maintenance instructions contained in this document.
Copyright
All rights reserved. No par t of this quick star t may be copied or reproduced in any form or by any
means without the prior written consent of Matrix ComSec.
Version V2
Release date: March 2, 2015

Contents
Know Your NAVAN ........................................................................................ 1
Overview ........................................................................................................... 1
Installing NAVAN ............................................................................................ 5
Preparing for Installation ................................................................................... 5
Selecting the Site .............................................................................................. 6
Getting Started .................................................................................................. 6
Connecting to Trunks ........................................................................................ 7
Connecting Extensions .................................................................................... 11
Setting up the Voice Mail System .................................................................... 27
Power ON ........................................................................................................ 27
Accessing Jeeves ........................................................................................ 31
Connecting a Computer .................................................................................. 31
Configuring NAVAN ..................................................................................... 37
Using the Wizard ............................................................................................. 37
Using Selective Configuration ......................................................................... 38
Activating License Key .................................................................................... 40
Table of Contents i

ii Table of Contents
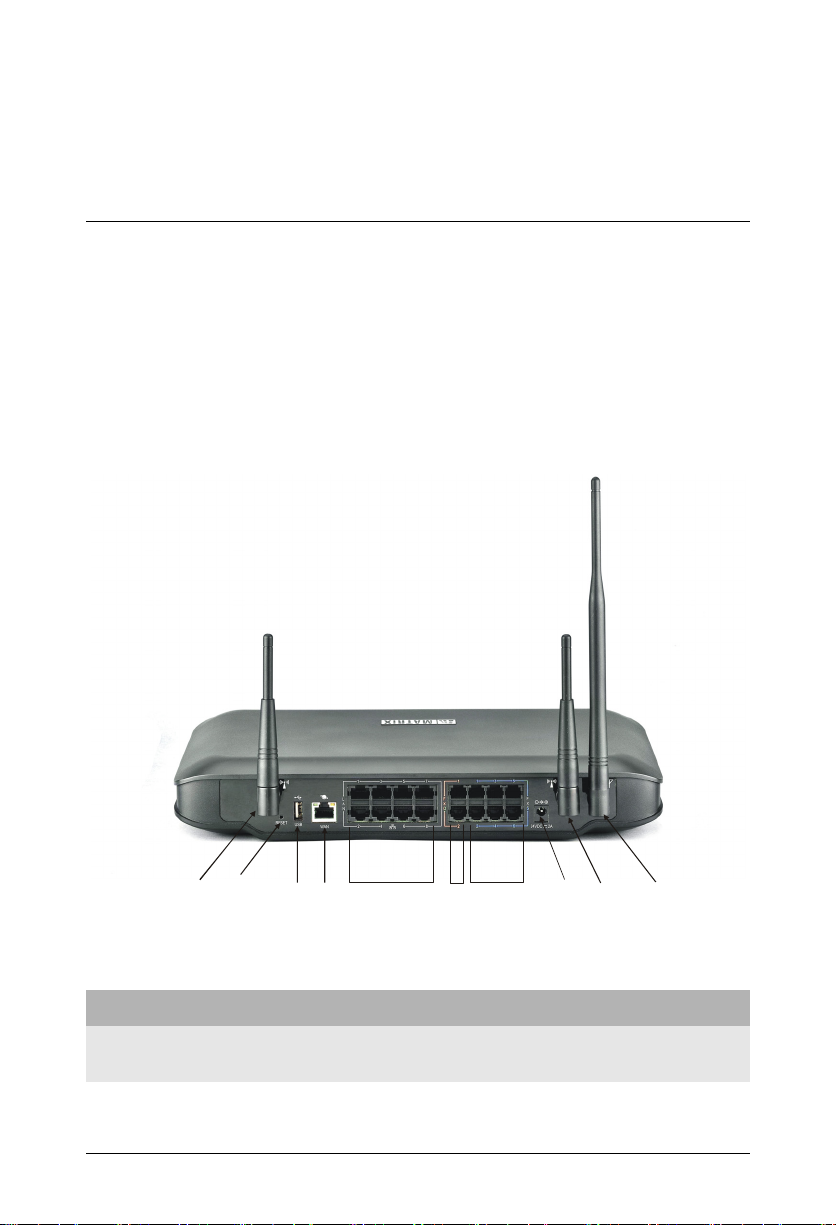
Know Your NAVAN
Wi-Fi
Antenna
Reset
Switch
USB
Port
WAN
Port
LAN
Ports
FXS
Ports
FXO
Ports
Adaptor
3G
Antenna
Wi-Fi
Antenna
Thank you for choosing the Matrix NAVAN! Please read the instructions in this Quick Start to
install and operate this feature-rich Office in-a-Box Solution. This is a common Quick Start for all
configurations of NAVAN. For the purpose of illustration, NAVAN CNX226 3G is used throughout
this document.
This Quick Start is meant to help you install and configure the basic parameters of the system. For
advanced configuration and feature description, please refer the System Manual provided to you
on the CD-ROM shipped with your NAVAN.
Overview
NAVAN variants:
Variant Description
NAVAN CNX244
Matrix NAVAN CNX200 Quick Start 1
4 FXO Ports, 4 FXS Ports, 8 SIP Trunks, 24* IP Extensions, Wi-Fi, 1 USB and 8
LAN Switch Ports.

Variant Description
NAVAN CNX226 2G
NAVAN CNX226 3G
NAVAN CNX226 2G2
NAVAN CNX208 3G2
NAVAN CNX244 3G2
*In-built 8 IP Extensions. To connect 16 more IP extensions you need to purchase two IP8 licenses.
2 FXO Ports, 6 FXS Ports, 8 SIP Trunks, 24* IP Extensions, Wi-Fi, 1 USB, 8 LAN
Switch Ports and 1 2G GSM Module.
2 FXO Ports, 6 FXS Ports, 8 SIP Trunks, 24* IP Extensions, Wi-Fi, 1 USB, 8 LAN
Switch Ports and 1 3G GSM Module.
2 FXO Ports, 6 FXS Ports, 8 SIP Trunks, 24* IP Extensions, Wi-Fi, 1 USB, 8 LAN
Switch Ports and 2 2G GSM Modules.
8 FXS Ports, 8 SIP Trunks, 24* IP Extensions, Wi-Fi, 1 USB, 8 LAN Switch Ports
and 2 3G GSM Modules.
4 FXO Ports, 4 FXS Ports, 8 SIP Trunks, 24* IP Extensions, Wi-Fi, 1 USB, 8 LAN
Switch Ports and 2 3G GSM Modules.
The 2G variants of NAVAN will support Voice calls and SMS only.
The 3G variants of NAVAN will support Voice calls, SMS and Internet connectivity.
Ports and Connectors
Port Description
24VDC- 2A (Max) Connector for the power adapter.
FXO/CO Analog trunk port to connect analog trunk line.
FXS/SLT
8 Ethernet LAN Ports Ethernet LAN ports to connect a computer/LAN Switch.
Ethernet WAN Port
USB Port USB Port to connect a USB Dongle.
SIM 1 Single SIM mobile port to connect to the GSM (2G/3G) network.
Single Line Telephone (SLT) port to connect any standard analog telephone
instrument and fax machine.
Ethernet WAN port to connect to IP network. As Ethernet WAN, you can
connect a DSL modem/Router or a LAN Switch.
2 Matrix NAVAN CNX200 Quick Start

LED
LED Indications for Power, System, SIM1,
WAN, USB, WLAN and LAN Switch Ports
NAVAN supports LED Indications for Power (PWR), System (SYS), Mobile Port (SIM1), USB,
WLAN, WAN and LAN Switch Ports (LAN).
Matrix NAVAN CNX200 Quick Start 3

4 Matrix NAVAN CNX200 Quick Start

Installing NAVAN
Preparing for Installation
Have the items listed below ready:
• A suitable location to install the NAVAN.
• Necessary telecom wiring in place, with wall jacks for extension lines at the required
locations.
• Standard, good quality, twisted pair telephone cables with 0.5 mm conductor diameter, with
RJ11 plugs.
• A dedicated Power supply outlet close to the system.
• As many standard analog telephone instruments as you want to connect as SLT extensions.
You may select any standard telephone instrument like rotary phone, Pulse/Tone switchable
push-button phone, Feature phone or Cordless phone.
• A fax machine, if you want to connect one to the SLT por t of NAVAN.
• One or more active, analog trunk lines from the CO network, as required.
• A SIM card to test mobile network connectivity, if GSM (2G/3G) module is to be used.
• SIP Account information to be configured in the system to test SIP calls.
• Any standard Open IP Phone or the Matrix Extended IP Phone/Mobile Softphone Client to
register as SIP Extension of NAVAN, if required.
• The License Voucher, if Voice Mail System (VMS) and SMS Gateway module is to be used.
• A standalone computer or a computer connected in a LAN to access Jeeves, the web-based
configuration tool of NAVAN.
• The Wi-Fi network information to be configured in the system, if you want to use Wi-Fi for
internet access.
Matrix NAVAN CNX200 Quick Start 5

Selecting the Site
Select an appropriate site to install the NAVAN. The site should:
• be well-ventilated, moisture and dust free; not exposed to direct sunlight, heat or excessive
cold, or water; be away from water bodies and sources of water.
• be away from sources of electromagnetic noise such as any radio equipment, heavy
transformers, etc.
• have sufficient network coverage available, if the GSM (2G/3G) module is present in the
system.
• place the system at a elevated location such as a high shelf for optimum wireless
connectivity.
• be away from reflective surfaces such as windows, mirrors; as these will bounce off the WiFi signals.
• be away from potential sources of interferences which weaken Wi-Fi signals.
This is an electronic device. Protect yourself from shock hazards. Never handle the
product in power ON condition. Always wear an electrostatic discharge prevention wrist
strap/belt and use a grounding mat when handling the product.
Protect the NAVAN from heavy voltages entering from CO trunk and Extension lines.
Install Primary Protection Modules (PPM) with Gas Discharge Tubes (GDT) and fuses on
entry points for all trunk lines and extensions.
For Safety Instructions, see the System Manual provided to you on the CD ROM.
Getting Started
• Unpack NAVAN and verify your package contents. In case, any of the items is missing or
damaged, contact your Dealer/Distributor.
Package Contents
•NAVAN Unit.
• Two 19” Rack mount side Clamps and four screws M4X6 CSK PH for side clamp Assembly
(Optional).
1. These package contents are with reference to NAVAN CNX226 3G. The package contents vary accord-
ing to the variant of NAVAN.
6 Matrix NAVAN CNX200 Quick Start
1

•GSM Antenna.
• Cable with RJ45 connector on one end (2 meters length) for WAN.
• Power Adapter 24VDC, 2Amp.
• AC Power Code for AC-DC Adapter (Indian/Country specific for export).
• Two Wall mount Screws (Wood Screw) #7-30 CSK Slotted Head.
• Two Screw Grips for Wall mount Screw (Wood Screw) #7-30.
• Warranty Card Set.
• Wall mounting template.
• Quick Start (Printed Copy).
• CD (NAVAN CNX200 System Manual, NAVAN CNX200 Quick Star t, User Guides).
Connecting to Trunks
CO Trunks (Analog Two-Wire Trunks)
• Use standard, good quality, twisted-wire pair telephone cables with RJ11 plugs to connect the
CO ports of NAVAN to the Trunk Lines from your CO (central office).
Mobile Networks
Enabling SIM PIN Protection
• Protect the SIM card from unauthorized use with a Personal Identification Number (PIN) on
the SIM (in consultation with the customer/owner of the SIM).
To enable SIM PIN protection,
• get a mobile handset. Insert the SIM into the mobile handset.
• from the mobile handset, enable PIN Protection.
• change the SIM PIN to 1234 (this is the default PIN for both SIM cards used in the
system). You can change this SIM PIN later from NAVAN when configuring the mobile
port.
• remove the SIM from the mobile handset.
If you do not want to use PIN protection, insert the SIM in the mobile handset and disable
PIN protection. Remove the SIM Card from the mobile handset and insert it in the SIM
Slot of NAVAN.
Matrix NAVAN CNX200 Quick Start 7

Inserting SIM Card in the Mobile Port
• To inser t the SIM card in NAVAN,
• insert the SIM into the SIM slot, with its contact side facing up.
• push the SIM backwards into the slot. The SIM is locked inside the slot.
To unlock the SIM within the slot, push the protruded portion of the SIM backwards
again.
• Connect the antenna to the antenna connector.
The 3G Mobile Ports of NAVAN also provide Wireless WAN Interface. If you want to use
wireless WAN over the Mobile port, you must have Internet services activated on the
SIM.
VoIP Network
Before you connect the system to WAN, we recommend that you first connect a
computer to the Ethernet LAN Port of NAVAN, configure the Basic Parameters, and then
connect to WAN.
• You can connect NAVAN to WAN either over Ethernet por t (Ethernet WAN) or over Mobile
(3G) Port (Wireless WAN) or through the USB Dongle (Wireless WAN).
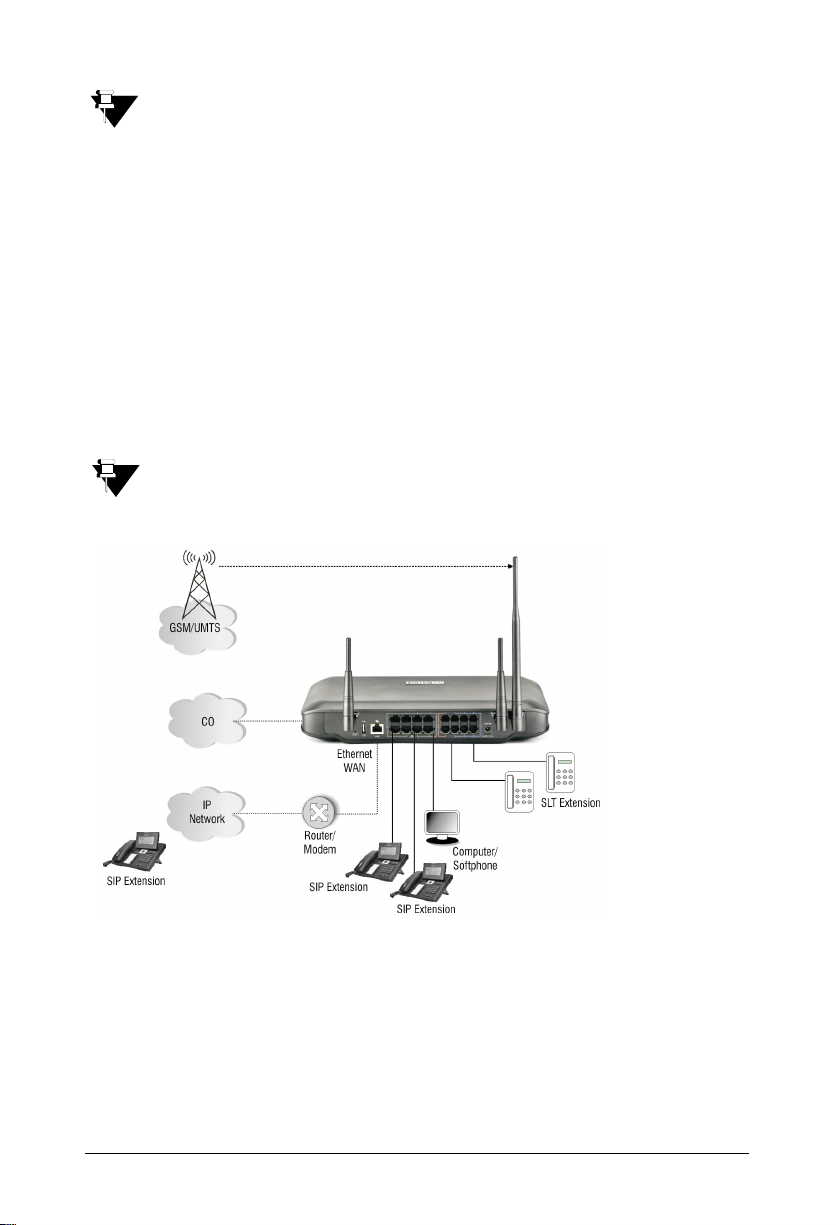
While several installation scenarios are possible, only three most common and most typical
scenarios are depicted here.
8 Matrix NAVAN CNX200 Quick Start
Ethernet WAN
• Use the RJ45 Ethernet cable supplied for the Ethernet port of NAVAN to connect the system
to the IP network, which may be Public Internet or a LAN.
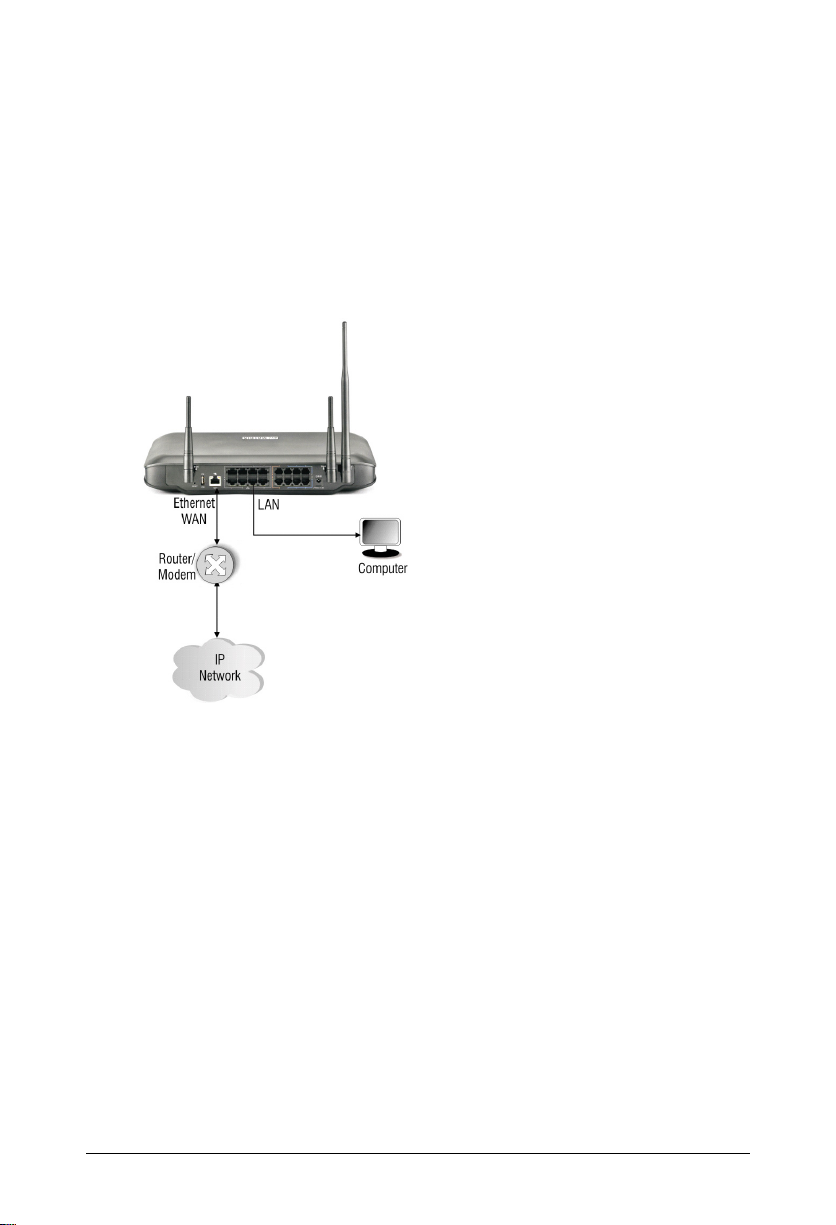
If connecting to the Public IP Network,
• Plug one end of the RJ45 Ethernet cable into the Ethernet WAN Port of NAVAN and the other
end into the Broadband Router/Modem.
Matrix NAVAN CNX200 Quick Start 9
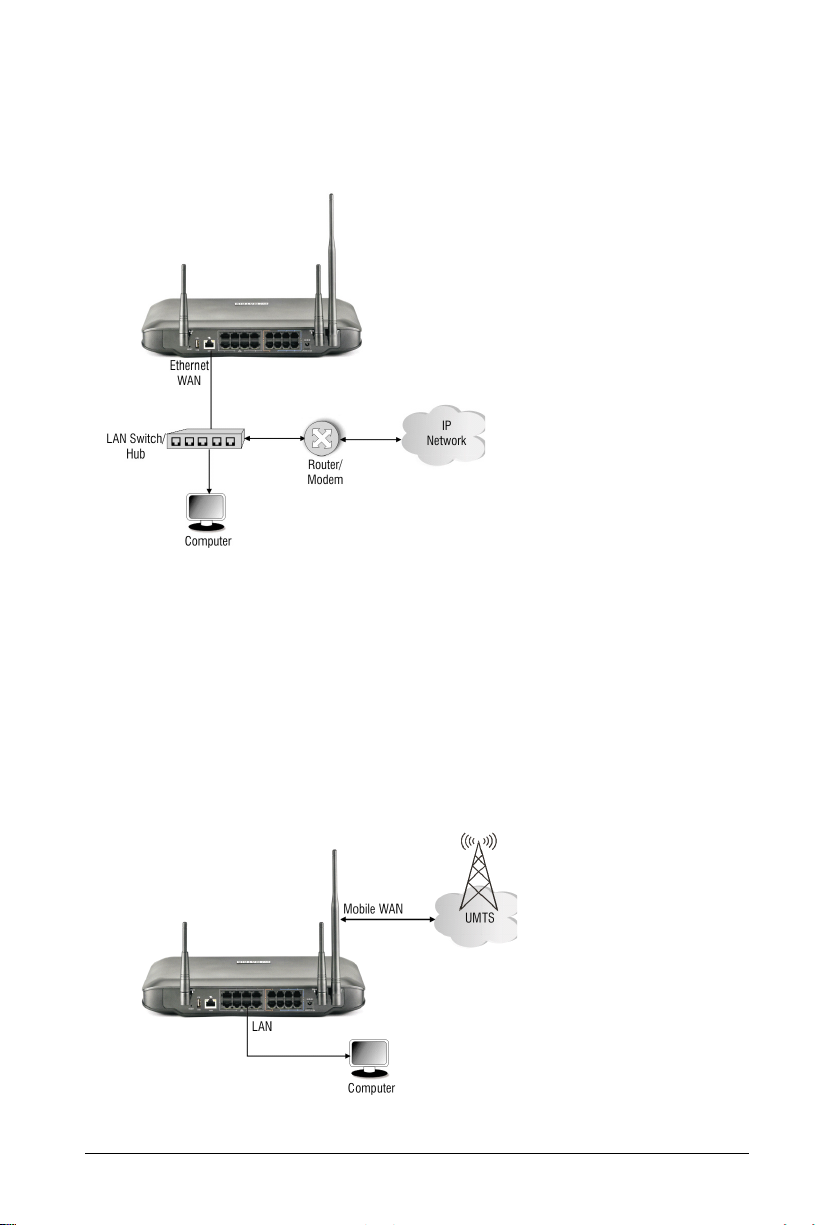
If connecting to a Private Network (Behind a NAT Router),
• Plug one end of the RJ45 Ethernet cable into the Ethernet WAN Port of NAVAN and the
other end into the LAN Switch/Hub.
Wireless WAN
• Make sure that-
• Your variant supports a 3G module.
• a SIM is present in the Mobile port.
• Internet Services are activated on the SIM.
OR,
• You have connected a USB Dongle for internet access.
10 Matrix NAVAN CNX200 Quick Start

Connecting Extensions
Single Line Telephones (SLT)
• Use standard twisted wire pair cables of good quality with RJ11 plugs to connect the analog
single line telephone instruments to the FXS (SLT) ports of NAVAN.
• Place the SLTs, Fax machine at the desired locations. Connect the SLTs, Fax machine
to the
wall jacks.
• Plug the RJ11 end of the telephone cables into the FXS (SLT) ports of NAVAN.
Terminate the other end of the cables from the FXS (SLT) ports on the wall jacks to which the
SLTs, FAX machines are connected.
Connecting SIP Extensions
The system allows registration of 24 SIP extensions.
You may register any SIP-enabled device like an IP-Phone, a Soft Phone, Analog Phone Adapter,
as the 'SIP Extension' of the NAVAN.
You may also connect/register the following as SIP Extensions of NAVAN:
• SPARSH VP248, the Extended IP Phone. For instructions, see “Connecting SPARSH VP248
as Extended SIP Extension”.
•SPARSH VP3102, the Executive IP Phone. For instructions, see “Connecting SPARSH VP310
as Extended SIP Extension”.
•SPARSH VP330
SPARSH VP330 User Guide provided to you on the CD.
3
, the Touch Screen Extended IP Phone. For instructions, refer to the Matrix
• Matrix SPARSH Mobile Softphone Clients for Android Smartphones or iPhones. Depending on
the application you have downloaded, for detailed instructions refer to the respective User
Guide provided to you on the CD - Matrix SPARSH MS Android Application User Guide or
Matrix SPARSH MS iPhone Application User Guide or Matrix SPARSH M2S Android
Application User Guide for Mobile/Tablet or Matrix SPARSH M2S iPhone Application User
Guide.
2. Check for availability.
3. Check for availability.
Matrix NAVAN CNX200 Quick Start 11
The first 8 SIP extensions are free. To increase the number of SIP extensions, you will
require the IP8 License. Make sure you have a valid Key for this license when connecting
more than 8 SIP Extensions. An IP8 license supports 8 SIP extensions.
The SIP Extensions may be registered either over Ethernet WAN or Ethernet LAN or Wireless
WAN, according to your preference and your IP network installation scenario.
Ethernet WAN
If NAVAN is connected to a Public Network,
• Connect any SPARSH Extended IP Phone or Open IP Phone to the LAN Switch.
• Register any SIP device (Extended IP Phone/Mobile Softphone Client or Open IP Phone) on
the public network as SIP Extension.
When you register any SIP device, other than the Extended IP Phone as SIP Extension,
you must configure the Registrar Server Address, the Registrar Server Port, the SIP ID,
Authentication ID and Password in the SIP device.
If NAVAN is connected to a Private Network (Behind the NAT),
• Connect any Extended IP Phone or Open IP Phone to the LAN Switch.
12 Matrix NAVAN CNX200 Quick Start
 Loading...