

Page 1
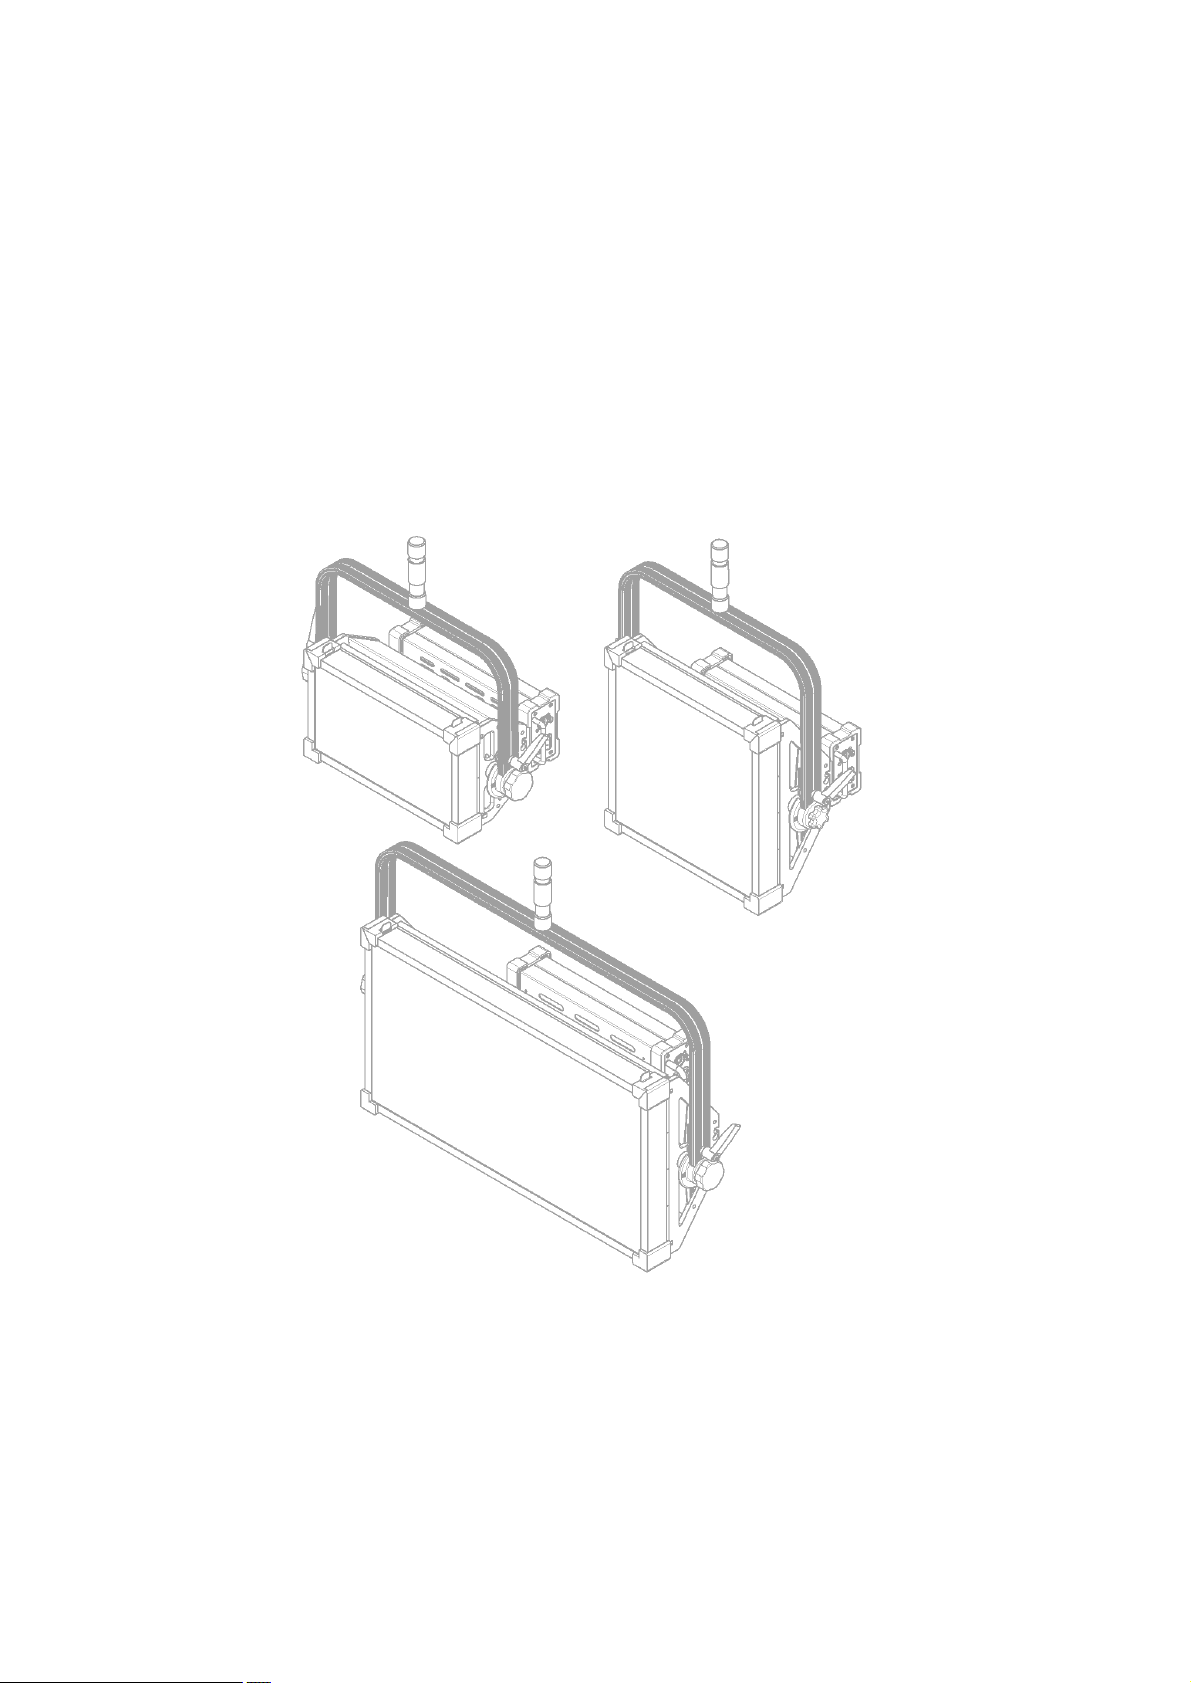
ALL LIGHT Series
USER MANUAL
Matrix Light
Page 2

••• Contents •••
About the product
01. Special features ······························································································································· 1
02. Important notices ··························································································································· 2
03. Safety and handling ······················································································································ 3
04. Product package components ···································································································· 7
Name and function of each part
01. LED Lights ·········································································································································· 9
Installation and Use of Light
01. How to Install and Use Light ··································································································· 11
02. How to operate the touchscreen ···························································································· 15
03. DMX Menu Configuration ·········································································································· 26
04. Bluetooth Connection and App. Operation ·········································································· 31
Troubleshooting
01. Self-troubleshooting checklist ··································································································· 32
Additional information
01. Warranty information ·················································································································· 33
02. Storage guidelines ························································································································· 33
03. Product specifications ·················································································································· 33
04. Servicing and repairs guide ······································································································ 36
••• For your safety, please read the “Safety and Handling” instructions carefully before using the
ALL LIGHT products.
••• ALL LIGHT products may be subject to technical improvements without prior notice from Matrix
Light.
••• Refer to this user manual for installation and safe use of the product.
••• This manual can be downloaded free of charge from the Matrix Light website at
www.matrixlight.com
Page 3

Matrix Light All Light
Matrix light ALL LIGHT
Thank you for choosing the Matrix Light All Light Series. All Light 1, 2, and 4 have been designed
and built with the goal of creating the ultimate lighting that professionals have wanted. The product
reflects the diverse needs of the field and creates a fast and seamless user experience that enables
professional users to deploy light sources as closely as possible in the real world. Professional users
can easily meet their needs by using the All Light Series when they need multi-functional,
high-performance lighting to suit their situations, such as broadcasting, movies, commercials, and live
events.
Graphic touch interface
The Matrix Light All Light Series features an innovative Graphic Touch control interface, which
provides users with quick and easy access to a variety of menus, making it incredibly easy and
convenient to control compared to the complex and cumbersome operating methods adopted by
similar products.
Wire / wireless control interface
The Matrix Light All Light Series complies with the DMX-512 standard protocol to make it fully
compatible with traditional lighting controllers. The All Light Series can also be controlled with
smartphones and tablets via Bluetooth connection.
Preset / Preset Save
The Matrix Light All Light Series has a preset menu that recreates the colors of many different
light sources. In addition, the colors and brightness of the various light sources you set are
saved through the Preset Save menu, and the saved settings can be recalled and used at any
time. These features make it very convenient to match the settings of the same lighting when
shooting multiple scenes in succession on the scene.
Multi effect and color filter
The ALL LIGHT provides users a wide range of preset lighting effects. Users can also easily create
their custom lighting effects by using the ALL LIGHT effect creator. The ALL LIGHT includes hundreds
of color filters, which can be accessed by their code value or name. The color filters not only
simplify the color lighting process, but also enable precise and flexible color control.
Stronger body, better performance
The ALL LIGHT’s main body includes a high-efficiency aluminium heat sink and a cooling fan. This
feature help minimize the effect of temperature difference on the ALL LIGHT’s performance. In
addition, the mechanical strength and lifespan of the product’s key parts and accessories have been
significantly improved. All Light will be the most ultimate form of LED light, providing the highest
quality of light as intended by the photographer.
* Visit www.matrixlight.com for a downloadable version of this product manual.
••• About the Product
01. Special features •••
- 1 -
Page 4
Matrix Light All Light
Safety symbols
Icon
Classification
Definition
DANGER
Death or serious injury will follow if warning is not heeded.
CAUTION
Injury or product damage loss will follow if warning is not heeded.
Safety-related matters of the product and the warranty service
Be sure to familiarize yourself with safety precautions before using this product.
Illustrations in the manual are for description purposes only; actual products may vary.
Before requesting service, refer to the 'Check before reporting any faults' section to check if the
product is defective.
In the event of a non-failure, the service must be requested at a certain cost, even within the
warranty period.
The user is solely responsible for any injury or product damage caused by failure to follow the
instructions.
Make sure to check that the product is functioning normally before filming.
Copyright
ⓒ2019 Matrix Light
All rights reserved. No part of this manual shall be reproduced, stored in a retrieval system, or
transmitted by any means, electronic, mechanical, photocopying, recording, or otherwise, without
written permission from Matrix Light.
••• About the Product
02. Important notices •••
For your safety, please carefully read and understand the following before continuing:
- 2 -
Page 5

Matrix Light All Light
••• About the Product
03. Safety and handling •••
For your safety, please carefully read and understand the following before continuing:
High voltage! Risk of electric shock and fire.
Read and understand all safety information and operating instructions before installing and
operating the product.
Failure to comply with safety information or general rules may result in injury, death, or damage
to equipment to oneself and others.
Always verify that the local AC power source matches the voltage and frequency range printed on the
product type label before using.
Use only genuine Power Supply Unit (PSU) and dedicated connection cables designed for Matrix
Light All Light.
To protect against electric shock, always connect the external power supply to ground (ground)
electrically when connected to AC power. The AC mains power supply must be equipped with a
fuse or circuit breaker and a ground fault (ground failure) protection.
Only use a power supply dedicated to the Matrix Light All Light and a connector cable
dedicated to the Matrix Light. Using other power supplies and connector cables can cause
malfunction and damage to the product.
When using a battery pack, always ensure that the voltage matches the voltage range printed
on the product type label before connecting the battery pack to the product.
Never use the power cables for transportation. Never hang heavy objects on the power cables.
Do not hang the battery pack on the product connection cable.
Do not disassemble or open the product on your own.
Never repair any part of the product on your own. Maintenance and repair work is only carried
out in the Matrix Light Service Center, and if repaired on your own, the product is not eligible
for after-service assurance.
Do not bypass or remove the safety features of the product.
Humidity and Condensation, Electric shock and fire hazard
Do not expose the product to rain or moisture. Do not use the product for 2 hours when exposed
to a large temperature difference as condensed moisture may electrically damage the product when
switched on.
Do not bend the power cable directly after the connector. Moisture could enter the connection
and cause damage to the product.
Overheating, fire hazard
Do not operate the product if the ambient temperature exceeds 45°C.
Intensive use of the product may result in hot surfaces (up to 80°C). Make sure that the
product is sufficiently cooled before handling the product.
Do not cover air vents when operating the product. Keep a clearance around the vents of at
least 0.5m(1.65ft).
Do not place the product near head sources. Intense heat may damage the product and / or
cause automatic power offs.
- 3 -
Page 6

Matrix Light All Light
Intense light! Rish of injury and fire.
Do not stare directly at the light source. Risk of irreversible eye damage. Wear safety glasses
when this is unavoidable. Keep a minimum distance of 1.0m(3.3ft) from illuminated surfaces,
objects, and people when operating.
Never use the product without a dedicated diffuser installed.
Always wear safety glasses when the product is connected to an AC power supply or a battery
pack. Keep a minimum distance of one meter from the LED panel. The product may cause eye
injury when it is suddenly turned on.
Always connect the product directly to AC power. Do not connect the product to a dimmer
system. It may damage the product.
Heavy weight! Risk of injury.
The equipment and accessories must be secured so that they do not fall when mounted on the floor level.
In particular, if the product is fastened to the ceiling, in addition to clamping the combined studs, be sure
to install and construct the product so that it does not fall off the ceiling even if the product is pulled
out of the clamp using an auxiliary safety cable that can withstand more than 10 times the product load.
Attach an approved safety cable to prepare for clamp or bracket failure when mounting the
product on the floor. The safety cable must be able to withstand at least 10 times the weight
of the product, including all accessories mounted on the product. The safety cables shall
comply with EN 60598-2-17 Section 17.6.6 and shall be products approved by a formal
instrument such as TUV.
Cover and install the safety cable on the "" shaped light stand (etc.) and keep it as short as
possible. Handles and floor stands should not be used as anchors for safety elements.
Always observe general and local safety regulations.
Make sure that the stirrup hangs or stands vertically. Installing the stirrup horizontally may
cause the spigot and stirrup to deform or break. The supporting structure has to withstand the
weight of all devices and accessories installed on it.
All Light 4 can damage vibration and objects or injure people when falling onto the safety
cable due to its horizontal length (600mm). To reduce this occurrence, it is recommended that
two safety cables be used on both sides of the fixture.
Whenever you install, service, or move a product or accessory, block access below the
workspace and work on a stable platform.
If you are using accessories and third-party accessories (e.g. battery pack and battery charger),
please follow the instructions in your product. They contain important safety and security
information.
Matrix Light recommends that all electrical components, in addition to regular visual checks, be
performed by experts every 12 months.
LED light sources in All Lights cannot be replaced individually. If the light source has reached
the end of its operational life, the entire LED board must be replaced.
If the light source malfunctions before the specified operating life is over, contact the head
office or branch office of the Matrix Light, your distributor, service agent, or similar qualified
persons.
- 4 -
Page 7

Matrix Light All Light
Firmware downgrade
After updating to version 1.0.0 or later, the firmware cannot be downgraded to a version lower
than 1.0.0.
Maintenance of products
Do not clean the surface of the product with solvents or strong detergents.
Wipe the surface with a soft cloth moistened with a mild detergent. Do not rub with force.
Clean electrical contacts with a cotton swab soaked in isopropyl alcohol. Keep electrical contacts
clean at all times and use corroded parts after replacement.
This product is intended to illuminate people and objects in a dry environment. Always follow
safety information. Use other than those described above is not permitted and failure to comply
may result in associated hazards such as product damage, short circuits, fires, electric shock.
Do not closely illuminate the All Light, the diffuser installed in front of the product, and the LCD
display on the back of the product with high-power rays that generate hot heat over a short
distance. The diffuser can be deformed by hot heat, the LCD display and internal circuits can be
damaged by high brightness and heat radiation in a very short time.
Battery / Charger Related
Do not randomly disassemble, replace, mix, charge or short circuit the battery. Doing so may
cause fire and / or explosion.
Charge the battery immediately when the low battery warning lamp turns on. Excessive
discharging and recharging will shorten the lifespan of the battery and may damage other
devices.
Do not expose the battery to excessive shock. May cause equipment failure, fire and explosion.
Do not leave the battery in a hot, humid place. May cause equipment failure, fire and explosion.
Only use the dedicated power line provided with the battery when charging the battery and
connecting the light. Using of other power lines may cause a malfunction, fire, or explosion.
If the battery is charged with strange noises, smell of burning, or smoke, remove the power
plug immediately and contact the service center. Causes electric shock, explosion and fire.
Do not put the battery on fire or heat it up. Causes heat and explosion.
Be sure to use a dedicated charger. Using another charger can cause fluid, heat and rupture.
Do not store or carry metal products such as necklaces and hair pins with batteries. Causes
heat and / or explosion.
If your eyes come in contact with chemicals leaked out of the battery, wash them immediately
with clean water and seek medical attention. Eyes will become damaged when untreated.
Wipe the battery with clean water immediately if the fluid is present on the skin or clothing.
Leaving it alone will cause skin damage.
Never disassemble the external casing of the battery or damage the parts, or use a battery that
has been dismantled or destroyed. Causes fluid, heat and explosion.
When charging the battery, stop charging immediately if charging is not completed even after
a certain amount of charging time has elapsed. Causes heat and / or explosion.
Do not wet the battery. Causes heat and / or explosion.
Be sure to disconnect the battery from the device after using it. Causes chemicals to leak and
/ or overheating.
When disposing a battery, insulate the contact area with tape and dispose of the battery
properly in accordance with the regulations of the local government in the residential area.
- 5 -
Page 8

Matrix Light All Light
Do not bend, pull, or strain the power line of the charger. Causes electric shock and fire.
Plug the charger into the inner end to prevent it from shaking. Incomplete connection may
cause fire.
Do not use damaged power lines, plugs, or loose socket outlets. Causes electric shock and fire.
Never touch the power plug of the charger with wet hands. Causes electric shock.
Keep the power line of the charger away from heat sources. The covering of the power supply
may melt, causing fire or electric shock.
Do not plug several power plugs into one outlet at the same time. Causes overheating and / or fire.
Light Installation/Operation
Do not install in areas where there is oil, smoke, moisture, dust, or rainwater
If oil or moisture enters the inside, there is a risk of electric shock and fire.
Never turn the product on in front of people’s and animals’ eyes. Doing so may cause
irreversible eye injury. Always attach the diffuser when filming people or infants, and be careful
not to point the light at their eyes. Keep a minimum distance of 2 meters.
Do not turn on the lights for the driver of the vehicle in motioned. Causes an accident.
Do not block the sidewalls and vents of the light. The LED module may experience reduced
life and fire due to increased internal temperature.
Be sure to use only the specified external power supply and battery for the light. Use of
random power may cause equipment failure and fire.
If the light has been lit for more than 5 minutes, there is a risk of low temperature burn if the
light is held in the light for longer than 5 minutes, so wait until the light case cools down
Manipulate it.
If the light falls into the water or the casing is damaged, turn off the product and unplug the power
supply. Failure to do so may cause fire and electric shock. Contact the Matrix Light Service Center.
Do not arbitrarily disassemble, repair, or modify the light. If you need repairs, please contact
the service center.
Do not use or store flammable sprays or flammable substances near the product. There is a risk of explosion and
/ or fire.
Do not insert metal objects such as chopsticks, wire, or trunks into the ventilation shaft or power
terminal, or fire-prone items such as paper or matches. There is a risk of electric shock and fire.
If water or foreign matter is inside the unit, turn off the power switch on the main body of the
machine, remove the power plug from the outlet, and contact the service center.
Avoid hot and humid places. Risk of failure and electric shock. There is also a risk of product
failure and electric shock when used outside during thunder and lightning.
Do not use benzene or paint thinner to clean. Causes deformation and discoloration.
Keep small accessories out of the infant's reach. Infants may swallow them. If swallowed,
consult your doctor immediately.
Don't touch it with wet hands. Causes electric shock.
Store in a stable, well-ventilated place.
- 6 -
Page 9
Matrix Light All Light
[All Light 1
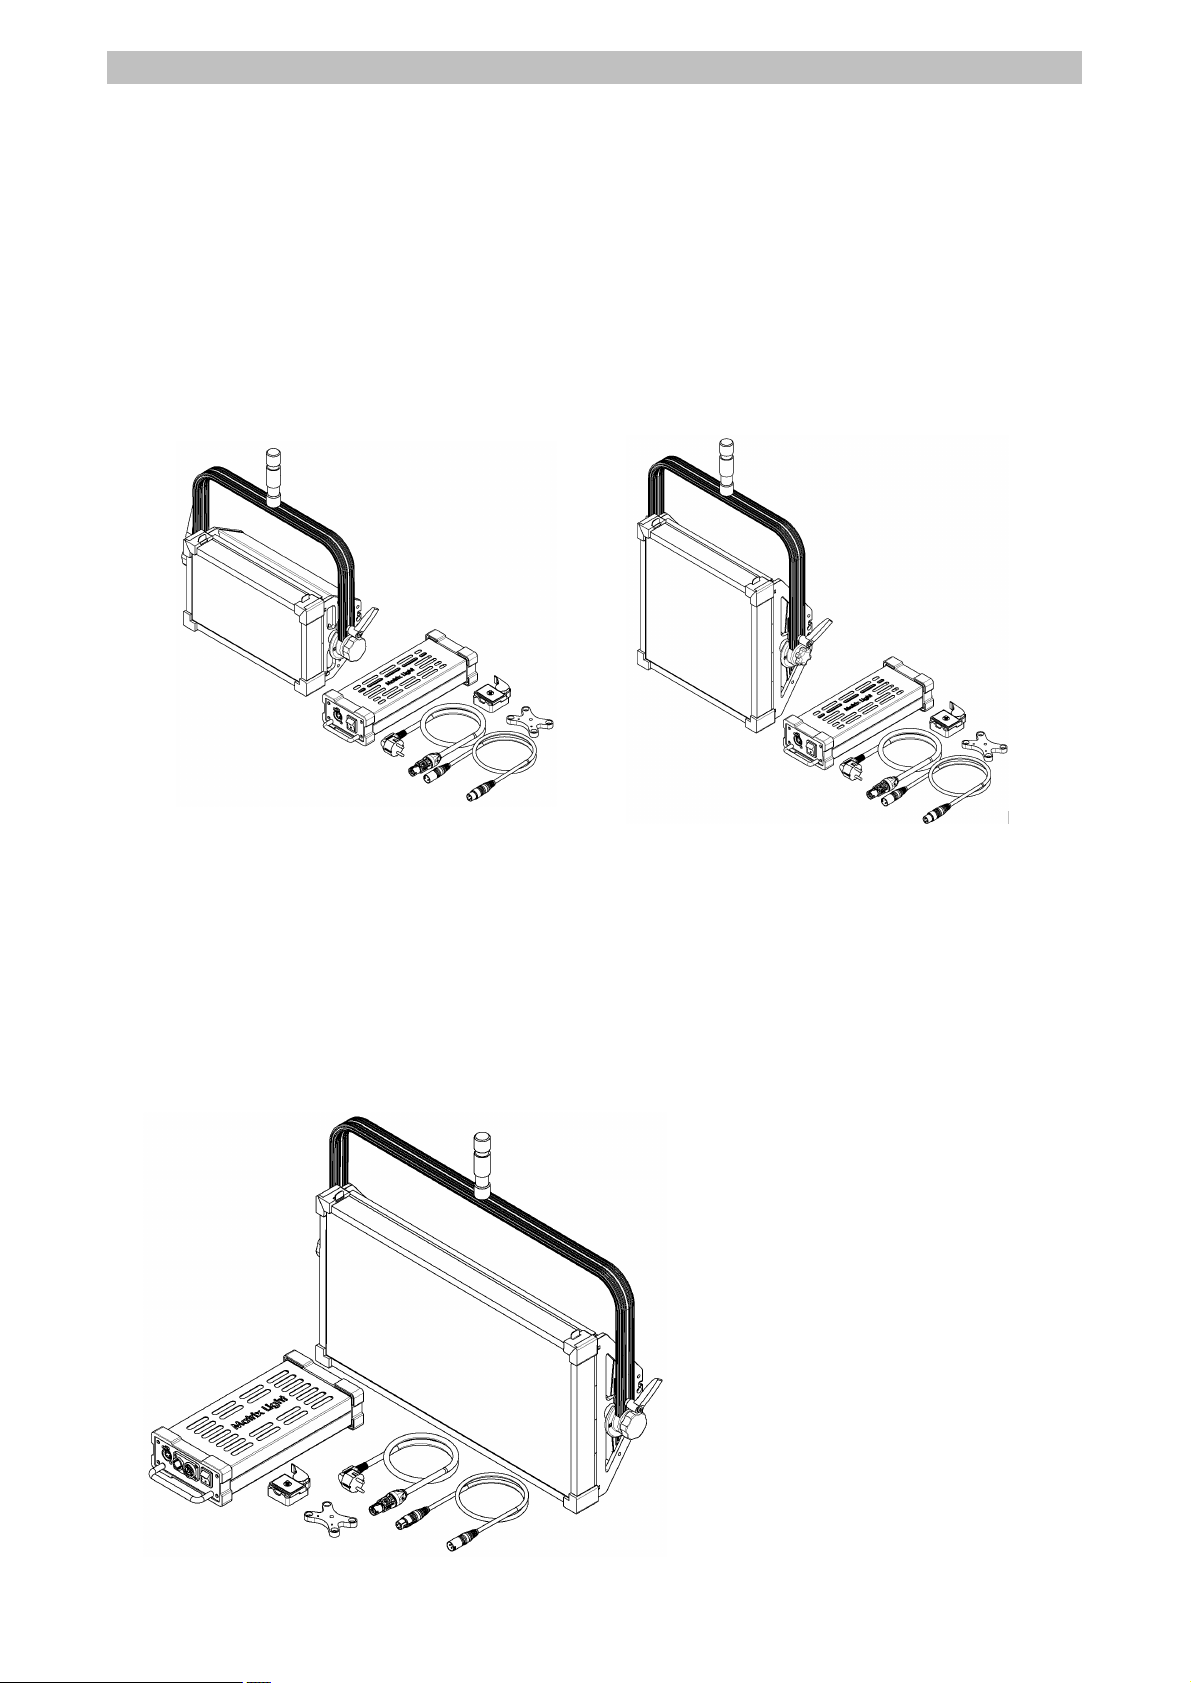
Basic components
]
➊ All Light 1 LED Light
➋ ML-APS1 Power Supply Unit
➌ ML-APC1 Power Cable
➍ ML-APC2 Power Cable
➎ ML-AT2 Power Supply Attacment
➏ ML-QR1 Quick release
[All Light 2
Basic components
]
➊ All Light 2 LED Light
➋ ML-APS2 Power Supply Unit
➌ ML-APC1 Power Cable
➍ ML-APC2 Power Cable
➎ ML-AT2 Power Supply Attacment
➏ ML-QR1 Quick release
➊
➋
➌
➍
➎
➏
➊
➋
➌
➍
➎
➏
[All Light 4
Basic components
]
➊ All Light 4 LED Light
➋ ML-APS4 Power Supply Unit
➌ ML-APC1 Power Cable
➍ ML-APC2 Power Cable
➎ ML-AT2 Power Supply Attacment
➏ ML-QR1 Quick release
➊
➋
➌
➍
➎
➏
••• Product knowledge
04. Product package components •••
Make sure that all necessary accessories are included in your package before using the product.
Depending on the type of package you purchased, the shape of the product configuration or
accessories may vary.
Basic components
•••
- 7 -
Page 10
Matrix Light All Light
[Optional Parts]
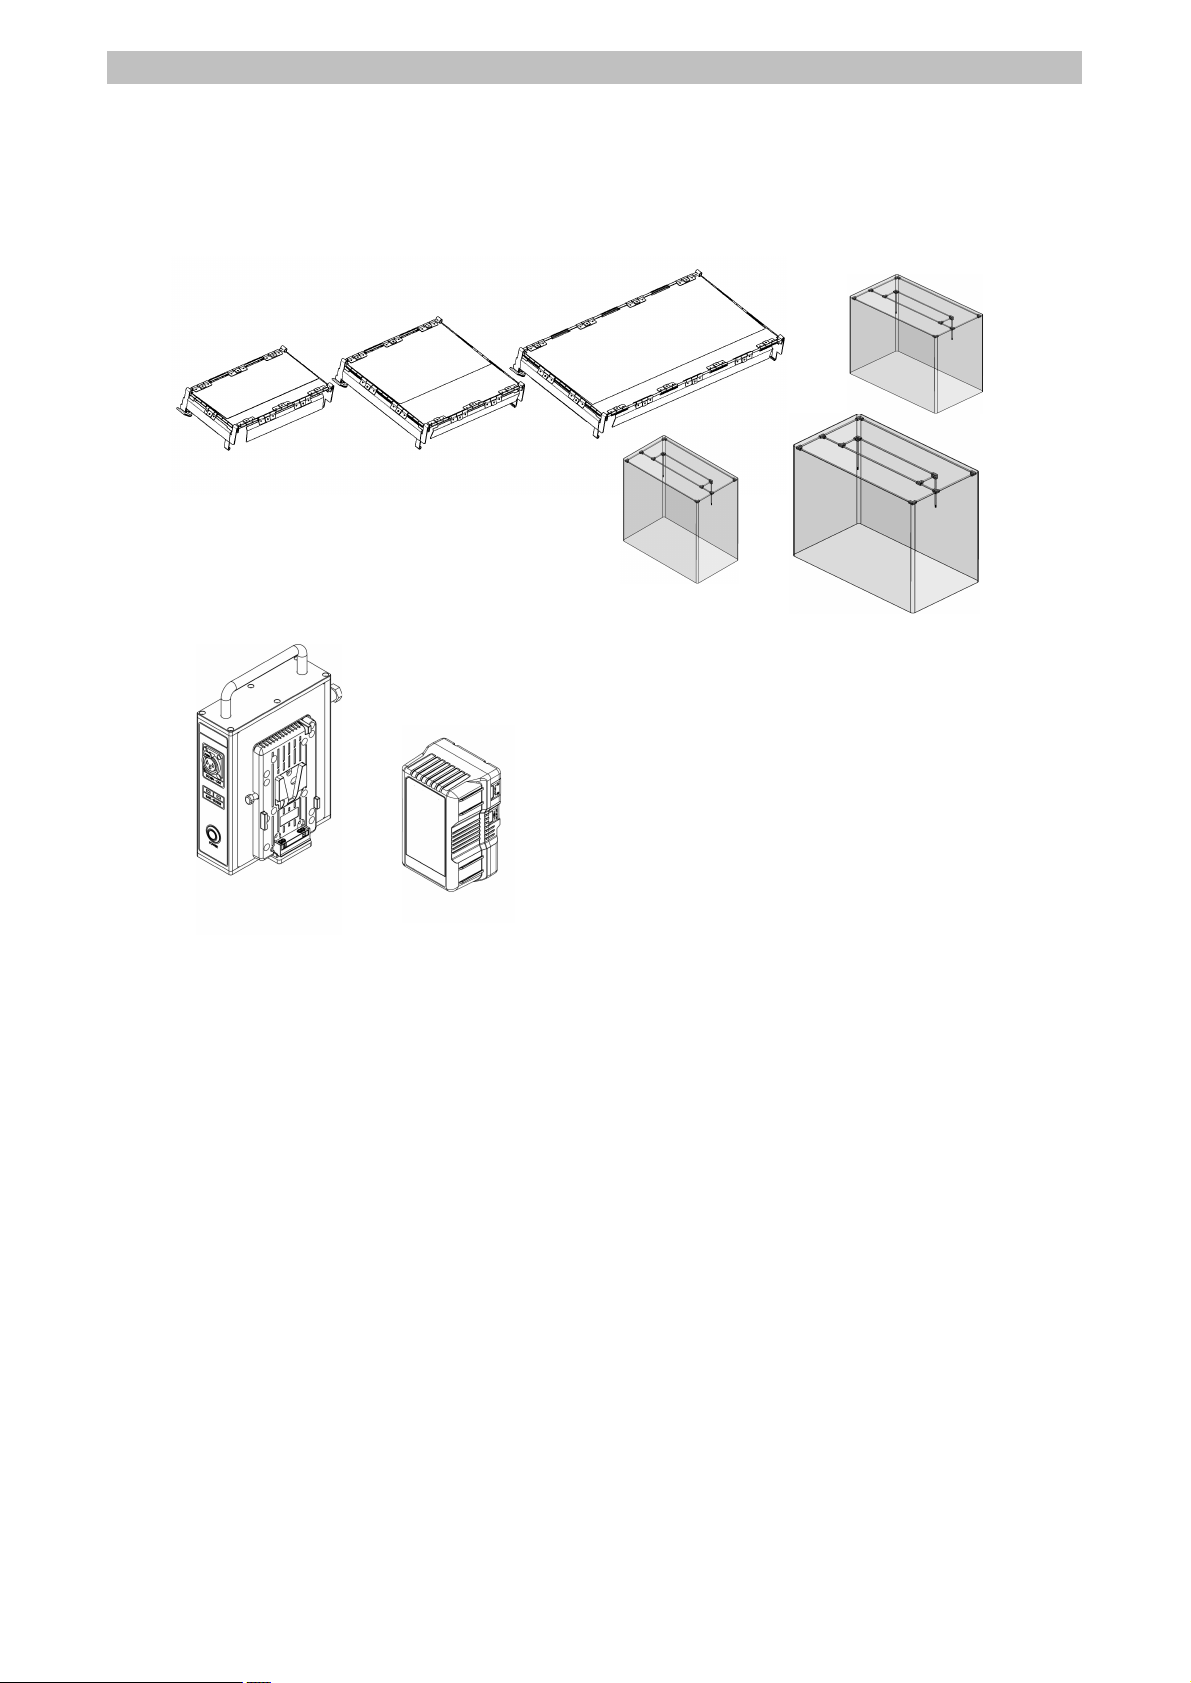
➊ ML-ABD1 Barn Door for All Light 1
➋ ML-ABD2 Barn Door for All Light 2
➌ ML-ABD4 Barn Door for All Light 4
➍ ML-ARC1 Rain Cover for All Light 1
➎ ML-ARC2 Rain Cover for All Light 2
➏ ML-ARC4 Rain Cover for All Light 4
➐ ML-PB48 48V DC Power Supply
➑ ML-BP22A BP Battery
➊
➌
➋
➎➍➏
➐
➑
Optional Parts •••
■ Accessories in the package or optional devices can be purchased from www.matrixlight.com
■ Revision of the user manual provided can be downloaded from the Matrix Light website at
(www.matrixlight.com)
■ Only use Matrix Light accessories (such as power cables, batteries, power supplies, etc).
Damages caused from using third-party accessories are not eligible for free warranty service.
- 8 -
Page 11
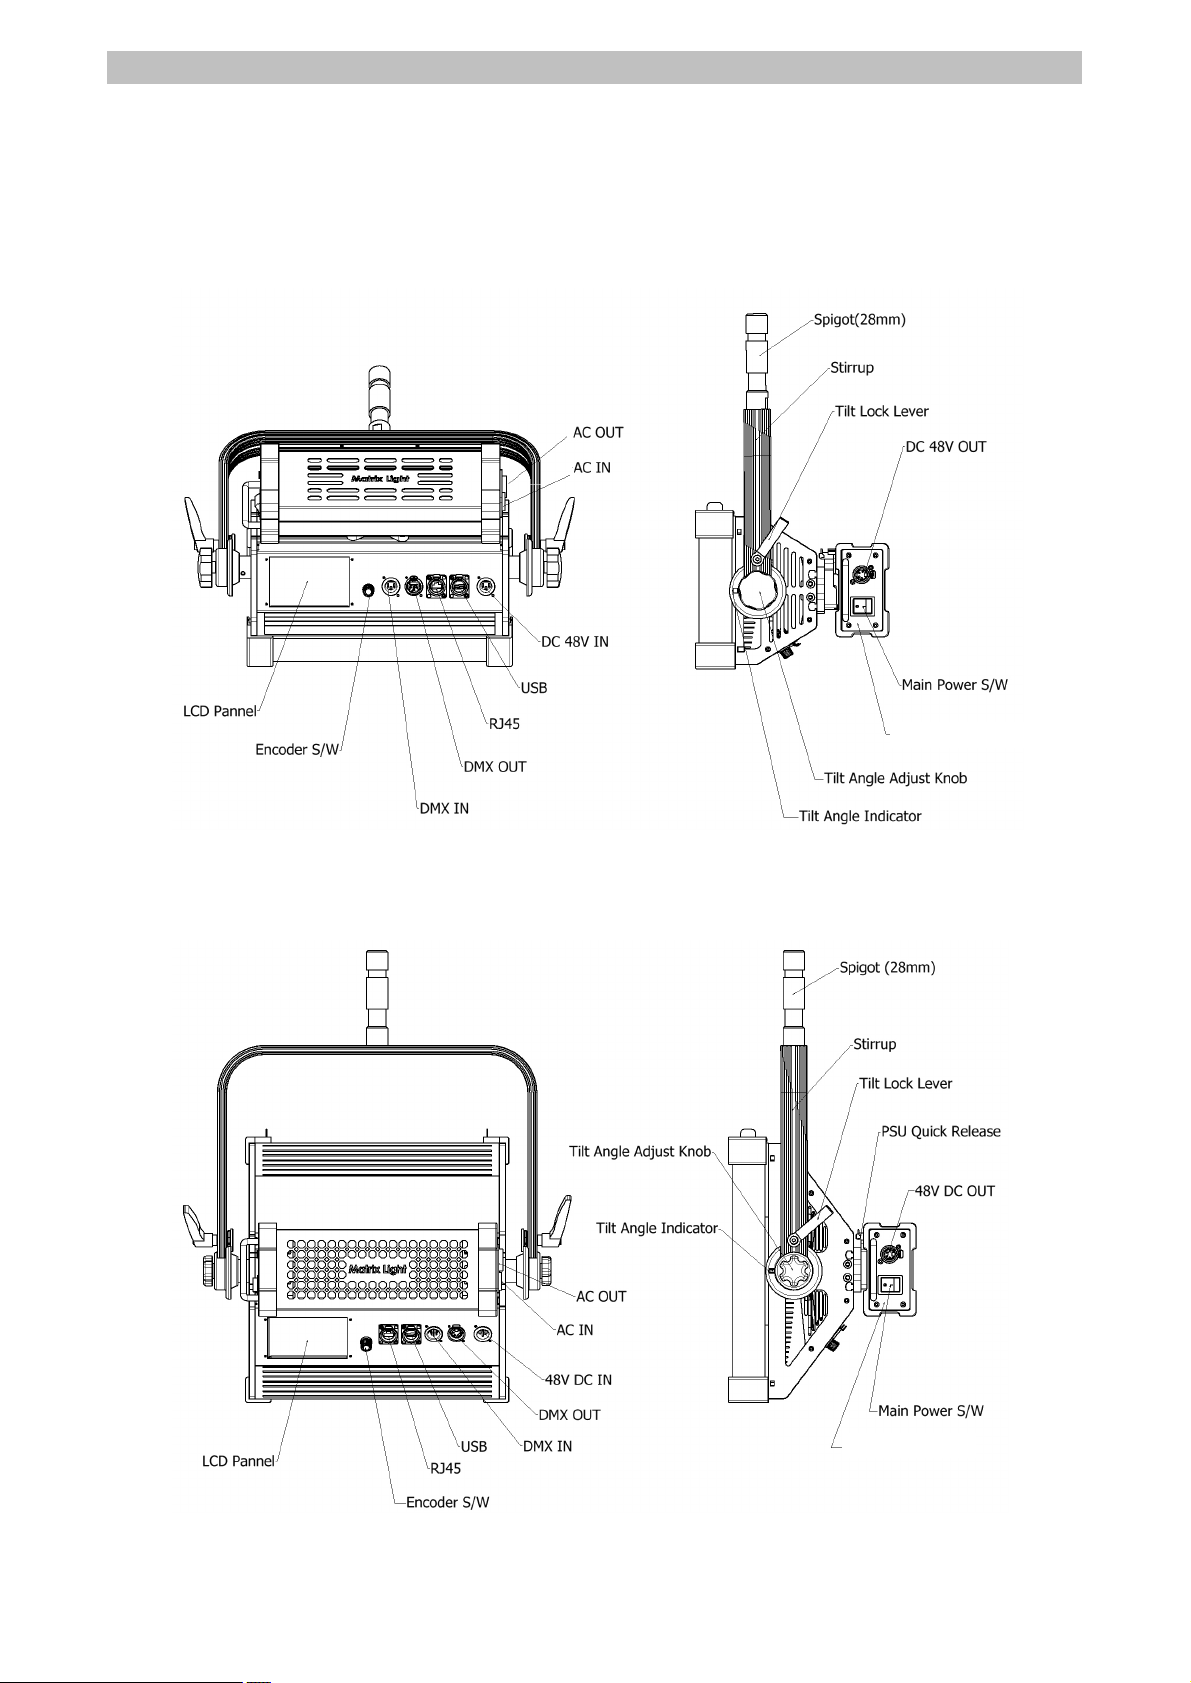
••• Name and function of each part
Power Supply Unit
Power Supply Unit
01. LED Light •••
[All Light 1]
Matrix Light All Light
[All Light 2]
- 9 -
Page 12
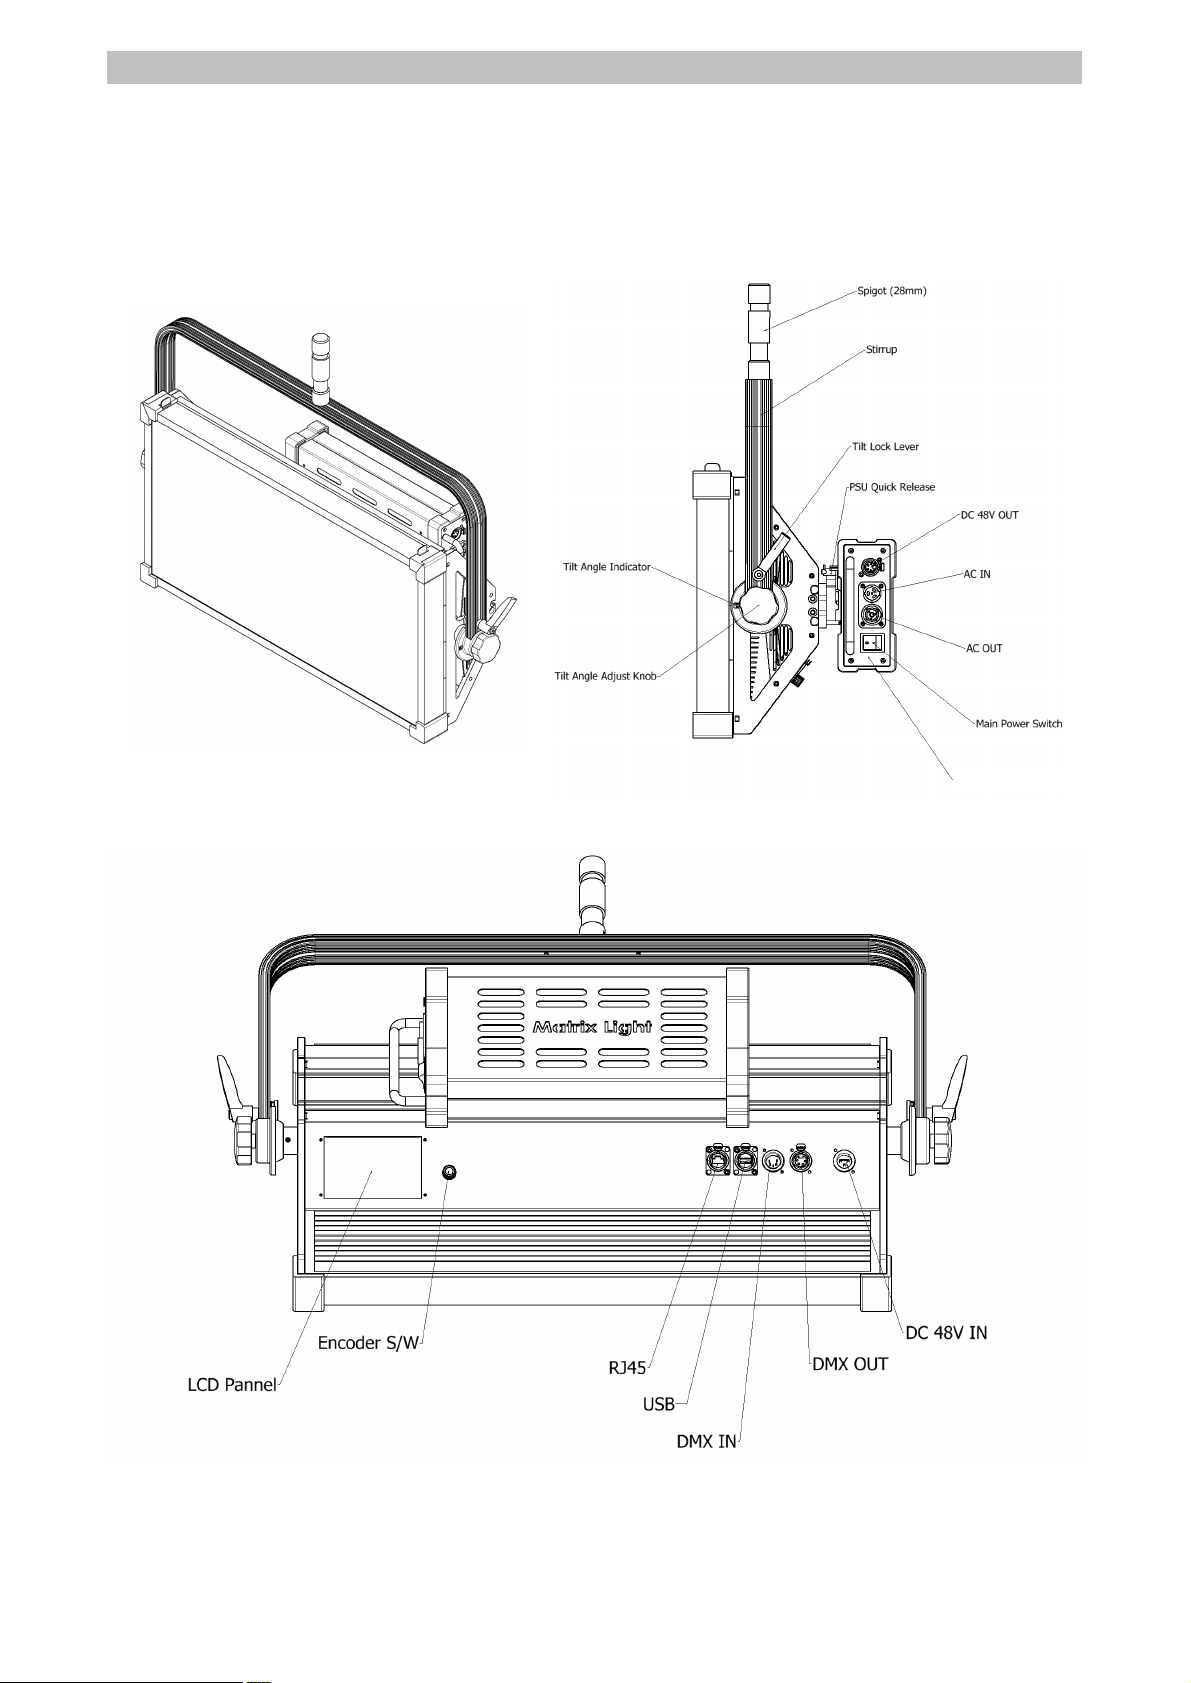
Matrix Light All Light
Power Supply Unit
[All Light 4]
- 10 -
Page 13
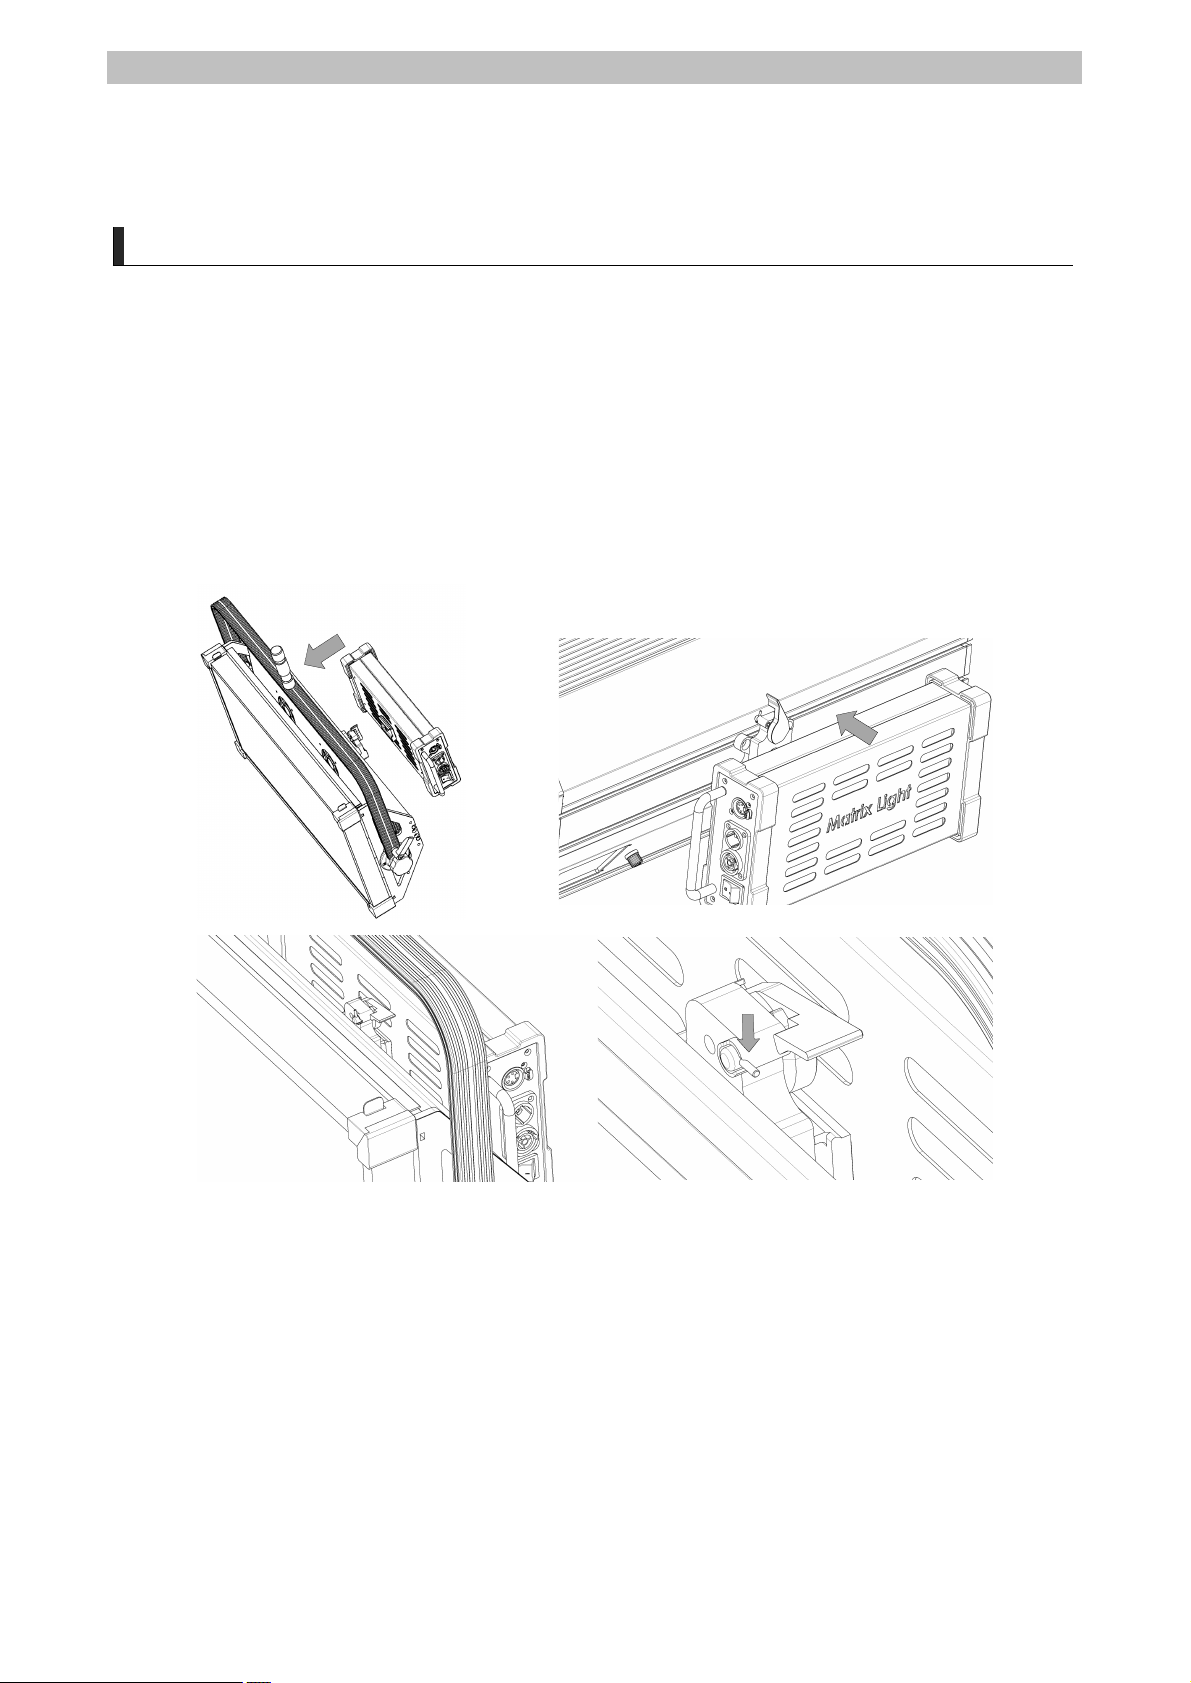
Matrix Light All Light
Power Supply
AC Power
The Matrix Light All Light is powered by an external power supply (Power Supply Unit / PSU). The
PSU is an automatic sense switch mode power supply that automatically adapts to AC power at 110
to 240 V and 50/60 Hz.
How to attach a power supply (PSU)
To attach an external power supply (PSU) to the Matrix Light All Light, push the external power
supply (PSU) into the groove of the Quick Release installed behind the Matrix Light All Light as
shown below. After attaching, pull the anti-departure lock lever of the Quick Release in the direction
of the arrow to prevent the external power supply (PSU) from falling easily.
••• Installation and Use of Lights
01. How to Install and Use Light •••
Do not stare closely at the light before connecting it to the power supply or battery pack.
Make sure the product is disconnected from the DMX device. Also, make sure that the power
switch on the external power supply (PSU) is turned off. Connecting the PSU to the light with
the power switch on the external power supply (PSU) may strain the equipment and cause a
failure. The power switch of the external power supply (PSU) must be turned on finally after all
the power cables are connected properly.
The power outlet or external power switch that supplies the Matrix Light All Light must be
located near the external power supply and the PSU must be easily disconnected or connected
from the power source.
The external power supply of the Matrix Light All Light requires a Neutrik PowerCON True1
NAC3FX-W cable connector or a compatible power input cable. The Matrix Light provides a
power cable with a different plug or end-to-end plug from the PowerCON cable connector for
- 11 -
Page 14
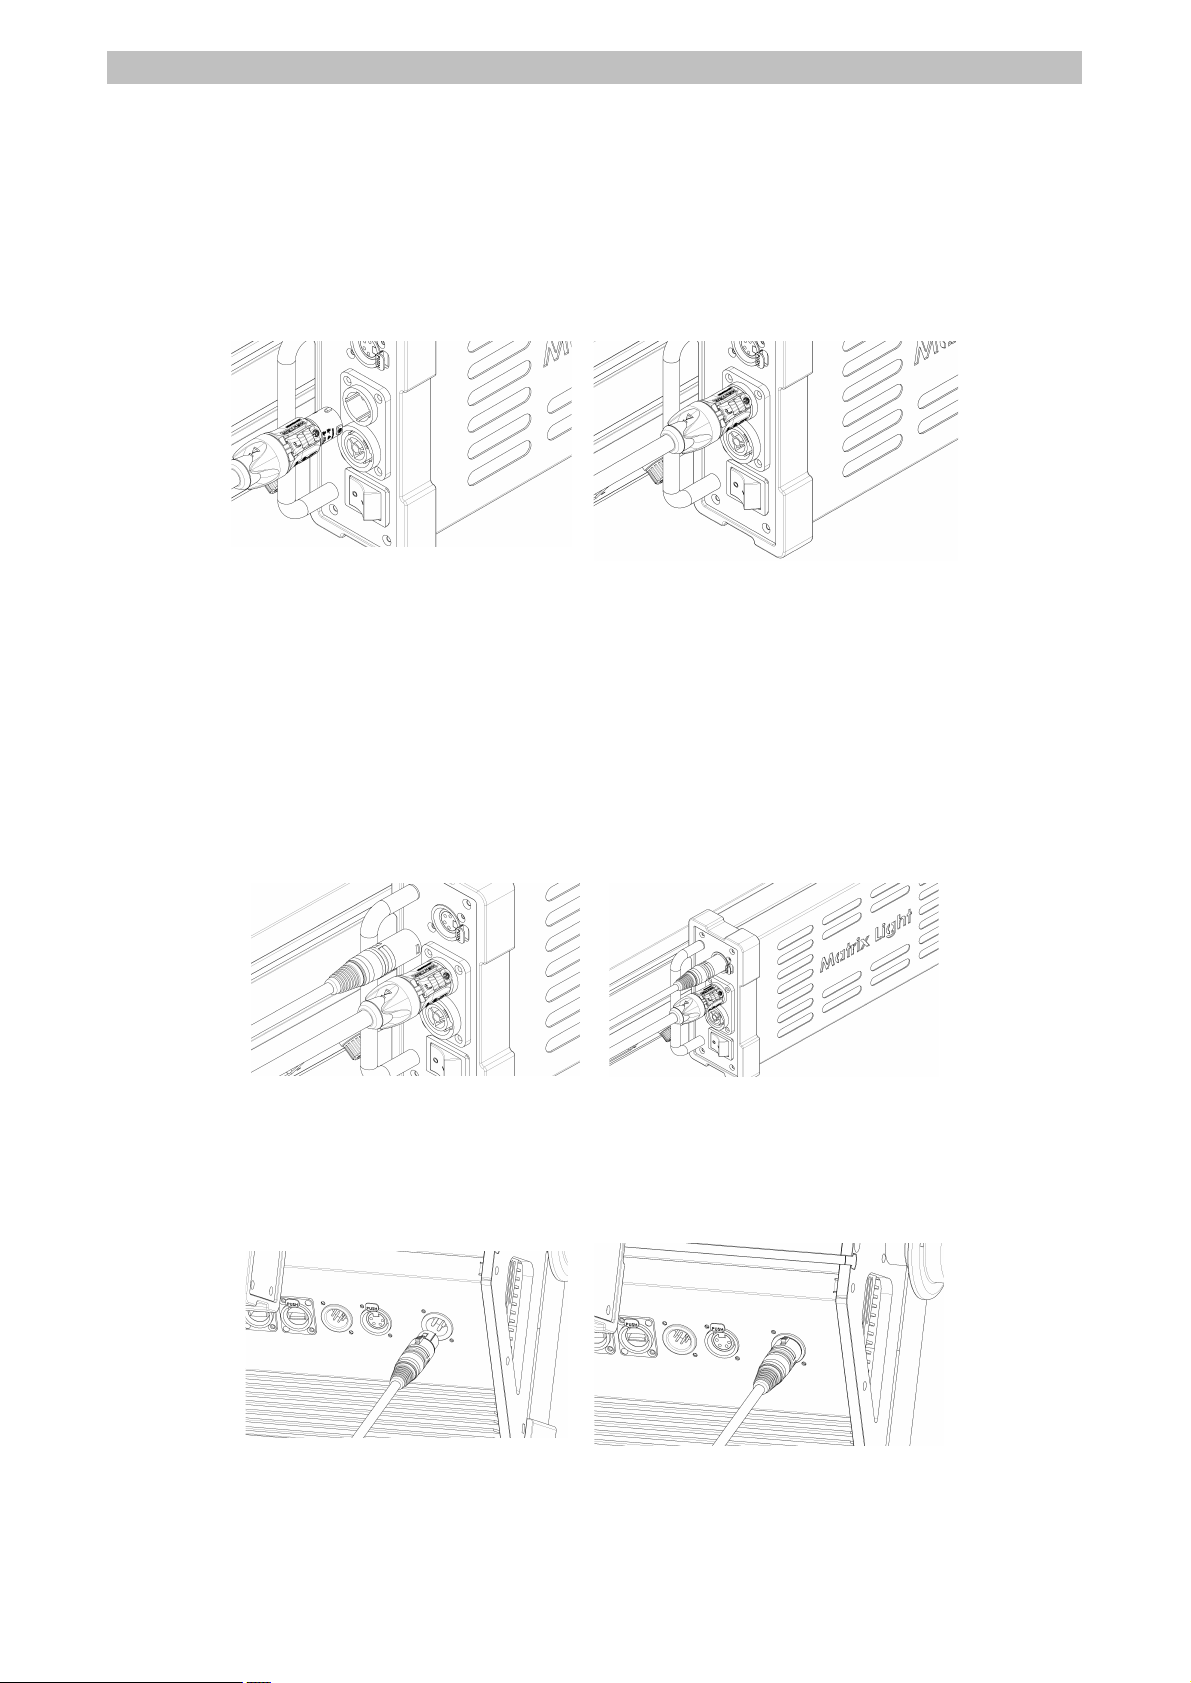
Matrix Light All Light
110V or 240V voltage (see "Product Specification").
The connector cable between the external power supply and the Matrix Light All Light can be
used in different lengths as an accessory. Use only connector cables for Matrix Light All Light
(see "Product Specification").
To insert and remove PowerCON cable connectors
1. Arrange the key protrusion of the connector and the keyway of the input socket, then insert the cable
connector into the power input socket.
2. Lock the cable connector by turning it fully clockwise.
3. To unlock the cable connector, press the connector lock backward and turn the cable connector
counterclockwise. Pull the cable connector out of the power input socket.
To connect and remove the XLR connector on the DC 48V cable
Connectivity to DC 48V cable connector:
1. Leave the main power switch on the external power supply OFF.
2. Align the 48 V DC power key on the socket of the product with the keyway on the arm cable
connector. Insert into the power supply of the socket until the cable connector is locked.
3. Align the raised key on the male cable connector with the keyway on the power supply outlet.
Insert into the power outlet until the cable connector is locked.
4. Insert the arm cable connector into the DC 48V IN terminal of the All Light body.
To disconnect the DC 48V cable connector:
1. Pull the connector lock and pull the cable connector out of the socket.
- 12 -
Page 15
Matrix Light All Light
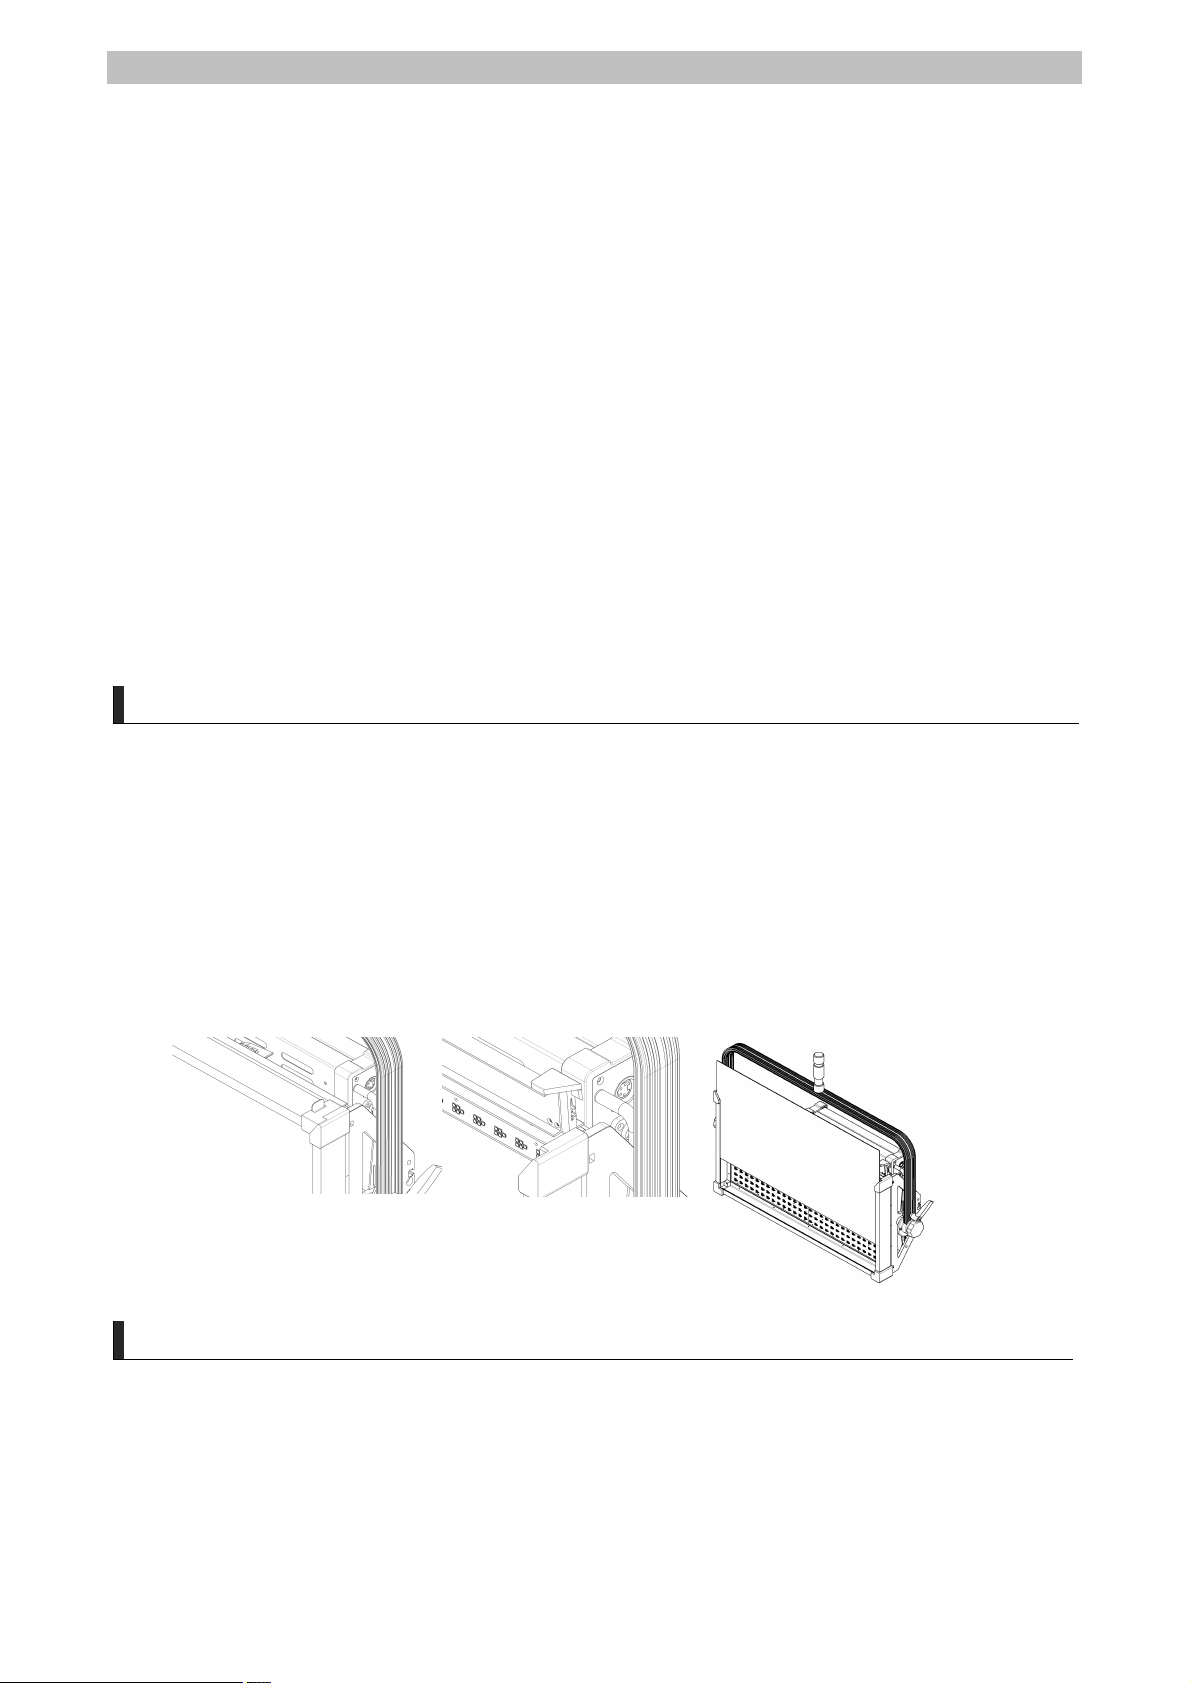
How to use diffusion filters
Diffusion filters are installed in the product at the time of initial product purchase. If you replace the
filter with a different spread ratio, proceed in the following order:
- Pull the upper cover latch on the left and right sides of the light upper cover to the direction of
the arrow and open the upper cover.
- Pull out the previously installed diffused filter in the upward direction and insert the new
diffused filter into the diffusion filter installation slot.
- Close the light upper cover and lock the upper cover by pushing the upper cover latch on the
left and right sides to the direction of the arrow.
How to Use a Barn door
Barn door is available as a separate option.
The installation of the vanguard is to extend the small wings outwards to facilitate installation, as
shown in the figure, and then mount them in the light in the order of the arrows. At this point,
spread the fixing latch to the left and right to grooves, and at the bottom, place the bottom of the
half-door into the "A" shaped shackle as illustrated, close the small wings to the light body and
open the large wings to adjust the desired angle.
Power Through
The external power supply is equipped with a Neutrik PowerCON Through 1 power output socket,
which can be supplied from one power outlet to another external power supply for the Matrix Light
All Light. The voltage and frequency of the penetrating power is the same as the voltage and
frequency of the power input.
External power supply power switch on/off
If the AC power input cable is connected to the external power supply and the lights are well
connected to the dedicated cable, turn on the power switch of the external power supply. Turn off
the power switch of the external power supply and release the power input cable when the lighting
is finished.
Battery power
To operate the Matrix Light All Light using battery power, separate optional items such as ML-DPS1 / DC
Power Supply Unit and ML-DPS1 exclusive BP batteries are required. If the battery is fully charged,
combine the ML-DPS1 exclusive BP battery with the battery power supply (ML-DPS1 / DC Power Supply
Unit) and connect the battery power supply and All Light to a dedicated power cable. Switch on the
power switch of the battery power supply. Turn off the power switch of the battery power supply and
release the power input cable when the lighting is finished.
- 13 -
Page 16
Matrix Light All Light
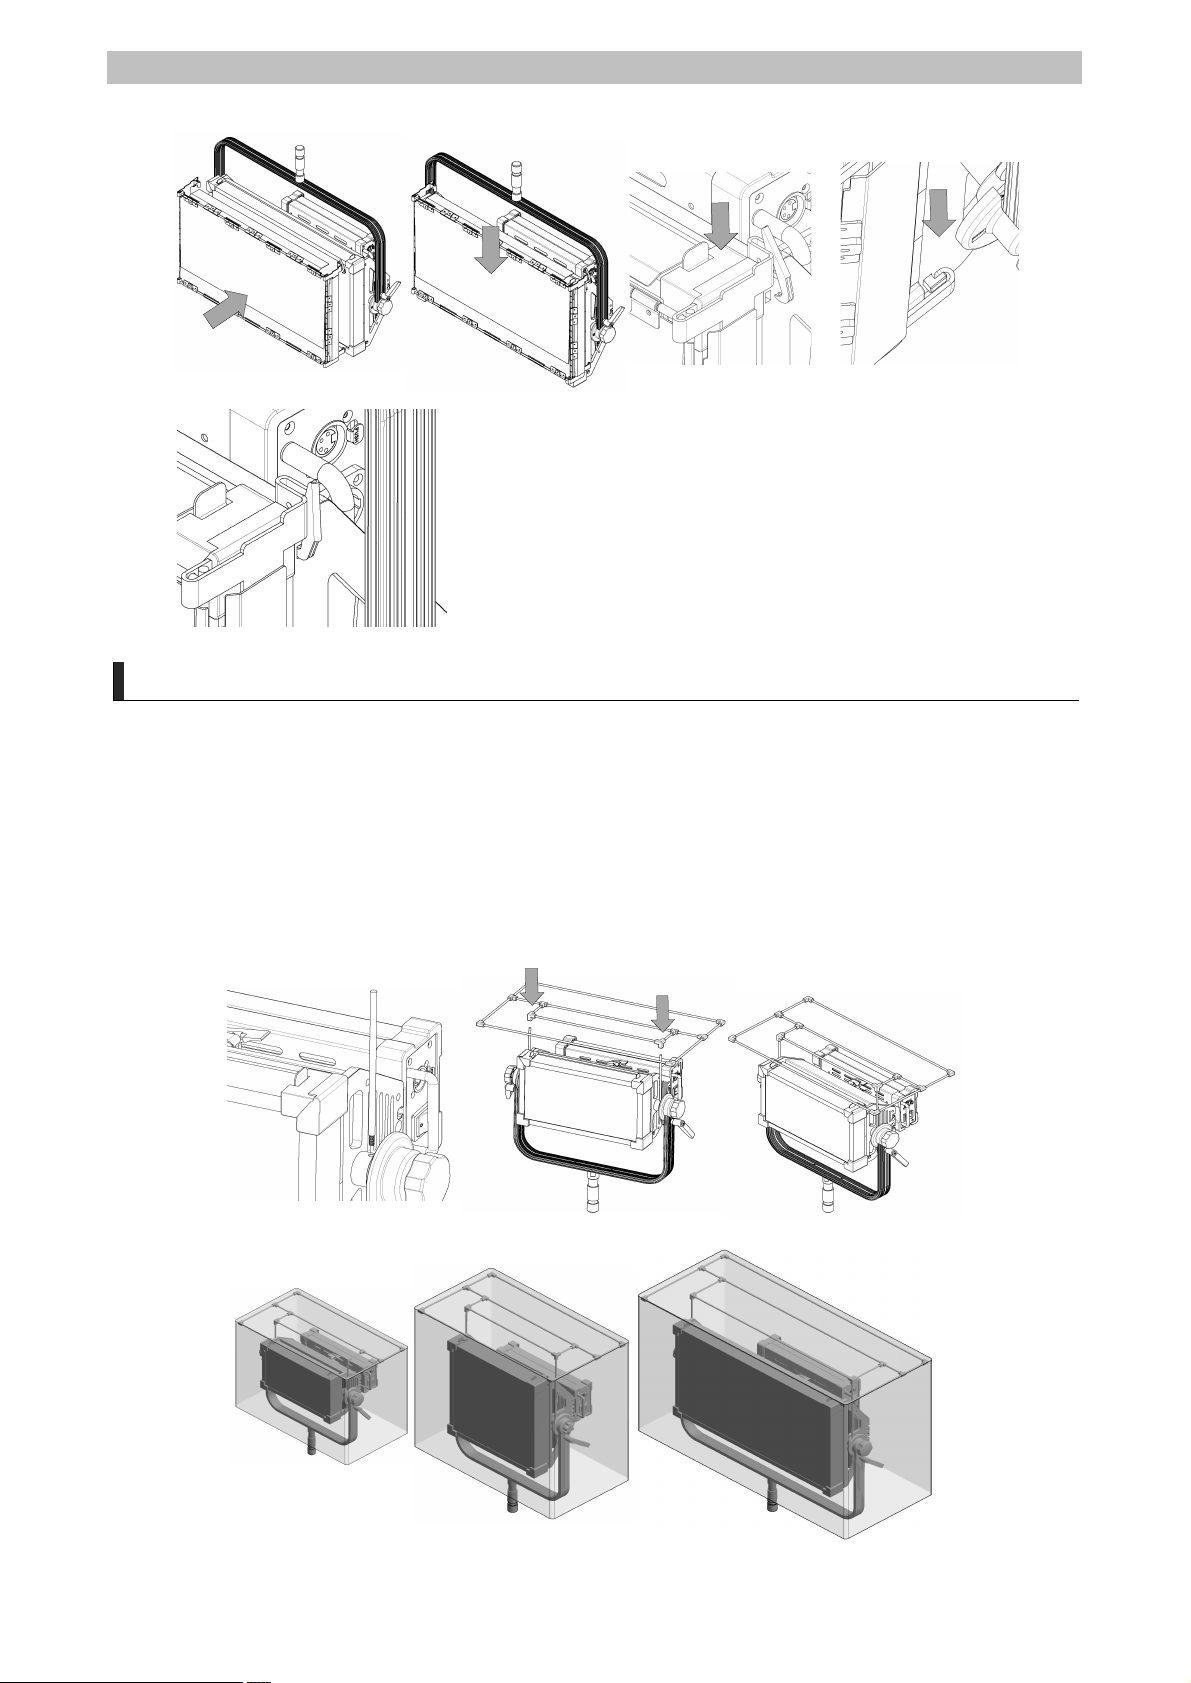
How to use a rain cover
The ML-ARC1, ML-ARC2, and ML-ARC4 rain cover are available as a separate option.
Install the rain cover as shown in the figure below, rotate the two rods to fix them on the mounting
screw groove for the run-in-cover rod. Install the rain cover frame using the connecting joint and
rod, and cover the rain cover as shown below. Secure the rain cover to the body of the product
with a retaining strap at the bottom of the rain cover to prevent the wind from blowing. (In severe
wind conditions, excessive use of rain cover without safely securing the light tripod may cause
damage to the equipment and damage to the equipment by the wind.)
- 14 -
Page 17
Matrix Light All Light
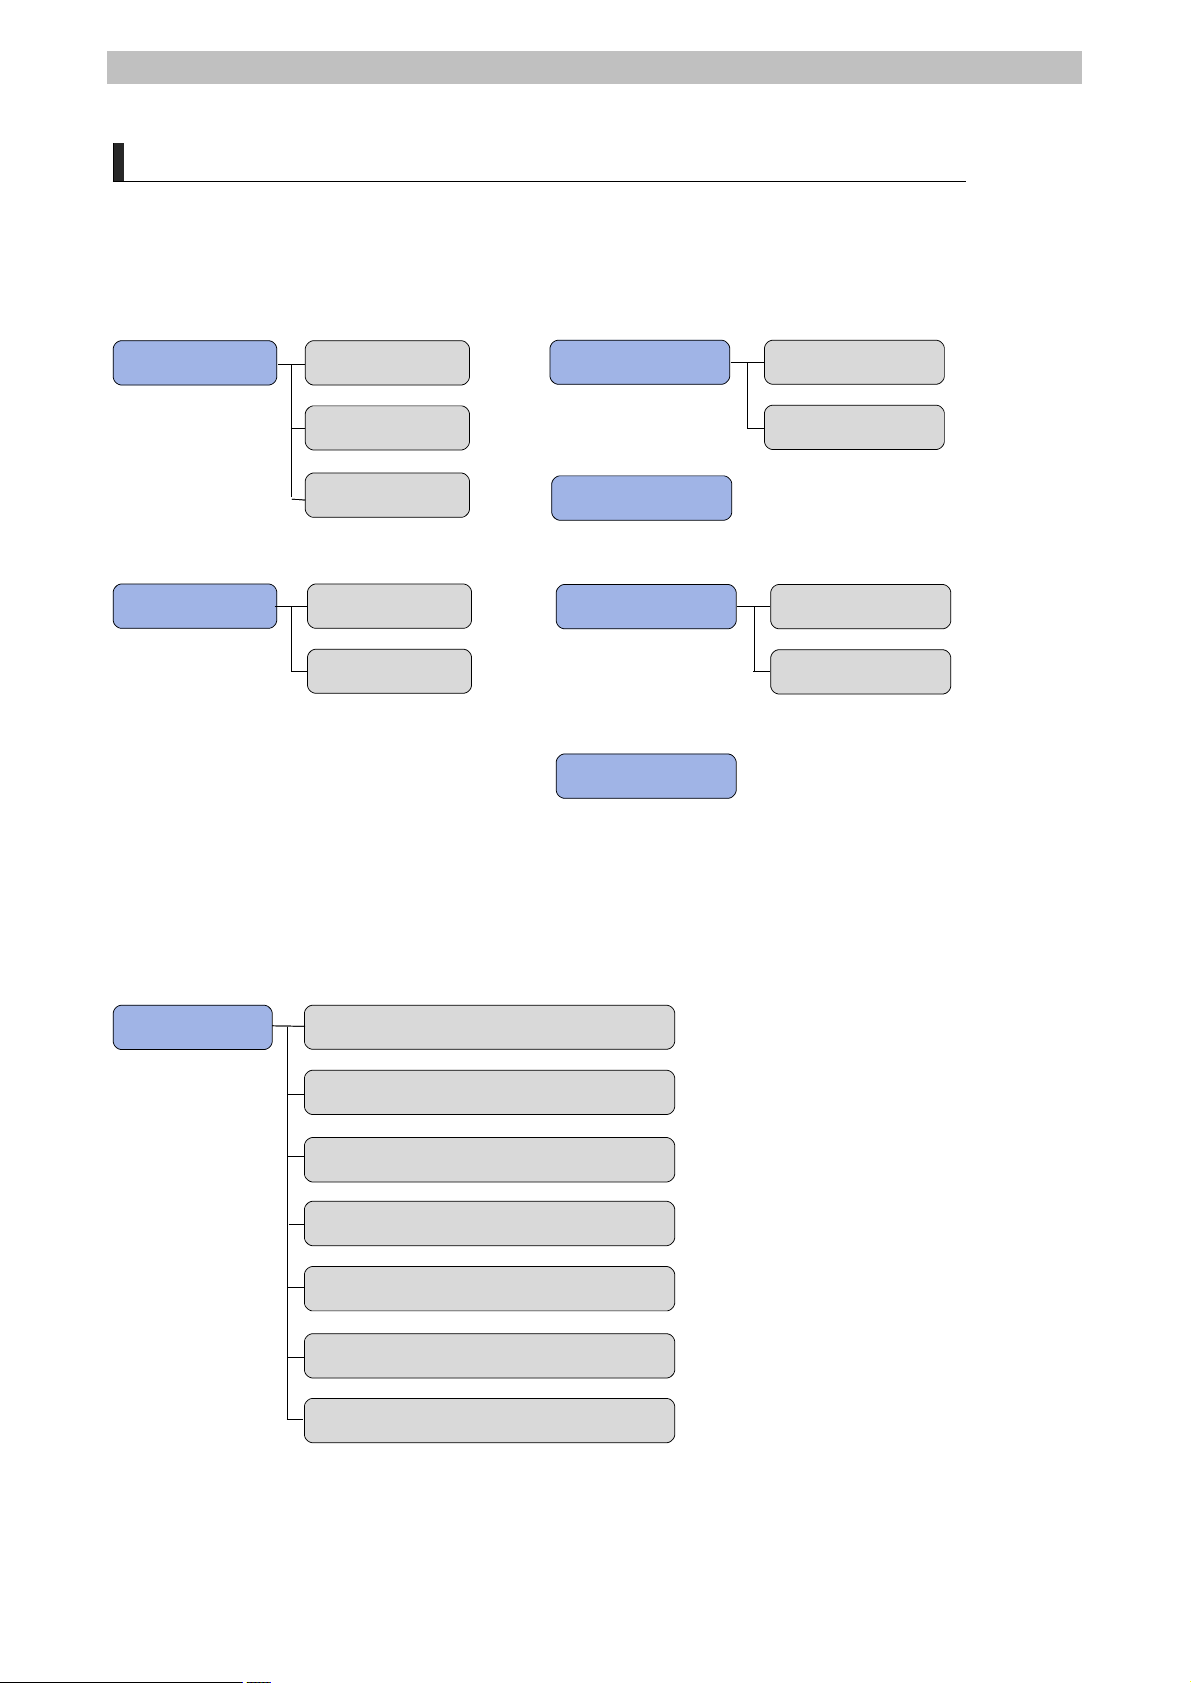
Touchscreen menu configuration
The touchscreen menu of the Matrix Light All Light consists of the following schemes:
COLOR Mode
Preset 1
Preset 2
CCT Mode
RGB Mode
HSI Mode
Preset
Preset Save
Filter Menu
Flash Effect
Color Effect
Color Filter 1
Color Filter 2
Effect Menu
Custom Effect
System Setting
Display
Color Offset
DMX Mode
Fan Speed
Bluetooh
Light Curve
Factory Default
02. How to operate the touchscreen •••
- 15 -
Page 18
Matrix Light All Light
Touchscreen menu operation
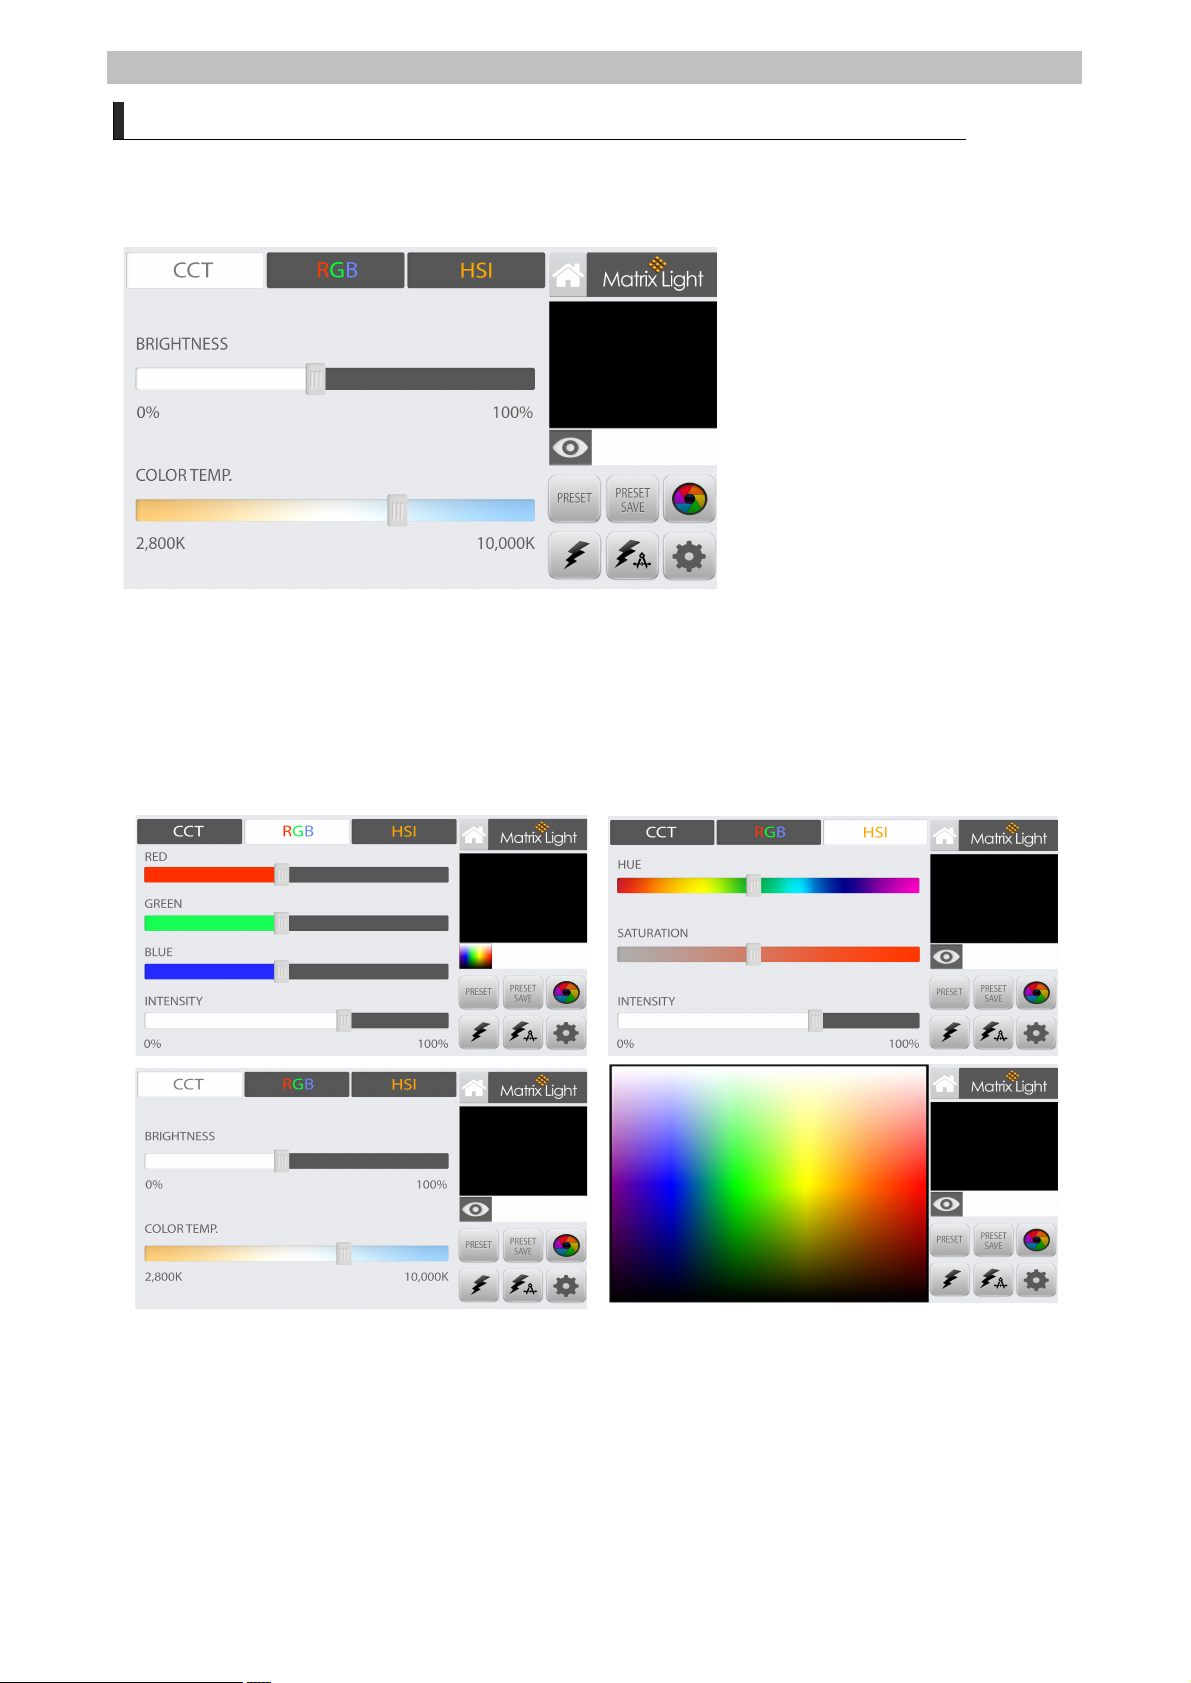
The initial menu of the touchscreen for the Matrix Light All Light consists of the following:
Brightness
43%
Color Temp
7100 [K]
Home Button
Color Mode Button
Brightness Controller
Color Temp. Controller
Information Window
Color Preview
Function Select Button
1. Color Mode
Matrix Light All Light supports three color modes: CCT, RGB, and HSI. CCT mode supports
between 2,800K and 10,000K white light, and RGB mode is a color combination of three-color
LEDs from Red, Green and Blue that can produce tens of millions of different colors. HSI mode
is a color combination based on Hue, Saturation and Intensity that allows you to express the
desired color.
To vary the brightness or color in each color mode, drag the control bar of the touchscreen to the
left or right or turn the Encoder Switch knob on the light body to fine-tune up to 0.1% units. In
addition to these functions, the encoder switch also moves to each menu (turns left and right),
selects (presses), and stores the current color setting (presses in the Preset menu for 3 seconds).
In particular, RGB color mode supports color palettes. In RGB color mode, touch the color palette
icon to display the color palette on the screen and change it to that color when you touch the
color you want.
- 16 -
Page 19
Matrix Light All Light
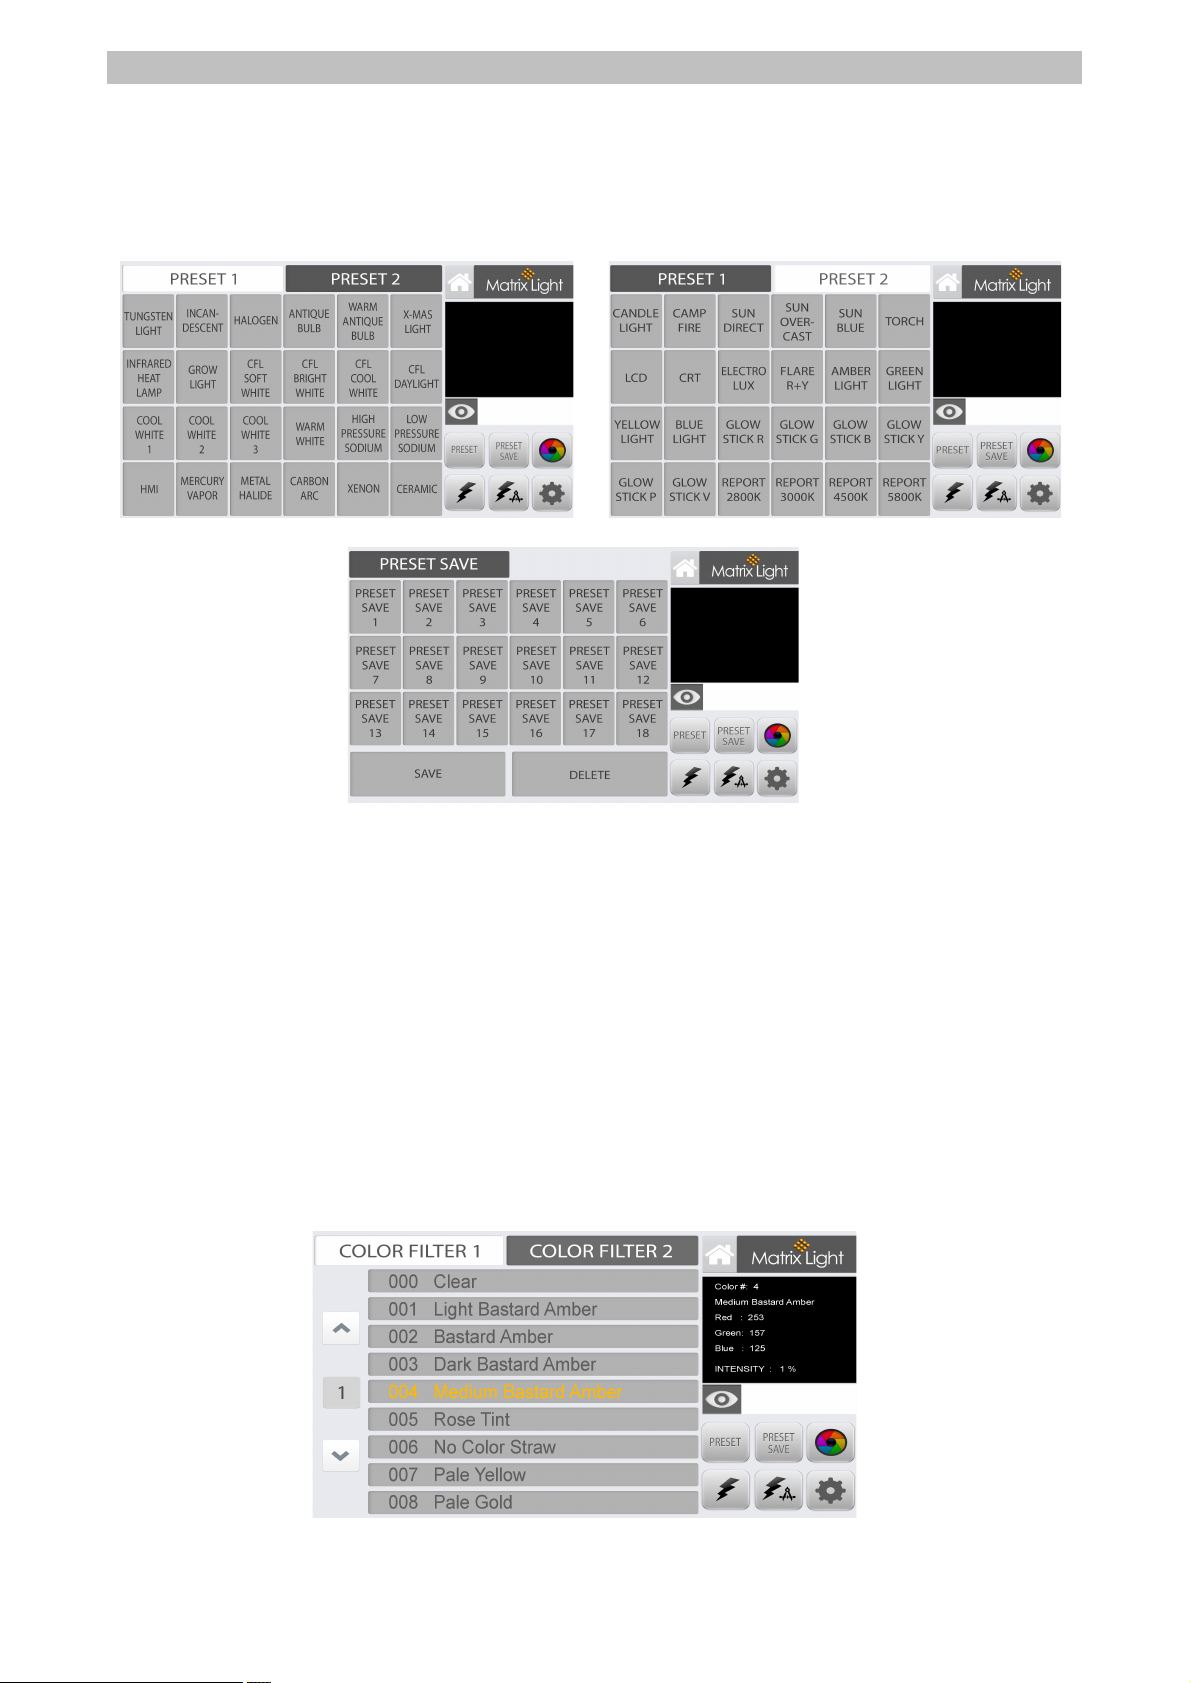
2. Preset Function
Frequently used colors are organized in the preset menu. Users can quickly select a color preset
from this menu. Colors selected from the color modes can be stored in the preset menu.
For example, if you want to save the color selected in color mode to a preset save menu, you can
touch the SAVE button in the Preset Save menu and then touch the save position (for example, the
Preset Save 1 button), which will save the color value you want to save and displays a dot of the
color stored in the upper right corner of the button. To clear the color value, press DELETE and then
press Preset to delete the stored data of that button.
3. Color Filter Menu
The Matrix Light All Light series contains specialized color filter data. It is divided into Color Filter 1
Group and Color Filter 2 Group, and the Color Filter 1 Group provides colors similar to most color
filters from LEE Filter Company and the Color Filter 2 Group from Rosco Lux Company.
- 17 -
Page 20
Matrix Light All Light
Classification
PAGE
AllLight#
Color
#
Color Name
Transmission
[%]
Color Filter 1
1
1
2
Rose Pink
33
2
3
Lavender Tint
75
34Medium Bastard Amber
64
4
7
Pale Yellow
85
5
8
Dark Salmon
35
6
9
Pale Amber Gold
71
7
10
Medium Yellow
87
8
13
Straw Tint
72
9
15
Deep Straw
61
2
1
19
Fire
19
2
20
Medium Amber
51
3
21
Gold Amber
31
4
22
Dark Amber
24
5
24
Scarlet
19
6
26
Bright Red
9
7
27
Medium Red
4
8
35
Light Pink
61
9
36
Mesium Pink
33
3
1
46
Dark Magenta
6
2
48
Rose Purple
15
3
52
Light Lavender
45
4
53
Paler Lavender
62
5
58
Lavender
9
6
61
Mist Blue
62
7
63
Pale Blue
54
8
68
Sky Blue
13
9
79
Just Blue
6
4
1
85
Deeper Blue
3
2
89
Moss Green
30
3
90
Dark Yellow Green
11
4
101
Yellow
80
5
102
Light Amber
75
6
103
Straw
82
7
104
Deep Amber
64
8
105
Orange
41
9
106
Primary Red
9
5
1
107
Light Rose
48
2
109
Light Salman
55
3
110
Middle Rose
47
4
111
Dark Pink
32
5
113
Magenta
11
6
115
Peacock Blue
35
7
116
Medium Blue-Green
19
8
117
Steel Blue
55
9
118
Light Blue
24
6
1
119
Dark Blue
3
2
120
Deep Blue
1
3
121
Color Filter 1 Green
64
4
122
Fern Green
52
5
124
Dark Green
31
6
126
Mauve
4
7
127
Smokey Pink
12
8
128
Bright Pink
14
9
129
Heavy Frost
7
7
1
130
Clear
95
2
132
Medium Blue
9
3
134
Golden Amber
38
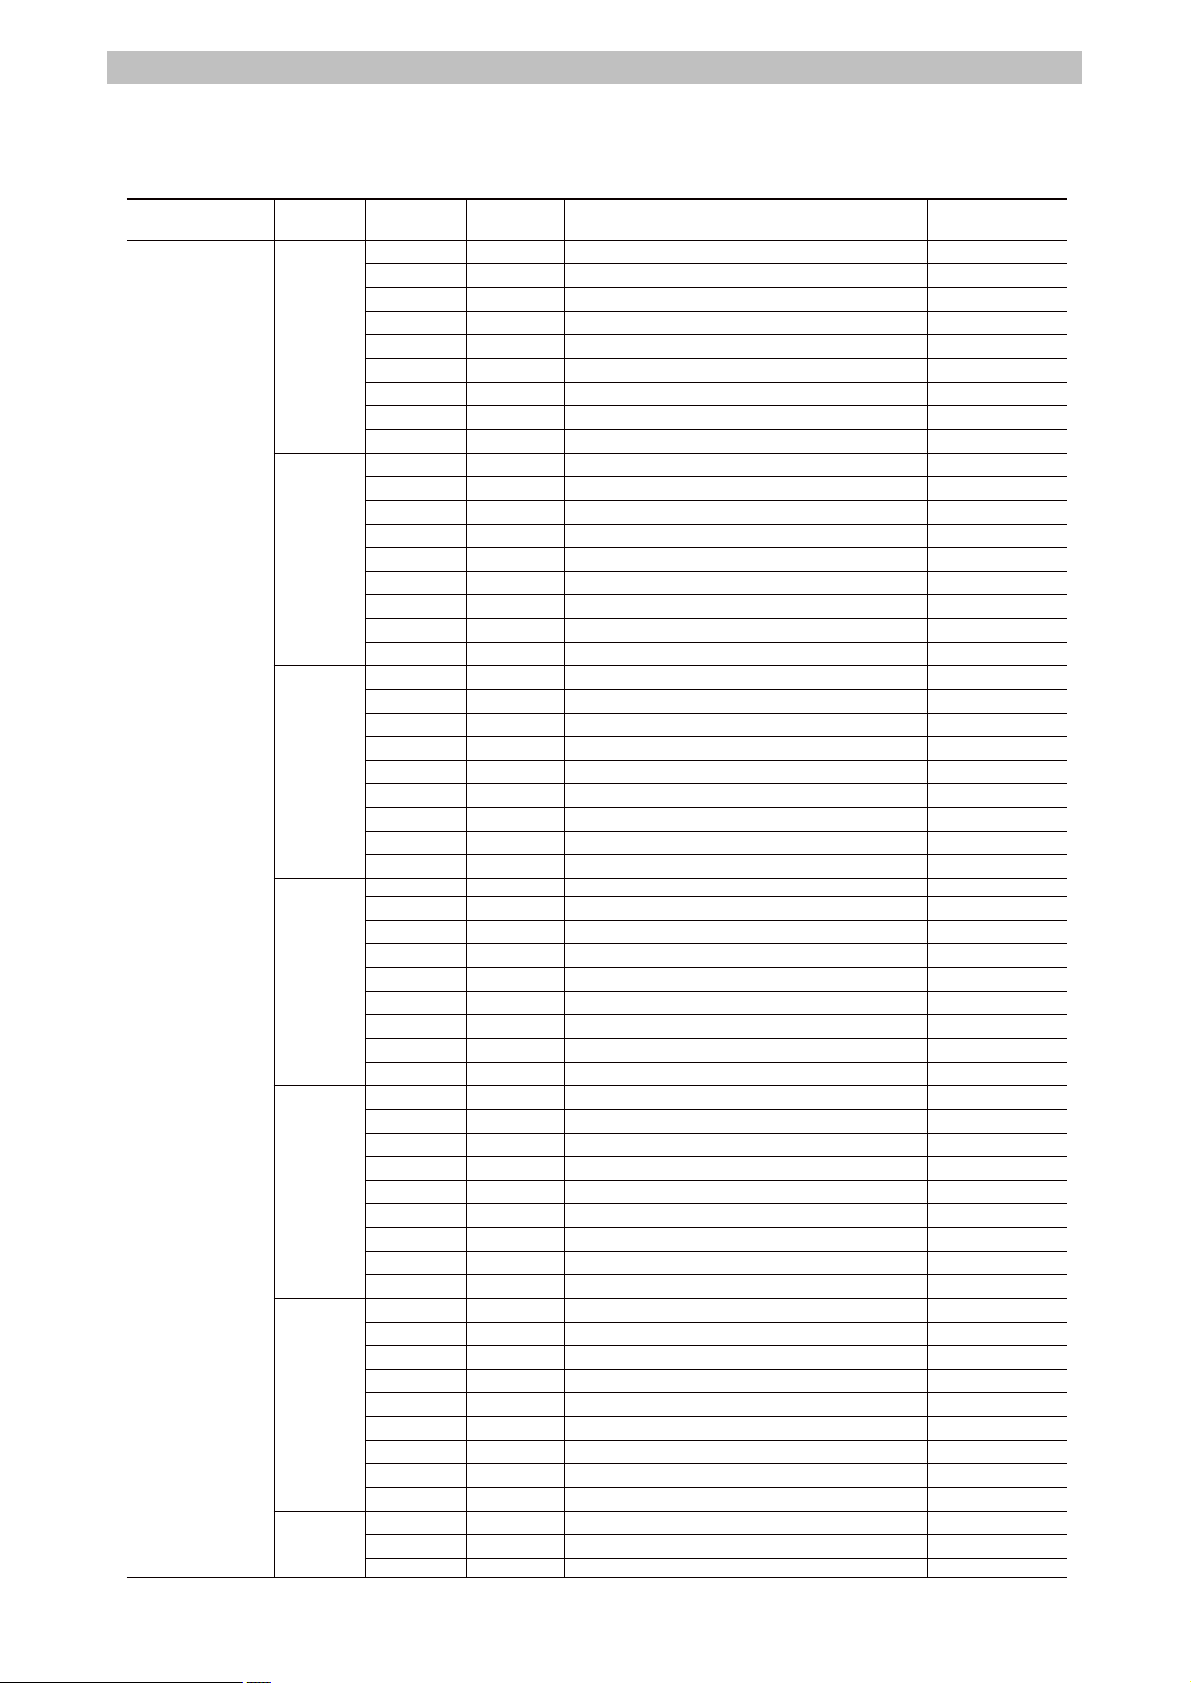
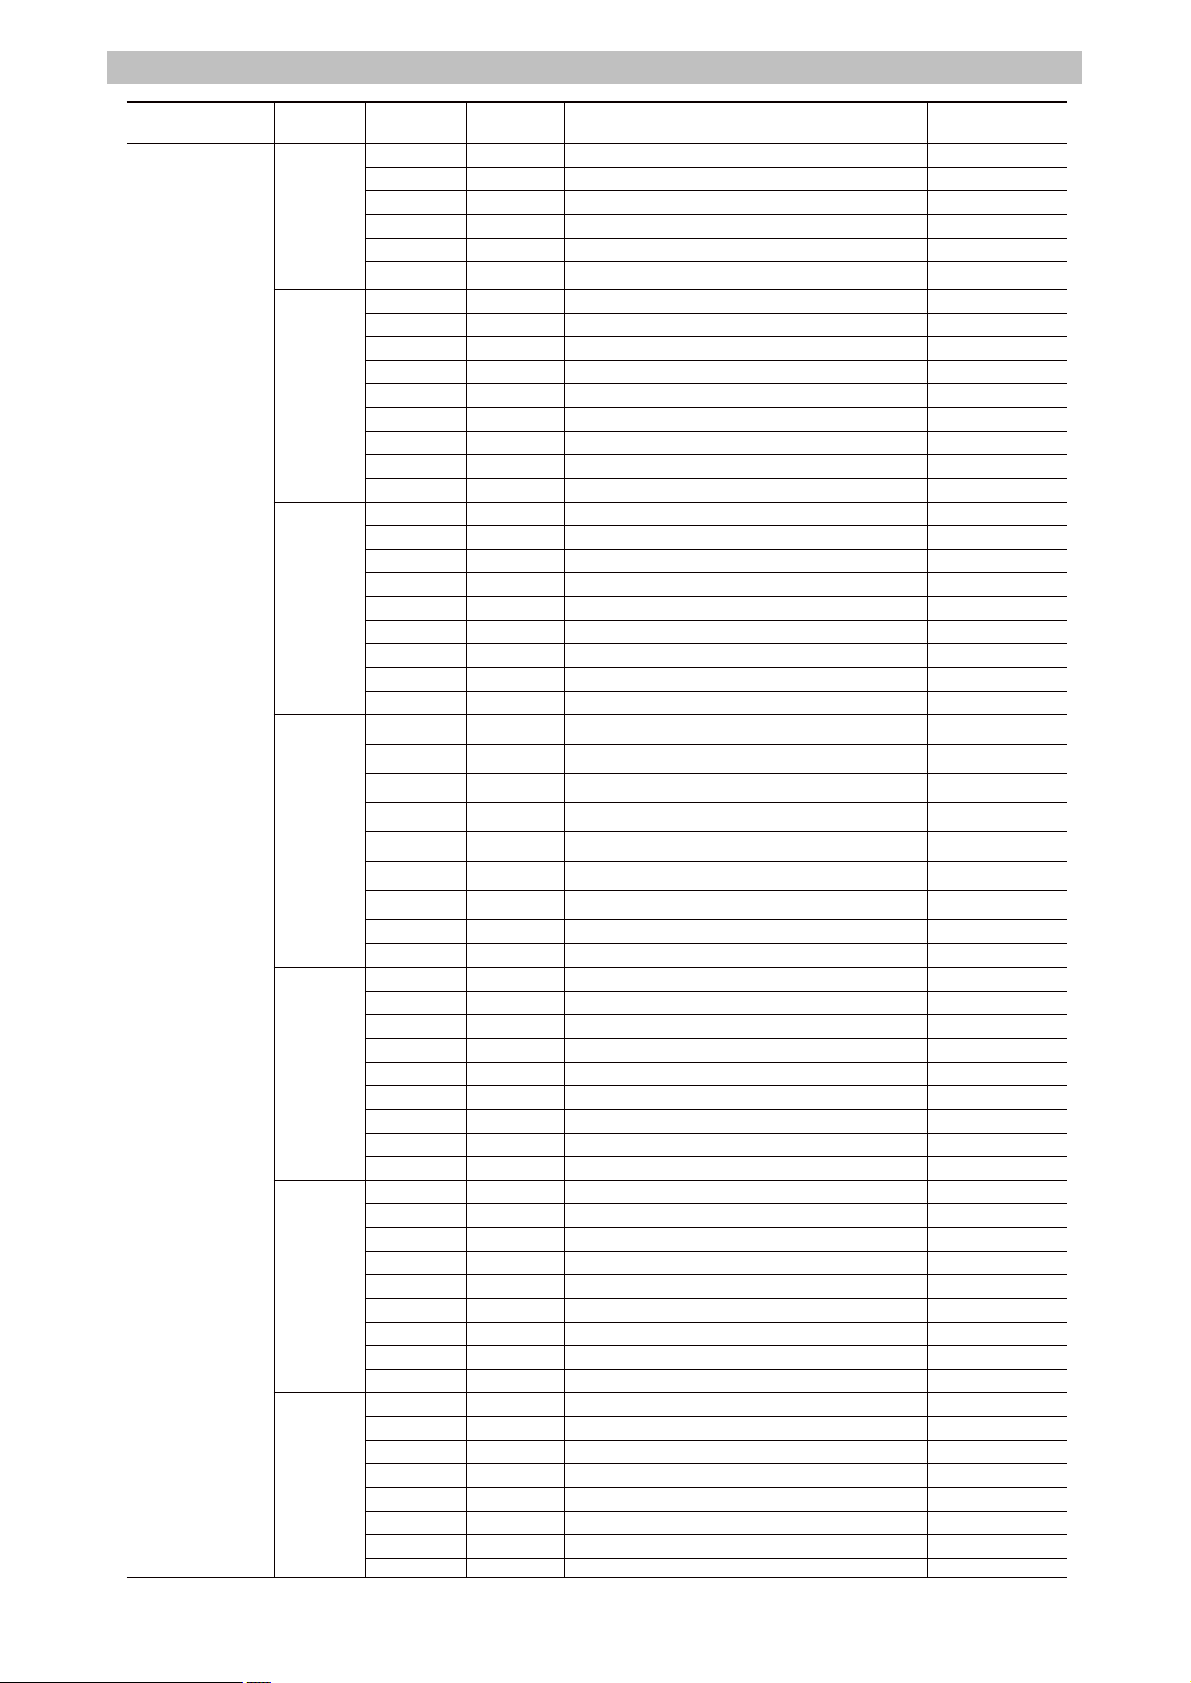
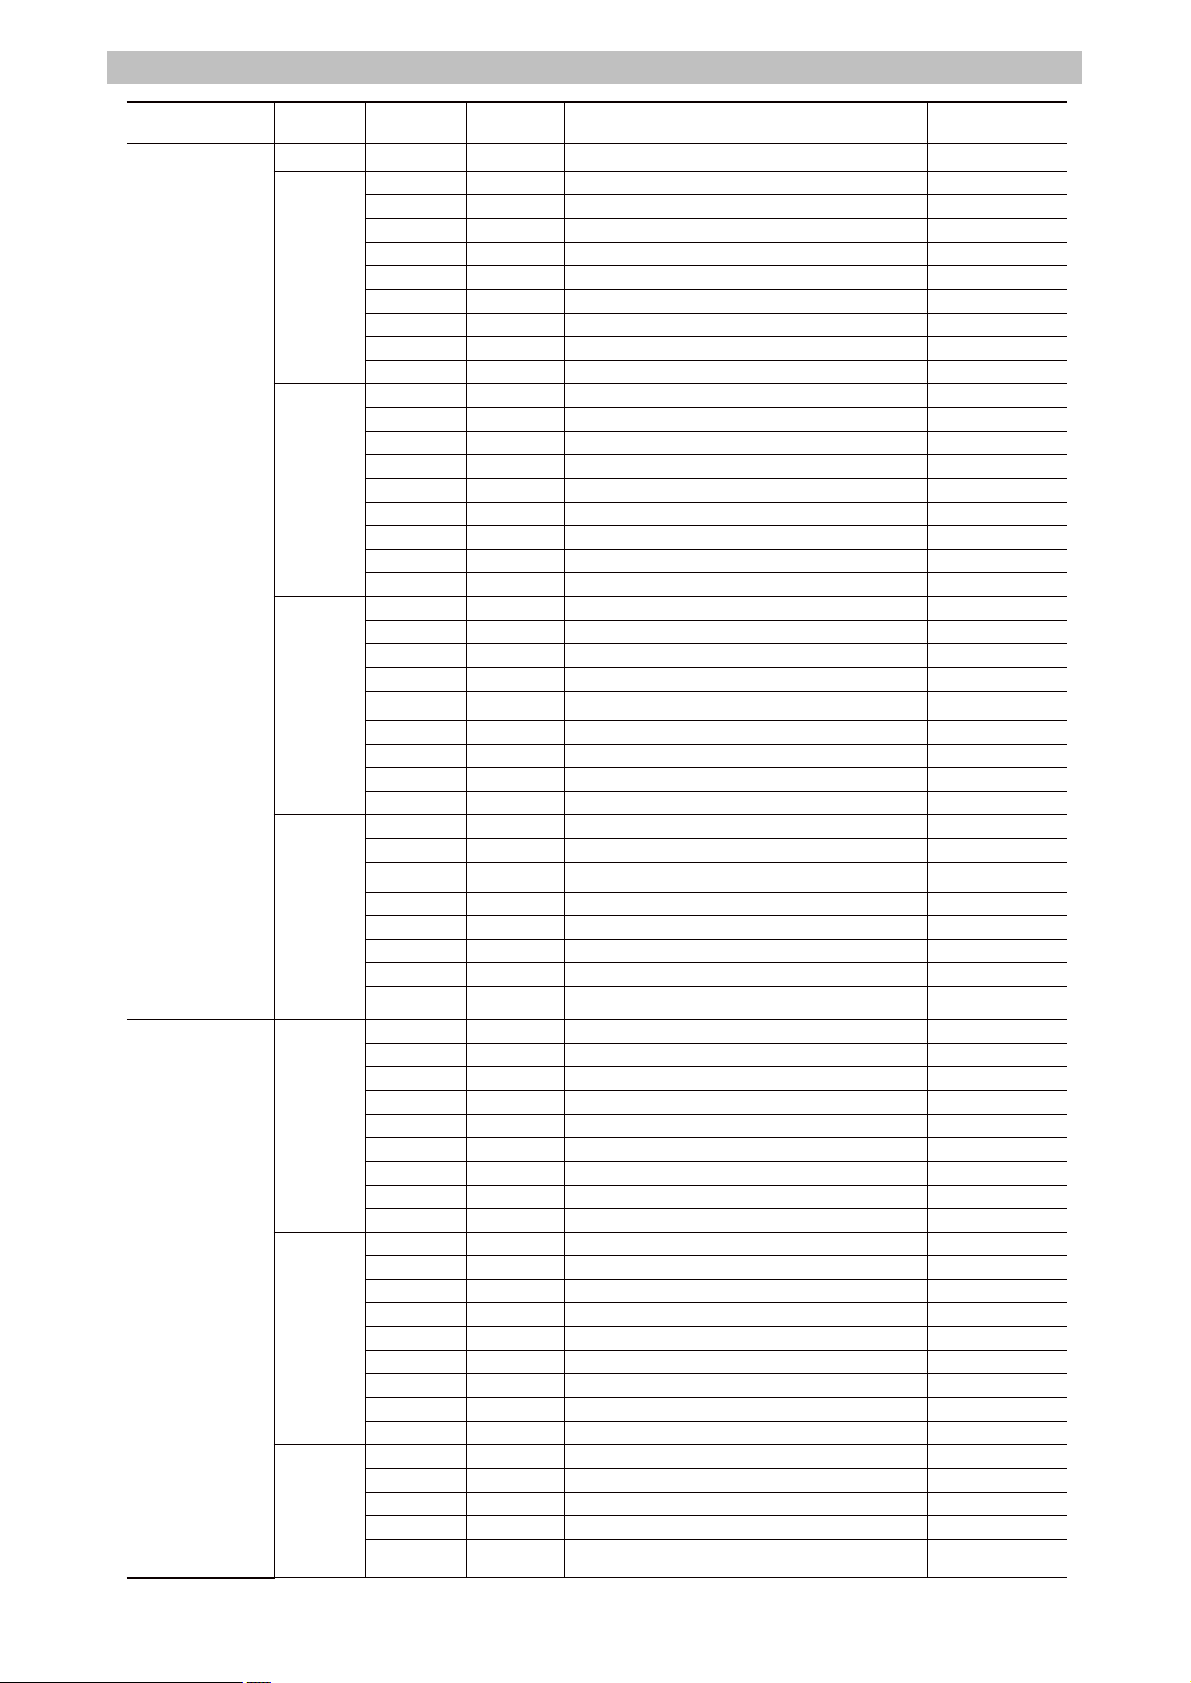
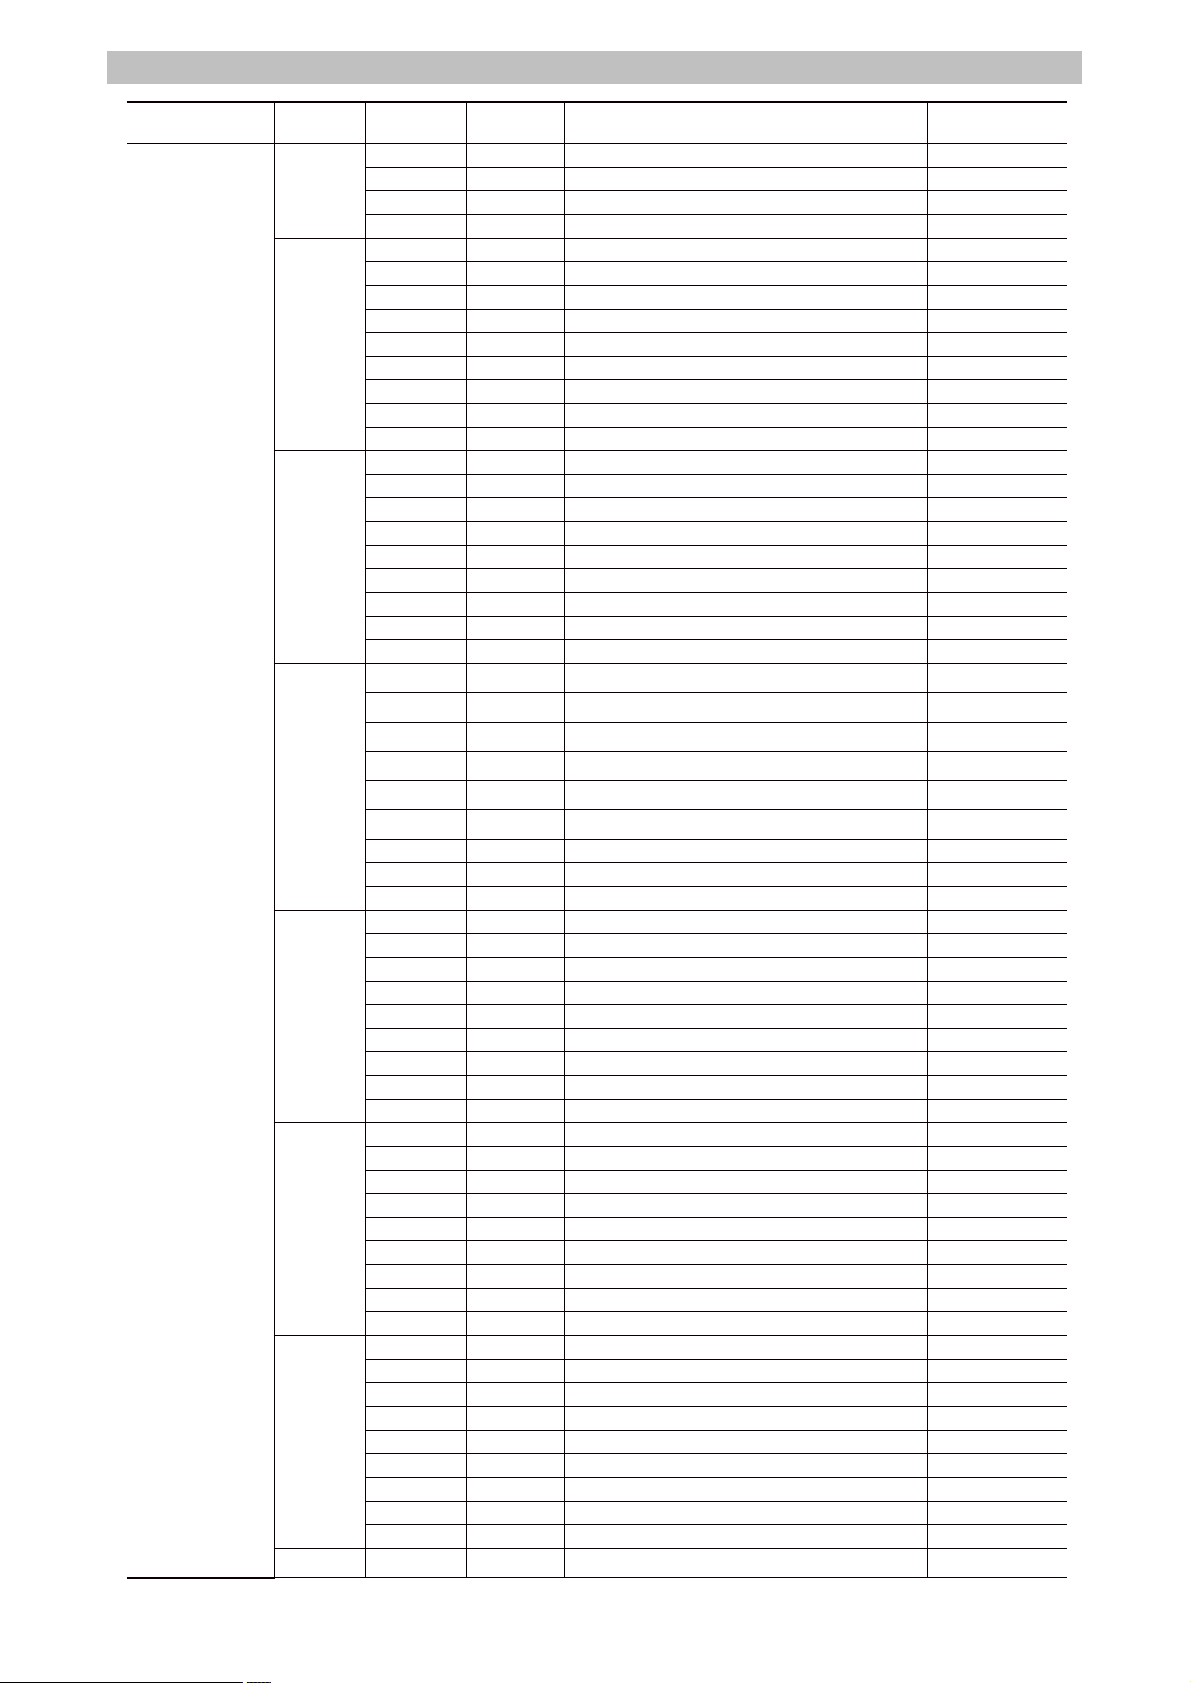
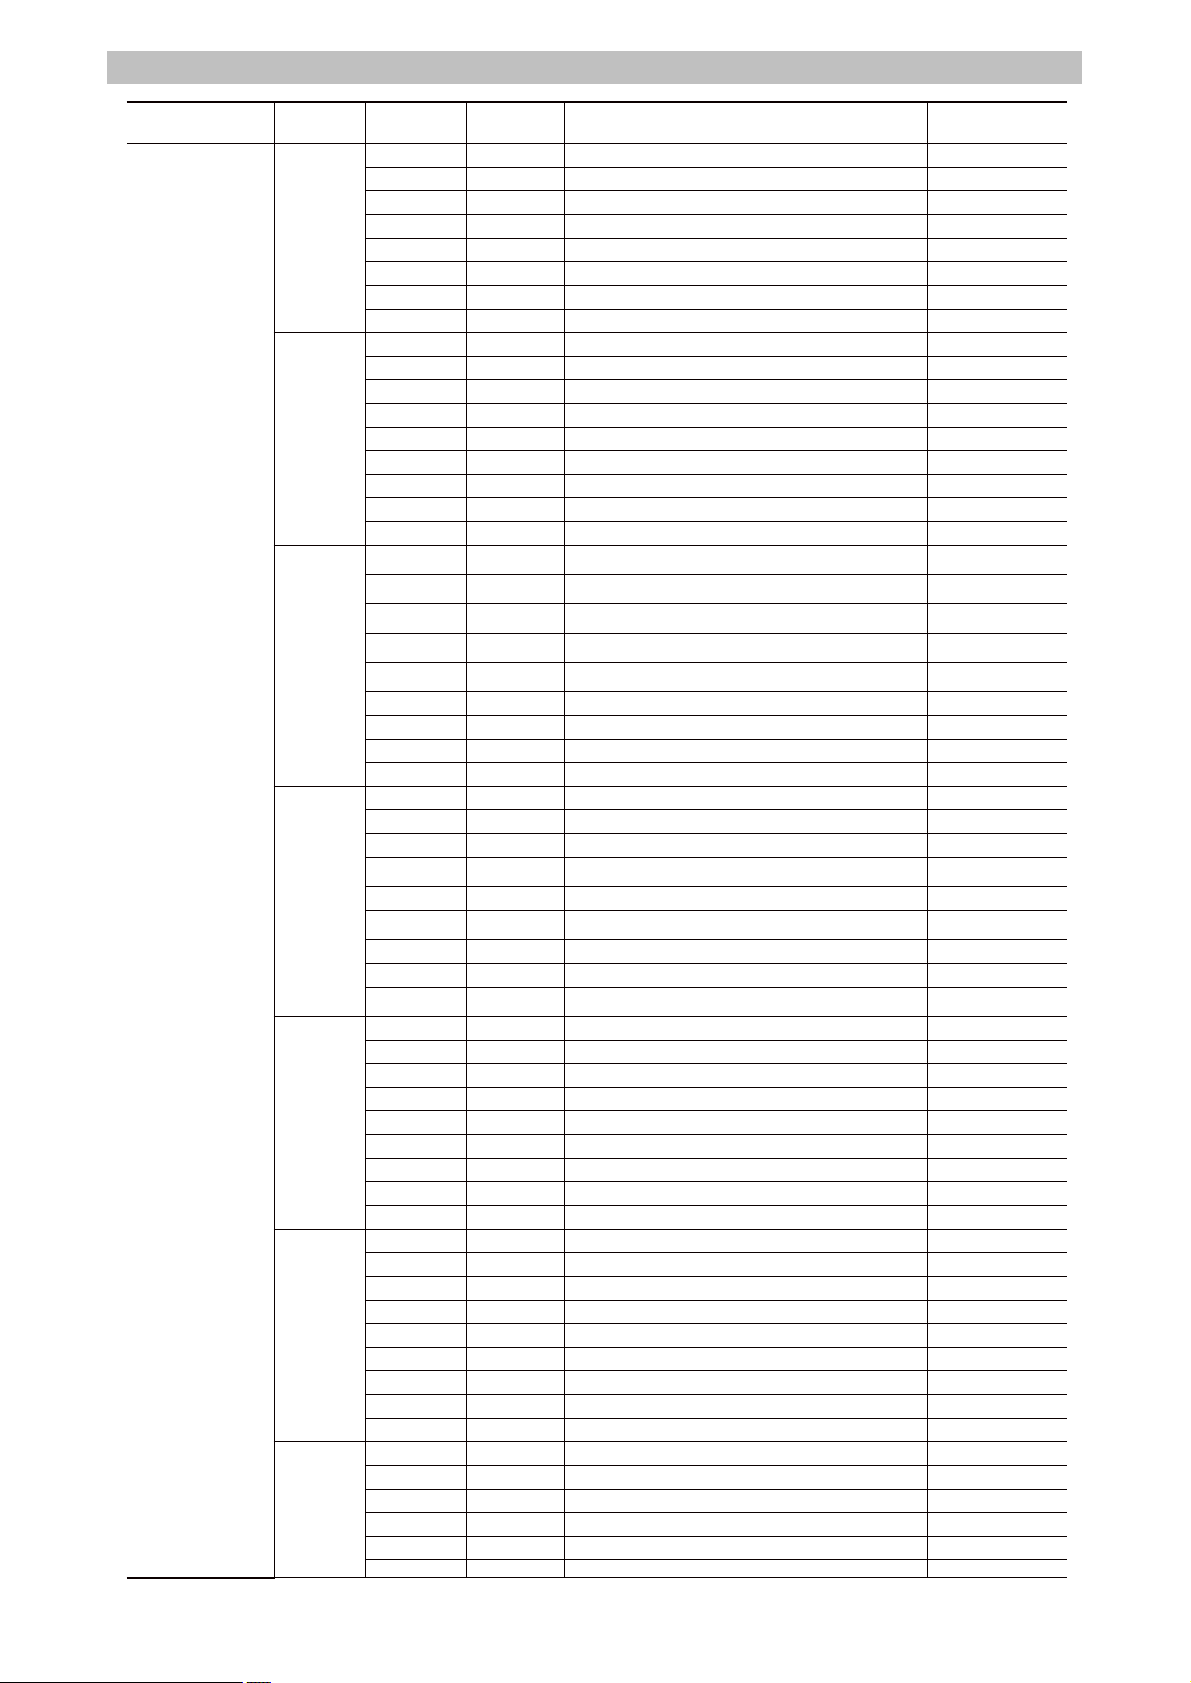
All Light provides 152 Color Filter 1 and 168 Color Filter 2 filter values. See the table below for
detailed color filter names, pages where they are located, and color numbers for these filters.
- 18 -
Page 21
Matrix Light All Light
Classification
PAGE
AllLight#
Color
#
Color Name
Transmission
[%]
4
135
Deep Golden Amber
19
5
136
Pale Lavender
43
6
137
Special Lavender
26
7
138
Pale Green
80
8
139
Primary Green
15
9
141
Bright Blue
18
8
1
142
Pale Violet
21
2
143
Pale Navy Blue
16
3
144
No Colour Blue
32
4
147
Apricot
53
5
148
Bright Rose
14
6
151
Gold Tint
69
7
152
Pale Gold
71
8
153
Pale Salmon
65
9
154
Pale Rose
73
9
1
156
Chocolate
26
2
157
Pink
36
3
158
Deep Orange
30
4
159
No Color Straw
89
5
161
Slate Blue
25
6
162
Bastard Amber
78
7
164
Flame Red
18
8
165
Daylight Blue
20
9
166
Pale Red
25
10
1
170
Deep Lavender
26
2
174
Dark Steel Blue
30
3
176
Loving Amber
50
4
179
Chrome Orange
54
5
180
Dark Lavender
7
6
181
Congo Blue
1
7
182
Light Red
11
8
183
Moonlight Blue
19
9
184
Cosmetic Peach
57
11
1
185
Cosmetic Burgundy
52
2
186
Cosmetic Silver Rose
51
3
187
Cosmetic Rouge
54
4
188
Cosmetic Highlight
56
5
189
Cosmetic Silver Moss
61
6
190
Cosmetic Emerald
60
7
191
Cosmetic Aqua Blue
53
8
192
Flesh Pink
35
9
193
Rosy Gold
36
12
1
194
Surprise Pink
22
2
195
Zenith Blue
3
3
196
True Blue
27
4
197
Alice Blue
10
5
200
Double C.T. Blue
16
6
201
Full C.T. Blue
34
7
202
1/2 C.T. Blue
55
8
203
1/4 C.T. Blue
69
9
204
Full C.T. Orange
55
13
1
205
1/2 C.T. Orange
71
2
206
1/4 C.T. Orange
79
3
207
C.T. Orange +.3 ND
32
4
208
C.T. Orange +.6 ND
16
5
209
.3 ND
51
6
210
.6 ND
24
7
211
.9 ND
14
8
212
L.C.T. Yellow
89
- 19 -
Page 22
Matrix Light All Light
Classification
PAGE
AllLight#
Color
#
Color Name
Transmission
[%]
9
213
White Flame Green
89
14
1
218
1/8 C.T. Blue
81
2
219
Color Filter 1 Fluorescent Green
32
3
223
1/8 C.T. Orange
85
4
226
Color Filter 1 U.V.
92
5
230
Super Correction L.C.T. Yellow
42
6
232
Super White Flame
37
7
236
H.M.I. To Tungsten
58
8
237
C.I.D. To Tungsten
39
9
238
C.S.I. To Tungsten
30
15
1
241
Color Filter 1 Fluorescent 5700K
27
2
242
Color Filter 1 Fluorescent 4300K
37
3
243
Color Filter 1 Fluorescent 3600K
46
4
244
Color Filter 1 Plus Green
74
5
245
Half Plus Green
82
6
246
Quarter Plus Green
85
7
247
Color Filter 1 Minus Green
59
8
248
Half Minus Green
72
9
249
Quarter Minus Green
82
16
1
278
Eighth Plus Green
88
2
279
Eighth Minus Green
87
3
281
3/4 C.T. Blue
46
4
285
3/4 C.T. Orange
61
5
298
.15 ND
69
6
299
1.2 ND
7
7
328
Follies Pink
20
8
332
Special Rose Pink
11
9
343
Special Medium Lavender
6
17
1
344
Violet
20
2
353
Lighter Blue
41
3
354
Special Steel Blue
39
4
363
Special Medium Blue
4
5
441
Full C.T. Straw
57
6
442
Half C.T. Straw
71
7
443
Quarter C.T. Straw
80
8
444
Eighth C.T. Straw
83
Color Filter 2
1
1
0
Clear
100
21Light Bastard Amber
56
3
2
Bastard Amber
78
4
3
Dark Bastard Amber
62
54Medium Bastard Amber
66
6
5
Rose Tint
80
7
6
No Color Straw
92
8
7
Pale Yellow
96
9
8
Pale Gold
86
2
1
9
Pale Amber Gold
74
2
10
Medium Yellow
92
3
11
Light Straw
82
4
12
Straw
88
5
13
Straw Tint
78
6
14
Medium Straw
68
7
15
Deep Straw
65
8
16
Light Amber
68
9
17
Light Flame
56
3
1
18
Flame
56
2
19
Fire
20
3
20
Medium Amber
54
4
21
Golden Amber
43
5
22
Deep Amber
26
- 20 -
Page 23
Matrix Light All Light
Classification
PAGE
AllLight#
Color
#
Color Name
Transmission
[%]
6
23
Orange
32
7
24
Scarlet
22
8
25
Orange Red
14
9
26
Light Red
12
4
1
27
Medium Red
4
2
30
Light Salmon Pink
44
3
31
Salmon Pink
46
432Medium Salmon Pink
28
5
33
No Color Pink
65
6
34
Flesh Pink
45
7
35
Light Pink
66
8
36
Medium Pink
46
9
37
Pale Rose Pink
56
5
1
38
Light Rose
49
2
40
Light Salmon
34
3
41
Salmon
24
4
42
Deep Salmon
8
5
43
Deep Pink
28
6
44
Middle Rose
26
7
45
Rose
8
8
46
Magenta
6
9
47
Light Rose Purple
16
6
1
48
Rose Purple
16
2
49
Medium Purple
4
3
50
Mauve
14
4
51
Surprise Pink
54
5
52
Light Lavender
26
6
53
Pale Lavender
64
7
54
Special Lavender
50
8
55
Lilac
37
9
56
Gypsy Lavender
4
7
1
57
Lavender
24
2
58
Deep Lavender
10
3
59
Indigo
2
4
60
No Color Blue
62
5
61
Mist Blue
66
6
62
Booster Blue
54
7
63
Pale Blue
56
8
64
Light Steel Blue
26
9
65
Daylight Blue
35
8
1
66
Cool Blue
67
2
67
Light Sky Blue
26
3
68
Sky Blue
14
4
69
Brilliant Blue
18
5
70
Nile Blue
45
6
71
Sea Blue
30
7
72
Azure Blue
44
8
73
Peacock Blue
28
9
74
Night Blue
4
9
1
76
Light Green Blue
9
2
77
Green Blue
9
3
78
Trudy Blue
19
4
79
Bright Blue
8
5
80
Primary Blue
9
6
81
Urban Blue
10
7
82
Surprise Blue
6
8
83
Medium Blue
4
9
84
Zephyr Blue
14
10185
Deep Blue
3
- 21 -
Page 24
Matrix Light All Light
Classification
PAGE
AllLight#
Color
#
Color Name
Transmission
[%]
2
86
Pea Green
56
3
87
Pale Yellow Green
85
4
88
Light Green
82
5
89
Moss Green
45
6
90
Dark Yellow Green
13
7
91
Primary Green
7
8
92
Turquoise
59
9
93
Blue Green
35
11
1
94
Kelly Green
25
2
95
Medium Blue Green
15
3
96
Lime
98
4
97
Light Grey
50
5
98
Medium Grey
25
6
99
Chocolate
35
7
120
Red Diffusion
12
8
121
Blue Diffusion
8
9
122
Green Diffusion
13
12
1
123
Amber Diffusion
32
2
124
Red Cyc Silk
12
3
125
Blue Cyc Silk
8
4
126
Green Cyc Silk
13
5
127
Amber Cyc Silk
32
6
128
Magenta Silk
6
7
129
Sky Blue Silk
14
8
130
Medium Blue Green Silk
15
9
131
Medium Amber Silk
54
13
1
150
Hamburg Rose
80
2
151
Hamburg Lavender
26
3
152
Hamburg Steel Blue
26
4
304
Pale Apricot
79
5
305
Rose Gold
75
6
312
Canary
85
7
317
Apricot
51
8
321
Soft Golden Amber
39
9
337
True Pink
55
14
1
339
Broadway Pink
15
2
342
Rose Pink
16
3
344
Follies Pink
21
4
355
Pale Violet
20
5
356
Middle Lavender
27
6
357
Royal Lavender
5
7
358
Rose Indigo
5
8
359
Medium Violet
5
9
378
Alice Blue
15
15
1
383
Sapphire Blue
4
2
385
Royal Blue
4
3
388
Gaslight Green
76
4
389
Chroma Green
40
5
397
Pale Grey
70
6
3102
Tough MT2
66
7
3106
Tough MTY
57
8
3107
Tough Y-1
93
9
3114
Tough UV Filter
93
16
1
3134
Tough MT 54
83
2
3202
Full Blue (CTB)
36
3
3203
Three-Quarter Blue (3/4 CTB)
41
4
3204
Half Blue (1/2 CTB)
52
5
3206
Third Blue (1/3 CTB)
64
6
3208
Quarter Blue (1/4 CTB)
74
- 22 -
Page 25
Matrix Light All Light
Classification
PAGE
AllLight#
Color
#
Color Name
Transmission
[%]
7
3216
Eighth Blue (1/8 CTB)
81
8
3220
Double Blue (2x CTB)
10
9
3304
Tough Plusgreen / WindowGreen
76
17
1
3308
Tough Minusgreen
55
2
3310
Fluorofilter
36
3
3313
Tough 1/2 Minusgreen
71
4
3314
Tough 1/4 Minusgreen
81
5
3315
Tough 1/2 Plusgreen
90
6
3316
Tough 1/4 Plusgreen
92
7
3317
Tough 1/8 Plusgreen
93
8
3318
Tough 1/8 Minusgreen
89
9
3401
Color Filter 2Sun 85
58
18
1
3402
Color Filter 2 N.3
50
2
3403
Color Filter 2 N.6
25
3
3404
Color Filter 2 N.9
12
4
3405
Color Filter 2Sun 85N.3
33
5
3406
Color Filter 2Sun 85N.6
17
6
3407
Color Filter 2Sun (CTO)
47
7
3408
Color Filter 2Sun (1/2 CTO)
73
8
3409
Color Filter 2Sun (1/4 CTO)
81
9
3410
Color Filter 2Sun (1/8 CTO)
92
19
1
3411
Color Filter 2Sun (3/4 CTO)
58
2
3415
Color Filter 2 N.15
70
3
3441
Full Straw (CTS)
50
4
3442
Half Straw (1/2 CTS)
73
5
3443
Quarter Straw (1/4 CTS)
81
6
3444
Eighth Straw (1/8 CTS)
92
7
3761
Color Filter 2lex 85
58
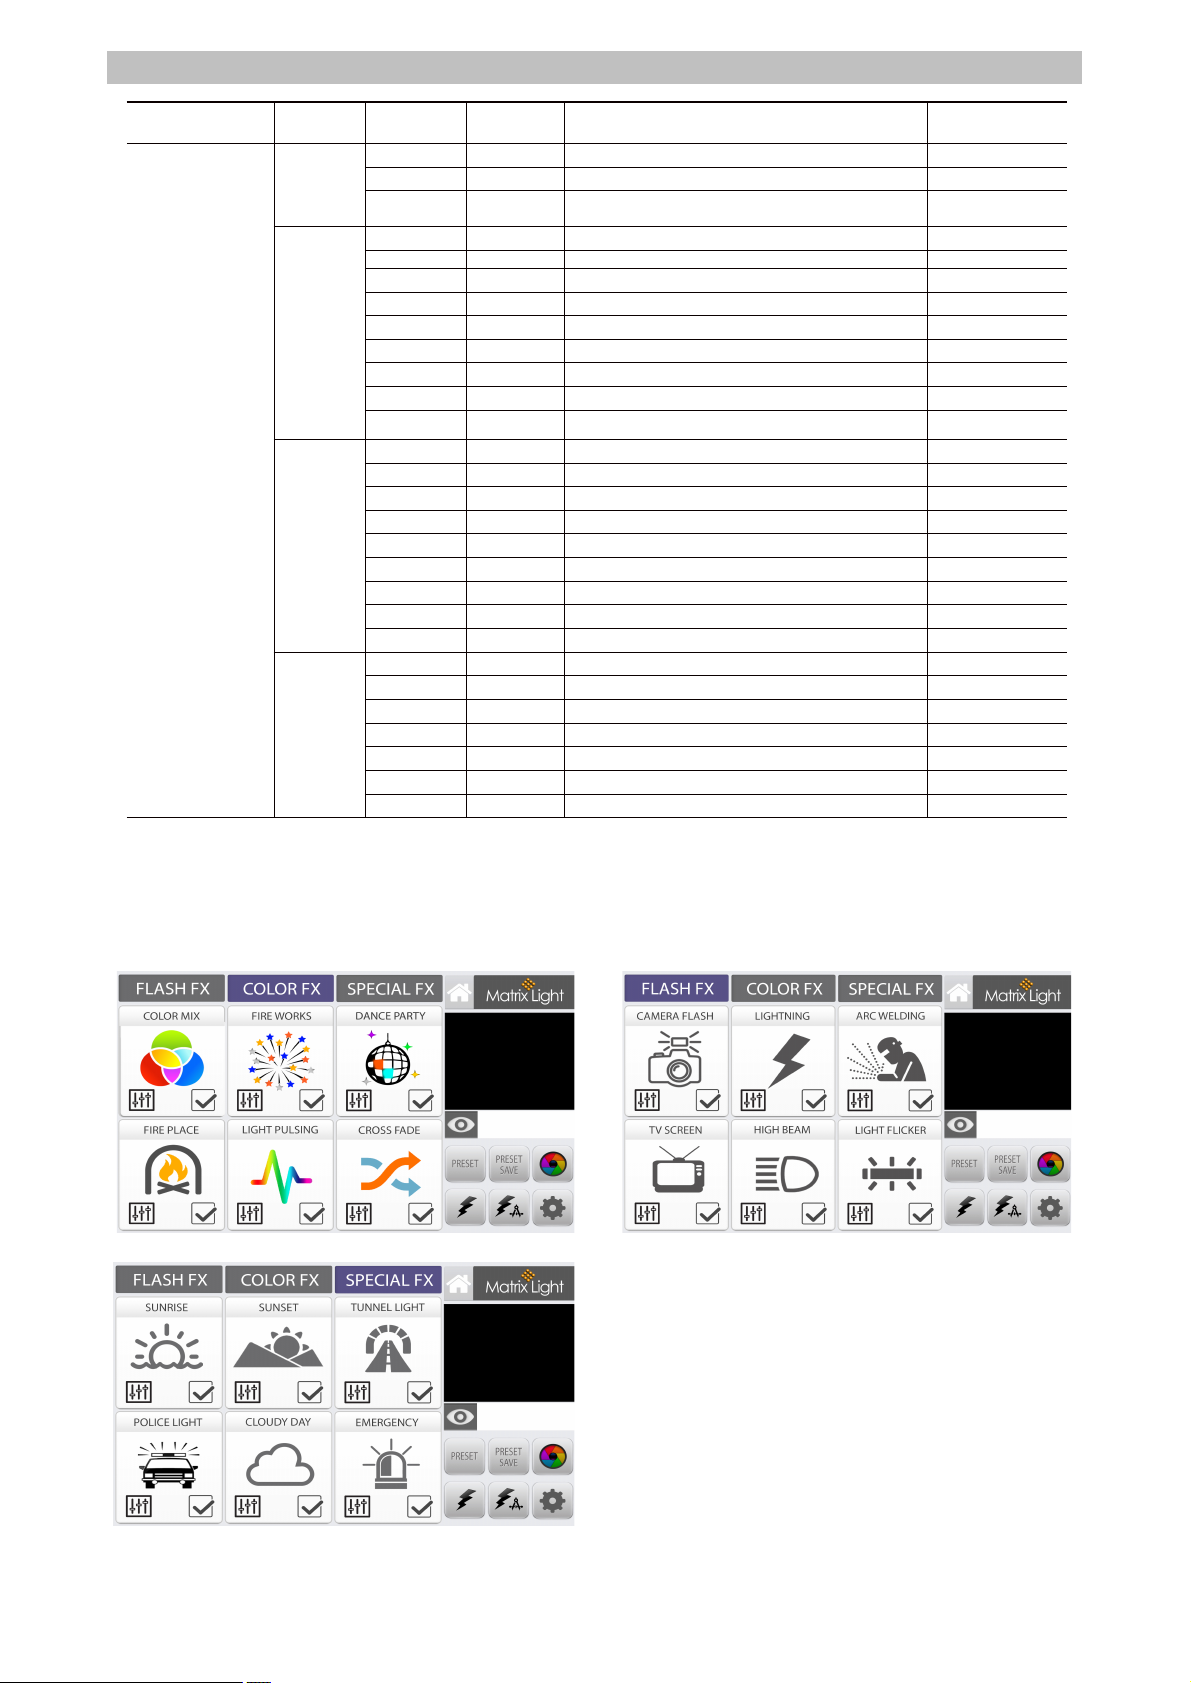
4. Effect Menu
The Matrix Light All Light series supports a wide variety of effects, and if you need a new effect in
addition to the existing one, you can create your own unique effect using the Custom Effect feature.
To select an effect, touch the corresponding
effect menu button in the effect menu. The
detailed type of effect for each effect is displayed
in the information window by pressing the mode
icon () in the lower right corner of the icon. To
select a detailed effect and then adjust its
brightness, you can adjust the brightness of the
effect by turning the Encoder Switch on the light
body to the desired amount. The brightness of
the selected effect is displayed in the information
window. To play the effect, simply press the
- 23 -
Page 26
Matrix Light All Light
Apply icon () in the lower left corner of the icon. If you want to adjust the regeneration cycle of the
effect, you can rotate the Encoder switch on the light body to adjust the desired length of the effect
while the effect is playing.
While the effect is playing, the touchscreen functions are suspended to prevent sudden interruption
of effect effects due to external interference. To stop the effect, press the encoder switch once.
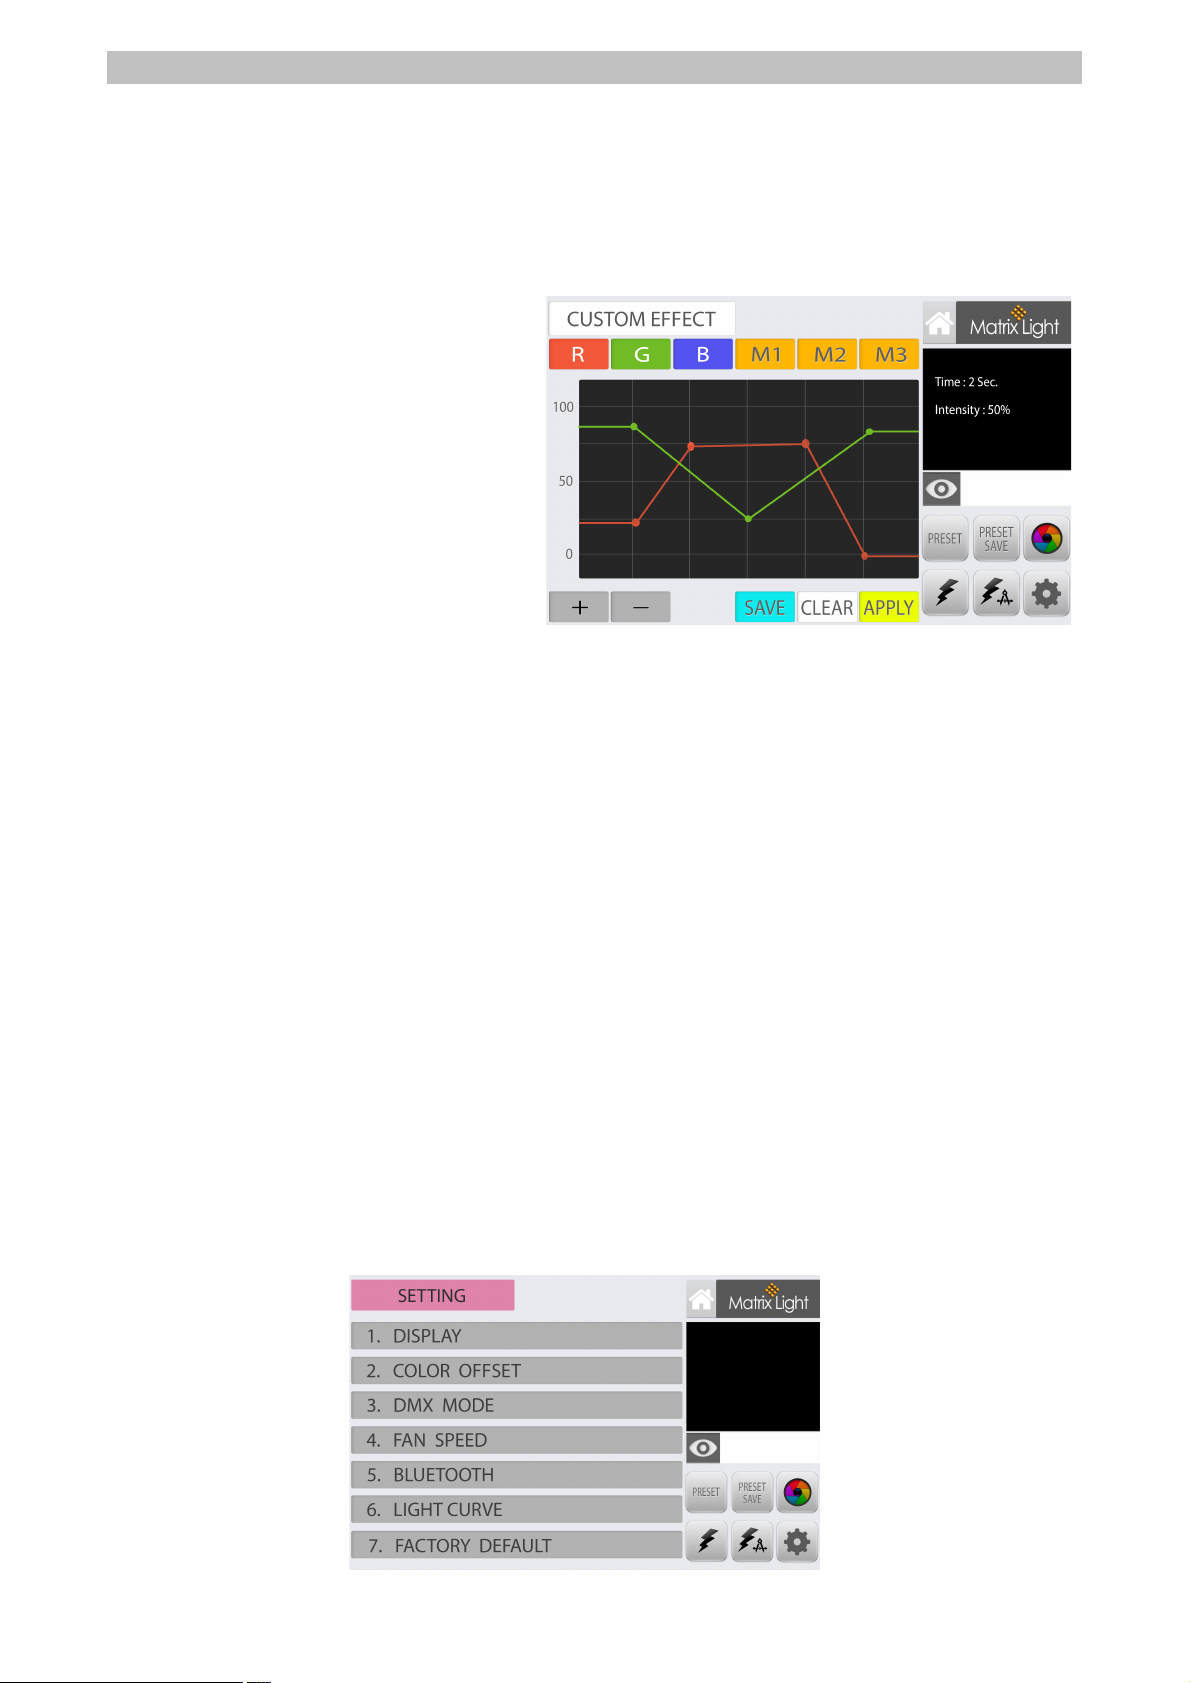
Custom Effect Menu is a menu that allows
you to create and use your own effects
when you need new ones that are not
already available. To use, select one of the
buttons M1, M2, M3 (by default, M1 is
selected), select the color desired by the
users of R, G, and B colors, press the +
button, and press the + button to create
a control point at that location on the
graph screen. This adjustment point can
be dragged up and down, and to create
additional adjustment points, press the +
button again and press the desired
position on the graph screen.
To delete a generated adjustment point, press the –button and touch the adjustment point you want
to delete. Up to 15 control points can be created per R,G,B color, and all are deleted at once by
pressing the Clear button. These control points appear in a curve graph. The horizontal axis of the
graph represents the time of effect effects, and the vertical axis of the graph represents the
brightness of the color R,G,B.
The effect can be changed up to 10 seconds in 0.1 second intervals by turning the encoder switch,
and the effect will be repeated indefinitely from the beginning at the end of the specified time. The
brightness of the effect can be adjusted in 1% intervals by pressing the Encoder button once and
turning the button. This created effect is created by pressing the Apply button to create that effect
in the light.
When the Save button is pressed, the effect is saved to the currently selected button of the M1, M2,
M3 buttons. To create and save a new effect on another button, you can first select an unselected
button from the M1, M2, M3 buttons and create an adjustment point to create an effect and touch
the Save button.
5. System Settings Menu
The system setting menu consists of seven items.
- 24 -
Page 27
Matrix Light All Light
1) DISPLAY
You can set the brightness of the touch LCD panel display.
2) COLOR OFFSET
Green / Magenta points can be set to make the light more natural in the CCT mode of the LED
light.
3) DMX MODE
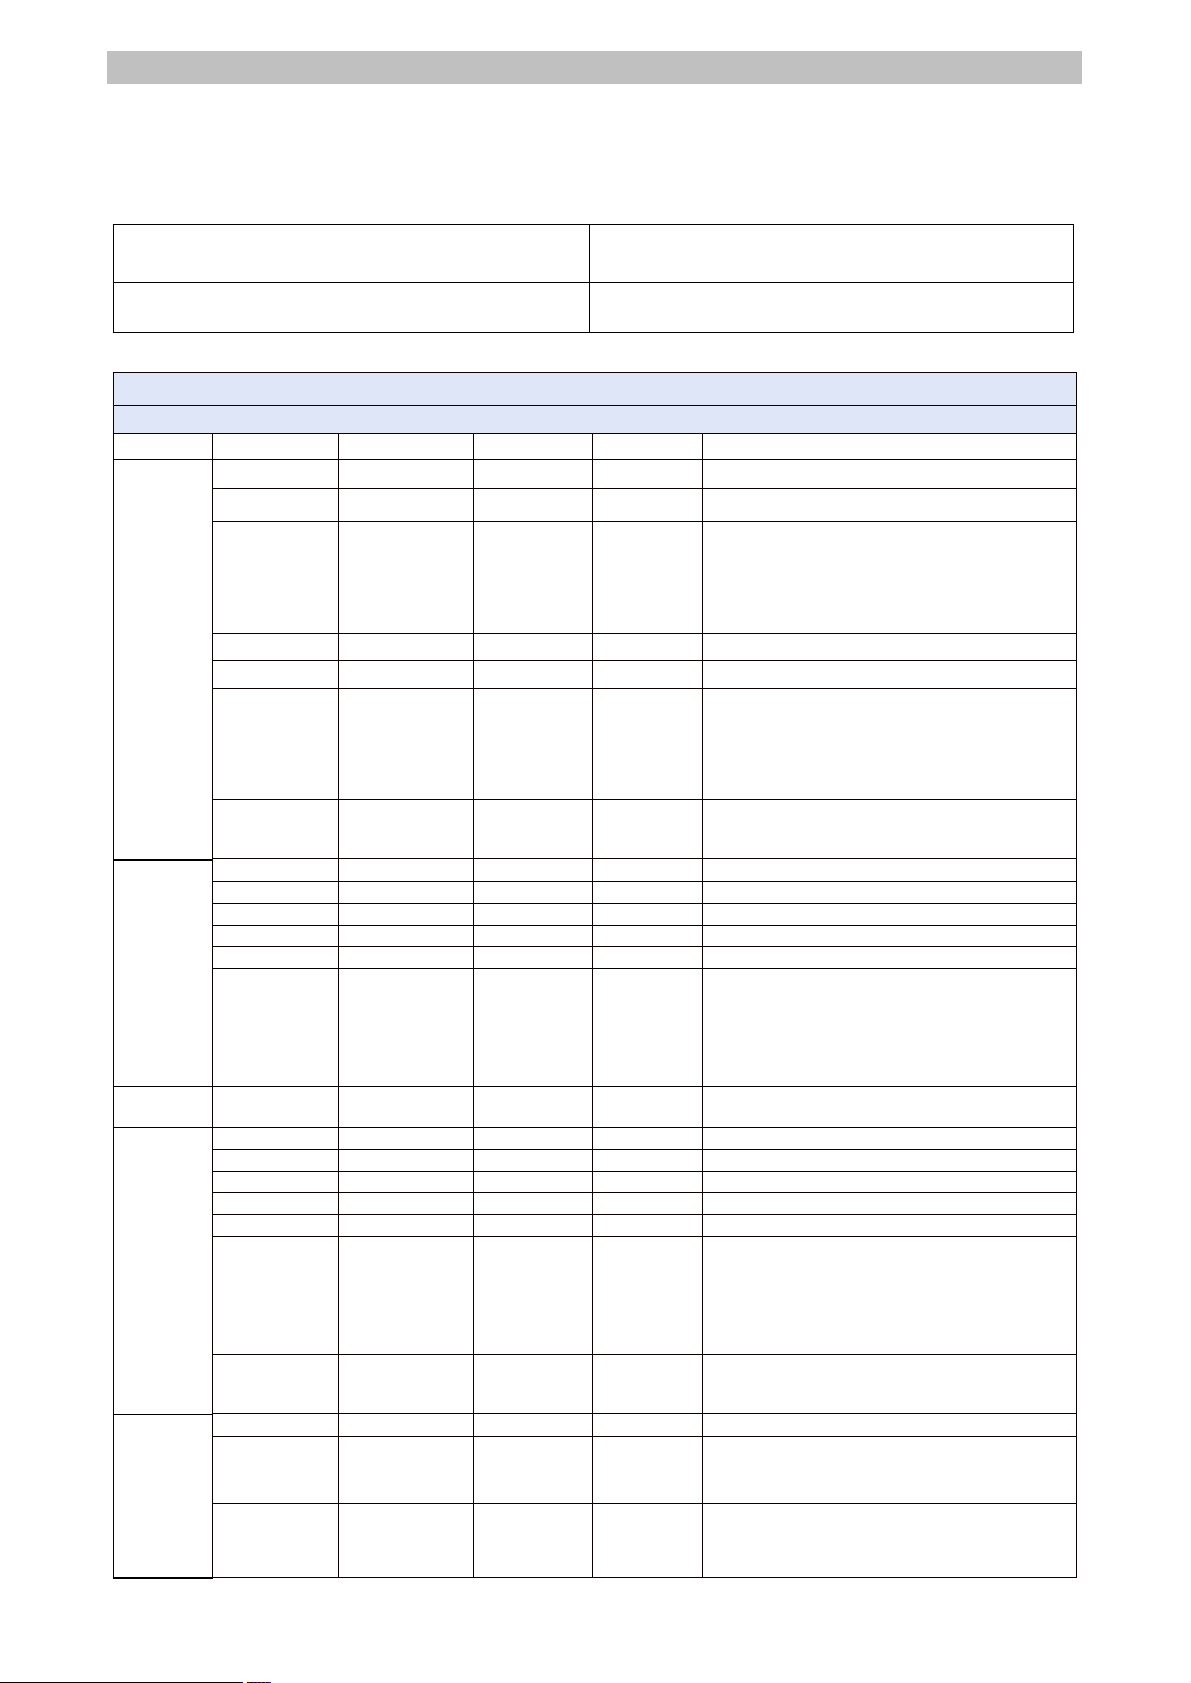
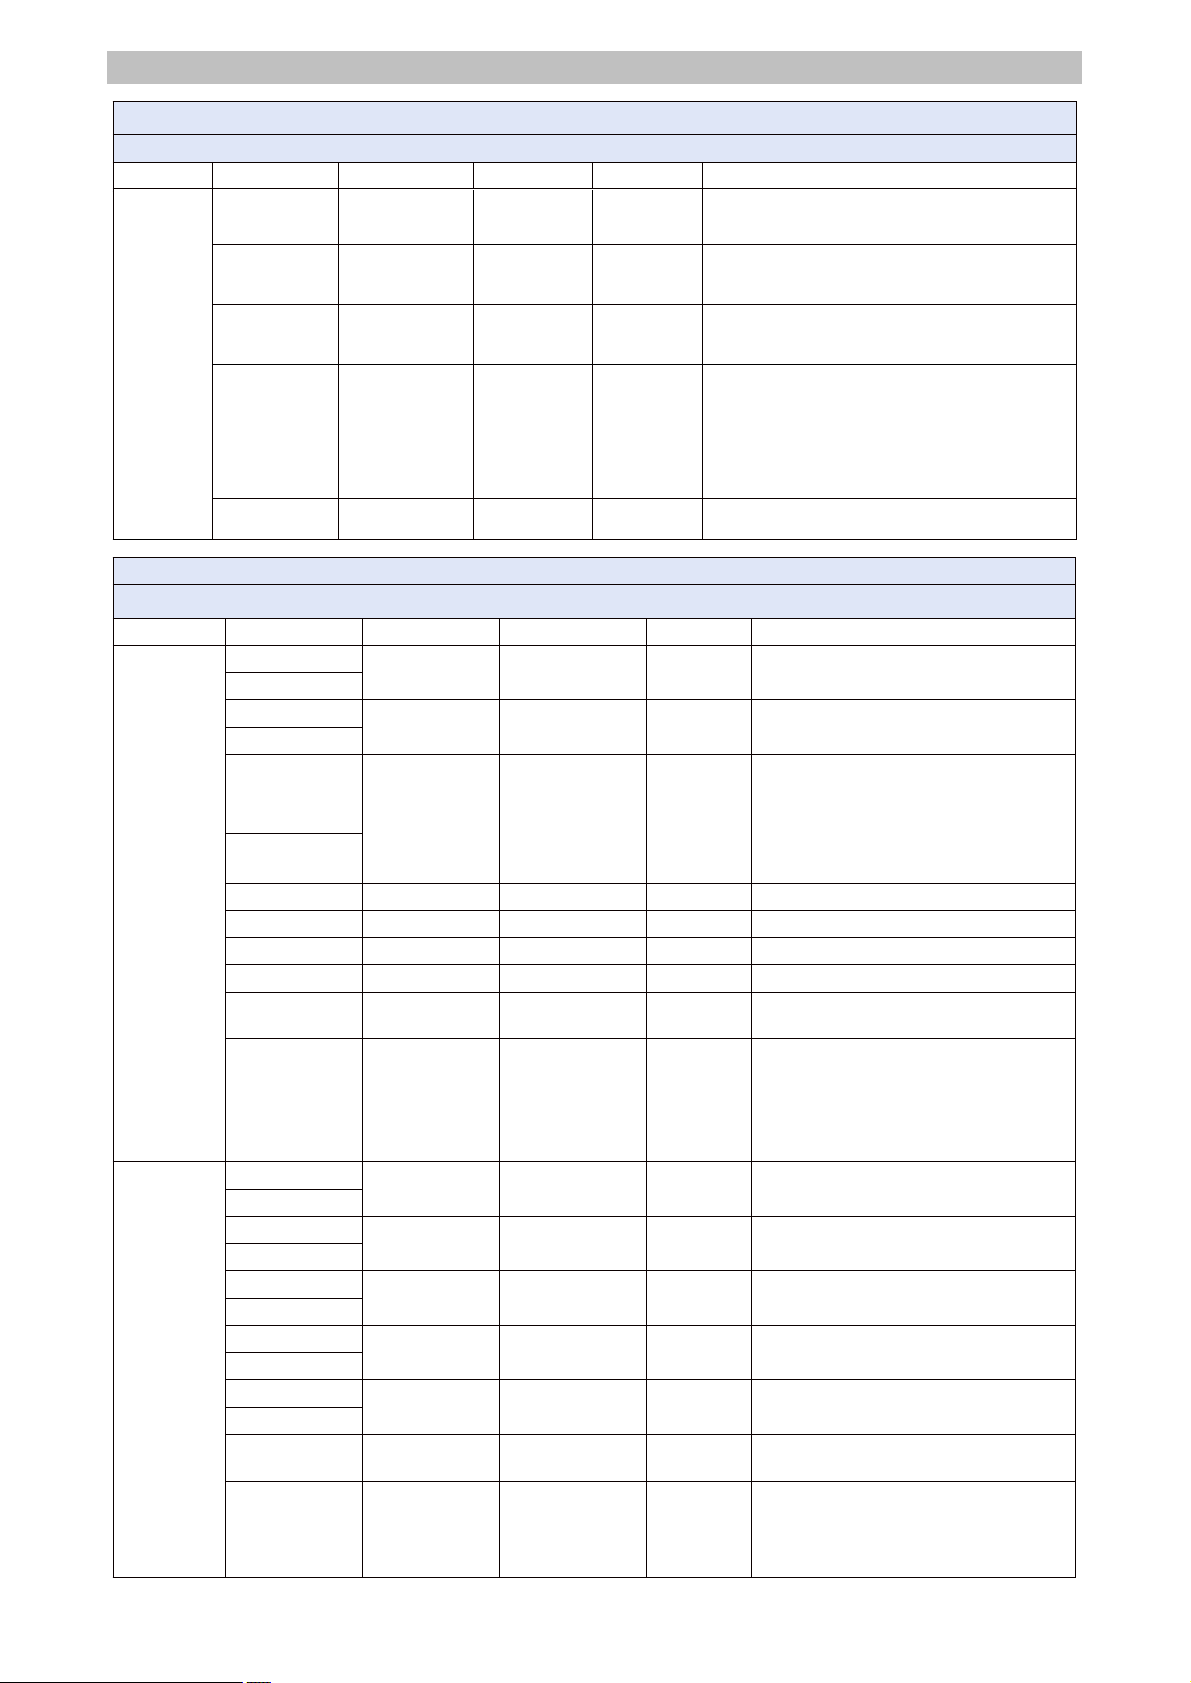
You can set the DMX mode to 8 or 16Bit schemes, and you can set the DMX channel for all
light lights.
4) FAN SPEED
You can set the number of rotations in the cooling fan in 10 steps. When Auto Mode is set, the
fan automatically determines the number of rotations by checking the temperature of the
instrument detected by the temperature sensor.
5) BLUETOOTH
To help distinguish between multiple All Lights, you can set 8 unique Bluetooth IDs for All Light
from Matrix 01 to Matrix 08.
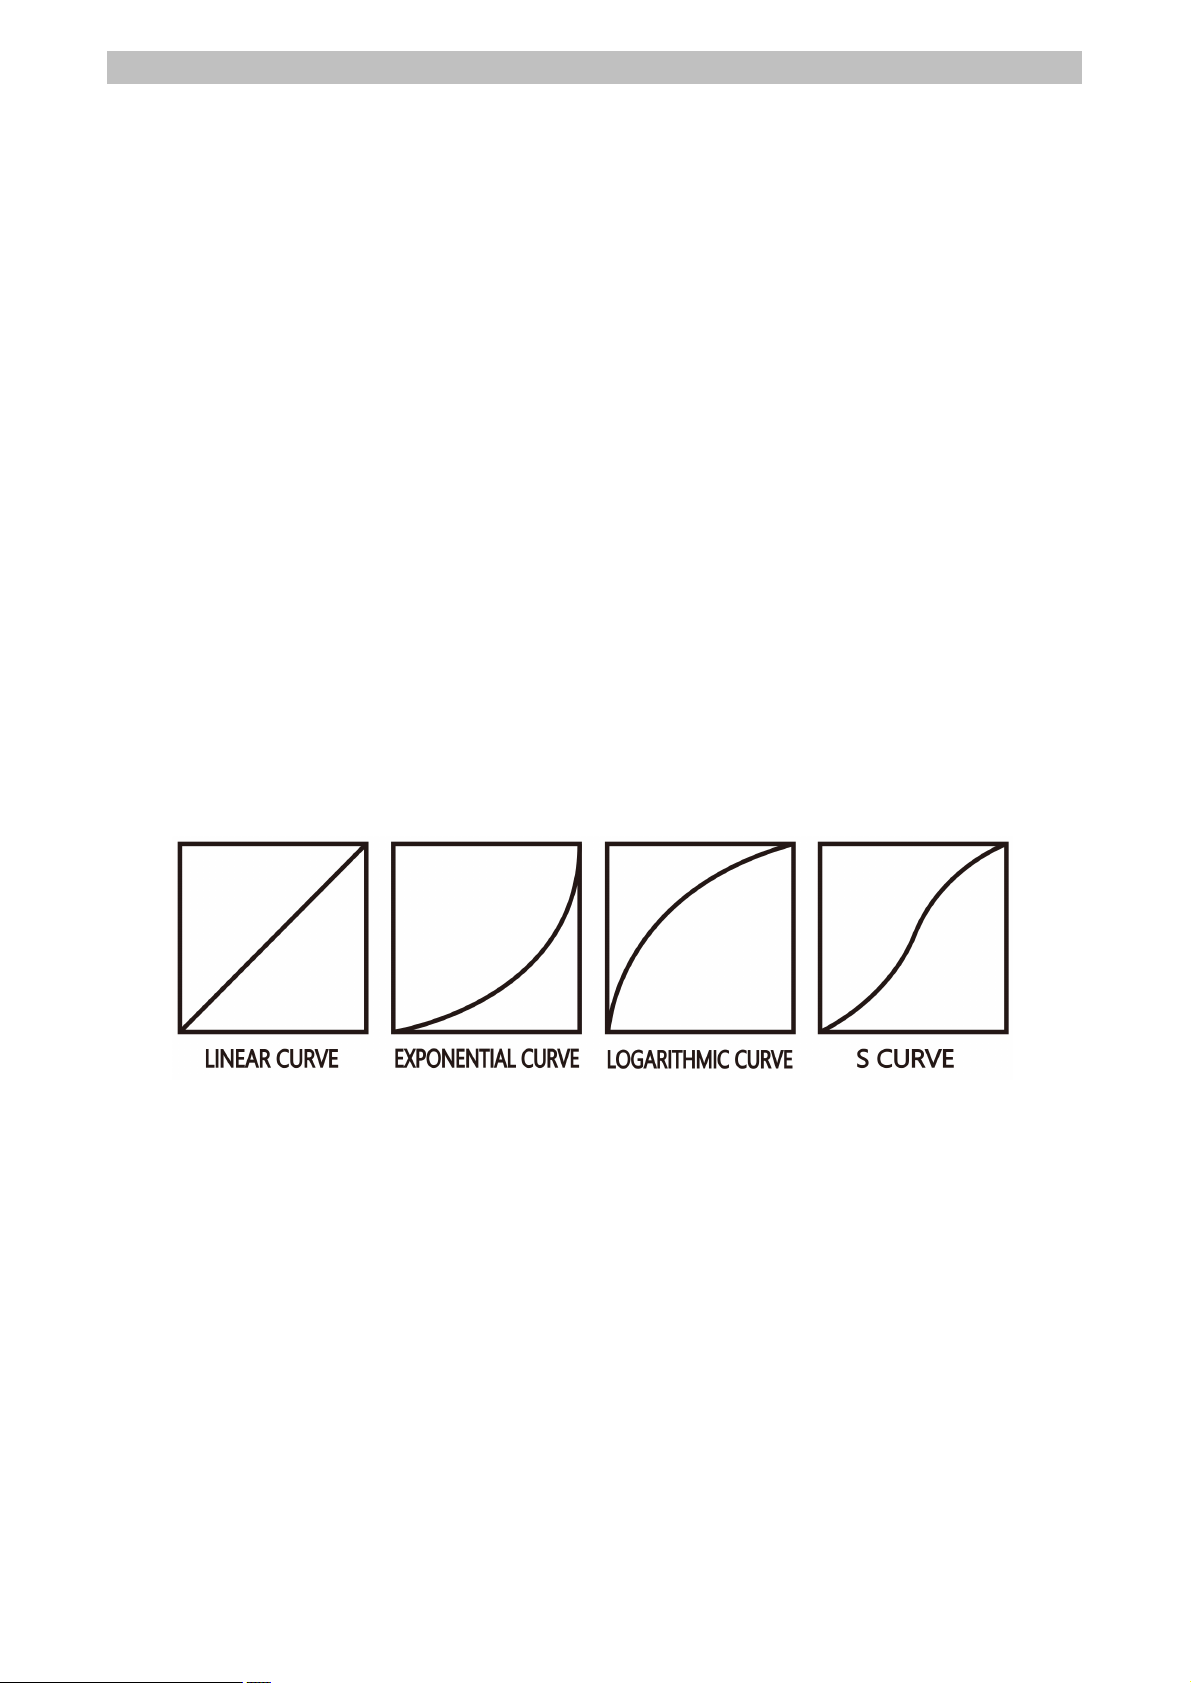
6) LIGHT CURVE
Light Curve sets the basic dimming curve of All Light. Light Curve has Linear Curve, Exponential
Curve, Logarithmic Curve, and S Curve. The curves are as follows.
- LINEAR CURVE: The strength changes relative to the brightness value entered by the encoder or
touchpanel.
- EXPONENTIAL CURVE: High at low resolution and low at high strength.
Used when high resolution is required at low intensity levels.
- LOGARITHMIC CURVE: The resolution is low at low intensity and high at high strength.
Use it when high resolution is required at high strength level.
- S CURVE: Resolution is high at both low and high strength levels.
Use this dimming curve when high resolution is required at low and high intensity levels.
7) Factory Default
This function initializes all user settings in All Light. The number shown in the information window
on the right indicates the time of use of the product. After a period of time, check the
instrument according to the items of regular maintenance.
- 25 -
Page 28
Matrix Light All Light
All Light DMX Settings
8Bit
MODE
CHANNEL
FUNCTION
VALUE
%
Notes
CCT
C+0
DIMMER
0-255
0-100
Channel set 1 - 506
C+1
CCT
0-255
0-100
2800K - 10000K
C+2
±GREEN
0-10
11-20
21-119
120-145
146-244
245-255
0-4
4-8
8-47
47-57
57-96
96-100
NO OffSet (0 Green)
-100 Green
-99 to -1 Green
No OffSet (0 Green)
+1 to +99 Green
+100 Green
C+3
Reserved
C+4
Reserved
C+5
CCT
RGBW
HSI
Preset
Filter
Effect
0-42
43-85
86-127
128-170
171-212
213-255
0-16
17-33
34-50
51-66
67-83
84-100
C+6 FAN
0-127
128-255
0-50
50-100
Low speed
Auto Fan
RGBW
C+0
DIMMER
0-255
0-100
Channel set 1 - 506
C+1
RED
0-255
0-100
C+2
GREEN
0-255
0-100
C+3
BLUE
0-255
0-100
C+4
WARM
0-255
0-100
C+5
CCT
RGBW
HSI
Preset
Filter
Effect
0-42
43-85
86-127
128-170
171-212
213-255
0-16
17-33
34-50
51-66
67-83
84-100
C+6
FAN
0-127
128-255
0-50
50-100
Low speed
Auto Fan
H S I
C+0
DIMMER
0-255
0-100
Channel set 1 - 506
C+1
HUE
0-255
0-100
0-360°
C+2
Saturation
0-255
0-100
C+3
Reserved
C+4
Reserved
C+5
CCT
RGBW
HSI
Preset
Filter
Effect
0-42
43-85
86-127
128-170
171-212
213-255
0-16
17-33
34-50
51-66
67-83
84-100
C+6 FAN
0-127
128-255
0-50
50-100
Low speed
Auto Fan
Preset
C+0
DIMMER
0-255
0-100
Channel set 1 - 506
C+1
FACTORY /
USER MANU
0-5
6-130
131-255
0-1
2-51
51-100
Preset Trigger Disabled
User Preset Selected
Factory Preset Selected
C+2
PRESET
SELECT
0-42
43-85
86-127
128-170
0-16
17-33
34-50
51-66
Preset # 1
Preset # 2
Preset # 3
Preset # 4
8 bit
1 channel per function
16 bit
2 channels per function
DMX mode 1
DMX mode 2
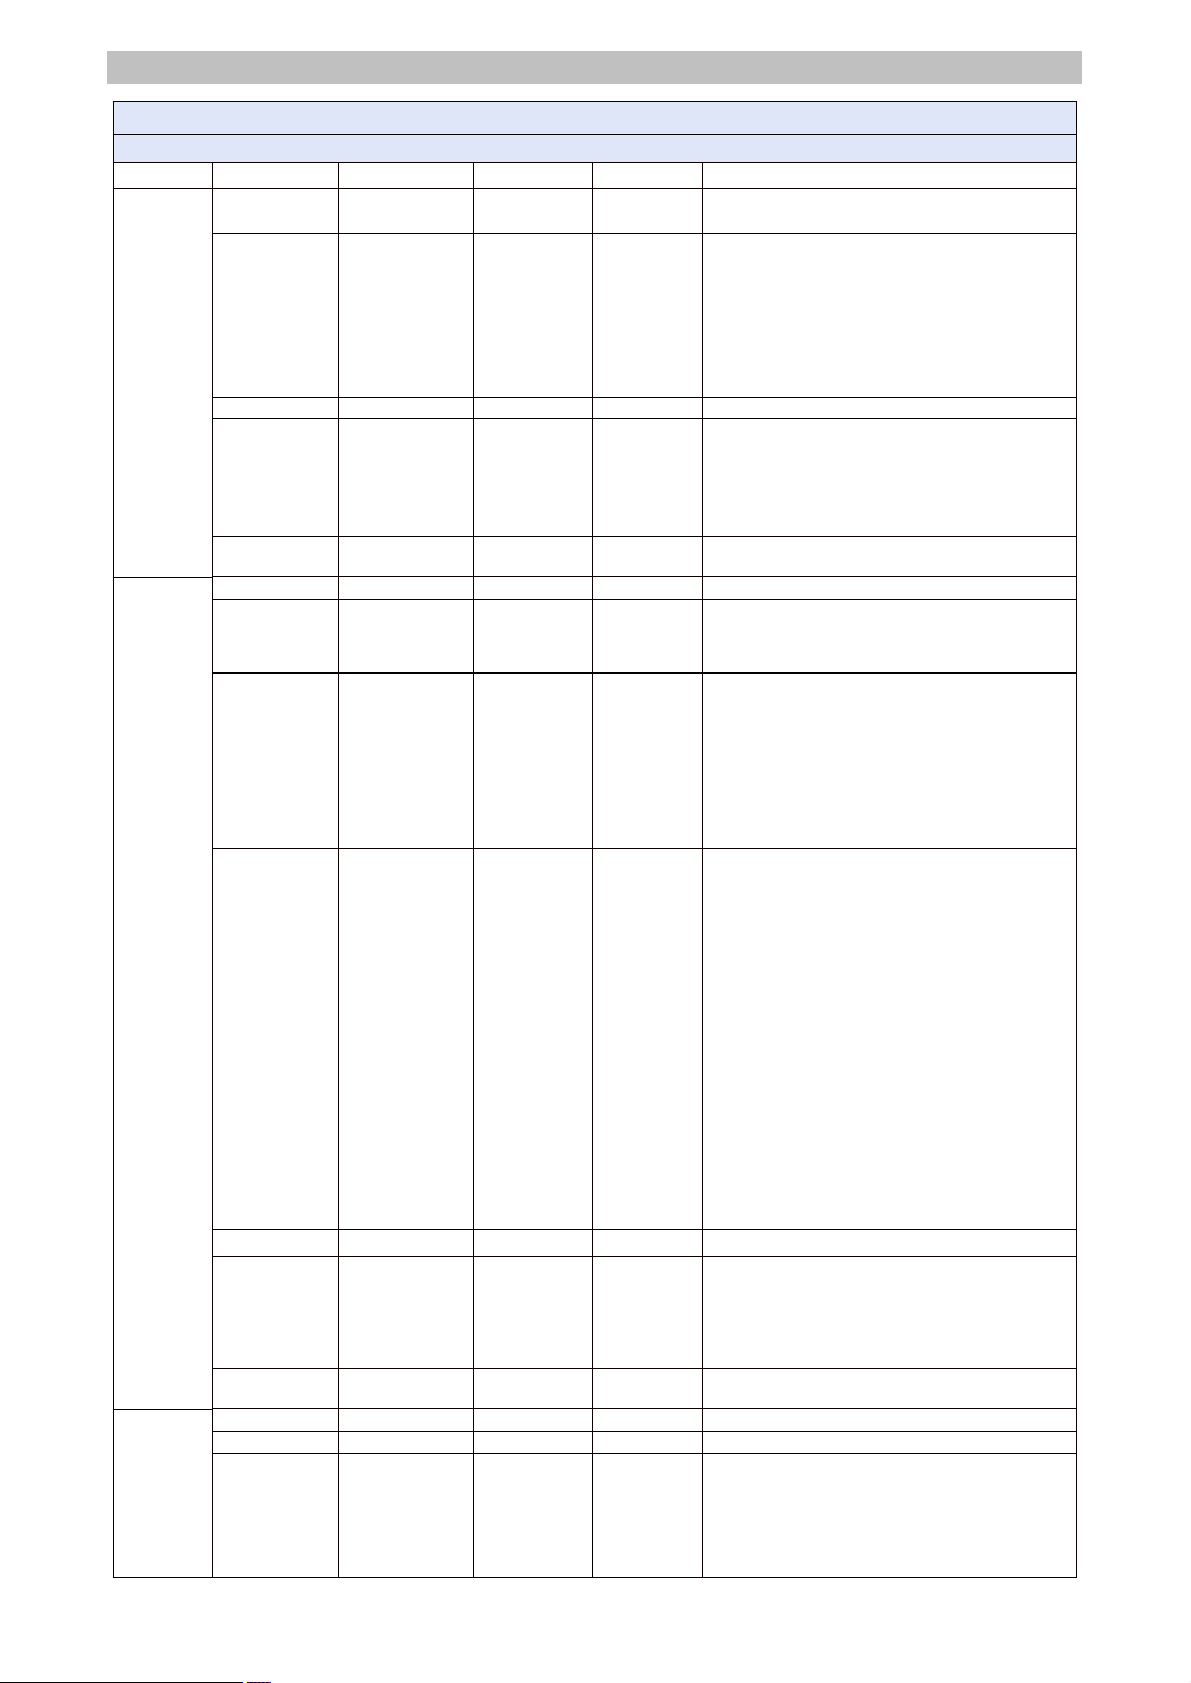
03. DMX Menu •••
The DMX menu of the Matrix Light All Light consists of the following.
- 26 -
Page 29
Matrix Light All Light
All Light DMX Settings
8Bit
MODE
CHANNEL
FUNCTION
VALUE
%
Notes
171-212
213-255
67-83
84-100
Preset # 5
Preset # 6
C+3
PRESET
SELECT 2
0-31
32-63
64-95
96-127
128-159
160-191
192-223
224-255
0-12.5
12.5-25
25-37.5
37.5-50
50-62.5
62.5-75
75-87.5
87.5-100
Preset Page # 1 (User, Factory Preset)
Preset Page # 2 (User, Factory Preset)
Preset Page # 3 (User, Factory Preset)
Preset Page # 4 (User, Factory Preset)
Preset Page # 5 (Only Factory Preset)
Preset Page # 6 (Only Factory Preset)
Preset Page # 7 (Only Factory Preset)
Preset Page # 8 (Only Factory Preset)
C+4
Reserved
C+5
CCT
RGBW
HSI
Preset
Filter
Effect
0-42
43-85
86-127
128-170
171-212
213-255
0-16
17-33
34-50
51-66
67-83
84-100
C+6
FAN
0-127
128-255
0-50
50-100
Low speed
Auto Fan
Filter
C+0
DIMMER
0-255
0-100
Channel set 1 - 506
C+1
No Filter
Color Filter 1
Color Filter
2LUX
0-5
6-130
131-255
0-1
2-51
51-100
Gel Trigger Disabled
Color Filter 1 Filters Selected
Color Filter 2lux Selected
C+2
FILTER SELECT
0-28
29-56
57-84
85-112
113-140
141-168
169-196
197-224
225-255
0-10
11-21
22-32
33-43
44-54
55-65
66-76
77-87
88-100
FILTER # 1
FILTER # 2
FILTER # 3
FILTER # 4
FILTER # 5
FILTER # 6
FILTER # 7
FILTER # 8
FILTER # 9
C+3
FILTER PAGE
0-13
14-26
27-39
40-52
53-65
66-78
79-91
92-104
105-117
118-130
131-143
144-156
157-169
170-182
183-195
196-208
209-221
222-234
235-255
0-5
5-10
10-15
15-20
20-25
26-31
31-36
36-41
41-46
46-51
51-56
56-61
61-66
66-71
71-76
77-82
82-87
87-92
92-100
Filter Page # 1 (Color Filter 1, Color Filter 2)
Filter Page # 2 (Color Filter 1, Color Filter 2)
Filter Page # 3 (Color Filter 1, Color Filter 2)
Filter Page # 4 (Color Filter 1, Color Filter 2)
Filter Page # 5 (Color Filter 1, Color Filter 2)
Filter Page # 6 (Color Filter 1, Color Filter 2)
Filter Page # 7 (Color Filter 1, Color Filter 2)
Filter Page # 8 (Color Filter 1, Color Filter 2)
Filter Page # 9 (Color Filter 1, Color Filter 2)
Filter Page # 10 (Color Filter 1, Color Filter 2)
Filter Page # 11 (Color Filter 1, Color Filter 2)
Filter Page # 12 (Color Filter 1, Color Filter 2)
Filter Page # 13 (Color Filter 1, Color Filter 2)
Filter Page # 14 (Color Filter 1, Color Filter 2)
Filter Page # 15 (Color Filter 1, Color Filter 2)
Filter Page # 16 (Color Filter 1, Color Filter 2)
Filter Page # 17 (Color Filter 1, Color Filter 2)
Filter Page # 18 (Only Color Filter 2)
Filter Page # 19 (Only Color Filter 2)
C+4
Reserved
C+5
CCT
RGBW
HSI
Preset
Filter
Effect
0-42
43-85
86-127
128-170
171-212
213-255
0-16
17-33
34-50
51-66
67-83
84-100
C+6
FAN
0-127
128-255
0-50
50-100
Low speed
Auto Fan
Effect
C+0
DIMMER
0-255
0-100
Channel set 1 - 506
C+1
PERIOD
0-255
0-100
Adjust the Period
C+2
1~6
0-42
43-85
86-127
128-170
171-212
213-255
0-16
17-33
34-50
51-66
67-83
84-100
<FLASH>
1.Camera, 2.Lightning, 3.ARC
4.TV, 5.High Beam, 6.Light Flicker
<COLOR>
1.Color Mix, 2.Fire Works, 3.Party
4.Fire, 5.Light Pulsing, 6.Cross Fade
- 27 -
Page 30
Matrix Light All Light
All Light DMX Settings
16Bit
MODE
CHANNEL
FUNCTION
VALUE
%
Notes
CCT
C+0(H)
DIMMER
0-65535
0-100
Channel set 1 - 501
C+1(L)
C+2(H)
CCT
0-65535
0-100
2800K - 10000K
C+3(L)
C+4(H)
±GREEN
0-5000
5001-10000
10001-29999
30000-40000
40001-59999
60000-65535
0-7
8-15
16-46
46-61
61-92
92-100
NO color (0 Green)
-100 Green
-99 to -1 Green
No color (0 Green)
+1 to +99 Green
+100 Green
C+5(L)
C+6
Reserved
C+7
Reserved
C+8
Reserved
C+9
Reserved
C+10
FAN
0-127
128-255
0-50
50-100
Low speed
Auto Fan
C+11
CCT
RGBW
HSI
Preset
Filter
Effect
0-42
43-85
86-127
128-170
171-212
213-255
0-16
17-33
34-50
51-66
67-83
84-100
RGBW
C+0(H)
DIMMER
0-65535
0-100
Channel set 1 - 501
C+1(L)
C+2(H)
RED
0-65535
0-100
C+3(L)
C+4(H)
GREEN
0-65535
0-100
C+5(L)
C+6(H)
BLUE
0-65535
0-100
C+7(L)
C+8(H)
WHITE
0-65535
0-100
C+9(L)
C+10
FAN
0-127
128-255
0-50
50-100
Low speed
Auto Fan
C+11
CCT
RGBW
HSI
Preset
0-42
43-85
86-127
128-170
0-16
17-33
34-50
51-66
All Light DMX Settings
8Bit
MODE
CHANNEL
FUNCTION
VALUE
%
Notes
<SPECIAL>
1.Sunrise, 2.Sunset, 3.Tunnle
4. Police, 5.Cloudy, 6.Emergency
C+3
FX Mode
0-85
86-170
171-255
0-33
33-67
67-100
Select Action Mode 1-3
C+4
FLASH
COLOR
SPECIAL
0-85
86-170
171-255
0-33
33-67
67-100
Select Effect
<FLASH>,<COLOR>,<SPECIAL>
C+5
CCT
RGBW
HSI
Preset
Filter
Effect
0-42
43-85
86-127
128-170
171-212
213-255
0-16
17-33
34-50
51-66
67-83
84-100
C+6
FAN
0-127
128-255
0-50
50-100
Low speed
Auto Fan
- 28 -
Page 31
Matrix Light All Light
All Light DMX Settings
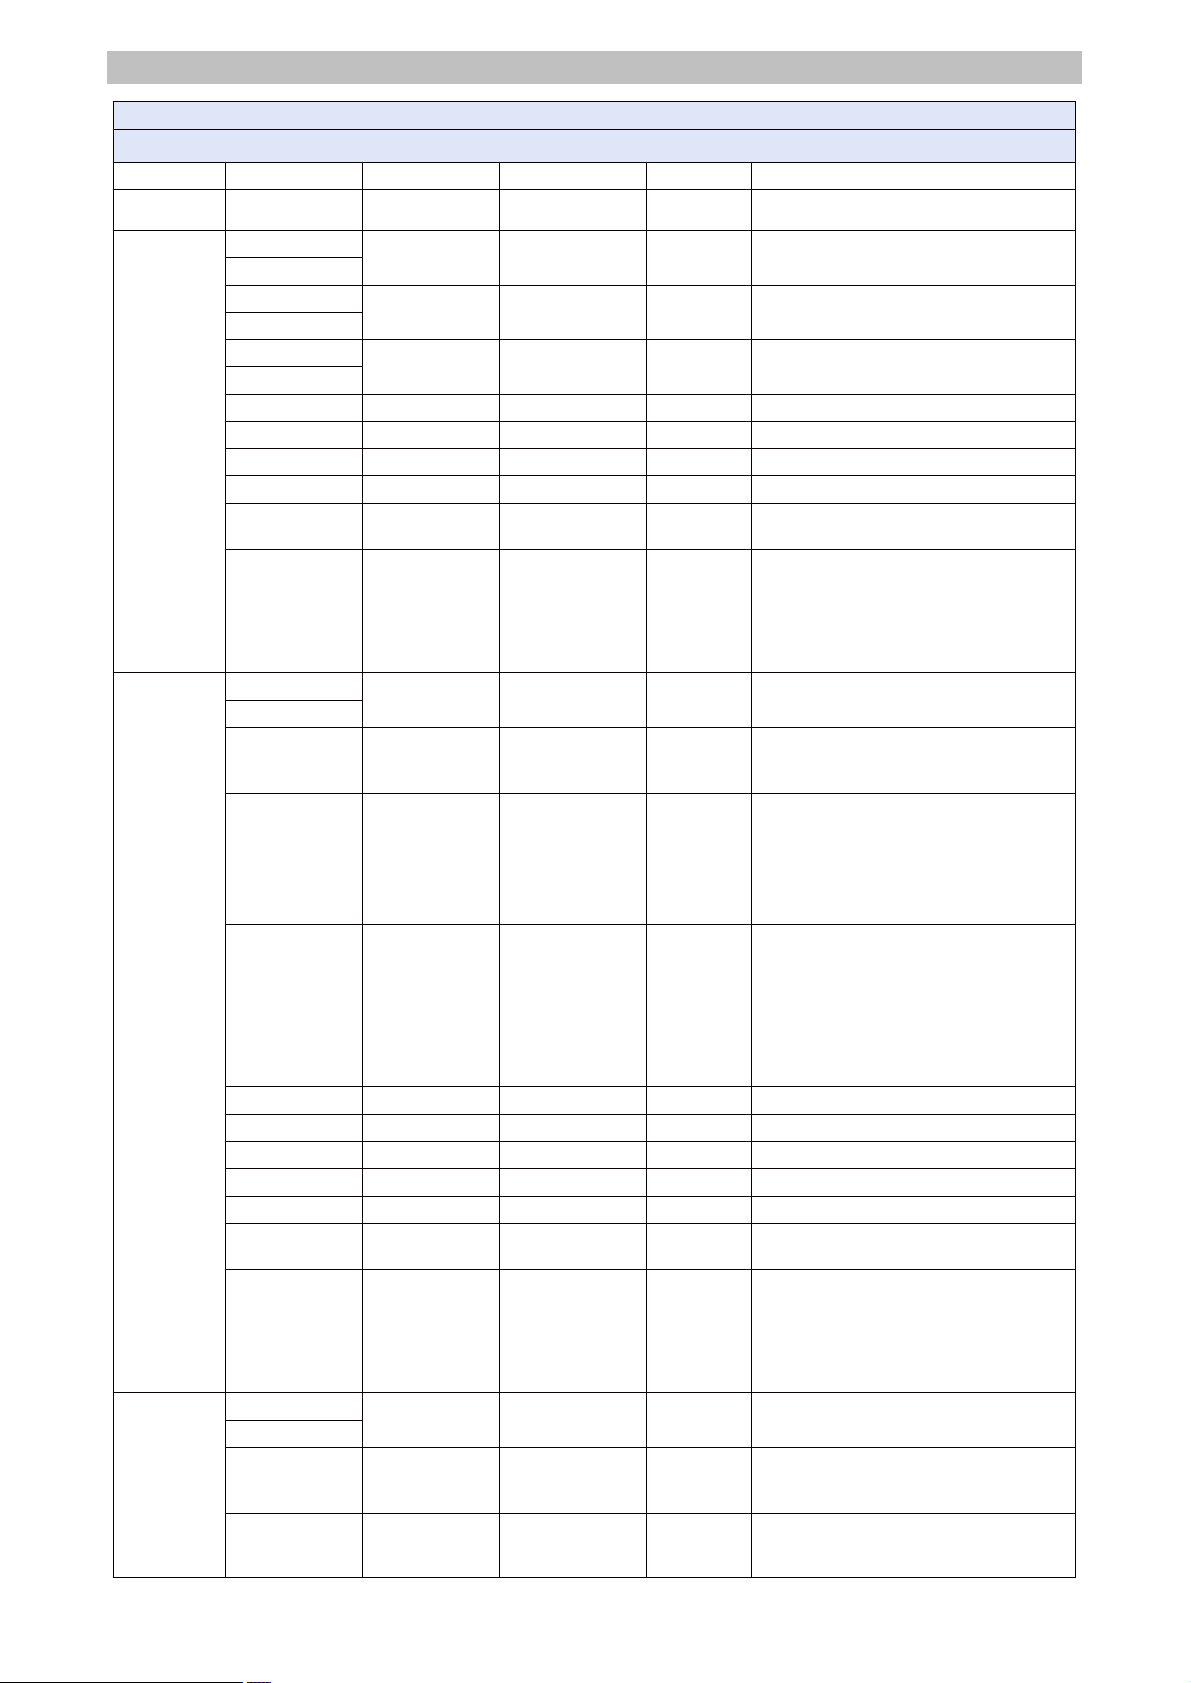
16Bit
MODE
CHANNEL
FUNCTION
VALUE
%
Notes
Filter
Effect
171-212
213-255
67-83
84-100
H S I
C+0(H)
DIMMER
0-65535
0-100
Channel set 1 - 501
C+1(L)
C+2(H)
HUE
0-65535
0-100
C+3(L)
C+4(H)
SATURATION
0-65535
0-100
C+5(L)
C+6
Reserved
C+7
Reserved
C+8
Reserved
C+9
Reserved
C+10
FAN
0-127
128-255
0-50
50-100
Low speed
Auto Fan
C+11
CCT
RGBW
HSI
Preset
Filter
Effect
0-42
43-85
86-127
128-170
171-212
213-255
0-16
17-33
34-50
51-66
67-83
84-100
Preset
C+0(H)
DIMMER
0-65535
0-100
Channel set 1 - 501
C+1(L)
C+2
FACTORY /
USER MANU
0-5
6-130
131-255
0-1
2-51
51-100
Preset Trigger Disabled
User Preset Selected
Factory Preset Selected
C+3
PRESET SELECT
0-42
43-85
86-127
128-170
171-212
213-255
0-16
17-33
34-50
51-66
67-83
84-100
Preset # 1
Preset # 2
Preset # 3
Preset # 4
Preset # 5
Preset # 6
C+4
PRESET SELECT
2
0-31
32-63
64-95
96-127
128-159
160-191
192-223
224-255
0-12.5
12.5-25
25-37.5
37.5-50
50-62.5
62.5-75
75-87.5
87.5-100
Preset Page # 1 (User, Factory Preset)
Preset Page # 2 (User, Factory Preset)
Preset Page # 3 (User, Factory Preset)
Preset Page # 4 (User, Factory Preset)
Preset Page # 5 (Only Factory Preset)
Preset Page # 6 (Only Factory Preset)
Preset Page # 7 (Only Factory Preset)
Preset Page # 8 (Only Factory Preset)
C+5
Reserved
C+6
Reserved
C+7
Reserved
C+8
Reserved
C+9
Reserved
C+10
FAN
0-127
128-255
0-50
50-100
Low speed
Auto Fan
C+11
CCT
RGBW
HSI
Preset
Filter
Effect
0-42
43-85
86-127
128-170
171-212
213-255
0-16
17-33
34-50
51-66
67-83
84-100
Filter
C+0(H)
DIMMER
0-65535
0-100
Channel set 1 - 501
C+1(L)
C+2
Color Filter 1
/ Color Filter
2LUX
0-5
6-130
131-255
0-1
2-51
51-100
Gel Trigger Disabled
Color Filter 1 Filters Selected
Color Filter 2lux Selected
C+3
FILTER SELECT
0-28
29-56
57-84
0-10
11-21
22-32
FILTER # 1
FILTER # 2
FILTER # 3
- 29 -
Page 32
Matrix Light All Light
All Light DMX Settings
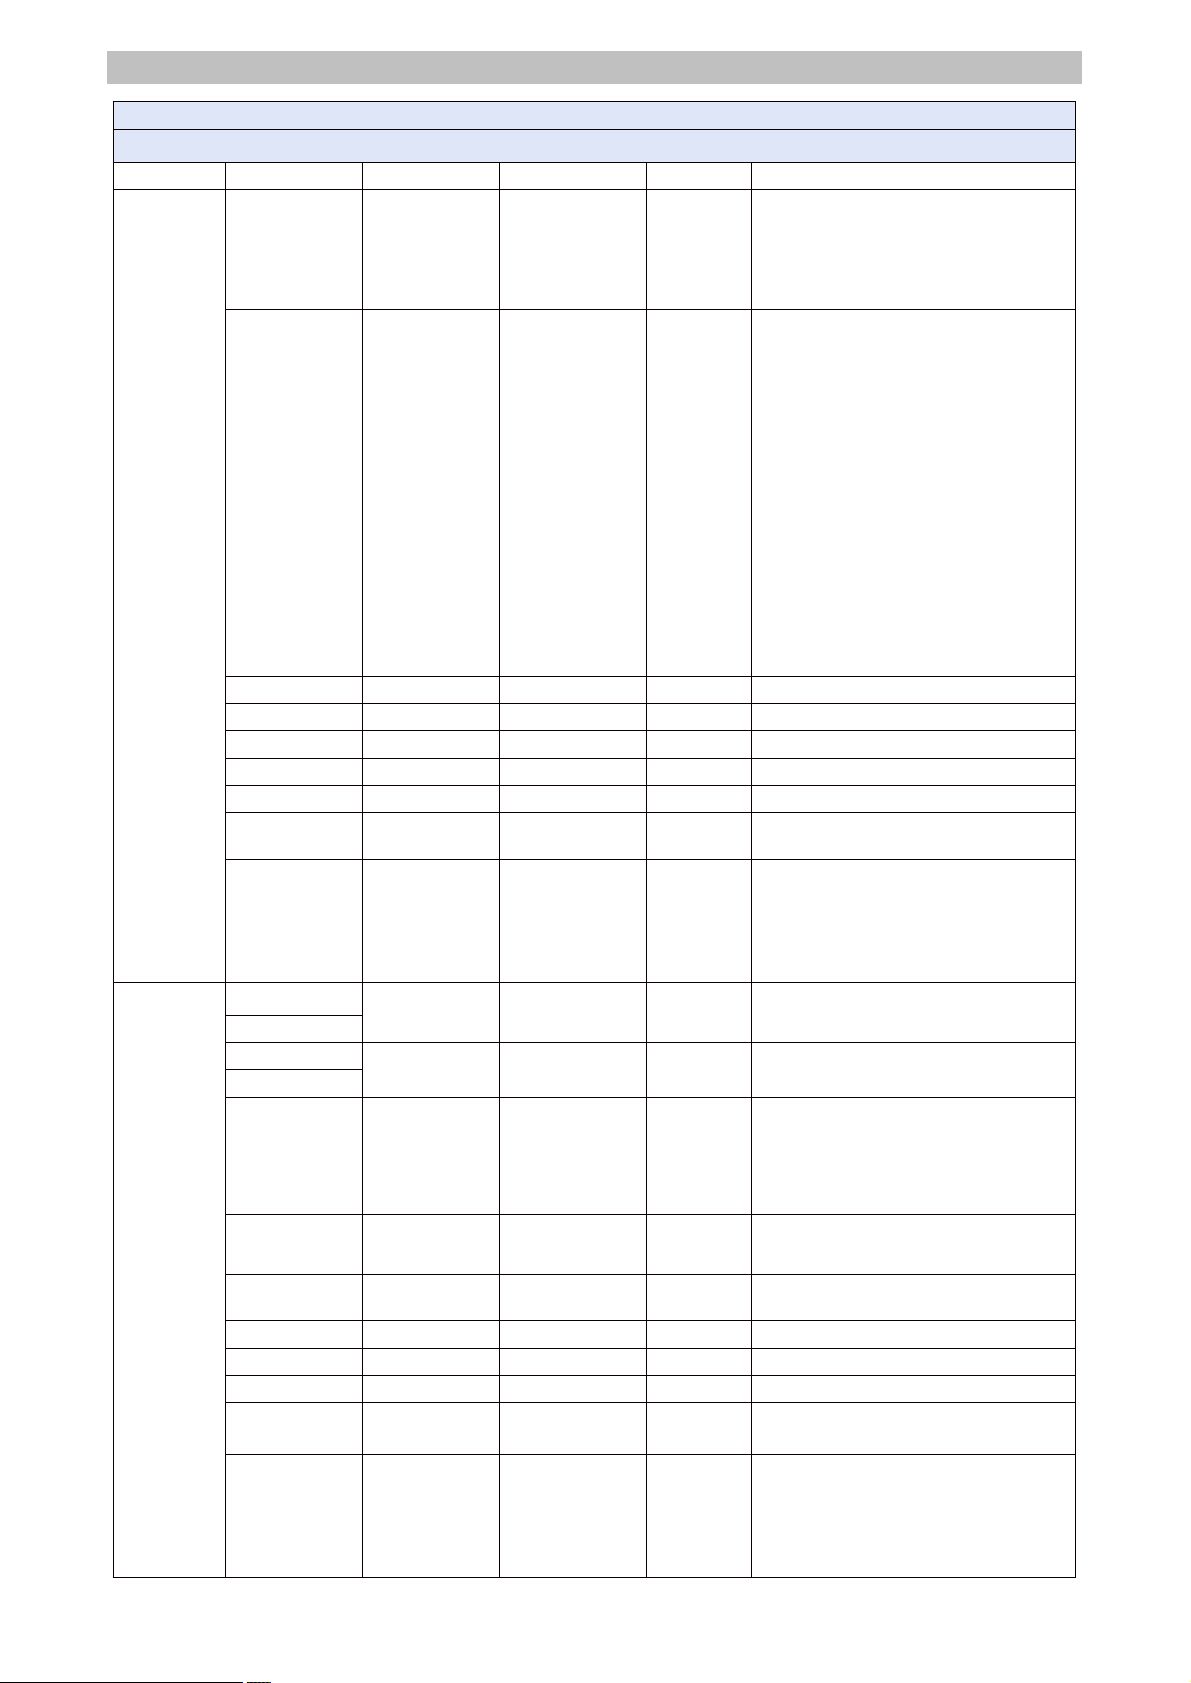
16Bit
MODE
CHANNEL
FUNCTION
VALUE
%
Notes
85-112
113-140
141-168
169-196
197-224
225-255
33-43
44-54
55-65
66-76
77-87
88-100
FILTER # 4
FILTER # 5
FILTER # 6
FILTER # 7
FILTER # 8
FILTER # 9
C+4
FILTER PAGE
0-13
14-26
27-39
40-52
53-65
66-78
79-91
92-104
105-117
118-130
131-143
144-156
157-169
170-182
183-195
196-208
209-221
222-234
235-255
0-5
5-10
10-15
15-20
20-25
26-31
31-36
36-41
41-46
46-51
51-56
56-61
61-66
66-71
71-76
77-82
82-87
87-92
92-100
Filter Page # 1 (Color Filter 1, Color Filter 2)
Filter Page # 2 (Color Filter 1, Color Filter 2)
Filter Page # 3 (Color Filter 1, Color Filter 2)
Filter Page # 4 (Color Filter 1, Color Filter 2)
Filter Page # 5 (Color Filter 1, Color Filter 2)
Filter Page # 6 (Color Filter 1, Color Filter 2)
Filter Page # 7 (Color Filter 1, Color Filter 2)
Filter Page # 8 (Color Filter 1, Color Filter 2)
Filter Page # 9 (Color Filter 1, Color Filter 2)
Filter Page # 10 (Color Filter 1, Color Filter 2)
Filter Page # 11 (Color Filter 1, Color Filter 2)
Filter Page # 12 (Color Filter 1, Color Filter 2)
Filter Page # 13 (Color Filter 1, Color Filter 2)
Filter Page # 14 (Color Filter 1, Color Filter 2)
Filter Page # 15 (Color Filter 1, Color Filter 2)
Filter Page # 16 (Color Filter 1, Color Filter 2)
Filter Page # 17 (Color Filter 1, Color Filter 2)
Filter Page # 18 (Only Color Filter 2)
Filter Page # 19 (Only Color Filter 2)
C+5
Reserved
C+6
Reserved
C+7
Reserved
C+8
Reserved
C+9
Reserved
C+10
FAN
0-127
128-255
0-50
50-100
Low speed
Auto Fan
C+11
CCT
RGBW
HSI
Preset
Filter
Effect
0-42
43-85
86-127
128-170
171-212
213-255
0-16
17-33
34-50
51-66
67-83
84-100
Effect
C+0(H)
DIMMER
0-65535
0-100
Channel set 1 - 501
C+1(L)
C+2(H)
PERIOD
0-65535
0-100
Adjust the Period
C+3(L)
C+4
1~6
0-42
43-85
86-127
128-170
171-212
213-255
0-16
17-33
34-50
51-66
67-83
84-100
<FLASH>
1.Camera, 2.Lightning, 3.ARC
4.TV, 5.High Beam, 6.Sun Light
<COLOR>
1.Emergency, 2.Fire Works, 3.Party
4.Fire, 5.Light Pulsing, 6.Tunnle
C+5
FX Mode
0-85
86-170
171-255
0-33
33-67
67-100
Select Action Mode 1-3
C+6
FLASH
COLOR
0-127
128-255
0-50
50-100
Select Effect
<FLASH>,<COLOR>
C+7
C+8
C+9
C+10
FAN
0-127
128-255
0-50
50-100
Low speed
Auto Fan
C+11
CCT
RGBW
HSI
Preset
Filter
Effect
0-42
43-85
86-127
128-170
171-212
213-255
0-16
17-33
34-50
51-66
67-83
84-100
- 30 -
Page 33
Matrix Light All Light
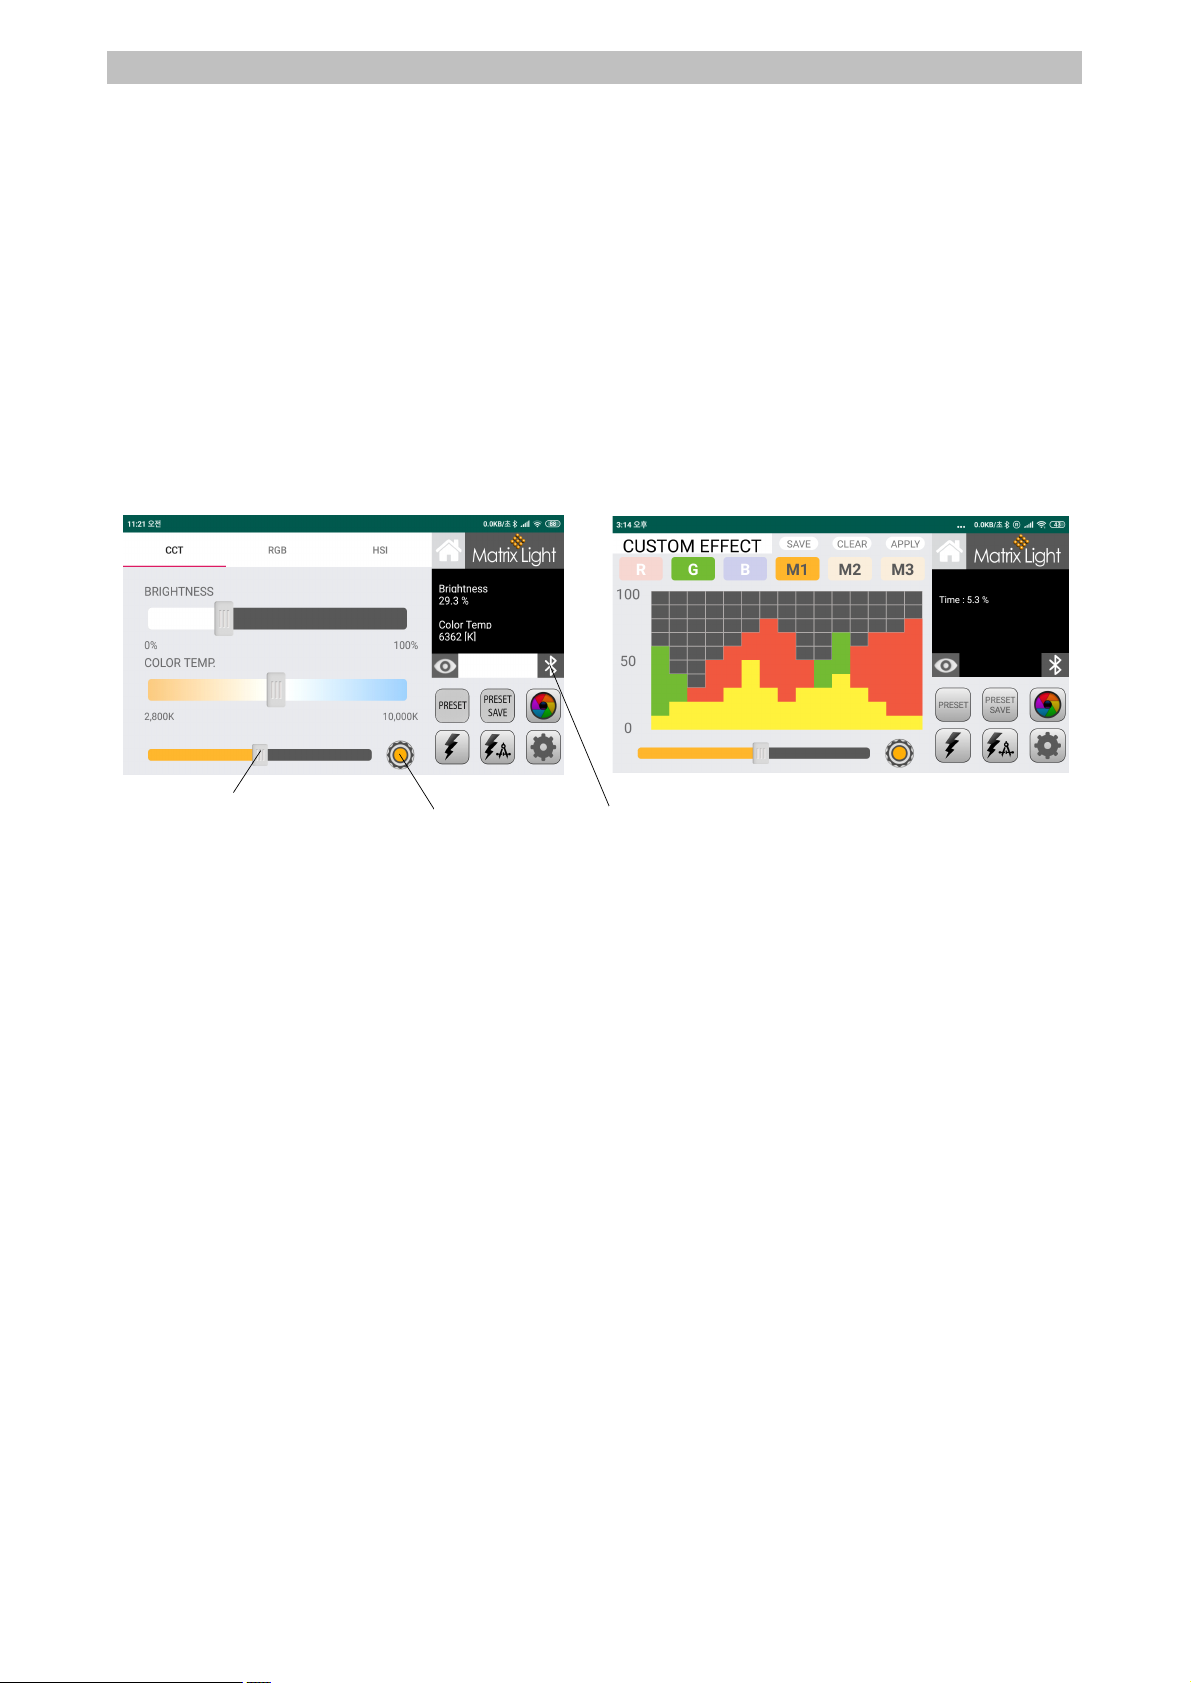
Encoder Button
Fine-tuning Slide
Bluetooth Connection Button
04. Bluetooth Connection and App Operation •••
The Matrix Light All Light supports Bluetooth 4.0 mode and allows remote control of all lights
through apps on Android or iOS-based wireless devices. For the Matrix Light All Light app, download
and install the Matrixlight.apk file from the Matrix Light homepage, the Google Play store, or the
Apple App Store, or search for the Matrix Light or All Light and install the app on your mobile
device.
After the All Light app is installed, turn on the Bluetooth feature on the Android-based wireless
device and run the All Light app. On the menu screen of the All Light app, press the Bluetooth
button to search for Bluetooth equipment and select a device that starts with "All Light" to connect.
The menu operation of the app is similar to the touchscreen menu of the All Light. Some functions
may be provided in a different form from the touchscreen menu of the All Light, considering the
transmission speed of the wireless connection and smooth operation.
To connect to Bluetooth, press the Bluetooth connection button for the application. When Bluetooth
is connected, the Bluetooth connection button changes color to blue.
When you connect the All Light with Bluetooth, the touchscreen features on the All Light body will
disabled until the Bluetooth connection is disabled. To re-enable the touchscreen feature of the All
Light, you must turn off the Bluetooth connection.
The different menu configurations and functions of the application are similar to the menu
configuration of the touch control panel in All Light.
For the Custom Effect, the horizontal axis in the grid area represents time and the vertical axis
represents brightness.
To create a custom effect, touch the desired part of the tick display area to automatically fill the
area below the touch. Also, if you select a different color and touch the desired part, the area below
the touch is automatically filled, and the area overlaps with the previously selected color is displayed
in a mixture of that color. To set the repeat time of the custom effect, you can set the repeat time
between 0 and 10 seconds by moving the fine adjustment slide from side to side. Press the "SAVE"
button at the top to save the created custom effect. To save the M1, M2, M3 buttons to the desired
button, select one of the M1, M2, M3 buttons first, create a custom effect, and press the "SAVE"
button to save the custom effect to the selected memory button. Press the "CLEAR" button to clear
the stored custom effect or to clear the currently created custom effect.
The Bluetooth modules on the Matrix Light All Light operate at approximately 10M distances.
However, the range of operation may be reduced in areas where there is a lot of shielding, indoors
or in areas where there is a lot of electromagnetic waves. To increase the reach of the Bluetooth
module, use the Bluetooth antenna located at the top of the rear of the All Light, and make sure to
fold and store the antenna when you are not using the Bluetooth connection.
- 31 -
Page 34
Matrix Light All Light
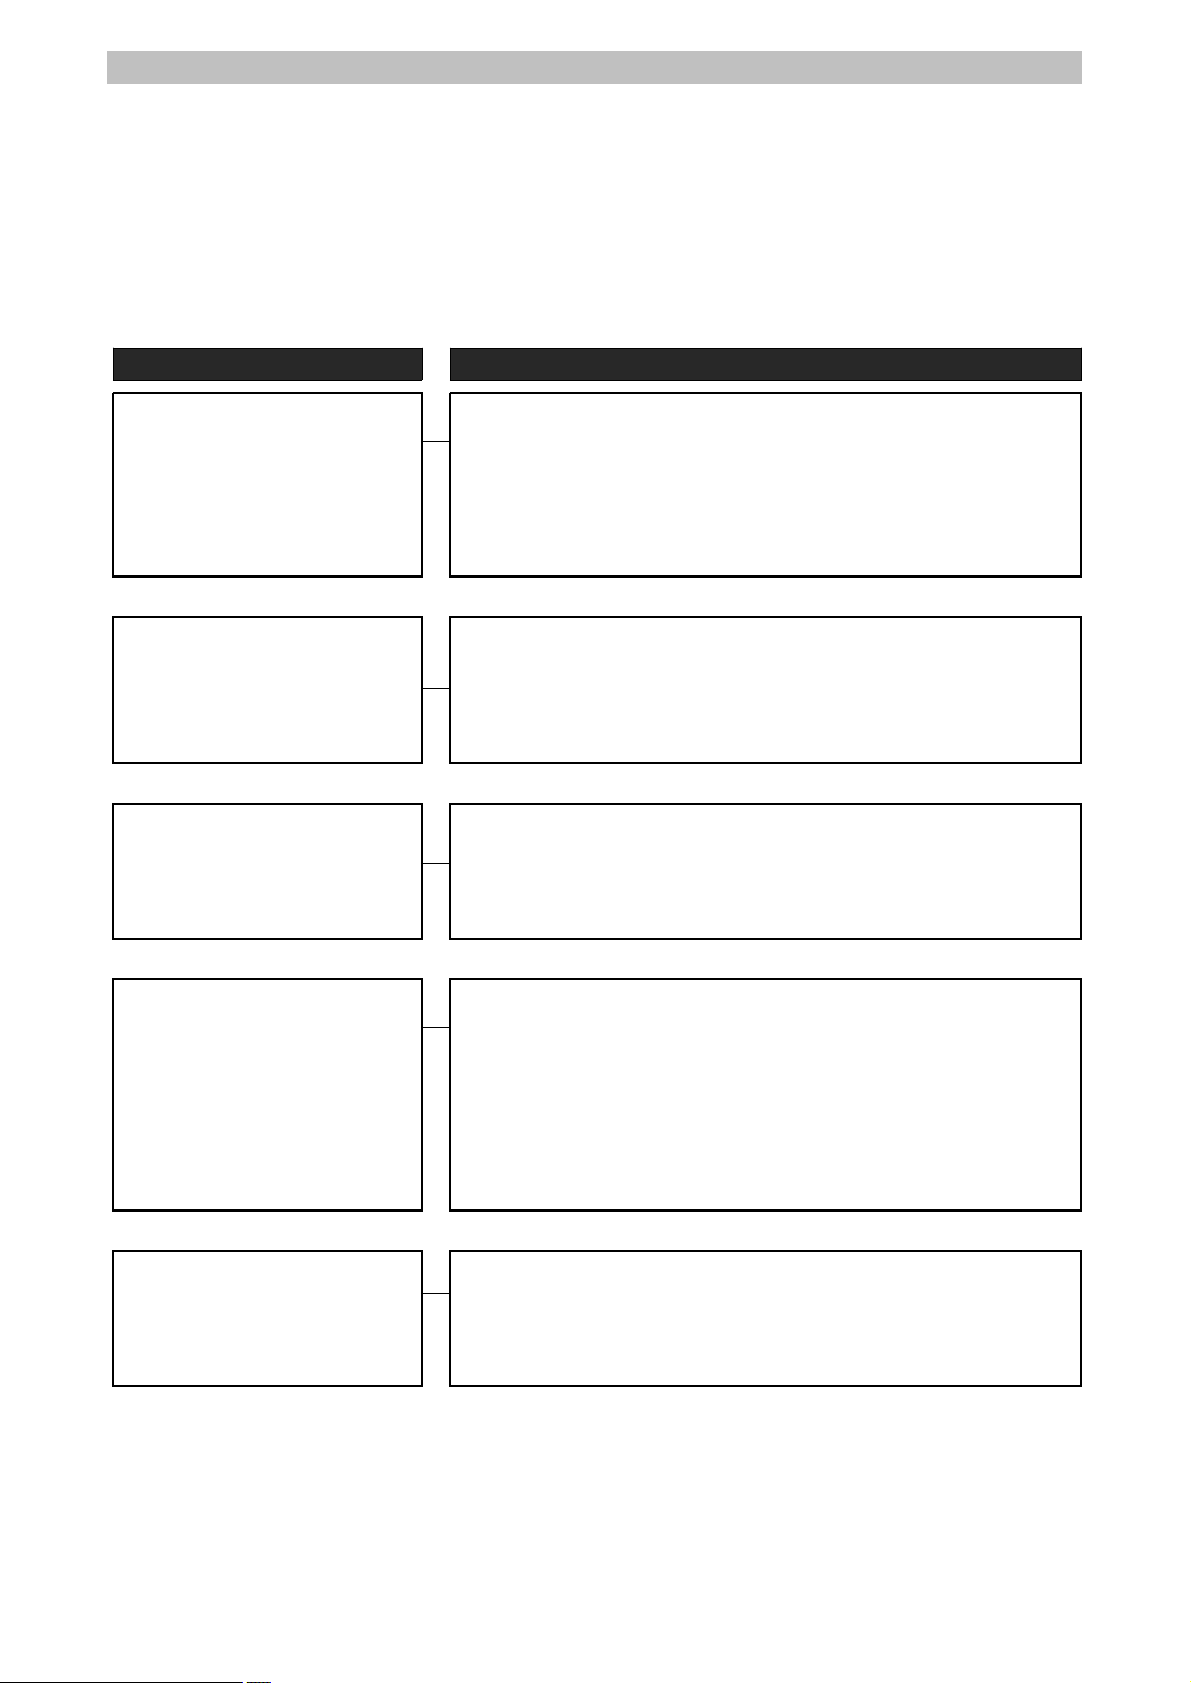
Symptom
Check Point
Power is not working
■ Is there a power supply or battery connected to the light? Correctly
connect the power supply or connect the charged battery to the light.
■
Is the battery less charged? Fully charge the battery, or replace with another
charged battery.
■
Is it connected correctly? Make sure that the power terminals and lights are
correctly connected with the power cable. See page 14 and 15.
The lights don't work even
though the power cable is
connected to a charged battery
or power supply.
■ Make sure that the switch on the power supply is turned on securely.
■ Make sure the inside temperature of the light is not too high. Turn off
the light and let it cool for a while.
The power goes off
automatically.
■ Make sure there is not enough battery charge. If the battery is running
low, charge it again.
■ Make sure the inside temperature of the light is not too high. Turn off
the light and let it cool for a while.
The noise from the cooling fans
is too loud.
■ Make sure that the front and rear of the light are not blocked.
■ Check for dust or foreign substances outside the light.
■ If there is a lot of dust outside the light, blow the dust lightly with a
blower, then wipe it lightly with a soft, clean cloth.
■ Make sure that only the high temperature or light is used in a confined
and confined space for a long time.
■ To protect your device, avoid putting it in a hot and humid place or in
a separate sealed case.
The battery is running out fast.
■ This may occur if the ambient temperature is too low. It's not a fault.
■ The battery is not sufficiently charged. Recharge the battery. If the
problem persists, replace with a new battery.
■ Is the battery out of life? Replace with a new battery.
••• Trouble Shooting
01. Check Point •••
If the light or battery doesn't work properly, check the following points first. If this does not solve
the problem, please contact your local distributor or the Matrix Light service center.
- 32 -
Page 35
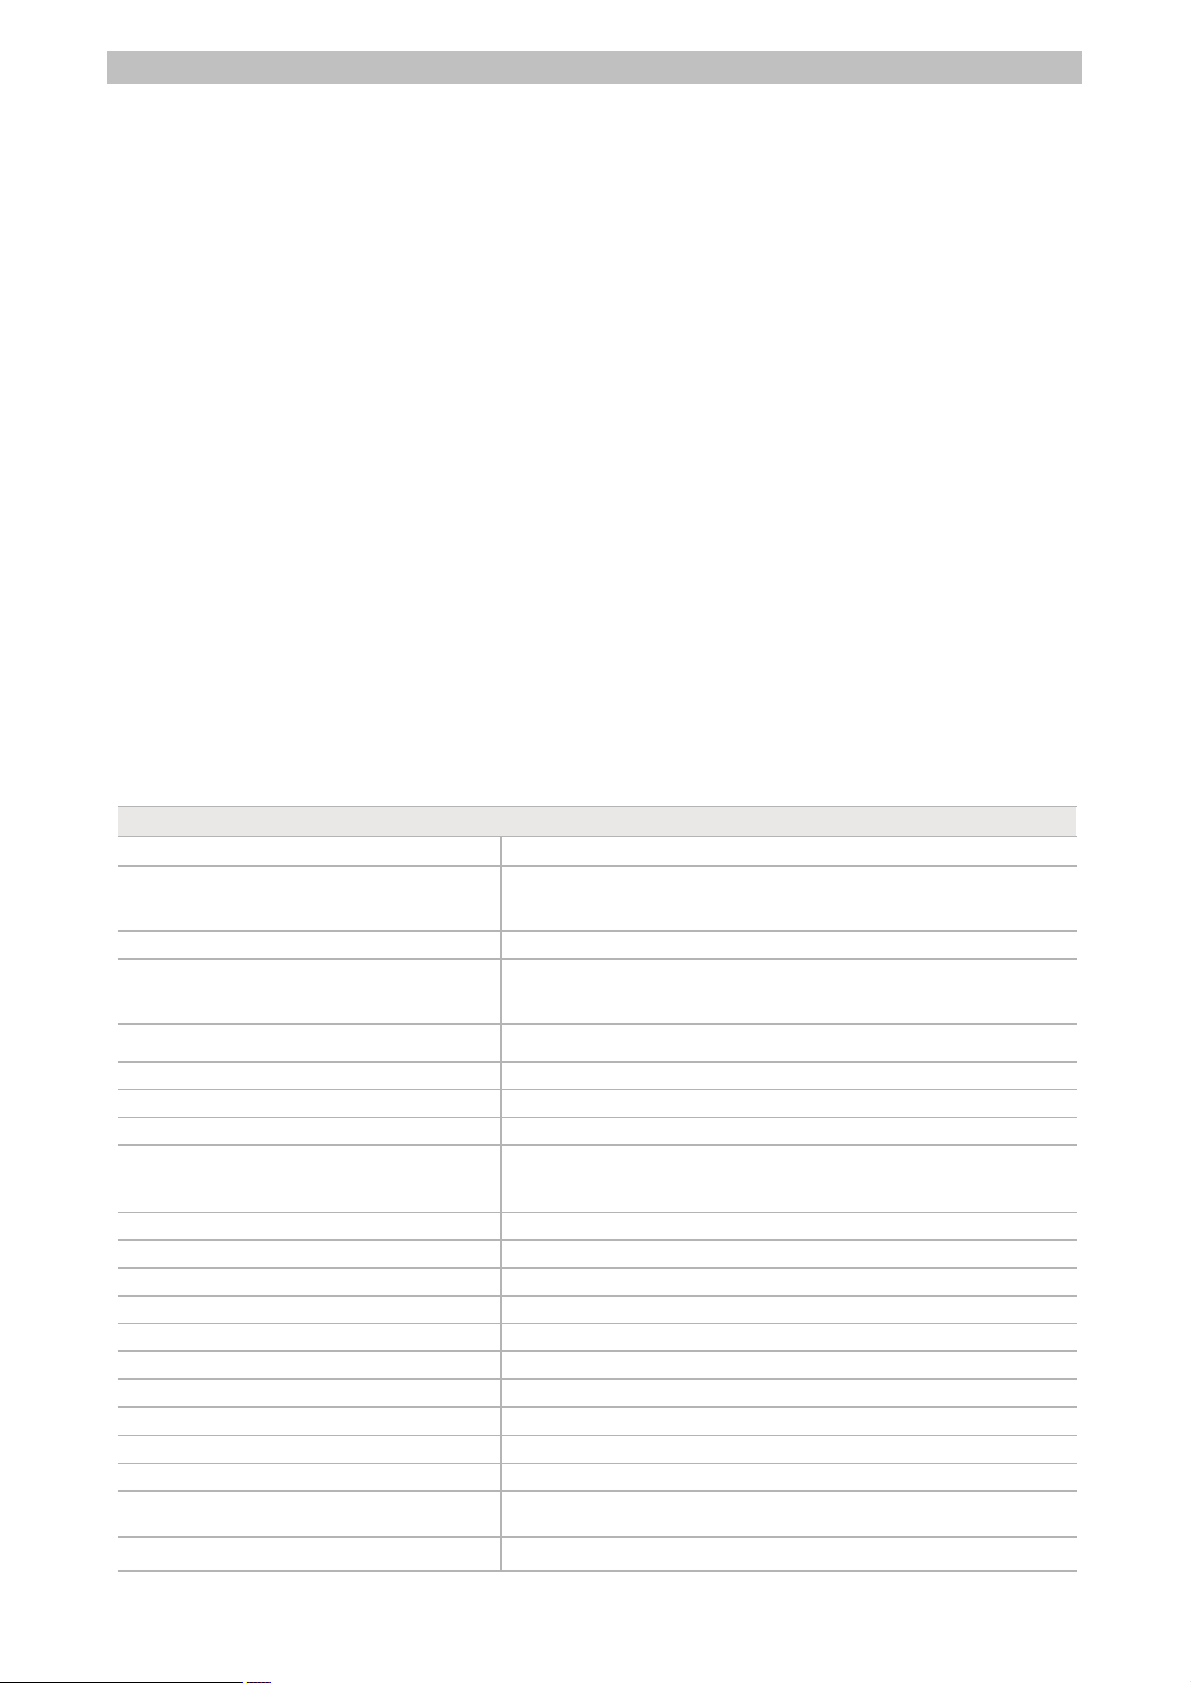
Matrix Light All Light
Lamp Head
Optical System
Soft Diffusion Panel
Light Aperture
ML-AL1: 310 x 166 mm / 12.2 x 6.5“ (All Light 1)
ML-AL2: 310 x 310 mm / 12.2 x 12.2“ (All Light 2)
ML-AL4: 610 x 310 mm / 24.4 x 12.2“ (All Light 4)
Beam Angle
115º (Half Peak Angle)
Weight
ML-AL1: 6.5kg/14.3lbs (All Light 1)
ML-AL2: 8.9kg/19.6lbs (All Light 2)
ML-AL4: 16kg/35.3lbs (All Light 4)
Handling
Aluminum Yoke, High Strength Tilt Lock, Pole Operation Option (Pan &
Tilt)
Mounting
16 mm / 28 mm Combo Pin (Baby 5/8” / Junior 1-1/8” Combo Pin)
Tilt Angle
+/- 90°
Lamphead Voltage Input
48 V DC
Power Consumption
48V DC / 2.6A / 110 W Nominal, 120 W Maximum (All Light 1)
48V DC / 5.2A / 220 W Nominal, 290 W Maximum (All Light 2)
48V DC / 10.4A / 450 W Nominal, 580 W Maximum (All Light 4)
Lamphead Power Connection
Male 3-Pin XLR - 15 Amp (Pin 1: Negative / Pin 2: Positive)
Battery Connector
Male 3-Pin XLR - 15 Amp (Pin 1: Negative / Pin 2: Positive)
Battery DC Voltage Range
48 V DC
Battery Mode Light Output
100 % of total output
White Light
2,800 K to 10,000 K continuously variable correlated color temperature
Colored Light
Full RBG+WW+PW color gamut with Hue and Saturation control
Color Temperature Tolerance
+/- 100 K (nominal), +/- 1/8 Green-Magenta (nominal)
Color Rendition
CRI Average > 95 TLCI Average > 91
Green-Magenta Adjustment
continuously adjustable (Full Minusgreen to Full Plusgreen)
Dimming
0 to 100 % continuous
Control
On-Board Controller, 5-Pin DMX In and Through, RJ45 LAN network
connectivity, USB-A
Bluetooth Connectivity
DMX Setup, Hour Counter and Standard Control commands
••• Other information
01. Warranty •••
● Free warranty period for products is one year after purchase.
● Faults caused by customer negligence or natural disasters are serviced for free even during the
service period.
● To receive free service, please send the receipt with the purchase date to the head office or
agency or visit the service center.
02. Storage method •••
● Store in a well-ventilated, dry place.
● Do not place near naphthalene or magnetic-producing instruments.
● Do not leave it in high temperatures (in the car in summer, near the stove, etc.).
● Remove the power supply, battery, and light after filming.
● If you move to a place with a high temperature difference, you may see drops of water inside
the light, power supply or battery. If possible, put it in a bag or plastic bag and use it after you
become familiar with the temperature around it.
03. Product specifications •••
- 33 -
Page 36
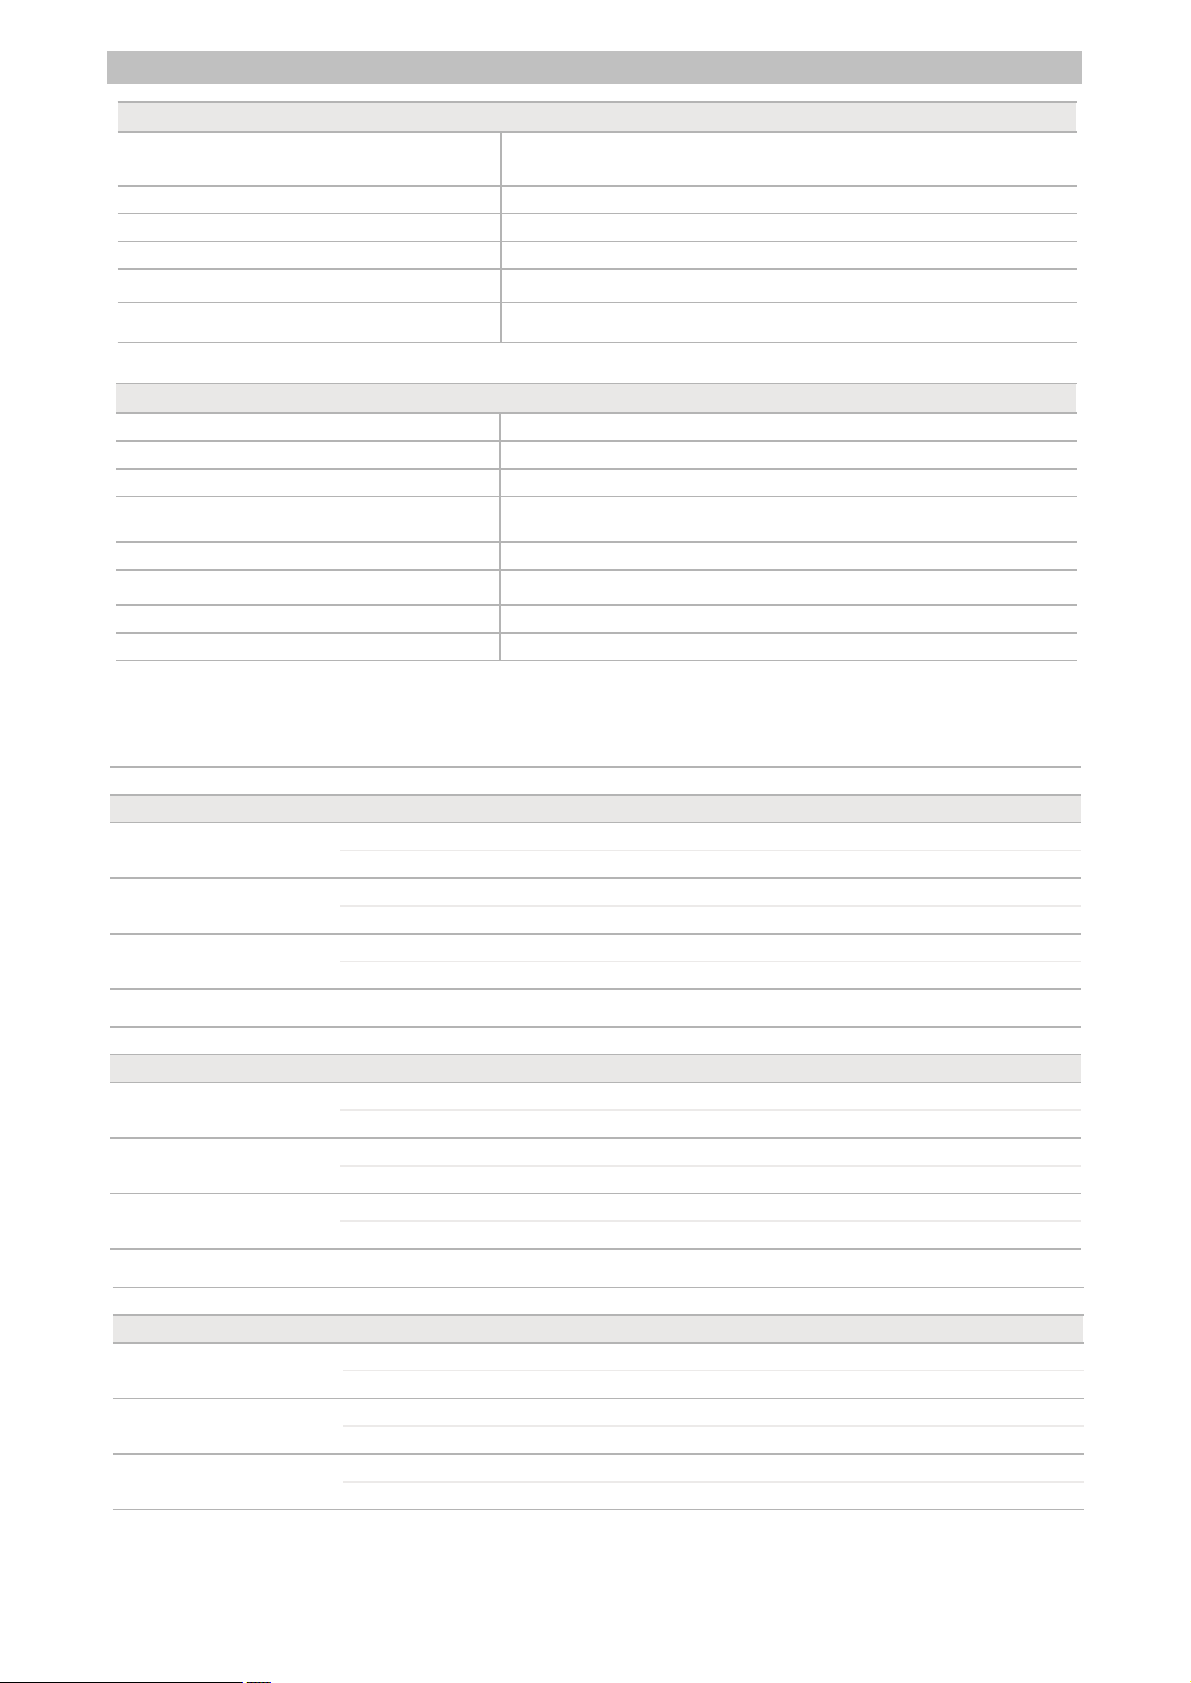
Matrix Light All Light
Lamp Head
Software Interface
RJ45: DMX In and Through
USB-A: Software Upgrade via flash drive
Housing Color
Orange / Silver, Black, White
Ambient Temperature Operation
-20 to +45º C (-4 to +113º F)
Protection Class / IP Rating
III / IP20
Estimated LED Lifetime (L70)
50,000 hours
Estimated Color Shift Over Lifetime (CCT)
+/- 5 %
Power Supply Unit
Power Supply Input Range
110 to 240 V ~, 50/60 Hz
Power Supply Output Range
48 V DC
Power Input Connection
PowerCON TRUE1 (Bare Ends / Schuko / Edison cables available)
Power Output Connection
Female 3-Pin XLR - 10 Amp (Pin 1: Negative / Pin 2: Positive)
PowerCON TRUE1 (mains power through)
Weight
ML-APS1: 2.5Kg/5.5lbs ML-APS2: 2.9Kg/6.4lbs ML-APS4: 4.9Kg/10.8lbs
Dimensions
348 x 124 x 70 mm / 13.7 x 5.4 x 2.8“ (ML-APS1,2)
390 x 176 x 76 mm / 15.3 x 6.9 x 3.0“ (ML-APS4)
Control
On-Board On/Off Switch
Mounting
All Light ML-AT2 Quick Release Clamp Adapter / ML-QR1 Rail Mount Adapter
3 m / 9.8 ft
5 m / 16.4 ft
7 m / 23 ft
9 m / 29.5 ft
All Light 1
3,200 K
5,600 K
3,200 K
5,600 K
3,200 K
5,600 K
3,200 K
5,600 K
All Light 1 with
Standard Diffusion
414 lx
406 lx
149 lx
146 lx
76 lx
74 lx
46 lx
45 lx
38 fc
38 fc
14 fc
14 fc
7 fc
7 fc
4 fc
4 fc
All Light 1 with
Lite Diffusion
448 lx
437 lx
161 lx
157 lx
82 lx
80 lx
50 lx
49 lx
42 fc
41 fc
15 fc
15 fc
7 fc
7 fc
5 fc
5 fc
All Light 1 with
Heavy Diffusion
343 lx
333 lx
124 lx
120 lx
63 lx
61 lx
38 lx
37 lx
32 fc
31 fc
11 fc
11 fc
6 fc
5 fc
3 fc
3 fc
3 m / 9.8 ft
5 m / 16.4 ft
7 m / 23 ft
9 m / 29.5 ft
All Light 2
3,200 K
5,600 K
3,200 K
5,600 K
3,200 K
5,600 K
3,200 K
5,600 K
All Light 2 with
Standard Diffusion
829 lx
811 lx
298 lx
292 lx
153 lx
149 lx
92 lx
90 lx
77 fc
76 fc
28 fc
27 fc
14 fc
14 fc
8 fc
8 fc
All Light 2 with
Lite Diffusion
895 lx
873 lx
323 lx
315 lx
165 lx
161 lx
100 lx
97 lx
84 fc
81 fc
30 fc
30 fc
15 fc
15 fc
9 fc
9 fc
All Light 2 with
Heavy Diffusion
686 lx
667 lx
247 lx
240 lx
126 lx
123 lx
76 lx
74 lx
63 fc
62 fc
23 fc
23 fc
12 fc
11 fc
7 fc
7 fc
3 m / 9.8 ft
5 m / 16.4 ft
7 m / 23 ft
9 m / 29.5 ft
All Light 4
3,200 K
5,600 K
3,200 K
5,600 K
3,200 K
5,600 K
3,200 K
5,600 K
All Light 4 with
Standard Diffusion
1658 lx
1623 lx
597 lx
583 lx
305 lx
297 lx
184 lx
181 lx
154 fc
151 fc
57 fc
54 fc
27 fc
27 fc
16 fc
16 fc
All Light 4 with
Lite Diffusion
1790 lx
1747 lx
645 lx
629 lx
329 lx
321 lx
200 lx
194 lx
167 fc
162 fc
59 fc
59 fc
30 fc
30 fc
19 fc
19 fc
All Light 4 with
Heavy Diffusion
1372 lx
1334 lx
494 lx
481 lx
251 lx
246 lx
151 lx
149 lx
127 fc
124 fc
46 fc
46 fc
24 fc
22 fc
14 fc
14 fc
Photometric Data
- 34 -
Page 37
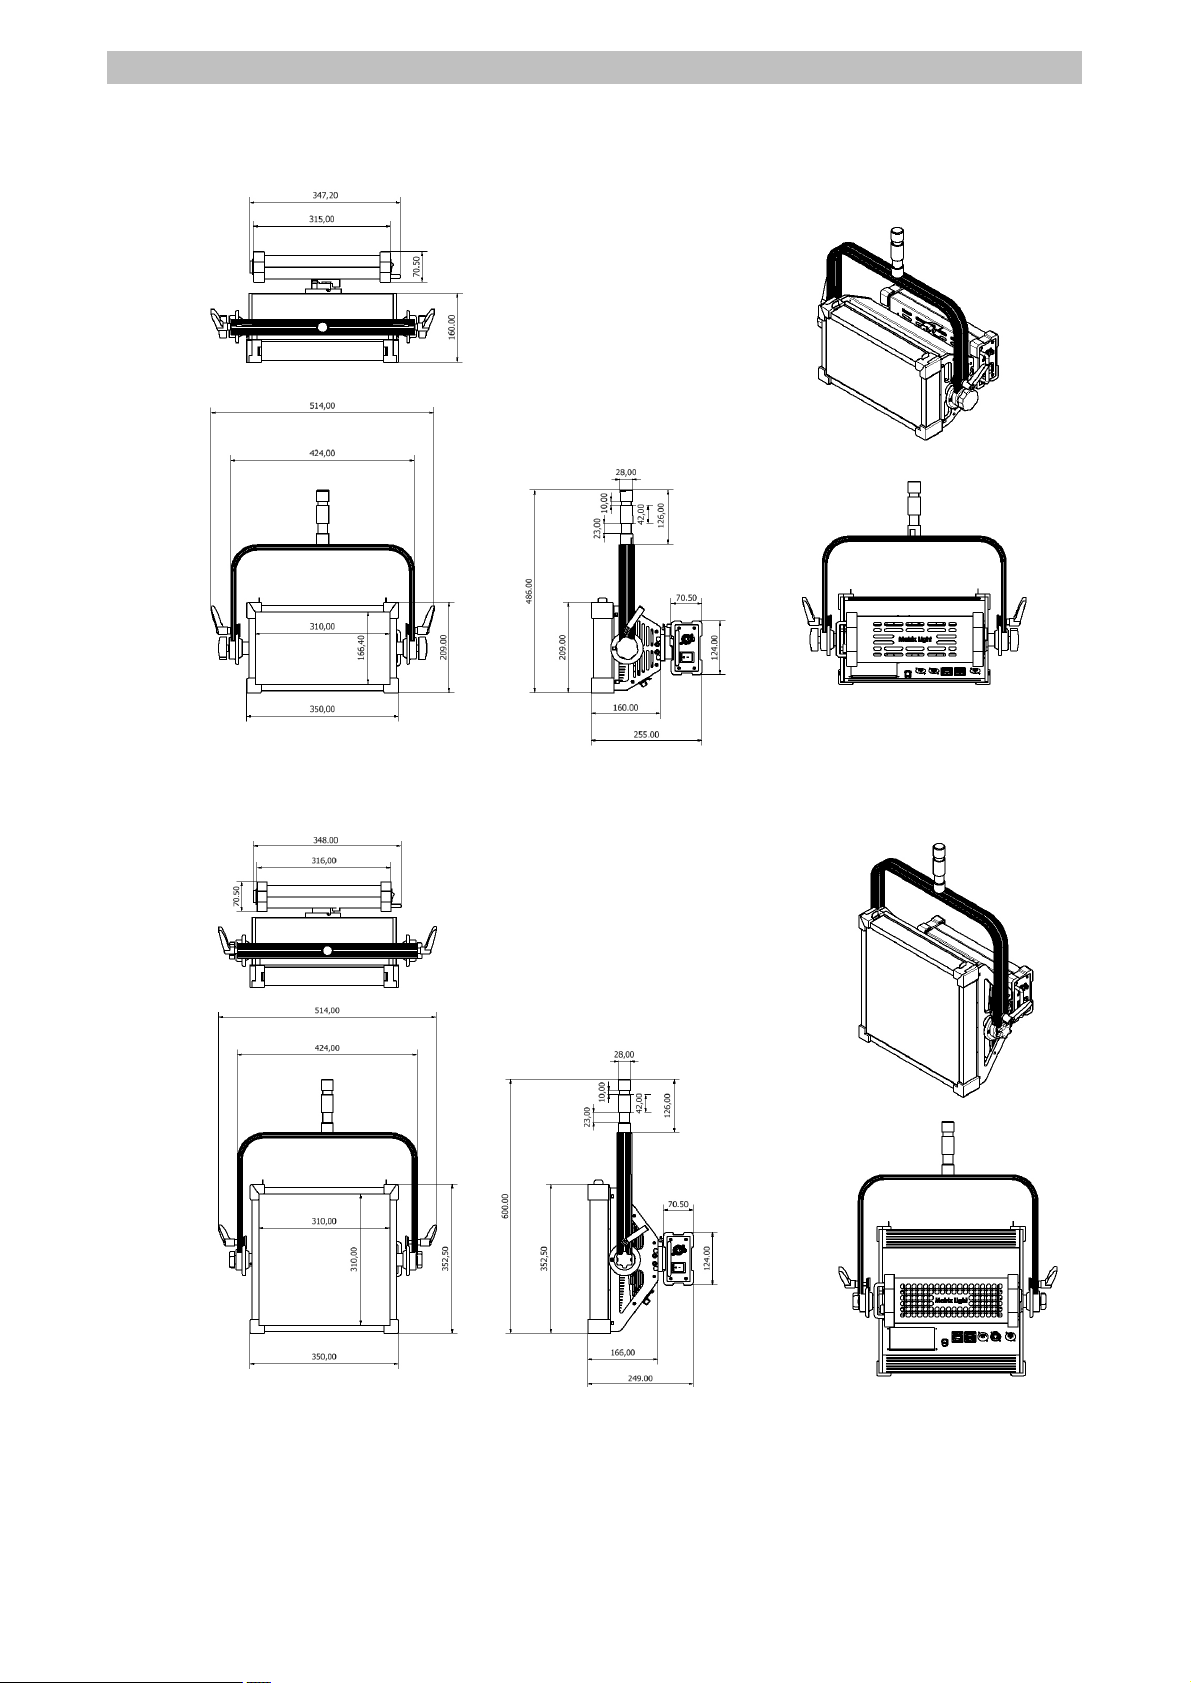
Product Dimension
All Light 1
Matrix Light All Light
All Light 2
- 35 -
Page 38
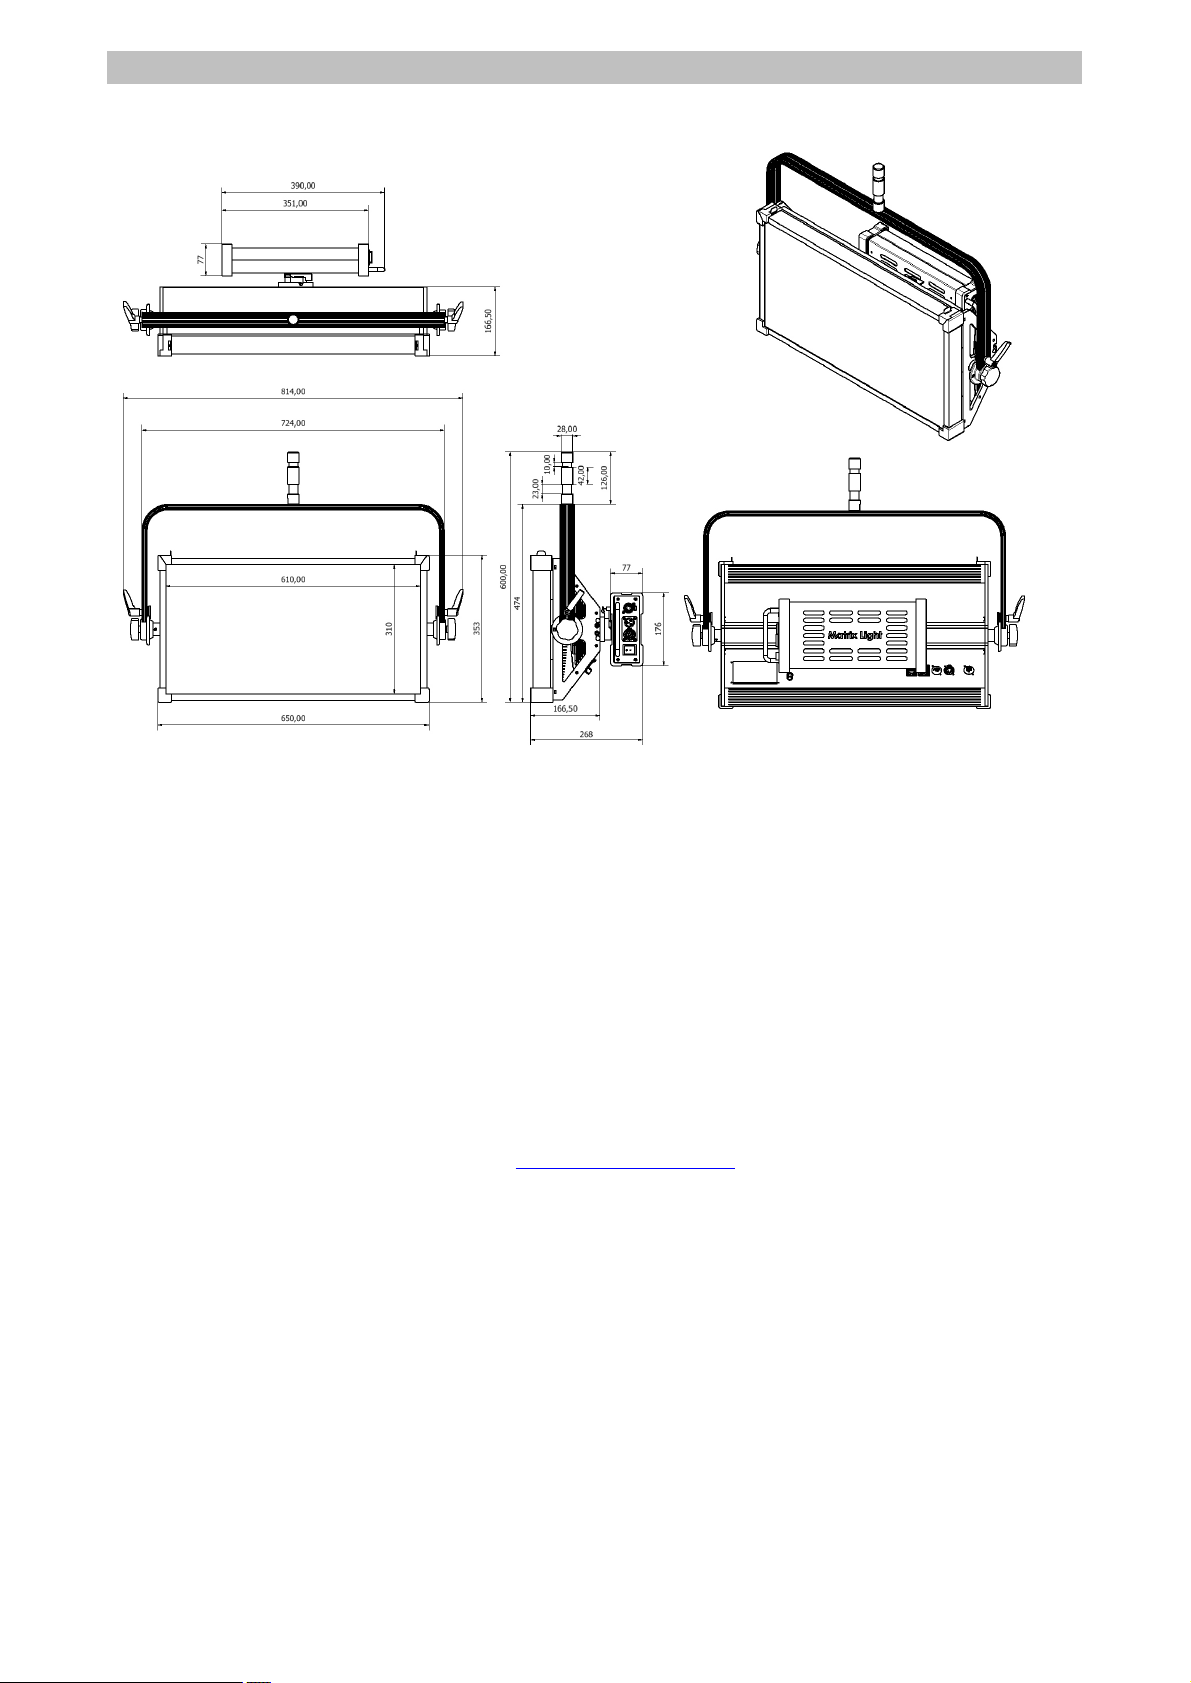
Matrix Light All Light
All Light 4
04. Product A/S information •••
● Visit the Matrix Light website at www.matrixlight.com or call 02-782-2888 for A/S related
inquiries in Korea.
● For overseas A/S-related inquiries, visit the Matrix Light website at www.matrixlight.com or email
● For guidance on overseas A/S-related agencies and service centers, visit the Matrix Light website at
www.matrixlight.com or contact us at [email protected]
● For product A/S related inquiries, please tell us the serial number of the product, the date of
purchase of the product, the place of purchase of the product, and the details of the defect,
for faster service.
Thank you
- 36 -
 Loading...