

Page 1

MUSIC STREAMER COMBO
User Manual
Page 2

HIGH
PERFORMANCE
AUDIO
www.matrix-digi.com
Matrix Electronic Technology Co., LTD
+86-29-86211122
B-801, No.111 Fengcheng 5th Rd.,
Xi'an, China
support@matrix-digi.com
Page 3

Users Manual
Catalog
Catalog
1. Packing list
2. Parts and name
2.1 Front panel
2.2 Rear panel
2.3 Display screen
2.3.1 Dispaly in main interface area
2.3.2 Volume control
2.3.3 Display for input channel
2.3.4 Display for Output channel
2.4 Remote control
3. Connections
3.1 Connect to AC power
3.2 Connect to input source
3.3 Connect to headphone
3.4 Connect to active speaker or AMP
3.5 Connect to storage devices
3.6 Connect to LAN
3.7 Connect to WLAN
4. Play
4.1 Basic operation
4.1.1 Power on
······························08
·······················01
·····················01
····························01
·····························02
··························02
·······················02
················03
··············03
·························03
························04
·····················04
··················05
···················05
················06
·························07
·······················07
·························08
·····························08
············02
··········06
4.1.2 Select the input source
4.1.3 Select output channel
4.1.4 Volume control
4.1.4.1 Volume adjustment
4.1.4.2 Mute
4.1.4.3 Hearing protection
4.1.5 Gain control
4.1.6 Filter settings
4.1.7 Auto sleep and wake up
4.1.8 Remote control
4.2 Play music through optical, coaxial or IIS-LVDS port
4.3 Play music through AirPlay or DLNA
4.4 Play music from USB storage devices\SD Card\NAS
4.5 USB Audio
5. Settings
5.1 Lineout Mode
5.2 PCM Filters
5.3 DSD Filters
5.4 Headphone Gain
5.5 Dither
5.6 Jitter Eliminator
5.7 DPLL Bandwidth
5.8 IIS-LVDS Port Definition
······························10
··························10
·························10
····························12
···························13
··························13
····························14
····························14
································14
························14
························15
·················09
··················09
·······················09
··················09
···················10
················10
·······················11
···········11
·······················14
··················15
11
12
5.9 Dimmer
5.10 Auto Sleep
5.11 User defined button settings
5.12 Network Type
5.13 Remote Control
5.14 Load Default
5.15 Product information
6. Appendix
6.1 File formats and sampling rate supported
6.2 About MQA
6.3 USB storage device requirements
6.4 IIS-LVDS Port
6.5 Technical specifications
··························15
························15
··········15
·····················15
····················16
······················16
················16
······················16
························16
······17
·······················17
··············18
··16
Page 4

Packing list
1.Packing list 2.Parts and name
2.1
Front panel
Users Manual
1. Product x1
2 3
4. USB cable x1
2
1
38
4
1. Standby
5
2. Menu
3. User-defined
4. Volume/control knob
5. XLR3/6.35mm headphone jack
7. Display
8. Remote control sensor
9. LED indicator
47655
1
9
2. Remote x1
3. Wi-Fi antenna x2
5. Power cable x1
6. XLR4 Balanced headphone jack
01
Page 5

Users Manual
Parts & name
2.2
Rear panel
RCA RCA
R
1. XLR right chanel output
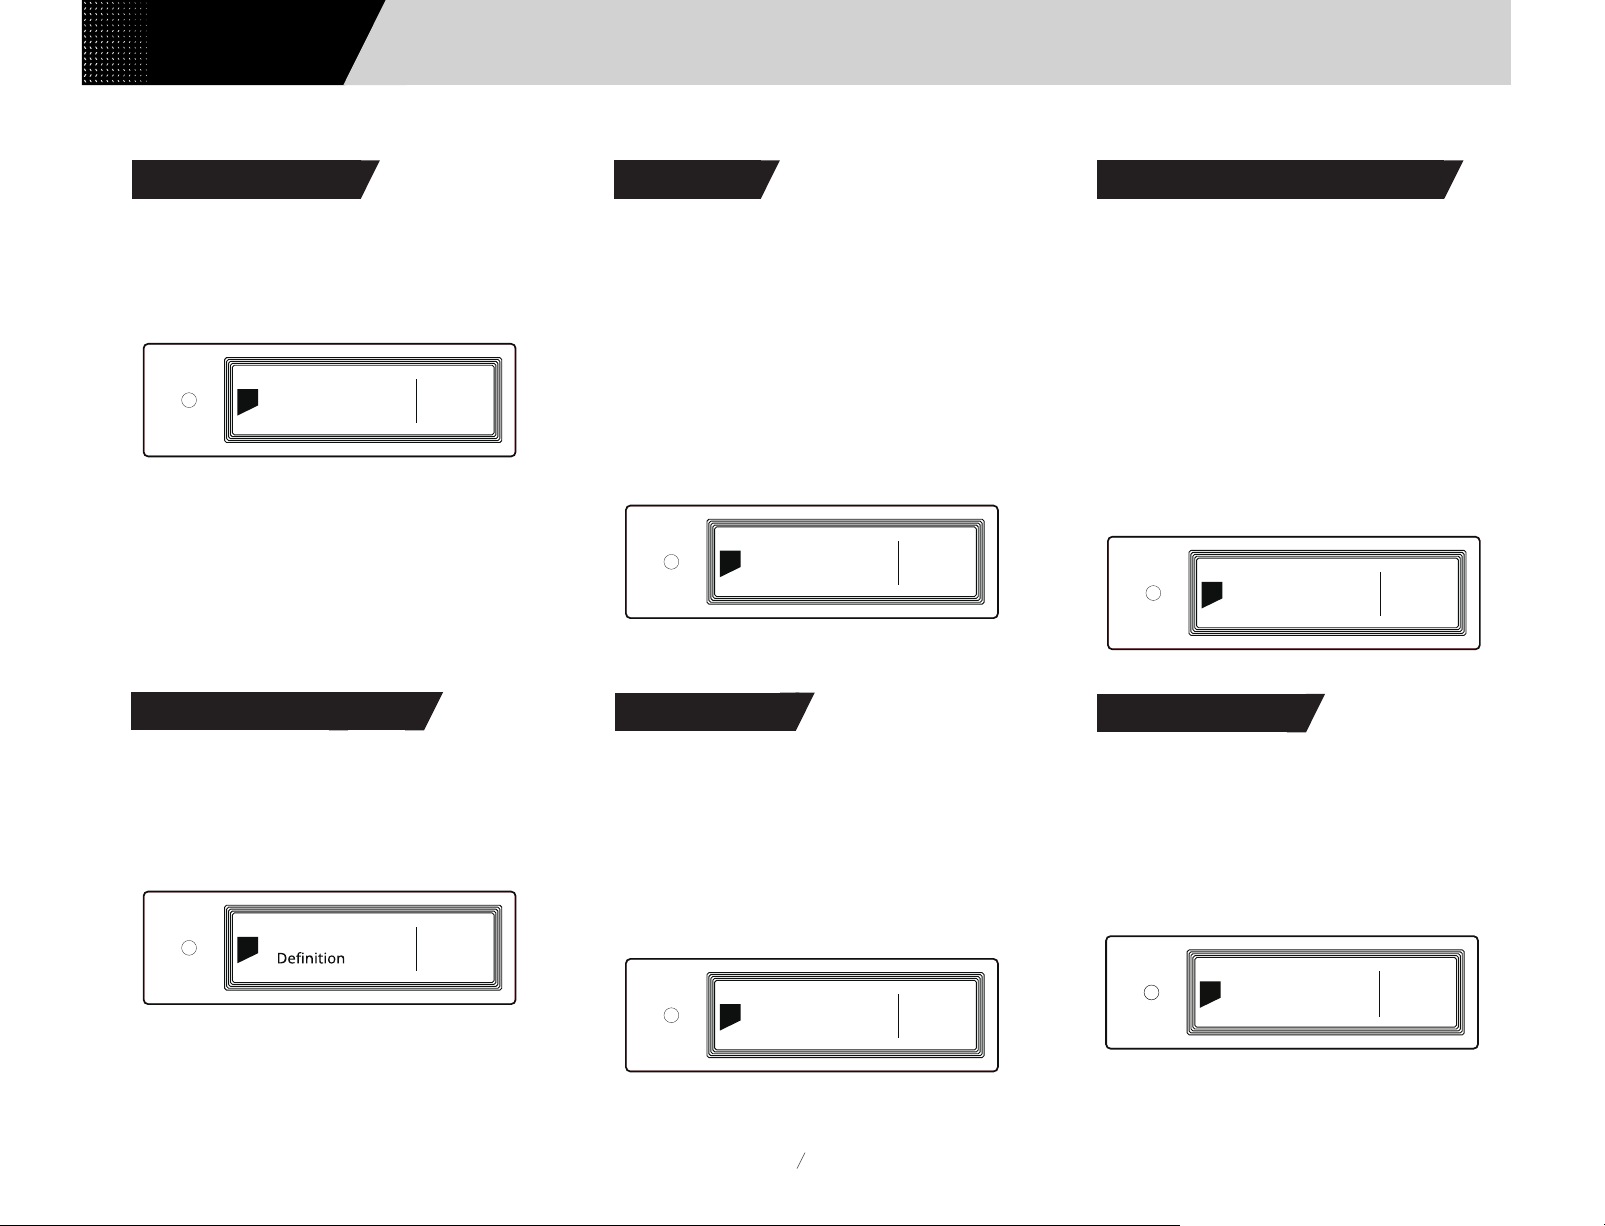
2.3 Display screen
2.3.1 Dispaly in main interface area
5 6 7 984321
13421 5 5 667 83
XLRXLR
L
1. Status for NAS devices
12 12 11 10 8
8. USB HOST port
9
2. Status for USB storage devices
3. Status for MicroSD card
4. Status for Wi-Fi and ethernet
connection
5. Input channel
Optical 1
PCM 44.1
Filter 5
k
6. Sampling rate
7. Assistant information
8. Volume bar
9. Output mode
UNBAL
2. RCA right chanel output
3. RCA left chanel output
4. XLR left chanel output
5. Coaxial input
6. Wi-Fi antenna jack
7. MicroSD card slot
9. Wired netword port
10. USB Audio port
11. IIS LVDS input
12. Optical input
13. Power input
02
2.3.2 Volume control
1. Current volume dB level
1 2 3
-30.0
dB
2. Volume bar 3. Output mode
BAL
Page 6

Parts & name
Users Manual
2.3.3 Display for input channel
Input
1. Input channel
2. Unselected
2.3.4 Display for output channel
1 2
Coaxial 1
1 2
2.4 Remote control
1
2
3
4
Filter
5
COA
OPT
IIS
USB/NET
6
7
8
9
1. Standby
2. Mute
3. Volume+
4. Volume-
Output
1. Current output mode
2. Selected
Balanced
5. Filter
6. Coaxial
7. Optical
8. IIS
9. USB/Network*
*This button can switch input channels between USB and
Network.
03
Page 7

Users Manual
3. Connections
3.1 Connect to AC power
Connection
element X is compatible with AC100-120V and AC220-240V power specifications.
Please make sure to switch the bottom power voltage according to your local valtage
enviroment before using. As shown:
AC 220-240V
230
115
AC 100-120V
Please use the right three-phase power cable which includes the ground terminal and
ensure the ground is correctly connected, or you will have the possibility of electric
shock when you touch it.
Please unplug the power cable, if you need the element X to be disconnected from the
power.
The two sections of the voltage switch are 115V and 230V, each section for:
115V position is fit for AC100V-120V 50/60Hz
230V position is fit for AC220V-240V 50/60Hz
04
Page 8
Connection
Users Manual
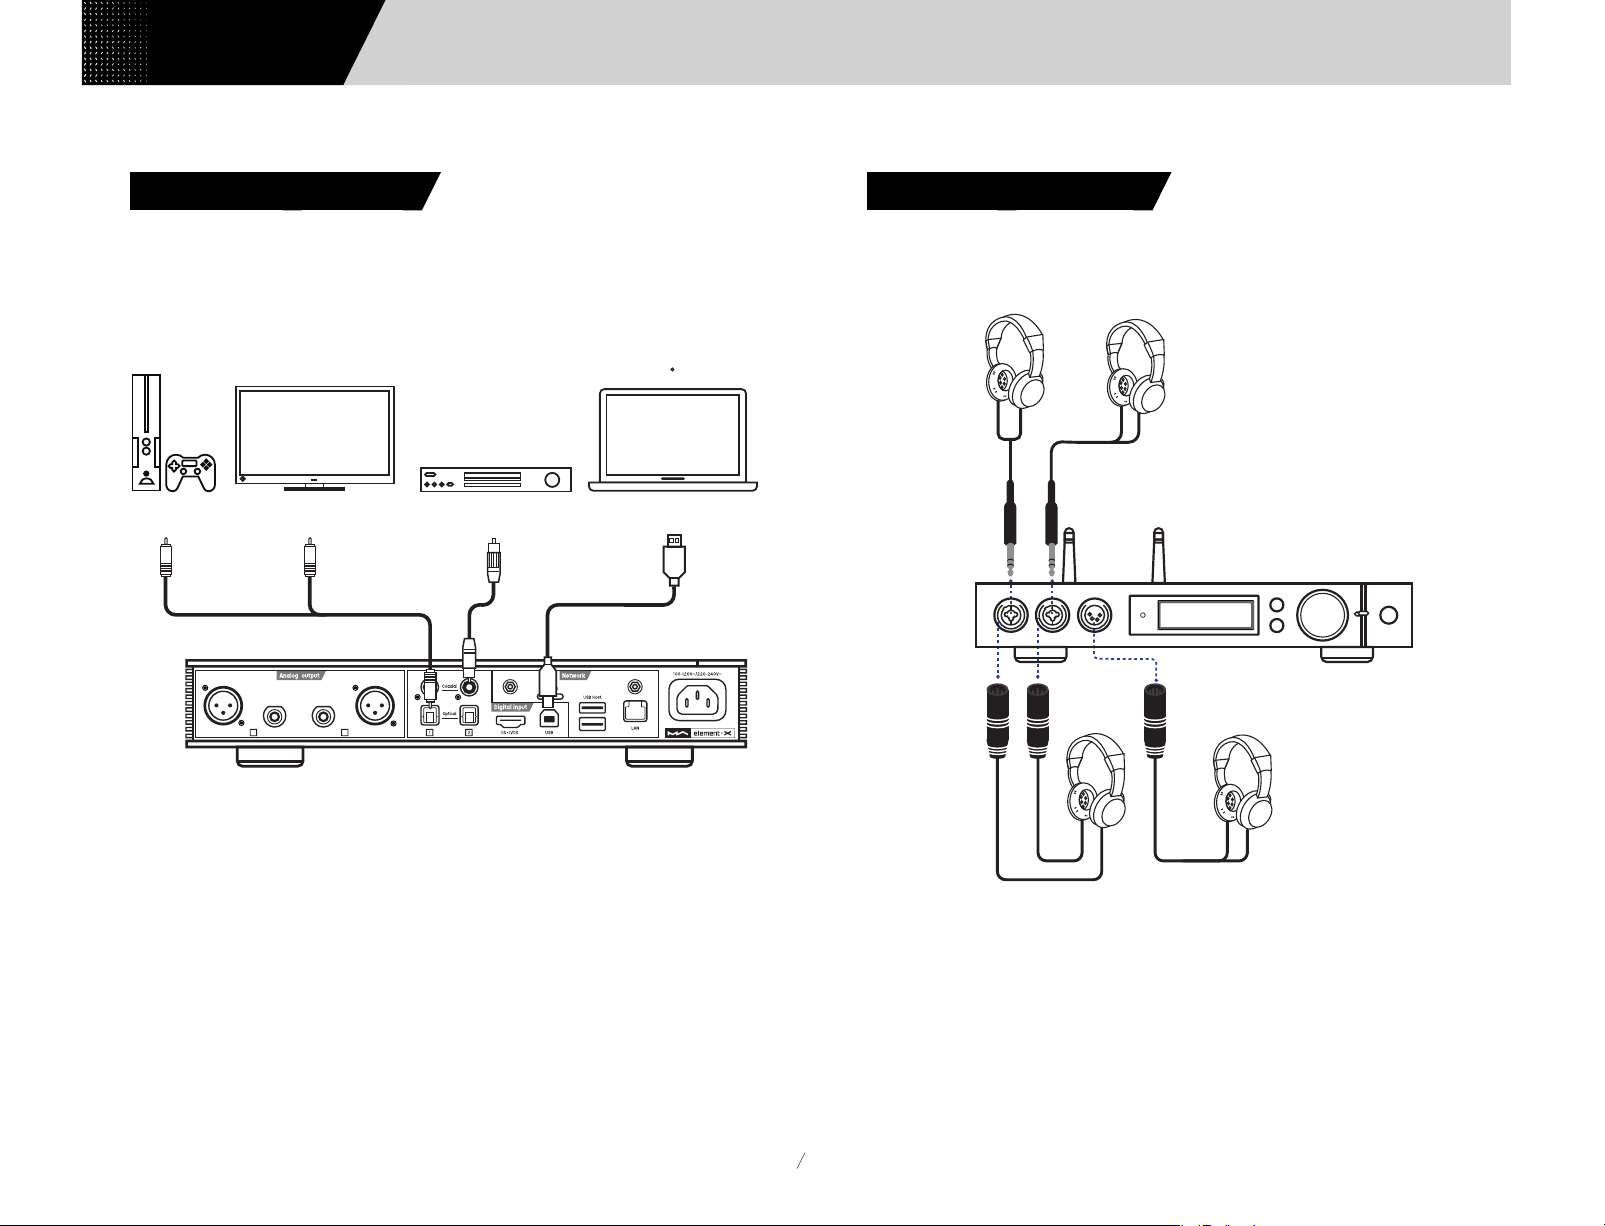
3.2 Connect to input source
Connection for front-end devices including S/PDIF output signal through coaxial and
optical port;
Connection for digital interface products of Matrix Audio through IIS prot.
Game Console
TV CD Player
XLRXLR
RCA RCA
R
L
Computer
3.3 Connect to headphone
There are two headphone hybrid chassis jacks and one XLR balanced headphone jack.
You can use three ways to connect to headphone:
6.35mm
6.35mm
XLR.3
XLR.3
XLR.4
It is advisable to connect with high-impedance headphone for the best sound effect. If
it is connected to a low-impedance and high sensitivity headphone, in order to
decrease the noise, it is advisable to set the gain of headphone AMP at 'LOW' and
consider if an impedance cable is needed.
05
Page 9

Users Manual
Connection
3.4 Connect to active speaker or AMP
In order to avoid damage to your devices, please turn off the active speakers or
amplifiers before you connect them to element X.
XLRXLR
RCA RCA
R
R
L
Output
L
Input
R
L
3.5 Connect to storage devices
There are two USB HOST ports on the rear panel to connect with standard mass
storage USB devices.
The MicroSD card support up to 128GB,push to install or popup the card.
XLRXLR
RCA RCA
R
Input
R
L
R
L
Output
L
06
Page 10

Connection
Users Manual
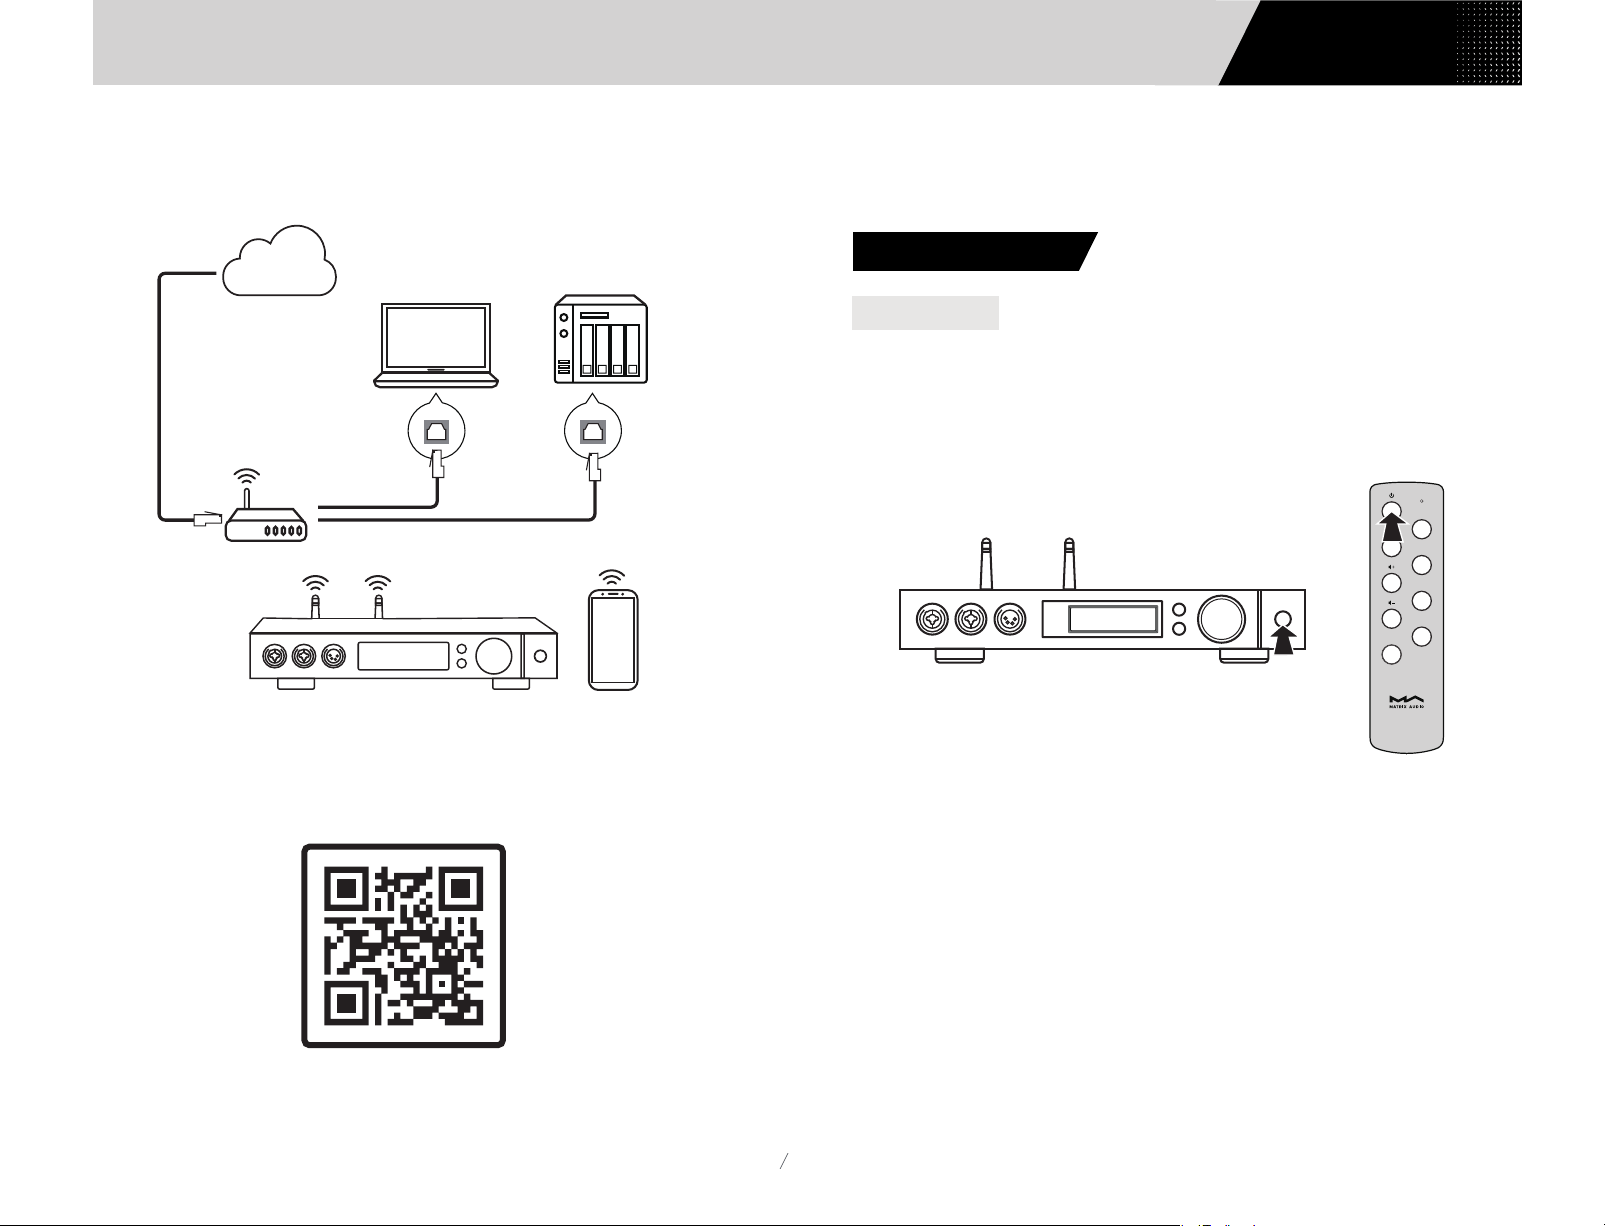
3.6 Connect to LAN
Connect to LAN, please use ethernet cable to connect element X with router (
recommend using CAT-5 or higher version shield ethernet cable), and let element X in
the status as shown below:
Internet
Computer NAS
Connect to WAN port
Connect to LAN port
Connect to LAN port
R
Router
RCA RCA
Connect to LAN port
XLRXLR
L
3.7 Connect to WLAN
3.7.1 Please make sure to properly install the two Wi-Fi antennas on the rear panel
(insert the Wi-Fi antenna into the jack and tighten it clockwise). You can adjust the
antenna angle to change the signal effect.
1 2 3
RCA RCA
R
XLRXLR
L
It is advisable to set up the router as DHCP server, and this function will allocate the
device IP address in LAN automatically.
07
Page 11
Users Manual
Play
3.7.2 Let element X in the status as shown below:
Internet
Connect to WAN port
Connect to LAN port
Router
Computer NAS
Connect to LAN port
4. Play
4.1. Basic operation
4.1.1 Power on
The LED indicator will turn to dimmed after element X is connected to power supply,
indicating that it has entered the standby status, press the 'Standby' button on the
unit body or remote control, element X will power on, and the LED indicator will turn
to highlight white.
COA
OPT
IIS
USB/NET
Filter
3.7.3 Scan the QR code below to download MA Remote app for your iPhone, iPad and
Android devices, and follow the configuration wizard in the app to connect element X
to Wi-Fi and explore more exciting functionalities..
Download MA Remote
When the power is on, press the 'Standby' button on the front panel or IR Remote
control to turn it into standby mode, and the LED indicator will turn to dimmed.
08
Page 12

Play
COA
OPT
AES
Users Manual
4.1.2 Select the input source
Repeat pressing the menu button ' ' and switch to input channel selection menu,
then rotate the knob to select between auto, coaxial 1, coaxial 2, optical 1, optical
2, IIS LVDS, USB Audio and network, you can press the knob to confirm the
selection.
Under 'Auto' mode, element X will automatically scan all digital input channels, the
first connected input channel will be locked immediately. It will continue to scan
other channels until the current channel signal is lost. When there are several input
channels being connected, element X is always locking the signal which is detected at
first. The order of input channel scanning is as shown,
COAX 1 COAX 2 OPT1
Network
USB
OPT2
IIS LVDS
4.1.3 Select output channel
Repeat pressing the menu button ' ' and switch to output channel selection menu,
you can select output channel between balanced headphone output, single-ended
headphone output and line output, then push the button to confirm. The switching
order is as follow,
Line out
Single-ended
headphone
Balanced
headphone
When single-ended headphone output is changed to balanced headphone output, in
order to avoid being scared, the output volume will reduce 6dB to make the balanced
headphone have the same volume as single-ended headphone.
4.1.4 Volume control
4.1.4.1 Volume adjustment
The volume can be adjusted by the knob or the and key on the remote control,
and the screen will show the current volume level at the same time. Line output and
headphone output have independent volume control level, also, the line output can
be configured as fixed level output.
COA
When selected 'Auto' channel and the input signal being locked, it will show the auto
scan mark beside the of the channel name. As shown,
Optical 1
PCM 44.1
When using network related music source such as AirPlay, DLNA, ROON or MA player,
please select Network input channel.
k
Filter 5
UNBAL
OPT
IIS
USB/NET
Filter
09
Page 13

Users Manual
Play
CAUTION
'Fixed output' means that the device outputs signal with maximum level at 0dB.
Before selecting this mode, please make sure that your power amplifier or active
speaker has been adjusted to a lower volume level. If the amplifier or speakers do
not have volume control, DO NOT set up to 'Fixed output' mode, otherwise this
operation may damage to your devices and harm to your ears.
4.1.4.2 Mute
In playback status, you can press the volume knob or 'Mute' on the remote control to
activate mute; press the 'Mute' again or turn the volume knob to exit mute. There will
be a mute icon on the screen when mute is activated.
COA
OPT
IIS
USB/NET
Filter
4.1.4.3 Hearing protection
In order to protect your hearing and avoid damage by excessive volume, when the
volume of a single-ended headphone is above -30dB and balanced headphone above
-36dB, the volume of single-ended headphone will be recovered to -30dB and
balanced headphone will be recovered to -36dB after reboot; if the volume is lower
than -30dB or -36dB, it will return to the same volume as you set last time.
4.1.5 Gain control
In order to accommodate different headphones, active speakers or power amplifiers,
element X has a pre-amplifier function, if the maximum volume still cannot provide
enough volume, please enable the inner pre-amplifier in the setting menu to get
+10dB gain. Please refer to the 1st option for line output pre-amplifier and the 4th
option for headphone pre-amplifier (page 13-14).
4.1.6 Filter settings
When element X is playing PCM or DSD music, users can select the digital filters to get
different sound performance. Users can switch on the 2nd option in the setting menu
or add the Filter setting to shortcut key '〇' on 11th option to fast switch it (page
14-15). The current selected filter will display in the auxiliary information area on the
screen, and the encoding mode of DSD audio is also displayed there.
When playing MQA files, the PCM filter will invalid.
2
PCM Filter
MOD 1
3
DSD Filter
47kHz
4.1.7 Auto sleep and wake up
element X will enter sleep mode when the current selected digital channel has no
input signal and no operation for more than 5 minutes.
The following operations can wake up element X from sleep status,
- Press the volume knob on the front panel of element X
- Press the 'Standby' button on element X or remote control
- Recover the input signal of the selected channel or recover signal of any digital
channels under Auto Scan mode
When element X has stopped playing for more than 5 minutes on the Network input
channel, and no operation for more than 5 minutes, it will enter sleep mode
automatically, and will wake up by the following conditions:
- Push music to element X through AirPlay or DLNA
- Play music through MA player
- Play music as a ROON endpointv
10
Page 14
Play
Users Manual
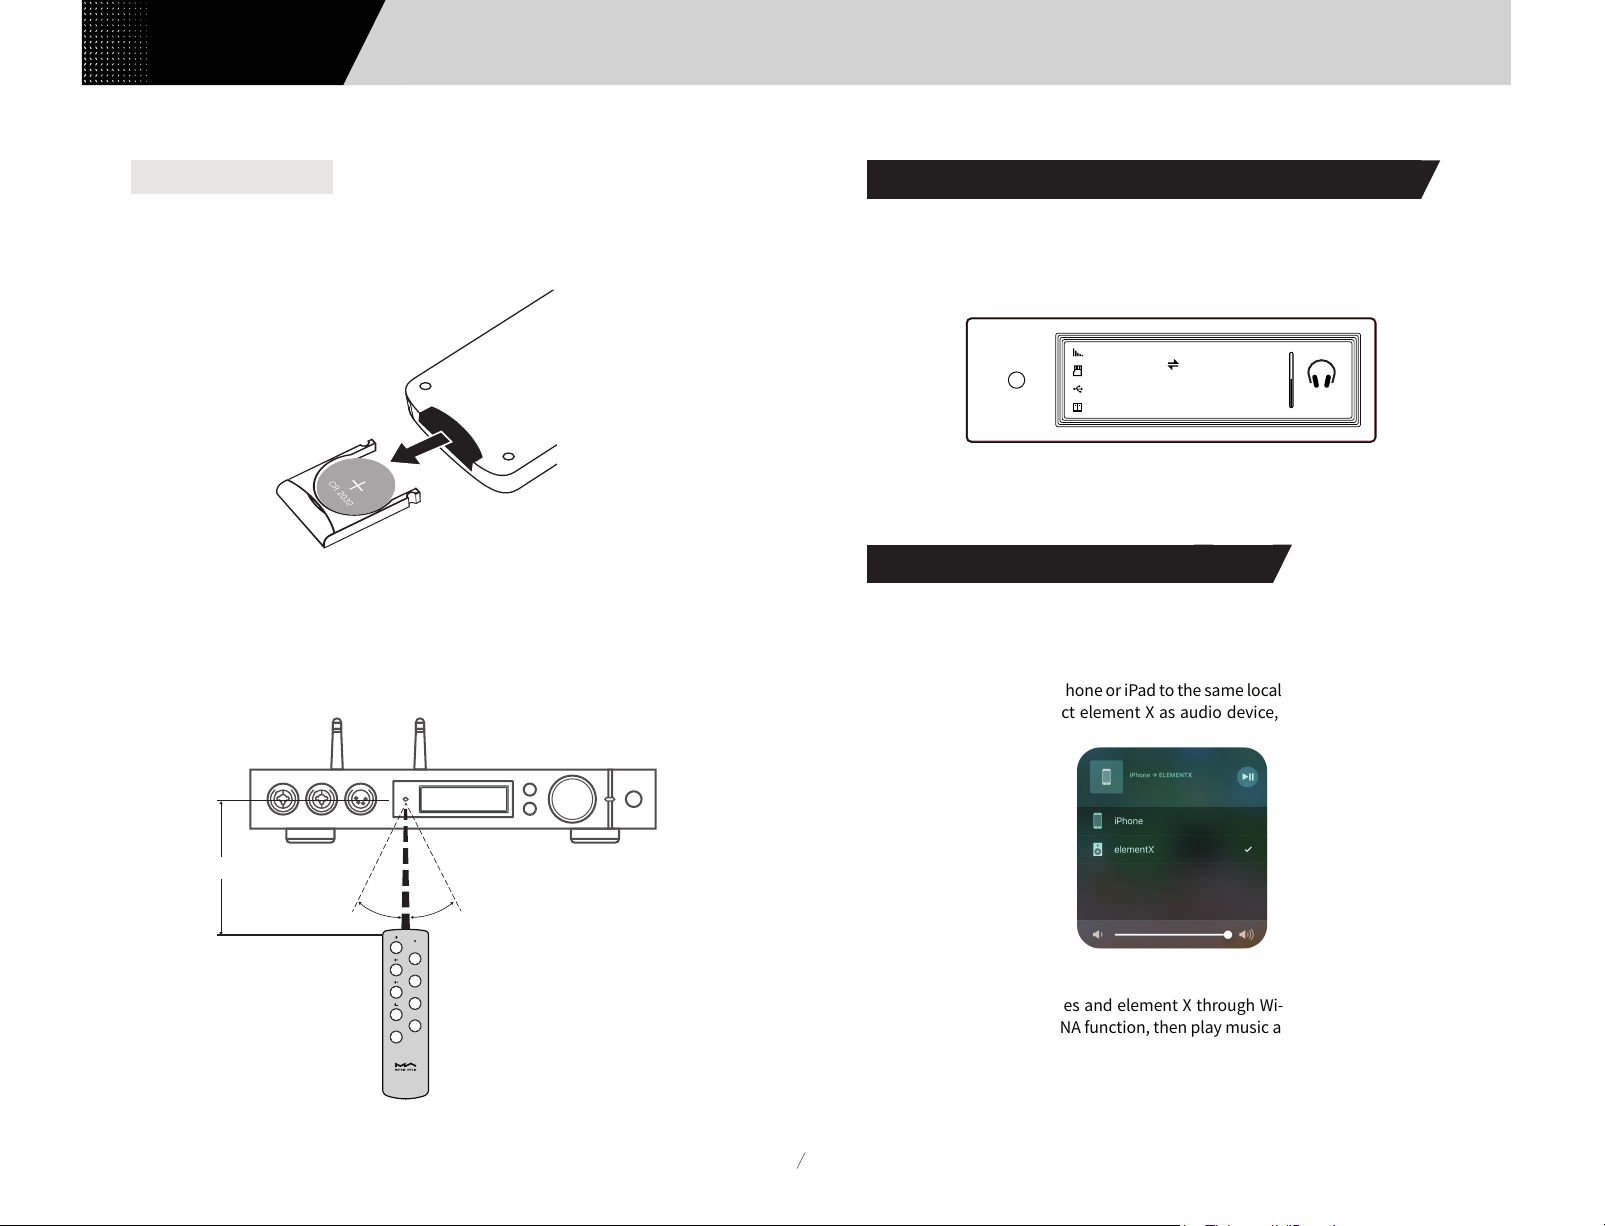
4.1.8 Remote control
Remote control uses a CR2032 button cell battery. Pull out the battary slot at the
bottom to install battery and make sure to put in the right polarity.
Please point the remote control to the remote sensor in the area in the following
picture, the remote distance is about 8 meters and the battery life is about one year,
please replace the battery if the remote distance becomes shorter or loses sensitivity .
4.2 Play music through optical, coaxial or IIS-LVDS port
When it is connected with front-end devices, which including S/PDIF output digital
signal through coaxial and optical port or digital interface products of Matrix Audio
through IIS port, the screen will show sampling rate and signal format of the selected
input channel.
Optical 1
PCM 44.1
Filter 5
k
UNBAL
If the sampling rate and signal format on the screen is not displayed correctly, please
check if the cable is correctly connected or the front-end device is outputting signal.
4.3 Play music through AirPlay or DLNA
After element X connected to LAN with the ethernet cable or wireless, users can push
the music from your smart phone or other mobile devices to it through AirPlay or
DLNA.
Connect the Wi-Fi of your iPhone or iPad to the same local area network as the element
X, and click AirPlay to select element X as audio device, then choose and enjoy your
favored music.
About 8 meters
30° 30°
COA
OPT
IIS
USB/NET
Filter
Connect the Android devices and element X through Wi-Fi under the same LAN, and
open the APP including DLNA function, then play music and push it to element X.
The experience of using element X with an Android device is due to the compatibility of
music APPs, not all the Android devices or music APPs have DLNA function.
11
Page 15

Users Manual
4.4 Play music from USB storage devices\MicroSD Card\NAS
element X can play the music from USB storage devices\MicroSD Card\NAS through
MA player. Download MA Remote APP to get more detail about user guide.
MA player can play kinds of lossless format audio files, as well as DSD music, it also
includes MQA full decoder technology, we believe you will feel a new experience when
enjoying music collections.
4.5 USB Audio
When the element X needs to be connected to computer as an USB DAC, please install
driver for Windows 7/8/10 which can be found in Matrix official website, the URL of the
download page is: https://matrix-digi.com/en/downloads/, the installation process as
follow,
Play
Step 2:
Please select the
installation path
and click 'Install'
Step 3:
Install the Windows driver for element X
Step 1:
Double-click the driver
installation file,
and click 'Next'
Installation is
completed
and click 'Next'
Step 4:
Click 'Finish', the
driver installation
is completed.
12
Page 16

Settings
Users Manual
Use element X under Mac OS X
Mac OS X does not need a driver. Please select the audio device as 'element Series'
in System Preferences.
Connect element X to mobile devices via USB port
Use Apple Lightening to USB Camera Kits to connect element X with iOS devices.
element X can be connected to an Android device with Micro USB or Type-C USB port
via the OTG cable,but it's not guaranteed to be compatible with all Android devices.
5. Settings
Repeat pressing the 'Menu' key to enter into configuration menu, then
press the knob to enter configuration items.
As shown:
Push knob enter settings
Settings
There are 15 items in the configuration menu as follow:
5.1 Lineout Mode
Lineout mode can be set as,
0dB Fixed: 0dB gain , fixed
0dB ADJ: 0dB gain,attenuation adjustable (Default)
10dB ADJ: +10dB gain,attenuation adjustable
1
Lineout Mode
10dB ADJ
13
Connect to power amplifier including volume control, recommend to set as
'0dB Fixed'
Connect to active speakers, recommend to set as '0dB ADJ'
Connect to active speakers which has lower volume gain, recommend to set
as '+10dB ADJ'
Line output max volum e
Press button to confirm "〇"
Page 17

Users Manual
In order to avoid misoperation, switching from
0dB ADJ or 10dB ADJ to 0dB Fixed requires a
2-step confirmation, press "〇" button to
confirm, other operations will cancel this
setting.
(Tested at 1kHz)
4
Headphone Gain
Settings
High
5.2 PCM Filters
7 Configurable digital filters with different frequency
response curves, to set filters for different timbre
MOD1 fast roll-off, minimum phase filter (Default)
MOD2 slow roll-off, minimum phase filter
MOD3 fast roll-off, linear phase filter
MOD4 slow roll-off, linear phase filter
MOD5 brickwall filter
MOD6 hybrid, fast roll-off, minimum phase filter
MOD7 Apodizing, fast roll-off, linear phase filter
2
PCM Filter
The frequency response curve of 7 different filters are
as follow:
MOD 1
5.3 DSD Filters
Set the cut-off frequency of DSD digital filter
47kHz (Default), 50kHz, 60kHz, 70kHz, AUTO
3
DSD Filter
Suggestion:
DSD64 - 47k, DSD128 - 50k, and so on. When this
option sets to AUTO, the DSD filter will be selected
automatically.
47kHz
5.4 Headphone Gain
Set headphone amplifier gain
Low (Default)
High
Suggestion:
'Low' for low-impedence and low-power headphones.
'High' for high-impedence and high-power headphones.
5.5 Dither
Configure to turn ON/OFF the dither function, it can
effectively reduce the quantizing distortion.
ON (Default)
OFF
5
Dither
ON
5.6 Jitter Eliminator
Set the internal time-base jitter elimination circuit for
turn ON or OFF.
ON (Default)
OFF
6
Jitter Eliminator
ON
14
Page 18
Settings
Users Manual
5.7 DPLL Bandwidth
Set the DPLL Bandwidth
Low: Low bandwidth High: High bandwidth
Normal: Standard bandwidth (Default)
7
DPLL Bandwidth
It's recommended to set the DPLL bandwidth to
default, but when the quality of digital signal which
output from front-end device is poor and the element
X can not lock the signal stablely, please select high
bandwidth, The sound quality may be reduced in high
bandwidth mode.
Normal
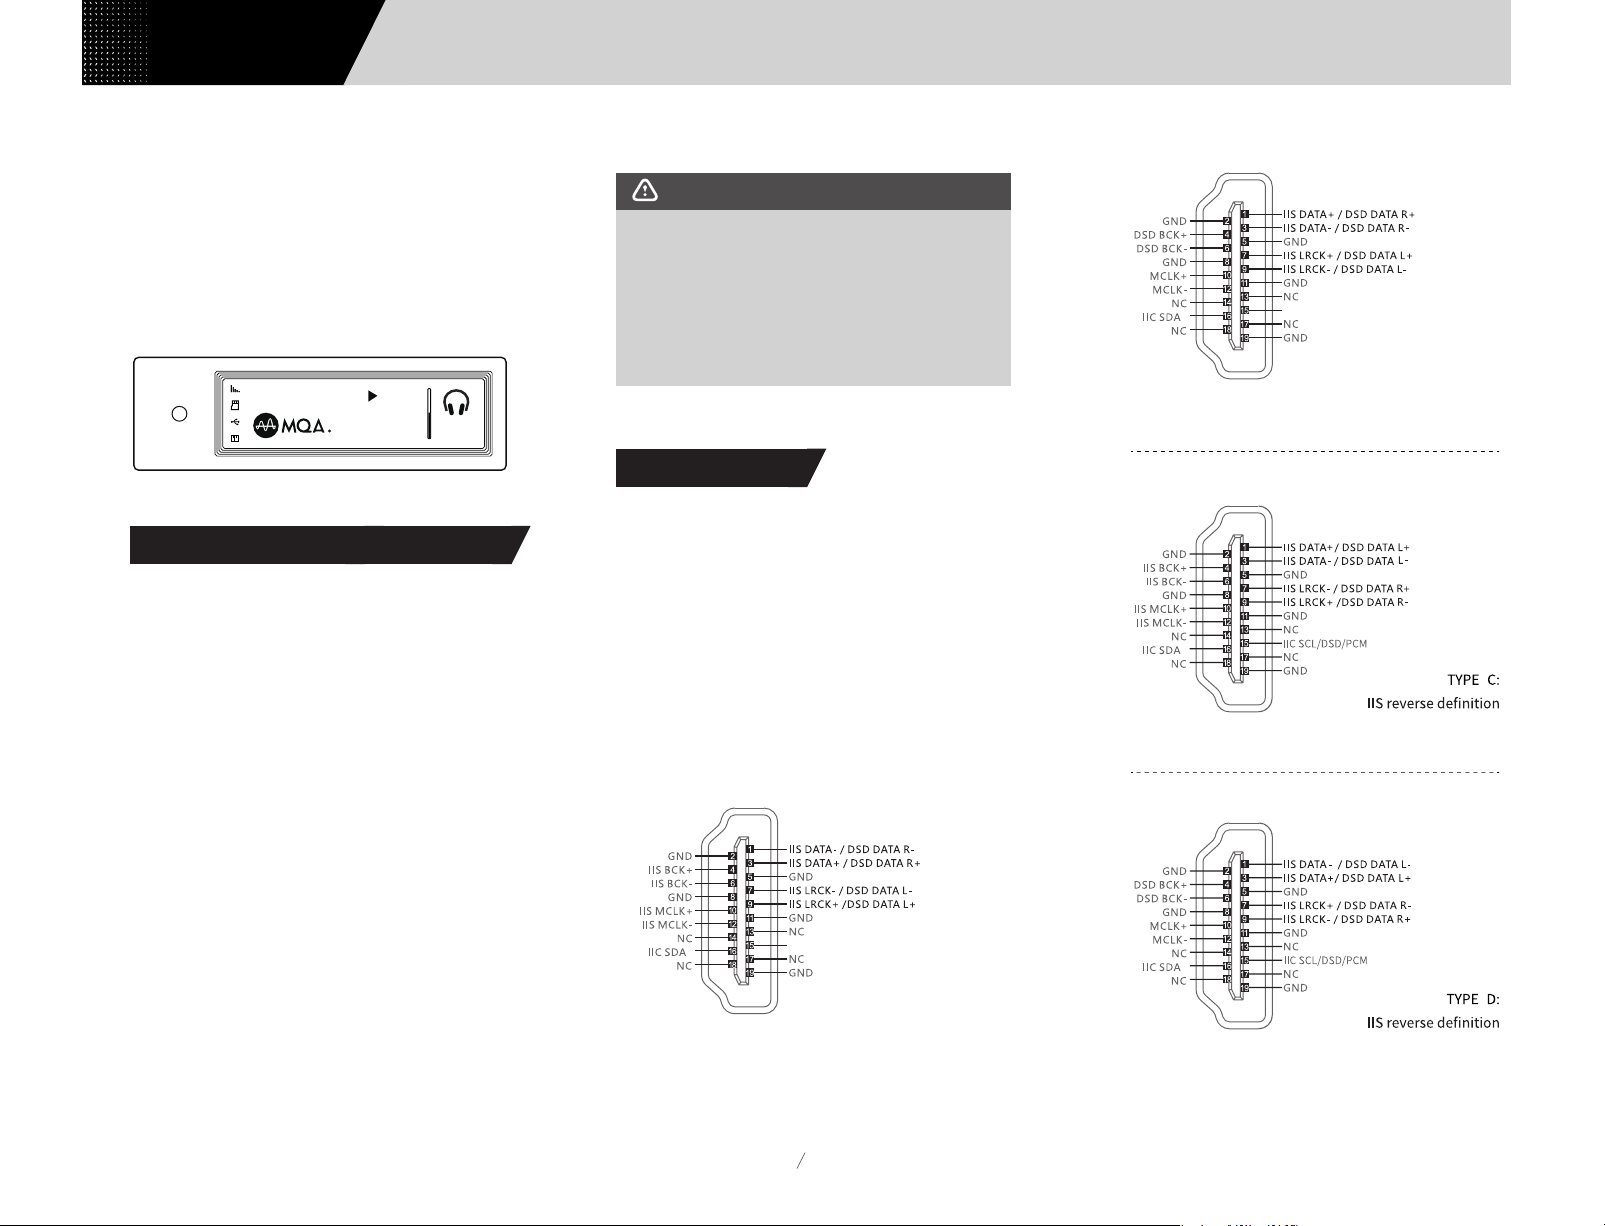
5.8 IIS-LVDS Port Definition
5.9 Dimmer
In order to avoid the interference from the LED
indicator and the screen, element X can enter dimmer
mode after no operation for 2 minutes, when this
option is turned on. At dimmer mode, the LED
indicator will reduce brightness and the screen will
turn off. The screen can be activated by operating on
the remote control or on the unit body. Turn off this
option to prevent element X enter dimmer mode.
ON
OFF (Default)
9
Dimmer
ON
5.10 Auto Sleep
5.11 User defined button settings
Set the function of '〇' button on the front panel
There are 4 actions available:
INPUT: Set 'Input Channel Select' as a shortcut, switch to
next input channel by every pressing
OUTPUT: Set 'Output Channel Select' as a shortcut,
switch to next output channel by every pressing (Default)
FILTER: Set 'Filter Select' as a shortcut, switch to next
filter by every pressing
INFO: Set 'Product Info' as a shortcut to display hardware
and software information of the unit
11
"O"Button Func
OUTPUT
5.12 Network Type
There are 4 kinds of IIS LVDS port definition provided,
for detailed definition diagram, please refer to section
6.4 (page 17).
TYPE A (Default) TYPE B TYPE C TYPE D
IIS-LVDS Port
8
Please select 'TYPE A' when collocated with Matrix
Audio products.
TYPE A
When there is no input signal from the selected
channel and no operation for more than 5 minutes,
element X will enter Sleep mode. element X will not
enter 'Auto Sleep' mode when 'Auto Sleep' function is
off.
ON
OFF (Default)
10
Auto Sleep
15
ON
Select network access method for element X, when
you select the option LAN, Wi-Fi is disabled and vice
versa if you select Wi-Fi, ethernet is disabled.
LAN: Wired network
Wi-Fi: Wireless network (Default)
12
N etwor k Typ e
Wi-Fi
Page 19

Users Manual
Appendix
5.13 Remote Control
If there are more than 1 Matrix device in the same
place, in order to prevent one remote control from
controlling multiple device at the same time, element
X has 5 built-in sets of remote control address codes,
which can be switched under this option to achieve
'one-to-one' control between the remote control and
the host.
13
Remote Control
Press the knob to enter the remote control settings as
shown below, at this time, you will see the current
remote control address code on the screen, press the
button on the remote control and the screen will
display the corresponding name. Hold the Standby
and Filter buttons on the remote control for 5 seconds
at the same time, the screen will display a new address
code, press the 2 buttons again within 5 seconds to
switch to the next address code, repeat the operations
above to select the address code, press ' ' or '〇' to
return to the menu page.
ADD: 1
Key: Filter
Enter
Set
5.14 Load Default
Press the knob in this option, all the settings will return
to default.
14
Load Default
Enter
5.15 Product information
Push the knob under this option, the hardware and
software information will shown on the screen.
15
Product info
Enter
6. Appendix
6.1
Audio file formats and sampling rate supported
MA player supports the following audio file formats:
MP3, WMA, WAV, AIF, AIFC, AIFF, AAC, FLAC, OGG, APE,
ALAC, M4A, DSF, DFF
PCM sampling rate support up to:
PCM
16/24/32Bit_44.1kHz, 48kHz, 88.2kHz, 96kHz,
176.4kHz, 192kHz, 352.8kHz, 384kHz, 705.6kHz,
768kHz
DSD sampling rate support up to:
DSD 2.8 MHz, 5.6 MHz, 11.2 MHz, 22.4MHz
More audio file formats could be supported through
future firmware updates.
6.2 About MQA (Master Quality Authenticated)
MQA is an award-winning British technology that
delivers the sound of the original master recording.
The master MQA file is fully authenticated and is
small enough to stream or download.
'MQA' or ' MQA.' indicates that the product is
decoding and playing an MQA stream or file, and
denotes provenance to ensure that the sound is
identical to that of the source material.
'MQA.' indicates it is playing an MQA Studio file, which
16
Page 20
Appendix
Users Manual
has either been approved in the studio by the
artist/producer or has been verified by the copyright
owner. The MA player delivers the final unfold of the
MQA file and displays the original sample rate of the
file. The sampling rate for MQA encoded playback
covers 44.1k-384kHz.
MA player
BAL
352.8
k
6.3 USB storage device requirements
- element X can use devices that comply with the USB
mass storage standard, but cannot guarantee
compatibility with all storage devices or memory
cards.
- USB storage devices support FAT, FAT32, exFAT, NTFS
formats.
- If the USB storage device is partitioned, each
partition will be treated as a separated device.
CAUTION:
Matrix Audio is not responsible for data loss,
modification, or failure to the USB storage
devices. We strongly recommend you back
up the data in the USB storage device before
using it on element X.
6.4 IIS-LVDS Port
The IIS port of element X is a standard 19-pin HDMI
connector. It uses four sets of LVDS differential signals
to transmit IIS data. It supports up to 32Bit/768kHz
PCM signal input and 1Bit/45.1MHz DSD signal input.
The PCM format is the standard IIS format, the DSD
format supports the original DSD format (Native DSD)
and the DSD format of DoP encoding.
The IIS port of element X is compatible with TYPE A
and TYPE B. These are 2 different interface definitions,
which can be configured in the 8th setting option.
The port definition as shown bellow:
IIC SCL/DSD/PCM
TYPE_B:
IIS reverse definition
- When using extension cable to connect a USB storage
device may result in unstable connection.
- When using a USB hub to connect the USB storage
device to element X, it may not work properly.
- The USB port of element X cannot supply more than
500 mA to the peripherals.
- If USB storage device comes with a power adapter,
please connect power adapter to the storage device.
IIC SCL/DSD/PCM
TYPE_A:
IIS standard definition
17
Page 21

Users Manual
6.5 Technical Specifications
Appendix
Digital Input
COAXIAL & OPTICAL:
PCM_16-24Bit/44.1kHz, 48kHz, 88.2kHz, 96kHz,
176.4kHz, 192kHz
DSD DSD64(DoP)
IIS-LVDS:
PCM 16-32Bit /44.1kHz, 48kHz, 88.2kHz, 96kHz
176.4kHz, 192kHz, 352.8kHz, 384kHz,
705.6kHz, 768kHz
DSD DSD64/128/256/(DoP)
DSD DSD64/128/256/512/1024(Native)
USB Audio:
PCM 16-24Bit /44.1kHz, 48kHz, 88.2kHz, 96kHz,
176.4kHz, 192kHz, 352.8kHz, 384kHz,
705.6kHz, 768kHz
DSD DSD64/128/256(DoP)
DSD DSD64/128/256/512(Native)
Line Output
XLR
XLR Pin Definition:
1 2
3
SNR: > -131dB
THD+N: < 0.00012%@1k, < 0.00025%@20Hz-20kHz
Frequency Response: 20Hz-20kHz ±0.05 -3dB@120kHz
Crosstalk: > -145dB
Amplitude: 4.5VRMS@0dB, 15.8VRMS@+10dB
1: GND
2: +
3: -
RCA
SNR: > -124dB
THD+N: < 0.00012%@1k, < 0.00025%@20Hz-20kHz
Frequency Response: 20Hz-20kHz ±0.05 -3dB@105kHz
Channel Crosstalk: > -137dB
Amplitude: 2.3VRMS@0dB, 8VRMS@+10dB
Headphone Output
XLR4 and Dual XLR3
XLR4 Pin Definition:
4
Dual XLR3 Pin Definition:
SNR: > -117dB
THD+N: < 0.00055%@20Hz-20kHz 1VRMS
Frequency Response: 20Hz-20kHz ±0.05 -3dB@50kHz
Output Impedance: < 1.5Ω
Output Power:1700mw@33Ω,1180mw@300Ω,
650mw@600Ω (1%THD)
Gain: +18dB@Low Gain,+28dB@High Gain
1
3
2
3
1: L+
2: L3: R+
4: R-
12
1: GND
2: +
3: -
18
Page 22

Appendix
Users Manual
TRS 6.35mm Definition:
SNR: > -112dB
THD+N: < 0.00055%@20Hz-20kHz 1VRMS
Frequency Response: 20Hz-20kHz ±0.1 -3dB@50kHz
Output Impedance: < 1.5Ω
Output Power: 1150mW@33Ω, 308mW@300Ω,
152mW@600Ω(1%THD)
Gain: +12dB@Low Gain,+22dB@High Gain
Network
LAN:10BASE-T/100BASE-TX
WLAN: 2.4GHz/5GHz, IEEE 802.11 a/b/g/n/ac standard
USB Host
Dimension
340×281×60mm(L×W×H, including the protruding part)
340mm
50mm
281mm
60mm
238mm
Precautions
- This product is for indoor use only.
- For full ventilation, it is recommended to reserve a
space of larger than 5 cm around the device.
- Do not cover the air vents with stuffs such as papers,
tablecloths, and curtains to obstruct ventilation.
- Do not place stuffs with flame, such as lighted candles,
on the device.- If the device is used in tropical areas,
please be careful to prevent insects from entering the
machine through the air vents.
- The device must not be subject to water droplets or
splashes. Please do not place stuffs filled with liquids
such as vases and cups on or near the device.
- Do not put stuffs around the device power plug and the
AC power socket, in order to disconnect the power
supply easily when needed.
USB 2.0 High-Speed
Each port provides a maximum of 500mA current
Power Supply
Power Voltage:
230V position is fit for AC220V-240V 50/60Hz
115V position is fit for AC100V-120V 50/60Hz
Standby Power Consumption:< 6W
Sleep Power Consumption:< 10W
Max Power Consumption:< 40W
128mm
Weight
4.2kg
19
For improvement purpose, specifications subject to
changes without prior notice.
The product with Hi-Res Audio logo is conformed to
High-Resolution Audio standard defined by Japan Audio
Society. This logo is used under license from Japan
Audio Society.
The MQA logo is a trade mark of MQA Limited. © MQA
Limited 2020.
Being Roon Ready means that Matrix network players
transparently discover and connect to Roon without any
configuration, and bit-perfect audio is delivered from
Roon to your network player.
202006 B51501 .1
 Loading...