

Page 1
MX17_XR-XER-XIR_r1_3_D.indd 1 5/8/17 11:09 AM
Page 2
58 59
ENGLISH
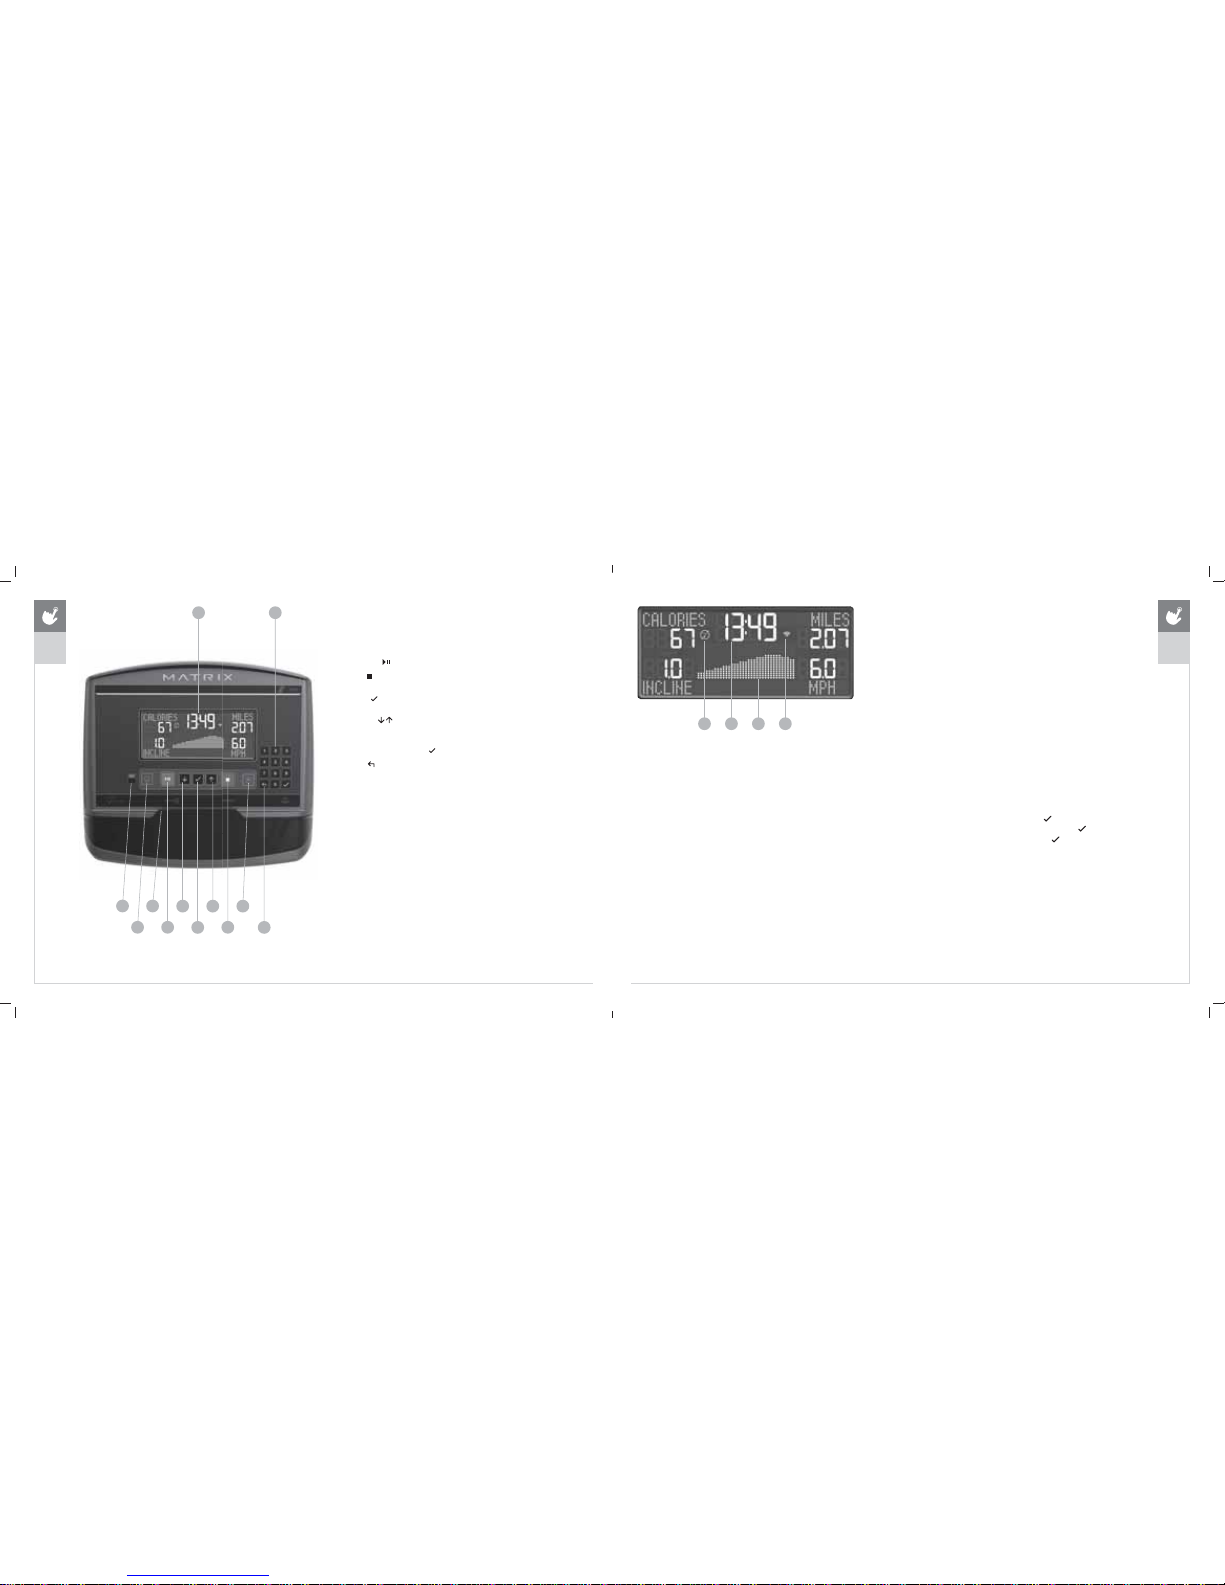
;5&2162/('(6&5,37,21
Note: There is a thin protective sheet of clear plastic on the overlay
of the console that should be removed before use.
A) /&'',63/$<:,1'2:Displays workout feedback, program profile and more.
B) *23$86(
: Press to start, pause or resume your workout.
C) 6723
: Press to stop your workout. Press and
hold for 3 seconds to reset console.
D) ENTER
: Confirm each program setting. Press to change
display feedback during workout. Press and hold to scan.
E) $552:6
: used to adjust program settings.
F) 180%(5.(<3$' Used to enter xID login, to enter program
data during program setup and to adjust speed / resistance
level during workout. Press
to confirm setting.
G) BACK
: Go to previous program setting.
H) :,),&211(&76<1& Press to connect your wireless internet
connection. See BEFORE YOU BEGIN section for more info.
I) 3$663257&211(&76<1& Press to connect your Passport
box for Virtual Active programming. Passport Player is sold
at your Retailer or at www.passportplayer.com
J) ENERGY SAVER LIGHT: Indicates if machine is in energy
saver mode. Press any key to wake up the machine.
K) READING RACK: Holds reading material or electronic device.
A
B
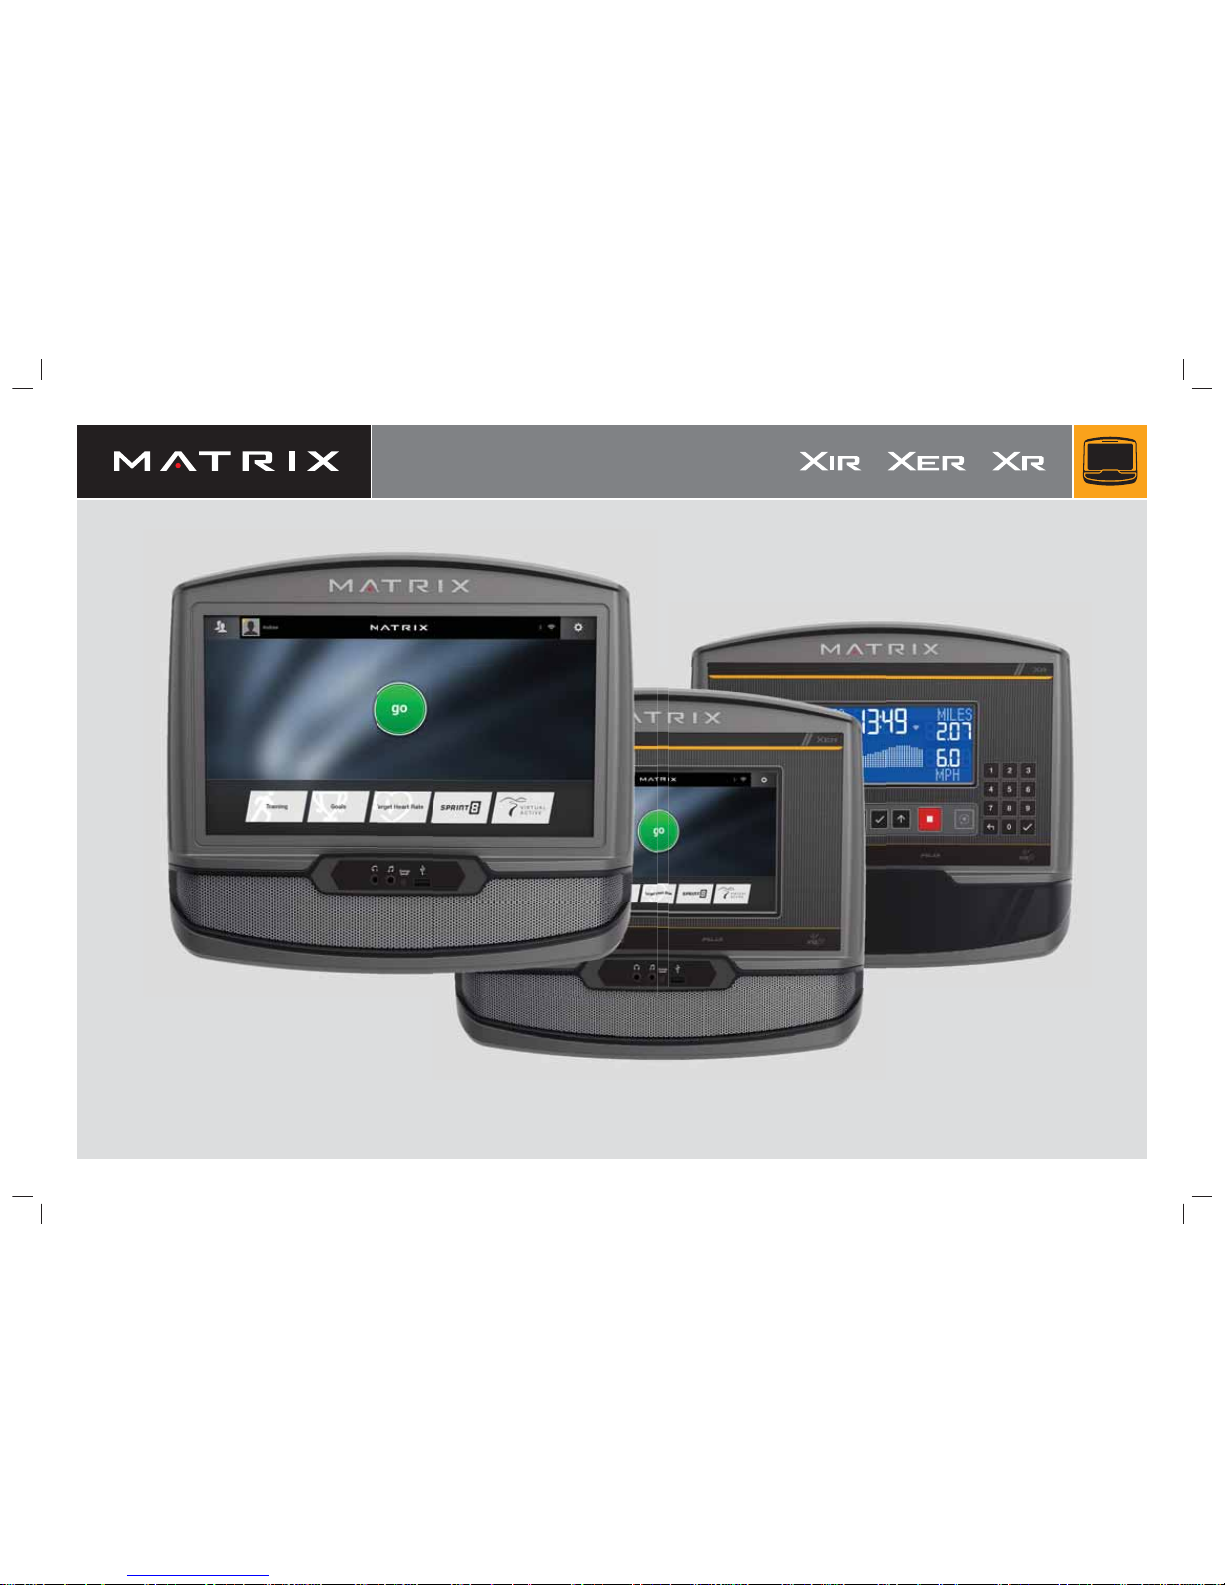
XR
C
D
EE
K
F
G
I
J
H
;5',63/$<'(6&5,37,21
A) TIME: Is always shown in the larger central portion of the display. Shown as minutes
: seconds. View the time remaining or the time elapsed in your workout.
B) INCLINE: Shown as percent. Indicates the incline of your walking
or running surface (Treadmills and Ascents only).
C) DISTANCE: Shown as Miles or Kilometers* based on your default setting.
Indicates distance traveled or distance remaining during your workout.
D) 63((': Shown as MPH or KPH* based on your default setting.
Indicates how fast the footpads/pedals are moving.
E) &$/25,(6: Total calories burned or calories remaining to burn during your workout.
F) HEART RATE: Shown as BPM (beats per minute). Used to monitor your heart rate (when
wearing a wireless heart rate strap or when contact is made with both pulse grips).
G) RESISTANCE(RES): Shows the current resistance level (Bikes, Ellipticals, Ascents only).
H) 530: Revolutions Per Minute (Bikes, Ellipticals, Ascents only).
I) :$776: Displays current user power output (Bikes, Ellipticals, Ascents only).
J) 3$&(: Indicates how many minutes it takes to complete a mile
based on your current speed (Treadmills only).
K) 352*5$0352),/(: The dot matrix will show the program profile
as you progress through wour workout. Profile represents incline,
resistance or speed (depending on model type and workout type).
L) 3$663257: Indicates Passport box connection is present.
M) :,),: Indicates wireless connection is present and the strength
(low, medium, high). Flashes when Wi-Fi is trying to connect.
* Default is set during console install. If logged in with xID, the default is set by user profile.
AL MK
%()25(<28%(*,1
,1,7,$/6( 783
When you power on the console for the first time
you will be prompted to perform initial setup.
Plug in the power cord and turn the equipment ON (Note:
Some equipment does not have a power switch). TREADMILLS
ONLY: Insert the safety key into the safety keyhole.
1) Select your language and touch
to confirm.
2) Select your frame model number and touch
to confirm.
3) Select metric / standard and touch
to confirm.
XR
ENGLISH
MX17_XR-XER-XIR_r1_3_D.indd 58-59 5/8/17 11:09 AM
Page 3
60 61
XR
ENGLISH
GETTING STARTED
1) Check to make sure no objects are nearby that will
hinder the movement of the equipment.
2) Plug in the power cord and turn the equipment ON (Note:
Some equipment does not have a power switch).
75($'0,//621/<
3) Stand on the side rails of the treadmill.
4) Attach the safety key clip to part of your clothing making sure
that it is secure and will not become detached during operation.
5) Insert the safety key into the safety keyhole.
$//02'(/6
6) Select User 1-4 that you linked your xID to in your user profile.
7) If prompted, enter your Passcode using the keypad then press
.
8) You are now logged into your xID.
$48,&.67$5783
Simply press to begin working out.
Time, distance, and calories will all count up from zero. OR...
%6(/(&7$352*5$0
1) Select a PROGRAM using and press .
2) Set workout program information using
and press
after each selection. Press
to go back a step in the setup.
3) Press
to begin workout.
),1,6+,1*<285:25.287
When your workout is complete, the display will flash “WORKOUT
COMPLETE” and beep. Your workout information will stay
displayed on the console for 30 seconds and then reset.
725(6(77+(&2162/(
Hold for 3 seconds.
%()25(<28%(*,1
6(783;,'$&&2817)259,(:) ,7&211(&7,9 ,7<
Connect to VIEWFIT and discover a powerful new way to get more
results from your workouts, your tracking and your social networking.
Up to four users can be saved on a machine. This process is the
first step in connecting your equipment. It must be done from a
computer, tablet, or mobile device that is connected to the internet.
1) Visit the web site: www.viewfit.eu to create an account
and connect your console to home wireless network.
2) Click on Connect Your Equipment.
3) Sign In if you already have an xID account or Create
an Account by entering in your information.
4) Continue to follow the online instructions to complete the process
of connecting your console to your home wireless network.
5) Manage the console user accounts from your
Account Profile at www.viewfit.eu
Congratulations! You are now connected and ready to get started.
3$6632570(',$3/$<(5
The Passport player, featuring Virtual Active™ technology, is a highdefinition experience that uses real destination footage and matching
ambient sounds from stunning destinations around the world. The
ultimate in workout entertainment, Passport lets you escape the confines
of a regular workout routine while enjoying a dynamic experience.
A Passport player is available for purchase separately from your Matrix
Retailer. Additional courses are available from your Matrix Retailer.
For more information, go to: www.passportplayer.com
6<1&,1*&2162/(:,7+3$6 63257
1) Use the arrow keys on the Passport remote to scroll to the setup icon
and press select.
2) Follow the on-screen prompts to press
on the equipment console.
3) The
icon (L) will flash while connecting and remain steady once it
has synced successfully.
NOTE: See PASSPORT OWNER’S MANUAL for more information.
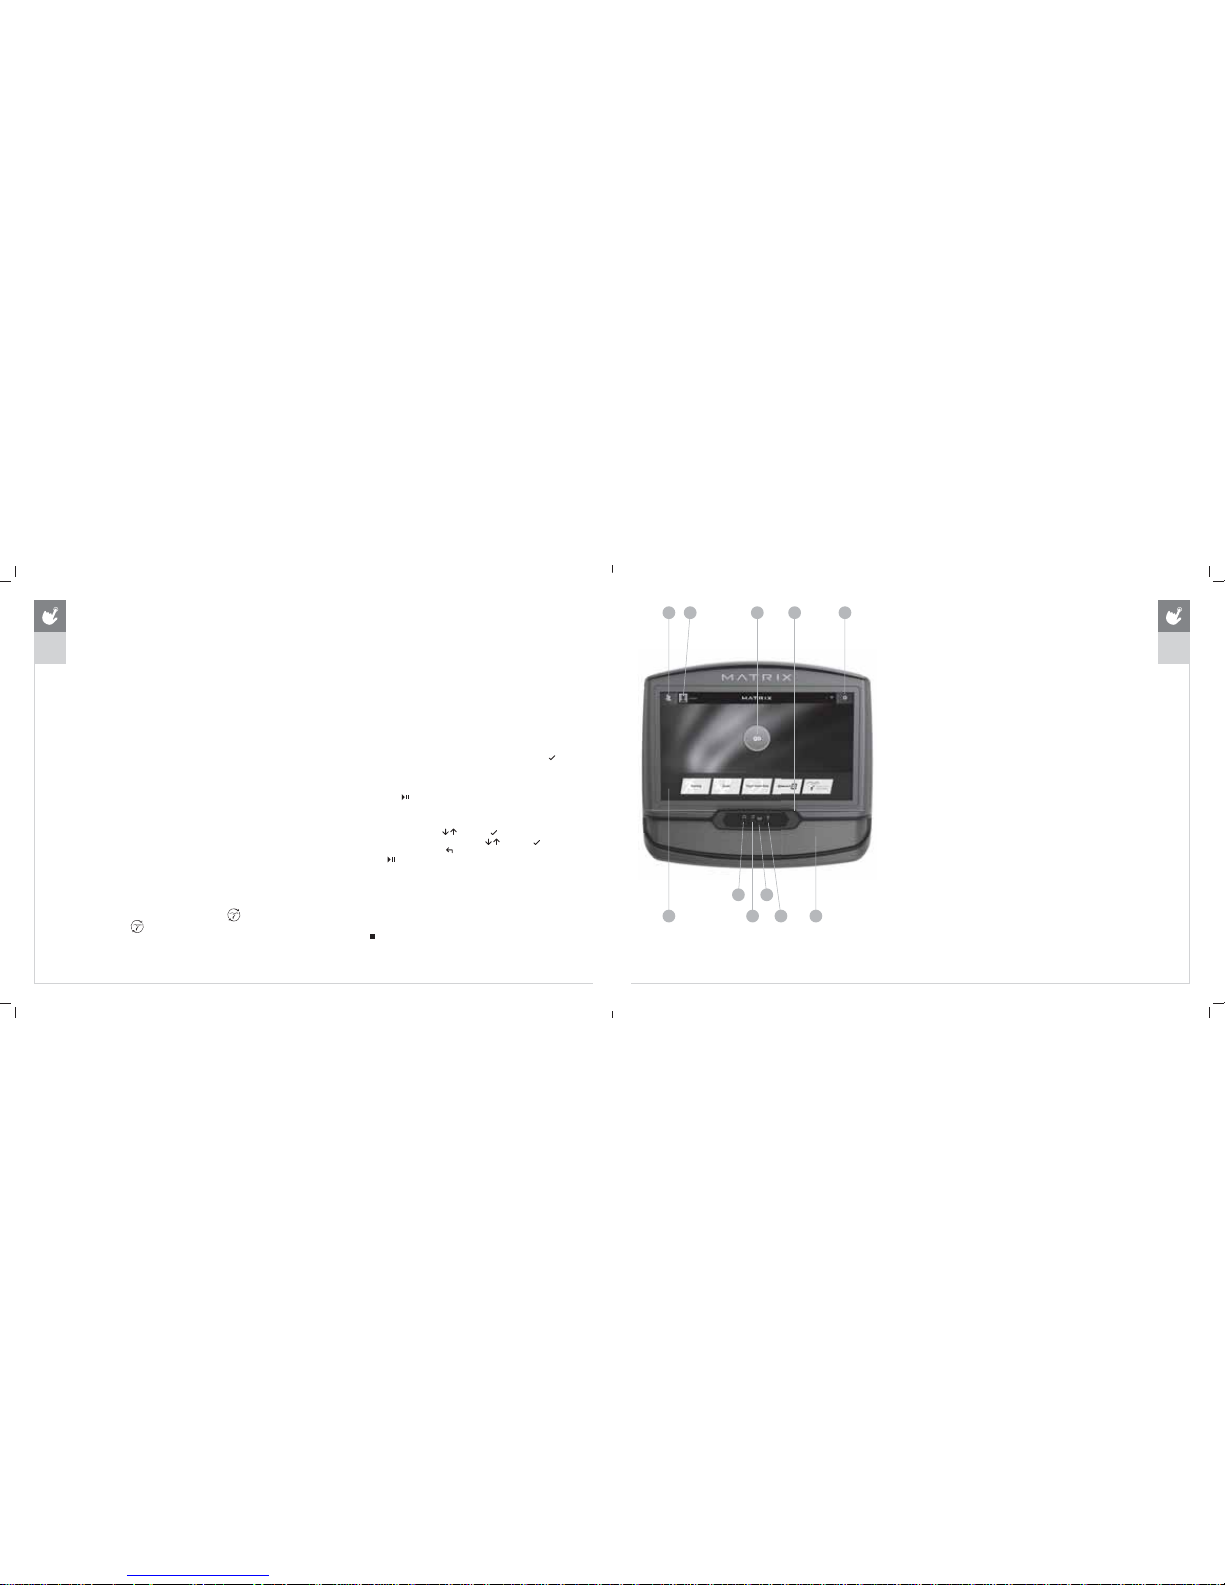
;(5; ,5&2162/('(6&5,37,21
Note: There is a thin protective sheet of clear plastic on the overlay of the console that should
be removed before use.
The XER and XIR has a fully integrated touch screen display. All information required for
workouts is explained on screen. Exploration of the interface is highly encouraged.
A) *2Press to begin a quick start program.
B) 352*5$0%877216 Press to select from a number of preset programs.
C) USER MENU: Select an existing User, Guest or Add User.
D) 86(56(783Allows you to edit User Information.
E) SETTINGS MENU: Access to Volume Controls, Bluetooth Pairing, Wi-Fi Setup, Sync
Passport, Machine defaults and more.
F) +($'3+21(-$&. Plug your headphones into the console to use them instead of
the console speakers.
G) $8',2,1 Plug your media player into the console using the included audio
adaptor cable.
H) ENERGY SAVER LIGHT: Indicates if machine is in energy saver mode. Press any key
to wake up the machine.
I) 86%3257 Access media from compatible devices, charging devices* and for
software updates.
J) 63($.(56Audio plays through the speakers.
K) READING RACK: Holds reading material or electronic device.
* Will not charge USB devices that draw more than 1 amp.
A
B
C D E
FGH
I J
K
;,56+2:1
XER
XIR
ENGLISH
MX17_XR-XER-XIR_r1_3_D.indd 60-61 5/8/17 11:09 AM
Page 4
62 63
XER
XIR
ENGLISH
GETTING STARTED
1) Touch *2 to begin working out immediately. Or...
2) Touch the :25.287&$7(*25< button of your choice.
75($'0,//621/<
3) Stand on the side rails of the treadmill.
4) Attach the safety key clip to part of your clothing making sure that
it is secure and will not become detached during operation.
5) Insert the safety key into the safety keyhole.
%()25(<28%(*,1
,1,7,$/6(783
When you power on the console for the first time you
will be prompted to perform initial setup.
1) Select your language and touch
to confirm.
&211(&7:,),
2) Choose from the available wireless networks detected and shown on
screen. If you do not see your network, you can add it manually via the
OTHER option. If you do not want to set up Wi-Fi at this time, touch
.
3) Use the keyboard to enter your Wi-Fi network password. Touch
to confirm.
4) Wi-Fi connection status and signal strength will be indicated by
the
symbol in the upper right corner of the display.
02'(/6(783
5) Select your frame model number and touch
to confirm.
'$7($1'7,0(6(783
6) If the console has been connected to Wi-Fi, it will detect your
location and fill in time and date info automatically.
7) Change any time and date settings as desired and touch
to confirm.
6(783;,'$&&2817)259,(:) ,7&211(&7,9 ,7<
Creating an xID account will allow you to save and share workout data online at
www.viewfit.eu
Create and save up to four xID accounts directly from the console.
1) If you already have an xID, touch Log In. To continue
without creating an xID touch Skip xID.
2) Enter your phone number or another easy-to-remember 10-14
digit number. This will be your xID. Touch
to confirm.
3) Create an easy to remember 4-digit passcode. Touch
to confirm.
4) Enter your email address. This must be a unique email address. Touch
to confirm.
5) Fill in your profile information to finish the xID account
set up process. Touch
to confirm.
6) Confirm your information and select the I accept the terms and conditions
box to review the Terms and Conditions. Touch
to complete xID setup.
7) Check the Share Information box to share your workouts to the VIEWFIT community.
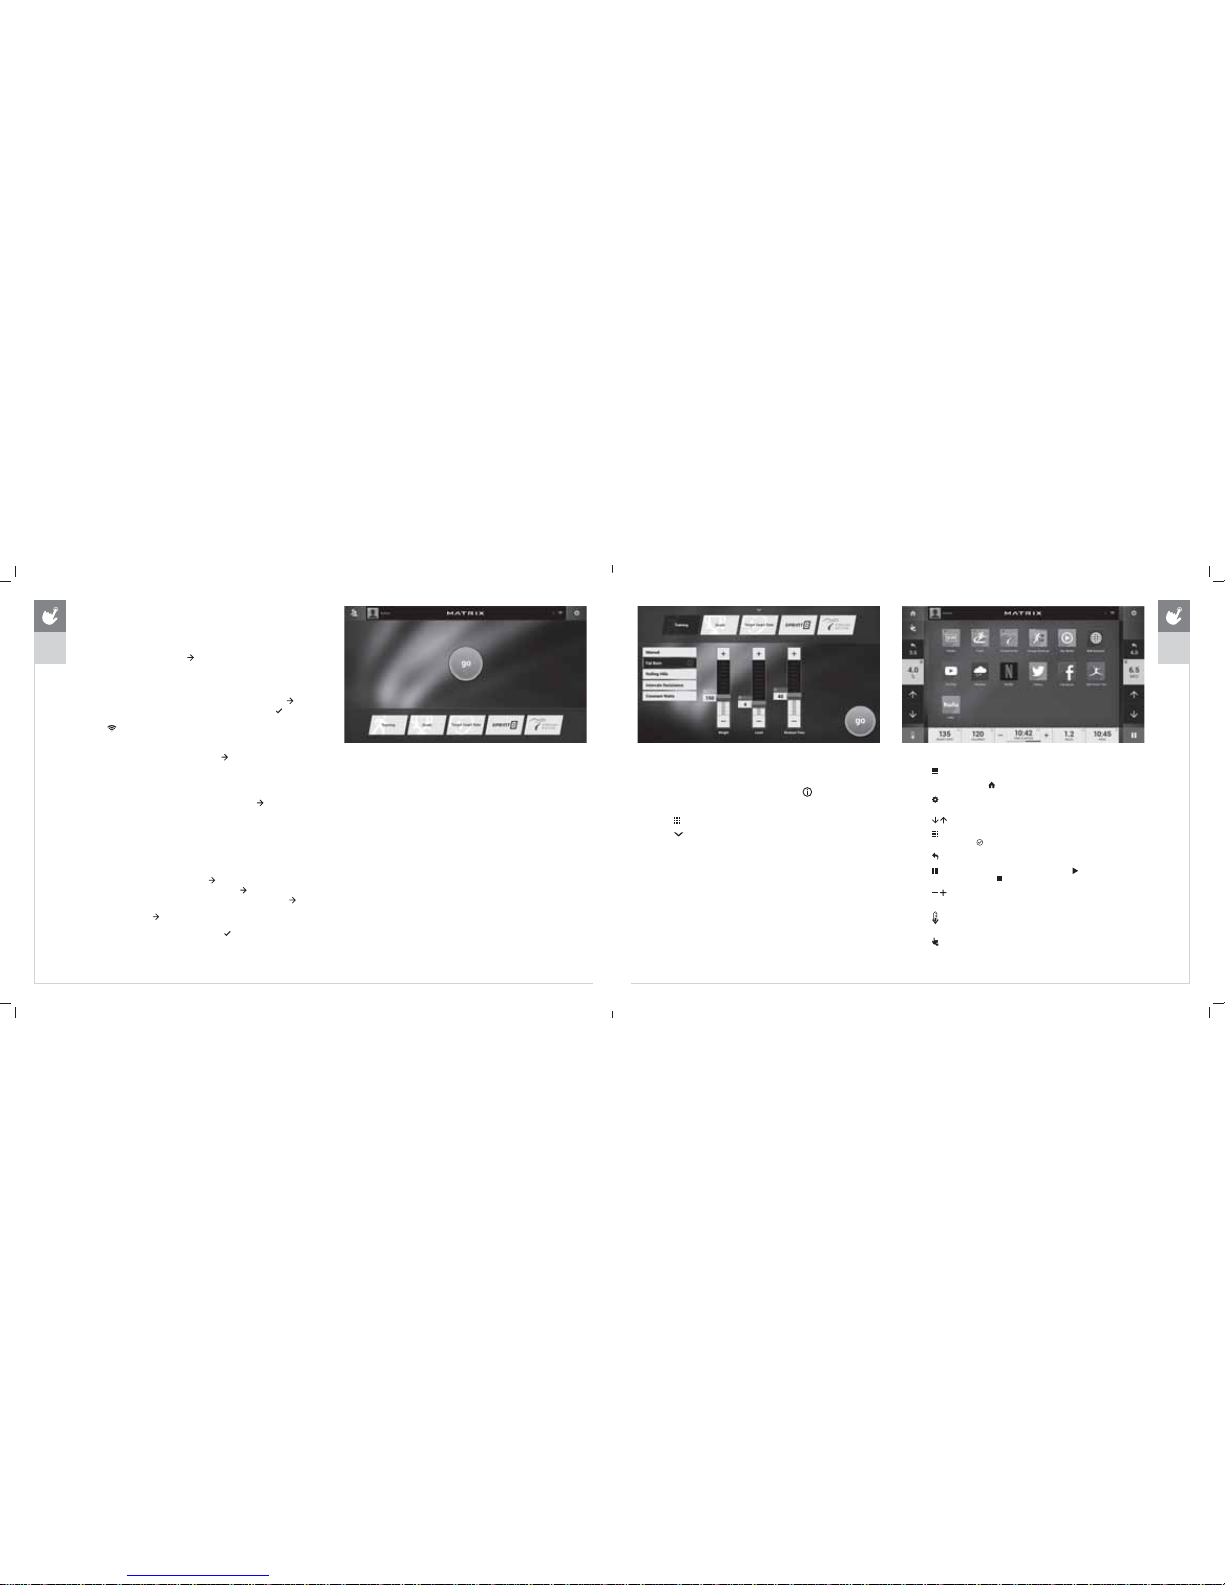
+20(6&5((1
• Touch to change :25.287)(('%$&. displays at the bottom of the screen.
• While using an app, touch
to go back to the home screen.
• Touch
to adjust 92/80(, pair a %/8(7227+ device or to
change $8',26285&( (Netflix, My Media, Virtual Active, etc.).
• Touch
to increase or decrease the resistance level, speed or incline.
• Touch
to use the keypad to set resistance level,
speed or incline. Press
to confirm change.
• Touch
to change resistance level, speed or incline back to previous setting.
• Touch
to temporarily pause your workout and touch to
resume. While paused, touch
to end workout.
• Touch
to increase or decrease the duration
of your workout or workout goal.
• Touch
to enter cool down mode. Cool down lasts for five minutes while
reducing the workout intensity, allowing your body to recover from your workout.
• Touch
to lock the screen. Touch it again to unlock
the screen and allow screen touches.
352*5$06(783
3) After selecting a :25.287&$7(*25< button, select
one of the 352*5$06 listed to the left.
• For more information on a selected program, touch
.
• Use the 6/,'(5&21752/6 to adjust your program settings.
• Touch to open a keypad to enter numbers.
• Touch
to return to the *26&5((1.
4) Touch *2 to begin your workout.
),1,6+,1*<285:25.287
When your workout is complete, your workout information will continue to display
on the console for 2 minutes and then is automatically saved to VIEWFIT if xID Terms
and Conditions were accepted and you are logged in.
XER
XIR
ENGLISH
MX17_XR-XER-XIR_r1_3_D.indd 62-63 5/8/17 11:09 AM
Page 5

64 65
XER
XIR
ENGLISH
$336$1'(17(57$,10(17
:(%%52:6(5;,521/<
Access the world wide web while you work out.
:($7+(5
Get local or worldwide weather forecasts and more.
<2878%(
Browse and watch YouTube videos while you work out.
)$&(%22.
Access Facebook while you work out. Facebook account required.
7:,77(5
Access Twitter while you work out. Twitter account required.
NETFLIX
Browse and watch Netflix videos while you work out.
Netflix account required to access content.
HULU
Browse and watch Hulu videos while you work out.
Hulu account required to access content.
0<),71(663$/
Lose weight with MyFitnessPal, the fastest and easiest to use nutrition app.
6,03/(
Workout stats are displayed in 3 customizable windows.
TRACK
Displays a 400
M (1/4 MILE) track. Split feature allows you to
keep track of your fastest laps and improve your time.
VIRTUAL ACTIVE
Your workout info is displayed and Virtual Active courses are
shown. With Virtual Active, escape the confines of an ordinary
workout as you travel through exotic destinations.
TARGET HEART RATE
Displays workout info while using a Target Heart Rate program.
&2167$17:$776
Displays workout info while using a Constant Watts program.
635,17
Displays workout info while using a Sprint 8 program.
&+$1*(:25.287
Select a different workout without stopping your current workout.
0<0(',$;,521/<
Connect and control audio and video files on-screen via USB port or Bluetooth.
* Availability of apps are subject to change. Some apps are not available in all areas.
Additional apps may become available. Workouts and features vary based on
model type, console configurations, software versions and options purchased.
%/8(7227+;(5$1';,521/<
The XIR console can connect via Bluetooth to one device per category:
• Media Players (XIR only, includes Phones, Tablet and MP3 players)
• Speakers / Headphones
• Heart Rate Monitors
72&211(&7<285&203$7,%/('(9,&(
1) %/8(7227+3$,5,1* can be accessed from the SETTINGS MENU .
2) Enable Bluetooth on your device and make sure it is discoverable.
3) Touch the appropriate category from the list. The Bluetooth
device should appear to the right after a few seconds.
4) Touch the device name and follow the onscreen prompts to pair
the device. Once paired, the Bluetooth icon
will be highlighted
and appear in the top right corner of the menu bar.
5) Connected Phone/Tablet/MP3 players can stream audio in the 0<0(',$$33.
86%$8',29,'(2;(5$1';,521/<
The XIR console can stream media in the 0<0(',$$33 via USB. Supported devices
include USB flash drives, Windows phones/tablets, and Android phones/tablets.
The media types supported are:
Audio
• AAC (.3GP, .MP4, .M4A, .AAC)
• MP3 (.MP3)
• Wave (.WAV)
Video
• H.263 (.3GP, .MP4)
• H.264 (.MP4, .MOV)
723/$<0(',$'85,1*<285:25.287
1) Unlock and connect your device to the USB port located beneath the display.
2) Open the 0<0(',$$33 and select the USB device name from the Media Source list.
3) Select the Audio or Video tab at the top to access your files and play your media.
3$6632570(',$3/$<(5
The Passport player, featuring Virtual Active™ technology, is a highdefinition experience that uses real destination footage and matching
ambient sounds from stunning destinations around the world. The
ultimate in workout entertainment, Passport lets you escape the confines
of a regular workout routine while enjoying a dynamic experience.
A Passport player is available for purchase separately from your Matrix
Retailer. Additional courses are available from your Matrix Retailer.
For more information, go to: www.passportplayer.com
6<1&,1*&2162/(:,7+3$663257
1) Use the arrow keys on the Passport remote to
scroll to the setup icon and press select.
2) Follow the on-screen prompts and when prompted,
return to the console and open the SETTINGS
MENU
and touch 3$6632576<1& .
3) When the passport sync is complete, the passport icon
will appear in the top right corner of the menu bar.
NOTE: See PASSPORT OWNER’S MANUAL for more information.
$8',2,1287
You can play audio through the console speakers by connecting a device
to the audio in jack
located beneath the display. Plug your headphones
into the audio out jack
to use them instead of the console speakers.
XER
XIR
* Not all Bluetooth protocols are compatible.
ENGLISH
:,5(/(665(48,5(0(176: 802.11b/g/n in 2.4 GHz range, minimum
speed 3 Mbps (5 Mbps for streaming in High Definition).
MX17_XR-XER-XIR_r1_3_D.indd 64-65 5/8/17 11:09 AM
Page 6

66 67
ENGLISH
$9$,/ $%/( 352*5 $06
02'(/ TREADMILL ASCENT (//,37,&$/ BIKE
&2162/( XR XER XIR XR XER XIR XR XER XIR XR XER XIR
75$,1,1*352*5$06
Manual
Fat Burn (A30, E30, R30, U30)
Rolling Hills
Intervals (Resistance)
Intervals (Incline)
Constant Watts (A50, E50, R50, U50)
Glutes
*2$/6352*5$06
Time
Distance
Calorie
7$5*(7+($575$7(352*5$06
Incline
Speed
Resistance
635,17352*5$0
9,578$/$&7,9(352*5$0
352*5$0'(6&5,37 ,216
75$,1,1*352*5$06
Manual
A workout that allows you to manually adjust the machine at anytime.
Fat Burn
Promotes weight loss by increasing and decreasing the incline, while keeping you in your fat burning zone.
Rolling Hills
A level based workout that automatically adjusts the incline or resistance to simulate going up or down hills.
Intervals (Resistance)
A level based workout that automatically adjusts the resistance at regular intervals.
Intervals (Incline)
A level based workout that will automatically adjust the incline value at regular intervals.
Constant Watts
Automatically adjusts the resistance to maintain the set Watt value.
Glutes
This program was designed to increase your range of motion and target the thighs and glutes. By varying a high incline throughout the workout you can engage significant glute
recruitment.
*2$/6352*5$06
Time
A workout that allows you to select a workout length that fits within your training routine.
Distance
A workout that allows you to select a specific distance you would like to travel during your workout. Increasing the distance goal of the workout will increase the duration of the
workout based on your speed.
Calorie
A workout that allows you to select a specific number of calories you would like to burn during your workout. Increasing the calorie goal of the workout will increase the duration
of the workout based on your speed.
7$5*(7+($575$7(352*5$06+($575$7(675$3,65(&200(1'('
Incline
Automatically adjusts incline to bring you within 5 beats of your set % of maximum heart rate.
Speed
XER/XIR: Automatically adjusts speed to bring you within 5 beats of your set % of maximum heart rate.
XR: Automatically adjusts speed to maintain your target heart rate.
Resistance
XER/XIR: Automatically adjusts resistance to bring you within 5 beats of your set % of maximum heart rate.
XR: Automatically adjusts resistance to maintain your target heart rate.
635,17352*5$0
The SPRINT 8 program is an anaerobic High Intensity Interval Training program designed to build muscle, improve speed, and naturally increase the release of Human Growth Hormone (HGH) in your body.
9,578$/$&7,9(352*5$0
Uses real destination footage from stunning destinations around the world. The ultimate in workout entertainment, Virtual Active lets you escape the confines of a regular workout routine while enjoying a dynamic
experience.
ENGLISH
MX17_XR-XER-XIR_r1_3_D.indd 66-67 5/8/17 11:09 AM
Page 7

68 69
352*5$06 &+$576
FAT BURN - A30, E30, R30, U30
LEVEL 1 2 34 56 7 8 9 1011121314151617181920
SEGMENT RESISTANCE
1 11334455668899101011111314
2 4 4 5 6 6 8 8 9 9 10 10 11 11 13 13 14 14 15 15 19
3 6 8 8 9 9 10 10 11 11 13 13 14 14 15 15 16 16 18 19 20
4 6 8 8 9 9 10 10 11 11 13 13 14 14 15 15 16 16 18 19 20
5 6 8 8 9 9 10 10 11 11 13 13 14 14 15 15 16 16 18 19 20
6 6 8 8 9 9 10 10 11 11 13 13 14 14 15 15 16 16 18 19 20
7 6 8 8 9 9 10 10 11 11 13 13 14 14 15 15 16 16 18 19 20
8 6 8 8 9 9 10 10 11 11 13 13 14 14 15 15 16 16 18 19 20
9 6 8 8 9 9 10 10 11 11 13 13 14 14 15 15 16 16 18 19 20
10 6 8 8 99 101011111313141415151616181920
11 6 8 8 99 101011111313141415151616181920
12 6 8 8 99 101011111313141415151616181920
13 6 8 8 99 101011111313141415151616181920
14 6 8 8 99 101011111313141415151616181920
15 4 4 5 66 8 8 9 91010111113131414151519
16 11334455668899101011111314
Segment = workout time / 16
52//,1*+,//6(58
LEVEL 1 2 34 56 7 8 9 1011121314151617181920
SEGMENT RESISTANCE
1 1114445566771011111213161718
2 1 4 4 4 5 5 5 6 7 7 10101112131717181922
3 4 4 5 6 6 6 6 6 7 10 11 12 13 16 17 18 19 22 23 24
4 4 5 5 6 6 7 7 7 101112131617181922232425
5 5 6 6 6 7 10 10 11 12 14 16 17 18 20 22 23 24 25 28 29
6 5 6 6 7 7 10 11 12 14 16 17 18 20 22 23 24 25 28 29 30
7 5 6 6 6 7 10 10 11 12 13 16 17 18 20 22 23 24 25 28 29
8 4 5 5 6 6 7 7 7 101112141617181922232425
9 4 4 5 5 5 5 6 6 6 7 10111213161718192223
10 14445566677101012161718192223
11 4 5 5 6 6 7 7 7 10 11 12 13 16 17 18 19 22 23 24 25
12 5 66 6 7101011121416171819222324252829
13 6 66 7 7101112141617182022232425282930
14 6 66 6 7101011121316171820222324252829
15 4 5 5 6 6 7 7 7 10 11 12 13 16 17 18 19 22 23 24 25
16 1 1 1 4 4 4 5 5 6 6 6 7 10 11 11 12 13 16 17 18
Segment = workout time / 16
52//,1*+,//675($'0,//6
LEVEL 1 2 34 56 7 8 9 1011121314151617181920
SEGMENT INCLINE
1 00000000000000000000
2 0.5 0.5 0.5 0.5 0.5 0.5 0.5 0.5 1 1 1 1 1 1 1 1.5 1.5 1.5 1.5 1.5
3 0.5 1 1 1 1 1 1.5 1.5 1.5 2 2 2 2 2.5 2.5 2.5 3 3 3 3.5
4 1 1 1.5 1.5 1.5 2 2 2 2.5 2.5 3 3 3.5 3.5 3.5 4 4 4.5 4.5 5
5 1.5 1.5 2 2 2 2.5 2.5 3 3 3.5 4 4 4.5 4.5 5 5.5 5.5 6 6 6.5
6 0.5 1 1 1 1 1 1.5 1.5 1.5 2 2 2 2 2.5 2.5 2.5 3 3 3 3.5
7 00000000000000000000
8 0.5 0.5 0.5 0.5 0.5 0.5 0.5 0.5 1 1 1 1 1 1 1 1.5 1.5 1.5 1.5 1.5
9 1.5 2 2 2.5 3 3 3.5 3.5 4 4.5 5 5.5 5.5 6 6 6.5 7 7 8 8.5
10 2.5 3 3.5 4 4.5 5 5.5 6 6 7 8 8.5 9 9.5 10 10.5 11 11.5 12.513.5
11 33.544.555.566.57 8 99.51010.5111212.5131415
12 2.5 2.5 3 3.5 4 4.5 4.5 5 5.5 6 7 7.5 8 8 8.5 9.5 9.5 10 11 11.5
13 1 1 1.5 1.5 1.5 2 2 2 2.5 2.5 3 3 3.5 3.5 3.5 4 4 4.5 4.5 5
14 00000000000000000000
15 1 1 1.5 1.5 1.5 2 2 2 2.5 2.5 3 3 3.5 3.5 3.5 4 4 4.5 4.5 5
16 1.5 1.5 2 2 2 2.5 2.5 3 3 3.5 4 4 4.5 4.5 5 5.5 5.5 6 6 6.5
Segment = workout time / 16
52//,1*+,//6(58
LEVEL 1 2 34 56 7 8 9 1011121314151617181920
SEGMENT RESISTANCE
1 11122233445567789111112
2 1223333455667891111121315
3 2 2 3 4 4 4 4 4 5 6 7 8 9 11 11 12 13 14 15 16
4 2 3 3 4 4 5 5 5 6 7 8 9 1012121314151617
5 3 4 4 4 5 6 6 7 8 9 10111213151516171819
6 3 4 4 4 5 6 7 8 9 11 11 12 13 14 15 16 17 18 19 20
7 3 4 4 4 5 6 6 7 8 9 10111213141516171819
8 2 3 3 4 4 5 5 5 6 7 8 9 1111121315151617
9 22333344456789111212131415
10 1 2 2 2 3 3 4 4 4 5 5 6 6 8 11 12 12 13 14 15
11 2 3 3 4 4 5 5 5 7 7 8 9 11 11 12 13 15 15 16 17
12 3 4 4 4 5 6 6 7 8 9 10 11 12 13 15 15 16 17 18 19
13 3 44 5 5 6 7 8 91111121315151617191920
14 3 4 4 4 5 6 6 7 8 9 10 11 12 13 14 15 16 17 18 19
15 2 3 3 4 4 5 5 5 7 7 8 9 11 11 12 13 15 15 16 17
16 11122233444577789101112
Segment = workout time / 16
ENGLISH
ENGLISH
INTERVALS (INCLINE) - TREADMILLS
LEVEL 1 2 34 56 7 8 9 1011121314151617181920
SEGMENT INCLINE
1 00000000000000000000
2 0.5 0.5 0.5 0.5 0.5 0.5 0.5 0.5 1 1 1 1 1 1 1 1.5 1.5 1.5 1.5 1.5
3 00000000000000000000
4 1.5 2 2 2.5 3 3 3.5 3.5 4 4.5 5 5.5 5.5 6 6 6.5 7 7 8 8.5
5 00000000000000000000
6 2.5 2.5 3 3.5 4 4.5 4.5 5 5.5 6 7 7.5 8 8 8.5 9.5 9.5 10 11 11.5
7 00000000000000000000
8 3 3.5 4 4.5 5 5.5 6 6.5 7 8 9 9.5 10 10.5 11 12 12.5 13 14 15
9 00000000000000000000
10 33.544.555.566.57 8 99.51010.5111212.5131415
11 00000000000000000000
12 33.544.555.566.57 8 99.51010.5111212.5131415
13 00000000000000000000
14 33.544.555.566.57 8 99.51010.5111212.5131415
15 00000000000000000000
16 33.544.555.566.57 8 99.51010.5111212.5131415
Segment = workout time / 16
INTERVALS (RESISTANCE) - A50, E50, R50, U50
LEVEL 1 2 3 4 5 6 7 8 9 10 11 12 13 14 15 16 17 18 19 20
SEGMENT IRIRIRIRIRIRIRIRIRIRIRIRIRIRIRIRIRIRIRIR
1
0 1 25 1 25 1 25 4 25 4 25 5 25 5 25 5 25 6 25 6 25 6 25 7 25 7 25 7 25 10 25 10 25 10 25 11 25 11 25 12
2
0 425525 525 530 630 6 306 306 357 357 4010401040104511451150125513601665177018
3
01151204204204255255255306306306357357357401040104010451145115012
4
0 525530 630 630 635 7 357 4010401040104511451150125012551460167018701875208022
5
0 1 15 1 20 4 20 4 20 4 25 5 25 5 25 5 30 6 30 6 30 6 35 7 35 7 35 7 40 10 40 10 40 10 45 11 45 11 50 12
6
0 530630 635 735 8401040104511451150125012551455146016601670188022802285239024
7
0 120420 425 530 630 6 306 306 357 357 357 401040104010451145114511501255146016
8
0 6 30 6 35 7 40 10 45 11 50 12 50 12 55 14 60 16 65 17 70 18 75 20 80 22 85 23 90 24 90 24 95 25 100 28 100 29 100 30
9
0 1 20 4 20 4 25 5 30 6 30 6 30 6 30 6 35 7 35 7 35 7 40 10 40 10 40 10 45 11 45 11 45 11 50 12 55 13 60 16
10
0 630635 740104511501250125514601665177018752080228523902490249525100281002910030
11
0 1 20 4 20 4 25 5 30 6 30 6 30 6 30 6 35 7 35 7 35 7 40 10 40 10 40 10 45 11 45 11 45 11 50 12 55 13 60 16
12
0 630635 740104511501250125514601665177018752080228523902490249525100271002910030
13
0 1 20 4 20 4 25 5 30 6 30 6 30 6 30 6 35 7 35 7 35 7 40 10 40 10 40 10 45 11 45 11 45 11 50 12 55 13 60 16
14
0 4 25 5 30 6 30 6 35 8 35 7 40 10 40 10 45 11 45 11 50 12 50 12 55 14 55 14 60 16 65 17 70 18 75 20 80 22 85 23
15
01151151204203255255255306306306357357357401040104010451145115012
16
0 1 15 1 15 1 20 4 20 3 25 5 25 5 25 5 30 6 30 6 30 6 35 7 35 7 35 7 40 10 40 10 40 10 45 11 45 11 50 12
I = % Incline / R = Resistance
Incline for A50 only
Segment = workout time / 16
INTERVALS (RESISTANCE) - A30, E30, R30, U30
LEVEL 1 2 3 4 5 6 7 8 9 10 11 12 13 14 15 16 17 18 19 20
SEGMENT IRIRIRIRIRIRIRIRIRIRIRIRIRIRIRIRIRIRIRIR
1
01251251253253253254254254254254255255255256256257257257258
2
03253254254304304304304355355406406406457457508559601165127012
3
01151203203203253253253304304304355355355406406406457457508
4
0 3 25 4 30 4 30 4 30 4 35 5 35 5 40 7 40 7 40 7 45 7 45 7 50 8 50 8 55 9 60 11 70 12 70 12 75 13 80 15
5
01151203203203253253253304304304355355355406406406457457508
6
0 330430 435 535 540 7 407 457 457 508 508 559 559 6011601170128015801585159016
7
012032032543043043043043553553554074074074574574575085596011
8
0 430435 540 745 750 8 508 559 601165117012751380158515901690169517100191001910020
9
012032032533043043043043553553554074074074574574575085596011
10
0 430435 440 745 750 8 508 559 601165117012751380158515901690169517100191001910020
11
012032032533043043043043553553554074074074574574575085596011
12
0 4 30 4 35 5 40 7 45 7 50 8 50 8 55 9 60 11 65 11 70 12 75 13 80 15 85 15 90 16 90 16 95 17 100 19 100 19 100 20
13
012032032533043043043043553553554074074074574574575085596011
14
03253304304355355407407457458508508559559601165117012751380158516
15
01151151203203253253253304304304355355355406407407458457508
16
01151151202203253253253304304304355355355406407407458457508
I = % Incline / R = Resistance
Incline for A30 only
Segment = workout time / 16
GLUTES - A50, A30
SEGMENT (/(9$7,21 RESISTANCE
150Min
Min = Minimum resistance set by the user
Max = Maximum resistance set by the user
Segment = workout time / 19
265Min
3 100 Max
4 100 Max
585Min
6 100 Max
785Min
8 100 Max
985Min
10 100 Max
11 85 Min
12 100 Max
13 85 Min
14 100 Max
15 85 Min
16 100 Max
17 85 Min
18 65 Min
19 50 Min
MX17_XR-XER-XIR_r1_3_D.indd 68-69 5/8/17 11:09 AM
Page 8

70 71
352*5$06&+$576
635,1775($'0,//6
SEGMENT
:$50
83
12345678
&22/
'2:1
TIME 3:00 0:30 1:30 0:30 1:30 0:30 1:30 0:30 1:30 0:30 1:30 0:30 1:30 0:30 1:30 0:30 2:30
Level 1
MPH 0.5 3.2 1.5 3.2 1.5 3.5 1.5 3.5 1.5 3.7 1.5 3.7 1.5 3.7 1.5 3.7 1.5
Incline 0.0 3.0 0.0 3.0 0.0 3.0 0.0 3.0 0.0 3.0 0.0 3.0 0.0 3.0 0.0 3.0 0.0
Level 2
MPH 0.5 3.7 1.5 3.7 1.5 4.0 1.5 4.0 1.5 4.2 1.5 4.2 1.5 4.2 1.5 4.2 1.5
Incline 0.0 3.0 0.0 3.0 0.0 3.0 0.0 3.0 0.0 3.0 0.0 3.0 0.0 3.0 0.0 3.0 0.0
Level 3
MPH 0.5 4.2 1.5 4.2 1.5 4.4 1.5 4.4 1.5 4.6 1.5 4.6 1.5 4.6 1.5 4.6 1.5
Incline 0.0 3.0 0.0 3.0 0.0 3.0 0.0 3.0 0.0 3.0 0.0 3.0 0.0 3.0 0.0 3.0 0.0
Level 4
MPH 0.5 4.6 1.5 4.6 1.5 4.8 1.5 4.8 1.5 5.0 1.5 5.0 1.5 5.0 1.5 5.0 1.5
Incline 0.0 3.0 0.0 3.0 0.0 3.0 0.0 3.0 0.0 3.0 0.0 3.0 0.0 3.0 0.0 3.0 0.0
Level 5
MPH 0.5 4.9 1.5 4.9 1.5 5.1 1.5 5.1 1.5 5.3 1.5 5.3 1.5 5.3 1.5 5.3 1.5
Incline 0.0 3.0 0.0 3.0 0.0 3.0 0.0 3.0 0.0 3.0 0.0 3.0 0.0 3.0 0.0 3.0 0.0
Level 6
MPH 0.5 5.0 2.0 5.0 2.0 5.2 2.0 5.2 2.0 5.5 2.0 5.5 2.0 5.5 2.0 5.5 2.0
Incline 0.0 4.0 0.0 4.0 0.0 4.0 0.0 4.0 0.0 4.0 0.0 4.0 0.0 4.0 0.0 4.0 0.0
Level 7
MPH 0.5 5.3 2.0 5.3 2.0 5.5 2.0 5.5 2.0 5.8 2.0 5.8 2.0 5.8 2.0 5.8 2.0
Incline 0.0 4.0 0.0 4.0 0.0 4.0 0.0 4.0 0.0 4.0 0.0 4.0 0.0 4.0 0.0 4.0 0.0
Level 8
MPH 0.5 5.8 2.0 5.8 2.0 6.0 2.0 6.0 2.0 6.3 2.0 6.3 2.0 6.3 2.0 6.3 2.0
Incline 0.0 4.0 0.0 4.0 0.0 4.0 0.0 4.0 0.0 4.0 0.0 4.0 0.0 4.0 0.0 4.0 0.0
Level 9
MPH 0.5 6.0 2.0 6.0 2.0 6.3 2.0 6.3 2.0 6.5 2.0 6.5 2.0 6.5 2.0 6.5 2.0
Incline 0.0 4.0 0.0 4.0 0.0 4.0 0.0 4.0 0.0 4.0 0.0 4.0 0.0 4.0 0.0 4.0 0.0
Level 10
MPH 0.5 6.5 2.0 6.5 2.0 6.7 2.0 6.7 2.0 7.0 2.0 7.0 2.0 7.0 2.0 7.0 2.0
Incline 0.0 4.0 0.0 4.0 0.0 4.0 0.0 4.0 0.0 4.0 0.0 4.0 0.0 4.0 0.0 4.0 0.0
Level 11
MPH 0.5 7.0 2.5 7.0 2.5 7.2 2.5 7.2 2.5 7.5 2.5 7.5 2.5 7.5 2.5 7.5 2.5
Incline 0.0 5.0 0.0 5.0 0.0 5.0 0.0 5.0 0.0 5.0 0.0 5.0 0.0 5.0 0.0 5.0 0.0
Level 12
MPH 0.5 7.5 2.5 7.5 2.5 7.7 2.5 7.7 2.5 8.0 2.5 8.0 2.5 8.0 2.5 8.0 2.5
Incline 0.0 5.0 0.0 5.0 0.0 5.0 0.0 5.0 0.0 5.0 0.0 5.0 0.0 5.0 0.0 5.0 0.0
Level 13
MPH 0.5 8.0 2.5 8.0 2.5 8.2 2.5 8.2 2.5 8.5 2.5 8.5 2.5 8.5 2.5 8.5 2.5
Incline 0.0 5.0 0.0 5.0 0.0 5.0 0.0 5.0 0.0 5.0 0.0 5.0 0.0 5.0 0.0 5.0 0.0
Level 14
MPH 0.5 8.5 2.5 8.5 2.5 8.7 2.5 8.7 2.5 9.0 2.5 9.0 2.5 9.0 2.5 9.0 2.5
Incline 0.0 5.0 0.0 5.0 0.0 5.0 0.0 5.0 0.0 5.0 0.0 5.0 0.0 5.0 0.0 5.0 0.0
Level 15
MPH 0.5 9.0 2.5 9.0 2.5 9.2 2.5 9.2 2.5 9.5 2.5 9.5 2.5 9.5 2.5 9.5 2.5
Incline 0.0 5.0 0.0 5.0 0.0 5.0 0.0 5.0 0.0 5.0 0.0 5.0 0.0 5.0 0.0 5.0 0.0
Level 16
MPH 0.5 9.5 3.0 9.5 3.0 9.7 3.0 9.7 3.0 10.0 3.0 10.0 3.0 10.0 3.0 10.0 3.0
Incline 0.0 6.0 1.0 6.0 1.0 6.0 1.0 6.0 1.0 6.0 1.0 6.0 1.0 6.0 1.0 6.0 1.0
Level 17
MPH 0.5 10.0 3.0 10.0 3.0 10.2 3.0 10.2 3.0 10.5 3.0 10.5 3.0 10.5 3.0 10.5 3.0
Incline 0.0 6.0 1.0 6.0 1.0 6.0 1.0 6.0 1.0 6.0 1.0 6.0 1.0 6.0 1.0 6.0 1.0
Level 18
MPH 0.5 10.5 3.0 10.5 3.0 10.7 3.0 10.7 3.0 11.0 3.0 11.0 3.0 11.0 3.0 11.0 3.0
Incline 0.0 6.0 1.0 6.0 1.0 6.0 1.0 6.0 1.0 6.0 1.0 6.0 1.0 6.0 1.0 6.0 1.0
Level 19
MPH 0.5 11.0 3.0 11.0 3.0 11.2 3.0 11.2 3.0 11.5 3.0 11.5 3.0 11.5 3.0 11.5 3.0
Incline 0.0 6.0 2.0 6.0 2.0 6.0 2.0 6.0 2.0 6.0 2.0 6.0 2.0 6.0 2.0 6.0 2.0
Level 20
MPH 0.5 11.5 6.0 11.5 6.0 11.7 6.0 11.7 6.0 12.0 6.0 12.0 6.0 12.0 6.0 12.0 6.0
Incline 0.0 6.0 2.0 6.0 2.0 6.0 2.0 6.0 2.0 6.0 2.0 6.0 2.0 6.0 2.0 6.0 2.0
635,17(85
SEGMENT
:$50
83
12345678
&22/
'2:1
TIME 3:00 0:30 1:30 0:30 1:30 0:30 1:30 0:30 1:30 0:30 1:30 0:30 1:30 0:30 1:30 0:30 2:30
Level 1Resistance1 313141416161616 1
Level 2Resistance1 414151517171717 1
Level 3Resistance1 515161618181818 1
Level 4Resistance1 616171719191919 1
Level 5 Resistance 1 7 1 7 1 8 1 8 1 10 1 10 1 10 1 10 1
Level 6 Resistance 2 8 2 8 2 9 2 9 2 11 2 11 2 11 2 11 2
Level 7 Resistance 2 9 2 9 2 10 2 10 2 12 2 12 2 12 2 12 2
Level 8 Resistance 2 10 2 10 2 11 2 11 2 13 2 13 2 13 2 13 2
Level 9 Resistance 2 11 2 11 2 12 2 12 2 14 2 14 2 14 2 14 2
Level 10 Resistance 2 12 2 12 2 13 2 13 2 15 2 15 2 15 2 15 2
Level 11 Resistance 2 13 2 13 2 14 2 14 2 16 2 16 2 16 2 16 2
Level 12 Resistance 2 14 2 14 2 15 2 15 2 17 2 17 2 17 2 17 2
Level 13 Resistance 2 15 2 15 2 16 2 16 2 18 2 18 2 18 2 18 2
Level 14 Resistance 2 16 2 16 2 17 2 17 2 19 2 19 2 19 2 19 2
Level 15 Resistance 2 17 2 17 2 18 2 18 2 20 2 20 2 20 2 20 2
Level 16 Resistance 3 18 3 18 3 19 3 19 3 21 3 21 3 21 3 21 3
Level 17 Resistance 3 19 3 19 3 20 3 20 3 22 3 22 3 22 3 22 3
Level 18 Resistance 3 20 3 20 3 21 3 21 3 23 3 23 3 23 3 23 3
Level 19 Resistance 3 21 3 21 3 22 3 22 3 24 3 24 3 24 3 24 3
Level 20 Resistance 3 22 3 22 3 23 3 23 3 25 3 25 3 25 3 25 3
635,17(85
SEGMENT
:$50
83
12345678
&22/
'2:1
TIME 3:00 0:30 1:30 0:30 1:30 0:30 1:30 0:30 1:30 0:30 1:30 0:30 1:30 0:30 1:30 0:30 2:30
Level 1Resistance1 212131314141414 1
Level 2Resistance1 313141415151515 1
Level 3Resistance1 414151516161616 1
Level 4Resistance1 515161617171717 1
Level 5Resistance1 616171718181818 1
Level 6Resistance2 626272728282828 2
Level 7Resistance2 727282829292929 2
Level 8 Resistance 2 8 2 8 2 9 2 9 2 10 2 10 2 10 2 10 2
Level 9 Resistance 2 8 2 8 2 9 2 9 2 10 2 10 2 11 2 11 2
Level 10 Resistance 2 9 2 9 2 10 2 10 2 11 2 11 2 11 2 11 2
Level 11 Resistance 2 10 2 10 2 11 2 11 2 12 2 12 2 12 2 12 2
Level 12 Resistance 2 11 2 11 2 12 2 12 2 12 2 13 2 13 2 13 2
Level 13 Resistance 2 12 2 12 2 13 2 13 2 13 2 14 2 14 2 14 2
Level 14 Resistance 2 13 2 13 2 14 2 14 2 14 2 15 2 15 2 15 2
Level 15 Resistance 2 14 2 14 2 15 2 15 2 15 2 16 2 16 2 16 2
Level 16 Resistance 3 14 3 14 3 15 3 15 3 16 3 16 3 16 3 16 3
Level 17 Resistance 3 15 3 15 3 16 3 16 3 17 3 17 3 17 3 17 3
Level 18 Resistance 3 16 3 16 3 17 3 17 3 18 3 18 3 18 3 18 3
Level 19 Resistance 3 17 3 17 3 18 3 18 3 19 3 19 3 19 3 19 3
Level 20 Resistance 3 18 3 18 3 19 3 19 3 20 3 20 3 20 3 20 3
635,17$
SEGMENT
:$50
83
12345678
&22/
'2:1
TIME 3:00 0:30 1:30 0:30 1:30 0:30 1:30 0:30 1:30 0:30 1:30 0:30 1:30 0:30 1:30 0:30 2:30
Level 1
Resistance1 313141416161616 1
Incline 0 30 0 30 0 30 0 30 0 30 0 30 0 30 0 30 0
Level 2
Resistance1 414151517171717 1
Incline 0 30 0 30 0 30 0 30 0 30 0 30 0 30 0 30 0
Level 3
Resistance1 515161618181818 1
Incline 0 30 0 30 0 30 0 30 0 30 0 30 0 30 0 30 0
Level 4
Resistance1 616171719191919 1
Incline 0 30 0 30 0 30 0 30 0 30 0 30 0 30 0 30 0
Level 5
Resistance 1 7 1 7 1 8 1 8 1 10 1 10 1 10 1 10 1
Incline 0 30 0 30 0 30 0 30 0 30 0 30 0 30 0 30 0
Level 6
Resistance 2 8 2 8 2 9 2 9 2 11 2 11 2 11 2 11 2
Incline 0 40 0 40 0 40 0 40 0 40 0 40 0 40 0 40 0
Level 7
Resistance 2 9 2 9 2 10 2 10 2 12 2 12 2 12 2 12 2
Incline 0 40 0 40 0 40 0 40 0 40 0 40 0 40 0 40 0
Level 8
Resistance 2 10 2 10 2 11 2 11 2 13 2 13 2 13 2 13 2
Incline 0 40 0 40 0 40 0 40 0 40 0 40 0 40 0 40 0
Level 9
Resistance 2 11 2 11 2 12 2 12 2 14 2 14 2 14 2 14 2
Incline 0 40 0 40 0 40 0 40 0 40 0 40 0 40 0 40 0
Level 10
Resistance 2 12 2 12 2 13 2 13 2 15 2 15 2 15 2 15 2
Incline 0 40 0 40 0 40 0 40 0 40 0 40 0 40 0 40 0
Level 11
Resistance 2 13 2 13 2 14 2 14 2 16 2 16 2 16 2 16 2
Incline 0 50 0 50 0 50 0 50 0 50 0 50 0 50 0 50 0
Level 12
Resistance 2 14 2 14 2 15 2 15 2 17 2 17 2 17 2 17 2
Incline 0 50 0 50 0 50 0 50 0 50 0 50 0 50 0 50 0
Level 13
Resistance 2 15 2 15 2 16 2 16 2 18 2 18 2 18 2 18 2
Incline 0 50 0 50 0 50 0 50 0 50 0 50 0 50 0 50 0
Level 14
Resistance 2 16 2 16 2 17 2 17 2 19 2 19 2 19 2 19 2
Incline 0 50 0 50 0 50 0 50 0 50 0 50 0 50 0 50 0
Level 15
Resistance 2 17 2 17 2 18 2 18 2 20 2 20 2 20 2 20 2
Incline 0 50 0 50 0 50 0 50 0 50 0 50 0 50 0 50 0
Level 16
Resistance 3 18 3 18 3 19 3 19 3 21 3 21 3 21 3 21 3
Incline 0 60 0 60 0 60 0 60 0 60 0 60 0 60 0 60 0
Level 17
Resistance 3 19 3 19 3 20 3 20 3 22 3 22 3 22 3 22 3
Incline 0 60 0 60 0 60 0 60 0 60 0 60 0 60 0 60 0
Level 18
Resistance 3 20 3 20 3 21 3 21 3 23 3 23 3 23 3 23 3
Incline 0 60 0 60 0 60 0 60 0 60 0 60 0 60 0 60 0
Level 19
Resistance 3 21 3 21 3 22 3 22 3 24 3 24 3 24 3 24 3
Incline 0 60 0 60 0 60 0 60 0 60 0 60 0 60 0 60 0
Level 20
Resistance 3 22 3 22 3 23 3 23 3 25 3 25 3 25 3 25 3
Incline 0 60 0 60 0 60 0 60 0 60 0 60 0 60 0 60 0
635,17$
SEGMENT
:$50
83
12345678
&22/
'2:1
TIME 3:00 0:30 1:30 0:30 1:30 0:30 1:30 0:30 1:30 0:30 1:30 0:30 1:30 0:30 1:30 0:30 2:30
Level 1
Resistance 1 2 1 2 1 2 1 2 1 3 1 3 1 3 1 3 1
Incline 0 30 0 30 0 30 0 30 0 30 0 30 0 30 0 30 0
Level 2
Resistance 1 2 1 2 1 3 1 3 1 4 1 4 1 4 1 4 1
Incline 0 30 0 30 0 30 0 30 0 30 0 30 0 30 0 30 0
Level 3
Resistance 1 3 1 3 1 4 1 4 1 5 1 5 1 5 1 5 1
Incline 0 30 0 30 0 30 0 30 0 30 0 30 0 30 0 30 0
Level 4
Resistance 1 4 1 4 1 5 1 5 1 6 1 6 1 6 1 6 1
Incline 0 30 0 30 0 30 0 30 0 30 0 30 0 30 0 30 0
Level 5
Resistance 1 4 1 4 1 5 1 5 1 6 1 6 1 6 1 6 1
Incline 0 40 0 40 0 40 0 40 0 40 0 40 0 40 0 40 0
Level 6
Resistance 2 5 2 5 2 6 2 6 2 6 2 6 2 6 2 6 2
Incline 0 40 0 40 0 40 0 40 0 40 0 40 0 40 0 40 0
Level 7
Resistance 2 6 2 6 2 6 2 6 2 7 2 7 2 7 2 7 2
Incline 0 40 0 40 0 40 0 40 0 40 0 40 0 40 0 40 0
Level 8
Resistance 2 6 2 6 2 7 2 7 2 8 2 8 2 8 2 8 2
Incline 0 40 0 40 0 40 0 40 0 40 0 40 0 40 0 40 0
Level 9
Resistance 2 6 2 6 2 7 2 7 2 8 2 8 2 8 2 8 2
Incline 0 50 0 50 0 50 0 50 0 50 0 50 0 50 0 50 0
Level 10
Resistance 2 7 2 7 2 8 2 8 2 9 2 9 2 9 2 9 2
Incline 0 50 0 50 0 50 0 50 0 50 0 50 0 50 0 50 0
Level 11
Resistance 2 8 2 8 2 9 2 9 2 10 2 10 2 10 2 10 2
Incline 0 50 0 50 0 50 0 50 0 50 0 50 0 50 0 50 0
Level 12
Resistance 2 9 2 9 2 10 2 10 2 10 2 10 2 10 2 10 2
Incline 0 50 0 50 0 50 0 50 0 50 0 50 0 50 0 50 0
Level 13
Resistance 2 9 2 9 2 10 2 10 2 10 2 10 2 10 2 10 2
Incline 0 60 0 60 0 60 0 60 0 60 0 60 0 60 0 60 0
Level 14
Resistance 2 10 2 10 2 10 2 10 2 11 2 11 2 11 2 11 2
Incline 0 60 0 60 0 60 0 60 0 60 0 60 0 60 0 60 0
Level 15
Resistance 2 11 2 11 2 12 2 12 2 13 2 13 2 13 2 13 2
Incline 0 60 0 60 0 60 0 60 0 60 0 60 0 60 0 60 0
Level 16
Resistance 3 11 3 11 3 12 3 12 3 13 3 13 3 13 3 13 3
Incline 0 60 0 60 0 60 0 60 0 60 0 60 0 60 0 60 0
Level 17
Resistance 3 12 3 12 3 13 3 13 3 14 3 14 3 14 3 14 3
Incline 0 60 0 60 0 60 0 60 0 60 0 60 0 60 0 60 0
Level 18
Resistance 3 13 3 13 3 14 3 14 3 14 3 14 3 14 3 14 3
Incline 0 60 0 60 0 60 0 60 0 60 0 60 0 60 0 60 0
Level 19
Resistance 3 14 3 14 3 14 3 14 3 15 3 15 3 15 3 15 3
Incline 0 60 0 60 0 60 0 60 0 60 0 60 0 60 0 60 0
Level 20
Resistance 3 14 3 14 3 15 3 15 3 16 3 16 3 16 3 16 3
Incline 0 60 10 60 10 60 10 60 10 60 10 60 10 60 10 60 0
ENGLISH
ENGLISH
MX17_XR-XER-XIR_r1_3_D.indd 70-71 5/8/17 11:09 AM
Page 9

72 73
86,1*7+(+($575$7()81&7,21
The heart rate function on this product is not a medical device. While heart rate grips can provide a relative estimation of your actual heart rate, they should not be
relied on when accurate readings are necessary. Some people, including those in a cardiac rehab program, may benefit from using an alternate heart rate monitoring
system like a chest or wrist strap. Various factors, including movement of the user, may affect the accuracy of your heart rate reading. The heart rate reading is intended
only as an exercise aid in determining heart rate trends in general. Please consult your physician. For best results, a wireless heart rate transmitter should be used.
38/6(*5,36
Place the palm of your hands directly on the grip pulse handlebars. Both hands must grip the bars for your
heart rate to register. It takes 5 consecutive heart beats (15-20 seconds) for your heart rate to register.
When gripping the pulse handlebars, do not grip tightly. Holding the grips tightly may elevate your blood
pressure. Keep a loose, cupping hold. You may experience an erratic readout if consistently holding the grip
pulse handlebars. Make sure to clean the pulse sensors to ensure proper contact can be maintained.
:,5(/(66+($5 75$7(5(&(,9(5
When used in conjunction with a wireless chest transmitter, your heart rate can
be transmitted wirelessly to the unit and displayed on the console.
Prior to wearing the wireless chest transmitter on your chest, moisten the two rubber electrodes with water. Center
the chest strap just below the breast or pectoral muscles, directly over your sternum, with the logo facing out. NOTE:
The chest strap must be tight and properly placed to receive an accurate and inconsistent readout. If the chest
strap is too loose, or positioned improperly, you may receive an erratic or inconsistent heart rate readout.
:$51,1*
Heart rate monitoring systems may be inaccurate. Over exercising may result in serious injury or death. If you feel faint, stop exercising immediately.
The first step in knowing the right intensity for your training is to find out your maximum
heart rate (max HR = 220 – your age). The age-based method provides an average statistical
prediction of your max HR and is a good method for the majority of people, especially those
new to heart rate training. The most precise and accurate way of determining your individual
max HR is to have it clinically tested by a cardiologist or exercise physiologist through the use
of a maximal stress test. If you are over the age of 40, overweight, have been sedentary for
several years or have a history of heart disease in your family, clinical testing is recommended.
This chart gives examples of the heart rate range for a 30-year-old exercising
at 5 different heart rate zones. For example, a 30-year-old’s max HR is
220 – 30 = 190 BPM and 90% max HR is 190 × 0.9 = 171 BPM.
TARGET HEART R ATE
Target Heart
Rate Zone
Workout
Duration
Example THR Zone
(age 30)
Your
THR Zone
Recommended For
VERY HARD
90 – 100%
< 5
MIN 171 – 190 BMP Fit persons and for athletic training
HARD
80 – 90%
2 – 10
MIN 152 – 171 BMP Shorter workouts
MODERATE
70 – 80%
10 – 40
MIN 133 – 152 BMP Moderately long workouts
LIGHT
60 – 70%
40 – 80
MIN 114 – 133 BMP
Longer and frequently repeated
shorter exercises
VERY LIGHT
50 – 60%
20 – 40
MIN 104 – 114 BMP
Weight management and active
recovery
Backside of chest strap
Apply moisture here
;5&2162/(
TREADMILLS
Target Heart Rate - Speed
• The incline and speed can be adjusted at any time by the
user including during warm up and cool down.
• The speed range for the workout is from 0.5 MPH – 12.5 MPH / 0.8 KPH – 20 KPH.
• During the 4 minute Cool Down, the speed will be reduced
by half of the current speed for the first 2 minutes and then
reduced to 0.5 mph / 0.8 kph the remaining 2 minutes.
• If no heart rate is detected or signal is lost, the speed will remain at the same level
for 60 seconds and then begin decreasing 0.6 MPH / 1.0 KPH every 10 seconds
until the minimum speed is reached while incline will remain unchanged.
$6&(17(//,37,&$/%,.(
Target Heart Rate - Resistance
• The resistance and incline (A30 & A50 only) can be adjusted at any
time by the user including during warm up and cool down.
• The resistance range for the workout is 1 – 20 (A30, E30,
U30 & R30) or 1 – 30 (A50, E50, U50 & R50)
• During the 4 minute Cool Down, the resistance will be reduced by half of the current
resistance for the first 2 minutes and then reduced to 1 for the remaining 2 minutes.
• If no heart rate is detected or signal is lost, the resistance will remain at the same level
for 60 seconds and then begin decreasing 1 resistance level every 10 seconds until the
minimum resistance is reached. The incline (A30 & A50 only) will remain unchanged.
TARGET HEART R ATE
ENGLISH
ENGLISH
TARGET HEART RATE - XR
TREADMILLS
%HDWV3HU0LQXWHIURP
Set Target Heart Rate
Action
12+ BPM Below Speed increases every 3 seconds 0.1mph/kph
7-11 BPM Below Speed increases every 5 seconds 0.1mph/kph
4-6 BPM Below Speed increases every 8 seconds 0.1mph/kph
3 BPM Below to 3 BPM Above No change
4-6 BPM Above Speed decreases every 8 seconds -0.1mph/kph
7-11 Above Speed decreases every 5 seconds -0.1mph/kph
12-15 BPM Above Speed decreases every 3 seconds -0.1mph/kph
16-24 BPM Above Speed decreases every 2 seconds -0.1mph/kph
25+ BPM Above Program ends
$6&(17(//,37,&$/%,.(
%HDWV3HU0LQXWHIURP
Set Target Heart Rate
Action
20+ BPM Below Resistance increases 1 level every 10 seconds
6-19 BPM Below Resistance increases 1 level every 35 seconds
5 BPM Below to 5 BPM Above No change
6-10 BPM Above Resistance decreases 1 level every 35 seconds
11-19 Above Resistance decreases 1 level every 10 seconds
20-24 BPM Above Resistance decreases half of current level every 10 seconds
25+ BPM Above Program ends
MX17_XR-XER-XIR_r1_3_D.indd 72-73 5/8/17 11:09 AM
Page 10
Page 11

© 2017 Johnson Health Tech
Rev 1.3%
MX17_XR-XER-XIR_r1_3_D.indd 96 5/8/17 11:09 AM
 Loading...