

Page 1

W1X ROWER
SERVICE MANUAL
Page 2

Page 3

CHAPTER 1: SERIAL NUMBER LOCATION ......................................................................................................... 1
CHAPTER 2: IMPORTANT SAFETY INSTRUCTIONS
2.1 Legal Disclaimer ................................................................................................................................................ 2
2.2 Before Getting Started .................................................................................................................................. 2
2.3 Read and Save These Instructions ............................................................................................................. 3
CHAPTER 3: PREVENTATIVE MAINTENANCE
3.1 Recommended Cleaning Tips ..................................................................................................................... 5
3.2 Check for Damaged Parts ............................................................................................................................. 5
3.3 Care and Maintenance Instructions ......................................................................................................... 6
CHAPTER 4: WORKOUT DESCRIPTION
4.1 Workout Overview ........................................................................................................................................... 6
4.2 Workout Setup Steps ...................................................................................................................................... 7
CHAPTER 5: TROUBLESHOOTING
5.1 Console Power Issues ..................................................................................................................................... 8
5.2 Counting Issues ................................................................................................................................................. 9
5.3 Rope Not Retracting ........................................................................................................................................ 10
CHAPTER 6: PART REPLACEMENT GUIDE
6.1 Front Shroud Removal .................................................................................................................................... 11
6.2 Middle Shroud Removal ............................................................................................................................... 12
6.3 Console Replacement .................................................................................................................................... 13
6.4 Handlebar Replacement ................................................................................................................................ 14
6.5 Rubber Center Cover Replacement ........................................................................................................... 15
6.6 Plastic Center Cover Replacement ............................................................................................................. 16
6.7 Rope Replacement ........................................................................................................................................... 17
6.8 Rope Pulley Replacement ............................................................................................................................ 18
6.9 Spin Axle Replacement .................................................................................................................................. 19
6.10 Rope Axle Replacement ................................................................................................................................ 20
6.11 Magnet Set Replacement ............................................................................................................................. 22
6.12 Speed Sensor Replacement .......................................................................................................................... 24
6.13 Tension Set Replacement .............................................................................................................................. 26
6.14 Center Axle Replacement .................................................................................................................................... 28
6.15 Handlebar Bracket Replacement ....................................................................................................................... 30
6.16 Console Cable Replacement ........................................................................................................................ 31
6.17 Stroke Sensor Replacement.......................................................................................................................... 32
6.18 Seat Pad Replacement .................................................................................................................................... 33
6.19 Testing the Rower ............................................................................................................................................. 34
TABLE OF CONTENTS
i
Page 4

iv
TABLE OF CONTENTS
CHAPTER 7: ROWER SPECIFICATIONS AND ASSEMBLY GUIDE
7.1 Rower Specifications ....................................................................................................................................... 35
7.2 Unpacking the Rower ..................................................................................................................................... 36
7.3 Fasteners and Assembly Tools ..................................................................................................................... 37
7.4 Assembly Instructions ................................................................................................................................... 38
ii
Page 5
1
1
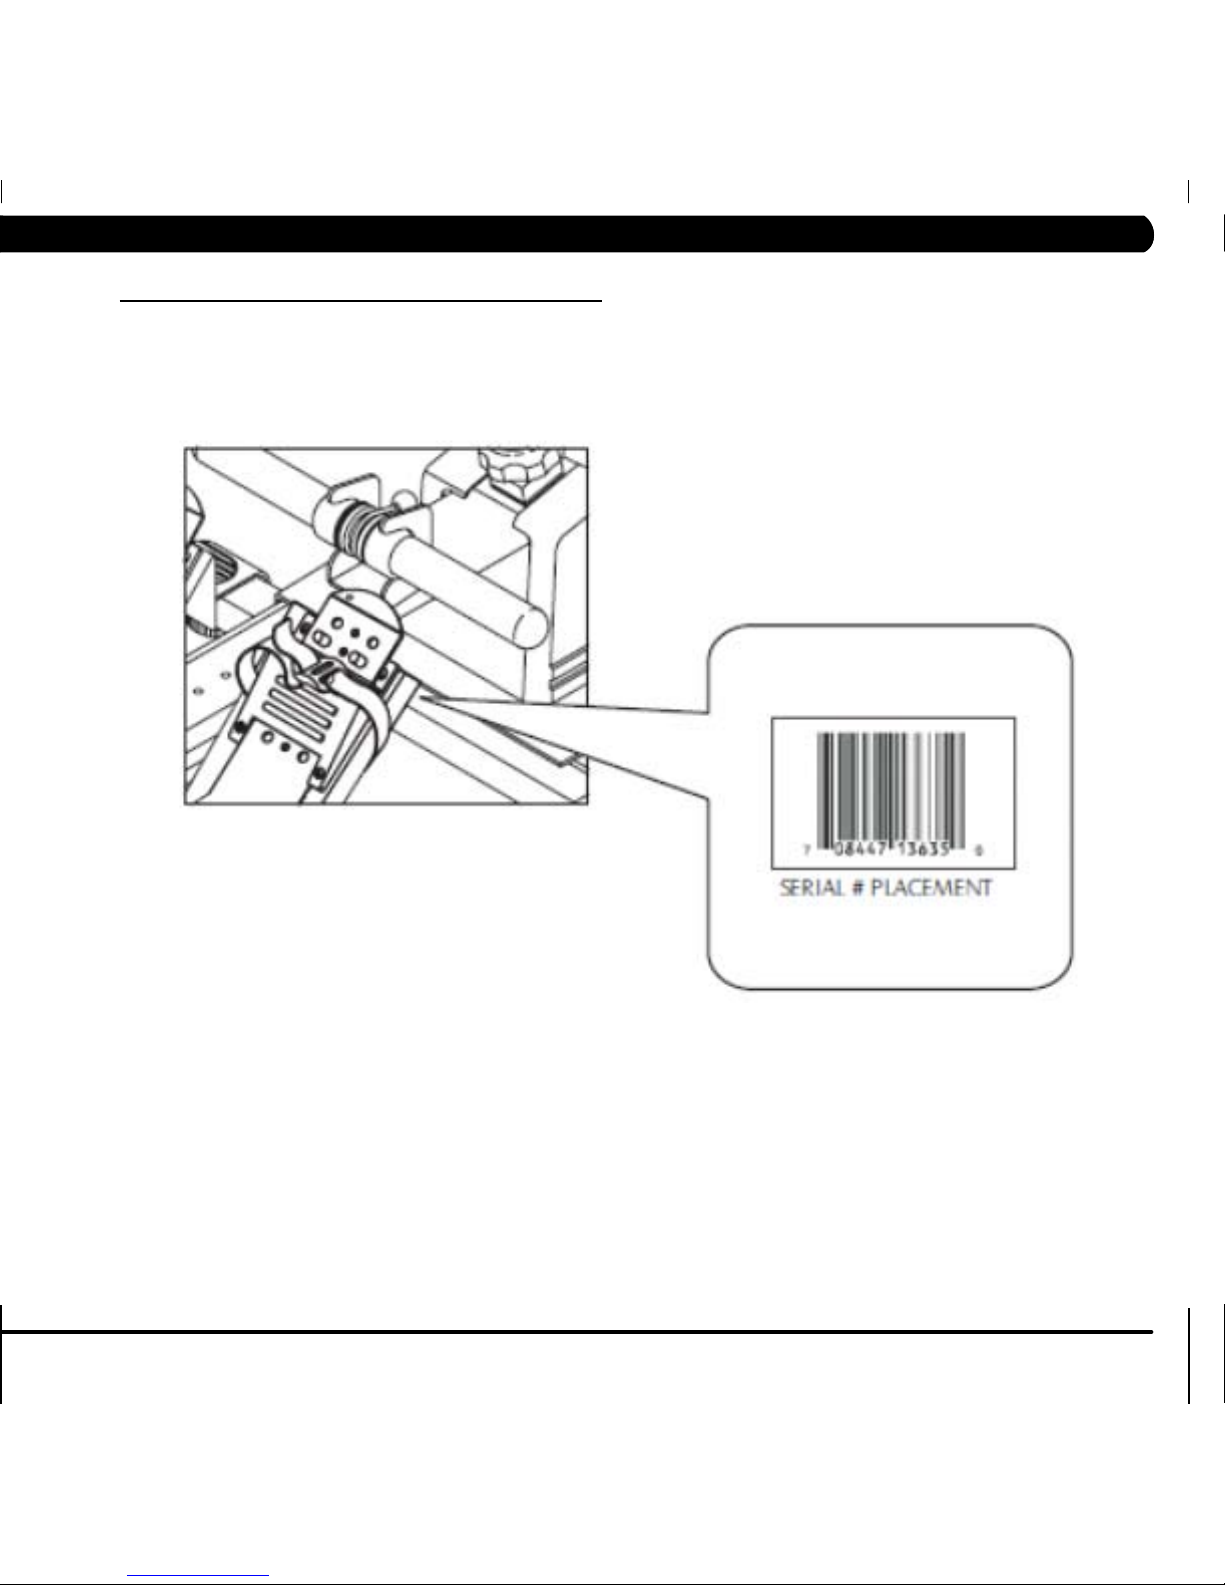
1.1 SERIAL NUMBER LOCATION
CHAPTER 1: SERIAL NUMBER LOCATION
Page 6

2
CHAPTER 2: IMPORTANT SAFETY INSTRUCTIONS
2.1 LEGAL DISCLAIMER
2.2 BEFORE GETTING STARTED
The Matrix W1x Rower is intended for commercial use. To ensure your
safety and protect the equipment, read all instructions before operating
the rower.
CHOOSING A SITE
The site should be well lit and well ventilated. Locate the Matrix W1x
Rower on a structurally solid and flat surface. If the site has a heavy plush
carpet, to protect the carpeting and machinery, you should place a rigid
plastic base under the unit.
Please do not place the Matrix W1x Rower in an area of high humidity,
such as the vicinity of a steam room, indoor pool, or sauna. Exposure to
intensive water vapor or chlorine could adversely affect the electronics,
as well as other parts of the machine.
BEFORE YOUR FIRST ROW
1) Consult a physician. Be sure that it is not dangerous for you to
undertake a strenuous exercise program.
2) Improper technique such as extreme lay back or jumping off the seat
can result in injury.
3) Start each workout with several minutes of easy rowing for a warm up.
4) Start your exercise program gradually. Row no more than 5 minutes
the first day to let your body adjust to the new exercise.
5) Gradually increase your rowing time and intensity over the first two
weeks. Do not row at full power until you are comfortable with the
technique and have rowed for at least a week. Like any physical activity,
if you increase the volume and intensity too rapidly, fail to warm up
properly, or use poor technique, you will increase the risk of injury.
6) The best resistance setting for a great cardiovascular workout is in
the range of 3-5. Rowing with the resistance setting too high can be
detrimental to your training program because it may reduce your output
and increase your risk of injury.
7) Aim for a stroke rate (spm) of between 24 and 30 spm (strokes per
minute).
Page 7

3
CAUTION! If you experience chest pains, nausea, dizziness, or shortness of breath, stop exercising immediately and consult your physician
before continuing.
CAUTION! Any changes of modifications to this equipment could void
the product warranty.
CHAPTER 2: IMPORTANT SAFETY INSTRUCTIONS
2.3 READ AND SAVE THESE INSTRUCTIONS
To ensure your safety and protect the equipment, read all instructions
before operating the MATRIX W1x Rower.
To ensure safe use of the Matrix W1x Rower, make sure that all users
read this manual. Remind the users that before undertaking any fitness
program, they should obtain complete physical examinations from
their physicians. If, at any time while exercising, the user experiences
dizziness, pain, or shortness of breath, nausea or feels faint, he or she
must stop immediately.
* Use the rower for its intended purpose as described in this manual. Do not
use attachments that have not been recommended by the manufacturer.
* Never drop or insert objects into any opening. Keep hands away from moving parts. If the item cannot be reached, contact a Matrix authorized dealer for
assistance.
* Never operate the rower if it is not working properly, or if it has been damaged
or immersed in water. Contact a Matrix authorized dealer for assistance.
* Keep hands and feet clear at all times from moving parts to avoid injury.
* Do not reach into, or underneath the unit, and do not tip the unit on its side
during operation.
* Do not use the rower outdoors, near swimming pools, or in areas of high
humidity.
* Do not operate where aerosol (spray) products are being used or when oxygen is being administered.
* Do not remove the fan cages. Service should only be done by an authorized
service technician.
* Close supervision is necessary when used near children, invalids, or disabled
persons.
* When the rower is in use, young children and pets should be kept at least 3
meters / 10 feet away.
* Assemble and operate the unit on a solid, level surface. Locate the unit at
least 1 meter / 3 feet of clearance from any obstructions, including walls and
furniture.
* Do not wear any clothing that might catch on any moving parts of this
rower.
* Do not stand the rower up on end as the rower may tip over.
* Place the handlebar against the chain guide or in the handlebar bracket
before letting go.
* Do not let the handlebar fly into the chain guide.
* Perform proper maintenance as described in the maintenance section of this
manual.
Page 8

4
The Matrix W1x Rower is for use in the commercial environment. However, as
a club owner or manager, you are responsible for cleaning and maintaining the
unit's integrity. If you fail to maintain the rower as described below, it could
affect or void the Matrix warranty.
Please read and follow these tips.
• Positiontheequipmentawayfromdirectsunlight.TheintenseUVlightcan
cause discoloration on plastics.
• Locateyourequipmentinanareawithcooltemperaturesandlowhumidity.
• Cleanwithasoft100%cottoncloth.
• Cleanwithsoapandwaterorothernon-ammoniabasedallpurposecleaners.
• Wipethepedals,console,theseatrailandthehandlebarcleanaftereachuse.
• Donotpourliquidsdirectlyontoyourequipment.Thiscancausedamageto
the equipment and in some cases electrocution.
• Adjustlevelingfeetwhenequipmentwobblesorrocks.
• Maintainacleanareaaroundtheequipment,freefromdustanddirt.
CHAPTER 3: PREVENTATIVE MAINTENANCE
3.1 RECOMMENDED CLEANING TIPS
3.2 CHECK FOR DAMAGED PARTS
DO NOT use any equipment that is damaged or has worn or broken
parts. Use only replacement parts supplied by Matrix Fitness Systems.
MAINTAIN LABELS AND NAMEPLATES. Do not remove labels for any
reason. They contain important information. If unreadable or missing,
contact Matrix Fitness Systems for a replacement at 866-693-4863 or
www.matrixfitness.com.
MAINTAIN ALL EQUIPMENT. Preventative maintenance is the key to
smoothly operating equipment. Equipment needs to be inspected
at regular intervals. Defective components must be kept out of use
until they are repaired. Ensure that any person(s) making adjustments
or performing maintenance or repair of any kind is qualified to do
so. Matrix Fitness Systems will provide service and maintenance
training at our corporate facility upon request or in the field if proper
arrangements are made.
Page 9

5
CHAPTER 3: PREVENTATIVE MAINTENANCE
3.3 CARE AND MAINTENANCE INSTRUCTIONS
In order to maximize life span, and minimize down time, all MATRIX
equipment requires regular cleaning, and maintenance items performed
on a scheduled basis. This section contains detailed instructions on how
to perform these items and the frequency of which they should be done.
Some basic tools and supplies will be necessary to perform these tasks
which include (but may not be limited to):
* Metric Allen wrenches
* #2 Phillips head screwdriver
* Adjustable wrench
* Torque wrench (capability to read foot lbs and inch lbs)
* Lint free cleaning cloths
* Teflon based spray lubricant such as "Super Lube" or other Matrix
approved products.
* Mild water soluable detergent such as "Simple Green" or other Matrix
approved products
* Vacuum cleaner with an extendable hose and crevasse tool attachment.
You may periodically see addendums to this document, as the Matrix
Technical Support Team identifies items that require specific attention,
the latest version will always be available on the Matrix web site at www.
matrixfitness.com.
DAILY MAINTENANCE ITEMS
1) Look and listen for loose fasteners, unusual noises, and any other
indications that the equipment may be in need of service.
2) Clean the rower before and after each use, including:
a. Use a damp, soft cloth with water or mild liquid detergent to
clean all exposed surfaces. DO NOT use ammonia, chlorine, or any acid
based cleaners.
b. Keep the console display free of fingerprints and salt build up
caused by sweat.
c. Frequently vacuum the floor beneath the unit to prevent the
accumulation of dust and dirt which can affect the smooth operation of
the unit.
MONTHLY MAINTENANCE ITEMS
1) Inspect the console, pedals, and handlebar for damage.
2) Check for dust inside of the flywheel with a flashlight and vacuum as
needed.
Page 10

6
4.1 WORKOUT OVERVIEW
WORKOUT TIPS
1. Matrix Fitness strongly recommends seeing your physician for a
complete physical examination before beginning any fitness program.
Know your physician's recommended heart rate target zone. If at any
time while exercising, you experience faintness, dizziness, pain, or
shortness of breath, you must stop immediately.
2. It is highly recommended that you always incorporate the warm up
and cool down period into your workout. Warm up brings the heart
rate into the lower end of the target zone and increases respiration and
blood flow to working muscles. Cool down takes time for a user's heart
rate to return to resting state after vigorous exercise and reduces the
amount of lactic acid in muscle tissue.
BEFORE YOUR FIRST ROW
1) Consult your physician. Be sure that it is not dangerous for you to
undertake a strenuous exercise program.
2) Improper technique such as extreme lay back or jumping off the seat
can result in injury.
3) Start each workout with several minutes of easy rowing for a warm
up.
4) Start your exercise program gradually. Row no more than 5 minutes
the first day to let your body adjust to the new exercise.
5) Gradually increase your rowing time and intensity over the first two
weeks. Do not row at full power until you are comfortable with the
technique and have rowed for at least a week. Like any physical activity,
if you increase the volume and intensity too rapidly, fail to warm up
properly, or use poor technique, you will increase the risk of injury.
6) The best resistance setting for a great cardiovascular workout is in
the range of 3-5. Rowing with the resistance setting too high can be
detrimental to your training program because it may reduce your output
and increase your risk of injury.
7) Aim for a stroke rate (spm) of between 24 and 30 spm (strokes per
minute).
CHAPTER 4: CONSOLE OVERLAY AND WORKOUT DESCRIPTION
Page 11

7
CHAPTER 4: CONSOLE OVERLAY AND WORKOUT DESCRIPTION
4.2 WORKOUT SETUP STEPS
MANUAL PROGRAM
You can choose either Time or Distance as your target.
TIME:
1) Press the ON / OFF button.
2) Use the UP and DOWN ARROW buttons to enter your workout time.
Time of between 1 and 180 minutes can be selected.
3) When the desired time is showing in the TIME window, press the
START button. The timer will begin counting down to zero as you begin
rowing.
4) When the workout time is completed, the console will beep 3 times
and the screen will flash 3 times.
DISTANCE:
1) Press the ON / OFF button.
2) Press the SELECT button and "0" will be flashing in the METER
window.
3) Use the UP and DOWN ARROW buttons to enter your workout
distance. Distance of between 100 and 30000 meters can be selected.
4) When the desired distance is showing in the METER window, press
the START button. The console will begin counting down to zero as you
begin rowing.
5) When the workout distance is completed, the console will beep 3
times and the screen will flash 3 times.
RACE PROGRAM
With Race Program, you compete with a computer pacer.
1) Press the ON / OFF button.
2) Press the RACE button and "500" will be flashing in the METER
window.
3) Use the UP and DOWN ARROW buttons to enter your race distance.
Distance of between 500 and 30000 meters can be selected. When the
desired distance is showing in the METER window, press the SELECT
button and "L09" will be flashing in the CAL window.
4) Use the UP and DOWN ARROW buttons to enter your race speed
(PACE / 500 M) from the list below. When the desired level is showing in
the window, press the START button.
L01 - 8:00 L02 - 7:30 L03 - 7:00 L04 - 6:30 L05 - 6:00
L06 - 5:30 L07 - 5:00 L08 - 4:30 L09 - 4:00 L10 - 3:30
L11 - 3:00 L12 - 2:30 L13 - 2:00 L14 - 1:30 L15 - 1:00
TRAINING PROGRAM
Stroke Per Minute (SPM) training. You can either choose Time or
Distance as your training target
TIME:
1) Press the ON / OFF button.
2) Press the TRAINING button and "0:00" will be flashing in the TIME
window.
3) Use the UP and DOWN ARROW buttons to enter your training time.
Time of between 1 and 180 minutes can be selected.
4) Press the SELECT button and "14" will be flashing in the SPM window.
5) Use the UP and DOWN ARROW buttons to enter your desired SPM.
SPM of between 6 and 99 can be selected. When the desired SPM is
showing in the window, press the START button.
DISTANCE:
1) Press the ON / OFF button.
2) Press the TRAINING button to enter Training Mode.
3) Press the SELECT button and "0" will be flashing in the METER
window.
4) Use the UP and DOWN ARROW buttons to enter your training
distance. Distance of between 100 and 30000 meters can be selected.
5) Press the SELECT button and "14" will be flashing in the SPM window.
6) Use the UP and DOWN ARROW buttons to enter your desired SPM.
SPM of between 6 and 99 can be selected. When the desired SPM is
showing in the window, press the START button.
Page 12
8
CHAPTER 5: TROUBLESHOOTING
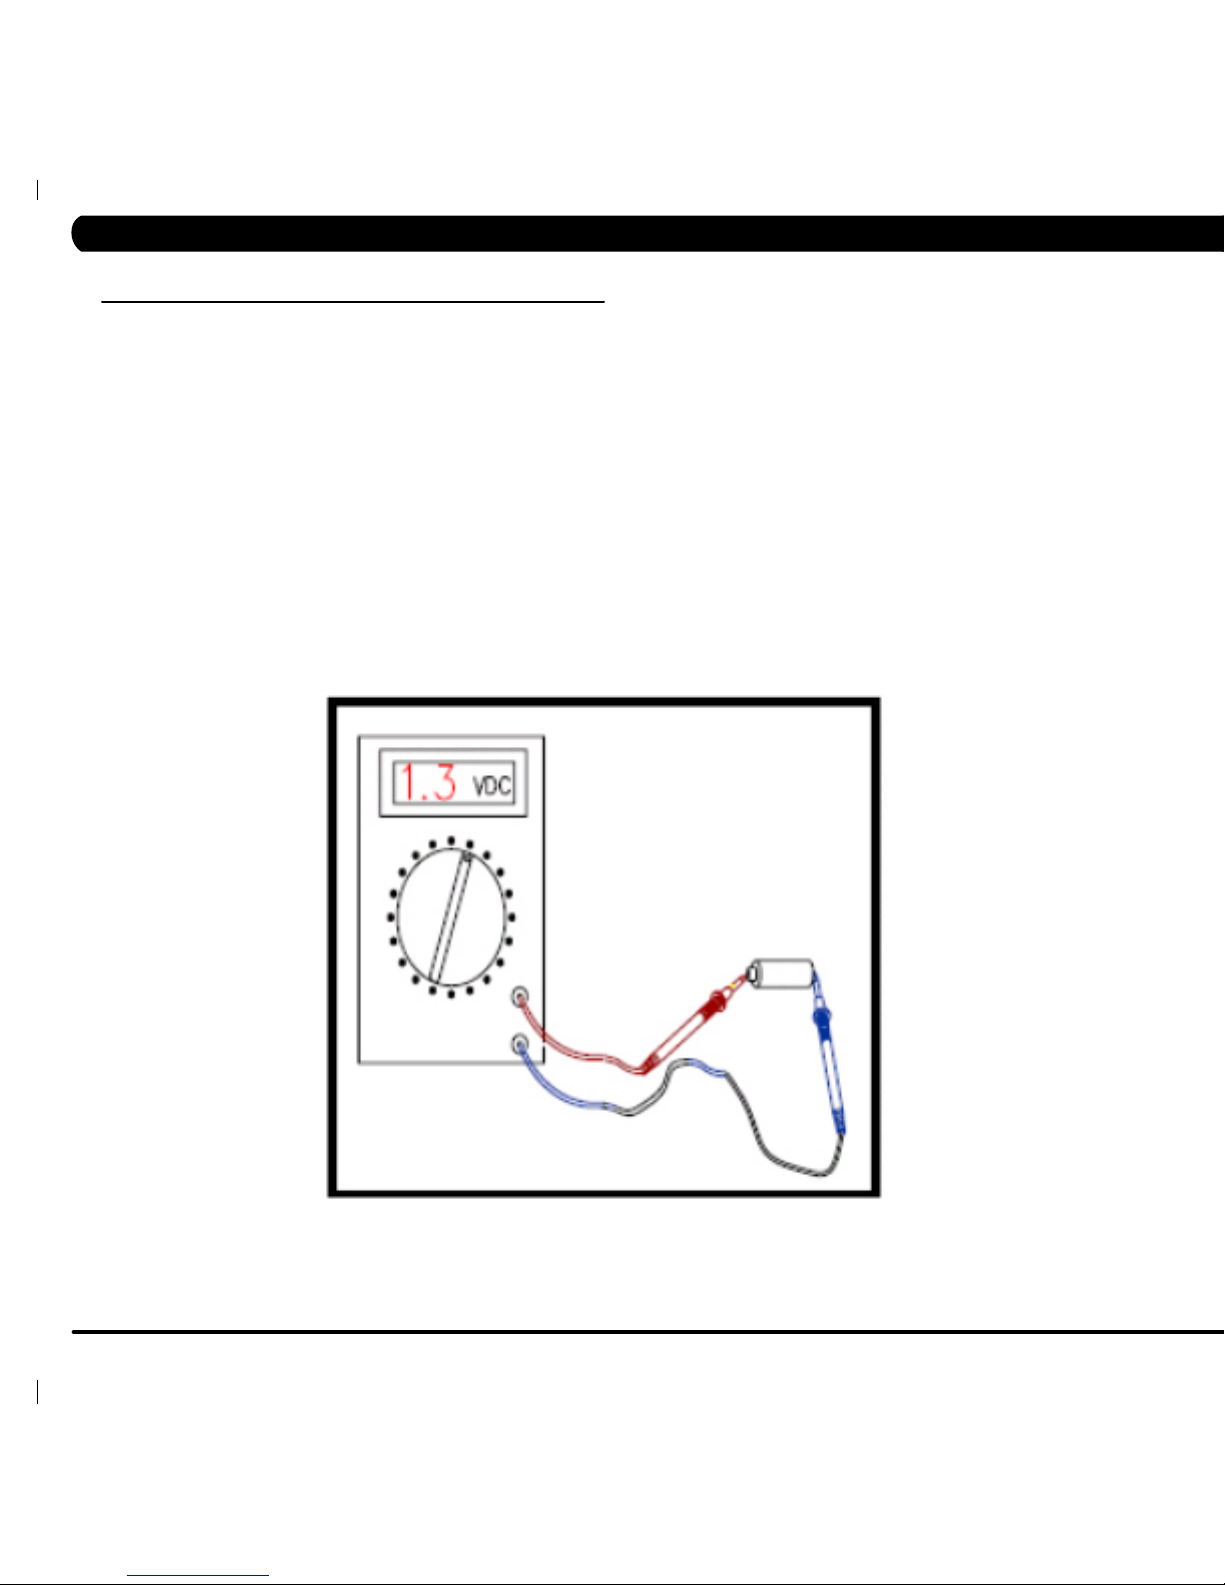
5.1 TROUBLESHOOTING CONSOLE POWER ISSUES
NO DISPLAY ON THE CONSOLE WHEN THE ON / OFF BUTTON IS PRESSED
POSSIBLE CAUSES:
1) The console is damaged or the console cable is not connected properly.
2) The console batteries do not have enough power.
SOLUTION
1) Check the console cable connection at the console.
2) Remove the battery cover from the back of the console and check to see if each of the battery's voltage is greater than 1.3 VDC.
a. If not, replace the batteries.
b. If yes, replace the console.
Page 13

9
5.2 TROUBLESHOOTING COUNTING ISSUES
CHAPTER 5: TROUBLESHOOTING
COUNT VALUE WON'T INCREASE WHILE THE SEAT IS MOVING
POSSIBLE CAUSES:
1) Improper operation of the seat adjustment.
2) The console is damaged, or the console cable is not connected properly.
3) The stroke sensor has fallen out of the seat rail or is mispositioned.
4) The speed sensor is loosely attached or broken.
SOLUTION:
1) Slide the seat to the far end of the seat rail and slide it back and forth several times to see if there is a display on the console.
2) Check if the stroke sensor is positioned correctly on the seat rail.
3) Reposition the stroke sensor. If the console is still not showing value for the stroke or distance:
a. Replace the stroke sensor.
b. Replace the speed sensor.
c. Replace the console cable.
d. Replace the console.
Page 14

10
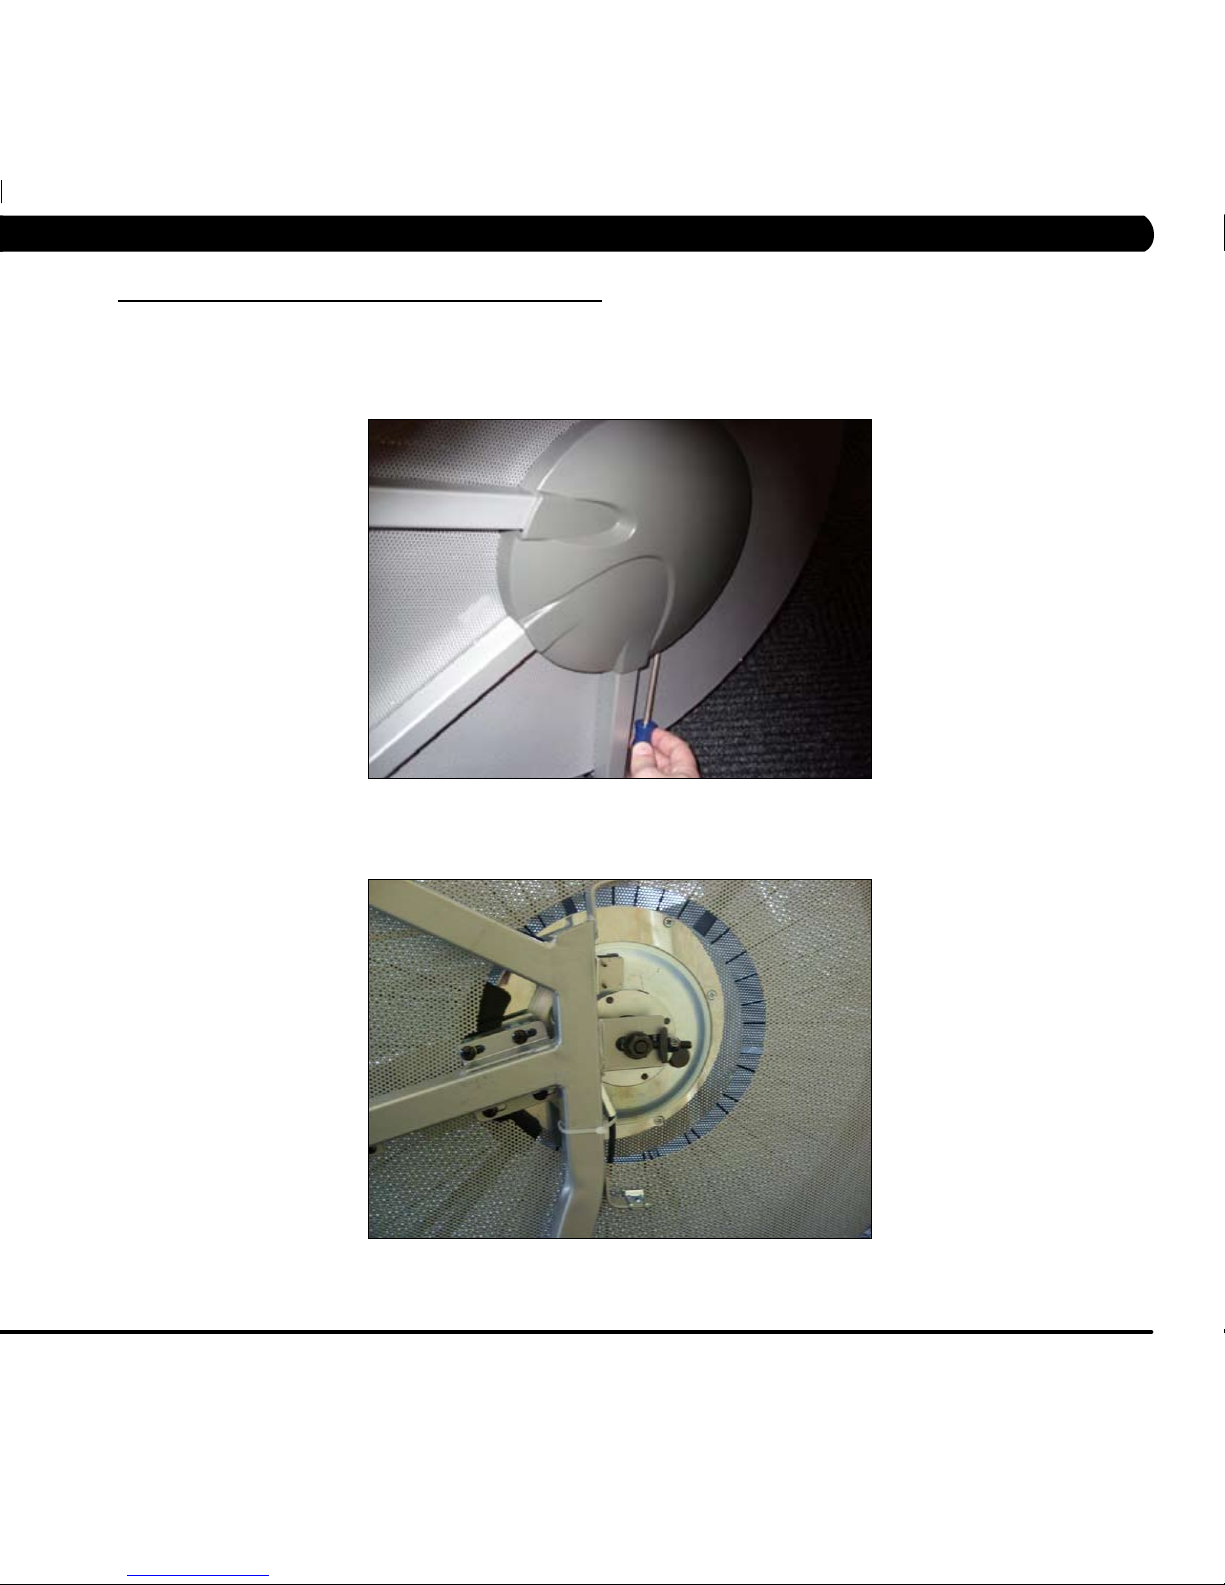
5.3 TROUBLESHOOTING ROPE NOT RETRACTING
ROPE WILL NOT RETRACT OR RETRACTS SLOWLY
POSSIBLE CAUSES
1) The spin axles are not wound tight enough.
2) The spin axles are defective.
SOLUTION
1) Remove the middle shrouds as outlined in Section 6.2, and rewind the spin axles (Figure A). The right side spin axle should be wound clockwise 2.5 - 3
revolutions, the left side spin axle should be wound counter clockwise 2.5 - 3 revolutions.
2) If the rope still will not retract, replace the spin axles.
FIGURE A
CHAPTER 5: TROUBLESHOOTING
Page 15
6.1 FRONT SHROUD REMOVAL
1) Remove the screw holding the shroud in place using a #2 Phillips Screwdriver.
2) Figure B shows the rower with a front shroud removed.
FIGURE A
FIGURE B
CHAPTER 6: PART REPLACEMENT GUIDE
11
Page 16

12
6.2 MIDDLE SHROUD REMOVAL
1) Remove the 4 screws holding the shroud to the frame (Figure A).
2) Figure B shows the rower with a middle shroud removed.. NOTE: When reinstalling the middle shroud, or when installing a new middle shroud, make
sure the nut clips are positioned correctly (Figure C).
FIGURE A
FIGURE B
FIGURE C
CHAPTER 6: PART REPLACEMENT GUIDE
Page 17

13
6.3 CONSOLE REPLACEMENT
1) Disconnect the HR and RPM wires from the back of the console (Figure A).
2) Remove the screw / nut holding the console to the console mast (Figure B).
3) Remove the console (Figure C).
4) Reverse Steps 1-3 to install a new console.
5) Test the rower for function as outlined in Section 6.19.
FIGURE A
FIGURE B
FIGURE C
CHAPTER 6: PART REPLACEMENT GUIDE
Page 18

14
CHAPTER 6: PART REPLACEMENT GUIDE
6.4 HANDLEBAR REPLACEMENT
1) Pull the rope away from the console to create slack in the rope.
2) Loosen the loops of the rope around the handlebar (Figure A).
3) Remove the handlebar.
4) To install a new handlebar, create double loops in the rope and slide the new handlebar into place (Figures B & C).
FIGURE A
FIGURE B FIGURE C
Page 19

15
1) Remove the console as outlined in Section 6.3.
2) Remove the handlebar from the rope as outlined in Section 6.4.
3) Remove the 3 screws holding the rubber center cover to the plastic (Figure A).
4) Lift up on the rubber center cover, and at the same time, pull the rope through the hole in the cover (Figure B).
5) Remove the rubber center cover (Figure C).
6) Reverse Steps 1-5 to install a new rubber center cover.
FIGURE A
FIGURE B
FIGURE C
6.5 RUBBER CENTER COVER REPLACEMENT
CHAPTER 6: PART REPLACEMENT GUIDE
Page 20

16
CHAPTER 6: PART REPLACEMENT GUIDE
6.6 PLASTIC CENTER COVER REPLACEMENT
1) Remove the console as outlined in Section 6.3.
2) Remove the handlebar from the rope as outlined in Section 6.4.
3) Remove the rubber center cover as outlined in Section 6.5.
4) Remove the 4 screws holding the plastic center cover to the frame (Figure A).
5) Lift up on the plastic center cover and at the same time pull the rope through the hole in the cover (Figure B).
6) Remove the plastic center cover (Figure C).
7) Reverse Steps 1-6 to install a new plastic center cover.
FIGURE A
FIGURE B
FIGURE C
Page 21

17
6.7 ROPE REPLACEMENT
CHAPTER 6: PART REPLACEMENT GUIDE
FIGURE A
FIGURE B
1) Remove the right side middle shroud as outlined in Section 6.2.
2) Remove the console as outlined in Section 6.3.
3) Remove the handlebar from the rope as outlined in Section 6.4.
4) Remove the rubber center cover as outlined in Section 6.5.
5) Remove the plastic center cover as outlined in Section 6.6.
6) Remove the rubber ball from the end of the rope (Figure A).
7) Allow the rope to coil around the rope axle.
8) Loosen the screws attaching the rope to the rope axle (Figure B).
9) Cut the rope and remove it.
10) Reverse Steps 1-9 to install a new rope. NOTE: When replacing the rope, first thread the rope through the guide hole of the rope axle and tie a knot,
then tighten the bracket screws.
11) Test the rower for function as outlined in Section 6.19.
Page 22

18
1) Remove the right side middle shroud as outlined in Section 6.2.
2) Remove the console as outlined in Section 6.3.
3) Remove the rubber center cover as outlined in Section 6.5.
4) Remove the plastic center cover as outlined in Section 6.6.
5) Remove the screw / nut holding the rope pulley to the frame (Figure A).
6) Remove the rope pulley (Figure B).
7) Reverse Steps 1-6 to install a new rope pulley.
8) Test the rower for function as outlined in Section 6.19.
CHAPTER 6: PART REPLACEMENT GUIDE
6.8 ROPE PULLEY REPLACEMENT
FIGURE A
FIGURE B
Page 23

19
6.9 SPIN AXLE REPLACEMENT
CHAPTER 6: PART REPLACEMENT GUIDE
1) Remove the middle shrouds as outlined in Section 6.2.
2) Remove the 3 screws holding the spin axle to the frame (Figure A).
3) Remove the spin axle (Figure B).
4) Reverse Steps 1-3 to install a new spin axle. NOTE: When installing a new spin axle, be sure to wind the axle 2.5 - 3 revolutions (clockwise for the right
spin axle, counter clockwise for the left spin axle) before attaching to the frame (Figure C).
5) Test the rower for function as outlined in Section 6.19.
FIGURE A
FIGURE B
FIGURE C
Page 24

20
6.10 ROPE AXLE SET REPLACEMENT
CHAPTER 6: PART REPLACEMENT GUIDE
1) Remove the front shrouds as outlined in Section 6.1.
2) Remove the middle shrouds as outlined in Section 6.2.
3) Remove the console as outlined in Section 6.3.
4) Remove the handlebar from the rope as outlined in Section 6.4.
5) Remove the rubber center cover as outlined in Section 6.5.
6) Remove the plastic center cover as outlined in Section 6.6.
7) Remove the rubber ball from the end of the rope (Figure A).
8) Allow the rope to coil around the rope axle set.
9) Remove the 3 screws holding the spin axle in place on both sides and remove the spin axles (Figures B & C).
10) Loosen the tension on the belt by loosening the eye bolt nuts on the center axle set (Figures D & E).
11) Remove the 3 screws holding the rope axle set to the frame on both sides (Figure F).
12) Remove the rope axle set (Figure G).
13) Reverse Steps 1-13 to install a new rope axle set.
13) Test the rower for function as outlined in Section 6.19.
FIGURE A
FIGURE B
FIGURE C
Page 25

21
6.10 ROPE AXLE SET REPLACEMENT CONTINUED
CHAPTER 6: PART REPLACEMENT GUIDE
FIGURE D FIGURE E
FIGURE F FIGURE G
Page 26

22
6.11 MAGNET SET REPLACEMENT
CHAPTER 6: PART REPLACEMENT GUIDE
1) Remove the front shrouds as outlined in Section 6.1.
2) Remove the middle shrouds as outlined in Section 6.2.
3) Remove the console as outlined in Section 6.3.
4) Remove the handlebar from the rope as outlined in Section 6.4.
5) Remove the rubber center cover as outlined in Section 6.5.
6) Remove the plastic center cover as outlined in Section 6.6.
7) Remove the rubber ball from the end of the rope (Figure A).
8) Allow the rope to coil around the rope axle set.
9) Remove the eye bolts that apply tension to the belt (Figures B & C).
10) Remove the 2 screws holding the speed sensor to the frame (Figure D).
11) Remove the 4 screws holding the magnet set to the frame (Figure E).
12) Remove the 4 screws holding the wheel cover to the frame (Figures F & G), this will allow you to roll the wheel covers / center axle from the frame
(Figure H) and remove the magnet set (Figure I).
13) Reverse Steps 1-12 to install a new magnet set.
14) Test the rower for function as outlined in Section 6.19.
FIGURE A
FIGURE B FIGURE C
Page 27

23
CHAPTER 6: PART REPLACEMENT GUIDE
FIGURE D
FIGURE E
6.11 MAGNET SET REPLACEMENT CONTINUED
FIGURE F
FIGURE G
FIGURE H
FIGURE I
Page 28

24
1) Remove the right side front shroud as outlined in Section 6.1.
2) Remove the right side middle shroud as outlined in Section 6.2.
3) Remove the console as outlined in Section 6.3.
4) Remove the handlebar from the rope as outlined in Section 6.4.
5) Remove the rubber center cover as outlined in Section 6.5.
6) Remove the plastic center cover as outlined in Section 6.6.
7) Remove the 2 screws holding the speed sensor to the frame (Figure A).
8) Remove the 2 screws holding the speed sensor to the speed sensor bracket (Figure B).
9) Tie a string / wire to the plug end of the defective speed sensor and pull the defective speed sensor out of the frame (Figures C & D). This will leave the
length of string / wire inside of the frame.
10) Tie the string / wire inside of the frame to the plug end of the new speed sensor and pull the new speed sensor through the frame.
11) Reverse Steps 1-10 to install a new speed sensor. NOTE: When remounting the speed sensor to the frame, be sure to space the speed sensor so that it
reads the magnet but does not make contact.
FIGURE A
FIGURE B
6.12 SPEED SENSOR REPLACEMENT
FIGURE C
FIGURE D
CHAPTER 6: PART REPLACEMENT GUIDE
Page 29

25
6.13 TENSION SET REPLACEMENT
1) Remove the front shrouds as outlined in Section 6.1.
2) Remove the middle shrouds as outlined in Section 6.2.
3) Remove the console as outlined in Section 6.3.
4) Remove the handlebar from the rope as outlined in Section 6.4.
5) Remove the rubber center cover as outlined in Section 6.5.
6) Remove the plastic center cover as outlined in Section 6.6.
7) Remove the rubber ball from the end of the rope.
8) Allow the rope to coil around the rope axle set.
9) Remove the eye bolts that apply tension to the belt (Figures A & B).
10) Remove the 2 screws holding the speed sensor to the frame (Figure C).
11) Remove the 4 screws holding the magnet set to the frame (Figure D).
12) Remove the 4 screws holding the wheel cover to the frame (Figures E & F), this will allow you to roll the wheel covers / center axle from the frame
(Figure G) and remove the magnet set (Figure H).
13) Disconnect the tension wiring from the magnet set (Figure I).
14) Remove the screw holding the tension knob to the frame and remove the tension set (Figures J & K).
15) Reverse Steps 1-14 to install a new tension set.
16) Test the rower for function as outlined in Section 6.19.
FIGURE A
FIGURE B
FIGURE C
FIGURE D
FIGURE E
CHAPTER 6: PART REPLACEMENT GUIDE
Page 30

26
FIGURE F FIGURE G
FIGURE H
FIGURE I
FIGURE J
FIGURE K
6.13 TENSION SET REPLACEMENT CONTINUED
CHAPTER 6: PART REPLACEMENT GUIDE
Page 31

27
6.14 CENTER AXLE REPLACEMENT
CHAPTER 6: PART REPLACEMENT GUIDE
1) Remove the front shrouds as outlined in Section 6.1.
2) Remove the middle shrouds as outlined in Section 6.2.
3) Remove the console as outlined in Section 6.3.
4) Remove the handlebar from the rope as outlined in Section 6.4.
5) Remove the rubber center cover as outlined in Section 6.5.
6) Remove the plastic center cover as outlined in Section 6.6.
7) Remove the rubber ball from the end of the rope (Figure A).
8) Allow the rope to coil around the rope axle set.
9) Remove the eye bolts that apply tension to the belt (Figures B & C).
10) Remove the 2 screws holding the speed sensor to the frame (Figure D).
11) Remove the 4 screws holding the magnet set to the frame (Figure E).
12) Remove the 4 screws holding the wheel cover to the frame (Figures F & G), this will allow you to remove the wheel covers / center axle from the
frame (Figure H).
13) Peel up the rubber center strip, and remove the screws holding the 2 sides of the wheel cover together (Figure I).
14) Remove the center axle.
15) Reverse Steps 1-14 to install a new center axle.
16) Test the rower for function as outlined in Section 6.19.
FIGURE A
FIGURE B
FIGURE C
Page 32

28
FIGURE D
6.14 CENTER AXLE REPLACEMENT CONTINUED
CHAPTER 6: PART REPLACEMENT GUIDE
FIGURE E
FIGURE F
FIGURE G
FIGURE H
FIGURE I
Page 33

29
6.15 HANDLEBAR BRACKET REPLACEMENT
CHAPTER 6: PART REPLACEMENT GUIDE
FIGURE A
FIGURE B
1) Remove the 2 screws holding the handlebar bracket to the frame (Figure A).
2) Remove the handlebar bracket (Figure B).
3) Reverse Steps 1-2 to install a new handlebar bracket.
Page 34

30
1) Remove the middle shrouds as outlined in Section 6.2.
2) Remove the console as outlined in Section 6.3.
3) Remove the handlebar from the rope as outlined in Section 6.4.
4) Remove the rubber center cover as outlined in Section 6.5.
5) Remove the plastic center cover as outlined in Section 6.6.
6) Remove the handlebar bracket as outlined in Section 6.15.
7) Remove the 2 long screws / nuts holding the seat rail to the frame (Figures A & B).
8) Disconnect the console cable from the stroke sensor wire (Figure C) and pull the console cable off the unit.
9) Reverse Steps 1-8 to install a new console cable.
10) Test the rower for function as outlined in Section 6.19.
6.16 CONSOLE CABLE REPLACEMENT
CHAPTER 6: PART REPLACEMENT GUIDE
FIGURE A
FIGURE B
FIGURE C
Page 35

31
6.17 STROKE SENSOR REPLACEMENT
CHAPTER 6: PART REPLACEMENT GUIDE
1) Remove the handlebar bracket as outlined in Section 6.15.
2) Remove the 2 long screws / nuts holding the seat rail to the frame (Figures A & B).
3) Disconnect the console cable from the stroke sensor wire (Figure C).
4) Cut the tie strap holding the stroke sensor wire to the seat rail (Figure D).
5) Remove the 2 screws holding the stroke sensor to the bottom of the seat rail (Figure E).
6) Tie a cable around the end of the stroke sensor wire (Figure F), and pull the stroke sensor out of the seat rail, sensor first.
7) Reverse Steps 1-6 to install a new stroke sensor. NOTE: Use the cable you just ran to pull a new stroke sensor into position inside of the seat rail.
8) Test the rower for function as outlined in Section 6.19.
FIGURE A
FIGURE B
FIGURE C
FIGURE D FIGURE E FIGURE F
Page 36

32
6.18 SEAT PAD REPLACEMENT
1) Remove the long screw / nut holding the bottom seat roller to the seat bracket set (Figure A).
2) Remove the seat roller (Figure B).
3) Remove the seat bracket set from the seat rail (Figure C).
4) Remove the 4 screws holding the seat pad to the seat bracket set (Figure D) and remove the seat pad.
5) Reverse Steps 1-4 to install a new seat pad.
FIGURE A
FIGURE B
CHAPTER 6: PART REPLACEMENT GUIDE
FIGURE C
FIGURE D
Page 37

CHAPTER 6: PART REPLACEMENT GUIDE
6.19 TESTING THE ROWER
ONCE THE UNIT OR REPLACEMENT PART IS FULLY INSTALLED AND ASSEMBLED AND PROPERLY
PLACED ON THE FLOOR, USE THE FOLLOWING INSTRUCTIONS TO TEST THE MACHINE:
1) Without hitting start or entering any program modes, sit on the machine and hold the handlebar while initiating movement to simulate exercising.
While moving, listen for any odd noises or squeaks.
2) After stopping movement, press the ON/OFF button and begin using the machine.
3) Grasp the handlebar and move the seat to make sure that strokes are accumulating.
4) Check the console to make sure that distance is accumulating once strokes are registered.
5) Adjust the tension knob to make sure that tension changes are registering.
33
Page 38

34
CHAPTER 7: ROWER SPECIFICATIONS AND ASSEMBLY GUIDE
7.1 ROWER SPECIFICATIONS
CONSOLE
Display Screen Extra large LCD display
Display Readout Time, Distance, SPM (strokes per minute), Stroke, Watts, Heart Rate,
Calories
Programs Manual, Race, Training
Telemetric HR Receiver Yes
Contact HR Sensors No
Transport Wheels Yes
TECHNICAL DATA
Resistance Technology Fan blade system
Resistance Levels 12
Drive System Coil spring poly-V belt
Dimensions (L x W x H) 106" x 20" x 40" / 269 x 51 x 102 cm
Product Weight 90 lbs / 41 kgs
Shipping Weight 97 lbs / 44 kgs
Max User Weight 350 lbs / 160 kgs
Power Requirements Battery powered LCD display
SPECIAL FEATURES
Handlebar Design Easy to grip wooden handrail.
Pedals Fit in with adjustable footboard
Monorail Aluminum
Page 39

35
7.2 UNPACKING THE ROWER
CHAPTER 7: ROWER SPECIFICATIONS AND ASSEMBLY GUIDE
The Matrix W1x Rower is carefully inspected before shipment, so it should arrive in good operating condition. Matrix Fitness ships the unit in the following
pieces.
NOTE: If these parts are missing from the package, please contact Matrix Fitness at once.
Page 40

36
7.3 FASTENERS AND ASSEMBLY TOOLS
CHAPTER 7: ROWER SPECIFICATIONS AND ASSEMBLY GUIDE
Page 41

37
7.4 ASSEMBLY INSTRUCTIONS
GETTING STARTED
Read the owner's manual before setting up the Matrix W1x Rower. Place the unit where it will be used before beginning the setup procedure.
MAKING A CHOICE OF SITE
The site should be well lit and well ventilated. Locate the Matrix W1x Rower on a structurally solid and flat surface. If the site has a heavy plush carpet, to
protect the carpeting and machinery, you should place a rigid plastic base under the unit.
Please do not place the Matrix W1x Rower in an area of high humidity, such as the vicinity of a steam room, indoor pool, or sauna. Exposure to intensive
water vapor or chlorine could adversely affect the electronics, as well as other parts of the machine.
CHAPTER 7: ROWER SPECIFICATIONS AND ASSEMBLY GUIDE
Page 42

38
1) Secure the front foot to the frame bracket using two bolts (H04).
STEP 1
7.4 ASSEMBLY INSTRUCTIONS
CHAPTER 7: ROWER SPECIFICATIONS AND ASSEMBLY GUIDE
Page 43

7.4 ASSEMBLY INSTRUCTIONS CONTINUED
CHAPTER 7: ROWER SPECIFICATIONS AND ASSEMBLY GUIDE
1) Attach the pedal assembly to the aluminum rail with four bolts (H04) and spring washers (H05).
2) Attach the seat rail rod to the aluminum rail using one screw (F07) and flat washer (F19).
STEP 2
39
Page 44

40
7.4 ASSEMBLY INSTRUCTIONS CONTINUED
CHAPTER 7: ROWER SPECIFICATIONS AND ASSEMBLY GUIDE
1) Mount the seat to the seat bracket with 4 screws (D09) and washers (D10).
2) Slide the seat assembly onto the aluminum rail.
3) Attach the seat stop bumper to the aluminum rail using the bolt (F07) and washers (F19).
STEP 3
Page 45

41
7.4 ASSEMBLY INSTRUCTIONS CONTINUED
1) Place the rear foot position plate (F04) inside the aluminum rail close to the edge. Attach the rear foot to the aluminum rail and align the four holes of
the aluminum rail with the four holes of the rear foot. Thread the bolts (H04) with spring washers (H05) through the rear foot into the rear foot position
plate and tighten them.
2) Press the seat rail end cap into the aluminum rail, and use two screws (F20) to fix the cap.
STEP 4
CHAPTER 7: ROWER SPECIFICATIONS AND ASSEMBLY GUIDE
Page 46

42
CHAPTER 7: ROWER SPECIFICATIONS AND ASSEMBLY GUIDE
7.4 ASSEMBLY INSTRUCTIONS CONTINUED
STEP 5
1) Connect the sensor cable from the main frame and the
aluminum rail.
STEP 6
1) Place the aluminum rail into the rail bracket of the main
frame, and tighten them using two bolts (F18), four washers
(F06), and two nuts (F08).
2) Mount the handlebar bracket to the rail bracket using two
bolts (B42).
Page 47

43
CHAPTER 7: ROWER SPECIFICATIONS AND ASSEMBLY GUIDE
7.4 ASSEMBLY INSTRUCTIONS CONTINUED
STEP 7
Plug the two console cables into the console. Secure the console to the console support using the screw (N08) and nylon nut (N09).
Page 48

NOTES
44
Page 49

45
MATRIX FITNESS SYSTEMS CORP.
1610 LANDMARK DRIVE COTTAGE GROVE WI 53527 USA
TOLL FREE 866.693.4863
www.matrixfitness.com
FAX 608.839.1717
KO
REV. 1
 Loading...