

Page 1

T7XE-04 TREADMILL
SERVICE MANUAL
Page 2

TABLE OF CONTENTS
CHAPTER 1: SERIAL NUMBER LOCATION ................................................................... 1
CHAPTER 2: IMPORTANT SAFETY INSTRUCTIONS
2.1 Before Getting Started .............................................................................................. 2
2.2 Read and Save These Instructions ........................................................................... 3
2.3 Electrical Requirements ............................................................................................ 4
CHAPTER 3: PREVENTATIVE MAINTENANCE
3.1 Recommended Cleaning Tips ................................................................................... 5
3.2 Check for Damaged Parts ......................................................................................... 5
3.3 Care and Maintenance Instructions .......................................................................... 6
3.4 Touch Screen Care and Cleaning .............................................................................. 7
3.5 Auto Calibration Procedure ........................................................................................ 8
3.6 Adjusting the Running Belt ........................................................................................ 8
CHAPTER 4: USING THE CONSOLE AND PROGRAM DESCRIPTION
4.1 Console Description .................................................................................................. 9
4.2 Manual Workout Operation ........................................................................................ 10
4.3 Operating Level Based Programs ............................................................................. 10
4.4 Heart Rate Control Workout Operation ...................................................................... 11
4.5 Fitness Test Workout Operation ................................................................................. 11
CHAPTER 5: MANAGER MODE
5.1 Using Manager Mode ................................................................................................ 13
5.2 Manager Mode - About .............................................................................................. 14
5.3 Manager Mode - Time ................................................................................................ 15
5.4 Manager Mode - Speed ............................................................................................. 15
5.5 Manager Mode - Defaults .......................................................................................... 16
5.6 Manager Mode - TV ................................................................................................... 17
5.7 Manager Mode - Language ........................................................................................ 18
5.8 Manager Mode - Other ............................................................................................... 19
CHAPTER 6: ENGINEERING MODE
6.1 Using Engineering Mode ........................................................................................... 20
6.2 Engineering Mode - Calibration ................................................................................. 20
6.3 Engineering Mode - Statistics .................................................................................... 21
6.4 Engineering Mode - Errors ......................................................................................... 21
6.5 Engineering Mode - Clubs ......................................................................................... 22
6.6 Engineering Mode - Club ID....................................................................................... 22
6.7 Engineering Mode - Erp Time .................................................................................... 23
CHAPTER 7: SERVICE MODE:
7.1 Using Service Mode. .................................................................................................. 24
7.2 Service Mode - Set Up ............................................................................................... 24
7.3 Service Mode - Test.................................................................................................... 25
7.4 Service Mode - Log .................................................................................................... 26
7.5 Service Mode - Date & Time ...................................................................................... 26
CHAPTER 8: TROUBLESHOOTING
8.1 Electrical Diagrams .................................................................................................... 27
8.2 Motor Control Board (MCB) LED Instructions ........................................................... 30
8.3 MCB Wiring ................................................................................................................ 31
8.4 0140 / 01A0 01A2 Error Troubleshooting .................................................................. 33
8.5 01A3 Error Troubleshooting ....................................................................................... 33
8.6 01A8 / 02B6 / 02B7 / 02B8 Error Troubleshooting .................................................... 33
8.7 029F Error Troubleshooting ....................................................................................... 34
8.8 02AD Error Troubleshooting....................................................................................... 34
8.9 02B2 Error Troubleshooting ....................................................................................... 35
ii
Page 3

TABLE OF CONTENTS
8.10 02B9 / 02BA / 02BD Error Troubleshooting ............................................................... 35
8.11 04A0 Error Troubleshooting ....................................................................................... 36
8.12 Troubleshooting - No Power to the Console ............................................................. 37
8.13 Troubleshooting - Heart Rate Issues ......................................................................... 38
8.14 Troubleshooting - Display Color Issues ..................................................................... 39
8.15 Troubleshooting - Speed Shown is Higher than Belt Speed ..................................... 40
8.16 Entertainment Troubleshooting - Overview ................................................................ 41
8.17 Entertainment Troubleshooting - Picture Fuzzy or Unclear ....................................... 42
8.18 Entertainment Troubleshooting - TV Will Not Turn On .............................................. 43
8.19 Entertainment Troubleshooting - Entertainment Keypad Issues ................................ 44
CHAPTER 9: PART REPLACEMENT GUIDE
9.1 Motor Cover and Lower Shroud Removal ................................................................. 45
9.2 Rear Roller Removal ................................................................................................. 46
9.3 Deck Removal ........................................................................................................... 47
9.4 Deck Cushion Replacement....................................................................................... 48
9.5 Front Roller Removal ................................................................................................. 49
9.6 Running Belt Removal .............................................................................................. 50
9.7 Side Rail Removal...................................................................................................... 51
9.8 Motor Control Board (MCB) Removal ....................................................................... 52
9.9 Motor Removal ........................................................................................................... 53
9.10 Drive Belt Replacement ............................................................................................ 54
9.11 Incline Motor Replacement ........................................................................................ 55
9.12 Console Replacement ................................................................................................ 57
9.13 Console Mast Arm Replacement ................................................................................... 58
9.14 Console Cable Replacement .......................................................................................... 60
9.15 Handlebar Service ...................................................................................................... 62
9.16 Emergency Stop Switch Replacement ....................................................................... 63
9.17 Heart Rate Board Replacement ................................................................................ 64
9.18 Blower Motor Replacement ....................................................................................... 65
9.19 Overlay / Keypad Replacement ................................................................................. 66
CHAPTER 10: TREADMILL SPECIFICATIONS AND ASSEMBLY GUIDE
10.1 Treadmill Specifications ............................................................................................. 68
10.2 Fasteners and Assembly Tools .................................................................................. 69
10.3 Assembly Instructions ............................................................................................... 70
10.4 Leveling the Unit ........................................................................................................ 74
10.5 Entering the Serial Number into the Console ............................................................ 75
10.6 TV Programming Instructions..................................................................................... 76
CHAPTER 11: SOFTWARE UPGRADE INSTRUCTIONS
11.1 Software Upgrade Instructions ................................................................................... 78
iii
Page 4
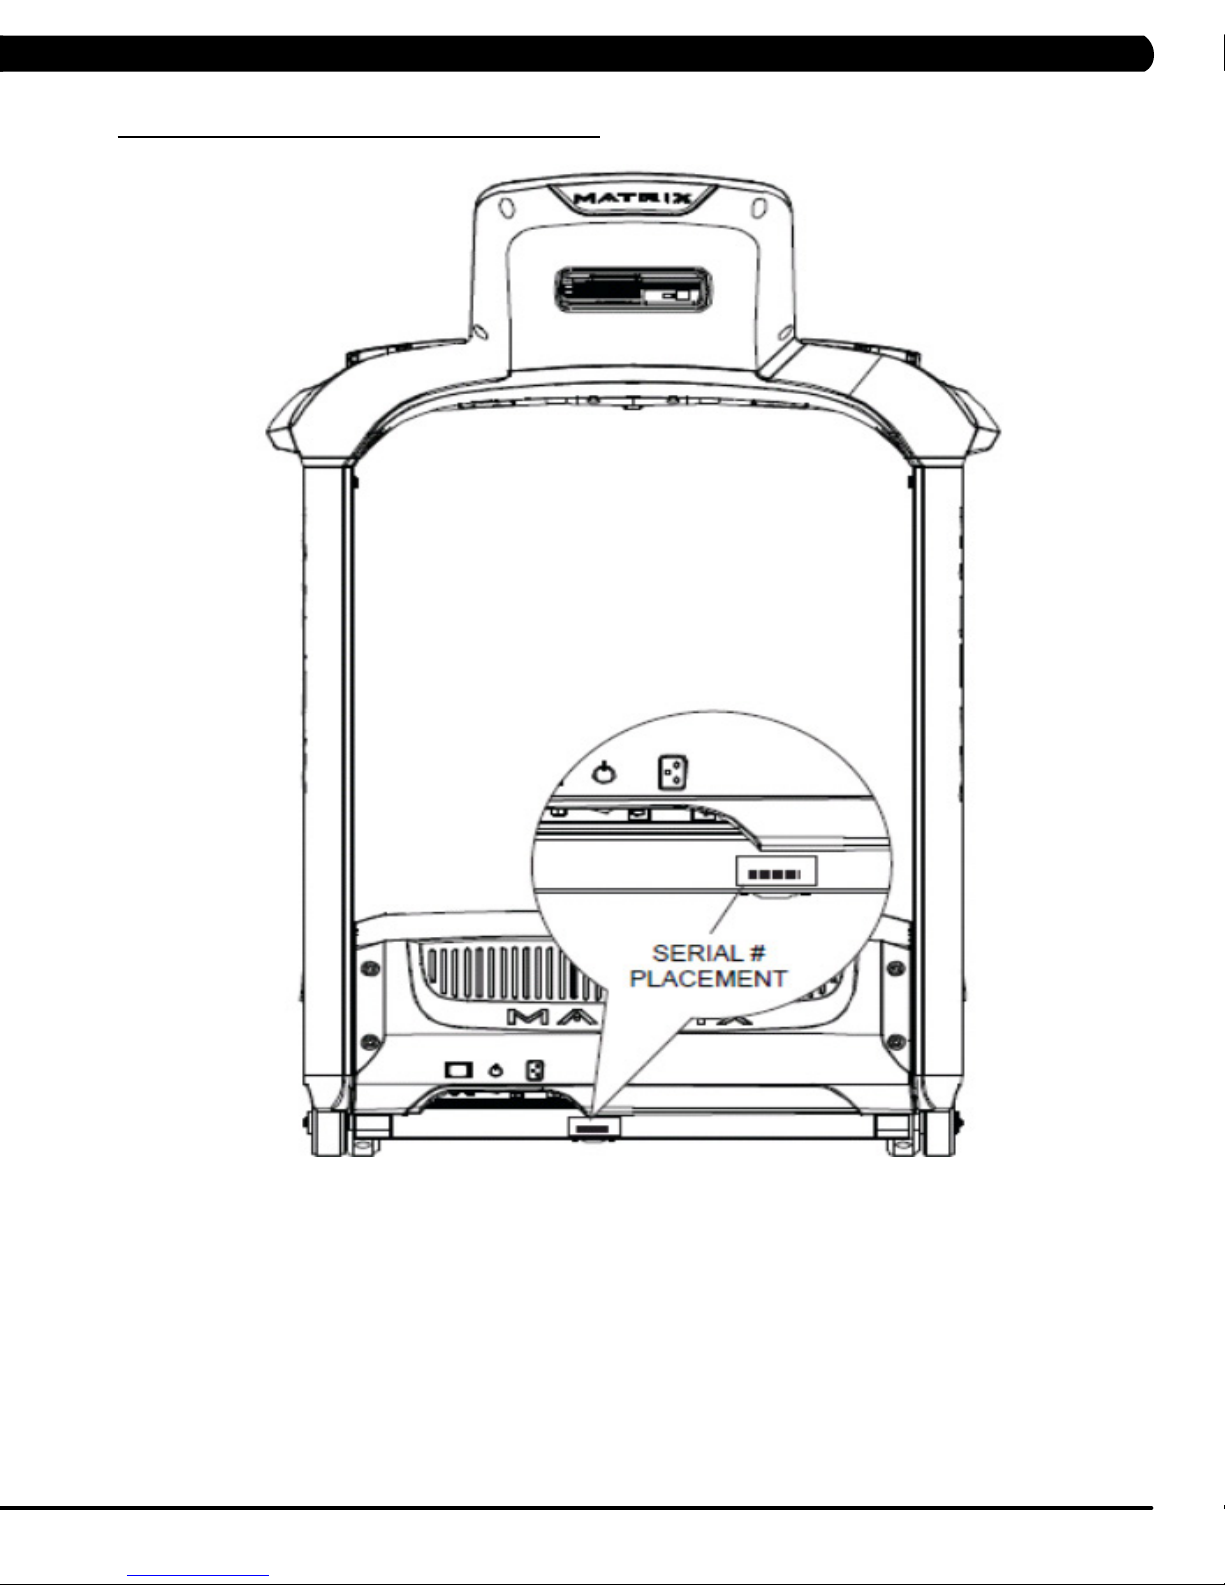
1.1 SERIAL NUMBER LOCATION
CHAPTER 1: SERIAL NUMBER LOCATION
1
Page 5
CHAPTER 2: IMPORTANT SAFETY INFORMATION
2.1 BEFORE GETTING STARTED
This treadmill is intended for commercial use. To ensure your safety and protect the equipment, read all instructions before operating the Matrix
Treadmill.
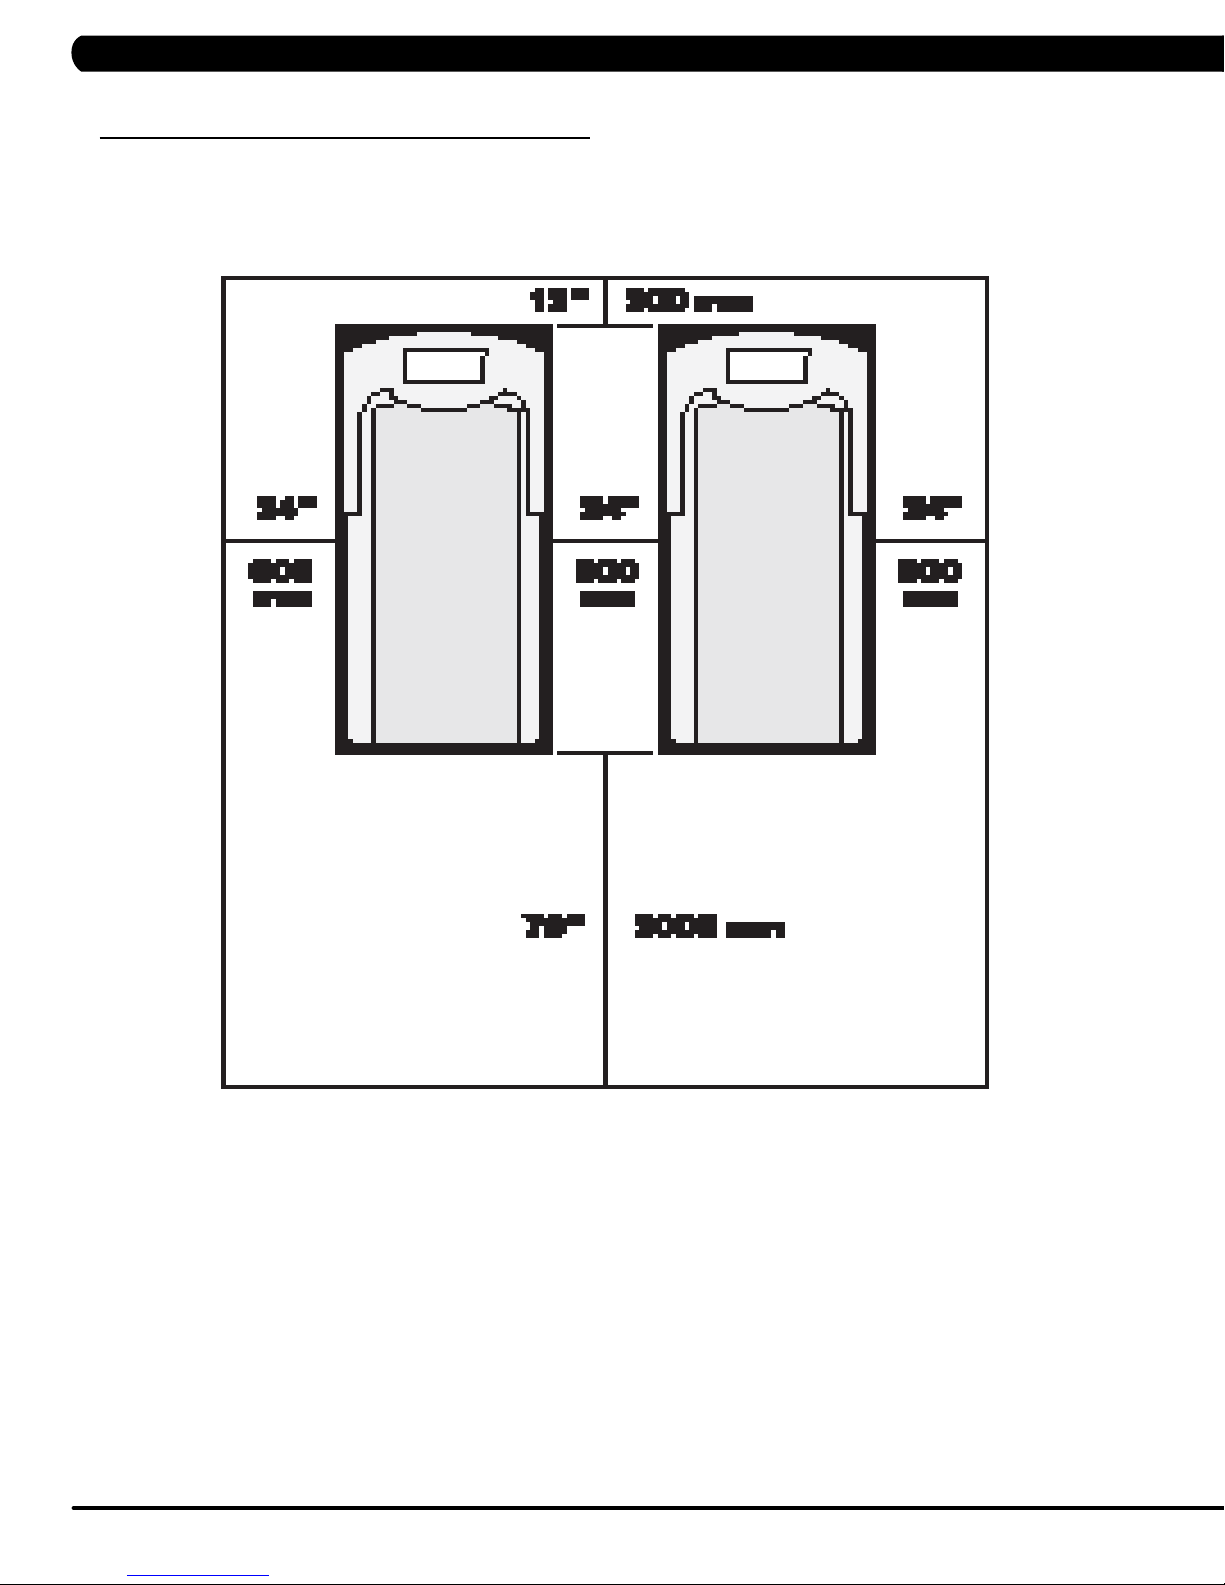
Place the treadmill on a level and stable surface away from direct sunlight. The intense UV light can cause discoloration on the plastics. Locate
your treadmill in an area with cool temperatures and low humidity. Please leave a clear zone behind the treadmill that is at least the width of the
treadmill and at least 79” (2000 mm) long. This zone must be clear of any obstruction and provide the user a clear exit path from the machine.
For ease of access, there should be an accessible space on both sides of the treadmill of at least 24” (600 mm) to allow a user access to the
treadmill from either side. Do not place the treadmill in any area that will block any vent or air openings. The treadmill should not be located in a
garage, covered patio, near water or outdoors.
2
Page 6

CHAPTER 2: IMPORTANT SAFETY INSTRUCTIONS
2.2 READ AND SAVE THESE INSTRUCTIONS
This treadmill is intended for commercial use. To ensure your safety and protect the equipment, read all instructions before operating the
MATRIX T7xe-04 treadmill.
When using an electrical product, basic precautions should always be followed including the following:
DANGER: To reduce the risk of electric shock: Always unplug this equipment from the electrical outlet immediately after using and before
cleaning.
WARNING: To reduce the risk of burns, fire, electrical shock or injury to persons that may be associated with using this product.
An appliance should never be left unattended when plugged in. Unplug from the outlet when not in use and before putting on or taking off parts.
This product must be used for its intended purpose described in this service manual. Do not use other attachments that are not recommended by
the manufacturer. Attachments may cause injury.
To prevent electrical shock, never drop or insert any object into any opening.
Do not remove the console covers. Service should only be done by an authorized service technician.
Never operate the treadmill with the air opening blocked. Keep the air opening clear, free of lint and hair.
Never operate product if it has a damaged cord or plug, if it is working improperly, if it has been damaged, or immersed in water.
Do not carry this unit by its supply cord or use the cord as a handle.
Keep any power cords away from heated surfaces.
Close supervision is necessary when the treadmill is used by or near children or disabled persons.
Do not use outdoors.
Do not operate where aerosol (spray) products are being used or when oxygen is being administered.
To disconnect, turn all controls to the off position, then remove the plug from the outlet.
Connect this treadmill to properly grounded outlets only.
CAUTION: If you experience chest pain, nausea, dizziness or shortness of breath, STOP exercising immediately and consult a physician
before continuing.
• Donotusetheequipmentinanywayotherthandesignedorintendedbythemanufacturer.ItisimperativethatallMatrixFitnessSystemsequip
ment is used properly to avoid injury.
• Keephandsandfeetclearofmovingpartsatalltimestoavoidinjury.
• Unsupervisedchildrenmustbekeptawayfromthisequipment.
• Donotwearlooseclothingwhileonequipment.
-
3
Page 7
CHAPTER 2: IMPORTANT SAFETY INFORMATION
2.3 ELECTRICAL REQUIREMENTS
MATRIX DEDICATED CIRCUIT / ELECTRICAL REQUIREMENT INFO
All Matrix treadmills require the use of a 20 amp "dedicated circuit":, with a non-looped (isolated) neutral / ground, for the power requirement.
Quite simply this means that each outlet you plug your treadmill into should not have anything else running on that same circuit. The easiest
way to verify this is to locate the main circuit breaker box, and turn off the breaker(s) one at a time. Once a breaker has been turned off, the
only thing that should not have power to it is the treadmill. No lamps, vending machines, fans, sound systems, or any other item should lose
power when you perform this test.
Non-looped (isolated) neutral / grounding means that each circuit must have an individual neutral / ground connection coming from it, and
terminating at an approved earth ground. You cannot "jumper" a single neutral / ground from one circuit to the next.
In addition to the dedicated circuit requirement, the proper gauge wire must be used from the circuit breaker box, to each outlet that will have
the maximum number of units running off of it. If the distance from the circuit breaker box, to each outlet, is 100 feet or less, then 12 gauge wire
may be used. For any distance greater than 100 feet from the circuit breaker box to the outlet, 10 gauge wire must be used.
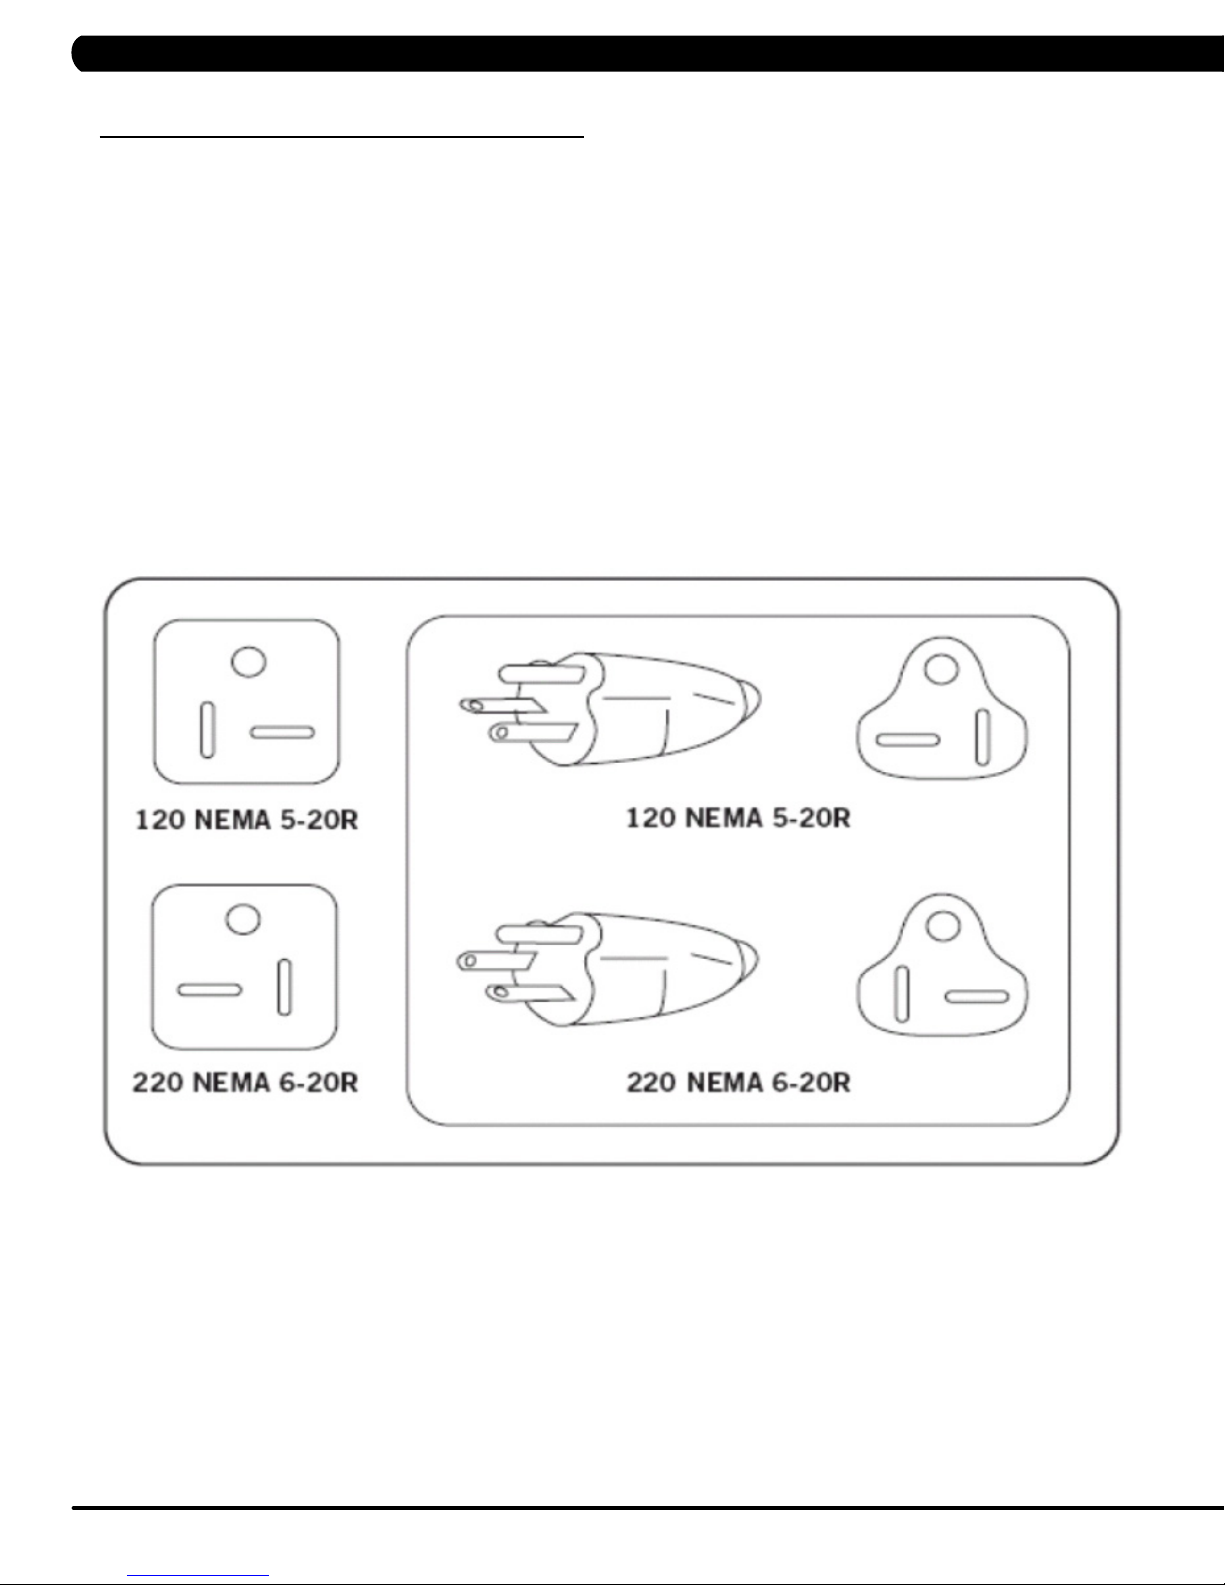
For your safety and to ensure good treadmill performance, the ground on this circuit must be non-looped. Please refer to NEC article 210-21 and
210-23. Your treadmill is provided with a power cord with a plug listed below and requires the listed outlet. Any alterations of this power cord could
void all warranties of this product..
4
Page 8

CHAPTER 3: PREVENTATIVE MAINTENANCE
3.1 RECOMMENDED CLEANING TIPS
In order to maximize life span, and minimize down time, all Matrix Fitness Equipment requires regularly
scheduled cleaning.
YOU WILL NEED:
- Mild dish soap and water mixture in a spray bottle (10:1 water to soap ratio).
- Lint free 100% cotton cleaning cloths or Micro fiber cleaning cloths.
- Vacuum / Shop Vac with extendable hose and soft brush attachment.
- Corrosion Block (available from Matrix - part # ZMS4001374).
DAILY:
1. Wipe down the unit after each use with a mild dish soap and water mixture. NOTE: Spray the soap / water mixture onto the cloth.
NEVER spray directly onto the equipment. We recommend that you do NOT allow customers to use spray bottles to clean the equipment. If
the cleaner is sprayed directly on the equipment or over spray is present, it may cause your equipment to rust and / or cause damage to con
sole overlays.
WEEKLY:
-
1. With a clean dry 100% lint free cloth and water / soap mixture, wipe any dust and dirt from the sides of the running deck between the run
ning belt and side rails.
2. With a clean dry 100% lint free cloth and water / soap mixture, wipe the dust from the top of the motor cover.
3. With a clean dry 100% lint free cloth and water / soap mixture, wipe down the entire console area including the hand grips and hand rails.
4. Use a computer screen cleaner or LCD / LED screen cleaner on the touch screen portion of the console (see Section 3.4).
MONTHLY:
1. Vacuum under and around the Treadmill. If you need to move it, unplug the unit first.
2. Vacuum the air vent on the front of the unit.
3. Apply Corrosion Block to the metal part of the iPod cable.
QUARTERLY:
1. Unplug the unit. Remove the motor cover. Use a vacuum with a soft brush extension, vacuum the dust and dirt from the motor, MCB, fan,
and surrounding areas. Be careful not to hit any of the wire connections.
-
3.2 CHECK FOR DAMAGED PARTS
DO NOT use any equipment that is damaged or has worn or broken parts. Use only replacement parts supplied by Matrix Fitness Systems.
MAINTAIN LABELS AND NAMEPLATES. Do not remove labels for any reason. They contain important information. If unreadable or
missing, contact Matrix Fitness Systems for a replacement at 866-693-4863 or www.matrixfitness.com.
MAINTAIN ALL EQUIPMENT. Preventative maintenance is the key to smoothly operating equipment. Equipment needs to be inspected at
regular intervals. Defective components must be kept out of use until they are repaired. Ensure that any person(s) making adjustments or
performing maintenance or repair of any kind is qualified to do so. Matrix Fitness Systems will provide service and maintenance training at
our corporate facility upon request or in the field if proper arrangements are made.
5
Page 9

CHAPTER 3: PREVENTATIVE MAINTENANCE
3.3 CARE AND MAINTENANCE INSTRUCTIONS
In order to maximize life span, and minimize down time, all Matrix Fitness System's equipment requires regular cleaning, and maintenance items
performed on a scheduled basis. This section contains detailed instructions on how to perform these items, the frequency of which they should
be done, and a check list to sign off on each time service is completed for a specific machine. Some basic tools and supplies will be necessary
to perform these tasks which include (but may not be limited to):
* Metric Allen wrenches
* #2 Phillips head screwdriver
* Adjustable wrench
* Lint free cleaning cloths
* Teflon based spray lubricant such as "Super Lube" or other Matrix approved products.
* Vacuum cleaner with an extendable hose and crevasse tool attachment.
You may periodically see addendums to this document, as the Matrix Technical Support Team identifies items that require specific attention, the
latest version will always be available on the Matrix web site at www.matrixfitness.com.
DAILY MAINTENANCE ITEMS
1) Clean the entire machine using water and mild detergent such as "Simple Green", or other Matrix approved solutions (cleaning agents MUST
be alcohol and ammonia free).
2) Check the emergency stop button and cord for proper operation.
3) Check the power cord for damage, and make sure that the power cord retainer is installed and securely fastened.
MONTHLY MAINTENANCE ITEMS
1) Check the alignment of the running belt (see Section 3.5).
2) Check the tension of the running belt (see Section 3.5).
NOTE: If there is any damage to the running belt or deck, replace with new. If you are replacing (or flipping) a deck, it should always be
accompanied by a new belt.
QUARTERLY MAINTENANCE ITEMS
1) Unplug the unit. Remove the motor cover and vacuum the entire inside area of the machine being careful not to bump any wires or
connections loose.
2) While the motor cover is off, inspect the drive belt for visible wear. Replace if any signs of damage.
3) While the motor cover is off, start the unit and raise incline settings to maximum height. Turn the power switch off at the front of the machine
to prevent it from lowering accidentally. Lubricate incline motor Acme screw (Matrix recommends Super Lube brand grease with PTFE additive).
BI-ANNUAL MAINTENANCE ITEMS
1) Remove wax build up from the front and rear rollers of the machine.
2) Inspect the underside of the running belt for damage, check for cracking or glazed surfaces.
3) During normal operating conditions, the running belt replacement and deck service should be done every 25,000 miles.
6
Page 10

CHAPTER 3: PREVENTATIVE MAINTENANCE
3.4 TOUCH SCREEN CARE & CLEANING
TOUCH SCREEN CARE AND CLEANING
* The touch screen requires very little maintenance. We recommend that you periodically clean the touch screen surface with a clean dry 100%
lint free cloth and water / soap mixture or a computer or LCD / LED screen cleaner.
* It is very important to avoid using any other chemical on the touch screen.
* Always dampen the cloth and clean the screen. Do not spray the water / soap mixture on the screen itself, the drips can seep into the display
or stain the bezel.
* After cleaning, make sure the surface is dry. There should not be any left over solvent to seep into the display.
* It is very important to handle the touch screen with care. Do not use excessive force when cleaning.
* Do not use any sharp materials to clean the touch screen surfaces.
* Do not use high pressure air, water, or steam to clean the touch screen surface.
7
Page 11
CHAPTER 3: PREVENTATIVE MAINTENANCE
3.5 AUTO CALIBRATION INSTRUCTIONS
Run Auto Calibration to calibrate incline after assembly and after
replacing any electronic component.
AUTO CALIBRATION PROCEDURE:
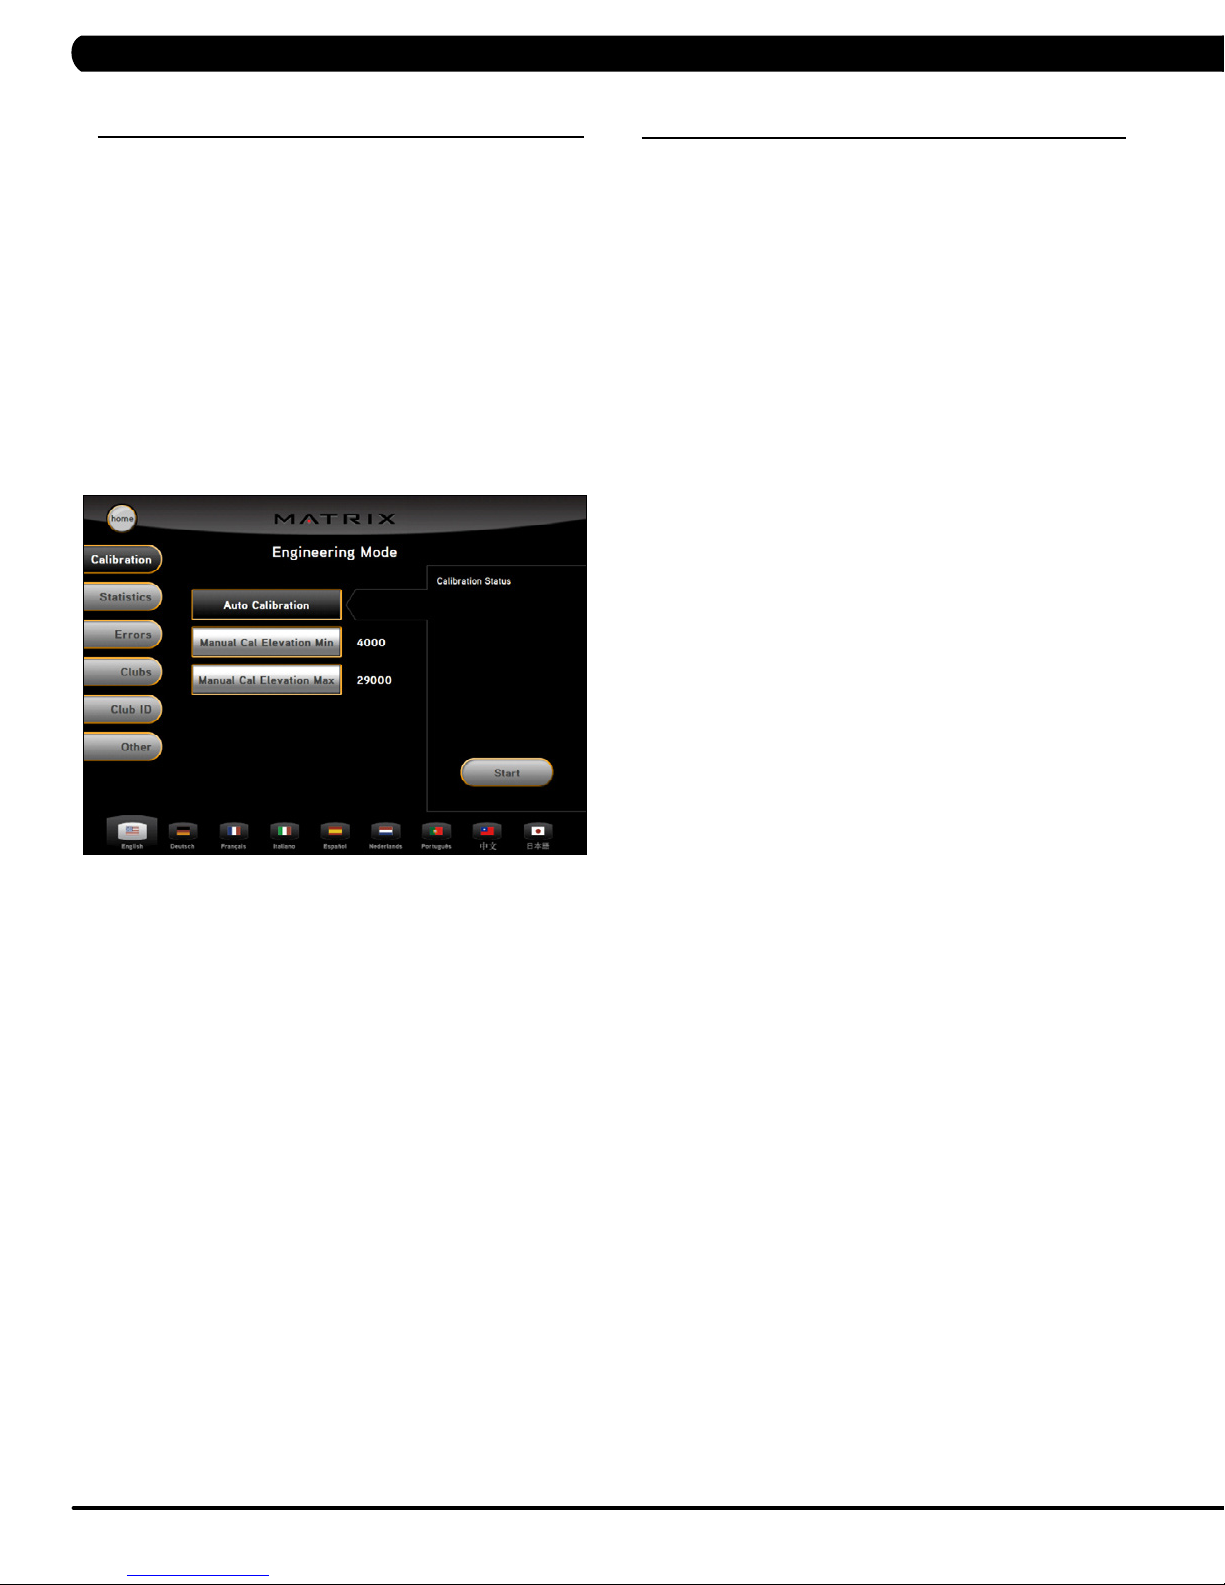
1) Press "ENTER, 2, 0, 0, 1, ENTER". Engineering Mode will
appear on the display.
2) CALIBRATION and AUTO CALIBRATION should be already high
lighted. You just need to press the START button (Figure A). You
SHOULD NOT be standing on the unit while it is calibrating.
3) After completion, the display will state either Complete or Auto
Calibration failed.
3.6 ADJUSTING THE RUNNING BELT
After placing the treadmill in the position it will be used, the belt
must be checked for proper tension and centering. The belt may
need to be adjusted after the first 2 hours of use. Temperature,
humidity, and use cause the belt to stretch at different rates. If
the belt starts to slip when a user is on it, be sure to follow the
directions below.
STEP 1: Locate the two hex head bolts on the rear of the treadmill.
The bolts are located at each end of the frame at the back of the
treadmill. These bolts adjust the rear roller. Do not adjust until the
treadmill is on. This will prevent over tightening of one side.
STEP 2: The belt should have equal distance on either side
between the frame. If the belt is touching one side, do not start
the treadmill. Turn the bolts counter clockwise approximately one
full turn on each side. Manually center the belt by pushing the belt
from side to side. Tighten the bolts the same amount as when the
user loosened them, approximately one full turn. Inspect the belt
for damage.
STEP 3: While the treadmill is running at 3 mph, observe the belt
position. If it is moving to the right, tighten the right bolt by turning
it clockwise 1/4 turn, and loosen the left bolt 1/4 turn. If it is moving
to the left, tighten the left bolt by turning it clockwise 1/4 turn and
loosen the right 1/4 turn. Repeat Step 3 until the belt remains
centered for several minutes.
STEP 4: Check the tension of the belt. The belt should be very
snug. When a person walks or runs on the belt, it should not
hesitate or slip. If this occurs, tighten the belt by turning both bolts
clockwise 1/4 turn. Repeat if necessary.
8
Page 12
CHAPTER 4: CONSOLE OVERLAY AND WORKOUT DESCRIPTION
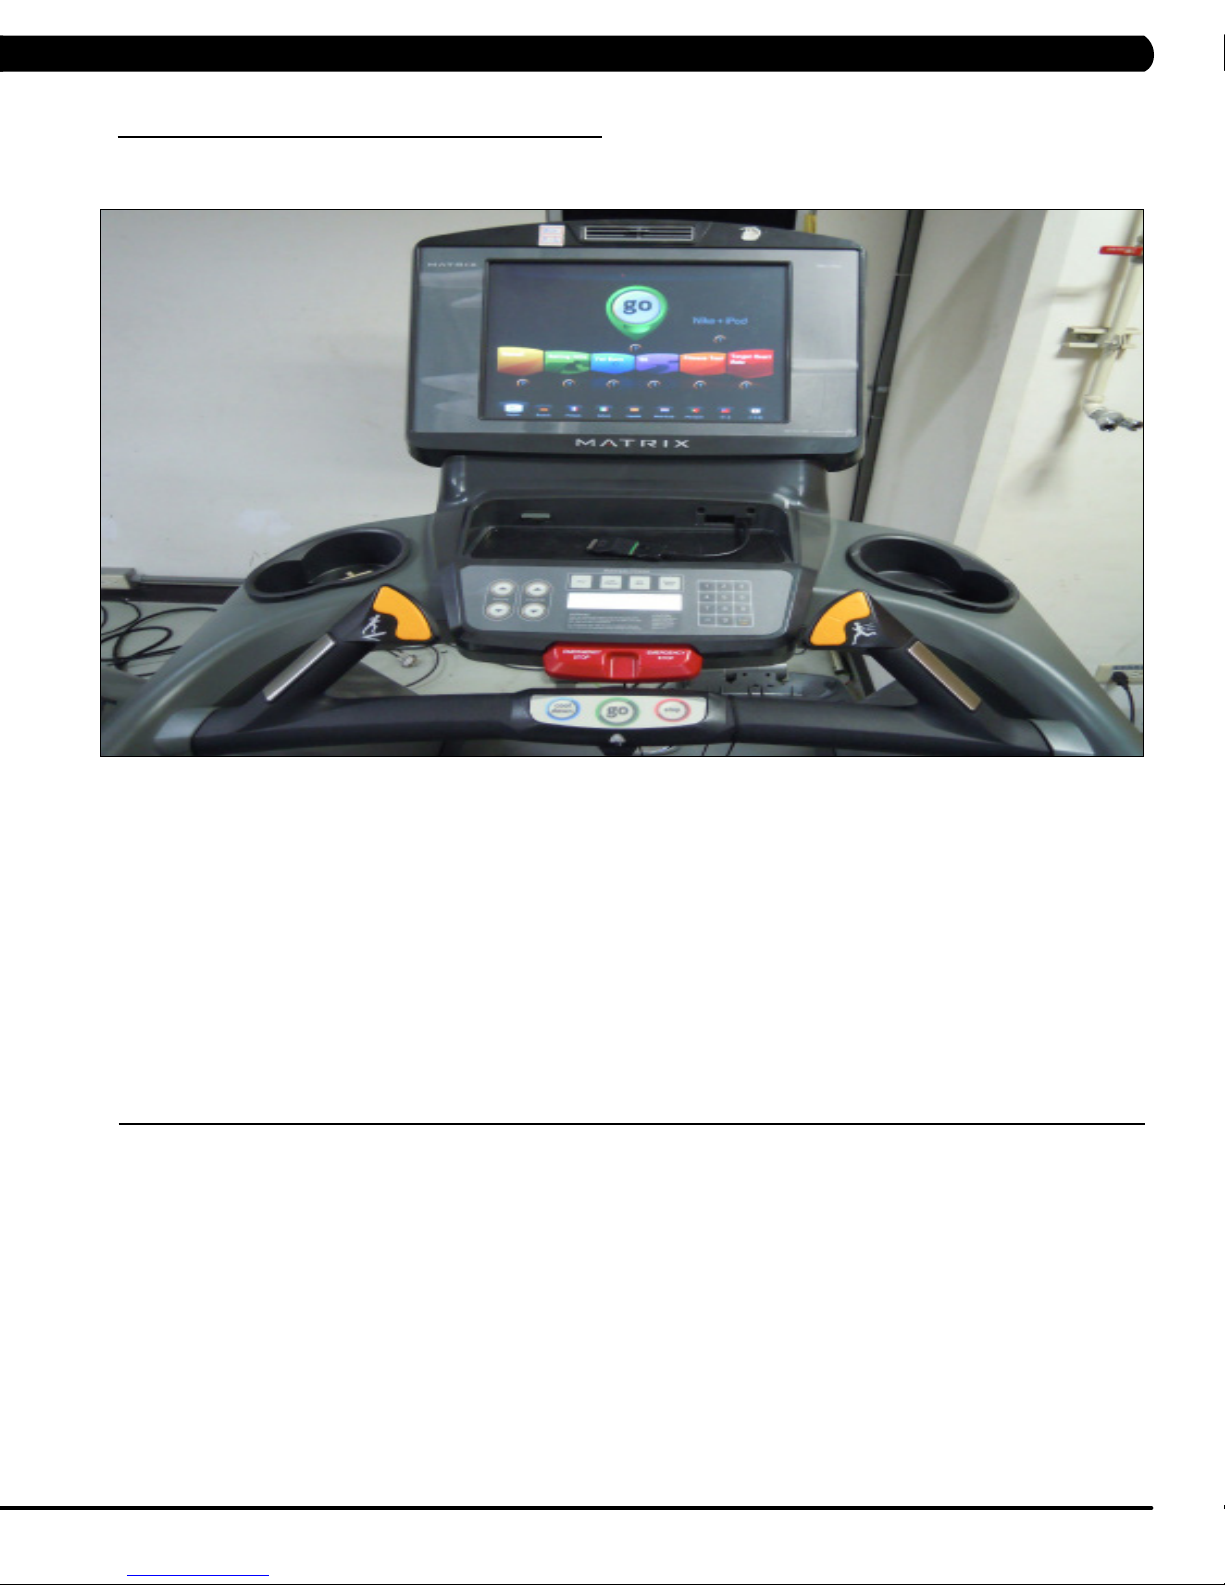
4.1 T7XE-04 CONSOLE DESCRIPTION
The Matrix treadmill is inspected before it is packaged. It is shipped in four pieces: the base, the upright console supports, the handlebar, and
the console. Carefully unpack the unit and dispose of the box material.
The T7xe-04 has a fully integrated touch screen display. All information required for workouts is explained on screen. Exploration of the
interface is highly encouraged. The information explaining how to program for various workouts will give an explanation about the contents of
each screen on the T7xe-04.
QUICK START / GO: One touch Start and Quick Start.
STOP: Ends workout and shows workout summary data.
COOL DOWN: Puts treadmill into Cool Down mode. Cool Down time is dependent on the length of the workout. Workouts 19 minutes and
shorter will have a cool down length of 2 minutes. Workouts 20 minutes and longer will have a cool down length of 5 minutes.
EMERGENCY STOP / IMMOBILIZATION: To stop all functions and immobilize the unit. The emergency stop on this treadmill must be returned
to its original position in order to allow normal operation of the unit.
INCLINE TOGGLES: Adjust incline during workout.
SPEED TOGGLES: Adjust speed during workout.
T7XE ENTERTAINMENT ZONE
iPOD: Will take the user directly to the iPod screen to allow for iPod control and play list selection.
VOLUME UP / DOWN: Adjust the volume output through the headphone jack of either the integrated console TV or the iPod output.
NUMBER KEYPAD: Allows for easy TV channel selections. These buttons work for the integrated console TV.
CHANNEL UP / DOWN: Allows for channel selection on the integrated console TV.
DISPLAY MODE: Allows user to cycle through console display options, iPod, TV, or profile display.
LAST CHANNEL: Allows the user to cycle between the current channel and the previous channel they were viewing.
CC/MUTE:
Mutes sound and turns closed captioning on or off.
9
Page 13

CHAPTER 4: CONSOLE OVERLAY AND WORKOUT DESCRIPTION
4.2 MANUAL WORKOUT OPERATION
QUICK START OPERATION
Press the GO or QUICK START button(s) and the treadmill will
count down "3, 2, 1" and enter into a manual mode of operation.
All energy expenditure values will be calculated using the default
weight measurement.
MANUAL WORKOUT OPERATION
Manual is a workout that allows you to manually adjust the speed
and incline values at anytime. The manual workout also contains a
setup screen which allows you to input your weight to help calculate
a more accurate caloric burn rate.
To enter into the Manual Workout:
1) Choose MANUAL WORKOUT by selecting the manual workout
button.
2) Enter the desired workout time using the ARROW KEYS or the
SLIDER.
3) Enter the user's weight (the user's weight is used to calculate
the caloric expenditure value-providing an accurate weight helps to
ensure an accurate caloric expenditure rating for each user) using
the ARROW KEYS or the SLIDER.
4) Enter the desired start speed using the ARROW KEYS or the
SLIDER.
5) Press GO or QUICK START to begin the workout.
4.3 OPERATING LEVEL BASED PROGRAMS
Your Matrix treadmill offers a variety of level-based workouts to
challenge users of all fitness levels. The following information will
briefly explain the workout and how to program the treadmill for
each workout selection.
ROLLING HILLS WORKOUT OPERATION
Rolling Hills is a level based workout that automatically adjusts the
incline value to simulate walking or running up hills.
1) Choose ROLLING HILLS by selecting the rolling hills workout
button.
2) Enter the desired workout time using the ARROW KEYS or the
SLIDER.
3) Enter the desired workout level using the ARROW KEYS or the
SLIDER.
4) Enter the user's weight (the user's weight is used to calculate
the caloric expenditure value, providing an accurate weight helps to
ensure an accurate caloric expenditure rating for each user) using
the ARROW KEYS or the SLIDER.
5) Enter the desired start speed using the ARROW KEYS or the
SLIDER.
6) Press GO or QUICK START to begin the workout.
FAT BURN WORKOUT OPERATION
Fat Burn is a level-based workout that is designed to help users
burn fat through various incline changes.
1) Choose FAT BURN by selecting the fat burn workout button.
2) Enter the desired workout time using the ARROW KEYS or the
SLIDER.
3) Enter the desired workout level using the ARROW KEYS or the
SLIDER.
4) Enter the user's weight (the user's weight is used to calculate
the caloric expenditure value, providing an accurate weight helps to
ensure an accurate caloric expenditure rating for each user) using
the ARROW KEYS or the SLIDER.
5) Enter the desired start speed using the ARROW KEYS or the
SLIDER.
6) Press GO or QUICK START to begin the workout.
10
5K RUN WORKOUT OPERATION
5K Run is a workout with a fixed distance of 5 km. Incline is
adjusted automatically throughout the workout. You control the
speed.
1) Choose 5K RUN by selecting the 5k run workout button.
2) Enter the desired workout level using the ARROW KEYS or the
SLIDER.
3) Enter the user's weight (the user's weight is used to calculate
the caloric expenditure value, providing an accurate weight helps to
ensure an accurate caloric expenditure rating for each user) using
the ARROW KEYS or the SLIDER.
4) Enter the desired start speed using the ARROW KEYS or the
SLIDER.
5) Press GO or QUICK START to begin the workout.
Page 14
CHAPTER 4: CONSOLE OVERLAY AND WORKOUT DESCRIPTION
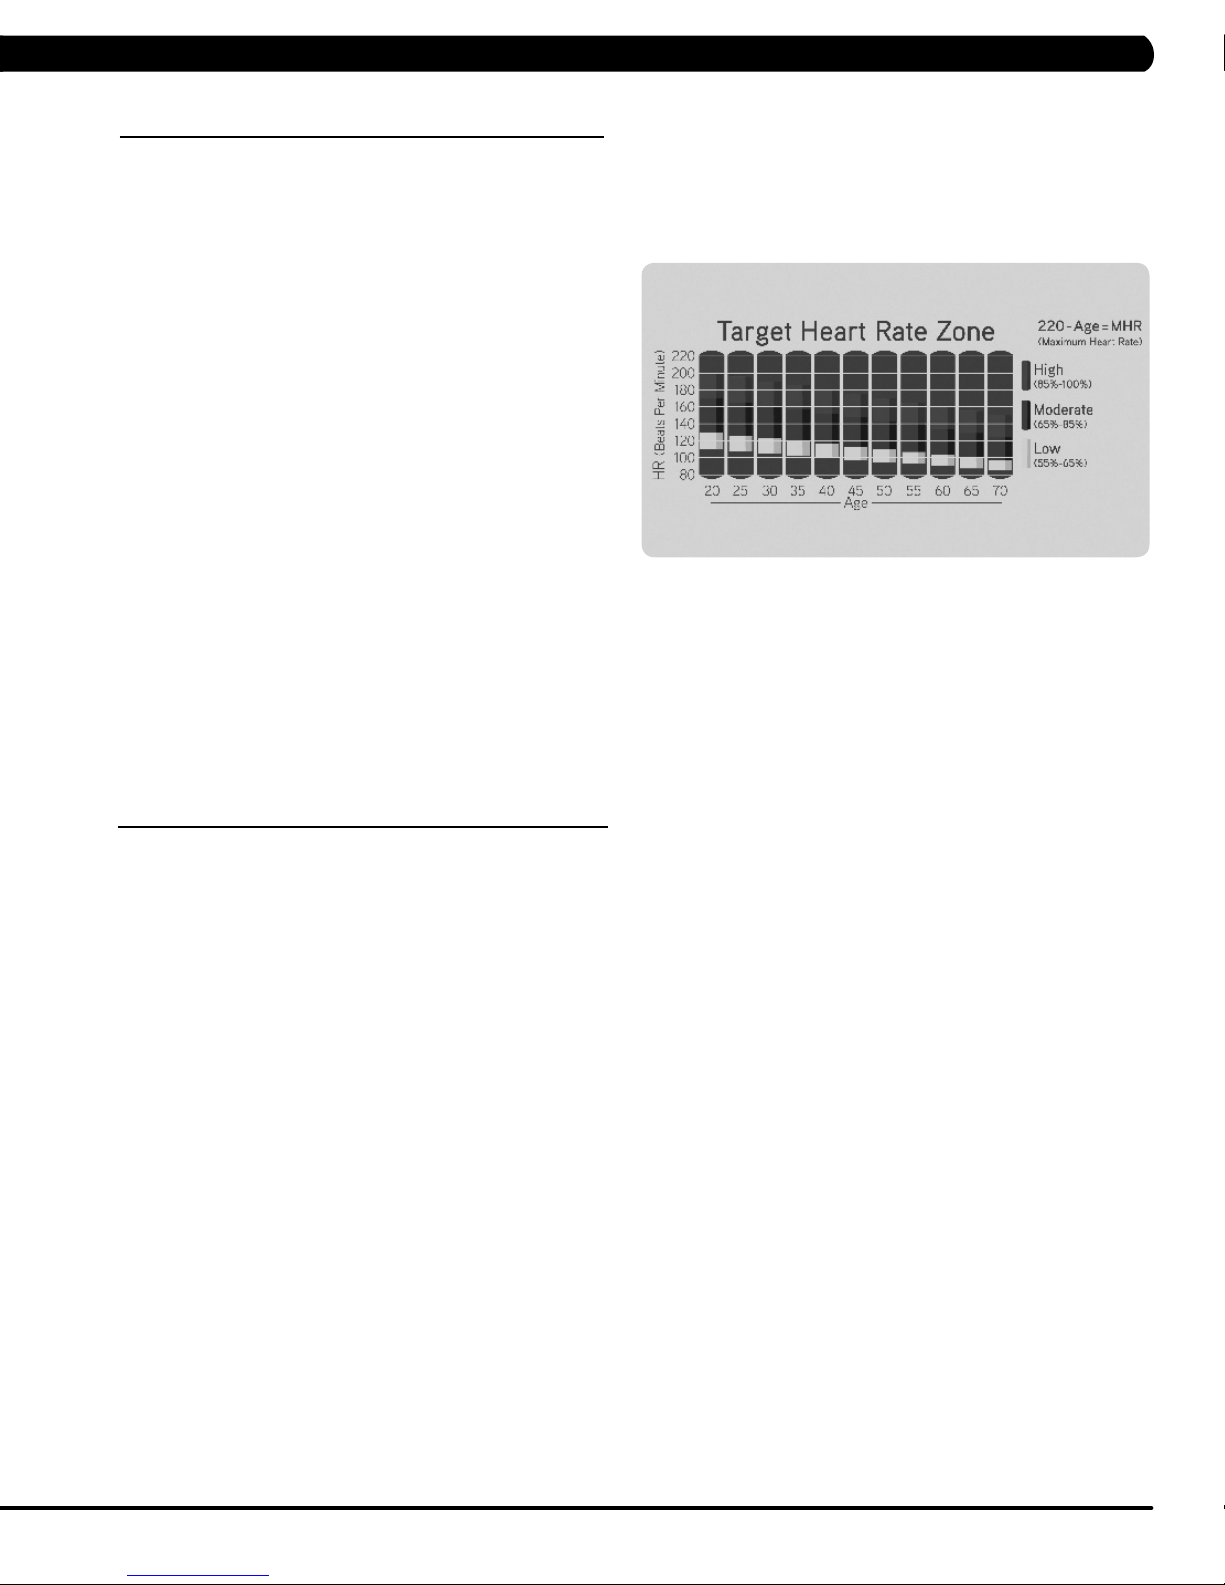
4.4 HEART RATE CONTROL WORKOUT OPERATION
Your Matrix treadmill offers a heart rate control workout mode. The
heart rate control workout mode allows the user to program their
desired heart rate zone and maximum allowable incline and the
treadmill will automatically adjust the incline based upon the user's
heart rate. The heart rate zone is calculated using the following
equation: (220-Age)*%=target heart rate zone. The user must wear
a telemetric heart rate monitor or continually hold onto the contact
heart rate grips for this workout.
1) Choose TARGET HEART RATE by selecting the target heart rate
workout button.
2) Enter the desired workout time using the ARROW KEYS or the
SLIDER.
3) Enter the user's age using the ARROW KEYS or the SLIDER.
4) Enter the desired percentage of maximum heart rate using the
ARROW KEYS or the SLIDER.
5) Enter the user's weight (the user's weight is used to calculate
the caloric expenditure value, providing an accurate weight helps to
ensure an accurate caloric expenditure rating for each user) using
the ARROW KEYS or the SLIDER.
6) Press GO or QUICK START to begin the workout.
4.5 FITNESS TEST WORKOUT OPERATION
Your Matrix treadmill offers a variety of fitness tests - the Gerkin Firefighter Protocol, the Army, Navy, USMC, and USAF as well as the Physical
Efficiency Battery (PEB).
The Gerkin Protocol was developed by Dr. Richard Gerkin of the Phoenix (Arizona) Fire Department. It is a sub-maximal graded treadmill
evaluation used by many Fire Departments across the United States to assess the physical condition of the firefighters. The test requires
constant monitoring of the user's heart rate so the use of a telemetric chest strap is highly encouraged. The workout operates as follows:
WARM UP: The warm up is 3 minutes long and runs at 3.0 mph (4.8 kph) and 0% incline.
STAGE 1: At the 3 minute mark, the treadmill will gradually increase speed to 4.5 mph (7.2 kph). The actual test begins at 4.5 mph (7.2 kph).
STAGE 2: After one minute, the treadmill incline will increase to 2%.
STAGE 3: After one minute, the treadmill speed increases to 5.0 mph (8.0 kph).
STAGES 4 THROUGH 11: After every odd minute the treadmill incline will increase by 2%. After every even minute the treadmill speed will
increase by 0.5 mph (0.8 kph). Once the user's heart rate exceeds the target heart rate (85% of maximum as determined by the equation
(220-Age)*%=target heart rate zone), the individual continues the evaluation for an additional 15 seconds. During the 15 second period, the
evaluation remains at the stage where the target heart rate is exceeded, without any change to speed or incline. If the heart rate does not return
to or below the target heart rate, the evaluation ends and the final evaluation stage is recorded. If the heart rate returns to or below the target
heart rate, the program continues at the point where it would have been had the program not stabilized for 15 seconds.
TEST COMPLETION: The test is completed when user's heart rate exceeds the target for more than 15 seconds or when the user completes
all 11 stages, whichever occurs first. The treadmill will enter a cool down cycle for 3 minutes at 3.0 mph (4.8 kph), 0% incline.
1) Choose the GERKIN TEST by pressing the fitness test workout button and then press the GERKIN button.
2) Enter the user's age using the ARROW KEYS or the SLIDER.
3) Enter the user's weight (the user's weight is used to calculate the caloric expenditure value, providing an accurate weight helps to ensure an
accurate caloric expenditure rating for each user) using the ARROW KEYS or the SLIDER.
4) Enter the user's gender by pressing the MALE or FEMALE button.
5) Press GO or QUICK START to begin the workout.
11
Page 15
CHAPTER 4: CONSOLE OVERLAY AND WORKOUT DESCRIPTION
4.5 FITNESS TEST WORKOUT OPERATION - CONTINUED
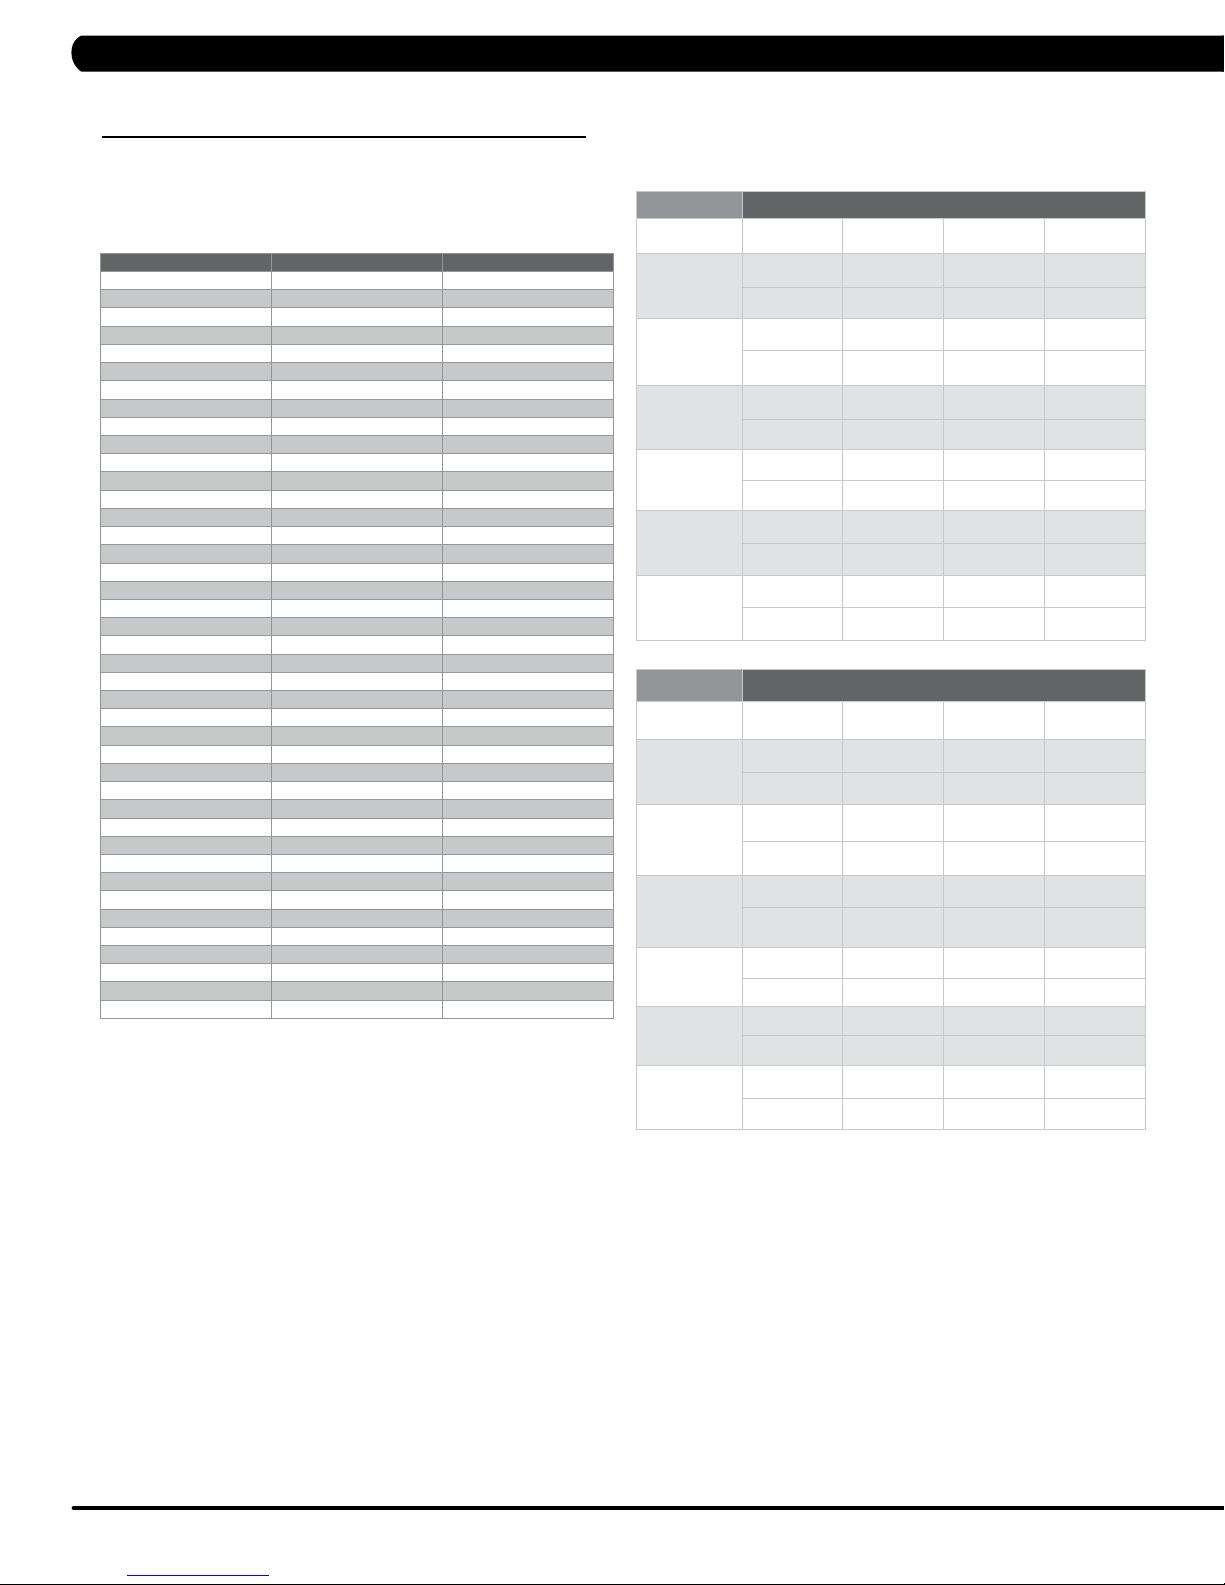
SUBMAXIMAL TREADMILL EVALUATION
CONVERSION TABLE
Stage Time Converted VO2max
1 1:00 31.15
2.1 1:15 32.55
2.2 1:30 33.6
2.3 1:45 34.65
2.4 2:00 35.35
3.1 2:15 37.45
3.2 2:30 39.55
3.3 2:45 41.3
3.4 3:00 43.4
4.1 3:15 44.1
4.2 3:30 45.15
4.3 3:45 46.2
4.4 4:00 47.5
5.1 4:15 48.6
5.2 4:30 50
5.3 4:45 51.4
5.4 5:00 52.8
6.1 5:15 53.9
6.2 5:30 54.9
6.3 5:45 56
6.4 6:00 57
7.1 6:15 57.7
7.2 6:30 58.8
7.3 6:45 60.2
7.4 7:00 61.2
8.1 7:15 62.3
8.2 7:30 63.3
8.3 7:45 64
8.4 8:00 65
9.1 8:15 66.5
9.2 8:30 68.2
9.3 8:45 69
9.4 9:00 70.7
10.1 9:15 72.1
10.2 9:30 73.1
10.3 9:45 73.8
10.4 10:00 74.9
11.1 10:15 76.3
11.2 10:30 77.7
11.3 10:45 79.1
11.4 11:00 80
CARDIOVASCULAR FITNESS PERCENTILES
Males: VO2 max (ml/kg/min)
0-29 30-39 40-49 50-59
SUPERIOR
EXCEL-
LENT
GOOD
FAIR
POOR
VERY
POOR
Females: VO2 max (ml/kg/min)
SUPERIOR
EXCEL-
LENT
GOOD
FAIR
POOR
VERY
POOR
>58.8 >58.9 >55.4 >52.5
54.0 52.5 50.4 47.1
51.4 50.3 48.2 45.3
48.2 46.8 44.1 41.0
46.8 44.6 41.8 38.5
44.2 42.4 39.9 36.7
42.5 41.0 38.1 35.2
41.0 38.9 36.7 33.8
39.5 37.4 35.1 32.3
37.1 35.4 33.0 30.2
34.5 32.5 30.9 28.0
31.6 30.9 28.3 25.1
20-29 30-39 40-49 50-59
>53.0 >48.7 >46.8 >42.0
46.8 43.9 41.0 36.8
44.2 41.0 39.5 35.2
41.0 38.6 36.3 32.3
38.1 36.7 33.8 30.9
36.7 34.6 32.3 29.4
35.2 33.8 30.9 28.2
33.8 32.3 29.5 26.9
32.3 30.5 28.3 25.5
30.6 28.7 26.5 24.3
28.3 26.5 25.1 22.3
25.9 25.1 23.5 21.1
The Military Test programs and the Physical Efficiency Battery (PEB) provide workouts of a preset distance. These distances are established by
the various branches of the Military with the objective of each test to complete the distance as quickly as possible. At the completion of the test,
a time-based score as defined by the respective Military branch will be shown on the console.
1) Choose your desired Military Test by pressing the FITNESS TEST WORKOUT button, and then press the desired MILITARY TEST or PEB
button.
2) Enter the user's age using the ARROW KEYS or the SLIDER.
3) Enter the user's weight (the user's weight is used to calculate the caloric expenditure value, providing an accurate weight helps to ensure an
accurate caloric expenditure rating for each user) using the ARROW KEYS or the SLIDER.
4) Enter the user's gender using the MALE and FEMALE buttons.
5) Press GO or QUICK START to begin the workout.
12
Page 16
5.1 USING MANAGER MODE
CHAPTER 5: MANAGER MODE
1) To enter Manager Mode, press "ENTER, 1, 0, 0, 1, ENTER" on the number keypad and Manager Mode will appear on the display.
2) Manager Mode is divided into 7 tabs, located on the left side of the screen. They are About, Time, Speed, Defaults, TV, Language, and Other.
3) Choose a tab by touching the screen over the desired tab.
4) Each of the tabs have options that will appear once you have chosen that particular tab.
5) Press the "HOME" button or the EMERGENCY STOP to exit Manager Mode..
13
Page 17
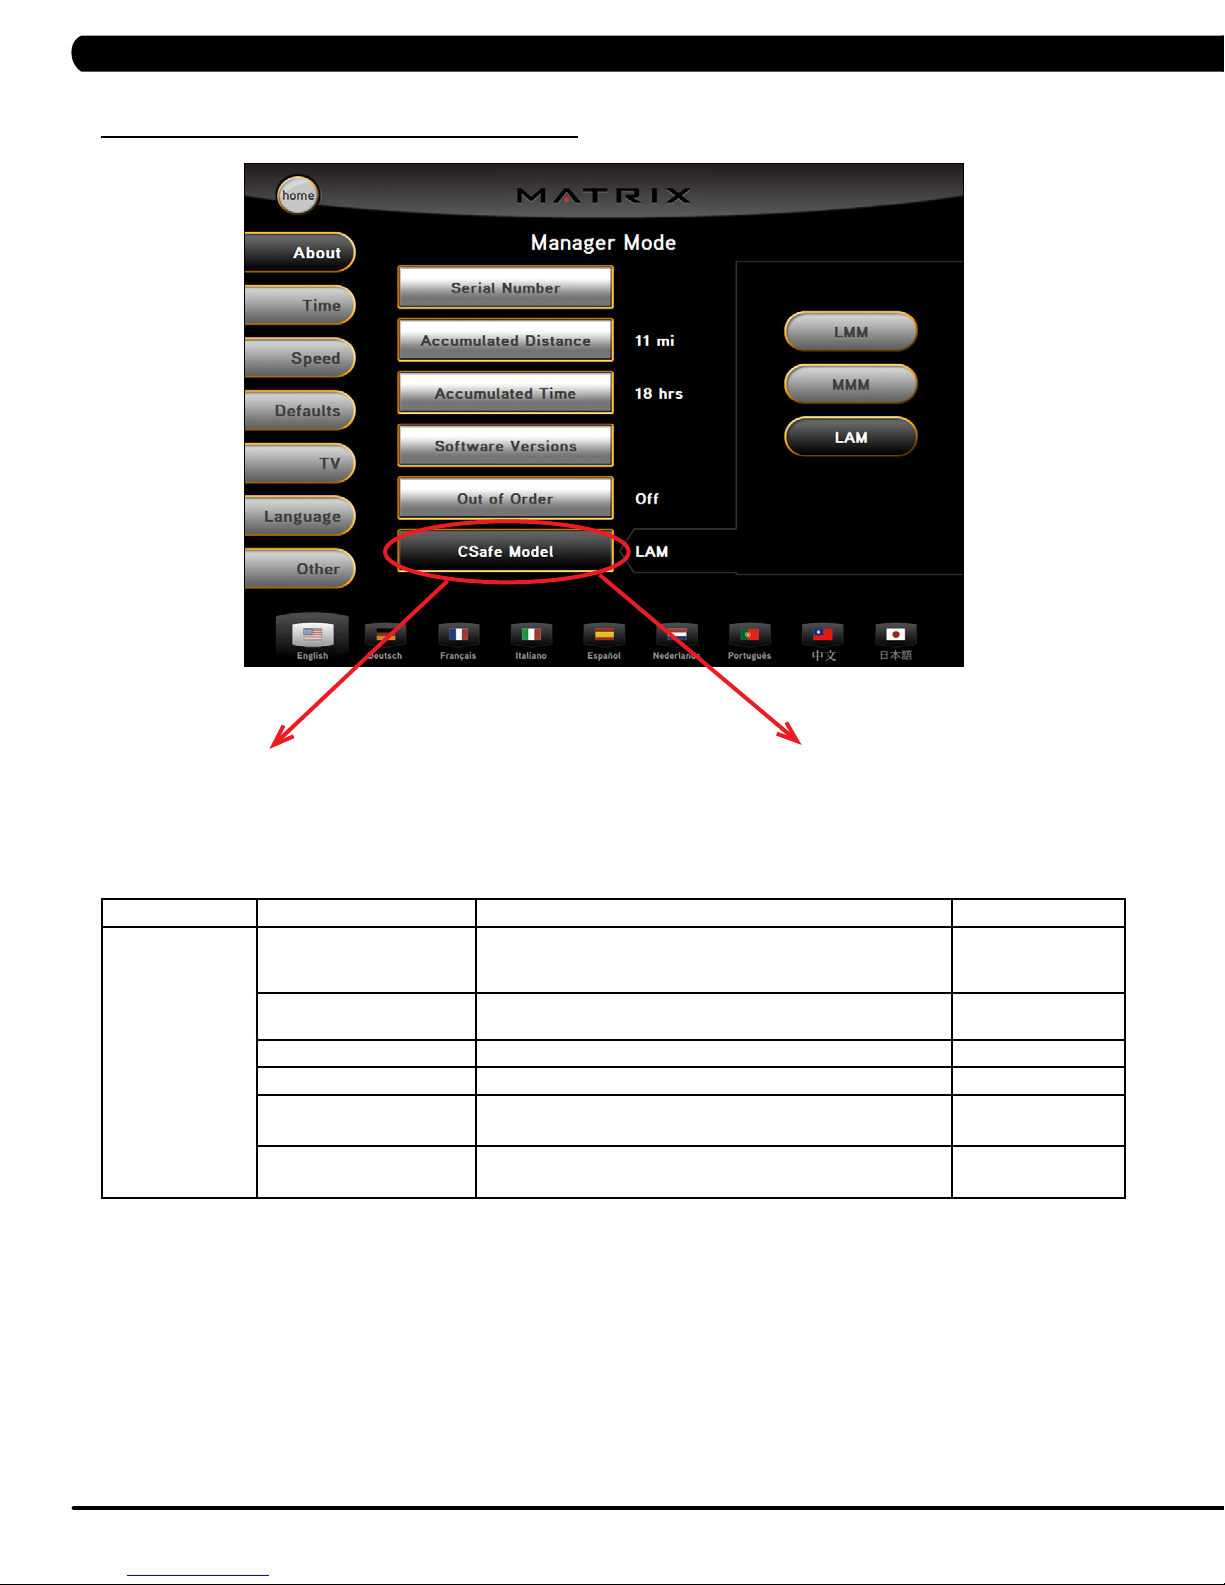
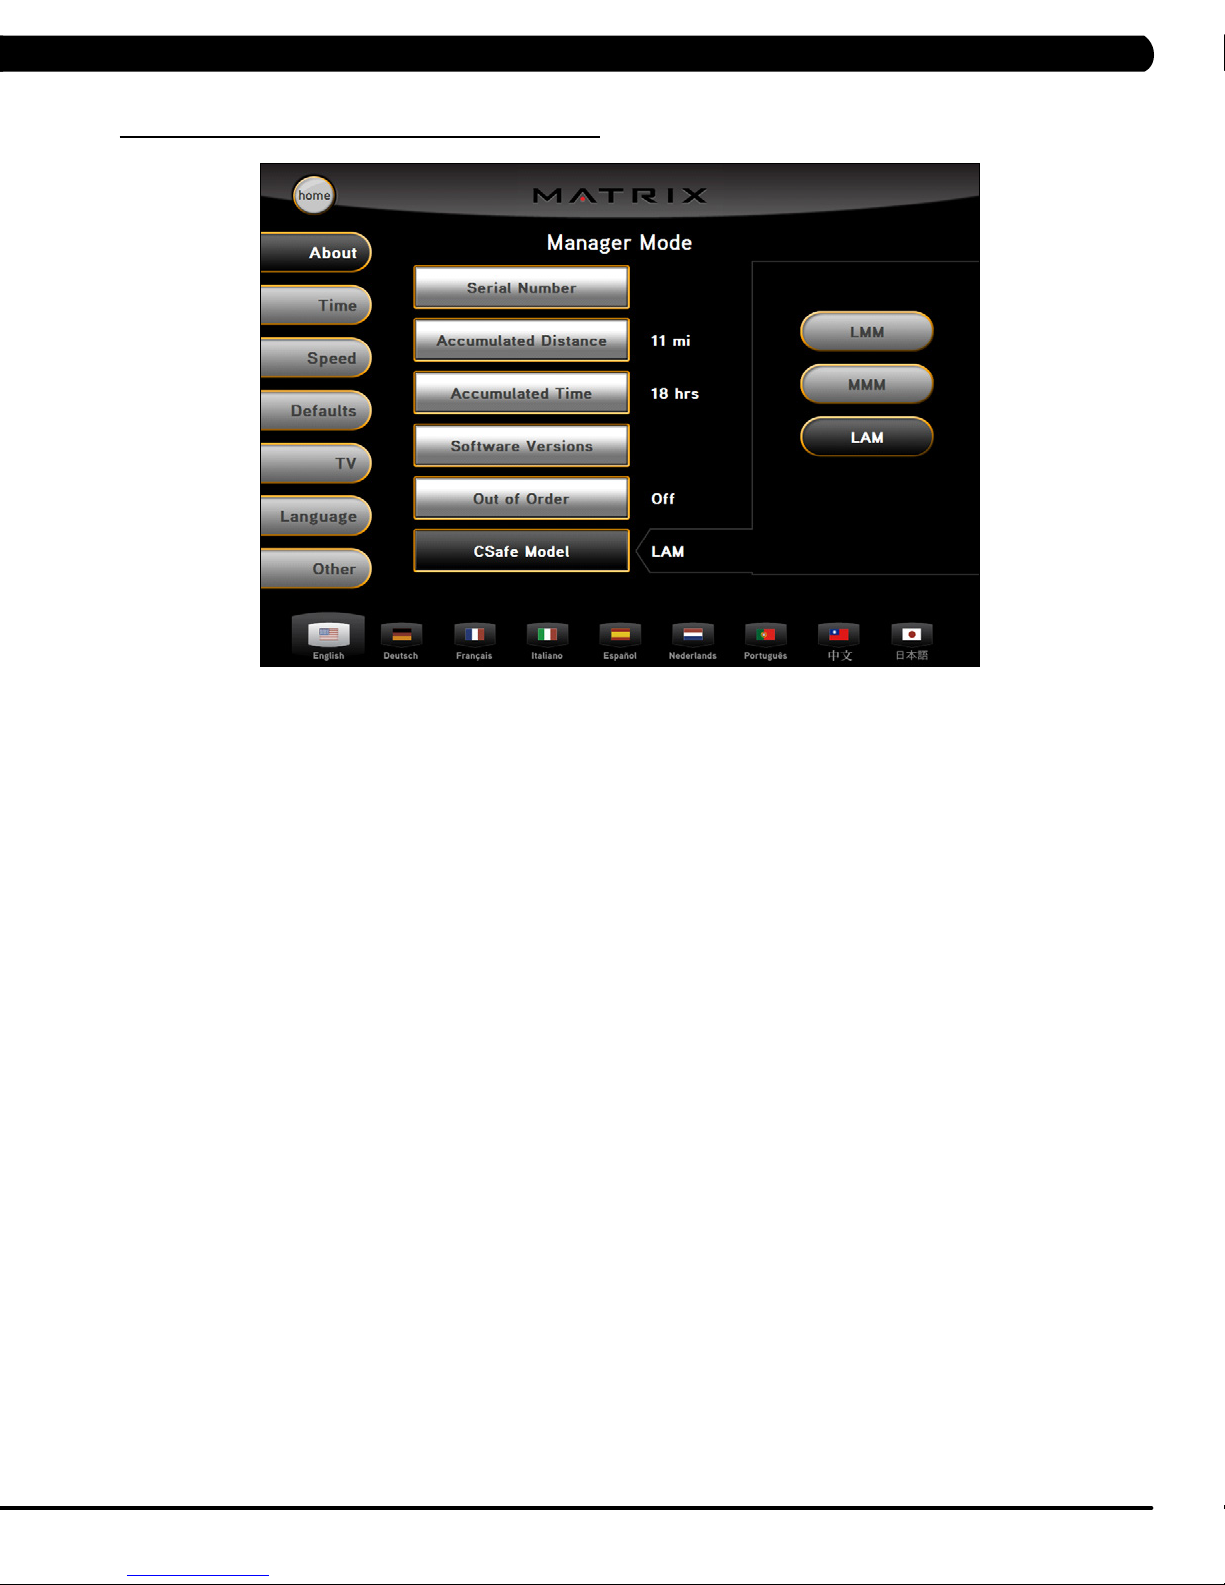
5.2 MANAGER MODE - TAB 1
CHAPTER 5: MANAGER MODE
T7xe-02-C - If the unit has the old MMM board, the
CSafe Model should be set for MMM.
MANAGER MODE
About
FUNCTION & DEFAULTS DESCRIPTIONS MODIFIED
Serial Number This option displays the serial number of the platform and
Accumulated Distance Total distance displayed in native units (miles or kilometers), not
Accumulated Time Total time, not editable. Cannot be modified.
Software Version Software version, not editable Cannot be modified
Out of Order
Default: Off
CSafe Model This option controls whether the console is Fitlinxx compatible. LMM / MMM / LAM
console, not editable (see Service Mode to change serial
numbers).
editable.
This option allows the club to show "out of order" on the console
before repair.
T7xe-03-C - If the unit has the LMM board, the CSafe
Model should be set for LMM.
T7xe-04-C - If the unit has the LAM console (the
console cover back will have holes for ventilation),, the
CSafe Model should be set for LAM.
Cannot be modified.
Cannot be modified
On / Off
14
Page 18
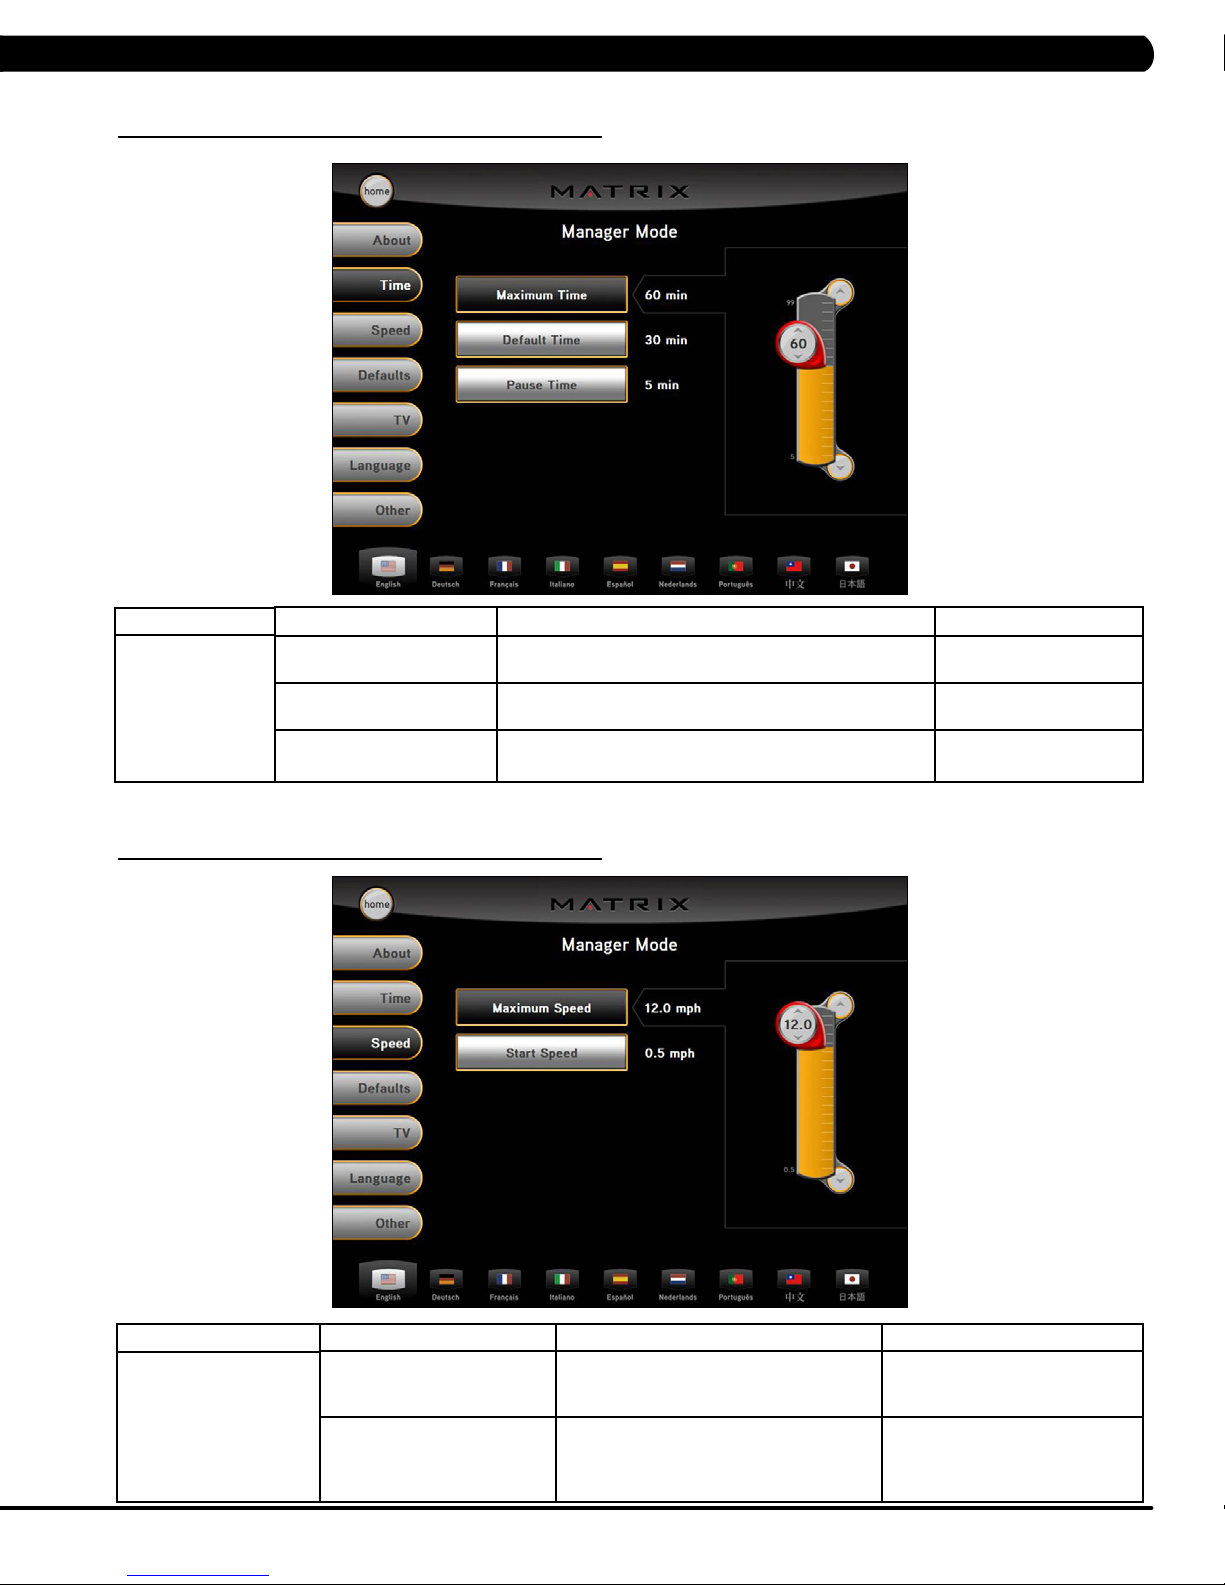
5.3 MANAGER MODE - TAB 2
CHAPTER 5: MANAGER MODE
MANAGER MODE
Time
5.4 MANAGER MODE - TAB 3
FUNCTION & DEFAULTS DESCRIPTIONS MODIFIED
Maximum Time
Default: 60 Minutes
Default Time
Default: 30 Minutes
Pause Time
Default: 5 Minutes
This option enables clubs to set the maximum workout
duration limits during peak and non peak hours of traffic.
This option controls the default program time. Maximum: Maximum Time
This option controls the default pause time. Maximum: 10 Minutes
Maximum: 99 Minutes
Minimum: 5 Minutes
Minimum: 5 Minutes
Minimum: 1 Minute
MANAGER MODE
Speed
FUNCTION & DEFAULTS DESCRIPTIONS MODIFIED
Maximum Speed
Default: 12 MPH / 19.3 KPH
Start Speed
Default: 0.5 MPH / 0.8 KPH
This option controls the maximum speed
for all programs. Displayed in native units
(miles or kilometers).
This option controls the starting speed
for all programs (minimum speed not
affected). Displayed in native units (miles
or kilometers).
Maximum: 15 MPH / 24.1 KPH
Minimum: 0.5 MPH / 0.8 KPH
Maximum: 1.4 MPH / 2.3 KPH
Minimum: 0.5 MPH / 0.8 KPH
15
Page 19
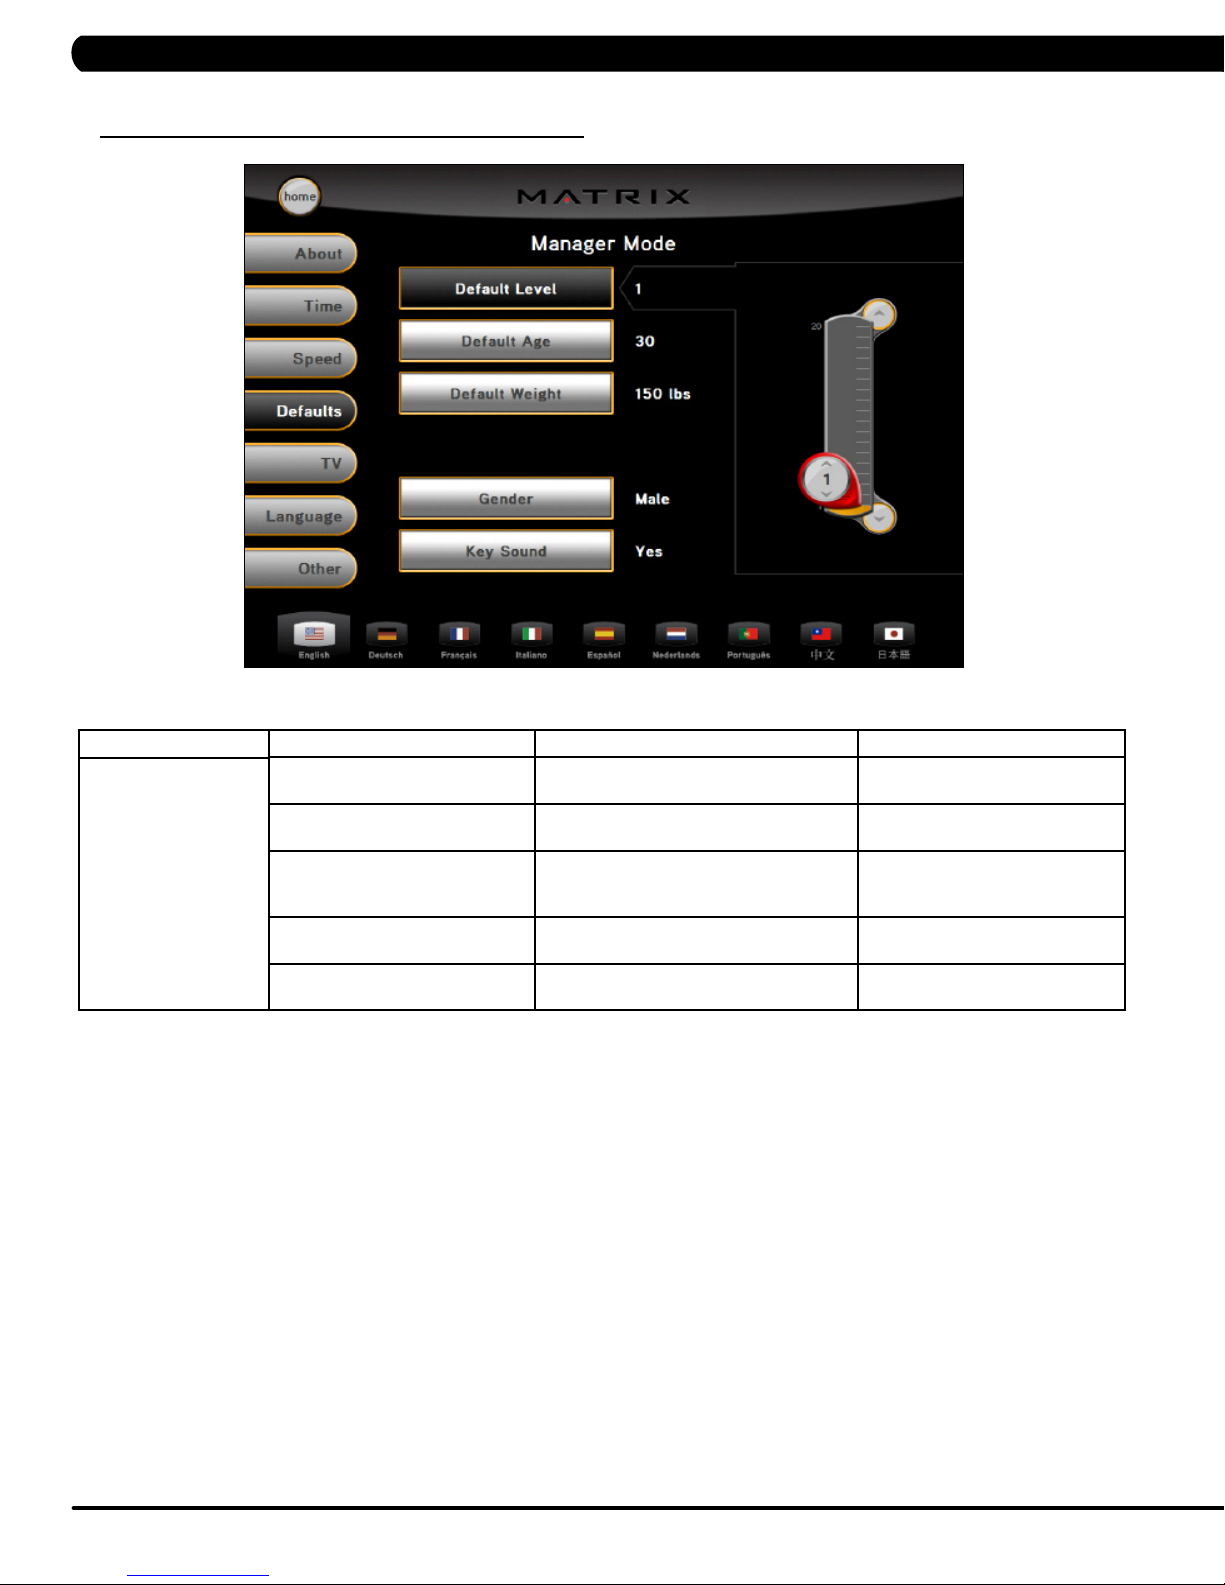
5.5 MANAGER MODE - TAB 4
CHAPTER 5: MANAGER MODE
MANAGER MODE
Defaults
FUNCTION & DEFAULTS DESCRIPTIONS MODIFIED
Default Level
Default: 1
Default Age
Default: 30
Default Weight
Default: 150 lb / 68 kg
Gender
Default: Male
Key Sound
Default: On
This option controls the default program
levels.
This option controls the default user's age
used in the target heart rate calculations.
This option controls the default weight
used in the calorie calculations. Displayed
in native units (pounds or kilograms).
This option sets the user's gender as
either male or female.
This option can set the keypad tone to
sound or not sound.
Maximum: 20
Minimum: 1
Maximum: 100
Minimum: 10
Maximum: 400 lb / 180 kg
Minimum: 50 lb / 22 kg
Male or Female
ON or OFF
16
Page 20
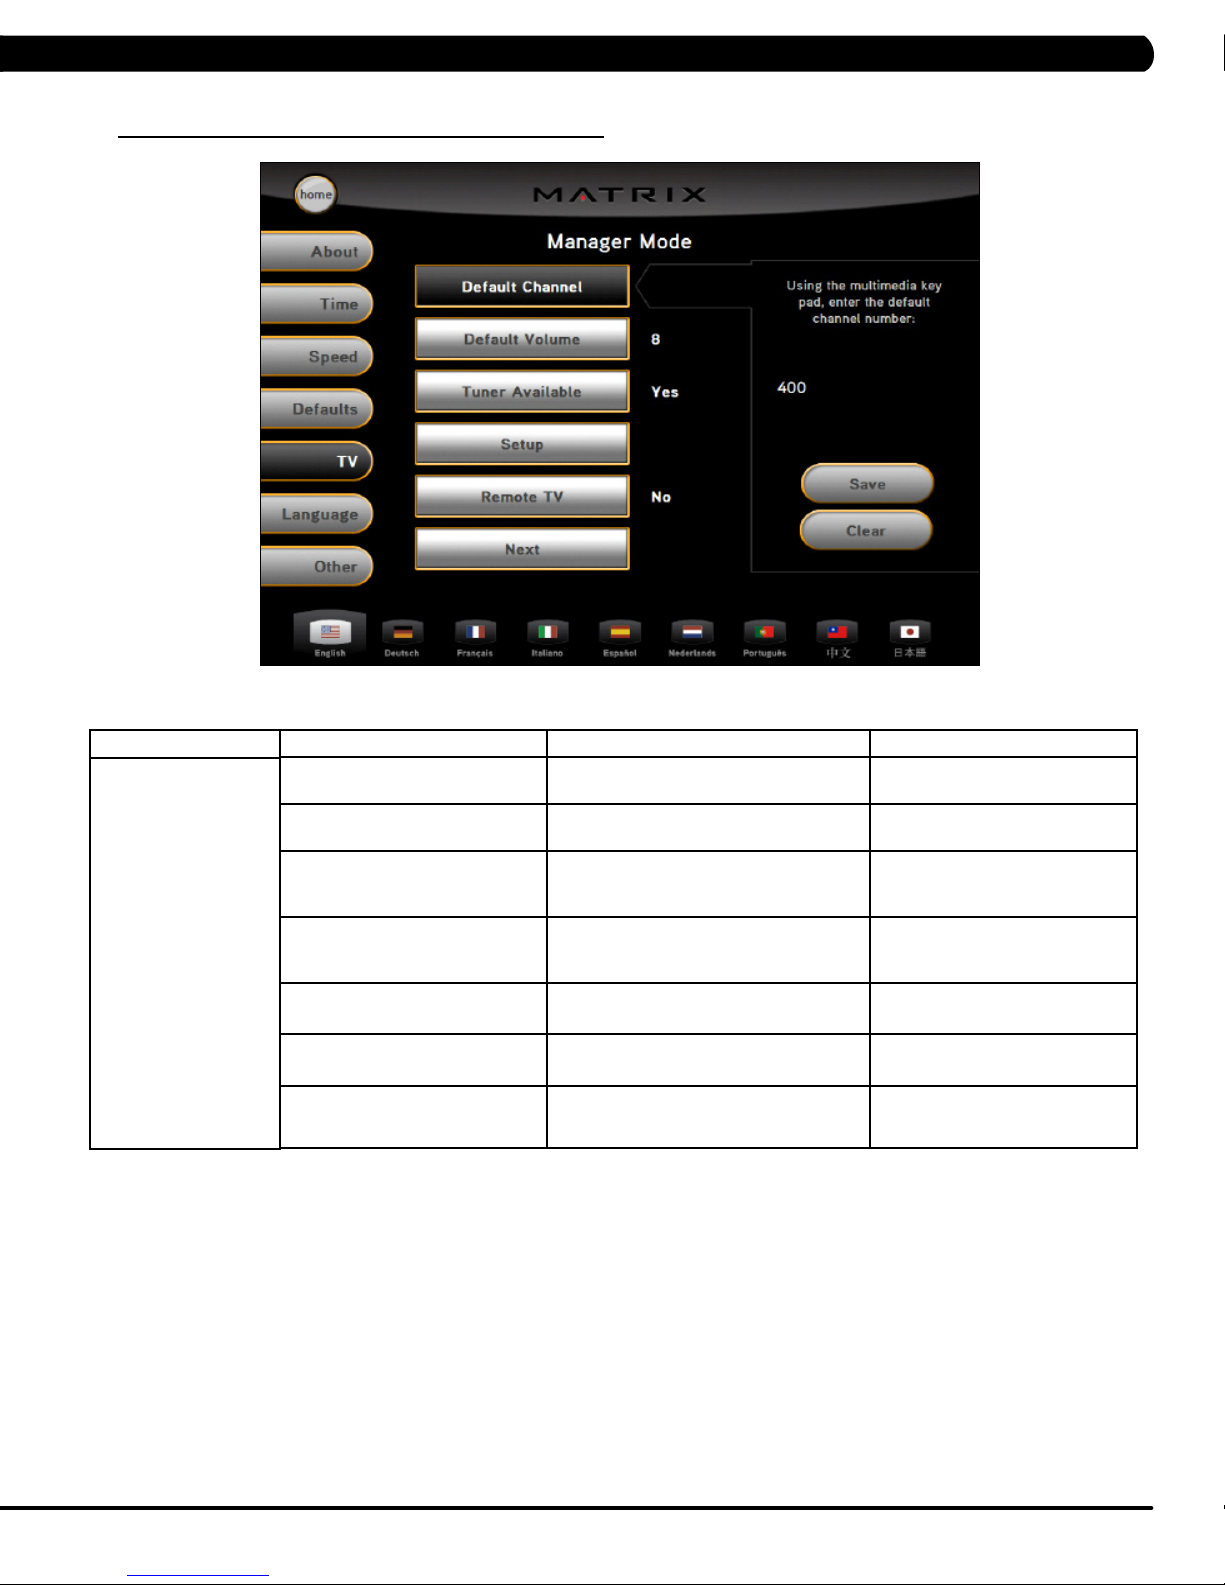
5.6 MANAGER MODE - TAB 5
CHAPTER 5: MANAGER MODE
MANAGER MODE
TV
FUNCTION & DEFAULTS DESCRIPTIONS MODIFIED
Default Channel
Default: 3
Default Volume
Default: 5
Tuner Available
Default: Yes
Setup This option is for setting the TV tuner
Remote TV
Default: No
Remote TV channel
Default: 1
Remote TV volume
Default: 15
This option controls the default TV channel
on start up.
This option controls the default TV volume
on start up.
This option controls the default TV
function. If NO is selected, the TV tab will
be removed from the normal function.
functions. Press the "-" key on the
NUMBER KEYPAD to enter this function.
This option controls the remote TV
function.
This option controls the default remote TV
channel on start up.
This option controls the default remote TV
volume on start up.
Maximum: 99
Minimum: 1
Maximum: 17
Minimum: 0
YES or NO
N/A
ON or YES
Maximum: 37
Minimum: 1
Maximum: 15
Minimum: 1
17
Page 21

5.7 MANAGER MODE - TAB 6
CHAPTER 5: MANAGER MODE
MANAGER MODE
Language
LANGUAGE
ENGLISH
GERMAN
SPANISH
FUNCTION & DEFAULTS DESCRIPTIONS MODIFIED
Default Language This option allow the user to select the flag for the
FLAG UNIT
MILE
MILE
KM
KM
KM
KM
specific language shown on the display.
LANGUAGE
CHINESE
PORTUGUESE
FRENCH
DUTCH
FLAG UNIT
N/A
KM
KM
KM
KM
KM
KM
KM
18
ITALIAN
JAPANESE
KM
KM
Page 22
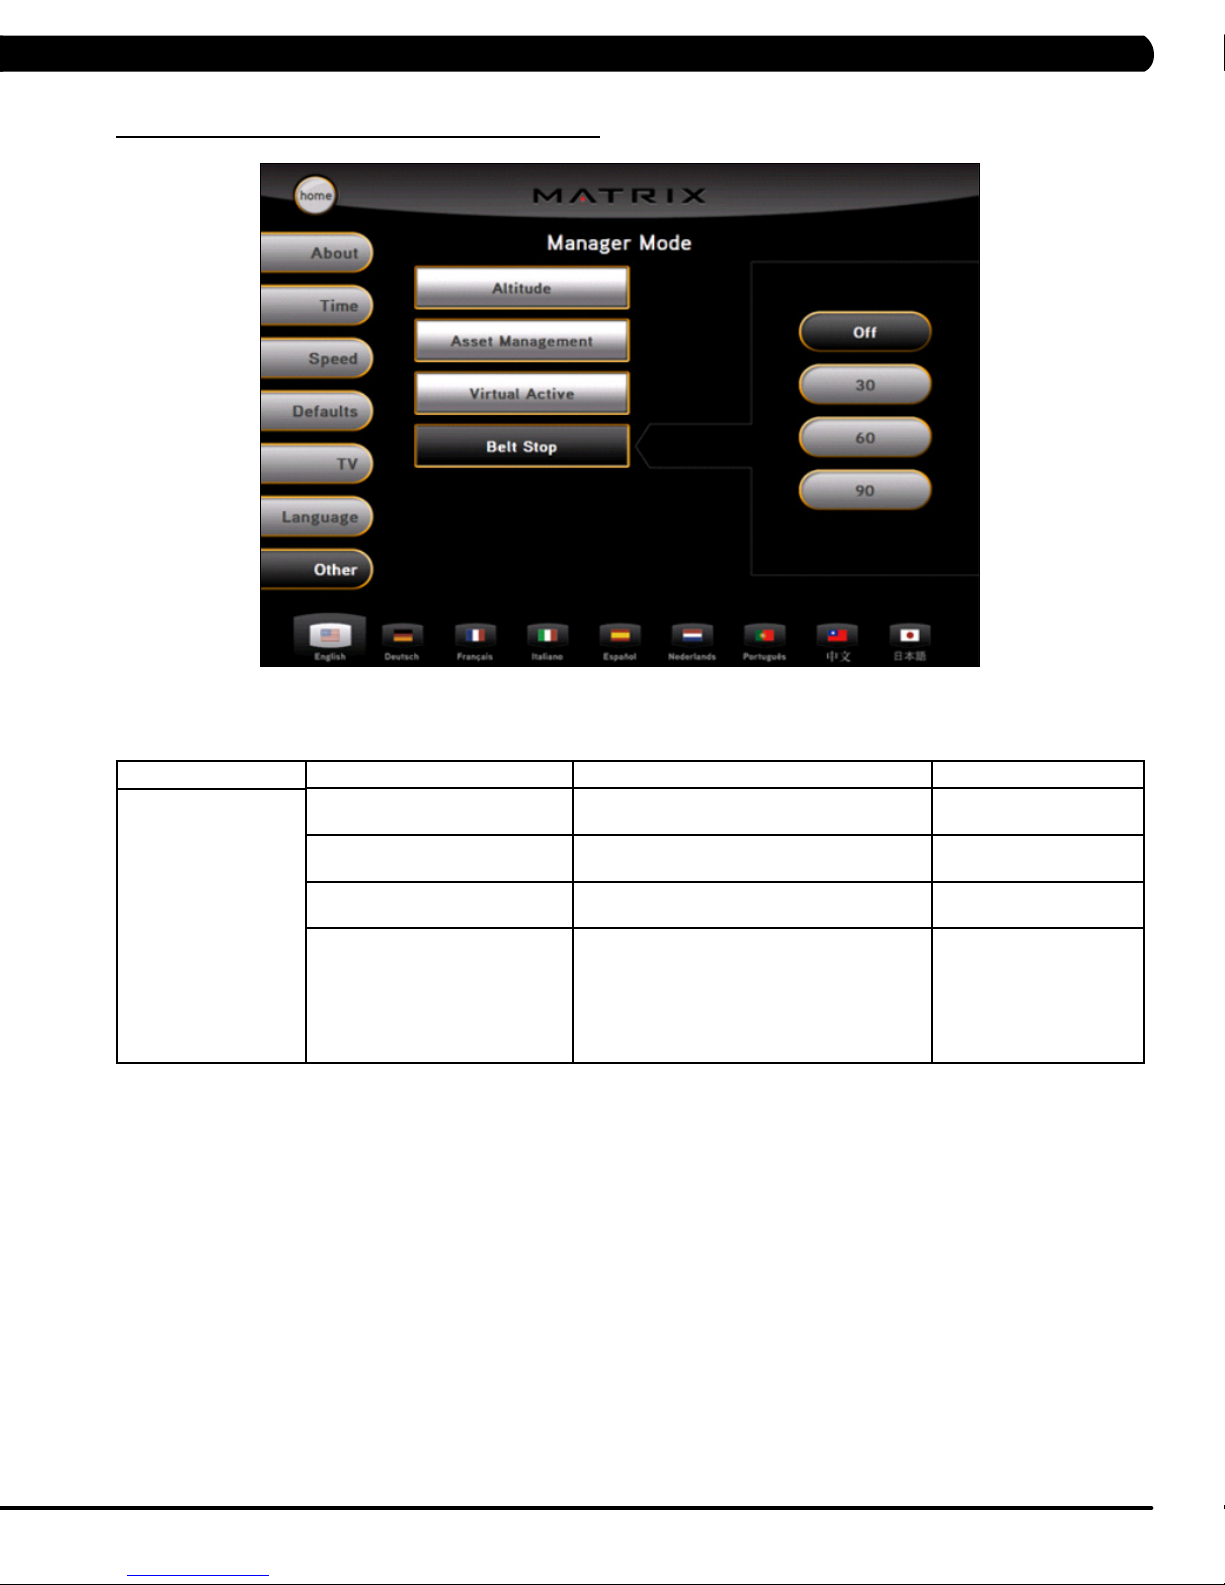
5.8 MANAGER MODE - TAB 7
CHAPTER 5: MANAGER MODE
MANAGER MODE
Other
FUNCTION & DEFAULTS DESCRIPTIONS MODIFIED
Altitude
Default: 5000 ft
Asset Management
Default: Off
Virtual Active
Default: ON
Belt Stop
Default: Off
This option controls the default altitude used in
the fitness test score calculations.
This option allows the fitness club to collect the
machine data to a PC server.
This option controls the Virtual Active function. ON
This option is to check the running belt to see
if a user is there. If there is no user, and the
status is over the default time, the machine will
enter into a pause mode for 5 minutes. If no
user is present within 5 minutes, the display will
return to the start up screen.
ON or OFF
OFF, 30, 60, or 90
19
Page 23

CHAPTER 6: ENGINEERING MODE
6.1 USING ENGINEERING MODE
1) To enter Engineering Mode, press "ENTER, 2, 0, 0, 1, ENTER" on the number keypad and Engineering Mode will appear on the display.
2) Engineering Mode is divided into 6 tabs, located on the left side of the screen. They are Calibration, Statistics, Errors, Clubs, Club ID, and
Other.
3) Choose a tab by touching the screen over the desired tab.
4) Each of the tabs have options that will appear once you have chosen that particular tab.
5) Press the "HOME" button or the EMERGENCY STOP to exit Engineering Mode..
6.2 ENGINEERING MODE - TAB 1
ENGINEERING MODE
Calibration
FUNCTION & DEFAULTS DESCRIPTIONS MODIFIED
Auto Calibration This option is to calibrate the elevation parameters. N/A
Manual Cal Elevation Minimum
Default: 4000
Manual Cal Elevation Maximum
Default: 29000
20
This option controls the minimum elevation parameter. Range: 2500-12000
This option controls the maximum elevation
parameter.
Range: 25000-32700
Page 24
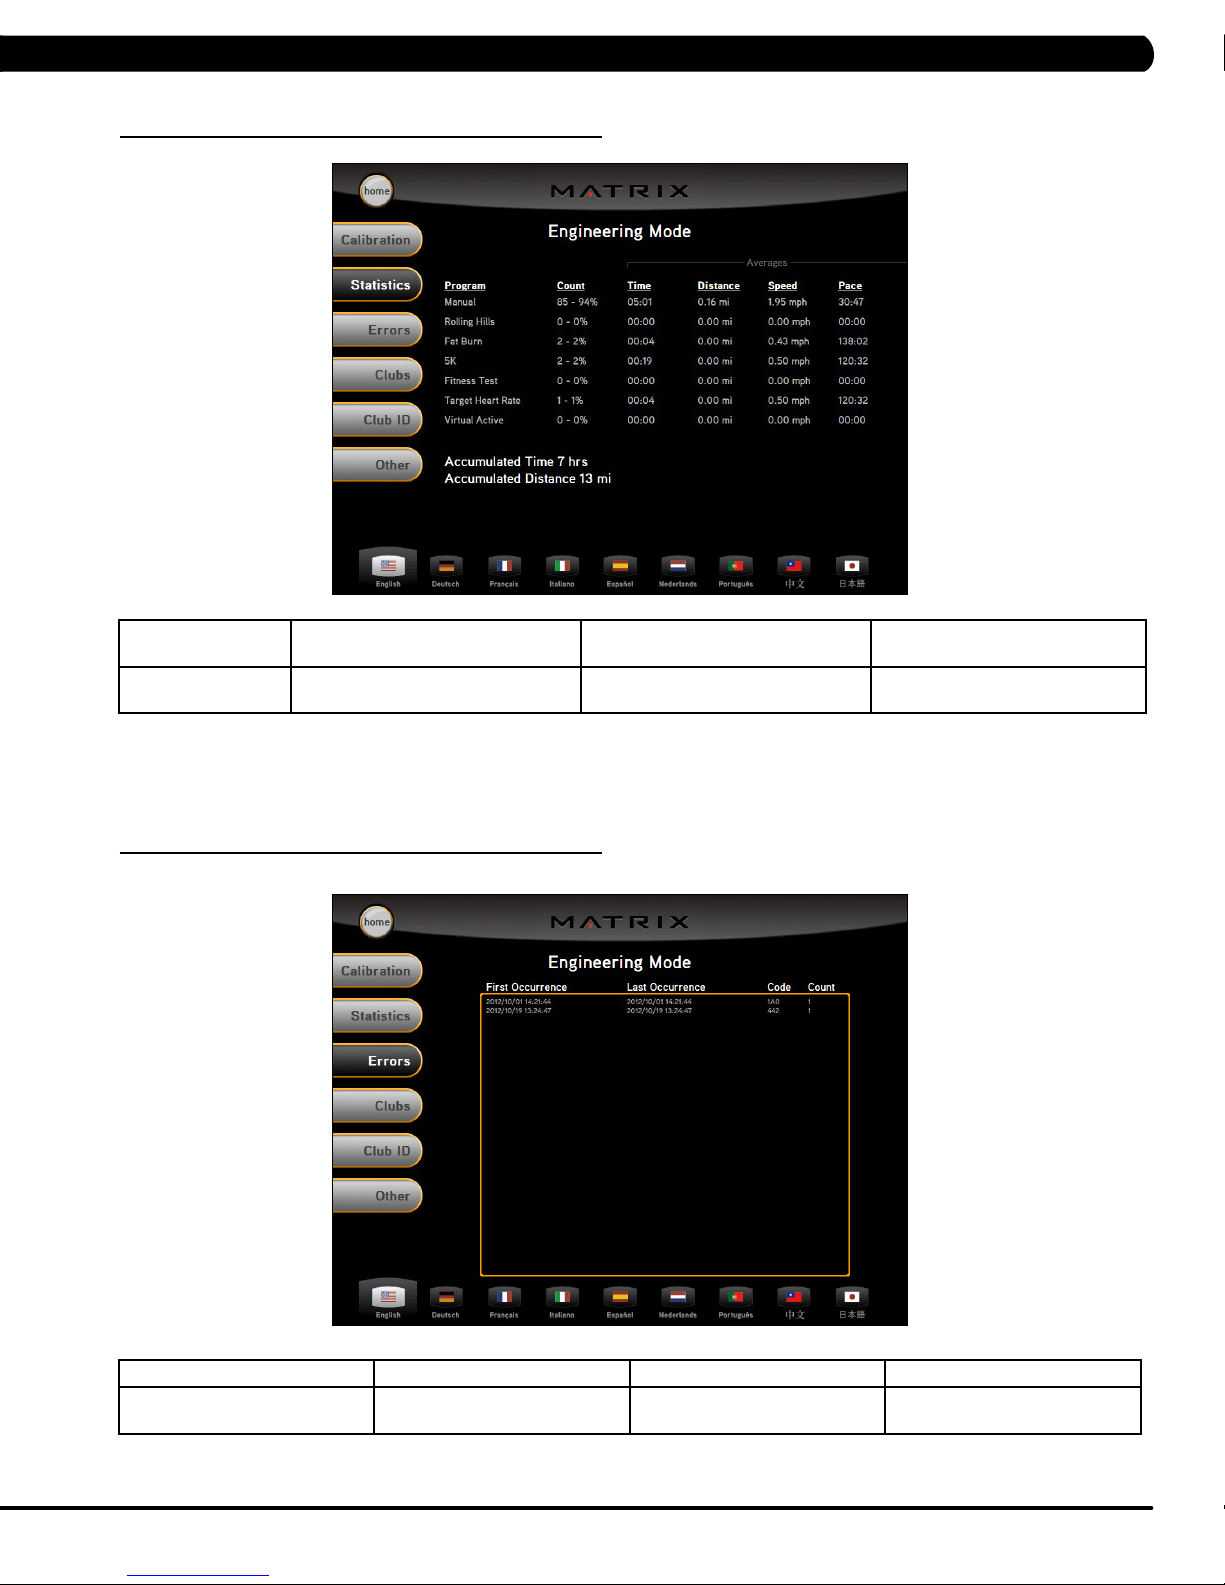
6.3 ENGINEERING MODE - TAB 2
CHAPTER 6: ENGINEERING MODE
ENGINEERING
MODE
6.4 ENGINEERING MODE - TAB 3
FUNCTION & DEFAULTS DESCRIPTIONS MODIFIED
Statistics This option displays workout
information for the various programs.
N/A
ENGINEERING MODE FUNCTION & DEFAULTS DESCRIPTIONS MODIFIED
Errors This option displays the error
code history on the treadmill.
N/A
21
Page 25
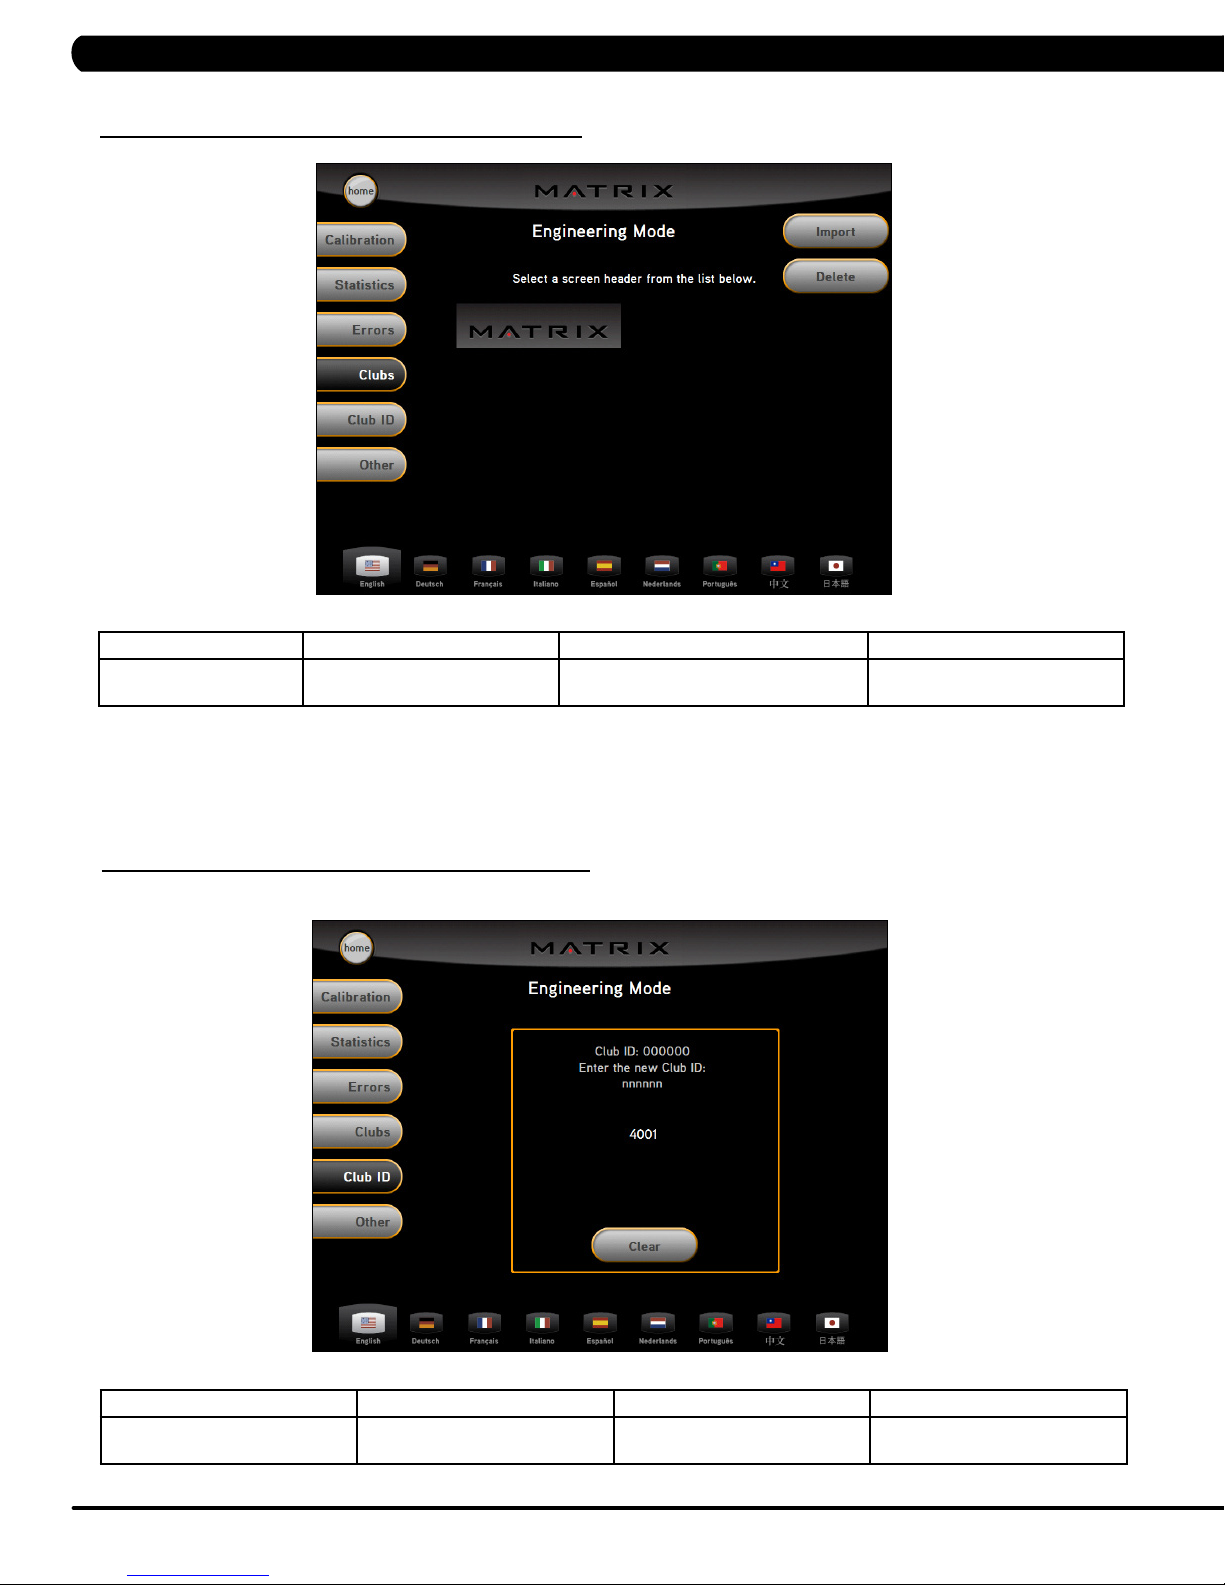
6.5 ENGINEERING MODE - TAB 4
CHAPTER 6: ENGINEERING MODE
ENGINEERING MODE FUNCTION & DEFAULTS DESCRIPTIONS MODIFIED
Clubs
Default: MATRIX
6.6 ENGINEERING MODE - TAB 5
This option allows the user to select the
screen header from a list.
N/A
ENGINEERING MODE FUNCTION & DEFAULTS DESCRIPTIONS MODIFIED
Club ID This option records the club ID of
22
the fitness facility.
N/A
Page 26

CHAPTER 6: ENGINEERING MODE
6.7 ENGINEERING MODE - TAB 6
ENGINEERING MODE FUNCTION & DEFAULTS DESCRIPTIONS MODIFIED
Other Erp Time
Default: 0 minute
If there is no use of the machine over a
period of time, the console LEDs will turn
off (go into ErP mode).
Maximum: 30 minute
Minimum: 0
CHAPTER 6:
CHAPTER 6:
CHAPTER 6:
CHAPTER 6:
CHAPTER 6:
ENGINEERING MODE
ENGINEERING MODE
ENGINEERING MODE
ENGINEERING MODE
ENGINEERING MODE
23
Page 27

CHAPTER 7: SERVICE MODE
7.1 USING SERVICE MODE
1) To enter Service Mode, press "ENTER 3, 0, 0, 1, ENTER" on the number keypad and Service Mode will appear on the display.
2) Service Mode is divided into 4 tabs, located on the left side of the screen. They are Setup, Test, Log, and Date & Time.
3) Choose a tab by touching the screen over the desired tab.
4) Each of the tabs have options that will appear once you have chosen that particular tab.
5) Press the "HOME" button or the EMERGENCY STOP to exit Service Mode..
7.2 SERVICE MODE - TAB 1
SERVICE MODE
Setup
FUNCTION & DEFAULTS DESCRIPTIONS MODIFIED
Machine Type
Default: Treadmill
Serial Number This option displays the serial number of the console and frame. N/A
Accumulated Distance Total distance displayed in native units (miles or kilometers), not editable. N/A
Accumulated Time Total time, not editable. N/A
Show Service on Boot Factory Setting Only N/A
24
This option is to select the current model. N/A
Page 28

7.3 SERVICE MODE - TAB 2
CHAPTER 7: SERVICE MODE
T7xe-02--C Keypad - Old keypad Includes Quick Start Key
T7xe-03--C Keypad - Old keypad - Does
NOT Includes Quick Start Key
SERVICE MODE
Test
T7xe-04-C Keypad - New keypad -
FUNCTION & DEFAULTS DESCRIPTIONS MODIFIED
Keypad This option is for a keypad test. N/A
Touch Calibration This option allows for a touch calibration of the
Keypad Type
Default: LAM
Radio Test This option will test the radio signal for function. N/A
console. Follow the cross mark and touch the
screen to catch. After 5 positions are tested, touch
the center of the screen to exit this test.
This option sets the type of keypad for the
treadmill. It should always be set for T7xe-04 for
this treadmill.
N/A
Quick Start or No Quick Start or
LAM
25
Page 29

7.4 SERVICE MODE - TAB 3
CHAPTER 7: SERVICE MODE
SERVICE MODE FUNCTION & DEFAULTS DESCRIPTIONS MODIFIED
Log This option allows the club to record key
components replacement history.
7.5 SERVICE MODE - TAB 4
N/A
SERVICE MODE FUNCTION & DEFAULTS DESCRIPTIONS MODIFIED
Date & Time This option allows the club to set the current date
26
and time.
N/A
Page 30

8.1 ELECTRICAL DIAGRAMS
CHAPTER 8: TROUBLESHOOTING
27
Page 31

CHAPTER 8: TROUBLESHOOTING
8.1 ELECTRICAL DIAGRAMS - CONTINUED
Digital Communication Wire
Hand Pulse Sensor Wire
28
Page 32

CHAPTER 8: TROUBLESHOOTING
8.1 ELECTRICAL DIAGRAMS - CONTINUED
UCB Little Board Wire
Hand Pulse Wire
29
Page 33

8.2 MCB LED INSTRUCTIONS
CHAPTER 8: TROUBLESHOOTING
LED REFERENCE DESIGNATOR DESCRIPTION
RS485 DSP2
MCU DSP1
DOWN DSP5
UP DSP6
+12V DSP4
30
Indicates if the digital communication is working normally between the console and the MCB.
Blinking = Normal.
Off = Fault
Indicates if the console is working normally.
Blinking - Normal.
Light = MCU Fault.
Off = MCU No Power.
Indicates if the console is commanding elevation down.
Light = Normal.
Off - No command from console received by the elevation motor.
Indicates if the console is commanding elevation up.
Light = Normal.
Off = No command from console received by the elevation motor.
Indicates if the console voltage supply is present.
Light = Normal.
Off - 12 Volts are not provided by the MCB.
Page 34

8.3 MCB WIRING
CHAPTER 8: TROUBLESHOOTING
TB1 - AC Motor Cable Socket
TB2 - Input Power Cable Socket
J9 - Inside Fan Cable Socket
J10 - Digital Communication Cable Socket
J12 - Elevation Motor Cable Socket
J16 - External Fan Cable Socket
31
Page 35

CHAPTER 8: TROUBLESHOOTING
8.4 0140 / 01A0 / 01A2 ERROR TROUBLESHOOTING
ERROR MESSAGES 0140 / 01A0 / 01A2
1) SYMPTOM:
a. 0140 - Incline motor operation failed.
b. 01A0 - Incline motor disconnected.
c. 01A2 - Incline motor is detected in the reverse of the position indicated by the potentiometer.
2) SOLUTION
a. Check the connection of the incline motor cable at the MCB.
b. Run auto calibration (See Section 3.5).
c. If auto calibration fails, re-enter Engineering Mode and again go to Calibration.
- Select Incline Minimum, and then Go To Value.
- Check the MCB LEDs. If LED DOWN (Figure A) has no light, check the console cable connections at the console and MCB.
Replace the console or cable as needed. If LED DOWN has a light, replace the incline motor.
d. If the incline motor does not resolve the issue, replace the MCB.
FIGURE A
32
Page 36

CHAPTER 8: TROUBLESHOOTING
8.5 01A3 ERROR TROUBLESHOOTING
ERROR MESSAGE 01A3
1) SYMPTOM:
a. Motor is disconnected.
2) SOLUTION:
a. Check the connection of the motor cable at the MCB (Figure A).
b. Check to see if the MCB LED DSP1 (MCU) is lit (Figure B).
c. If LED DSP1 is blinking, the motor should be replaced.
d. If LED DSP1 is a solid light, replace the motor.
e. If LED DSP1 is not lit, replace the MCB.
FIGURE A FIGURE B
8.6 01A8 / 02B6 / 02B7 / 02B8 ERROR TROUBLESHOOTING
ERROR MESSAGE 01A8 / 02B6 / 02B7 / 02B8
1) SYMPTOM:
a. 01AB - Motor over current.
b. 02B6 - Speed up is overcurrent.
c. 02B7 - Speed down is overcurrent.
d. 02B8 - Running status is overcurrent.
2) SOLUTION:
a. Check the condition of the running deck and belt. Replace the belt and flip or replace the running deck as needed.
b. Replace the MCB.
33
Page 37

CHAPTER 8: TROUBLESHOOTING
8.7 029F ERROR TROUBLESHOOTING
ERROR MESSAGE 029F
1) SYMPTOM:
a. Motor over temperature.
2) SOLUTION:
a. Check the connection of the motor cable at the MCB (Figure A).
b. Use a multi-meter to check the motor wire circuit. Set the multi-meter to Ohms and place both terminals on the blue wires of the
motor cable (Figure B). There should be an Ohm reading of 0. If there is an Ohm reading above 0, replace the motor. If the Ohm reading is 0,
replace the MCB.
FIGURE BFIGURE A
8.8 02AD ERROR TROUBLESHOOTING
ERROR MESSAGE 02AD
1) SYMPTOM:
a. MCB is over temperature.
2) SOLUTION:
a. Check to see that both fans are operating (there is a fan mounted to the MCB itself as well as an external fan). Also check the
connection of the fans at the MCB (Figure A).
b. If the fans are running correctly, replace the MCB.
34
FIGURE A
Page 38

CHAPTER 8: TROUBLESHOOTING
8.9 02B2 ERROR TROUBLESHOOTING
ERROR MESSAGE 02B2
1) SYMPTOM:
a. The emergency circuit on the interface board active.
2) SOLUTION:
a. Check the connection of the safety key (emergency stop) switch (Figure A). If the switch is always open or shorted out, replace the
switch.
b. If the emergency stop does not resolve the issue, replace the console.
FIGURE A
8.10 02B9 / 02BA / 02BD ERROR TROUBLESHOOTING
ERROR MESSAGE 02B9 / 02BA / 02BD
1) SYMPTOM:
a. 02B9 - The inner memory IC data write error.
b. 02BA - The inner memory IC data read error.
c. 02BD - Inverter hardware interrupt error.
2) SOLUTION:
a. Check LED DSP1 (MCU) on the MCB (Figure A).
b. If this LED is blinking, replace the console.
c. If this LED is a constant light, replace the MCB.
d. If this LED is not lit at all, check the power to the MCB.
FIGURE A
35
Page 39

CHAPTER 8: TROUBLESHOOTING
8.11 04A0 ERROR TROUBLESHOOTING
ERROR MESSAGE 04A0
1) SYMPTOM:
a. No communication received.
2) SOLUTION:
a. If the display is giving an 04A0 error, LED DSP2 (RS485) should be off (Figure A). If this light is not on and an 04A0 error is present,
replace the console.
b. Check the connection of the console communication cable at both the console and the MCB.
c. Replace the console communication cable.
d. Replace the MCB.
FIGURE A
36
Page 40

CHAPTER 8: TROUBLESHOOTING
8.12 TROUBLESHOOTING - NO POWER TO THE CONSOLE
POWER SWITCH IS ON, BUT THE CONSOLE HAS NO DISPLAY
1) SYMPTOM:
a. The unit is not getting power from the outlet.
b. The MCB is not getting power from the power receptacle.
c & d. The power switch and MCB LEDs are lit, but there is no power to the console.
2) SOLUTION:
a. Check to see if the power switch is lit. If it is not, plug the power cord into a known working outlet and re-test.
- If the power switch is still not lit, replace the power switch, receptacle, and / or the power cord.
b. Remove the motor cover and check to see if LED +12V (DSP4) is lit on the MCB (Figure A).
- If the LED +12V is not lit, check the incoming AC voltage to the MCB.
- Replace the MCB if all power components are OK, and there is AC volts to the MCB.
c. If LED +12V is lit, check the switch on the back of the LMM Board (Figure B).
- If the unit has a power board (Figure C), the switch should be towards the left.
- If the unit does not have a power board, the switch should be towards the right .
d. If LED +12V is lit, check the connection of the console communication cable.
- If the console communication cable is connected correctly, D18 on the console UCB should be lit.
- If D18 on the console UCB is not lit, replace the console communication cable.
- If D18 on the console UCB is lit, but there is still no power to the console, replace the console.
FIGURE BFIGURE A
FIGURE C
37
Page 41

CHAPTER 8: TROUBLESHOOTING
8.13 TROUBLESHOOTING - HEART RATE ISSUES
HEART RATE ISSUES
1) SYMPTOM:
a. No heart rate.
b. No or high heart rate.
2) SOLUTION:
a. With a multi meter set for DC Voltage, place one prong of the multi meter on each of the HR plates on the handlebar (Figure A). A
correctly connected HR grip will have a DC Voltage reading of between 0.5 and 2.0. If this reading is correct, skip to Step b.
- If the reading is not correct, remove the screws holding the 2 halves of the HR grip together and check the connection of the HR grip
wiring to the grips (Figure B). Replace the grips if any damage is seen to the plates.
- Remove the console to expose the HR board.
- Check the connection of the HR grip wiring to the 6 pin Y cable attached to one side of the HR board. Use a multi meter set for
ohms to verify the continuity of these wires. If the ohm reading is more than 1 (or not there at all), replace the HR grip wiring (this will require
replacing the HR handlebar). If the ohm reading is correct, your issue is not with the HR grip / HR wire portion of the HR system.
b. Perform a continuity test on the treadmill console (see Service Bulletin - Continuity Test on Matrix Treadmills).
- Verify the HR board ground wire. With a multi meter set for ohms, place one prong on the HR board ground wire, and the other on
the console ground screw. You should get a resistance reading of 1 or less. If you get a reading over 1 (or none at all), replace the HR board.
- Check the continuity of the wire that goes from the HR board to the Translator Board. With a multi meter set for ohms, place one
prong on the 3 pin wire connecting to the HR board (Figure C) and the other on where this wire connects to the Translator Board (Figure D). If
you get a reading of over 1 (or no reading at all), replace this wire.
- Check the connection of the wire that goes from the Translator Board to the UCB. Replace this wire if needed.
- If all wiring checks out good and the unit is still having HR issues, replace the HR board.
- If the HR board does not resolve the issue, replace the UCB.
FIGURE A FIGURE B
FIGURE C FIGURE D
38
Page 42

CHAPTER 8: TROUBLESHOOTING
8.14 TROUBLESHOOTING - DISPLAY COLOR ISSUES
CONSOLE DISPLAY COLOR ISSUES
1) SYMPTOM:
a. The display colors are off or there are a "rainbow" of colors on the display.
2) SOLUTION:
a. Check the console cable connections at the upper and lower control boards.
b. Check the LED display wire connection (Figure A).
- This wire connection should be taped in place, add tape if needed.
- This wire should be tie strapped to the frame (Figure B). Add a tie strap if needed.
FIGURE BFIGURE A
39
Page 43

CHAPTER 8: TROUBLESHOOTING
8.15 TROUBLESHOOTING - SPEED SHOWN IS HIGHER THAN BELT SPEED
SCREEN SHOWS A HIGH SPEED, BUT THE BELT MOVING SLOWER THAN SHOWN
1) SYMPTOM:
a. The unit speed does not match the console display.
2) SOLUTION:
a. Perform an amp draw on the incoming power (see Field Work Instruction - Running an Amp Draw on Matrix Treadmills).
b. If the amp draw is too high regardless if a user is present or not, the issue is likely with the drive system (drive belt or motor).
- Make sure that there is enough tension from the idler on the drive belt so that it is not slipping.
- Check the rotation of the motor to find any dead spots or a wobble in the motor axle.
- Check the condition of the drive belt. Look for any wear or tears. Replace as needed.
c. If the amp draw is too high with a user, the issue is likely with the deck / running belt.
- Inspect the running deck for sticky or worn spots. If any wear is seen, flip the deck (it is waxed on both sides). A new running belt
should be installed any time a running deck is flipped.
- Replace the running belt.
40
Page 44

CHAPTER 8: TROUBLESHOOTING
8.16 ENTERTAINMENT TROUBLESHOOTING - OVERVIEW
1. Sections 8.16 - 8.19 will help with diagnosing problems with TV and entertainment related equipment that is produced by Matrix Fitness.
2. The Matrix T7xe treadmill includes an integrated TV that shows in the large display window. The TV is capable of being shown as a 7" or 15"
screen (Figures A & B). Your treadmill should be equipped with an Entertainment keypad similar to Figure C.
FIGURE A FIGURE B
FIGURE C
41
Page 45

CHAPTER 8: TROUBLESHOOTING
8.17 ENTERTAINMENT TROUBLESHOOTING – PICTURE FUZZY OR UNCLEAR
1. Usingaveriedgoodpieceofcoaxcable(agoodcoaxcablewillhaveasignalstrengthof10hzorgreater),removetheconsolebackcover
(Figure A) and hook the coax directly to the TV jack on the tuner. This bypasses internal connections for your machine (Figure B).
2. Checkyourinternalcablesandttingsinsideyourmachineattheconsole(FigureB)andbelowthemotorcover(FigureC).Makesureyou
havenodamage(kinks,cutsetc)andnostraywiresorpoorttingsontheendsofthecables.FittingsshouldlooklikeFigureD,withaclean
ushconnectorandnostrayaluminumstrandstouchingthecenterconductor.Replaceorrepairanysuspectcables.
3. Ifnodamagecanbefoundoncables,ttings,orconnectorsbeginreplacingcablesandconnectorswithknowngoodpartsuntilthe
damaged part is found. It is also possible that the console tuner is damaged, replace as needed.
FIGURE A FIGURE B
FIGURE C FIGURE D
42
Page 46

CHAPTER 8: TROUBLESHOOTING
8.18 ENTERTAINMENT TROUBLESHOOTING -TV WILL NOT TURN ON
1. If you have no picture at all, check to see if you have any status lights on your Entertainment keypad (next to the power button). The status
light should be red when off or in standby mode, and green when the TV is powered on. If you have lights of any color skip to Section 8.19.
2. Remove the console back (Figure A) and check the electrical connections for the TV (Figures B & C).
3.Afteryouhaveveriedallconnectionsaresecureandproblemstillexistsverifypowerattheoutlet(FigureD).Iftheoutletisnotoutputting
120V,checkthetnessroompower.
4. If internal electrical connections are good,, and the outlet is outputting 120V, the issue is likely with the TV, contact Matrix Customer Technical
Support.
FIGURE A FIGURE B
FIGURE C FIGURE D
43
Page 47

CHAPTER 8: TROUBLESHOOTING
8.19 ENTERTAINMENT TROUBLESHOOTING - ENTERTAINMENT KEYPAD ISSUES
1. If you have a status light on the Entertainment keypad but the On / Off button gives no response, disconnect and then reconnect the power to
the treadmill from the wall. Attempt to turn on the TV again using the On / Off button.
2. If TV still does not power on, remove the console back (Figure A) and check the Entertainment keypad connections at the console (Figure B).
3. If the TV does not power on after the Entertainment keypad connection is reset, the issue it is likely with the TV itself, contact Matrix Customer
Technical Support.
FIGURE A
FIGURE B
44
Page 48

CHAPTER 9: PART REPLACEMENT GUIDE
9.1 MOTOR COVER AND LOWER SHROUD REMOVAL
1) The motor cover is split into two pieces (called the motor cover and lower shroud
2) Remove the 2 screws holding motor cover to the frame (Figure A ).
3) Pull up on the rear of the motor cover to release the Velcro, and remove the motor cover (Figure B).
FIGURE A FIGURE B
4) Remove the 4 screws holding the lower shroud to the frame (Figure C).
5) Figure D shows a unit with both the motor cover and lower shroud removed.
FIGURE C FIGURE D
45
Page 49

CHAPTER 9: PART REPLACEMENT GUIDE
9.2 REAR ROLLER REPLACEMENT
1) Turn off power to the unit and disconnect the cord from the machine.
2) Remove one of the end caps using a Phillips screwdriver (Figure A).
3) Remove both roller adjustment screws using an 8 mm Allen wrench (Figure B).
FIGURE A
4) Remove the roller from the running belt (Figures C & D).
FIGURE C
5) Reverse Steps 1-4 to install a new rear roller.
6) Tension the running belt as outlined in Section 3.6.
FIGURE B
FIGURE D
46
Page 50

CHAPTER 9: PART REPLACEMENT GUIDE
9.3 RUNNING DECK REPLACEMENT
1) Remove the motor cover as outlined in Section 9.1.
2) Remove the four running deck screws using a 5 mm Allen wrench (Figure A).
FIGURE A
3) Remove the running deck from the running belt (Figures B & C). NOTE: Be careful not to pinch fingers during removal / installation of the
running deck.
FIGURE B FIGURE C
4) Reverse Steps 1-3 to install a new running deck. NOTE: The running deck is waxed on both sides so the opposite side surface may be
usable. New running deck surfaces must ALWAYS be matched to a new running belt.
5) Tension the running belt as outlined in Section 3.6.
47
Page 51

CHAPTER 9: PART REPLACEMENT GUIDE
9.4 RUNNING DECK CUSHION REPLACEMENT
1) Remove the running deck as outlined in Section 9.3.
2) Hold the running deck cushion bolt with a 5 mm Allen wrench and loosen the nut with 13 mm socket (Figures A & B).
FIGURE A FIGURE B
3) Remove the rear cushion by holding the cushion while removing the 13 mm nut (Figure C).
FIGURE C
4) Reverse Steps 1-3 to install new running deck cushions.
5) Tension the running belt as outlined in Section 3.6.
48
Page 52

CHAPTER 9: PART REPLACEMENT GUIDE
9.5 FRONT ROLLER REPLACEMENT
1) Remove the motor cover as outlined in Section 9.1.
2) Using a hook or loop of wire, remove the spring from the drive belt tensioner. The tensioner should now pivot away from the drive belt
(Figures A & B).
FIGURE A FIGURE B
3) Remove the front roller mounting screws using an 8 mm Allen wrench (Figures C & D).
4) Remove the drive belt from the front roller and remove the roller from the running belt (Figure E).
FIGURE C FIGURE D
5) Reverse Steps 1-4 to install a new front roller.
6) Tension the running belt as outlined in Section 3.6.
FIGURE E
49
Page 53

CHAPTER 9: PART REPLACEMENT GUIDE
9.6 RUNNING BELT REPLACEMENT
1) Remove the motor cover as outlined in Section 9.1.
2) Remove the rear roller as outlined in Section 9.2.
3) Remove the running deck as outlined in Section 9.3.
4) Remove the front roller as outlined in Section 9.5.
5) Once the rollers and deck are removed, the running belt can be lifted up and off the unit (Figures A & B).
FIGURE A
6) Reverse Steps 1-5 to install a new running belt. NOTE: A new running belt should ALWAYS be installed on a new deck surface (deck
should either be flipped or replaced to gain a new surface).
7) Tension the running belt as outlined in Section 3.6.
FIGURE B
50
Page 54

CHAPTER 9: PART REPLACEMENT GUIDE
9.7 SIDE RAIL REPLACEMENT
1) Remove the 4 screws holding on the end cap on the same side as the broken side rail using a Phillips screwdriver and remove the end cap
(Figure A).
2) Loosen the four screws under the frame of the side rail using a 5 mm Allen wrench (Figure B).
FIGURE A FIGURE B
3) Slide the rail off the back of the treadmill (Figures C & D).
FIGURE C
4) Reverse Steps 1-3 to install a new side rail. NOTE: After reinstalling the side rail, make sure the end cap is on first before tightening the
screws for proper gap spacing. Also be careful not to over tighten the screws, or they will poke through the top of the side rail.
FIGURE D
51
Page 55

CHAPTER 9: PART REPLACEMENT GUIDE
9.8 MOTOR CONTROL BOARD (MCB) REPLACEMENT
1) Turn off power and disconnect the cord from the machine.
2) Remove the motor cover as outlined in Section 9.1.
3) Cut any wire ties that are secured to the MCB panel.
4) Disconnect wires from the MCB - five total connections.
5) Remove two MCB mounting screws using a Phillips head screwdriver (Figures A & B).
6) Reverse Steps 1-5 to install a new MCB. Be sure to re-connect the 5 wires removed from the old MCB in Step 4 (Figure C). NOTE: The
speed sensor wire from the motor is no longer used and can be tie strapped to a bracket.
7) Auto Calibration must ALWAYS be run after replacing the MCB (see Section 3.5).
J10 - 8 pin black connector
to the console.
J16 - 2 pin white
connector to the
external fan.
FIGURE A
FIGURE B
TB2 - 3 pin connector from
the choke (2 wires) and a
ground (1 wire).
TB1 - 5 pin connector from
the motor.
J12 - 6 pin white
connector to the
incline motor.
52
FIGURE C
Page 56

CHAPTER 9: PART REPLACEMENT GUIDE
9.9 MOTOR REPLACEMENT
1) Turn off the power and disconnect the cord from the machine.
2) Remove the motor cover as outlined in Section 9.1.
3) Release the drive belt tensioner as outlined in Section 9.5.
4) Disconnect the motor power cable from the MCB (Figure A).
5) Use an 8 mm Allen wrench to remove the four motor mounting screws (Figure B).
FIGURE A FIGURE B
6) Lift the motor away from the treadmill (Figure C).
7) Reverse Steps 1-6 to install a new motor. NOTE: When reinstalling the motor, make sure the red vibration pad is in place (Figure D).
FIGURE C FIGURE D
8) Auto Calibration must ALWAYS be run when installing a new motor. (see Section 3.5)
53
Page 57

CHAPTER 9: PART REPLACEMENT GUIDE
9.10 DRIVE BELT REPLACEMENT
1) Remove the motor cover as outlined in Section 9.1.
2) Release the drive belt tensioner from the drive belt as outlined in Section 9.5.
3) Remove the front roller screw on the drive belt side and loosen the screw on the opposite side (Figure A).
FIGURE A
4) Lift the roller and remove the old drive belt (Figure B).
FIGURE B
5) Reverse Steps 1-4 to install a new drive belt. NOTE: After installing a new belt, check it for correct alignment to the motor pulley before
setting the tensioner in place.
6) Tension the running belt as outlined in Section 3.6.
54
Page 58

CHAPTER 9: PART REPLACEMENT GUIDE
9.11 INCLINE MOTOR REPLACEMENT
1) Turn off the power and disconnect the cord from the machine.
2) Lift the treadmill and support it so that the front wheels are off the floor, or the unit may be tipped on its side (Figure A).
FIGURE A
3) Remove the clip from the pin attaching the bottom of the incline motor to the rack (Figure B).
4) Remove the pin attaching the bottom of the incline motor to the rack (Figure C).
FIGURE B FIGURE C
55
Page 59

CHAPTER 9: PART REPLACEMENT GUIDE
9.11 INCLINE MOTOR REPLACEMENT - CONTINUED
5) Disconnect the incline motor power cable from the MCB (Figure D).
6) Disconnect the pin from the top of the incline motor (Figure E).
FIGURE D FIGURE E
7) Lift the incline motor away from the treadmill (Figure F).
8) Reverse Steps 1-7 to install a new incline motor. When installing the new motor, the worm screw should be turned as short as possible, and
then rotated out 2 full turns prior to being re-attached to the rack. NOTE: When installing the new incline motor, make sure to replace the white
washers at the top and bottom connection points of the incline motor (Figure G).
FIGURE F FIGURE G
9) Auto Calibration must ALWAYS be run after replacing the incline motor (see Section 3.5).
56
Page 60

CHAPTER 9: PART REPLACEMENT GUIDE
9.12 CONSOLE REPLACEMENT
1) Turn off the power and disconnect the cord from the machine.
2) Remove the 4 screws holding the console back to the front (Figure A).
3) Lean the console back away from the console and disconnect the coax cable connection.
4) Remove the six 6 mm screws from underneath the console. There are arrows stamped in the plastic at the proper openings (Figure B).
FIGURE A FIGURE B
5) Disconnect the remaining connectors holding the console to the frame and remove the console.
6) Reverse Steps 1-5 to install a new console. NOTE: Be sure to re-connect any wire connections removed in Steps 3 and 5 (Figure C).
FIGURE C
7) Auto Calibration must ALWAYS be run after replacing the console (see Section 3.5).
57
Page 61

CHAPTER 9: PART REPLACEMENT GUIDE
9.13 CONSOLE MAST ARM REPLACEMENT
1) Turn off power and disconnect the cord from the machine.
2) Remove the console as outlined in Section 9.12.
3) Take off the cup holder from the right side of the treadmill (Figure A).
4) Use a 6 mm Allen wrench to remove one screw and take off the plastic hand rail (Figure B).
FIGURE A FIGURE B
5) Remove the 5 Phillips screws and remove the right side upper plastic cover (Figures C, D, & E).
FIGURE C FIGURE D FIGURE E
6) Cut the wire ties and begin to unthread the console cable (Figures F & G).
FIGURE F
58
FIGURE G
Page 62

CHAPTER 9: PART REPLACEMENT GUIDE
9.13 CONSOLE MAST ARM REPLACEMENT - CONTINUED
7) Remove the screws holding the console frame to the mast arms with a 6 mm Allen wrench in the openings with arrows (Figure H).
8) Lift the frame from the mast arms and set it aside (Figure I).
FIGURE H FIGURE I
9) Use a 6 mm Allen wrench to remove the lower mast arm mounting screws (Figure J).
10) Pull the mast arm from the side of the machine (Figure K).
FIGURE J
11) Reverse Steps 1-10 to install a new console mast. NOTE: If replacing the right side mast arm, the console cable must be threaded through
it prior to it being mounted to the frame.
FIGURE K
59
Page 63

CHAPTER 9: PART REPLACEMENT GUIDE
9.14 CONSOLE CABLE REPLACEMENT
1) Turn off power and disconnect the cord from the machine.
2) Remove the console as outlined in Section 9.12.
3) Take off the cup holder from the right side of the treadmill (Figure A).
4) Use a 6 mm Allen wrench to remove one screw and take off the plastic hand rail (Figure B).
FIGURE A FIGURE B
5) Remove the 5 Phillips screws and remove the right side upper plastic cover (Figures C, D, & E).
FIGURE C FIGURE D FIGURE E
6) Cut the wire ties and begin to unthread the wire harness (Figures F & G). .
FIGURE F FIGURE G
60
Page 64

CHAPTER 9: PART REPLACEMENT GUIDE
9.14 CONSOLE CABLE REPLACEMENT - CONTINUED
7) Remove the spiral protective wrap from the top and bottom portions of the wire harness (Figures H & I).
FIGURE H FIGURE I
8) Attach a pulling wire to the top of the defective console cable (Figure J).
9) Slowly remove the defective console cable starting at the bottom of the machine and pulling it down to the motor compartment (Figure K).
FIGURE J FIGURE K
10) Connect the new console cable at the motor tray - 4 connections total. Figures L & M show 2 of these connections, the 3rd is the coax
cable.
FIGURE L FIGURE M
11) Attach the new console cable to the pulling wire and gently pull the new cable up through the machine. NOTE: Once the wire is in place,
reinstall the spiral wrap and wire ties.
12) Reverse Steps 1-7 to finish installing a new console cable.
13) Auto Calibration must ALWAYS be run after the installation of a new console cable (see Section 3.5).
61
Page 65

CHAPTER 9: PART REPLACEMENT GUIDE
9.15 HANDLE BAR SERVICE
1) Turn off the power and disconnect the cord from the machine.
2) All items on the handle bar are removed using a Phillips screwdriver from the underside of the bar.
3) Once the screws are removed, lift the part carefully and disconnect any wire connections to fully remove the handle bar.
4) Replace the parts as needed on handle bar including the Quick Start Key, Resistance and Incline Toggles, and the Heart Rate Grip Plates
(Figures A-F).
FIGURE A FIGURE B
FIGURE C
FIGURE E FIGURE F
62
FIGURE D
Page 66

CHAPTER 9: PART REPLACEMENT GUIDE
9.16 EMERGENCY STOP SWITCH REPLACEMENT
1) Turn off power and disconnect the cord from the machine.
2) Remove the console as outlined in Section 9.12.
3) Use a Phillips screwdriver to remove two screws, one from each side of the red button (Figure A).
4) Lift the button from bracket by pulling one side out at a time (Figure B).
FIGURE A FIGURE B
5) Use a Phillips screwdriver to remove two screws, one from each side of the mounting bracket (Figure C).
6) Turn the bracket and use a straight screwdriver or pliers to compress each end of the switch and release it from the bracket (Figures D & E).
FIGURE C
7) Reverse Steps 1-6 to install a new emergency stop switch. NOTE: Make sure the new switch has the same orientation as the old one
when installing, and that the wires are properly connected.
FIGURE D
FIGURE E
63
Page 67

CHAPTER 9: PART REPLACEMENT GUIDE
9.17 HEART RATE BOARD REPLACEMENT
1) Turn off power and disconnect the cord from the machine.
2) Remove the console as outlined in Section 9.12.
3) The Heart Rate Board is located in front of the red Emergency Stop button (Figure A).
4) Disconnect the wires from each side of the Heart Rate Board (Figure B).
FIGURE A
5) Use a Phillips screwdriver to remove two screws, one from each side of the Heart Rate Board mounting bracket (Figure C).
FIGURE B
FIGURE C
6) Reverse Steps 1-5 to install a new heart rate board. NOTE: Be sure to fully seat the wires on the new heart rate board and test the grips
after the console is reinstalled.
64
Page 68

CHAPTER 9: PART REPLACEMENT GUIDE
9.18 BLOWER MOTOR REMOVAL
1) Turn off power and disconnect the cord from the machine.
2) Remove the console as outlined in Section 9.12.
3) Lay the console face down and remove the four screws using a Phillips screwdriver (Figure A).
4) The console shell will now separate. Use a Phillips screwdriver to remove the two screws holding the blower motor in place (Figure B).
FIGURE A
5) Carefully separate the blower motor from the duct and remove it (Figure C).
6) Unplug the wire connections from the main circuit board to completely split the front and rear sections (Figure D).
FIGURE B
FIGURE C FIGURE D
7) Reverse Steps 1-6 to install a new blower motor. NOTE: Be sure to test the blower motor once the console is reinstalled.
65
Page 69

CHAPTER 9: PART REPLACEMENT GUIDE
9.19 OVERLAY / KEYPAD REPLACEMENT
NOTE: The instructions below are for console overlays / keypads replacement, but the procedure is the same regardless of where the overlay /
keypad is.
1) Turn off power and disconnect the cord from the machine.
2) Remove the console as outlined in Section 9.12 (Figure A).
3) Unplug and remove the faulty overlay / keypad (Figure B).
FIGURE A
4) Clean the area with alcohol to remove any left over adhesive (Figure C).
5) Peel part of the protective film from the new overlay / keypad (Figure D).
FIGURE C
FIGURE B
FIGURE D
66
Page 70

CHAPTER 9: PART REPLACEMENT GUIDE
9.19 OVERLAY / KEYPAD REPLACEMENT - CONTINUED
6) Push the overlay / keypad ribbon cable through the hole in the console and plug it in to the open pins on the UCB (Figure E).
7) Match the overlay / keypad to the cutout on the console (Figure F).
FIGURE E
8) Press down on the corners of the new overlay / keypad to keep it in place, and then remove the protective film (Figure G).
9) Once the overlay / keypad is in the correct position, press down on the overlay / keypad to adhere it in place (Figure H).
FIGURE G
10) Follow the same procedure to replace any additional faulty overlays. NOTE: Overlays can not be reused.
FIGURE F
FIGURE H
67
Page 71

CHAPTER 10: TREADMILL SPECIFICATIONS AND ASSEMBLY GUIDE
10.1 TREADMILL SPECIFICATIONS
MODEL NAME
TREADMILL TYPE T7xe TREADMILL
FR AME PAR T# T-5X / 7X- 03-F
CONSOLE PART # T-7X E-04 - C
FE AT U RES
DECK TYPE ULTIMATE™ HARD-WAX REVERSIBLE 1” DECK
BELT T YPE HABASIT - 2-PLY COMMERCIAL GRADE
RUNNING AREA 60” X 22” / 152.4 CM X 55.9 CM
DECK STEP HEIGHT 9.5” / 24.1 CM
CUSHION SYSTEM ULTIMATE DECK™ CUSHIONING SYSTEM
INCLINE RANGE 0-15% (1,300 LB / 589.7 KG THRUST INCLINE MOTOR)
SPEED RANGE 0.5 - 15* MPH / 0.8 - 24.1* KPH
CONTACT & TELEMETRIC HR SENSORS YES
T-5x /7x
DRIVE SYSTEM
MOTOR MATRIX 5.0 HP AC DYNAMIC RESPONSE DRIVE SYSTEM™
MOTOR CONTROLLER COMMERCIAL TREADMILL AC DRIVE
CONSOLE
DI S PL AY TYPE 15" / 38.1 CM TOUCH SCREEN LCD
TIME, TIME ELAPSED, TIME REMAINING, TOTAL PROGRAM TIME, CLOCK, DIS
DI S PL AY FE EDBA C K
USER DEFINED MULTI-LANGUAGE DISPLAY
WORKOUTS
CSAFE, FITLINXX READY YES
NETPULSE READY NO
ON-THE-FLY PROGRAM CHANGE YES
FIT TOUCH TECHNOLOGY™ YES
INTEGR ATED VISTA CLEAR™ DIGITAL READY TELEVISION YES-15" / 38.1 CM SCREEN SIZE
VIRTUAL ACTIVE™ COMPATIBLE YES
FITCONNEXION™ READY NO
WIFI YES
ASSET MANAGEMENT COMPATIBLE YES
IP O D CO M PAT I BLE YES
NIKE + IPOD COMPATIBLE YES
PERSONAL FAN YES
CROSSBAR CONTROLS GO, STOP, COOL DOWN, SPEED AND INCLINE CONTROL
TANCE (KILOMETERS OR MILES), CALORIES, CALORIES PER HOUR, SPEED,
INCLINE, PACE, HEART R ATE, METS, WATTS, STATIC PROFILE DISPLAY, DYNAMIC
PROFILE DISPLAY
YES - ENGLISH, GERMAN, FRENCH, ITALIAN, SPANISH, DUTCH, PORTUGUESE,
CHINESE, JAPANESE, KOREAN, SWEDISH, FINNISH, RUSSIAN, ARABIC
MANUAL, ROLLING HILLS, FAT BURN, 5K, TARGET HR, GERKIN PROTOCOL, ARMY
PFT, NAVY PRT, MARINE PFT, AIR FORCE PRT, PHYSICAL EFFICIENCY BATTERY
(PEB)
TECH SPECS
OVERALL DIMENSIONS
L X W X H
MAXIMUM USER WEIGHT 400 LBS/182 KG
WEIGHT 399 LBS/181 KG
SHIPPING WEIGHT 440 LBS/200 KG
ELECTRICAL RECEPTACLE & PLUG NEMA 5-20R/P 110 V OR NEMA 6-20R/P 220 V
ELECTRICAL REQUIREMENTS 20 A DEDICATED CIRCUIT REQUIRED-NON-LOOPED-GROUNDED
84.6" X 33.7" X 58"
214.9CM X 85.6CM X 147.3CM
-
68
Page 72

CHAPTER 10: TREADMILL SPECIFICATIONS AND ASSEMBLY GUIDE
10.2 FASTENERS AND ASSEMBLY TOOLS
Part #: Part Name: Outline: Dimensions: Quantity: Bag Color:
10 020090-00 Socket head cap screw
14 0000086571 Flat Washer
20 0000084935 Left Connection Bracket SPHC 4.0T 1
21 0000084936 Right Connection Bracket
11 004541-AC Socket Head Cap Screw M8 x 1.25P x 45 mm 2 White
12 035882-AB Socket Head Cap Screw
14 0000086571 Flat Washer
17 004539-AD Socket Head Cap Screw
19 0000088905 Spacer 6.2 x 12.0 x 1.6 2 Blue
15 004859-AC
14 0000086571 Flat Washer 6.2 x 12 x 1.6T 6 Red
Button Socket Head Cap
Screw
M8 x 20mm 10 Black
6.2 x 12 x 1.6 10 Black
SPHC 4.0T 1
M8 x 1.25P x 75 mm 4 White
6.2 x 12 x 1.6T 6 White
M8 x 1.25P x 25mm 2 Blue
M8 x 1.25 x 20 mm 6 Red
13 020072-00 Socket Head Cap Screw M8 x 1.25 x 60mm 4 Yellow
16 062769-00 Socket Head Cap Screw M8 x 1.25 x 15mm 2 Yellow
23 0000089835 Ribbed Lock Washer 8.5 x 12.8 x .8/1.3H 6 Yellow
22 0000086284 Power Cord Holder SPHC 1.6 1 Green
002153-C Power Cord 1 Green
18 004386-00 Button Head Screw 6.2 x 12.0 x 1.6T 2 Green
69
Page 73

CHAPTER 10: TREADMILL SPECIFICATIONS AND ASSEMBLY GUIDE
10.3 ASSEMBLY INSTRUCTIONS
ATTENTION
After assembly and installation is complete, the treadmill will need to be calibrated using the auto-calibration procedure outlined in Section 3.5.
DO NOT stand on the belt while the auto-calibration sequence is in progress.
Prior to assembling the treadmill, unpack all of the contents of the box and make sure that all necessary components are present. Review the
contents of the hardware package for completeness. Contact Matrix customer service at 866.693.4863 to report any missing items.
ASSEMBLY INSTRUCTIONS
Please make sure that the power cord is not plugged into the wall outlet while completing the following procedure.
To ensure correct assembly of the treadmill, carefully read and follow these steps:
STEP 1
Remove the motor cover(s) and set aside. The motor cover(s) need
to be removed to gain access to the motor compartment so that wire
harness
connections can occur.
STEP 2
Open Black Assembly Bag. Assemble both the left and right console
masts to the treadmill base using item 10 socket head cap screw and
item 14 washer.
70
Page 74

CHAPTER 10: TREADMILL SPECIFICATIONS AND ASSEMBLY GUIDE
10.3 ASSEMBLY INSTRUCTIONS - CONTINUED
STEP 3
Open White Assembly Bag. Assemble the left and right bracket
(items 20 and 21) to the console base using item 12 socket head
cap screw, item 14 flat washer and item 11 socket head cap screw.
STEP 4
Open Blue Assembly Bag. Slide the urethane arms over the steel
tubes on the console base. Fasten the urethane arms to the steel
tubes using item 17 socket head cap screw and item 19 spacer.
Assembly Tip: It is much easier to accomplish this task if the
console base is left inside its shipping container.
71
Page 75

CHAPTER 10: TREADMILL SPECIFICATIONS AND ASSEMBLY GUIDE
10.3 ASSEMBLY INSTRUCTIONS - CONTINUED
STEP 5 STEP 6
Open Red Assembly Bag. Assemble the console base to the
console masts using item 15 button head cap screw and item 14
flat washer. Be sure to route the console cables down the console
mast through the larger opening in the mast which is closest to
the running belt. Make all appropriate wire connections within the
motor compartment.
Open Yellow Assembly Bag. Make appropriate wire connections
to the faceplate and then assemble to the console base using item
13 socket head cap screw, item 23 lock washers, and item 16
socket head cap screw. Item 16 is a shorter socket head cap screw
and gets assembled into the holes closest to the running surface.
All holes applicable to the assembly step can be noted by the
embossed arrow next to the hole. See pages 69-70 for detailed
instructions on wire connections.
72
Page 76

CHAPTER 10: TREADMILL SPECIFICATIONS AND ASSEMBLY GUIDE
10.3 ASSEMBLY INSTRUCTIONS - CONTINUED
STEP 7
ASSEMBLY COMPLETE
Assembly is complete, the running belt should be adjusted as
needed and the auto calibration sequence must now be run as
outlined in Sections 3.5 and 3.6 Also level the unit as outlined in
Section 10.4.
Replace the motor cover(s) and power the treadmill on. The power
button is located next to the power cord inlet.
73
Page 77

CHAPTER 10: TREADMILL SPECIFICATIONS AND ASSEMBLY GUIDE
10.4 LEVELING THE TREADMILL
OPTIONAL LEVELING ASSEMBLY TECHNIQUES: USE OF SHIM OR BY ADDING A LEVELING FOOT.
Note: It is extremely important that the levelers are correctly adjusted for proper operation. An unbalanced unit may cause belt misalignment or
other issues. Use of a level is recommended.
Remove the leveling shim provided on the underside of the treadmill. The shim can be found mounted on the underside of the right hand side
rail. Remove the rear foot on the side of the treadmill that is resting low. Install the shim as shown above and return the rear foot.
When installing the optional rear leveling foot accessory, remove the existing rear foot. Replace with new leveling foot and fasten to the frame
using the existing fasteners that held in the half-moon foot.
74
Page 78

CHAPTER 10: TREADMILL SPECIFICATIONS AND ASSEMBLY GUIDE
10.5 ENTERING THE SERIAL NUMBER INTO THE CONSOLE
ONCE INSTALLATION IS COMPLETE, THE CONSOLE AND PLATFORM SERIAL NUMBERS SHOULD BE
ENTERED INTO THE CONSOLE.
1) Press ENTER, 3, 0, 0, 1, ENTER on the number keypad and Service Mode will appear on the display.
2) Press Serial Number on the display.
3) Choose Platform (Figure A) or Console (Figure B).
4) Enter the serial number of the console or platform using the number keypad. Only the final 9 digits of the serial number should be entered.
5) Repeat this procedure so that both the console and platform serial numbers are entered.
6) Press the EMERGENCY STOP or the HOME key to return to normal function.
FIGURE A
FIGURE B
75
Page 79

CHAPTER 10: TREADMILL SPECIFICATIONS AND ASSEMBLY GUIDE
10.6 TV PROGRAMMING INSTRUCTIONS
Once the cardio equipment has been installed, and proper power and cable wiring is provided, The Television must be programmed to the club's
channels and settings.
Auto Scan - An auto scan will search for channel signals from the coax cable. It will tune in all channels that provide a signal.
1. Press ENTER, 1, 0, 0, 1, ENTER on the number keypad to enter Manager Mode.
2. Press TV on the display (Figure A).
3. Press SETUP on the display (Figure B). A TV will appear.
FIGURE BFIGURE A
4. Press the - key on the number keypad and a Menu will appear on the TV (Figure C). NOTE: Once the Menu is present on the screen, the
following buttons must be pressed quickly, or the Menu will minimize after 5 seconds of no key strokes.
5. Use the CHANNEL UP and DOWN keys to move, ENTER key to enter this action in the Menu. Use the VOLUME UP and DOWN keys to
select item and ENTER key to start / change / save this setting item in the sub-menu.
6. Use the CHANNEL UP and DOWN keys to scroll the cursor to Installation of the Menu, then press the ENTER key to enter the Installation
sub-menu(Figure D).
FIGURE C
7. Use the CHANNEL UP or DOWN keys to scroll down to Auto Scan (Figure E), then press the ENTER key to start the channel scan (Figure
F).
76
FIGURE D
FIGURE FFIGURE E
Page 80

CHAPTER 10: TREADMILL SPECIFICATIONS AND ASSEMBLY GUIDE
10.6 TV PROGRAMMING INSTRUCTIONS - CONTINUED
Auto Scan (continued):
8. If the channels are not coming in clearly after a channel scan (or if only some channels come in), follow Steps 4-7 to enter the Installation .
Use the CHANNEL UP or DOWN keys to change the TV System to match the club's incoming frequency (Figure G), then re-run Auto Scan.
10. If the channels are coming in clearly, press the HOME key to return to normal function (Figure H). If some channels are still not coming
in, are blurry, or are not scanning, follow the procedure below for adding / deleting a single channel. If no channels are coming in, see the
troubleshooting in Chapter 8.
FIGURE HFIGURE G
Adding or Deleting a Single Channel - At times the Channel Scan can pick up channels that do not have a strong enough signal to
come in clearly or will fail to pick up channels that do come in clearly. Use the following procedure to manually add or delete a channel.
1. Follow Steps 1-4 in the Auto Scan instructions to access the TV Menu.
2. Use the CHANNEL UP or DOWN keys to scroll to Channel Management the Menu. Then press the ENTER key to enter the Channel
Management sub-menu.
3. Use the CHANNEL UP or DOWN keys to scroll to Hide / Show (Figure I). Then press the ENTER key to enter the Hide / Show sub-menu.
4. The Hide / Show sub-menu will show a list of channels available (Figure J). Channels with a check mark are scanned in and should show
up during normal TV usage.
5. To remove or add any channel, simply scroll to the channel using the CHANNEL UP or DOWN keys, and then press ENTER to add or delete
a check mark (which adds or deletes the channel).
6. Once the desired channels are scanned in, press HOME to return to normal operation.
FIGURE JFIGURE I
77
Page 81

CHAPTER 11: SOFTWARE UPGRADE INSTRUCTIONS
11.1 SOFTWARE UPGRADE INSTRUCTIONS
1) Four files should be present on the USB drive. These are: DrummundDeploy.cab, NK, IO_XXX, updateLMM.confige, and Extract_CE.
2) Turn on the power to the treadmill, wait until the standard display picture has been come up (Figure A).
3) Enter Manager Mode by pressing ENTER, 1, 0, 0, 1, ENTER on the lower keypad.
4) Record the Accumulated Mileage, Accumulated Time, and Serial Number. NOTE: The information can be lost during the update procedure
and should be recorded so that the information can be entered into the newly updated console.
5) Press the HOME key to return to the standard display picture.
6) Insert the USB Flash Drive into the USB port in the console (Figure B).
FIGURE A FIGURE B
7) After a few seconds, a window called JHT Extraction Utility will come up (Figure C). Wait for this to complete its steps.
8) The treadmill will then auto run the upgrade processing. The achieved percentage of the scheduled process will be displayed in the bottom
right corner of the display (Figure D).
9) When the update is complete, the display will ask you to remove the USB drive (Figure E). Once the USB drive is removed, turn off the
treadmill and wait 40 seconds, then turn the treadmill back on.
10) Wait until the standard display picture comes up on the screen. NOTE: If Virtual Active is present on the console, wait until the Virtual
Active icon turns red around the edges.
11) Enter Service Mode by pressing ENTER, 3, 0, 0, 1, ENTER on the lower keypad and enter the values recorded in Step 3 (if needed). Also
check that the Machine Type is correctly set for treadmill and that the Service On Boot setting is NO.
FIGURE C
FIGURE D FIGURE E
78
Page 82

NOTES
79
Page 83

MATRIX FITNESS SYSTEMS CORP.
1610 LANDMARK DRIVE COTTAGE GROVE WI 53527 USA
TOLL FREE 866.693.4863 www.matrixfitness.com FAX 608.839.1717
REV. 01
KO
80
 Loading...