

Page 1

T50x / T50x-U
TREADMILLS
OWNER’S MANUAL
Page 2

1
CHAPTER 1: IMPORTANT SAFETY INSTRUCTIONS PAGES
1.1 Before Getting Started ....................................................................................................
1.2 Proper Usage .................................................................................................................
1.3 Read and Save These Instructions ...................................................................................
1.4 Electrical Requirements ..................................................................................................
1.5 Grounding Instructions ...................................................................................................
CHAPTER 2: PREvENTATIvE MAINTENANCE
2.1 Recommended Cleaning Tips ..........................................................................................
2.2 Deck and Belt Replacement ...........................................................................................
2.3 Check for Damaged Parts ...............................................................................................
2.4 Adjusting the Belt ..........................................................................................................
CHAPTER 3: SERIAL NUMBER LOCATION
3.1
T50x, T50x-U Treadmill ..........................................................................................................
CHAPTER 4: OvERLAY AND WORKOUT DESCRIPTION
4.1 T50x Console Description .........................................................................................................
4.2 T50x-U Console Description .....................................................................................................
4.3 Manual Workout Operation........................................................................................................
4.4 Operating Level Based Programs ...............................................................................................
4.5 Heart Rate Control Workout Operation .......................................................................................
4.6 Fitness Test Workout Operation .................................................................................................
CHAPTER 5: T50x, T50x-U TREADMILL SPECIFICATIONS, PARTS & ASSEMBLY GUIDES
5.1 Model Specifications .................................................................................................................
5.2 Fasteners and Assembly Tools ....................................................................................................
5.3 Assembly Steps .......................................................................................................................
02
02
02
03
03
03
03
03
04
04
05
06
07
07
08
08
10
11
12
T
ABLE OFCONTENTS
Page 3
2 3
CHAPTER 1: Important Safety Instructions
1.1 BEFORE GETTING STARTED
It is the sole responsibility of the purchaser of Matrix Fitness Systems
products to instruct all individuals, whether they are the end user or
supervising personnel, on proper usage of the equipment.
It is recommended that all users of Matrix Fitness Systems exercise
equipment be informed of the following information prior to its use.
1.2 PROPER USAGE
• Do not use the equipment in any way other than designed or intended by
the manufacturer. It is imperative that all Matrix Fitness Systems
equipment is used properly to avoid injury.
• Keep hands and feet clear of moving parts at all times to avoid injury.
• Unsupervised children must be kept away from this equipment.
• Do not wear loose clothing while on equipment.
1.3 READ AND SAvE THESE INSTRUCTIONS
This Treadmill is intended for commercial use. To ensure your safety and
protect the equipment, read all instructions before operating the
MATRIX treadmill.
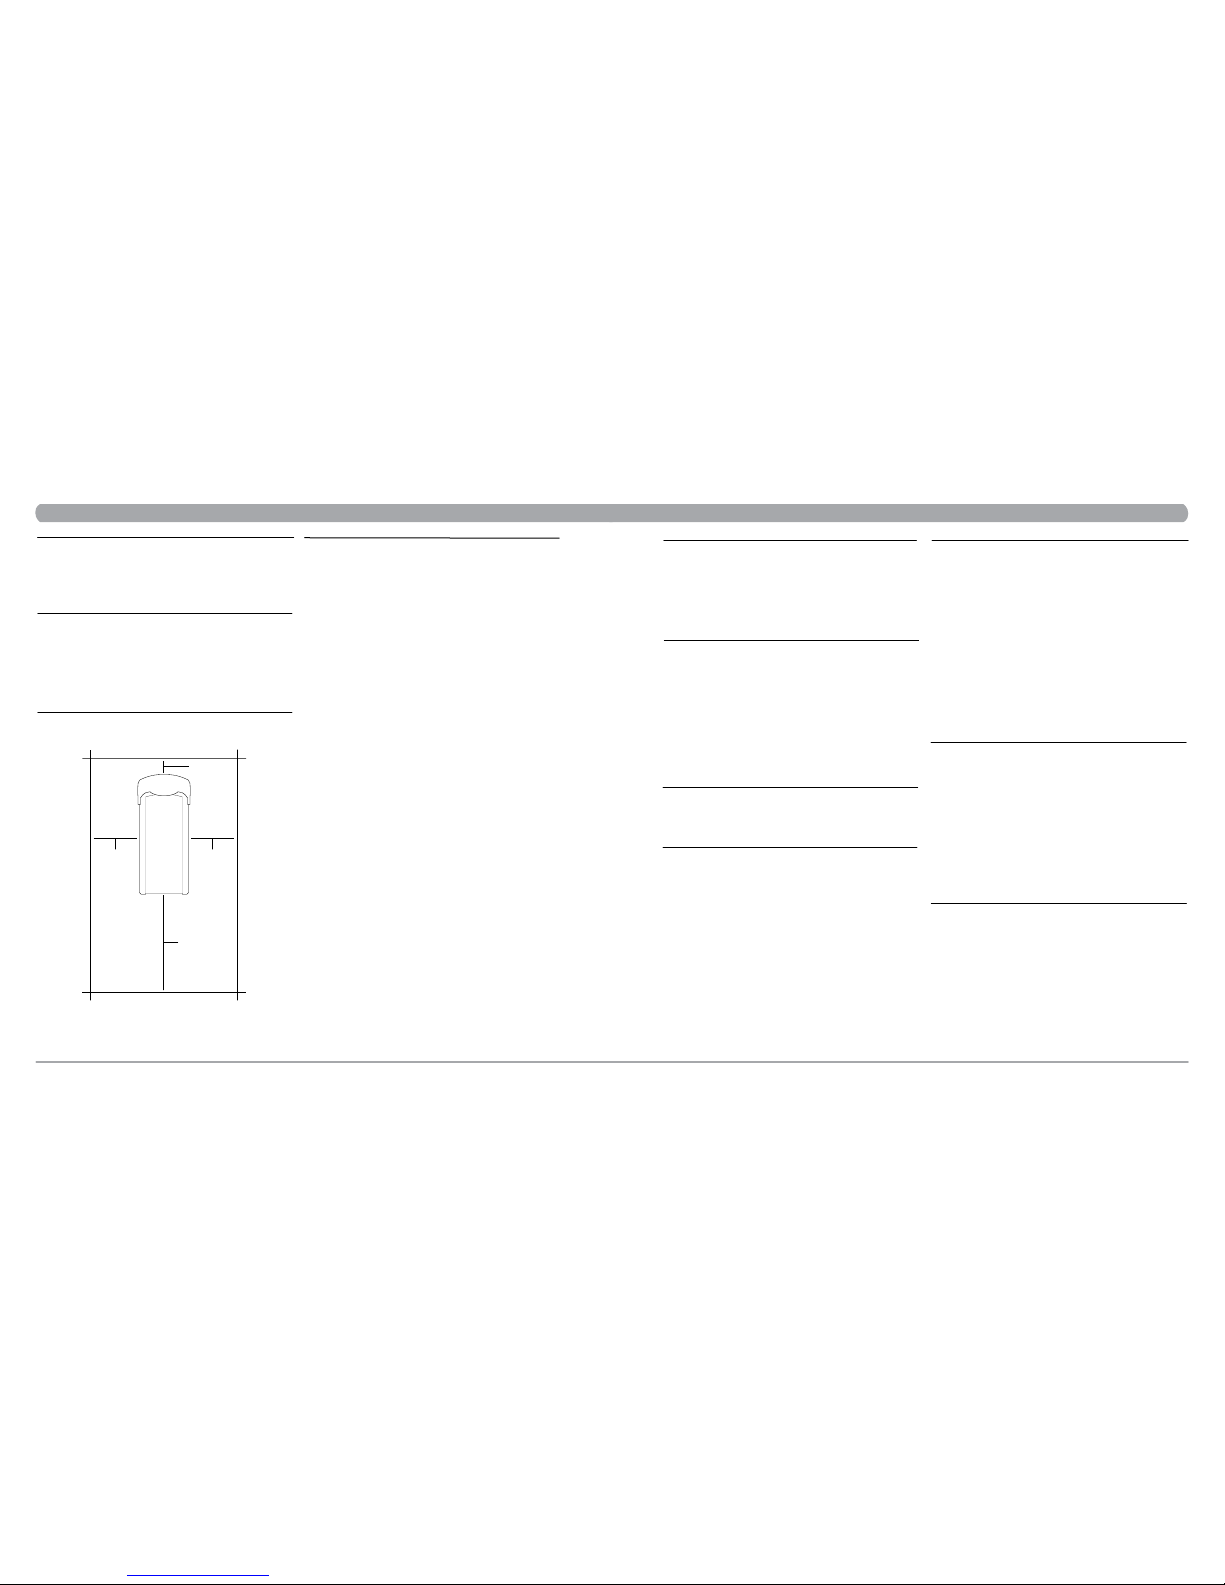
Please leave a 78.75” (2000 mm) x 39.50” (1000 mm) landing zone
behind the treadmill. This zone is to allow easy access to the treadmill and
gives the user an easy exit path from the machine. In case of an emergency,
place both hands on the side arm rests to hold yourself up and place your
feet onto the side rails.
When using an electrical product, basic precautions should always be
followed including the following:
DANGER: To reduce the risk of electric shock: Always unplug this
equipment from the electrical outlet immediately after using and
before cleaning.
WARNING: To reduce the risk of burns, fire, electrical shock or injury
to persons that may be associated with using this product:
• An appliance should never be left unattended when plugged in. Unplug from
outlet when not in use and before putting on or taking off parts.
• This product must be used for its intended purpose described in this
owner’s manual. Do not use other attachments that are not recommend by
the manufacturer. Attachments may cause injury.
• To prevent electrical shock, never drop or insert any object into any opening.
• Do not remove the console covers. Service should only be done by an
authorized service technician.
• Never operate the treadmill with the air opening blocked. Keep the air
opening clean, free of lint and hair.
• Never operate product if it has a damaged cord or plug, if it is working
improperly, if it has been damaged, or immersed in water. Return the unit
to a service center for examination and repair.
• Do not carry this unit by it’s supply cord or use the cord as a handle.
• Keep any power cord away from heated surfaces.
• Close supervision is necessary when treadmill is used by or near children or
disable persons.
• Do not use outdoors.
• The treadmill shall be installed on a stable base.
• Do not operate where aerosol (spray) products are being used or when
oxygen is being administered.
• To disconnect, turn all controls to the off position, then remove the plug
from outlet.
• Connect this treadmill to a properly grounded outlet only.
• This appliance is not intended for use by persons with reduced physical,
sensory or mental capabilities, or lack of experience and knowledge unless
they have been given supervision or instruction concerning use of the appliance by a person responsible for their safety.
• Children should be supervised to ensure that they do not play with the
appliance.
• If the supply cord is damaged, it must be replaced by a special cord or
assembly available from the manufacturer or its service agent.
WARNING: Heart rate monitoring systems may be inaccurate. Over
exercise may result in serious injury or death. If you feel faint stop exercising
immediately.
SAvE THESE INSTRUCTIONS
3
1000 mm
2000 mm
1000 mm
305 mm
CHAPTER 1: Important Safety Instructions
1.4 ELECTRICAL REqUIREMENTS
For your safety and to ensure good treadmills performance, the ground on
this circuit must be no-looped. Before connecting the plug into an electrical outlet, make sure that the voltage requirements match that the voltage
of the treadmill.
ATTENTION: Your treadmill is provided with a power cord. Please
only use with the power cord as supplied, or with Matrix spare part, otherwise this may result in damage.
120v UNITS
The Matrix T50X, T50X-U 120 treadmill is for use on a nominal 120-volt
circuit and has a non-looped grounding plug. Make sure that the 120-volt
treadmill is connected to an outlet, NEMA 5-20R, having the same configuration as the plug. No adapter should be used with this product.
220v UNITS
The Matrix T50X, T50X-U 220 treadmill is for use on a nominal 220-volt
circuit and has a non-looped grounding plug. Make sure that the 220-volt
treadmill is connected to an outlet, NEMA 6-20R, having the same
configuration as the plug. No adapter should be used with this product.
1.5 GROUNDING INSTRUCTIONS
The treadmill must be grounded. If it should malfunction or breakdown,
grounding provides a path of least resistance for electric current to reduce
the risk of electric shock. The treadmill is equipped with a cord having an
equipment-grounding conductor and a grounding plug. The plug must be
plugged into an appropriate outlet that is properly installed and grounded in
accordance with all local codes and ordinances. If the user does not follow
these grounding Instructions, the user could void the Matrix
limited warranty.
DANGER: Improper connection of the equipment-grounding conduc-
tor can result in the risk of electric shock. Check with a qualified electrician
or serviceman if the user is in doubt as to whether the product is properly
grounded. Do not modify the plug provided with the product if it will not fit
the outlet; have a proper outlet installed by a qualified technician.
2.1 RECOMMENDED CLEANING TIPS
1. Use a soft, clean cotton cloth. DO NOT use paper towels to clean
surfaces on the treadmill. Paper towels are abrasive and can
damage surfaces.
2. Use a mild soap and damp cloth. DO NOT use ammonia based cleaner.
This will cause discoloring of the aluminum and plastics it comes into
contact with.
3. Do not pour water or cleaning solutions on any surface. This could
cause electrocution.
4. Wipe the console and side rails after every use.
5. Brush away any wax deposits from the deck and belt area. This is a
common occurrence until the wax is worked into the belt material.
6. Be sure to remove any obstructions from the path of the elevation
wheels including power cords.
7. Monthly, unplug the treadmill and remove the motor cover. Check for
debris and clean with a dry cloth or small vacuum nozzle.
WARNING: Do not plug the treadmill in until the motor cover has
been reinstalled.
CAUTION: Be sure to have proper assistance to install and move the
unit in order to avoid injury or damage to the treadmill.
2.2 DECK AND BELT REPLACEMENT
One of the most common wear and tear items on a treadmill is the deck and
belt combination. If these two items are not properly maintained they can
cause damage to other components. This product has been provided with
the most advanced maintenance free lubricating system on the market. The
Matrix Ultimate Deck™ does not require any maintenance, other than
cleaning and belt tightening, for up to 25,000 miles.
WARNING: Do not run the treadmill while cleaning the belt and
deck. This can cause serious injury and can damage the machine.
Maintain the belt and deck by wiping the sides of the belt and deck with a
clean cloth. The user can also wipe under the belt 2 inches on both sides
removing any dust or debris.
The deck can be flipped and reinstalled or replaced by an authorized service
technician. Please contact Matrix Fitness Systems for more information.
2.3 CHECK FOR DAMAGED PARTS
DO NOT use any equipment that is damaged or has worn or broken parts.
Use only replacement parts supplied by Matrix Fitness Systems.
MAINTAIN LABELS AND NAMEPLATES. Do not remove labels for any
reason. They contain important information. If unreadable or missing,
contact Matrix Fitness Systems for a replacement or an authorized
service provider.
MAINTAIN ALL EqUIPMENT Preventative maintenance is the key to
smooth operating equipment, as well as keeping the users liability to a
minimum. Equipment needs to be inspected at regular intervals. Defective
components must be replaced immediately. Improperly working equipment
must be kept out of use until it is repaired. Ensure that any person(s)
making adjustments or performing maintenance or repair of any kind is
qualified to do so. Matrix Fitness Systems will provide service and
maintenance training at our corporate facility upon request or in the field if
proper arrangements are made.
CHAPTER 2: Preventative maintenance
Page 4
4 5
2.4 ADJUSTING THE BELT
After placing the treadmill in the position it will be used, the belt must be
checked for proper tension and centering. The belt might need to be
adjusted after the first two hours of use. Temperature, humidity, and use
cause the belt to stretch at different rates. If the belt starts to slip when a
user is on it, be sure to follow the directions below.
Locate the two hex head bolts on the rear of the treadmill.
The bolts are located at each end of the frame at the back of
the treadmill. These bolts adjust the rear belt roller. Do not
adjust until the treadmill is on. This will prevent over
tightening of one side.
The belt should have equal distance on either side between
the frame. If the belt is touching one side, do not start the
treadmill. Turn the bolts counter clockwise approximately one
full turn on each side. Manually center the belt by pushing
the belt from side to side. Tighten the bolts the same amount
as when the user loosened them, approximately one full turn.
Inspect the belt for damage.
While the treadmill is running at 5 kph, observe the belt
position. If it is moving to the right, tighten the right bolt by
turning it clockwise ¼ turn, and loosen the left bolt ¼ turn.
If it is moving to the left, tighten the left bolt by turning it
clockwise ¼ turn and loosen the right ¼ turn. Repeat Step 3
until the belt remains centered for several minutes.
Check the tension of the belt. The belt should be very snug.
When a person walks or runs on the belt, it should not
hesitate or slip. If this occurs, tighten the belt by turning
both bolts clockwise ¼ turn. Repeat if necessary.
STEP 1
STEP 2
STEP 3
STEP 4
CHAPTER 2: Preventative maintenance CHAPTER 3: Serial number location
T50x, T50x-U TREADMILL
SERIAL #
PLACEMENT
CHAPTER 4: overlay and Workout description
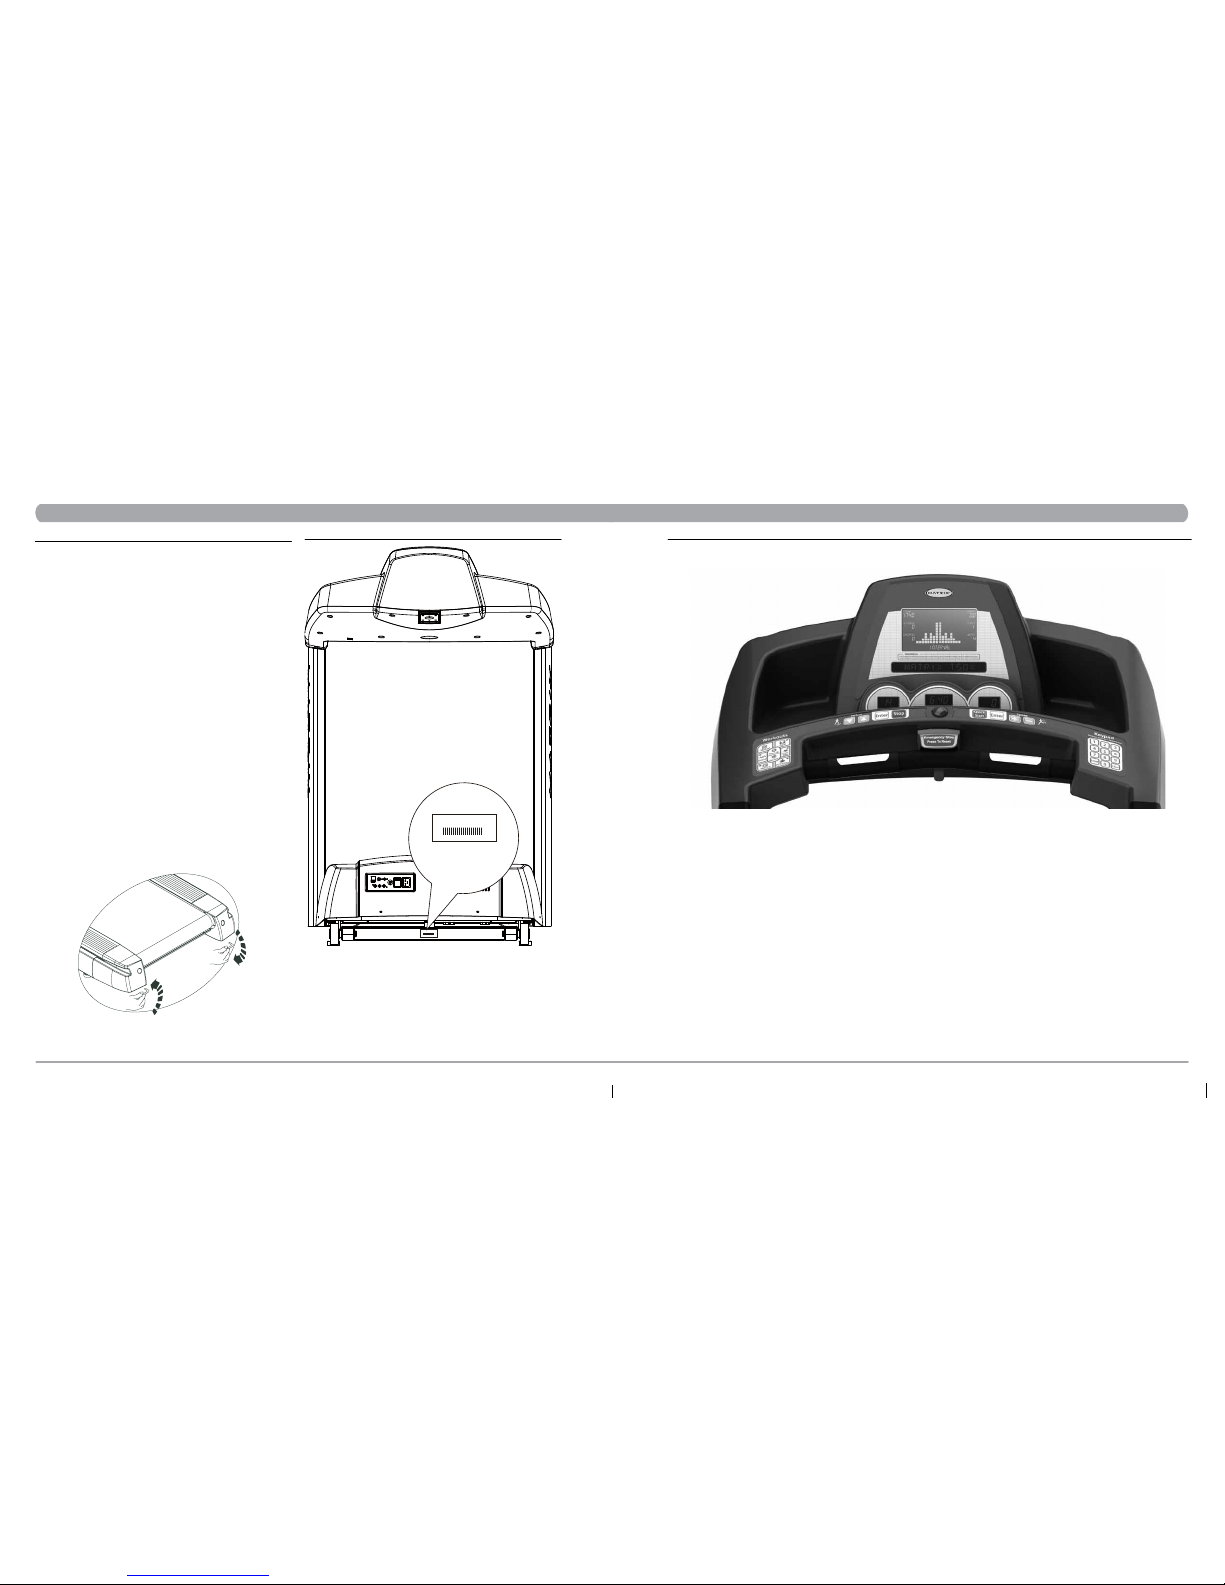
4.1 T50x CONSOLE DESCRIPTION
1/4 TURN
1/4 TURN
WORKOUT KEYS: Simple program view and selection buttons.
qUICK START: One touch Start and Quick Start.
ENTER: To confirm each program setting.
UP/DOWN INCLINE: Easy information and incline selection.
UP/DOWN SPEED: Easy information and speed selection.
EMERGENCY STOP / IMMOBILIzATION: To stop all functions and immobilize the unit. The emergency stop on this treadmill must be returned to its original
position in order to allow normal operation of the unit.
STOP: Ends workout and shows workout summary data.
COOL DOWN: Puts treadmill into Cool Down mode. Cool Down time is dependent on the length of the workout. Workouts 19 minutes and shorter will have a
cool down length of 2 minutes. Workouts 20 minutes and longer will have a cool down length of 5 minutes.
CLEAR: Use the CLEAR key to clear data not yet entered during the workout setup.
NUMBER KEYS: Press the numbers to input exercise Time, Weight, Level, Age, Heart Rate, Speed and Incline.
Page 5

6 7
4.2 T50x-U CONSOLE DESCRIPTION
CHAPTER 4: overlay and Workout description
CHAPTER 4: overlay and Workout description
4.4 OPERATING LEvEL BASED PROGRAMS
Your Matrix treadmill offers a variety of level-based workouts to challenge
users of all fitness levels. The following information will briefly explain the
workout and how to program the treadmill for each workout selection.
WARM UP
1. Press the “WARM UP” key to enter the program.
2. “SELECT TIME” using the RIGHT / LEFT ARROW keys, and then press
ENTER.
3. Press QUICK START to begin the workout.
INTERvAL+
(A) HILL INTERvAL
1. Press the “INTERVAL+” key and use the RIGHT / LEFT ARROW keys to
select “HILL INTERVAL”
2. “SELECT LEVEL” using the RIGHT / LEFT ARROW keys, and then
press ENTER.
3. “SELECT TIME” using the RIGHT / LEFT ARROW keys, and then press
ENTER.
4. “SELECT WEIGHT” using the RIGHT / LEFT ARROW keys, and then
press ENTER.
5. Press QUICK START to begin the workout.
(B) RANDOM HILL
1. Press the “INTERVAL+” key and use the RIGHT / LEFT ARROW keys to
select “RANDOM HILL”.
2. “SELECT TIME” using the RIGHT / LEFT ARROW keys, and then press
ENTER.
3. “SELECT WEIGHT” using the RIGHT / LEFT ARROW keys, and then
press ENTER.
4. Press QUICK START to begin the workout.
MULTI FX+
(A) BRAvE HILL, LAKESIDE & FOREST
1. Press the “MULTI FX+” key and use the RIGHT / LEFT ARROW keys to
select “BRAVE HILL, LAKESIDE, or FOREST”.
2. “SELECT TIME” using the RIGHT / LEFT ARROW keys, and then press
ENTER.
3. “SELECT LEVEL” using the RIGHT / LEFT ARROW keys, and then
press ENTER.
4. “SELECT START SPEED” using the RIGHT / LEFT ARROW keys, and
then press ENTER.
5. “SELECT WEIGHT” using the RIGHT / LEFT ARROW keys, and then
press ENTER.
6. Press QUICK START to begin the workout.
(B) DESERT & PLATEAU
1. Press the “MULTI FX+” key and use the RIGHT / LEFT ARROW keys to
select “DESERT, or PLATEAU”.
2. “SELECT TIME” using the RIGHT / LEFT ARROW keys, and then press
ENTER.
3. “SELECT START SPEED” using the RIGHT / LEFT ARROW keys, and
then press ENTER.
4. “SELECT WEIGHT” using the RIGHT / LEFT ARROW keys, and then
press ENTER.
5. Press QUICK START to begin the workout
ATTENTION: The treadmill is going to be standby if there is no
one use the machine 5 minutes later, the owner can enter engineering mode
and choose “ErP mode” to make a customized time. Maximum: 30 minutes,
Minimum: 1 minute.
WORKOUT KEYS: Simple program view and selection buttons.
qUICK START: One touch Start and Quick Start.
ENTER: To confirm each program setting.
UP/DOWN INCLINE: Easy information and incline selection.
UP/DOWN SPEED: Easy information and speed selection.
EMERGENCY STOP / IMMOBILIzATION: To stop all functions and immobilize the unit. The emergency stop on this treadmill must be returned to its original
position in order to allow normal operation of the unit.
STOP: Ends workout and shows workout summary data.
COOL DOWN: Puts treadmill into Cool Down mode. Cool Down time is dependent on the length of the workout. Workouts 19 minutes and shorter will have a
cool down length of 2 minutes. Workouts 20 minutes and longer will have a cool down length of 5 minutes.
Use the WORKOUT KEYS to enter the program, or use RIGHT / LEFT arrow
keys to scroll to the desired program. The program name is displayed in the
PROMPT AREA. Use the RIGHT / LEFT ARROW keys to scroll to desired
parameter values displayed in the PROMPT AREA. Press the ENTER key to
confirm each selection. Follow the steps to set up each workout.
NOTE: : the PROMPT AREA is located in the bottom of WORKOUT PROFILE
WINDOW. Before an exercise session, each parameter prompt will appear
here depending on different programs.
4.3 MANUAL WORKOUT OPERATION
qUICK START OPERATION
Press the qUICK START button and the treadmill will enter into a manual
mode of operation. All energy expenditure values will be calculated using
the default weight measurement.
MANUAL WORKOUT OPERATION
Manual is a workout that allows you to manually adjust the speed and
incline values at anytime. The manual workout also contains a setup screen
which allows you to input your weight to help calculate a more accurate
caloric burn rate.
To enter into this workout on a T50x or T50x-U, use the following guidelines:
1. Press the “MANUAL” key to enter the program.
2. “SELECT TIME” using the RIGHT / LEFT ARROW keys, and then press
ENTER.
3. “SELECT WEIGHT” using the RIGHT / LEFT ARROW keys, and then
press ENTER.
4. Press QUICK START to begin the workout.
Page 6

8 9
CHAPTER 4: t50x, t50x-u overlay and Workout description
CHAPTER 4: t50x, t50x-u overlay and Workout description
4.6 FITNESS TEST WORKOUT OPERATION
HEARTRATE+
TARGET HR & WEIGHT LOSS
1. Press the “HEARTRATE+” key and use the RIGHT / LEFT ARROW keys
to select “TARGET HR” or “WEIGHT LOSS”.
2. “SELECT AGE” using the RIGHT / LEFT ARROW keys, and then press
ENTER.
3. “SELECT HR” using the RIGHT / LEFT ARROW keys, and then press
ENTER.
4. “SELECT HR CONTROL” using the RIGHT / LEFT ARROW keys, and
then press ENTER.
5. If SPEED is selected, the INSTRUCTION CENTER will display “SET
MAX SPEED”. Use the RIGHT / LEFT ARROW key to set MAX SPEED,
and then press ENTER.
6. If INCLINE is selected, the INSTRUCTION CENTER will display “SET
MAX INCLINE”. Use the RIGHT / LEFT ARROW key to set MAX
INCLINE, and then press ENTER.
7. “SELECT TIME” using the RIGHT / LEFT ARROW keys, and then press
ENTER.
8. “SELECT WEIGHT” using the RIGHT / LEFT ARROW keys, and then
press ENTER.
9. Press QUICK START to begin the workout.
FIT TRAINER+
FIT TEST & COOPER TEST
1. Press the “FIT TRAINER+” key and use the UP / DOWN ARROW keys
to select “FIT TEST” or “COOPER TEST”
2. “SELECT GENDER” using the UP / DOWN ARROW keys, and then
press ENTER.
3. “SELECT AGE” using the UP / DOWN ARROW keys, and then press
ENTER.
4. “SELECT WEIGHT” using the UP / DOWN ARROW keys, and then
press ENTER.
5. Press QUICK START to begin the workout.
GOAL+
(A) TIME GOAL
1. Press the “GOAL+” key and use the RIGHT / LEFT ARROW keys to
select “TIME GOAL”.
2. “SELECT TIME” using the RIGHT / LEFT ARROW keys, and then press
ENTER.
3. “SELECT START INCLINE” using the RIGHT / LEFT ARROW keys, and
then press ENTER.
4. “SELECT START SPEED” using the RIGHT / LEFT ARROW keys, and
then press ENTER.
5. “SELECT WEIGHT” using the RIGHT / LEFT ARROW keys, and then
press ENTER.
6. Press QUICK START to begin the workout.
(B) DISTANCE GOAL
1. Press the “GOAL+” key and use the RIGHT / LEFT ARROW keys to
select “DISTANCE GOAL”.
2. “SELECT DISTANCE” using the RIGHT / LEFT ARROW keys, and then
press ENTER.
3. “SELECT START INCLINE” using the RIGHT / LEFT ARROW keys, and
then press ENTER.
4. “SELECT START SPEED” using the RIGHT / LEFT ARROW keys, and
then press ENTER.
5. “SELECT WEIGHT” using the RIGHT / LEFT ARROW keys, and thenpress ENTER.
6. Press QUICK START to begin the workout.
(C) CALORIES GOAL
1. Press the “GOAL+” key and use the RIGHT / LEFT ARROW keys to
select “CALORIES GOAL”.
2. “SELECT DISTANCE” using the RIGHT / LEFT ARROW keys, and then
press ENTER.
3. “SELECT START INCLINE” using the RIGHT / LEFT ARROW keys, and
then press ENTER.
4. “SELECT START SPEED” using the RIGHT / LEFT ARROW keys, and
then press ENTER.
5. “SELECT WEIGHT” using the RIGHT / LEFT ARROW keys, and then
press ENTER.
6. Press QUICK START to begin the workout.
Male Estimated vO2 Max (ml/kg/min) Per Age Category
Poor Fair Average Good Excellent
15 – 19
< 42 48 – 51 52 – 57 56 – 61 > 61
20 – 29
< 38 38 – 43 44 – 51 52 – 57 > 57
30 – 39
< 34 34 – 39 40 – 47 48 – 51 > 51
40 – 49
< 30 30 – 35 36 – 43 44 – 48 > 48
50 – 59
< 25 25 – 31 32 – 39 40 – 44 > 44
60+
< 21 21 – 26 27 – 35 36 – 40 > 40
Age
Rating
Female Estimated vO2 Max (ml/kg/min) Per Age Category
Poor Fair Average Good Excellent
15 – 19
< 30 30 – 36 37 – 45 46 – 52 > 52
20 – 29
< 28 28 – 34 35 – 43 44 – 50 > 50
30 – 39
< 27 27 – 33 34 – 41 42 – 46 > 48
40 – 49
< 25 25 – 31 32 – 40 41 – 46 > 46
50 – 59
< 21 21 – 27 28 – 36 37 – 42 > 42
60+
< 17 17 – 23 24 – 31 32 – 37 > 37
The tables below list Fit Test and Cooper Test results.
FIT TEST’S RESULT FOR MALE
FIT TEST’S RESULT FOR FEMALE
Rating
Male Estimated vO2 Max (ml/kg/min) Per Age Category
Very Poor Poor Fair Good Excellent Superior
15 – 19
< 35.0 35.0 – 38.3 38.4 – 45.1 45.2 – 50.9 51.0 – 55.9
> 55.9
20 – 29
< 33.0 33.0 – 36.4 36.5 – 42.4 42.5 – 46.4 46.5 – 52.4
> 52.4
30 – 39
< 31.5 31.5 – 35.4 35.5 – 40.9 41.0 – 44.9 45.0 – 49.4
> 49.4
40 – 49
< 30.2 30.2 – 33.5 33.6 – 38.9 39.0 – 43.7 43.8 – 48.0
> 48.0
50 – 59
< 26.1 26.1 – 30.9 31.0 – 35.7 35.8 – 40.9 41.0 – 45.3
> 45.3
60+
< 20.5 20.5 – 26.0 26.1 – 32.2 32.3 – 36.4 36.5 – 44.2
> 44.2
Age
COOPER TEST’S RESULT FOR MALE
COOPER TEST’S RESULT FOR FEMALE
Age
Rating
Rating
Female Estimated vO2 Max (ml/kg/min) Per Age Category
Very Poor Poor Fair Good Excellent Superior
15 – 19
< 25.0 25.0 – 30.9 31.0 – 34.9 35.0 – 38.9 39.0 - 41.9
> 41.9
20 – 29
< 23.6 23.6 – 28.9 29.0 – 32.9 33.0 – 36.9 37.0 - 41.0
> 41.0
30 – 39
< 22.8 22.8 – 26.9 27.0 – 31.4 31.5 – 35.6 35.7 - 40.0
> 40.0
40 – 49
< 21.0 21.0 – 24.4 24.5 – 28.9 29.0 – 32.8 32.9 - 36.9
> 36.9
50 – 59
< 20.2 20.2 – 22.7 22.8 – 26.9 27.0 – 31.4 31.5 - 35.7
> 35.7
60+
< 17.5 17.5 – 20.1 20.2 – 24.4 24.5 - 30.2 30.3 - 31.4
> 31.4
Age
4.5 HEART RATE CONTROL WORKOUT OPERATION
Your Matrix treadmill offers a heart rate control workout mode. The heart
rate control workout mode allows the user to program their desired heart
rate zone and maximum allowable incline and the treadmill will automatically adjust the incline based upon the user’s heart rate. The heart rate zone
is calculated using the following equation: (220-Age)*%=target heart rate
zone. The user must wear a telemetric heart rate monitor or continually hold
onto the contact heart rate grips for this workout.
4.6 FITNESS TEST WORKOUT OPERATION
The Matrix T50x & T50x-U treadmills offer a variety of fitness
protocol.
Page 7

10 11
CHAPTER 5: t50x, t50x-u Treadmill specifications, parts, and assembly Guides
5.1 T50x, T50x-U MODEL SPECIFICATIONS
* Product specifications subject to change without notice.
CHAPTER 5: t50x, t50x-u Treadmill specifications, parts, and assembly Guides
5.2 T50x, T50x-U MODEL REqUIRED FASTENERS & ASSEMBLEY TOOLS
FASTENERS & ASSEMBLY TOOLS
Model Name T50x
Console
Display type
Workout Profile Window – 7” blue backlit graphic LCD display
Instruction Center – 14 – red dot-matrix LEDs display
Informational Display – 3 numeric 7-segment display
Display feedback
Time, Speed, Distance, Calories, Incline, Level, Heart Rate, METs,
Profile
Workouts
Manual, Interval + (Hill Interval, Random Hill),
Multi FX + (Brave Hill, Lakeside, Forest, Desert, Plateau),
Goal + (Time Goal, Distance Goal, Calories Goal),
Heart Rate + (Target HR, Weight Loss),
Fit Trainer + (Fit Test, Cooper Test),
Warm Up
On-the-fly program change Yes
Telemetric HR Receiver Yes
Contact HR sensors Yes
Cushion system
Ultimate Deck™ cushioning system
Safety stop Emergency button with lanyard clip
Language options
English, Italian, German, Spanish, French, Dutch, Portuguese,
Japanese
Tech Specs
Drive motor 4.2 HP AC motor
Motor control system Club Treadmill AC drive
Speed range 0.8 – 20 km/h / 0.5 – 12 mph
Incline range 0 – 15%
Deck type 1” hard-wax reversible deck
Belt area 51 × 152 cm / 20" × 60"
Running type 2-ply commercial belt
Rollers 7.6 cm / 3” Diameter, precision-crowned steel, front and back
Side handrails
56 cm (22”) long, cantilevered, integrated Speed and
Incline Control
Dimensions (LxWxH) 216 × 86 × 140 cm / 84” × 34” × 55”
Product weight 165 kg / 365 lbs
Maximum user weight
220 / 240 voltage version : 182 kg / 400 lbs
200 voltage version : 159 kg / 350 lbs
Special Features
Integrated accessory tray Yes
Integrated reading rack Yes
Maintenance lamp Yes
Swift Controls™ panel Yes
HR indicator light Yes
Speed leading light Yes
Entertainment Solutions
FITCONNEXION™ ready
Yes
Networking capabilities CSAFE ready
Number keys Yes
Model Name T50x-U
Console
Display type
Workout Profile Window – 7” blue backlit graphic LCD display
Instruction Center – 14 – red dot-matrix LEDs display
Informational Display – 3 numeric 7-segment display
Display feedback
Time, Speed, Distance, Calories, Incline, Level, Heart Rate, METs,
Profile
Workouts
Manual, Interval + (Hill Interval, Random Hill),
Multi FX + (Brave Hill, Lakeside, Forest, Desert, Plateau),
Goal + (Time Goal, Distance Goal, Calories Goal),
Heart Rate + (Target HR, Weight Loss),
Fit Trainer + (Fit Test, Cooper Test),
Warm Up
On-the-fly program change Yes
Telemetric HR Receiver Yes
Contact HR sensors Yes
Cushion system
Ultimate Deck™ cushioning system
Safety stop Emergency button with lanyard clip
Language options
English, Italian, German, Spanish, French, Dutch, Portuguese,
Japanese
Tech Specs
Drive motor 4.2 HP AC motor
Motor control system Club Treadmill AC drive
Speed range 0.8 – 20 km/h / 0.5 – 12 mph
Incline range 0 – 15%
Deck type 1” hard-wax reversible deck
Belt area 51 × 152 cm / 20" × 60"
Running type 2-ply commercial belt
Rollers 7.6 cm / 3” Diameter, precision-crowned steel, front and back
Side handrails
56 cm (22”) long, cantilevered, integrated Speed and
Incline Control
Dimensions (LxWxH) 216 × 86 × 140 cm / 84” × 34” × 55”
Product weight 165 kg / 365 lbs
Maximum user weight
220 / 240 voltage version : 182 kg / 400 lbs
200 voltage version : 159 kg / 350 lbs
Special Features
Integrated accessory tray Yes
Integrated reading rack Yes
Maintenance lamp Yes
Swift Controls™ panel Yes
HR indicator light Yes
Speed leading light Yes
Entertainment Solutions
FITCONNEXION™ ready
Yes
Networking capabilities CSAFE ready
Number keys No
SOCKET HEAD SCREW (LOW HEAD)
CROSS-HEAD BUTTON SCREW
PARTS NO. DESCRIPTION QUANTITY SKETCH
1
8
8
4
2
4
(M8 x 1.25P x 15L)
(M5 x 0.8P x 12L)
SOCKET HEAD CAP SCREW
(M3 x 0.5P x 15L)
(ULTRA LOW HEAD)
Z05
Z50
Z51
Z52
Z53
Z54
8mm T-SHAPED WRENCH
WASHER
SOCKET HEAD SCREW (M10 x 1.5P x 25L)
ASSEMBLY INSTRUCTIONS
Please make sure that the power plug is not plugged into the wall outlet while completing the following procedure. To ensure correct assembly
of the T50X and T5OX-U, carefully read and follow these steps:
ATTENTION: After installation is completed, the treadmill will need to be calibrated by using the AUTO-CHECK function. If this is
not done, the treadmill’s speed and incline values may be incorrect and damage the treadmill. Do not stand on the belt when performing the
AUTO-CHECK function.
Page 8

12 13
CHAPTER 5: t50x, t50x-u Treadmill specifications, parts, and assembly Guides
5.2 T50x, T50x-U MODEL REqUIRED FASTENERS & ASSEMBLEY TOOLS
ASSEMBLY EXPLODED DIAGRAM
CHAPTER 5: t50x, t50x-u Treadmill specifications, parts, and assembly Guides
5.3 T50x, T50x-U MODEL ASSEMBLY STEPS
•
ATTENTION
After assembly and installation is complete the treadmill will need to be calibrated using the AUTO-CHECK feature found in the manager mode
screen. Please refer to the Matrix treadmill service manual for instructions on how to enter manager mode. DO NOT stand on the belt while the auto-
calibration sequence is in progress.
Prior to assembling the treadmill, unpack all of the contents of the box and make sure that all necessary components are present. Review the
contents of the hardware package for completeness. Contact Matrix customer service to report any missing items.
• ASSEMBLY INSTRUCTIONS
Please make sure that the power plug is not plugged into the wall outlet while completing the following procedure.
To ensure correct assembly of the treadmill, carefully read and follow these steps:
STEP 1
Z52
Z52
Q53
Z53
Z51
Z51
N07
N06
Z50
Z50
Motor Cover
Console
Swift Controls™ P anel
Frame Base
Foam Armrest
Console Mast
Unscrew the screw (Q53) on each side, and keep the screws. Remove the motor cover.
Pull out the console, antenna coaxial signal and C-SAFE cables and route them through the right console mast. Place the right console mast and then the left
console mast in the console support brackets. Secure the right and left bracket with the 4 screws and 2 washers provided (Z51, Z50). Make sure these screws
are tightened.
Z51
Z51
Z50
Z50
Q53
Z53
Motor Cover
Page 9

14 15
5.3 T50x, T50x-U MODEL ASSEMBLY STEPS
CHAPTER 5: t50x, t50x-u Treadmill specifications, parts, and assembly Guides
5.3 T50x, T50x-U MODEL ASSEMBLY STEPS
CHAPTER 5: t50x, t50x-u Treadmill specifications, parts, and assembly Guides
Z52
Z52
STEP 2
Connect the console cables from the console set to the motor control board cables. Secure the console set with 2 screws (Z52) on each side.
N06
N04
N07
N03
STEP 3
Put the foam armrests (N03, N04) into the armrest frame. Use the caps (N06, N07) to secure them.
Note: The caps separate into right and left, make sure these caps are in the correct position.
Page 10

1716
CHAPTER 5: t50x, t50x-u Treadmill specifications, parts, and assembly Guides
5.3 T50x, T50x-U MODEL ASSEMBLY STEPS 5.3 T50x, T50x-U MODEL ASSEMBLY STEPS
Assembly is completed and the auto-calibration sequence must be run at this time.
ASSEMBLY COMPLETED
CHAPTER 5: t50x, t50x-u Treadmill specifications, parts, and assembly Guides
Z53
Z54
STEP 4
1. Connect the speed and incline Swift Controls™ cables with the control panels. Secure the Swift Controls™ panels onto the armrests with the 2 screws
(Z54) on each side. Note: The Swift Controls™ panels separate into right for SPEED control and left for INCLINE control, make sure these panels are
in the correct position.
2. Place the motor cover onto the treadmill front end and secure with the screws (Q53) included in the motor cover and the screws (Z53) provided in the
hardware kit. Plug the power cable into the outlet.
Page 11

MAT R IX FITN E S S S Y S TEMS CO R P.
1600 L A N D M A RK DRIV E CO T TAG E G R O V E W I 5 3527 US A
TOLL F R E E 8 6 6 .693. 4 8 6 3
w w w . m a t r i x f i t n e s s . c o m
FAX 60 8 . 8 3 9 .868 7
REv. 1.2
 Loading...