

Page 1

Matrix T50x-02 / T50x-U-02
SERVICE MANUAL
1
Page 2

TABLE OF CONTENTS
SECTION 1::::SERIAL NUMBER LOCATION- - - - - - - - - - - - - - - - - - - - - 5 ~ 6
SECTION 2::::MOVING THE UNIT- - - - - - - - - - - - - - - - - - - - - - - - - - - - - 7 ~ 8
SECTION 3::::IMPORTANT SAFETY INSTRUCTIONS- - - - - - - - - - - - - -9 ~ 12
SECTION 4::::PREVENTATIVE MAINTENANCE- - - - - - - - - - - - - - - - - -13
4.1 Maintenance check list - - - - - - - - - - - - - - - - - - - - - - - - - - - - - - - - - - - - -14
4.2 Recommended cleaning tips - - - - - - - - - - - - - - - - - - - - - - - - - - - - - - - - - 15
4.3 Deck and belt replacement - - - - - - - - - - - - - - - - - - - - - - - - - - - - - - - - - - 16
4.4 Check for damaged parts - - - - - - - - - - - - - - - - - - - - - - - - - - - - - - - - - - - 17
4.5 Adjusting the belt - - - - - - - - - - - - - - - - - - - - - - - - - - - - - - - - - - - - - - - - 18
4.6 Clean the grooves procedures - - - - - - - - - - - - - - - - - - - - - - - - - - - - - - - - 19
4.7 Deck re-waxing procedure - - - - - - - - - - - - - - - - - - - - - - - - - - - - - - - - - - -20 ~ 21
SECTION 5 : OVERLAY AND WORKOUT DESCRIPTION - - - - - - - - - - 22
5.1 T50x Console description - - - - - - - - - - - - - - - - - - - - - - - - - - - - - - - - - -- 23
5.2 T50x-U Console description - - - - - - - - - - - - - - - - - - - - - - - - - - - - - - - - - 24
SECTION 6::::ENGINEERING MODE- - - - - - - - - - - - - - - - - - - - - - - - - - - 25 ~ 28
2
Page 3

TABLE OF CONTENTS
SECTION 7::::TROUBLESHOOTING- - - - - - - - - - - - - - - - - - - - - - - - - - - - - 29
7.1 Electrical block diagram - - - - - - - - - - - - - - - - - - - - - - - - - - - - - - - - - - - - - 30
7.2 Wire pin definition - - - - - - - - - - - - - - - - - - - - - - - - - - - - - - - - - - - - - - - - -31
7.3 MCB LED instruction- - - - - - - - - - - - - - - - - - - - - - - - - - - - - - - - - - -- - -32~33
7.4 MCB wiring connection- - - - - - - - - - - - - - - - - - - - - - - - - - - - - - - - - - - - - 34
7.5 T50x switch setting definition - - - - - - - - - - - - - - - - - - - - - - - - - - - - - - - - - -35
7.6 Error message 0140 / 01A0 / 01A2 troubleshooting - - - - - - - - - - - - - - - - - - 36
7.7 Error message 01A3 troubleshooting - - - - - -- - - - - - - - - - - - - - - - - - - - - - - -37
7.8 Error message 0144 / 02B6 / 02B7 / 02B8 / 01A8 / 02B5 troubleshooting- - - - 38
7.9 Error message 0141 troubleshooting- - - - - - - - - - - - - - - - - - - - - - - - - - - - - -39
7.10 Error message 02AD troubleshooting - - - - - - - - - - - - - - - - - - - - - - - - - - - - 40
7.11 Error message 02B2 troubleshooting - - - - - - - - - - - - - - - - - - - - - - - - - - - - -41
7.12 Error message 02B9 / 02BA/ 02BB / 01AB troubleshooting- - - - - - - - - -- - - -42
7.13 Error message 04A0 troubleshooting - - - - - - - - - - - - - - - - - - - - - - - - - - - - -43
7.14 Error message 04B0 troubleshooting - - - - - - - - - - - - - - - - - - - - - - - - - - - - -44
7.15 Error message 01A4 / 01A5 / 01A6 / 02A7 troubleshooting - - - - - - - - - - - - - 45
7.16 Error message 02A2 / 0241 troubleshooting - - - - - - - - - - - - - - - - - - - - - - - -46
7.17 Error message IMMOBILIZED troubleshooting - - - - - - - - - - - - - - - - - - - - - 47
7.18 How to test Incline motor function troubleshooting- - - - - - - - - - - - - - - - - - - -48
7.19 Incline motor jammed and 01A0 troubleshooting - - - - - - - - - - ---- - - - - - - - - 49
3
Page 4

TABLE OF CONTENTS
SECTION 8::::PART REPLACEMENT GUIDE- - - - - - - - - - - - - - - - - - - - - 50
8.1 Removal of plastic shroud - - - - - - - - - - - - - - - - - - - - - - - - - - - - - - - - - - 51
8.2 Rear roller removal - - - - - - - - - - - - - - - - - - - - - - - - - - - - - - - - - - - - - - -52
8.3 Side rail removal - - - - - - - - - - - - - - - - - - - - - - - - - - - - - - - - - - - - - - - - 53
8.4 Deck Removal/Replacement - - - - - - - - - - - - - - - - - - - - - - - - - - - - - - - - 54
8.5 Deck cushion replacement - - - - - - - - - - - - - - - - - - - - - - - - - - - - - - - - - -55
8.6 Front roller removal- - - - - - - - - - - - - - - - - - - - - - - - - - - - - - - - - - - - - - -56
8.7 Running belt replacement- - - - - - - - - - - - - - - - - - - - - - - - - - - - - - - - - - -57
8.8 Motor control board (MCB) removal - - - - - - - - - - - - - - - - - - - - - - - - - - -58
8.9 Motor Removal- - - - - - - - - - - - - - - - - - - - - - - - - - - - - - - - - - - - - - - - - -59
8.10 Drive Belt Removal - - - - - - - - - - - - - - - - - - - - - - - - - - - - - - - - - - - - - - 60
8.11 Incline motor removal/replacement - - - - - - - - - - - - - - - - - - - - - - - - - - - -61 ~ 62
8.12 PCB removal/disassembly - - - - - - - - - - - - - - - - - - - - - - - - - - - - - - - - - -63
8.13 Quick key removal/replacement - - - - - - - - - - - - - - - - - - - - - - - - - - - - - -64
8.14 Handlebar removal/replacement - - - - - - - - - - - - - - - - - - - - - - - - - - - - - -65
8.15 PCB software installation SOP - - - - - - - - - - - - - - - - - - - - - - - - - - - - - - -66 ~ 71
4
Page 5

SECTION 1
SERIAL NUMBER LOCATION
5
Page 6
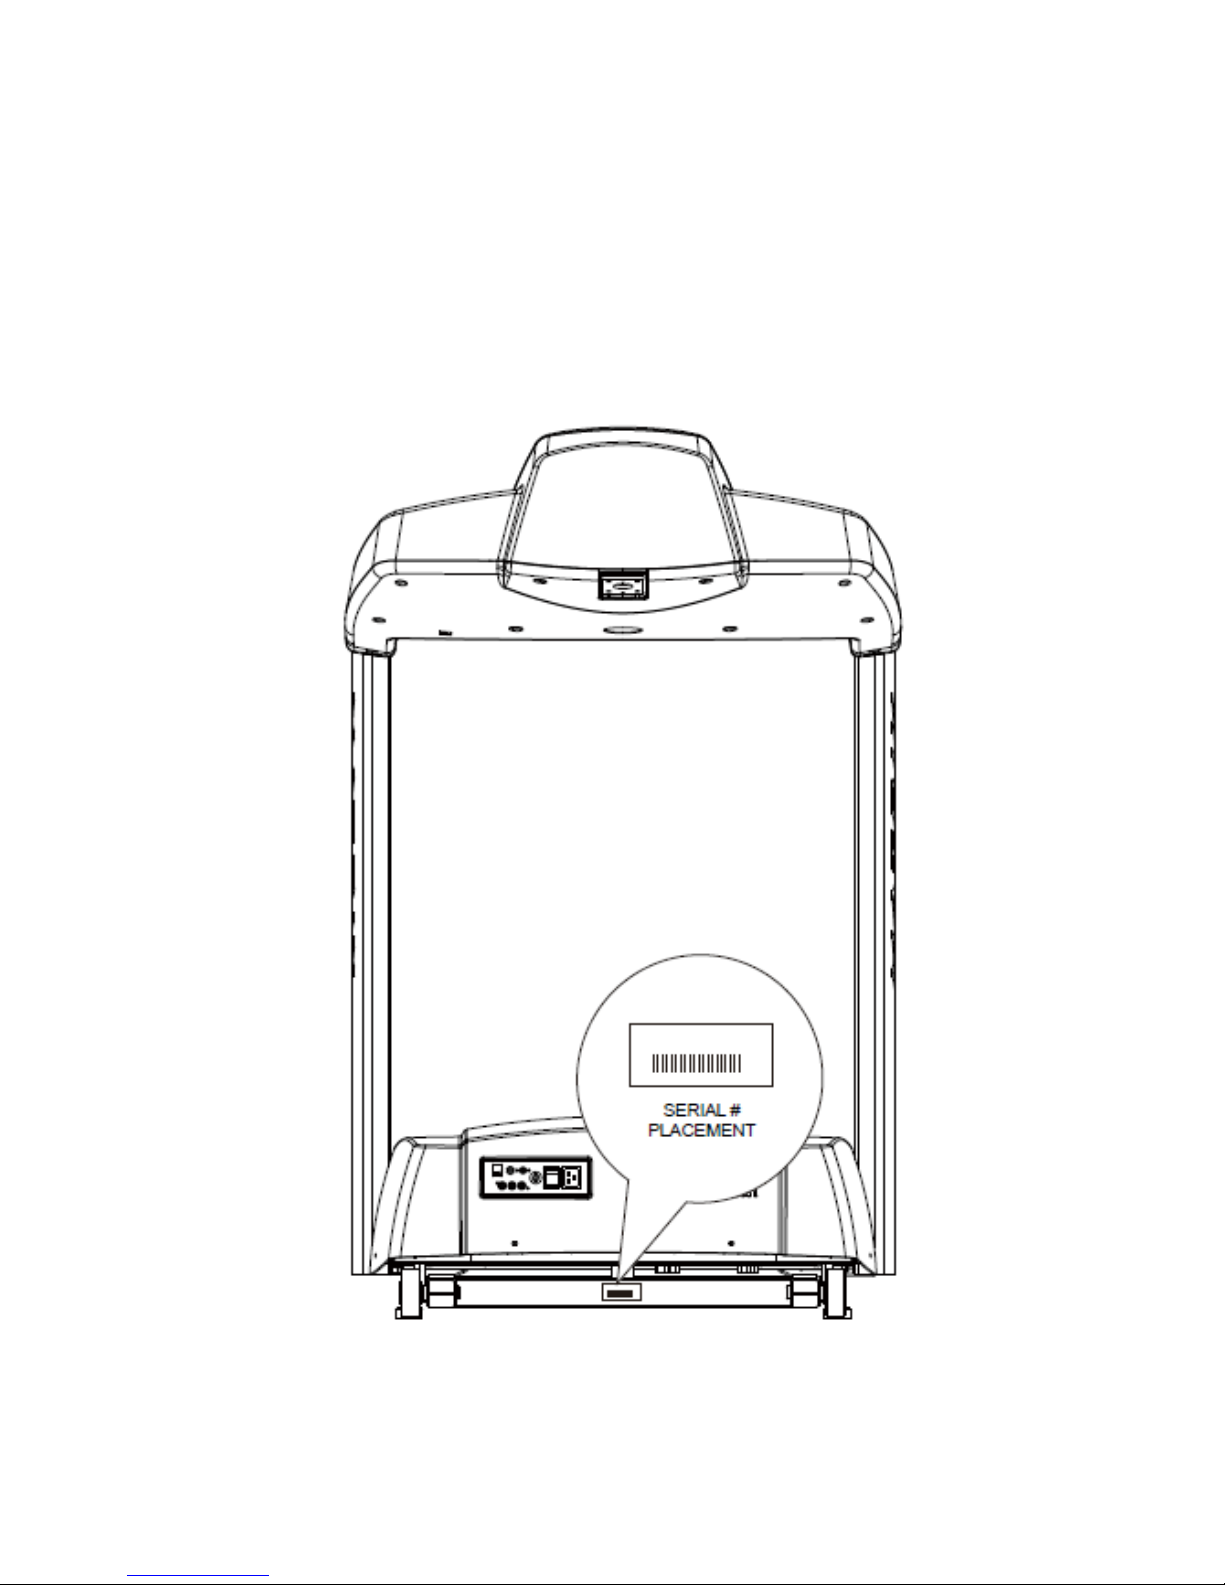
Matrix T50x Serial Number
Location
6
Page 7

SECTION 2
MOVING THE UNIT
7
Page 8

UNPACKING THE TREADMILL
SETTING UP THE TREADMILL
The MATRIX treadmill is inspected before it is packaged. It is shipped in two separate pack- ages:
the frame and the console. Carefully unpack the unit and dispose of the box material.
CAUTION
This unit weights 165 kg / 365 lbs pounds. Be sure to have proper assistance to remove and move the
unit, to avoid injury to the user and the unit.
CONTENTS
Frame :
1.Treadmill Base
2.Console Supports
3.Hardware Fasteners and Washer Bag
Console:
1.Handle Bar Set
2.Console
8
Page 9

SECTION 3
IMPORTANT SAFETY
INSTRUCTIONS
9
Page 10
1.1 Before getting Started
It is the sole responsibility of the purchaser of Matrix Fitness Systems products to instruct all
individuals, whether they are the end user or supervising personnel, on proper usage of the
equipment.
It is recommended that all users of Matrix Fitness Systems exercise equipment be informed of
the following information prior to its use.
1.2 proper usage
• Do not use the equipment in any way other than designed or intended by the manufacturer. It is
imperative that all Matrix Fitness Systems equipment is used properly to avoid injury.
• Keep hands and feet clear of moving parts at all times to avoid injury.
• Unsupervised children must be kept away from this equipment.
• Do not wear loose clothing while on equipment.
1.3 READ AND SAVE THESE INSTRUCTIONS
This Treadmill is intended for commercial use. To ensure your safety and protect the equipment,
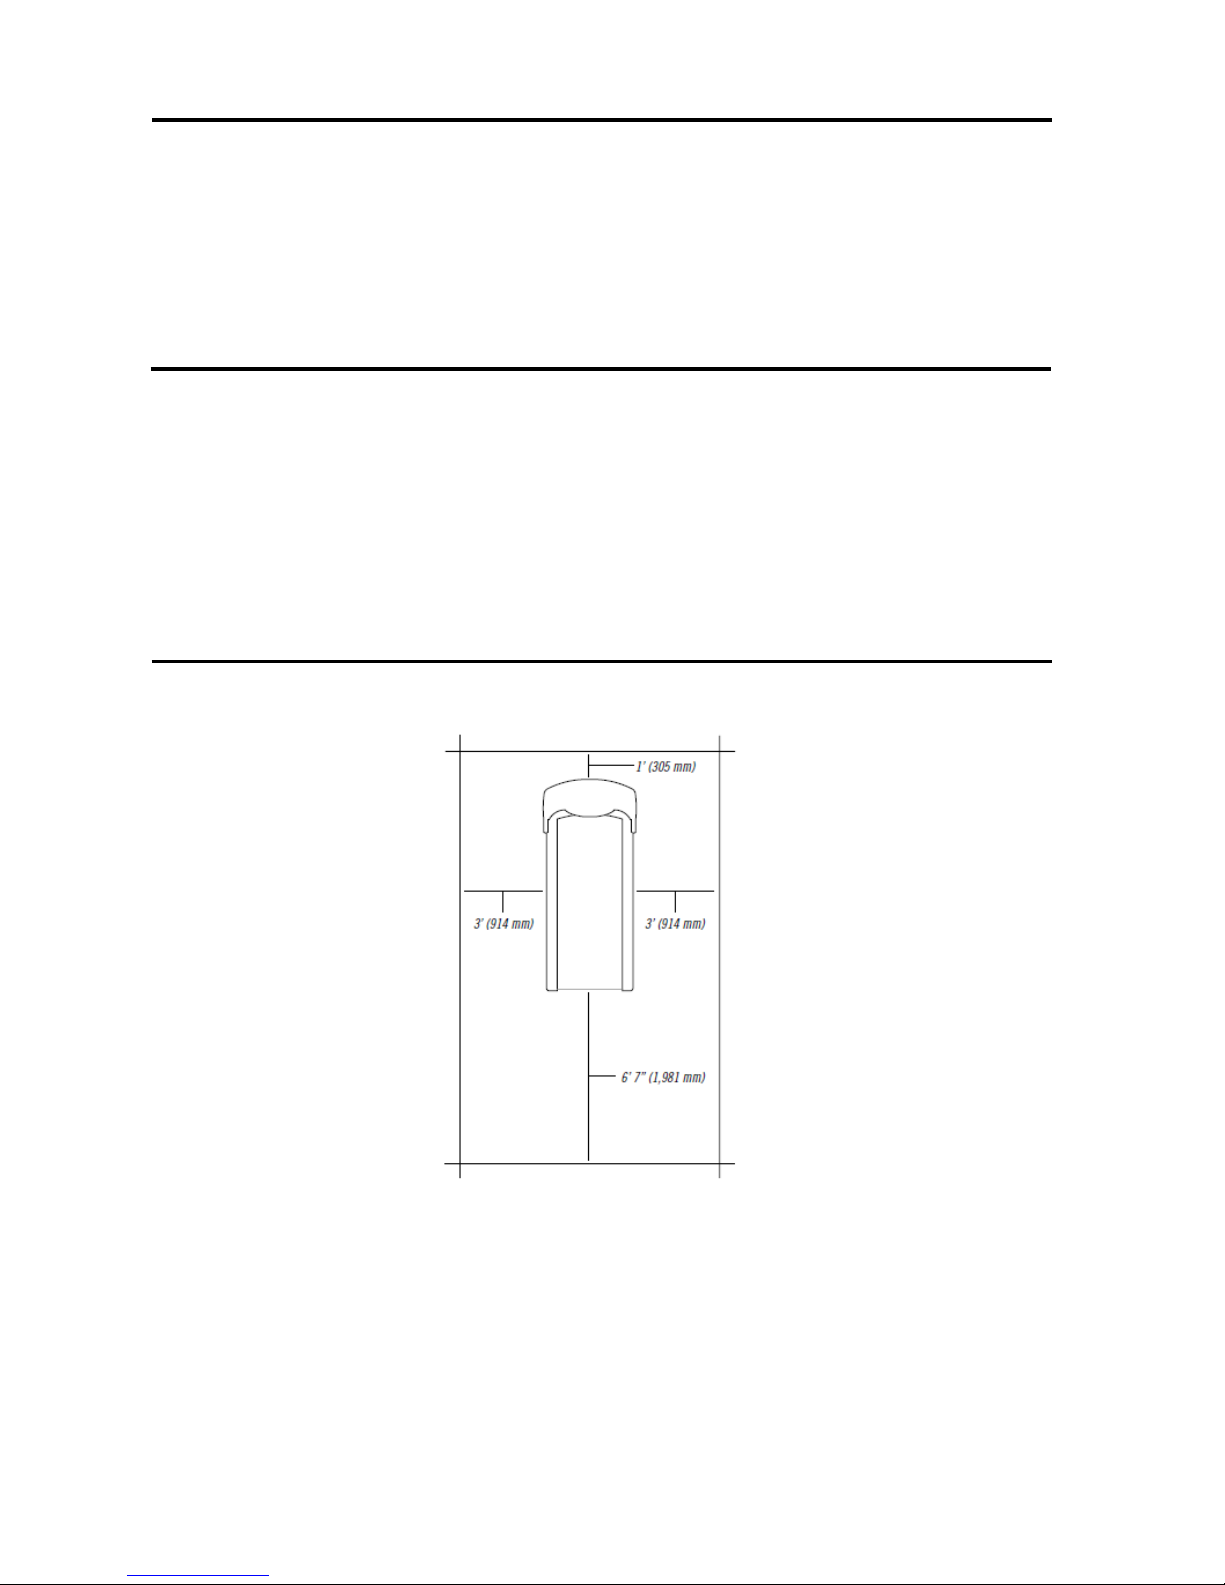
read all instructions before operating the MATRIX treadmill.
Please leave a 78.75” (2000 mm) x 39.50” (1000 mm) landing zone behind the treadmill. This zone is
to allow easy access to the treadmill and gives the user an easy exit path from the machine. In case of
an emergency, place both hands on the side arm rests to hold yourself up and place your feet onto the
side rails.
10
Page 11

When using an electrical product, basic precautions should always be followed including the following:
DANGER: To reduce the risk of electric shock: Always unplug this equipment from the electrical
outlet immediately after using and before cleaning.
WARNING : To reduce the risk of burns, fire, electrical shock or injury to persons that may be
associated with using this product:
• An appliance should never be left unattended when plugged in. Unplug from outlet when not in
use and before putting on or taking off parts.
• This product must be used for its intended purpose described in this owner’s manual. Do not use
other attachments that are not recommend by the manufacturer. Attachments may cause injury.
• To prevent electrical shock, never drop or insert any object into any opening.
• Do not remove the console covers. Service should only be done by an authorized service
technician.
• Never operate the treadmill with the air opening blocked. Keep the air opening clean, free of lint
and hair.
• Never operate product if it has a damaged cord or plug, if it is working improperly, if it has been
damaged, or immersed in water. Return the unit to a service center for examination and repair.
• Do not carry this unit by it’s supply cord or use the cord as a handle.
• Keep any power cord away from heated surfaces.
• Close supervision is necessary when treadmill is used by or near children or disable persons.
• Do not use outdoors.
• The treadmill shall be installed on a stable base.
• Do not operate where aerosol (spray) products are being used or when oxygen is being
administered.
• To disconnect, turn all controls to the off position, then remove the plug from outlet.
• Connect this treadmill to a properly grounded outlet only.
• This appliance is not intended for use by persons with reduced physical, sensory or mental
capabilities, or lack of experience and knowledge unless they have been given supervision or
instruction concerning use of the appliance by a person responsible for their safety.
• Children should be supervised to ensure that they do not play with the appliance.
• If the supply cord is damaged, it must be replaced by a special cord or assembly available from the
manufacturer or its service agent.
WARNING: Heart rate monitoring systems may be inaccurate. Over exercise may result in
serious injury or death. If you feel faint stop exercising immediately.
11
Page 12

1.4 Electrical Requirements
For your safety and to ensure good treadmills performance, the ground on this circuit must be
no-looped. Before connecting the plug into an electrical outlet, make sure that the voltage
requirements match that the voltage of the treadmill.
ATTENTION: Your treadmill is provided with a power cord. Please only use with the power
cord as supplied, or with Matrix spare part, otherwise this may result in damage.
1.5 grounding instructions
The treadmill must be grounded. If it should malfunction or breakdown, grounding provides a
path of least resistance for electric current to reduce the risk of electric shock. The treadmill is
equipped with a cord having an equipment-grounding conductor and a grounding plug. The plug
must be plugged into an appropriate outlet that is properly installed and grounded in accordance
with all local codes and ordinances. If the user does not follow these grounding Instructions, the
user could void the Matrix limited warranty.
DANGER : Improper connection of the equipment-grounding conductor can result in the risk
of electric shock. Check with a qualified electrician or serviceman if the user is in doubt as to
whether the product is properly grounded. Do not modify the plug provided with the product if it
will not fit the outlet; have a proper outlet installed by a qualified technician.
120v units
The Matrix T50X, T50X-U 120 treadmill is for use on a nominal 120-volt circuit and has a nonlooped grounding plug. Make sure that the 120-volt treadmill is connected to an outlet, NEMA
5-20R, having the same configuration as the plug. No adapter should be used with this product.
220v units
The Matrix T50X, T50X-U 220 treadmill is for use on a nominal 220-volt circuit and has a nonlooped grounding plug. Make sure that the 220-volt treadmill is connected to an outlet, NEMA
6-20R, having the same configuration as the plug. No adapter should be used with this product.
12
Page 13

SECTION 4
PREVENTATIVE MAINTENANCE
13
Page 14

4.1 MAINTENANCE CHECKLIST
FOR BEST PERFORMANCE WE RECOMMEND THE FOLLOWING
MAINTENANCE SCHEDULE:
AnnuallyBI-annuallyMonthlyWeeklyItem
InspectConsole Bolts
InspectCleanFrame
Motor Drive Belt
CleanRunning Belt
Assure
Tighten
InspectPower Code
InspectCleanConsole
CleanBottle Holders
InspectStop Key
Inspect
InspectCleanHandlebars
InspectHandlebars Bolts
InspectFront / Rear Roller
Inspect /
Tighten
TightenDeck Bolts
14
Page 15

4.2 RECOMMENDED CLEANING TIPS
1. Use a soft, clean cotton cloth. DO NOT use paper towels to clean surfaces on the treadmill. Paper
towels are abrasive and can damage surfaces.
2. Use a mild soap and damp cloth. DO NOT use ammonia based cleaner. This will cause
discoloring of the aluminum and plastics it comes into contact with.
3. Do not pour water or cleaning solutions on any surface. This could cause electrocution.
4. Wipe the console and side rails after every use.
5. Brush away any wax deposits from the deck and belt area. This is a common occurrence until the
wax is worked into the belt material.
6. Be sure to remove any obstructions from the path of the elevation wheels including power cords.
7. Monthly, unplug the treadmill and remove the motor cover. Check for debris and clean with a dry
cloth or small vacuum nozzle.
WARNING:
Do not plug the treadmill in until the motor cover has been reinstalled.
15
Page 16

4.3 DECK AND BELT REPLACEMENT
One of the most common wear and tear items on a treadmill is the Deck and Belt combination. If
these two items are not properly maintained they can cause damage to other components. This product
has been provided with the most advanced maintenance free lubricating system on the market.
WARNING:
Do not run the treadmill while cleaning the belt and deck. This can cause serious injury and can
damage the machine.
Maintain the belt and deck by wiping the sides of the belt and deck with a clean cloth. The user can
also wipe under the belt 2 inches / 5 centimeters on both sides removing any dust or debris.
The deck can be flipped and reinstalled or replaced by an authorized service technician. Please contact
Matrix Fitness Systems or authorized dealers for more information.
16
Page 17

4.4 CHECK FOR DAMAGED PARTS
DO NOT :
use any equipment that is damaged or has worn or broken parts. Use only replacement parts supplied
by Matrix Fitness Systems.
MAINTAIN LABELS AND NAMEPLATES :
Do not remove labels for any reason.. They contain important information. If unreadable or missing,
contact local service window for a replacement.
MAINTAIN ALL EQUIPMENT:
Preventative maintenance is the key to smooth operating equipment, as well as keeping the users
liability to a minimum. Equipment needs to be inspected at regular intervals. Defective components
must be replaced immediately. Improperly working equipment must be kept out of use until it is
repaired. Ensure that any person(s) making adjustments or performing maintenance or repair of any
kind is qualified to do so. Matrix Fitness Systems will provide service and maintenance training at our
corporate facility upon request or in the field if proper arrangements are made.
17
Page 18

4.5 ADJUSTING THE BELT
After placing the treadmill in the position it will be used, the belt must be checked for proper tension
and centering. The belt might need to be adjusted after the first two hours of use. Temperature,
humidity, and use cause the belt to stretch at different rates. If the belt starts to slip when a user is on it,
be sure to follow the directions below.
STEP 1:
Locate the two hex head bolts on the rear of the treadmill. The bolts are located at each end of the
frame at the back of the treadmill. These bolts adjust the rear belt roller. Do not adjust until the
treadmill is on. This will prevent over tightening of one side.
STEP 2 :
The belt should have equal distance on either side between the frame. If the belt is touching one side,
do not start the treadmill. Turn the bolts counter clockwise approximately one full turn on each side.
Manually center the belt by pushing the belt from side to side. Tighten the bolts the same amount as
when the user loosened them, approximately one full turn. Inspect the belt for damage.
STEP3 :
While the treadmill is running at 3 mph / 4.8 kph, observe the belt position. If it is moving to the right,
tighten the right bolt by turning it clockwise ?turn, and loosen the left bolt turn. If it is moving to the
left, tighten the left bolt by turning it clockwise ?turn and loosen the right ?turn. Repeat Step 3 until
the belt remains centered for several minutes.
STEP 4 :
Check the tension of the belt. The belt should be very snug. When a person walks or runs on the belt, it
should not hesitate or slip. If this occurs, tighten the belt by turning both bolts clockwise ?turn. Repeat
if necessary.
18
Page 19
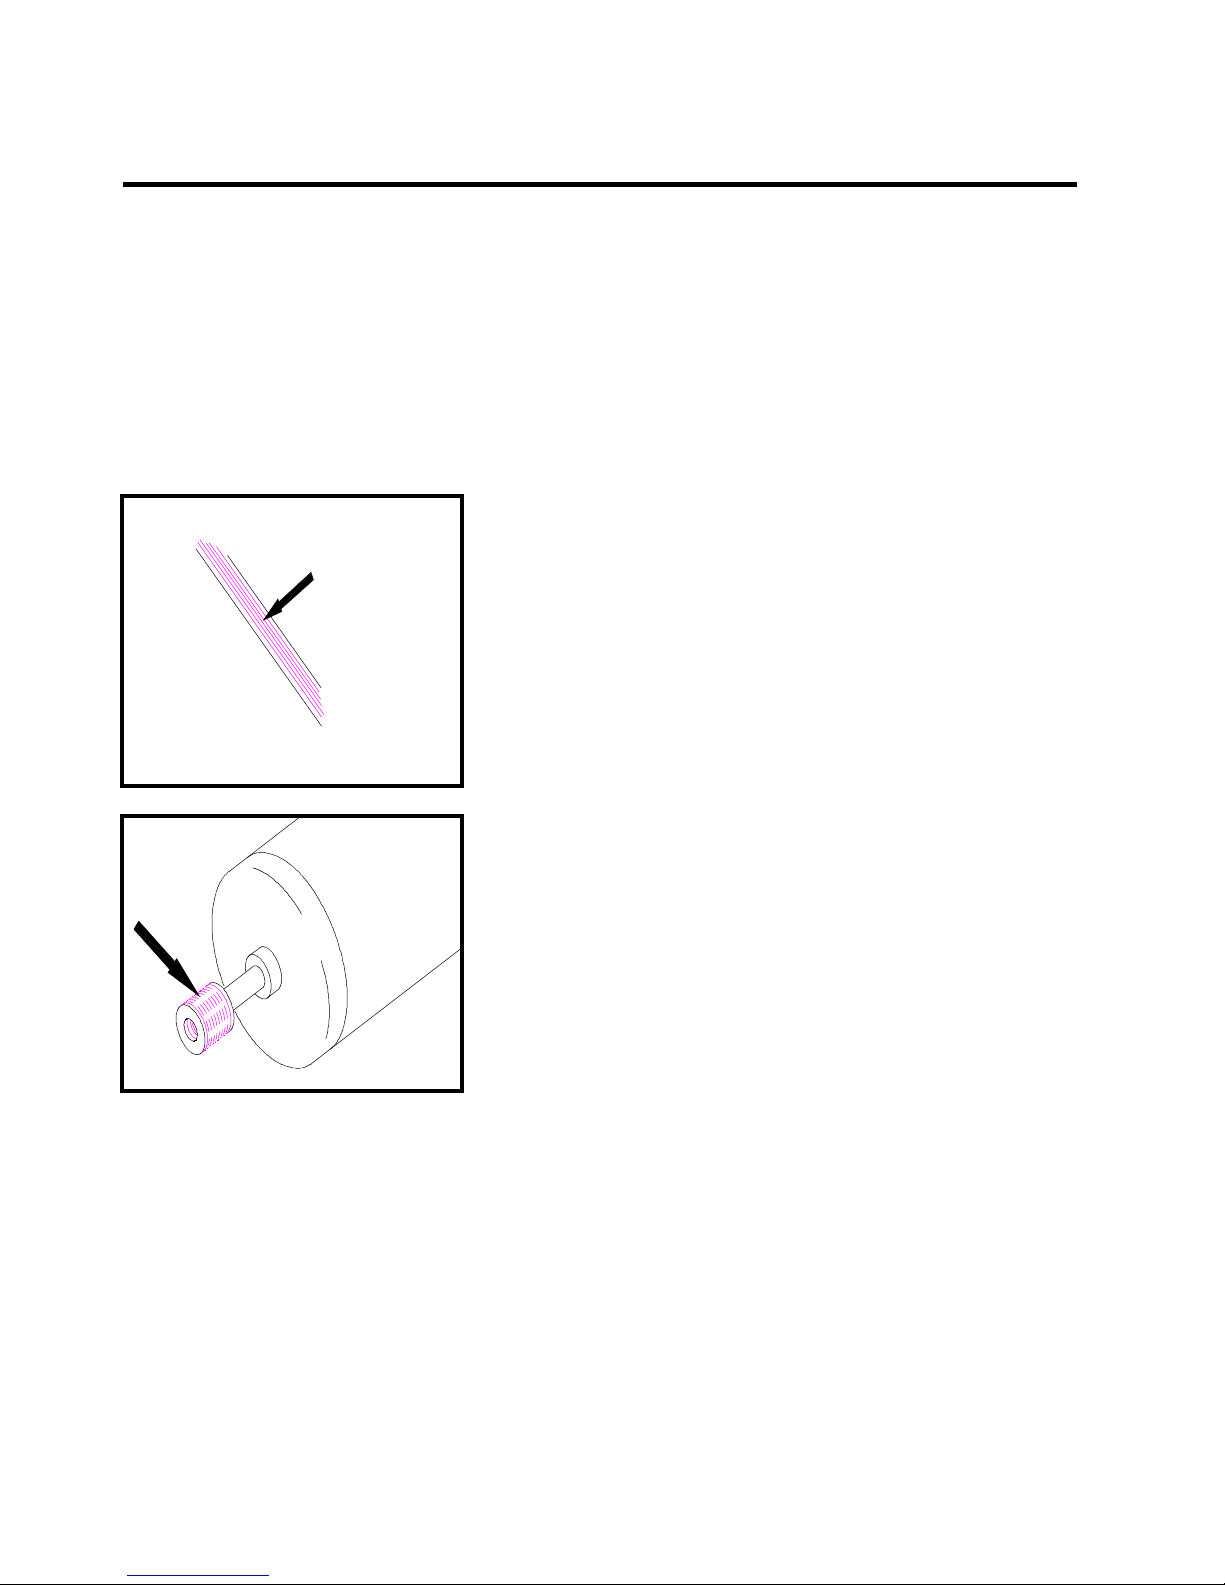
4.6 CLEAN THE GROOVES PROCEDURE
Frequency: Every 3 months
Caution:
If dirty grooves in the drive belt, motor and roller pulley, there will be noises while
running.
Procedure:
1.Remove the drive belt and check the grooves in belt
for dirt or dust and clean it.
2.Check the grooves in motor pulley for dirt or dust and
clean it
19
Page 20

at
4.7 DECK RE-WAXING PROCEDURE
Purpose : To ensure the maximum life of your treadmill, follow these steps
Purpose :
regular intervals.
The timing of running belt and deck maintenance :
The timing of running belt and deck maintenance
1. Each 6 months to lubricate by wax powder.
2. One year to flip the running deck.
3. Two years or over 6,000 hrs of usage to replace new running belt and
deck.
4. In the regular maintain, If the motor over current that has to lubricate
by wax powder
★ Take a motor current reading while a 70-90 kg user is walking on the machine at
5KM. If it is over limited current , wax the deck.
The limit current for each motor as below :
The limit current for each motor as below
Limited CurrentNormal CurrentMotor type
11A<9A220V DC
20A<15A110V DC
220V AC
5.5A<5A
110V AC
Recheck the motor current as above –
If the motor current is still over limited current, Please flip the deck or replace the
belt.
20
Page 21
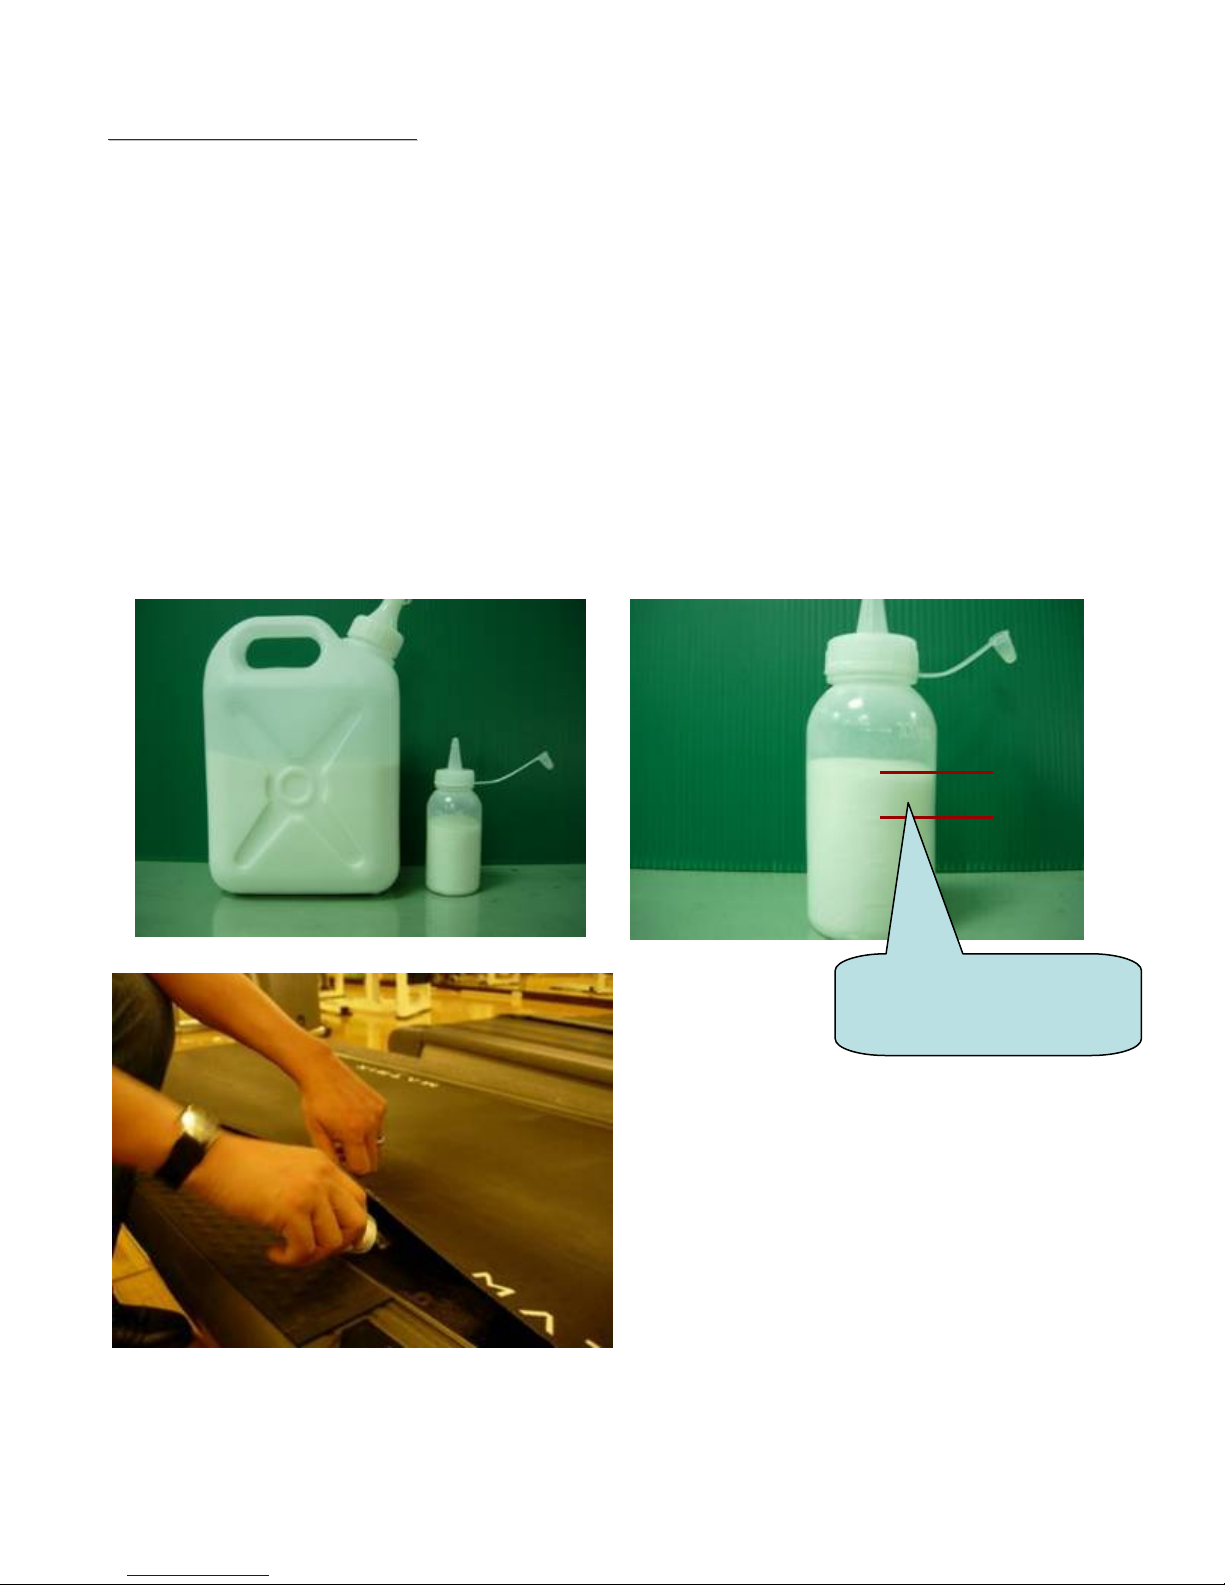
WAXING PROCEDURE:
WAXING PROCEDURE:
1. Warm deck and belt by walking on treadmill for 3 or more minutes at a
minimum speed of 3 mph (4.8 kph).
2. Turn off and unplug the treadmill.
3. Sprinkle approximately 1/2 scales of wax under the running belt. (It is useful
to lightly blow the wax to the center of the belt.)
4. Turn the unit on and walk the wax in for 3-4 minutes at 1 mph. Walk all over
the belt to ensure smooth wax distribution.
5. Once wax is walked into the belt and deck repeat procedure for checking the
motor current to ensure that the belt and deck are not to worn for wax to
improve the friction.
Be careful to monitor wax buildup on the rollers – too much wax can cause
issues and technicians need to monitor the rollers if they continually wax units.
MTOOL-052
1/2 scale for one
machine per one time
(around 5gm)
The wax powder set
Parts number : MTOOL-052
Price : US$ 30
Wax powder set including
1. One big bottle with 1kg wax powder
2. A small bottle for maintenance.
21
Page 22

SECTION 5
OVERLAY AND WORKOUT
DESCRIPTION
22
Page 23

5.1 T50x Console description
WORKOUT keys : Simple program view and selection buttons.
Quick START: One touch Start and Quick Start.
ENTER: To confirm each program setting.
up/down INCLINE: Easy information and incline selection.
up/down speed : Easy information and speed selection.
emergency stop / Immobilization : To stop all functions and immobilize the unit. The
emergency stop on this treadmill must be returned to its original position in order to allow normal
operation of the unit.
stop: Ends workout and shows workout summary data.
COOL DOWN: Puts treadmill into Cool Down mode. Cool Down time is dependent on the
length of the workout. Workouts 19 minutes and shorter will have a cool down length of 2 minutes.
Workouts 20 minutes and longer will have a cool down length of 5 minutes.
Clear: Use the CLEAR key to clear data not yet entered during the workout setup.
NUMBER KEYS: Press the numbers to input exercise Time, Weight, Level, Age, Heart Rate,
Speed and Incline.
23
Page 24

5.2 T50x-U Console description
WORKOUT keys : Simple program view and selection buttons.
Quick START: One touch Start and Quick Start.
ENTER: To confirm each program setting.
up/down INCLINE: Easy information and incline selection.
up/down speed : Easy information and speed selection.
emergency stop / Immobilization : To stop all functions and immobilize the unit. The
emergency stop on this treadmill must be returned to its original position in order to allow
normal operation of the unit.
stop: Ends workout and shows workout summary data.
COOL DOWN: Puts treadmill into Cool Down mode. Cool Down time is dependent on the
length of the workout. Workouts 19 minutes and shorter will have a cool down length of 2
minutes. Workouts 20 minutes and longer will have a cool down length of 5 minutes.
24
Page 25

SECTION 6
ENGINEERING MODE
25
Page 26

Engineering MODE
The Engineering Mode allow the club owner to customize the treadmill for the club.
To enter the Engineering Mode, press and hold down the "INCLINE ▼ " and "SPEED ▼ " keys.
Continue to hold down these two keys until the INSTRUCTION CENTER displays
“MANAGER MENU”.
1. To scroll through the list of Engineering Mode use the SPEED ▼ / ▲ key. The
INSTRUCTION CENTER will display, in turn, each of custom settings.
2. To select a custom setting, press the START key to enter.
3. To change the value of the setting, use the SPEED ▼ / ▲ key.
4. To confirm and save the value of the setting, press the QUICK START key. “SETTING
SAVED” will appear in the INSTRUCTION CENTER. To exit the setting without saving,
press the STOP key over 5 seconds, or if there is no key pressed, the system will
resume automatically.
Display test MODE
The Display test Mode allow the club owner to test display the treadmill for the club.
To enter the Display Mode, press and hold down the “ GOAL” & “INTERVAL” keys for 3’S.
26
Page 27

P0
CUSTOM
SETTING
MAXIMUM
TIME
UNIT
This option enables fitness club managers
to set the program maximum workout
10~9999
Minute
duration limits during peak and non-peak
hours of club traffic. Active variable
displayed in the TIME display after change.
DESCRIPTIONRANGEDEFAULT
DEFAULT
P2
LEVEL
DEFAULT
P3
WEIGHT
MAXIMUM
P5
SPEED
MAXIMUM
P6
INCLINE
ACCUMULATED
P7
DISTANCE
68KG
/
150LBS
20 kph /
12 mph
34~182 KG
/
75~400 LBS
10~9930DEFAULT AGEP4
6.4~20 kph /
4~12 mph
4 / 8/ 12 /1515
N/AN/A
Minute
N/A
KG
/
LBS
AGE
Kph /
mph
N/A
Km /
Mile
This option controls the default program time.10~Max20DEFAULT TIMEP1
This option controls the default program level.1~101
This option controls the default weight
used in the calorie calculations. Sets to
default unit change (kilograms or
pounds). Displayed in native units.
This option controls the default users age
used in the target heart rate calculations.
Controls the maximum speed for all
programs. Displayed in native units
(kilometers per hour or miles per hour).
Reverts to default value on unit change.
This option changes the maximum incline
grade to 4%, 8%, 12% or 15%.
Accumulated distance is not editable, for
display only. Displayed in native units
( miles or kilometers ). Holding the
INCLINE ▲and SPEED ▲ keys simultanously
to reset the accumulated distance. After
the treadmill reaches the maximum
distance, it will reset to “0” automatically.
ACCUMULATED
P8
TIME
START
P9
SPEED
0.8kph/
0.5mph
N/AN/A
0.8~3.0kph /
0.5~1.8mph
Hour
Kph /
mph
Accumulated distance is not editable, for
display only. Displayed in native units
( miles or kilometers ). Holding the
INCLINE ▲ and SPEED ▲ keys simultanously
to reset the accumulated distance. After
the treadmill reaches the maximum
distance, it will reset to “0” automatically.
Controls the starting speed for all
programs (minimum speed not affected).
Displayed in native units (kilometers per
hour or miles per hour). Reverts to default
value on unit change.
27
Page 28

CUSTOM
SETTING
UNIT
DESCRIPTIONRANGEDEFAULT
P10
P13
P15
P16
P17
PAUSE
TIME
SOFTWARE
VERSION
MAINTENANCE
LAMP
AUTO
CHECK
ERROR
LOG
30~180 sec60 sec
N/AEnglishLANGUAGEP11
T50xMODELP12
MetricUNITSP14
T50x /
T50x-IFI
N/AN/A
Metric /
English
ON / OFFON
N/AN/A
N/AN/A
sec
N/A
N/A
N/A
N/A
N/A
N/A
N/A
This is the maximum time during which
a workout can remain in pause mode.
The language of the INSTRUCTION CENTER
Display.
When the machine set to T50x-IFI will not have
the number keys function.
Software version is not editable, for
display only.
The measurement unit type for weight,
distance, and speed.
This option enables fitness club managers
to set the maintenance lamp as ON/OFF.
The function is to calibrate the treadmill’s
speed and incline after the completion of
the installation.
Error log is not editable, for display only.
Holding the INCLINE ▲ and SPEED ▲ keys
simultaneously to erase error log.
P19
MANUFACTURING
TEST
The function would clear all custom
settings had stored on the unit as a default
N/AN/ARESET ALLP18
N/AN/A
N/A
N/A
value. Holding the INCLINE ▲ and SPEED ▲
key simul-taneously to clear all custom
setting as a default value.
The function is only for manufacturer
use.
28
Page 29

SECTION 7
TROUBLE SHOOTINGS
29
Page 30

7.1 Electrical block diagram
30
Page 31

7.2 Wire pin definition
W35 -- Digital Comm Wire
W38 -- Grip Pulse Wire
31
Page 32

7.3 MCB LED instruction
32
Page 33

LED
+12V
RS485
Reference
Designator
LED2DOWN
LED3UP
Description
Indicates if the upper console is commanding elevation DOWN.
LED display:
Light : Normally
Off : No command from console into elevation motor
Indicates if the upper console is commanding elevation UP.
LED display:
Light : Normally
Off : No command from console into elevation motor
Indicates if console voltage supply is present.
LED display:
Light : Normally
Off : No 12 voltage provided by MCB
Indicates if the digital communication is working normally between upper
console and MCB.
LED display:
Blinking : normally.
Off : Fault
MCU
Indicates if the main control unit is working normally.
LED display:
Blinking : Normally.
Light : MCU fault.
Off : MSU no power.
33
Page 34

7.4 MCB wiring connection
CN9 -------AC motor cable socket
CN1-------Input power cable socket
CN13--------External fan cable socket
CN7--------Digital communication cable socket
CN6--------Elevation motor cable socket
CN8--------Adaptor power cable socket (only for T1xe / T3xe)
34
Page 35

7.5 T50x switch setting definition
T1x(TM522) /
T3x(TM523)
T7000PRO(TM51
2C) / T60(TM518C)
Switch definitionCollocation motorModel
35
Page 36

7.6 Error message 0140 / 01A0 / 01A2 troubleshooting
[Symptom ]
0140 - Incline motor operation failed.
01A0 - Incline motor disconnected.
01A2 - Incline motor is detected in the reverse of the position indicated by the potentiometer.
[Solution]
a. Check the connection of the incline motor cable at the MCB.
b. Run auto calibration.
c. If auto calibration fails, re-enter Engineering Mode and go to Calibration again.
- Select Incline Minimum, and then Go To Value.
- Check the MCB LEDs. If LED2 DOWN (Figure B) has no light, check the console cable
connections at the console and MCB. Replace the console or cable as needed. If LED2 DOWN
has a light, replace the incline motor.
d. If the issue is not solved by replacing the incline motor, replace the MCB.
Figure A
36
Page 37

7.7 Error message 01A3 troubleshooting
[Symptom ]
Motor is disconnected.
[Solution]
a. Check the connection of the motor cable at the MCB (Figure A).
b. Check if the MCB LED DSP1 (MCU) is lit (Figure B).
c. If LED DSP1 is blinking, the motor should be replaced.
d. If LED DSP1 is a solid light, replace the motor.
e. If LED DSP1 is not lit, replace the MCB.
Figure A Figure B
37
Page 38

7.8 Error message 0144 / 02B6 / 02B7 / 02B8 / 01A8 / 02B5 troubleshooting
[Symptom ]
0144 - Motor over current.
02B6 - Speed up is overcurrent.
02B7 - Speed down is overcurrent.
02B8 - Running status is overcurrent.
01A8 - Internal electronic thermal relay protection: motor load is too large.
02B5 - Inverter sensor the normal rated current over 150% , can hold 60 sec.
[Solution]
a. Check the condition of the running deck and belt. Replace the belt and flip or replace the
running deck as needed.
b. Replace the MCB.
38
Page 39

7.9 Error message 0141 troubleshooting
[Symptom ]
a. Motor over temperature.
[Solution]
a. Check the connection of the motor cable at the MCB (Figure A).
b. Use a multi-meter to check the motor wire circuit. Set the multi-meter to Ohms and place both
terminals on the blue wires of the motor cable (Figure B). There should be an Ohm reading of 0. If
there is an Ohm reading above 0, replace the motor. If the Ohm reading is 0, replace the MCB.
Figure A
Figure B
39
Page 40

7.10 Error message 02AD troubleshooting
[Symptom ]
a. MCB is over temperature.
[Solution]
a. Check if both fans are operating (there is a fan mounted to the MCB itself as well as an external fan).
Also check the connection of the fans at the MCB (Figure A).
b. If the fans are running correctly, replace the MCB.
Figure A
40
Page 41

7.11 Error message 02B2 troubleshooting
[Symptom ]
The emergency circuit on the interface board active.
[Solution]
a. Check the connection of the safety key (emergency stop) switch (Figure A). If the switch is
always open or shorted out, replace the switch.
b. If the emergency stop does not resolve the issue, replace the console.
Figure A
41
Page 42

7.12 Error message 02B9 / 02BA/ 02BB / 01AB troubleshooting
[Symptom ]
02B9 - The inner memory IC data write error.
02BA - The inner memory IC data read error.
02BB - Inverter hardware interrupt error.
01AB - Inverter Error
[Solution]
a. Check LED DSP1 (MCU) on the MCB (Figure A).
b. If this LED is blinking, replace the console.
c. If this LED is a constant light, replace the MCB.
d. If this LED is not lit at all, check the power to the MCB.
Figure A
42
Page 43

7.13 Error message 04A0 troubleshooting
[Symptom ]
a. UCB no communication received.
[Solution]
a. If the display is giving a 04A0 error, LED DSP2 (RS485) should be light (Figure A). If this light
is not on and a 04A0 error is present, replace the UCB.
b. Check the connection of the console communication cable at both of the console and the MCB.
c. Replace the console communication cable.
d. Replace the UCB.
Figure A
43
Page 44

7.14 Error message 04B0 troubleshooting
[Symptom ]
a. MCB no communication received.
[Solution]
a. If the display is giving a 04B0 error, LED DSP2 (RS485) should be light (Figure A). If this light is
not on and a 04B0 error is present, replace the UCB.
b. Check the connection of the console communication cable at both of the console and the MCB.
c. Replace the console communication cable.
d. Replace the MCB.
Figure A
44
Page 45

7.15 Error message 01A4 / 01A5 / 01A6 / 02A7 troubleshooting
[Symptom ]
01A4 - Main motor U phase disconnection
01A5 - Main motor V phase disconnection
01A6 - Main motor W phase disconnection
02A7 - Inverter output side is detected abnormal sudden increase over current
[Solution]
a. Please check the Motor wire connection between the Motor and MCB. (Figure A)
b. Please use the electric meter to check the 3 points (U / V / W) and see if there’s data of inside
impedance. (Figure B~C)
If yes, replace MCB.
If no, replace Motor set.
Figure A
W & U (Figure C)
W & V (Figure B)
V & U (Figure D)
45
Page 46

7.16 Error message 02A2 / 0241 troubleshooting
[Symptom ]
02A2 - DC high voltage converter to detect the internal side of over-voltage phenomenon.
0241 - DC high voltage side of the internal drive is too low to detect.
[Solution]
a. Please check if the input power is normal and reboot power again.(Figure A)
b. Replace the MCB.
Figure A
46
Page 47

7.17 Error message IMMOBILIZED troubleshooting
[Symptom 2 of treadmill will not start ]
Press start the LED display will show “IMMOBILIZED”
[Cause]
Machine lock
[Solution]
1. Please hold machine function “FIT TRAINER” & “MULTI FX” key for 3’s to
unlock
47
Page 48

7.18 How to test Incline motor function troubleshooting
[Symptom 2 of treadmill will not start ]
To verify Incline motor function (Test VR value)
[Cause]
If the VR value reading show “0” during Auto Check, will cause 01A0.
[Solution]
1. Please release incline tube (Figure A), and run “Auto check”
2. After start “Auto Check”. Will test the Incline motor VR value. (Figure B)
(Figure A)
(Figure B)
3. If the value show “0” suddenly during Auto Check process. (Figure C)
(Figure C)
4. Will appear “01A0”, and this Incline motor is defective part
(Due to VR value is variable, If the VR has broken circuit, Will show “0” on screen).
48
Page 49

7.19 Incline motor jammed and 01A0 troubleshooting
[Symptom 2 of treadmill will not start ]
If the Incline tube jammed with the bottom or error code “01A0” appear.
[Cause]
Error code 01A0
[Solution]
1. Please release incline tube (Figure A), and turn on the power.
2. After turn on the power, Machine will find BDC (bottom dead center) (Figure B)
(Figure A)
(Figure B)
3. When Incline stop rotated (on BDC position), rotated the tube to bottom. (Figure C)
4. When tube touch bottom, reverse the tube 2 cycles. (Figure D)
5. Fix the incline tube.
(Figure C)
(Figure D)
49
Page 50

SECTION 8
PARTS REPLACEMENT
50
Page 51

8.1 Plastic shroud removal
Figure A
1. Remove the 6 pcs screw using Phillips
screwdriver. (Figure A)
2. Remove motor cover. (Figure B)
Figure B
51
Page 52

8.2 Rear roller removal
Figure A
1. Turn off power and disconnect the cord
from the machine
2. Remove one of the end caps using a Phillips
screwdriver (Figure A)
3. Remove both roller adjustment screws using an
8mm Allen wrench ( Figure B and C)
4. Remove roller from running belt
(Figure D )
Figure B
Figure C
Figure D
52
Page 53

8.3 Side rail removal
Figure A
1. Remove the end cap as outlined in section 8.2
2. Remove the reinforce tube two screw using a
4mm Allen wrench (Figure A)
3. Slide the rail off the back of the treadmill
( Figure B )
Figure B
53
Page 54

8.4 Deck removal / Replacement
Figure A
1. Remove the front shroud as outlined in
section 8.1
2. Remove four deck screws using a
5mm Allen wrench (Figure A)
3. Remove deck from the running belt
(Figure B )
4. Be careful not to pinch fingers during
removal/installation of deck board
5. *New deck surfaces must ALWAYS be
matched to a new running belt*
Figure B
54
Page 55

8.5 Deck cushion replacement
Figure A
1. Remove the deck as outlined in section 8.3
2. Holding the bolt with 5mm Allen wrench,
loosen the nut with 13mm socket
(Figure A and B)
3. For the rear cushion, hold the cushion and
remove the 13mm nut (Figure C)
Figure B
Figure C
55
Page 56

8.6 Front roller removal
Figure A
1. Remove shrouds as outlined in section 8.1
2. Using a hook or loop of wire, (Figure A)
remove the spring from the belt tensioner.
The tensioner will now pivot away from
the drive belt
3. Remove the front roller mounting screws using
8mm Allen (Figure B and C)
4. Remove the drive belt from the front roller and
remove the roller from the running belt
(Figure D)
Figure B
Figure C
Figure D
56
Page 57

8.7 Running belt replacement
Figure A
1. Remove shrouds as outlined in section 8.1
2. Remove rear roller as outlined in section 8.2
3. Remove front roller as outlined in section 8.5
4. Remove deck as outlined in section 8.4
5. Remove the running belt and replace with new
belt (Figure A and B)
6. *New running belts must ALWAYS be installed
to a new deck surface*
Figure B
57
Page 58

8.8 Motor control board (MCB) removal
1. Remove shroud as outlined in section 8.1
2. Cut any wire ties that are secured to
3. Disconnect wires from the MCB
4. Remove four MCB mounting screws using
Figure A
the MCB panel (Figure A)
seven connections total (Figure B)
Phillips head screwdriver (Figure C )
Figure B
Figure C
58
Page 59

8.9 Motor removal
Figure A
1. Remove the front shroud as outlined in
section 8.1
2. Release drive belt tensioner as described in
section 8.5
3. Disconnect the motor power cable from the
motor control board (Figure A)
4. Using the 4mm Allen wrench the ground wire from the
motor set (Figure B)
5. Using the 8mm Allen wrench, remove 4 motor
mounting screws (Figure C)
5. Lift the motor away from the treadmill
(Figure D)
6. When reinstalling the motor, make sure the
red vibration pad is in place.
Figure B
Figure C
Figure D
59
Page 60

8.10 Drive belt removal
Figure A
1. Remove plastic shroud from machine as outlined in
section 8.1
2. Release belt tensioner from drive belt as outlined in
section 8.5
3. Remove the front roller screw on the drive belt side,
and loosen the screw on the opposite side (Figure A)
4. Lift roller and remove old drive belt.
5. After installing new belt, check it for correct alignment to
the motor pulley before setting tensioner in place
60
Page 61

8.11 Incline motor removal / Replacement
1. Lift the treadmill and support it so that the
wheels are off the floor, or the unit
may be tipped onto it’s side (Figure A)
2. Remove the clip from the pin attaching motor
shaft to the rack (Figure B and C)
3. Disconnect the incline motor power cable
from the motor control board ( Figure D)
4. Disconnect the bolt from the incline motor
( Figure E)
5. Lift the incline motor away from the treadmill
(Figure F)
Figure A
6. When installing the incline motor, make sure
to replace the white washers at the top and
bottom (Figure G)
Figure B
Figure C
61
Page 62

Figure D
Figure E
Figure F
Figure G
62
Page 63

8.12 PCB set removal / replacement
1. Remove the four screws from underneath the console.
There are arrows stamped in the plastic at the proper
openings (Figure A)
2. Disconnect the wires from the PCB. (Figure B and C)
Figure A
Figure B
Figure C
63
Page 64

8.13 Quick key set removal / replacement
1. Remove the quick key set two screws using
2mm Allen (Figure A)
2. Disconnect the wires from the quick key set (Figure B)
Figure A
Figure B
64
Page 65

8.14 Handlebar removal / replacement
1. Remove quick key set from machine as outlined in
section 8.12
2. Remove bottom cover from handlebar below using
screwdriver (Figure A)
3. Remove handlebar from the frame (Figure B and C)
Figure A
Figure B
Figure C
65
Page 66

8.15 PCB software installation SOP
A. Service Tools & Accessories:
1. MSP-FET430 (Please refer the bulletin NB-0506002)
2. Parts NO: 010688-00
3. Software
66
Page 67

1
2
3
6
4
5
Please refer the above photo to set the parameter.
Press the File Name Find out the software version file in the computer and
then actuate/open the file.
67
Page 68

Install the MSP430 Tools
Computer
68
Page 69

Press the Load Image, Installation software to MSP430 Tools.
69
Page 70

Installing the MSP430 cable to console.
MSP430
70
Page 71

1. Press the MSP430 “START” key, the “MODE” light will to
glitter about 10 sec, If installing pass, the OK LET light.
2. Drive the machine to provide power for console and then
enter into the engineering mode to confirm if the software had
been installed/upgraded
71
 Loading...