

Page 1

OWNER’S MANUAL
Page 2
TREADMILL
Page 3

Table of Contents
1.0) IMPORTANT SAFETY INFORMATION
Proper Usage
1
Check for Damaged Parts 1
1.1)
Important Safety Instructions 1
1.2)
Electrical Requirements 2
1.3)
Grounding Instructions 2
2.0) SETTING UP THE TREADMILL
2.1) Unpacking Treadmill 3
2.2)
Contents 3
2.3)
Optional Equipment 3
3.0) OVERLAY DESCRIPTION AND CUSTOM SETTINGS
3.1) The Console 4
3.2)
Manager Club Settings 4
3.3)
Manager Screen Description 4
3.4)
Manager Screens Exceptions/Details 4
3.5)
Setting Up Entertainment and CSAFE Devices 5
3.6)
Entertainment Devices for the T5 Treadmill 6
3.7)
Troubleshooting 6
4.0) MAINTENANCE
4.1) Recommended Cleaning Tips 7
4.2)
Deck and Belt Replacement 7
4.3)
Adjusting the Belt 7
5.0) USING THE PROGRAMS
5.1) Introduction to the Programs 8
5.2)
Run Time Program Screens Descriptions 8
6.0) OPERATING THE PROGRAMS
6.1) Manual Operation 10
6.2)
Operating Level Based Programs 10
6.3)
Heart Rate Controlled Programs 10
7.0) EQUIPMENT SPECIFICATIONS 12
8.0) PARTS AND ASSEMBLY
8.1) T5 Exploded View 15
8.2)
Parts List 16
8.3)
Assembly Instructions 20
Page 4

1) Important Safety Information
It is the sole responsibility of the purchaser of Matrix Fitness Systems products to instruct all individuals, whether they are the end user or supervising personnel on proper usage of the equipment.
It is recommended that all users of Matrix Fitness Systems exercise equipment be informed of
the following information prior to its use.
PROPER USAGE
1. Do not use any equipment in any way other than designed or intended by the manufacturer.
It is imperative that weight stack machines as well as any other Matrix Fitness Systems equipment
are used properly to avoid injury.
2. Keep hands and feet clear at all times from moving parts to avoid injury.
3. Unsupervised children must be kept away from this equipment.
4. Do not wear dangling loose clothing while on equipment.
CHECK FOR DAMAGED PARTS
1. DO NOT use any equipment that is damaged and or has worn or broken parts. Use only
replace-ment parts supplied by Matrix Fitness Systems.
2. MAINTAIN LABELS AND NAMEPLATES Do not remove labels for any reason. They contain
important information. If unreadable or missing, contact Matrix Fitness Systems for a replacement.
3. MAINTAIN ALL EQUIPMENT Preventative maintenance is the key to smooth operating equip-
ment as well as keeping the users liability to a minimum. Equipment needs to be inspected
at regular intervals. Defective components must be replaced immediately. Improperly working
equipment must be kept out of use until it is repaired.
4. Ensure that any person(s) making adjustments or performing maintenance or repair of any
kind is qualified to do so. Matrix Fitness Systems will provide service and maintenance training
at our corporate facility upon request or in the field if proper arrangements are made.
1.1 IMPORTANT SAFETY INSTRUCTIONS
READ AND SAVE THESE INSTRUCTIONS
• This T
readmill is intended to for commercial use
• T
o insure the users safety and protect the equipment, read all instructions before operating
the MA
TRIX
tr
eadmill.
When using an electrical product, basic precautions should always be followed, including
the following:
DANGER To reduce the risk of electric shock:
• Always unplug this equipment from the electrical outlet immediately after using and
before cleaning.
WARNING To reduce the risk of burns, fire, electrical shock or injury to persons that may be
associated with using this product:
• An appliance should never be left unattended when plugged in. Unplug from outlet when
not in use and before putting on or taking off parts.
• This product must be used for its intended purpose described in this Owner’s Guide. Do not
use other attachments that are not recommended by the manufacturer. Attachments may
cause injury.
• To prevent electrical shock, never drop or insert any object into any opening.
• Do not remove the side covers. Service should only be done by an authorized service technician.
• Never operate the treadmill with the air openings blocked, Keep the air openings clean, free
of lint, hair and the like.
• Never operate product if it has a damaged cord or plug, if it is not working properly, if it has
been damaged, or immersed in water. Return the appliance to a service center for examination
and repair.
• Do not carry this appliance by supply cord or use cord as handle.
• Keep the power cord away from heated surfaces.
• Keep hands and loose clothing away from moving parts.
• Close supervision is necessary when treadmill is used by or near children, invalids, or dis-
abled persons.
• Do not use outdoors.
• Do not operate where aerosol (spray) products are being used or where oxygen is being
administered.
• To disconnect, turn all controls to the off position, then remove plug from outlet
• Connect this treadmill to a properly grounded outlet only. See grounding instructions.
CAUTION If the user experience chest pains, nausea, dizziness or shortness of breath, STOP
exercising immediately and consult a physician before continuing.
1
Page 5

1) Important Safety Information
1.2 ELECTRICAL REQUIREMENTS
For your safety and treadmill performance, Matrix Fitness Systems' treadmills require a dedicated
20 amp circuit. The ground on this circuit must be non-looped. Please refer to NEC article 210-21
and 210-23. Your Treadmill is provided with a power cord with a plug listed below and requires the
listed outlet. Any alterations of this power cord could void all warranties of this product.
1.3 GROUNDING INSTRUCTIONS
The Matrix T4 or T5 Treadmill must be grounded. If it should malfunction or breakdown,
grounding provides a path of least resistance for electric current to reduce the risk of electric
shock. The treadmill is equipped with a cord having an equipment-grounding conductor and a
grounding plug. The plug must be plugged into an appropriate outlet that is properly installed
and grounded in accordance with all local codes and ordinances. If the user do not follow these
Gr
ounding Instructions, the user could void the Matrix limited warranty.
DANGER Improper connection of the equipment-grounding conductor can result in a risk of
electric shock. Check with a qualified electrician or ser
viceman if the user ar
e in doubt as to
whether the product is properly grounded. Do not modify the plug provided with the product if
it will not fit the outlet; have a proper outlet installed by a qualified technician.
120V UNITS DESIGNATED FOR U.S. MARKETS
The Matrix T5 or T4 Treadmill is for use on a nominal 120-volt circuit and has a non looped
grounding plug. Make sure that the 110V treadmill is connected to an outlet, NEMA 5-20R,
having the same configuration as the plug. No adapter should be used with this product.
220V UNITS DESIGNATED FOR U.S. MARKETS
The T5 or T4 Treadmill is for use on a circuit having a nominal rating more than 220 volts and
is factory-equipped with a specific power supply cord to permit connection to a proper electric circuit. Make sure that the 220V T5 or T4 is connected to an outlet, NEMA 6-20R, having the same
configuration as the plug. No adapter should be used with this product.
2
120V 20amp Plug NEMA 5-20P
220V 20amp Plug NEMA 6-20P
120V 20A Outlet NEMA 5-20R
220V 20A Outlet NEMA 6-20R
Page 6

2) Setting Up the Treadmill
2.1 UNP
ACKING TREADMILL
The users MATRIX treadmill is inspected before it is packaged. It is shipped in four pieces: the
base, the uprights console supports the handlebar and the console. Carefully unpack the unit
and dispose of the box material.
CAUTION This unit weighs 450 pounds. Be sure to have proper assistance to remove and move
the unit, to avoid injury to the user and the unit.
2.2 CONTENTS
1. Treadmill Base 1
2. Upright Console Supports 2
3. Hardware Fasteners and Washer Bag 1
4. Handle Bar Set 1
5. Console Side Cover Shrouds 2 Sets
6. Console 1
7. Console Mounting Bracket 2
8. Power Cord 1
If any items are missing please contact MATRIX FITNESS SYSTEMS customer service at
1-866-MXFITNESS.
2.3 OPTIONAL EQUIPMENT
Optional equipment may be available for the users MATRIX product. Please visit our web site
at www.matrix-fitness.com for more information.
3
Page 7
3) Overlay Description and Custom Settings
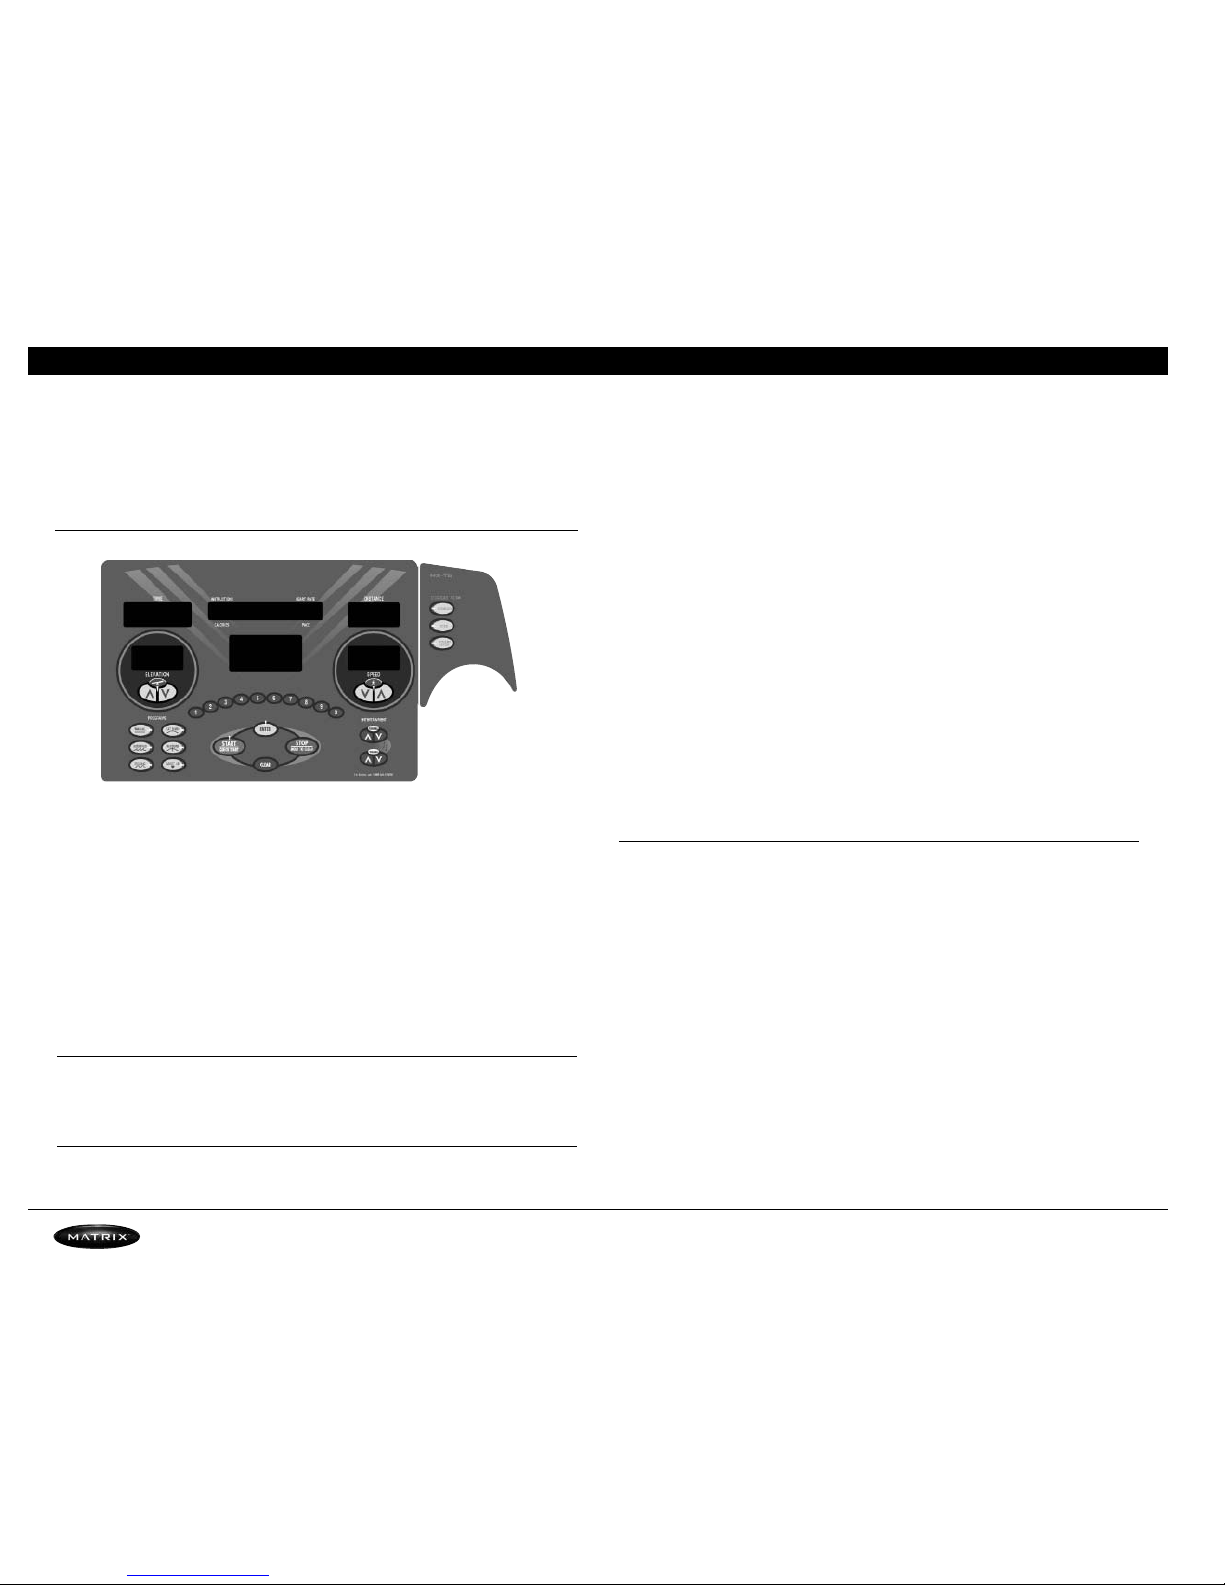
3.1 THE CONSOLE
PROGRAMS Simple program view and selection buttons. Seven programs to choose from.
START / QUICK START One touch Start and Quick Start.
ENTER Quick entry of information and level selection.
STOP / HOLD TO RESET Stop Pause and hold for 3 seconds to reset.
CLEAR (T5) Clears number keypad entry.
NUMBER KEYPAD (T5) Allows quick information and level selection.
UP / DOWN ELEVATION Easy information and elevation selection.
UP / DOWN SPEED Easy information and speed selection.
DISPLAY VIEW (T5) These three buttons allow the user to customize the way the unit's infor-
mation and lights are displayed.
ENTERTAINMENT (T5) Control the CHANNEL and VOLUME of your attached TV or enter-
tainment system.
3.2 MANAGER CLUB SETTINGS
There are two levels of access to manager screens. The first level of access is obtained by holding the elevation down, speed up keys. This level only allows access to the Manger screens.
3.3 MANAGER SCREEN DESCRIPTION
Manager screens allow the viewing and editing of variables that would be necessary for a club
operator/manager to customize. Unless otherwise noted manager screens consist of the initial
screen, the editing or action screen and the saving screen. The initial screen displays the variable
type and in most cases the current value. Edit or actions screens are where the editing of the
variable take place. The saving screen indicates the variable is being saved.
To access the Manager Settings press and hold the
ELEVA
TION DOWN
and SPEED UP buttons
for three seconds.
Use the ELEVATION or SPEED UP and DOWN arrows to scroll through the different man-
ager settings.
Press ENTER to edit the selected manager setting.
Use the ELEVATION or SPEED UP and DOWN arrows to set the variable.
Press
START to save the selected variable.
*Note SAVING will appear in the 7 segment window when the variable is being saved to
memory.
Press STOP to exit that segment at any time or press the emergency stop for treadmill use.
3.4 MANAGER SCREENS EXCEPTIONS/DETAILS
Below is a list of functions for each manager setting. Exceptions will be noted in the description for each manager setting:
P0 MAXIMUM TIME (EDIT)
This variable controls the program maximum time.
Active variable displayed in the time seven segment display.
Numeric entry is active.
P1 DEFAULT TIME (EDIT)
This variable controls the default program time.
Active variable displayed in the time seven segment display.
Numeric entry is active.
P2 DEFAULT LEVEL (EDIT)
This variable contr
ols the default pr
ogram level (may be eliminated in final product).
Active variable displayed in the time seven segment display
.
Numeric entry is active.
P3 DEFAULT AGE (EDIT)
This variable controls the default user age used in the goal heart rate calculations.
4
Page 8
3) Overlay Description and Custom Settings
Active variable displayed in the time seven segment display.
Numeric entry is active.
P4 DEFAULT WEIGHT (EDIT)
This variable sets the default weight used in the calorie calculations.
Active variable displayed in the time seven segment display.
Sets to default on unit change.
Displayed in native units (kilogram or pounds).
Numeric entry is active.
P5 ACCUMULATED DISTANCE
Active variable displayed in the time seven segment display.
Accumulated distance is not editable, for display only.
Displayed in native units (miles or kilometers).
Holding the start key resets the accumulated distance.
P6 ACCUMULATED TIME
Active variable displayed in the time seven segment display.
Accumulated distance is not editable, for display only.
Holding the start key resets the accumulated distance.
P7 SOFTWARE VERSION
Active variable displayed in the distance seven-segment display.
Software version is not editable, for display only.
P8 START SPEED (EDIT)
Controls the starting speed for all programs (minimum speed not affected).
Active variable displayed in the speed seven-segment display.
Displayed in native units (miles per hour or kilometers per hour).
Reverts to default value on unit change.
Numeric entry is active.
P9 MAXIMUM SPEED (EDIT)
Controls the maximum speed for all programs.
Active variable displayed in the speed seven-segment display.
Displayed in native units (miles per hour or kilometers per hour).
Rever
ts to default value on unit change.
Numeric entry is active.
P10 DEFAULT CHANNEL (EDIT)
Controls the default channel for entertainment CSAFE compatible devices.
This variable is editable.
Numeric entry is active.
P11 DEFAULT VOLUME (EDIT)
Controls the default volume for entertainment CSAFE compatible devices.
This variable is editable.
Numeric entry is active.
P13 SPEED MODE (EDIT)
Changes from Standard (Miles) to Metric (Kilometers).
Unit change will force unit dependent variables to revert to their default values.
3.5) SETTING UP ENTERTAINMENT AND CSAFE DEVICES
On the back of the console there are three RJ45 connectors on the T5 and two on the T4, for
the users convenience. They ar
e labeled for Enter
tainment and
CSAFE The T5 allows the user
to use Entertainment audio and visual products in combination with CSAFE products like
FITLINXX.
Locate the three jacks. Use the CSAFE IN to plug in any CSAFE device using the RJ45 connector.
5
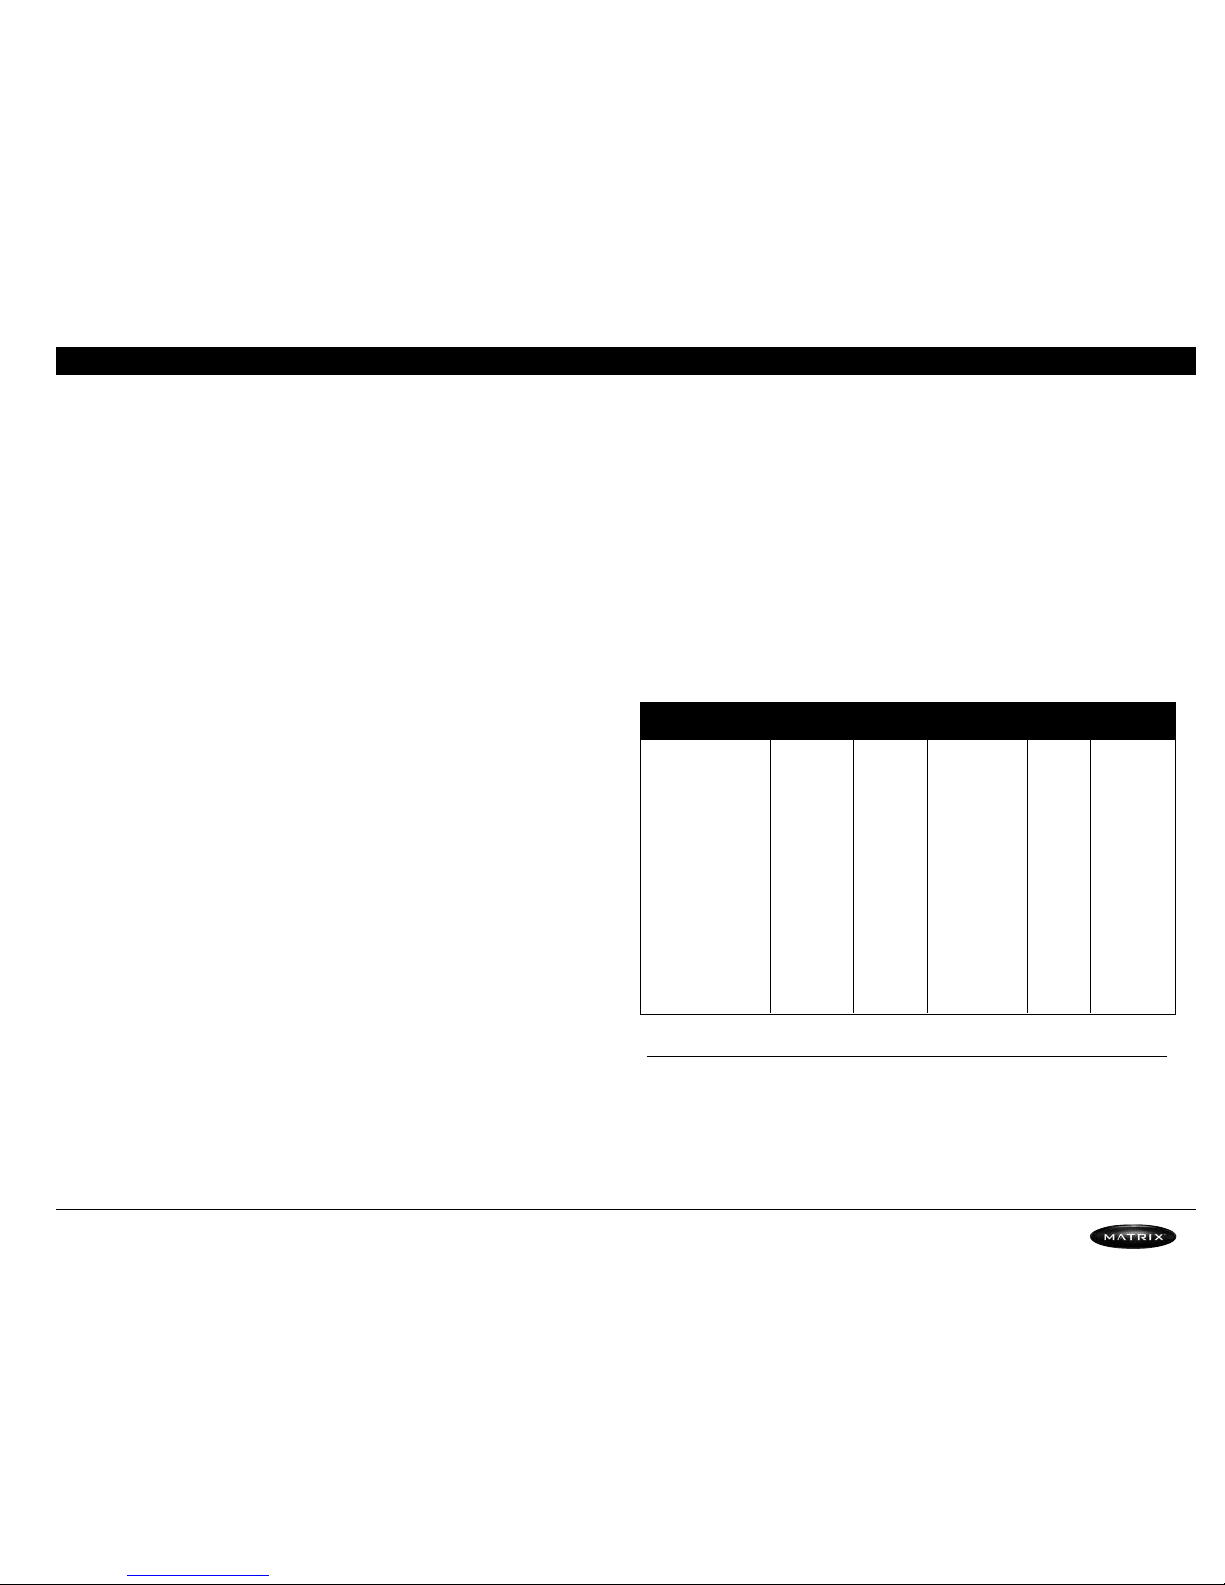
MINIMUM
VARIABLE DEFAULT FACTORY MAXIMUM STEP SIZE UNITS
Maximum Time 5 20 95 5 minutes
Default Time 5 20 NV max time 5 minutes
Default Level 1 1 20 1
Default Weight 80 150 400 5 pounds
Default Age 15 30 100 1 years
Start Speed 0.5 1 2 0.1 mph
Maximum Speed 2 12 12 0.1 mph
Machine Type T4 T4 T5 1 Unit
IR On/Off OFF ON ON 1 Unit
Default Channel 1 1 30 1
Default Volume 1 16 30 1
Page 9

3) Overlay Description and Custom Settings
CSAFE OUT allows CSAFE products to be daisy chained together from one unit to the next. The
connection is as follows:
3.6 ENTERTAINMENT DEVICES FOR THE T5 TREADMILL
The users equipment is preset to offer the user the maximum benefit of the users desired entertainment offering. Whether it is FIT CONNEXION or other CSAFE ready entertainment packages, Matrix makes it easy to connect. Look on the back of the console and locate the port
labeled
ENTERTAINMENT. This port is specific for audio and visual entertainment devices.
CSAFE ready products can plug in and utilize the volume, channel and the headphone connector
located on the console. Please contact the manufacture of the users entertainment option for
more information on
CSAFE compatibility.
3.7 TROUBLE SHOOTING
1. MY DEVICE DOES NOT POWER UP.
A. Check that the Treadmill has power and is turned on.
B. Make sure the RJ45 connector is plugged into the entertainment unit and the
ENTERTAINMENT port on the back of the console.
C. Some third party entertainment systems require headphones to be plugged in for it to
power up.
2. I CAN NOT CHANGE CHANNELS OR VOLUME WITH THE CONSOLE ON THE T5.
A. Check with the entertainment unit’s manufacture to be sure the user have a CSAFE
compatible device.
B. Check Manager Club Settings.
Follow the instructions that come with FIT CONNEXION to connect the users personal TV and
enjoy the proprietary entertainment device. Visit www.matrix-fitness.com for more information.
6
CSAFE IN
CSAFE OUT
CSAFE IN
CSAFE OUT
CSAFE IN
CPU
UNIT 1
UNIT 2
UNIT 3
Page 10

4) Maintenance
4.1 RECOMMENDED
CLEANING TIPS
1. Use a soft clean cotton cloth. DO NOT use paper towels to clean surfaces on the treadmill.
Paper towels are abrasive and can scratch surfaces.
2. Use a mild soap and damp cloth. DO NOT use ammonia based cleaner. This will cause dis-
coloring of the aluminum and plastics it comes into contact with.
3. Do not pour water or cleaning solutions on any surface. This could cause electrocution.
4. Wipe the console and side rails dry after every use.
5. Brush away any wax deposits from the deck and belt area. This is a common occurrence until
the wax is worked into the belt material.
6. Be sure to remove any obstructions form the path of the elevation wheels including power cords.
7. Monthly unplug the treadmill and remove the motor cover. Check for debris and clean with
a dry cloth or small vacuum nozzle. WARNING Do Not plug the treadmill in until the motor
cover has been reinstalled.
CAUTION This unit weighs 450 pounds. Be sure to have proper assistance to install and move
the unit, to avoid injury to you and the unit.
4.2 DECK AND BELT REPLACEMENT
One of the most common wear and tear items on a treadmill is the Deck and Belt combination.
If these two items are not properly maintained they can cause damage to other components.
This product has been provided with most advanced maintenance free lubricating system on
the market.
WARNING Do not run the treadmill while cleaning the belt and deck. This can cause serious
injury and can damage the machine.
Maintain the belt and deck by wiping the sides of the belt and deck with a clean cloth. The user
can also wipe under the belt 2 inches on both sides removing any dust or debris.
The deck can be flipped and reinstalled with a new belt by only by an authorized service technician.
Please contact Matrix Fitness Systems for more information.
4.3 ADJUSTING THE BELT
After locating the treadmill in the position it will be used, the belt must be checked for proper
tension and centering. The belt might need to be adjusted after the first two hours of use.
T
emperature, humidity, and use cause the belt to stretch at different rates. If the belt starts to
slip when a user is on it be sure to follow the directions below.
STEP 1 Locate the two hex head bolts on the rear of the treadmill. The bolts are located at
each end of the frame at the back of the treadmill. These bolts adjust the rear belt roller. Do
not adjust until the treadmill is on. This will prevent over tightening of one side.
STEP 2 The belt should have equal distance on either side between the frame. If the belt is
touching one side, do not start the treadmill. Turn the bolts counter clockwise approximately one full turn on each side. Manually center the belt by pushing the belt from side to side.
Tighten the bolts the same amount as when the user loosened them approximately one full
turn. Inspect the belt for damage.
STEP 3 While the treadmill is running, at 3 mph, notice the belt position. If it is moving to the
right, tighten, turn clockwise, the right bolt 1/4 turn and loosen the left bolt 1/4 turn. If it
moving to the left, tighten, turn clockwise, the left bolt 1/4 turn and loosen the right bolt 1/4
turn. Repeat Step 3 until the belt remains centered for several minutes.
STEP 4 Check the tension of the belt. The belt should be very snug. When a person walks or
runs on the belt it should not hesitate or slip. If this occurs tighten, turn clockwise, both bolts
1/4 turn. Repeat if necessary.
7
Page 11

5) Using the Programs
5.1 INTRODUCTION TO THE PROGRAMS
The Matrix treadmill the user have selected comes with 6 preprogrammed workouts. Quick Start
allows the user to get to the workout with the touch of one button. Manual allows the user to
input the correct information for accurate calorie calculations and easy program switching on the
fly. Intervals, Rolling, and Fat Burn use selected levels to challenge any user. Press Random for
more program profiles. Target Heart Rate uses the inputted target heart rate to adjust for the
duration of the workout and includes a 5 minute 2 level reduction cool down.
5.2 RUN TIME PROGRAM SCREENS DESCRIPTIONS
STARTING 3.2.1 SCREEN
This screen is the countdown screen for starting a program.
DOT MATRIX Countdown text STARTING “3…2…1” is displayed in the dot matrix. A beep
is produced for every change in count. The belt will start moving a few seconds after the “1”
appears.
RUN TIME SCREEN – MANUAL PROGRAM
This screen is the manual program running screen. The user controls all functions. There is
an oval track set to the total time of the program. A distance motivational message will
appear every _ mile and an amber dot will remain at that point of time on the track.
DOT MATRIX A manual track with the _ mile indicators. The spent time is displayed in green,
the un-used in red and the current segment blinks in amber. Every _ mile the current mileage
is displayed on the dot matrix and the segment that the _ mile change took place remains
solid amber.
RUN TIME SCREEN – LEVEL BASED PROGRAMS (INTERVAL, ROLLING INTERVAL, FAT BURN AND RANDOM)
Level based programs have similar functions excepts for the program in use. Level based
programs take the number of LED’s illuminated in a column of the current graphic and translate them to an elevation based upon the current level. When changing between programs the
elevation will change to the current programs elevation after five seconds or when the segment changes whichever is first.
DOT MATRIX Level based graphics consist of expired columns (green), current column
(flashing amber) and pending columns (r
ed). Each column height cor
r
esponds to a potential
change in elevation depending upon the level setting.
ALPHA NUMERIC
NORMAL Calories and Pace
HR PRESENT Calories and Current HR (HR symbol flashes in response to heart rate)
LEVEL CHANGES T
emporar
y display of text “LEVEL XX” with XX being the cur
r
ent level.
KEYS
ELEVATION UP/DOWN Increases/decreases level. Value displayed in the elevation window
will change when change in level for given LED’s displayed change the elevation.
SPEED UP/DOWN KEYS Increases/decreases speed
PROGRAM KEYS Change to selected program (except HR), displays “reset for HR” mes-
sage if HR key.
STOP KEY (PRESSED) Jumps to pause screen.
ENTERTAINMENT KEYS Entertainment key functions are active
NUMERIC ENTRY KEYS Edits the current speed after a selection is made and enter is pressed.
WARM-UP SCREEN (HEART RATE PROGRAM ONLY)
This screen operates as a manual program for the warm up period. Initial warm up will be 2
minutes and any pause in program will be 1 minute (or until heart rate is within 10 BPM of
goal heart rate). During the warm-up the user will be prompted to increase the active variable (speed or elevation). If the active variable is greater than _ the maximum value set in the
pre-program section the user will be prompted to increase the alternate variable. A prompt
will indicate the user is approaching the target heart rate.
DOT MATRIX A manual track without the _ mile amber dot indicators.
IMPORTANT MESSAGES
•
Starting Warm up message at the beginning of the warm-up.
•
Increase elevation or speed message depending upon the level of the active variable.
•
Approaching Target Heart Rate message as the actual heart rate approaches the target
heart rate.
•
Warm up complete, starting program message, as the heart rate stabilizes within 10 BPM
of the target.
•
Reset for programs message (change from heart rate to other programs not allowed
using program keys).
KEYS
ELEVATION UP/DOWN Increases/decreases current elevation
SPEED UP/DOWN KEYS Increases/decreases current speed
STOP KEY (PRESSED) Jumps to pause screen.
ENTERTAINMENT KEYS Entertainment key functions are active
After warm up program ends (1 or 2 minutes see warm-up screen) changes to program
run time screen.
RUN TIME SCREEN – HEART RATE PROGRAMS
Hear
t rate pr
ogram alters the “active variable” (either speed or elevation) in to maintain the
goal heart rate. The active variable can be altered from its minimum value to the maximum
value specified by the user during the pre-programs. If the active variable is at a limit and
8
Page 12

5) Using the Programs
additional change to the workout is required the user is prompted to increase/decrease the
alternate variable.
IMPORTANT SAFETY FEATURES
•
Safety – When the user heart rate exceeds the target heart rate by the below values, the
following prompts/actions will take place:
•
10 BPM – Warning in alpha numeric indicating active variable will be reduced (if above
minimum) or alternate variable will be reduced.
•
12 BPM – Active variable (if above minimum) or alternate variable reduced by 30%.
•
15 BPM – Warning indicating heart rate over maximum and program will end.
•
20 BPM – Program ends.
DOT MATRIX A graphic displaying a heart with its position relative to the relationship
between the measured heart rate vs. goal heart rate (goal heart rate in center of the screen
in green). Two vertical bars indicate the lower and upper limits Heart graphic portions located
between the upper and lower limit are green. Portions below the lower limit are illuminated
amber and portions above are illuminated red.
KEYS
ELEVATION UP/DOWN If active variable is elevation, jumps to HR manual screen, if active
variable speed increases or decreases current elevation.
SPEED UP/DOWN KEYS If active variable is speed, jumps to HR manual screen, if active
variable elevation, increases or decreases speed.
PROGRAM KEYS If pressed displays “reset for programs” this program does not change
on the fly.
STOP KEY (PRESSED) Jumps to pause screen.
ENTERTAINMENT KEYS Entertainment key functions are active
NUMERIC ENTRY KEYS If elevation based program, edits speed (see numeric edit
description), if speed based program keys inactive because the treadmill will control the speed.
PAUSE SCREEN
The pause screen maintains existing accumulated variables (time, distance, calories, etc.)
allowing the program to be restarted where it left off. Paused heart rate programs restart
with a short warm up (1- minute). Speed is returned to the default value during a pause.
Elevation is left at its current setting.
Treadmill will not restart until it comes to a compete stop.
ALPHA NUMERIC
Displays message “Select Start to Resume”.
KEYS
STOP KEY (HELD, 3 SECONDS) Jumps to the safety startup screen.
ENTERTAINMENT KEYS Entertainment key functions are active
START KEY Jumps to STARTING “3…2…1” screen for current program (restarts current program).
AUTO ENTRY/TIME OUT
Timeout after 25 seconds jumps to the safety startup screen. Pressing any key will extend
the timeout time.
COOL DOWN SCREEN
Cool down screen sets the elevation to the minimum and reduces the current speed to 30%
of current value or 4 MPH whichever is lower to the default start speed. Cool down effectively
functions as a manual program and has a set time of 2 minutes. Calories and distance accumulate during the cool down screen.
KEYS
ELEVATION UP/DOWN Increases/decreases current elevation
SPEED UP/DOWN KEYS Increases/decreases current speed
STOP KEY (PRESSED) Jumps to program end screen.
ENTERTAINMENT KEYS Entertainment key functions are active
NUMERIC ENTRY KEYS Edits the current speed (see numeric edit description).
PROGRAM END (PROGRAM REVIEW) SCREEN
The program end screen stops belt movement and returns elevation to zero at the end of a
workout. During the program end screen workout totals are displayed allowing the user to
review their workout.
ALPHA NUMERIC
Displays message “WORKOUT COMPLETE END WORKOUT” followed by message
“WORKOUT SUMMARY, PACE, DIST, CALS”.
SEVEN SEGMENTS
TIME Displays text “END”
DISTANCE Displays workout distance.
ELEVATION Displays elevation.
SPEED Displays speed
KEYS
STOP KEY (HELD, 3 SECONDS) Jumps to the safety startup scr
een.
AUTO ENTRY/TIME OUT
T
imeout after 25 seconds jumps to the safety star
tup scr
een. Pr
essing any key will
extend the timeout time.
9
Page 13

6) Operating the Programs
6.1 MANUAL OPERATION
MATRIX design makes using the programs as easy as one touch of a button. During Quick Start
or Manual operation the Manual Run Time Screen will appear.
QUICK START Prepare to start and press QUICK START to begin workout.
Program will use the default settings for Time and weight. Any program change during the
users workout will start at Level 1.
MANUAL PROGRAM Allows the user to enter desired time, level, and weight.
STEP 1 Select Manual program button on left of panel.
Press ENTER or wait 3 seconds.
NOTE Selecting START will start program using remaining default values.
STEP 2 Select Time by using the UP or DOWN arrow keys.
When finished Press
ENTER
NOTE Selecting START will start program using remaining default values.
STEP 3 Select Weight by using the UP or DOWN arrow keys.
STEP 4 Press START to begin workout.
Treadmill will Flash “Starting 3..2..1” Then the belt will start moving.
6.2 OPERATING LEVEL BASED PROGRAMS
The MATRIX treadmill offers versatile programs to keep the user motivated.
The following Instructions will guide the user through simple steps to select
INTERVALS,
ROLLING, FAT BURN,
and RANDOM programs.
Press RANDOM multiple times for other profiles.
STEP 1 Select INTERVALS, ROLLING, FAT BURN, or RANDOM program from the program
button on left of panel.
Press
ENTER or wait 3 seconds.
NOTE Selecting START will start program using remaining default values.
STEP 2 Select Time by using the UP or DOWN arrow keys. When finished Press ENTER or
wait 3 seconds.
NOTE Selecting ST
ART
will star
t program using remaining default values.
STEP 3 Select Level by using UP or DOWN arrow keys. The user can change the level at any
time during workout. When finished, Press ENTER or Wait 3 seconds.
NOTE Selecting ST
ART
will star
t program using remaining default values.
STEP 4 Select Weight by using the UP or DOWN arrow keys.
STEP 5 Press START to begin workout.
Treadmill will Flash “Starting 3..2..1” Then the belt will start moving.
6.3 HEART RATE CONTROLLED PROGRAMS
CAUTION If you feel light headed or are having chest pains stop immediately and consult a
physician.
USING THE HEART RATE HANDLES
Heart rate can be received by holding onto the Heart Rate Handles for 10 Seconds. The users
hand must touch both metal tabs on each handle to get an accurate reading. This technology will work for 85% of the population. Not everyone can get an accurate reading from the
grips.
USING A POLAR TELEMETRY STRAP
Matrix Fitness Systems treadmills are equipped for the user to use a Polar compatible heart
rate chest strap. These can be purchased at fitness equipment retail stores. Please follow
instructions provided by the manufacture for wearing the chest strap.
HEART RATE CONTROL PROGRAM
Follow these easy Steps to enter into the Heart Rate Program. Heart rate is controlled by
either speed or elevation and will maintain the user at the target percentage the user has
selected based on age.
STEP 1 Select TARGET HR program button on left of panel.
STEP 2 Select TIME by using the UP or DOWN arrow keys or the number keypad on
the T5 treadmill. When finished Press ENTER or wait 5 seconds.
STEP 3 Select AGE by using the UP or DOWN arrow keys or the number keypad on
the T5 treadmill. When finished Press ENTER or wait 5 seconds.
STEP 4 Select PERCENTAGE OF MAXIMUM HEART RATE by using the UP or DOWN arrow
keys or the number keypad on the T5 treadmill.
Per
centage of maximum heart rate is determined by the following formula.
(220 Beats Per Minute – Age) Selected Per
centage
Example (220 – 30)65% = 123 Beats Per Minute
SELECT FROM 50% TO 80% IN 5 % INCREMENTS.
STEP 5 Select HR PROGRAM TYPE by using the UP or DOWN arrow keys select the active
variable Speed or Elevation that will be used to contr
ol the users heart rate.
10
Page 14
6) Operating the Programs
Press ENTER or wait 5 seconds.
STEP 6 Select MAXIMUM SPEED/ELEV
ATION
by using the UP or DOWN arrow keys select
the active variable Maximum Speed or Elevation that will be used to control the
users heart rate.
HEART RATE SAFETY PROTOCOLS
SAFETY When the users heart rate exceeds the target heart rate by the values below, the following
prompts/actions will take place:
• 10 BPM Warning in alpha numeric indicating active variable will be reduced (if above
minimum) or alternate variable will be reduced.
• 12 BPM Active variable (if above minimum) or alternate variable, if active variable is at
zero, reduced by 30%.
•
15 BPM Warning indicating heart rate over maximum and program will end.
• 20 BPM Program ends.
11
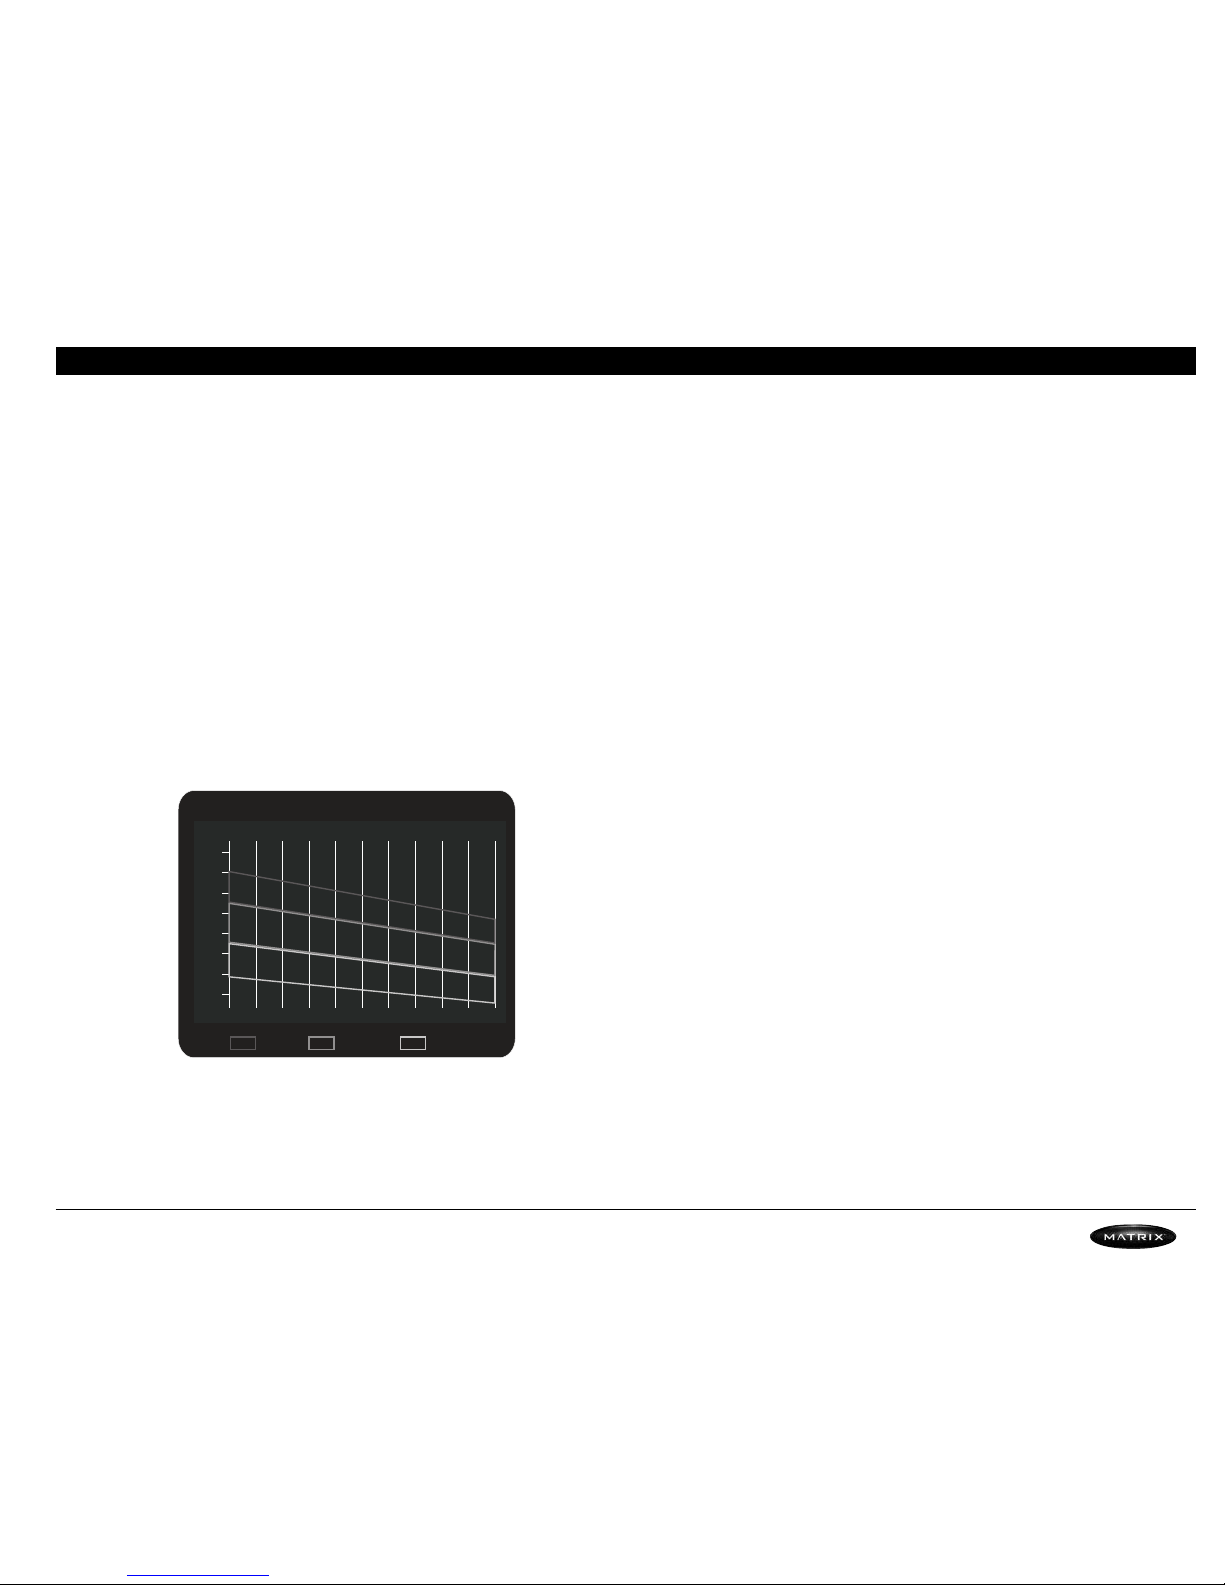
POLAR TARGET HEART RAT E ZONE
HEAVY MODERATE LIGHT
220
20
AGE
HR BEATS
PER MINUTE
25 30 35 40 45 50 55 60 65
200
180
160
140
120
100
80
Page 15

7) Equipment Specifications
>treadmill
MX-T5
MACHINE
WEIGHT SIZE
450 lbs
inches = 85” x 35” x 62”
204 kg
cm = 215.9 x 88.9 x 157.5
12
Pr
oduct Name T5
Foot Print
85”L x 35”W x 62”H
Weight 450
Running Area 22 x 60
Belt Type Habisat
Max User Weight 400 = 181.4 kg
Frame Construction Steel
Incline Range 15%
Speed Min 0.5
Speed Max 12
Motor Type Reliance AC
Motor Size 2 HP 4 Pole
Controller Cooling fan Yes
Electrical Receptacle 110 NEMA 5-20R
Electrical Plug 110 NEMA 5-20P
Electrical Receptacle 220 NEMA 6-20R
Electrical Plug 220 NEMA 6-20P
Electrical Amps 110v 20 Amps
Electrical Amps 220v 20 Amps
Sharp TV Electrical 110V 50/0Hz
Deck 1” Reversible
Wax No Maintenance
VARIABLE COMPRESSION TECHNOLOGY
Absorber Rubber Dampeners
Number of Cushions 8
Cushion = Stride Impact Yes
SAFETY
Dual Function Shut Off
w/Tether Connected Yes
Large Safety Stop Yes
PROGRAMS
Number Key Pad Yes
One Button Quick Start Yes
Random (20 profiles) Yes
Target Heart Rate Yes
Fat Burn Yes
Inter
vals
Y
es
Rolling
Y
es
HEAR
T RATE
Polar Telemetry Yes
Contact Heart Rate Yes
Removable Contact Heart
Rate Handles Yes
ENTERTAINMENT READY
Volume Control Yes
Channel Control Yes
Display View Yes
Cable Connection Yes
Sharp AC Power Connection Yes
Monitor Mount Yes
IR Port Yes
Head Phone Jack Yes
CSAFE Port 3
MANAGER MODE
Maximum Time 5 to 95
Default Time 5 to 95
Default Level L1
Default Weight 60 to 400
Accumulated Distance
Accumulated Time
Start Speed .5 to 2.0
SPECIFICATIONS
Page 16

>treadmill
MX-T5
8) Parts & Assembly
Page 17

THIS PAGE INTENTIONALLY BLANK
Page 18

8.1) T5 Exploded View
>treadmill
MX-T5
15
Page 19

16
8.2) Parts List
>treadmill
MX-T5
NO. DESCRIPTION SPECIFICATION
G10
Handpulse Grip Set
M01 Motor Set
N01
Console Set
N01 Console Set-Id Line
O01 TV Bracket-USA Line (w/Cables) MATRIX T5 (TM65)
O01 TV Bracket-ID Line(w/Cables)
Q01 Front Cover Set
U01 Tension Wheel Set
002 Screw, Oval Hex Socket M6x1.0Px45L
003 TV Sleeve Nylon
005 KSS Mast Sleeve (Jacket) SB-30
006 Nylon Nut M5x0.8P
007 TV Earphone Wire 850(+RJ-45)
010 Screw, Round Head M4x0.7Px40L(15L)
011 Flat Washer 4x10x1.0t
012 Nylon Nut M4x0.7P
AB1 Frame Set
AB2 Belt Guide
AC1 Left Console Mast
AC2 Right Console Mast
AG1 Main Handle Bar
AH1 Incline Leg
AH1 TV Bracket Mend Strive Set
AN3 Console Mend Strive Set
AN4 Safety Key Set
AR1 Front Roller Set 3.5"
AR2 Rear Roller Set 3.5"
AZ1 Hardware Package
AZ2 Hardware Package (1)
AZ3 Hardware Package (2)
B35 Running Deck (Inwood) 616x1340x25.4t 3 Layers Deck
B36 Deck Cushion (SBR)
B37 Deck Cushion 30x37L(40°)
B38 Left Console Mast Base AL
B39 Right Console Mast Base AL
B40 Deck Cushion (Short A 40°)
B41 Screw, Oval Tapping 4x12L
B42 Screw, Plain Hex Socket M8x1.25Px35L
B43 Rivet (Brass Inserts Nut) ALS7-8125-3.8(0.5-3.8)
B44
Rivet (Brass Inserts Nut) ALS7-610-4.2(0.5-4.2)
B45 Screw, Round Hex Socket M8x1.25Px20L
B52 Power Switch Holder SPC
B53
Nylon Nut
M8x1.25P
NO. DESCRIPTION SPECIFICATION
B54
Screw, Oval Hex Socket M8x1.25Px20L
B55 Flat Washer 8.6x26x2.0t
B56
Spring Washer SW8 8.2x13.5x2.0t
C05 Screw, Oval Hex Socket M8x1.25Px15L
C06 Left Console Mast Cover (6~8)
C08 Right Console Mast Cover (6~8)
C09 Screw, Plain Hex Socket M8x1.25Px25L (SUS 304)
C10 Socket Head Cap Screw M8x1.25Px20L
C11 Screw, Round Head M5x0.8Px8L
C13 Flat Washer 8.2x16x1.4t
G07 Handlebar Casing Pipe G20%
G08 Heart Rate Sensor Plate
G09 Upper End Cap For Grip Pulse
G10 Pulse Sensor
G12 Lower End Cap For Grip Pulse
G13 Handlebar Mend Strive Pipe 25.4x1.5tx208L
G14 Handlebar Mend Strive Pipe End Cap POM
G15 Spring
G19 Screw, Oval Head M5x0.8Px12L
G20 Screw, Round Head M3x12L
G23 Spring Washer SW6 6.0x10.0x1.5t
H08 Axle Bushing
H09 Plastic Plug AC002
H10 Bolt, Round Hex Socket M12x1.75Px70L
H11 Flat Washer 12.7x23x2.2t
H12 Cap 45x45
H13 Nylon Nut M12x1.75P
H14 Wave Washer 20.7x29.1x0.3t
H15 Spring Washer SW12 12.2x21.5x3t
L01 Mobile Wheel
L02 Flat Washer 8.2x30x2.0t
L03 Screw, Oval Hex Socket M8x1.25Px12L
M02 Incline Motor (110V) 1100LB/115V 124mm T4/T5
M03 Motor Fixing Plate
M05 Motor Control Board MD65 5HP/230V (Reliance)
M07 Dcrew, Hex Head M12x1.75Px55L(30L)
M10 Nylon Nut M12x1.75P
M11 Connecting Cable For Incline Motor
M12 Screw, Oval Hex Socket M8x1.25Px25L
M13
Nylon Nut M8x1.25P
M14 Screw 3/8"-16UNCx25L (BED)
M15 Nylon Nut 3/8"-16UNC
M16
Flat W
asher 8.2x20x1.8
Page 20

8.2) Parts List
17
>treadmill
MX-T5
NO. DESCRIPTION SPECIFICATION
M17
Flat Washer 10.5x18x2.0t (Bed)
M18 Screw, Oval Head M5x0.8Px12L (Bed)
M19
Transformer (117V To 234V) 3.5KW 117V TO 234V (MX-T5)
M20 Bolt, Round Hex Socket 3/8”x45L
M21 Incline Motor(220V) 1100LB/230V 124mm T4/T5
M21 Teflon Washer 13.2x26x1.0t
M23 Power Resistance 300W,62 ohm
M33 Screw, Round Hex Socket M10x1.5Px60L
M34 Nylon Nut M10x1.5P
M35 Teflon Washer 10.5x25x1.0t
M36 2-End Round Key 6x6x35L
M37 Settle Bolt M6x1.0Px10L
M38 Shockproof Pad t=4.0mm(:75±4°)
M40 Screw, Round Hex Socket M4x0.7Px10L
M41 Sleeve (Jacket) SB-22 (KSS)
M42 Teflon Washer 10.5x25x1.5
M43 Wave Washer 12.7x18x0.2t
M44 Pu Housing PU
M45 Choke Separate Slice MX-T5/T4
M46 Plastic Screw KSS PF-408
M47 Flat Washer 4.2x10x1.2t
M50 Large Screw, Oval Head M4x0.7Px8L
M50 Filter (220V) 12SS4-4BC4 115V/250V
M51 Screw, Round Head M5x0.8Px20L
M51 Choke (220V) 1.7mH/25A 600,200
M53 Incline Power Board(110V)-USA Line IBC7X 110V DCI T5
M53 Incline Power Board(110V)-USA Line IBC8X 220V DCI T5
M53 Incline Power Board(110V)-Id Line Reliance 115V H106
M53 Incline Power Board(220V)-Id Line Reliance 220V H106
M54 Bakelite Board T5/T4
M55 Screw, Oval Head M5x0.8Px8L
M56 Screw, Oval Head M5x0.8Px12L
M57 Motor Fixing Bracket 1 SPC 4.0t
M58 Motor Fixing Bracket 2 SPC
M59 Screw, Round Hex Socket M8x1.25Px25L
M60 Spring Washer SW8 8.2x15.4x2t
M61 Flat Washer 8.2x19x2.0t
M62 Shockproof Pad (20wx0.7tx280L)
N01 Overlay (English)
N01
Overlay (Germany)
N01 Overlay (Netherlands)
N01 Overlay (Italy)
N02
Console Contr
ol Board-USA Line DGC5X DCI T5
NO. DESCRIPTION SPECIFICATION
N02
Console Control Board-Id Line MX-T4/T5 H107S230
N04 Membrane Key (Big) Big
N05
Membrane Key (Small) Small
N08 Heart Rate Receiver Polar E2380164
N09 Right Keyboard Set-U.S.A AFD2X DCI T5
N09 Right Keyboard Set-Id Line MX-T5
N10 Screw, Oval Head M3x0.5Px6L
N12 C-Cafe Rubber Cover
N13 Screw, Round Head M3x0.5Px6L
N14 Nut M3
N15 End Nut 5 (PRECISION SPECIALIST)
N18 Hand Pulse Receiver Set 2000F 5V (Salutron)
N20 Led Indicated Board-Usa Line AFD1X DCI T5
N20 Led Indicated Board-Id Line MX-T5
N25 Console Lower Cover ABS
N26 Console Upper Cover ABS
N34 Tv Back Cover ABS
N36 E-Port Fixed Case
N37 Sensor Cap
N41 Safety Key Push A Button
N43 Spring For Safety Key SWP 1.0x15x8Nx30L
N45 Screw, Round Tapping 3x6L
N46 Screw, Oval Head M4x0.7Px15L
N47 Flat Washer 4x10x1.0t
N47 Overlay (English)-RH
N47 Overlay (Germany)-RH
N47 Overlay (Netherlands)-RH
N47 Overlay (Italy)-RH
N48 Overlay (English)-LH
N48 Overlay (Germany)-LH
N48 Overlay (Netherlands)-LH
N48 Overlay (Italy)-LH
N49 Safety Key Extended Cable 80((ZIPPY+CN250-01-2P)
N50 Screw, Oval Head M5x0.8Px12L
N51 Screw, Oval Head M5x0.8Px50L
N60 Safety Key Exchange Stem SPC
N61 Nylon Washer 8.0x15.0x3.0t
N63 Screw,Oval Tapping 3x7L
N64 Exchange Stem Spring SWP 0.4x6x27L
N70
Screw, Round Tapping 5x19L
N71 Flat Washer 6x19x1t
N72 Arc Washer 5.5x20x1.5t
N73
Safe Key Fixed Slice
SPC
Page 21

18
8.2) Parts List
>treadmill
MX-T5
NO. DESCRIPTION SPECIFICATION
P02
Switch Connecting Cable 100 12AWG (White)
P03 Console Extended Wire 1250(SMP-16V-BC+H6657R1-16)
P04
Power Socket (220V) 100+250+80 CE
P04 Power Socket (110V) SS-7B MATRIX T5
P05 Console Cable-USA Line
2130(IDC 7820-B500x2+1.58-1R F*END)3M
P05 Console Cable-Id Line 900(H6657R1-16+SMR-16V-B)
P06 Keyboard Connecting Cable 100 (FC-10PX2)28AWG
P07 Power Switch RF-1004
P07 Safety Key Cable 400(XAP-02V-1+PCB)
P08 Infrared Rays Shoot Cable Set 200 200(XAP-02V-1+PCB+LED)
P10 TV Signal Cable 3020 (RG-6)x2
P10 TV Signal Cable 3020 (RG-6)x2
P11 KSS Fix Jig HC-101(KSS)
P12 Exterior Power Cable 220v
P12 Exterior Power Cable 110v
P14 Handpulse Grip Cable 100+100(731X2+-JST-2P)
P15 Sensor Magnet 12x5t
P16 Speed Sensor (USA Line) 1300
P16 Speed Sensor-Id 1300
P16 Speed Sensor (USA Line) 1200+100+100(+XH2.5-2P+XAP-02V-1)
P17 TV Power Cable 3020 (SCD460+ZIAJ)
P18 C-Safe Signal Cable 450(RJ-45-8P+XAP-08V-1)
P19 Cardio Signal Cable 450(RJ-45-8P+XAP-08V-1)
P20 Ear Signal Cable 500
P21 Handpulse Connecting Cable 200(2510-3P+XAP-04V-1)
P23 Handpulse Winding Cable (200+300+100)(JST-2P)X2
P25 Power Socket Fixed Slice SPC
P26 Cable For Control Board (Black) 250 12AWG
P27 Cable For Control Board (White) 250 12AWG
P28 Led Connecting Wire-USA Line 140(FC-14P)x2
P28 Led Connecting Wire-Id Line 140(FC-16P+FC-16P)
P29 Interface Power Wire (220V) 300(250)
P30 Interface Connecting Wire
250+105(H6657R1-14+NUMBER PLATE)
P30 Interface Connecting Wire 250+105(H6657R1-14+NUMBER PLATE)
P31 Interface Power Wire (220V) 300(250)
P32 Earphone Extended Cable 60(3.5)
P34 Screw, Round Hex Socket M4x0.7Px10L
P37 Speed Sensor Bracket
P38 Screw, Plain Head M3x0.5Px10L
P39
Breaker (110V) ZE-700 20A/250V
P39 Breaker (220V) ZE-700 15A/250V
P46 Cable For Control Board (220V) 750 (250)x2
P47
Filter Gr
ound Wire (220V) 500(5.0 O+250)
NO. DESCRIPTION SPECIFICATION
P48
Filter Power Wire (220V) 500 (250)x2
P49 Filter Power Wire (220V) 500 (250)x2
P94
Hand Pulse Cable-USA Line 300,240(2695-6P+SMR-2V-Bx2)
P96 Hand Pulse Grip Cable-Id Line 1300(MDFNYD2-250-1+R1.25-5)
P96 Hand Pulse Grip Cable
150(MDFNYD2-250-1+R1.25-5+1.58-1P)
P98 Membrane Key Grounding Wire-Id Line 250+600+600+200+200
P98 Membrane Key Grounding Wire-Usa Line
1550(R1.25-3+2.5-2P+R1.25-5+R125-5)
Q01 Motor Upper Cover ABS
Q02 Motor Lower Cover ABS
Q03 Left Side Rail AL
Q04 Right Side Rail AL
Q05 Rear Cover Left AL
Q06 Rear Cover Right AL
Q07 Rear Foot Pad PVC
Q08 Left Side Pad
Q09 Right Side Pad
Q10 Motor Shelter Cover
Q12 Internal Handlebar Support Cover-LH ABS
Q13 Internal Handlebar Support Cover-RH ABS
Q14 External Handlebar Support Cover-LH ABS
Q15 External Handlebar Support Cover-RH ABS
Q16 Screw,Oval Hex Socket M6x1.0Px24L
Q17 Screw, Plain Hex Socket M8x1.25Px25L
Q18 Screw, Round Hex Socket M8x1.25Px40L
Q19 Screw,Oval Tapping 4x15L
Q20 Screw,Oval Tapping 5x12L
Q21 Super Sticker 50X50mm
Q22 Super Sticker Fixed Slice
Q23 Screw,Oval Tapping 4x15L
Q24 Screw,Oval Tapping 5x38L
Q26 C Clip WUSN-4039
Q27 Screw, Oval Head M4x0.7Px20L
R04 Ploy V Belt 300-J12
R05 Running Belt 554x3330x2.5t
R07 Screw, Round Hex Socket M10x1.75Px140L(BED)
R08 Screw, Round Hex Socket M10x1.5Px40L
R09 Spring Washer SW10 10.2x18.4x2.5t
R10 Flat Washer 12x23x2.5t
R11 Screw, Round Hex Socket M6x1.0Px35L
R12
Spring Washer SW10 10.2x18.4x2.5t
U03 Tension Wheel Bracket SPC
U04 Tension Wheel NYLON+G30%
U05
Ball Bearing
6203ZZ
Page 22

8.2) Parts List
19
>treadmill
MX-T5
NO. DESCRIPTION SPECIFICATION
U06
Screw,Oval Hex Socket M8x1.25Px12L
U08 Socket 23x17x6L
U09
Tension Wheel SS41
U15 Spring SWPA(3.0x23.13Nx72L)
U19 Screw, Round Hex Socket M6x1.0Px12L
U20 Hex Nut 1/4"-20UNC
U21 Eye Bolt 1/4"-20UNCx45L
U22 Support Axle SS41
U23 Flat Washer 6.2x16x2.0t
U24 Axle Bushing
U25 E-Type Clip E-12
V01 Voltage Decal AC100-120,50-60Hz
V02 Front Cover Decal
V04 Earthing Decal
V05 Side Rail Decal
V06 Console Decal (Matrix) POLY
X01 Carton Set T5
Z08 Screw Driver
Z09 T Type Wrench 8mm
Z10 T Type Wrench 5mm
Z11 Lubricator (Spray)
Z12 L-Key Wrench M5
Tv Bracket (Support European Tv)
Assembly Manual
Page 23

8.3) Assembly
Orange Package
Blue Package
Tool
C11 SCREW, ROUND HEAD (M5x8L) 2
N50 SCREW, OVAL HEX SOCKET (M5x12L) 6
G19
SCREW, OVAL HEX SOCKET (M5x12L) 8
Q23
SCREW, OVAL TAPPING (M4x15L) 10
Q27
SCREW, OVAL HEAD (M4x20L) 2
C09
SCREW, PLAIN-HEX-SOCKET (M8x25L) 8
C05
SCREW, OVAL HEX SOCKET (M8x15L) 4
C10
SCREW, FLAT HEX SOCKET (M8x20L) 8
Z08
CROSS DRIVER 1
Z09 T-TYPE WRENCH (M8) 1
Z10 T-TYPE WRENCH (M5) 1
Z11 L-TYPE HEX-WRENCH 1
FASTENERS AND ASSEMBLY TOOLS
REFERENCE SKETCH DESCRIPTION QUANTITY
C05
C09
C09
C05
N50
N50
G19
G19
N39
>treadmill
MX-T5
20
Page 24

8.3) Assembly Step 1
STEP 1
AN1
AC1
AC2
AC1
N50
CABLE SET
>treadmill
MX-T5
21
Page 25

8.3) Assembly Step 2
STEP 2
C06
C08
>treadmill
MX-T5
22
Page 26

8.3) Assembly Step 3
STEP 3
C10
>treadmill
MX-T5
23
Page 27

8.3) Assembly Step 4
C05
C09
STEP 4
C05
>treadmill
MX-T5
24
Page 28

8.3) Assembly Step 5
G19
G19
STEP 5
>treadmill
MX-T5
25
Page 29

8.3) Assembly Step 6
STEP 6
>treadmill
MX-T5
26
Page 30

MATRIX FITNESS SYSTEMS, INC.
1411 BROADWAY, NE ALBUQUERQUE, NM 87102
TOLL FREE 866.693.4863 F
AX
505.242.4725
www
.matrix-fitness.com
 Loading...