

Page 1

T 3 X - 0 3 T R E A D M I L L
S E R V I C E M A N U A L
Page 2

TABLE OF CONTENTS
CHAPTER 1: SERIAL NUMBER LOCATION ........................................................... 1
CHAPTER 2: IMPORTANT SAFETY INSTRUCTIONS
2.1 Before Getting Started ............................................................................................... 2
2.3 Read and Save These Instructions ............................................................................ 3
2.4 Electrical Requirements ............................................................................................. 4
CHAPTER 3: PREVENTATIVE MAINTENANCE
3.1 Recommended Cleaning Tips .................................................................................... 5
3.2 Check for Damaged Parts ......................................................................................... 5
3.3 Care and Maintenance Instructions ........................................................................... 6
3.4 Auto Calibration Procedure ......................................................................................... 7
3.5 Adjusting the Running Belt ........................................................................................ 7
3.6 Knowing When to Replace the Running Belt and Deck ............................................. 8
CHAPTER 4: USING THE CONSOLE AND PROGRAM DESCRIPTION
4.1 Console Description ................................................................................................... 9
4.2 Manual Workout Operation ......................................................................................... 10
4.3 Operating Level Based Programs .............................................................................. 10
4.4 Heart Rate Control Workout Operation ....................................................................... 11
4.5 Fitness Test Workout Operation .................................................................................. 11
CHAPTER 5: MANAGER MODE
5.1 Using Manager Mode ................................................................................................. 13
5.2 Manager Mode Overview ............................................................................................ 13
CHAPTER 6: ENGINEERING MODE
6.1 Using Engineering Mode ............................................................................................ 14
6.2 Engineering Mode Overview ....................................................................................... 14
CHAPTER 7: SERVICE MODE:
7.1 Using Service Mode. .................................................................................................. 15
7.2 Service Mode Overview ............................................................................................. 15
CHAPTER 8: TROUBLESHOOTING
8.1 Electrical Diagrams .................................................................................................... 16
8.2 MCB Wiring ................................................................................................................. 19
8.3 MCB LED Placement and Definitions ......................................................................... 20
8.4 Error Messages on the Console ................................................................................. 21
8.5 0140 / 01A0 Error Troubleshooting ............................................................................. 22
8.6 01A4 / 01A5 / 01A6 Error Troubleshooting ................................................................. 23
8.7 01A8 / 01AD / 02B6 / 02B7 / 02B8 Error Troubleshooting ......................................... 23
8.8 01AB Error Troubleshooting ........................................................................................ 24
8.9 02A0 Error Troubleshooting ........................................................................................ 25
8.10 02A1 / 02A2 Error Troubleshooting ............................................................................ 26
8.11 02AD Error Troubleshooting ....................................................................................... 26
8.12 02B5 Error Troubleshooting ........................................................................................ 27
8.13 02B3 / 02BA / 02BC / 02BD Error Troubleshooting .................................................... 28
8.14 04A0 Error Troubleshooting ........................................................................................ 28
8.15 Troubleshooting Heart Rate Issues............................................................................. 29
8.16 Entertainment Troubleshooting - Overview ................................................................. 30
8.17 Entertainment Troubleshooting - Picture Fuzzy or Unclear ........................................ 31
8.18 Entertainment Troubleshooting - TV Will Not Turn On ............................................... 32
8.19 Entertainment Troubleshooting - Controller Issues ..................................................... 33
Page 3

TABLE OF CONTENTS
CHAPTER 9: PART REPLACEMENT GUIDE
9.1 Motor Cover Replacement .......................................................................................... 34
9.2 Rear Roller Replacement ............................................................................................ 35
9.3 Running Deck Removal .............................................................................................. 36
9.4 Deck Cushion Replacement ....................................................................................... 37
9.5 Front Roller Replacement ........................................................................................... 38
9.6 Running Belt Removal ............................................................................................... 39
9.7 Side Rail Replacement ............................................................................................... 40
9.8 Motor Control Board (MCB) Replacement ................................................................. 41
9.9 Motor Replacement ..................................................................................................... 42
9.10 Drive Belt Replacement ............................................................................................. 44
9.11 Incline / Elevation Motor Replacement ....................................................................... 46
9.12 Console Replacement ................................................................................................... 48
9.13 Emergency Stop Switch Replacement ........................................................................... 49
9.14 Console Frame Replacement ..................................................................................... 51
9.15 Heart Rate Board Replacement .................................................................................. 52
9.16 Speed and Incline Keypads Replacement ................................................................. 53
9.17 Handlebar Replacement ............................................................................................ 54
9.18 Heart Rate Handlebar Replacement ........................................................................... 55
9.19 Heart Grips Replacement ........................................................................................... 56
9.20 Console Mast Replacement ........................................................................................ 57
9.21 Testing the Treadmill ................................................................................................... 58
CHAPTER 10: TREADMILL SPECIFICATIONS AND ASSEMBLY GUIDE
10.1 Treadmill Specifications .............................................................................................. 59
10.2 Fasteners and Assembly Tools ................................................................................... 60
10.3 Assembly Instructions ................................................................................................ 61
10.4 TV Bracket Installation Instructions ............................................................................. 65
CHAPTER 11: SOFTWARE UPGRADE INSTRUCTIONS
11.1 Software Upgrade Instructions .................................................................................... 68
III
Page 4
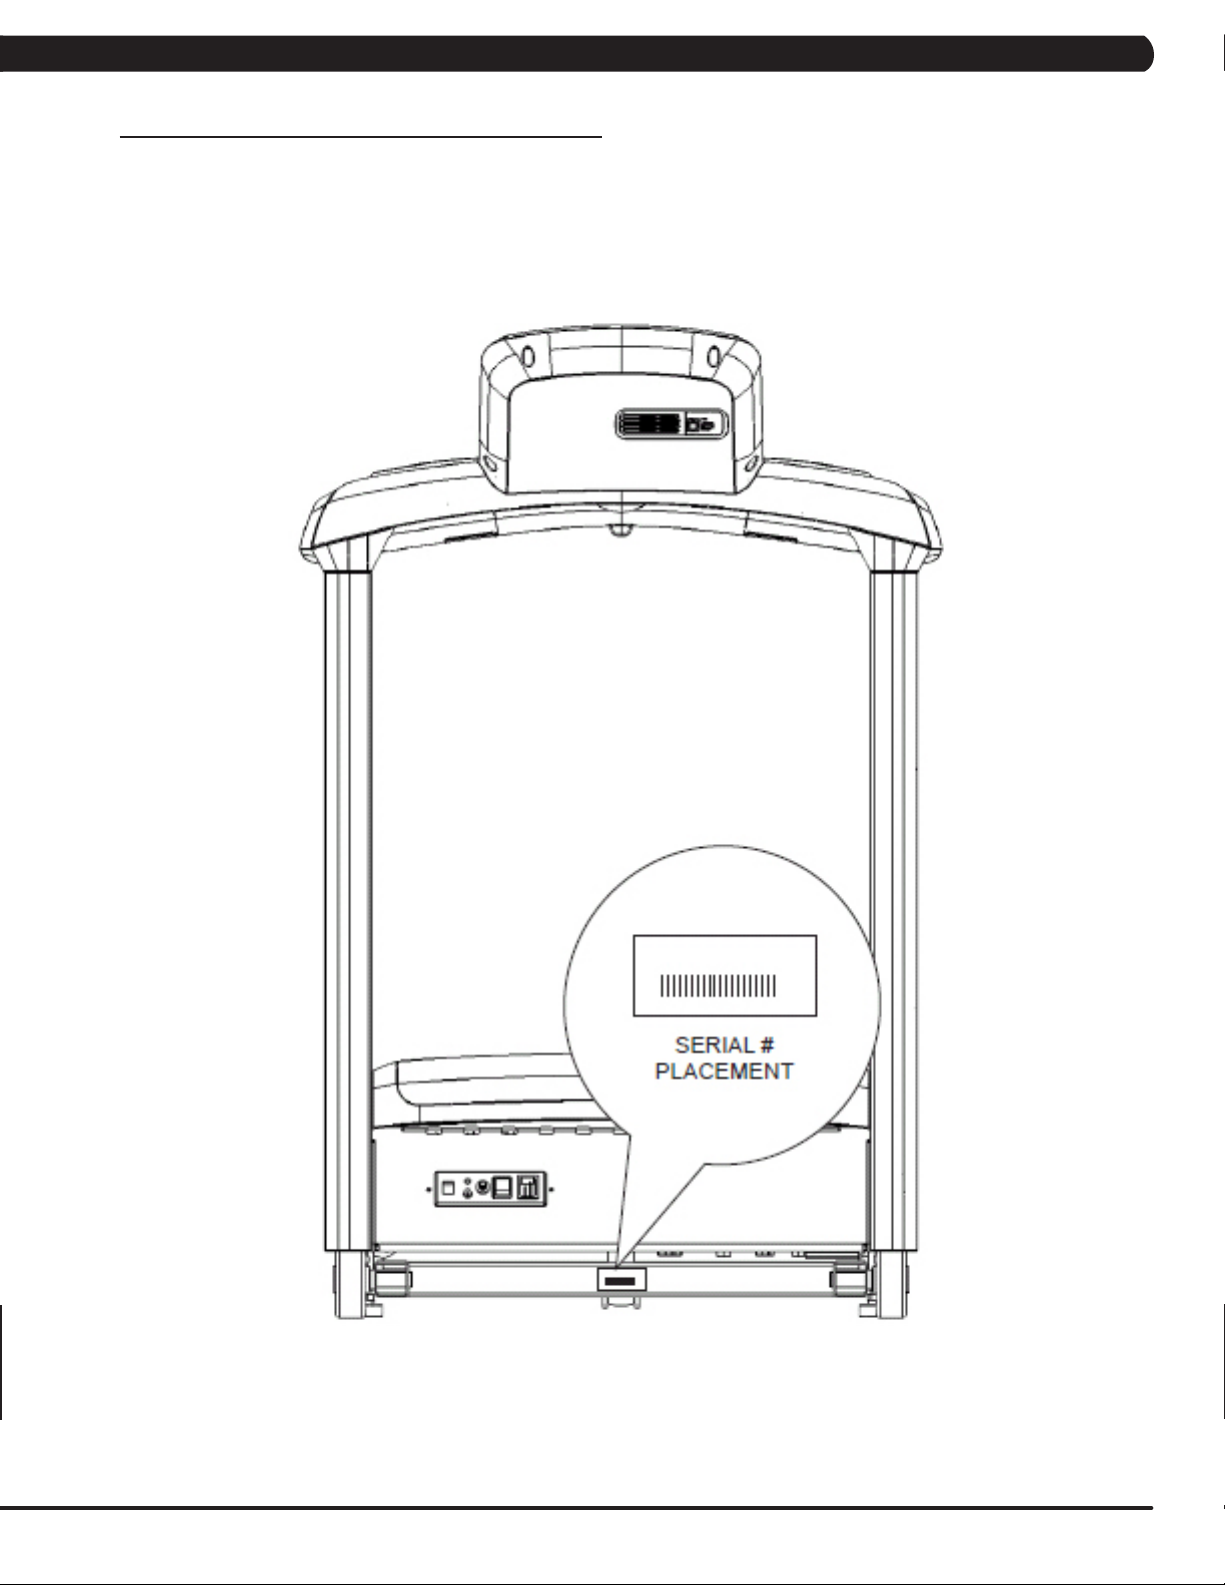
1.1 SERIAL NUMBER LOCATION
CHAPTER 1: SERIAL NUMBER LOCATION
1
Page 5
CHAPTER 2: IMPORTANT SAFETY INSTRUCTIONS
2.1 BEFORE GETTING STARTED
This treadmill is intended for commercial use. To ensure your safety and protect the equipment, read all instructions before operating the Matrix
Treadmill.
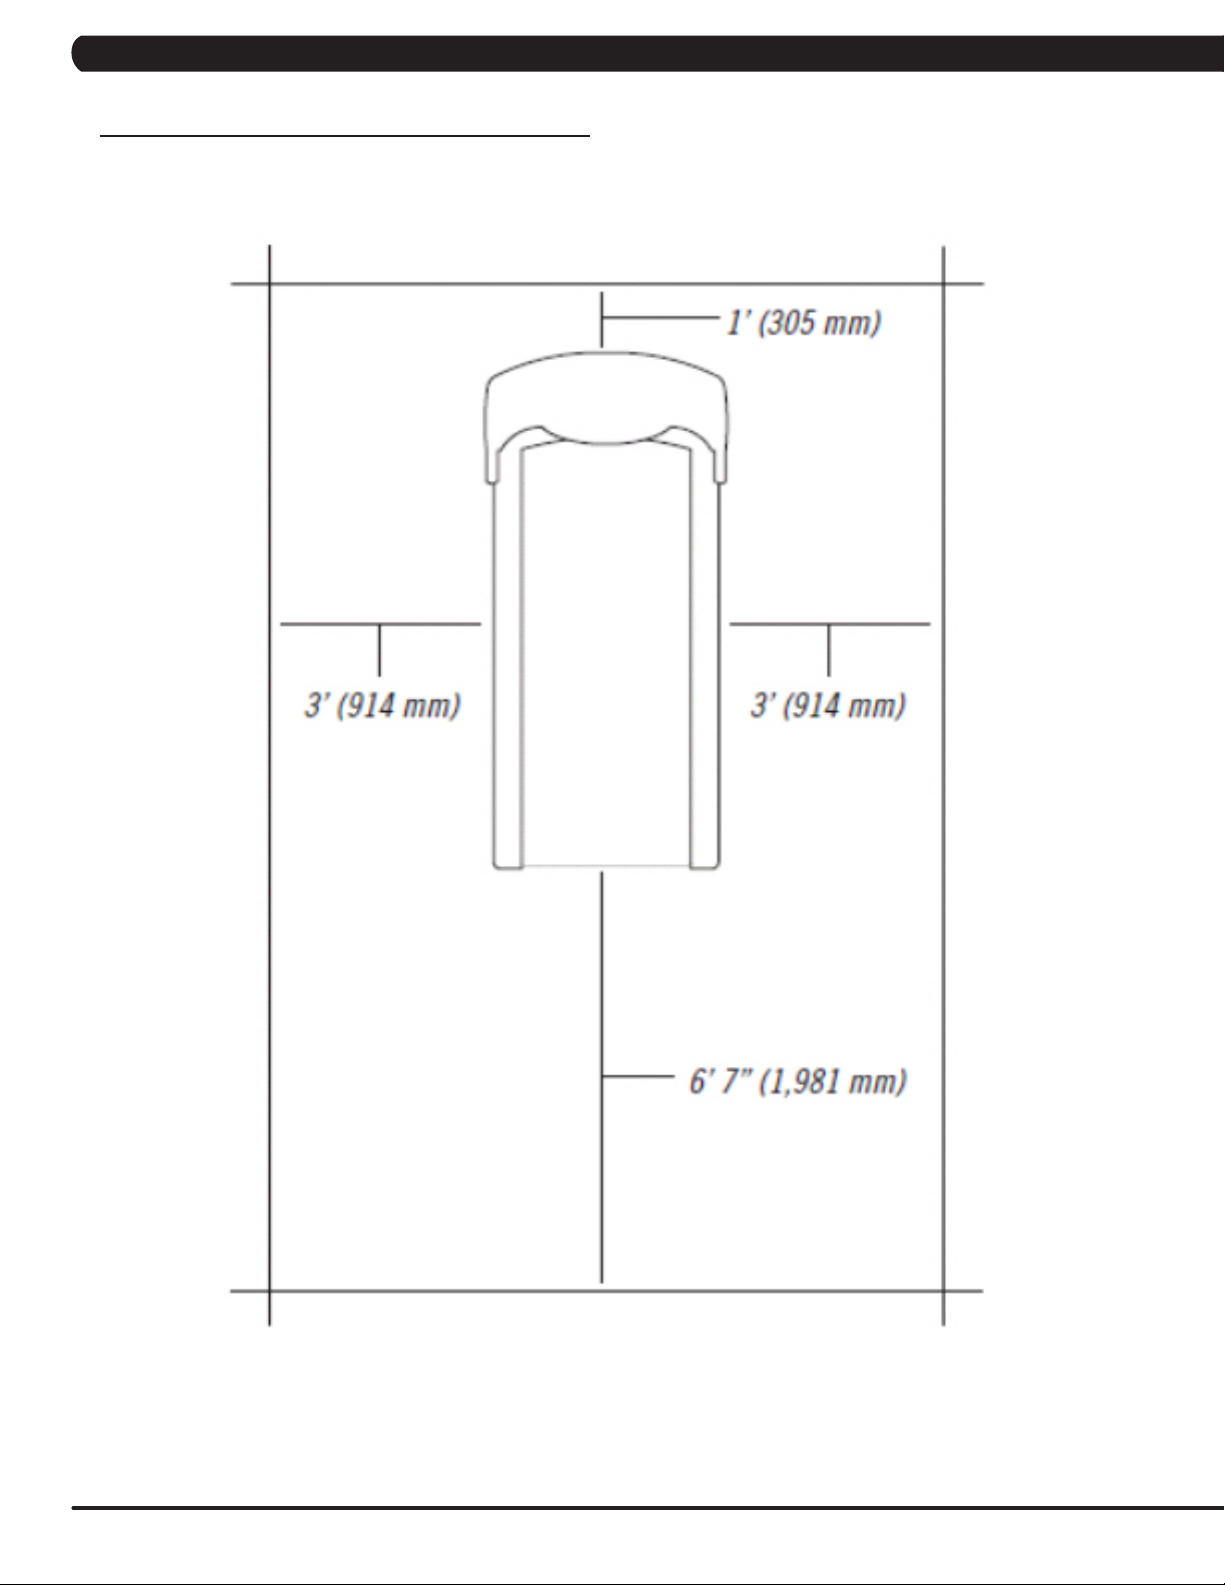
Please leave a 78.75" (2000 mm) x 39.50" (1000 mm) landing zone behind the treadmill. This zone is to allow easy access to the treadmill and
gives the user an easy exit path from the machine. In case of an emergency, place both hands on the side arm rests to hold yourself up and
place your feet onto the side rails.
2
Page 6

CHAPTER 2: IMPORTANT SAFETY INSTRUCTIONS
2.2 READ AND SAVE THESE INSTRUCTIONS
This treadmill is intended for commercial use. To ensure your
safety and protect the equipment, read all instructions before
operating the MATRIX T3x-03 treadmill.
When using an electrical product, basic precautions should always
be followed including the following:
DANGER: To reduce the risk of electric shock: Always unplug
this equipment from the electrical outlet immediately after
using and before cleaning.
WARNING: To reduce the risk of burns, fire, electrical shock
or injury to persons that may be associated with using this
product.
An appliance should never be left unattended when plugged in.
Unplug from the outlet when not in use and before putting on or taking off parts.
This product must be used for its intended purpose described in this
service manual. Do not use other attachments that are not recommended by the manufacturer. Attachments may cause injury.
To prevent electrical shock, never drop or insert any object into any
opening.
Do not remove the console covers. Service should only be done by
an authorized service technician.
Never operate the treadmill with the air opening blocked. Keep the
air opening clear, free of lint and hair.
Never operate product if it has a damaged cord or plug, if it is working improperly, if it has been damaged, or immersed in water.
CAUTION: If you experience chest pain, nausea, dizziness or
shortness of breath, STOP exercising immediately and consult a physician before continuing.
• Donotusetheequipmentinanywayotherthandesignedor
intended by the manufacturer. It is imperative that all Matrix
Fitness System's equipment is used properly to avoid injury.
• Keephandsandfeetclearofmovingpartsatalltimestoavoid
injury.
• Unsupervisedchildrenmustbekeptawayfromthisequipment.
• Donotwearlooseclothingwhileonequipment.
Do not carry this unit by its supply cord or use the cord as a handle.
Keep any power cord away from heated surfaces.
Close supervision is necessary when the treadmill is used by or near
children or disabled persons.
Do not use outdoors.
Do not operate where aerosol (spray) products are being used or
when oxygen is being administered.
To disconnect, turn all controls to the off position, then remove plug
from the outlet.
Connect this treadmill to properly grounded outlets only.
3
Page 7
CHAPTER 2: IMPORTANT SAFETY INSTRUCTIONS
2.3 ELECTRICAL REQUIREMENTS
For your safety and to ensure good treadmill performance, the ground on this circuit must be non-looped. Please refer to NEC articles 210-21 and 210-23.
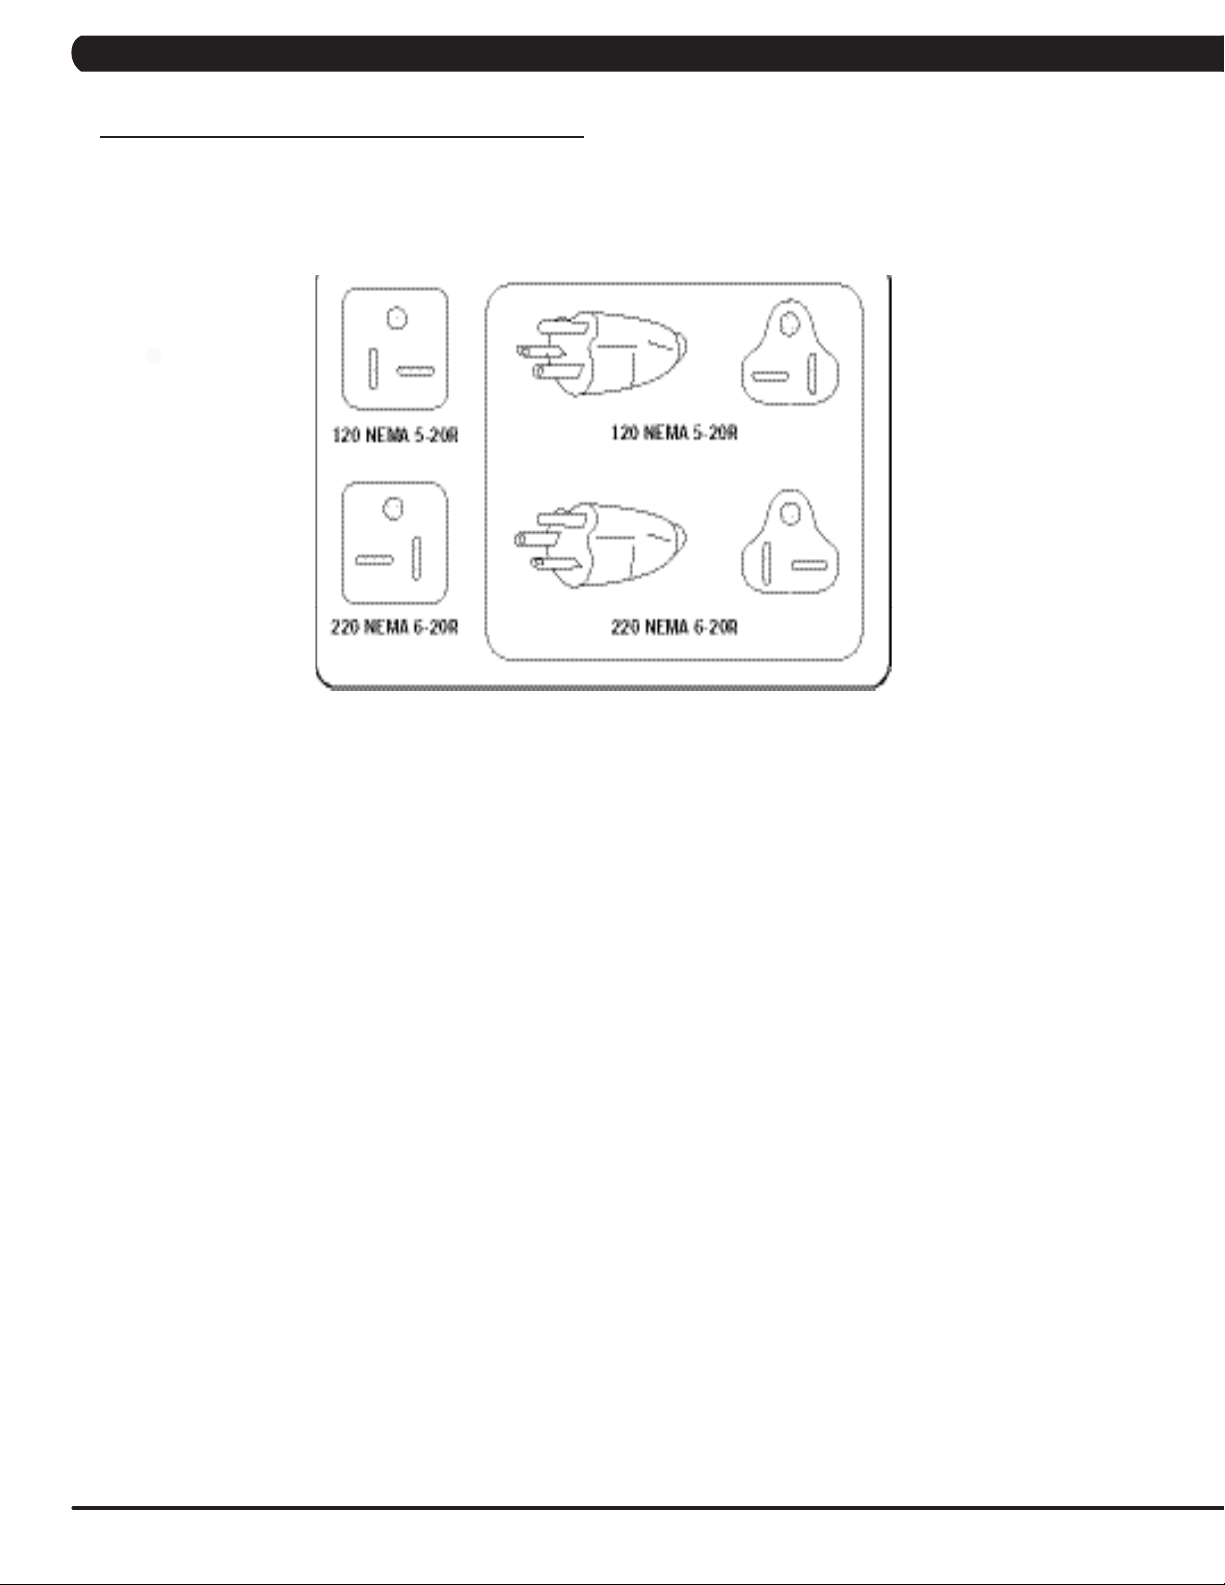
Your treadmill is provided with a power cord with a plug listed below and requires the listed outlet. Any alterations of this power cord could void all warranties
of this product..
MATRIX DEDICATED CIRCUIT / ELECTRICAL REQUIREMENT INFO
All Matrix treadmills require the use of a 20 amp "dedicated circuit" with a non-looped (isolated) neutral / ground for the power requirement.
Quite simply this means that each outlet you plug your treadmill into should not have anything else running on that same circuit. The easiest
way to verify this is to locate the main circuit breaker box, and turn off the breaker(s) one at a time. Once a breaker has been turned off, the
only thing that should not have power to it is the treadmill. No lamps, vending machines, fans, sound systems, or any other item should lose
power when you perform this test.
Non-looped (isolated) neutral / grounding means that each circuit must have an individual neutral / ground connection coming from it, and
terminating at an approved earth ground. You cannot "jumper" a single neutral / ground from one circuit to the next.
In addition to the dedicated circuit requirement, the proper gauge wire must be used from the circuit breaker box, to each outlet that will have
the maximum number of units running off of it. If the distance from the circuit breaker box, to each outlet, is 100 feet or less, then 12 gauge
wire may be used. For any distance greater than 100 feet from the circuit breaker box to the outlet, 10 gauge wire must be used.
TV POWER REQUIREMENTS
If a TV will be added to the treadmill via a bracket, separate power must be provided for the TV. Matrix MYE TVs require the use of a 15 amp
or 20 amp “dedicated circuit,” with a non-looped (isolated) neutral/ground, for the power requirement. Up to 3 TVs can be daisy chained per 15
amp circuit or 4 per 20 amp circuit via a Matrix provided daisy chain.
4
Page 8

CHAPTER 3: PREVENTATIVE MAINTENANCE
3.1 RECOMMENDED CLEANING TIPS
Preventative maintenance and daily cleaning will prolong the life and
look of your MATRIX T3x-03 Treadmill.
Please read and follow these tips.
• Positiontheequipmentawayfromdirectsunlight.TheintenseUV
light can cause discoloration on plastics.
• Locateyourequipmentinanareawithcooltemperaturesand
low humidity.
• Cleanwithasoft100%cottoncloth.
• Cleanwithsoapandwaterorothernon-ammoniabasedallpur-
pose cleaners.
• Wipefootrails,console,heartrategrips,andhandlebarsclean
after each use.
• Donotpourliquidsdirectlyontoyourequipment.Thiscancause
damage to the equipment and in some cases electrocution.
• Checktherunningbeltforpropertensionandrouting.
• Adjustthelevelingfeetwhenequipmentwobblesorrocks.
• Maintainacleanareaaroundequipment,freefromdustanddirt.
3.2 CHECK FOR DAMAGED PARTS
DO NOT use any equipment that is damaged or has worn or
broken parts. Use only replacement parts supplied by Matrix
Fitness Systems.
MAINTAIN LABELS AND NAMEPLATES. Do not remove labels
for any reason. They contain important information. If unreadable
or missing, contact Matrix Fitness Systems for a replacement at
866-693-4863 or www.matrixfitness.com.
MAINTAIN ALL EQUIPMENT. Preventative maintenance is the
key to smoothly operating equipment. Equipment needs to be
inspected at regular intervals. Defective components must be
kept out of use until they are repaired. Ensure that any person(s)
making adjustments or performing maintenance or repair of any
kind is qualified to do so. Matrix Fitness Systems will provide
service and maintenance training at our corporate facility upon
request or in the field if proper arrangements are made.
5
Page 9

CHAPTER 3: PREVENTATIVE MAINTENANCE
3.3 CARE AND MAINTENANCE INSTRUCTIONS
In order to maximize life span, and minimize down time, all Matrix Fitness System's equipment requires regular cleaning, and maintenance items
performed on a scheduled basis. This section contains detailed instructions on how to perform these items and the frequency of which they
should be done. Some basic tools and supplies will be necessary to perform these tasks which include (but may not be limited to):
* Metric Allen wrenches
* #2 Phillips head screwdriver
* Adjustable wrench
* Torque wrench (capability to read foot lbs and inch lbs)
* Lint free cleaning cloths
* Teflon based spray lubricant such as "Super Lube" or other Matrix approved products.
* Mild water soluble detergent such as "Simple Green" or other Matrix approved products
* Vacuum cleaner with an extendable hose and crevasse tool attachment.
You may periodically see addendums to this document, as the Matrix Technical Support Team identifies items that require specific attention, the
latest version will always be available on the Matrix web site at www.matrixfitness.com.
DAILY MAINTENANCE ITEMS
1) Clean the entire machine using water and mild detergent such as "Simple Green", or other Matrix approved solutions (cleaning agents MUST
be alcohol and ammonia free).
2) Check the emergency stop button and cord for proper operation.
MONTHLY MAINTENANCE ITEMS
1) Inspect the power cord for damage, inspect the hand grip areas, and inspect the emergency stop button and cord for proper operation.
2) Check the running belt for proper tension, adjust as needed.
QUARTERLY MAINTENANCE ITEMS
1) Remove the front plastic cover, and vacuum the entire inside area of machine. Be careful when working around the MCB not to bump any
wires or connections loose.
2) Check the drive belt for visible wear, ie, cracking, tears, etc. The belt should be replaced if there are any visible signs of damage. Proper
alignment of the pulley / tensioner should be verified at this time as well.
3) Remove the motor cover at the front of the machine. Start the unit and raise the incline settings to maximum height. Turn the power switch
off at the front of the machine to prevent it from lowering accidentally. Lubricate the incline motor Acme screw (Matrix recommends Super Lube
brand grease with PTFE additive).
BI-ANNUAL MAINTENANCE ITEMS
1) Remove any wax build up from the front and rear rollers of the machine.
2) Inspect the underside of the running belt for damage, check for cracking or glazed surfaces.
3) If the belt has damage or wear to it that warrants replacement, note that a new running belt should ALWAYS be installed on a new deck
surface (deck should either be flipped or replaced to gain a new surface).
4) During normal operating conditions, the running belt replacement and deck service should be done every 15,000 miles.
6
Page 10

CHAPTER 3: PREVENTATIVE MAINTENANCE
3.4 AUTO CALIBRATION INSTRUCTIONS
Run Auto Calibration to calibrate incline after assembly and after
replacing any electronic component.
AUTO CALIBRATION PROCEDURE:
1) Press and hold the INCLINE DOWN and SPEED DOWN keys for
three seconds until Manager appears on the middle LED display.
2) Press the SPEED or INCLINE UP key until Engineering appears on
the display.
3) Press ENTER once Engineering is displayed.
4) Scroll between programs in the Engineering Mode using any UP or
DOWN key until Auto Calibration appears on the middle LED display.
5) Press ENTER once Auto Calibration is displayed., you should not
be standing on the running belt.
6) After completion, the display will either return to normal operation (if
the unit passed the Auto Calibration) or display that the Auto Calibration
failed.
3.5 ADJUSTING THE RUNNING BELT
After placing the treadmill in the position it will be used, the belt
must be checked for proper tension and centering. The belt may
need to be adjusted after the first 2 hours of use. Temperature,
humidity, and use cause the belt to stretch at different rates. If
the belt starts to slip when a user is on it, be sure to follow the
directions below.
STEP 1: Locate the two hex head bolts on the rear of the treadmill.
The bolts are located at each end of the frame at the back of the
treadmill. These bolts adjust the rear roller. Do not adjust until the
treadmill is on. This will prevent over tightening of one side.
STEP 2: The belt should have equal distance on either side
between the frame. If the belt is touching one side, do not start
the treadmill. Turn the bolts counter clockwise approximately one
full turn on each side. Manually center the belt by pushing the belt
from side to side. Tighten the bolts the same amount as when the
user loosened them, approximately one full turn. Inspect the belt
for damage.
STEP 3: While the treadmill is running at 3 mph, observe the belt
position. If it is moving to the right, tighten the right bolt by turning
it clockwise 1/4 turn, and loosen the left bolt 1/4 turn. If it is moving
to the left, tighten the left bolt by turning it clockwise 1/4 turn and
loosen the right 1/4 turn. Repeat Step 3 until the belt remains
centered for several minutes.
STEP 4: Check the tension of the belt. The belt should be very
snug. When a person walks or runs on the belt, it should not
hesitate or slip. If this occurs, tighten the belt by turning both bolts
clockwise 1/4 turn. Repeat if necessary.
7
Page 11

CHAPTER 3: PREVENTATIVE MAINTENANCE
3.6 KNOWING WHEN TO REPLACE THE RUNNING BELT AND DECK
One of the most common wear and tear items on a treadmill is the deck and belt combination. If these two items are not properly maintained,
they can cause damage to other components. Always keep your deck and belt free of dirt and dust by wiping the edges of the belt and deck and
up to 2" under the belt with a clean dry cloth.
To tell if your deck and belt combination needs to be replaced:
1) Have someone between 150-200lbs run on the treadmill at about 3 MPH.
2) Use a multi - meter to measure the amp draw with the user running. During normal use, the amp draw should be close to 5 amps. If the amp
draw is significantly higher than 5 amps, replace the belt and / or flip / replace the running deck.
8
Page 12
CHAPTER 4: CONSOLE OVERLAY AND WORKOUT DESCRIPTION
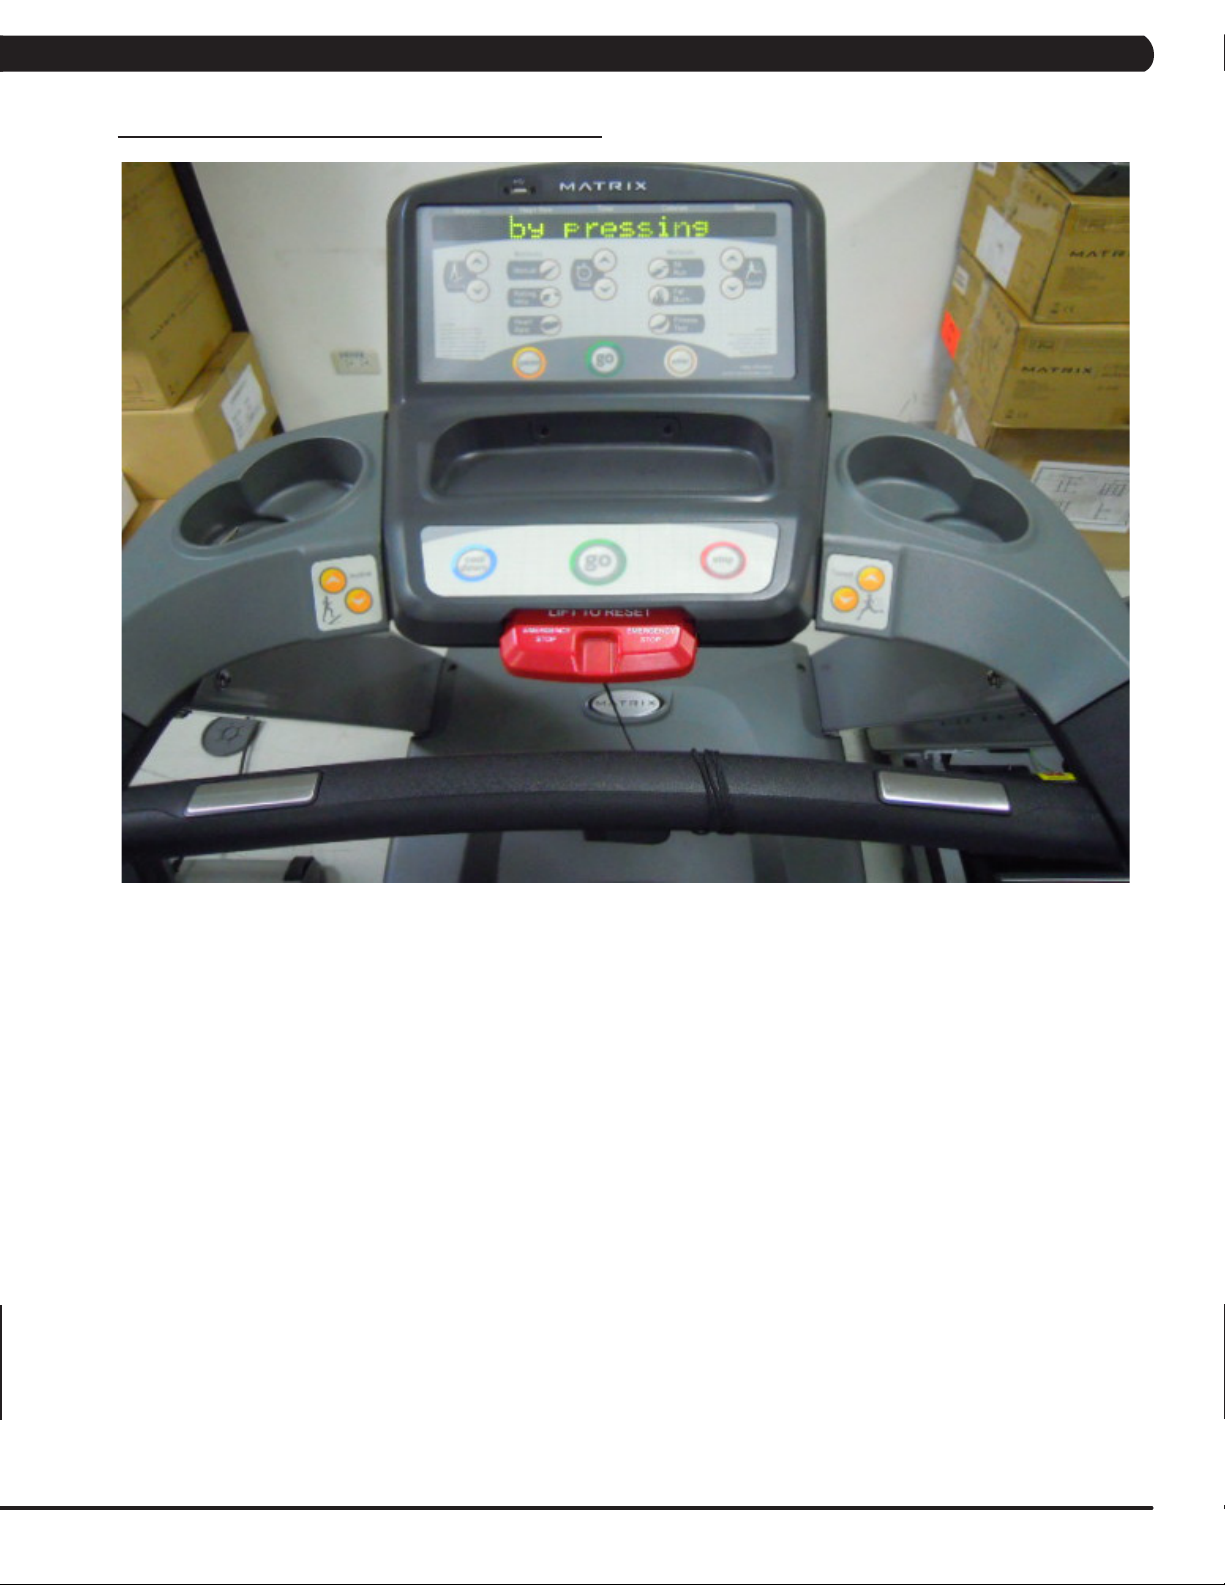
4.1 T3X-03 CONSOLE DESCRIPTION
WORKOUT KEYS: Simple program view and selection buttons.
GO: One touch Start and Quick Start.
ENTER: To confirm each program setting.
UP / DOWN INCLINE: Easy information and incline selection.
UP / DOWN SPEED: Easy information and speed selection.
EMERGENCY STOP / IMMOBILIZATION: To stop all functions and immobilize the unit. The emergency stop on this treadmill must be returned
to its original position in order to allow normal operation of the unit.
STOP: Ends workout and shows workout summary data.
PAUSE: Pauses workout. Pause duration can be set in Manager Mode.
COOL DOWN: Puts treadmill into Cool Down mode. Cool Down time is dependent on the length of the workout. Workouts 19 minutes and
shorter will have a cool down length of 2 minutes. Workouts 20 minutes and longer will have a cool down length of 5 minutes.
9
Page 13

CHAPTER 4: CONSOLE OVERLAY AND WORKOUT DESCRIPTION
4.2 MANUAL WORKOUT OPERATION
QUICK START OPERATION
Press the GO button(s) and the treadmill will enter into a manual mode of operation. All energy expenditure values will be calculated using the
default weight measurement.
MANUAL WORKOUT OPERATION
Manual is a workout that allows you to manually adjust the speed and incline values at anytime. The manual workout also contains a setup
screen which allows you to input your weight to help calculate a more accurate caloric burn rate.
To enter into this Manual Workout:
1) Choose the Manual Workout by selecting the MANUAL WORKOUT button and press ENTER.
2) Enter the desired workout length using the INCLINE or SPEED KEYS and press ENTER.
3) Enter the user's weight (the user's weight is used to calculate the caloric expenditure value-providing an accurate weight helps to ensure an
accurate caloric expenditure rating for each user) using the INCLINE or SPEED KEYS and press ENTER.
4) Enter the desired initial incline value using the INCLINE or SPEED KEYS and press ENTER.
5) Enter the desired start speed using the INCLINE or SPEED KEYS and press ENTER.
6) Press GO to begin the workout. The display will read 3, 2, 1, and then the workout will begin.
4.3 LEVEL BASED WORKOUT OPERATION
Your Matrix T3x-03 Treadmill offers a variety of level-based workouts to challenge users of all fitness levels. The following information will briefly
explain the workouts and how to program the treadmill for each workout selection.
ROLLING HILLS WORKOUT OPERATION
Rolling Hills is a level based workout that automatically adjusts the incline value to simulate walking or running up hills.
1) Choose the Rolling Hills workout by selecting the ROLLING HILLS workout button and press ENTER.
2) Enter the desired intensity using the INCLINE or SPEED KEYS and press ENTER.
3) Enter the desired workout length using the INCLINE or SPEED KEYS and press ENTER.
4) Enter the user's weight (the user's weight is used to calculate the caloric expenditure value, providing an accurate weight helps to ensure an
accurate caloric expenditure rating for each user) using the INCLINE or SPEED KEYS and press ENTER.
5) Press GO to begin the workout. The display will read 3, 2, 1, and then the workout will begin.
FAT BURN WORKOUT OPERATION
Fat Burn is a level-based workout that is designed to help users burn fat through various incline changes.
1) Choose the Fat Burn workout by selecting the FAT BURN workout button and press ENTER.
2) Enter the desired intensity level using the INCLINE or SPEED KEYS and press ENTER.
3) Enter the desired workout length using the INCLINE or SPEED KEYS and press ENTER.
4) Enter the user's weight (the user's weight is used to calculate the caloric expenditure value, providing an accurate weight helps to ensure an
accurate caloric expenditure rating for each user) using the INCLINE or SPEED KEYS and press ENTER.
5) Press GO to begin the workout. The display will read 3, 2, 1, and then the workout will begin.
5K RUN WORKOUT OPERATION
10
5K Run is a level-based workout with a fixed distance of 5 kilometers. Incline is adjusted automatically throughout the workout. You control the
speed.
1) Choose the 5K Run workout by selecting the 5K RUN workout button and press ENTER.
2) Enter the desired intensity level using the INCLINE or SPEED KEYS and press ENTER.
3) Enter the user's weight (the user's weight is used to calculate the caloric expenditure value, providing an accurate weight helps to ensure an
accurate caloric expenditure rating for each user) using the INCLINE or SPEED KEYS and press ENTER.
4) Press GO to begin the workout. The display will read 3, 2, 1, and then the workout will begin.
Page 14
CHAPTER 4: CONSOLE OVERLAY AND WORKOUT DESCRIPTION
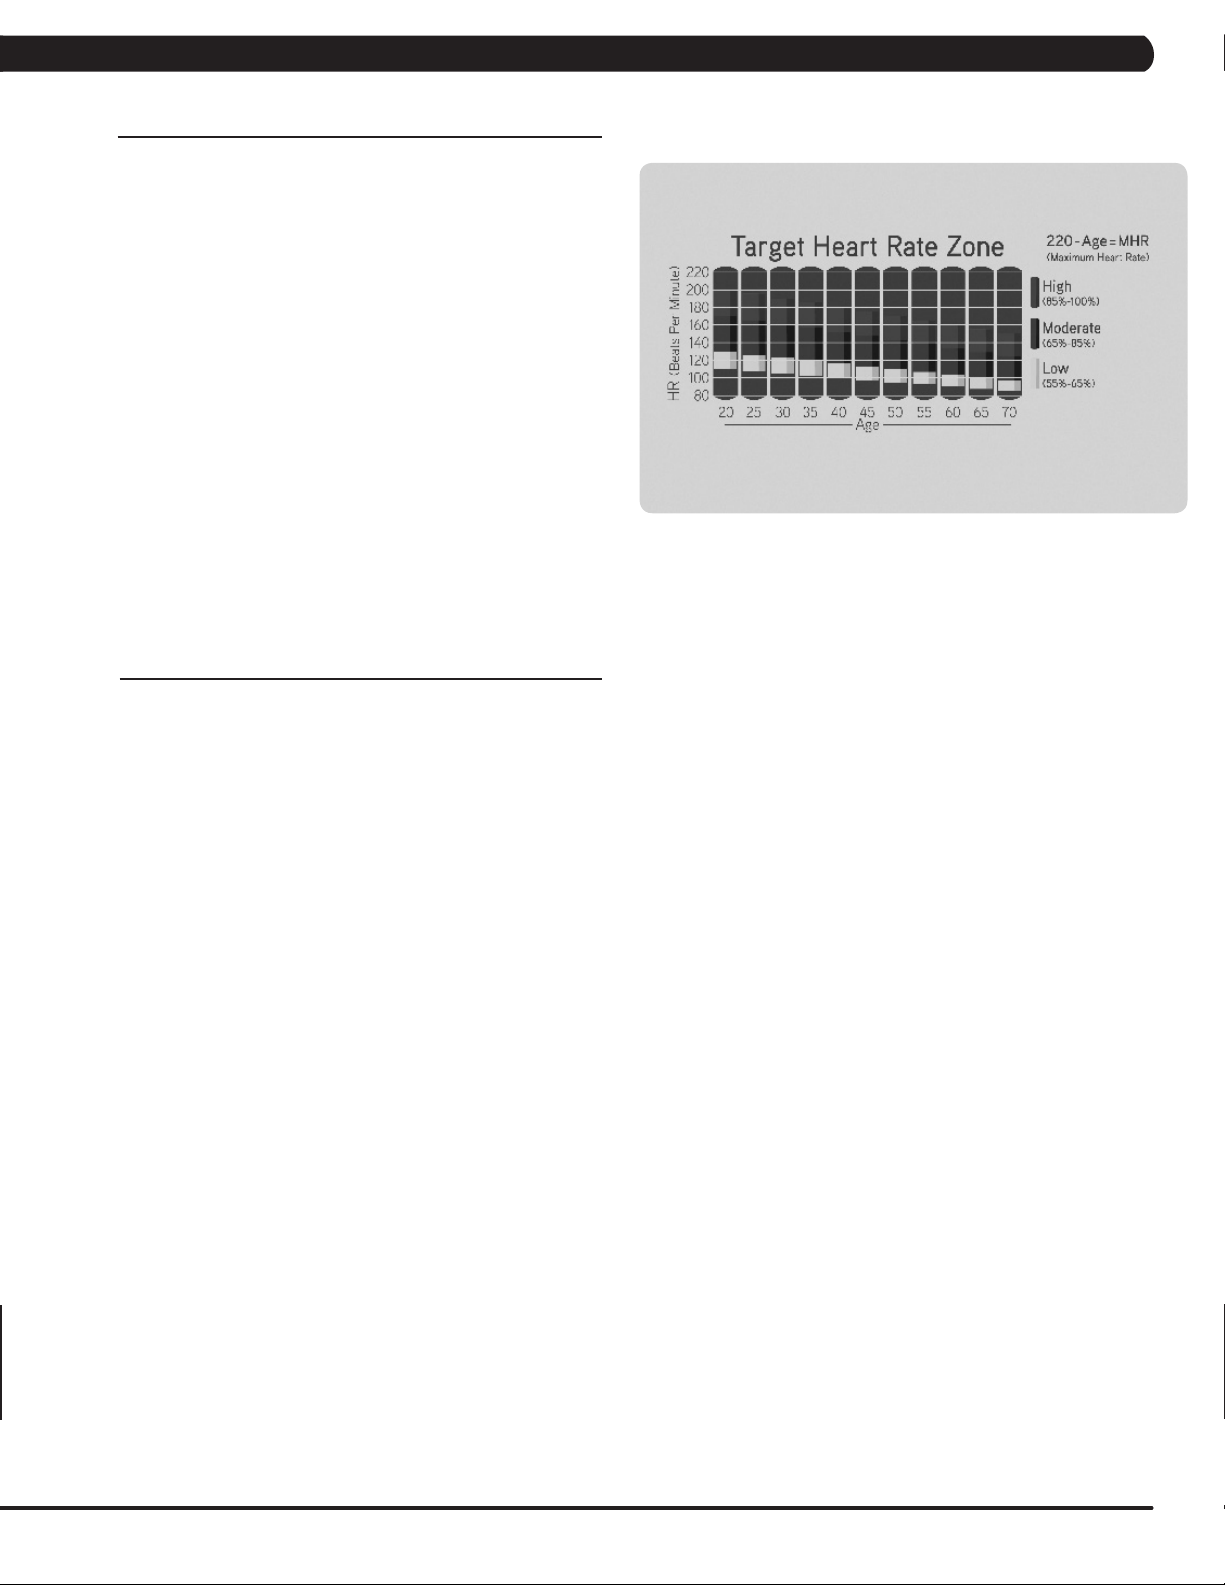
4.4 HEART RATE CONTROL WORKOUT OPERATION
Your Matrix T3x-03 Treadmill offers a heart rate control workout
mode. The heart rate control workout mode allows the user to
program their desired heart rate zone and maximum allowable
incline and the treadmill will automatically adjust the incline based
upon the user's heart rate. The heart rate zone is calculated using
thefollowingequation:(220-Age)*%=targetheartratezone.The
user must wear a telemetric heart rate monitor or continually hold
onto the contact heart rate grips for his workout.
1) Choose the Target Heart Rate workout by selecting the HEART
RATE workout button and press ENTER.
2) Enter the user's age using the INCLINE or SPEED KEYS and
press ENTER.
3) Enter the desired percent of maximum heart rate using the
INCLINE or SPEED KEYS and press ENTER.
4) Enter the user's weight (the user's weight is used to calculate
the caloric expenditure value, providing an accurate weight helps to
ensure an accurate caloric expenditure rating for each user) using
the INCLINE or SPEED KEYS and press ENTER.
5) Press GO to begin the workout. The display will read 3, 2, 1,
and then the workout will begin.
4.5 FITNESS TEST WORKOUT OPERATION
Your Matrix T3x-03 Treadmill offers a Gerkin Firefighter Protocol Fitness Test, The Gerkin Protocol was developed by Dr.. Richard Gerkin of the
Phoenix (Arizona) Fire Department. It is a sub-maximal graded treadmill evaluation used by many fire departments across the United States to
assess the physical condition of the firefighters. The test requires constant monitoring of the user's heart rate so the use of a telemetric chest
strap is highly encouraged. The workout operates as follows:
WARM UP:Thewarmupis3minuteslongandrunsat3.0mph(4.8kph)and0%incline.
STAGE 1: At the 3 minute mark, the treadmill will gradually increase speed to 4.5 mph (7.2 kph). The actual test begins at 4.5 mph (7.2 kph).
STAGE 2:Afteroneminute,thetreadmillinclinewillincreaseto2%.
STAGE 3: After one minute, the treadmill speed increases to 5.0 mph (8.0 kph).
STAGES 4 THROUGH 11:Aftereveryoddminutethetreadmillinclinewillincreaseby2%.Aftereveryevenminutethetreadmillspeedwill
increaseby0.5mph(0.8kph).Oncetheuser'sheartrateexceedsthetargetheartrate(85%ofmaximumasdeterminedbytheequation
(220-Age)*%=targetheartratezone),theindividualcontinuestheevaluationforanadditional15seconds.Duringthe15secondperiod,the
evaluation remains at the stage where the target heart rate is exceeded, without any change to speed or incline. If the heart rate does not
return to or below the target heart rate, the evaluation ends and the final evaluation stage is recorded. If the heart rate returns to or below the
target heart rate, the program continues at the point where it would have been had the program not stabilized for 15 seconds.
TEST COMPLETION: The test is completed when user's heart rate exceeds the target for more than 15 seconds or when the user completes
all11stages,whicheveroccursfirst.Thetreadmillwillenteracooldowncyclefor3minutesat3.0mph(4.8kph),0%incline.
1) Choose the Gerkin Test by pressing the FITNESS TEST workout button and press ENTER.
2) Enter the user's age using the INCLINE or SPEED KEYS and press ENTER.
3)Themessagewindowwilldisplayyourtargetheartratebaseduponyourageandthetargetheartratezoneof85%.
4) Select the user's gender using the INCLINE or SPEED KEYS and press ENTER.
5) Enter the user's weight (the user's weight is used to calculate the caloric expenditure value, providing an accurate weight helps to ensure an
accurate caloric expenditure rating for each user) using the INCLINE or SPEED KEYS and press ENTER.
6)Themessagewindowwillnotifytheuserthatthestartspeedis3.0mph(4.8kph)and0%inclineduringthewarm-up.
7) Press GO to begin the workout. The display will read 3, 2, 1, and the workout will begin.
11
Page 15
CHAPTER 4: CONSOLE OVERLAY AND WORKOUT DESCRIPTION
4.5 FITNESS TEST WORKOUT OPERATION - CONTINUED
SUB MAXIMAL TREADMILL EVALUATION
CONVERSION TABLE
Stage Time Converted VO2max
1 1:00 31.15
2.1 1:15 32.55
2.2 1:30 33.6
2.3 1:45 34.65
2.4 2:00 35.35
3.1 2:15 37.45
3.2 2:30 39.55
3.3 2:45 41.3
3.4 3:00 43.4
4.1 3:15 44.1
4.2 3:30 45.15
4.3 3:45 46.2
4.4 4:00 47.5
5.1 4:15 48.6
5.2 4:30 50
5.3 4:45 51.4
5.4 5:00 52.8
6.1 5:15 53.9
6.2 5:30 54.9
6.3 5:45 56
6.4 6:00 57
7.1 6:15 57.7
7.2 6:30 58.8
7.3 6:45 60.2
7.4 7:00 61.2
8.1 7:15 62.3
8.2 7:30 63.3
8.3 7:45 64
8.4 8:00 65
9.1 8:15 66.5
9.2 8:30 68.2
9.3 8:45 69
9.4 9:00 70.7
10.1 9:15 72.1
10.2 9:30 73.1
10.3 9:45 73.8
10.4 10:00 74.9
11.1 10:15 76.3
11.2 10:30 77.7
11.3 10:45 79.1
11.4 11:00 80
CARDIOVASCULAR FITNESS PERCENTILES
Males: VO2 max (ml/kg/min)
0-29 30-39 40-49 50-59
SUPERIOR
EXCEL-
LENT
GOOD
FAIR
POOR
VERY
POOR
Females: VO2 max (ml/kg/min)
SUPERIOR
EXCEL-
LENT
GOOD
FAIR
POOR
VERY
POOR
>58.8 >58.9 >55.4 >52.5
54.0 52.5 50.4 47.1
51.4 50.3 48.2 45.3
48.2 46.8 44.1 41.0
46.8 44.6 41.8 38.5
44.2 42.4 39.9 36.7
42.5 41.0 38.1 35.2
41.0 38.9 36.7 33.8
39.5 37.4 35.1 32.3
37.1 35.4 33.0 30.2
34.5 32.5 30.9 28.0
31.6 30.9 28.3 25.1
20-29 30-39 40-49 50-59
>53.0 >48.7 >46.8 >42.0
46.8 43.9 41.0 36.8
44.2 41.0 39.5 35.2
41.0 38.6 36.3 32.3
38.1 36.7 33.8 30.9
36.7 34.6 32.3 29.4
35.2 33.8 30.9 28.2
33.8 32.3 29.5 26.9
32.3 30.5 28.3 25.5
30.6 28.7 26.5 24.3
28.3 26.5 25.1 22.3
25.9 25.1 23.5 21.1
12
The Military Test programs and the Physical Efficiency Battery (PEB) provide workouts of a preset distance. These distances are established by
the various branches of the Military with the objective of each test to complete the distance as quickly as possible. At the completion of the test,
a time-based score as defined by the respective Military branch will be shown on the console.
1) Choose your Military Test by pressing the FITNESS TEST button until the desired test is shown on the screen.
2) Enter the user's age using the INCLINE or SPEED KEYS and press ENTER.
3) Select the user's gender using the INCLINE or SPEED KEYS and press ENTER.
4) Enter the user's weight (the user's weight is used to calculate the caloric expenditure value, providing an accurate weight helps to ensure an
accurate caloric expenditure rating for each user) using the INCLINE or SPEED KEYS and press ENTER.
5) Enter the desired intensity level using the INCLINE or SPEED KEYS and press ENTER.
6) Press GO to begin the workout. The display will read 3, 2, 1, and the workout will begin.
Page 16
CHAPTER 5: MANAGER MODE
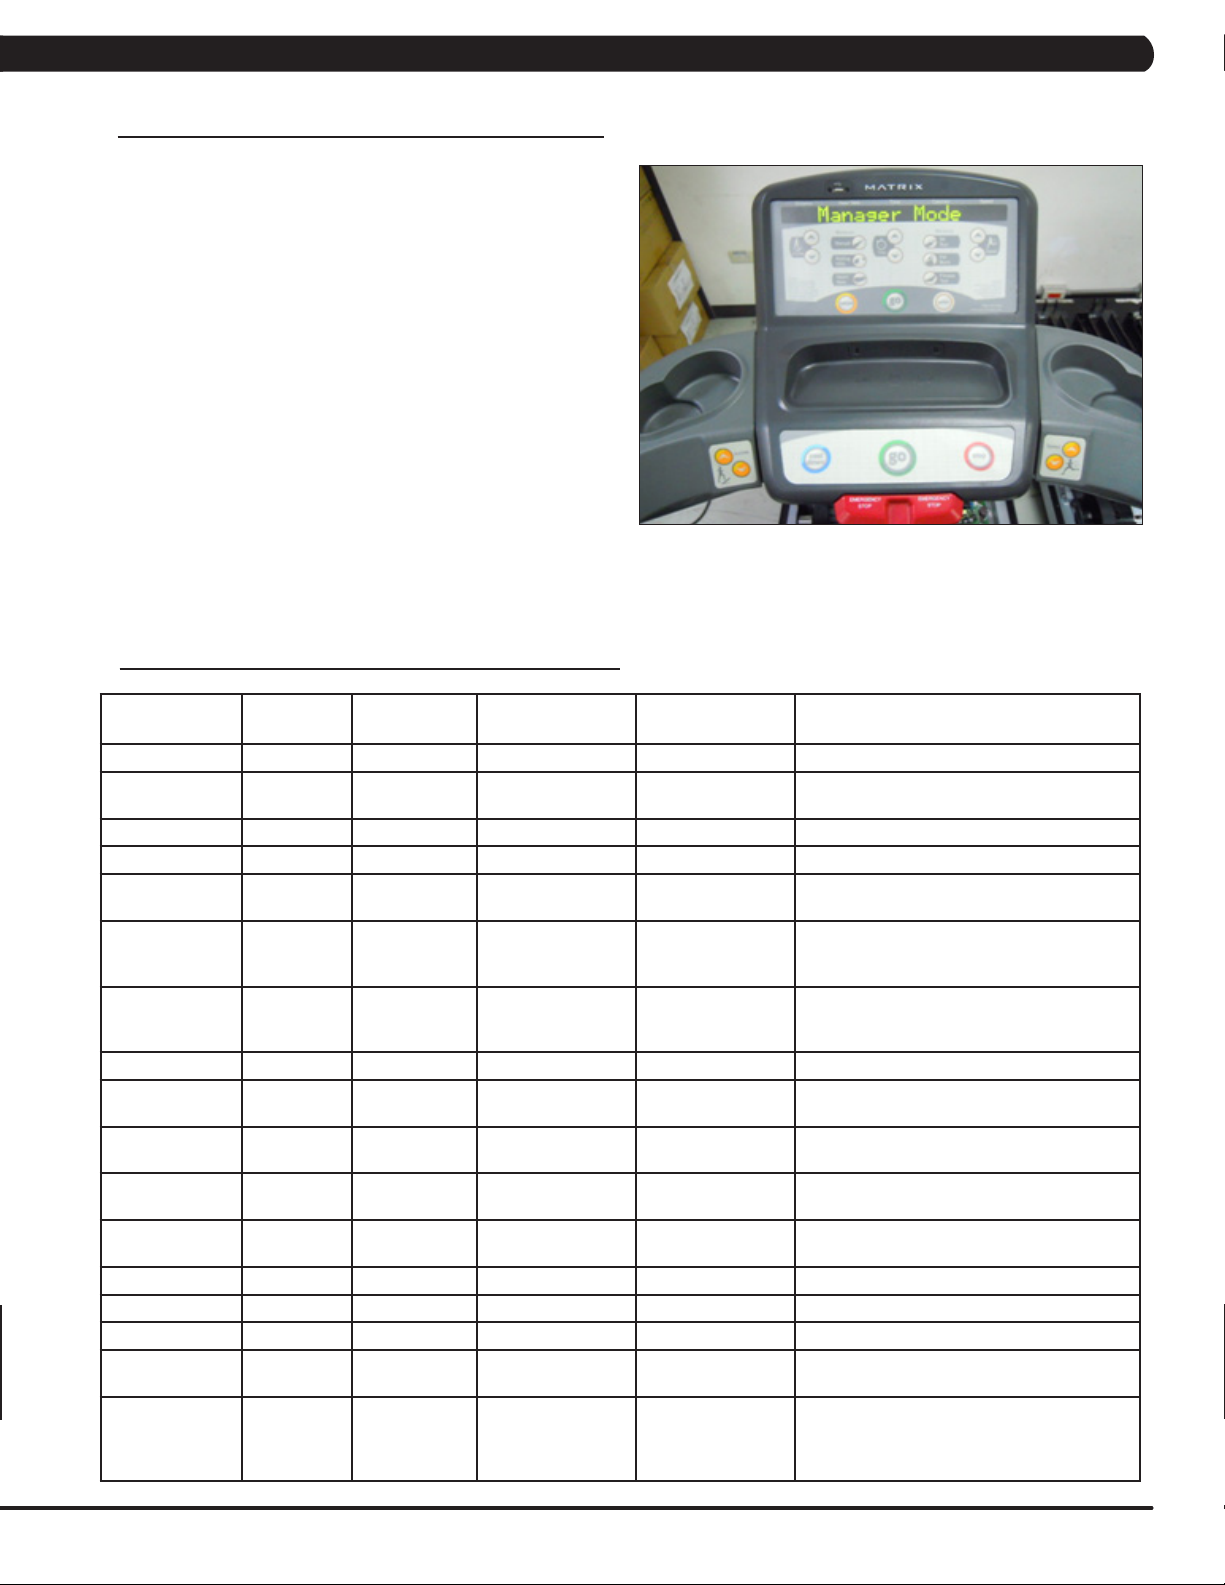
5.1 USING MANAGER MODE
1) To enter Manager Mode, press & hold INCLINE DOWN and
SPEED DOWN keys at the same time for 3-5 seconds until Manager
appears on the display.
2) To enter the Manager Mode, press ENTER once Manager Mode
appears on the display (Figure A).
3) To scroll between settings in the Manager Mode, press the
INCLINE or SPEED keys.
4) Press ENTER to modify the settings once displayed.
5) Press any INCLINE or SPEED key to change the value of the setting.
6) Once the setting is correct, press ENTER to save.
7) Press the EMERGENCY STOP to exit Manager Mode..
FIGURE A
5.2 MANAGER MODE OVERVIEW
CUSTOM
DEFAULT MINIMUM MAXIMUM UNIT DESCRIPTION
SETTINGS
MAXIMUM TIME 60 5 99 MINUTE Maximum workout duration.
DEFAULT TIME 60 5 99 (limited to max
DEFAULT LEVEL 1 1 10 LEVEL Default start level in all programs.
DEFAULT AGE 30 15 100 AGE Default age used in HR programs.
DEFAULT
WEIGHT
ACCUMULATED
DISTANCE
ACCUMULATED
TIME
SOFTWARE N/A N/A N/A N/A Software Version, not editable.
START SPEED 0.5 MPH /
MAXIMUM
SPEED
TIMER MODE DOWN DOWN UP N/A Controls whether the user time counts up or
SPEED MODE MILE MILE KILOMETER N/A Measurement unit used for calorie
OUT OF ORDER OFF OFF ON OFF OR ON Locks the machine.
GENDER MALE MALE FEMALE N/A Sets the user's gender.
LANGUAGE ENGLISH N/A N/A N/A Sets the language shown on the console.
SOUND MODE ON ON OFF N/A Controls whether the display broadcasts
BELT STOP OFF OFF 30, 60, OR 90
150 LB / 68 KG50 LB / 23 KG 400 LB / 182 KG POUND /
N/A N/A 65,000 MILES /
N/A N/A 65,000 HOURS HOUR Total time on treadmill, not editable. TO
0.8 KPH
12 MPH / 20
KPH
0.5 MPH / 0.8
KPH
2.0 MPH / 3.2
KPH
time setting)
104,000 KM
2.0 MPH / 3.2 KPH MPH / KPH Controls the starting speed for all programs
12 MPH / 20 KPH MPH / KPH Controls the maximum speed for all
SECONDS
MINUTE Default start time in all programs.
KILOGRAM
MILE / KILOMETER Total distance on treadmill, not editable. TO
SECONDS This option checks for a user on the running
Default weight used in calorie calculations
and HR programs.
RESET: Press and hold INCLINE DOWN and
SPEED DOWN for 3-5 seconds.
RESET: Press and hold INCLINE DOWN and
SPEED DOWN for 3-5 seconds.
(does not affect minimum speeds).
programs.
down.
calculations, distance, and speed.
chime when buttons are pressed.
belt. If there is no user detected, the unit will
go into pause mode, and reset if no user for
5 minutes.
13
Page 17
CHAPTER 6: ENGINEERING MODE
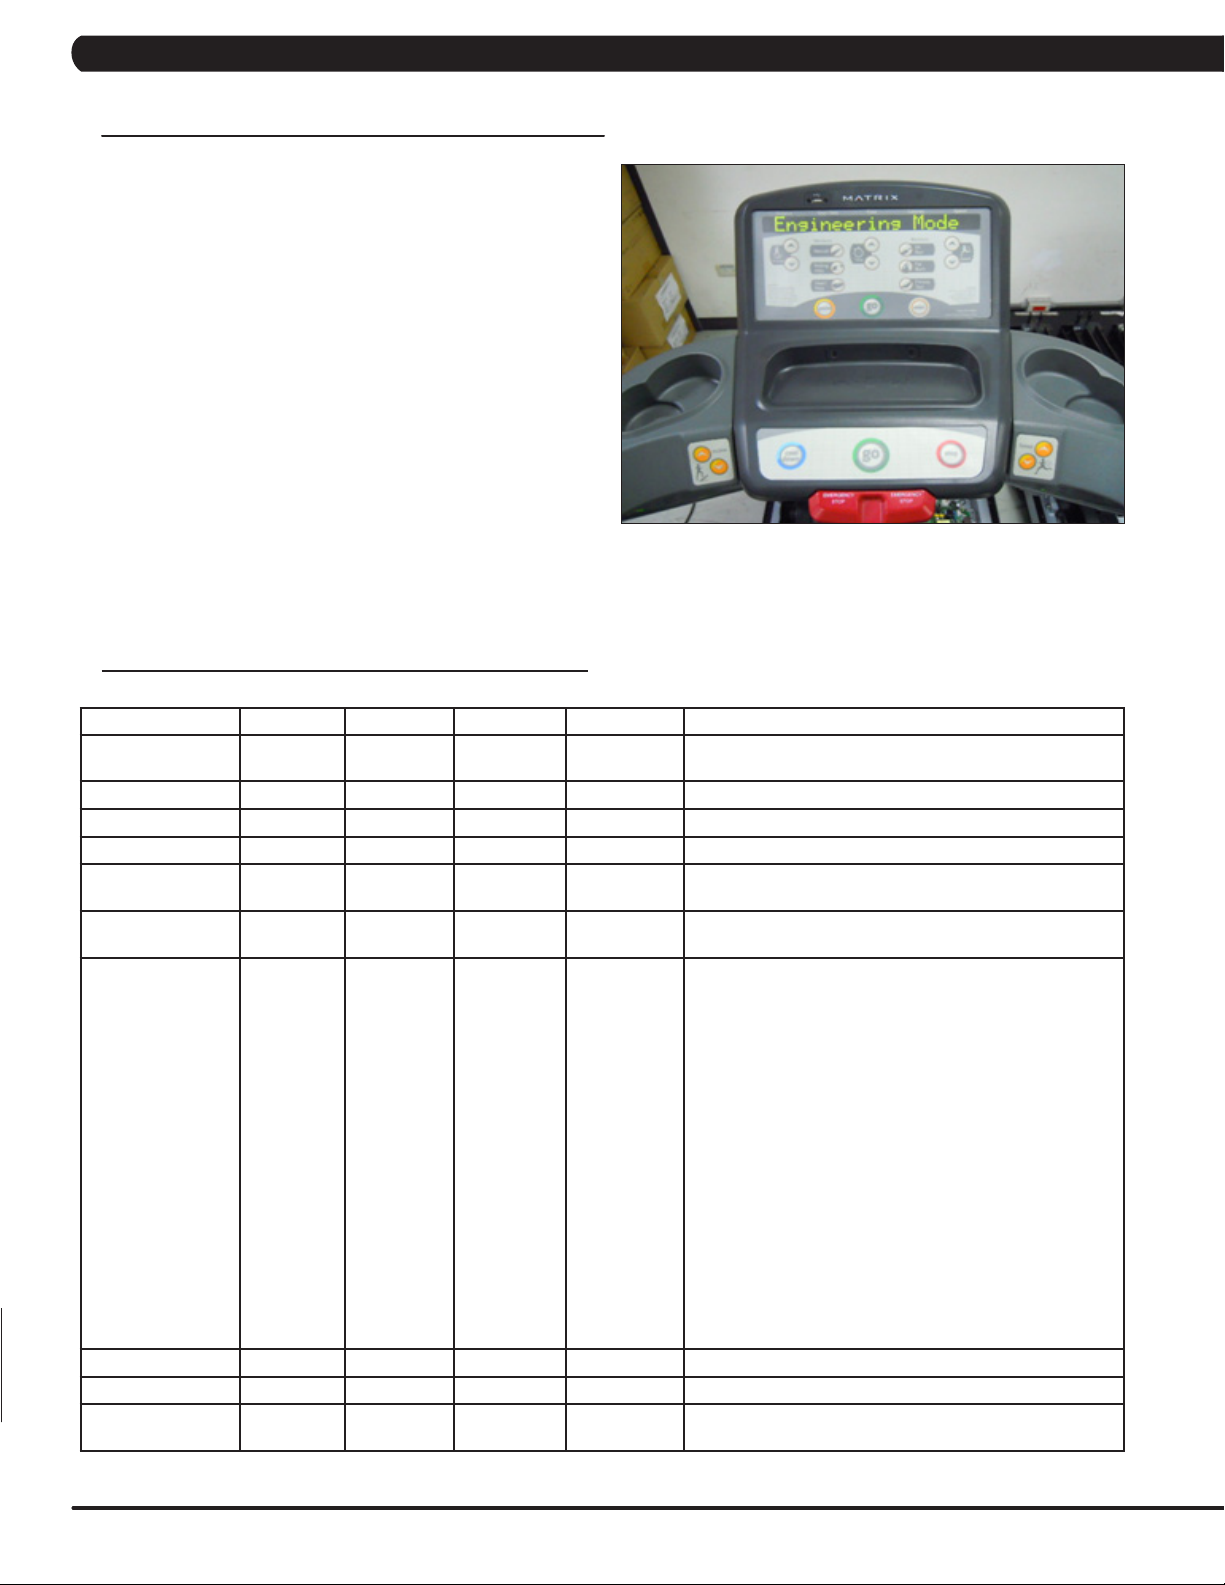
6.1 USING ENGINEERING MODE
1) To enter Engineering Mode, press & hold the INCLINE DOWN
and SPEED DOWN keys at the same time for 3-5 seconds until
Manager Mode appears on the display.
2) Press the INCLINE or SPEED keys until Engineering Mode
appears on the display (Figure A) and press ENTER.
3) To scroll between settings in the Engineering Mode, press the
INCLINE or SPEED keys.
4) Press ENTER to modify the settings once displayed.
5) Press any INCLINE or SPEED key to change the value of the
setting.
6) Once the setting is correct, press ENTER to save.
7) Press the EMERGENCY STOP to exit Engineering Mode..
FIGURE A
6.2 ENGINEERING MODE OVERVIEW
CUSTOM SETTING DEFAULT MINIMUM MAXIMUM UNIT DESCRIPTION
Disable Errors OFF OFF ON N/A Off - Shows Class A-C errors. On - Shows Class C errors
Elevation Minimum 28 20 239 N/A Controls the low incline parameter.
Elevation Maximum 230 20 239 N/A Controls the high incline parameter.
Auto Calibration N/A N/A N/A N/A This function is to calibrate the treadmill incline.
Speed Units MILE MILE KILOMETER DISTANCE Measurement unit used for calorie calculations, distance,
Pause Time 5 MINUTES 5 SECONDS 10 MINUTES SECOND /
Serial Number Serial Number input is available for both the Console and
Reset Defaults N/A N/A N/A N/A Reset the default values to factory settings.
Club ID N/A N/A N/A N/A This sets the club ID for clubs using Asset Management.
Audio Source OFF OFF TV / PCTV /
REMOTE TV
MINUTE
N/A Sets which outside TV will have audio through the console
only.
and speed.
Controls the maximum time the treadmill can be paused
during a workout.
Frame. Due to the limited LED characters, 2 layers are
used to enter the serial number. First Layer:
- PPPPP V
- PPPPP is the product name
- V is the version. If the version is A, just leave this blank.
Second Layer
- YY MM nnnnn.
- YY is the year (11, 12).
- MM is the month (e.g. 08, 09, 10).
- nnnnn is the actual serial number.
Use the UP / DOWN LEVEL keys to navigate the layers
and the number keys to input the serial number. The
product name is dependent on the Machine Type setting.
For example, the console is TM509 with ver. C and the
manufactured date is 2011.08 with 98765. The frame is
TM509 with ver. D and the manufactured date is 2011.06
with 12345. Their serial numbers are:
Console SN: TM509C 1rst layer, 110898765 2nd layer.
Frame SN: TM509D 1rst layer, 110612345 2nd layer.
audio ports.
14
Page 18
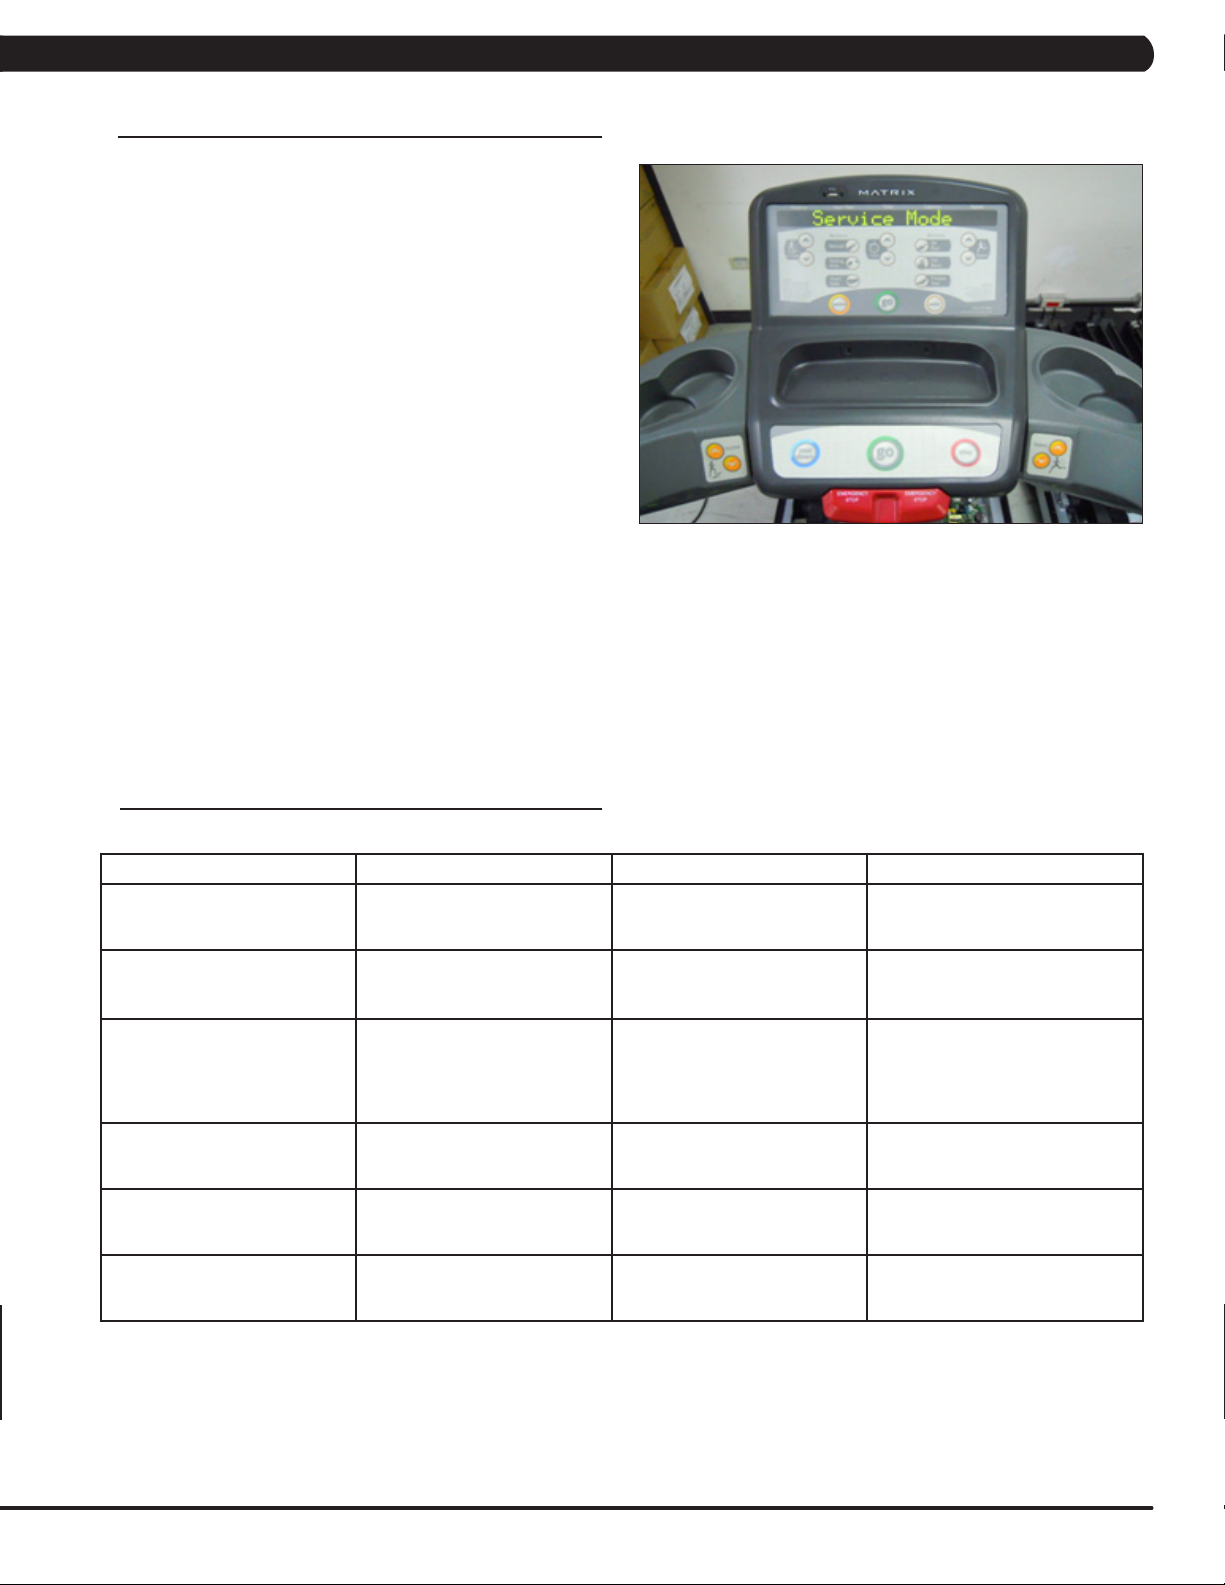
CHAPTER 7: SERVICE MODE
7.1 USING SERVICE MODE
1) To enter Service Mode, press & hold the INCLINE DOWN and
SPEED DOWN keys at the same time for 3-5 seconds until Manager
Mode appears on the display.
2) Press the INCLINE or SPEED keys until Service Mode appears on
the display (Figure A) and press ENTER.
3) To scroll between settings in the Service Mode, press the INCLINE
or SPEED keys.
4) Press ENTER to modify the settings once displayed.
5) Press any INCLINE or SPEED key to change the value of the setting.
6) Once the setting is correct, press ENTER to save.
7) Press the EMERGENCY STOP to exit Service Mode..
FIGURE A
7.2 SERVICE MODE OVERVIEW
CODE DEFAULT OPTIONS DESCRIPTION
Service 1 Display Test Press the ENTER key repeatedly
Service 2 Keypad Test Press any key and the display
Service 3 Distance / Time Distance:
Mile 0 - 99999
Kilometer 0 - 160898
Time:
0 - 999999
Service 4 CSafe / RF Test Press the ENTER key to test CSafe.
Service 5 Error Log Shows the last 10 errors. Press
Service 6 Set Date / Time Press the LEVEL keys to move
to check each set of LEDs on the
display sequentially.
should show the corresponding
message.
Manually sets the Accumulated
Distance and Time.
Press the ENTER key again to test
the RF module.
and LEVEL UP and DOWN for 3
seconds to clear the errors.
cursor, the number keys to set date
/ time, and the ENTER key to save.
15
Page 19
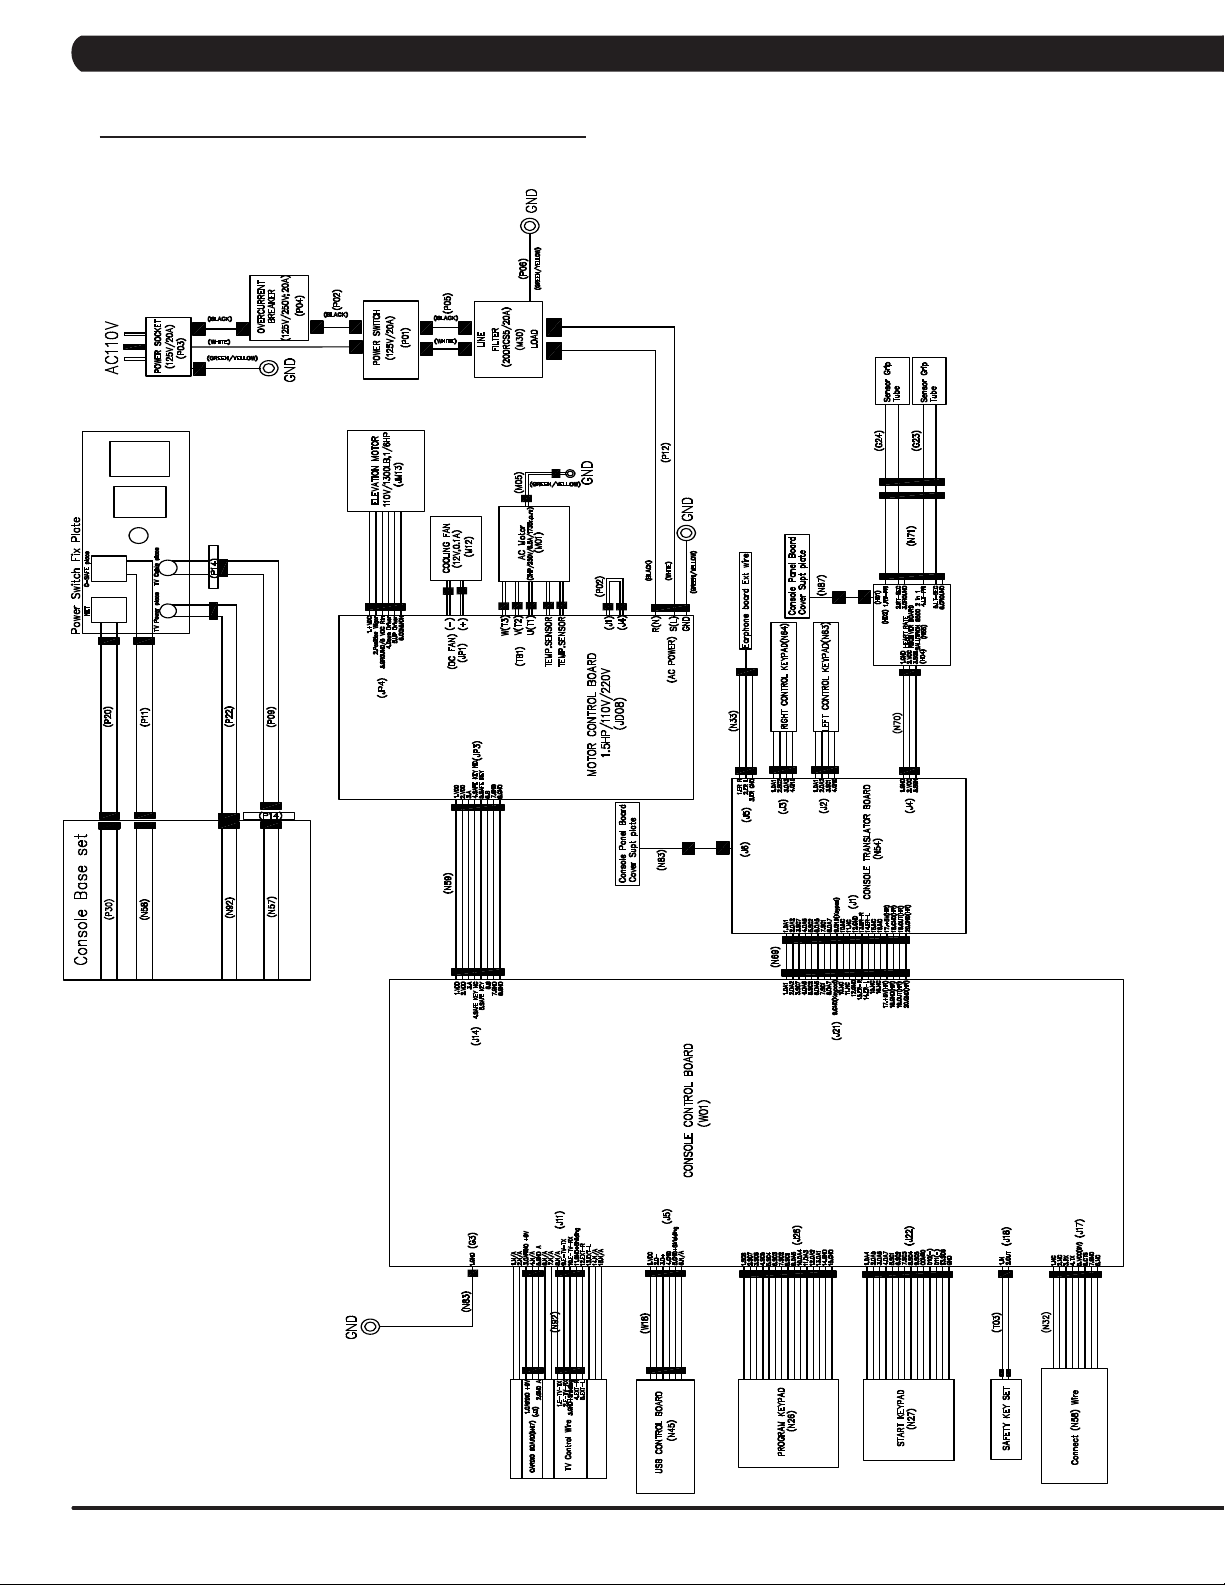
8.1 ELECTRICAL DIAGRAMS
CHAPTER 8: TROUBLESHOOTING
16
Page 20
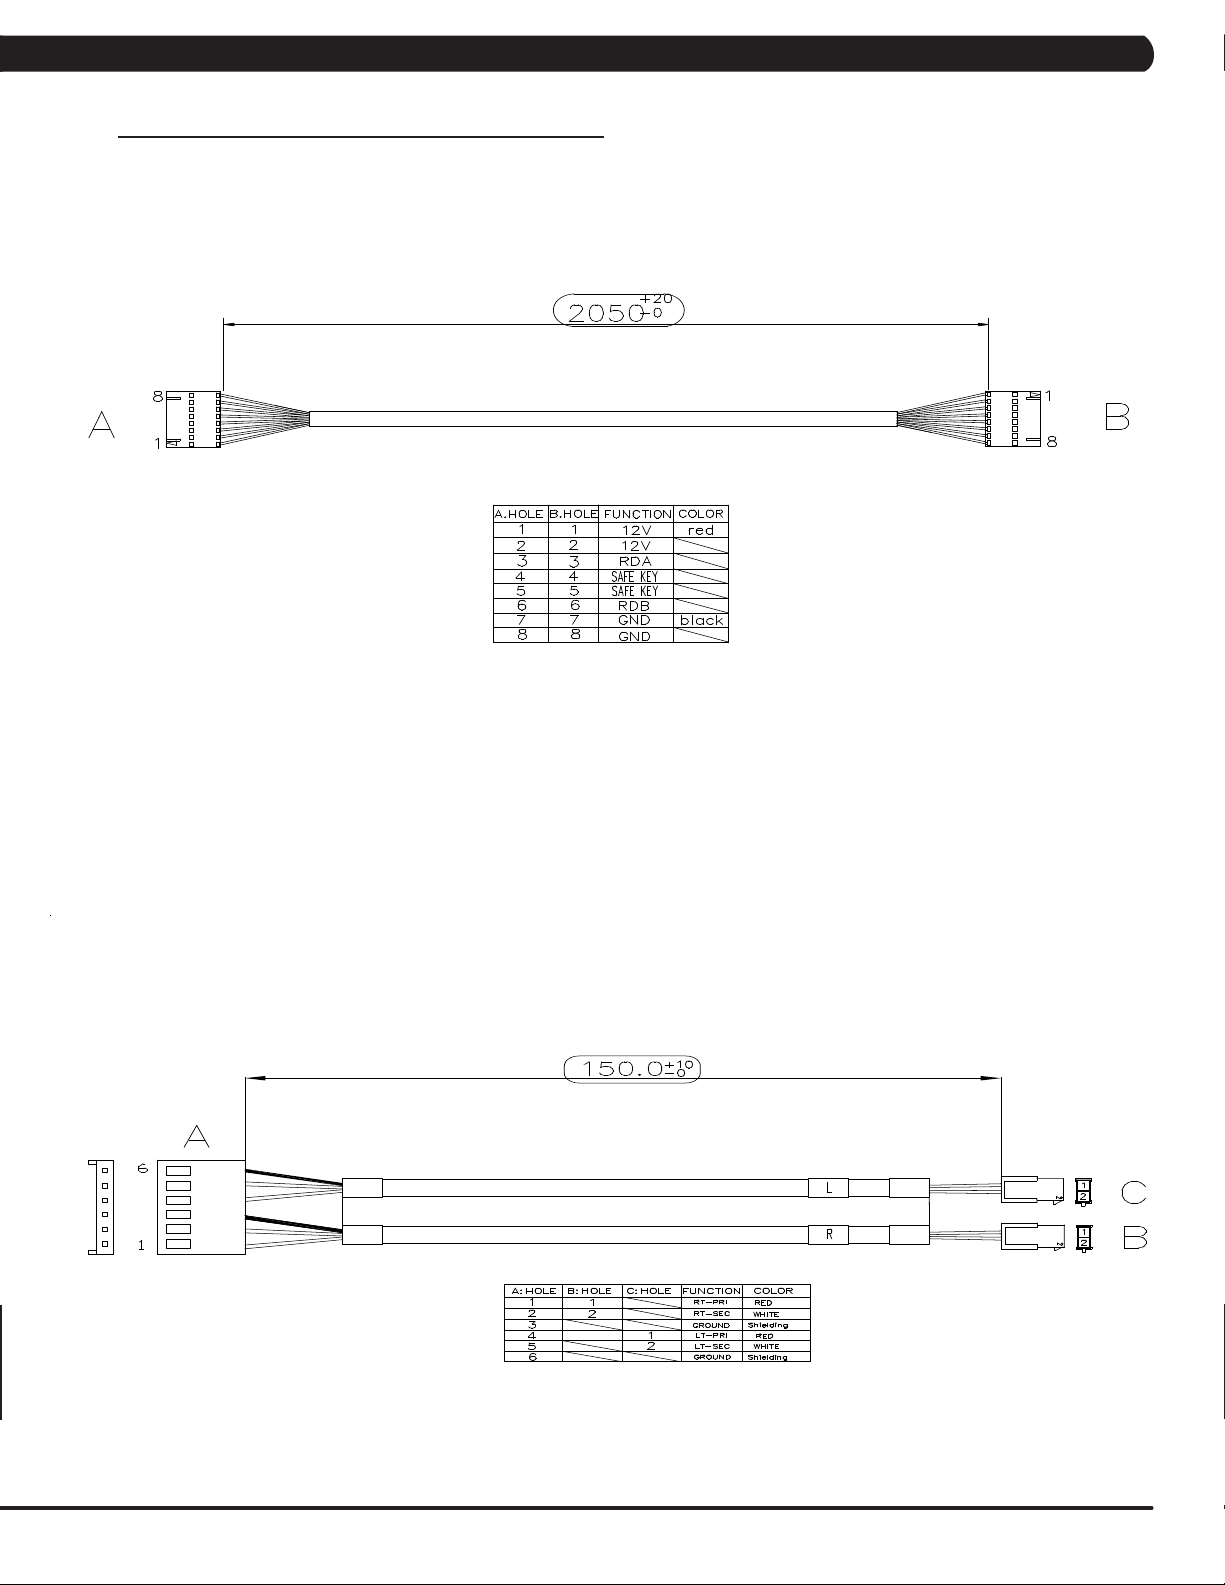
CHAPTER 8: TROUBLESHOOTING
8.1 ELECTRICAL DIAGRAMS - CONTINUED
DIGITAL COMMUNICATION WIRE - N59
PULSE GRIP WIRE - N71
17
Page 21
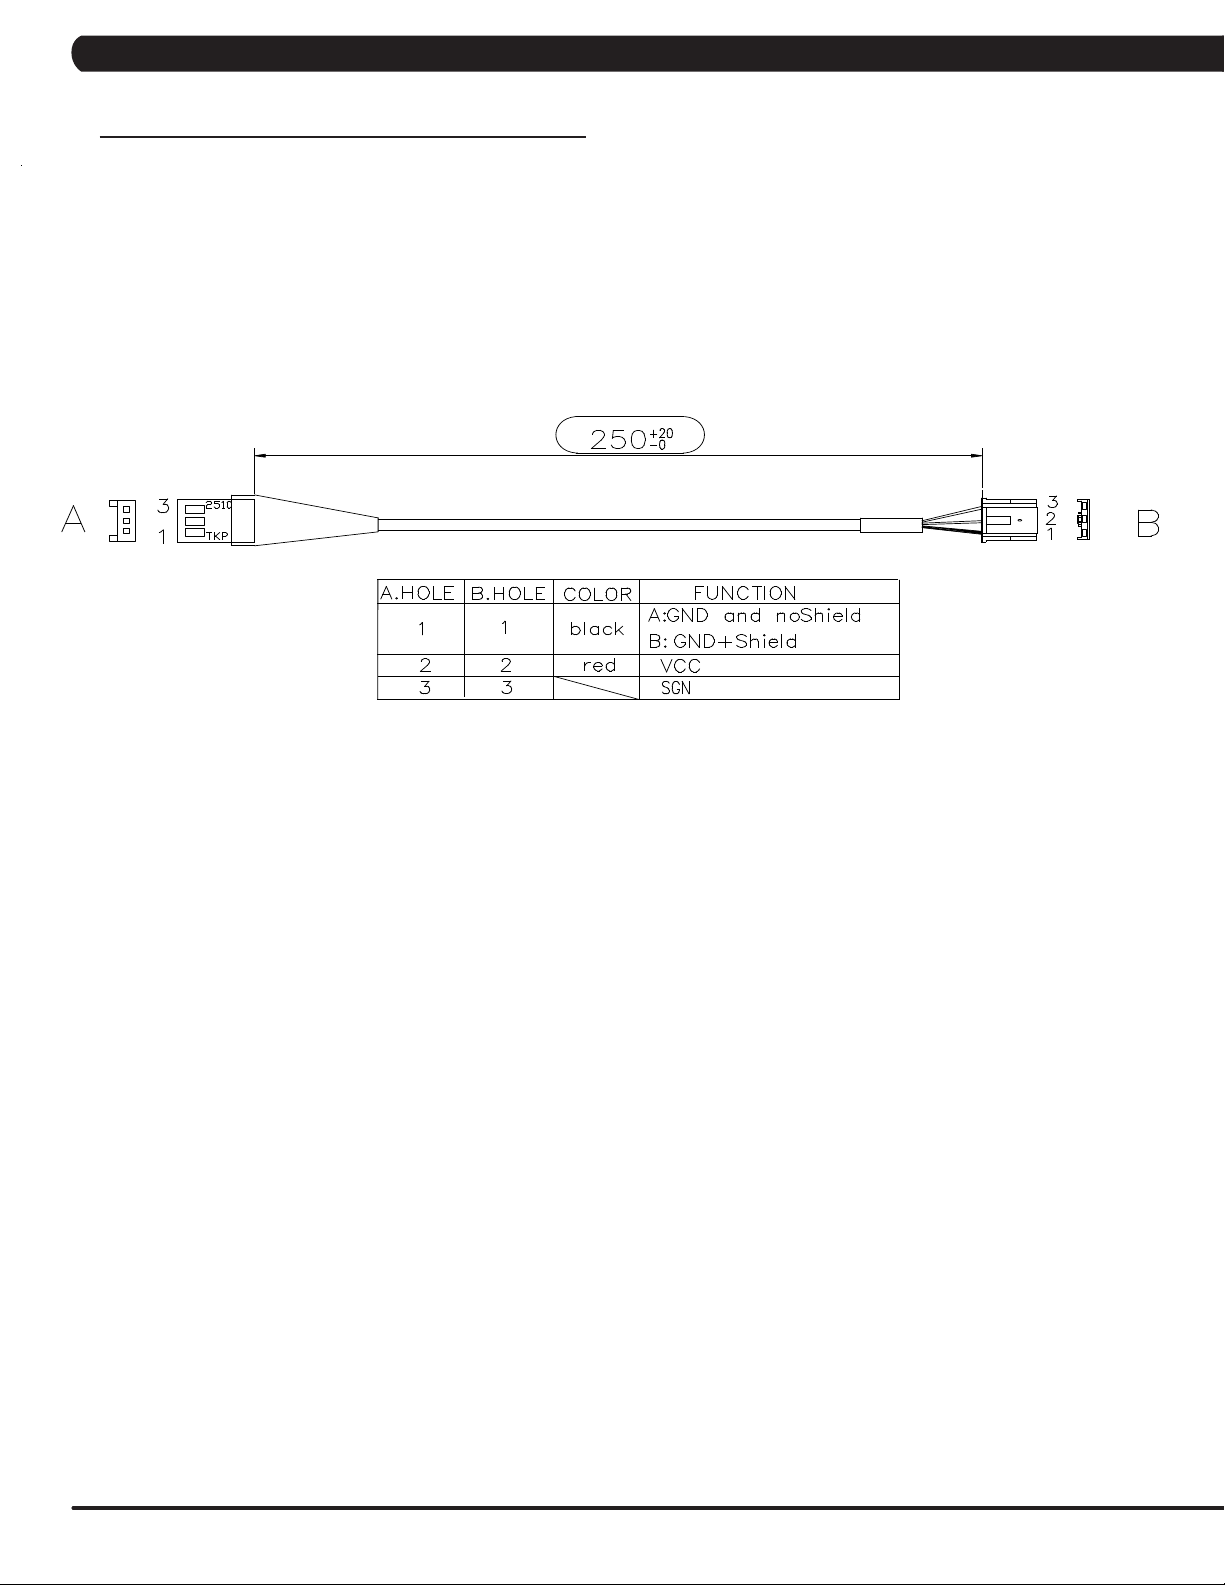
CHAPTER 8: TROUBLESHOOTING
8.1 ELECTRICAL DIAGRAMS - CONTINUED
PULSE GRIP CONNECTING WIRE - N70
18
Page 22
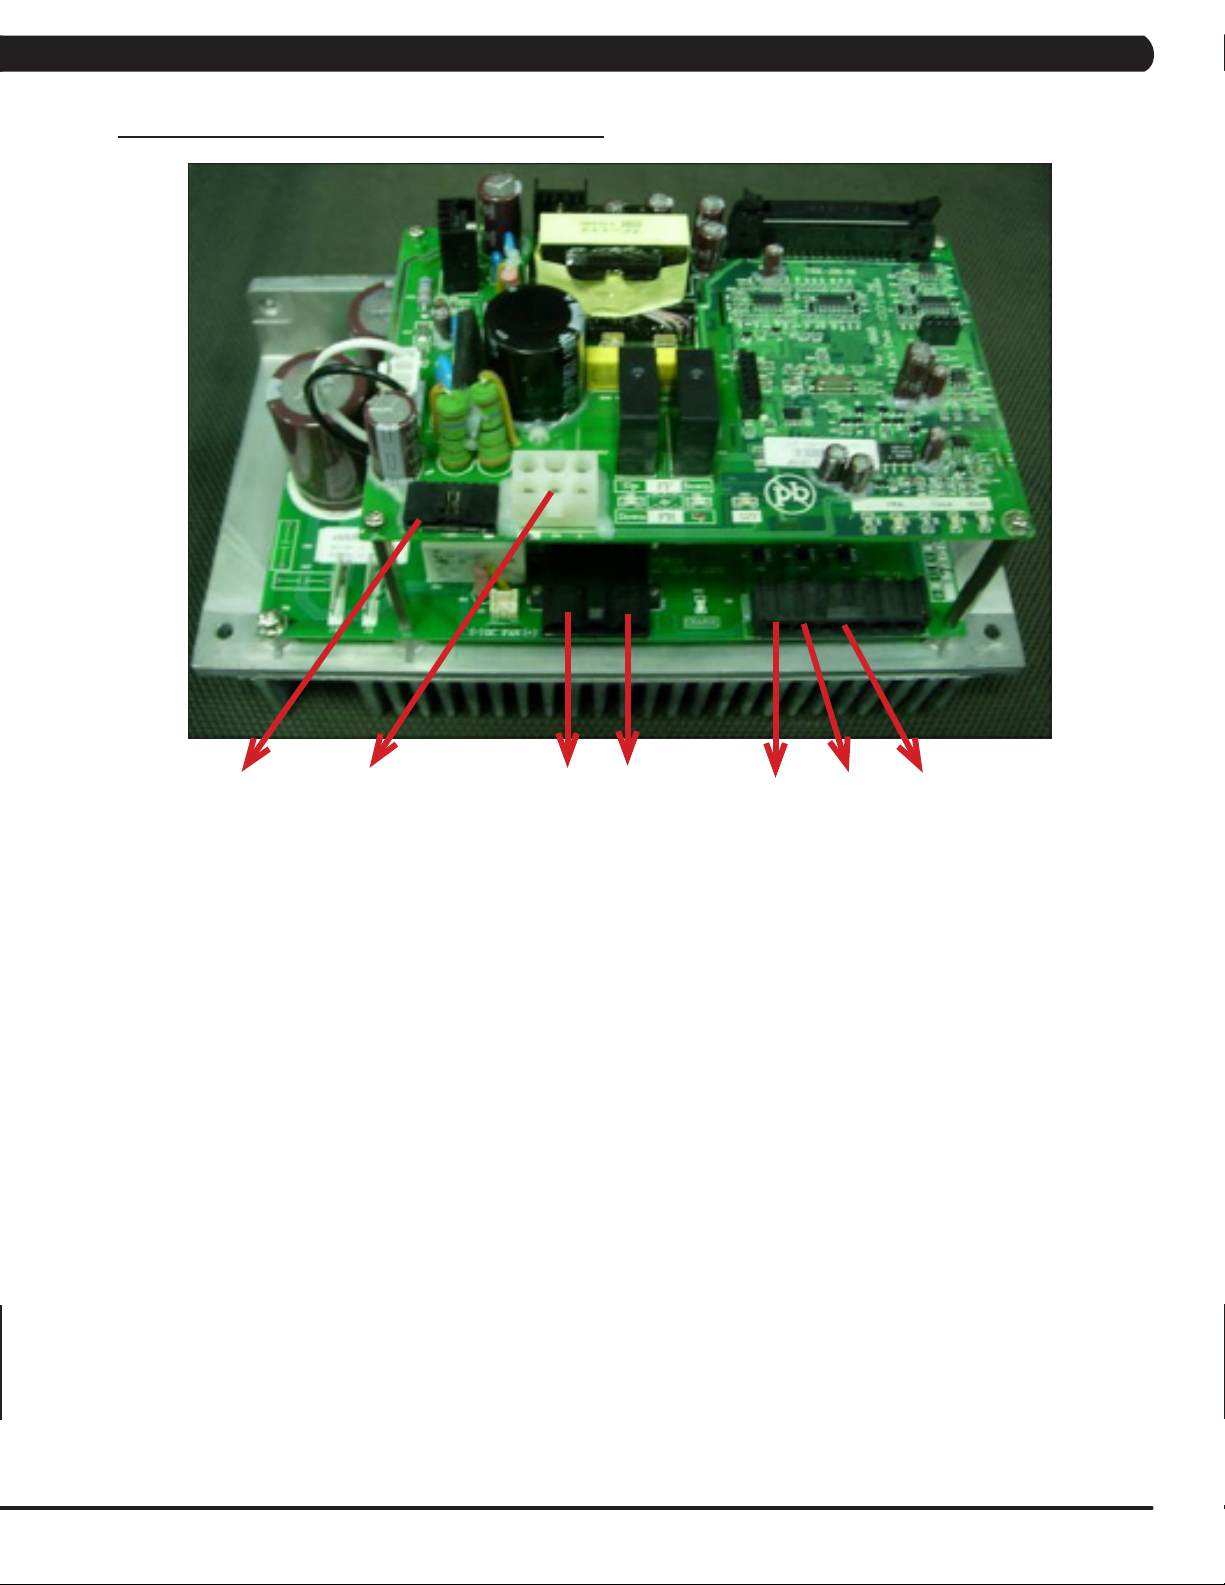
8.2 MCB WIRING
CHAPTER 8: TROUBLESHOOTING
JP3 JP4
JP3 - Console Cable
JP4 - Incline Motor Cable
N - Power Input (white)
L - Power Input (Black)
U - Motor Wire (red)
V - Motor Wire (White)
W - Motor Wire (Black)
N L
U
V
W
19
Page 23

CHAPTER 8: TROUBLESHOOTING
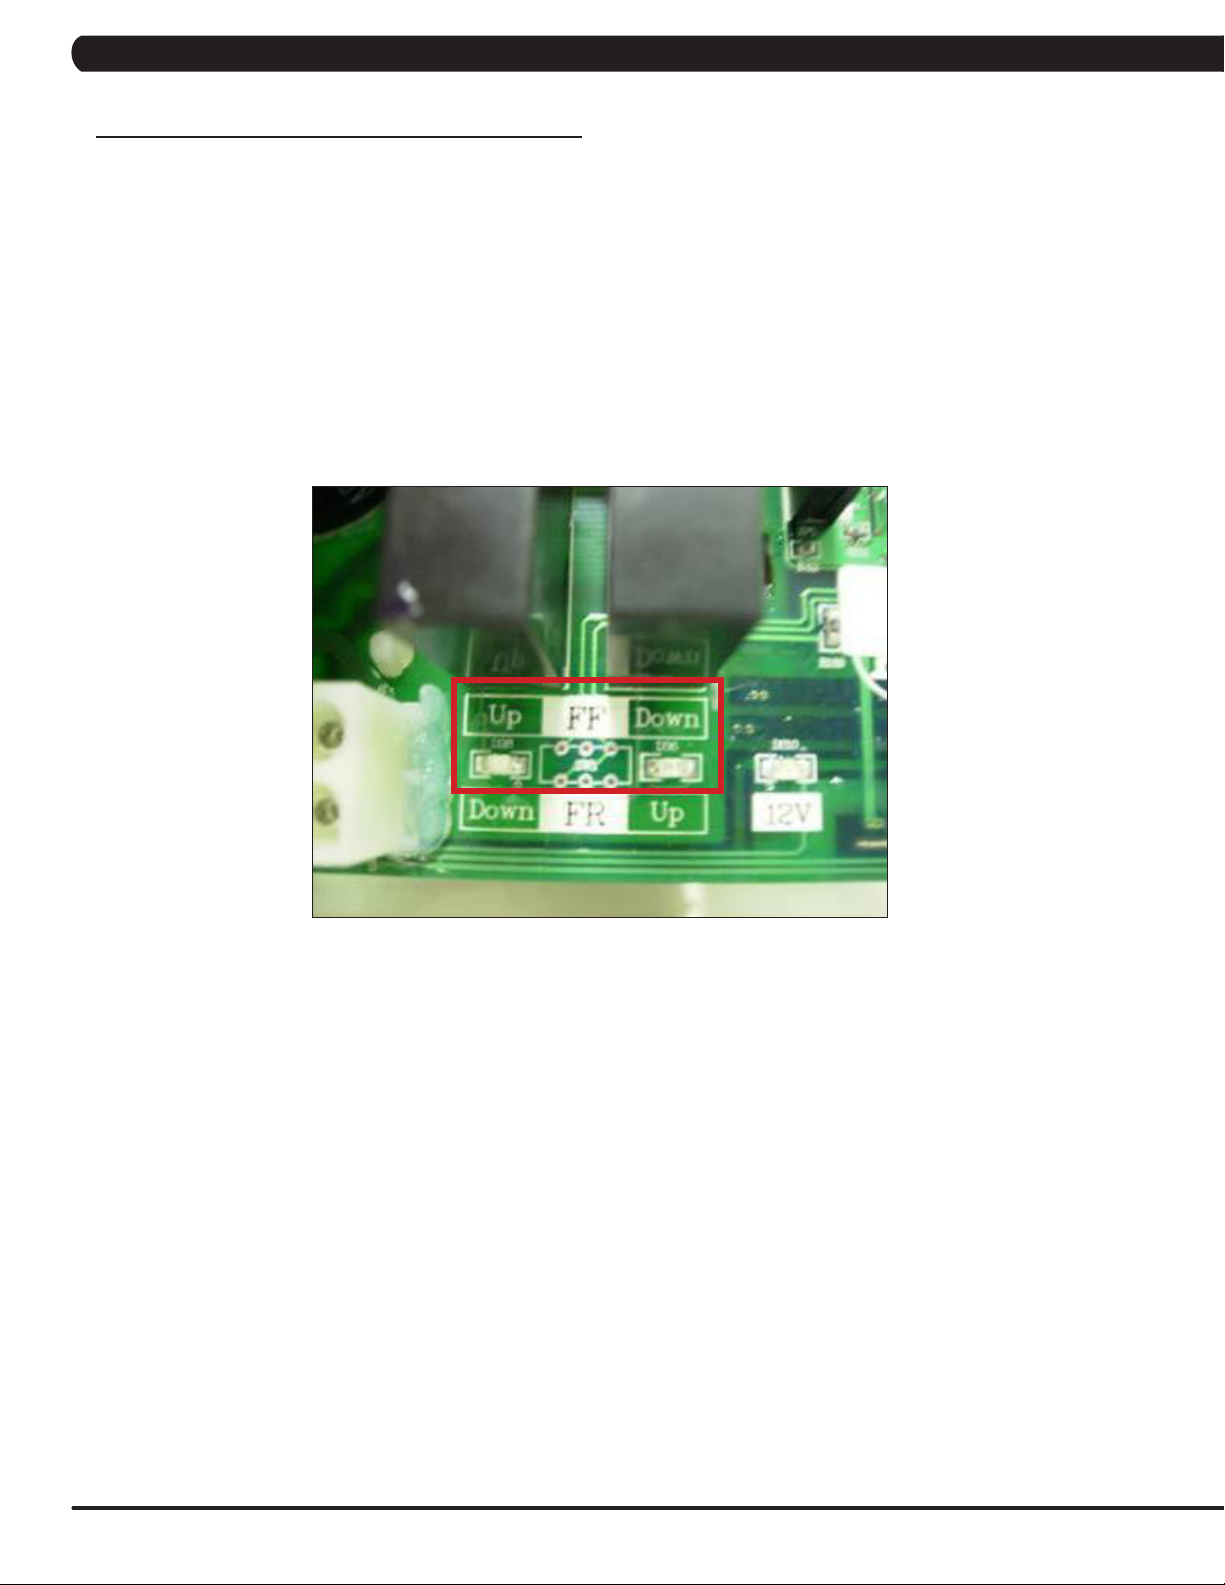
8.3 MCB LED PLACEMENT AND DEFINITIONS
PWM - Console PWM signal light (when
the motor is running, the light should
flash).
COM - Digital communication light.
FAULT - The machine has stopped due
to any C class error.
UP / DOWN (FF) - Incline motor status
light.
20
Page 24

CHAPTER 8: TROUBLESHOOTING
8.4 ERROR MESSAGES ON THE CONSOLE
CLASS
ERROR CODE DESCRIPTION CONDITION
LEVEL
B 0140 Incline motor fail. When the incline motor is supposed to move, it does not move.
C 01A0 Incline motor disconnection. When the incline position cable is not connected.
C 01A4 Main motor U phase
disconnection.
C 01A5 Main motor V phase
disconnection.
C 01A6 Main motor W phase
disconnection.
C 01A8 Main motor over current. Main motor over current of 7 amps.
C 01AB Inverter Error. Internal error of the inverter.
C 01AD Motor over temperature. When a heavy user makes the motor over load over go over
C 02A0 Main motor failed. The belt does not move when commanded.
C 02A1 Over AC power input voltage. Power input voltage over range.
C 02A2 Over / low DC bus voltage. Power input voltage over range.
C 02A8 Inverter circuit of motor drive
failed.
C 02AD LCB over temperature. LCB over temperature.
C 02B5 Inverter senses that the normal
ratedcurrentisover150%for
over 60 seconds.
C 02B6 Speed up has over current. Software issue.
C 02B7 Speed down has over current. Software Issue.
C 02B8 Running status over current. Software Issue.
C 02B9 The inner memory IC data write
error.
C 02BA The inner memory IC data read
error.
C 02BC Ground connection or fuse error. MCB failure.
C 02BD Inverter hardware interrupt error. MCB failure.
C 04A0 Digital communication failure.
LCB has no return message from
the UCB within 3 seconds.
C 04B0 UCB no response. Check the console cable connection at the UCB and LCB.
When the error happens the incline motor will be locked. The
command "initialize" is needed to unlock the incline.
Main motor U phase disconnection.
Main motor V phase disconnection.
Main motor W phase disconnection.
current.
Motor resistance closed.
Inverter sensor is reading the normal rated current is over 10.5
amps for 60 seconds.
MCB failure.
MCB failure.
Check the console cable connection at the UCB and LCB.
Replace the console cable, UCB, or LCB as needed.
Replace the console cable, UCB, or LCB as needed.
CLASS LEVEL
Class B - Will make a record in the error log. The machine will keep working.
Class C - The machine will stop and not work.
21
Page 25
CHAPTER 8: TROUBLESHOOTING
8.5 0140 / 01A0 ERROR TROUBLESHOOTING
ERROR MESSAGE 0140 / 01A0
1) CAUSE:
a. Incline motor operation failed.
2) SOLUTION:
a. Check the connection of the incline motor cable at the MCB.
b. Run auto calibration (See Section 3.5).
c. If auto calibration fails, press GO and attempt to incline the treadmill.
- Check the MCB UP and DOWN (FF) LEDs (Figure A). If the LEDs do not light up when incline is commanded, replace the console
cable or console. If the LEDs do light up, replace the incline motor.
d. If replacing the console, console cable, and incline motor do not resolve the issue, replace the MCB.
FIGURE A
22
Page 26

CHAPTER 8: TROUBLESHOOTING
8.6 01A4 / 01A5 / 01A6 ERROR TROUBLESHOOTING
ERROR MESSAGE 01A4 / 01A5 / 01A6
1) CAUSE:
a. 01A4 - Main motor U phase disconnection.
b. 01A5 - Main motor V phase disconnection.
c. 01A6 - Main motor W phase disconnection.
2) SOLUTION:
a. Check the connection of the motor cable at the MCB (Figure A).
b. Replace the motor.
c. Replace the MCB.
FIGURE A
U V
8.7 01A8 / 01AD / 02B6 / 02B7 / 02B8 ERROR TROUBLESHOOTING
ERROR MESSAGE 01A8 / 01AD / 02B6 / 02B7 / 02B8
1) CAUSE:
a. 01A8 - Main motor over current of 7 Amps.
b. 01AD - Motor over temperature.
c. 02B6 - Speed up is over current.
d. 02B7 - Speed down is over current.
e. 02B8 - Running status over current.
2) SOLUTION:
a. See Section 3.6 for checking the status of the running deck and belt. Replace as needed.
b. Replace the MCB.
W
23
Page 27

CHAPTER 8: TROUBLESHOOTING
8.8 01AB ERROR TROUBLESHOOTING
ERROR MESSAGE 01AB
1) CAUSE:
a. Inverter error.
2) SOLUTION:
a. When the display is showing an 01AB error, the MCB Fault LED should be lit (Figure A).
b. If the MCB Fault LED is not lit, replace the console.
c. If the MCB Fault LED is lit, replace the MCB.
FIGURE A
24
Page 28

CHAPTER 8: TROUBLESHOOTING
8.9 02A0 / 02A8 ERROR TROUBLESHOOTING
ERROR MESSAGE 02A0 / 02A8
1) CAUSE:
a. 02A0 - Main motor failure. The belt does not move when it is supposed to move.
b. 02A8 - Inverter circuit of the motor failed. Motor resistance is closed.
2) SOLUTION:
a. Check the connection of the motor cable at the MCB (Figure A).
b. Use a multi - meter to check the motor cable for resistance at 3 points (Figures B, C, & D).
c. If the motor cable displays an ohm value, replace the MCB.
d. If the motor cable does not display an ohm value, replace the motor.
FIGURE A
FIGURE C
FIGURE B
FIGURE D
25
Page 29

CHAPTER 8: TROUBLESHOOTING
8.10 02A1 / 02A2 ERROR TROUBLESHOOTING
ERROR MESSAGE 02A1 / 02A2
1) CAUSE:
a. 02A1 - Over AC power input voltage.
b. 02A2 - Over / low DC bus voltage.
2) SOLUTION:
a. Use a multi - meter to check if the input power is over 260V.
b. If the power outlet is ok, replace the MCB.
8.11 02AD ERROR TROUBLESHOOTING
ERROR MESSAGE 02AD
1) CAUSE:
a. MCB over temperature.
2) SOLUTION:
a. Check the condition and connection of the motor cable at the MCB (Figure A).
b. Use a multi - meter to check the motor cable for resistance at the 2 blue wires in the cable (Figure B).
c. If the blue wires of the motor cable display an ohm value, replace the motor.
d. If the blue wires of the motor cable do not display an ohm value, replace the MCB.
26
FIGURE A
FIGURE B
Page 30

CHAPTER 8: TROUBLESHOOTING
8.12 02B5 ERROR TROUBLESHOOTING
ERROR MESSAGE 02B5
1) CAUSE:
a. The inverter sensor is reading the normal rated current is over 10.5 amps for 60 seconds.
2) SOLUTION:
a. Use a multi - meter to check the motor cable for resistance at 3 points (Figures A, B, & C).
b. If the motor cable displays an ohm value over 4, replace the motor.
c. If the motor cable displays an ohm value under 4, replace the MCB.
FIGURE A
FIGURE B FIGURE C
27
Page 31

CHAPTER 8: TROUBLESHOOTING
8.13 02B9 / 02BA / 02BC / 02BD ERROR TROUBLESHOOTING
ERROR MESSAGE 02B9 / 02BA / 02BC / 02BD
1) CAUSE:
a. 02B9 - The inner memory IC data write error.
b. 02BA - The inner memory IC data read error.
c. 02BC - Ground connection or fuse error.
d. 02BD - Inverter hardware interrupt error.
2) SOLUTION:
a. Replace the MCB.
8.14 04A0 ERROR TROUBLESHOOTING
ERROR MESSAGE 04A0
1) CAUSE:
a. No communication response.
2) SOLUTION:
a. If an 04A0 error is displayed, MCB Com LED should not be lit (Figure A).
b. Check the connection of the digital communication wire at the MCB (Figure B).
c. Replace the digital communication wire.
d. Replace the console.
e. Replace the MCB.
28
FIGURE A FIGURE B
Page 32

CHAPTER 8: TROUBLESHOOTING
8.15 TROUBLESHOOTING - HEART RATE ISSUES
HEART RATE ISSUES
1) SYMPTOM:
a. No heart rate.
b. No or high heart rate.
2) SOLUTION:
a. With a multi meter set for DC Voltage, place one prong of the multi meter on each of the HR plates on the handlebar (Figure A). A
correctly connected HR grip will have a DC Voltage reading of between 0.5 and 2.0. If this reading is correct, skip to Step b.
- If the reading is not correct, remove the screws holding the 2 halves of the HR grip together and check the connection of the HR grip
wiring to the grips (Figure B). Replace the grips if any damage is seen to the plates.
- Remove the console and split the plastic and metal portions of the console frame to expose the HR board (Figure C).
- Check the connection of the HR grip wiring to the 6 pin Y cable attached to one side of the HR board. Use a multi meter set for
ohms to verify the continuity of these wires. If the ohm reading is more than 1 (or not there at all), replace the HR grip wiring (this will require
replacing the HR handlebar). If the ohm reading is correct, your issue is not with the HR grip / HR wire portion of the HR system.
b. Perform a continuity test on the treadmill console (see Service Bulletin - Continuity Test on Matrix Treadmills).
- Verify the HR board ground wire. With a multi meter set for ohms, place one prong on the HR board ground wire, and the other on
the console ground screw. You should get a resistance reading of 1 or less. If you get a reading over 1 (or none at all), replace the HR board.
- Check the continuity of the wire that goes from the HR board to the Translator Board. With a multi meter set for ohms, place one
prong on the 3 pin wire connecting to the HR board and the other on where this wire connects to the Translator Board (Figure D). If you get a
reading of over 1 (or no reading at all), replace this wire.
- Check the connection of the wire that goes from the Translator Board to the UCB. Replace this wire if needed.
- If all wiring checks out good and the unit is still having HR issues, replace the HR board.
- If the HR board does not resolve the issue, replace the UCB.
FIGURE A FIGURE B
FIGURE C FIGURE D
29
Page 33

CHAPTER 8: TROUBLESHOOTING
8.16 ENTERTAINMENT TROUBLESHOOTING - OVERVIEW
1. Sections 8.16 - 8.19 will help with diagnosing problems with TV and entertainment related equipment that is produced by Matrix Fitness Systems.
2. The T3x-03 treadmill has the capability of adding an external 15" TV with a bracket. A Matrix brand external TV will look similar to the TV in
Figure A. Your control keypad should look similar to Figure B. If your equipment looks different contact Matrix or the manufacturer of your TV
equipment if known.
FIGURE A FIGURE B
3. Verify how your TV is mounted, compare your machine to Figure C which shows an external 15" TV directly mounted to a T3x Treadmill.
FIGURE C
4. For Matrix produced and mounted equipment you can use the information outlined in this section to help with any connection and power
issuesyoumayhave.IfyouhavequestionsthatarespecictotheTValone(settings,programming,menuoptions,etc)pleaseseethe
entertainment owner’s manual.
30
Page 34

CHAPTER 8: TROUBLESHOOTING
8.17 ENTERTAINMENT TROUBLESHOOTING – PICTURE FUZZY OR UNCLEAR
1.RemovetheTVandconsolebackcovers(FigureA)Usingaveriedgoodpieceofcoaxcable,hookthecoaxdirectlytotheTVjack.This
bypasses internal connections for your machine or TV stand (Figure B).
FIGURE A FIGURE B
2. If this does not clear your picture the issue is with the club's signal. Make sure that the coax has a signal strength of at least 10db.
3.IfStep1doesclearyourpicture,checktheinternalcablesandttingsinsideyourmachine.Makesureyouhavenodamage(kinks,cutsetc)
andnostraywiresorpoorttingsontheendsofthecablesanywherethatthecoaxcableisconnected(FiguresC&D).Fittingsshouldhavea
cleanushconnectorandnostrayaluminumstrandstouchingthecenterconductor.Replaceorrepairanysuspectcables.
FIGURE C FIGURE D
4.Ifnothingisvisiblywrongwithanyofthecables,ttings,orconnectorsreplacetheinternalcoaxcablesandconnectorswithknowngood
parts.
31
Page 35

CHAPTER 8: TROUBLESHOOTING
8.18 ENTERTAINMENT TROUBLESHOOTING -TV WILL NOT TURN ON
1. If you have no picture at all check to see if you have any status lights on your controller or TV. Status lights should be red when off or in
standby mode, and green when the TV is powered on. If you have lights of any color skip to Section 8.19.
2. Remove the TV back cover (Figure A) and check the connection of the TV power wire at the TV (Figure B). Also check the TV power wire
connection at the bracket (Figure C) and at the base of the treadmill (Figure D).
FIGURE A
FIGURE B
FIGURE C FIGURE D
3.Afteryouhaveveriedallconnectionsaresecureandaproblemstillexistsverifypowerattheoutlet(FigureD).Iftheoutletisnotoutputting
120Volts,checktnessroompower.
4. If internal TV power wire connections are good, verify 12 Volts power at the TV power wire where it plugs into the TV (wire in Figure B, shown
with multi - meter in Figure E). If 12 Volts are present, the issue is likely with the TV itself, contact Matrix Customer Service.
32
FIGURE E
FIGURE F
Page 36

CHAPTER 8: TROUBLESHOOTING
8.19 ENTERTAINMENT TROUBLESHOOTING - CONTROLLER ISSUES
1. If you have status lights on the TV, but the On / Off button gives no response, disconnect and then re-connect the power to the treadmill from
the wall. Attempt to turn on the TV again using the On / Off button.
2. If the TV does not power on check the TV keypad connection at the console (Figure A).
3. Also check the connection of the TV controller wire at the TV (Figure B) and the console (Figure C).
4. If the TV does not power on with the TV keypad, attempt to power on the TV using the small handheld remote that came with the TV (Figure D)
(Used for changing menu and other settings). If the TV will function with the handheld remote, replace the TV keypad. If the TV will not function
with handheld remote it is likely an issue with the TV itself, contact Matrix Customer Technical Support.
FIGURE A FIGURE B
FIGURE DFIGURE C
33
Page 37

CHAPTER 9: PART REPLACEMENT GUIDE
9.1 MOTOR COVER REPLACEMENT
1) Remove the 2 screws holding the motor cover to the frame using a 6 mm Allen wrench (Figures A).
2) The motor cover is velcroed to the frame, so you will have to pull up with some force (Figure B).
FIGURE A
3) Figure C shows the motor area with the cover removed.
4) Reverse Steps 1-2 to install a new motor cover. NOTE: When reinstalling the motor cover, be sure to tuck the sides in so they do not bow
outward (Figure D).
FIGURE C
FIGURE B
FIGURE D
34
Page 38

CHAPTER 9: PART REPLACEMENT GUIDE
9.2 REAR ROLLER REPLACEMENT
1) Remove one of the rear end caps using a Phillips screwdriver (Figure A).
2) Remove both rear roller adjustment screws using an 8 mm Allen wrench (Figure B).
FIGURE A FIGURE B
3) Remove the rear roller from the running belt (Figures C & D).
FIGURE C FIGURE D
4) Reverse Steps 1-3 to install a new roller. NOTE: Be sure to follow the instructions in Section 3.5 to re-tension the running belt.
5) Test the treadmill for function as outlined in Section 9.21.
35
Page 39

CHAPTER 9: PART REPLACEMENT GUIDE
9.3 DECK REMOVAL
1) Remove the motor cover as outlined in Section 9.1.
2) Remove the four deck screws using a 5 mm Allen wrench (Figure A).
FIGURE A
3) Remove the deck from the running belt (Figures B & C).
FIGURE B
4) Be careful not to pinch fingers during removal / installation of deck board.
5) Deck is waxed on both sides so the opposite side surface may be usable.
6) New deck surfaces must ALWAYS be matched to a new running belt.
7) Test the treadmill for function as outlined in Section 9.21.
FIGURE C
36
Page 40

CHAPTER 9: PART REPLACEMENT GUIDE
9.4 DECK CUSHION REPLACEMENT
1) Remove the deck as outlined in Section 9.3.
2) Holding the bolt with a 5 mm Allen wrench, loosen the nut with a 13 mm socket (Figure A & B).
FIGURE A FIGURE B
3) For the rear cushion, hold the cushion and remove the 13 mm nut (Figure C).
FIGURE C
4) Reverse Steps 1-3 to install new deck cushions.
5) Test the treadmill for function as outlined in Section 9.21.
37
Page 41

CHAPTER 9: PART REPLACEMENT GUIDE
9.5 FRONT ROLLER REPLACEMENT
1) Remove the motor cover as outlined in Section 9.1.
2) Using a hook or loop of wire, remove the spring from the drive belt tensioner. The tensioner should now pivot away from the drive belt
(Figure A).
3) Loosen the rear roller screws to remove tension from the running belt.
4) Remove the front roller mounting screws using an 8 mm Allen wrench (Figures B & C).
5) Remove the drive belt from the front roller and remove the roller from the running belt (Figure D).
FIGURE A
FIGURE C
6) Reverse Steps 1-4 to install a new roller.
7) Test the treadmill for function as outlined in Section 9.21.
FIGURE B
FIGURE D
38
Page 42

CHAPTER 9: PART REPLACEMENT GUIDE
9.6 RUNNING BELT REPLACEMENT
1) Remove the motor cover as outlined in Section 9.1.
2) Remove the rear roller as outlined in Section 9.2.
3) Remove the deck as outlined in Section 9.3.
4) Remove the front roller as outlined in Section 9.5.
5) Remove the running belt and replace it with a new belt (Figures A & B). NOTE: New running belts should ALWAYS be installed on a new
deck surface (deck should either be flipped or replaced to gain a new surface).
FIGURE A FIGURE B
6) Reverse Steps 1-5 to install a new running belt.
7) Test the treadmill for function as outlined in Section 9.21.
39
Page 43

CHAPTER 9: PART REPLACEMENT GUIDE
9.7 SIDE RAIL REPLACEMENT
1) Remove the rear end cap using a Phillips screwdriver (Figure A).
2) Loosen the four screws under the frame using a 5 mm Allen wrench (Figure B).
FIGURE A FIGURE B
3) Slide the rail off the back of the treadmill (Figures C & D).
FIGURE C
4) Reverse Steps 1-3 to install a new side rail.
5) After reinstalling the side rail, make sure the rear end cap is on first before tightening the screws for proper gap spacing.
6) Be careful not to over tighten the screws, or they will poke through the top of the side rail.
FIGURE D
40
Page 44

CHAPTER 9: PART REPLACEMENT GUIDE
9.8 MOTOR CONTROL BOARD (MCB) REPLACEMENT
1) Turn off power and disconnect the cord from the machine.
2) Remove the motor cover as outlined in Section 9.1.
3) Remove the wire connections to the MCB.
4) Remove the 2 screws holding the MCB to the base frame (Figures A & B).
FIGURE A
5) Remove the MCB.
6) Reverse Steps 1-5 to install a new MCB. NOTE: Be sure to plug in all wire connections removed in Step 3 (Figure C). The wire coming
from the speed sensor on the motor is not used on this model and should not be plugged in.
7) Test the treadmill for function as outlined in Section 9.21.
6 pin connector from
the incline motor.
8 pin connector from
the console cable.
3 pin connector from
the choke (Inductance).
FIGURE C
FIGURE B
5 pin connector from
the motor.
41
Page 45

CHAPTER 9: PART REPLACEMENT GUIDE
9.9 MOTOR REPLACEMENT
1) Turn off power to the treadmill and disconnect the power cord.
2) Remove the motor cover as outlined in Section 9.1.
3) Release the drive belt tensioner spring (Figure A).
4) With the spring released, rotate the tensioner to relieve tension on the drive belt (Figure B).
FIGURE A
5) The drive belt can now be walked off of the motor pulley (Figure C).
6) Disconnect the motor cables from the MCB and cut any tie straps holding them in place (Figure D).
FIGURE C FIGURE D
FIGURE B
42
Page 46

CHAPTER 9: PART REPLACEMENT GUIDE
9.9 MOTOR REPLACEMENT - CONTINUED
7) Disconnect the motor ground wire from the motor and cut any tie straps holding the ground wire in place (Figure E).
FIGURE E
8) Using an 8 mm Allen wrench, remove the four motor mounting screws (Figure F).
9) Lift the motor away from the treadmill (Figure G).
FIGURE F FIGURE G
10) Reverse Steps 1-9 to install a new motor. NOTE: The speed sensor on the motor is not used on this model and should not be plugged into
the MCB.
11) Test the treadmill for function as outlined in Section 9.21.
43
Page 47

CHAPTER 9: PART REPLACEMENT GUIDE
9.10 DRIVE BELT REPLACEMENT
1) Turn off power to the treadmill and disconnect the power cord.
2) Remove the motor cover as outlined in Section 9.1.
3) Release the drive belt tensioner spring (Figure A).
FIGURE A
4) With the spring released, rotate the tensioner to relieve tension on the drive belt and walk the drive belt off of the motor pulley (Figures B & C).
FIGURE B FIGURE C
44
Page 48

CHAPTER 9: PART REPLACEMENT GUIDE
9.10 DRIVE BELT REPLACEMENT - CONTINUED
5) Loosen the rear roller screws to relieve tension on the running belt (Figure D).
6) Remove the two 8 mm front roller screws (Figures E & F).
7) Lift the roller and remove the old drive belt (Figure G).
FIGURE D FIGURE E
8) Reverse Steps 1-7 to install a new drive belt. NOTE: After installing a new belt, check it for correct alignment to the motor pulley before
setting the tensioner in place.
9) Test the treadmill for function as outlined in Section 9.21.
FIGURE F FIGURE G
45
Page 49

CHAPTER 9: PART REPLACEMENT GUIDE
9.11 INCLINE MOTOR REPLACEMENT
1) Turn off power to the treadmill and disconnect the power cord.
2) Lift the treadmill and support it so that the front wheels are off the floor, or the unit may be tipped on its side (Figure A).
FIGURE A
3) Remove the clip from the pin and remove the pin attaching the incline motor to the rack (Figure B & C).
FIGURE B FIGURE C
46
Page 50

CHAPTER 9: PART REPLACEMENT GUIDE
9.11 INCLINE MOTOR REPLACEMENT - CONTINUED
4) Disconnect the incline motor power cable from the MCB (Figure D).
5) Disconnect the incline motor from the top mounting bracket (Figure E).
FIGURE D FIGURE E
6) Lift the incline motor away from the treadmill (Figure F).
7) Reverse Steps 1-6 to install a new incline motor. NOTE: When installing the new incline motor, make sure to replace the white washers at
the top and bottom (Figure G).
FIGURE F FIGURE G
8) Test the treadmill for function as outlined in Section 9.21.
47
Page 51

CHAPTER 9: PART REPLACEMENT GUIDE
9.12 CONSOLE REPLACEMENT
1) Turn off power to the treadmill and disconnect the power cord.
2) Remove the 4 screws holding the back cover onto the console (Figure A).
3) Remove the four 6 mm screws from underneath the console (Figure B).
FIGURE A FIGURE B
4) Disconnect the 4 wire connections from the console (Figure C).
5) Remove the console (Figure D).
FIGURE C FIGURE D
6) Reverse Steps 1-5 to install a new console.
7) Test the treadmill for function as outlined in Section 9.21.
48
Page 52

CHAPTER 9: PART REPLACEMENT GUIDE
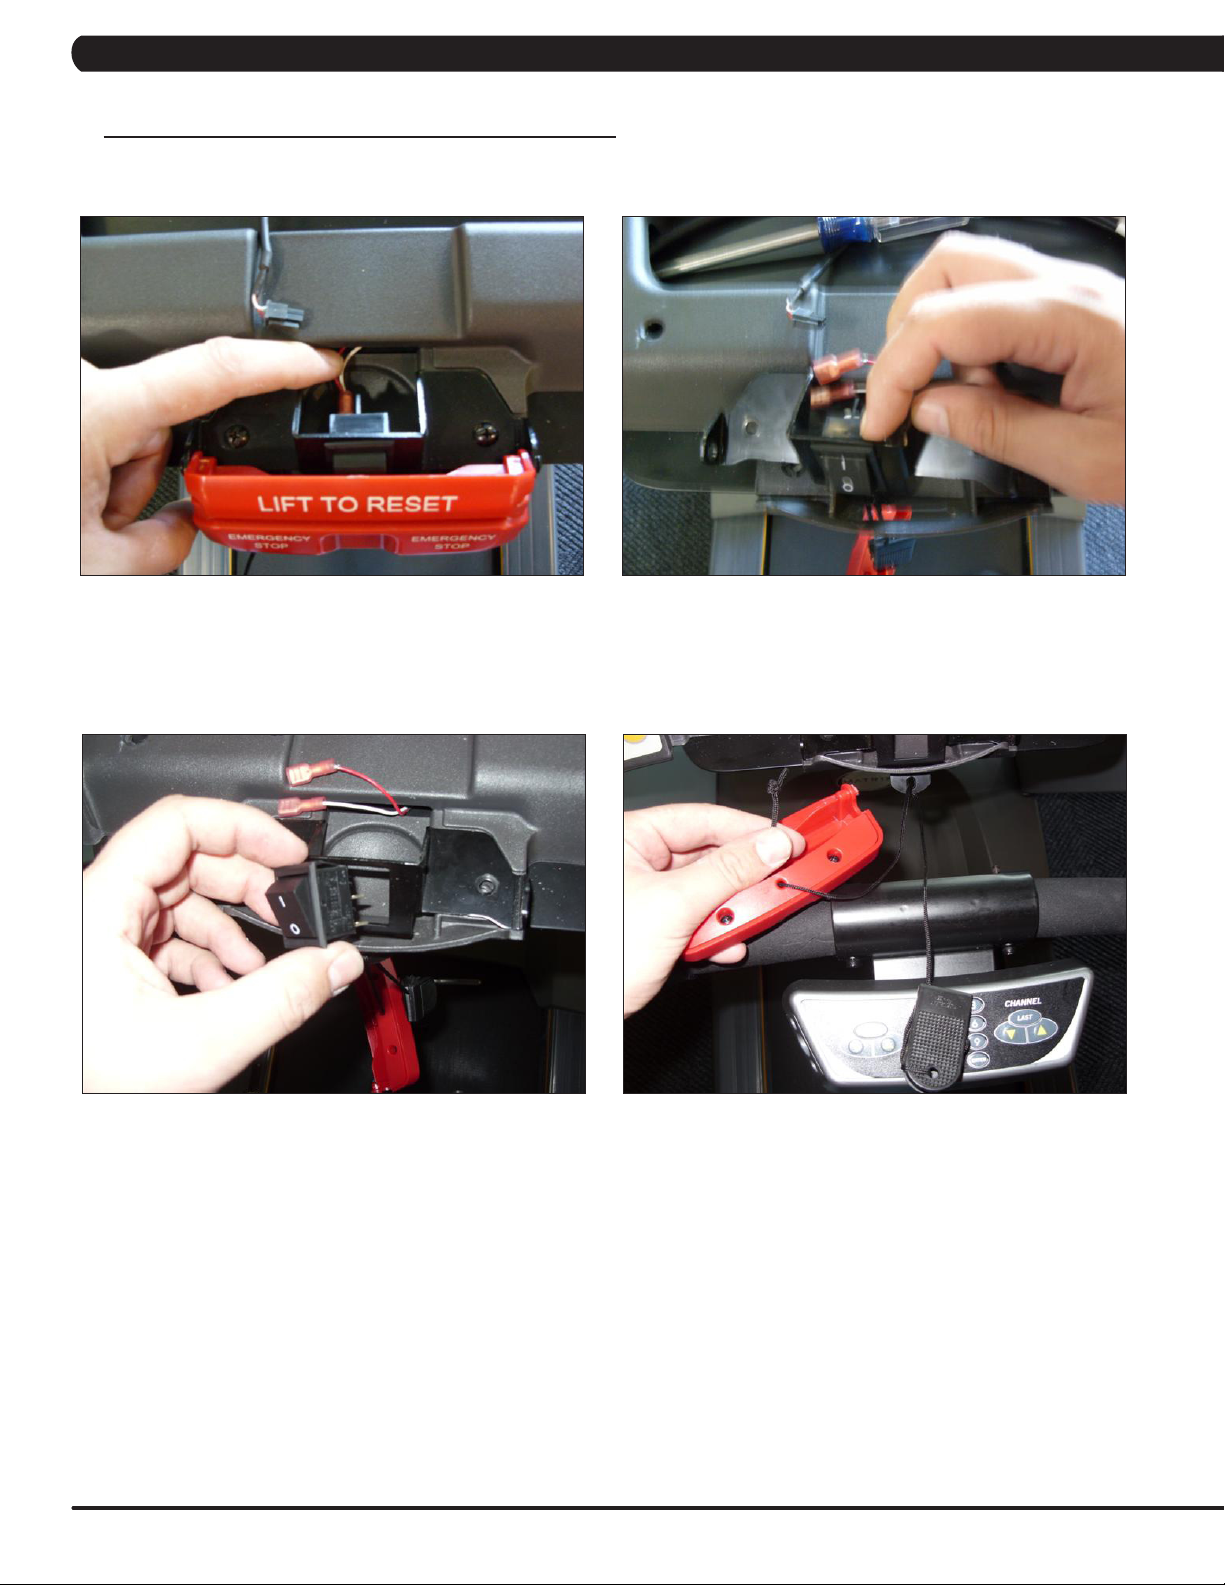
9.13 EMERGENCY STOP SWITCH REPLACEMENT
1) Turn off power to the treadmill and remove the power cord.
2) Remove the console as outlined in Section 9.12.
3) Remove the 2 screws holding the red emergency stop key to the emergency stop frame (Figure A).
4) Remove the 2 screws holding the emergency stop frame to the console frame (Figure B).
FIGURE A FIGURE B
5) Using a flat screwdriver, flex the red emergency stop key to remove it from the emergency stop frame (Figures C & D).
FIGURE C FIGURE D
49
Page 53
CHAPTER 9: PART REPLACEMENT GUIDE
9.13 EMERGENCY STOP SWITCH REPLACEMENT - CONTINUED
6) Disconnect the 2 wires plugged into the back of the emergency stop switch (Figure E).
7) Depress the tabs on the top and the bottom of the emergency stop switch (Figure F).
FIGURE E FIGURE F
8) This will allow the emergency stop to be removed from the emergency stop frame (Figure G).
9) Reverse Steps 1-8 to install a new emergency stop switch. NOTE: If replacing the red emergency stop key, be sure to attach the safety clip
string to the red emergency stop key before re-installing it (Figure H).
FIGURE G FIGURE H
10) Test the treadmill for function as outlined in Section 9.21.
50
Page 54

CHAPTER 9: PART REPLACEMENT GUIDE
9.14 CONSOLE FRAME REPLACEMENT
1) Turn off power to the treadmill and disconnect the power cord.
2) Remove the console as outlined in Section 9.12.
3) Remove the 2 screws on each side holding the console frame to the handlebar frame (Figure A).
FIGURE A
4) Remove the console frame from the handlebar frame. NOTE: The console cable wiring will need to be removed from the console frame as
it is removed (Figure B).
FIGURE B
5) Reverse Steps 1-4 to install a new console frame.
6) Test the treadmill for function as outlined in Section 9.21.
51
Page 55

CHAPTER 9: PART REPLACEMENT GUIDE
9.15 HEART RATE BOARD REPLACEMENT
1) Turn off power to the treadmill and remove the power cord.
2) Remove the console as outlined in Section 9.12.
3) Remove the console frame as outlined in Section 9.14.
4) Remove the 2 screws holding the emergency stop frame to the console frame (Figure A).
5) Lay the console frame on its face and remove the 7 screws holding the back panel to the console frame and lean the console back out of
the way (Figure B).
FIGURE A FIGURE B
6) Disconnect the wire connections that go to the heart rate board (Figure C).
7) Remove the 2 screws holding the heart rate board to the console frame and remove it (Figure D).
FIGURE C FIGURE D
8) Reverse Steps 1-7 to install a new heart rate board.
9) Test the treadmill for function as outlined in Section 9.21.
52
Page 56

CHAPTER 9: PART REPLACEMENT GUIDE
9.16 SPEED OR INCLINE KEYPAD REPLACEMENT
1) Turn off power to the treadmill and remove the power cord.
2) Remove the console as outlined in Section 9.12.
3) Remove the console frame as outlined in Section 9.14.
4) Remove the 2 screws holding the emergency stop frame to the console frame (Figure A).
5) Lay the console frame on its face and remove the 7 screws holding the back panel to the console frame and lean the console back out of the
way (Figure B).
FIGURE A FIGURE B
6) Disconnect the ribbon cable of the affected keypad (Figures C & D).
FIGURE C
7) Peel the keypad up from the front side of the console and remove it.
8) Reverse Steps 1-7 to install a new keypad.
9) Test the treadmill for function as outlined in Section 9.21.
FIGURE D
53
Page 57
CHAPTER 9: PART REPLACEMENT GUIDE
9.17 HANDLEBAR FRAME REPLACEMENT
1) Turn off power to the treadmill and remove the power cord.
2) Remove the console as outlined in Section 9.12.
3) Remove the console frame as outlined in Section 9.14.
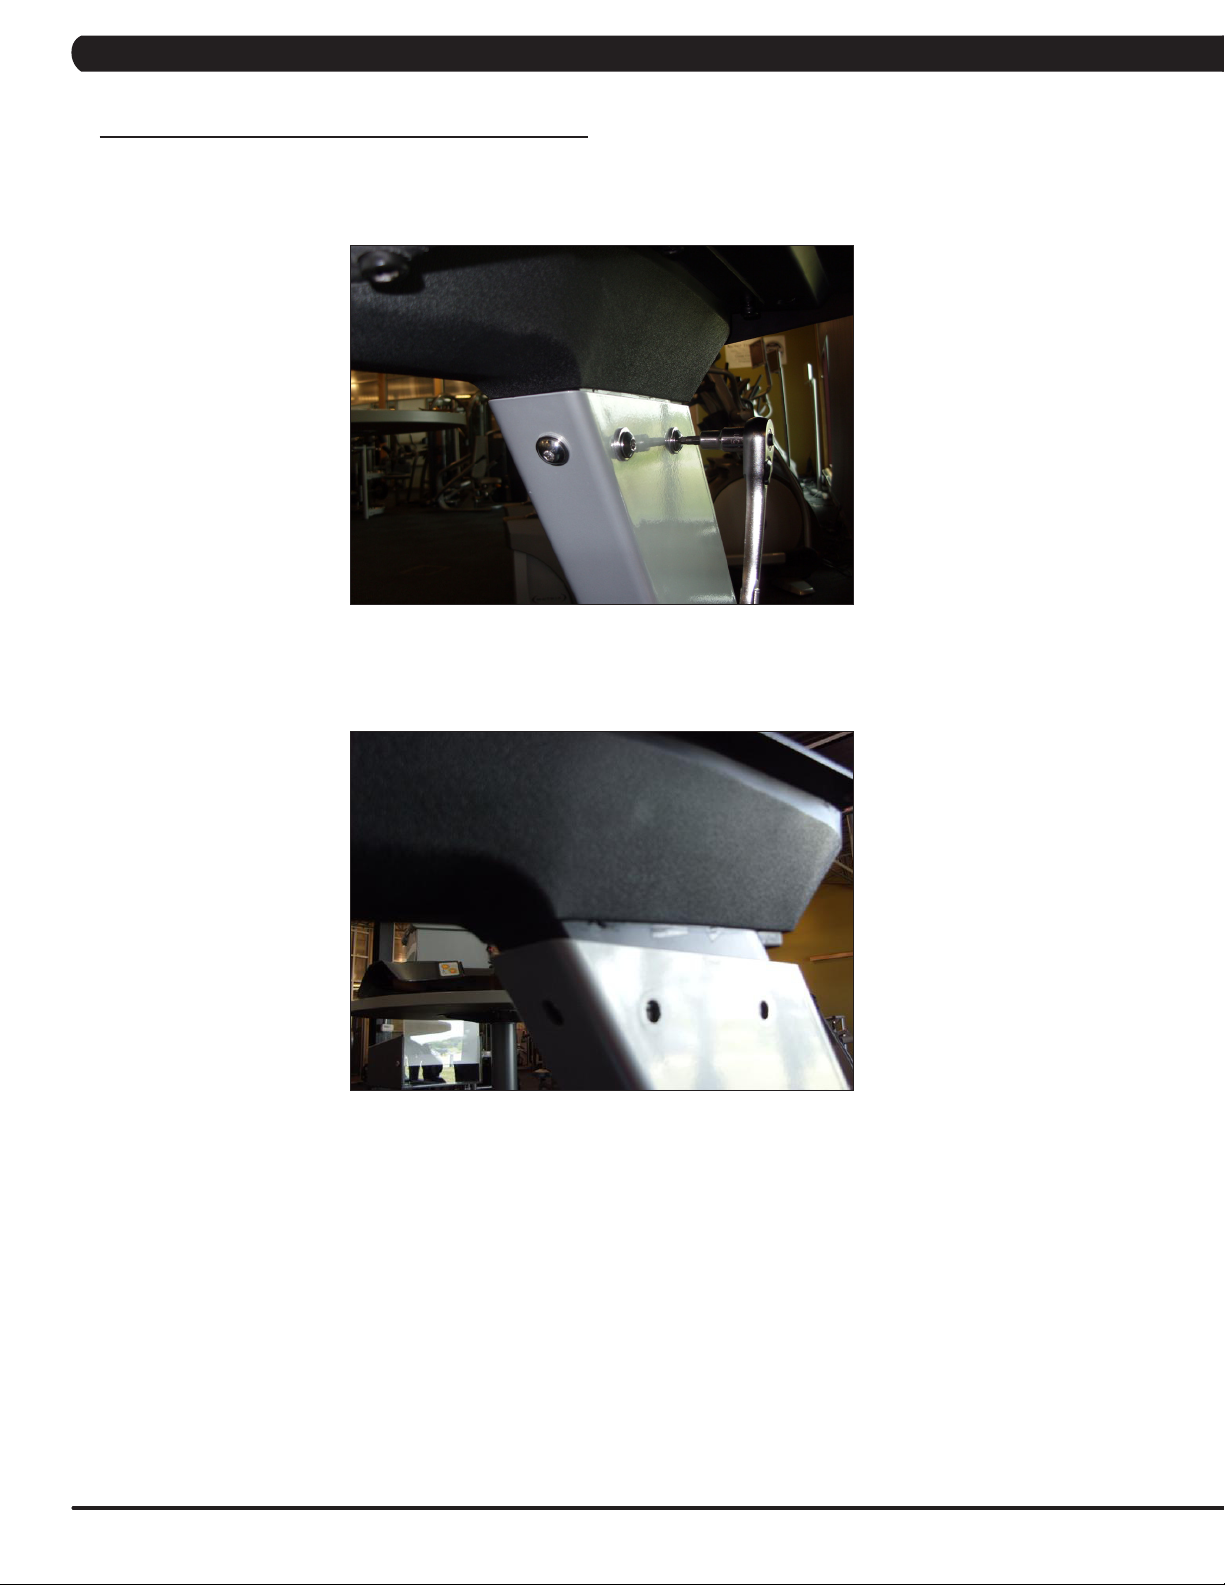
4) Remove the 3 screws on each side holding the handlebar frame to the console mast (Figure A).
FIGURE A
5) Lift the handlebar frame up and away from the console mast (Figure B). NOTE: The console cable wiring will need to be removed from the
handlebar frame on the user's right side as it is removed.
FIGURE B
6) Reverse Steps 1-5 to install a new handlebar frame.
7) Test the treadmill for function as outlined in Section 9.21.
54
Page 58

CHAPTER 9: PART REPLACEMENT GUIDE
9.18 HEART RATE HANDLEBAR REPLACEMENT
1) Turn off power to the treadmill and remove the power cord.
2) Remove the console as outlined in Section 9.12.
3) Remove the console frame as outlined in Section 9.14.
4) Remove the 3 screws on each side holding the handlebar frame to the console mast (Figure A).
5) Lift the handlebar frame up and away from the console mast (Figure B). NOTE: The console cable wiring will need to be removed from the
handlebar frame on the user's right side as it is removed.
FIGURE A FIGURE B
6) Remove the screw on each side holding the heart rate handlebar to the handlebar frame (Figure C).
FIGURE C
7) Pull the two sides of the handlebar frame away from each other and remove the heart rate handlebar from the handlebar frame.
8) Reverse Steps 1-7 to install a new heart rate handlebar.
9) Test the treadmill for function as outlined in Section 9.21.
55
Page 59

CHAPTER 9: PART REPLACEMENT GUIDE
9.19 HEART RATE GRIPS REPLACEMENT
1) Turn off power to the treadmill and remove the power cord.
2) Remove the 2 Phillips screws holding the 2 halves of the HR grip together (Figure A).
3) Disconnect the white wire from the bottom HR terminal and remove it (Figure B).
FIGURE A
4) Disconnect the red wire from the top HR terminal and remove it (Figure C).
FIGURE C
5) Reverse Steps 1-4 to install new HR grips.
6) Test the treadmill for function as outlined in Section 9.21.
FIGURE B
56
Page 60

CHAPTER 9: PART REPLACEMENT GUIDE
9.20 CONSOLE MAST REPLACEMENT
1) Turn off power to the treadmill and remove the power cord.
2) Remove the console as outlined in Section 9.12.
3) Remove the console frame as outlined in Section 9.14.
4) Remove the handlebar frame as outlined in Section 9.17.
5) Remove the motor cover as outlined in Section 9.1.
6) Remove the 4 screws holding the console mast to the base frame (Figure A).
7) Remove the console mast. NOTE: You will need to pull the console cable wiring through the hole in the bottom of the right side console
mast (Figure B).
FIGURE A FIGURE B
8) Reverse Steps 1-7 to install a new console mast. NOTE: Be sure to run the console cable wiring through the right side console mast prior
to mounting it to the base frame.
9) Test the treadmill for function as outlined in Section 9.21.
57
Page 61

CHAPTER 9: PART REPLACEMENT GUIDE
9.21 TESTING THE TREADMILL
ONCE THE TREADMILL OR REPLACEMENT PART IS FULLY INSTALLED AND
ASSEMBLED AND PROPERLY PLACED ON THE FLOOR, USE THE FOLLOWING
INSTRUCTIONS TO SETUP AND TEST THE MACHINE:
1) If the treadmill was just assembled or if any electronic component has been replaced (including if the console cable is unplugged for any
reason), the treadmill MUST be auto calibrated. Refer to the procedure in Section 3.4.
2) If the treadmill was just assembled or if the running belt, deck, or rollers are replaced, center and tension the running belt. Refer to the
procedure in Section 3.5.
3) Once Auto Calibration has been run and the running belt is centered, press GO on the display. Listen for any odd noises or squeaks.
4) Press the INCLINE UP key until the treadmill is raised to the maximum incline, then lower back down to the minimum incline. Listen for any
odd noises or squeaks during this procedure.
5) Press the SPEED UP key until the treadmill is raised to the maximum speed, then lower back down to the minimum speed. Listen for any
odd noises or squeaks during this procedure.
6) Grasp the heart rate grips to check for proper heart rate response.
7) Press and release the Emergency Stop to return to normal operation.
58
Page 62

CHAPTER 10: TREADMILL SPECIFICATIONS AND ASSEMBLY GUIDE
10.1 TREADMILL SPECIFICATIONS
FEATURES
Deck Type Ultimate Hard-Wax reversible 1" deck
Belt Type Habisat - 2 ply commercial grade
Running Area 60" x 20"
Deck Step Height 7.5"
Cushion System Ultimate Deck Cushioning System
Incline Range 0-15%(1300lb.thrustinclinemotor)
Speed Range 0.5 - 12 mph / 0.8 - 20 km/h
Contact HR Sensors Yes
Telemetric HR Receiver Yes
Transport Wheels Yes
DRIVE SYSTEM
Motor Matrix 4.2 hp AC Dynamic Response Drive System™
Motor Controller Commercial Treadmill AC Drive
CONSOLE
Display Type Dot-Matrix LED
Display Feedback Time, Distance, Calories, Speed, Incline, Pace, Heart Rate,
Workouts Manual, Rolling Hills, Fat Burn, 5K, Target HR, Gerkin Protocol,
One-Button Quick Start Yes
CSAFE, FitLinxx Ready Yes
Pause Function Yes
On-the-fly Program Change Yes
Integrated Vista Clear Digital Ready TV No
Manager Mode Re-settable defaults with accumulated time and distance.
TECH SPECS
Overall Dimensions 84"L x 33.25"W x 52"H
Maximum User Weight 400 lbs / 181.4 kg
Weight 345 lbs / 156 kg
Shipping Weight 350 lbs / 159 kg
Electrical Requirements 120 Volt 20 Amp Dedicated Circuit required with a non-looped
METs, Watts, and Profile.
Army PFT, Navy PRT, Marine PFT, and Air Force PRT
ground.
59
Page 63

CHAPTER 10: TREADMILL SPECIFICATIONS AND ASSEMBLY GUIDE
10.2 FASTENERS AND ASSEMBLY TOOLS
FRAME SET
PART # PART NAME DIAGRAM SPECIFICATION QUANTITY COLOR
11 Hex Head Cap Screw M8 x 1.25P x 25L 8 Blue
12 Flat Washer 8.2 x 19 2.0t 8 Blue
13 Hex Head Cap Screw M8 x 1.25P x 15L 6 Black
14 Button Head Screw M8 x 1.25P x 25L 6 White
15 Flat Washer 8.2 x 19 x 2.0t 6 White
CONSOLE SET
PART # PART NAME DIAGRAM SPECIFICATION QUANTITY COLOR
41 Hex Head Cap Screw M8 x 1.25P x 40L 4 Yellow
60
Page 64

CHAPTER 10: TREADMILL SPECIFICATIONS AND ASSEMBLY GUIDE
10.3 ASSEMBLY INSTRUCTIONS
ATTENTION
After assembly and installation is complete, the treadmill will need to be calibrated using the auto-calibration procedure outlined in Section 3.4.
DO NOT stand on the belt while the auto-calibration sequence is in progress.
Prior to assembling the treadmill, unpack all of the contents of the box and make sure that all necessary components are present. Review the
contents of the hardware package for completeness. Contact Matrix customer service at 866.693.4863 to report any missing items.
ASSEMBLY INSTRUCTIONS
Please make sure that the power cord is not plugged into the wall outlet while completing the following procedure.
To ensure correct assembly of the treadmill, carefully read and follow these steps:
Remove the motor cover(s) and set aside. The motor cover(s) need
to be removed to gain access to the motor compartment so that wire
harness connections can occur.
Open Blue Assembly Bag. Assemble both the left and right console
masts to the treadmill base using item 11 hex head cap screw and
item12atwasher.Threadtheconsolecablethroughtheright
console mast as you attach it.
61
Page 65
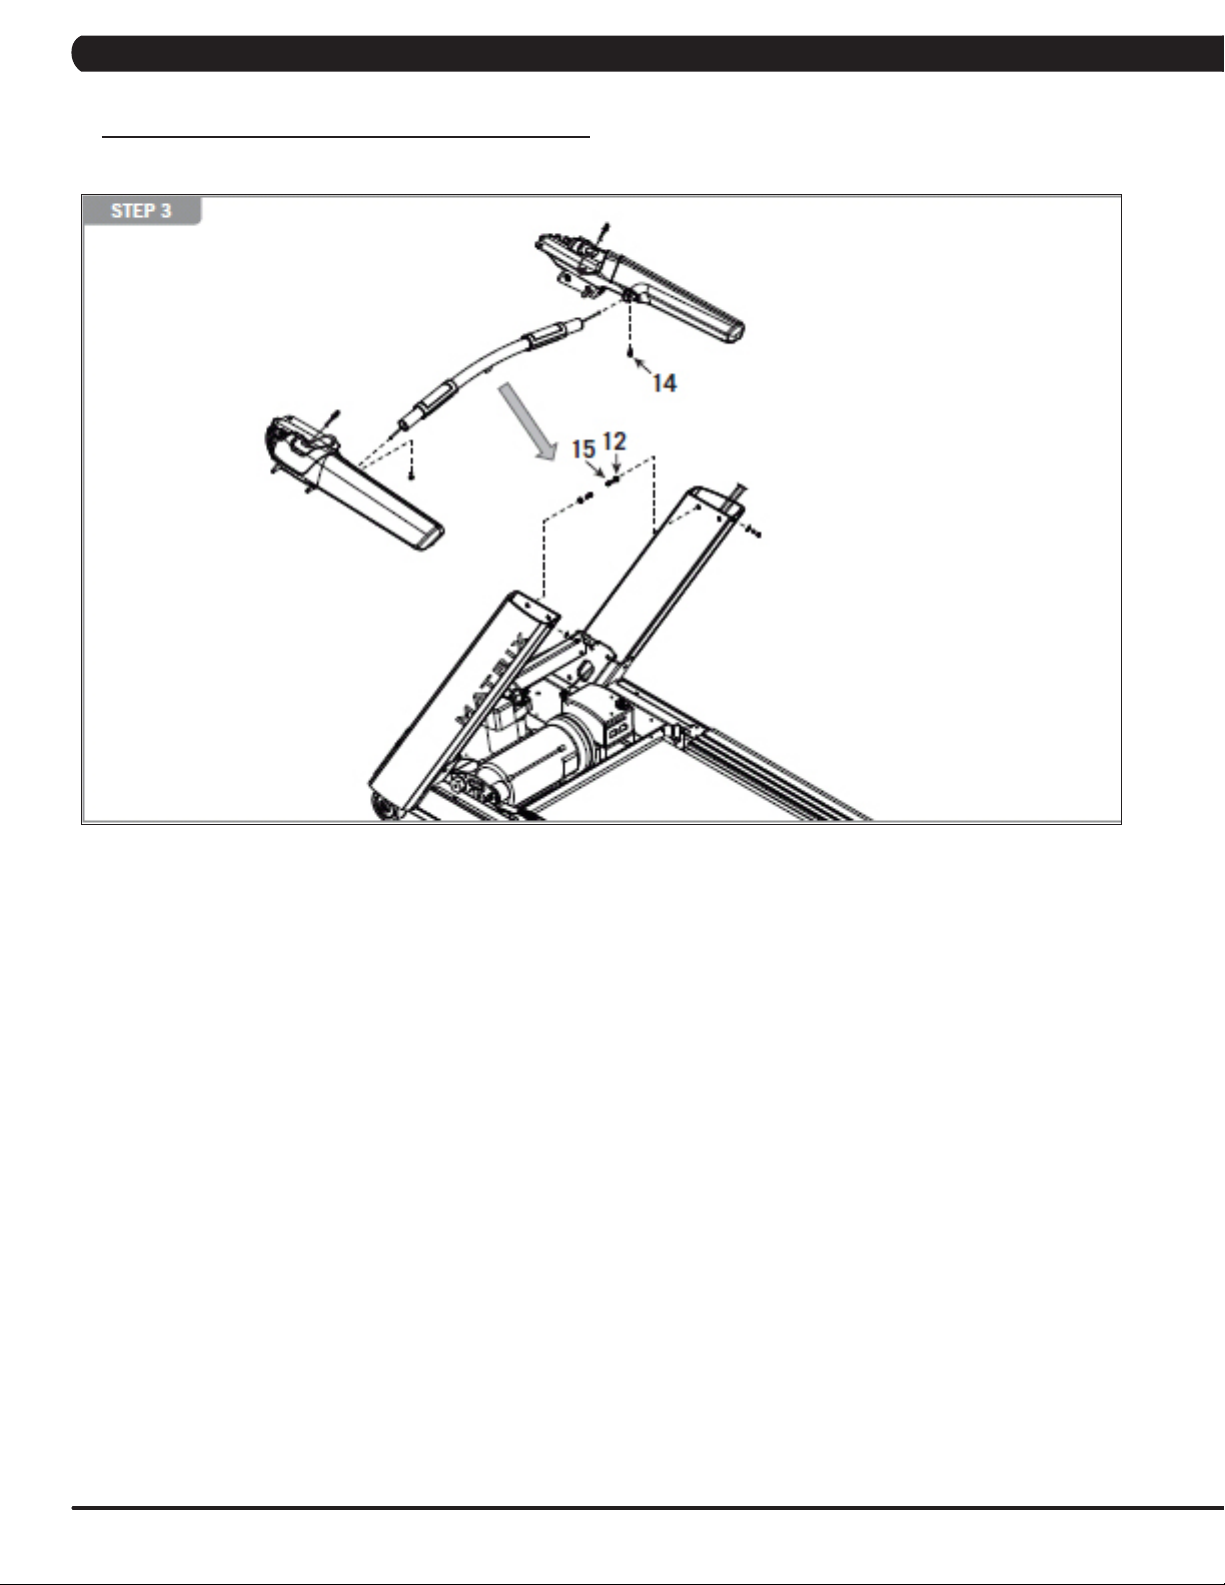
CHAPTER 10: TREADMILL SPECIFICATIONS AND ASSEMBLY GUIDE
10.3 ASSEMBLY INSTRUCTIONS - CONTINUED
Open Black & White Assembly Bag. Assemble the HR handlebar to the left and right handlebars using item 14 - hex head cap screw. Fasten
the contact HR handlebar assembly to the console masts using item 15 - button head screw and item 12 - flat washer.
Pull the HR wires through the handlebar using the wire pull. Pull the mast wire through the handlebar.
Assembly tip: Look at the labels on the HR wire coming from the HR handlebar to ensure that contact with the left and right handlebars are
assembled in the proper orientation.
62
Page 66

CHAPTER 10: TREADMILL SPECIFICATIONS AND ASSEMBLY GUIDE
10.3 ASSEMBLY INSTRUCTIONS - CONTINUED
Open Black Assembly Bag. Assemble the console frame to the
handlebars using item 14 - hex head cap screw. Be sure to route
the console cables down the console mast and connect the HR
handlebar wires. Make all appropriate wire connections within the
motor compartment.
NOTE: For the T3x, three connections need to be made in the
motor compartment and four connections at the console. Each wire
connector is a different size and will not fit into an incorrect position.
There will be 2 wires that will not be used, the coax and power
wiring (4 pin connector) that is used for the T3xe TV (Figure A).
Open Yellow Console Assembly Bag. Make the appropriate color
coded wire connections to the faceplate then assemble to the
console frame using item 41 - hex head cap screw.
FIGURE A
63
Page 67

CHAPTER 10: TREADMILL SPECIFICATIONS AND ASSEMBLY GUIDE
10.3 ASSEMBLY INSTRUCTIONS - CONTINUED
Open Green Assembly Bag. Install the power cord and assemble
item 18 power cord holder with item 22 button head screw. If your
hardware pack is missing item 22, check to see if the screws are
already assembled on the treadmill.
Replace the motor cover(s) and power the treadmill on. The power
button is located next to the power cord inlet.
64
Page 68
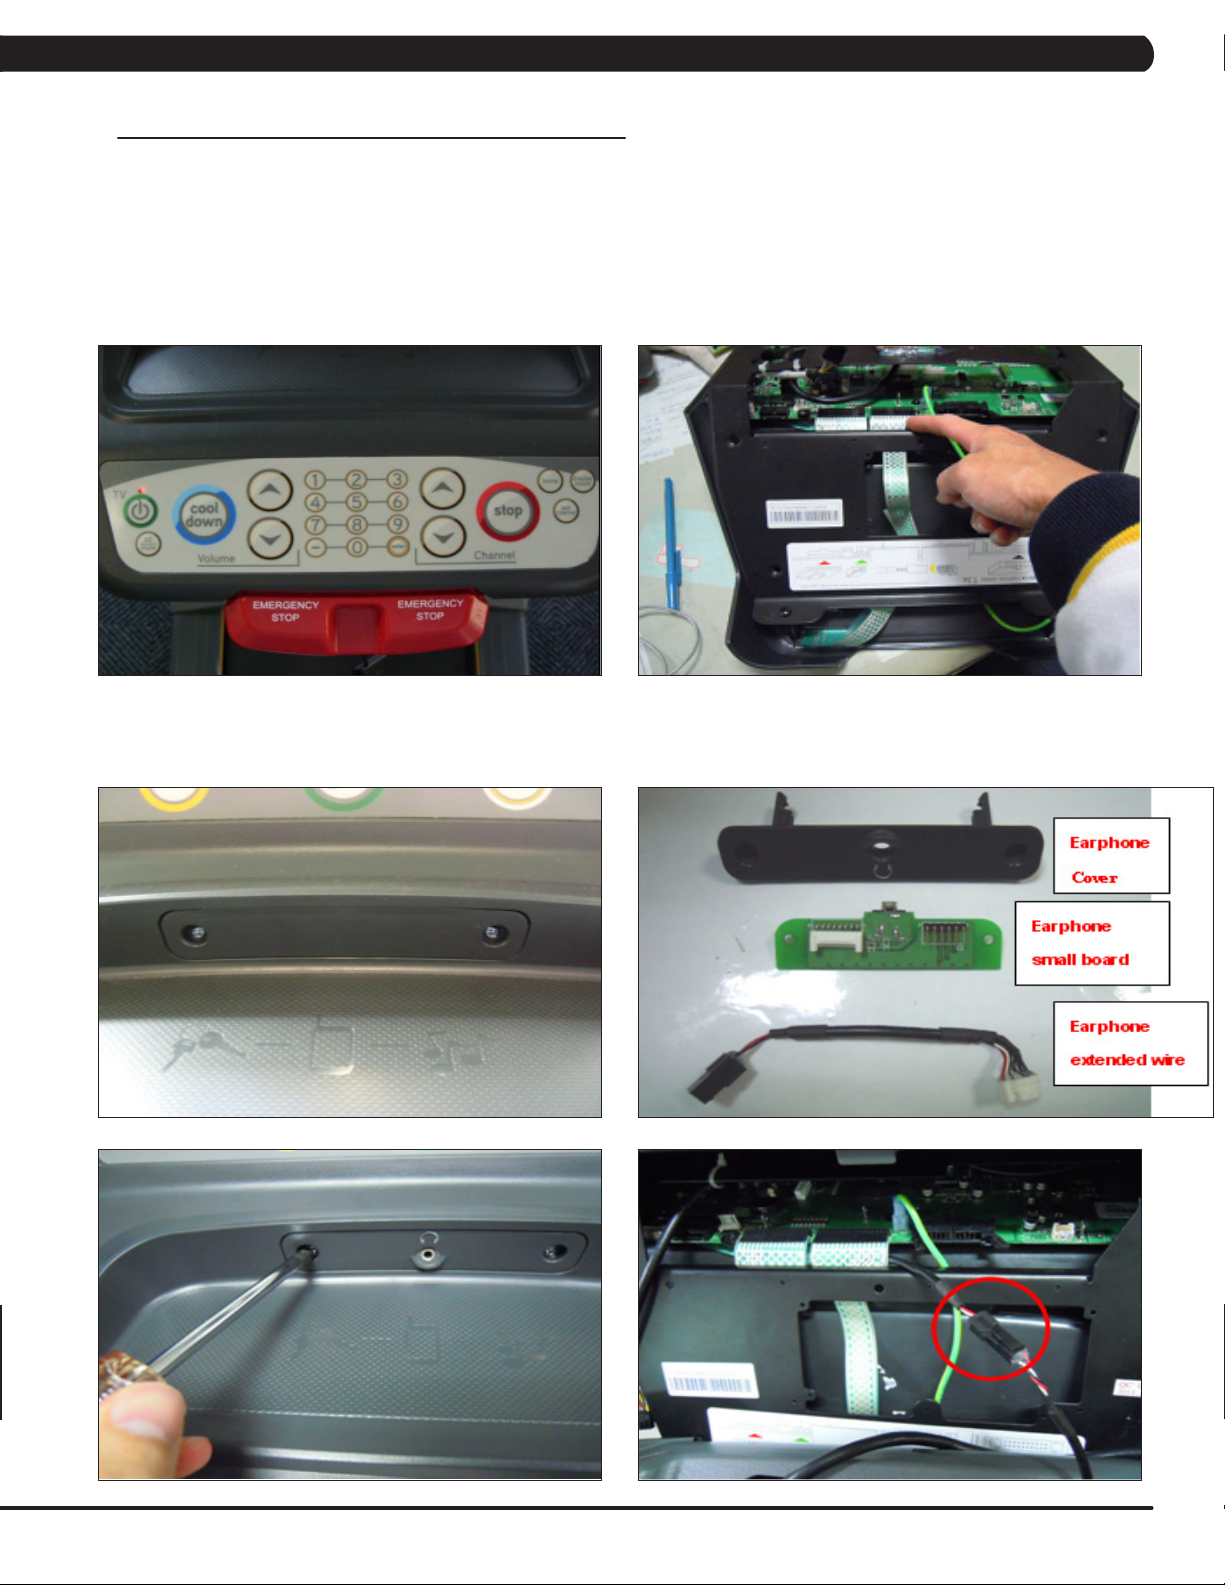
CHAPTER 10: TREADMILL SPECIFICATIONS AND ASSEMBLY GUIDE
10.4 TV BRACKET INSTALLATION INSTRUCTIONS
The T3x-03 is capable of accepting an add on 15" TV via a bracket. Use the instructions below to install
the bracket to the treadmill. Use the TV Owner's Guide to program the TV after installation.
1. Turn off power and remove the power cord.
2. Remove the console as shown in Section 9.12.
3. Remove the console back cover.
4. Unplug and remove the lower keypad / overlay from the console.
5. Install a the new entertainment keypad / overlay from the TV bracket kit (FIgure A).
6. Plug the new keypad / overlay ribbon cable into the UCB (Figure B).
FIGURE BFIGURE A
7. Remove the existing head phone jack cover (Figure C).
8. Assemble the new head phone jack and wire to the new cover (Figure D), and install the new head phone jack / cover / wire to the console
(Figure E). Plug the head phone jack wire into the 4 pin wire coming up the console mast (Figure F).
FIGURE C
FIGURE D
FIGURE FFIGURE E
65
Page 69
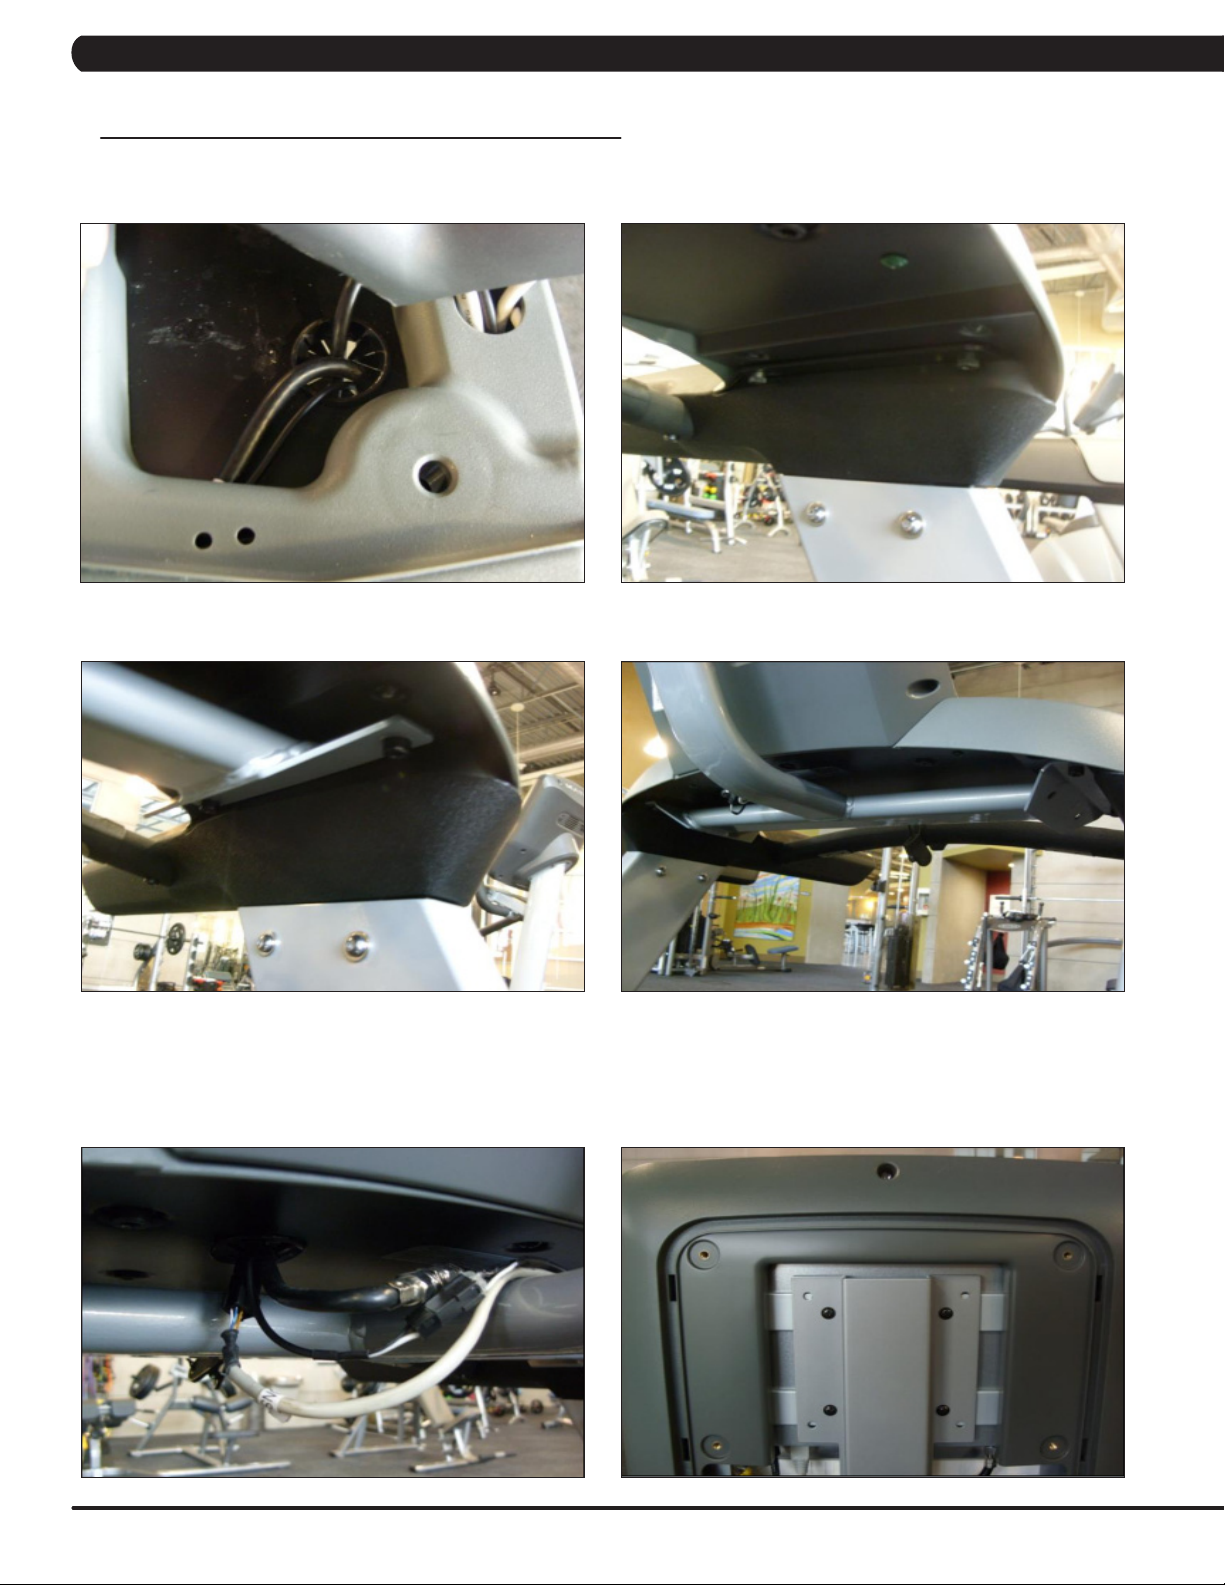
CHAPTER 10: TREADMILL SPECIFICATIONS AND ASSEMBLY GUIDE
10.4 TV BRACKET INSTALLATION INSTRUCTIONS - CONTINUED
9. Feed the coax cable and TV power wire (4 pins - both wires come up the console mast), and controller signal wire (8 pins - from the console)
through the hole in the handlebar frame below the console (Figure G).
10. Remove the 4 screws holding the upper handlebar assembly to the console masts (Figure H).
FIGURE G FIGURE H
11. Mount the TV bracket to the frame using the 4 screws removed in Step 4 (Figures I & J).
FIGURE JFIGURE I
12. Connect the coax cable, TV power wire, and controller signal wire that you fed through the hole in the handlebar frame in Step 9 to the
cables coming out of the TV bracket (Figure K). NOTE: There is a wire in the TV bracket that is not currently used (it has a 6 pin connector on
one end and a yellow RJ45 connector on the TV end of the bracket).
13. Re-install the console onto the handlebar frame.
14. Install the TV to the TV bracket using 4 screws sent with the TV (Figure L).
66
FIGURE LFIGURE K
Page 70

CHAPTER 10: TREADMILL SPECIFICATIONS AND ASSEMBLY GUIDE
10.4 TV BRACKET INSTALLATION INSTRUCTIONS - CONTINUED
15. Plug in the coax cable, TV power wire, and controller signal wire to the back of the TV (Figure M). NOTE: The yellow RJ45 connector
shown in Figure I is not currently used.
16. Plug in the power adaptor and cord sent with the TV to the base of the treadmill to provide power to the TV (Figure N).
FIGURE NFIGURE M
17. Plug in a coax cable to the base of the treadmill (Figure O). NOTE: Matrix does not provide any external coax cables, it is the
responsibility of the club to provide these cables. All coax cables should have a signal strength of 10db.
18. Program the TV using the instructions provided in the Entertainment Owner's Manual (sent with every TV). Test the entertainment keypad
for function.
19. Install the TV back cover (Figure P).
FIGURE PFIGURE O
67
Page 71

CHAPTER 11: SOFTWARE UPGRADE GUIDE
11.1 SOFTWARE UPGRADE INSTRUCTIONS
1) Turn on the power to the treadmill, wait until the standard display picture has come up.
2) Enter Manager Mode by pressing and holding the LEVEL UP and DOWN keys simultaneously. Record the Accumulated Mileage and
Accumulated Distance. Scroll to Engineering Mode and record the Serial Number. NOTE: This information can be lost during the update
procedure and should be recorded so that the information can be re-entered into the console once it is updated.
3) Build a path of folders on the USB drive that will be used. The path should be MATRIX\FW\UCB (create a folder called MATRIX, then a
folder within MATRIX called FW, then a folder within FW called UCB).
4) Copy the software files into the UCB folder on the USB drive (the path should read \MATRIX\FW\UCB - Figure A).
5) Insert the USB drive into the USB port on the console (Figure B).
6) Press TIME and PAUSE simultaneously for 3 seconds to choose the correct software version(Figure C).
7) Wait until the display shows the message "Please choose update name", then press the LEVEL UP or DOWN keys to choose the correct
software (if more than one version is on the USB drive). Once the correct software is show, press ENTER and the upgrade procedure will run.
8) When the console beeps and the standard display picture comes back up (Figure B), the upgrade is complete. Remove the USB drive.
9) Enter into Manager Mode (see Section 5.1) and make sure the software version is correct.
10) Enter into Service Mode (See Section 7.1). Enter the values recorded in Step 2 (if needed).
11) Enter into Engineering Mode (See Section 6.1). Check that the serial number is correct.
12) Test the treadmill for function as outlined in Section 9.21.
FIGURE A
FIGURE CFIGURE B
68
Page 72

NOTES
69
Page 73

70
MAT R I X FITN E S S S YSTEM S C O R P.
1610 L A N D MARK D R I V E C O T TA G E G R O V E WI 5 3 5 2 7 U S A
TO LL FRE E 8 6 6 .693. 4 8 6 3
w w w. m a tr i x f i t n e s s . c o m
KO
REV. 1
FA X 6 0 8 .839. 1 7 1 7
 Loading...