

Page 1
T130 XT130 XI
Page 2

IMPORTANT PRECAUTIONS
ENGLISH
SAVE THESE INSTRUCTIONS
• When using a treadmill, basic precautions should always be followed, including the following: Read all instructions before using this equipment. It is
the responsibility of the owner to ensure that all users of this equipment are adequately informed of all warnings and precautions.
• This equipment is intended for commercial use. To ensure your safety and protect the equipment, read all instructions before operating.
DANGER!
TO REDUCE THE RISK OF ELECTRICAL SHOCK:
• Always unplug the equipment from the electrical outlet immediately after using, before cleaning, performing maintenance and putting on or taking off parts.
WARNING!
TO REDUCE THE RISK OF BURNS, FIRE, ELECTRICAL SHOCK OR INJURY TO PERSONS:
• Incorrect or excessive exercise may cause injury. If you
experience any kind of pain, including but not limited to chest
pains, nausea, dizziness, or shortness of breath, stop exercising
immediately and consult your physician before continuing.
• When exercising, always maintain a comfortable pace.
• Do not wear clothes that might catch on any part of the treadmill.
• Always wear athletic shoes while using this equipment.
• Do not jump on the treadmill.
• At no time should more than one person be
on treadmill while in operation.
• This treadmill should not be used by persons weighing more
than specied in the OWNER’S MANUAL SPECIFICATIONS
SECTION. Failure to comply will void the warranty.
• Disconnect all power before servicing or moving the equipment.
To clean, wipe surfaces down with soap and slightly damp
cloth only; never use solvents. (See MAINTENANCE)
• The treadmill should never be left unattended when
plugged in. Unplug from outlet when not in use,
and before putting on or taking off parts.
• Do not operate under blanket or pillow. Excessive heating can
occur and cause re, electric shock, or injury to persons.
• Connect this exercise product to a properly grounded outlet only.
• Installation of parts or accessories not originally
intended or compatible with the equipment as sold
will void warranty and may impact safety.
• Measured at typical head height, the A-weighted sound
pressure level when the Treadmill is running at 12 Km/
Hour (without load) is no greater than 82 dB.
• Noise emission under load is higher than without load.
• At NO time should pets or children under the age
of 14 be closer to the treadmill than 10 feet.
• At NO time should children under the age of 14 use the treadmill.
• Children over the age of 14 should not use the
treadmill without adult supervision.
• This equipment is not intended for use by persons with
reduced physical, sensory or mental capabilities, or lack
of experience and knowledge, unless they have been
given supervision or instruction concerning use of the
equipment by a person responsible for their safety.
• Use the treadmill only for its intended use as described
in the treadmill guide and owner’s manual.
• Do not use other attachments that are not recommended
by the manufacturer. Attachments may cause injury.
• Never operate the treadmill if it has a damaged cord
or plug, if it is not working properly, if it has been
dropped or damaged, or immersed in water. Call
Customer Tech Support for examination and repair.
• Keep power cord away from heated surfaces. Do not carry
this unit by its supply cord or use the cord as a handle.
• Never operate the treadmill with the air opening blocked.
Keep the air opening clean, free of lint, hair, and the like.
• To prevent electrical shock, never drop or
insert any object into any opening.
• Do not operate where aerosol (spray) products are
being used or when oxygen is being administered.
• To disconnect, turn all controls to the off
position, then remove plug from outlet.
• Do not use treadmill in any location that is not
temperature controlled, such as but not limited to
garages, porches, pool rooms, bathrooms, car ports or
outdoors. Failure to comply may void the warranty.
• Do not remove the console covers unless instructed
by Customer Tech Support. Service should only be
done by an authorized service technician.
• To avoid injury, stand on the side rails
before starting the treadmill.
• Heart rate monitoring systems may be inaccurate.
• Over exercising may result in serious injury or death.
• If you feel faint, stop exercising immediately.
CAUTION!
CONSULT A PHYSICIAN BEFORE USING THIS EQUIPMENT. READ OWNER’S MANUAL BEFORE USE.
• It is essential that this equipment is used only indoors, in a climate controlled room. If this equipment has been exposed to colder temperatures or high
moisture climates, it is strongly recommended that the equipment is warmed up to room temperature before rst time use. Failure to do so may cause
premature electronic failure. The initial (default) starting speed is 0.5 mph (0.8 kph). The default starting speed set too high can be dangerous.
2
Page 3

POWER REQUIREMENTS
DEDICATED CIRCUIT AND ELECTRICAL INFO
A “Dedicated Circuit” means that each outlet you plug into should
not have anything else running on that same circuit. The easiest
way to verify this is to locate the main circuit breaker box, and turn
off the breaker(s) one at a time. Once a breaker has been turned
off, the only thing that should not have power to it are the units
in question. No lamps, vending machines, fans, sound systems, or
any other item should lose power when you perform this test.
Non-looped (isolated) neutral/grounding means that each circuit
must have an individual neutral/ground connection coming from
it, and terminating at an approved earth ground. You cannot
“jumper” a single neutral/ground from one circuit to the next.
ELECTRICAL REQUIREMENTS
For your safety and to ensure good treadmill performance, the
ground on this circuit must be non-looped (isolated). Please refer
to NEC article 210-21 and 210-23. Your treadmill is provided with a
power cord with a plug listed below and requires the listed outlet. Any
alterations of this power cord could void all warranties of this product.
110 V UNITS
All Matrix T130 X and T130 XI 110 V treadmills require the use
of a 100-125 V, 60 Hz and a 15 A “Dedicated Circuit”, with a
non-looped (isolated) neutral/ground for power. This outlet
should be a NEMA 5-20R and have the same conguration as
the plug. No adapter should be used with this product.
GROUNDING INSTRUCTIONS
The equipment must be grounded. If it should malfunction or
breakdown, grounding provides a path of least resistance for electric
current to reduce the risk of electric shock. The unit is equipped with
a cord having an equipment-grounding conductor and a grounding
plug. The plug must be plugged into an appropriate outlet that
is properly installed and grounded in accordance with all local
codes and ordinances. If the user does not follow these grounding
instructions, the user could void the Matrix limited warranty.
ADDITIONAL ELECTRICAL INFO
In addition to the dedicated circuit requirement, the proper
gauge wire must be used from the circuit breaker box, to each
outlet that will have the maximum number of units running
off of it. If the distance from the circuit breaker box to each
outlet, is 100 ft (30.5 m) or less, then 12 gauge wire should be
used. For distances greater than 100 ft (30.5 m) from the circuit
breaker box to the outlet, a 10 gauge wire should be used.
ENERGY SAVING / LOW-POWER MODE
All units are congured with the ability to enter into an energy
saving / low-power mode when the unit has not been in use
for a specied period of time. Additional time may be required
to fully reactivate this unit once it has entered the low-power
mode. This energy saving feature may be enabled or disabled
from within the ‘Manager Mode’ or ‘Engineering Mode.’
WARNING!
• Connect this exercise product to a properly grounded outlet only.
• Never operate product with a damaged cord or plug even
if it is working properly. Never operate any product if it
appears damaged, or has been immersed in water. Contact
Customer Tech Support for replacement or repair.
Failure to follow these specications can cause damage
to your product and can void the warranty:
• All power outlets must be functional the day of delivery /
assembly of the product. The client is responsible for any
additional installation charges associated with return visits.
• Electrical supply may uctuate in your area. To ensure stable
performance of the product, use the proper gauge wire.
DANGER!
Improper connection of the equipment-grounding conductor
can result in a risk of electric shock. Check with a qualied
electrician or serviceman if you are in doubt as to whether
the product is properly grounded. Do not modify the plug
provided with the product. If it will not t the outlet, have
a proper outlet installed by a qualied electrician.
FCC REGULATIONS
This equipment has been tested and found to
comply with the limits for a Class B digital device,
pursuant to part 15 of the FCC rules. These limits are
designed to provide reasonable protection against
harmful interference in a residential installation. This
equipment generates, uses and can radiate radio
frequency energy and, if not installed and used in
accordance with the instructions, may cause harmful
interference to radio communications. However,
there is no guarantee that interference will not occur
in a particular installation. If this equipment does
cause harmful interference to radio or television
reception, which can be determined by turning the
equipment off and on, the user is encouraged to try
to correct the interference by one or more of the
following measures:
• Reorient or relocate the receiving antenna.
• Increase the separation between the equipment
and receiver.
• Connect the equipment into an outlet on a
circuit different from that to which the receiver is
connected.
• Consult the dealer or an experienced radio/TV
technician for help.
FCC RF Radiation Exposure Statement:
1. This Transmitter must not be co-located or
operating in conjunction with any other antenna
or transmitter.
2. This equipment complies with FCC RF radiation
exposure limits set forth for an uncontrolled
environment. This equipment should be installed
and operated with a minimum distance of 20
centimeters between the radiator and your body.
ENGLISH
3
Page 4
ENGLISH
ASSEMBLY
UNPACKING
Unpack the equipment where you will be using it. Place the carton on a level at surface. It is recommended
that you place a protective covering on your oor. Never open box when it is on its side.
IMPORTANT NOTES
During each assembly step, ensure that ALL nuts and bolts are in place and partially threaded.
Several parts have been pre-lubricated to aid in assembly and usage. Please do not wipe this
off. If you have diculty, a light application of lithium grease is recommended.
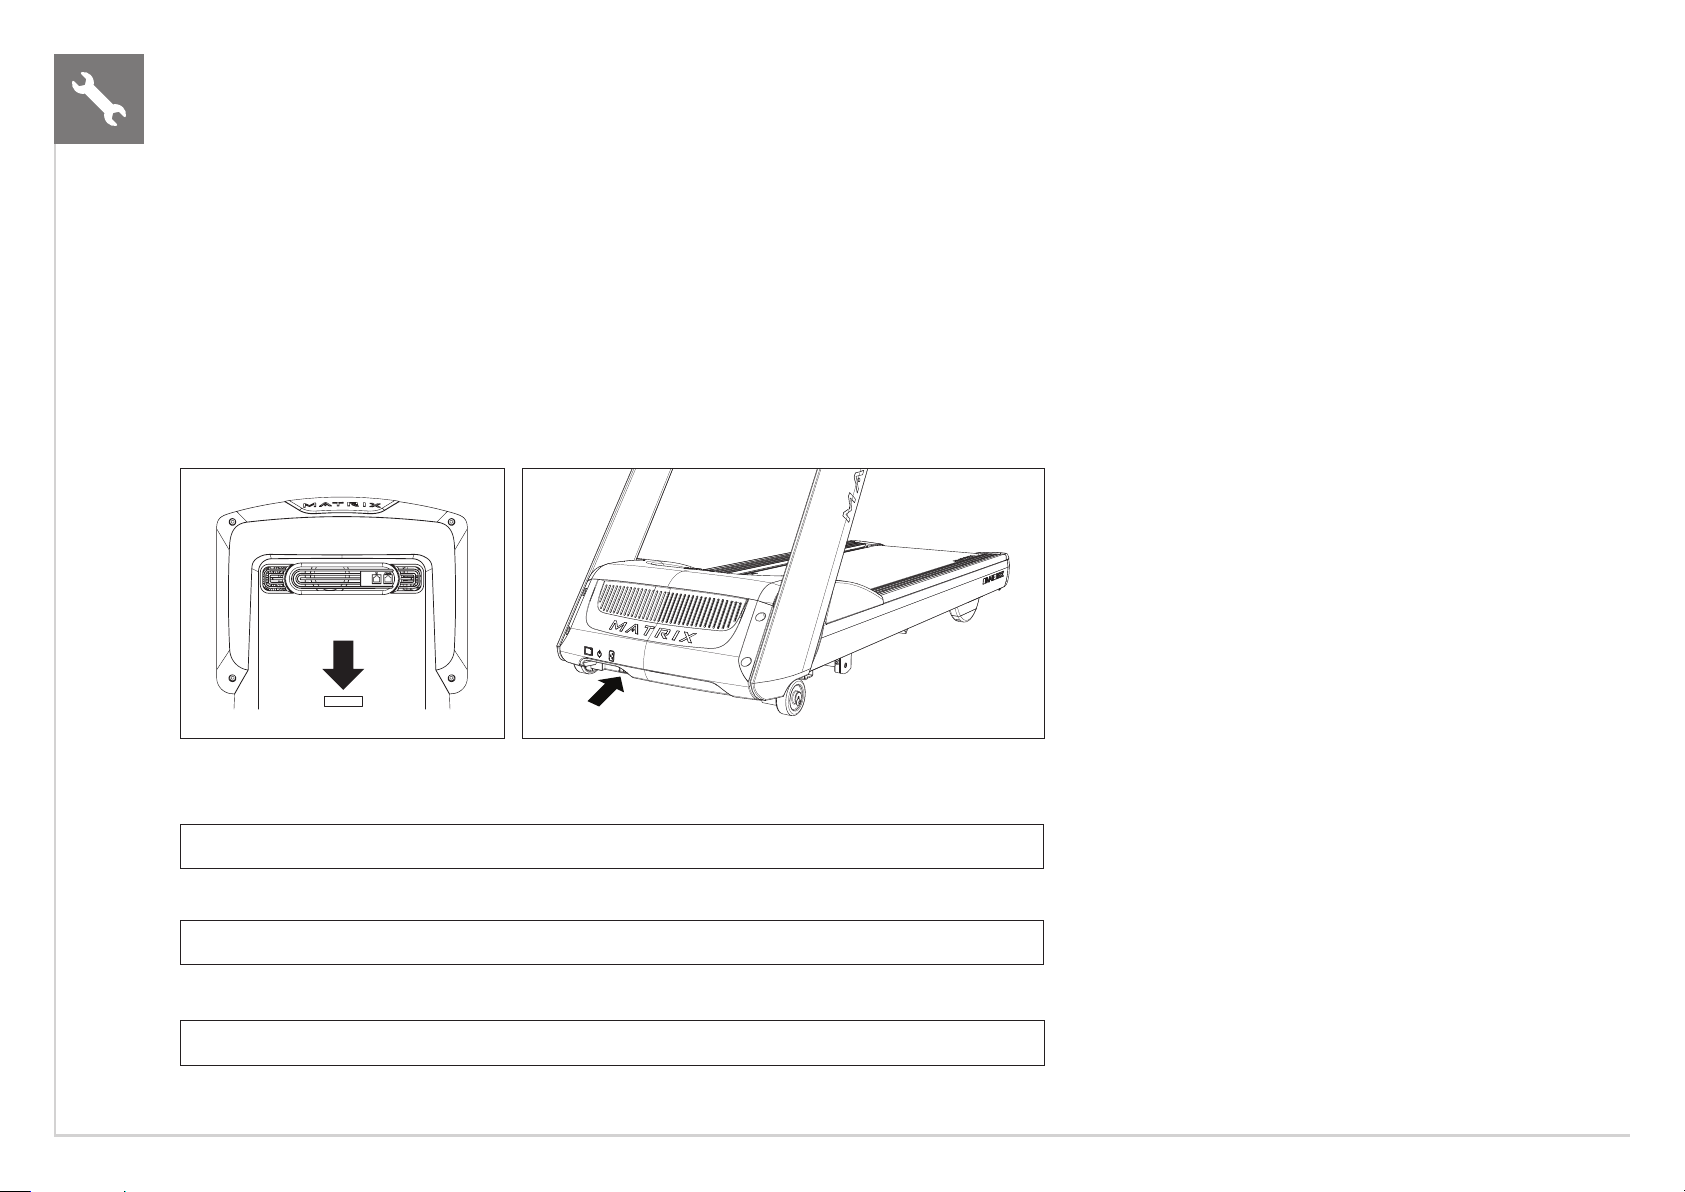
SERIAL NUMBER LOCATIONS
WARNING!
There are several areas during the assembly process that special
attention must be paid. It is very important to follow the assembly
instructions correctly and to make sure all parts are rmly tightened. If
the assembly instructions are not followed correctly, the equipment could
have parts that are not tightened and will seem loose and may cause
irritating noises. To prevent damage to the equipment, the assembly
instructions must be reviewed and corrective actions should be taken.
NEED HELP?
If you have questions or if there are any missing parts, contact Customer
Tech Support. Contact information is located on the information card.
TOOLS REQUIRED:
F 8mm T-Wrench
F 5mm Allen Wrench
F 6mm Allen Wrench
F Phillips Screwdriver
PARTS INCLUDED:
F 1 Base Frame
Before proceeding, nd the serial numbers located on barcode stickers and enter them in the spaces provided below.
CONSOLE SERIAL NUMBER
FRAME SERIAL NUMBER
F 2 Console Masts
F 2 Console Mast Brackets
F 1 Console Assembly
F 2 Handlebar Covers
F 1 Power Cord
F 1 Hardware Kit
Console packaged separately
MODEL
F
T130 X
* Use the information above when calling for service.
4
F
T130 XI MATRIX TREADMILL
Page 5
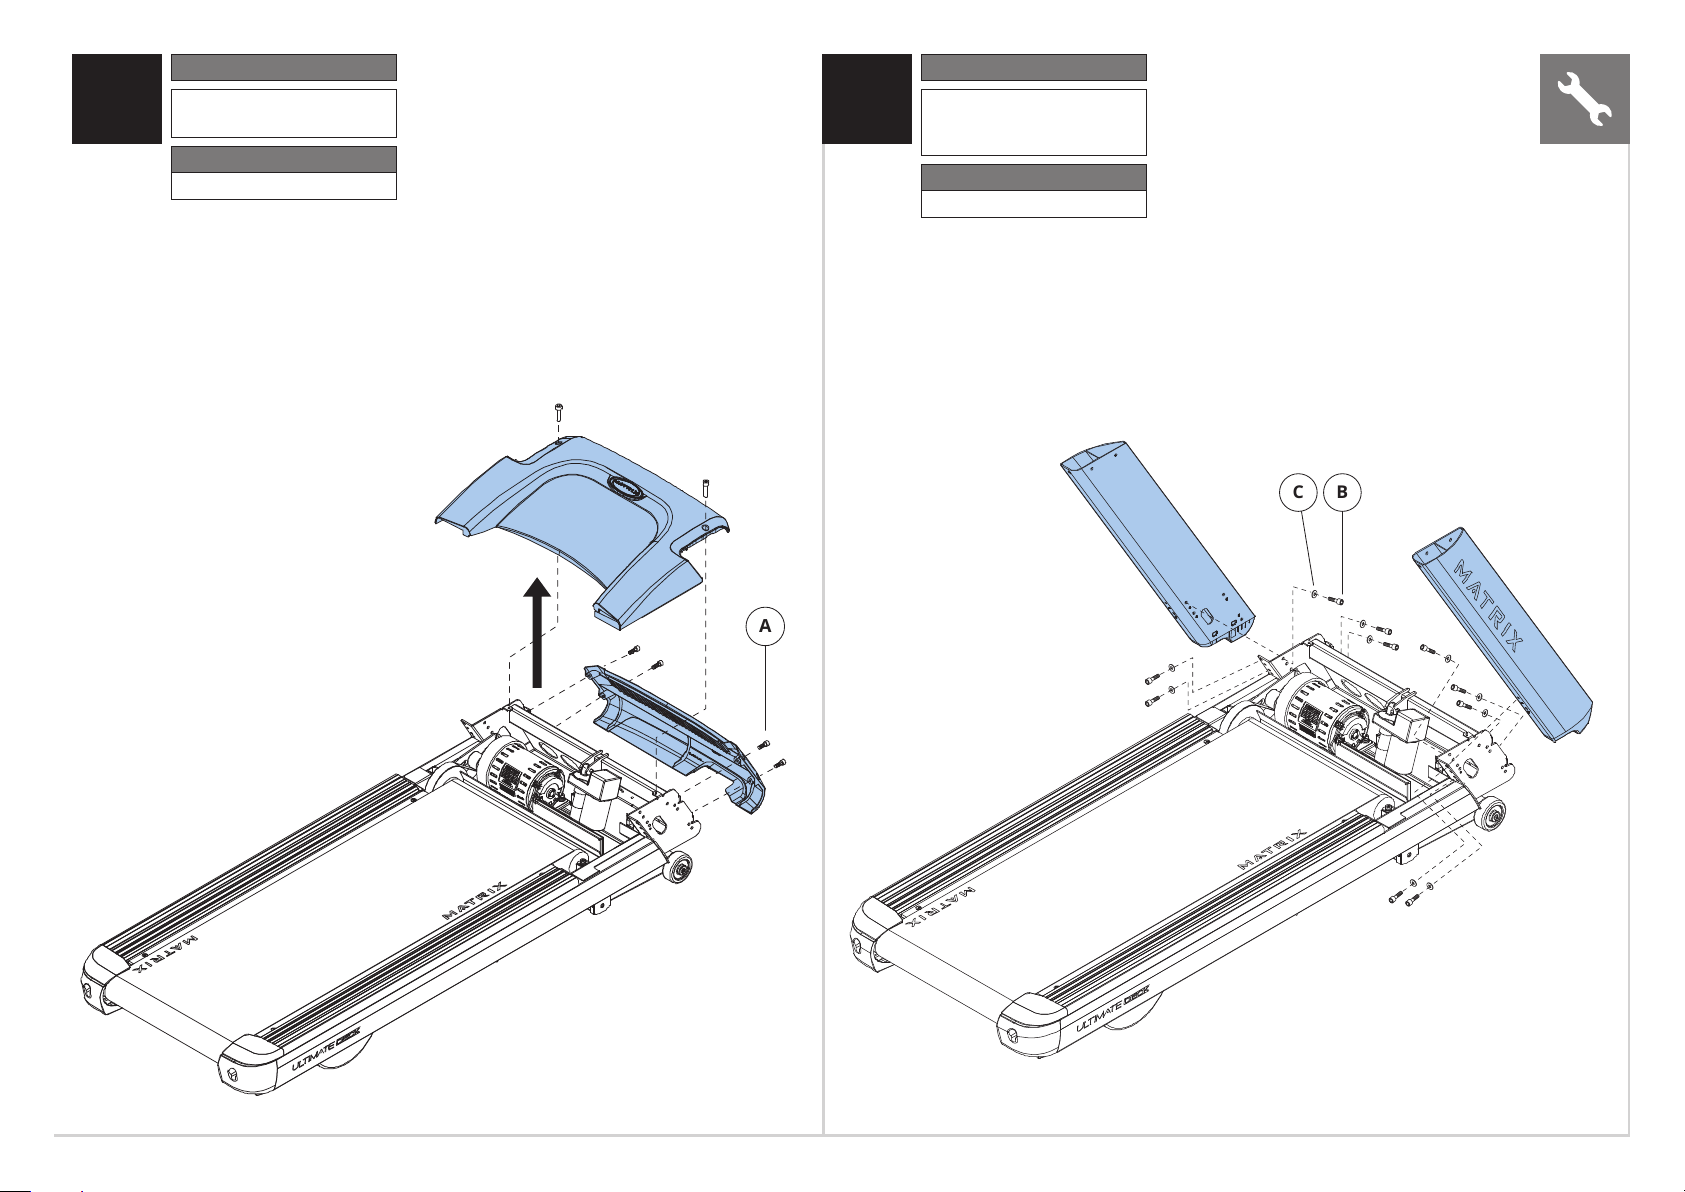
A
B
C
Pre-Installed Hardware
Black Hardware Bag
1 2
Description Qty
A Bolt 6
Torque Value
15 Nm / 11 ft-lb
Description Qty
BCBolt
Flat Washer
Torque Value
25 Nm / 18 ft-lb
10
10
ENGLISH
5
Page 6
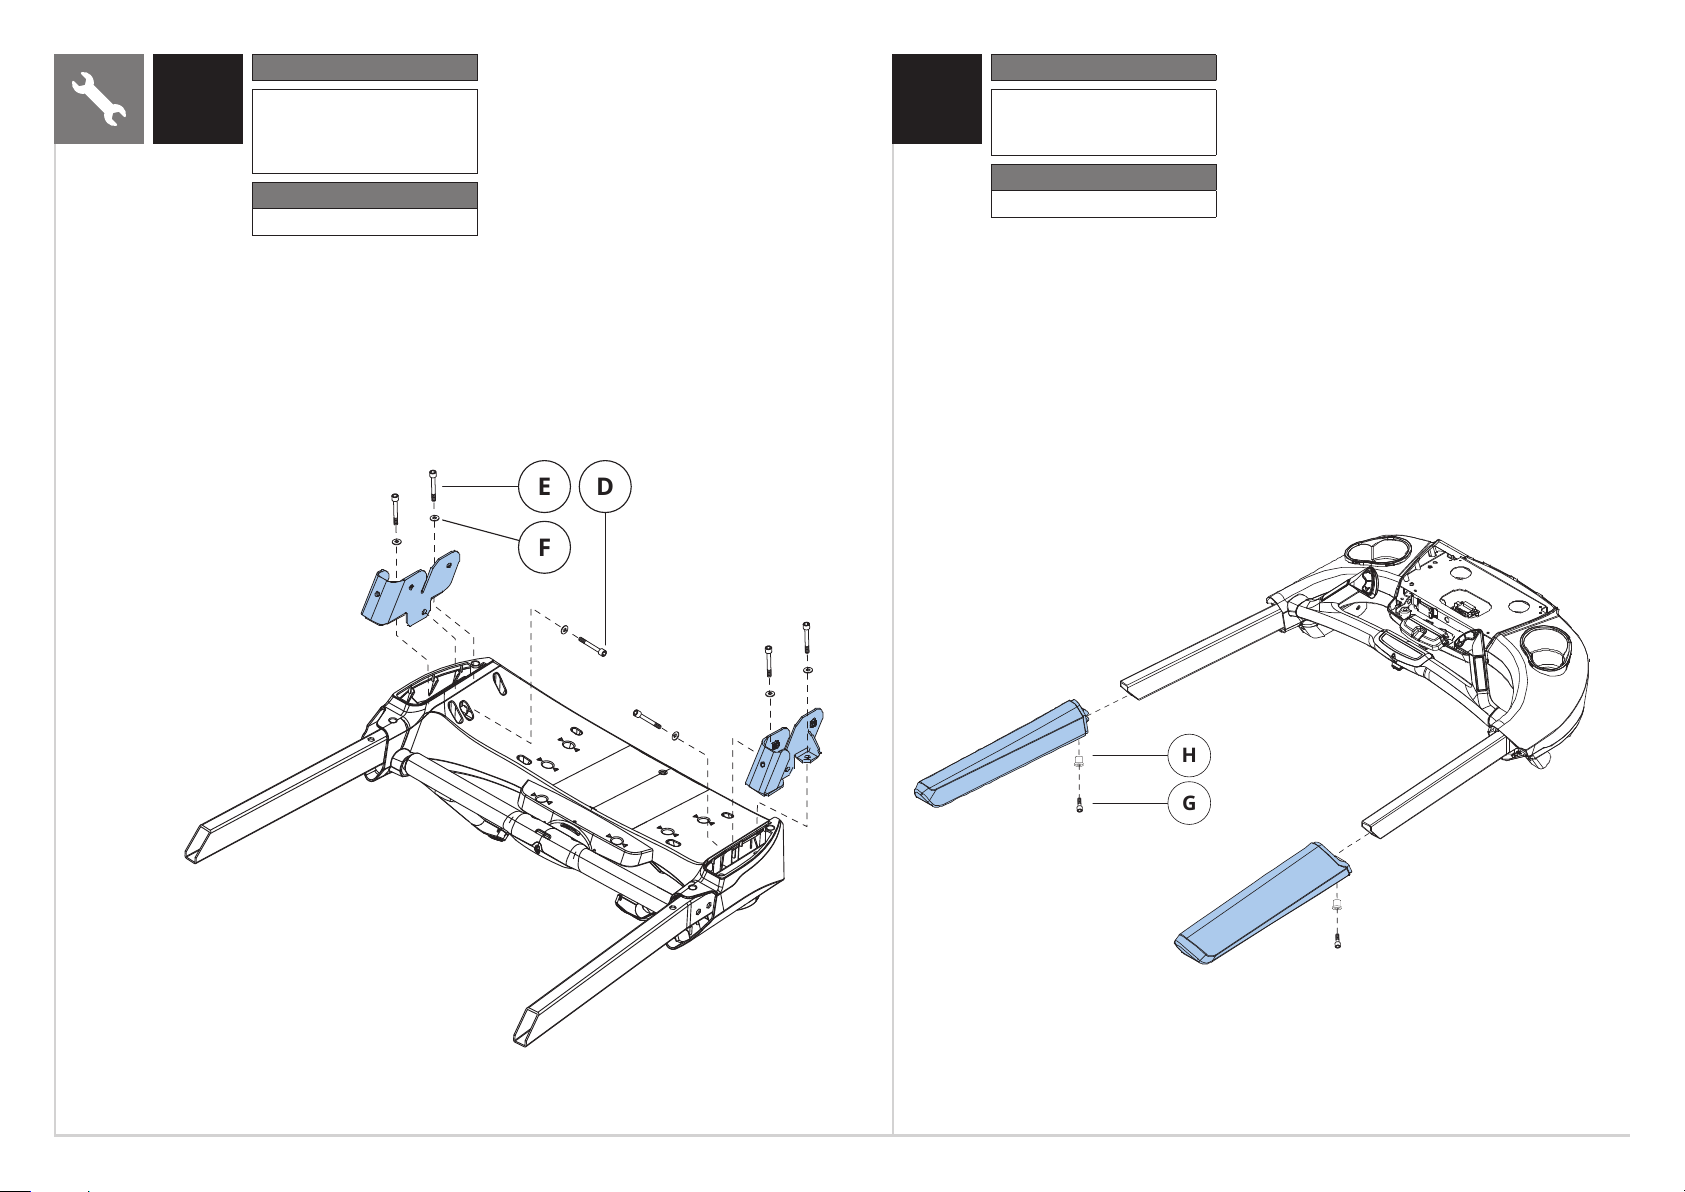
D
E
F
White Hardware Bag
G
H
Blue Hardware Bag
ENGLISH
3 4
Description Qty
D
Bolt
E
Bolt
F
Flat Washer
Torque Value
25 Nm / 18 ft-lb
2
4
6
Description Qty
GHBolt
Spacer
Torque Value
25 Nm / 18 ft-lb
2
2
6
Page 7
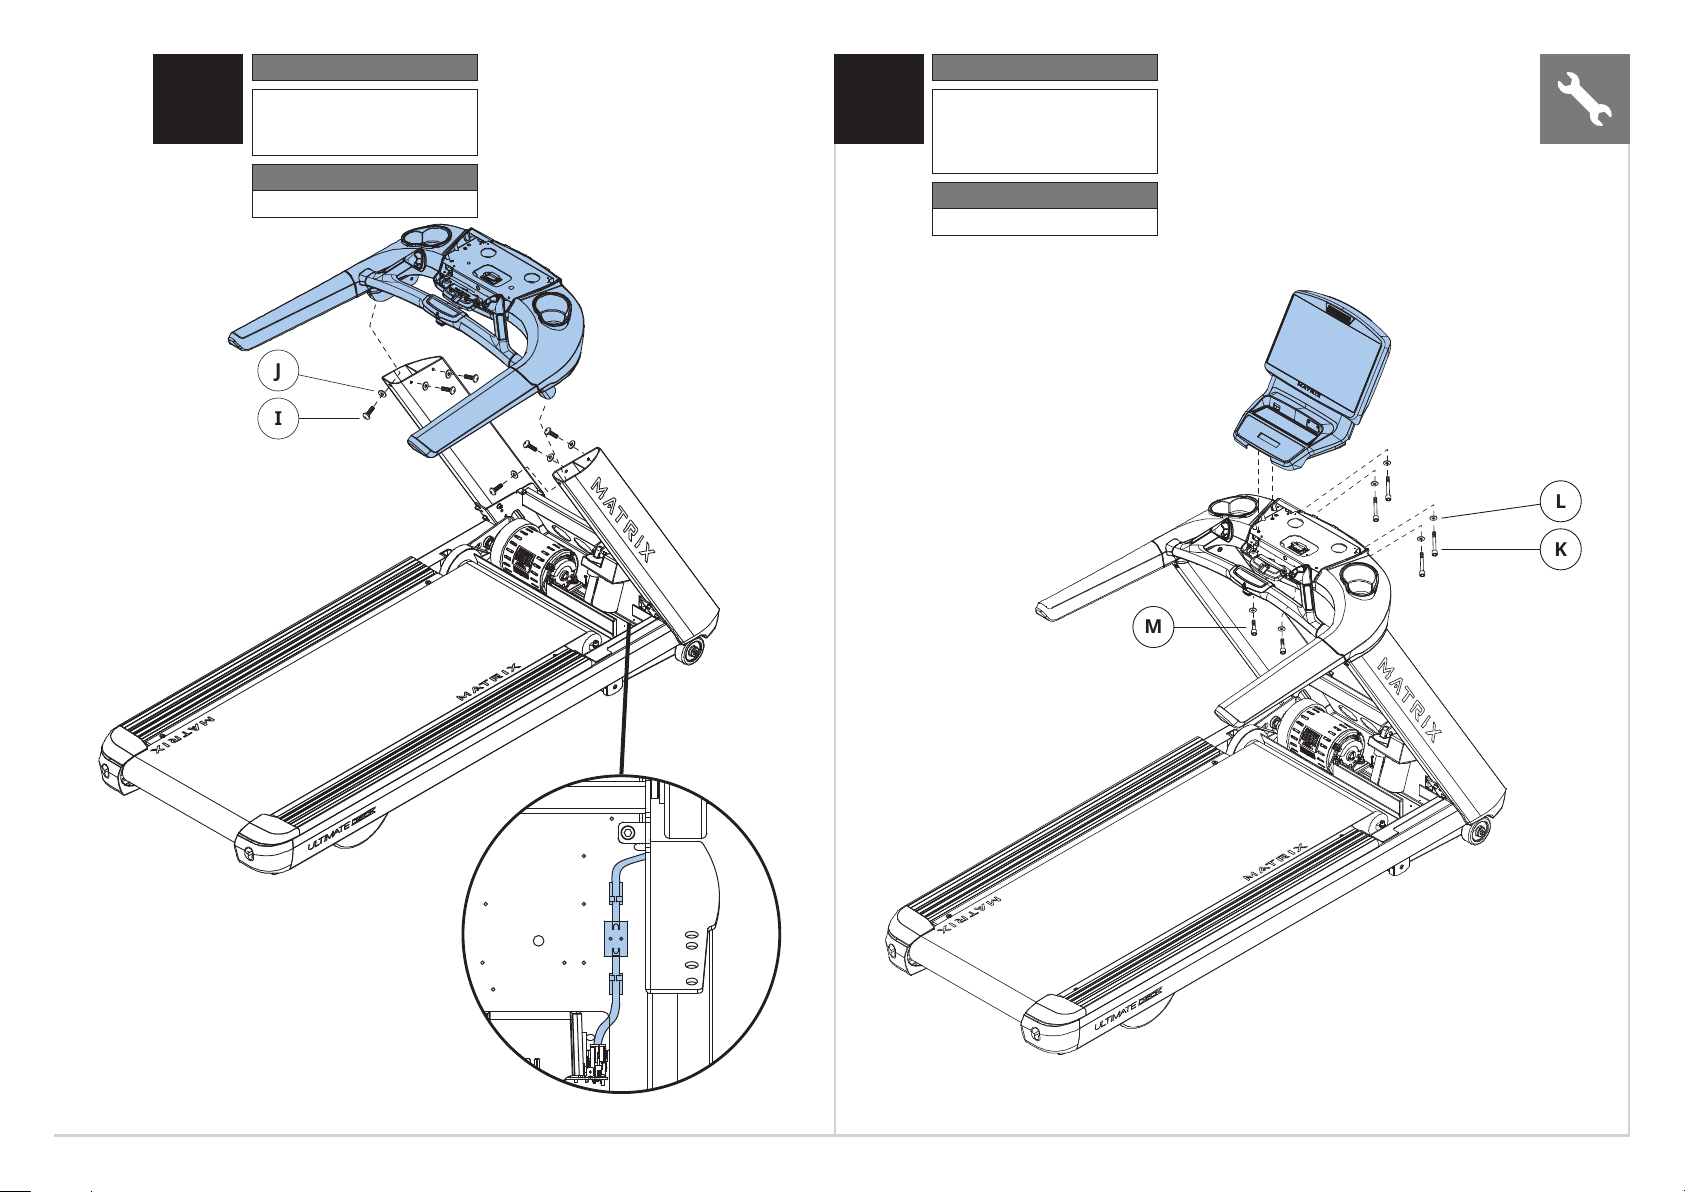
K
L
M
Red Hardware Bag
I
J
Yellow Hardware Bag
Description Qty
IJBolt
Flat Washer
Torque Value
20 Nm / 15 ft-lb
6
6
65
Description Qty
K
Bolt
L
Flat Washer
M
Bolt
Torque Value
25 Nm / 18 ft-lb
4
6
2
ENGLISH
7
Page 8
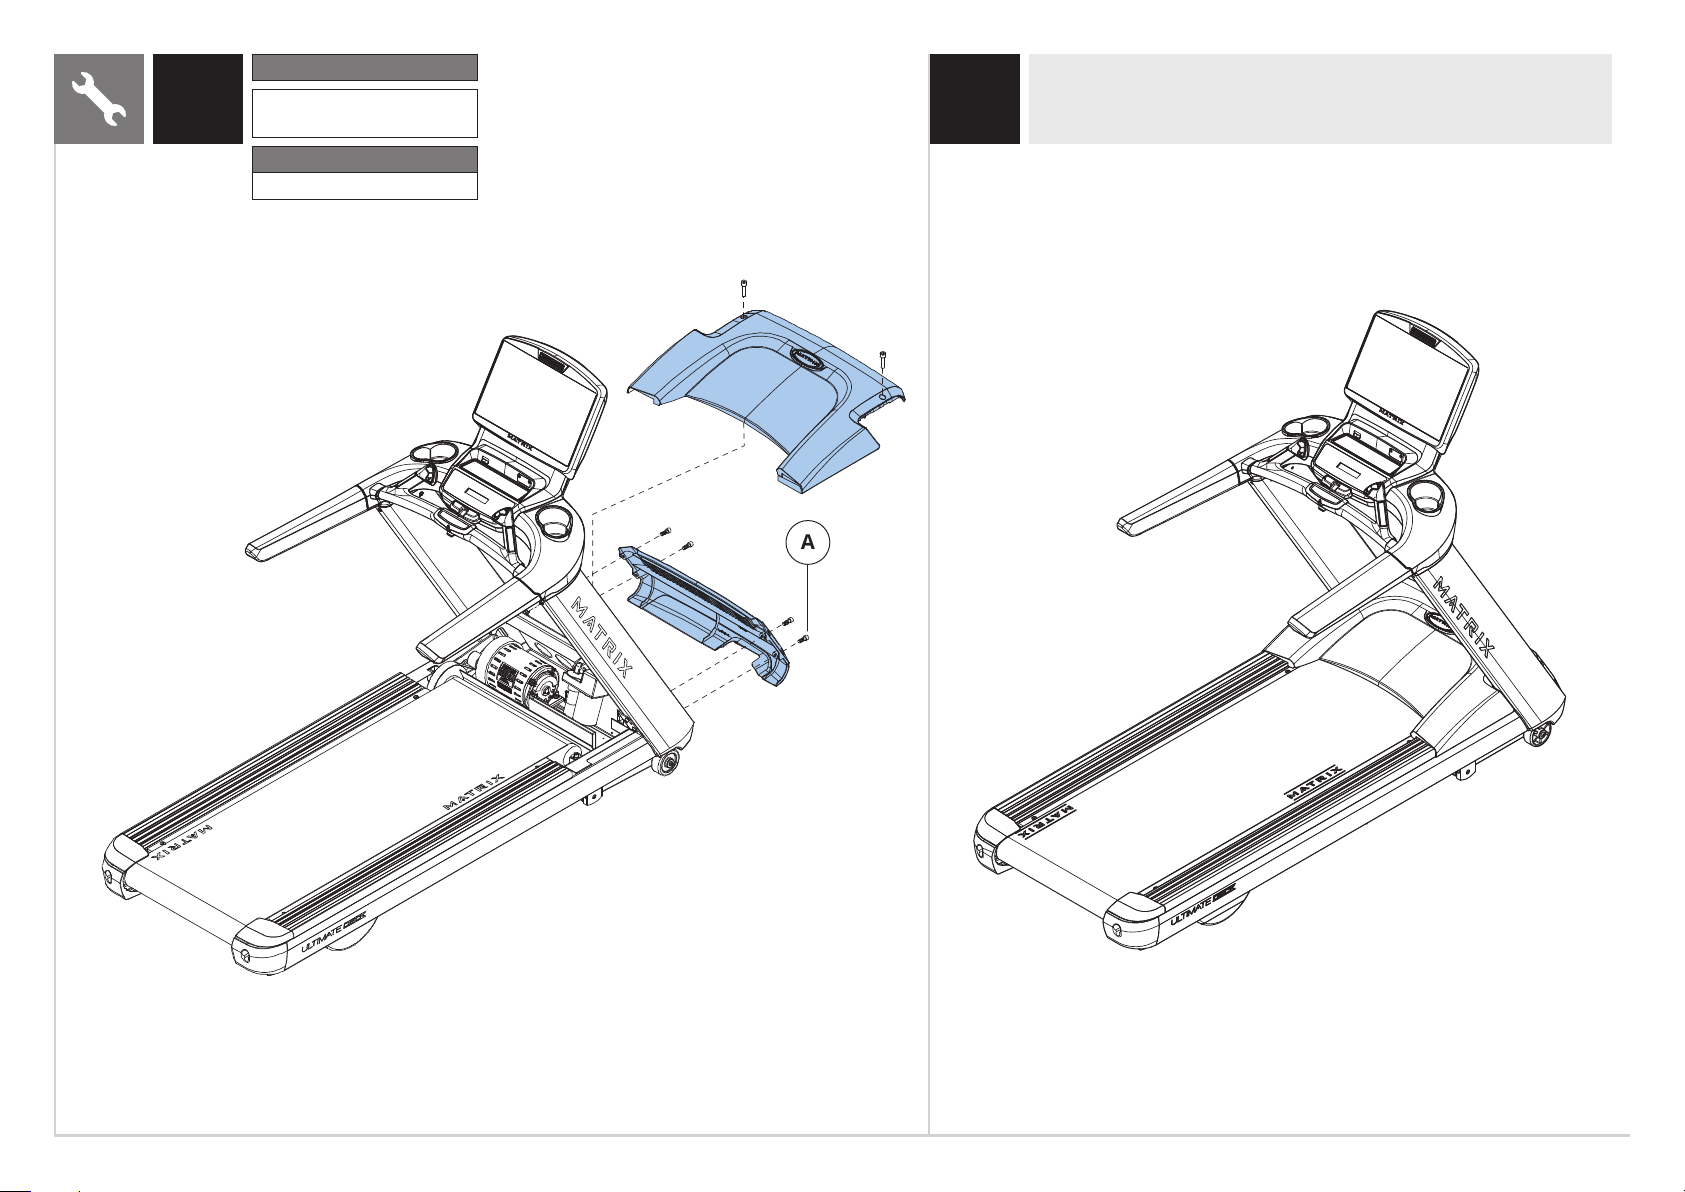
Pre-Installed Hardware
A
ENGLISH
7 8
Description Qty
A Bolt 6
Torque Value
15 Nm / 11 ft-lb
ASSEMBLY COMPLETE!
8
Page 9

D M I F A H
B E
T130 X CONSOLE DESCRIPTION
J
The Matrix machine is inspected before it is packaged. It is shipped in two pieces: the base and
the console. Carefully unpack the unit and dispose of the box material. Note: There is a thin
protective sheet of clear plastic on the overlay of the console that should be removed before use.
A) WORKOUT KEYS: Simple program view and selection buttons. Press
Fitness Test button to cycle through available tests.
B) GO: One Touch Start.
C) ENTER: To confirm each program setting.
D) UP/DOWN INCLINE: Adjust incline and make program selections.
E) UP/DOWN SPEED: Adjust speed and make program selections.
F) UP/DOWN TIME: Adjust time and make program selections.
G) EMERGENCY STOP / IMMOBILIZATION: To stop all functions and immobilize
the unit. The emergency stop on this treadmill must be returned to its
original position in order to allow normal operation of the unit.
H) STOP: Ends workout and shows workout summary data.
I) PAUSE: Pauses workout. Pause duration can be set in manager or engineering mode.
N
L C
J) NUMBER KEYPAD: Workout data input for workout setup. Speed adjustment during workout.
K) COOL DOWN: Puts treadmill into Cool Down mode. Cool Down time is dependent on the
length of the workout. Workouts 19 minutes and shorter will have a cool down length of
2 minutes. Workouts 20 minutes and longer will have a cool down length of 5 minutes.
L) FAN: Allows for fan speed selection (fan has three operating speeds.)
T130 X
ENGLISH
M) TOGGLE DISPLAY: Cycles between 4 rows of workout information displayed in LED
window. The console will automatically cycle between the workout information
if the Toggle Display button is pushed and held down for 3 seconds.
N) LANGUAGE: Select Language.
O) USB PORT: Used for software updates only.
: These features are not functional on this model.
BKD E
GO
H
9
Page 10

T130 XI
ENGLISH
T130 XI CONSOLE DESCRIPTION
A
G
The Matrix machine is inspected before it is packaged. It is shipped in two pieces: the base and the
console. Carefully unpack the unit and dispose of the box material. Note: There is a thin protective
sheet of clear plastic on the overlay of the console that should be removed before use.
The T130 XI has a fully integrated touch screen display. All information required for workouts is
explained on-screen. Exploration of the interface is highly encouraged. The information explaining how
to program for various workouts will give an explanation about the contents of each screen on the T130
XI.
A) GO: One Touch Start.
B) STOP: Ends workout and shows workout summary data.
C) INCLINE TOGGLES: Adjust incline during workout.
D) SPEED TOGGLES: Adjust speed during workout.
E) COOL DOWN: Puts treadmill into Cool Down mode. Cool Down time is dependent on the length
of the workout. Workouts 19 minutes and shorter will have a cool down length of 2 minutes.
Workouts 20 minutes and longer will have a cool down length of 5 minutes.
F) EMERGENCY STOP / IMMOBILIZATION: To stop all functions and immobilize the unit. The
emergency stop on this treadmill must be returned to its original position in order to allow
normal operation of the unit.
G) USB PORT: Used for software updates only.
10
C DAE BF
Page 11

CONSOLE SETUP
T130 X SETUP
SET UP XID ACCOUNT FOR WORKOUT TRACKING
Connect to ViaFit and discover a powerful new way to get more results
from your workouts, your tracking and your social networking.
(For the T130 X, you must create an account from a computer, tablet,
or mobile device that is connected to the internet.)
1) Visit the web site: www.viafitness.com
2) Click on Create an Account and follow the online instructions to setup your ViaFit account.
3) Once you have created an xID, you can login and track your workouts if
your console is connected to the internet via Ethernet or WiFi.
CONNECT TO WIFI*
1) Create a WiFi config file using a text editor on your computer named “wifi_set.cfg”
2) Type the following text in the text editor (change the SSID to your WiFi
network name and change KEY to your network password) :
[WIFI AP]
SSID=yournetworkname
Security=WPA2-PSK
Encryption=AES
Key=yournetworkpassword
KeyIndex=1
3) Save the “wifi_set.cfg” file on a USB flash drive using this folder structure:
T130 XI SETUP
1) Choose your language. Touch to continue.
2) Select the RETAIL MODE button. Touch to continue.
3) Select your home Wi-Fi network. If your network is
password protected, enter your network password
and press enter. Touch to continue.
4) Select TREADMILL. Touch to continue.
5) Input your frame and console serial numbers. The serial
numbers can be found on the back of your console
and on the elevation platform beneath the power
switch on your treadmill. They can also be found on
the outside of your console and frame boxes. Touch
to continue after entering your serial information.
6) Verify your serial information is correct. Touch to continue.
7) Input the date and time. Touch to
continue to your home screen.
ENGLISH
USB Flash Drive > MATRIX > FW > wifi_set.cfg
4) Insert the USB flash drive into the console’s USB Port.
5) To enter Manager Mode, press , 1, 0, 0, 1, .
6) Use
7) Select “Enable/Disable” and press .
8) Select “Enable” and press . Then press to go back.
9) Use
10) When the console displays, “Success !!”, the WiFi is connected.
11) Press and hold to exit Manager Mode and remove the USB flash drive.
to select “internet”. Press .
to select “Import Setting”. Press .
*
For additional Instructional videos, go to:
youtube.com/MatrixFitnessUS and click on Matrix for the Home
11
Page 12

T130 XI CONSOLE OPERATION
LOGIN SCREEN
T130 XI
ENGLISH
GETTING STARTED
• Touch the USER button to sign-in with your XID.
• Touch the GUEST button to workout anonymously.
• Touch the REGISTER button to create a new XID.
• For help or more information, touch .
• To change language, touch
.
USER SIGN-IN
1) Enter your XID and touch
2) Enter your PASSCODE and touch
Consoles equipped with RFID will have this symbol in the lowerright corner of the display. To log in, touch your RFID tag to the
symbol located on the bottom right of the console. *
.
.
REGISTER A NEW USER
1) Don’t have an xID account? Registration is easy.
2) Follow the on-screen prompts to create your free account.
3) Review your information and select the I ACCEPT THE TERMS
AND CONDITIONS box to review the Terms and Conditions.
GO SCREEN
• Touch GO to begin working out immediately. Or...
• Touch the WORKOUT CATEGORY button of your
choice to customize your workout.
PROGRAM SETUP
1) After selecting a WORKOUT CATEGORY button, select one of the PROGRAMS
listed to the left.
For more information on a selected program, touch .
2) Use the SLIDER CONTROLS to adjust your program settings.
3) Press GO to begin your workout.
12
4) Touch
is now active and you are signed-in.
* Supported standards with carrier frequency of 13.56 MHz include; ISO 14443 A, ISO 15693, ISO 14443 B, Sony Felica, Inside Contact-less (HID iClass), and LEGIC RF.
to complete registration. Your account
Note: Workouts and features vary based on model type, console
configurations, software versions and options purchased.
Page 13
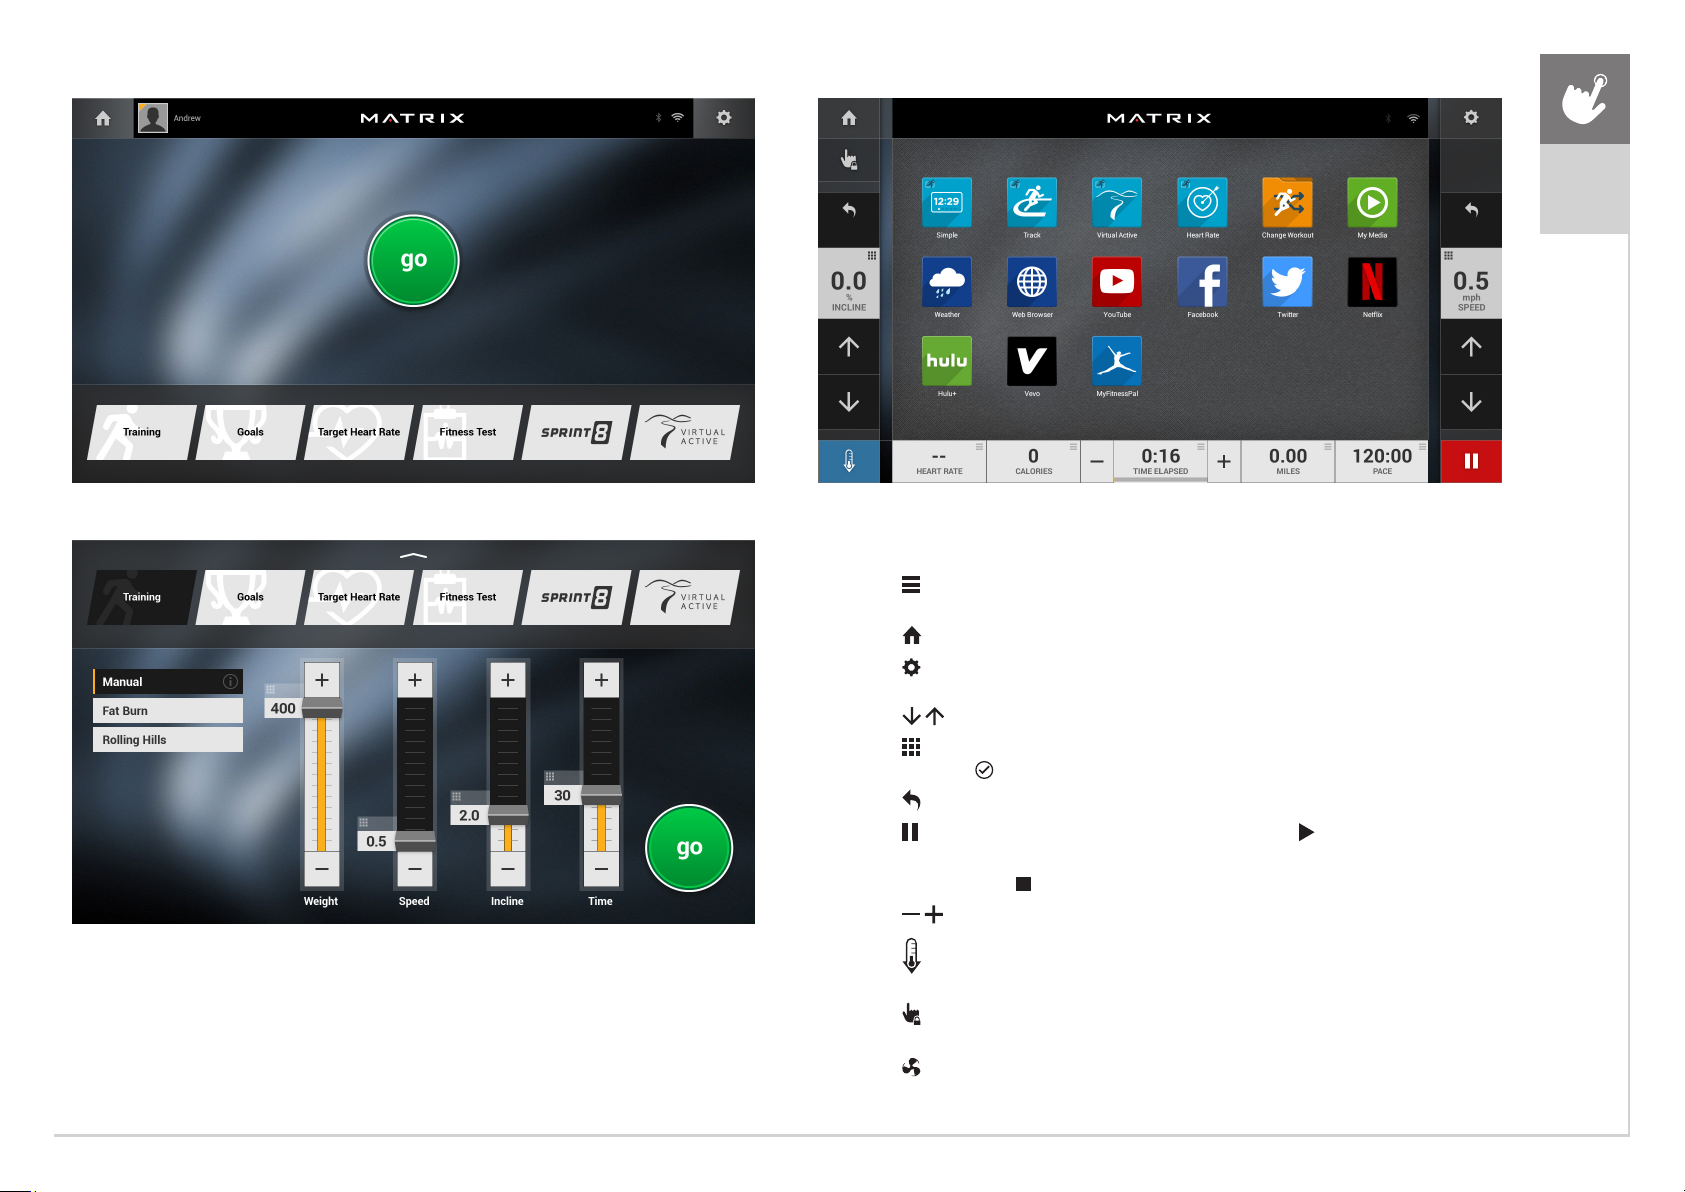
GO SCREEN
HOME SCREEN
T130 XI
ENGLISH
PROGRAM SETUP
Note: Workouts and features vary based on model type, console
configurations, software versions and options purchased.
HOME SCREEN
• The USERNAME or GUEST is shown in the upper left corner.
• Touch to change WORKOUT STATISTICS
displayed at the bottom of the screen.
• Touch to go back to the home screen whenever you’re using an app.
• Touch
change AUDIO SOURCE (My Media, Virtual Active, etc.).
• Touch to increase or decrease the intensity level, speed or incline.
• Touch to use the keypad to set intensity level, speed
or incline. Press
• Touch to change intensity level, speed or incline back to previous setting.
• Touch to temporarily pause your workout and touch to resume.
NOTE: After resuming, speed, incline and intensity levels will be reset.
• While paused, touch to end workout.
• Touch to increase or decrease the duration of your workout.
• Touch
reducing the workout intensity, allowing your body to recover from your workout.
• Touch to lock the screen in order to prevent accidental screen touches from
being implemented. Touch it again to unlock the screen and allow screen touches.
• Touch to turn the fan on. There are three fan speeds (low, medium, high).
to adjust VOLUME, pair a BLUETOOTH device or to
to confirm change.
to enter cool down mode. Cool down lasts for a few minutes while
13
Page 14

APPS AND ENTERTAINMENT
T130 XI
ENGLISH
SIMPLE
Workout stats are displayed in 3 customizable windows.
TRACK
Displays a 400 m (1/4 mile) track. Split feature allows you to
keep track of your fastest laps and improve your time.
VIRTUAL ACTIVE
Your workout info is displayed and Virtual Active courses are
shown. With Virtual Active, escape the confines of an ordinary
workout as you or walk or run through exotic destinations.
HEART RATE
Track your progress while working out to a Target Heart Rate program.
SPRINT 8
Sprint 8® is an scientifically validated high-intensity interval
training program that burns fat and builds muscle with a
complete and efficient workout in just 20 minutes.
CHANGE WORKOUT
Select a different workout without stopping your current workout.
WEB BROWSER
Access the world wide web while you work out.
YOUTUBE
Browse and watch YouTube videos while you work out.
FACEBOOK
Browse your Facebook page while you work out.
TWITTER
Access your Twitter feed while you work out.
NETFLIX
Browse and watch Netflix videos while you work out.
Netflix account required to access content.
HULU
Browse and watch Hulu Plus videos while you work
out. Hulu account required to access content.
14
MY MEDIA
Connect and control audio and video files on-screen via USB port or Bluetooth.
WEATHER
Get local weather info.
VEVO
Browse and watch Vevo videos while you work out.
Vevo account required to access content.
MYFITNESS PAL
Lose weight with MyFitnessPal, the fastest and easiest to use calorie counter.
Note: Workouts and features vary based on model type, console configurations, software versions and options purchased.
Page 15

NOTE:
This equipment has been tested and found to comply with the limits for a Class B digital device, pursuant to part 15 of the FCC rules. These limits are designed to
provide reasonable protection against harmful interference in a residential installation. This equipment generates, uses and can radiate radio frequency energy
and, if not installed and used in accordance with the instructions, may cause harmful interference to radio communications. However, there is no guarantee
that interference will not occur in a particular installation. If this equipment does cause harmful interference to radio or television reception, which can be
determined by turning the equipment off and on, the user is encouraged to try to correct the interference by one or more of the following measures:
• Reorient or relocate the receiving antenna.
• Increase the separation between the equipment and receiver.
• Connect the equipment into an outlet on a circuit different from that to which the receiver is connected.
• Consult the dealer or an experienced radio/TV technician for help.
Any changes or modifications not expressly approved by the party responsible for compliance could void the user’s authority to operate this equipment.
FCC RF Radiation Exposure Statement:
1. This Transmitter must not be co-located or operating in conjunction with any other antenna or transmitter.
2. This equipment complies with FCC RF radiation exposure limits set forth for an uncontrolled environment. This equipment should
be installed and operated with a minimum distance of 20 centimeters between the radiator and your body
ENGLISH
PRODUCT SPECIFICATIONS
T130 XI Treadmill T130 X Treadmill
Max User Weight 159 kg / 350 lbs
Product Weight 181 kg / 399 lbs
Shipping Weight 200 kg / 4 40 lbs
Overall Dimensions (L x W x H)* 215 x 93 x 161 cm / 84.6” x 36.5” x 63.5”
Electrical Receptacle & Plug NEMA 5 -15R/P 110 V
Electrical Requirements 15 A dedicated circuit required-non-looped- grounded
* Ensure a minimum clearance width of 0.6 meters (24”) for access to and passage around MATRIX equipment. Please note,
0.91 meters (36”) is the ADA recommended clearance width for individuals in wheelchairs.
15
Page 16

BEFORE YOU BEGIN
0.3 m (1 ft)
ENGLISH
LOCATION OF THE TREADMILL
Place the equipment on a level and stable surface away from direct sunlight. The intense UV light
can cause discoloration on the plastics. Locate the equipment in an area with cool temperatures
and low humidity. Please leave a clear zone behind the treadmill that is at least the width of the
treadmill and at least 79” (2 meters) long. This zone must be clear of any obstruction and provide
the user a clear exit path from the machine. For ease of access, there should be an accessible space
on both sides of the treadmill of at least 24” (0.6 meters) to allow a user access to the treadmill
from either side. Do not place the treadmill in any area that will block any vent or air openings.
The treadmill should not be located in a garage, covered patio, near water or outdoors.
LEVELING THE TREADMILL
Use of shim or adding leveling foot.
NOTE: It is extremely important that the levelers are correctly adjusted for proper operation. An
unbalanced unit may cause belt misalignment or other issues. Use of a level is recommended.
Remove the leveling shim provided on the underside of the treadmill. The shim can be found
mounted on the underside of the right hand side rail. Remove the rear foot on the side of the
treadmill that is resting low. Install the shim as shown above and return the rear foot.
When installing the optional rear leveling foot accessory, remove the existing rear foot. Replace with
new leveling foot and fasten to the frame using the existing fasteners that held in the half-moon foot.
WARNING!
Our equipment is heavy, use care and additional help if necessary when moving.
Failure to follow these instructions could result in injury.
0.6 m
(2 ft)
0.6 m
(2 ft)
2 m (79”)
16
POWER
This treadmill is powered by a power supply and must be plugged into a power jack. The
power jack is located at the front of the treadmill underneath the motor cover. Make sure
the power switch is in the ON position. Unplug power chord when not in use.
WARNING!
Never operate equipment if it has a damaged cord or plug, if it is not working properly, if it has been
damaged, or immersed in water. Contact Customer Tech Support for examination and repair.
Page 17

TENSIONING THE RUNNING BELT
After placing the treadmill in the position it will be used, the belt must be checked for
proper tension and centering. The belt might need to be adjusted after the first two
hours of use. Temperature, humidity, and use cause the belt to stretch at different rates.
If the belt starts to slip when a user is on it, be sure to follow the directions below.
1) Locate the two hex head bolts on the rear of the treadmill. The bolts are located at each
end of the frame at the back of the treadmill. These bolts adjust the rear belt roller.
Do not adjust until the treadmill is on. This will prevent over tightening of one side.
2) The belt should have equal distance on either side between the frame.
If the belt is touching one side, do not start the treadmill. Turn the bolts
counter clockwise approximately one full turn on each side. Manually center
the belt by pushing the belt from side to side until it is parallel with the
side rails. Tighten the bolts the same amount as when the user loosened
them, approximately one full turn. Inspect the belt for damage.
3) Start the treadmill running belt by pressing the GO buttion. Increase speed to 3
mph (~4.8 kph) and observe the belt position. If it is moving to the right, tighten
the right bolt by turning it clockwise ¼ turn, and loosen the left bolt ¼ turn. If it is
moving to the left, tighten the left bolt by turning it clockwise ¼ turn and loosen the
right ¼ turn. Repeat Step 3 until the belt remains centered for several minutes.
4) Check the tension of the belt. The belt should be very snug. When a person
walks or runs on the belt, it should not hesitate or slip. If this occurs, tighten
the belt by turning both bolts clockwise ¼ turn. Repeat if necessary.
NOTE: Use the orange strip in the lateral position of the side rails as criteria
to confirm the belt is properly centered. It is necessary to adjust the belt
until the edge of the belt is parallel to the orange or white strip.
ENGLISH
TIGHTENS RIGHT SIDE OF ROLLER TIGHTENS LEF T SIDE OF ROLLER
WARNING!
Do not run belt faster than 3 mph (~4.8 kph) while
centering. Keep ngers, hair and clothing away from belt at all times.
Treadmills equipped with side handrails and front handlebar for user support and emergency
dismount, press emergency button to stop the machine for emergency dismount.
BELT IS TOO FAR TO THE RIGHT SIDE BELT IS TOO FAR TO THE LEFT SIDE
BEFORE USING THE TREADMILL
Perform initial setup and calibrate the treadmill using the auto-calibration
feature found in ‘Manager Mode’ or ‘Engineering Mode’.
NOTES:
• DO NOT stand on the belt while the auto-calibration sequence is in progress.
• DO NOT adjust incline until the initial setup and auto-calibration are completed.
• DO NOT start the treadmill running belt or press any speed buttons until directed to while tensioning the running belt.
17
Page 18

ENGLISH
CAUTION!
RISK OF INJURY TO PERSONS
While you are preparing to use the treadmill, do not stand on the
belt. Place your feet on the side rails before starting the treadmill.
Start walking on the belt only after the belt has begun to move.
Never start the treadmill at a fast running speed and attempt to
jump on! In case of an emergency, place both hands on the side
arm rests to hold yourself up and place your feet onto the side rails.
USING THE HEART RATE FUNCTION
The heart rate function on this product is not a medical device. While heart rate grips can provide a
relative estimation of your actual heart rate, they should not be relied on when accurate readings
are necessary. Some people, including those in a cardiac rehab program, may benefit from using an
alternate heart rate monitoring system like a chest or wrist strap. Various factors, including movement
of the user, may affect the accuracy of your heart rate reading. The heart rate reading is intended
only as an exercise aid in determining heart rate trends in general. Please consult your physician.
USING THE SAFETY KEY
Your treadmill will not start unless the emergency stop button
is reset. Attach the clip end securely to your clothing. This safety
key is designed to cut the power to the treadmill if you should
fall. Check the operation of the safety key every 2 weeks.
WARNING!
Never use the treadmill without securing the safety key clip to your clothing.
Pull on the safety key clip rst to make sure it will not come off your clothing.
PULSE GRIPS
Place the palm of your hands directly on the grip pulse handlebars. Both hands must grip
the bars for your heart rate to register. It takes 5 consecutive heart beats (15-20 seconds)
for your heart rate to register. When gripping the pulse handlebars, do not grip tightly.
Holding the grips tightly may elevate your blood pressure. Keep a loose, cupping hold.
You may experience an erratic readout if consistently holding the grip pulse handlebars.
Make sure to clean the pulse sensors to ensure proper contact can be maintained.
When used in conjunction with a wireless chest transmitter, your heart rate
can be transmitted wirelessly to the unit and displayed on the console.
WARNING!
Heart rate monitoring systems may be inaccurate. Over exercising may result in
serious injury or death. If you feel faint, stop exercising immediately.
PROPER USAGE
Position your feet on the belt, bend your arms slightly and grasp the heart rate sensors
(as shown). While running, your feet should be located in the center of the belt so that
your hands can swing naturally and without contacting the front handlebars.
Your treadmill is capable of reaching high speeds. Always start off using a slower speed and
adjust the speed in small increments to reach a higher speed level. Never leave the treadmill
unattended while it is running. When not in use turn the on/off switch to off and unplug
the power cord. Make sure to follow the MAINTENANCE schedule in this guide to maintain
optimal performance and prevent premature electronic failure. Keep your body and head
facing forward. Do not attempt to turn around or look backwards while the treadmill is
running. Stop your workout immediately if you feel pain, faint, dizzy or are short of breath.
18
Page 19

MAINTENANCE
MAINTENANCE SCHEDULE
Preventative maintenance is the key to smooth
operating equipment, as well as keeping the
users’ liability to a minimum. Equipment needs
to be inspected at regular intervals. Defective
components must be replaced immediately.
Improperly working equipment must be kept out
of use until it is repaired. Ensure that any person(s)
making adjustments or performing maintenance
or repair of any kind is qualified to do so.
WARNING
To remove power from the treadmill, the power
cord must be disconnected from the wall outlet.
ACTION FREQUENCY
Clean and inspect the treadmill:
• Turn off the treadmill with the ON/OFF switch, then
unplug the power cord at the wall outlet.
• Wipe down the running belt, deck, motor cover and console casing with a
damp cloth. Never use solvents, as they can cause damage to the treadmill.
• Inspect the power cord. If the power cord is damaged, please reference contact
information on the back cover of the INFORMATION CARD for assistance.
• Make sure the power cord is not underneath the treadmill or in any other
area where it can become pinched or cut during storage or use.
• Check the tension and alignment of the running belt. Make sure that the treadmill
belt will not damage any other components on the treadmill by being misaligned.
• If any labels are damaged or illegible, please reference contact information
on the back cover of the INFORMATION CARD for assistance.
Clean underneath the treadmill:
• Turn off the treadmill with the ON/OFF switch, then
unplug the power cord at the wall outlet.
• Fold the treadmill into the upright position, making
sure that the lock latch is secure.
• Move the treadmill.
• Wipe or vacuum any dust particles or other objects that
may have accumulated underneath the treadmill.
• Return the treadmill to its previous position.
DAILY
WEEKLY
ENGLISH
IMPORTANT!
• Turn off the treadmill with the ON/OFF switch, then unplug
the power cord at the wall outlet. Wait 60 seconds.
• Inspect all assembly bolts of the machine for proper tightness.
• Remove the motor cover. Wait until ALL display screens turn off.
• Clean the motor and lower board area to eliminate any lint or
dust particles that may have accumulated. Failure to do so may
result in premature failure of key electrical components.
• Wipe down the belt with a damp cloth. Vacuum any black/
white particles that may accumulate around the unit. These
particles may accumulate from normal treadmill use.
• If your treadmill has air shocks under the deck for lift assistance, lubricate the silver
air shock tube with Teflon-based spray found at your local hardware or bike store.
MONTHLY
19
Page 20

MAINTENANCE SCHEDULE
ENGLISH
LUBRICATING THE RUNNING BELT
EVERY 3 MONTHS OR 500 Miles
It is necessary to lubricate your treadmill running deck every three months
or 500 Miles to maintain optimal performance. Once the treadmill records
500 Miles it will display the message “LUBE” or “LUBE BELT.” The treadmill
will not operate while the message is showing. Your treadmill came with a
bottle of 100% silicone lubricant, which can be used for two applications.
Go to this website to purchase additional Silicone
Lubricant: www.johnsonfit.com/lubricant
Tools Needed:
• Blue-handled T-wrench or Allen wrench
• 100% silicone oil
PROCEDURE:
1. Turn off the treadmill with the on/off switch and unplug the power cord at the wall outlet.
2. Using the T-wrench or Allen wrench, loosen the rear roller bolts
10-15 counter-clockwise turns. This should give the belt enough slack for you to lift it.
3. Lift the belt as far as you can and squirt the silicone oil in a zigzag pattern across the entire running deck surface.
Use slightly less than 1/2 bottle or 40 ml. Do not apply the silicone oil on top of the running belt. Lay the running
belt down and then tighten both rear roller bolts clockwise the same number of turns loosened.
4. After you have applied lubricant, plug in the power cord. Press and hold STOP for three seconds to remove message
for one workout. Press and hold STOP and SPEED UP for 5 seconds to reset for the next 500 miles.
5. Stay off of the machine and press START. Allow the belt to run at 3 mph for 3 minutes to begin
spreading the silicone. Then walk on the machine at a comfortable speed for 3 minutes to complete
spreading the silicone and to check the running belt for proper tension and alignment.
6. Once the belt is centered and tensioned, stop the belt. Wipe any excess oil from the sides with a damp cloth.
RUNNING
DECK
RUNNING
BELT
20
Visit the Customer Support section of our website to view “how-to” maintenance videos. Please contact
Customer Tech Support with questions about applying lubricant to your treadmill.
Page 21

TROUBLESHOOTING
COMMON PRODUCT QUESTIONS
ARE THE SOUNDS MY TREADMILL MAKES NORMAL?
All treadmills make a certain type of thumping noise due to the belt riding over the rollers, especially new treadmills. This noise will diminish
over time, although it may not totally go away. Over time, the belt will stretch, causing the belt to ride smoother over the rollers.
WHY IS THE TREADMILL I PURCHASED LOUDER THAN THE ONE AT THE STORE?
All fitness products seem quieter in a large store showroom because there is generally more background noise than in your home.
Also, there will be less reverberation on a carpeted concrete floor than on a wood overlay floor. Sometimes a heavy rubber mat will
help reduce reverberation through the floor. If a fitness product is placed close to a wall, there will be more reflected noise.
WHEN SHOULD I BE WORRIED ABOUT A NOISE?
As long as the sounds your treadmill makes are no louder than a normal conversational tone of voice, it is considered normal noise.
BASIC TROUBLESHOOTING
PROBLEM: The console does not light up.
SOLUTION: Verify the following:
Does the light on the ON/OFF switch light up?
NOTE: Some treadmill models do not have a switch that lights up. If this is
the case, please proceed with the yes and no solutions below.
If yes:
• Turn the power off, unplug the power cable and wait 60 seconds. Remove motor cover.
Wait until all LED lights have gone off on the motor control board before proceeding. Next
verify that none of the wires connecting to the lower board are loose or disconnected.
• Double-check that all connections are secure, especially the console
cable. Unplug and reconnect the console cable to verify.
• Make sure the console cable is not pinched or damaged in any way.
• Plug the treadmill in, turn the power switch on and look for any lit LEDs on the motor control board.
If no:
• Verify that the outlet the machine is plugged into is functional. Double-check that the
breaker has not tripped, it is on a dedicated 15-amp circuit, it is not on a GFCI-equipped
outlet, and it is not plugged into a power strip/surge protector or extension cord.
• Verify that the power cord is not pinched or damaged and
is properly plugged into the outlet AND the machine.
• Verify that the power switch is turned to the ON position.
DRIVE
BELT
UNDERNEATH THE MOTOR COVER
DRIVE
MOTOR
JOHNSON
OPTICAL
SENSOR
INCLINE
MOTOR
CONTROL
FRONT ROLLER
RUNNING BELT
MOTOR
BOARD
CONSOLE
CABLE
ENGLISH
21
Page 22

BASIC TROUBLESHOOTING
ENGLISH
PROBLEM: The belt does not move or moves briefly, but the console works.
SOLUTION: Verify the following:
• Make sure you are following the recommendations and power
guidelines. The unit should be on a dedicated 15-amp circuit
and not on a GFCI-equipped outlet. Do not plug the machine
into a power strip/surge protector or extension cord.
• Check for any belt movement. If so, make note of how
far or how long it moves before stopping.
• Try to move the belt by hand. If not, the drive belt may
have come off or the motor bearings may have seized.
• Turn the treadmill off and unplug it from the outlet. Remove the
plastic motor cover located in front of the machine by taking out
the Phillips screws. Check the drive belt for proper alignment.
• With the cover still off, check over the wire and cable connections,
as they may have become loose or disconnected during
shipping or assembly. Make sure connections are secure and
no wires are crimped, damaged, disconnected or burnt.
PROBLEM: The incline does not move, won’t go down
or does not seem to be at the right level.
SOLUTION: Verify the following:
• Make sure you are following the recommendations and power
guidelines. The unit should be on a dedicated 15-amp circuit
and not on a GFCI-equipped outlet. Do not plug the machine
into a power strip/surge protector or extension cord.
• Make sure the console shows a change on the display
when the elevation buttons are pressed.
• Turn the treadmill off and unplug it from the outlet. Verify the console
cable connections at the top of the mast are connected securely. Make
sure all of the multicolored wires are fully inserted into the cable harness.
• Remove the plastic motor cover located in front of the machine
by taking out the Phillips screws. Check over the wire and cable
connections, as they may have become loose or disconnected
during shipping or assembly. Make sure connections are secure
and no wires are crimped, damaged, disconnected or burnt.
PROBLEM: The treadmill circuit breaker trips during a workout.
SOLUTION: Verify the following:
• Make sure the treadmill is plugged into a dedicated
15-amp circuit.
• Verify that you do not have the machine
on an extension cord or surge protector.
• Confirm that the machine is not plugged into a GFCI-equipped
outlet or on a circuit that has a GFCI-equipped outlet on it.
PROBLEM: The running belt does not stay centered during a workout.
SOLUTION: Verify the following:
• Make sure the treadmill is on a level surface.
• Verify that the belt is properly tightened and centered (Refer to the TENSIONING
and CENTERING THE RUNNING BELT sections for detailed directions).
•
TROUBLESHOOTING HEART RATE (GRIP-PULSE ONLY)
Check your exercise environment for sources of interference such as fluorescent
lights, computers, underground fencing, home security systems or appliances
containing large motors. These items may cause erratic heart rate readouts.
You may experience an erratic readout under the following conditions:
• Gripping the heart rate handlebars too tight. Try to maintain moderate
pressure while holding onto the heart rate handlebars.
• Constant movement and vibration due to constantly holding the heart rate
handlebars while exercising. If you are receiving erratic heart rate readouts,
try to only hold the grips long enough to monitor your heart rate.
• When you are breathing heavily during a workout.
• When your hands are constricted by wearing a ring.
• When your hands are dry or cold. Try to moisten your
palms by rubbing them together to warm.
• Anyone with heavy arrhythmia.
• Anyone with arteriosclerosis or peripheral circulation disorder.
• Anyone whose skin on the measuring palm is especially thick.
22
Page 23

CUSTOMER TECH SUPPORT
LIMITED HOME USE WARRANTY
DO NOT RETURN TO THE RETAILER if you have any problems
during assembly or if parts are missing.
For fast and friendly service, please contact one of our trained
customer support technicians via phone, email or our website.
1-800-335-4348
www.matrixfitness.com
info@johnsonfit.com
We want to know if you have a problem and we want to have an opportunity to
correct it for you. Additional product information is available on our website.
Matrix Fitness
1600 Landmark Drive,
Cottage Grove WI, 53527
WEIGHT CAPACITY:
350 LBS (159 KG)
FRAME/DRIVE MOTOR/CUSHIONING • LIFETIME
Matrix warrants the frame, motor and cushioning against defects
in workmanship and materials for the lifetime of the original
owner, so long as the device remains in the possession of the
original owner. (The frame is defined as the welded metal base
of the unit and does not include any parts that can be removed.)
LIMITED HOME USE WARRANTY
EXCLUSIONS AND LIMITATIONS
Who IS covered:
• The original owner and is not transferable.
What IS covered:
• Repair or replacement of a defective motor, electronic component, or defective part and is the sole remedy of the warranty.
What IS NOT covered:
• Normal wear and tear, improper assembly or maintenance, or installation of parts or
accessories not originally intended or compatible with the equipment as sold.
• Damage or failure due to accident, abuse, corrosion, discoloration of paint or plastic, neglect, theft, vandalism,
fire, flood, wind, lightning, freezing, or other natural disasters of any kind, power reduction, fluctuation
or failure from whatever cause, unusual atmospheric conditions, collision, introduction of foreign objects
into the covered unit, or modifications that are unauthorized or not recommended by Matrix.
• Incidental or consequential damages. Matrix is not responsible or liable for indirect, special or consequential
damages, economic loss, loss of property, or profits, loss of enjoyment or use, or other consequential damages
of whatsoever nature in connection with the purchase, use, repair or maintenance of the equipment. Matrix does
not provide monetary or other compensation for any such repairs or replacement parts costs, including but not
limited to gym membership fees, work time lost, diagnostic visits, maintenance visits or transportation.
• Equipment used for commercial purposes or any use other than a single family or Household, unless endorsed by Matrix for coverage.
• Equipment owned or operated outside the US and Canada.
• Delivery, assembly, installation, setup for original or replacement units or labor or other
costs associated with removal or replacement of the covered unit.
• Any attempt to repair this equipment creates a risk of injury. Matrix is not responsible or liable for any damage, loss or liability
arising from any personal injury incurred during the course of, or as a result of any repair or attempted repair of your fitness
equipment by other than an authorized service technician. All repairs attempted by you on your fitness equipment are undertaken
AT YOUR OWN RISK and Matrix shall have no liability for any injury to the person or property arising from such repairs.
• If you are out of the manufacturer’s warranty but have an extended warranty, refer to your extended warranty
contract for contact information regarding requests for extended warranty service or repair.
ELECTRONICS & PART: 10 YEARS
CONSOLE: 3 YEARS
Matrix warrants the electronic components, finish and
all original parts for the period specified above from
the date of original purchase, so long as the device
remains in the possession of the original owner.
LABOR • 1 YEAR
Matrix shall cover the labor cost
for the repair of the device for the
period specified above from the
date of the original purchase, so
long as the device remains in the
possession of the original owner.
SERVICE/RETURNS
• In-home service is available within 150 miles of the nearest
authorized Service Provider (Mileage beyond 150 miles from an
authorized service center is the responsibility of the consumer).
• All returns must be pre-authorized.
• The warranty is limited to replacing or repairing, at the servicer’s
and/or manufacturer’s option, the same or comparable model.
• Defective components may be requested to be returned to the
manufacturer upon completion of warranty service using a prepaid
return shipping label. If you have been advised to return parts and
did not receive a label, please contact Customer Tech Support.
• Replacement units, parts and electronic components
reconditioned to as-new condition by the manufacturer
or its vendors may sometimes be supplied as warranty
replacement and constitute fulfillment of warranty terms.
• This warranty gives you specific legal rights, and
your rights may vary from states to state.
ENGLISH
23
Page 24

© 2018 Johnson Health Tech
T130 XT130 XI
Rev 1.0 ENGLISH
 Loading...