

Page 1

SETU VFX88L/VFX44L
Quick Start
Page 2

Page 3
SETU VFX88L/VFX44LSETU VFX88L/VFX44L
SETU VFX88L/VFX44L
SETU VFX88L/VFX44LSETU VFX88L/VFX44L
8-Port VoIP to FXS Gateway with Lifeline
Quick Start
Page 4
Thank you for choosing Matrix SETU VFX88L!
This Quick Start is meant to help you to install your SETU VFX88L and do
basic configurations to enable you to make and receive VoIP calls using it as
easily as a normal telephone call. For detailed information on installing and
configuring SETU VFX88L, please refer 'Matrix SETU VFX88L System
Manual' on CD-ROM provided to you with the product.
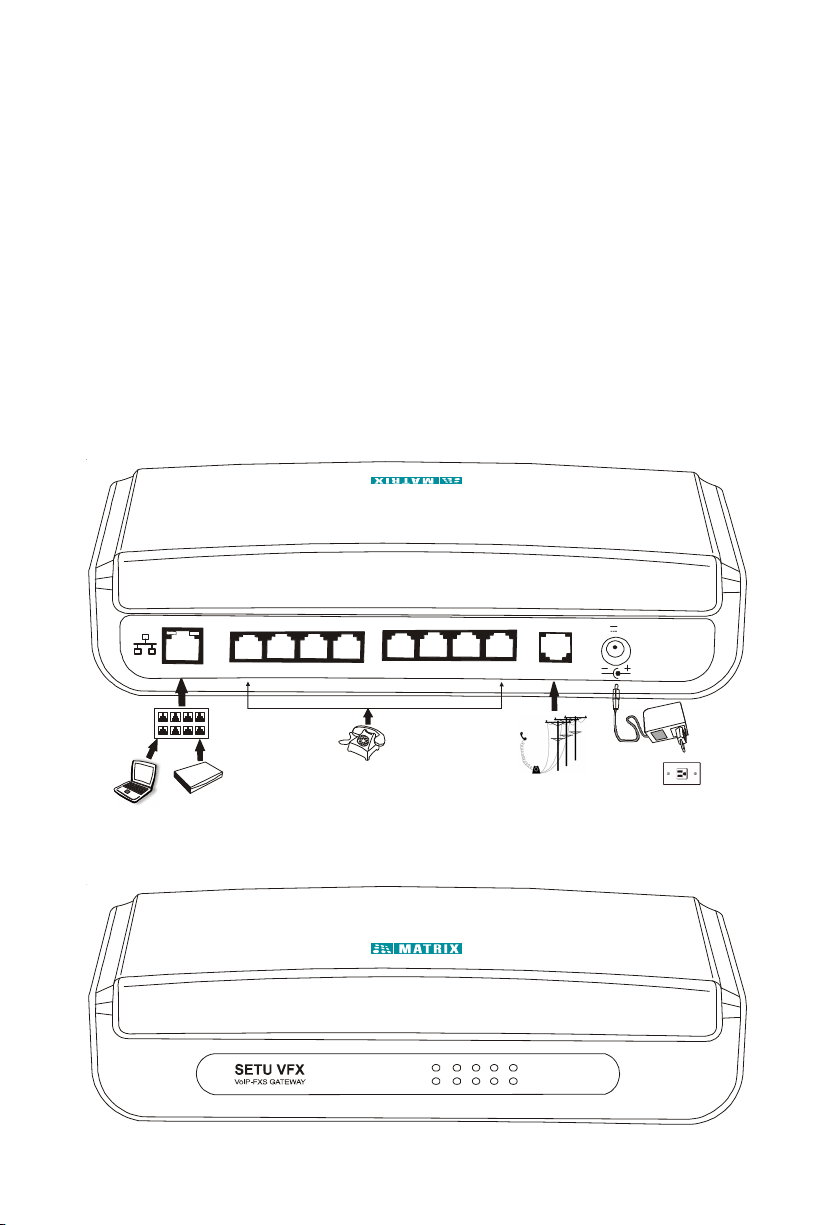
Know your SETU VFX88L
SETU VFX88L has 1 Ethernet port, 8 FXS ports, 1 Lifeline port, a Power
Socket and 10 LEDs.
Figure 1: Back Side Panel
LIFELINE
12VDC 2A(Max)
ETHERNET FXS1 FXS2 FXS3 FXS4 FXS5 FXS6 FXS7 FXS8
Ethernet
Switch
Computer
Router
Figure 2: Front Side Panel
RJ11
PWRF1F2F3F4
STS
F5 F6 F7 F8
FXO
Page 5
Before You Start
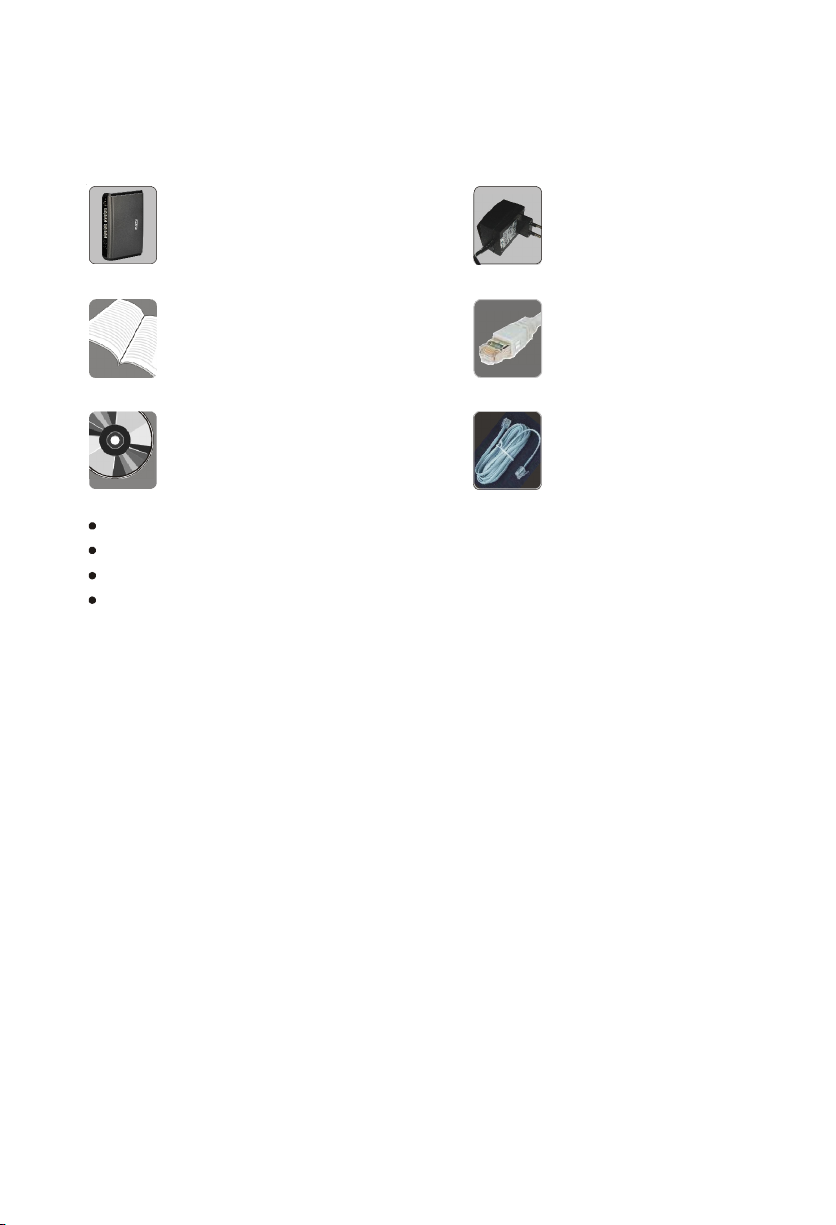
1. Verify Package Contents
SETU VFX88L
Quick Start and User Card
CD containing System Manual,
Quick Start and User Card
Two Screw M 7/30
Two Screw Grip
Warranty Card Set
Mounting Template
Make sure that all the above mentioned accessories are present when you
open the Sales Kit of SETU VFX88L. In case any of the part is missing or
damaged, contact the vendor/ITSP/system administrator from whom you have
purchased the system.
2. Get your Internet Connection ready
To install SETU VFX88L you must have:
• Broadband Internet Connection to make/receive calls through Public
Internet. If you want to make calls within your network, you do not
need an Internet connection.
• A SIP Account from an Internet Telephony Service Provider (ITSP). If
you want to make Peer-to-Peer calls (i.e. calls made without the
intervention of a SIP/Proxy server), you do not need the services of
an ITSP.
Adaptor 12V, 2Amp
(Country Specific)
Ethernet Cable (RJ45)
Line Cord (RJ11)
3. Get your Network Information ready
Ask your LAN Administrator/ISP for:
• Connection Type
• PPPoE User ID, Password and Service Name (in case of PPPoE
Connection type)
• IP Address
• Subnet Mask
Page 6

• Gateway Address
• DNS Address
• DNS Domain Name
4. Get your SIP Account Information ready (if you want to make call
using SIP Account of an ITSP)
Ask your ITSP for:
• SIP ID/User ID
• Authentication User ID (in most cases same as SIP ID)
• Authentication Password
• Registrar Server Address
• Registrar Server Port
• Outbound Proxy Address
• Outbound Proxy Server Port
Installing SETU VFX88L
Precautions & Safety Instructions:
Take following precautions while installing SETU VFX88L to reduce the risk of
fire, electric shock and injury to the system as well as the person using it:
• Do not install the system where sulfuric gases are produced and do not
use the telephone to report a gas leak in the vicinity of the leak.
• Do not install the system at the places where shocks or vibrations are
frequent or strong.
• Do not install the system at dusty places or places where it may come in
direct contact with oil or water.
• Read and understand all the instructions given in the system manual
properly.
• Unplug the product from the wall outlet before cleaning and do not use
liquid cleaners. Use only dry and soft cloth.
• Do not open the system in power ON condition.
• To reduce the risk of electric shock or damage to the system, take the
product to the qualified serviceman when some repair work or servicing is
required. Removing covers or opening the system or incorrect reassembly
may cause electric shock when used subsequently.
Mounting the VFX88L on wall
• Select a suitable place on the wall for mounting the SETU VFX88L.
• Drill a hole of appropriate size.
• Insert the nail grip in the hole.
• Insert the screw and tighten it leaving the screw head a few millimeters
protruded of the wall.
• Check the strength of the nail.
• Hang the SETU VFX88L on the wall.
Page 7
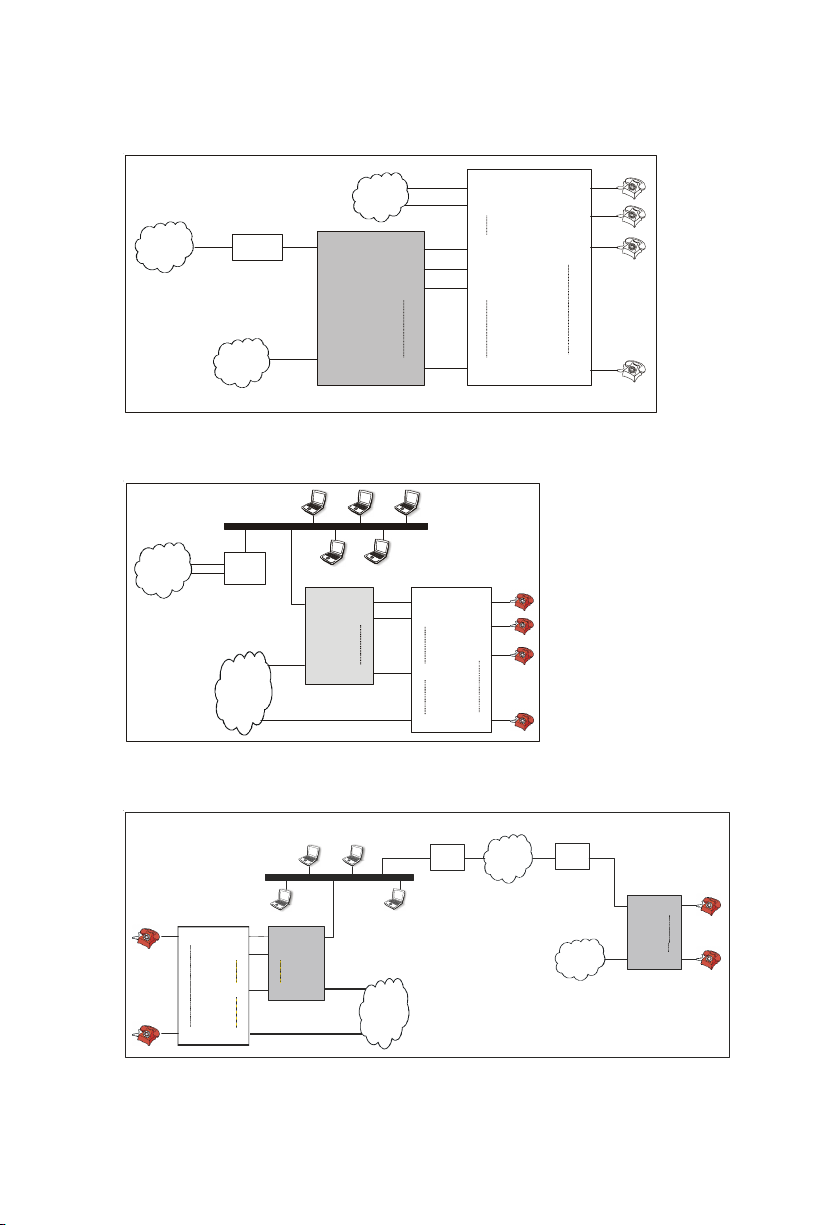
Applications:
1. In Small Office/Home office
IP
Broadband
Router/Modem
PSTN
2. In Corporate Office
IP
Broadb and
Modem/Ro uter
PSTN
WAN
LifeLi ne
Port
SETU VFX88L
SETU VFX88L
FXS1
WAN
FXS2
LifeLi ne
FXS8
Port
PSTN
FXS1
FXS2
FXS3
FXS8
FXO1
FXO2
FXO8
FXOn
PBX
FXO1
FXO2
FXO5
FXO6
FXO7
FXOn
FXS1
FXS2
FXS3
FXSn
FXS1
FXS2
FXS3
FXSn
PBX
3. Peer to Peer Application-Corporate Users (Scenario-1)
Head Office Branch Office
FXS1
FXSn
PBX
FXO1
FXS1
FXO2
FXS2
FXO8 FXS8
FXOn
SETU VFX88L
WAN
LifeLi ne
PSTN
Broadband
Modem/Router
IP N/w
Broadband
Modem/Router
PSTN
SETU VFX88L
WAN
FXS1
FXS8
LifeLi ne
Page 8

4. Peer to Peer Application-Corporate Users (Scenario-2)
IP N/w
Broadband
Modem/Router
PSTN
SETU VFX88L
WAN
LifeLine
FXO1
FXS1
FXS2
FXS8
FXS1
FXO2
PBX
FXO8
FXOn
FXSn
FXS1
PBX
FXSn
SETU VFX88L
FXO1
FXS1
FXO2
FXS2
FXO8 FXS8 LifeLi ne
FXOn
Broadband
Modem/Router
WAN
PSTN
Connecting SETU VFX88L
• Connect the Ethernet port of the SETU VFX88L to the Ethernet Port of the
broadband modem/LAN switch using an Ethernet cable provided with the
system.
• Connect FXS ports of SETU VFX88L to the telephone instrument/FXO
ports of PBX using RJ11 cables.
• Connect the PSTN line to the Lifeline FXO port when it is required to be
used.
• Connect the power adaptor to the SETU VFX88L.
Switching ON the SETU VFX88L
• Power the SETU VFX88L.
• The 10 LED's on the front panel display the events of FXS port/status of
SIP Accounts.
LED marked with F1-F8 represents FXS port LED and SIP Account (1-8)
Status LED.
LED marked with STS represents System Status LED.
LED marked with PWR represents Power LED. Power LED glows Red
when gateway is powered ON.
Following LED sequence would be observed during Power ON:
• All LEDs would be OFF.
• After around 2-3 minutes, all LEDs glow Green for 500msec, Red for 500
msec, Orange for 500msec.
• All LEDs would be OFF again.
• On successful completion of initialization cycle,
• STS LED will blink Green for 1sec ON-1sec OFF continuously.
• F1-F8 LED would be OFF.
Page 9

After attaining the normal state, LED F1-F8 will show the status of its response
as shown below:
Event LED Colour LED Cadence
FXS Port Idle + SIP Active Green 200ms ON - 4800ms OFF
FXS Port Idle + SIP
Authentication Failed
Incoming Ring Event on FXS
port
Off-hook Event on FXS port Red Continuous
Speech Red Continuous
Green 200ms ON - 200ms OFF
200ms ON - 4800ms OFF
Red 1000ms ON - 4000ms OFF
Configuring the SETU VFX88L using the Web Interface
How to reach the Home Page of Web Server?
• Connecting the SETU VFX88L with the computer
• Connect the Ethernet Port of the SETU VFX88L to the Ethernet Port
of the Computer/LAN switch using the RJ-45 cable provided with the
system.
• To know the IP Address and Subnet Mask of the Ethernet port of the
computer go to: My Network Places
Connection
Properties
Internet Protocol (TCP/IP)
Properties
Properties (For computers with windows 2000 and XP Operating
Systems).
• Follow below steps to change IP address and Subnet Mask of
Network port of SETU VFX88L such that computer and Network port
of SETU VFX88L are in same subnet.
Local Area
Default IP address and Subnet Mask of Network port of SETU VFX88L
is 192.168.001.156 and 255.255.255.0 respectively.
Step 1: Entering into the Programming mode
• Pick up handset of telephone instrument connected to SETU
VFX88L.
• Dial #19-1234 (1234 is the default SE Password)
• You will hear Programming Tone.
Step 2: Assigning an IP Address
• Enter into the programming mode by following the step 1 i.e "Entering
into the Programming mode".
• Dial the SE command 11-IP Address-#*.
• For example, if the IP address 192.168.1.182 is to be programmed,
the SE command shall be given as, 11-192168001182-#*.
• SETU VFX88L will restart once you enter this command.
Page 10

Step 3: Assigning Subnet Mask
• Enter into the programming mode by following the step 1 i.e "Entering
into the Programming mode".
• Dial the SE command 12-Subnet Mask-#*.
• For example, if the subnet mask 255.255.255.0 is to be programmed,
the SE command shall be given as, 12-255255255000-#*.
• SETU VFX88L will restart once you enter this command.
• Access the Webjeeves of the SETU VFX88L
• Open the Web browser/Internet Explorer.
• Enter the IP address of the SETU VFX88L Network Port in the URL
field of the Web browser/Internet Explorer and press Enter key.
• The SETU VFX88L will prompt for login as shown below:
• Enter the SE Password (default: 1234) in the 'Password' field.
• Click on the 'Login' button.
• On successful login, you will be taken to the Home Page.
Page 11

• Now, you can configure the SETU VFX88L using Web Jeeves.
• The left most side displays the link for different web pages for
configuring.
• Click on the link and the respective webpage will get opened.
• Make required changes and click on 'Submit' button given on the
bottom of the webpage to affect the changes.
• Click on 'Default All' button given on the bottom of the webpage to
default the parameters of the page.
Configuring the SIP Account Parameters
• Click on the link 'SIP Account Parameters 1' and webpage will open as
given below:
Page 12

• By default, Status for all SIP Accounts is 'Disabled'.
• Program following parameters for registering SIP Account to ITSP:
• Enable the SIP Account Status
• Program following parameters as given by the ITSP:
• SIP User ID
• Registrar Server Address
• Registrar Server Port
• Authentication User ID
• Authentication User Password
• Outbound Proxy
• Program following parameters for Peer-to-Peer application:
• Enable the SIP Account Status
• SIP User ID:
• By default, SIP User ID is programmed as '*'.
• Program SIP User ID only if you want to assign particular SIP
account to a fixed FXS port or group of FXS port i.e if particular
number (programmed as SIP User ID) is dialed by the remote
end, it should route to FXS port 1 only or to FXS port 1 to FXS
port 4, etc.
• Source Port IP Address
• Options supported are as given below:
• Use Network Port IP Address
• Use IP Address fetched using STUN
• Use Router's Public IP Address
• By default, 'Use Network Port IP Address' is programmed.
• Program this parameter if Peer-to-Peer application is to be used
and SETU VFX88L is connected behind the NAT.
Page 13

• Symmetric RTP flag:
• Program this feature, if you want to make Peer-to-Peer
application and you are using Public IP Address.
• By default, flag is disabled.
• Enable the flag, if Symmetric RTP logic is to be used.
• Program the OG Vocoder preference, DTMF Option, FAX Option.
For programming the parameters related to routing of SIP Account:
• Click on the link 'SIP Account Parameters 2' and webpage will open as
given below:
• Incoming Call Allowed:
• By default, Incoming calls are allowed for all SIP Accounts.
• If it is required to restrict the incoming calls through any SIP accounts,
disable the flag.
• Answer Anonymous Call:
• By default, Anonymous calls are allowed for all SIP Accounts.
• If it is required to restrict the incoming anonymous call, disable this
parameter.
• Maximum Calls:
• Maximum 8 calls (incoming or outgoing) are allowed in the system.
(Maximum 4 calls allowed for VFX44L gateway).
• Program the maximum calls (Incoming or outgoing) to be allowed for
the particular SIP Accounts.
Page 14

• Send CLI:
• Feature allows you to restrict the CLI while making a call through SIP
Account.
• By default, Send CLI flag is enabled for all SIP Accounts
• Disable the flag if CLI is to be restricted.
• Black Listed Callers:
• Feature allows you to reject the calls from particular users i.e Black
listed numbers.
• By default, Number List 03 is assigned and all numbers are allowed
through all SIP Account.
• If you want to restrict any numbers through any SIP account during
incoming call on that SIP account, program the numbers which is to
be restricted in the Number Lists.
• Assign this number list to the SIP Accounts where it should be
restricted.
• If you do not want to use this feature, disable the Apply flag.
• Automatic Number Translation (ANT):
• Feature allows you to modify/substitute the called party number to the
number compatible to be out dialed on SIP Account.
• Program 2 number lists viz. Dialed and Substitute Number list and
assign these Number lists to the SIP Account.
• If you do not want to use this feature, disable the Apply flag.
• Routing Type:
• Feature allows you to select the routing method to be used when
there is any incoming call on SIP Account.
• Following Routing types are supported for each SIP Account:
• All Calls
• Called Number Based
• For "All Calls" Routing type:
• FXS Port Routing Group:
• Click the link "FXS port Routing Groups" and the webpage
will open.
• Program the FXS port number in the routing group on which
the call should be placed when there is call for the SIP
account.
• Assign that FXS Port Routing group number to the SIP
account.
• CLI Number on FXS port:
• Two different options are supported for displaying the CLI on
FXS port:
• Received Calling Party
• Received Called Party
• By default, Received Calling Party Number would be displayed as
Page 15

CLI on FXS port.
• For "Called Number Based" Routing type:
• Program the Called Number based Routing table and refer topic
"Configuring the Called Number Based Routing Table".
Configuring the FXS Port Parameters
• Click on the link 'FXS Port Parameters' and webpage will open as given
below:
• Status:
• By default, Status of all FXS port is 'Enabled'.
• Disable the port only if that port is not supposed to be used for
incoming and outgoing calls.
• Name:
• Program the Name of the person who is responsible for this FXS port.
• Name field would be used as Display Name field.
• Number:
• By default, 2001 to 2008 number is given to the FXS1 to FXS8 port.
• Number should be of maximum 4 digits.
• Number field is used as calling number when call is routed through
Page 16

any Non-Proxy SIP Account with SIP User ID as '*'.
• CLIP Type:
• Following CLIP type is supported:
• None
• DTMF
• V.23 FSK
• Bellcore FSK
• By default, DTMF is programmed as CLIP type for all FXS ports.
• Flash Timer:
• By default, Flash Timer is programmed as 600 msec for all FXS ports
and Flash timer range is 083-900msec.
• Flash timer is used for supplementary features like Call hold, Blind
Call Transfer, Call Waiting, etc.
• Flash timer value should be greater than or equal to the Flash timer of
the telephone instrument connected or the Flash timer of FXO port to
which it is connected (in case of SETU VFX88L is connected to any
PBX).
• First Digit Wait Timer:
• By default, First Digit Wait timer is programmed as 15 seconds for all
FXS ports and its range is 01-99 seconds.
• End of Dialing:
• There are 3 different methods to consider as End of Dialing:
• Number of Digits
• End of Dialing Digit
• Inter Digit Wait Timer
• Any of the method can be selected for End of Dialing.
• By default, all 3 methods are applicable.
• Number of Digits length is programmed as 16 by default and
its range is 01-24.
• End of Dialing digits is programmed as '#' by default. Only '*'
or '#' can be programmed as End of Dialing digit.
• Inter digit wait timer is programmed as 5 seconds and its
range is 01-99 seconds.
• Answer Signaling:
• By default, Answer Signaling is programmed as Battery Reversal.
• If Answer Signaling is not required, program Answer Signaling as
None.
• Disconnect Signaling:
• There are two method for generating Disconnect Signaling:
• Battery Reversal
Page 17

• Open Loop Disconnect
• By default, Disconnect Signaling is programmed as Battery Reversal.
• If Disconnect Signaling is required as Open Loop Disconnect,
program the Open Loop Disconnect Timer also. By default, Open
Loop Disconnect timer is programmed as 500 msec. Range of this
timer is 001-999 msec.
• If Disconnect Signaling is not required, program it as 'None'.
• Allowed-Denied Numbers:
• Use this feature if it is required to restrict some particular numbers to
be out dial through the FXS port.
• By default, this feature is enabled and all numbers are allowed
through all FXS port.
• If some number has to be restricted, program the numbers in any
Number list and assign that Number list to Allowed - Denied Number
list as per the requirement.
• If this feature is not required, disable the flag.
• Routing Type:
• Feature allows you to select the routing method to be used when a
number is dialed on FXS port.
• Two different routing type is supported through each FXS port:
• Fixed
• Dialed Number Based
• By default, Fixed routing type is programmed for all FXS ports.
• Program Fixed routing type in following cases:
• If individual SIP account is to be assigned to each FXS port.
• No Least Cost Routing feature is required and equal distribution
through all SIP account is required.
• Program Dialed Number Based routing type in following cases:
• If Least Cost Routing feature is required.
• If it is required that peer to peer call should go through Non-proxy
SIP account and other call should go through Proxy SIP account.
• SIP Account Routing Group:
• If Fixed Routing Type is programmed, program the SIP Account
Routing Group and assign that to the FXS port.
• If Dialed Number Based Routing Type is programmed, refer Dialed
Number Based Routing.
Configuring the Dialed Number Based Routing Table
• Dialed Number based routing table allows system to select the destination
account on the basis of the number dialed on FXS port which results in
the Least Cost Routing (LCR).
Page 18

• Dialed Number Based Routing Table is required to program only if Routing
type for any FXS port is programmed as 'Dialed Number Based'.
• Click on the link 'Dialed Number Based Routing' and webpage will open
as given below:
• By default, all Dialed number string is blank and SIP Account routing
group viz. 1 is assigned to all indices.
• Program the desired number/prefix to be out dialed and program SIP
account routing group to be used for routing that desired number/prefix.
Configuring the Peer-to-Peer Dialing
• Peer-to-Peer Dialing table allows the system to select the destination
address for the number to be out dialed.
• Peer-to-Peer Dialing table is required to program only if call is to be routed
through any non-proxy SIP Account.
• Click on the link 'Peer-to-Peer Dialing' and webpage will open as given
below:
Page 19

• By default, all Number string and Destination address is blank.
Destination Port is 5060.
• Program the desired number/prefix in Number field and corresponding
destination address & port for this number/prefix.
Configuring the Called Number Based Routing Table
• Called Number based routing table allows system to placed the incoming
SIP call to desired user directly.
• Called Number Based Routing Table is required to program only if Routing
type for any SIP Account is programmed as 'Called Number Based'.
• Click on the link 'Called Number Based Routing' and webpage will open
as given below:
Page 20

• By default, Called number string is blank and FXS port routing group viz.1
is assigned to all indices.
• Program the desired number/prefix to be placed on the particular FXS port
routing group assigned to it.
• By default, CLI Number on FXS port is programmed as Received Calling
Party.
• Program Received Called Party as CLI Number on FXS port when
incoming call on SIP account is to be directly placed on particular
extension number of the PBX.
• FXS port of gateway is connected to FXO port of PBX.
• Program CLI Based routing with extension number as CLI number in
PBX.
• Thus in Peer-to-Peer application, if Called Party number is displayed
as CLI on FXS port, call can be placed directly to the extension to
which it is called.
Configuring the Network Port Parameters
• Click on the link 'Network Port Parameters' and webpage will open as
given below:
Page 21

• Connection Type:
• Program the Connection type for the Network Port from the following:
• DHCP
• PPPoE
• Static IP
• By default, Static IP is programmed.
• Select 'DHCP', if you want IP address, Subnet mask and Gateway
address to be assigned by DHCP server automatically.
• Select 'PPPoE', if your ISP provides internet services using PPPoE.
Configure Username, Password and 'PPPoE Service Name' provided
by your ISP.
Page 22

• Select 'Static IP', if you want to assign IP address, Subnet Mask and
Gateway IP Address manually.
• DNS:
• Program DNS IP Address and DNS Domain Name.
• If connection type is programmed as Static then DNS address
programmed will be used i.e Static.
• If connection type is programmed as DHCP or PPPoE, you can
choose from the options for using DNS:
• Use Obtained Automatically
• Use Static i.e programmed.
• Router's Public IP address:
• Program Router's Public IP address if you are using any SIP account
for Peer-to-Peer application and you have configured 'Use Router's
Public IP Address' in parameter Source Port IP address for any SIP
Account. By default it is blank.
• STUN:
• Program STUN Server's Address and STUN Server Port if you are
using any SIP account for Peer-to-Peer application and you have
configured 'Use IP address fetched using STUN' in parameter Source
Port IP address for any SIP Account.
• You may use following STUN server address and STUN server port:
Address: stun.kcip.com or stun.fwdnet.net
Port: 3478
• After Submitting this page, SETU VFX88L will restart and you will be
logout from webjeeves.
• If SETU VFX88L is connected directly to the computer for configuring the
SETU VFX88L, remove the Ethernet cable connected to Computer and
connect it to the Broadband modem/LAN switch.
• Know your SETU VFX88L IP Address by following the steps given below:
• Enter into the Programming mode through FXS port.
• Enter the command 21-#* and go ON-Hook during Confirmation tone.
• System will place the ring and displays IP address as CLI on FXS
port.
• After knowing the IP address, exit from programming mode.
• Access the Web Jeeves using the displayed IP Address through one of
the computer connected to the LAN switch or through internet ready
access computer (if IP address of the system is Public IP).
Page 23

Checking the SIP Account Status
After configuring SETU VFX88L and making the connection of Ethernet port:
• You can check the status of SIP Accounts by clicking on the 'Status' link
in the Web Jeeves or through LEDs on the product (Refer LED table in
'Switching ON the SETU VFX88L' topic)
Step 3: Making a Test Calls
Making a call from FXS to SIP Account
• Lift the handset of the phone connected to the FXS port of SETU VFX88L.
• Dial Number.
• Talk.
• Replace the handset to disconnect.
Receiving a Call from SIP Account to FXS
• Have someone call you.
• Phone connected to the SETU VFX88L will ring.
• Lift the handset.
• Talk.
• Replace the handset to disconnect.
APPENDICES
A: Frequently Asked Questions (FAQ)
Q.1. Which internet telephony (VoIP) protocols are supported by
SETU VFX88L?
Ans. SETU VFX88L supports Session Initiation Protocol (SIP) to make/
receive calls on Internet network.
Q.2. Can I make a call to another SIP terminal (e.g., Soft Phone
running on PC) in my LAN network?
Ans. Yes. You can make a call to any SIP terminal in your LAN just by
dialing an IP address of the SIP terminal. If you are not comfortable in
dialing an IP address, you can use ‘Peer to Peer’ feature which allows
you to dial the number instead an IP address for such type of
applications.
Q.3. I have only one Internet connection for Internet surfing. Do I need
another internet connection for making VoIP calls using SETU
VFX88L?
Page 24

Ans. No. You do not need another internet connection to use SETU
VFX88L. But you should have hub or switch to connect PC and SETU
VFX88L.
Q.4. My Internet Service Provider (ISP) supports only PPPoE for
internet services. Can I use SETU VFX88L with my ISP?
Ans. Yes. You need to configure PPPoE User-Id, PPPoE Password and
PPPoE Service Name in SETU VFX88L provided by your ISP.
Q.5. My internet Service Provider (ISP) supports only DHCP to provide
internet services. Can I use SETU VFX88L with my ISP?
Ans. Yes. You need to enable the DHCP client in SETU VFX88L.
Q.6. My internet service provider (ISP) provides me only dynamic IP
address. Can I use SETU VFX88L to make VoIP calls?
Ans. Yes. Enable DHCP or PPPoE client in SETU VFX88L as used by your
ISP to provide internet services.
Q.7. I do not have PC to access Web Jeeves for configuration. Can I
change the IP address and subnet mask of Network port?
Ans. Yes. You can change the IP address and subnet mask of Network
port of SETU VFX88L if you do not have PC to access Web Jeeves.
You need to issue commands from any of the FXS port to change the
IP address and subnet mask.
Q.8. I do not have PC to access Web Jeeves for configuration. Can I
change the internet connection type of SETU VFX88L to DHCP?
Ans. Yes. You can change the connection type to DHCP by issuing
command from any of the FXS port of SETU VFX88L.
Q.9. I do not have PC to access Web Jeeves for configuration. Can I
know whether SETU VFX88L is registered with ITSP or not?
Ans. Yes. You can know the status of your SIP registration using LED
provided on the enclosure of SETU VFX88L.
Page 25

Q.10. I have connected my PC to Network port of SETU VFX88L. But, I
am not able to access the Web Jeeves for configuration.
Ans. Please ensure that the IP address of Network port of SETU VFX88L
and IP address of your computer should be in same subnet to access
Web Jeeves from your computer. If both the IP address is in the same
subnet, check for any error in the ethernet cable which connects your
computer to Network port of SETU VFX88L.
Q.11. Can I upgrade my SETU VFX88L for new firmware?
Ans. Yes. You can upgrade the SETU VFX88L for new firmware. To
upgrade SETU VFX88L for new firmware, please refer ‘Software
Upgrade’ in the System Manual.
Q.12. Can I upgrade the SETU VFX88L for new firmware remotely?
Ans. Yes. If you know the public IP address of Network port of SETU
VFX88L at the time of configuration, you can use the FTP server of
SETU VFX88L to upgrade the firmware. Please refer ‘Software
Upgrade’ in the System Manual.
Q.13. I am not able to access the Web Jeeves since I forgot the IP
address of Network port of SETU VFX88L. How can I know the IP
address of Network port?
Ans. You can use the system commands to know the IP address of
Network port of SETU VFX88L. Please ensure that you have
connected SLT with CLIP support on FXS port.
Q.14. Can I make call to PSTN, GSM number using SETU VFX88L?
Ans. Yes. You can make call to any PSTN, GSM number. Valid ITSP
account is required who provide services of terminating call to PSTN/
GSM network. Confirm with your ITSP about the service.
Q.15. Can I make call from one FXS port to other FXS port of the SETU
VFX88L?
Ans. Yes. You have to configure following in your SETU VFX88L:
Page 26

Programming for SIP Account:
• Enable one SIP account as Peer-to-Peer with SIP User ID = ‘*’ i.e
default and routing type for this SIP Account as “Called Number
Based”.
• Program the number of each FXS port in Number field of Called
Number Based Routing Table and assign FXS Port Routing
Group which consist of FXS port to which the call should be
routed i.e make 8 different FXS Port Routing Groups and assign
it to individual number.
Programming for FXS Port:
• Program Routing Type for each FXS port as “Dialed Number
Based”
• Program the number of each FXS port in Number field of Dialed
Number Based Routing Table and assign SIP Account Routing
Group which consist of Enabled Peer-to-Peer SIP Account.
• Program the number of each FXS port in Number field of Peer-toPeer table and assign Destination Address as the Network Port
IP Address of the SETU VFX88L.
Now, you can make call.
B: Programming Commands
Description Commands
Enter Programming Mode
Exit Programming Mode
To program connection type of the Network Port
To program Network Port IP Address
To program Subnet Mask
To display connection type on SLT
To display the Network IP Address on the Phone
To display Subnet Address
To display Gateway Address
To display DNS Address
To enable/disable VLAN Tag Flag
To default the system
#19-SE Password
00#*
10-Code-#*
11-XXX XXX XXX XXX-#*
12-XXX XXX XXX XXX-#*
20-#*
21-#*
22-#*
23-#*
24-#*
31-Code-#*
41-Reverse SE Password-#*
Page 27

Page 28

MATRIX COMSEC PVT. LTD.
Corporate Office:
394-GIDC, Makarpura, Vadodara - 390010, India.
Tel.:+91 265 2630555, Fax: +91 265 2636598
E-mail: Info@MatrixComSec.com
Factory:
39-GIDC, Waghodia - 391760, Dist. Vadodara, India.
Tel.: +91 2668 262056/57
Technical Support:
Tel.: +91 2668 263172/73, Fax: +91 2668 262631
E-mail: Support@MatrixComSec.com
Website: www.MatrixComSec.com
Version 3, April 2010
 Loading...