

Page 1

OPERATION & INSTALLATION MANUAL
MATRIX S3600 SILVER SERIES
REVERSE OSMOSIS
SYSTEM
Page 2

2
TABLE OF CONTENTS
PREFACE ....................................................................................................................... 5
A DISCUSSION OF REVERSE OSMOSIS ..................................................................... 6
THE MAIN COMPONENTS OF A WATERMAKER ........................................................ 8
THE SUBCOMPONENTS AND ACCESSORIES ......................................................... 10
DESIGN CONSIDERATIONS ....................................................................................... 13
TEMPERATURE CORRECTION TABLE ............................................................................................................ 15
OPERATING INSTRUMENTS ............................................................................................................................... 16
OPERATING INSTRUMENTS ............................................................................................................................... 17
PRODUCT WATER CONDUCTIVITY MEASUREMENT ................................................................................ 17
PRODUCT AND CONCENTRATE FLOW MEASUREMENT .......................................................................... 17
OPERATING PRESSURE MEASUREMENT ....................................................................................................... 17
FEED PRESSURE MEASUREMENTS .................................................................................................................. 17
MATRIX WATERMAKER LOG SHEET ............................................................................................................. 19
INSTALLATION INSTRUCTIONS ................................................................................ 20
PIPING MATERIAL ................................................................................................................................................ 20
FEED PIPING ................................ ................................................................ ............................................................ 20
CONCENTRATE PIPE ............................................................................................................................................ 20
OPERATING INSTRUCTIONS ..................................................................................... 26
MANUAL UNIT INITIAL START UP PROCEDURES ....................................................................................... 26
MANUAL UNIT NORMAL OPERATION ............................................................................................................ 28
AUTOMATIC UNIT INITIAL START UP PROCEDURES ................................................................ ................ 29
AUTOMATIC UNIT NORMAL OPERATION ..................................................................................................... 31
AUTOMATIC UNIT MANUAL START UP AND SHUT DOWN PROCEDURES .......................................... 32
Page 3

3
ROUTINE MAINTENANCE ........................................................................................... 33
SILVER SERIES MAINTENANCE SCHEDULE ................................................................................................. 33
MAINTENANCE OF PRE-FILTRATION COMPONENTS ............................................................................... 34
TO CHANGE THE BAG .......................................................................................................................................... 36
THE WATERMAKER .................................................................................................... 38
MEMBRANE STERILIZATION AND CLEANING PROCEDURES ............................... 39
TROUBLESHOOTING .................................................................................................. 44
ENGINEERING DATA .................................................................................................. 47
COMPONENT ILLUSTRATIONS ................................................................................. 48
Page 4

Page 5

5
PREFACE
This material is restricted and is for use only by the personnel who
need this information. It shall not be reproduced in any manner or
distributed for any purpose, whatsoever, except by written permission
of MATRIX Desalination, Inc.
The illustrations and instructions in this manual are based on
information available at the time of issue. We reserve the right to make
subsequent changes, or revise pages or sections, and to replace
existing copies without penalty.
INTRODUCTION
This manual is intended to aid you in understanding the principles of
Reverse Osmosis, and instruct you on how to properly operate the
MATRIX watermaker system.
Before you operate your new MATRIX watermaker it is recommended
that you READ THIS MANUAL FIRST!
Familiarize yourself with this manual now so that in the event of
complications, you can competently evaluate and correct the situation.
Page 6

6
SEAWATER DESALINATION:
A Discussion of Reverse Osmosis
Seawater contains many kinds of solids dissolved in solution. The most prevalent is
common table salt (Sodium Chloride). Present as well are other minerals, including
Calcium, Magnesium, Sulfate, Bicarbonate Alkalinity, Silica, and others. The sum of these
dissolved solids is referred to as the Total Dissolved Solids or T.D.S.
When sodium chloride (NaCl) is dissolved in water, the sodium (Na+) and the chloride (Cl-)
actually separate. When this occurs, each is called an ion and each has an electrical
charge. Sodium has a positive charge and is referred to as a cation (Na+). Chloride has a
negative charge and is referred to as an anion (Cl-). As the number of these cations and
anions increases, the ability of the water to conduct an electrical current increases, thus
one can measure the T.D.S. of the water by its ability to conduct current.
Most seawater averages between 35,000 and 38,000 PPM T.D.S., although variations of
up to 7,000 ppm are common in Middle East waters.
Required of any desalination process is the reduction of dissolved solids in water.
Thermal, membrane, or ion exchange processes are the most common methods of
desalination.
Reverse Osmosis (RO) is essentially a process for reducing dissolved solids in water.
This is accomplished by passing pressurized water over a semi-permeable membrane.
The membrane can be visualized as containing numerous tiny holes that allow the water
molecules to pass through. However, the holes are so small that they do not allow most
of the dissolved solids to pass through the membrane. These solids and the remaining
water (called the concentrate or brine) flow past the membrane surface and are piped to
drain. The water which goes through the membrane is called the permeate, or product
water.
The equipment used to desalinate water is referred to as a Reverse Osmosis system. It
must be remembered that the system cannot remove (“reject”) all the dissolved solids
from seawater. It is actually designed to reject approximately 99% of the T.D.S. or, in
other words, to allow 1% of the 38,000 PPM T.D.S. of the seawater to pass into the fresh
water. This yields water of less than 500 PPM of T.D.S (380 PPM). In this case, one
would refer to the system as having a T.D.S. passage, or salt passage, of 1%. However,
if the T.D.S. of the feed increases, there will be a corresponding increase in the level of
dissolved solids in the product water.
The fraction of the feedwater entering the system that then passes through the membrane
as product water is called the “recovery” (also called the conversion), and is usually stated
as a percentage, i.e., 25% recovery. Obviously, 100% of the feedwater cannot go through
Page 7

7
the membranes because there would be no water left to flush away the solids, which do
not pass through the membranes.
Normal recoveries for small seawater conversion units are in the range of 15-30%. At
20% recovery, for every 100 gallons of raw water fed to the RO system, 20 gallons are
recovered as purified water and 80 gallons are routed to waste as concentrated rejected
salts (brine). The same concept holds true for numbers expressed as gallons per minute,
cubic meters per hour, etc.
The rate at which water flows through the membrane is directly proportional to the driving
force available. The driving force is basically the difference between the pressure on the
feedwater (system pressure) and product water sides of the membrane and the difference
in osmotic pressure of the solutions on opposite sides of the membrane. The greater the
feed pressure the greater the driving force and product flow rate will be. Increasing the
pressure on the product side of the membrane decreases the driving force and therefore
lowers the product flow. The difference in salt concentration between the feedwater and
product water also reduces the driving force due to the difference in osmotic pressure,
which must be overcome.
It follows that if the pressure is raised and the concentrate flow rate consequently
decreases, the recovery increases. On the other hand, if the system pressure is held
fixed and the concentrate flow rate is made to decrease, the recovery also goes up. If, at
constant pressure, the concentrate flow is stopped altogether, the recovery is 100%. This
condition cannot last long. Most of the solid materials in the feedwater will adhere to the
membrane if not flushed from the membrane surface and vessel. Eventually, these
materials will so heavily coat the membrane that all flow will cease. This will result in the
rapid deterioration of the membrane. There must always be sufficient concentrate flow
to carry away the rejected dissolved solids and prevent concentrations that would
allow precipitation and resulting scaling of the membranes.
Pressure is not the only factor, which affects the product flow rate of the RO system.
Temperature of the feedwater can change the output by as much as 50% in the range
from nearly freezing to 95 degrees F (35 degrees C). As a general rule of thumb, product
flow from thin film composite RO systems will decrease by approximately 1.5% per 1
degree C decrease in feedwater temperature unless pressure corrections are made. The
capacity of the system therefore may vary seasonally with temperature.
The physical or chemical nature of many natural waters and industrial process waters is
such that it is not suitable to pump some waters directly into a Reverse Osmosis system.
Among the characteristics of water that may necessitate pre-treatment are suspended
solids (turbidity), the limited solubility of some salts, and strong chemicals such as acid or
chlorine, which chemically attack the membrane. Suspended solids (not to be confused
with dissolved solids) within the spiral wound element may gradually clog the flow path.
Some salts will crystallize from solution when concentrated, and may also clog the flow
paths.
Page 8

8
A common method of pretreatment is pre-filtration, which removes most of the suspended
matter from the feedwater. Although the RO system incorporates a pre-filter, some very
small particles pass through and have a tendency to collect on the membranes. In time ranging from months to years, depending on what is in the water - enough particles collect
inside the membrane housing that the membranes require cleaning. This is usually done
with detergents or other chemicals, as described in this manual.
Oxidizing chemicals, such as chlorine or bromine, dissolved oxygen, petroleum, solvents,
or halogens will degrade the salt rejection capability of the membranes. Adequate
pretreatment measures or operating procedures must ensure against their introduction
into the membrane systems.
Chemical post-treatment of RO water is often advisable. This is desirable to protect the
product water from re-contamination by harmful organisms such as bacteria while storing
the potable water. While the Reverse Osmosis process effectively removes bacteria from
seawater, the product water should be sterilized by chlorinating to guard against
contamination of the water after leaving the RO system's storage tanks.
Due to the very pure nature of RO product water, additional chemicals may be required to
protect against corrosion and add certain ions to the water for stability and/or taste.
THE MAIN COMPONENTS OF A WATERMAKER
The main components of any water maker, in order, are:
The supply pump, which supplies the feed water necessary for the high-
pressure pump to operate. The supply pump must have sufficient capacity
and good suction head properties to prevent cavitation. Dissolved gasses in
the feed water cause cavitation. As the feed water passes into the eye of the
impeller it is exposed to a low pressure. If the pressure is low enough for the
gasses to come out of solution it will make a crackling noise as the gasses
expand then collapse. Repeated or constant cavitation can be detrimental to
the pump impeller and casing. The noise level from cavitation will usually
increase and decrease with flow rate.
Another cause of noise in the supply pump is from air leaks in the suction
piping. This noise is usually constant. Air in the feed water will cause damage
to the ceramic plungers in the high-pressure pump as well as possible
damage to the membranes.
Filtration is the next and the most important part of any water-making unit.
This is done in various ways and usually in stages.
Cartridge filters are found on nearly all reverse osmosis systems. The
cartridge filter elements can be composed of different materials such as
paper, or polypropylene. They can be in a pleated, spun, melt-blown, or
Page 9

9
wound design. They are designed to be changed after they have become
fouled or clogged. Every water maker must have a final filter no larger than
five microns to help prevent fouling of the membranes. A 2-stage cartridge
filtration system incorporating a 30-micron filter followed by a 5-micron filter is
often used. This 2-stage configuration reduces the frequency at which the
filter elements become clogged.
Bag filters are another method of pre-filtering the water prior to the final
cartridge filter. These filters have a bag or sock inside, which are available in
different levels of micron filtration. These filters can be removed and cleaned
for reuse. The bag filter element can be cleaned several times before it needs
to be replaced.
A less common prefiltration type is the use of a multimedia tank, which will
have several different types of media (gravel, garnet, sand, etc.) loaded
inside, that will filter out the larger particles (25 microns) found in water. In
comparison, the diameter of a cross section of a human hair is 84 microns.
The advantage of using a media tank is in operating cost savings, as there
are no consumables required. To clean the filter, the flow of water is reversed,
and the particles that have been trapped by the filter, are then flushed out,
and dumped to waste.
Another type of filter, is an activated carbon filter. These filters can be
provided in configurations similar to the cartridge filter, or the media filter. The
activated carbon will absorb chlorine and organics in the water. Carbon filter
elements must be changed out periodically to remain effective.
High-pressure pumps or booster pumps vary in design, usually depending
on a specific application. Matrix uses only positive-displacement, plunger type
high-pressure pumps.
Pressure vessels house the membranes for a water maker. They are
manufactured from aluminum, stainless steel, or fiberglass. Generally
fiberglass pressure vessels are the most widely used because of their
resistance to corrosion, and lower cost. Pressure vessels can be produced in
assorted lengths, the shortest being for a single element (membrane).
Membranes consist of a semi-permeable thin-film composite layer
sandwiched between a permeate channel spacer and a feed channel spacer.
These layers are then spirally wound over a perforated plastic tube (product
tube). The layers are then covered with a shell of fiberglass. The actual
membrane is a thin porous film between two mesh like layers that serve as
spacers for the water to flow over. There are different types of membranes for
different purposes. The three basic types are freshwater, brackish, and
seawater. Their names refer to the type of feed water that will be applied.
Each membrane is designed for a specific rate of salt rejection, meaning that
Page 10

10
the membrane will only allow a certain amount of salts to pass through. When
two or more membranes are used in a pressure vessel, the product tubes are
connected by interconnects. These interconnects allow the product water to
flow continuously from one product tube of a membrane to another, without
being contaminated with the salt water feed flowing over them. The product
water then flows out the product tube and into the permeate port of the end
plug. The product water is then collected from each permeate port into a
manifold where there are sensors to detect the flow rate of water and the
quality of water.
The regulating valve is the primary means of controlling the operating
pressure of the system by restricting the concentrate flow rate.
THE SUBCOMPONENTS AND ACCESSORIES
Freshwater Flush Assembly
In order to extend the life of the membranes, MATRIX offers 4 fresh water flush options,
Manual, Solenoid Operated, Automatic, and Automatic with a flush tank. The first three
options use ship’s fresh water to flush the unit, and include a carbon filter to remove any
residual chlorine from the ship’s fresh water supply.
Manual System: This option incorporates a manual ball valve to isolate the feed
(seawater) and allow ship’s fresh water to the watermaker inlet. Ship’s pressure will flush
fresh water through the unit.
Solenoid Operated System: This option incorporates a solenoid-operated valve in place of
the manual ball valve, with a pushbutton on the RO unit control panel. Pressing the fresh
flush pushbutton starts the flush sequence. The solenoid valve will open allowing ship’s
water to flush the unit. After a pre-set time period, the solenoid valve will close.
Automatic System: This option is similar to the solenoid-operated system, except that the
flush sequence runs automatically whenever the unit shuts down, without operator
intervention.
Because the ship’s water may contain chlorine, the flush water is routed through a carbon
filter prior to the unit. The carbon filter will neutralize any residual chlorine in order to
protect the membranes from oxidation.
CAUTION: The carbon filter should be changed frequently to prevent damage to the
membranes by oxidation.
Automatic System with Flush Tank: This option includes a tank to store RO product water
to be used for flushing, and a flush pump to force the flush water through the unit. In this
configuration, the flush tank can also be used for chemical cleaning of the unit.
Page 11

11
Chemical Valve Assembly (Optional)
There are two (2) three way chemical valves that are available as an option that can be
plumbed to the suction port of the feed pump and the concentrate discharge on the unit.
Quick release fittings on one side of the valves enable chemical hoses to be stored when
the watermaker is in normal operation. In applications requiring a remote-mounted
supply pump, a separate cleaning system with pump can be provided for convenience.
Pressure gauges are used to indicate the pressure of the water at different
points in the system.
Flow meters show the flow of the concentrate (concentrated salt water that is
going to waste), and the product water. They are invaluable as they indicate
the recovery rate along with the production of the water maker. Again there
are different types such as the flow through indicators, and the digital or dial
type, which have small paddle wheels that spin as the water flows pass them.
The digital or dial type needs to be calibrated on a regular basis to insure their
accuracy.
Pressure switches are provided for safety, and for pump and membrane
protection. There are low pressure and high-pressure switches, each having a
certain function. The low-pressure switch is installed to shut down the water
maker in the event that the supply of water has been diminished for one
reason or another. This action protects the high-pressure pump. The high-
pressure switch is in place to shut down the water maker in the event that
the pressure after the high-pressure pump becomes too high. This action
prevents possible damage to the membranes, or other high-pressure
components.
Pressure relief valves are installed to prevent the build up of excessive
pressure in pipes and components. High-pressure relief valves are for safety
and to provide back up for the high-pressure switch, in case of failure. Lowpressure relief valves are used primarily for the accidental build up of
pressure in the PVC piping.
Conductivity Meters are included to monitor the quality of the water being
produced, and ensure that if the product quality does not meet specifications,
the water is diverted to waste. These monitors need to be calibrated on a
regular basis to ensure their accuracy.
ORP meters (optional) are used to monitor the incoming feed water to insure
that the oxidant level is low enough not to harm the membranes. They are
generally used to serve as a precautionary device. They measure the millivolt
level of the water, and they can be set up to shutdown the water maker in the
Page 12

12
event that an oxidant is found in the water. This action prevents membrane
damage.
Chemical injection systems (optional) are used to feed chemical solutions
to the feed and/or product water. Different chemicals can be applied to the
feed water depending on the need. The chemical tanks may have mixers if
the chemical is a powder and needs to stay mixed, to stay soluble. Since the
water that is produced is soft, from the lack of minerals and has no alkalinity,
chemicals may be added to raise the pH level and add minerals to reduce the
corrosivity and improve taste.
Accumulators (optional, depending on model) are containers, which have a
bladder inside that can dampen the pulsations that are produced from a
positive displacement pump. Pulsation dampener is another name for the
same component. Low-pressure accumulators use air to fill the bladder, high
pressure accumulators use nitrogen as it is inert and is not a flammable gas.
The pressures used, are generally 50 to 75% of the operating pressure that
the accumulator is in contact with.
Electrical control panels are used to provide the sequencing needed to
have a sequenced startup, and shut down of a reverse osmosis unit. They
also house the electrical controls and instruments. Matrix uses electric control
panels that are constructed to the NEMA 4X standard. The 4X rating ensures
that the electrical components will be protected from water, even if the water
is sprayed on the panel under pressure.
Remineralizers (optional) are vessels that contain a mixture of calcite and
corosex to add alkalinity and raise the pH of the product water in order to
reduce corrosivity and improve taste. The remineralizer incorporates a glove
valve to regulate the amount of minerals being added to the product water.
The remineralizer also includes a bypass valve to bypass the remineralizer
when it is out of service. The remineralizert should be located between the
product outlet on the RO unit and the inlet to the water storage tank.
The remineralizer load (calcite and corosex) will slowly lose it’s effectiveness
over time. The load should be replaced when the pH of the water leaving the
remineralizer is not higher than the pH of the water entering the remineralizer.
Ultraviolet Sterilizers (optional) are components that will destroy any
biological organisms in the water. Although the reverse osmosis system will
effectively remove all microorganisms, a UV sterilizer is recommended at the
outlet of the product water storage tank to ensure that any recontamination
that occurs in the tank (such as from contaminated shore water added to the
tank) is not passed to the point of use.
Page 13

13
DESIGN CONSIDERATIONS
WATER TEMPERATURE EFFECT
The water temperature significantly affects the product water flow rate through
the membrane. At any given pressure this flow increases with increasing
feedwater temperatures and decreases at lower feedwater temperatures. The
system design is based on expected product water output at 77°F. The water
temperature conversion chart illustrates the percent variance observed in
product water flow at temperatures other than the design basis (77°F). This data
set assumes that the operating pressure remains constant.
The graph of Production Capacity vs. Temperature demonstrates the capacity of
the watermaker versus temperature, when operating pressure adjustment is
taken into consideration. Starting at the right side of the graph, the watermaker
can be operated at constant production capacity as feedwater temperature
decreases, as long as the operating pressure is increased by closing the
concentrate control valve. At some minimum feedwater temperature, the
maximum operating pressure is reached, and no more adjustment can be made.
As the feedwater temperature continues to decline, the unit’s production capacity
will decline, since the operating pressure can no longer be increased to
compensate. The temperature at which the inflection point occurs varies with
watermaker model, feedwater salinity, membrane age, and a number of other
variables.
It is important that the maximum product flowrate, maximum operating pressure,
and maximum recovery rate of the watermaker are not exceeded.
It is recommended that the system not be operated at maximum pressures if
temperatures are significantly higher than 85°F for any length of time.
PRESSURE
The operating pressure has a direct effect on product water quality and quantity.
Both factors will increase as the system pressure increases (within design limits).
The system must be operated at the LOWEST pressure required to achieve the
designed product water flow rate. Always adjust the system pressure to the
specified PRODUCT flow, but do not exceed the specified recovery rate or
maximum operating pressure limit (950 psi).
BRINE VELOCITY
The brine flow over the membrane is very important to both product water quality
and quantity. The brine flow through an element should be maintained as given
Page 14

14
in the Design Data Sheet. At lower brine flows, concentration of sparingly
soluble salts will foul the membrane surface.
High brine velocities can also be a source of difficulty. At excessive flows the
elements are subjected to severe stress and physical damage such as
telescoping, glue-line fracture, etc. Irreparable membrane damage will result.
The total system has been designed with these factors in mind, and should be
controlled as specified in the operating procedures.
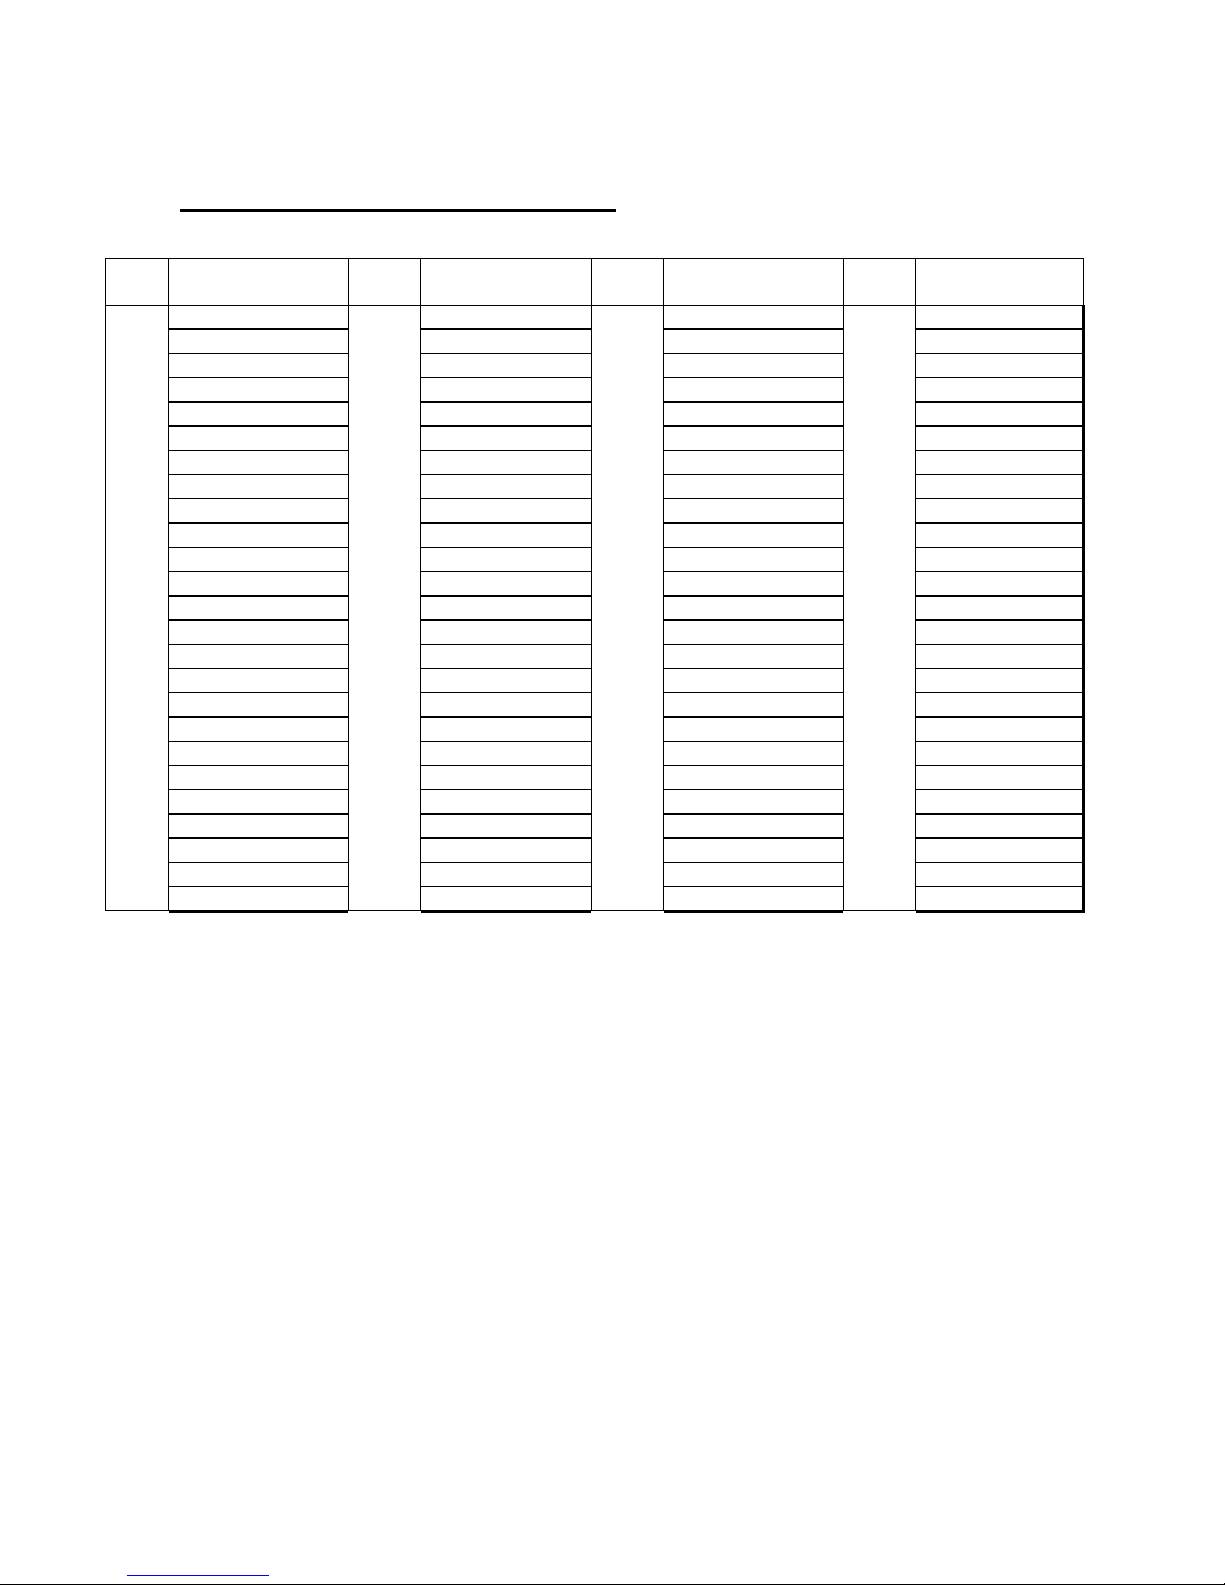
TEMPERATURE CORRECTION PROCEDURES
Procedure for correcting reverse osmosis system flow rate to compensate for
feed water temperature.
1. Refer to Section I of this manual for the Engineering Data on your unit.
2. Note the designed product flow at 77º Fahrenheit (25º C).
3. Note the temperature of the water presently being fed to the membranes.
4. From the “TEMPERATURE CORRECTION TABLE” find the correction factor
for the feed water temperature.
5. Divide the design product flow rate by the correction factor to get the product
flow rate for the feed temperature.
6. This quotient is the desired flow rate at the present temperature.
7. It may be possible to increase the product flow rate at lower temperatures by
increasing the operating pressure (by closing the concentrate control valve).
Caution should be exercised not to exceed the maximum product flowrate,
maximum operating pressure, or the maximum recovery rate of the
watermaker.
Note: In cold water expect to have less product flow from your watermaker. In
warm water your unit will produce more but you will extend the life of the
membranes by not exceeding the design flow rate. See the Temperature
Correction Chart for additional information on flow rates.
Page 15
15
°C
CORRECTION
°C
CORRECTION
°F
CORRECTION
°F
CORRECTION
FACTOR
FACTOR
FACTOR
FACTOR
1
3.64
26
0.97
34
3.47
82
0.90
2
3.23
27
0.94
36
3.18
84
0.88
3
3.03
38
0.91
38
2.93
86
0.82
4
2.78
29
0.88
40
2.68
88
0.79
5
2.58
30
0.85
42
2.47
90
0.79
6
2.38
31
0.83
44
2.29
92
0.77
7
2.22
32
0.80
46
2.14
94
0.75
8
2.11
33
0.77
48
2.01
96
0.73
9
2.00
34
0.75
50
1.88
98
0.70
10
1.89
35
0.73
52
1.77
100
0.68
11
1.78
36
0.71
54
1.68
102
0.65
12
1.68
37
0.69
56
1.59
104
0.63
13
1.61
38
0.67
58
1.51
106
0.61
14
1.54
39
0.65
60
1.44
108
0.59
15
1.47
40
0.63
62
1.36
110
0.57
16
1.39
41
0.61
64
1.30
112
0.55
17
1.34
42
0.60
66
1.24
114
0.53
18
1.29
43
0.58
68
1.17
116
0.51
19
1.24
44
0.56
70
1.12
118
0.49
20
1.19
45
0.54
72
1.08
120
0.47
21
1.15
46
0.53
74
1.05
122
0.45
22
1.11
47
0.51
76
1.02
23
1.08
48
0.49
77
1.00
24
1.04
49
0.47
78
0.97
25
1.00
50
0.46
80
0.93
TEMPERATURE CORRECTION TABLE
Page 16

16
Production Capacity vs. Temperature
Temperature (Deg F)
Product Capacity (GPD)
Operating Pressure vs. Temperature
Temperature (Deg F)
Operating Pressure (psi)
Page 17

17
OPERATING INSTRUMENTS
PRODUCT WATER CONDUCTIVITY MEASUREMENT
The conductivity meter that is located at the front of the electrical panel
measures the electrical conductivity of the product water. The meter is equipped
with an adjustable high point setting that allows the poor quality water to be
dumped to waste. This meter displays the salinity of the water in micromho’s or
microsiemens.
PRODUCT AND CONCENTRATE FLOW MEASUREMENT
The flow meters, located on the hydraulic control panel, monitor the flow rate of
the product and concentrate streams.
Reduced feedwater temperature, membrane fouling, etc., will cause a decrease
in product flow. An adjustment of the pressure control valve towards the closed
position will result in higher operating pressure; and increase the product flow.
OPERATING PRESSURE MEASUREMENT
The water pressure to which the membrane elements within the pressure
vessels are exposed is normally described as the R/O operating pressure.
Pressure gauges are mounted on the hydraulic panel for precise measurement
of the operating conditions.
Frequent reading and recording of each of these measurements is HIGHLY
important for evaluating system performance and in determining corrective
measures that may be required.
FEED PRESSURE MEASUREMENTS
Pressure gauges are provided at selected points in the feed system to monitor
the condition of the pretreatment components. The final feed pressure at the
high-pressure pump suction should never fall below 20 psi.
Page 18

Page 19

19
MATRIX WATERMAKER LOG SHEET
Date
System
Hours
Media/ Bag
Filter
Inlet
PSI
Media/
Bag
Filter
Outlet
PSI
Fine
Filter
Inlet
PSI
Fine Filter
Outlet
PSI
Mem. Feed
Press.
PSI
Product
Flow
GPM
Conc.
Flow
GPM
Product
Quality
Panel
(mmho)
Product
Quality
Hand
Meter
(mmho)
Initial
Date
Maintenance / Comments
Page 20

20
INSTALLATION INSTRUCTIONS
PIPING MATERIAL
In marine installations, when possible, the through-hull fitting, seacock, and feed piping
should be of non-corrosive materials such as fiberglass or thermo-plastics. However, in
cases where classification societies or insurance companies require metal through-hull
fittings and seacocks, the first choice of materials is 70/30 cupro-nickel. In cases where
other materials must be used, such as stainless steel or copper based alloys, it is
recommended to consult with MATRIX prior to installation.
In land-based applications, the recommended piping material is PVC Schedule 80.
PVC piping should be protected from direct sunlight, as UV light will cause the PVC
material to degrade over time.
NOTE: Iron, steel, copper, galvanized, or aluminum materials should never be used.
FEED PIPING
MATRIX recommends to increase the feedwater piping above the inlet size for the
system by one pipe diameter (except for stainless steel) whenever possible. Also
increasing the through-hull and seacock in marine applications, by one pipe size, is
normally a good practice.
Never reduce piping or valving diameters under the minimum specified size for your
particular watermaker.
CONCENTRATE PIPE
In normal conditions the concentrate overboard piping can remain the same size as
recommended in the watermaker specification sheet. Backpressure should be kept as
low as possible. Normal backpressure should be less than 25 psi.
PRODUCT WATER PIPING
No increase in product water piping, above the specified dimension, is normally
required.
It is very important to keep the pressure (membrane backpressure) of the product water
to a minimum. The membrane backpressure is ideally kept under 10 psi and in no case
should ever exceed 30 psi. It is strongly recommended that the product water piping be
configured such that there is an air gap where the product piping enters the product
Page 21

21
holding tank. The air gap will ensure that no stored water (which may contain chlorine)
can be drawn back into the watermaker when the watermaker is not in operation.
CAUTION: Rupture of the membrane envelope may occur if the product
backpressure is exceeded.
GENERAL INTAKE LOCATION
The intake (feedwater) location and associated plumbing is an aspect to be carefully
considered. Any restrictions in the feedwater plumbing could degrade the performance
of the watermaker as well as compromise the life of the system.
In marine installations, the through-hull fitting should be located as far below the water
line and normally as far forward as possible. Consideration of hull design should be
taken into account.
If the intake is to be incorporated into a sea chest, then locate this as low as practical
on the chest. Never take suction from the top of the sea chest, as air introduction may
occur.
If the ship has a sewage treatment system, the RO feed should be located as far away
as possible from the sewage plant discharge (preferably on the opposite side of the
hull). The treated sewage effluent usually contains high levels of chlorine, and if
ingested by the watermaker, will destroy the membranes.
CAUTION: Never place zinc anodes within 6 feet of the watermaker intake.
For land-based installations where a well or direct seawater intake is to be used, the
user must ensure that the feedwater is clean, and does not contain silt, suspended
solids, oils, or oxidizing agents.
FEED (SUPPLY) PUMP
The feed pump must have a flooded suction, as the pump is not self-priming. If the
pump is mounted above the vessel waterline, a suitable foot/check valve must be
installed and the pump primed prior to start up. The pump should be located as close
to the feed water supply as possible, with short and direct plumbing. Avoid high points,
which form air pockets.
If the feed pump is remote mounted (such as in a land-based application), ensure that it
is properly secured to a firm base. It will be necessary to run power wiring from the RO
cabinet to the remote mounted feed/supply pump. A suitable electrical disconnect
should be installed at the remote pump location in order to ensure personnel safety and
meet electrical code requirements.
Page 22

22
If you desire to provide your own supply pump, contact Matrix so that we can ensure
that the pressure and flow of the pump are sufficient, and that the control of the pump
can be properly integrated into the watermaker control system.
BAG FILTER (Optional)
This filter should be mounted vertically. It should be firmly secured at the base. In
marine installations, the filter should also be secured higher up on the chamber.
Allowance should be made to be able to unfasten the lug bolts securing the top plate of
the filter. Adequate clearance should be given at the top of the filter to enable bag
change when necessary.
Isolation valves can be installed on the suction and discharge lines to the housings to
reduce spillage when changing bags. These can be supplied as an option by request
MEDIA FILTER (Optional)
The media tank should be mounted vertically and, in marine installations, located with
consideration to unit weight and vessel displacement.
The filter should be mounted firmly at the base and, in marine applications also higher
up on the tank. Ensure that direction of flow through the tank is consistent with that
indicated on the tank hub. Gauges are supplied on the inlet and outlet to this filter for
monitoring of the differential pressure across it.
MEDIA TANK LOADING INSTRUCTIONS
After locating the MATRIX media filter to its permanent location the media tank will
have to be loaded. The media load will consist of bags and or boxes of pre-measured
ingredients, i.e. gravel, sand, garnet, carbon or anthracite. The media will have to be
loaded into the tank in the correct sequence and to the proper levels. The first media to
be loaded is the gravel. Before loading, some disassembly of the tank head and
plumbing is required.
The media tank assembly consists of a tank with a threaded head (cap) on top. This
head has two (2) ports on each side, which are plumbed to two (2) 3-way valves. There
is a small engraved “I” and “O” above the ports on the top of the head. To remove the
head from the tank, the two valves nuts must be unscrewed at the valves. The head
may now be unscrewed from the tank. Upon removal of the head, a PVC tube will be
found inserted into the center hole. This tube will have to be pulled out of the head, and
capped off with tape to prevent any media to fall inside and plugging the distributor on
the bottom of the tube. This PVC tube should be placed into the tank during the loading
of the media and held into position, so that the top end is flush with the top of the tank
and that it is in the center of the opening. After the media has been loaded, the tape
should be removed from the PVC tube. This procedure will enable the replacement of
the head to the tank.
Page 23

23
Once the head has been removed, mask off the tank internal threads with tape to
protect the threads during media loading. Locate the first load associated with that
particular tank. After the proper media is set aside for the tank, loading may begin.
First scoop or pour the gravel into the opening on top of the tank where the head was.
This first layer should cover the top of the distributor. Remember to hold the PVC tube
during this procedure. After all of the gravel has been loaded for that tank, use a pole or
piece of PVC pipe to level out the first layer. This should be done after each different
media is loaded. After the gravel is loaded, the pipe should stay in place, and will not
have to be held any longer.
The second media to load is the garnet #12; this is slightly coarser and larger in size
than the garnet #50. Again when a particular media is finished loading, level that layer.
The third media to be loaded is the garnet #50.
The next (fourth) media to be loaded is the sand.
The fifth and final load is the anthracite.
After the tank has been loaded, the top of the media should fill the tank two thirds (2/3)
to three-fourths (3/4) full. Remove the tape protecting the tank internal threads. Place a
hose in the tank to slowly fill the tank with water, without disturbing the media. During
this time the threads on top of the tank should be washed thoroughly to aid the
replacement of the head.
The head contains two (2) o-rings, which should be lubricated with a silicone-based
lubricant. Check that they are installed, and that they are in correct position. Remember
to remove the tape from the PVC pipe and slowly turn the head to install the head into
the tank. After this check the alignment of the piping and turn the tank if needed to
ensure proper alignment.
It is very important that the inlet (I) and outlet (O) are in the correct position after all the
plumbing has been reconnected. In the Service mode, the water will exit the supply
pump and enter the media tank through the inlet port. The water will then exit the outlet
port of the media tank and flow to the inlet of the cartridge filter(s).
In the Back flush mode the three way valves on either side of the head will be turned
180 degrees. This will reverse the flow of water so that it will enter the outlet of the tank
and exit the inlet side and be discharged to waste. It will be necessary to install a waste
discharge hose from the media filter backwash discharge fitting, and route the effluent
overboard. The backwash process removes any small debris or material that have
accumulated in the media filter. This process can take as little as fifteen (15) minutes or
as much as four hours depending on what has been accumulated during Service.
Page 24

24
After the tank is loaded, and the plumbing has been replaced the tank can now be
backflushed. The initial backwash will sometimes take two to four hours to discharge all
of the loose material in the media. During this time, loosen the vent plugs located on the
tank heads. This will expel the air in the system.
After the initial backwash is completed, and all air has been purged from the tank, the
media filter can be placed into service.
THE WATERMAKER CABINET
The cabinet requires a solid base. The cabinet should not be mounted above any
electrical apparatus. Allowances, with regard to access, should be made for ease of
maintenance. Ideally, there should be 48” of clearance on either side of the cabinet and
36” above the cabinet for easy maintenance.
Holes should be drilled in the base on which the watermaker is to be mounted that line
up with the vibration mounts for the watermaker. Once in place, the watermaker should
be secured to the base using stainless steel bolts, nuts, and lockwashers.
COMPONENT MODELS
Mount the individual components (hydropanel, supply pump, high-pressure pump
assembly, pressure vessel rack, and prefilters) in such a way to allow easy access for
maintenance, and to minimize piping lengths between components.
Make piping connections between each of the individual components using the piping
and hoses provided in the installation kit. Each individual IN/OUT connection is
lableled. Simply connect piping between matching letters (“A” to “A”, “B” to “B”, etc.).
See connection table at the end of this manual.
FRESHWATER FLUSH (Optional)
If the unit is using ship’s water (or house water) for flushing, plumb a hose from the
pressurized fresh water supply to the flush inlet on the watermaker. If the unit
incorporates a flush tank, ensure that the tank is securely mounted and plumb a hose
from the flush pump discharge to the flush inlet on the watermaker.
AUTOMATIC START/STOP
If your watermaker is configured to accept external inputs to start and stop the unit,
note the following information. Typically, 2 float switches are installed in the product
water storage tank. When the level in the storage tank becomes low, the LOW level
float switch is activated, closing a contact in the control circuit causing the unit to start.
When the product tank is full, the HIGH level float switch is activated, opening a second
Page 25

25
contact in the control circuit causing the unit to shut down. The unit will automatically
fresh flush after shutdown. No operator intervention is required when the unit is in
automatic operating mode.
Refer to the electrical schematic at the end of this manual for float switch wiring
instructions.
REMINERALIZER (Optional)
The remineralizer tank should be mounted vertically and, in marine installations, located
with consideration to unit weight and vessel displacement. The flow through a
remineralizer is reverse that of normal media filtration as the purpose is to chemically
modify the water and any filtration would be redundant. Connect the product outlet on
the RO watermaker to the fast&tite fitting inlet on the remineralizer tank assembly.
Connect the outlet to the product storage tank.
The filter should be mounted.
Page 26

26
OPERATING INSTRUCTIONS
MANUAL UNIT INITIAL START UP PROCEDURES
Normally after installation of the R/O either a MATRIX technician or authorized
representative should be present on initial system start up.
In all cases, if working with electricity, a qualified electrician should be present.
1. Ensure that all switches on the RO control panel are in the OFF position.
2. Turn the main breaker on.
3. Ensure that both the line voltage and frequency are correct for the unit.
4. Ensure all suction and discharge valves are in the correct position. Ensure that
chemical clean suction and discharge valves are in the correct position. Disconnect
the product water line to the storage tanks and direct to waste. This is to ensure that
all chemicals are adequately flushed out that were placed into the system at the
factory.
5. Ensure the high pressure-regulating valve is fully opened (counter-clockwise).
This valve is often in a closed position for membrane sterilization.
6. Ensure that the oil level of the high-pressure pump is half way up on the pump sight
glass.
7. Check rotation of the pumps. Open the electrical panel on the watermaker and
locate the contactor for the high-pressure pump, it should be labeled M1 and be
located at the bottom right of the panel. Turn the Off/Run/Start switch to the Run
position and then momentarily press the manual button on the contactor to supply
voltage to the high-pressure pump. The pump will momentarily start up. With the aid
of a second person check the rotation of the pump. Ensure the rotation complies
with the arrow found on top face the pump. If rotation is opposite to the direction of
the arrow and the unit is three-phase, turn off the control power and the main
breaker then switch two of the three wires supplying the main power to the electrical
panel. If the unit is single phase then the wiring will have to be corrected at each
motor. Repeat the process for the supply pump using the contactor labeled M2.
8. If the unit is equipped with a media filter, place the media filter valves in backwash
mode, restart the supply pump, and perform a thorough backwash of the media
filter.
Page 27

27
9. Once correct rotation has been verified, restart the supply pump by turning the
Off/Run/Start switch to Start and while the supply pump is running, check for leaks.
If leaks are observed turn off the control power and make necessary repairs.
10. With the supply pump running, purge air from the cartridge filter(s) by pressing the
small red button on the top of the cartridge filter housing. Hold the button in until no
more air escapes. If a media or bag filter is installed, purge air from the tank or filter
housing by opening the vent valve on the top of the tank or housing and allow all air
to escape.
11. When no large air bubbles are visible in the water flow in the concentrate flowmeter,
the high-pressure pump can be started up by turning the Off/Run/Start switch to the
Run position.
12. With both pumps running, check for leaks. If leaks are observed, turn off the control
power, and make necessary repairs.
13. With both pumps running, the high-pressure regulating valve should be adjusted to
achieve the desired flow rate of product water. The regulating pressure valve should
be slowly turned in the clockwise direction when bringing the system up to pressure.
If any leaks are observed, the pressure should be backed off slowly by turning the
regulating pressure valve counter clockwise.
14. After a period of one hour, the product water line can be reconnected to the storage
tanks.
15. With the unit operating at the correct product flow rate, record initial system readings
on the logsheet found in this manual.
YOU MUST ALWAYS USE EXTEME CAUTION WHEN ENTERING THE
ELECTRICAL CONTROL PANEL, OR WORKING ON ANY PART OF THE
ELECTRICAL SYSTEM OF THIS UNIT.
FAILURE TO DO SO CAN RESULT IN DEADLY SHOCK.
FAILURE TO COMPLY WITH ANY INSTRUCTIONS ABOVE, WILL, IN MOST
CASES, RESULT IN EQUIPMENT DAMAGE, AND POSSIBLY VOID THE
WARRANTY.
Page 28

28
MANUAL UNIT NORMAL OPERATION
1. Turn the main breaker on.
2. Ensure all suction and discharge valves are in the correct position.
3. Ensure the high pressure-regulating valve is fully opened (counter-clockwise).
4. Turn the Off/Run/Start switch to the Start position. The Feed Pump running light will
illuminate.
5. When there is water flowing in the Concentrate Flowmeter and the red Low
Pressure light has shut off, the high-pressure pump can be started.
6. Turn the Off/Run/Start switch to the Run position. The High-Pressure Pump running
light will illuminate.
7. With both pumps running, the high-pressure regulating valve can now be slowly
increased to achieve the desired flow rate for the product water.
8. With the unit operating at the correct pressures and flow rates, record system
readings on the logsheet. This will aid in diagnosing any problems that may occur in
the future.
9. When ready to shut down the unit, the regulating valve should be fully opened to
reduce the pressure.
10. After the pressure is reduced, turn the Off/Run/Start switch to the Off position.
11. The unit is now ready to be flushed.
a. If the unit has the “Automatic Solenoid Flush on Shutdown” option, flushing is
initiated by turning the Off/Run/Start to the “Off” position. If there is need to stop
the flush simply turn off the panel disconnect. Daily flushing can be
accomplished by momentarily placing the Off/Run/Start switch to “Run” and
returning to “Off”. The solenoid will automatically close after a preset time limit
(4-7 minutes).
b. If the unit has an automatic flush the switch should be returned to the run
position and the fresh water flush button depressed. It will automatically time
itself and shut off. The solenoid will automatically close after a preset time limit
(2-7 minutes).
c. If the unit has a manual fresh flush, open the flush valve, and allow fresh water
to flush the unit for 5 minutes.
Page 29

29
AUTOMATIC UNIT INITIAL START UP PROCEDURES
Normally after installation of the R/O either a MATRIX technician or authorized
representative should be present on initial system start up.
In all cases, if working with electricity, a qualified electrician should be present.
Turn the OFF/RUN/START switch to OFF. Turn the MANUAL/AUTO switch to
MANUAL. Turn the RUN/OFF/FLUSH switch to OFF.
Turn on the main breaker supplying power to the unit.
Ensure line voltage and frequency is correct for the unit.
Ensure all suction and discharge valves are in the correct position. Ensure that
chemical clean suction and discharge valves are in the correct position. Disconnect the
product water line to the storage tanks and direct to waste. This is to ensure that all
chemicals are adequately flushed out that were placed into the system at the factory.
Ensure the high pressure-regulating valve is fully opened (counter-clockwise).
Ensure that the oil level of the high-pressure pump is half way up on the pump sight
glass.
Check rotation of the pumps as follows:
Turn the OFF/RUN/START switch to the RUN position and then back off. The supply
pump will briefly operate. Ensure that the rotation is correct. Restart the supply pump by
turning the OFF/RUN/START switch to RUN. While the supply pump is running, check
for leaks. If leaks are observed turn off the control power and make necessary repairs.
Allow the supply pump to run to fully flush the feed piping. If a media filter is installed,
perform a backwash of the media filter.
Open the electrical panel on the watermaker and locate the contactor for the highpressure pump, it should be labeled M1 and be located at the bottom right of the panel.
Turn the OFF/RUN/START switch to the RUN position and then momentarily press the
manual button on the contactor to supply voltage to the high-pressure pump. The pump
will momentarily start up. With the aid of a second person check the rotation of the
pump. Ensure the rotation complies with the arrow found on top face the pump. If
rotation is opposite to the direction of the arrow and the unit is three phase, turn off the
control power and the main breaker then switch two of the three wires supplying the
main power to the electrical panel. If the unit is single phase then the wiring will have to
be corrected at each motor.
Page 30

30
When no large air bubbles are visible in the water flow in the concentrate flowmeter, the
unit can be started (see Startup and Shutdown Procedures)
With the unit running, check for leaks. If leaks are observed, turn off the unit, and make
necessary repairs.
With the unit running, the high-pressure regulating valve should be adjusted to achieve
the desired flow rate of product water. The pressure-regulating valve should be slowly
turned in the clockwise direction when bringing the system up to pressure. If any leaks
are observed, the pressure should be backed off slowly by turning the regulating
pressure valve counter clockwise.
After a period of one hour, the product water line can be reconnected to the storage
tanks.
With the unit operating at the correct product flow rate, record initial system readings on
the logsheet found in this manual.
YOU MUST ALWAYS USE EXTEME CAUTION WHEN ENTERING THE
ELECTRICAL CONTROL PANEL, OR WORKING ON ANY PART OF THE
ELECTRICAL SYSTEM OF THIS UNIT.
FAILURE TO DO SO CAN RESULT IN DEADLY SHOCK.
FAILURE TO COMPLY WITH ANY INSTRUCTIONS ABOVE, WILL, IN MOST
CASES, RESULT IN EQUIPMENT DAMAGE, AND POSSIBLY VOID THE
WARRANTY.
Page 31

31
AUTOMATIC UNIT NORMAL OPERATION
Prior to setting the unit to AUTO for the first time, run the unit in MANUAL to ensure that
the high-pressure regulating valve is set to the correct position. Once this has been
accomplished, shut the unit down.
Place the MANUAL/AUTO switch in AUTO
Turn the OFF/RUN/START switch to the RUN position.
Turn the FLUSH switch to RUN. This will arm the flush system to start automatically
after the unit shuts down.
When the product storage tank level is low, the tank level switch will close a contact,
commanding the unit to start automatically. The supply pump will start first, followed by
the high-pressure pump after a time delay.
With the unit operating at the correct pressures and flow rates, record system readings
on the logsheet. This will aid in diagnosing any problems that may occur in the future.
When the product storage tank is full, the level switch contact will open, and the unit will
automatically shut down. Once the unit has shut down, the fresh flush sequence will
automatically run.
After the fresh flush sequence is complete, the unit is in standby mode, and will restart
when the product storage tank level switch indicates a low condition.
It is recommended that the unit be tested in automatic mode by manually activivating
the float switches (bench test) prior to allowing the unit to operate unattended.
Page 32

32
AUTOMATIC UNIT MANUAL START UP AND SHUT DOWN PROCEDURES
If external float switches are not installed, it will be necessary to install a jumper wire on
terminals 3 and 4 in the control panel to simulate a normally closed contact from the
product storage tank level switch.
Ensure all suction and discharge valves are in the correct position.
Ensure the high pressure-regulating valve is fully opened (counter-clockwise).
Verify that the OFF/RUN/START switch is in the OFF position.
Place the MANUAL/AUTO switch in AUTO.
Place the RUN/OFF/FLUSH switch to RUN.
Turn the OFF/RUN/START switch to the START position and release. The switch is
spring loaded to return to the RUN position. The supply pump will start. After a time
delay, the high-pressure pump will start.
With both pumps running, the high-pressure regulating valve can now be slowly
adjusted to achieve the desired flow rate of product water.
To shut down the unit, turn the RUN/OFF/FLUSH switch to OFF. The unit will shut
down, and the fresh flush sequence will run automatically. At the end of the flush
sequence, turn the RUN/OFF/FLUSH switch to RUN.
The unit is now in standby mode. To restart the unit, turn the OFF/RUN/START switch
to START and release.
Page 33

33
ROUTINE MAINTENANCE
SILVER SERIES MAINTENANCE SCHEDULE
Seacock – Open and close each month to ease operation
Sea Strainer - Check every two weeks or when it is suspected that it needs cleaning.
Supply Pump – Replace mechanical seal when leakage occurs. Check impeller for
debris when rebuilding pump and when loss of flow occurs.
Supply Pump Motor – Grease motor bearings once every three months with MATRIX
SRI No. 2 Grease.
Media Filter – Backflush when there is a 15 psi or more differential between the inlet
and outlet of the filter. Sterilize filter with D-20 if the unit is not going to be used for two
weeks or more. Back flush filter for 30 minutes when returning to service.
Bag Filter – Change bag when there is a 15 psi or more differential between the inlet
and outlet of the filter. Ensure that the filter housing is clean of debris when replacing
bag by rinsing the housing and allowing to drain.
Cartridge Filter – Change filter(s) when the pump suction/fine filter outlet pressure is
between 15 and 20 psi. Ensure housing is free of debris and clean and rinse as is
necessary. Flush filters with fresh water before changing, this will prevent salt water
from spilling on other components.
CAUTION: Failure to completely clean all dirt and debris from the filter housing
will allow debris to enter the membranes. The will foul the membranes, and will
void the warranty.
Carbon Filter – Change filter(s) every three months.
CAUTION: Failure to change the carbon filter regularly may allow chlorine
contamination of the membranes. The will destroy the membranes, and will void
the warranty.
High Pressure Pump – Replace seals and valves when there is leakage or when there
is a loss of flow. Flush pump after each use with fresh water. Change pump oil first 50
hours and after every 500 hours with MATRIX Pump Oil.
High Pressure Pump Motor – Grease motor every three months with MATRIX SRI No. 2
grease.
Page 34

34
Membranes – Clean membranes every six months with general cleaning chemicals or
as needed. If there is suspected fouling then clean the membranes with the chemical
that is best prescribed. Always sterilize the membranes when they will not be used for
one week or more to prevent bacteria from growing. Flush the membranes with fresh
water after each use.
Gauges – Replace gauges when necessary. Clean glass and base when needed.
Flow Meters – Clean with mild detergent when necessary. Do not expose the flow
meters to Zylene or similar solvents and thinners. Flush flow meters after cleaning with
fresh water.
PVC Fittings – Threaded fittings should be removed and new Teflon tape applied when
leaks occur. The fitting should be replaced if necessary. Fittings should be cleaned on
the exterior when necessary.
Stainless Steel Fittings – The fittings should be cleaned and polished when necessary.
Leaks should be attended to immediately to prevent corrosion damage. Threaded
fittings should be removed and new Teflon tape applied when leaks occur. The fitting
and ferrules should be replaced if necessary.
High Pressure Switch – Should be adjusted as necessary to ensure the correct setting
of 950 psi. Switch should be replaced immediately if malfunctioning.
Low Pressure Switch – Should be adjusted as necessary to ensure the correct setting
of 15 psi. Switch should be replaced immediately if malfunctioning.
Electrical Components – Replace as is necessary.
Fuses - Replace as is necessary.
Frame, Supports and Brackets – Clean and polish when necessary. Touch-up any
marred or chipped paint to prevent corrosion.
MAINTENANCE OF PRE-FILTRATION COMPONENTS
The pretreatment of the feedwater is one of the most critical aspects of reliable, long-
term performance of the R/O elements.
Turbidity and suspended particles must be removed from the feedwater prior to the R/O
portion of the system, otherwise damage will occur to the sensitive instruments, highpressure pump, and specifically the membrane elements.
Mechanical plugging of the elements by particles is one of the most difficult forms of
fouling to correct. In some cases, mechanical fouling can be irreversible, resulting in
costly element replacement.
Page 35

35
Although this system utilizes the finest prefiltration available, improper service can still
result in this problem. By changing filters and not flushing out the chamber, or re-using
old cartridges; a "sludge" of particle contaminated water will flow to the elements and
some particles will become lodged within the brine spacer, or if large enough, plug the
feedwater end of the element. Repeated occurrences will obviously increase this fouling
problem.
Also, using other than specified types and qualities of prefilter replacements can
increase the potential of mechanical fouling.
MEDIA TANK FILTRATION
The media is designed to catch particles of 25 micron or greater. When the pressure
drop across the media filter exceeds 15 psi, it is necessary to backflush the system.
Only the supply pump is used to clean the media tank, pushing seawater through the
media, but in the opposite direction of normal flow.
BACKFLUSH PROCEDURE
1. Place the two three way valves in the backflush mode. This requires turning the
valve handles 180 degrees from the normal operating position.
2. Turn the Off/Run/Start switch to the Start position. The supply pump will then start
up and provide water to the media filter.
3. The duration of the time of the backflush depends on how badly the media tank is
clogged. With the watermaker in continuous duty it is recommended that the
operator perform this operation at least once a week.
4. Generally one hour is sufficient to adequately backflush the filter. Once this is done,
turn the Off/Run/Start switch to the Off position.
5. Place the valves in the normal service operating position.
6. The system is now ready for return to service. Note all pressure and flow rates on
system when restarted.
The high-pressure pump does not run in the media tank backflush mode.
BAG FILTER
The bag filter assembly is provided with a polypropylene large capacity bag filter. These
bags provide a large holding capacity and good particle retention while being
substantially lighter than media filters. Approximate wet weight of each of the filters is
250 pounds compared with a properly sized media filter, which would weigh between
Page 36

36
1000-2000 pounds. The bag filters are non-corrosive and are rated up to 150 psi.
operating pressure.
There is no backflushing procedure for this type of filter. When the pressure gauge
shows a pressure drop of 15 psi., simply remove the bag, and clean with fresh,
dechlorinated water. The bag can be cleaned several times before replacement. After
cleaning, carefully inspect the bag for holes or signs of wear. Replace the bag if any
defects are noted.
TO CHANGE THE BAG
1. Shut down the system.
2. Isolate the filter by closing valving on the intake and discharge (if installed ) of the
unit.
3. Remove the line that is attached to the top of the filter, if necessary. If hard piped,
there should be a union for easy removal. If connected by hose there should be
adequate hose to remove the cover with out disconnecting the hose.
4. Loosen the wing nuts found on top of the chamber which secure the cover plate.
The bolts should swing down to the sides.
5. Apply steady pressure and evenly lift up the cover plate.
6. Loosen the collar on top of the cover by holding the disk that is inside the bag, while
unscrewing the collar. Be careful not to fully unscrew the disk, only loosen enough
for bag removal.
7. If particles are noticed in the remaining water left in the chamber, flush out well with
dechlorinated fresh or salt water until cleared.
8. Carefully place a new bag in the chamber and place so that there are no folds or
pleats in the bag.
9. Replace cover and lugs. Do not overtighten these lugs. Hand tightening is adequate.
10. Return all valves to normal service positions.
11. Start the supply pump and purge air from the chamber with the air bleed fitting (if
installed) on the top of the cover plate.
12. Return system to normal operation. Note all pressure and flow rates.
Page 37

37
CARTRIDGE FILTRATION
Cartridge filter assemblies are provided for removal of suspended solids of 5 micron, or
greater, that could damage the high-pressure pump and/or foul the membranes.
A pressure gauge is provided to facilitate the monitoring of the feedwater supply
pressure to the H.P. pump.
The cartridge elements should normally be changed before the pressure to the high-
pressure pump suction falls below 15 psi. Each filter chamber requires one cartridge
element rated at five (5) microns.
NOTE: DO NOT OPERATE THE SYSTEM WITHOUT FILTER CARTRIDGE
ELEMENTS INSTALLED!
TO CHANGE THE FILTER CARTRIDGES
1. Shut down system.
2. Flush system with fresh water.
3. Press the small red button on top of the filter housing to release any pressure.
4. Unscrew the blue lower half of the prefilter housing.
5. Remove the old cartridge and discard.
6. Rinse or wash out the chamber with dechlorinated water being careful to remove all
accumulated dirt.
CAUTION: Failure to completely clean all dirt and debris from the filter
housing will allow debris to enter the membranes. This may foul the
membranes, and will void the warranty.
7. Place the new filter cartridge in the housing. An o-ring on top of the housing makes
the watertight seal. Inspect the o-ring for nicks or cuts and replace if necessary.
Lubricate the o-ring with silicone grease before reinstallation of the cartridge filter
housing.
8. Reinstall the lower half of the prefilter by screwing it into the head. Tighten to handtight plus ¼ turn using the wrench provided.
9. The prefilter is now ready to be put back into service.
10. Once the supply pump is running, press the small vent button to expel any air.
Page 38

38
THE WATERMAKER
GENERAL
Wash and rinse down equipment routinely. Touch up marred or chipped painted
surfaces, and spray equipment (except electrical parts) with a corrosion inhibitor such
as T-9 spray.
HIGH PRESSURE PUMP
Maintain the oil level in the crank end of the pump to one half the sight glass level. The
oil must be changed after the first fifty-(50) hours of running. Always use MATRIX Pump
Oil to maintain the warranty. Subsequent oil changes are at 500 hours or every three
months.
Lubricate the High Pressure Pump Motor every three-(3) months with MATRIX SRI #2
grease. Tighten drive belts (if supplied) when the deflection exceeds .5" or if a reduced
flow is observed when the high-pressure pump is running. Tighten belts with the control
power off.
REMINERALIZER
The remineralizer bed (corosex and calcite) should be replaced when there is a
noticeable drop in water pH at the remineralizer discharge. In general, the bed will
require replacement every 1-2 years, depending on usage.
CALIBRATION PROCEDURES
Calibration of electronic flowmeters can be accomplished by operating the unit, and
collecting the flow (either product or concentrate) in a measured container for a fixed
period of time to determine the actual flow rate. The meter is then adjusted to match
the measured flow rate.
Mechanical flowmeters do not require periodic recalibration.
Conductivity meter calibration is accomplished by measuring the conductivity of the
product water using a hand-held meter, and adjusting the unit’s meter to match the
hand-held reading. The hand-held meter should be calibrated periodically by using
standard calibration solutions available from Matrix.
Perform additional maintenance as specified in the individual components O&M
Manuals
Page 39

39
CHEMICAL
USE
QUANTITY
A-10
ALKALINE CLEANER
FOR ORGANICS
REMOVAL
4 OUNCES
A-11
ELEVATING THE pH
WHEN USING A-10 AND
A-20
AS NEEDED TO RAISE
pH TO 10-12
A-20
ALKALINE CLEANER
FOR ORGANICS
REMOVAL
1 PINT
B-10
ACID CLEANER FOR
REMOVAL OF METAL
OXIDES
1 PINT
C-15
ACID CLEANER FOR
REMOVAL OF METAL
OXIDES
1 PINT
D-20
SHORT TERM
STERILIZER FOR LESS
THAN 30 DAYS
4 OUNCES
E-25
LONG TERM
STERILIZER FOR
MORE THAN 30 DAYS
1 GALLON
M5-SW
ENZYME CLEANER
FOR OVERALL
CLEANING
4 OUNCES
MEMBRANE STERILIZATION AND CLEANING PROCEDURES
The following chemical cleaning procedures are intended to be applied through the use
of a standard Matrix cleaning system. Cleaning should be performed only by qualified
personnel. Contact Matrix for assistance if required.
The quantity of mixed cleaning solution required is as follows:
Silver A Series (600-1500 GPD) 5 Gallons
Silver B Series (2600-4400 GPD) 10 gallons
Silver C Series (6800-12000 GPD) 15 Gallons
MIXING INSTRUCTIONS (PER FIVE GALLON SOLUTION)
Page 40

40
MEMBRANE STERILIZATION PROCEDURES
SOLUTION D-20 - FOR SHORT-TERM SHUTDOWN - (FOUR WEEKS OR LESS)
AND
SOLUTION E-25 - FOR LONG-TERM SHUTDOWN (FOUR WEEKS TO SIX MONTHS)
STEP 1: Prepare Watermaker
1. Flush system with copious amounts of fresh, dechlorinated water. This step is to
remove all saline water and chemicals from the system and membrane elements.
2. The watermaker and any additional (optional) prefiltration equipment (i.e., media
filter, bag filter, etc.), should be flushed and sterilized prior to shutdown.
3. Install the chemical cleaning hoses to the cleaning connection fittings on the unit,
and the cleaning tank. Turn the chemical cleaning valves so the supply pump feed
is isolated and Concentrate water returns to the tank. This will allow recirculation of
the chemical solution through the watermaker.
4. If the supply pump is being used to recirculate the chemicals, the cleaning container
must be placed above the level of the pump since the pump is not self-priming.
5. Disconnect the product water supply tube from the storage tank. This will prevent
chemicals from entering the fresh water system.
STEP 2: Prepare Chemical Solution
READ CHEMICAL MSDS SHEET (PROVIDED WITH CHEMICAL) BEFORE
PROCEEDING
WHEN HANDLING CHEMICALS ALWAYS USE APPROPRIATE SAFETY
EQUIPMENT
1. Mix solution according to the mixing instructions described previously
STEP 3: Sterilizing Procedure
1. Start the cleaning/recirculation Pump ensuring that the regulating valve is fully
open, and re-circulate for forty-five (45) minutes. REMEMBER! ALL CHEMICALS
Page 41

41
ARE RE-CIRCULATED UNDER "MINIMUM PRESSURE"! CHEMICAL
SOLUTION TEMPERATURE MUST NEVER EXCEED 35°C (110°F).
2. During recirculation, the temperature of the cleaning solution will rise. Do not
allow the temperature to exceed 110 degF
3. After re-circulation, close all inlet and discharge valves to isolate the watermaker
and prevent the solution from draining out of the watermaker.
4. Disconnect the electrical power source (breaker) to the system.
MEMBRANE STERILIZATION IS NOW COMPLETED
STEP 4: Return Watermaker to Service
1. Set all valves to service positions.
2. Disconnect the product water line and allow it to dump to waste.
3. Fully open the concentrate control (pressure regulating valve) by turning
counterclockwise.
4. Start the system, and allow it to operate at low pressure for at least 30 minutes.
This should flush the majority of the preservation solution from the system.
5. Slowly increase pressure control valve to normal operating pressure.
6. After producing potable water for sixty (60) minutes, reconnect the product water
line so the product water may now go to the fresh water tank.
Page 42

42
CHEMICAL CLEANING INSTRUCTIONS
FOR USE WITH A-10, A-20, B-10, C-15, and M5-SW Solutions
STEP 1: Prepare Watermaker:
1. Flush system with copious amounts of fresh, dechlorinated water. This step is to
remove all saline water and chemicals from the system and membrane elements.
2. The watermaker and any additional (optional) prefiltration equipment (i.e., media
filter, bag filter, etc.), should be flushed and sterilized prior to shutdown.
3. Install the chemical cleaning hoses to the cleaning connection fittings on the unit,
and the cleaning tank. Turn the chemical cleaning valves so the supply pump feed
is isolated and Concentrate water returns to the tank. This will allow recirculation of
the chemical solution through the watermaker.
4. If the supply pump is being used to recirculate the chemicals, the cleaning container
must be placed above the level of the pump since the pump is not self-priming.
5. Disconnect the product water supply tube from the storage tank. This will prevent
chemicals from entering the fresh water system.
STEP 2: Prepare Chemical Solution:
READ CHEMICAL MSDS SHEET (PROVIDED WITH CHEMICAL) BEFORE
PROCEEDING
WHEN HANDLING CHEMICALS ALWAYS USE APPROPRIATE SAFETY
EQUIPMENT
1. Mix solution according to the mixing instructions described previously
2. Cleaning chemicals A-10 and A-20 are most effective at a pH level between 10 and
12. When using these chemicals only, check the pH of the mixed solution. Add A11 as required to raise the pH to between 10 and 12. pH adjustment is not required
for B-10, C-15, and M5-SW cleaners.
STEP 3: Cleaning Procedure:
1. Start the cleaning/recirculation pump ensuring that the regulating valve is fully open,
and re-circulate for forty-five (45) minutes. REMEMBER! ALL CHEMICALS ARE
Page 43

43
RE-CIRCULATED UNDER "MINIMUM PRESSURE"! CHEMICAL SOLUTION
TEMPERATURE MUST NEVER EXCEED 35°C (110°F).
2. During recirculation, visually inspect the condition of the cleaning solution. If the
solution becomes very dirty, discard the solution and mix a new batch. When using
cleaners A-10 and A-20 only, periodically, check the pH of the solution. The pH will
normally fall as the membrane foulants are removed. Add small amounts of A-11 as
required to maintain the pH of the solution between 10 and 12.
3. During recirculation, the temperature of the cleaning solution will rise. Do not allow
the temperature to exceed 110 degF
4. After re-circulation for 45 minutes, disconnect the return line from the chemical
cleaning tank and direct the line to waste.
5. Restart the cleaning pump, and pump the cleaning solution to waste. Do not allow
the pump to dry run.
WHEN HANDLING CHEMICALS ALWAYS WEAR APPROPRIATE SAFETY
EQUPMENT
STEP 4: Return Watermaker to Service:
1. Set all valves to service positions.
2. Disconnect the product water line and allow it to dump to waste.
3. Fully open the concentrate control (pressure regulating valve) by turning
counterclockwise.
4. Start the system, and allow it to operate at low pressure for at least 30 minutes.
This should flush the majority of the preservation solution from the system.
5. Slowly increase pressure control valve to normal operating pressure.
6. After producing potable water for sixty (60) minutes, reconnect the product water
line so the product water may now go to the fresh water tank.
STEP 5: Document all pressure, flow, and water quality and temperature
parameters after each chemical treatment.
Page 44

44
PROBLEM
INDICATION
SOLUTION
“Low Feed Pressure”
Light Not Working
Red Light Burned Out
No Control Power
L.P. Switch Out
Replace Bulb
See Below
Adjust Or Replace Switch.
No Control Power
Feed Power Off
Internal Fuse Blown
Transformer Open Or Burned
Motor Overload Trip
Check Feeder To Unit
Change Fuse
Replace Transformer
Reset Overload
Feed Pump Running
No Green Light
Light Bulb Faulty
Loose Wire
Check Bulb
Check Wiring
Feed Pump Not
Running
Improper Switch Position
Supply Pump Fuse Or Circuit
Breaker Off
Supply Voltage Or Phase
Incorrect
Thermal Overloads Are
Tripped
Motor Contactor Contacts Or
Coil Bad
Turn Switch To START
Replace Fuse Or Turn On
Supply Pump Breaker
Locate Proper Power Supply
Wait For Overload To Cool
Then Reset
Replace Contactor
Feed Pump Running,
No Feed Pressure
Suction Valve Not Open
Pump Not Primed
Pump Rotation Wrong
Open Suction Valve
Prime Pump
Correct Pump Wiring
Feed Pump Running,
Feed Pressure Good,
No Flow Through
Concentrate Flow Meter
Improper Valve Position
Check All Valves For Correct
Operating Position
Feed Pump Running
Low Pressure And Flow
Broken Or Obstructed Supply
Piping
Fouled Filter Cartridges
Fouled Media Filter
Fouled Bag Filter
System Valves Improperly
Positioned
Repair Piping/Remove
Obstruction
Replace Cartridges
Backflush Filter
Clean or Replace Bag
Place Valves In Normal
Service Position
TROUBLESHOOTING
GENERAL
After correct installation and start up of the MATRIX Watermaker by authorized personnel,
most problems occur with the normal wear and tear of components. Many problems can be
eliminated by following the correct maintenance procedures and also maintaining the
operating logs described in this manual.
Page 45

45
Problem
Indication
Solution
High Pressure Pump
Running, Low Flow
Defective Pump Fluid End
Foreign Mater In Fluid End
Defective Motor
Belts Slipping
Replace Pump
Disassemble Pump, Check
Valves
Replace Motor
Tighten Belts, Check Pulleys
For Wear.
Unit Shutdown On High
Pressure
Faulty High Pressure Switch
Unit Pressure Too High
High Pressure Switch Needs
Adjustment.
Belts Slipping Intermittently
Replace High Pressure
Switch
Run Unit Within Correct
Operating Parameters
Adjust High Pressure Switch
Tighten Belts
Membrane Product
Quality Low
Fouled Membranes
Feedwater Salinity Increase
Improper Chemical
Pretreatment (Optional
Equipment)
Conductivity Probe Needs
Cleaning
RO Membrane Feed Pressure
Low
Defective Pressure Vessel “O”
Ring, Brine Seal, or
Membrane Interconnect
Conductivity Meter Out Of
Adjustment
Clean/ Replace Membrane
Check Sea Water Salinity
Consult MATRIX Service
Department
Clean Probe
Adjust Pressure For Correct
Flow Rate
Replace “O” Ring, Brine
Seal, or Interconnect
Calibrate Conductivity Meter
Membrane Product Flow
Low
Fouled Membranes
Temperature Decrease
Low Membrane Feed Pressure
Clean / Replace Membranes
Check Seawater Correction
Table
Adjust Pressure For Correct
Flow
Page 46

46
Membrane
Housing
V-shaped
Brine Ring
Membrane inlet
Seawater
Flow
V-RING
MEMBRANE
Membrane Installation
& Position of Brine Ring
To install the membrane, observe that there is one outer seal (called the “Brine Seal”) on only one end of
the membrane – SEE DRAWING. This “V-shaped” seal ensures that the feedwater goes through the
membrane, not around the outside (path of least resistance). The water flows from one side (inlet with
Brine Seal) to the other side (concentrate outlet) of the membrane in the vessel. Lubricate the brine seal
and the inner edge of the pressure vessel. When installing the membrane, load the membrane into the
pressure vessel in the direction of the feedwater flow. This will ensure that the Brine Seal is positioned on
the feed (inlet)
The “V-shaped” portion of the seal should have the open portion of the “V” facing the flow, so that
it will flare open and seal against the inside diameter of the pressure vessel.
FLOW
side.
Page 47

47
ENGINEERING DATA
Page 48

48
COMPONENT ILLUSTRATIONS
Page 49

49
 Loading...