

Page 1
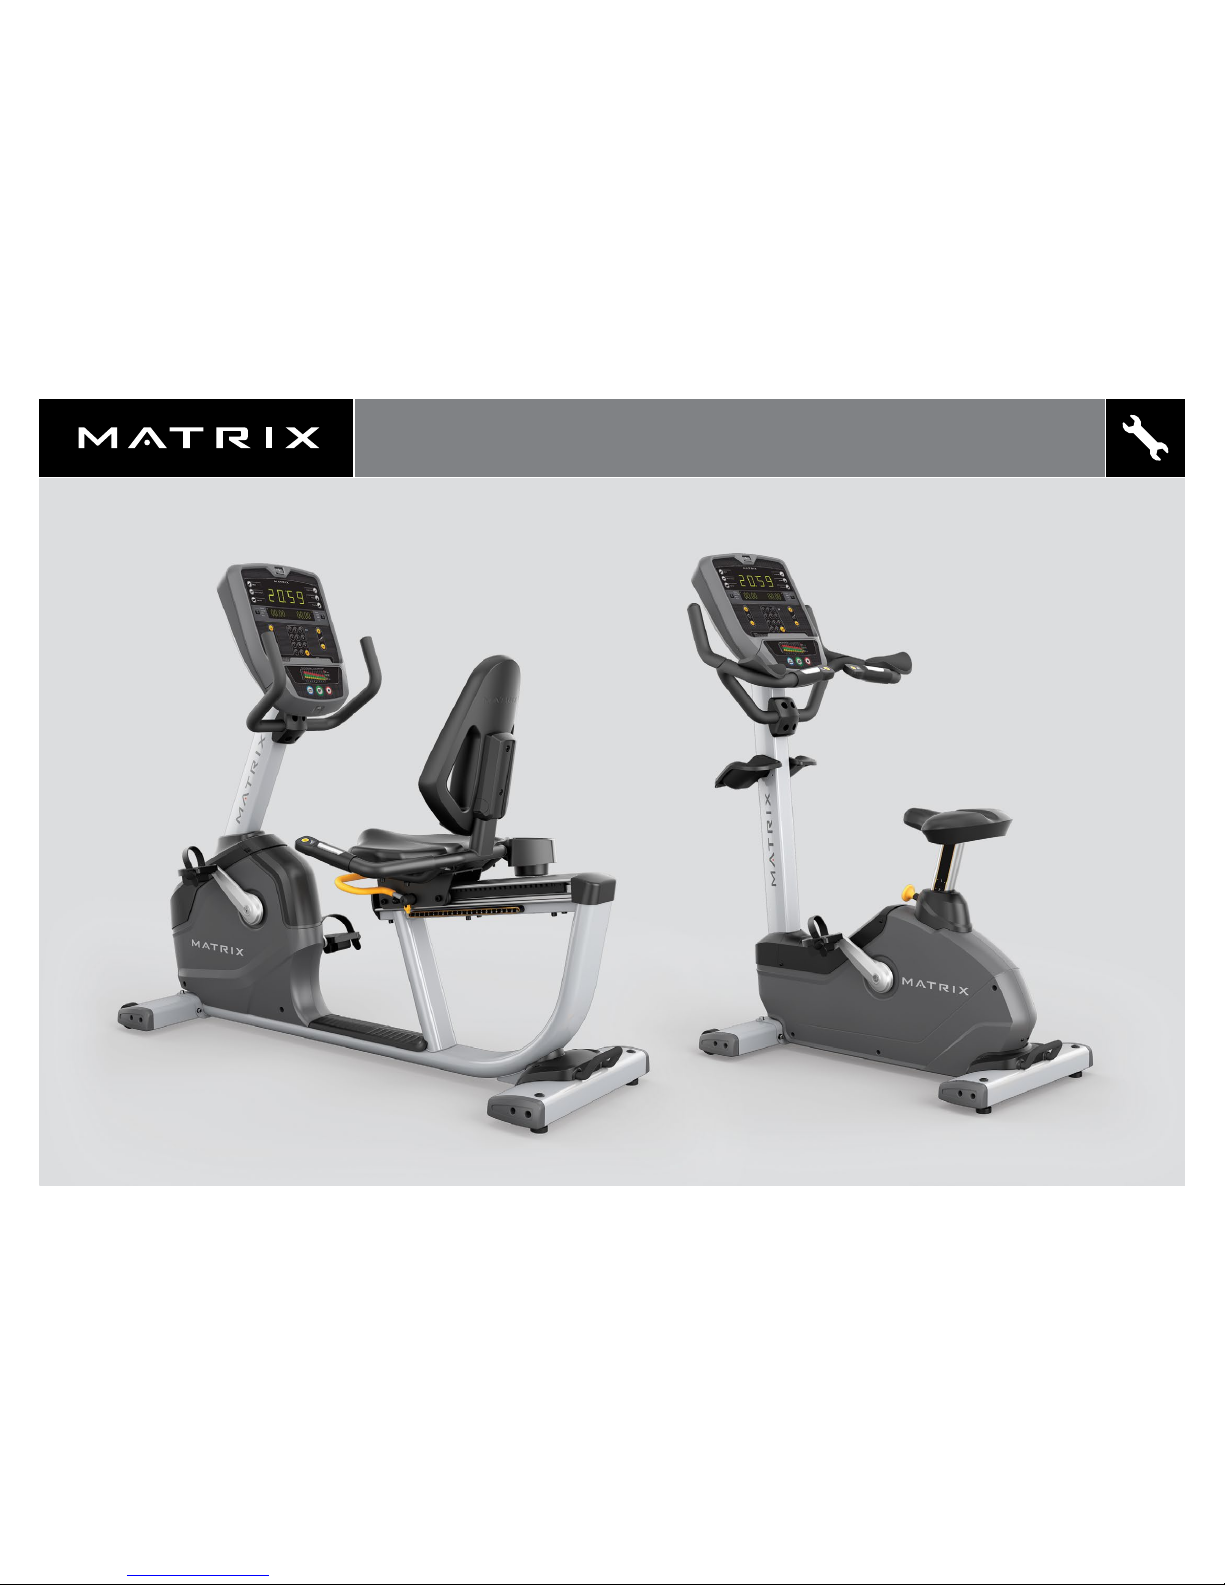
U1x
U1xe
R1x
R1xe
Page 2

2
matrixtness.com/manuals
ENG
To download the latest owner’s manual, in the language of your choice, visit the website above.
For further assistance, Matrix contact information is on the next page.
GER
Das neueste Benutzerhandbuch in der Sprache Ihrer Wahl können Sie auf der zuvor genannten Website herunterladen.
Falls Sie weitere Hilfe benötigen, nden Sie die Matrix-Kontaktdaten auf der nächsten Seite.
FRE
Pour télécharger la version la plus récente du guide d’utilisation dans la langue de votre choix, visitez le site ci-dessus.
Si vous avez besoin d’aide, rendez-vous sur la page suivante pour obtenir les coordonnées de Matrix.
SPE
Para descargar el último manual de usuario en el idioma que preera, visite el sitio web anterior.
Si necesita más ayuda, la información de contacto de Matrix se encuentra en la página siguiente.
DUT
Ga naar de bovenstaande website om de laatste gebruikershandleiding te downloaden in de taal van uw keuze.
Voor extra hulp vindt u de Matrix-contactgegevens op de volgende pagina.
DAN
Du kan downloade den seneste brugsvejledning på dit foretrukne sprog fra webstedet ovenfor.
Hvis du har brug for yderligere hjælp, henvises du til Matrix’ kontaktoplysninger på næste side.
ITA
Per scaricare il più recente manuale del proprietario, nella lingua che preferisci, visita il sito Web indicato in precedenza.
Per ulteriore assistenza, le informazioni di contatto per Matrix si trovano alla pagina successiva.
GRK
Για λήψη του πιο πρόσφατου εγχειριδίου χρήστη, στη γλώσσα της επιλογής σας, επισκεφθείτε την παραπάνω ιστοσελίδα.
Για περαιτέρω βοήθεια, πληροφορίες επικοινωνίας με την Matrix παρέχονται στην επόμενη σελίδα.
POL
Aby pobrać najaktualniejszą wersję instrukcji obsługi w wybranym języku, należy odwiedzić powyższą stronę internetową.
Jeśli potrzebna jest dalsza pomoc, można skorzystać z informacji kontaktowych Matrix podanych na kolejnej stronie.
PRB
Para baixar a versão mais recente do nosso manual em seu idioma, acesse o site acima.
Para obter mais assistência, as informações de contato da Matrix estão na próxima página.
CHT
若要下載您所選語言版本的最新使用手冊,請造訪上述網站。
如需其他協助,請參閱下一頁的 Matrix 聯絡資訊。
JPN
KOR
VTM
Để tải về sách hướng dẫn sử dụng mới nhất, bằng ngôn ngữ của bạn, hãy truy cập trang web bên trên.
Để được trợ giúp thêm, thông tin liên lạc của Matrix có ở trang kế tiếp.
THI
ท่านสามารถดาวน์โหลดคู่มือผู้ใช้ล่าสุดในภาษาที่ต้องการได้จากเว็บไซต์ข้างต้น หากท่านต้องการ
ความช่วยเหลืออื่นๆ โปรดติดต่อไปยังข้อมูลติดต่อ Matrix ที่ให้ไว้ในหน้าถัดไป
ARB
لتنزيل أحدث دليل للمالك، باللغة التي تختارها، تفضل بزياردة موقع الويب أعلاه.
لمزيد من المساعدة، توجد معلومات الاتصال الخاصة بشركة Matrix في الصفحة التالية.
Page 3
3
AUSTRALIA
Johnson Health Tech Australia
6B Hazelwood Drive
Morwell
VIC 3840 AUSTRALIA
Tel: +61 1300 760 601
au.matrixtness.com
BRAZIL
Johnson Health Tech Brasil
Estrada Municipal, 200 – mód 14 e 15 – gleba 3
Chácara Alvorada
Indaiatuba, SP
CEP 13337-200 BRASIL
Tel: +55-19-2107-5300
br.matrixtness.com
CANADA
Johnson Health Tech Canada
10401, Ray-Lawson Blvd.
Montreal, Quebec H1J 1M3
CANADA
Tel: 514-336-0006
www.matrixtness.com
CHINA
Johnson Health Tech (Shanghai) Co., Ltd.
Rm 508-512
HuaWen Plaza 999 Zhongshan
(West) Road
Changning District
Shanghai, 200050 CHINA
Tel: +86-021-32503800
www.johnsontness.com.cn
FRANCE
Johnson Health Tech France
45, avenue Georges Politzer
Trappes
78190 FRANCE
Tel: +33 01 30 68 62 80
www.matrixtness.fr
GERMANY / AUSTRIA
Johnson Health Tech. GmbH
Nikolaus-Otto-Str. 1
D-22946 Trittau GERMANY
Tel. +49 (0)4154-7952-0
www.matrixtness.eu
GREECE
Johnson Health Tech Hellas SA
12 Vas. Konstantinou Avenue
116 35 Athens GREECE
Tel: +20 211 4112797
www.Johnson Health Tech.gr
HONG KONG
Johnson Health Tech (HK) Limited
Room 1501-1502, Aitken Vanson Centre,
61 Hoi Yuen Road, Kwun Tong
Kowloon
HONG KONG
Tel: +852-2302 0596
hk.matrixtness.com
IBERIAN PENINSULA (SPAIN, PORTUGAL)
Johnson Health Tech Ibérica
Avenida de la Astronomía, 4 nave 9.2
San Fernando de Henares
28830 Madrid - ESPAÑA
Tel: +34-91 6293 688
www.matrixtness.es
ITALY
Johnson Health Tech Italia Spa
Zona Ind.le Campolungo 11
63100 Ascoli Piceno (AP)
ITALY
Tel: +39 0736 22699
www.matrixtness.it
JAPAN
Johnson Health Tech Japan
Yasuda Bldg. 2F,
3-3-8 Kaigan,
Minato-ku Tokyo 108-8435
JAPAN
Tel: +81-3-5419-3560
www.matrixtness.jp
KOREA
Johnson Health Tech Co., Ltd. Korea Branch
203 ho, A-Block Richensia Young
San133-3 Wonhyoro 1-ga, Young San
Gu, 140-111 Seoul
SOUTH KOREA
Tel: +82-2-6731-0175
kr.matrixtness.com
MALAYSIA
Johnson Fitness (Malaysia) Sdn. Bhd.
Lot 557D, Jalan Subang 3
Subang Jaya Industrial Estate
47610 Subang Jaya
Selangor MALAYSIA
Tel: +60-603-5632 8273
my.matrixtness.com
NETHERLANDS (BELGIUM, DENMARK, LUXEMBOURG)
Matrix Fitness / Johnson Health Tech. Netherlands
Vleugelboot 14
3991 CL Houten
NETHERLANDS
Tel: +31 30 24 45 435
www.matrixtness.nl
PHILIPPINES
Johnson Health Tech. Commercial Philippines Inc.
15th Floor, Citibank Center, 8741 Paseo de Roxas,
Makati City, Metro Manila, 1226 PHILIPPINES
Tel: +63-2-558-6590
world.matrixtness.com
POLAND
Johnson Health Tech Poland
ul. Działkowa 62
02-234 Warszawa POLAND
Tel: +49 2234 9997-100
pl.matrixtness.com
SWITZERLAND
Johnson Health Tech. (Schweiz) GmbH
Althardstrasse 185
CH-8105 Regensdorf SWITZERLAND
Tel. +41 (0)44-843 30 30
www.matrixtness.ch
TAIWAN
Johnson Health Tech Taiwan
999, Sec 2, Dongda Rd., Daya Dist.,
Taichung City 428
TAIWAN (R.O.C)
Tel: +886-4-25667100
world.matrixtness.com/zh
THAILAND
Johnson Health Tech Thailand
9th Floor, Unit 9B, Bangna Towers,
Tower A 2/3
Moo 14, Bangna-Trad Rd.
K.M. 6.5 Bangkaew, Pangplee
Samutprakan, 10540 THAILAND
Tel: +66-2751-9360
th.matrixtness.com
UNITED ARAB EMIRATES
Johnson Health Tech. UAE
ICON Tower, Oce #602
TECOM, Al Barsha
Dubai, United Arab Emirates
Tel: +971 4 4567939
world.matrixtness.com/
UNITED KINGDOM
(ENGLAND, SCOTLAND, N. IRELAND, WALES)
Johnson Health Tech UK
Riverside park
Campbell Road
Stoke on Trent
ST4 4EY ENGLAND
Tel: +44-1782644900
www.matrixtness.co.uk
UNITED STATES
Matrix Fitness / Johnson Health Tech NA
1600 Landmark Drive
Cottage Grove, WI 53527 USA
Toll Free: +1-866-693-4863
www.matrixtness.com
VIETNAM
Johnson Health Tech (Vietnam) Co. Ltd.
Unit 2302, Lim Tower
9-11 Ton Duc Thang Street
Ben Nghe Ward, District 1
Ho Chi Minh City
VIETNAM
Tel: +84 909 977957
vn.matrixtness.com
INTERNATIONAL (OTHER COUNTRIES)
Matrix Fitness International
999, Sec 2, Dongda Rd., Daya Dist.,
Taichung City 428
TAIWAN (R.O.C)
Tel: +886-4-25667100
world.matrixtness.com
Page 4

4
IMPORTANT PRECAUTIONS
SAVE THESE INSTRUCTIONS
• When using an exercise bike, basic precautions should always be followed, including the following: Read all instructions before using this equipment. It
is the responsibility of the owner to ensure that all users of this equipment are adequately informed of all warnings and precautions.
• This equipment is intended for commercial use. To ensure your safety and protect the equipment, read all instructions before operating.
DANGER!
TO REDUCE THE RISK OF ELECTRICAL SHOCK:
• Always unplug the equipment from the electrical outlet immediately after using, before cleaning, performing maintenance and putting on or taking off parts.
• Care should be taken when mounting or dismounting the
equipment. Before mounting or dismounting, move the
pedal on the mounting or dismounting side to its lowest
position and bring the machine to a complete stop.
• To maintain balance, it is recommended to
keep a grip on the handlebars while exercising,
mounting or dismounting the machine.
• Keep the topside of the foot support clean and dry.
• When exercising, always maintain a comfortable pace.
Do not sprint above 80 RPMs on this machine.
• Incorrect or excessive exercise may cause injury.
If you experience any kind of pain, including but
not limited to chest pains, nausea, dizziness, or
shortness of breath, stop exercising immediately
and consult your physician before continuing.
• This unit is not equipped with a free wheel. Pedal
speed should be reduced in a controlled manner.
• Do not turn pedal arms by hand.
• Do not wear clothes that might catch
on any part of the unit.
• Always wear athletic shoes while using this equipment.
• Do not jump on the unit.
• At no time should more than one person
be on unit while in operation.
• This unit should not be used by persons weighing more
than specied in the OWNER’S MANUAL SPECIFICATIONS
SECTION. Failure to comply will void the warranty.
• Disconnect all power before servicing or
moving the equipment. To clean, wipe surfaces
down with soap and slightly damp cloth only;
never use solvents. (See MAINTENANCE)
• The unit should never be left unattended when
plugged in. Unplug from outlet when not in use,
and before putting on or taking off parts.
• Do not operate under blanket or pillow.
Excessive heating can occur and cause re,
electric shock, or injury to persons.
• Connect this exercise product to a
properly grounded outlet only.
• At NO time should pets or children under the
age of 14 be closer to the unit than 10 feet.
• At NO time should children under
the age of 14 use the unit.
• Children over the age of 14 or disabled persons
should not use the unit without adult supervision.
• Use the unit only for its intended use as described
in the unit guide and owner’s manual.
• Do not use other attachments that are not recommended
by the manufacturer. Attachments may cause injury.
CAUTION!
CONSULT A PHYSICIAN BEFORE USING THIS EQUIPMENT. READ OWNER’S MANUAL BEFORE USE.
• It is essential that this equipment is used only indoors, in a climate controlled room. If this equipment has been exposed to colder temperatures or
high moisture climates, it is strongly recommended that the equipment is warmed up to room temperature before rst time use.
WARNING!
TO REDUCE THE RISK OF BURNS, FIRE, ELECTRICAL SHOCK OR INJURY TO PERSONS:
• Never operate the unit if it has a damaged cord
or plug, if it is not working properly, if it has been
dropped or damaged, or immersed in water. Call
Customer Tech Support for examination and repair.
• Keep power cord away from heated surfaces. Do not carry
this unit by its supply cord or use the cord as a handle.
• Never operate the unit with the air opening blocked. Keep
the air opening clean, free of lint, hair, and the like.
• To prevent electrical shock, never drop or
insert any object into any opening.
• Do not operate where aerosol (spray) products are
being used or when oxygen is being administered.
• To disconnect, turn all controls to the off
position, then remove plug from outlet.
• Do not use unit in any location that is not temperature
controlled, such as but not limited to garages,
porches, pool rooms, bathrooms, car ports or
outdoors. Failure to comply may void the warranty.
• Do not remove the console covers unless instructed
by Customer Tech Support. Service should only
be done by an authorized service technician.
• Heart rate monitoring systems may be inaccurate.
• Over exercising may result in serious injury or death.
• If you feel faint, stop exercising immediately.
Page 5

5
DEDICATED CIRCUIT AND ELECTRICAL INFO
A “Dedicated Circuit” means that each outlet you plug into should not have anything else
running on that same circuit. The easiest way to verify this is to locate the main circuit breaker
box, and turn off the breaker(s) one at a time. Once a breaker has been turned off, the only
thing that should not have power to it are the units in question. No lamps, vending machines,
fans, sound systems, or any other item should lose power when you perform this test.
Non-looped (isolated) neutral/grounding means that each circuit must have an individual
neutral/ground connection coming from it, and terminating at an approved earth ground.
You cannot “jumper” a single neutral/ground from one circuit to the next.
ELECTRICAL REQUIREMENTS
For your safety and to ensure good unit performance, the ground on this circuit must
be non-looped (isolated). Please refer to NEC article 210-21 and 210-23. Any alterations
to the standard power cord provided could void all warranties of this product.
The 1x cycles are designed to be self-powered and do not require an external power supply source to
operate. Without an external power supply, the console’s start-up time may be delayed. Add-on TV’s and
other console accessories will increase the time needed for start-up. An external power supply will ensure
power is provided to the console at all times and is recommended when add-on accessories are used.
For units with an integrated TV (1xe), the TV power requirements are included in the unit. An RG6
quad shield coaxial cable with ‘F Type’ compression ttings on each end will need to be connected
to the cardio unit and the video source. Additional power requirements are not needed for the
add-on digital TV. For units with an add-on PCTV, the TV power requirements are separate.
NOTE: All units with Virtual Active™ must be powered.
110 V UNITS
All Matrix 1x 110 V cycles require the use of a 100-125 V, 60 Hz and a 15 A “Dedicated
Circuit”, with a non-looped (isolated) neutral/ground for power. This outlet should
be a NEMA 5-15R and have the same conguration as the plug. No adapter should
be used with this product. These cycles can be daisy-chained together with up to 4
units per 15 A dedicated circuit. Matrix daisy-chain cord adapters are sold separately.
220 V UNITS
All Matrix 1x 220 V cycles require the use of a 216-250 V, 50 Hz and a 15 A “Dedicated
Circuit”, with a non-looped (isolated) neutral/ground for power. This outlet should
be a NEMA 6-15R and have the same conguration as the plug. No adapter should
be used with this product. These cycles can be daisy-chained together with up to 4
units per 15 A dedicated circuit. Matrix daisy-chain cord adapters are sold separately.
GROUNDING INSTRUCTIONS
The unit must be grounded. If it should malfunction or breakdown, grounding
provides a path of least resistance for electric current to reduce the risk
of electric shock. The unit is equipped with a cord having an equipment-
grounding conductor and a grounding plug. The plug must be plugged into
an appropriate outlet that is properly installed and grounded in accordance
with all local codes and ordinances. If the user does not follow these
grounding instructions, the user could void the Matrix limited warranty.
ADDITIONAL ELECTRICAL INFO
In addition to the dedicated circuit requirement, the proper gauge wire
must be used from the circuit breaker box, to each outlet that will have
the maximum number of units running off of it. If the distance from the
circuit breaker box to each outlet, is 100 ft (30.5 m) or less, then 12 gauge
wire should be used. For distances greater than 100 ft (30.5 m) from the
circuit breaker box to the outlet, a 10 gauge wire should be used.
ENERGY SAVING / LOW-POWER MODE
All units are congured with the ability to enter into an energy saving / lowpower mode when the unit has not been in use for a specied period of
time. Additional time may be required to fully reactivate this unit once it has
entered the low-power mode. This energy saving feature may be enabled
or disabled from within the ‘Manager Mode’ or ‘Engineering Mode.’
ADD-ON PCTV
A 15 A or 20 A “Dedicated Circuit” with a non-looped (isolated) neutral/
ground is required. Each PCTV requires at least 1.2 A of current. No more
than 12 PCTVs should be used for each 15 A circuit and no more than 16
PCTVs should be used for each 20 A circuit. The power outlet should have
the same conguration as the plug. No adapter should be used with this
product. An RG6 coaxial cable with ‘F Type’ compression ttings will need
to be connected between the video source and each add-on PCTV unit.
ADD-ON DIGITAL TV
Additional power requirements are not needed for the add-on digital TV.
An RG6 coaxial cable with ‘F Type’ compression ttings will need to be
connected between the video source and each add-on digital TV unit.
North American
power cord plugs
shown. Depending
on your country, the
plug type may vary.
110 NEMA 5-15P
PLUG
220 NEMA 6-15P
PLUG
POWER REQUIREMENTS
Page 6

6
ASSEMBLY
UNPACKING
Unpack the equipment where you will be using it. Place the carton
on a level at surface. It is recommended that you place a protective
covering on your oor. Never open box when it is on its side.
IMPORTANT NOTES
During each assembly step, ensure that ALL nuts and
bolts are in place and partially threaded.
Several parts have been pre-lubricated to aid in assembly and usage. Please do not wipe
this off. If you have diculty, a light application of lithium grease is recommended.
WARNING!
There are several areas during the assembly process that special attention must be
paid. It is very important to follow the assembly instructions correctly and to make
sure all parts are rmly tightened. If the assembly instructions are not followed
correctly, the equipment could have parts that are not tightened and will seem
loose and may cause irritating noises. To prevent damage to the equipment, the
assembly instructions must be reviewed and corrective actions should be taken.
NEED HELP?
If you have questions or if there are any missing parts, contact Customer
Tech Support. Contact information is located on the information card.
DANGER!
Improper connection of the equipment-
grounding conductor can result in a risk
of electric shock. Check with a qualied
electrician or serviceman if you are
in doubt as to whether the product is
properly grounded. Do not modify the
plug provided with the product. If it will
not t the outlet, have a proper outlet
installed by a qualied electrician.
WARNING!
• Connect this exercise product to a properly grounded outlet only.
• Never operate product with a damaged cord or plug even if it is working properly. Never operate any product if it
appears damaged, or has been immersed in water. Contact Customer Tech Support for replacement or repair.
Failure to follow these specications can cause damage to your product and can void the warranty:
• All video and power outlets must be functional the day of delivery / assembly of the product. The
client is responsible for any additional installation charges associated with return visits.
• Electrical supply may uctuate in your area. To ensure stable performance of the product, use the proper gauge wire.
R1x Recumbent
Page
7
U1x Upright
Page
12
Page 7

7
CONSOLE
CONSOLE MAST
TOP CAP
FRONT SHROUD
POWER CORD SOCKET
TRANSPORT WHEELS
CRANK
PEDALS
CONSOLE MAST HANDLEBARS
RESISTANCE TOGGLES
PULSE GRIPS
SEAT BACK
SEAT BOTTOM
WATER BOTTLE HOLDER
SEAT POSITION
ADJUSTMENT LEVER
TRANSPORT HANDLE
R1x
Page 8

8
R1x
1
TOOLS REQUIRED:
F 4 mm Allen Wrench
F 6 mm Allen Wrench
F Flat Wrench (15mm/17mm 325L)
F Phillips Screwdriver
PARTS INCLUDED:
F 1 Main Frame
F 1 Rear Stabilizer Tube
F 1 Front Stabilizer Tube
F 1 Rear Frame Handle
F 1 Rear Frame Cover
F 1 Console Mast
F 1 Console Handlebars
F 2 Handlebar Covers
F 1 Seat Frame
F 1 Water Bottle Pocket
F 1 Seat Base
F 1 Seat Back
F 1 Hardware Kit
F 1 Power Cord (packaged with console)
Console sold separately
Recumbent Cycle Assembly
A
B
Pink Hardware Bag
Description Qty
ABBolt
Spring Washer
8
8
Page 9

9
2 3
D
C
EFG
Yellow Hardware Bag
Description Qty
CDBolt
Screw
2
2
Black Hardware Bag
Description Qty
E
F
G
Bolt
Tooth Washer
Screw (pre-installed)
4
4
4
R1x
Page 10

10
R1x
4 5
H
I
J
K
Red Hardware Bag
Description Qty
HIScrew
Bolt
2
4
White Hardware Bag
Description Qty
JKBolt
Spring Washer
4
4
Page 11

11
Q
P
6 7
O
N
M
L
R1X ASSEMBLY COMPLETE!
Blue Hardware Bag
Description Qty
L
M
N
O
Bolt
Arc Washer
Spring Washer
Screw
4
4
4
3
Purple Hardware Bag
Description Qty
PQBolt
Bolt (pre-installed)25
R1x
Page 12

12
U1x
RESISTANCE TOGGLES
PULSE GRIP HANDLEBARS
SEAT
SEAT ADJUSTMENT KNOB
PEDALS
TRANSPORT HANDLE
CONSOLE
WATER BOTTLE HOLDERS
CONSOLE MAST
TOP CAP
POWER CORD SOCKET
SHROUD
CRANK
Page 13

13
TOOLS REQUIRED:
F 4 mm Allen Wrench
F 6 mm Allen Wrench
F Flat Wrench (13/15 mm)
F Phillips Screwdriver
PARTS INCLUDED:
F 1 Main Frame
F 1 Rear Stabilizer Tube
F 1 Front Stabilizer Tube
F 1 Rear Frame Handle
F 1 Rear Frame Cover
F 1 Console Mast
F 1 Water Bottle Holder
F 1 Seat Base
F 1 Arm Rest Handlebars
F 1 Front Shroud Cover (pre-installed)
F 1 Rear Shroud Cover (pre-installed)
F 1 Hardware Kit
F 1 Power Cord (packaged with console)
Console sold separately
Upright Cycle Assembly
A
B
U1x
1
Red Hardware Bag
Description Qty
ABBolt
Flat Washer
8
8
Page 14

14
U1x
2
C
D
3
E
F
H
G
G
I
Pink Hardware Bag
Description Qty
CDBolt
Screw
2
2
Green Hardware Bag
Description Qty
E
F
G
H
I
Bolt
Tooth Washer
Screw (pre-installed)
Screw
Bolt
4
4
6
2
2
Page 15

15
4
J
K
L
U1x
Yellow Hardware Bag
Description Qty
J Bolt 4
5
Pre-installed Hardware
Description Qty
KLFlat Washer
Nylon Nut
3
3
Page 16

16
U1x
M
6
U1X ASSEMBLY COMPLETE!
Pre-installed Hardware
Description Qty
M Bolt 4
Page 17

17
BEFORE YOU BEGIN
LOCATION OF THE UNIT
Place the equipment on a level and stable surface away from direct sunlight.
The intense UV light can cause discoloration on the plastics. Locate your
equipment in an area with cool temperatures and low humidity. Please
leave a clear zone on both sides of the equipment that is at least 24”
(600 mm). This zone must be clear of any obstruction and provide the
user a clear exit path from the machine. Do not place the equipment in
any area that will block any vent or air openings. The equipment should
not be located in a garage, covered patio, near water or outdoors.
LEVELING THE EQUIPMENT
The equipment should be level for optimum use. Once you have
placed the equipment where you intend to use it, raise or lower one
or both of the adjustable levelers located on the bottom of the frame.
Use 6mm hex key through the access hole (shown below).
A carpenter’s level is recommended.
NOTE: There are only two levelers on the equipment.
WARNING!
Our equipment is heavy, use care and additional help if necessary when
moving. Failure to follow these instructions could result in injury.
POWER
If the equipment is powered by a power supply, the power must be plugged
into the power jack, which is located in the front of the equipment near the
stabilizer tube. Some equipment has a power switch, located next to the power
jack. Make sure it is in the ON position. Unplug cord when not in use.
WARNING!
Never operate equipment if it has a damaged cord or plug, if it is not working properly, if it has been
damaged, or immersed in water. Contact Customer Tech Support for examination and repair.
HYBRID SEAT HEIGHT
To adjust the seat height on the Hybrid Cycle, pull the orange lever under the seat and
lower the seat to the lowest position, stand over the seat and grab the orange lever. Pull
the lever and lift until the seat base makes contact with your pelvic bone.
RECUMBENT SEAT HEIGHT
To adjust the seat height on the Recumbent Cycle, locate the orange lever under the seat
before you mount the Cycle. Place your right hand on the orange adjustment handle
under the seat. Place feet on the ground while seated and slide forward if needed. Place
feet on pedals, gently lift lever under the seat. Using legs, slowly push and slide the seat
up or down to desired position. Release lever and allow to lock into place.
UPRIGHT SEAT HEIGHT
To raise the seat height on the Upright Cycle, pull the seat upward. To lower the seat,
locate the orange adjustment lever under the seat and pull the lever up to slide the seat
down. Release lever and allow to lock into place.
The seat height adjusts from level 1 to 23. Do not raise the seat past level 23.
FREE AREA
0.6 m
(2 ft)
0.6 m
(2 ft)
0.6 m
(2 ft)
Page 18

18
PROPER USAGE
To determine proper seat position, sit on the seat
and position the ball of your foot on the center of the
pedal. Your knee should bend slightly at the furthest
pedal position. You should be able to pedal without
locking your knees or shifting your weight from side
to side. Adjust pedal straps to deisired tightness.
USING THE HEART RATE FUNCTION
The heart rate function on this product is not a medical device.
While heart rate grips can provide a relative estimation of
your actual heart rate, they should not be relied on when
accurate readings are necessary. Some people, including
those in a cardiac rehab program, may benefit from using an
alternate heart rate monitoring system like a chest or wrist
strap. Various factors, including movement of the user, may
affect the accuracy of your heart rate reading. The heart rate
reading is intended only as an exercise aid in determining
heart rate trends in general. Please consult your physician.
PULSE GRIPS
Place the palm of your hands directly on the grip pulse handlebars.
Both hands must grip the bars for your heart rate to register. It
takes 5 consecutive heart beats (15-20 seconds) for your heart rate
to register. When gripping the pulse handlebars, do not grip tightly.
Holding the grips tightly may elevate your blood pressure. Keep
a loose, cupping hold. You may experience an erratic readout if
consistently holding the grip pulse handlebars. Make sure to clean
the pulse sensors to ensure proper contact can be maintained.
WIRELESS HEART RATE RECEIVER
When used in conjunction with a wireless chest transmitter, your heart rate
can be transmitted wirelessly to the unit and displayed on the console.
Prior to wearing the wireless chest transmitter on your chest, moisten the two rubber
electrodes with water. Center the chest strap just below the breast or pectoral muscles,
directly over your sternum, with the logo facing out. NOTE: The chest strap must be tight and
properly placed to receive an accurate and consistent readout. If the chest strap is too loose,
or positioned improperly, you may receive an erratic or inconsistent heart rate readout.
WARNING!
Heart rate monitoring systems may be inaccurate. Over exercising may result in
serious injury or death. If you feel faint, stop exercising immediately.
Backside of chest strap
Apply moisture here
Page 19

19
MAINTENANCE SCHEDULE
ACTION FREQUENCY
Unplug the unit. Clean entire machine using water and a mild soap or
other Matrix approved solution (cleaning agents should be alcohol and
ammonia free).
DAILY
Inspect the power cord. If the power cord is damaged, contact Customer
Tech Support.
DAILY
Make sure the power cord is not underneath the unit or in any other area
where it can become pinched or cut during storage or use.
DAILY
Clean underneath the cycle, following these steps:
• Turn off the cycle.
• Move the cycle to a remote location.
• Wipe or vacuum any dust particles or other objects that may have
accumulated underneath the cycle.
• Return the cycle to its previous position.
WEEKLY
Inspect all assembly bolts and pedals on the machine for proper
tightness.
MONTHLY
Clean any debris off of the seat guide rail. MONTHLY
For 7xe consoles, enter service mode and select ‘test’. Select ‘touch
calibration’ and then select ‘start’. Follow the on-screen prompts and touch
the screen where indicated.
QUARTERLY
MAINTENANCE
1. Any and all part removal or replacement must be
performed by a qualied service technician.
2. DO NOT use any equipment that is damaged and or has worn or broken parts.
Use only replacement parts supplied by your country’s local MATRIX dealer.
3. MAINTAIN LABELS AND NAMEPLATES: Do not remove labels for
any reason. They contain important information. If unreadable or
missing, contact your MATRIX dealer for a replacement.
4. MAINTAIN ALL EQUIPMENT: Preventative maintenance is the key to
smooth operating equipment as well as keeping your liability to a
minimum. Equipment needs to be inspected at regular intervals.
5. Ensure that any person(s) making adjustments or performing maintenance
or repair of any kind is qualied to do so. MATRIX dealers will provide
service and maintenance training at our corporate facility upon request.
WARNING
To remove power from the exercise cycle, the power cord
must be disconnected from the wall outlet.
PRODUCT SPECIFICATIONS
R1x / R1xe U1x / U1xe
Max User Weight 182 kg / 400 lbs
Product Weight 82 kg / 181 lbs 65 kg / 143 lbs
Shipping Weight 100 kg / 220 lbs 75 kg / 165 lbs
Overall Dimensions
(L x W x H)*
154 x 68 x 116 cm /
60.8” x 26.7” x 45.6”
107 x 47 x 77 cm /
42” x 18.3” x 30.1”
* Ensure a minimum clearance width of 0.6 meters (24”) for access to and passage around MATRIX equipment.
Please note, 0.91 meters (36”) is the ADA recommended clearance width for individuals in wheelchairs.
Page 20

R1x / U1x Cycle Frame
© 2016 Johnson Health Tech
Part # 1000345282
Rev 1.0 A
 Loading...