

Page 1

Covers Models:
NTSC/ATSC
NTSC/ATSC/Pro:Idiom
Page 2

Page 3

CHAPTER 1 : GENERAL SAFETY AND CARE........................................................................
GENERAL GUIDELINE
CHAPTER 2 : SETUP.................................................................................................................
CONNECTION IDENTIFICATION AND MENU SETUP
CHAPTER 3 : CHANNEL MENU...............................................................................................
CHAPTER 4 : PICTURE MENU.................................................................................................
CHAPTER 5 : AUDIO MENU.....................................................................................................
CHAPTER 6 : TIME MENU........................................................................................................
CHAPTER 7 : SETUP MENU.....................................................................................................
CHAPTER 8 : LOCK MENU......................................................................................................
CHAPTER 9 : CUSTOM FEATURES MENU.............................................................................
CHAPTER 10 : REMOTE CONTROL.........................................................................................
PAGES
4
4
5
7
9
12
15
18
22
24
TABLE OF CONTENTS
3
Page 4
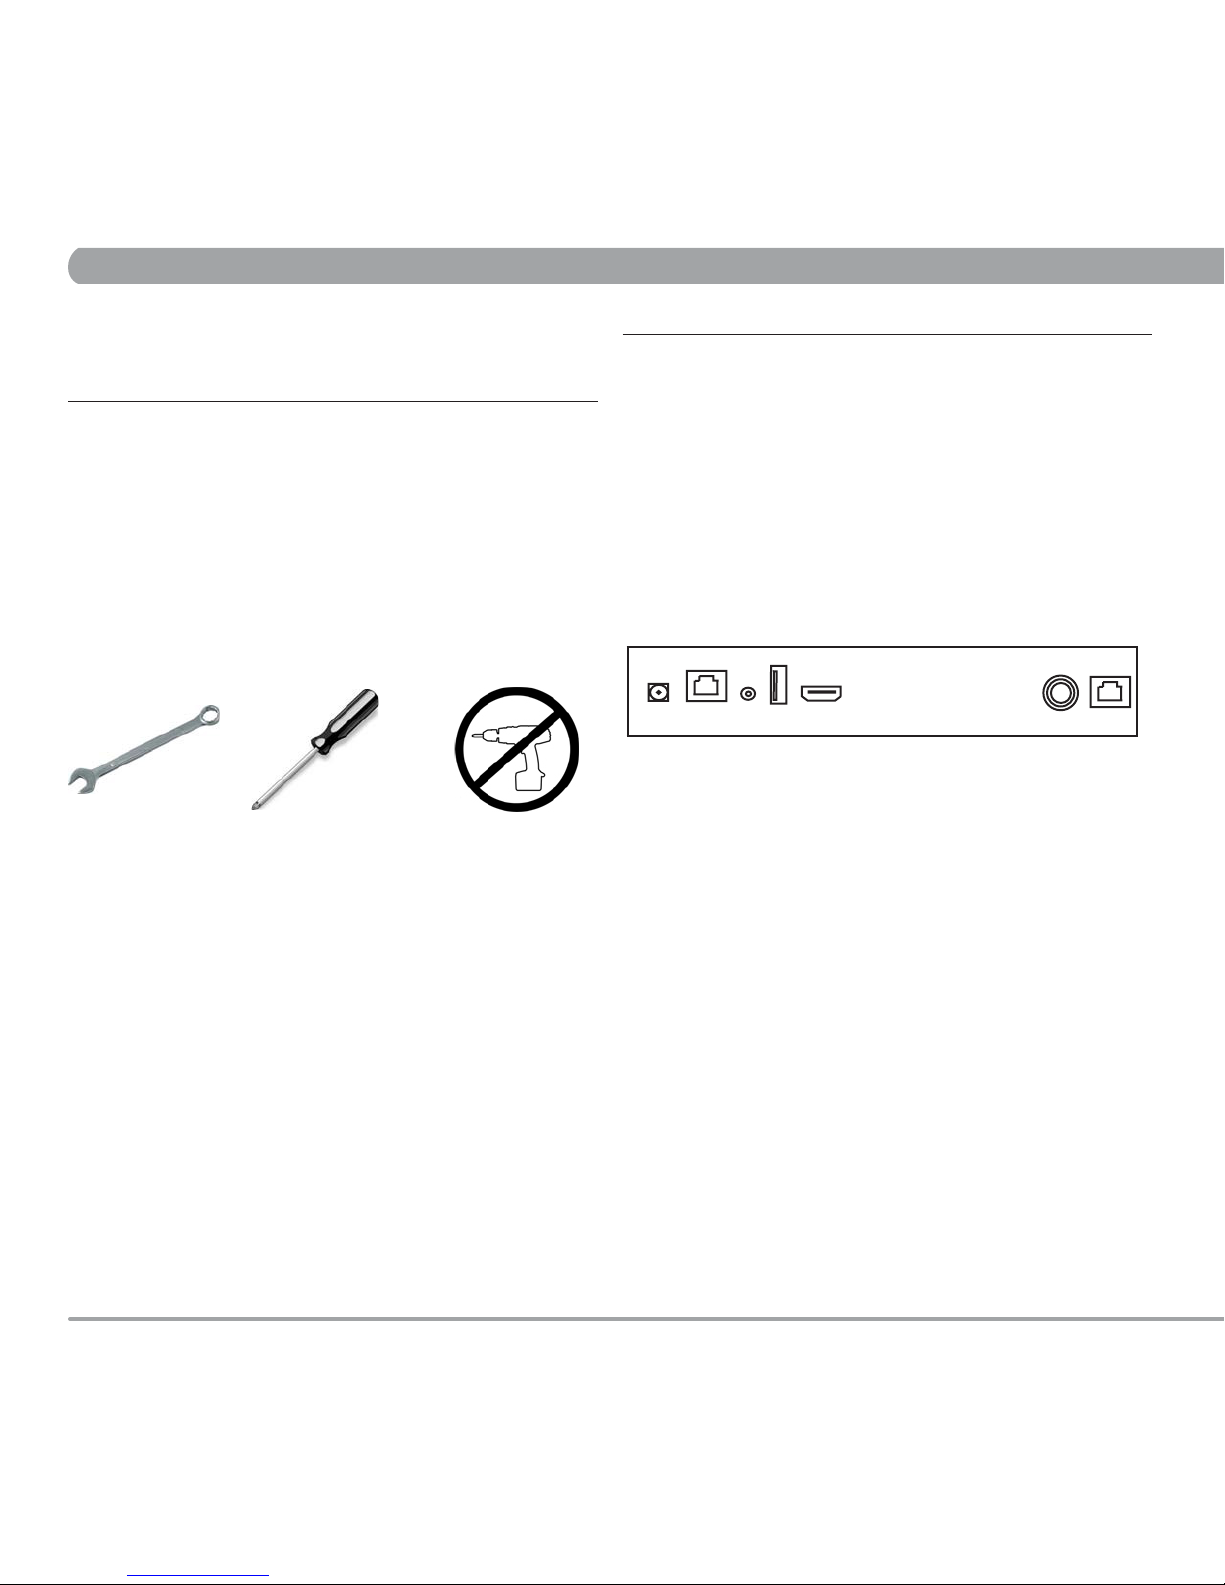
7/16” Wrench
Required Tools :
#2 Phillips screwdriver NO POWER TOOLS!
CHAPTER 1 : GENERAL SAFETY AND CARE CHAPTER 2 : SETUP
This product has been designed specically for use in the health & tness
industry, ensuring maximum per formance and longevity in the harsh tness
club environment. Properly cared for, this product will provide years of highquality entertainment.
WARNING! Do not open monitor enclosure. There are no
user-servicable parts inside. Any changes or modications made to this
product that are not approved by MYE Entertainment will void the user’s
warranty and authorization to operate the equipment.
1. GENERAL GUIDELINES
● Prepare an area in which to place the product components as they are
removed from the box prior to installation. The surface of the work area
should be clean so as not to damage the screen and associated
components.
● Do not open package using sharp instruments or tool.
● Inspect all shipping cartons for signs of damage and to ensure that the
contents of the cartons have not broken loose during shipping.
● Keep away from liquid or areas of highly
● Unattended monitor should be unplugged during lightning or
electrical storms.
● Unplug by the power cord if there are uncharacteristic sounds or if
smoke occurs.
● Do not spray cleaner directly on monitor. This can cause a shock or
damage to the enclosure. Use a mild solution on a soft cloth to wipe the
surface of the monitor.
● Do not use bent or damaged power cords. Discontinue use and contact
your technician.
● Never touch power cords with wet hands.
This device complies with Par t 15 of the FCC Rules (47CFR15). Operation
is subject to the following two conditions:
1. This device may not cause harmful inter ference, and
2. This device must accept any inter ference received, including interference
that may cause undesired operation.
1. DC Power In. 2.5mm DC jack
2. AUX TV Controller Cable port. RJ45 jack
3. Audio Output 3.5mm stereo jack
4. Firmware Download USB jack
5. AUX High Denation Input Jack (Option)
6. RF Signal Input. TYPE “F” Connector
7. AUX CableSat port. RJ45 jack(Option)
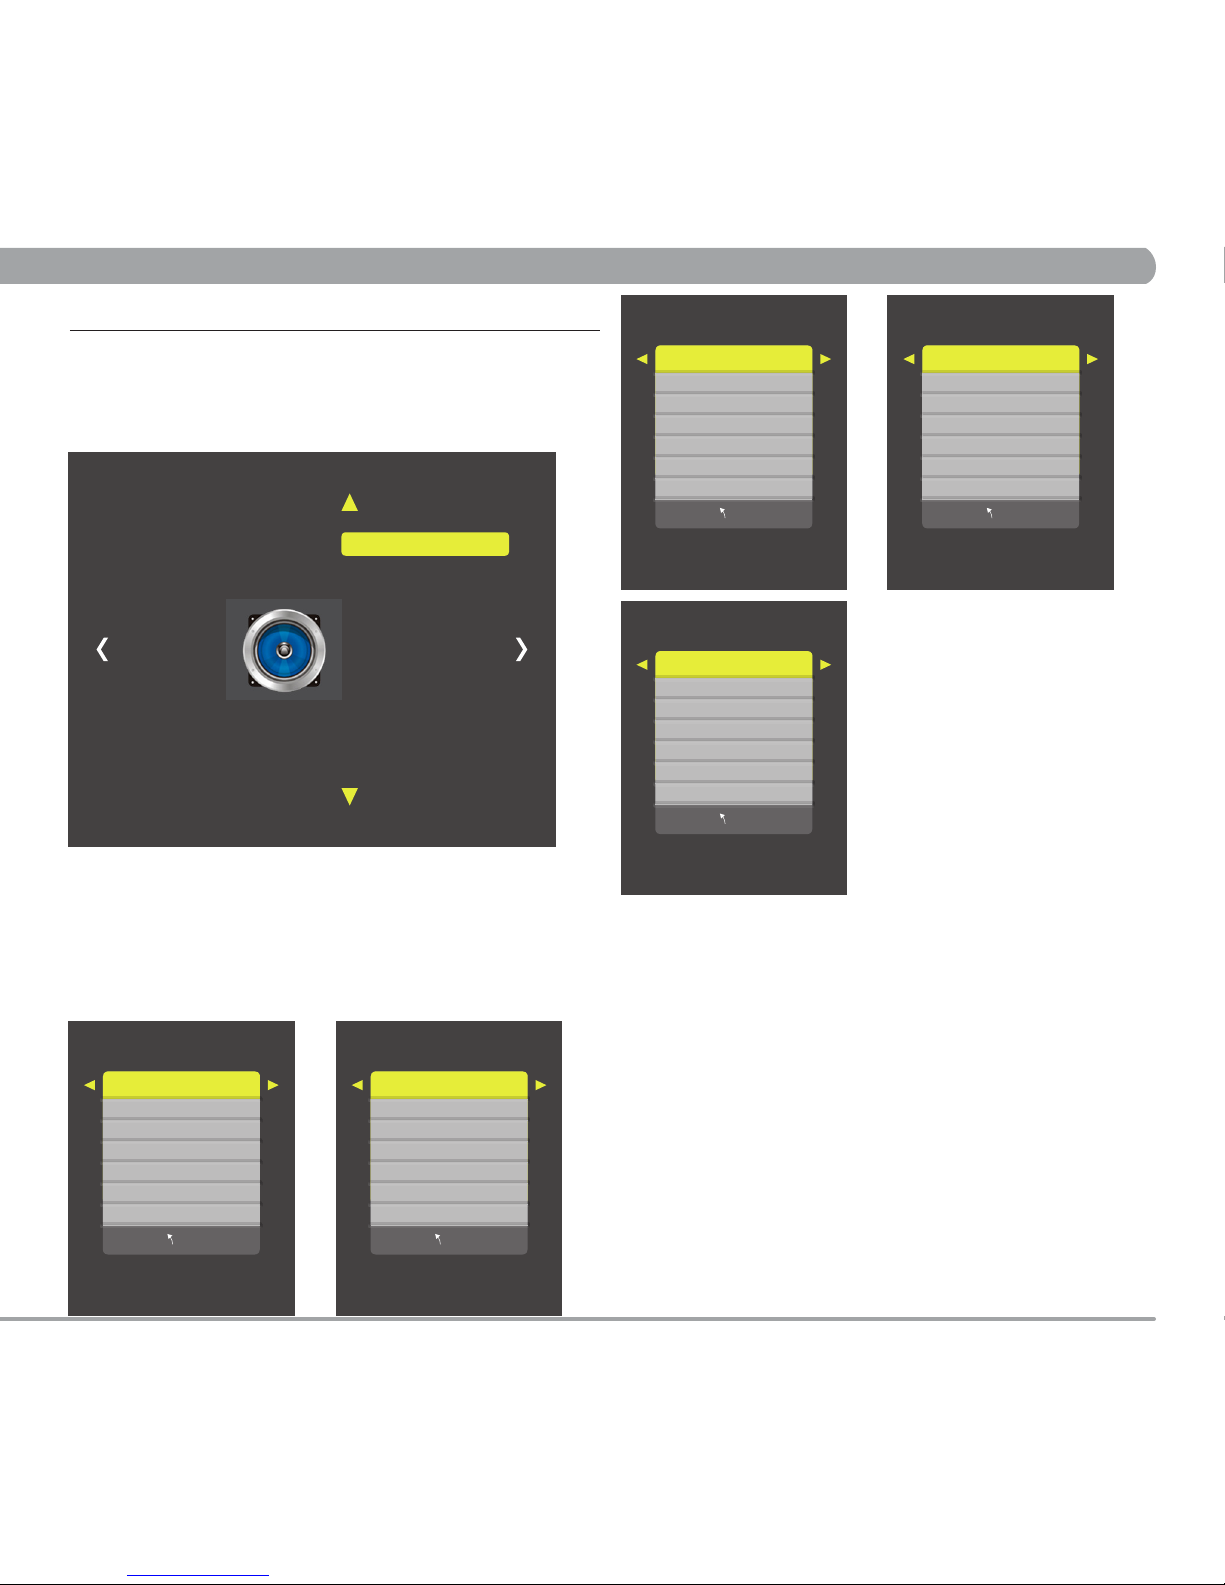
2.2 MENU SETUP AND OPERATION
Once the unit has been connected, a setup procedure is required for
optimal operation.
MAIN MENU ACCESS
To access all MENU functions you must enter MENU mode.
To ENTER MENU
1. Push MENU on the IR remote.
2. Use UP/DOWN keys on remote to select SUB-MENU.
3. Press RIGHT ARROW key to enter SUB-MENU.
SUB- MENU pages are:
• Channel
• Picture
• Audio
• Time
• Setup
• Lock
To EXIT MENU
1. Push EXIT to exit MENU
This product generates and utilizes radio frequency energy. If not installed
and maintained in accordance with the installation & maintenance
procedures, there is a possibility of causing interference with other services.
In order to determine whether or not this product is generating harmful
interference, try per forming the following steps:
• Try turning off the product by unplugging it from the AC power receptacle.
• Try powering the product from another AC power receptacle.
• Relocate or turn the antenna of the receiving device.
• Increase the distance between this product and the receiving device.
If these steps do not resolve the inter ference, please contact your local
installation company, distributor or dealer.
RADIO FREQUENCY INTERFERENCE (RFI) FEDERAL
COMMUNICATIONS COMMISSION, PART 15
2.1 CONNECTION IDENTIFICATION
1 2 3 4 5 6 7
2. SETUP
4
Page 5

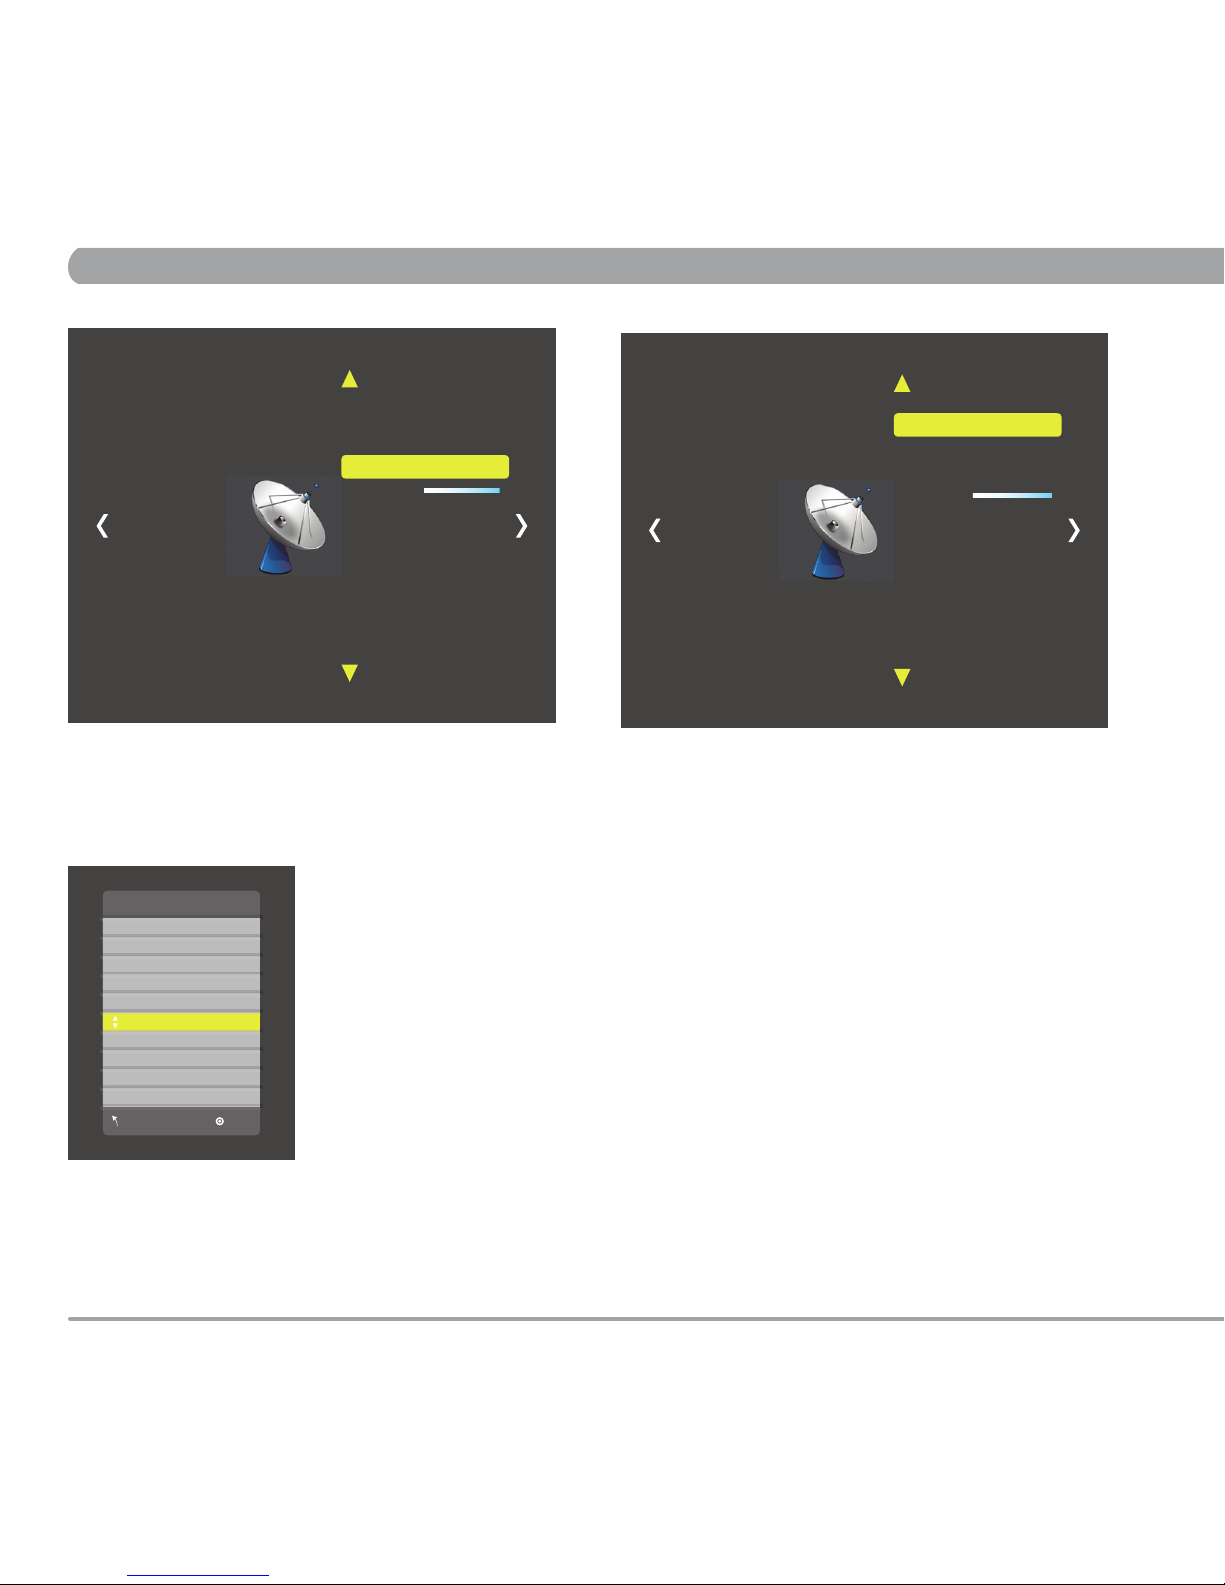
CHANNEL MENU contains 4 sub-menu presets (Air Cable,Auto Scan,
Show/Hide, DTV Signal)
Enter MENU
1. Use LEFT/RIGHT keys on remote to select Channel.
2. Use UP/DOWN keys on remote to select Air/Cable.
3. Push OK key to enter/change setting(Air or Cable).
Enter MENU
1. Use LEFT/RIGHT keys on remote to select Channel.
2. Use UP/DOWN keys on remote to select Auto Scan.
3. Push OK key.
4. Use RIGHT keys on remote to select Yes.
3.1 Auto Scan
3.2 Auto Scan
3. CHANNEL MENU
Are you sure ?
No Yes
AutoScan
Found 0 Progam(s)
ATV 0 Progam(s)
DTV 0 Progam(s)
2 % CH 4
Air/Cable Cable
Auto Scan
Show/Hide
DTV Signal Good
Channel
Air/Cable Cable
Auto Scan
Show/Hide
DTV Signal Good
Channel
5
CHAPTER 3 : CHANNEL
INPUT SIGNAL LEVEL REQUIREMENTS
Common sources of television signal are cable, satellite or over-the-air
antenna systems. Many of these choices will provide signal in analog,
digital or both even both formats. In order to provide high-quality images,
the signal level supplied to each screen should be in the range of -70dBm to
-5 dBm when read on analog channels. A signal level outside of this range
will provide less than optimum results. In order to ensure the highest degree
of satisfaction, MYE Entertainment recommends using a MYE
Entertainment Certied Installer for installation & ongoing maintenance.
Broadcasting frequency is automatically searched and saved. The search
starts from analog TV (NTSC) to digital TV (VSB/QAM/Pro:Idom) and takes
from 4 to 5 minutes. Channel numbers are allocated for weak signals from
analog broadcasting. In DTV, weak signals or signals without broadcasting
are ignored.
Depending on the content provided by the cable or satellite company, there
may be some content received that is inappropriate for your intended viewing
audience. Once channel scanning is complete, these channels can be deleted
as necessary by using the IR remote control.
Page 6
CHAPTER 3 : CHANNEL
3.3 Show/Hide
Enter MENU
1. Use LEFT/RIGHT keys on remote to select Channel.
2. Use UP/DOWN keys on remote to select Show/Hide.
3. Push OK key.
Show/Hide
6.1 SBS
7.1 KBS2
7.1 KBS2
9.1 KBS1
9.1 KBS1
10.1 EBS
10.1 EBS
11.1 MBCDTV
MENU OK
Enter MENU
1. Use UP/DOWN keys on remote to select Channel.
2. Push OK key to Hide channel.
3.4 DTV Signal
Enter MENU
1. Use LEFT/RIGHT keys on remote to Channel.
Signal window meter will show signal strength. (Bad/Normal/Good)
Channel
Channel
6
Air/Cable Cable
Auto Scan
Show/Hide
DTV Signal Good
Air/Cable Cable
Auto Scan
Show/Hide
DTV Signal Bad
Page 7
CHAPTER 4 : PICTURE
4.1 Picture Mode
Enter MENU
1. Use LEFT/RIGHT keys on remote to select Picture.
2. Use UP/DOWN keys on remote to select Picture Mode.
3. Push OK key.
Picture Mode Personal
Contrast 50
Brightness 50
Sharpness 50
Tint 50
Color 50
MENU
Picture Mode contains 4 video presets(Standard, Dynamic, Personal, Soft)
Picture Mode Standard
Contrast 50
Brightness 50
Sharpness 50
Tint 50
Color 50
MENU
Picture Mode Dynamic
Contrast 70
Brightness 60
Sharpness 60
Tint 60
Color 50
MENU
Picture Mode Soft
Contrast 45
Brightness 40
Sharpness 50
Tint 50
Color 50
MENU
4. PICTURE MENU
4.2 Color Mode
Enter MENU
1. Use LEFT/RIGHT keys on remote to select Picture.
2. Use UP/DOWN keys on remote to select Color Mode.
3. Push OK key.
Enter MENU and SUB-MENU page
1. Use LEFT/RIGHT keys on remote to select Personal.
2. Use UP/DOWN keys on remote to select sub menu.
3. Push OK key to enter/change setting.
4. Use LEFT/RIGHT keys to adjust level.
PICTURE MENU contains 3 sub-menu presets (Picture Mode, Color Mode,
Aspect Ratio)
Picture Mode Personal
Color Mode
Aspect Ratio 4:3
Picture
Picture Mode
Color Mode Normal
Aspect Ratio 4:3
Picture
7
Page 8
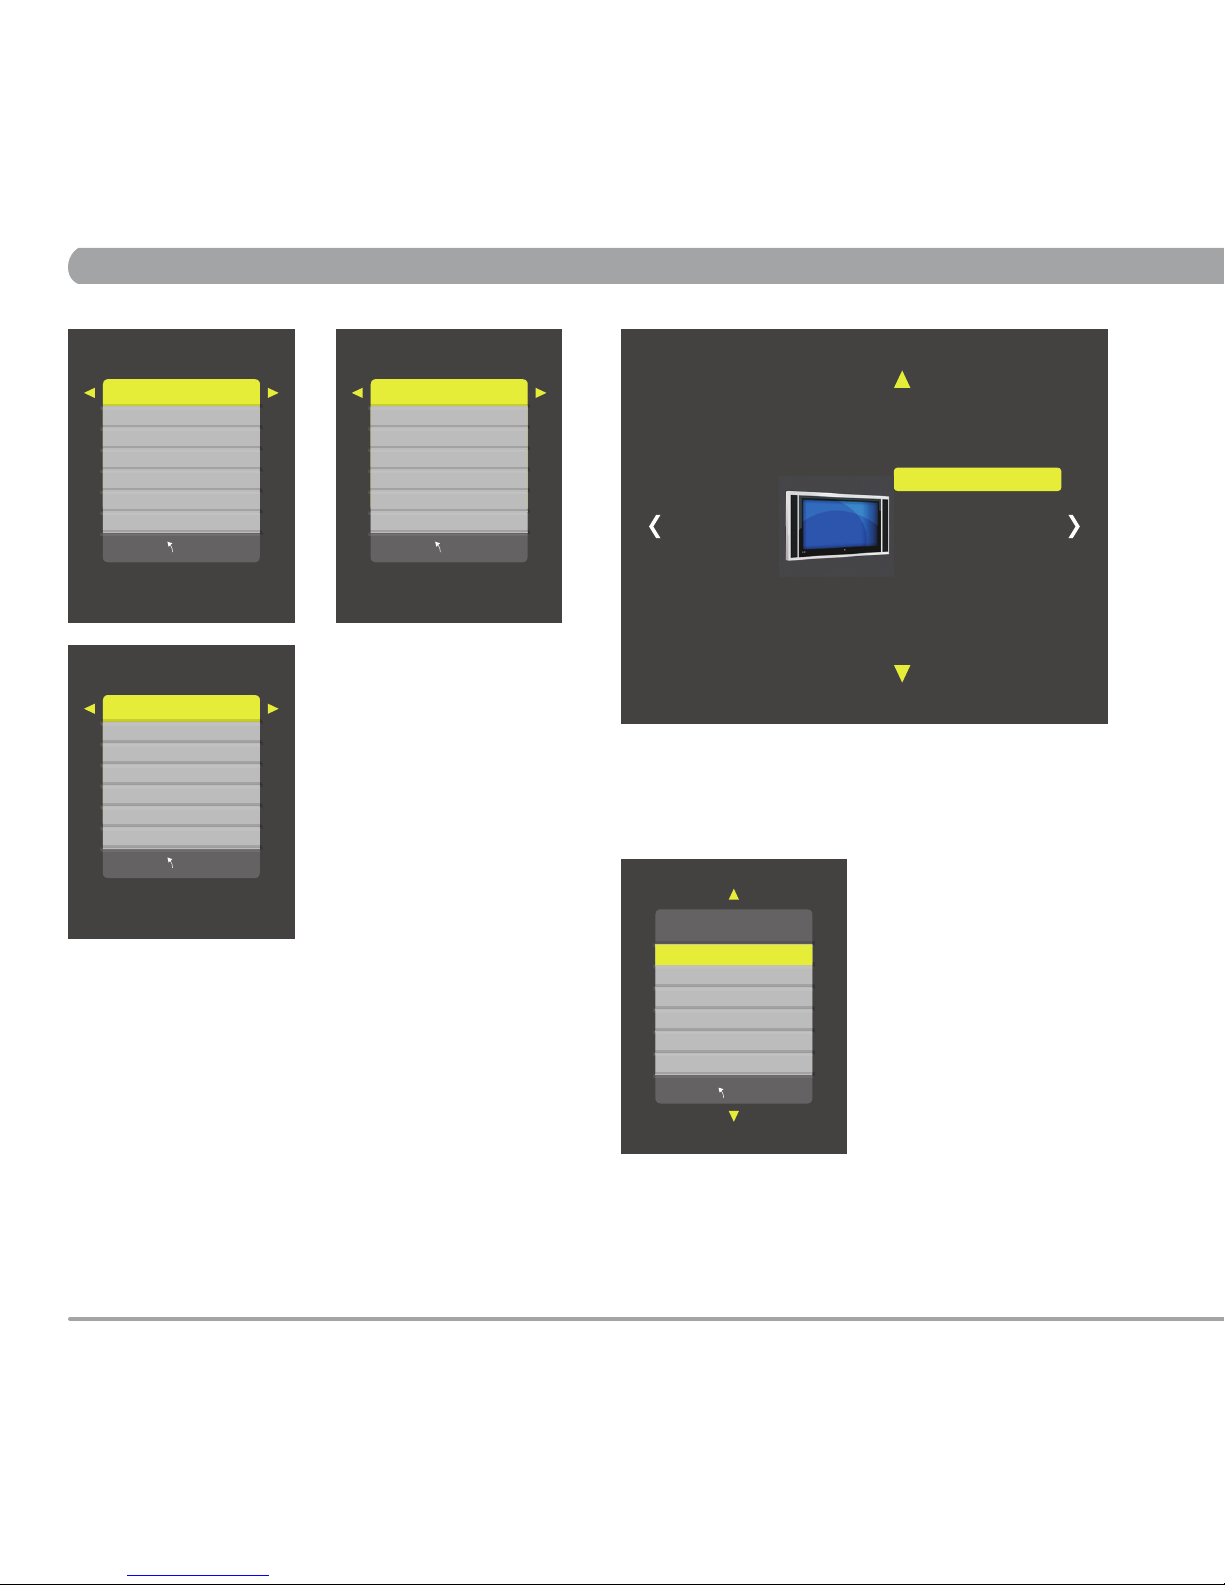
CHAPTER 4 : PICTURE
Color Mode Normal
R133
G130
B123
MENU
Color Mode contains 3 video presets(Normal, Warm, Cool)
Color Mode Warm
R127
G118
B99
MENU
Color Mode Cool
R133
G130
B123
MENU
4.3 Aspect Ratio
Enter MENU
1. Use LEFT/RIGHT keys on remote to select Picture.
2. Use UP/DOWN keys on remote to select Aspect Ratio.
3. Push OK key.
Aspect Ratio
4:3
16:9
MENU
Enter MENU and SUB-MENU page
1. Use UP/DOWN keys to adjust setting.
Picture Mode
Color Mode
Aspect Ratio 4:3
Picture
8
Page 9
CHAPTER 5 : AUDIO
5.1 Equalizer
5. AUDIO MENU
Enter MENU
1. Use LEFT/RIGHT keys on remote to select Audio.
2. Use UP/DOWN keys on remote to select Equalizer.
3. Push OK key.
4. Use LEFT/RIGHT keys on remote to select.
Equalizer Standard
120 Hz 70
500 Hz 60
1.5 KHz 65
5 KHz 70
10 KHz 40
Balance 50
MENU
Equalizer contains 5 Audio presets(Standard, Sport, Movie, Music,
Personal)
Equalizer Sports
120 Hz 30
500 Hz 30
1.5 KHz 40
5 KHz 60
10 KHz 80
Balance 50
MENU
Equalizer Movie
120 Hz 50
500 Hz 50
1.5 KHz 70
5 KHz 60
10 KHz 70
Balance 50
MENU
Equalizer Music
120 Hz 40
500 Hz 50
1.5 KHz 70
5 KHz 20
10 KHz 30
Balance 50
MENU
Equalizer Personal
120 Hz 50
500 Hz 50
1.5 KHz 50
5 KHz 50
10 KHz 50
Balance 50
MENU
Enter MENU and SUB-MENU page
1. Use LEFT/RIGHT keys on remote to select Personal.
2. Use UP/DOWN keys on remote to select sub menu.
3. Use LEFT/RIGHT keys to adjust level.
AUDIO MENU contains 5 sub-menu presets (Equalizer, MTS, Audio
Language, Surround Sound, AVC)
Equalizer Personal
MTS Mono
Audio Language
Surround Sound
AVC Off
Audio
9
Page 10

CHAPTER 5 : AUDIO
5.2 MTS 5.3 Audio Language
Enter MENU
1. Use LEFT/RIGHT keys on remote to select Audio.
2. Use UP/DOWN keys on remote to select MTS.
3. Push OK key.
1. Use UP/DOWN keys on remote to select mode (Mono, STEREO, SAP)
2. Push MENU key.
Enter MENU
1. Use LEFT/RIGHT keys on remote to select Audio.
2. Use UP/DOWN keys on remote to select Audio Language.
3. Push OK key.
4. Use UP/DOWN Keys on remote to select.
MTS
Mono
STEREO
SAP
MENU
Menu Language
English
French
Spanish
MENU
Menu Language contains 3 Language presets(English, French, Spanish)
Equalizer
MTS Mono
Audio Language
Surround Sound
AVC Off
Audio
Equalizer
MTS Mono
Audio Language
Surround Sound
AVC Off
Audio
10
Page 11

CHAPTER 5 : AUDIO
Enter MENU
1. Use LEFT/RIGHT keys on remote to select Audio.
2. Use UP/DOWN keys on remote to select Surround Sound.
3. Push OK key to enter/change setting(ON or OFF).
Equalizer
MTS STEREO
Audio Language Enlish
Surround Sound Off
AVC Off
Audio
5.4 Surround Sound
5.5 AVC (Auto Volume Control)
Equalizer
MTS STEREO
Audio Language Enlish
SurroundSound
AVC Off
Audio
Enter MENU
1. Use LEFT/RIGHT keys on remote to select Audio.
2. Use UP/DOWN keys on remote to select AVC.
3. Push OK key to enter/change setting(ON or OFF).
11
Page 12

CHAPTER 6 : TIME
6.1 Sleep Timer
6. TIME MENU
TIME MENU contains 6 sub-menu presets (Sleep Timer, Time Zone,
DST, Time Format, Auto Sync, Clock)
Sleep Timer Off
Time Zone
DST Off
Time Format
Auto Sync
Clock 2015/1/26 18:3
Time
Enter MENU
1. Use LEFT/RIGHT keys on remote to select Time.
2. Use UP/DOWN keys on remote to select Sleep Timer.
3. Push OK key.
4. Use UP/DOWN keys on remote to select time.
Sleep Timer contains 11 Timers presets(Off, 5, 10, 15, 30, 60, 90, 120, 180,
240Min, Personal)
6.2 Time Zone
Sleep Timer
Time Zone Pacic
DST Off
Time Format
Auto Sync
Clock 2015/1/26 18:3
Time
Enter MENU
1. Use LEFT/RIGHT keys on remote to select Time.
2. Use UP/DOWN keys on remote to select Time Zone.
3. Push OK key.
4. Use UP/DOWN keys on remote to select area.
Time Zone contains 7 Areas presets(Atlantic, Eastern, Central, Mountain,
Pacic, Alaska, Hawaii)
Sleep Timer
Off
5 Min
10 Min
15 Min
30 Min
60 Min
MENU
Time Zone
Atlantic
Eastern
Cental
Mountain
Pacic
Alaska
MENU
12
Page 13

6.3 Time Format
Sleep Timer
Time Zone
DST Off
Time Format 24-hour
Auto Sync
Clock 2015/1/26 18:3
Time
CHAPTER 6 : TIME
Enter MENU
1. Use LEFT/RIGHT keys on remote to select Time.
2. Use UP/DOWN keys on remote to select Time Format.
3. Push OK key to enter/change setting(12-Hour or 24 -Hour).
6.4 Auto Sync
Sleep Timer
Time Zone
DST Off
Time Format
Auto Sync On
Clock 2015/1/26 22:3
Time
Enter MENU
1. Use LEFT/RIGHT keys on remote to select Time.
2. Use UP/DOWN keys on remote to select Auto Sync.
3. Push OK key to enter/change setting(ON or OFF).
Sleep Timer
Time Zone
DST Off
Time Format
Auto Sync
Clock 2015/1/26 22:3
Time
6.5 DST
Enter MENU
1. Use LEFT/RIGHT keys on remote to select Time.
2. Use UP/DOWN keys on remote to select DST.
3. Push OK key to enter/change setting(ON or OFF).
13
Page 14

6.6 Clock
Sleep Timer
Time Zone
DST
Time Format
Auto Sync
Clock 2015/1/26 22:3
Time
Enter MENU
1. Use LEFT/RIGHT keys on remote to select Time.
2. Use UP/DOWN keys on remote to select Clock.
3. Push OK key.
4. Use UP/DOWN keys on remote to select sub menu.
5. Use LEFT/RIGHT keys to adjust time.
Clock
- Year 2015 +
Month 1
Month 1
Hour 22
Minute 3
MENU
14
CHAPTER 6 : TIME
Page 15

7.1 Menu Language
7. SETUP MENU
SETUP MENU contains 5 sub-menu presets (Menu Language, Transparent,
Close Caption, Restore Default, USB Update)
Menu Language English
Transparent
Closed Caption
Restore Default
USB Update
Setup
Enter MENU
1. Use LEFT/RIGHT keys on remote to select Setup.
2. Use UP/DOWN keys on remote to select Menu Language.
3. Push OK key.
4. Use UP/DOWN keys on remote to select.
Menu Language
English
French
Spanish
MENU
Menu Language contains 3 Languages presets(English, French, Spanish)
CHAPTER 7 : SETUP
7.2 Transparent
Menu Language
Transparent 50 %
Closed Caption
Restore Default
USB Update
Setup
Enter MENU
1. Use LEFT/RIGHT keys on remote to select Setup.
2. Use UP/DOWN keys on remote to select Transparent.
3. Push OK key.
4. Use UP/DOWN keys on remote to select.
Transparent contains 5 presets(0, 25, 50, 75, 100%)
Transparent
0 %
25 %
50 %
75 %
100 %
MENU
15
Page 16

CHAPTER 7 : SETUP
7.4 Restore Default
Menu Language
Transparent
Closed Caption
Restore Default
USB Update
Setup
Enter MENU
1. Use LEFT/RIGHT keys on remote to select Setup.
2. Use UP/DOWN keys on remote to select Restore Default.
3. Push OK key.
4. Use RIGHT keys on remote to select Yes.
Are you sure ?
No Yes
16
7.3 Close Caption
Menu Language
Transparent
Closed Caption
Restore Default
USB Update
Setup
Enter MENU
1. Use LEFT/RIGHT keys on remote to select Setup.
2. Use UP/DOWN keys on remote to select Close Caption.
3. Push OK key.
4. Use LEFT/RIGHT keys on remote to select CC On or CC Of f.
5. Use UP/DOWN keys on remote to select sub menu.
-. Basic CC1, CC2, CC3, CC4 mode
-. Basic Text1, Text2, Text3, Text4 mode
-. Advanced Service1, Service2, Service3, Service4, Ser vice5,
Service6 mode
CC Mode CC On
Basic CC1
Advanced Service1
MENU
Page 17

7.5 USB Update
Menu Language
Transparent
Closed Caption
Restore Default
USB Update
Setup
Enter MENU
1. Use LEFT/RIGHT keys on remote to select Setup.
2. Use UP/DOWN keys on remote to select USB Update.
3. Push OK key.
4. Use RIGHT keys on remote to select Yes.
Are you sure ?
No Yes
17
CHAPTER 7 : SETUP
Page 18

Change Password
System Lock On
Input Block
US
Canada
RRTSetting
ResetRRT
Unrated
Lock
CHAPTER 8 : LOCK
8.1 Change Password
Enter MENU
1. Use LEFT/RIGHT keys on remote to select Lock.
2. Use UP/DOWN keys on remote to select Change Password.
3. Push OK key.
4. Enter Old Password Numver Keys.
(Factory set password is “0000”)
5. Enter New Password Number Keys.
6. Enter Conrm Password Number Keys.
Enter Old Password
Enter New Password
Conrm Password
Clear Cancel
8.2 System Lock
Change Password
System Lock Off
Input Block
US
Canada
RRTSetting
ResetRRT
Unrated
Lock
Enter MENU
1. Use LEFT/RIGHT keys on remote to select Lock.
2. Use UP/DOWN keys on remote to select System Lock.
3. Push OK key to enter/change setting(On or Off).
18
Enter Password _ _ _ _
Lock
8. LOCK MENU
Enter LOCK MENU
Enter Password “0000” on the number keypad.
(Factory set password is “0000”)
LOCK MENU contains 6 sub-menu presets (Change Password, System
Lock, Input Block, US, CANADA, Unrated)
Page 19

8.3 Input Block
Change Password
System Lock On
Input Block
US
Canada
RRTSetting
ResetRRT
Unrated
Lock
Enter MENU
1. Use LEFT/RIGHT keys on remote to select Lock.
2. Use UP/DOWN keys on remote to select Inter Block.
3. Push OK key.
4. Use UP/DOWN keys on remote to select SOURCE.
5. Use LEFT/RIGHT keys on remote to select(Block or UnBlock).
CHAPTER 8 : LOCK
8.4 US
Change Password
System Lock On
Input Block
US
Canada
RRTSetting
ResetRRT
Unrated
Lock
Enter MENU
1. Use LEFT/RIGHT keys on remote to select Lock.
2. Use UP/DOWN keys on remote to select US.
3. Push OK key.
US
TV
MPAA
MENU OK
InputBlock
TV UnBlock
HDMI UnBlock
PC Block
MENU
Enter SUB-MENU Page
1. Use UP/DOWN keys on remote to select sub-menu.
2. Push OK key.
19
Page 20

CHAPTER 8 : LOCK
8.4.1 T V
8. 4 .2 MPA A
MPAA
G
PG
PG-13
R
NC-17
X
N/A
MENU
TVRATING
TV-Y
TV-Y7
TV-G
TV-PG
TV-14
TV-MA
BLOCK
ALL FV
V
V
V
S
S
S
L
L
L
D
D
ALL
ALL
ALL
ALL
ALL
Enter SUB-MENU
1. Use UP/DOWN keys on remote to select.
Rating G : General audiences
PG : Parental guidance suggested
PG-13 : Parents strongly cautioned
R : Restricted
NC-17 : No One 17 and under admitted
X : Adult Only
Enter SUB-MENU
1. Use UP/DOWN keys on remote to select.
2. Push OK keys.
8.5 CANADA
Change Password
System Lock On
Input Block
US
Canada
RRTSetting
ResetRRT
Unrated
Lock
Enter MENU
1. Use LEFT/RIGHT keys on remote to select Lock.
2. Use UP/DOWN keys on remote to select CANADA.
3. Push OK key.
Canada
Canada Eng
Canada Fre
MENU OK
Enter SUB-MENU
1. Use UP/DOWN keys on remote to select.
20
Page 21

CanadaEng
C
C8+
G
PG
14+
18+
EXEMPT
MENU
CanadaFre
G
8ans+
13ans+
16ans+
18ans+
EXEMPT
MENU
Change Password
System Lock On
Input Block
US
Canada
RRTSetting
ResetRRT
Unrated Off
Lock
8.6 Unrated
Enter MENU
1. Use LEFT/RIGHT keys on remote to select Lock.
2. Use UP/DOWN keys on remote to select Unrated.
3. Push OK key to enter/chage setting(On or Off).
21
CHAPTER 8 : LOCK
Page 22

CHAPTER 9 : CUSTOM FEATURES
Program any channel for one touch Home channel access.
Popular Home channels include child care camera and digital signage.
• Program any designated Home Channel.
• Home Channel displayed when TV is rst powerd on.
• Home key button for direct access on keypad.
In CUSTOM FEATURES menu
1. Press UP/DOWN keys to CHANNEL DEFAULT TIME
Activate Default Channel
1. Press UP/DOWN keys to CHANNEL DEFAULT
2. Press LEFT/RIGHT key to cycle through and select ON
Deactivate Auto Default
1. Press UP/DOWN keys to AUTO DEFAULT
2. Press LEFT/RIGHT key to cycle through and select OFF
Go to TV Channel List
1. Press UP/DOWN keys to MANUAL CH SETTING
2. Press LEFT/RIGHT key to enter TV CHANNEL LIST
3. Press UP/DOWN keys to select desired channel to be used as
HOME channel
Set the HOME Default Channel
1. Press OK key to cycle through / select CH Def & Auto Def
a. This channel is now assigned as the channel the TV will default to upon
being turned on.
b. This channel is now assigned as the channel the TV will go to when the
HOME key is pressed.
Press EXIT key.
Custom Features
Detect Vibration
Chanel Default Time
Chanel Default
Auto Default
Auto Power On
Manual CH Setting
Set Factory Default
Off
Off
Off
Off
Off
MV :
CV :
SW Version
22
Custom Features
Detect Vibration
Chanel Default Time
Chanel Default
Auto Default
Auto Power On
Manual CH Setting
Set Factory Default
Off
MCU ver :
To enter CUSTOM FEATURES menu
1. Enter the code “0003” on the number keypad
2. CUSTOM FEATURES menu (OSD) will appear
• Detect Vibration • Auto Power On
• Channel Default Time • Manual Channel Setting
• Channel Default • Set Factory Default (Reset)
• Auto Default
9. Custom Features
Used to set a vibration monitoring time. When no vibration is detected on the
cardio equipment after the assigned monitoring time the TV will automatically
turn Off.
In CUSTOM FEATURES menu
1. Press CHANNELUP/DOWN keys to select DETECT VIBRATION
2. Press OK key to cycle through and select the desired Vibration monitoring
time in minutes (1-8). When no vibration is detected on the cardio equipment
for the assigned number of minutes the TV will automatically turn off.
Custom Features
Detect Vibration
Chanel Default Time
Chanel Default
Auto Default
Auto Power On
Manual CH Setting
Set Factory Default
Off
Off
Off
Off
Off
MV :
CV :
SW Version
Custom Features
Detect Vibration
Chanel Default Time
Chanel Default
Auto Default
Auto Power On
Manual CH Setting
Set Factory Default
Off
Off
Off
Off
Off
MV :
CV :
SW Version
Page 23

Custom Features
Detect Vibration
Chanel Default Time
Chanel Default
Auto Default
Auto Power On
Manual CH Setting
Set Factory Default
Off
Off
Off
Off
Off
MV :
CV :
SW Version
Exclusive feature works with in-club private TV networks including
ClubCom™ and Digital Signage systems.
When turned on the TV will automatically go the club promotional channel.
The user cannot change the channel until the promotional programming has
ended. The TV then changes to the secondary club “Home Channel” at which
time the user can change to any desired TV channel.
Enter the CUSTOM FEATURES menu page and then:
Set the TV’s Vibration Detection Circuit
1. Press UP/DOWN keys to highlight DETECT VIBRATION
(Detects vibration or use of the cardio equipment)
2. Press LEFT/RIGHT key to cycle through and select the desired vibration
time in minutes (1-8). When no vibration is detected on the cardio
equipment for the assigned number of minutes the TV will automatically
switch to the club Home channel.
Set the Channel Default Time
1. Press UP/DOWN keys to highlight CHANNEL DEFAULT
TIME and set the desired viewing time of the Promotional Network
Channel.
2. Press LEFT/RIGHT key to cycle through and select time setting.
(Off - 10 - 20 - 30 - 40 - 50 - 60 seconds)
a. During this programmed time the viewer will be unable to navigate off the
Promotional Network Channel.
Activate Channel Default
1. Press UP/DOWN keys to highlight CHANNEL DEFAULT
2. Press LEFT/RIGHT key to cycle through and set to ON.
Activate Auto Default
1. Press UP/DOWN keys to highlight AUTO DEFAULT
2. Press LEFT/RIGHT key and cycle through and set to ON.
Go to TV Channel List
1. Press UP/DOWN keys to highlight MANUAL CH SETTING
2. Press LEFT/RIGHT key to enter and go to TV CHANNEL LIST Set the
HOME channel.
Set the HOME Channel
1. Press UP/DOWN keys to scroll to the desired channel to be set as he
HOME channel.
2. Press OK key to cycle through / select AUTO DEFAULT
a. This channel is now assigned as the channel the TV will switch to when
no vibration is detected on the cardio equipment.
Set the Promotional Network channel
1. Press UP/DOWN keys to scroll to desired channel to be set as the
Promotional Network Channel at TV start up
2. Press OK key to cycle through / select Channel Default
a. This channel is now assigned as the channel the TV will default to upon
being turned on.
b. Users will be unable to navigate off this channel during the preset Channel
Default Time.
Press EXIT key
Custom Features
Detect Vibration
Chanel Default Time
Chanel Default
Auto Default
Auto Power On
Manual CH Setting
Set Factory Default
Off
Off
Off
Off
Off
MV :
CV :
SW Version
CHAPTER 9 : CUSTOM FEATURES
Used to change the TV POWER ON from factory setting OFF. Upon being
energized from a NO POWER state the TV will automatically turn on.
In CUSTOM FEATURES menu
1. Press UP/DOWN keys to select AUTO POWER ON
2. Press LEFT/RIGHT key to enter / change setting
(ON - OFF)
3. Press EXIT key.
23
Page 24

10. REMOTE CONTROL
POWER : Power On / Off
MUTE : Mute On / Off
SLEEP : Displays current sleep timer value by minutes when no sleep
timer OSD is activated.
(Off – 15 – 30 – 60 – 90 – 120 minutes)
SCALE : Changes picture aspect ratio ( 16:9 – 4:3 )
CH. SET : Display the channel list
DISPLAY : Displays input source information
NUMBERKEY : (0 – 9, 100/ – ) Direct channel number access
100 / – : DTV Channel number point “ . ”
( if go 2.1 CH. Press 2 No key, 100/- key and 1 No key on the remote control )
: Dash “ - ” on the consol controller is SKIP function
PRE-CH: Change to last tuned program
MENU : Activates / deactivates main menu OSD
SOURCE : Changes input source
UP/DOWN/LEFT/RIGHT ARROW KEYS : Navigates the main menu
when menu is activated
OK : Selects / Changes the value of selected sub–menu item
VOL +/– : Changes volume level
CH +/– : Changes channel program
DTV–CH + / – : Chages DTV Channel
EPG : Electronic Program Guide
CC : Colse Caption On / Off
CHAPTER 10 : REMOTE CONTROL
24
Page 25

Page 26

Page 27

Page 28

MATRIX FITNESS SYSTEMS| 1610 LANDMARK DRIVE COTTAGE GROVE WI 53527 USA
Toll Free 866.693.4863 matrixtness.com Fax 608.839.8687
REV. 1.0
 Loading...