

Page 1
..
:::
..
;:-·--L~·-fo=
,
--~
..
-)~-
-··~···'--·-'~----·o"''-:'7-~
MHC002
,Manual
for
ec.ec..'TIl\'-
Ceramic
li1Staliation, Use
Hob'
"0&'
and
Maintenance'
~
..
1
Page 2
Ltd
cannot
be
held responsible for injuries
invalidate
or
losses' caused
the
guarantee supplied with this product following incorrect
by
incQrrect ilse or installation
of
this
-"""""'''''111'"''
..
c-.JJnoder·.·nc.
"'--'C'''-,·i'-oPlease:,eni:er·the details on
)ti~,c~"?";'ir)te;'ded
....J:.;=1:"'.0.':
:~LLL.;-JMPORTANTINFORMATION
~,~+I·+-i~l,*cinvUOO2/96/EC
..
~=b.:;:-_.-2
Electdealsafety (lVD)
•. -
,~~,.-'.
......
,is
not
des,igned
to
be
who
lad<
experience or knowledge
ci,"cums-tancp.sshould any external covers be removed for servicing or maintenance except
the
and
.
le~laratlol"S
ar,plfantehas been manufactured
'.
;';dolits
of
Conformity:
to
come into contact with
2006/95/EC
.
working life,
aRPlIance recycling services.
g.ot'a household appliance separately avoids
tie
constituent materials
used by people (including children) with reduced physical, sensorial
about
it, unless they have
appliance rating plate
to
register your appliance for guarantee purposes.
to
and
food
conform
FOR CORRECT DISPOSAL OF THE PRODUCT
the
product must be taken
to
be recovered,.saving both energy
bel.ow
for reference,
the
strictest standards
Electromagnetic interference compatibility (EMC)
to
89/109/EC.
to
a special local authority waste collection centre
possibl<;
negative consequences for
and
complies with
and
resources.
had
supervision
to
as~ist
As
CDA
or
instructions
by
Customer Care
all
applicable legislation,
2004/108/EC.
IN
ACCORDANCE
the
environment and health.
a reminder
of
the
or
mental
on
how
to
suitably qualified
in
the
event
of
induding.
Parts
WITH
or
to
a dealer
It
also
need
to
dispose
use
a
EC
of
•
Page 3
Please note:
Ceramic
nobs
become
hot and
remain
alloweli
to
.
This
cOol.
Keep
children
away
from
the
appliance
Never
put
cooking
foil
or
plastic
cause
damage
to the
Never
use
Pan
handles should never
Do
not
use
Do
not
switch
Do
not lean
Follow
the
Ensure
the
After
use,
hob
(Class
considered incorrect and therefore dangerous.
The
appliance
hob.
the
hob
top for storage.
pans
on
over
cleaning
base
please
is
Stand
with
rough
bases
the
zones
without
the
hob
when
instructions
of the saucepan
ensure that
3)
not intended to be operated
all
has
been designed for
out beyond the edge of the
it
carefully.
the
, Important
,
Do
not
use
the
hob
if the
glass
surface
supply.
power
hot during and
when
materials
(e.g.
cast
cookware
is
in
we. .
is
clean
zQnes
is
in
use.
on
the
Ceramic
iron)
as
these
in
place.
and
dry
before
have
been switched
use
only
as a cooking
by
any
cracked
or damaged to prevent
immediately
surface
worktop.
may
placing
means
of
after
use.
Do,
not touch the
when
the
hob
is
hot.
This
will
scratch the
it
on
off.
appliance.
an
external timer or separate
hob
the
hob.
Anyotlier
risk ofelectric
ensure
surface.
These
children
use
(e.g.
shock.
hob
until
it
materials
could melt"nd
cannot
reach
heating
rooms)
remot","control
Disconnect itfrom
has
been
them.
should
sYstem.
be'
the
I
I
Page 4
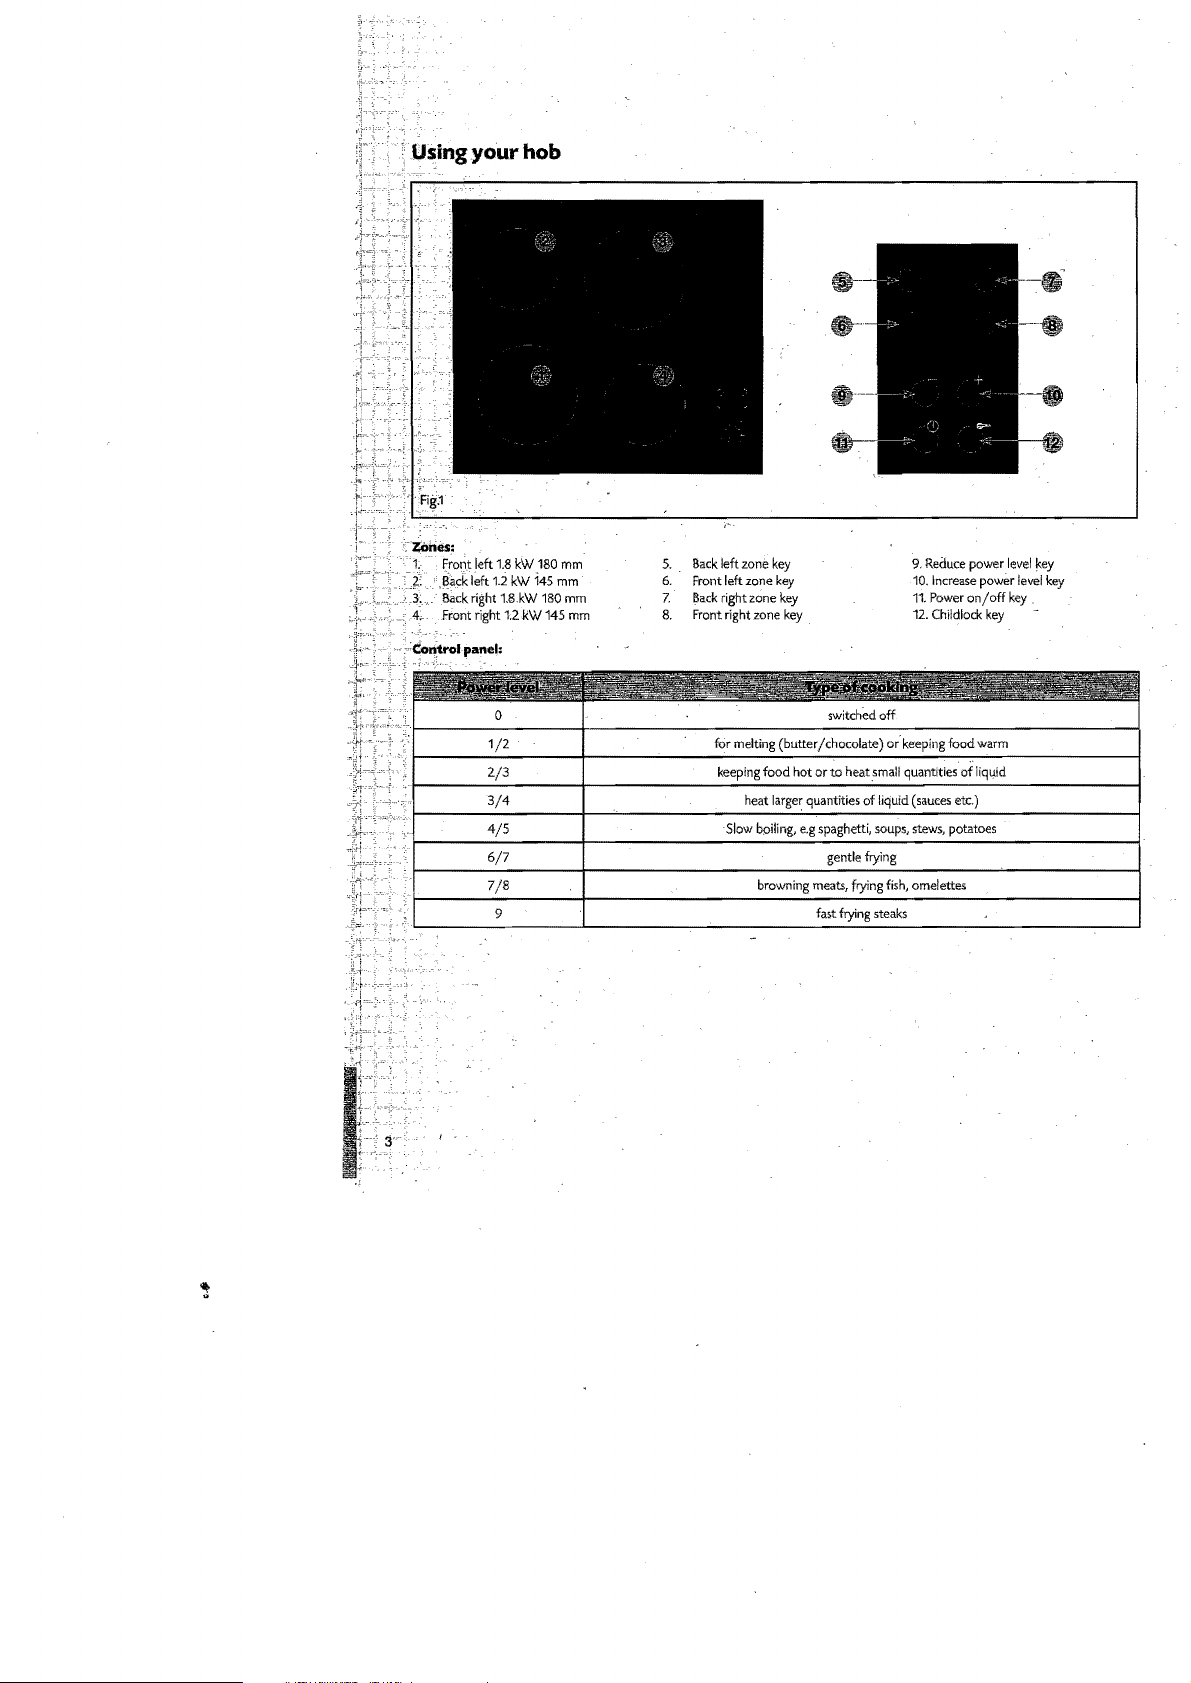
5.
Back
left
zone
6.
key
Front
left
zone
right
right
zone
zone
key
key
key
7.
Back
8.
Front
9.
Reduce
10.
Increase
11.
Power
12.
Childlock
power
power
on / off
key
level
level
key
key
key
.
Page 5

),
1
Using
To
• Touch
Please note:
to
"Touchthe
• Touch
•
switch
set
To
go
the 0 key.
the
theO
straight
your
hob
th~
zone on '
The zone
i1isplays
will
If
a power
level
not
set
flash 0 and
within
is
ten
the
seconds,
power level
zqne selection key for
key
to
increase
to
power level 9,
the
zone required, _
the
po~r
level from 1 (lowest) to 9 (maximum),
tou~
the 0 key
when
Please note:
The power
selection
Booster function
The hob
and
•
• Touch
To
Once
level
keys
are only active
for
that
zone, '
equipped with a Booster function which
zone
will
return
to
z~ne
is
switched on, touch
an_
A shows on the zone display for
()
key to
set
the
or
an
A).
power level, touch
reqUired power level between 1
The
hob
is
complete,
then'the
Once
. (dot)
the.
change
(dot)
the
key
is
the
or
the
the
booster function
for
one
zone
at
a time.
will
normal functioning, '
the
d key
will
beep
to
confirm
the 0 ord
the
hob
set
to
set
the
five
seconds. ,
the
keys
at
any time, ,
will
'beep
Please note:
•
As 9 is
the
deactivate
To
•
Touc!1
-Touch
maximum power level, there
the
booster.
switch a zone
after approximately three seconds., '
the
theO
off
z~ne
selection
key reduce
key
for
the
power level to 0
is
no boost function available
the
zone
required.
or
touch the 0
hob
will
beep
the
the
To
the
zone
booster
and
to
zone
will
zone
is
first switched on,
make a zone active when
zone
to
its maximum power for a specific period
power level
and
8 within
is
set.
the
zone
will
_..
and
0 keys simultaneously. The zone
confirm
the
hob
is
switch off automaticany.
and
at
9,
five
seconds (whilst
return
at
power level
on.
thee)
key
the
hob
and
then
touch
the
to
the
selected power level.
9.
Selecting power level 9
. '
to
reduce
'.
is
on, touch
the 0 key
zone
it
the
of
again so a
display shows
.
will
switch off
zone .
time,
will
I
~
To switdt
• Touch
the 0 key.
th~
hob
off
,-,----~""
-------------
Page 6

power
supply
to the
heat
display
residual
hob
the
indicator.;
after
heat
indicator.;
residual
to
warn
cooking
heat
until
when
until
will
illuminate
indicators
the
~ED
any
of the zones are
the zone
after the power
will
not
above
still
is
at a safe temperature to touch.
work,
the
childlock
supply
so
extra
key
hot to the touch after
is
restored.
care
must
be
illuminates
However,
taken.
unintentionally.
and the
hob
cooking.
whilst
beeps
aDl)ro<irr.at.,lv
off a zone
when
Ithnee
the
seconds
childlock
until
is
the
on for
LED
safety
ab'ove
reasons.
the
childlock
key
goes out and the
hob
beeps
to
Page 7

Efficient Use
Before using your hob for
the
manufacturing process
The ceramic glass retains heat, so
of
cooking. .
To
reduce
the
of
cooking time,
your
Hob
the
first time, switch
to
make best use
the
zone can be
set
the
to
zones on for a
ofthe
residual heat, switch
the
maximum setting
FEW
SECONDS
off
the
at
the
beginning ofcooking,
during cooking time. .
The hob
is
results,
fident
Use pan
equipped. with zones
only
use pans with flat
use
of
the
hob
lids
where possible
is
of
different sizes, designed
bottoms
and
shown below, where
to
minimise
the
to
accommodate most shapes
choose an appropriate zone depending
the
pan
and
zone are, correctly chosen.
energy usage
of
your appliance.
to
burn
off
any grease left over
zone five minutes prior
and
size
of
sizes
the
on
the
and
then
of
pan. For
pan. The
to
the
reduced
most
Jrom,
end
ef- -
""
~:,,_{;c
~:',,-
~.
It
is
very important
base should
be
thatthe
flat
and
smooth, as any rough
pans used
Choose pans which are between
sible, e,g. dull and dark.
Only pans recommended for use
on
the
the
sizes recommended
On
ceramic hobs should
hob are made
part
on
the
in
of
a suitable material arid have
pan base could scratch
the
table above, and with
be
used.
the
the
ceramic hob top.
bases
that
correct
type
of
base:
THe·.
are as non-reflective as pos-
Page 8

~..,~
,
'"
;(~':.
'
~),
fJ)
-=:eare
;~;,
~I~ys
Y6h
~.;
.
disconnect the appliance
nolildlJSe
s
,r~-~"";'='-""'"
}
l~~:tJ
and
Maintenance
from
the power supply before undertaking
a non-abrasive deaner to dean the hob top.
the control
panel
markings.
Any
abrasive
any
cleaner
cleaning
(including
or maintenance.
Cif)
will
scratch the surface and
Light
Accumulated baked-on stains!
dirt, sugar
spills
or melted
plastics
Rings
and hard water
'
.••
'*e<imcleariers must not be used when cleaning this appliance.
J'i~"~~--k:
-.~:
CllstOmer
+'~T:
0'1949862
residues
Care
Department, The
012
F: 01949 862 003
Cleaning
sponge and soft doth,
Cleaning
sponge or
and soft
White
vinegar
CDA
Group
E:
service@cdaeu
glass
cloth
and soft cloth'
230-240Vac
6kW
L.td,
Harby
W:
scraper
Road,
Langar,
www.cda,eu
Wipe
Wipe
over the zone to
water,
using
or stains and then
Pour a small
leave
it
to stand, and then
Nottinghamshire,
be cleaned
wipe
be
a ceramic scraper to remove
wipe
all'\ount of
warm
NG13
off
with
cleaned
off
white
wipe
9HY
with
a soft
with
with
vinegar
off witlia'soft
a sponge and hot
dry
cloth.
a sponge and hot
any
large
a soft dry doth.
onto the
dry
marks
stain,
doth,
-}
'~,.,'-->"':~
"--?"='c"~
.;.
'\""~t-..,.
Z·.-,.-.~-
-
I ~ _" ~ _
~
"
~"
=
~ I ~
t-+,-"
,'1'
"
,·1
J
'r-:'
'~-,b.·,·
•.
,.,T
,.
__
c
~-_-,_
1--
~
f""
Page 9
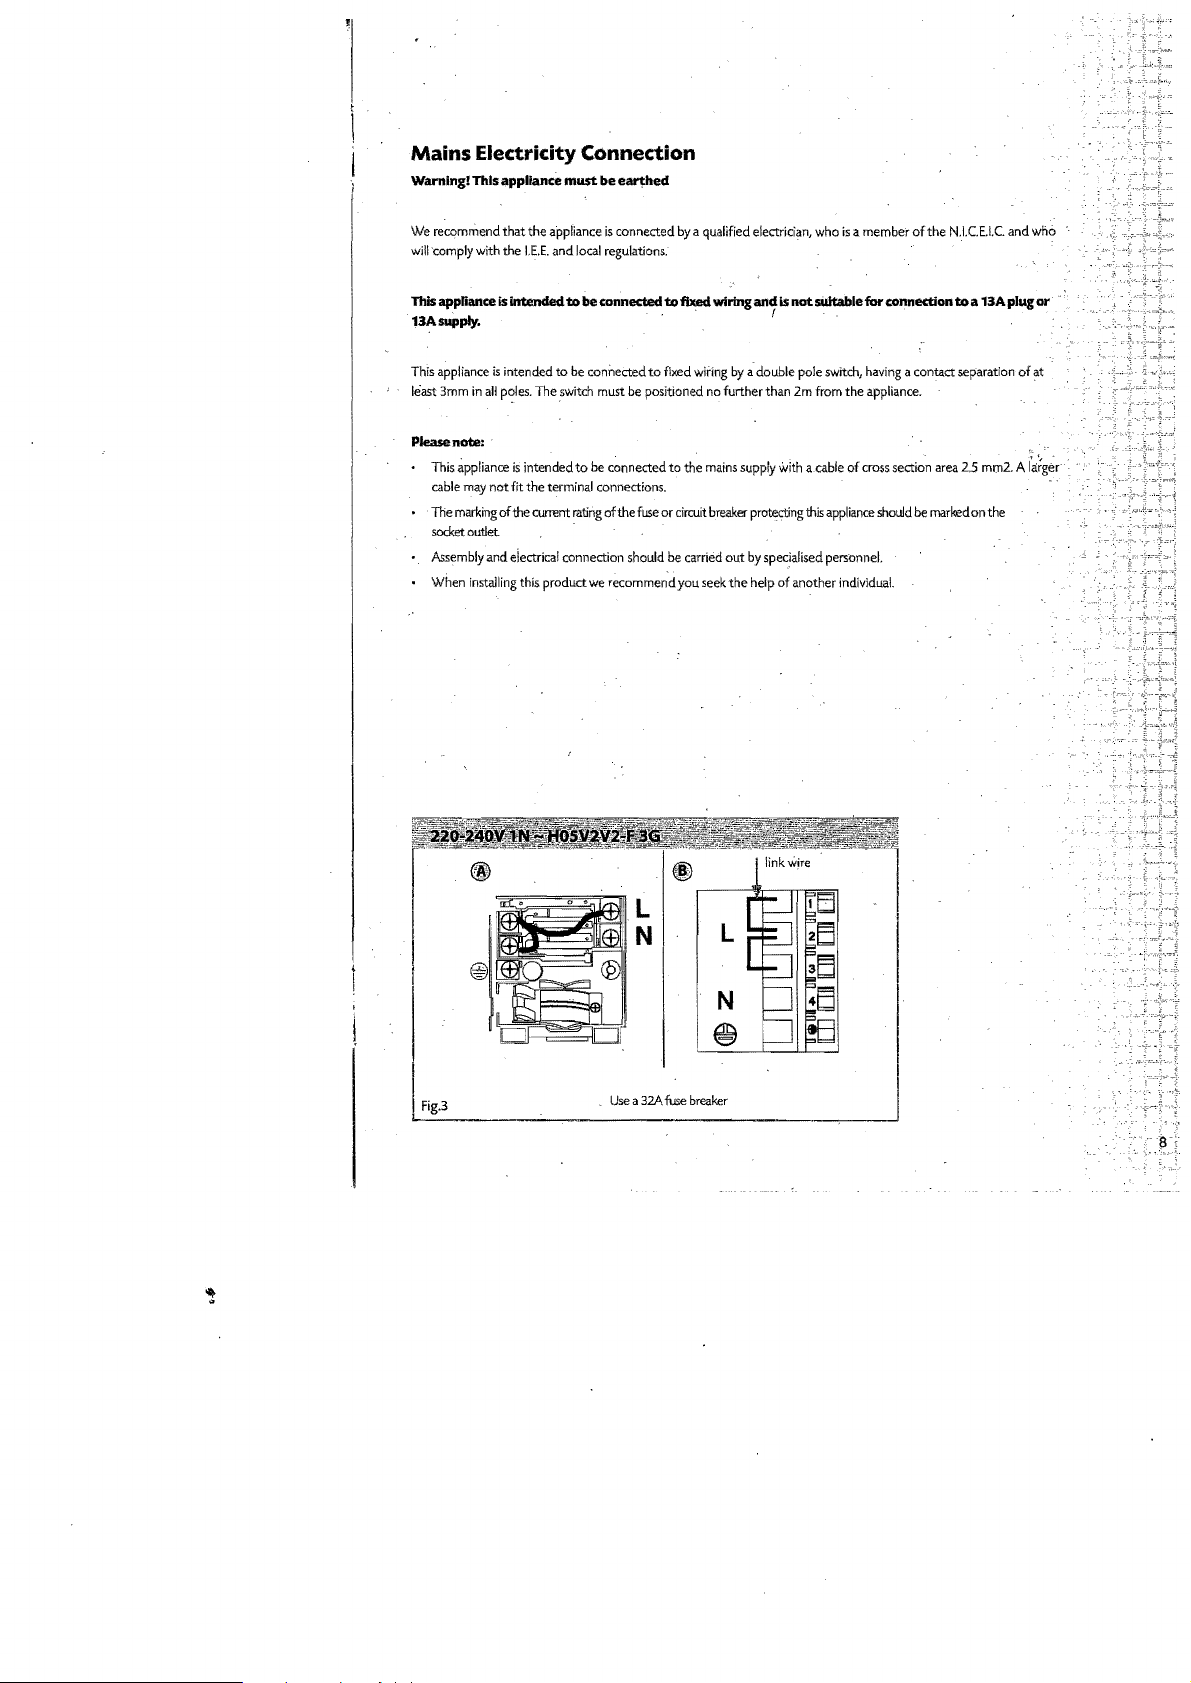
Mains Electricity Connection
Warning! This appliance
must
be
eat1hed
We recommend that the appliance
will
comply with the
This appDance is intendedtobe
13Asupply. . . . .
This appliance
least 3mm
is
in
all
I.E.E.
intended to
poles.
The
and
switch
local
connected
be
connected
must
is
connected
regulations.
to
be
positioned
by
a qualified electrician, who
to
fixed.
wiring
an11s
fixed
wiring
by
a double pole
no
further than 2m from the appliance.
is
a member
of
not
silltablefor connection toa
switch,
having
a contact separation
the
N.l.C.E.I.C
13A
and who
plug
or
of
at
Pleasenolle:
This
appliance
is
cable
marking
The
socket
Assembly
When
intended to
may
not fit the terminal connections.
of
the
outlet
and eiectrical connection should
installing
this product
current
be
connected
rating
of the
fuse
we
recommend you seek
to
the
or
circuit
be
carried out
mains
breaker
supply
the
protecting
by
help
with
a.cable
of
cross section area
this
appliance
specialised personnel.
of
another
individual.
should
be
marked
2.5
on the
mm2.
A
I~fg~r
Fig.3
Use a 32A
fuse
N
@
breaker
Page 10

pOsItIon
of
'.
mUSt
be.installed a minimum
ital
surfaces,
or
steel,
for
hood
is
to
the
.
fJded}(Fig.5),
}990rnm, then that
hob:
e.g. a tall
example).
be
installed
If
the
height
cupboard end
These
above
instructions
is
the
minimum
of 50mm
dimensions
the
hob,
supplied
required
panel.
the
with
from
This
are
height
the
any
ba~k
wall
may
be
in
reduced
Fig.4.
shown
ofthe hood
hood
dictate that the hood must
and a minimum
to
100mm
above
the
hob
if
m~
of
190mm
the
adjacent
be
at
be
installed
away
least
from
surface
600mm
at a height
any
is
resistant
(650mm
greater
is
fUn1itul'll!
i[,imum
height
. t
pelmets)
l'Il!qulrements:
of
any
cabinet
is
400mm,
immediately
unless
they
above
the
are
m,nufactured
hob
is
900mm.
from a material
The
minimum
resistant
height
to
fire
of
any
(steel,
adjacent
for
example)
units
Page 11

1
I
How
to
Install
How
to
install ~e
Overall
dimensions
Worktop cut-out
1.
Make
the required hole
to enslirethat you
edge.
The
. take
2.
3.
distance
this
into
wall
or
splashback
Position
the
Secure
the
after tightening the
hob:
ofthe
dimensions:
will
from
account
is
hob
seal,
hob
to the worktop
the
hob:
in
have
the
when
50mm.
as
shown
brackets.
Hob
Width:
580mm
Width:
560mm
thewori<top.
the required
hob,
when fitted, to
cutting the
in.
Fig.6,
using
the
Do
hot over-tighten the
Depth:
510mm
Depth:
490mm
Before
doing
this,
you must
check
clearance.
The cut-out
"the
hole.
The
minimum
ensuring that the ends meet without
fixing
brackets
back
wall
di~nce
and
fixing
brackets.
(FigA)
shows
is
50mm.lfa
thatthe hob should be
screws
supplied,
the instructions supplied
a 60mm
gap
in
Fig.7.
fromthe
Do
pOSitioned
not
Remove
splashback/wori<top
overlapping.
as'shown
with
wall
upstand
use
silicone
.
any
cooKer
to the cut-out
is
to
be
fitted,
away
from
type sealant
a~y
excess
hood
the
rear
sealant
-
FigA
Fig.S
Fig.?
Page 12

To
contact
Serviced by
ICIDIAI
our
Customer Care Department,
the
please contact us on
details below.
or
for Service,
Page 13

GUARANTEE
Your
new
Matrix
workmanship. Any parts found
discretion.
All
product
repairs must be carried
is
guaranteed against defects
to
be defective
out
will
be repaired
by
an authorised Matrix Repair Agent.
in
materials
or
replaced
and/or
at
our
THIS GUARANTEE
PROVIDING THAT:
• The appliance
suitably
•
Installation
accordance
legislation
• Proof of purchase
• The appliance
domestic purposes
• The appliance
with or repair attempted or modified
any
unauthorised person
This
guarantee
Please
note:
has
qualified person
has
been carried
with
has
has
If
you
full 2 year
guarantee.
IS
VALID
been installed
out
instructions and current
can
be
produced
been used for
only
not been tampered
does
not
do
not register
You
will
Standard 2 year
All
a
*
by
a
in
in
any
within
only
Matrix
full
parts
All
guarantees
• Damage
•
Use
recommended
• Routine maintenance, general wear
tear and installation faults
Rubber
•
plastic
need replacing
• Second-hand or reconditioned
by
30
way
days
be
appliances
Appliances
•
professional purposes
affect
of
your
purchase
eligible
for 1
year
parts
appliances
and
are
covered
labour guarantee during the
are
subject to registration.
THIS GUARANTEE
NOT
neglect or transit
have
by
Matrix
removable
fuses
or
periodically
you
labour
COVER:
not been
light
will
DOES
by
misuse,
of parts that
seals,
parts,
used for commercial or
your
statutory
date,
parts &
guarantee
by
a 2
year
first
&
glass
and/or
bulbs
which
legal
rights
NOT
receive
guarantee.
parts guarantee*
year.
all
the
plus
Page 14
r
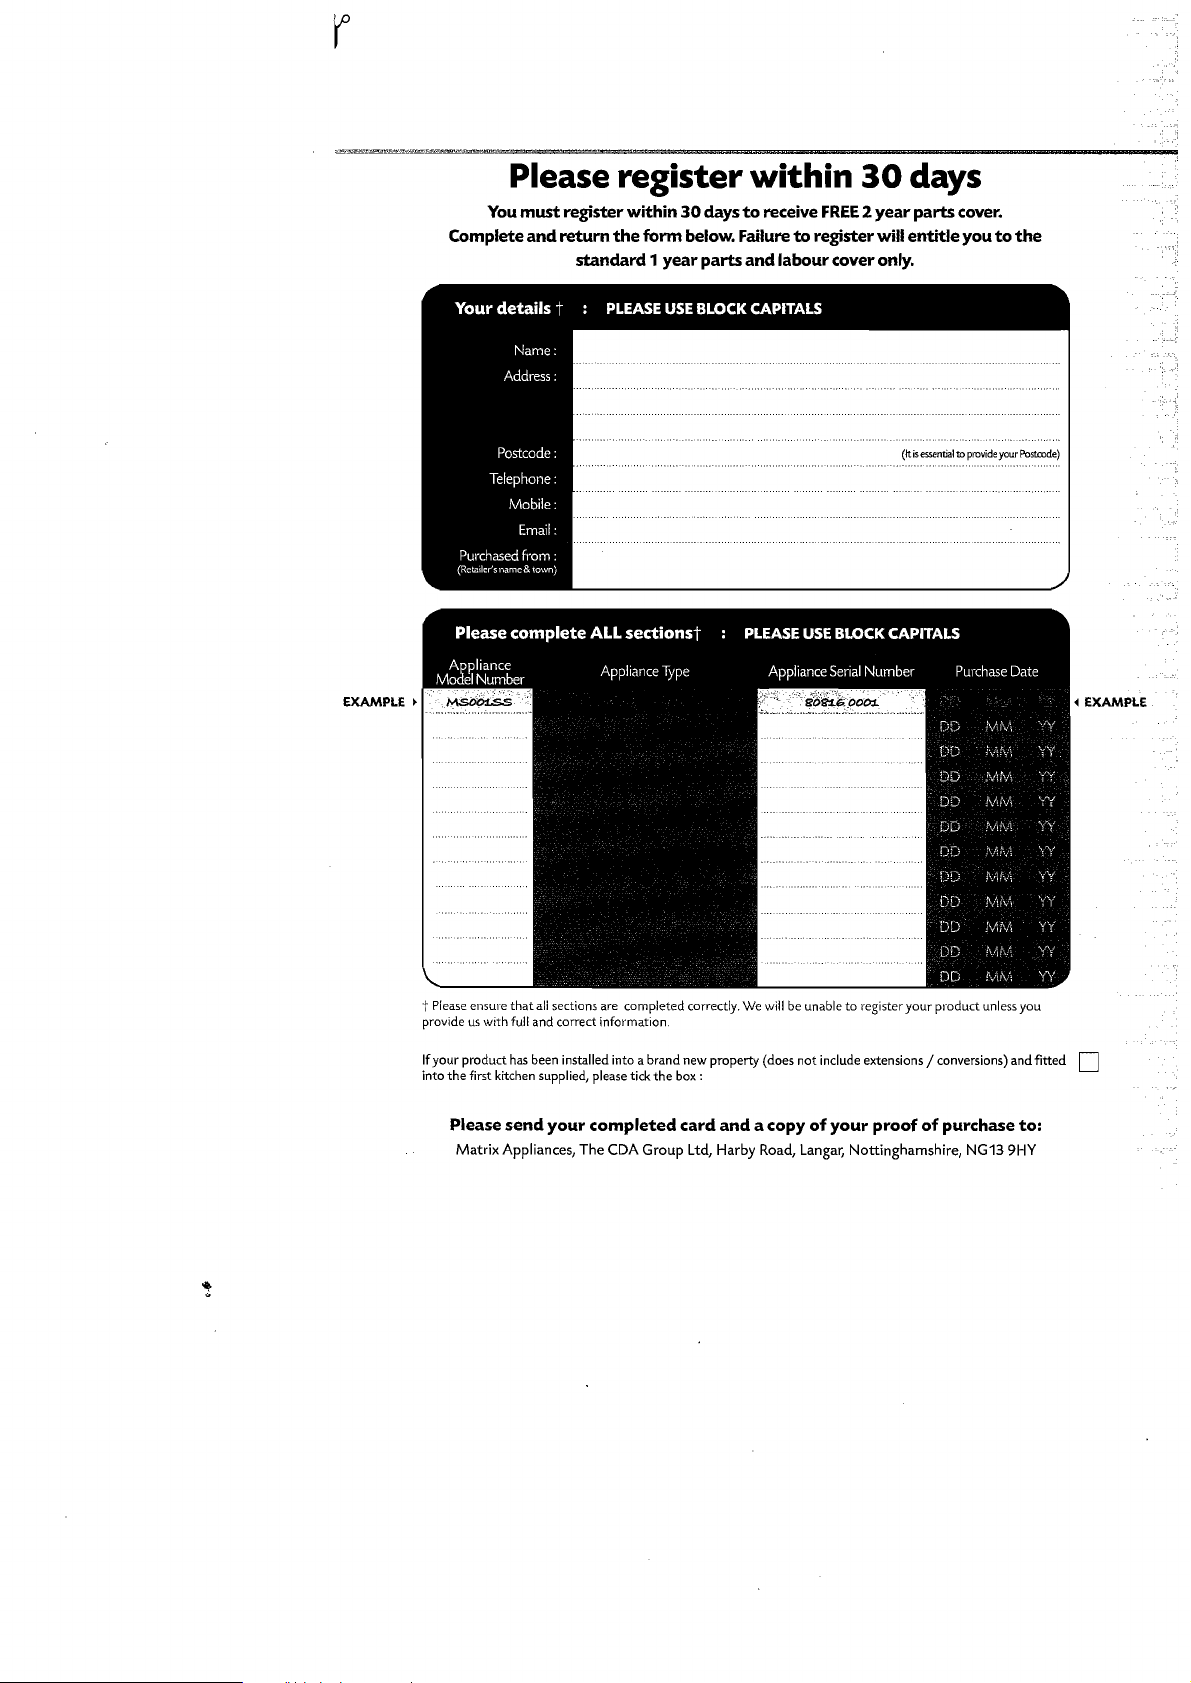
EXAMPLE
Please register within
You
must
Complete and
~
I.:.~~~:'"
30
register within
retum
the
standard 1 year parts and labour cover only.
30
days
to
receive
form below. Failure
FREE
to
register will
2 year parts cover.
days
entitle
(It
is
essential
to
you
provide
to
your
the
Postrode)
~
EXAMPLE
t Please ensure
provide
If
your product has been installed into a brand new property (does
into
the
Please
that
all
us
with full and correct information.
first kitchen supplied, please tick
Matrix Appliances,
sections are completed correctly.
send
your
completed
The
CDA Group Ltd, Harby Road, Langar, Nottinghamshire, NG13 9HY
the
box:
card
We
and a copy
will
be unable to register your product unless you
not
include extensions / conversions) and fitted D
of
your
proof
of
purchase
to:
Page 15

The
T:
ICIDIAl
ICIDIAI
For
our
Customer Care Department,
01949 862 012 f :
Group
Ltd·
Harby
Serviced
please contact
01949862003
Road·
Langar • Nottinghamshire • NG139HY
by
or
for Service,
us
on:
E : service@cda.eu
Stampa 3/05/2010 TW1592 3GA0215
 Loading...