

Page 1

Krankcycle_091021.indd 1 10/22/09 8:31 AM
Page 2

1
CHAPTER 1: IMPORTANT SAFETY INSTRUCTIONS PAGES
1.1 Read and Save These Instructions.....................................................................................
1.2 Proper Usage .................................................................................................................
1.3 Setting up the KRANKcycle™..........................................................................................
CHAPTER 2: KRANKcycle™ SPECIFICATIONS, PARTS AND ASSEMBLY GUIDES
2.1 Specifications .................................................................................................................
2.2 Required Parts, Fasteners and Tools .................................................................................
2.3 Assembly Steps ..............................................................................................................
CHAPTER 3: GETTING TO KNOW THE KRANKcycle™
3.1 Diagram .........................................................................................................................
CHAPTER 4: USING THE KRANKcycle™
4.1 Proper Setup ..................................................................................................................
4.2 How to Operate ..............................................................................................................
4.3 How to Move ..................................................................................................................
CHAPTER 5: PLACEMENT OF SERIAL NUMBER ON KRANKcycle™
5.1 Serial Number Location....................................................................................................
CHAPTER 6 PREVENTATIVE MAINTENANCE
6.1 Daily Maintenance ..........................................................................................................
6.2 Weekly Maintenance ........................................................................................................
6.3 Monthly Maintenance ......................................................................................................
6.4 Bi-yearly (6 Month) Maintenance ......................................................................................
6.5 Troubleshooting Guide .....................................................................................................
02
02
02
03
04
05
09
10
10
11
12
12
12
12
13
13
T
ABLE OFCONTENTS
Krankcycle_091021.indd 1 10/22/09 8:31 AM
Page 3

CHAPTER 1: I
mportant Safety Instructions
1.1 READ AND SAVE THESE INSTRUCTIONS
It is the sole responsibility of the purchaser of Matrix Fitness Systems
products to instruct all individuals, whether they are the end user or
supervising personnel, on proper usage of the equipment.
It is recommended that all users of Matrix Fitness Systems exercise
equipment be informed of the following information prior to its use.
1.2 PROPER USAGE
• Do not use the equipment in any way other than designed or intended by
the manufacturer. It is imperative that all Matrix Fitness Systems
equipment is used properly to avoid injury.
• Keep the KRANKcycle™ indoors, away from moisture and dust. Do not
place the KRANKcycle™ in a garage or covered patio or near water.
• Place the KRANKcycle™ on a level horizontal surface. To protect the floor
or carpet from damage, place a mat beneath the KRANKcycle™. Make
sure that there is 20 inches (0.5m) minimum distance to other
equipment around the KRANKcycle™ to mount, dismount, and operate it.
• Children under the age of 18 should only be allowed to use the
KRANKcycle™ with parental approval and if guided by a
trained instructor. Unaccompanied minors should not be allowed to use
the KRANKcycle.
• The KRANKcycle™ should not be used by persons weighing more than
350 lbs / 159 kg.
• Always wear appropriate athletic clothing and shoes while operating the
KRANKcycle™. Do not wear loose clothing that could become caught on
the KRANKcycle™ or shoes with loose laces.
• Before using the KRANKcycle™, make sure that you are familiar with the
setup/operation of the KRANKcycle™ (see page 10).
• Make sure seat hooks are fully engaged around protruding center pin.
• Both the rotation adjustment and pivoting height adjustment should be
fully engaged and locked into position before using the KRANKcycle™.
• The KRANKcycle™ has independent crank arms which will stop moving
once the user stops; however, the flywheel will continue to move.
• Always regulate the flywheel resistance so that your upper body
movements are controlled.
• Keep your grip light while kranking and keep your elbows in a
neutral position.
• If you feel pain or dizziness while exercising, STOP immediately, rest,
cool down and consult a physician.
• If replacement parts are needed, use only manufacturer supplied parts.
• Do not operate this cycle with 2 people, equipment is designed for
individual use.
• Stay clear of moving parts and place both hands on the crank handles
while exercising
• Stop your workout in the event a person is within reach of
moving parts
!WARNING!
To reduce the risk of serious injury, read the following important precautions
and information before operating the KRANKcycle™.
!WARNING!
Before beginning any exercise program, consult your physician. This is
especially important for persons over the age of 35 or persons with pre-existing
health problems. Carefully read all instructions before use. Be aware that
incorrect or extensive training may result in serious health injuries. The
manufacturer assumes no responsibility for personal injury or property damage
sustained by or through the use of this product.
!WARNING!
Regularly inspect and properly tighten all parts of the KRANKcycle™ as
recommended in this manual. Please replace defective and heavy wear parts
(like the brake pad) immediately and do not use the cycle until repair is
performed. Only use original parts from the manufacturer.
1.3 SETTING UP THE KRANKcycle™
Assembly Instructions have been provided with your cycle. For your safety,
please read and follow each of the steps in the assembly guide.
2
Krankcycle_091021.indd 2 10/22/09 8:31 AM
Page 4

3
CHAPTER 2:
KranKcycle™ specifications, parts and assembly steps
2.1 JOHNNY G KRANKcycle™ BY MATRIX SPECIFICATIONS
The Johnny G KRANKcycle™ by Matrix is designed according to EN957-5 standards as a Class S subcategory C product for professional and / or
commercial use. Such training equipment is intended for use in training areas of commercial facilities such as Fitness Clubs or Sport Associations,
where access and control is regulated by the person who has legal responsibility. The Johnny G KRANKcycle™ is not suited for theraputic use.
Specifications
Foot print: 56.5”L x 26.8”W x 41.5”H / 1.44m L x 0.68m W x 1.06m H
Weight of bike: 142.4 lbs / 64.6 kg
Saddle height: 24.3” / 0.62m
Max crank arm height: 53.5” / 1.36m
Max user weight: 350 lbs / 159 kg
The KRANKcycle™ is designed to accommodate most users from 150 to 205 cm / 59 to 81 inch Body height.
Krankcycle_091021.indd 3 10/22/09 8:31 AM
Page 5

4
CHAPTER 2:
KranKcycle™ specifications, parts and assembly steps
2.2 REQUIRED PARTS, FASTENERS & TOOLS (NOT INCLUDED)
Part Name: Outline: Dimensions: Quantity: Bag Color:
1 Flat Washer M10 4 Black
2 Socket Head Cap Screw M10 x 25mm 4 Black
3 Phillips Head Screw M4 x 8mm 10 Red
4 Socket Head Cap Screw M5 x 20mm 2
5 Allen Key Wrench 8mm
6 Allen Key Wrench 4mm
7 Philips Head Screwdriver
8 Spanner Wrench 15mm
9 Left Krank Handle 100 x 100 x 35mm 1
10 Right Krank Handle 100 x 100 x 35mm 1
11 Seat Assembly 130 x 85 x 80mm 1
12 Bottle Holder 130 x 85 x 80mm 1
Krankcycle_091021.indd 4 10/22/09 8:31 AM
Page 6

5
CHAPTER 2:
KranKcycle™ specifications, parts and assembly steps
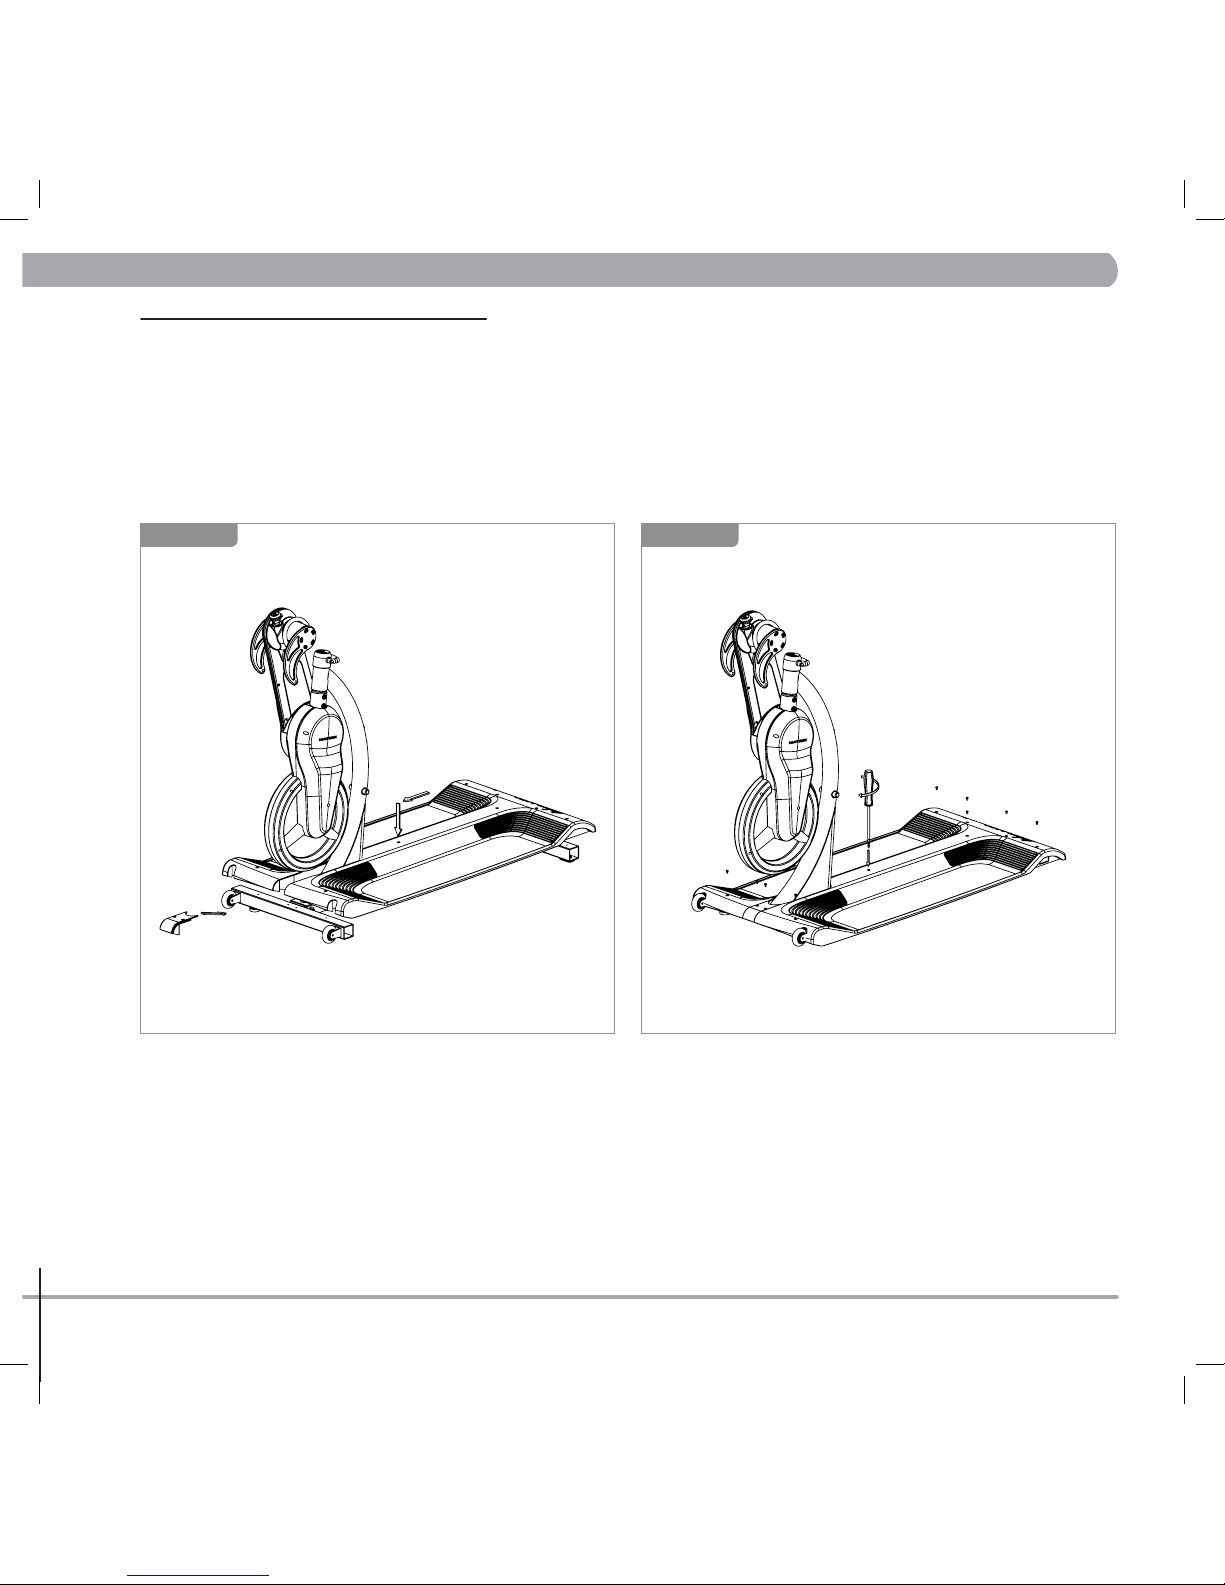
2.3 ASSEMBLY STEPS
Place DRIVE FRAME on BASE FRAME so the bolt holes line up.
IMPORTANT: Due to the size and weight of the drive frame, the
manufacturer recommends using two people to lift and place the drive
frame on the base.
• ATTENTION
Prior to assembling the KRANKcycle™, unpack all of the contents of the box and make sure that all necessary components are present. Review the
contents of the hardware package for completeness. Contact your local distributor or go to www.matrixfitness.com to report any missing items.
DRIVE FRAME
BASE FRAME
STEP 1
Attach the DRIVE FRAME to the BASE FRAME using 8mm ALLEN KEY WRENCH
and item 1-FLAT WASHER and item 2-SOCKET HEAD CAP SCREW.
STEP 2
Krankcycle_091021.indd 5 10/22/09 8:31 AM
Page 7
6
2.3 ASSEMBLY STEPS
CHAPTER 2:
KranKcycle™ specifications, parts and assembly steps
Secure BASE PLATE to BASE FRAME from step 3 with item 3-PHILLIPS HEAD
SCREW and PHILLIPS HEAD SCREW DRIVER.
Place SMALL BASEPLATE FRONT COVER and LARGE MAIN BASE PLATE on metal
frame.
STEP 3 STEP 4
Krankcycle_091021.indd 6 10/22/09 8:31 AM
Page 8

7
2.3 ASSEMBLY STEPS
CHAPTER 2:
KranKcycle™ specifications, parts and assembly steps
Secure HANDLES tightly to CRANK ARMS using a 15mm WRENCH.
Attach LEFT HANDLE to LEFT CRANK ARM and RIGHT HANDLE to RIGHT
CRANK ARM. Please note the LEFT HANDLE has a left hand thread.
STEP 5 STEP 6
Krankcycle_091021.indd 7 10/22/09 8:31 AM
Page 9

8
2.3 ASSEMBLY STEPS
CHAPTER 2:
KranKcycle™ specifications, parts and assembly steps
Attach WATER BOTTLE CAGE to CENTER UPRIGHT FRAME with 4mm ALLEN KEY
WRENCH using item 4-SOCKET HEAD CAP SCREWS.
STEP 7
Attach SEAT to UPRIGHT FRAME by securely placing SEAT HOOKS around
PROTRUDING PIN.
!WARNING! Make sure seat hooks are fully engaged around protruding
center pin.
STEP 8
ASSEMBLY COMPLETE
Krankcycle_091021.indd 8 10/22/09 8:31 AM
Page 10

9
CHAPTER 3:
GettinG to Know the KranKcycle
™
Upper Drive
(crank axis)
Resistance Knob
Height Adjustment Lever
LEFT Crank Arm
Crank Handle
RIGHT Crank Arm
Rotation Lever
Lower Drive
Flywheel
Leveling Foot
Rolling Wheel
Removable Seat
Seat Mounting Pins
Baseplate
Handle
Krankcycle_091021.indd 9 10/22/09 8:31 AM
Page 11
10
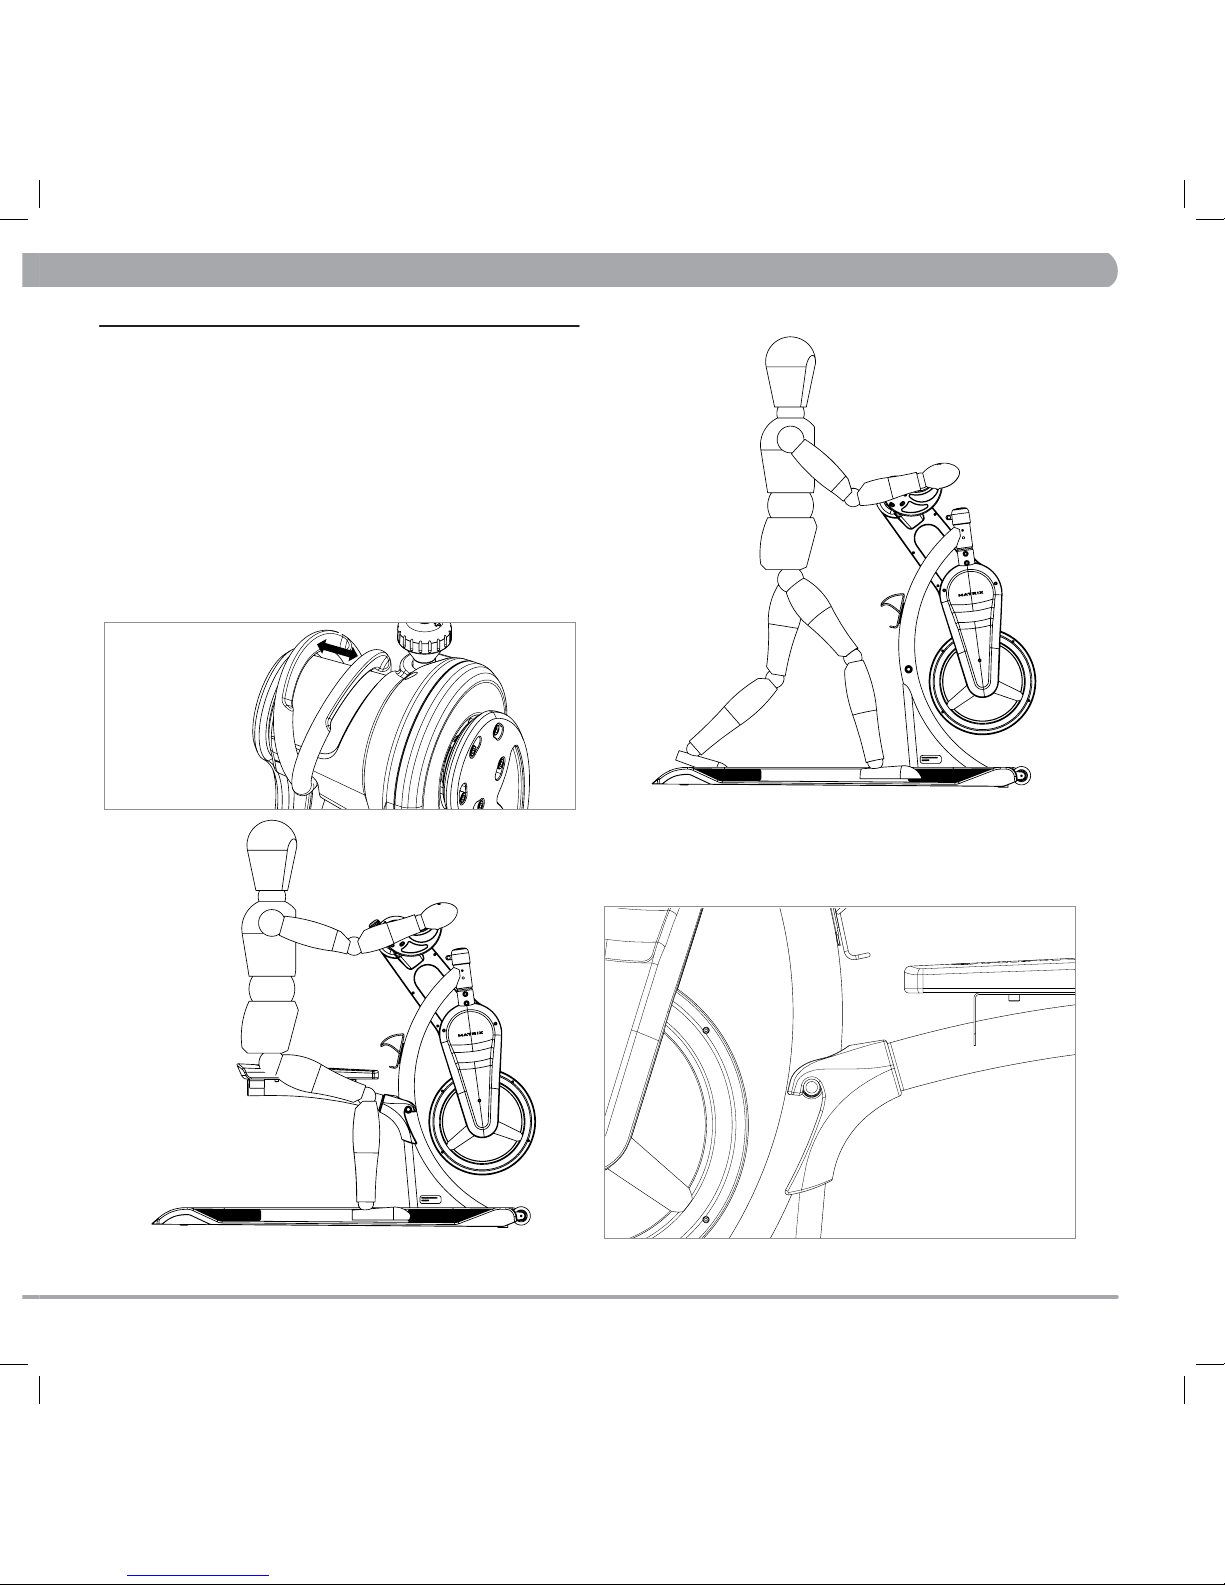
4.1 PROPER SET UP
The KRANKcycle™ was designed explicitly for upper body and
cardiovascular training. To maximize exercise effectiveness and comfort, the
KRANKcycle should be adjusted for each user and exercise position. The
instructions below describe one approach to adjusting the cycle to ensure
optimal user comfort and ideal body positioning: you may choose to adjust
the cycle differently.
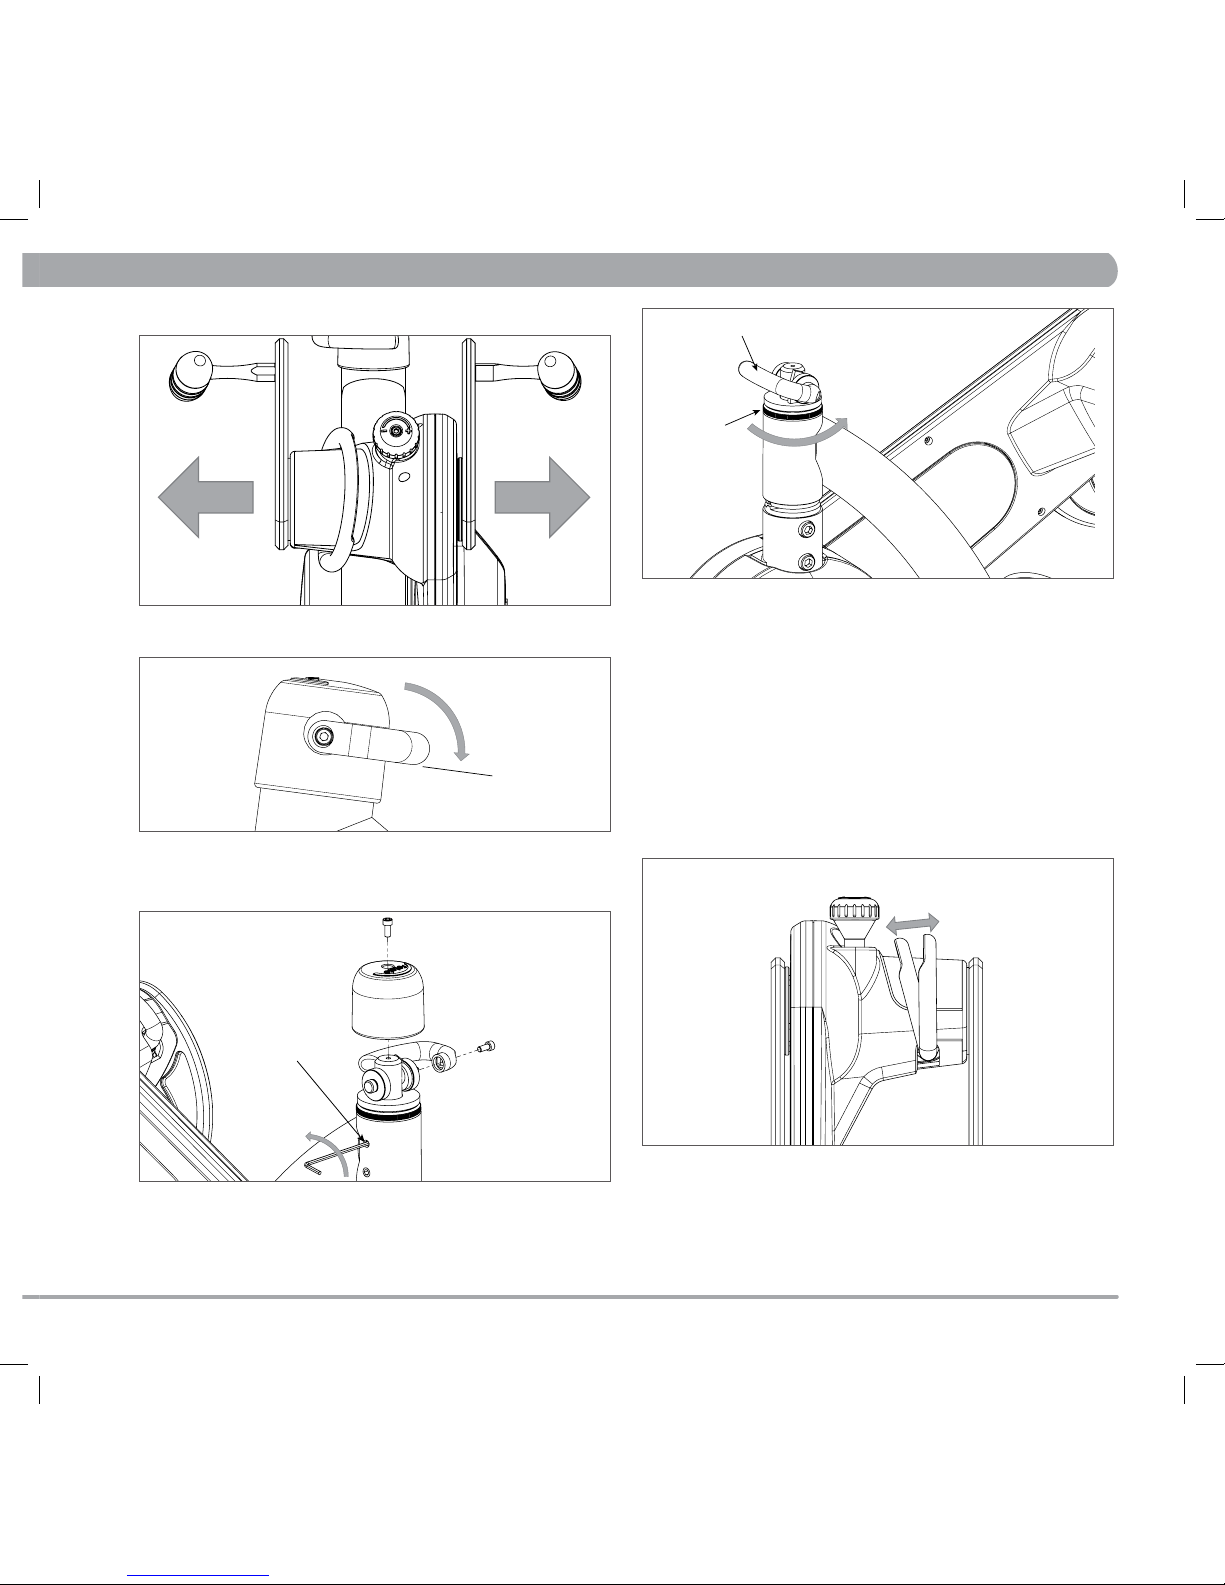
CRANK HEIGHT ADJUSTMENT
While seated on the KRANKcycle™, grab the upper crank axis with both
hands, press the height adjustment lever towards the outer edge of the
crank axis, lifting or lowering the crank axis until it is in line with the center
of the chest. Release the lever to lock into position. Crank handles should
not hit the thigh when rotated.
!WARNING! Make sure height adjustment mechanism is locked into posi-
tion before you begin Kranking.
With your back straight, position yourself on the saddle so that there is a
slight bend in the elbow when the crank arm is in the furthest position away
from the body.
CHAPTER 4:
usinG the KranKcycle
™
To Krank while standing, first remove the seat and set aside. Stand with
your back straight and your feet shoulder width apart. Position yourself so
there is a slight bend in the elbow when the crank arm is in the furthest
position away from the body. Adjust the crank height if necessary.
!WARNING! When replacing the seat be sure the hooks are fully engaged
around protruding center pin.
Krankcycle_091021.indd 10 10/22/09 8:31 AM
Page 12

11
CHAPTER 4:
usinG the KranKcycle
™
4.2 HOW TO OPERATE
!WARNING! Do not operate this cycle with 2 people, equipment is
designed for individual use. Please stay clear of moving parts and place
both hands on the crank handles while exercising. Stop your workout in the
event a person is within reach of moving parts.
Recommended cadence while exercising should be 60-90 RPM and the
user should never operate without resistance applied.
RESISTANCE ADJUSTMENT
The preferred level of difficulty in Kranking (resistance) can be regulated in
fine increments by use of the resistance knob. To increase the resistance,
turn the resistance knob toward the “+” sign; to decrease the resistance,
turn the knob toward the “- “ sign.
IMPORTANT: To stop the flywheel
(wheel) while Kranking, turn the
resistance knob toward the “+” sign
until flywheel stops.
!WARNING! The flywheel will
continue to move even after you
stop Kranking. Always Krank in a
controlled manner and adjust your
desired cadence and resistance
according to your own abilities.
CHANGE CRANK ARM DIRECTION
To bring cranking direction from forward or reverse, bring crank arms to top
position, release rotation level, turn drive frame 180º and lock rotation lever
back into place (toward the word lock) and pivot crank arms back toward user.
!WARNING! Make sure rotation adjustment lever is locked before you begin
Kranking. Make sure that no components or devices block the users movement.
4.3 HOW TO MOVE
Bend your knees and lift the rear base of the KRANKcycle™ using the
integrated grips on each side of the base. Carefully move the cycle to the
desired location and then lower it. CAUTION: To reduce the risk of injury,
use extreme caution while moving the KRANKcycle™. Do not attempt to
move it over uneven surfaces and make sure you allow for a minimum of 20
inches to the nearest equipment. When lifting the front of the unit, grab the
metal frame only – not the plastic base.
If the KRANKcycle™ rocks on the floor after being set down, turn the
leveling feet (see diagram) underneath the front stabilizer until the rocking
motion is eliminated.
IMPORTANT: Please do not unscrew the leveling feet more than ½ inch!
!WARNING! The KRANKcycle should be installed on a stable base and
properly leveled before use.
LOCKED
STEP 1
STEP 2
STEP 3 STEP 4
STEP 5
STEP 6
Krankcycle_091021.indd 11 10/22/09 8:31 AM
Page 13

12
!WARNING! Regular maintenance must be performed on the KRANKcycle™
for optimal performance and longevity. Please read and follow all instructions
below. If the cycle is not maintained as described, components may wear
excessively and the cycle may become damaged. Improper maintenance will
void the warranty terms. If you have questions about maintenance, contact
your local distributor or go to www.matrixfitness.com.
Note: Many maintenance procedures require lubricant (ex. brake pad,
chains, and sprockets). MATRIX recommends 3-IN-ONE oil.
6.1 DAILY MAINTENANCE
1. Make sure that the KRANKcycle™ is level. If it rocks on your floor, turn
the leveling feet underneath the front stabilizer until the rocking motion is
eliminated (see page 11).
2. After each use, the cycle should be disinfected and cleaned to maintain
a hygienic environment. Clean cycle with mild soap and water or other
non-ammonia based all purpose cleaners. Apply cleaner to lint free cloth
and wipe crank handles, adjustment knobs and levers, base plate and the
seat. Do not pour liquids directly onto the equipment. Maintain a clean
environment around the cycle, free of dust and dirt.
6.2 WEEKLY MAINTENANCE
1. Apply a small amount of mild soap and water or other non-ammonia
based all purpose cleaner to a lint free cloth and thoroughly clean the
frame, crank handles, adjustment knobs and levers, seat, flywheel,
baseplate and plastic covers.
2. Check regular functions of cycle and consult the TROUBLESHOOTING
GUIDE (see page 13) if any problems exist.
6.3 MONTHLY MAINTENANCE
1. For optimal performance of the resistance system the following steps
should be taken:
a. Remove lower inside plastic cover by removing 6 socket head cap screws
with a 3mm ALLEN KEY WRENCH.
5.1 JOHNNY G KRANKcycle™ by MATRIX
CHAPTER 6: P
reventative maintenance
CHAPTER 5: S
erial number location
Krankcycle_091021.indd 12 10/22/09 8:31 AM
Page 14

13
CHAPTER 6: P
reventative maintenance
b. Check brake pad setting by first turning the resistance knob toward the
“-“ sign as far as it will go (minimum braking effect). The brake pad should
have approximately a credit card thickness between it and the flywheel and
the brake pad should feel slightly loose around its pivot. If adjustment is
required see TROUBLESHOOTING GUIDE (see page 13).
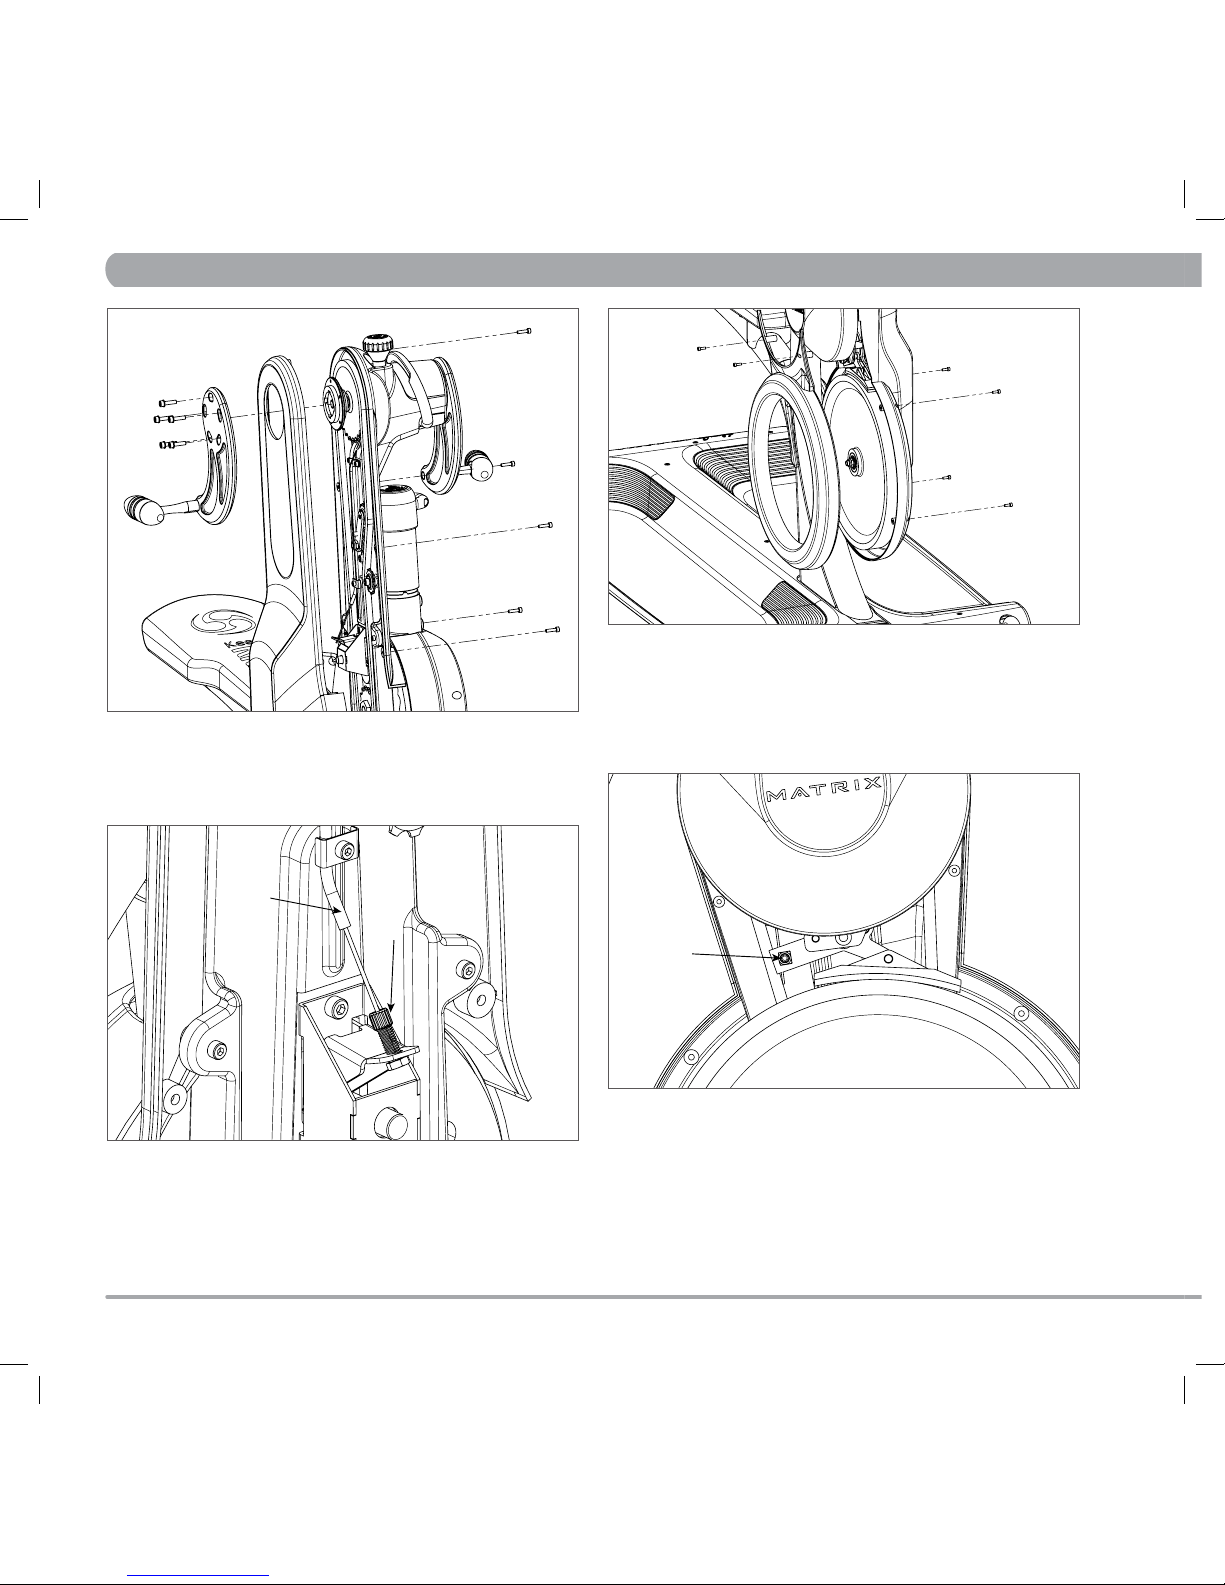
c. Check brake pad for signs of wear and the presence of lubrication. If the
brake pad requires lubrication, first adjust the resistance knob so the brake
pad is just slightly touching the flywheel. Then slowly rotate the flywheel
with one hand while applying a small amount of lubricant on the flywheel
just behind the brake pad (A) on the in-going side. Wipe off excess.
d. Replace brake pad if necessary
e. Replace lower inside plastic cover
2. Check and tighten (if necessary) the screws on crank arms, adjustment
knobs and levers, seat, water bottle holder, and plastic covers.
6.4 BI-YEARLY (6 MONTH) MAINTENANCE
1. For optimal performance of the drive system the following steps should
be taken:
a. Remove the RIGHT crank arm by removing 5 socket head cap screws
with a 4mm ALLEN KEY WRENCH then remove the upper outside plastic
cover by removing 5 socket head cap screws with a 3mm ALLEN KEY
WRENCH. Then remove both of the lower plastic covers by removing 9
socket head cap screws with a 3mm ALLEN KEY WRENCH and 5mm
ALLEN KEY WRENCH.
b. Thoroughly wipe down around all internal components and look for signs
of excessive wear or damage.
c. Lubricate both upper and lower drive chains. Clean excess.
d. Replace drive chains if necessary
e. Replace all plastic covers and RIGHT crank arm
6.5 TROUBLESHOOTING GUIDE
Follow the steps below if any problems are discovered in the weekly
function test.
CRANK ARMS NOT SYNCHRONIZED
Turn the resistance knob toward the “+” sign until the crank arms do not
fall by themselves back to the lowest rest position. Raise the crank arms
so the crank handles are nearly level. Loosen (do not remove) the 5 socket
head cap screws (B) on the RIGHT crank arm with a 4mm ALLEN KEY
WRENCH. Adjust the position of screws within the slots until both crank
handles are level and then tighten. Make sure all screws are tight, or the
crank handle may slip out of synchronization again.
Rotation Direction
A
B
Krankcycle_091021.indd 13 10/22/09 8:32 AM
Page 15
14
CHAPTER 6: P
reventative maintenance
UPPER DRIVE ARM EXHIBITS EXCESSIVE SIDE-TO-SIDE PLAY
Check if rotation lever is fully engaged (A). If so, follow next steps.
Remove rotation lever and cap by removing 2 socket head cap screws with a
4mm ALLEN KEY WRENCH. Loosen (do not remove) upper set screw (B) on
upright frame with a 3mm ALLEN KEY WRENCH.
Replace rotation lever, and release rotation cam mechanism (C). Rotate
cam plate (D) counterclockwise 1/8 of a turn and then engage rotation cam
mechanism. Repeat until the upper drive arm is held rigidly without play.
The rotation lever should require a firm force to fully engage. If the rotation
lever is too difficult to engage, reverse the previous steps.
To complete adjustment tighten upper set screw and replace rotation lever
and cap.
ROTATION LEVER POPS UP WHILE THE CYCLE IS IN USE
If the rotation lever loosens or pops up while the cycle is in use, perform the maintenance suggestions for “UPPER DRIVE ARM EXHIBITS
EXCESSIVE SIDE-TO-SIDE PLAY”
EXCESSIVE PLAY IN PIVOTING HEIGHT ADJUSTMENT LEVER
It is normal for the lever to exhibit a small amount of play before the upper
drive arm is disengaged, but if the lever has excessive play (E) or the lever
is pulled to its full extent and there is a pronounced clicking noise when
the upper drive arm is rotated, then follow the next steps.
Remove the RIGHT crank arm by removing 5 socket head cap screws with a
4mm ALLEN KEY WRENCH then remove the upper outside plastic cover by
removing 5 socket head cap screws with a 3mm ALLEN KEY WRENCH.
A
B
D
C
E
Krankcycle_091021.indd 14 10/22/09 8:32 AM
Page 16
15
CHAPTER 6: P
reventative maintenance
Check cable and cable sheath (A) for excessive wear (replace if necessary).
If the lever still exhibits excessive play, tighten the adjustment screw (B)
clockwise until play is removed. Be careful not to over tighten the adjustment screw as the pivoting mechanism may not fully engage and could lead
to machine failure or injury.
Replace upper outside plastic cover and RIGHT crank arm
FLYWHEEL RESISTANCE TOO HARD EVEN WHEN REDUCED TO THE
MINIMUM, OR RESISTANCE KNOB REQUIRES TOO MANY TURNS
BEFORE BECOMING HARDER
To adjust the brake pad setting, first remove the lower inside plastic cover
by removing 6 socket head cap screws with a 3mm ALLEN KEY WRENCH.
Loosen (do not remove) the brake cable screw (C) and turn the resistance
knob toward the “-“ sign as far as it will go (minimum braking effect). Then
turn the knob toward the “+” sign 1 full revolution. Make sure the brake
pad is pressed against the flywheel, and then secure the brake cable under
the brake cable screw (C). Turn the resistance knob toward the “-“ sign
as far as it will go, the brake pad should have approximately a credit card
thickness between it and the flywheel.
Replace lower inside plastic cover.
A
B
C
Krankcycle_091021.indd 15 10/22/09 8:32 AM
Page 17
16
CHAPTER 6: P
reventative maintenance
UPPER CHAIN DRIVE MAKING A PRONOUNCED CLICKING NOISE
Over time, it is normal for the drive chains to stretch with use. The
KRANKcycle™ is equipped with automatic chain tensioning devices, but
the chain may need to be replaced if it has stretched too far. Follow the
next steps to check for excessive chain wear or stretch. If the chain needs
to be replaced,contact MATRIX customer service.
Remove the RIGHT crank arm by removing 5 socket head cap screws with a
4mm ALLEN KEY WRENCH then remove the upper outside plastic cover by
removing 5 socket head cap screws with a 3mm ALLEN KEY WRENCH.
If the chain is rubbing on the inside covers the chain should be replaced by
a service technician
Replace upper outside plastic cover and RIGHT crank arm
LOWER CHAIN DRIVE MAKING A PRONOUNCED CLICKING NOISE
Over time, it is normal for the drive chains to stretch. The KRANKcycle™
is equipped with automatic chain tensioning devices, but the chain may
need to be replaced if it has stretched too far. Follow the next steps to
check for excessive chain wear or stretch.
Remove both of the lower plastic covers by removing 9 socket head cap
screws with a 3mm ALLEN KEY WRENCH and 5mm ALLEN KEY WRENCH.
If the chain is rubbing on the inside covers or exhibits too much play
around the sprockets the chain should be replaced by a service technician.
Replace both lower plastic covers.
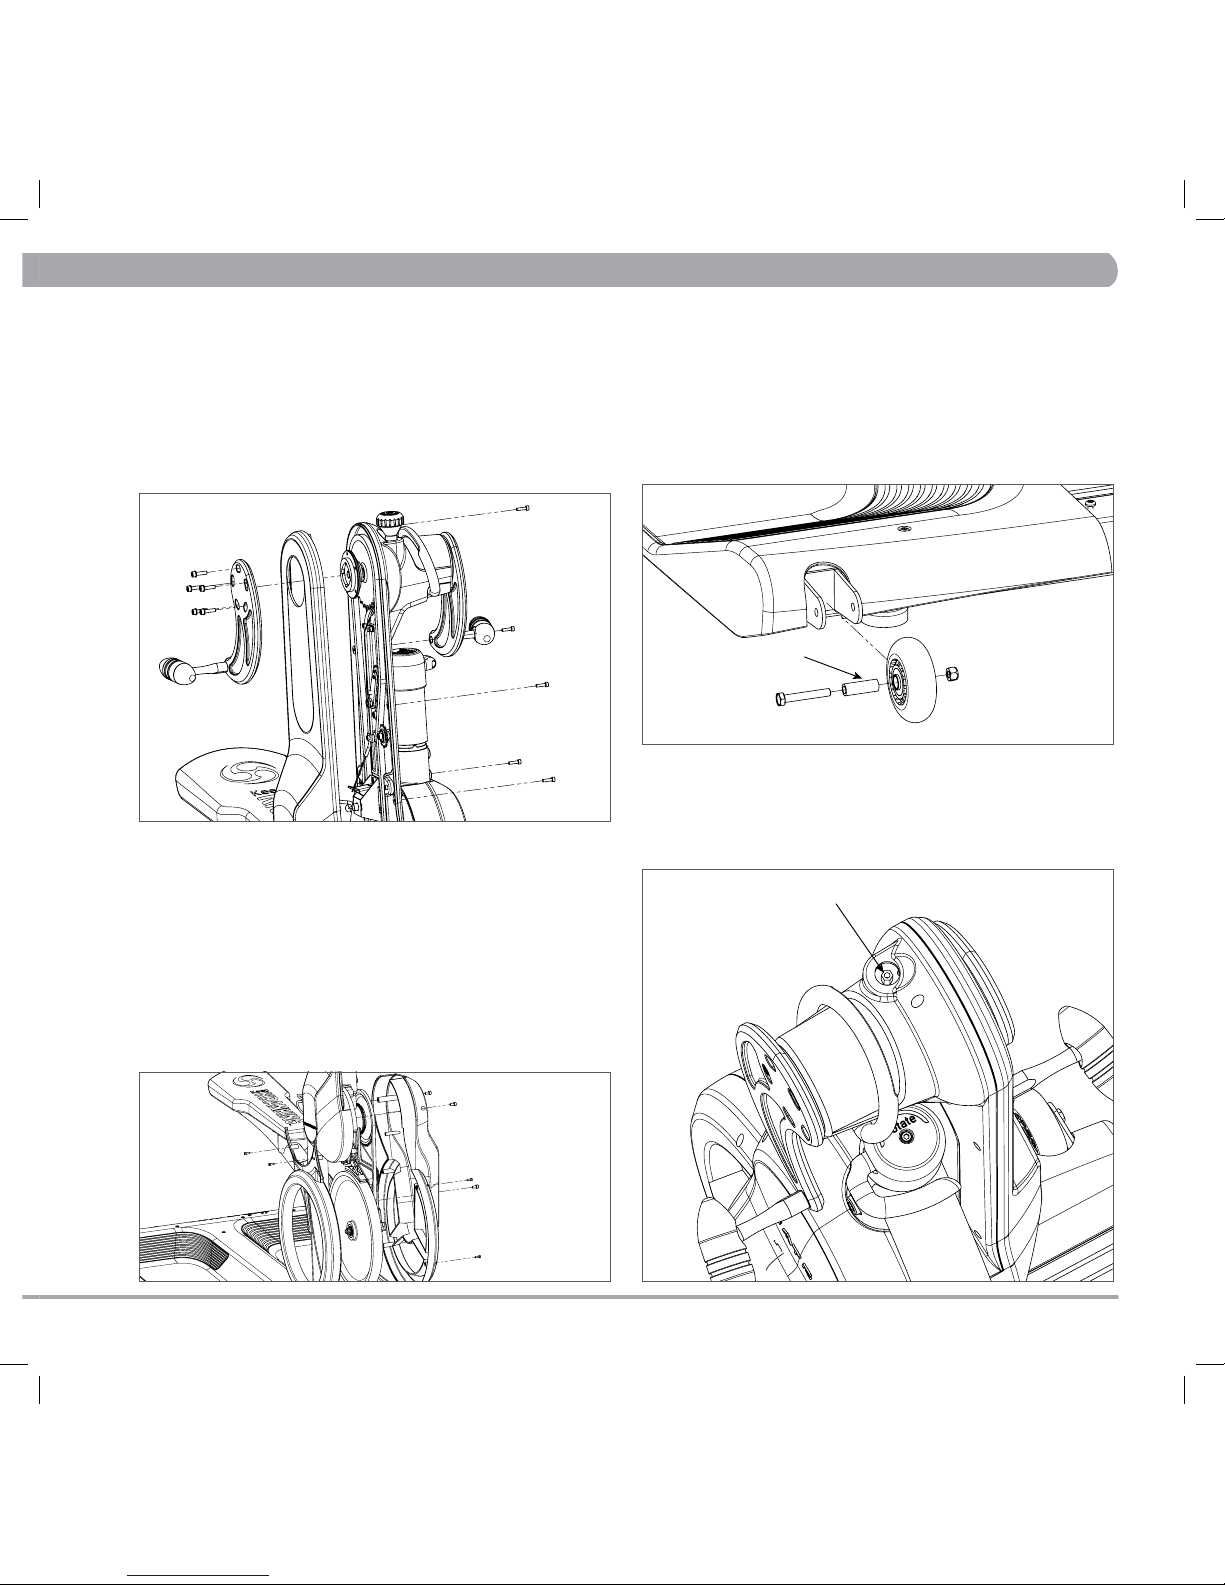
CYCLE DIFFICULT TO PUSH WHEN MOVING
The front rolling wheels may need lubrication. Remove both wheels by
unscrewing the nut and bolt. Lubricate the outside of steel axle tube (A).
Replace both wheels using a 10mm WRENCH.
RESISTANCE KNOB DOES NOT ROTATE SMOOTHLY
The resistance cable mechanism may need lubrication. Remove the
resistance knob by removing the 1 socket head cap screw with a 4mm
ALLEN KEY WRENCH. Lubricate the cable mechanism (B) through the
opening in the plastic cover. Replace the resistance knob.
A
B
Krankcycle_091021.indd 16 10/22/09 8:32 AM
Page 18

Krankcycle_091021.indd 17 10/22/09 8:32 AM
Page 19

Krankcycle_091021.indd 18 10/22/09 8:32 AM
Page 20

M AT RIX F I T N ES S S YST E M S | 1 61 0 L A N D M ARK DR I VE CO T TA GE GR OVE W I 5 352 7 U SA
To l l Fre e
8 66 .69 3 .4 8 6 3
m a t r i x fi t n e s s . co m Fa x
6 08. 8 3 9. 8 6 87
M OD E L # M F C 0 0 02 - 0 S
REV. 1.0
Krankcycle_091021.indd 19 10/22/09 8:32 AM
 Loading...