

Page 1

SIMADO GFX44
Magyarországon a Matrix Telecom Ltd. képviselete,
Matrix termékek importőre, kizárólagos forgalmazója:
1095 Budapest, Mester u. 34.
Telefon: *218-5542, 215-9771, 215-7550, 216-7017, 216-7018
Fax: 218-5542 Mobil: 30 940-1970, 20 949-2688
E-mail: delton@delton.hu Web: www.delton.hu
System Manual
Page 2

Documentation Information
This is a general documentation and it covers many models with
different specifications. A particular product may not support all the
features and facilities described in the documentation.
Matrix Telecom reserves the right to revise information in this
publication for any reason without prior notice. Information in this
documentation may change from time to time. Matrix Telecom
makes no warranties with respect to this documentation and
disclaims any implied warranties. While every precaution has been
taken in preparation of this system manual, Matrix Telecom
assumes no responsibility for errors or omissions. Neither is any
liability assumed for damages resulting from the use of the
information contained herein.
Matrix Telecom reserves the right without prior notice to make
changes in design or components of the equipment as engineering
and manufacturing may warrant.
Neither Matrix Telecom nor its affiliates shall be liable to the
purchaser of this product or third parties for damages, losses, costs
or expenses incurred by purchaser or third parties as a result of:
accident, misuse or abuse of this product or unauthorized
modifications, repairs or alterations to this product or failure to
strictly comply with Matrix Telecom’s operating and maintenance
instructions.
All rights reserved. No part of this system manual may be copied or
reproduced in any form or by any means without the prior written
consent of Matrix Telecom.
Page 3

Contents
Section 1: Introduction ................................................................ 5
Welcome ...................................................................................... 7
Packing List ................................................................................. 9
Warranty Statement ................................................................... 10
Introducing the System .............................................................. 13
Protecting the System ............................................................... 15
Getting Started ........................................................................... 17
Section 2: Features and Facilities ............................................. 25
Allowed and Denied Lists ........................................................... 27
Answer Signaling on FXS Port .................................................. 32
Answer-Number Based Routing ................................................ 34
Automatic Number Translation .................................................. 37
Call Detail Recording (CDR) ...................................................... 41
Call Proceeding Tone ................................................................. 47
Call Progress Tone Generation (CPTG) .................................... 49
CLIP Type on FXS Port ............................................................. 52
Communication Port .................................................................. 54
Daylight Saving Time ................................................................. 57
Default the Configuration ........................................................... 62
Disconnect Signaling on FXS Port ............................................ 64
Emergency Number Dialing ....................................................... 67
End of Dialing Digit .................................................................... 71
Fixed Dialing ............................................................................... 72
FXS Port Parameters ................................................................ 75
International Mobile Equipment Identity (IMEI) ......................... 81
Jeeves ........................................................................................ 82
Mobile Port Parameters ............................................................. 86
Network Selection ...................................................................... 91
Number Lists .............................................................................. 96
Programming the System .......................................................... 98
Real Time Clock (RTC) ........................................................... 100
Remote Programming .............................................................. 102
Restart the System .................................................................. 103
Returned Calls to Original Callers (RCOC) ............................. 104
Routing Group ........................................................................... 110
Page 4

Routing Type ............................................................................. 116
Signal Strength ........................................................................ 129
SIM PIN .................................................................................... 130
Software Version/Revision ....................................................... 133
Time Table ............................................................................... 134
Section 3: Appendices ............................................................. 137
Appendix A: Applications ......................................................... 139
Appendix B: Technical Specifications ..................................... 141
Appendix C: System Commands ............................................ 143
Appendix D: Regulatory Information ........................................ 148
Index ........................................................................................ 150
Notes ........................................................................................ 153
Programming Register .......................................................... 155
Page 5

Section 1: Introduction
Page 6

Page 7

Matrix
Welcome
Welcome to the world of telecom solutions from Matrix and thanks
for purchasing a Matrix product.
We want you to get the maximum performance from our product. If
you run into technical difficulties, we are here to help. But please
consult this system manual first.
If you still can’t find the answer, gather all the information or
questions that apply to your problem and with the product close to
you, call your dealer. Matrix dealers are trained and ready to give
you the support you need to get the most from your Matrix product.
In fact, most problems reported are minor and can be easily solved
over the phone.
In addition, technical consultation is available from Matrix engineers
every business day. We are always ready to give advice on
application requirements or specific information on installation and
operation of our products.
The system manual is divided in following sections:
Section 1: Introduction
Section 2: Features and Facilities
Section 3: Appendices
We suggest the first time users to read this system manual in the
following sequence and then remaining chapters.
• Section 1
• Section 2 (in the given below hierarchy)
• Communication Port 54
• Programming the System 98
• Remote Programming 102
• Software Version/Revision 133
• Time Table 134
• Number Lists 96
• Allowed and Denied Lists 27
• Automatic Number Translation 37
7SIMADO GFX44 V1 System Manual
Page 8

Matrix
•
Routing Group 110
• Routing Type 116
• Real Time Clock 100
• Daylight Saving Time 57
• FXS Port Parameters 75
• Mobile Port Parameters 86
• Returned Calls to Original Callers (RCOC) 104
• Fixed Dialing 72
• Answer-Number Based Routing 34
• Call Detail Recording 41
• Call Progress Tone Generation 49
• Emergency Number Dialing 67
• International Mobile Equipment Identity (IMEI) 81
• Network Selection 91
• SIM PIN 130
The words ‘GSM’ and ‘Mobile’ are synonymous and are used
interchangeably in the manual. The words ‘SIMADO GFX44’
and ‘System’ are used interchangeably in the manual.
The user can use the pages named ‘Notes’ given at the end of
the system manual for making note of customer’s requirements
and ‘Programming Register’ for registering the programming
changes datewise. These could be used for future reference.
8 SIMADO GFX44 V1 System Manual
Page 9

Matrix
Packing List
The ideal sales package for SIMADO GFX44 is as mentioned below:
Sr. Accessories Qty.
01 SIMADO GFX44 1
02 System Manual 1
03 3 Pin Power Cord, MC-4 Black 1
04 Wall Mounting Nails 2
05 Warranty Card Set 1
06 Support Card 1
07 COM Port Cable (RS232C) 1
08 Mounting Template 1
09 SIMADO GFX44 CD 1
10 Antenna with Cable 1
RJ11 Cables (Depends on Configuration)
11
• Please make sure that these components are present.
• In case of short supply or damage detection, contact the source
from where you have purchased the system.
=X=X=
9SIMADO GFX44 V1 System Manual
Page 10

Matrix
Warranty Statement
Matrix Telecom Pvt. Ltd. (Matrix) warrants to its consumer
purchaser for any of its products to be free of defects in material,
workmanship and performance for a period of 15 months from date
of manufacturing or 12 months from the date of installation which
ever is earlier.
During this warranty period, Matrix will at its option, repair or replace
the product at no additional charge if the product is found to have
manufacturing defect. Any replacement product or part/s may be
furnished on an exchange basis, which shall be new or like-new,
provided that it has functionality at least equal to that of the product
being replaced. All replacement parts and products will be the
property of Matrix. Parts repaired or replaced will be under warranty
throughout the remainder of the original warranty period only.
This limited warranty does not apply to:
1. Products that have been subjected to accident, natural disaster,
misuse, modification, tampering, faulty installation, lack of
reasonable care, repair or service in any way that is not
contemplated in the documentation for the product or if the model
or serial number has been altered, tampered with, defaced or
removed.
2. Products which have been damaged by lightning storms, water or
power surges or which have been neglected, altered, used for a
purpose other than the one for which they were manufactured,
repaired by customer or any party without Matrix’s written
authorization or used in any manner inconsistent with Matrix’s
instructions.
3. Products received improperly packed or physically damaged.
4. Products damaged due to operation of product outside the
products’ specifications or use without designated protections.
Warranty valid only if:
• Primary protection on all the ports provided.
• Mains supply is within limit and protected.
• Environment conditions are maintained as per the product
specifications.
10 SIMADO GFX44 V1 System Manual
Page 11

Matrix
Warranty Card:
• When the product is installed, please return the warranty card
with:
• Date, signature and stamp of the customer.
• Date, signature and stamp of the channel partner.
• Matrix assumes that the customer agrees with the warranty
terms even when the warranty card is not signed and returned as
suggested.
The Purchaser shall have to bear shipping charges for sending
product to Matrix for testing/rectification. The product shall be
shipped to the Purchaser at no-charge if the material is found to be
under warranty. The Purchaser shall have to either insure the
product or assume liability for loss or damage during transit.
Matrix reserves the right to waive or make any changes in its
warranty policy without giving any notice.
If Matrix is unable to repair or replace, as applicable, a defective
product which is covered by Matrix warranty, the Matrix shall, within
a reasonable time after being notified of the defect, refund the
purchase price of the product provided the consumer purchaser
returns the product to Matrix.
In no event will Matrix be liable for any damages, including lost
profits, lost business, lost savings, downtime or delay, labor, repair
or material cost, injury to person, property or other incidental or
consequential damages arising out of use of or inability to use such
product, even if Matrix has been advised of the possibility of such
damages or losses or for any claim by any other party.
Except for the obligations specifically set forth in this Warranty
Policy Statement, in no event shall Matrix be liable for any direct,
indirect, special, incidental or consequential damages whether
based on contract or any other legal theory and where advised of
the possibility of such damages.
Neither Matrix nor any of its distributors, dealers or sub-dealers
makes any other warranty of any kind, whether express or implied,
11SIMADO GFX44 V1 System Manual
Page 12

Matrix
with respect to Matrix products. Matrix and its distributors, dealers
or sub-dealers specifically disclaim the implied warranties of
merchantability and fitness for a particular purpose.
This warranty is not transferable and applies only to the original
consumer purchaser of the Product. Warranty shall be void if the
warranty card is not completed and registered with Matrix within 30
days of installation.
12 SIMADO GFX44 V1 System Manual
Page 13

Matrix
Introducing the System
• Matrix product SIMADO GFX44 is a versatile analog gateway.
• It is a multi channel GSM Gateway, a solution for medium size
companies that widely use GSM lines.
• It makes possible up to 4 simultaneous calls to the GSM
network. Four analog phones can also be connected to the
gateway.
• It is much more effective to use multi channel gateway for higher
call cost savings.
• Thanks to the advanced and powerful Least Cost Router, the
gateway selects the cheapest possible route for the calls, taking
into consideration the dialed number prefix.
• Frequency band for mobile can be programmed.
Main Benefits of using Matrix gateway:
• The main advantages of the transit function:
• No need to change the configuration of your PBX, the LCR can
be programmed in the gateway.
• Calls to GSM network can be directly initiated from the gateway
FXS port which will save the PSTN charges for the call.
• Remote programming.
• Call Detail Recording, for keeping records of calls history.
• COM port for report generation.
• Using RCOC features, callers from the gateway can get their
called party’s call on their own phone station if they could not call
them while they were busy.
• Two option for system programming.
• Programming with analog phones
• Windows based programming of all the features and easy to
operate with mouse operated GUI.
• Fixed dialing feature allows a user to be contacted even at home
also.
13SIMADO GFX44 V1 System Manual
Page 14
Matrix
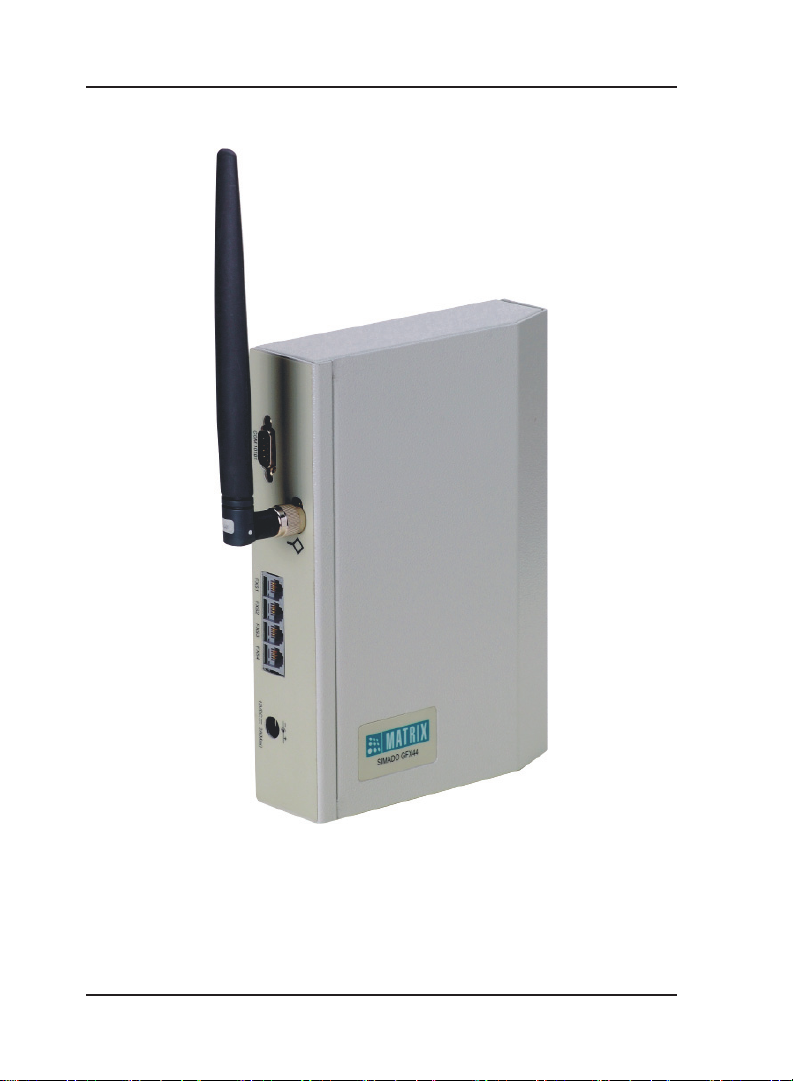
SIMADO GFX44 Photograph:
=X=X=
14 SIMADO GFX44 V1 System Manual
Page 15

Matrix
Protecting the System
Installation Precautions:
• Do not install in direct sunlight and excessive cold or humid
places.
• Do not install at places where sulfuric gases are produced and in
areas where there are thermal springs, etc. because it may
damage the equipment or contacts.
• Do not install at places where shocks or vibrations are frequent or
strong.
• Do not install at dusty places or places where water or oil may
come into contact with the system.
• Do not obstruct area around the system (for reasons of
maintenance and inspection be especially careful to allow space
for cooling above and at the sides of the system).
Important Safety Instructions:
When using your telephone equipment, basic safety precautions
should always be followed to reduce the risk of fire, electric shock
and injury to persons, including the following:
• Read and understand all instructions.
• Unplug this product from the wall outlet before cleaning. Do not
use liquid cleaners or aerosol cleaners. Use a dry and soft cloth
for cleaning.
• Do not use this product near water. For example, near a bathtub,
wash bowl, kitchen sink, or laundry tub, in a wet basement, or
near a swimming pool.
• Do not open the system in power ON condition.
• Do not place this product on an unstable cart, stand or table. The
product may fall, causing serious damage to the product.
• Interfacing cables should not touch the exposed power line cable.
• This product should be operated with proper supply voltage. If you
are not sure about supply voltage, contact authorized dealer. It is
advisable to give proper, stabilized power.
• Do not allow anything to rest on the power cord of product or ACDC Adapter. Do not place this product where the cord will be
misused by people walking on it.
• Do not overload wall outlets and extension cords as this can
15SIMADO GFX44 V1 System Manual
Page 16

Matrix
result in the risk of fire or electric shock.
• To reduce the risk of electric shock, do not disassemble this
product. Take it to a qualified serviceman when some service or
repair work is required. Opening or removing covers may expose
you to dangerous voltages or other risks. Incorrect reassembly
can cause electric shock when the appliance is subsequently
used.
• Unplug this product from the wall outlet and contact qualified
service personnel under the following conditions:
a) When the power supply cord or plug is damaged or frayed.
b) If liquid has been spilled into the product.
c) If the product has been exposed to rain or water.
d) If the product does not operate normally by following the
operating instructions. Adjust only those controls, which are
covered by the operating instructions because improper
adjustment of other controls may result in damage and will
often require extensive work by a qualified technician to
restore the product to normal operation.
e) If the product has been dropped or the cabinet has been
damaged.
f) If the product exhibits a distinct change in performance.
• Do not use the telephone of the product to report a gas leak in
the vicinity of the leak.
=X=X=
16 SIMADO GFX44 V1 System Manual
Page 17
Matrix
Getting Started
Overview
The Matrix SIMADO GFX44 allows you to call GSM number from
the normal analog phone and establish a voice call. Total of four
such calls can be established. It can be four GSM calls for different
service provider network. The GFX44 connects to four analog
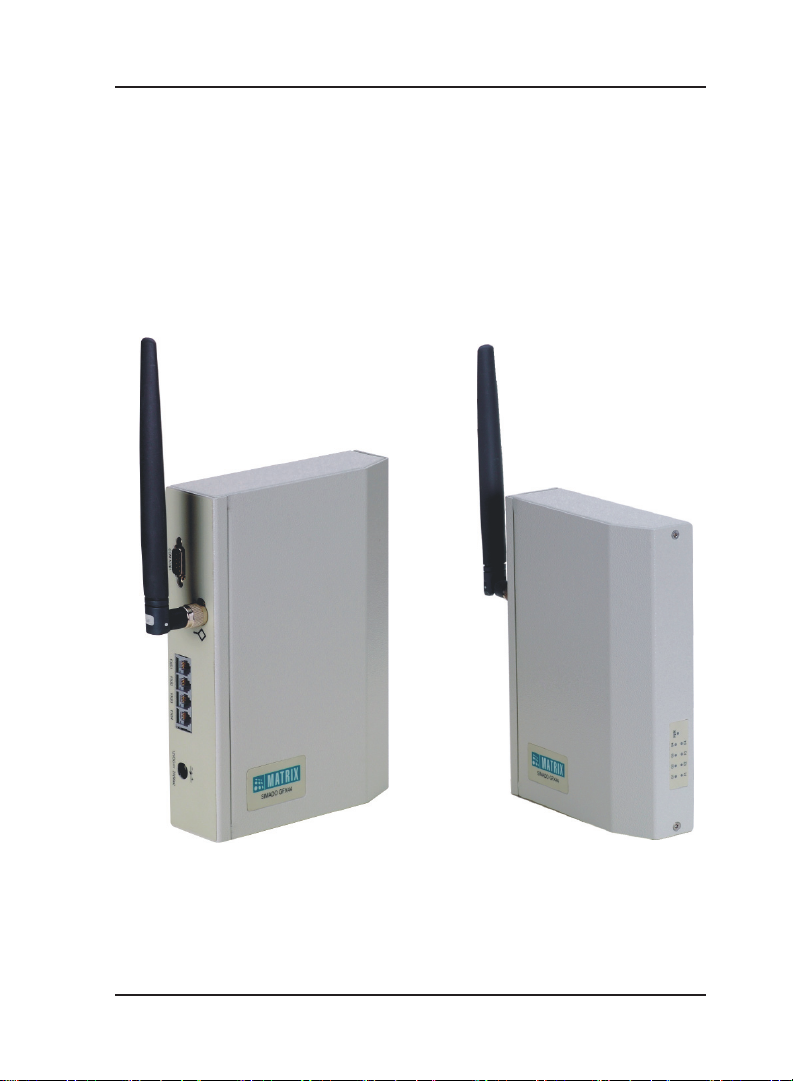
phones, four SIM cards and one Antenna. The product looks as
shown below:
Left Side Panel Ports Right Side Panel LEDs
This chapter gets the GFX44 up and running quickly. The details
which we have skipped to make this brief can be found elsewhere in
the manual. It is divided into four sections:
• Getting to know the GFX44.
17SIMADO GFX44 V1 System Manual
Page 18
Matrix
• Instruction for connecting interfaces.
• Basic steps for configuration.
• Making phone calls.
Getting to know the GFX44
This Matrix GFX44 has some ports located on the rear panel and
LED’s with SIM card slots located on the right side panel, as shown
below:
• Left Side Panel Ports.
• Right Side Panel LEDs.
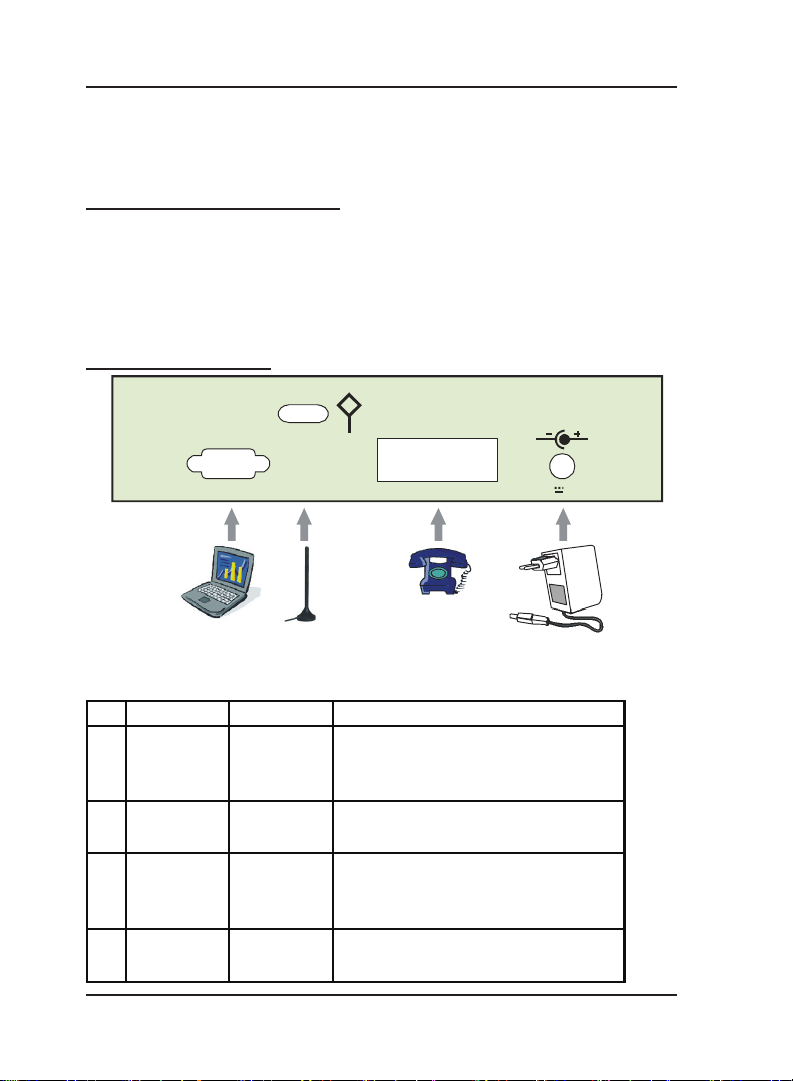
Left Side Panel Ports
ANTENNA
COM 10101
(1) (2) (3) (4)
FXS1 FXS2 FXS3 FXS4
12VDC 2A(Max)
Various interfaces for connection are as mentioned below. The port
number index is given as per the picture shown:
Sr. Port Name Connector Description
To download the windows based
1 COM 9-Pin D-sub
software for working of the gateway
and getting reports output.
2 Antenna SMA
To connect antenna, provided with
GFX44 unit.
To connect analog telephone, one
3FXS RJ11
at each port. Four ports are
provided.
4 Power DC Jack
Through the power adaptor 9-14
Volt.
18 SIMADO GFX44 V1 System Manual
Page 19
Matrix
Right Side Panel LED’s:
It consists of LEDs for indication of status of ports and GSM
modules, as shown below:
• Port LED’s.
• GSM Module LED’s.
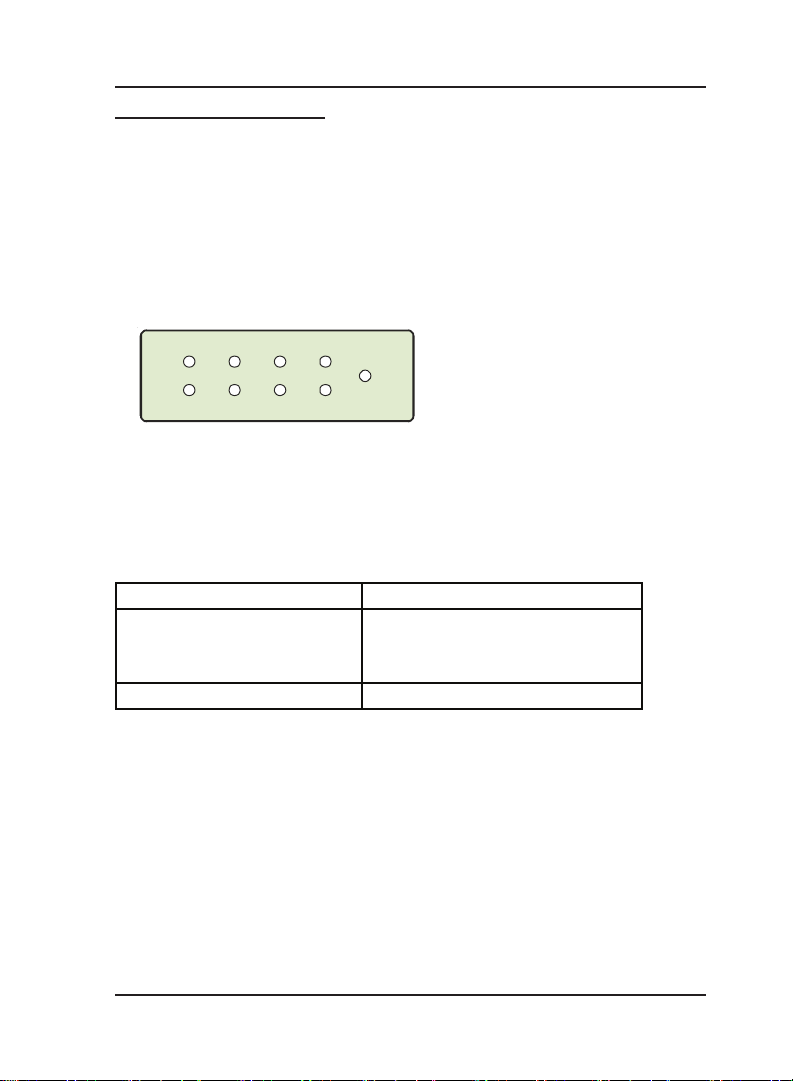
Port LED’s:
The gateway supports 8-port LED’s as mentioned below:
• FXS Port LED’s = 4.
• GSM Port LED’s = 4.
G1 G2 G3 G4
F1 F2 F3 F4
PWR
Port LED’s are not used only for the status indication but also used
to signify following events:
• Reset Sequence.
• Normal Functioning and Fault Events.
Reset Sequence:
Time Response
At Power ON All LEDs glow Red for 500ms.
This period depends on type of
GSM module.
Reset (Initialization) Cyc le Takes 1-2 minutes
Normal functioning of the System:
On completion of the reset sequence, the card starts
communicating with the network.
• The card checks for the events during this cycle and the error is
displayed by the LEDs.
• For example, if SIM PIN faulty/Network Absent is detected, it
indicates that, GSM module could not log on to the network.
• After the reset cycle is completed, the ports are under different
states. There may be a ring event on the port or may be an
Outgoing call event on the port. Accordingly, respective LED is
glowing. The Gateway supports following LED Indications during
19SIMADO GFX44 V1 System Manual
Page 20

Matrix
pp
)
f
Normal condition:
Event Color
Port Disable -- LED Off
Port Idle -- LED Off
Port Off hook RED Continuous ON
Ring Event GREEN
Port Active
Speech GREEN Continuous ON
GSM Initialization
(Note 2)
PUK required ORANGE
SIM PIN faulty ORANGE
SIM Absent ORANGE
Network absent-GSM
module could not establish
communication with the
Network
(Note1)
RED
ORANGE
ORANGE 200 ms On-2800 ms Off (1 Blink)
Cadence in ms (1 cadence is of
rox. 3000ms
a
400ms On-200ms Off-400ms On2000ms Of
68ms On-68ms Off (This is to
simulate the pulse dialing
cadence.)
200ms On-200ms Off-200ms On200ms Off-200ms On-200ms Off200msOn-200ms Off-200ms On1200ms Off (5 Blinks)
200ms On-200ms Off-200ms On200ms Off-200ms On-200ms Off200msOn-1600ms Off (4 Blinks)
200ms On-200ms Off-200ms On200ms Off-200ms On-2000ms Off
(3 Blinks)
200ms On-200ms Off-200ms On2400ms Off (2 Blinks)
Note1: From going off hook till receiving either speech event or
disconnect event.
Note2: GSM modules take some to reset at power ON. After
completion of initialization cycle, if module does not get
initialize, it remains in initializing state and failure of GSM
module will not be detected.
Port Disabling:
In case if any Port is disabled, system supports following Cadence
for the concerned LEDs:
20 SIMADO GFX44 V1 System Manual
Page 21

Matrix
Event Color
Port Disabled GREEN 200 200 200 5000
ON OFF ON OFF
Cadence
• When the user enables any port, the indications are as per the
Table of ‘Normal Conditions’.
• When the use goes OFF-Hook, from the port, which is ‘disabled’
he will get ‘Error Tone’.
GSM Module LED’s:
The gateway supports 4-GSM module LED’s and 4-slots for SIM
card as mentioned below:
• GSM Module LEDs = 4.
• SIM Holder Slots = 4.
Module LED’s indicate status of the ‘GSM Module’ for registration to
the network if signal strength is sufficient. Valid SIM card is inserted
in the SIM holder to get registered with the network. The module
LED blinking sequence is explained as shown below:
Module status LED activity
In OFF mode OFF
ON mode, not registered to network Permanently ON
ON mode, registered to network,
communication inactive
Slow flashing
ON mode, registered to network,
communication in progress
Quick flashing
Instruction for Connecting Interfaces:
This section describes the instructions on how to connect the
Matrix GFX44 to GSM network and analog telephones.
• Unpack the box. Get satisfied with the contents and the condition
of the parts. Refer to Packing List. If parts are OK, proceed with
connections as mentioned below.
• Place GFX44 in a safe and convenient location where cables for
phone system and power are accessible. For this, mechanical
drawing can be used as a reference which is provided at the end
of the chapter.
21SIMADO GFX44 V1 System Manual
Page 22
Matrix
• Connect one end of telephone cable, RJ11 to FXS1 port and the
other end to analog telephone. Place the telephone at maximum
possible distance from the GFX44 unit. Likewise connect other
telephones to FXS2 to FXS4 port as per your requirement.
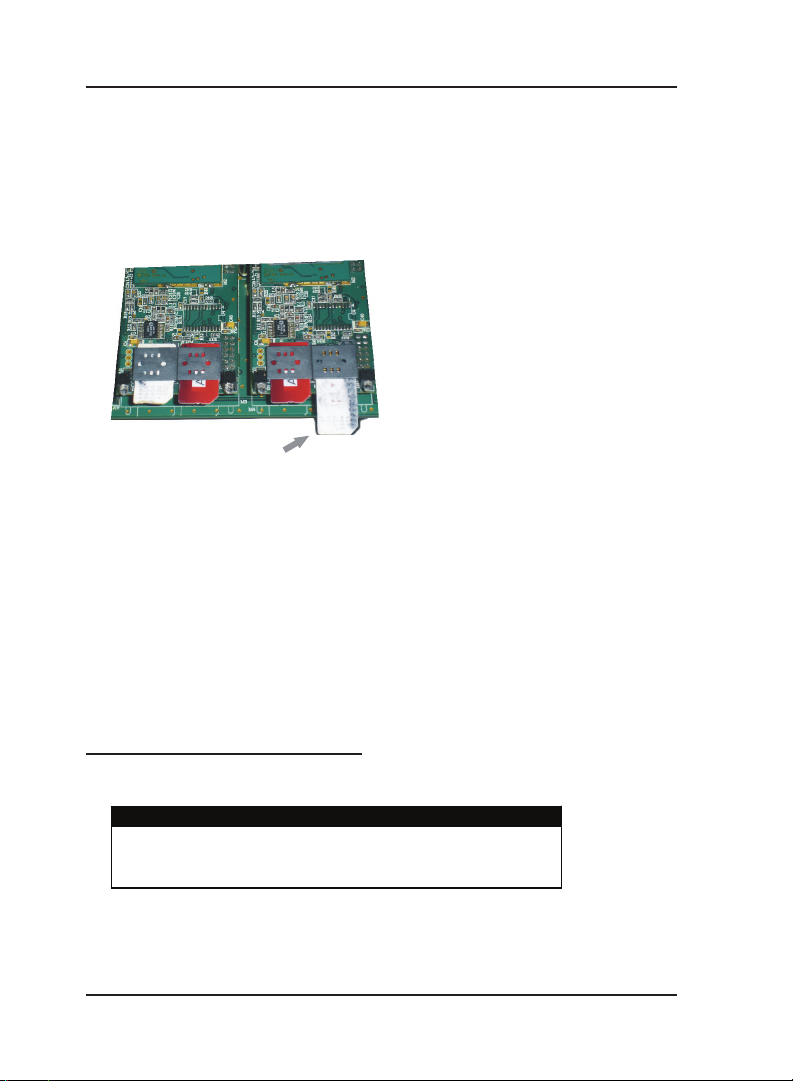
• Insert a SIM card in the SIM holder at GSM1 port as shown
below.
Similarly insert SIM cards at other GSM ports.
Place SIM Card with
contact facing down
• Connect one Antenna which is supplied with the product to the
antenna connector as shown in figure. Gently tighten the
connection with suitable spanner. If Antenna is ‘with cable’ type,
connect the cable and place Antenna at suitable location.
• Connect the PC to COM of the GFX44, using the cable supplied
with the product.
• Check the voltage from the power point from where the supply is
to be accessed. It should be between the 90-265VAC, 47-63Hz.
Connect one end of the power cord to the AC Mains socket and
other end to the ‘Mains’ of the GFX44.
Basic Steps for Configuration
• Switch ON the GFX44 by ‘ON-OFF’ switch and wait for LED; to
attain normal state.
ABSOLUTELY NEEDED !
• Ensure network availability
• Make sure that your GSM module is registered
with GSM network
• Default the gateway by dialing 292-4321-#*. You can now call any
number from the GSM port.
• You can use the gateway features by two ways:
22 SIMADO GFX44 V1 System Manual
Page 23

Matrix
• Programming through Windows based software.
• Programming through analog phone.
• For programming through Windows based software, install the
CD provided with the product, to your PC. Click on Start
Programs Æ Matrix Æ SIMADO GFX44 Jeeves V1R2. Enter the
‘Password’, ‘1234’ to start programming. Refer chapter ‘
manual.
• For operating GFX44, using commands, enter the programming
mode by; Lift the handset
programming tone.
• For enjoying benefits of many useful features of the gateway,
program the feature using specific command mentioned in the
manual.
• When programming is complete, dial 00-#*, during the
programming tone or just go ON-Hook, to exit the programming
mode.
• During programming, if you find there is some network problem,
then you can restart the gateway by dialing 291-#*. Wait till the
system is resetting.
• If any feature, need to be subscribed from the GSM service
provider, contact your service provider, before programming the
feature. For example, ‘Emergency Number Dialing’ is enabled by
default, from the service provider.
• If you need to reprogram the system you can get back to factory
defaults by dialing 292-4321-#*.
• After reset and network registration, your GFX44 is ready to call
any number from GSM port.
Æ Dial Tone Æ Dial *19-1234. You get
Æ
Jeeves’ in
Making Phone Call:
• Lift the handset; you get the dial tone of GFX44.
• Dial the mobile/telephone number.
• If at least one SIM card is inserted and the gateway is
programmed as factory defaults, then the number will be dialed
out, from the GSM port and you get Ring Back Tone (RBT).
• If the called party attends the call, speech is established.
23SIMADO GFX44 V1 System Manual
Page 24
Matrix
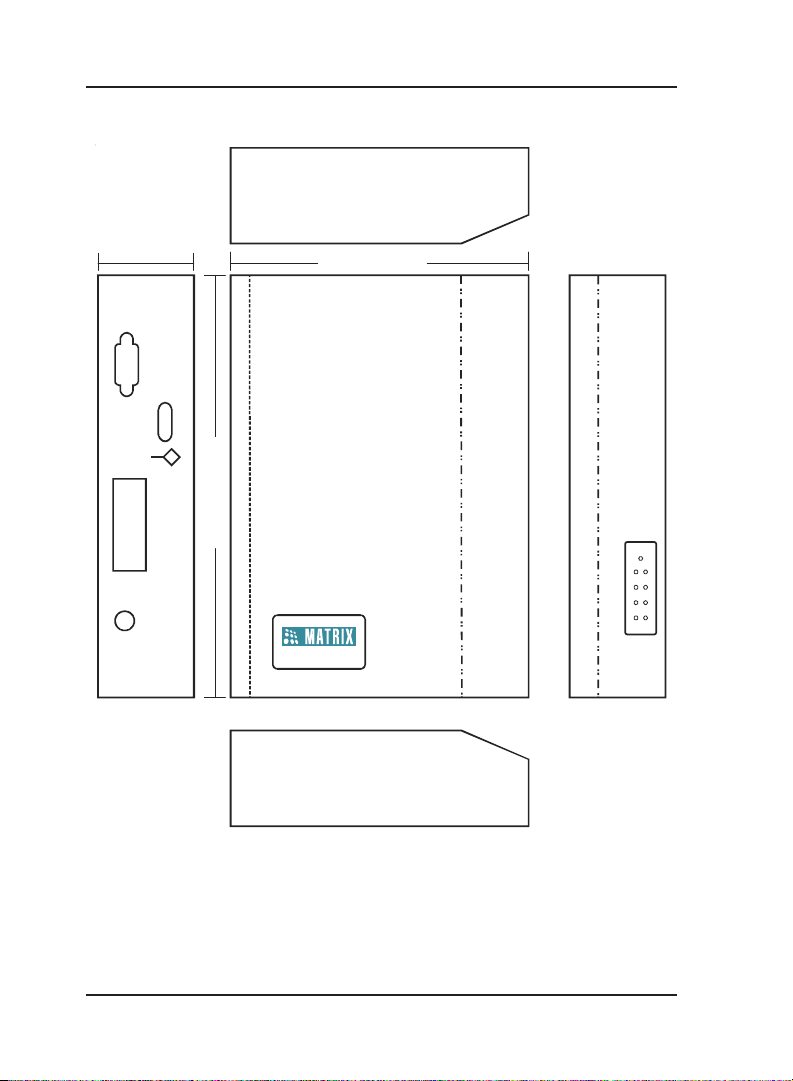
Mechanical Dimension of SIMADO GFX44
50 millimeters
(1.97 Inch)
155 millimeters (6.10 Inch)
220 millimet ers (8.66 Inch)
SIMADO GF X44
=X=X=
24 SIMADO GFX44 V1 System Manual
Page 25

Section 2: Features and Facilities
Page 26

Page 27

Matrix
Allowed and Denied Lists
What’s this?
• The SIMADO GFX44, supports a feature by which the system
can prevent selected numbers to be dialed out, known as Allowed
and Denied Lists. For this, the feature should be enabled for the
port.
• Allowed and Denied Number Lists are a list of group of number
strings. When the number is dialed out, the system compares
the dialed-number string with the number strings in the Allowed
and Denied Number Lists. If the number matches with the denied
Number List, caller will get ‘Error Tone’.
How it works?
• This feature keeps a check on the number string dialed through
the port.
• If the dialed-number string matches with any of the number
strings in the Allowed Number list assigned to the port, the
number is processed further.
• If the dialed-number string matches with any of the number
strings in the Denied Number list assigned to the port, the
number is not processed further.
• If the dialed-number string matches with any of the number
strings in both the number list i.e. Allowed Number List as well as
Denied Number List assigned to the port, the number is
processed further.
• If the dialed-number string does not match any of number strings
in either Allowed Number List or Denied Number List assigned to
the port, the number is processed further.
• The logic is applied to the port at which the call is originated.
• Each port (Mobile and FXS) is assigned two number lists. One
list is for numbers to be denied and other for the numbers to be
allowed.
• The system supports 16 Number Lists. Each Number list has 24
entries. Each entry can accommodate 16 digits.
Number List looks as given below:
27SIMADO GFX44 V1 System Manual
Page 28

Matrix
Loc. Index
No. List Index
01
:
16
01 02 ….. 24
Number String
(16 digits)
How to program?
Step 1: Program to assign an allowed number list to a FXS port
using command 111.
Step 2: Program to assign a denied number list to a FXS port using
command 112.
Step 3: Program to assign an allowed number list to a Mobile Port
using command 113.
Step 4: Program to assign a denied number list to a Mobile Port
using command 114.
Step 5: Enable/disable allowed/denied logic on FXS port using
command 115.
Step 6: Enable/Disable allowed/denied logic on Mobile port using
command 116.
Step 1
Use following command to assign an allowed number list to a FXS
port:
111-FXS Port-Number List-#*
Where,
FXS Port is from 1 to 4.
Number List is from 01 to 16.
By default, Number List 01 is assigned to the FXS port.
Use the following command to assign allowed number list to all the
FXS ports:
111-*-Number List-#*
Step 2
Use following command to assign a denied number list to a FXS
port:
28 SIMADO GFX44 V1 System Manual
Page 29

Matrix
112-FXS Port-Number List-#*
Where,
FXS Port is from 1 to 4.
Number List is from 01 to 16.
By default, Number List 06 is assigned to the FXS port.
Use the following command to assign denied number list to all the
FXS ports:
112-*-Number List-#*
Step 3
Use following command to assign an allowed number list to a
mobile port:
113-Mobile Port-Number List-#*
Where,
Mobile Port is from 1 to 4.
Number List is from 01 to 16.
By default, Number List 01 is assigned to the Mobile Port.
Use following command to assign a allowed number list to all the
mobile ports:
113-*-Number List-#*
Step 4
Use following command to assign a denied number list to a mobile
port:
114-Mobile Port-Number List-#*
Where,
Mobile Port is from 1 to 4.
Number List is from 01 to 16.
By default, Number List 06 is assigned to the Mobile Port.
Use following command to assign a denied number list to all the
mobile ports:
114-*-Number List-#*
Step 5
Use following command to enable/disable allowed/denied logic on
FXS port:
29SIMADO GFX44 V1 System Manual
Page 30

Matrix
115-FXS Port-Code-#*
Where,
FXS Port is from 1 to 4.
Code Meaning
0 Disable
1 Enable
By default, Allowed/Denied logic on all FXS ports is enable.
Use following command to enable/disable allowed/denied logic on
all the FXS ports:
115-*-Code-#*
Step 6
Use following command to enable/disable allowed/denied logic on
Mobile port:
116-Mobile Port-Code-#*
Where,
Mobile Port is from 1 to 4.
Code Meaning
0 Disable
1 Enable
By default, Allowed/Denied logic on all Mobile ports is enable.
Use following command to enable/disable allowed/denied logic on
all the Mobile ports:
116-*-Code-#*
Example:
Program the gateway such that a phone user at FXS1 port is not
allowed to dial, some mobile numbers:
102-08-#* (Clear number list 08)
101-08-01-98-#* (Mobile Number 98 programmed in list 08)
101-08-02-93-#* (Mobile Number 93 programmed in list 08)
101-08-03-94-#* (Mobile Number 94 programmed in list 08)
112-1-08-#* (Assign list 08 as denied list to FXS1)
102-06-#* (Clear No. list 06, assigned to FXS1, by default)
102-01-#* (Clear No. list 01, assigned to FXS1, by default)
30 SIMADO GFX44 V1 System Manual
Page 31

Relevant Topic:
1.
Number Lists 96
Matrix
=X=X=
31SIMADO GFX44 V1 System Manual
Page 32

Matrix
Answer Signaling on FXS Port
What’s this?
• As general application, telecom equipment like PCO machine is
connected to the FXS port of the system. Now whenever the
called party (remote party) answers i.e. goes off-hook it is
required to inform the FXS port so that the PCO machine can
consider the call as matured and start billing. In absence of this
signal, the call is never considered as matured and hence no
billing will be generated.
• To avoid such problems the system supports ‘Answer Signaling’.
It is a signal which will be generated on FXS port, which indicates
that the called party has answered and the call is matured. This
helps in accurate billing, avoids billing of unanswered and
unsuccessful call attempts.
• During an OG call from FXS to any other port FXO/Mobile,
whenever called party answers, they provide an ‘answer signal’
which can be generated on the FXS port to support any Billing
equipment or PCO machine or PBX if connected to the FXS port
for considering the call to be matured.
• It is generated in the form of:
• None
• Polarity (Battery) Reversal
How it works?
• Answer Signaling is applicable for OG call made from FXS.
• When call is made from FXS port to any other port, system will
wait for the call to get matured.
• When the call gets matured, the system will check the Answer
Signal programmed for the FXS. The options are as explained
below:
• None: If this option is set, the system will not generate any
answer signaling on the FXS port.
• Battery Reversal: The Battery polarity of the FXS port will get
reversed. For example, if the battery polarity of the FXS port is
+ve for TIP and -ve for RING in speech condition then after call
maturity, TIP will become -ve and Ring will become +ve.
32 SIMADO GFX44 V1 System Manual
Page 33

Matrix
g
How to program?
Use following command to program the signal to be generated as
Answer Signaling on FXS port:
261-FXS Port-Answer Signal-#*
Where,
FXS Port is from 1 to 4
Answer Signal Meanin
0 None
1 Polarity (Battery) Reversal
By default, Polarity Reversal for all ports.
Use following command to program the signal to be generated as
Answer Signaling on all FXS port:
261-*-Answer Signal-#*
Related Topic:
1. Disconnect Signaling on FXS Port 64
=X=X=
33SIMADO GFX44 V1 System Manual
Page 34

Matrix
Answer-Number Based Routing
What’s this?
• SIMADO GFX44, has the facility to initiate the call from a specific
port based on the number string dialed. This is called AnswerNumber Based Routing.
• For this, a separate routing group is assigned for a specific
number string and the Member of the group will be the ports for
dialing the Number.
How it works?
• The routing group to be used for placing the call is determined
from the number dialed.
• This logic is used when routing type is programmed as AnswerNumber Based.
• The dialed-number string is compared with the dialed-number
string table and if match is found then the call is routed on the
routing group assigned to that number string.
• If matching entry is not found in the dialed-number string table
then the call is routed with routing type defined as ‘answer-fixed’.
Please refer the topic ‘Routing Type’ for more details.
• This routing group can be formed such that number can be dialed
out from the port, for which call cost will be minimum. Different
prefix can be programmed for the required numbers to be dialed
out from the port which will cost minimum compared to other
ports in the routing group assigned to that prefix number string.
• Thus Least Cost Routing (LCR) can be implemented by suitable
programming of the table.
• The dialed-number string table contains maximum 250 entries.
How to program?
Use following command to program the prefix number string in
dialed number string table:
151-Index-Prefix Number String-#*
Where,
Index is from 001 to 250 of the ‘Dialed Number String Table’.
Prefix Number String is of maximum 8 digits.
By default, the dialed number prefix table is Blank.
34 SIMADO GFX44 V1 System Manual
Page 35

Matrix
Use following command to clear the dialed number string
programmed at the Index:
151-Index-#*
Where,
Index is from 001 to 250.
Use following command to clear the prefix table:
151-*-#*
Use following command to program the Routing Group for the
dialed-number string table:
152-Index-Routing Group-#*
Where,
Index is from 001 to 250.
Routing Group is from 1 to 4.
By default, Routing Group is 4.
Use following command to default the entire dialed-number string
table:
160-#*
Default dialed-number string table is given below:
Index Prefix Number String Routing Group
001 Blank (8 digit Max.) 4
002 Blank (8 digit Max.) 4
003 Blank (8 digit Max.) 4
:
250 Blank (8 digit Max.) 4
Blank (8 digit Max.) 4
Example:
• Call is to be made on the SP’s number of City A (022-301220)
using routing group 1, then the dialed number string is
programmed as (0223) and routing group number is programmed
as 2 at index 01.
• If local calls made to City B’s number starting with 95792....
using routing group number 2, then the dialed number string is
35SIMADO GFX44 V1 System Manual
Page 36

Matrix
programmed as (95792) and routing group number is programmed
as 2 at index 2.
• If all international calls need to be routed through routing group 3,
the dialed number string should be programmed as (00) and
routing group number is programmed as 3 at index 3. The table
may look as given below:
Index Prefix Numbe r String Routing Group
001 0223 1
002 95792 2
003 00 3
Commands:
160-#* (Default entire table)
151-001-0223-#* (Program 0223 at index 1)
151-002-95792-#* (Program 95792 at index 2)
151-003-00-#* (Program 001 at index 3)
152-001-1-#* (Program a routing group 1 at index 1)
152-002-2-#* (Program a routing group 2 at index 2)
152-003-3-#* (Program a routing group 3 at index 3)
202-1-1-#* (Assign selection a first free to routing group 1)
202-2-2-#* (Assign selection a first free to routing group 2)
202-3-3-#* (Assign selection a first free to routing group 3)
Relevant Topics:
1. Routing Group 110
2. Routing Type 116
=X=X=
36 SIMADO GFX44 V1 System Manual
Page 37

Matrix
Automatic Number Translation
What’s this?
• This feature translates the number received from the Call
processing logic to be dialed to a number compatible to the port
on which it is to be dialed out by the Gateway.
• For e.g. suppose the Gateway is so programmed that all the
calls made within the telecom circle (Commonly called 95 calls)
are routed through the Mobile port. Now when you make a call to
a number, say ‘952668263172’, the Call Handling logic of the
Gateway determines a Mobile port on which this number should
be dialed. But this number string is invalid for the GSM network.
• Hence the logic is required to translate this dialed number to a
valid number before it is dialed by the system. Thus the dialed
number string will be translated to ‘912668263172’ by using this
feature, called Automatic Number Translation (ANT).
How it works?
In above example, suppose the caller dials 952668263172 then
number 912668263172 should be dialed out by the system. Then
two number list can be programmed as shown below.
The dialed number list:
Index Dialed String/Substring
01 95
02
Substitute number list:
Index Substitute String
01 91
02
These two lists are assigned to a port from where, the number is to
be dialed out. User can use ANT for dialing international number
also. For this ‘+’ sign has to be programmed in the substitute
number list. It can be done by entering ‘#8’ from the telephone
keypad. For example, +91266 can be entered by string #891266.
37SIMADO GFX44 V1 System Manual
Page 38

Matrix
How to program?
Step 1: Assign a dialed-number list to a FXS Port using command
121.
Step 2: Assign a substitute number list to a FXS Port using
command 122.
Step 3: Assign a dialed-number list to a Mobile port using
command 123.
Step 4: Assign a substitute number string to a Mobile port using
command 124.
Step 5: Enable/disable Automatic Number Translation logic on FXS
port using command 125.
Step 6: Enable/Disable Automatic Number Translation logic on
Mobile port using command 126.
Step 1
Use following command to assign a dialed number list to a FXS
port:
121-FXS Port-Number List-#*
Where,
FXS Port is from 1 to 4.
Number List is from 01 to 16.
By default, Number List 06 is assigned to the FXS Port.
Use following command to assign a dialed number list to all FXS
ports:
121-*-Number List-#*
Step 2
Use following command to assign a Substitute number list to a FXS
port:
122-FXS Port-Number List-#*
Where,
FXS Port is from 1 to 4.
Number List is from 01 to 16.
By default, Number List 06 is assigned to the FXS Port.
Use following command to assign a Substitute number list to all
FXS ports:
122-*-Number List-#*
38 SIMADO GFX44 V1 System Manual
Page 39

Matrix
Step 3
Use following command to assign a dialed number list to a Mobile
port:
123-Mobile Port-Number List-#*
Where,
Mobile Port is from 1 to 4.
Number List is from 01 to 16.
By default, Number List 06 is assigned to the Mobile Port.
Use following command to assign a dialed number list to all Mobile
ports:
123-*-Number List-#*
Step 4
Use following command to assign a substitute number list to a
Mobile port:
124-Mobile Port-Number List-#*
Where,
Mobile Port is from 1 to 4.
Number List is from 01 to 16.
By default, Number List 06 is assigned to the Mobile Port.
Use following command to assign a substitute number list to all
Mobile ports:
124-*-Number List-#*
Step 5
Use following command to enable/disable automatic number
translation logic on FXS port:
125-FXS Port-Code-#*
Where,
FXS Port is from 1 to 4.
Code Meaning
0 Disable
1 Enable
By default, Automatic Number Translation logic on all FXS
ports is enable.
39SIMADO GFX44 V1 System Manual
Page 40

Matrix
Use following command to enable/disable automatic number
translation logic on all the FXS ports:
125-*-Code-#*
Step 6
Use following command to enable/disable automatic number
translation logic on Mobile port:
126-Mobile Port-Code-#*
Where,
Mobile Port is from 1 to 4.
Code Meaning
0 Disable
1 Enable
By default, Automatic Number Translation logic on all Mobile
ports is enable.
Use following command to enable/disable automatic number
translation logic on all the Mobile ports:
126-*-Code-#*
Example:
For the example explained in the beginning, ANT programming can
be done as mentioned below:
102-03-#* (Clear all location of number list 03)
102-05-#* (Clear all location of number list 05)
101-03-01-95-#* (Program 95 at index 1 of number list 03,
dialed-number list)
101-05-01-91-#* (Program 91 at index 1 of number list 05,
substitute number list)
123-1-03-#* (Assign dialed-number list to mobile port 1)
124-1-05-#* (Assign substitute number list to mobile port
1)
Relevant Topic:
1. Number Lists 96
=X=X=
40 SIMADO GFX44 V1 System Manual
Page 41

Matrix
Call Detail Recording (CDR)
What’s this?
• The SIMADO GFX44, supports a facility to store the details of
calls made through the Gateway. This is called Call Detail
Recording (CDR). User will program ‘enable’ option of filter, to
apply the filter programmed.
• Maximum 200 records can be stored in the buffer.
• The system offers facility to store the call details and even to get
the report on the COM port as per the requirement (Report
Generation).
• To get report from Jeeves, click on ‘Capture Report’ on the page
for CDR and download the file from option displayed by windows.
How it works?
• A call is stored when the call gets over.
• Calling party number and source port is stored when a call
originates on a FXS/Mobile port.
Each record has following parameters or fields:
• Serial Number
• S-Port (FXS, Mobile)
• D-Port (FXS, Mobile)
• Called Number (Maximum 16 digits)
• Calling Number (Maximum 16 digits)
• Date (DD-MM-YYYY)
• Time (HH:MM:SS)
• Duration (four digits)
Where,
S-Port = Source Port
D-Port = Destination Port
Filter Commands:
Various filters can be used to generate a report. These commands
enable the user to select the type of call reports generated. It is
possible to program the following filters.
41SIMADO GFX44 V1 System Manual
Page 42

Matrix
Filter Command
To set filter to print all calls terminated
on FXS
To set filter to print all calls terminated
on Mobile
To set filter to print all calls originated
from FXS
To set filter to print all calls originated
from Mobile
To set filter to print all calls from-to Date
To set filter to print all calls between
time
To set filter to print all calls
Party Number)
list
To set filter to print all calls
Party Number)
list
To set filter to print all calls with call
duration more than specified
To set default filters
matching the Number
matching the Number
(Called
(Calling
132-FXS Port-FXS Port-#*
133-Mobile Port-Mobile
Port-#*
134-FXS Port-FXS Port-#*
135-Mobile Port-Mobile
Port-#*
136-DD-MM-YYYY-DDMM-YYYY-#*
137-HH-MM-HH-MM-#*
138-Number List-#*
(Default = 01)
139-Number List-#*
(Default = 01)
140-Seconds-#* (Default
= 001)
149-#*
Where,
FXS Port is from 1 to 4.
Mobile Port is from 1 to 4.
DD is from 01 to 31.
MM is from 01 to 12.
YYYY is from 2006 to 2099.
HH is from 00 to 23.
MM is from 00 to 59.
Number List is from 01 to 16.
Seconds is from 001 to 999.
Default Filters for CDR are All FXS Ports, All GSM Ports, Date from
01-01-2006 to Current date, Time 00:00 to 23:59, Caller Number List
01, Called Number List 01, Duration more than 001 sec.
By default, CDR report are Blank.
42 SIMADO GFX44 V1 System Manual
Page 43

Matrix
How to program?
Step 1: Program to start/stop the CDR report using the command
131.
Step 2: Program to clear the CDR buffer using the command 150.
Step 3: Program to enable/disable the filter setting for calls
terminated on FXS port using the command 141.
Step 4: Program to enable/disable the filter setting for calls
terminated on mobile port using the command 142.
Step 5: Program to enable/disable the filter setting for calls
originated from FXS port using the command 143.
Step 6: Program to enable/disable the filter setting for calls
originated from mobile port using the command 144.
Step 1
Use following command to start/stop the CDR report:
131-Code-#*
Where,
Code Meaning
0 Abort Report
1 Start Report
Step 2
Use following command to clear the CDR buffer:
150-Reverse SE Password-#*
Step 3
Use following command to enable/disable the filter setting for calls
terminated on FXS port:
141-Code-#*
Where,
Code Meaning
0 Disable
1 Enable
By default, Filter setting for calls terminated on FXS port is
enable.
43SIMADO GFX44 V1 System Manual
Page 44

Matrix
Step 4
Use following command to enable/disable the filter setting for calls
terminated on mobile port:
142-Code-#*
Where,
Code Meaning
0 Disable
1 Enable
By default, Filter setting for calls terminated on Mobile port is
enable.
Step 5
Use following command to enable/disable the filter setting for calls
originated from FXS port:
143-Code-#*
Where,
Code Meaning
0 Disable
1 Enable
By default, Filter setting for calls originated on FXS port is
enable.
Step 6
Use following command to enable/disable the filter setting for calls
originated from mobile port:
144-Code-#*
Where,
Code Meaning
0 Disable
1 Enable
By default, Filter setting for calls originated on Mobile port is
enable.
• Called party number and Destination Port can be found when a
call terminates on a port.
44 SIMADO GFX44 V1 System Manual
Page 45

Matrix
Example:
A Call originates on an FXS port (FXS port is source port) having
routing type = Fixed and Mobile port is the destination port found as
per programming. Then in such case, report details will be as below:
• The source port = FXS port.
• The calling party number = blank.
• The destination port = Mobile port.
• The called party number = Number dialed by the FXS port. The
call is considered matured after getting the connect message
from Mobile Port.
• When call routing type is “Answer-Number Based” gateway
immediately answers the call coming on Mobile port and caller
will get dial tone of the Gateway. First Digit Wait Timer is loaded
on Mobile port and the system starts collecting digits dialed out
by the caller. If caller doesn’t dial any digit and first digit wait
timer expires, and Fixed Dialing is disabled, then call is rejected
and the caller gets the Error Tone. This type of call is not stored
in CDR.
• If caller dials any digit during First Digit Wait Timer then, Inter
Digit Wait Timer is loaded on the Mobile port and the digits
collected which are dialed out through Mobile port. In such case,
the Dialed Number will be the “Called Party Number” for the CDR
report.
Important Points:
• You can get CDR report with header and footer evenif CDR buffer
empty.
• If buffer is empty you will get message ‘CDR Buffer Empty!’.
• But if report is not found, you will get alert ‘No records matching
filter criteria found’.
• CDR records will be stored in the system permanently, only after
5 minutes (approx.). Do not restart the system before saving.
Relevant Topics:
1.
Communication Port 54
2. Allowed and Denied Lists 27
3. Routing Type 116
4. Jeeves 82
45SIMADO GFX44 V1 System Manual
Page 46

Matrix
R
CALL DETAIL RECORDS REPORT as on 01-Jul-2007 at 09:53:5 6
------------------------- ----------------------- ------------------------ -------Source Port Destina tion Port NUM LIST : C alled - 02 Calling - 02
FXS : 1 To 4 FXS : 1 To 4 DATE : 01 -Jul-2007 To 01-Jul-200 7
MOB : 1 To 4 MOB : 1 To 4 DUR(sec) : 1 TIME : 00:00 To 23 :59
------------------------- ----------------------- ------------------------ -------SR. S-PORT D-PORT CALLED NUMBER CALLING NUMBER DATE TIME DUR
------------------------- ----------------------- ------------------------ ------- 1 FXS 2 FXS 4 01-Jul- 2007 09:27:53 6
2 FXS 4 FXS 2 01-Jul- 2007 09:28:32 3
3 FXS 2 MOB 2 9898091380 01-Jul-2007 09:39:59 12
4 FXS 2 MOB 2 9824981745 01-Jul-2007 09:49:43 3
5 FXS 2 FXS 4 01-Jul- 2007 09:27:53 6
6 FXS 4 FXS 2 01-Jul- 2007 09:28:32 3
7 FXS 2 MOB 2 9898091380 01-Jul-2007 09:39:59 12
8 FXS 2 MOB 2 9824981745 01-Jul-2007 09:49:43 3
------------------------- ----------------------- ------------------------ -------Matrix SIMADO GFX44 V1
3 Page: 01
=X=X=
46 SIMADO GFX44 V1 System Manual
Page 47

Matrix
Call Proceeding Tone
What’s this?
Some sort of signaling tone is required when a call is terminated on
Mobile port to inform the user that call is established. It is done with
special Call Proceeding Tone and can be generated by network or
gateway.
• This feature is used to avoid silence received from the GSM
network while making a call.
• When the caller is calling from a Mobile instrument, he
understands the silence but when the call is routed through the
gateway, he might hang up due to silence. To take care of this
point, this feature is used which is programmable.
How it Works?
For Mobile Port
• When the call is terminated on (routed to) the mobile port, the
originating port can be connected to a tone generator (feature
tone) or to the GSM network tones.
• If the originating port is connected to the GSM network,
immediately on end of dialing, the caller can listen to the tone
received from the GSM network.
• Whereas if the caller is connected to the feature tone generator,
the caller gets feature tone (which nearly simulates call routing
tone of the PSTN network) till ‘Call Progress Message’ is
received from the GSM network.
• On receipt of first Call Progress Message, the originating port is
connected to the terminating port.
How to program?
Use following command to set Call Proceeding Tone for mobile port:
277-CPT Type-#*
Where,
CPT Type Meaning
1 Feature Tone (SIMADO Tone)
2 GSM Network Tone
By default, Call Proceeding Tone is ‘2’.
47SIMADO GFX44 V1 System Manual
Page 48

Matrix
Relevant Topic:
1.
Call Progress Tone Generation 49
=X=X=
48 SIMADO GFX44 V1 System Manual
Page 49

Matrix
Call Progress Tone Generation (CPTG)
What’s this?
• The SIMADO GFX44 supports generation of different types of
tones to indicate the response for various events while
establishing a call. These tones are called Call Progress Tone
Generation (CPTG). The tones are generated in response to
dialing of codes and commands. Various country and region have
the specific standard of types of tones.
• GFX44 supports country specific tones. For this, user has to just
select the country and program the code for the country.
• The system will automatically generate/play the tones specific for
the selected country. Refer table at end of the chapter.
• GFX44 supports following Call Progress Tones:
• Dial Tone.
• Ring Back Tone.
• Busy Tone.
• Error Tone.
• Confirmation Tone.
• Programming Tone or Beep Tone.
• CCWT.
Dial Tone
This tone is heard when user lifts the handset, it is also given when
user tries to press flash.
• Dial tone stays for time of first digit wait timer for the port.
Ring Back Tone
When the user dials a number and if that number is free, he will get
the ring back tone. It indicates that called party’s telephone number
is reached.
• Ring Back Tone continues for 90 seconds.
Busy Tone
When a call is made by system and the called party is OFF-Hook
or busy with another call, the caller gets busy tone.
• Busy tone stays for 7 seconds.
49SIMADO GFX44 V1 System Manual
Page 50

Matrix
Error Tone
This is given when the user performs some invalid operation or some
denied access. For example, this tone is given after dial tone, if the
user does not dial anything till the end of dial tone duration. In the
feature access mode or when this tone is given after the dial tone,
this tone remains till the user again goes ON-Hook.
• Error tone stays for 7 seconds.
Confirmation Tone
This tone is given as continuous, fast beeps to indicate that the
system has successfully executed a feature command/
programming command issued by the user. This is also called the
Programming Confirmation Tone.
• Confirmation tone stays for 5 seconds.
Programming Tone or Beep Tone
When user enters the programming mode or enters some digits of
command, this tone is heard. It indicates that the system is
responding to programming activity. Programming tone remains
continuously till you go ON-Hook or dial a command.
CCWT
When an incoming call arrives while the user is connected to
another party, this tone is played by the system.
Use the following command to program the CPTG for a country:
281-Code-#*
Where,
50 SIMADO GFX44 V1 System Manual
Page 51

Matrix
CCWT Error ToneRing Back Tone Busy Tone Confirmation Tone
400 0.1on 0.1off 400 0.1on 0.9off 400 0.3on 6.0o ff
400 0.1on 0.1off 400 0.1on 0.9off 400 0.3on 6.0o ff
400 0.1on 0.1off 400 0.1on 0.9off 400 0.3on 6.0o ff
0.25on
0.25off
0.25on
0.25off
0.25on
0.25off
425 0.2on 0.6off 400 0.1on 0.1off 400 0.1on 0.9off 400 0.3on 6.0off
0.2on 0.6off
0.2on 0.6off
425
0.67on 3.0off
1.5on 5.0off
350+440 cont 440+480 1.0on 2.0off 480+620 0.5on 0.5off 480+620 0.3on 0.2off 400 0.1on 0.1off 400 0.1 on 0.9off 400 0.3on 6.0off
16 Kenya 425 cont 425
17 Korea
0.25off
425
0.25on
0.25off
425 0.5on 0.5off 425 0.5on 0.25off 400 0.1on 0.1off 400 0.1on 0.9off 400 0.3on 6.0off
400 0.5on 0.5off 400
0.4on 0.2off
0.4on 2.0off
0.4on 0.2off
0.4on 2.0off
425 cont. 425 1.0on 4.0off 425
425 cont. 425 1.0on 4.0off 425 0.5on 0.5off 425 0.5on 0.5off 400 0.1on 0.1of f 400 0.1on 0.9off 400 0.3on 6.0off
425 cont. 425 1.0on 5.0off 425 0.5on 0.5off 450 0.33on 1.0off 400 0.1on 0.1off 400 0.1on 0.9off 400 0.3on 6.0off
19 Mexico
20 New Zeal and 400 cont. 400+450
21 Phillippines 425 cont. 425+480 1.0on 4.0off 480+620 0.5on 0.5off 480+620
22 Poland
18 Malaysia 425 cont 425
23 Portugal
Dial Tone Prog. Tone
Freq. Cadence Freq. Cadence Freq. Cadence Freq. Cadence Freq. Cadence Freq. Cadence Freq. Cadence
CountryCode
Hz second Hz second Hz second Hz s econd Hz second Hz second Hz second
0.375on
0.375on
0.4on 0.2off
400 0.1on 0.1off 400 0.1on 0.9off 400 0.3on 6.0o ff
0.375off
425
0.375off
425
0.4on 2.0off
425*25 cont. 400*25
01 Australia
400 0.1on 0.1off 400 0.1on 0.9off 400 0.3on 6.0o ff
400 0.1on 0.1off 400 0.1on 0.9off 400 0.3on 6.0o ff
400 0.1on 0.1off 400 0.1on 0.9off 400 0.3on 6.0o ff
400 0.1on 0.1off 400 0.1on 0.9off 400 0.3on 6.0o ff
400 0.1on 0.1off 400 0.1on 0.9off 400 0.3on 6.0o ff
400 0.1on 0.1off 400 0.1on 0.9off 400 0.3on 6.0o ff
400 0.1on 0.1off 400 0.1on 0.9off 400 0.3on 6.0o ff
400 0.1on 0.1off 400 0.1on 0.9off 400 0.3on 6.0o ff
400 0.1on 0.1off 400 0.1on 0.9off 400 0.3on 6.0o ff
400 0.1on 0.1off 400 0.1on 0.9off 400 0.3on 6.0o ff
0.167on
0.167off
0.25on 0.25
off
0.25on
0.25off
0.24on
0.24off
0.15on
0.15off
0.25on
0.25off
0.25on
0.25off
0.25on
0.25off
0.25on
0.25off
0.25on
425
450 0.7on 0.7off 400 0.1on 0.1off 400 0.1on 0.9off 400 0.3on 6.0off
425
400
0.25on
0.25off
0.35 on
0.36off
0.48on
0.48off
0.75on
0.75off
400
0.4on 0.2off
0.4on 2.0off
425 1.0on 4.0off 425 0.3on 0.3off 425
0.2on 0.3off
0.7on 0.8off
450 cont 450 1.0on 4.0off 450
02 Argentina 425 cont. 425 1.0on 4.0 of f 425 0.3on 0.2of f 425 0.3on 0.4off 400 0.1on 0.1off 400 0.1on 0.9off 400 0.3on 6.0off
03 Belgium 425 cont. 425 1.0on 3.0off 425 0.5on 0.5off 425
04 Brazil 425 cont. 425 1.0on 4.0 off 425
05 China
06 Egypt 425*50 cont 425*50 2.0on 1.0off 425*50 1.0on 4.0off 450 0.5on 0.5off 400 0.1on 0.1off 400 0.1on 0.9off 400 0.3on 6.0off
400*25 cont 400*25
400 cont 400 1.0on 3.0off 400 0.5on 0.5off 400
400 cont 400*20 1.0on 2.0off 400 0.5on 0.5off 400
07 France 440 cont 440 1.5on 3.5off 440 0.5on 0.5off 440
08 Germany 42 5 cont 425 1.0on 4.0off 425
09 Greece 425
10 India
11 Indonesia 425 cont. 425 1.0on 4.0off 425 0.5on 0.5off 425
12 Iran 425 cont 425 1.0on 4.0off 425 0.5on 0.5off 425
13 Israel
14 Italy 425 cont. 425 1.0on 4.0off 425 0.5on 0.5off 425 0.2on 0.2off 400 0.1on 0.1off 400 0.1 on 0.9off 400 0.3on 6.0off
15 Japan
Remarks:
• f1*f2 : ‘f1’ is modulated by ‘f2’.
• f1+f2 : Two frequencies without modulation.
=X=X=
400 0.1on 0.1off 400 0.1on 0.9off 400 0.3on 6.0o ff
400 0.1on 0.1off 400 0.1on 0.9off 400 0.3on 6.0o ff
400 0.1on 0.1off 400 0.1on 0.9off 400 0.3on 6.0o ff
400 0.1on 0.1off 400 0.1on 0.9off 400 0.3on 6.0o ff
400 0.1on 0.1off 400 0.1on 0.9off 400 0.3on 6.0o ff
400 0.1on 0.1off 400 0.1on 0.9off 400 0.3on 6.0o ff
400 0.1on 0.1off 400 0.1on 0.9off 400 0.3on 6.0o ff
400 0.1on 0.1off 400 0.1on 0.9off 400 0.3on 6.0o ff
400 0.1on 0.1off 400 0.1on 0.9off 400 0.3on 6.0o ff
0.25on
0.25off
0.25on
0.25off
0.25on
0.25off
0.25on
0.25off
0.25on
0.25off
0.2on 0.2off
0.6on 0.2off
0.4on 0.35off
0.225on
0.525off
0.4on 0.35off
0.225on
0.525off
0.25on
0.25off
425
0.75on
0.75off
425
400 0.5on 0.5off 400
0.4on 0.2off
0.4on 2.0off
0.4on 0.2off
0.4on 2.0off
425 cont. 425 1.2on 4.6off 425 0.5on 0.5off 425
24 Russia 425 cont. 425 0.8on 3.2off 4 25 0.4on 0.4off 425
25 Saudi Arabia
26 Singapore 42 5 cont. 425*24
27 South Africa 400*33 cont. 40 0*33
425 cont. 425 1.5on 3.0off 425 0.2on 0.2off 425
28 Spain
400
400
0.375on
0.375off
0.375on
0.375off
400
400
0.4on 0.2off
0.4on 2.0off
0.4on 0.2off
0.4on 2.0off
400*50 cont. 400 1.0on 4.0off 400 0.5on 0.5off 400 0.3on 0.3off 400 0.1on 0.1off 400 0.1on 0.9off 400 0.3on 6.0off
29 Thailand
350+440 cont. 400+450
30 Turkey 450 cont. 450 2.0on 4.0off 4 50 0.5on 0.5off 450
31 UAE 350+440 cont. 400+450
32 UK
33 USA/Canada 350+440 cont. 440+480 2.0on 4.0off 480+620 0.5on 0.5off 480+620
51SIMADO GFX44 V1 System Manual
Page 52

Matrix
CLIP Type on FXS Port
What’s this?
• SIMADO GFX44 provides a facility to detect the name and
number of the calling party and present it to the FXS port. This is
called Calling Line Identification and Presentation. The CLI data
can be presented on LCD of the telephone instrument.
How it works?
• The FXS Port supports any of the 3 types of signaling viz. DTMF
signaling, V.23 FSK and Bellcore FSK. Depending on the
telephone instrument type the FXS Port should be programmed.
• If Name and Number are received from GSM network, the
information is passed on to the FXS port and displayed.
• If name and number is not received from GSM network then these
are displayed as Blank.
• But if Date is not received then RTC is used by the system and
current date is displayed.
How to program?
Use following command to program the CLIP type for the FXS port:
161-FXS Port-CLIP Type-#*
Where,
FXS Port is from 1 to 4.
CLI Type Meaning
0None
1DTMF
2V.23 FSK
3 Bellcore FSK
By default, CLIP Type is ‘1’.
Use following command to program the CLIP type for all FXS ports:
161-*-CLIP Type-#*
Example:
Program FXS port 1 to read software version/revision:
52 SIMADO GFX44 V1 System Manual
Page 53

Matrix
161-1-3-#* (Bellcore FSK)
Important Point:
• This command is of help when a Telephone instrument connected
to the FXS port is capable of sensing only one type of
information.
Relevant Topics:
1.
Software Version/Revision 133
2. FXS Port Parameters 75
=X=X=
53SIMADO GFX44 V1 System Manual
Page 54

Matrix
Communication Port
What’s this?
• The SIMADO GFX44 supports a communication port which is
used for following purpose:
• To send the Call Detail Recording (CDR) to the computer.
• For programming through Jeeves.
• Based on application, a process is assigned to the COM port.
How to use it?
• Connect the communication port of the gateway with the
communication port of the computer using a crossed
communication cable. Matrix provides a crossed communication
cable with 9-pin D type female connector on both the sides.
The Jeeves software for the gateway can be installed on any
standard computer with Window and NT operating system.
COM 1 COM 1
SIMADO
GFX44
RS232C Cable
(Crossed)
Computer
Following attributes programmed in the system are fixed and not
programmable:
Baud Rate 115200bps
Stop Bit 1
Parity Mark
Data Bits 8
Flow Control None
54 SIMADO GFX44 V1 System Manual
Page 55

Matrix
Following table gives the pin out details of the COM port:
Pin No. Signal Name
1 Data Carrier Detect (DTD)
2 Receive Data (RXD)
3 Transmit Data (TXD)
4 Data Terminal Ready (DTR)
5 Ground (GND)
6 Data Set Ready (DSR)
7 Request to Send (RTS)
8 Clear to Send (CTS)
9 Ring Indicator (IR)
• The communication port can be assigned for various purpose like
CDR, Jeeves program and system debug. Thus port assignment
depends on the application the user wants for the gateway. But if
he needs debug process, then he can start the debugging. Thus
Start and Stop commands will be useful like CDR application.
How to program?
Use following command to assign a process to the COM port:
310-Code-#*
Where,
Code Meaning
0 None
1 Debug
2 Programming through Jeeves
3 Call Detail Recording
By default, COM port is assigned the process ‘2’.
Example:
To assign COM port for taking CDR report, use following command:
310-3-#*
Use the following command to start and stop the system debug:
309-Code-#*
55SIMADO GFX44 V1 System Manual
Page 56

Matrix
Where,
Code Meaning
0Stop
1Start
By default, System debug is 0.
Relevant Topics:
1. Call Detail Recording (CDR) 41
2. Jeeves 82
=X=X=
56 SIMADO GFX44 V1 System Manual
Page 57

Matrix
Daylight Saving Time
What’s this?
• Based on sunrise and sunset during different period in a year for
different countries; the working time during a day is affected. To
consider such problem, the concept of Daylight Saving Time has
been involved.
• Daylight Saving Time (DST) is the new local time a region is
assigned for a portion of the year, usually an hour forward from its
standard official time.
• The clocks are advanced at the beginning of the daylight saving
time and delayed at the end of the daylight saving time.
How it works?
• DST can be disabled or set according to week-day-month wise or
date-month wise.
• DST can be disabled by the SE if not applicable in the country or
it can be entered either using DST type 1 or DST type 2.
• If DST type 1 is selected, the DST is effective on the programmed
week, day and the month wise whereas if DST type 2 is selected,
the DST is effective on the programmed date and month wise, of
the year.
• Different DST type can be selected for DST forward time and DST
backward time.
• DST changes on a particular day of a particular week, every year.
How to program?
Step 1: Program to select DST Forward Type using command 321.
Step 2: Program to set time for Week-Day-Month for DST Forward
Type using command 322.
Step 3: Program to set time for Date-Month-Hour-Minute for DST
Forward Type using command 323.
Step 4: Program to select DST Backward Type using command
324.
Step 5: Program to set time for Week-Day-Month for DST
Backward Type using command 325.
Step 6: Program to set time for Date-Month-Hour-Minute for DST
Backward Type using command 326.
57SIMADO GFX44 V1 System Manual
Page 58

Matrix
Step 1
Use following command to select DST forward type:
321-DST Type-#*
Where,
DST Type Meaning
0 Disabled
1 Week-Day-Month wise
2 Date-Month wise
By default, DST forward Type is 0.
Step 2
Use following command to set time for Week-Day-Month for DST
forward type:
322-Week-Day-Month-Hour-Minute-Hour-Minute-#*
Where,
Week is from 1 to 5. (For example For First Sunday of the month,
set Week = 1; likewise for last Sunday of the month, set Week = 5.
If the month has 4 Sundays in a particular Calendar year then the
last Sunday would be automatically the fourth one and if the month
has 5 Sundays in a particular month of the Calendar year then the
last Sunday would be automatically the fifth one).
Day is from 1 to 7 (Sunday is Day1 and Saturday is Day7).
Month is from 01 to 12.
Hour is from 00 to 23.
Minute is from 00 to 59.
By default, Day is 1, Month is 01, Hour is 00 and Minute is 00.
First Hour-Minute in the command is for current time settings
whereas the Second Hour-Minute in the command is for time to
which the clock should be forwarded to.
For e.g. In New Zealand, the DST starts on Last Sunday of October.
The clock changes from 02:00 to 03:00. Following command should
be issued to effect DST in New Zealand.
322-5-1-10-02-00-03-00-#*
Step 3
Use following command to set time for Date-Month for DST forward
type:
58 SIMADO GFX44 V1 System Manual
Page 59

Matrix
323-Date-Month-Hour-Minute-Hour-Minute-#*
Where,
Date is from 01 to 31.
Month is from 01 to 12.
Hour is from 00 to 23.
Minute is from 00 to 59.
By default, Date is 01, Month is 01, Hour is 00 and Minute is 00.
For e.g. In Cuba, the DST starts on 1
st
April of every year. The clock
changes from 01:00 to 02:00. Following command should be issued
by the SE to affect DST.
323-01-04-01-00-02-00-#*
For e.g. In Syria, the DST starts on 1st April of every year. The clock
changes from 00:00 to 01:00. Following command should be issued
by the SE to affect DST.
323-01-04-00-00-01-00-#*
Step 4
Use following command to select DST backward type:
324-DST Type-#*
Where,
DST Type Meaning
0 Disabled
1 Week-Day-Month wise
2 Date-Month wise
By default, DST backward type is 0.
Step 5
Use following command to set time for Week-Day-Month for DST
backward type:
325-Week-Day-Month-Hour-Minute-Hour-Minute-#*
Where,
Week is from 1 to 5. (For example For First Sunday of the month,
set Week = 1; likewise for last Sunday of the month, set Week = 5.
If the month has 4 Sundays in a particular Calendar year then the
last Sunday would be automatically the fourth one and if the month
has 5 Sundays in a particular month of the Calendar year then the
last Sunday would be automatically the fifth one).
59SIMADO GFX44 V1 System Manual
Page 60

Matrix
Day is from 1 to 7 (Sunday is Day1 and Saturday is Day7).
Month is from 01 to 12.
Hour is from 00 to 23.
Minute is from 00 to 59.
First Hour-Minute in the command is for current time settings
whereas the Second Hour-Minute in the command is for time to
which the clock should be changed to.
By default, Week is 1, Day is 1, Month is 01, Hour is 00 and
Minute is 00.
For e.g. In New Zealand, the DST ends on Third Sunday of March.
The clock changes from 03:00 to 02:00. Following command should
be issued to affect DST in New Zealand.
325-3-1-03-03-00-02-00-#*
For e.g. In Cuba, the DST ends on last Sunday of October every
year. The clock changes from 23:59 (in fact 00:00 midnight) to
23:00. Following command should be issued by the SE to affect
DST.
325-5-1-10-23-59-22-59-#*
Step 6
Use following command to set time for Date-Month for DST
backward type:
326-Date-Month-Hour-Minute-Hour-Minute-#*
Where,
Date is from 01 to 31.
Month is from 01 to 12.
Hour is from 00 to 23.
Minute is from 00 to 59.
By default, Date is 01, Month is 01, Hour is 00 and Minute is 00.
For e.g. In Syria, the DST ends on 1st October of every year. The
clock changes from 23:59 (00:00 midnight of 1st October) to 23:00.
This means that DST should be changed on 30th Sept. at 23:59 to
23:00. Following command should be issued by the SE to effect
DST.
326-30-09-23-59-22-59-#*
60 SIMADO GFX44 V1 System Manual
Page 61

Important Points:
• The day is not changed by the system automatically while
forwarding the clock or reverting back to normal. Hence the user
has to enter the current time and the forward/backward time
keeping this aspect in mind.
• For e.g. In Chile, DST is advanced on second Saturday of
October from 00:00 to 01:00. This means that on Second
Saturday of October at 00:00, the clock is advanced to 01:00. To
effect this in the system, the user has to use following command:
322-2-7-10-0000-0100-#*
• For e.g. In Chile, DST is reverted back to normal on second
Sunday of March at 00:00 to Second Saturday of March 23:00.
To effect this, user has to use following command:
325-2-7-03-23:59-22:59-#*
Relevant Topics:
1.
Real Time Clock (RTC) 100
2. Time Table 134
=X=X=
Matrix
61SIMADO GFX44 V1 System Manual
Page 62

Matrix
Default the Configuration
What’s this?
Every system comes with pre-defined set of variable like configuring
port parameters, timers and other parameters. These pre-defined
settings are called default settings.
The default value of each programmable parameter is mentioned in
the respective section. If the default setting suits your requirement
then, you may not even require programming the system and the
system will work with the default settings.
When to use it?
Many times it happens that due to some programming error, the
system goes haywire and you are unable to analyze the problem.
During such a situation, it is advisable to default the system.
However, software default of the system can be done from the
programming mode and hence programming password should be
known. If you forget the password default cannot be done and in that
case hardware default of the system should be done.
How to program?
Use the following command to assign default values to all the
programmable parameters:
292-Reverse SE Password-#*
By default, SE Password is 1234.
The following is the list of parameters which will get defaulted:
• Serial COM Port Application Assignment.
• FXS Port Parameters.
• Mobile Port Parameters.
• Routing Groups.
• Number Lists.
• CDR Filters.
• Dialed-Number String Table.
• Time Table.
• DST Parameters.
• Clear RCOC Entries.
62 SIMADO GFX44 V1 System Manual
Page 63

Matrix
• System general parameters like:
• SE Password.
• Call Progress Tone Generation.
• Record Delete Timer.
• Call Proceeding Tone.
Hardware Default:
In case the SE password is forgotten, no further programming is
possible.
To take care of such rare situations, the system allows the System
Engineer (SE) to clear the password to its default value. Following
steps describe the procedure:
• Switch OFF the system.
• Locate a mini jumper J9 on the main PCB.
• Put the jumper in A-B Position.
• Switch it ON.
• Wait for 15 seconds.
• Switch OFF the system.
• Restore the jumper in its original position (B-C).
• Switch it ON again.
• The SE password gets default to 1234.
Important Point:
• SIM PIN and RTC is not assigned any default value while issuing
system default command.
Relevant Topics:
1.
Getting Started 17
2. Programming the System 98
=X=X=
63SIMADO GFX44 V1 System Manual
Page 64

Matrix
Disconnect Signaling on FXS Port
What’s this?
• As a general application, telecom equipment like PCO machine
is connected to the FXS port of the system. Now whenever the
called party (remote party) disconnects or goes on-hook it is
required to inform the FXS port so that the PCO machine can
consider the call as complete and stop billing. In absence of this
signal, the call is considered as complete when the caller goes
ON-Hook. But this will result in inaccurate billing.
• To solve such problems, the system supports ‘Disconnect
Signaling’. It is a signal which is generated on FXS port, when the
called party has disconnected. This helps to avoid excessive
billing.
• If FXS port of ‘GFX 44’ is connected to FXO port of PBX, the FXS
port will serve as exchange for PBX. Hence Disconnect Signaling
on FXS port is supported for both IC and OG calls.
• When call is made from FXS to any other port FXO/Mobile
whenever called party disconnects, they provide a disconnect
signal. Same is generated on the FXS port, so that billing of call
can be stopped.
• It can be in the form of:
• None
• Polarity Reversal
• Open Loop Disconnect
How it works?
• When an outgoing call is made from FXS port to any other port
and call gets matured, the system will wait for any disconnect
signaling.
• When other port gets disconnected due to disconnection event or
signal available on the port, the system will check the Disconnect
Signal assigned to the FXS port from where call has been made.
The options for Disconnect Signaling are mentioned below:
• None: It is used when no signaling is to be generated on FXS for
call disconnection. When call is disconnected, user will get Error
tone.
64 SIMADO GFX44 V1 System Manual
Page 65

Matrix
• Polarity Reversal: It is used when the call disconnection is to be
signaled in the form of Polarity Reversal. The Battery polarity of
the FXS port will be reversed. For example, if the battery polarity
of the FXS port is +ve for TIP and -ve for RING in speech
condition then on disconnection on other port, TIP will become ve and Ring will become +ve. When call is disconnected, user
will get Error tone.
• Open Loop Disconnect: It is used when call disconnection is to
be signaled in the form of Open Loop Disconnect pulse. During
this:
• The Battery voltage on FXS port will be removed for time of
Open loop disconnect timer programmed for that FXS port
and will be restored again.
• But the Polarity of the FXS port battery voltage will not be
changed. When call is disconnected, user gets Error tone.
• “Open Loop Disconnect Timer” can be programmed and is
applicable only if Open Loop Disconnect option is selected for
Disconnect Signal.
• Disconnect signal will also be generated when call is terminated
on FXS port i.e. when call is made from Mobile to FXS
(terminating) port.
• When call is terminated on FXS port and call gets matured
(user of FXS port goes off-hook), the system will wait for the
disconnection of other port.
• If other (source) port gets disconnected, the system will check
the disconnect signal programmed on FXS port and generates
the corresponding disconnect signal.
• User will get Error tone after disconnect signal is generated on
the FXS port.
How to program?
Disconnect Signal:
Use following command to program the Disconnect Signal to be
generated on FXS port during IC and OG call:
256-FXS Port-Disconnect Signal-#*
Where,
FXS Port is from 1 to 4.
65SIMADO GFX44 V1 System Manual
Page 66

Matrix
Disconnect Signal Meaning
0 None
1 Polarity (Battery) Reversal
2 Open Loop Disconnect (Battery
Removal or Current Removal)
By default, Polarity Reversal for all ports.
Use following command to program the Disconnect Signal to be
generated on all FXS port during IC and OG call:
256-*-Disconnect Signal-#*
Open Loop Disconnect Timer:
Use following command to program the Open Loop Disconnect
timer on FXS port:
257-FXS Port-Open Loop Disconnect Timer-#*
Where,
FXS Port is from 1 to 4
Open Loop Disconnect Timer is from 001 to 999 ms.
By default, 500ms for each port.
Use following command to program the Open Loop Disconnect
timer on all FXS port:
257-*-Open Loop Disconnect Timer-#*
Related Topic:
1. Answer Signaling on FXS Port 32
=X=X=
66 SIMADO GFX44 V1 System Manual
Page 67

Matrix
Emergency Number Dialing
What’s this?
• The user should be able to contact service personnel like Fire
Brigade, Ambulance, etc. from GSM network, when he is facing
some adverse situation and needs some help. This is known as
‘Emergency Number Dialing’.
• SIMADO GFX44 supports this feature Mobile port. It may happen
that you need to call emergency number even when you have not
inserted the SIM card and the GSM module is not registered with
the network. This is called ‘False’ status of the GSM port.
Normally SIM card is inserted and the module is registered with
the network. This is called ‘True’ status of the GSM port.
SIMADO GFX44, supports the emergency dialing feature for both
status of GSM port, just like a mobile handset.
How it works?
• The system supports 4 programmable numbers and routing
group, which will be used as emergency numbers for dialing.
Each number of 8 digits maximum.
• The dialed number is compared with numbers programmed in the
emergency number table. If it matches by prefect fit logic then
the number is dialed out from the port, selected by routing logic
using the routing group programmed in the system.
• The destination port, (GSM port) will send the number to the
GSM module for dialing out, even if the port is True or False.
• The system doesn’t check the Allowed and Denied Lists or
automatic Number Translation, for dialing the emergency number,
but the port must be enabled.
• Emergency dial in GSM network is explained in detail as below:
• A Mobile station has two intelligent systems within itself viz. the
GSM Engine and the SIM card.
• Both, the GSM engine and the SIM card classify few number
strings as Emergency numbers. Such numbers are dialed by
the module with a specific SET UP message known as
Emergency Call Set Up message.
• These numbers are dialed by the GSM Engine in following
cases:
67SIMADO GFX44 V1 System Manual
Page 68

Matrix
• Not registered with subscribed Service Providers’ Network.
In such case, the Engine dials the Emergency number
using any other available GSM network.
• When SIM is absent.
• When SIM is invalid (Only few Emergency numbers are
allowed. This depends on the GSM Engine).
• When SIM is blocked.
• When wrong SIM PIN is entered.
For example, for a specific GSM Engine and a SIM Card from a
Service Provider, following sequence is followed to dial an
Emergency Number:
• It will first search for emergency call number stored in the SIM
phone book. If there is at least one emergency number in the
SIM, it will search for the number. If does not match, it will
search for 112 or 911.
• If SIM does not have any emergency number stored it will search
for the number in the default emergency number list stored in the
firmware which are 000, 08, 112, 110, 911, 999.
• If the SIM is invalid means either PUK1 Blocked or PUK2
Blocked or No SIM, it will search for emergency numbers, which
are 000, 08, 112, 110, 911, 999, 118 and 119.
• If SIM is blocked means either PIN1 Blocked (PUK1 Requested)
or PIN2 Blocked (PUK2 requested) valid emergency numbers are
000, 08, 112, 110, 911, 999.
• If SIM is not inserted 000, 08, 112, 110, 911, 999, 118 and 119 are
considered as emergency numbers.
• If wrong PIN is entered 000, 08, 112, 110, 911, 999 are
considered as emergency numbers.
How to program?
Step 1: Program emergency Number at an index using command
233.
Step 2: Program routing group at on index using command 234.
Step 1
Use the following command to program the emergency number in
the table:
68 SIMADO GFX44 V1 System Manual
Page 69

Matrix
233-Index-Emergency Number-#*
Where,
Index is from 1 to 4.
Emergency Number is 8 digits maximum.
Refer table for default numbers.
Use the following command to clear the emergency number at an
index:
233-Index-#*
Step 2
Use the following command to assign routing group for an index in
the table:
234-Index-Routing Group-#*
Where,
Index is from 1 to 4.
Routing Group is from 1 to 4.
By default, Routing Group is 4.
The default, emergency number table programmed in the system
looks as shown below:
Index Emergency Number Routing Group
1 112 4
2 911 4
3Null 4
4Null 4
Example:
Suppose an emergency number 999 is required to be dialed out
from Mobile port 1 and another number 110 is required to be dialed
out from Mobile port 3, then program the emergency number table:
233-1-999-#* (Program Emergency Number 999)
233-2-110-#* (Program Emergency Number 110)
234-1-4-#* (Program Routing Group Number 4)
234-2-3-#* (Program Routing Group Number 3)
Now, program the routing group 4 such that Mobile port 1 is the first
member and selection is first free type. Similarly program routing
69SIMADO GFX44 V1 System Manual
Page 70

Matrix
group number 3 such that the first member is Mobile port 3 and
relation is first free type.
Important Points:
• The GSM port from where, the emergency number is to, be dialed
should be enabled, even if it is ‘False’.
• The number programmed, which are to be routed through GSM
port as emergency number should exist as emergency number
either in the GSM module, or in the SIM in the memory storage,
which is classified as emergency number. For this information,
contact your GSM Service Provider.
Relevant Topic:
1.
Mobile Port Parameters 86
=X=X=
70 SIMADO GFX44 V1 System Manual
Page 71

Matrix
End of Dialing Digit
What’s this?
• End of dialing digit is a single digit on receipt of which, end of
number string is interpreted and the received digits are sent for
further analysis.
• End of Dialing digit is not programmable. By default, End of
dialing Digit as ‘#’.
• Because of this feature the dialing is faster and will not wait for
expiry of Inter Digit Wait Timer to end the dialing of digits.
Relevant Topic:
1. FXS Port Parameters 75
=X=X=
71SIMADO GFX44 V1 System Manual
Page 72

Matrix
Fixed Dialing
What’s this?
To avoid dialing of a station number or destination number which is
frequently used, the Matrix system offers, a feature by which the
user has to just pick up his handset and the system will
automatically dial out the fixed destination number. This feature is
called Fixed Dialing.
How it works?
• When the fixed dialing is enabled, user gets the regular dial tone
on going OFF-Hook. If the user does not dial anything for a time
period of First Digit Wait Timer of FXS port/Mobile port the
SIMADO GFX44 places the fixed dialing call to the programmed
number.
• This delay provides a facility to the user to dial out other numbers
without canceling fixed dialing.
• Fixed destination number is applicable on FXS/mobile port.
• If fixed dialing is disabled then error tone is issued to the caller on
the expiry of First Digit Wait Timer for FXS port.
How to program?
Step 1: Program to enable/disable fixed dialing on a FXS port using
command 171.
Step 2: Program the fixed destination number for the FXS port using
command 172.
Step 3: Program to enable/disable fixed dialing on a mobile port
using command 175.
Step 4: Program the fixed destination number for the mobile port
using command 176.
Step 1
Use following command to enable/disable fixed dialing on a FXS
port:
171-FXS Port-Code-#*
Where,
FXS Port is from 1 to 4.
72 SIMADO GFX44 V1 System Manual
Page 73

Matrix
Code Meaning
0 Disable
1 Enable
By default, Fixed Dialing is disabled on all the ports.
Use following command to enable/disable Fixed Dialing on all FXS
ports:
171-*-Code-#*
Step 2
Use following command to program the fixed destination number for
the FXS port:
172-FXS Port-Number String-#*
Where,
FXS Port is from 1 to 4.
Number String is of 16 digits.
By default, the Number String is blank.
Use following command to program the fixed destination number for
all FXS ports:
172-*-Number String-#*
Step 3
Use following command to enable/disable fixed dialing on a mobile
port:
175-Mobile Port-Code-#*
Where,
Mobile Port is from 1 to 4.
Code Meaning
0 Disable
1 Enable
By default, Fixed Dialing is enabled on all the ports.
Use following command to enable/disable fixed dialing on all mobile
ports:
175-*-Code-#*
73SIMADO GFX44 V1 System Manual
Page 74

Matrix
Step 4
Use following command to program the fixed destination number for
the mobile port:
176-Mobile Port-Number String-#*
Where,
Mobile Port is from 1 to 4.
Number String is of 16 digits.
By default, the Number String is blank.
Use following command to program the fixed destination number for
all mobile ports:
176-*-Number String-#*
Example:
A number 9898034498 is required to be frequently dialed out from
Mobile port 1, to contact the person X then program the fixed dialing
feature as below:
171-1-1-#* (Enable feature)
172-1-9898034498-#* (Program destination number)
185-1-1-#* (Assign routing type as Answer-Fixed to
Mobile port for Timezone 1)
201-4-1-1-1-#* (For FXS1 routing type is Answer-Number
Based and routing group is 4 by default.
Hence program Mobile Port 1 as a member
at index 1)
202-4-1-#* (Member selection as first free)
Relevant Topics:
1. Routing Type 116
2. Routing Group 110
=X=X=
74 SIMADO GFX44 V1 System Manual
Page 75

Matrix
FXS Port Parameters
What’s this?
In order to integrate analog phones with different flash timer
specification, FXS port should be programmable, for required flash
timer. Also it may be required to differentiate priority level of two
incoming calls. This can be done by providing different ring types for
two stations. These features can be obtained by suitable
programming of FXS port. The SIMADO GFX44 provides a facility in
which FXS port can be programmed for following parameters:
• Enable/Disable Port.
• Ring Type.
• Inter Digit Wait Timer.
• Flash Timer.
• First Digit Wait Timer.
• Tx Gain, Rx Gain.
• AC Impedance.
How to program?
Step 1: Program to enable/disable a FXS port using command 251.
Step 2: Program to select the ring cadence for a country using
command 252.
Step 3: Program to set Inter digit wait timer for a FXS port using
command 253.
Step 4: Program to set Flash Timer for a FXS port using command
254.
Step 5: Program to set First Digit Wait Timer for FXS port using
command 255.
Step 6: Program Tx Gain on FXS port using command 258.
Step 7: Program Rx Gain on FXS port using command 259.
Step 8: Program AC Impedance for FXS port using command 260.
Step 1
Port Status (Enable/Disable)-This command is used to enable/
disable FXS port. It is required to disable the port in case, any FXS
port has gone faulty.
Use following command to enable/disable a FXS port:
251-FXS Port-Code-#*
Where,
75SIMADO GFX44 V1 System Manual
Page 76

Matrix
FXS Port is from 1 to 4.
Code Meaning
0 Disable
1 Enable
By default, all the ports status are enabled.
Use following command to enable/disable all FXS ports:
251-*-Code-#*
Step 2
Ring Type
• During an incoming call, SIMADO GFX44 plays the ring over SLT,
as per the ring cadence specified for the country. For example,
ring for India is ‘Double’, whereas for Canada or US it is ‘Long
Slow’.
• GFX44 supports ring type for 25 countries.
• This doesn’t affect the country code for CPTG tones.
Use following command to select a ring type for a country:
252-Code-#*
Where,
Code Country
Australia
01
Belgium
02
Brazil
03
China
04
Egypt
05
France
06
Germany
07
Greece
08
India
09
Israel
10
Italy
11
Frequency
(Hz)
25 0.4 0.2 0.4 2.0
25 1.0 3.0
25 1.0 4.0
25 1.0 3.0
25 2.0 4.0
25 1.5 3.5
25 3.5 5.5 0.79 1.1
25 1.0 4.0
25 0.4 0.2 0.4 2.0
25 2.0 3.0
25 1.0 4.0
CADENCE (In Seconds)
TON1 TOFF1 TON2 TOFF2
76 SIMADO GFX44 V1 System Manual
Page 77

Matrix
Japan
12
Korea
13
Malaysia
14
New Zealand
15
Poland
16
Portugal
17
Russia
18
Singapore
19
South Africa
20
Spain
21
Thailand
22
UAE
23
UK
24
USA/Canada
25
25 1.0 2.0
25 1.0 3.0
25 2.0 3.0
25 2.0 3.0
25 2.0 3.0
25 1.0 5.0
25 1.0 3.0
25 0.4 0.2 0.4 2.0
25 0.4 0.2 0.4 2.0
25 1.5 3.0
25 3.0
25 2.0 3.0
25 0.4 0.2 0.4 2.0
25 2.0 4.0
By default, the Ring Type of the FXS ports is 09 (India).
Remark:
• Waveform is sinewave, TON1 = Tone1 ON period, TOFF1 = Tone
1 OFF period.
Step 3
Inter Digit Wait Timer-This timer signifies the time between two
digits dialed on the port.
Use following command to set inter digit wait timer for the FXS port:
253-FXS Port-Inter Digit Wait Timer-#*
Where,
FXS Port is from 1 to 4.
Inter Digit Wait Timer is from 01 to 99 seconds.
By default, Inter Digit Wait Timer is 04 seconds.
Use following command to set inter digit wait timer for all FXS ports:
253-*-Inter Digit Wait Timer-#*
Step 4
Flash Timer-This command is used to program the flash timer for
77SIMADO GFX44 V1 System Manual
Page 78

Matrix
the FXS port.
Use following command to program the flash timer for the FXS port:
254-FXS Port-Flash Timer-#*
Where,
FXS Port is from 1 to 4.
Flash Timer is from 083ms to 999ms.
By default, the Flash Timer for all the FXS ports is 600ms.
Use following command to program the flash timer for all FXS ports:
254-*-Flash Timer-#*
Step 5
First Digit Wait Timer: This is maximum time period for which
system waits for dialing first digit after going OFF-Hook.
Use the following command to program First Digit Wait Timer for
FXS port:
255-FXS Port-Timer-#*
Where,
FXS Port is from 1 to 4.
First Digit Wait Timer is from 01 to 99 sec.
By default, First Digit Wait Timer is 06 sec.
Use the following command to program First Digit Wait Timer for all
the FXS ports:
255-*-Timer-#*
Step 6
Tx Gain on FXS Port: Sometimes, it is required to adjust the level
of outgoing speech. For example, if FXO port of the PBX to be
interfaced with FXS Port, is very far from the gateway site, the Tx
level will be required to increase.
Use following command to program Tx Gain on FXS port:
258-FXS Port-Code-#*
Where,
FXS Port is from 1 to 4.
78 SIMADO GFX44 V1 System Manual
Page 79

Matrix
Code Meaning
1-1.5
20
3+1.5
4+3
By default, Tx Gain for FXS Port is 2.
Use following command to program Tx Gain on all FXS ports:
258-*-Code-#*
Step 7
Rx Gain on FXS Port: Sometimes it is required to adjust the level
of speech of incoming audio. For this, Rx Gain is kept
programmable, on FXS port.
Use following command to program Rx Gain on FXS port:
259-FXS Port-Code-#*
Where,
FXS Port is from 1 to 4.
Code Meaning
1-1.5
20
3+1.5
4+3
By default, Rx Gain for FXS Port is 2.
Use the following command to program Rx Gain on all the FXS
ports:
259-*-Code-#*
Step 8
AC Impedance on FXS Port: If AC Impedance of communication
equipment connected to FXS port is notmatching to that of FXS
port, then it may result to signal loss. To avoid such problem, AC
Impendance is kept programmable.
Use following command to program AC Impedance on FXS port:
260-FXS Port-Code-#*
79SIMADO GFX44 V1 System Manual
Page 80

Matrix
Where,
FXS Port is from 1 to 4.
Code AC Impedance(Ω)
1 600
2 900
3 Complex
By default, AC Impedance on FXS port is 1.
Use following command to program AC Impedance on all the FXS
ports:
260-*-Code-#*
Important Points:
• If after completion of ‘error tone’, FXS port is still OFF-Hook then
error tone will continue till user goes ON-Hook.
• If the user goes OFF-Hook from FXS port and that port is
disabled, then user will get ‘Error Tone’.
• When programming the AC Impedance of the FXS ports, it is
recommended that if user wants to program the AC impedance of
FXS1 or FXS2, it should be done through FXS3 or FXS4 and vice
versa. Otherwise user will get ‘Error tone’. The programming of
AC impedance should be done only when FXS port is ‘Idle’.
Relevant Topics:
1. End of Dialing Digit 71
2. CLIP Type on FXS Port 52
=X=X=
80 SIMADO GFX44 V1 System Manual
Page 81

Matrix
International Mobile Equipment Identity (IMEI)
What’s this?
It may happen that you loose the gateway or it is stolen. Very
important personnel information is stored and you don’t want
somebody to misuse it. To help the user, manufacturer of GSM
Module provides a code known as International Mobile Equipment
Identity (IMEI) which can be sent to the network operator. The
operator will use it to put your GSM module of the specific gateway,
in unoperational state. Thus, the IMEI code is used to identify an
individual GSM Module. The IMEI number is normally printed on the
GSM Module.
How it works?
• This information is available through Jeeves. User has to click in
the box for the Mobile port number, for which IMEI information is
required.
• When the gateway is powered ON, the GSM module takes some
time to reset. Hence if user tries to download IMEI data during
this time, he will get only blank or invalid data.
• If the user tries to get ‘IMEI’ after GSM module is reset, the
information is stored by the system which is sent by the GSM
module. This IMEI number is then sent to Jeeves and can be
read, for all the modules.
Important Point:
• Sometimes it may happen that module does not send the IMEI
number during power ON. In such case, the user should restart
the system.
Relevant Topic:
1. Mobile Port Parameters 86
=X=X=
81SIMADO GFX44 V1 System Manual
Page 82

Matrix
Jeeves
What’s this?
• Programming a system through phones, is a bit time consuming
process. The Matrix system provides a facility to program it using
computer.
• Matrix supplies a customized, windows based software to
program the SIMADO GFX44, known as Jeeves.
• The Jeeves is a flexible and friendly tool with mouse operated
GUI.
How it works?
82 SIMADO GFX44 V1 System Manual
Page 83

Start
Install the Jeeves on a PC
with working COM Port.
Connect the PC and the System using
standard RS232C serial cable (crossed)
Set COM Port parameters
in the Jeeves
Set the COM Port parameters on
the System (if required)
Set the System COM Port for Jeeves
application (By default, COM Port is
assigned for Jeeves)
Download the existing System
configuration on the Jeeves if needed.
Matrix
Make necessary changes in the
configuration parameters
Up load the modified
configuration on to the System
Verify by checking various
features on the System
End
83SIMADO GFX44 V1 System Manual
Page 84

Matrix
How to program?
The COM port is assigned to Jeeves using specific command.
Example:
To dial Mobile number ‘9898507330’ from ‘Mobile-1’ using Routing
Group number-1
• The Jeeves screen for ‘GFX44’ looks as shown below:
• Main Menu screen looks as shown below:
84 SIMADO GFX44 V1 System Manual
Page 85

Matrix
• Click on ‘Routing Group’ to program ‘Mobile-1’ as first member of
Routing Group Number-1.
• Click on ‘Mobile Parameters’ from main Menu. Enable ‘Fixed
dialing’ for Mobile-1 port. Program the Mobile Number
‘9898507330’ in the ‘Fixed Destination Number’ field.
Relevant Topics:
1. Communication Port 54
2. Programming the System 98
=X=X=
85SIMADO GFX44 V1 System Manual
Page 86

Matrix
Mobile Port Parameters
What’s this?
• The GSM modules, used by the system need different setting for
Rx audio level and Tx audio level, for required speech level at
analog phones. For this, user has to optimize the gain of RF
module.
• Similarly, different GSM networks take some time to respond the
information asked by the gateway. But this time can be very long
in case of problem like network congestion. Hence, our system is
required to program for maximum time upto which it can wait.
• In order to interface Mobile ports with GSM network, few
parameters are required to be programmed. The SIMADO GFX44
provides a facility in which mobile port parameters can be
programmed for following parameters:
• Enable/Disable Port.
• Receive Gain.
• Transmit Gain.
• Inter Digit Wait Timer.
• First Digit Wait Timer.
• Mobile Frequency Band
How to program?
Step 1: Program to enable/disable the mobile port using the
command 271.
Step 2: Program to set receive gain to the mobile port using the
command 272.
Step 3: Program to set transmit gain to the mobile port using the
command 273.
Step 4: Program to set inter digit wait timer to the mobile port using
the command 274.
Step 5: Program to set First Digit Wait Timer for mobile port using
command 276.
Step 6: Program mobile frequency band using command 278.
Step 1
Port Enable/Disable-This command is used to disable a mobile
port. Disabling mobile port is required in cases like Budget
86 SIMADO GFX44 V1 System Manual
Page 87

Matrix
exhausted (Pre-paid SIM card), Network problems, SIM problems,
Hardware failure, etc. On disabling the port, No calls are possible
through this port.
Use following command to enable/disable a mobile port:
271-Mobile Port-Code-#*
Where,
Mobile Port is from 1 to 4.
Code Meaning
0Disable
1 Enable
By default, all the ports are enabled.
Use following command to enable/disable all the mobile ports:
271-*-Code-#*
Step 2
Receive Gain-This command is used to increase/decrease the
Receive Gain to improve the audibility of the incoming speech.
Use following command to program the receive gain of a mobile
port:
272-Mobile Port-Receive Gain-#*
Where,
Mobile Port is from 1 to 4.
Receive Gain Meaning
1Very Low
2Low
3Normal
4High
5 Very high
By default, Receive Gain is 3.
Use following command to program the receive gain of all the mobile
ports:
272-*-Receive Gain-#*
87SIMADO GFX44 V1 System Manual
Page 88

Matrix
Step 3
Transmit Gain-This command is used to increase/decrease the
transmit gain to improve the output RF signal from the gateway.
Use following command to program the transmit gain of a mobile
port:
273-Mobile Port-Transmit Gain-#*
Where,
Mobile Port is from 1 to 4.
Transmit Gain Meaning
1Very Low
2Low
3Normal
4High
5 Very high
By default, Transmit Gain is 3.
Use following command to program the transmit gain of all the
mobile ports:
273-*-Transmit Gain-#*
Step 4
Inter Digit Wait Timer-This timer signifies the time between two
digits dialed on the port. This is same as inter digit timer in case of
PBX.
Use following command to program inter digit wait timer for a mobile
port:
274-Mobile Port-Inter Digit Wait Timer-#*
Where,
Mobile Port is from 1 to 4.
Inter Digit Wait Timer is from 01 to 99 secs.
By default, Inter Digit Wait Timer is 04 secs.
Use following command to program inter digit wait timer for all the
mobile ports:
274-*-Inter Digit Wait Timer-#*
88 SIMADO GFX44 V1 System Manual
Page 89

Matrix
g
Step 5
First Digit Wait Timer: This timer signifies the time for which the
system waits after the user has gone OFF-Hook.
Use the following command to program First Digit Wait Timer for
Mobile port:
276-Mobile Port-First Digit Wait Timer-#*
Where,
Mobile Port is from 1 to 4.
First Digit Wait Timer is from 01 to 99 sec.
By default, First Digit Wait Timer is 06 sec.
Use the following command to program First Digit Wait Timer for all
the Mobile ports:
276-*-Timer-#*
Step 6
Use following command for selection of Mobile Frequency Band on
Mobile Port:
278-Mobile Port-Mobile Frequency Band-#*
Where,
Mobile Port is from 1 to 4
Mobile Frequency Band Meanin
1 900
2 1800
3 1900
4 850 + 1900
5 900 + 1800
By default, Mobile Frequency Band is 900 + 1800.
Use following command for selection of Mobile Frequency Band on
all Mobile Ports:
278-*-Mobile Frequency Band-#*
For example:
Program 850 + 1900 GSM frequency band for countries which
support both 850 and 1900 MHz frequencies for GSM network.
89SIMADO GFX44 V1 System Manual
Page 90

Matrix
Network Response Timer:
• ‘Network response timer’ signifies the time for which the system
waits for a response from the network. It is not programmable.
• Network related setting takes more time to get the complete
response from the network.
• For example, Auto registration process will be repeated after the
expiry of network response timer in congestion with network
registration retry timer.
• Hence value of this timer in the system is fixed and long enough
to get complete response from the network by the GSM Module.
It is 150 second.
Relevant Topics:
1.
Emergency Number Dialing 67
2. International Mobile Equipment Identity 81
3. Network Selection 91
4. SIM PIN 130
5. RCOC 104
6. Call Proceeding Tone 47
7. Signal Strength 129
=X=X=
90 SIMADO GFX44 V1 System Manual
Page 91

Matrix
Network Selection
What’s this?
• Many times it happens that the system is installed in a remote
place which is hilly or at a place where it is surrounded by
multistoryed buildings. In such case, the mobile user may not get
registered with a suitable network and his work is affected. Same
problem is faced when he is moving out of his home region. User
of mobile station (Handset) has the user interface on the LCD,
which shows, the name of the available network and he can
select the desired network. But such user interface is not
available in the SIMADO GFX44, gateway. The same purpose is
served by providing multiple network operator options based on
their specific network operator code. The subscriber can select
the network manually or automatically, for each mobile port. This
is known as Network Selection.
• If the subscriber is working in the area where, his home network
as well as other network coverage is also available, then he can
select the network manually such that he can restrict the extra
charges. Normally subscriber uses this mode when he is working
outside his home network.
• But if the subscriber is always busy with important business
matter, then he would like to get registered with any network
operator. He wants to make and receive calls, at any cost. For
such requirement he will use this feature, in automatic mode.
How it works?
• User can assign option for network selection to each mobile port
he wants to use.
• The feature works, when SIMADO GFX44 is powered ON or if the
port is NOT registered with network.
• Maximum 9 network operators can be programmed. In Manual
Mode mobile port starts to get registered with network operator,
as per order of programming with its network operator code. In
Automatic Mode, the GSM port gets registered with the network
operator as per field strength. If it doesn’t get registered till expiry
of network registration retry timer, it starts again the process of
network selection.
91SIMADO GFX44 V1 System Manual
Page 92

Matrix
• User should know the inter network call charges while
programming priority network operator codes, for manual mode
operation.
• Network operator code, consists of:
• MCC
• MNC
• MCC: MCC is Mobile Country Code, which identifies a country.
For a country, there can be more than one MCC. It is generally of
3 digits. For e.g. for India, MCC is 404, which is same for all
networks in India.
• MNC: MNC is Mobile Network Code, which is same for all
network operators in India. But it is different in each state for the
same network operator. For e.g. Airtel-Gujarat, MNC is ‘98’ and
Airtel-Maharastra, MNC is ‘90’. Thus, MCC-MNC combination
uniquely identifies the home network of the mobile terminal. For
example, MCC for other countries are as shown below:
• USA : 310
• Canada : 302
• Australia : 505
• Italy : 222
How to program?
Network selection feature can be programmed for SIMADO GFX44,
using following steps:
Step 1: To select network selection mode Manual or Automatic
using command 231.
Step 2: To program network operator’s code with priority using
command 232.
Step 3: To read the network operator code.
Step 1
Use following command to program Network Selection Mode for the
Mobile port:
231-Mobile Port-Mode-#*
Where,
Mobile Port is from 1 to 4.
92 SIMADO GFX44 V1 System Manual
Page 93

Matrix
Mode Meaning
1 Automatic
2 Manual
By default, Network Selection Mode is Automatic.
Use following command to program network selection mode for all
the mobile ports:
231-*-Mode-#*
Step 2
Use following command to program the network operator’s number
with priority:
232-Mobile Port-Priority-Code-#*
Where,
Mobile Port is from 1 to 4.
Priority is from 1 to 9.
Code: MCC-MNC, Maximum 8 digits.
By default, Network Operator Number is Blank.
The default table programmed in the system for mobile port = 1 will
be as shown below:
Mobile
Port
Priority
11 Blank
Network Operator
Number
2Blank
: :
: :
: :
9Blank
Use the following command to clear network operator number:
232-Mobile Port-Priority-#*
Where,
Mobile Port is from 1 to 4.
Priority is from 1 to 9.
93SIMADO GFX44 V1 System Manual
Page 94

Matrix
Step 3
User can read the ‘Network Operator Code’ only by using windows
Jeeves.
Example 1:
A user feels call charges of network operator ‘X’ (MCC 404, MNC
98), will be the cheapest for his SIM card of home region. Second
operator ‘Y’ (MCC 404, MNC 25) is cheaper, but the third operator
‘Z’ (MCC 404, MNC 21) is little cheap for call charges. Then
program the network operator as per priority, as shown below:
He should program the SIMADO GFX44, for manual mode which
doesn’t depend on field strength of the network. He makes the call
from mobile port 3.
231-3-2-#* (Network selection mode: Manual)
232-3-1-40498-#* (1st priority to network ‘X’)
232-3-2-40425-#* (2nd priority to network ‘Y’)
232-3-3-40421-#* (3rd priority to network ‘Z’)
Example 2:
If user wants that the GSM port 1 should get registered with any of
the available network operator, then he should program the network
selection mode as Automatic by:
231-1-1-#*
Rest of priority are kept, blank.
Important Points:
• In ‘Manual Mode’, network is not selected as per the field
strength but is selected as per the priority network codes,
programmed for that mobile port.
• Network Registration Timer:
• It signifies the time for which the mobile port should try for
network registration between two attempts.
• Network Registration Timer is not programmable.
• The system implements the network registration as follows:
• Network registration is attempted at the time of init (System
Restart)
• If the registration response from the desired network
operator is not received within 50ms the system reports it
94 SIMADO GFX44 V1 System Manual
Page 95

as failure.
• If this happens for all the registered network operators at
the time of init, then after system start, the registration
process can be reattempted at every two minutes till the
port is registered with one of the operators.
• If user reattempts at every two minutes, then he is sure that
the port will get registered and the system will be
functional.
Relevant Topic:
1.
Mobile Port Parameters 86
=X=X=
Matrix
95SIMADO GFX44 V1 System Manual
Page 96

Matrix
Number Lists
What’s this?
• The number lists is a group of number strings. The SIMADO
GFX44 use these lists to allow/deny a number dialed from the
port as well as for automatic number translation.
• SIMADO GFX44 supports 16 number lists.
• Each number list has 24 entries, which can be referred to as
location.
• Number string in each location can be of maximum 16 digits
long.
Number list looks as given below:
Loc. Index
No. List Index
01
:
:
:
:
16
01 …… 24
Number String
(16 digits)
How to program?
Use following command to program a number string in a location
index in the number list:
101-Number List-Location Index-Number String-#*
Where,
Number List is from 01 to 16.
Location Index is from 01 to 24.
Number String is a string of maximum 16 digits.
Use following command to clear a location in the number list:
101-Number List-Location Index-#*
Use following command to clear all the locations in the number list:
102-Number List-#*
96 SIMADO GFX44 V1 System Manual
Page 97

Matrix
Default number list is given below:
01 02 03 04 05 06 07 08 09 10 11 12 13 14 15-24
0123456789*#F+ B
01
0 959894 3 5 B B B B * # F B B
02
095BBBBBBBB * # FB B
03
0BBBBBBBBB * # FB B
04
0BBBBBBBBB * # FB B
05
BBBBBBBBBB * # FB B
06
BBBBBBBBBB * # FB B
07
08-15
16
BBBBBBBBBB * # FB B
Same as 07
Example:
If 0-dialing is to be barred, for a phone, connected to the system,
then a number list 04 can be programmed as:
102-04-#* (To clear all location)
101-04-01-0-#* (Program list with 0 prefix)
Assign this list as denied list number to all FXS ports.
Relevant Topics:
1. Allowed and Denied Lists 27
2. Automatic Number Translation 37
=X=X=
97SIMADO GFX44 V1 System Manual
Page 98

Matrix
Programming the System
What’s this?
• SIMADO GFX44, supports two methods of programming:
• Programming with analog phones, connected at FXS ports.
• Programming using Jeeves. Refer chapter Jeeves for this.
• This chapter explains how to enter programming mode for
applying various commands.
• You can enter programming mode by using password called
System Engineer (SE) Password.
How to Save the configuration of the System?
• To save the configuration in the system, it is recommended for
the SE to logout from the programming mode or to wait for 5
minutes if still in the programming mode.
• Restart the system only after saving the configuration in the
system else new configuration will be lost.
• Same shall also be applicable when doing programming using
Jeeves. Any changes done in Jeeves will take effect permanently
only after quitting the Jeeves or 5minutes (approx) after doing the
change (if SE is still in Jeeves) whichever occurs earlier.
• The system should be restarted from Jeeves only after saving the
configuration in the system else the last configuration will not be
saved.
Note:
• To save the CDR records table and RCOC table, user should wait
for 5 minutes before restarting the system.
How to use it?
1 Lift the handset. Dial tone
Dial
2
By default, SE Password is 1234.
To exit SE Mode, Dial 00-#*.
Use following command to change the SE password:
293-New SE Password-#*
98 SIMADO GFX44 V1 System Manual
*-19-SE Password.
Programming tone
Page 99

Matrix
Where,
New SE Password is number string of 4 digits.
Important Points:
• While in programming mode, if you go ON-Hook you will come
out (exit) from the SE Mode. You will have to enter SE Mode
again, to restart programming.
• The commands are accepted even during confirmation tone.
• You will get programming tone on expiry of the confirmation tone.
Relevant Topics:
1.
Jeeves 82
2. Routing Type 116
3. Default the Configuration 62
4. Communication Port 54
=X=X=
99SIMADO GFX44 V1 System Manual
Page 100

Matrix
Real Time Clock (RTC)
What’s this?
• Various features and facilities provided by the gateway, use date
and time parameters. These features are:
• Defining four timezones in the table.
• Routing type for the FXS and Mobile port for timezone.
• Routing group for the FXS and Mobile port for timezone.
• Such facilities work properly only if the system is set with correct
date and time values.
• For this SIMADO GFX44 is equipped with built in Real Time
Clock (RTC) circuit. This circuit is to be set once with current
date and time values. It then updates itself regularly to keep track
of the parameters. However, please note that the RTC circuit can
drift over a long period. Hence it is recommended to check and
reset RTC values at least once every month to correct this drift.
Please note that the system RTC takes care of the leap year.
However, please note that the RTC circuit can drift over a long
period. Hence it is recommended to check and reset RTC
values at least once every month to correct this drift. Please
note that the system RTC takes care of the leap year.
How to program?
Use following command to program the current date:
296-DD-MM-YYYY-#*
Where,
DD= 01 to 31 (leading zero must in case of single digit date).
MM= 01 to 12 (leading zero must in case of single digit month).
YYYY= Year in four digits from 2007 to 2099.
Use the following command to program current time:
297-HH-MM-SS-#*
Where,
HH= Hours in two digits from 00 to 23 (leading zero must in case of
single digit hour).
MM= Minutes in two digits from 00 to 59 (leading zero must in case
of single digit minute).
100 SIMADO GFX44 V1 System Manual
 Loading...