

Page 1

CXP
Page 2

2
Page 3

IMPORTANT PRECAUTIONS
SAVE THESE INSTRUCTIONS
• When using Matrix Cycles, basic precautions should always be followed, including the following: Read all instructions before using this equipment. It is
the responsibility of the owner to ensure that all users of this equipment are adequately informed of all warnings and precautions.
• This equipment is intended for commercial use. To ensure your safety and protect the equipment, read all instructions before operating.
WARNING!
TO REDUCE THE RISK OF BURNS, FIRE, ELECTRICAL SHOCK OR INJURY TO PERSONS:
ENGLISH
• Use this indoor cycle for its intended purpose as
described in this manual. Do not use attachments that
have not been recommended by the manufacturer.
• Never operate the indoor cycle if it is not working properly,
or if it has been damaged. Contact Customer Tech Support
or the authorized dealers for examination and repair.
• Do not use the indoor cycle without proper footwear.
NEVER operate the indoor cycle with bare feet.
• Do not wear any clothing that might catch on
any moving parts of this indoor cycle.
• Keep hands and feet clear at all times from moving parts
to avoid injury. Never turn the pedal cranks by hand.
• Do not dismount the indoor cycle until the
pedals are at a complete STOP.
• Do not insert any object, hands or feet into any openings,
or expose hands, arms or feet to the drive mechanism
or other potentially moving part of the indoor cycle.
• Do not use any equipment that is damaged or has worn
or broken parts. Use only replacement parts supplied
by Customer Tech Support or the authorized dealers.
• Do not operate where aerosol (spray) products are
being used or when oxygen is being administered.
• Close supervision is necessary when used near children.
• This equipment is not intended for use by persons with
reduced physical, sensory or mental capabilities, or lack
of experience and knowledge, unless they have been
given supervision or instruction concerning use of the
equipment by a person responsible for their safety.
• Ensure that adjustment levers (seat and handlebar
fore-and-aft) are properly secured and do not
interfere with range of motion during exercise.
• When adjusting the seat and handlebar height,
hold the seat or handlebar with one hand,
while lifting and then locking the lever. Ensure
clamp is fully engaged prior to use.
• Incorrect or excessive exercise may result in serious
injury or death. If you experience any kind of pain,
including but not limited to chest pains, nausea, dizziness,
or shortness of breath, stop exercising immediately
and consult your physician before continuing.
• Do not jump on the unit.
• At no time should more than one person
be on unit while in operation.
• This unit should not be used by persons weighing
more than specied in the PRODUCT SPECIFICATIONS
SECTION. Failure to comply will void the warranty.
• Do not use other attachments that are not recommended
by the manufacturer. Attachments may cause injury.
• To clean, wipe surfaces down with soap and slightly damp
cloth only; never use solvents. (See MAINTENANCE)
• At NO time should pets or children under the
age of 14 be closer to the unit than 10 feet.
• At NO time should children under the age of 14 use the unit.
• Children over the age of 14 should not use
the unit without adult supervision.
• Heart rate monitoring systems may be inaccurate.
• After exercising, push down on the brake lever to slow
the ywheel down and decrease the potential for injury.
• The indoor cycle does not have a independently
moving ywheel; the pedals will continue to move
together with the ywheel until the ywheel stops.
• Use the stationary training equipment
in a supervised environment.
CAUTION!
CONSULT A PHYSICIAN BEFORE USING THIS EQUIPMENT. READ OWNER’S MANUAL BEFORE USE.
• It is essential that this equipment is used only indoors, in a climate controlled room. If this equipment has been exposed to colder temperatures or high moisture
climates, it is strongly recommended that the equipment is warmed up to room temperature and allowed time to dry out before rst time use.
3
Page 4

ENGLISH
ASSEMBLY
UNPACKING
Unpack the equipment where you will be using it. Place the carton
on a level at surface. It is recommended that you place a protective
covering on your oor. Never open box when it is on its side.
IMPORTANT NOTES
During each assembly step, ensure that ALL nuts
and bolts are in place and partially threaded.
Several parts have been pre-lubricated to aid in assembly
and usage. Please do not wipe this off. If you have diculty,
a light application of lithium grease is recommended.
WARNING!
There are several areas during the assembly process that
special attention must be paid. It is very important to follow
the assembly instructions correctly and to make sure all parts
are rmly tightened. If the assembly instructions are not
followed correctly, the equipment could have parts that are not
tightened and will seem loose and may cause irritating noises.
To prevent damage to the equipment, the assembly instructions
must be reviewed and corrective actions should be taken.
TOOLS REQUIRED:
F 3 mm Allen Wrench
F 5 mm Allen Wrench
F 10 mm Allen Wrench
F Flat Wrench (15mm/17mm 325L)
F Phillips Screwdriver
PARTS INCLUDED:
F 1 Main Frame
F 1 Front Stabilizer Tube
F 1 Rear Stabilizer Tube
F 1 Handlebar Set
F 1 Transport Handle
F 1 Bicycle Saddle
F 2 Pedals
F 1 Console
F 1 Hardware Kit
WARNING
SEAT AND HANDLEBARS: HOLD WITH ONE HAND WHILE
ADJUSTING HEIGHT. ENSURE CLAMP IS FULLY
ENGAGED PRIOR TO USE.
USE THE STATIONARY TRAINING EQUIPMENT IN A
SUPERVISED ENVIRONMENT UNDER THE DIRECT
SUPERVISION OF A TRAINED INSTRUCTOR.
SPINNING PEDALS CAN CAUSE INJURY.
THIS EXERCISE BICYCLE DOES NOT HAVE A
FREEWHEEL AND PEDAL SPEED MUST BE
REDUCED IN A CONTROLLED MANNER.
CAUTION
KEEP CHILDREN UNDER THE AGE OF 14 AWAY FROM
EXERCISE EQUIPMENT.
ALL WARNINGS AND INSTRUCTIONS SHOULD BE READ
AND PROPER INSTRUCTION OBTAINED PRIOR TO USE.
USE THIS EQUIPMENT FOR ITS INTENDED PURPOSE
ONLY. CONSULT A PHYSICIAN BEFORE USING THIS
EQUIPMENT.
SET UP AND OPERATE THE STATIONARY EXERCISE
BICYCLE ON A SOLID LEVEL SURFACE. CARE
SHOULD BE TAKEN IN MOUNTING AND
DISMOUNTING THE STATIONARY EXERCISE
BICYCLE. BEFORE DISMOUNTING,
BRING THE PEDALS TO A
COMPLETE STOP.
NEED HELP?
If you have questions or if there are any missing
parts, contact Customer Tech Support. Contact
information is located on the information card.
SERIAL NUMBER
MODEL: CXP MATRIX TARGET TRAINING CYCLE
* Use the information above when calling for service.
4
Page 5

TENSION CONTROL & EMERGENCY BRAKE LEVER
SADDLE
HANDLEBARS
ENGLISH
CONSOLE
HORIZONTAL SADDLE
ADJUSTMENT LEVER
SADDLE HEIGHT
ADJUSTMENT LEVER
MAIN FRAME
SERVICE PANEL
FLYWHEEL
TRANSPORT HANDLE
WATER BOTTLE HOLDER
HORIZONTAL HANDLEBAR
ADJUSTMENT LEVER
HANDLEBAR HEIGHT
ADJUSTMENT LEVER
PEDALS
CRANK
TRANSPORT WHEELS
REAR STABILIZER TUBE
FRONT STABILIZER TUBE
LEVELERS
5
Page 6
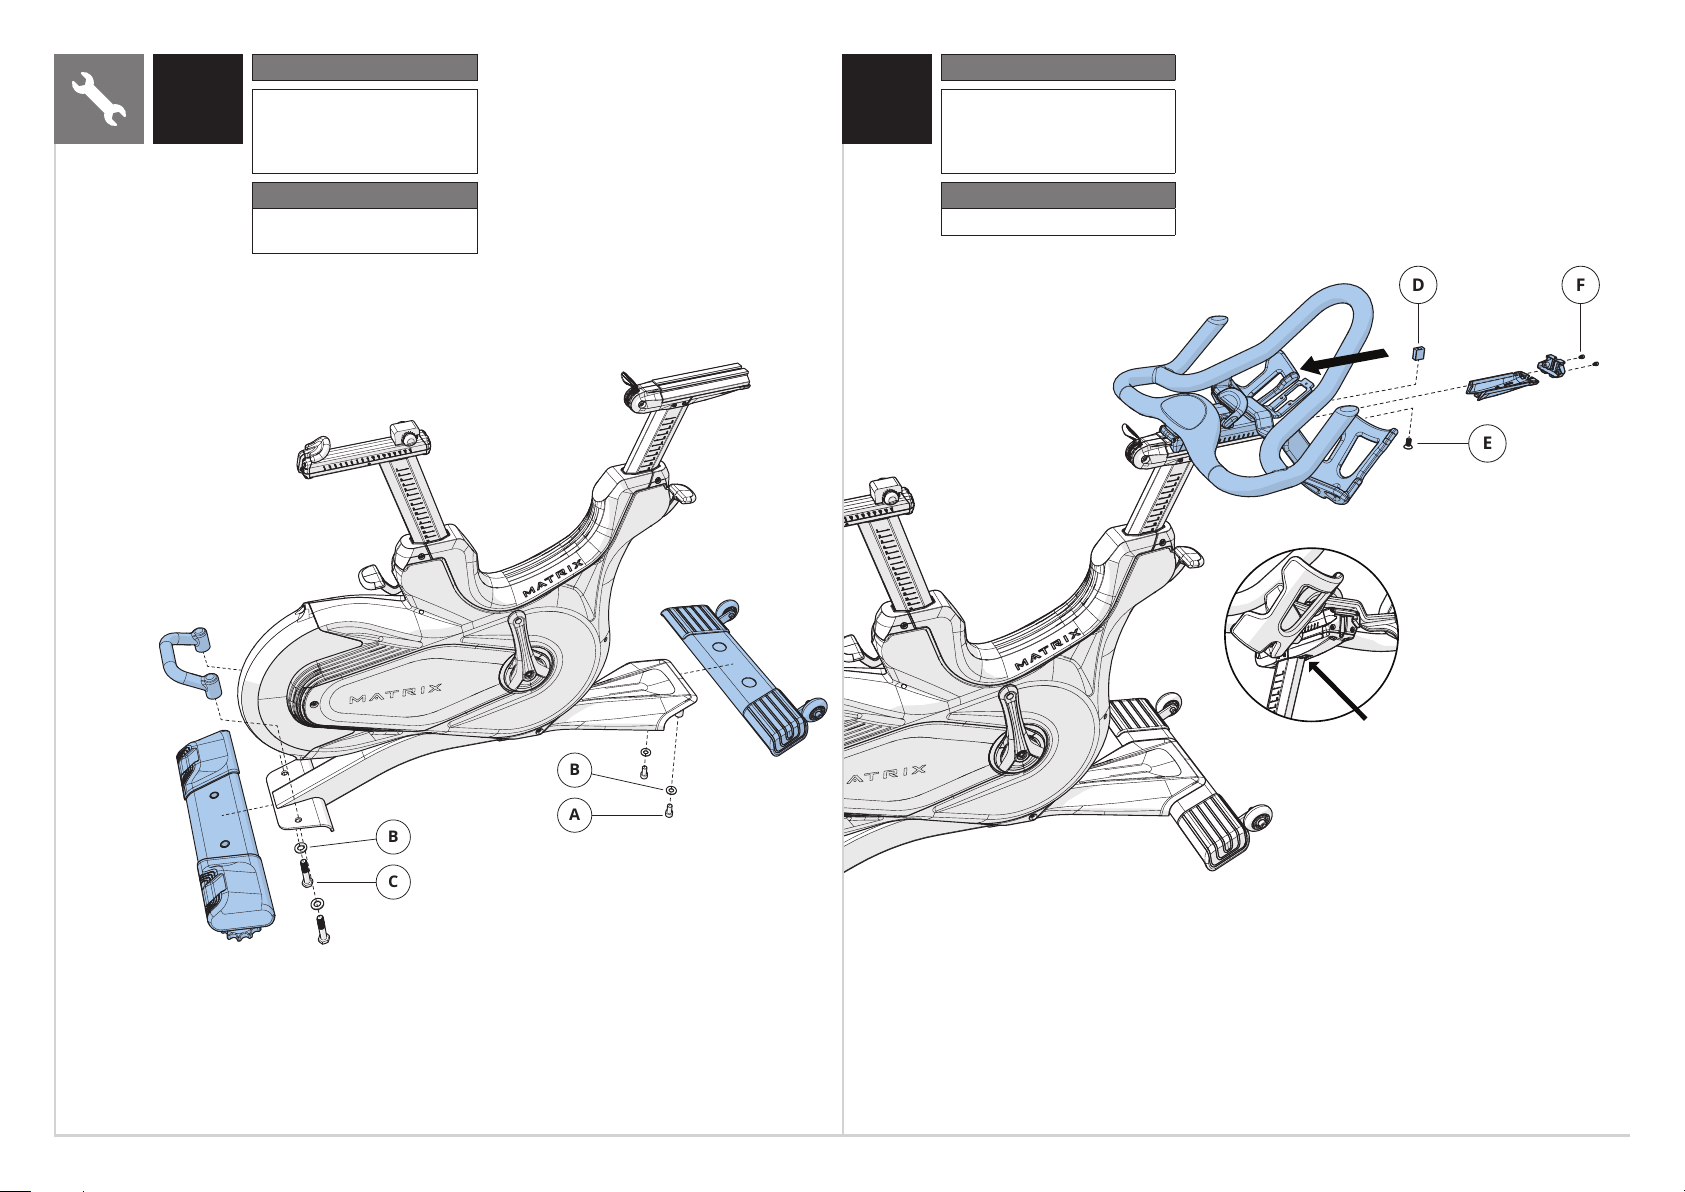
A
B
C
B
Red Hardware Pack
E
F
D
Yellow Hardware Pack
ENGLISH
1 2
Description Qty
A
Bolt (M12x25L)
B
Flat Washer
C
Bolt (M12x70L)
Torque Value
AC78 Nm / 58 ft-lb
78 Nm / 58 ft-lb
2
4
2
Description Qty
D
Stopper
E
Screw (M8x20L)
F
Screw (M4x6L)
Torque Value
E 20 Nm / 14 ft-lb
1
1
2
Push to lock
6
Page 7
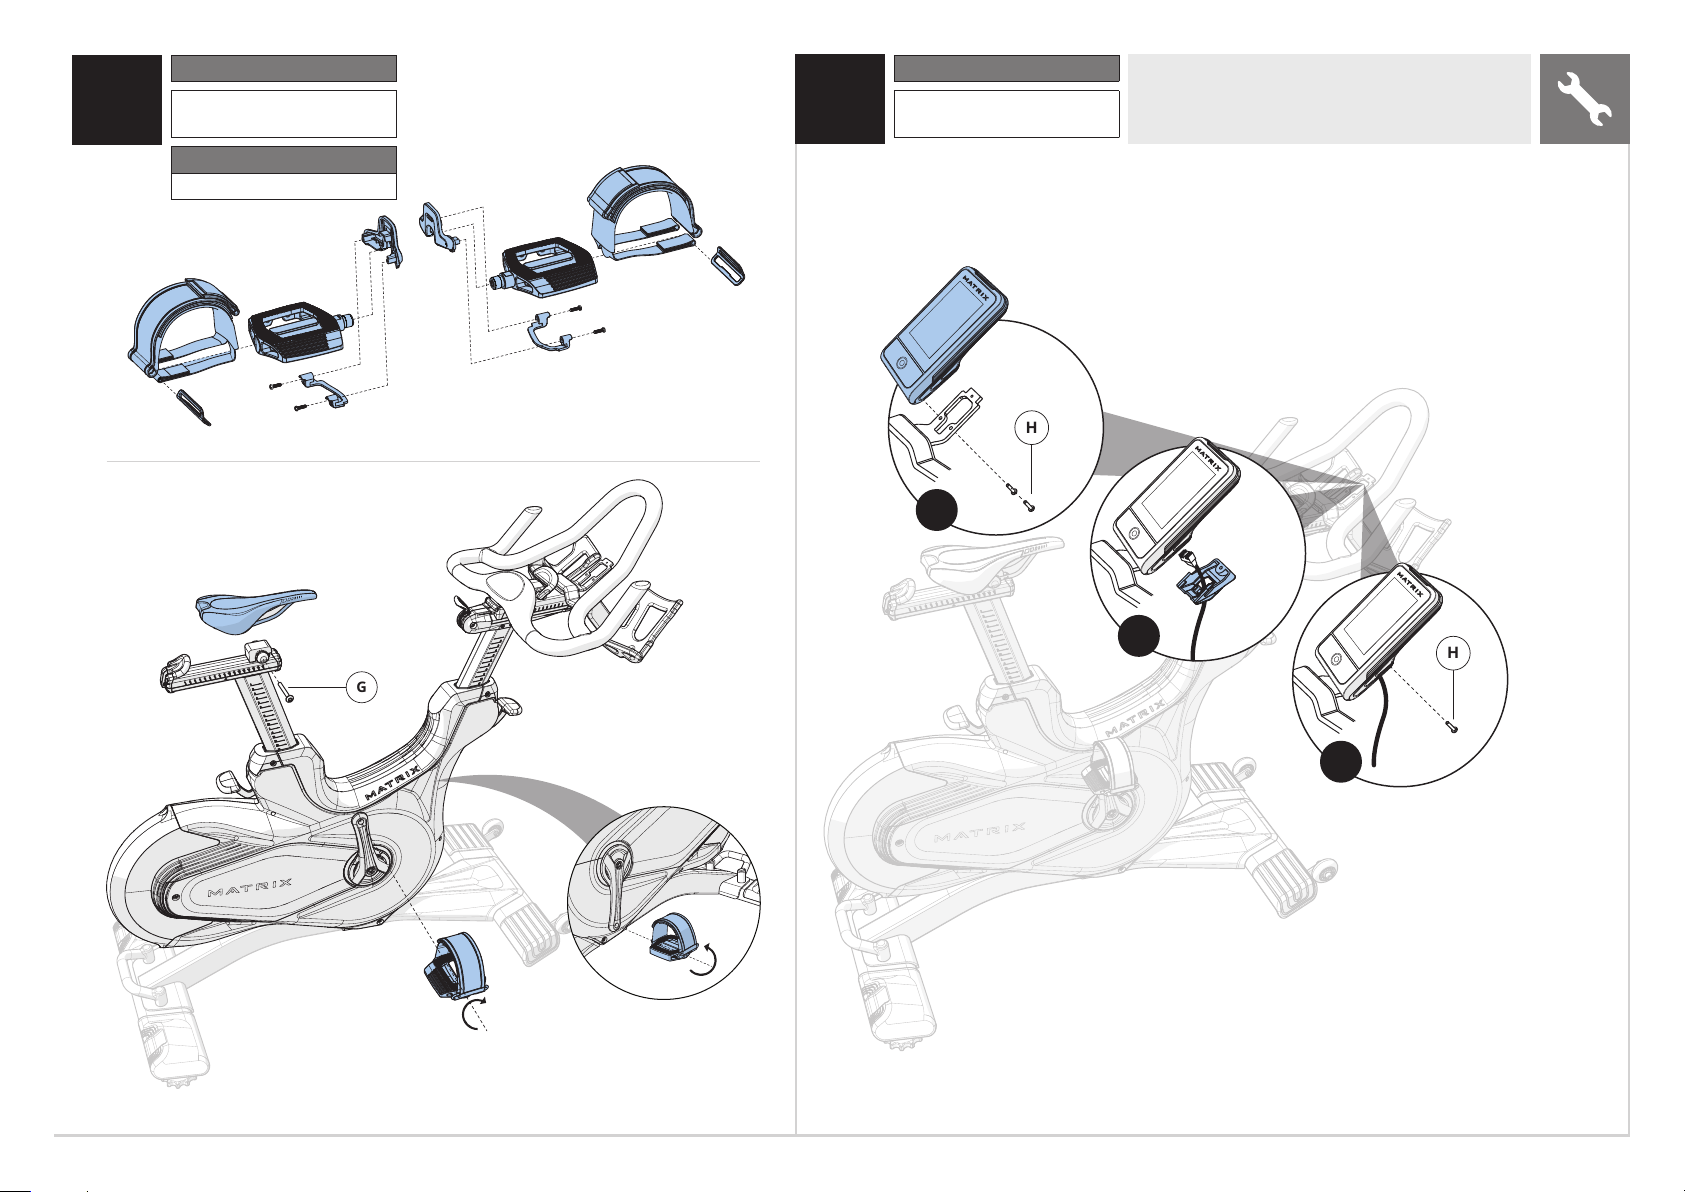
H
H
G
Pre-installed Hardware
Green Hardware Pack
3
Description Qty
G Bolt (M6x50L) 1
Torque Value
100 Nm / 74 ft-lb
4
Description Qty
H Screw (M4x10L) 3
1
ASSEMBLY COMPLETE!
ENGLISH
2
3
LEFT PEDAL
7
Page 8

ENGLISH
HOME SCREEN RUN SCREEN (RPM)
B
D
G
C
H
E
I
J
F
A
8
Page 9

CONSOLE OPERATION
The CXP has a fully integrated touch screen display. All information required for
workouts is explained on screen. Exploration of the interface is highly encouraged.
A) POWER BUTTON: Press to wake display/power on. Press and hold for 3 seconds
to put display to sleep. Press and hold for 10 seconds to power off.
B) LANGUAGE SELECTION
C) CLOCK
D) MENU: Touch to access various functions before or during your workout.
E) WORKOUTS: Touch to access a variety of target training options or preset
workouts.
F) SIGN IN: Touch to sign in using your XID (WiFi is an optional add-on feature).
G) CURRENT SCREEN: Displays what screen you are currently viewing.
H) FEEDBACK WINDOWS: Displays Time, RPM, Watts, Average Watts, Speed, Heart
Rate (BPM), Level, Pace, Distance or Calories. Feedback varies based on current
screen.
I) CHANGE SCREEN: Swipe display left or right to cycle between 6 different run
screen options. Or select a metric with an orange triangle to go straight to a
desired screen.
J) TARGET TRAINING SCREEN: Press to return to target training screen when a
target training options has been set. Press the target icon to set a specific training
goal and activate the LED color wrap.
• PERSONAL INFO: Enter weight, age and gender to ensure caloric data and the
power-to-weight ratio is more accurate.
SIGN IN
1) Enter your XID and touch .
2) Enter your PASSCODE and touch .
Consoles equipped with RFID will support logging in with RFID tag. To
log in, touch your RFID tag to the right side surface of the console.
REGISTER A NEW USER
1) Don’t have an xID account? Registration is easy.
2) Follow the on-screen prompts to create your free account.
3) Review your information and select the I ACCEPT THE TERMS AND
CONDITIONS box to review the Terms and Conditions.
4) Touch to complete registration. Your account
is now active and you are signed-in.
WORKOUT SETUP
1) After touching the WORKOUTS button, select
one of the WORKOUTS from the list.
2) Use the SLIDER CONTROLS to adjust your program settings.
3) Press GO to begin your workout.
CHANGE WORKOUT
During a workout, touch and then touch CHOOSE
EXERCISE to access available workouts.
ENGLISH
• BATTERY: Battery level is shown at the bottom of the MENU screen. Pedaling
can wake/power on the console. Pedaling at a rate above 77 RPM will charge the
battery.
HOME SCREEN
• Pedal to START immediately. Or...
• Touch the WORKOUTS button to customize your workout.
• Touch the SIGN IN button to sign in using your XID.
SUMMARY SCREENS
After your workout is complete, a workout summary will appear. You
can swipe up and down to scroll through the summary. Also, swipe the
display left and right to switch between the summary screens.
COOL DOWN
Touch START COOL DOWN to enter cool down mode. Cool down lasts for
a few minutes while reducing the workout intensity, allowing your body to
recover from your workout. End cool down to go to workout summary.
9
Page 10

CONSOLE OPERATION
ENGLISH
TARGET TRAINING WORKOUT
1) Start pedaling until the default screen appears.
2) Either swipe right or tap the metric box with an orange triangle to take you
directly to the desired screen.
3) Once on your desired screen, tap the large metric or the target icon to set your
training goal and then touch . The LED lights now become associated to that
target.
LED LIGHTS
Target training programming uses bright color lights on the top and sides of the
console to gauge effort and keep everyone on track of their goals. These lights may
be turned on or off in the workout setup by pressing LIGHTS ON or LIGHTS OFF. The
color indicators are: BLUE = below target, GREEN = on target, RED = above target.
MANAGER MODE
To enter manager mode, press and hold the MATRIX logo in the center of the screen
for 10 seconds. Then enter 1001 and touch .
POWER ACCURACY
This bike displays power on the console. The power accuracy of this model has been
tested using the test method of ISO 20957-10:2017 to ensure a power accuracy within a
tolerance of ±10 % for input power ≥50 W, and within a tolerance of ±5 W for input power
<50 W. The power accuracy was verified using the following conditions:
Nominal Power Rotations per minute measured at crank
• 50 W 50 RPM
• 100 W 50 RPM
• 150 W 60 RPM
• 200 W 60 RPM
• 300 W 70 RPM
• 400 W 70 RPM
In addition to the above testing conditions, the manufacturer tested the power accuracy
at one additional point, using a crank rotation speed of approximately 80 RPM (or higher)
and comparing the displayed power to the input (measured) power.
WIRELESS HEART RATE
To connect your ANT+ or Bluetooth SMART heart rate device to the
console, touch and then touch HEART RATE DEVICE PAIRING.
The heart rate function on this product is not a medical device. The heart rate reading is
intended only as an exercise aid in determining heart rate trends in general. Please consult
your physician.
When used in conjunction with a wireless chest strap or arm band, your heart rate can be
transmitted wirelessly to the unit and displayed on the console.
WARNING!
Heart rate monitoring systems may be inaccurate. Over exercising may result
in serious injury or death. If you feel faint, stop exercising immediately.
10
* Supported standards with carrier frequency of 13.56 MHz include; ISO 14443 A, ISO 15693, ISO 14443 B, Sony Felica, Inside Contact-less (HID iClass), and LEGIC RF.
Page 11
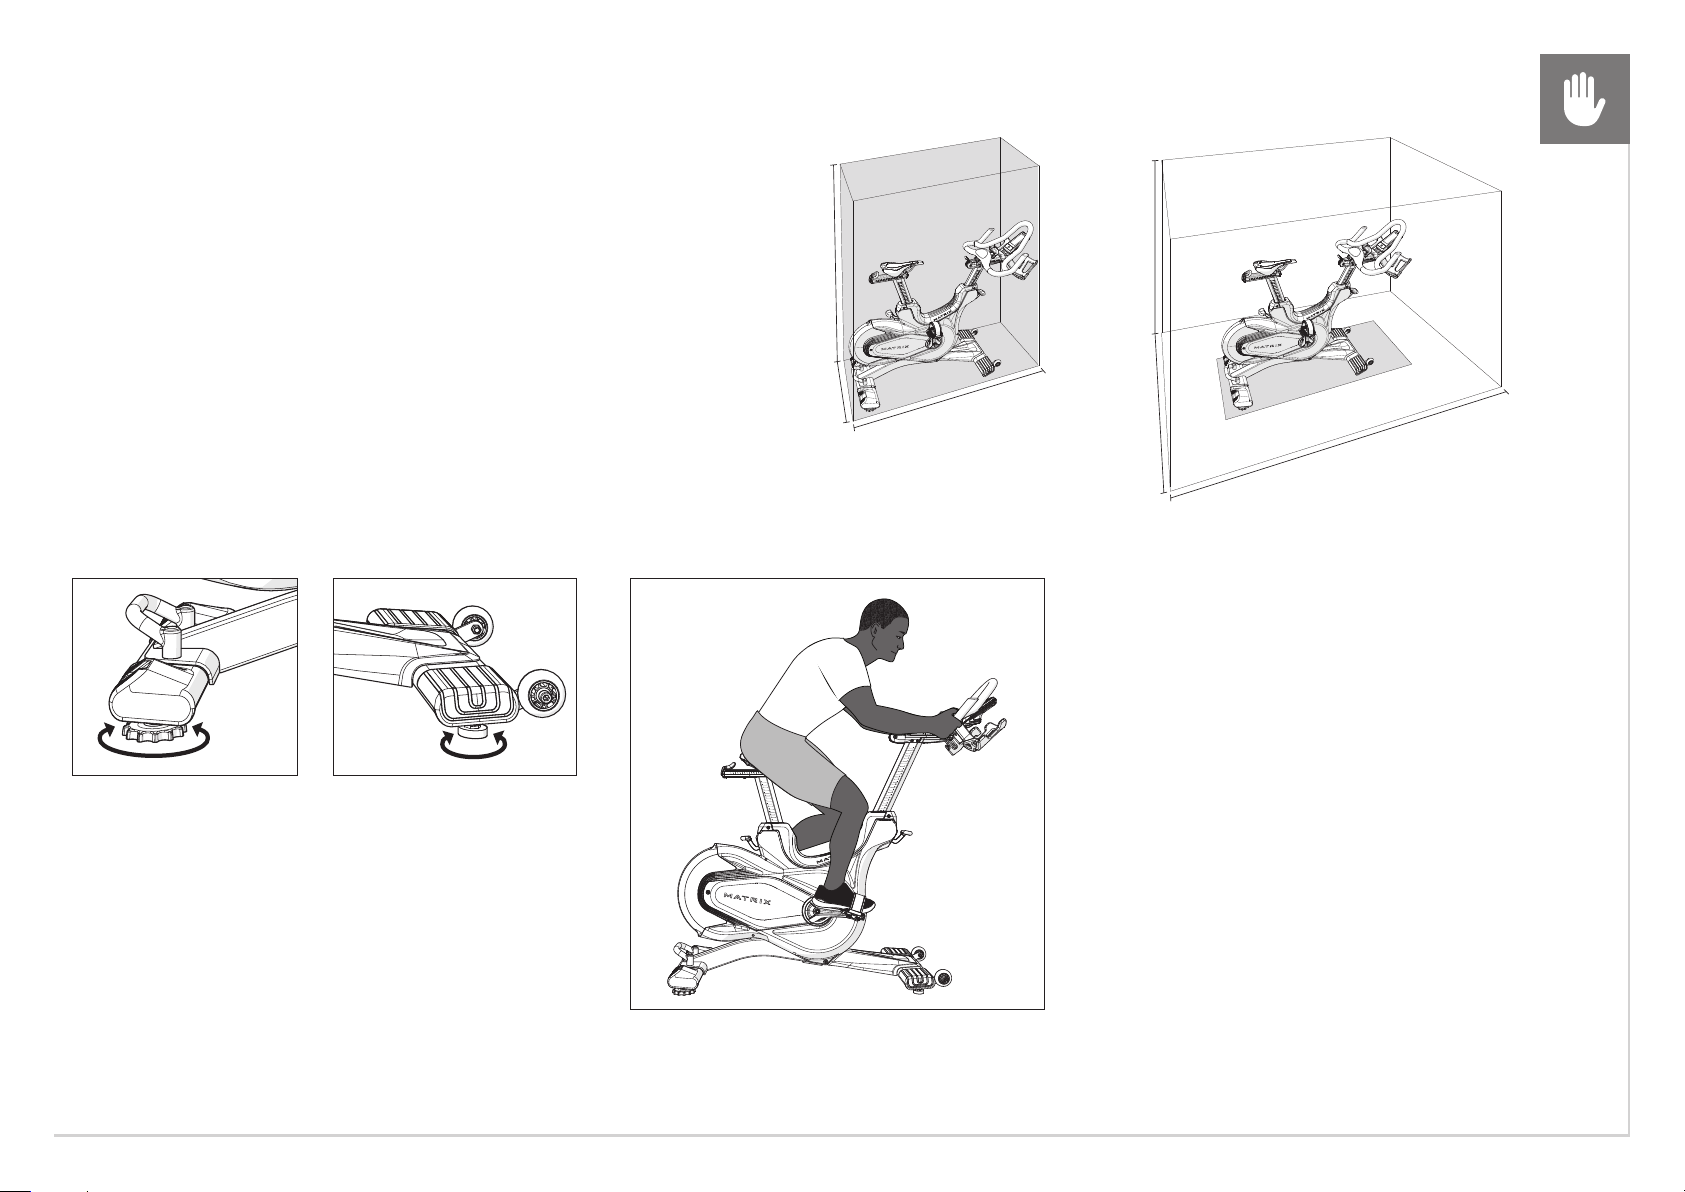
BEFORE YOU BEGIN
LOCATION OF THE UNIT
Place the equipment on a level and stable surface away from direct sunlight. The
intense UV light can cause discoloration on the plastics. Locate your equipment in
an area with cool temperatures and low humidity. Please leave a clear zone on all
sides of the equipment that is at least 60 cm (23.6”). This zone must be clear of any
obstruction and provide the user a clear exit path from the machine. Do not place
the equipment in any area that will block any vent or air openings. The equipment
should not be located in a garage, covered patio, near water or outdoors.
TRAINING AREA
2 M
(78.7”)
2 M
(78.7”)
FREE AREA
ENGLISH
WARNING!
Our equipment is heavy, use care and additional help if necessary when
moving. Failure to follow these instructions could result in injury.
LEVELING THE EQUIPMENT
It is extremely important that the levelers are correctly
adjusted for proper operation. Turn leveling foot
clockwise to lower and counter-clockwise to raise unit.
Adjust each side as needed until the equipment is
level. An unbalanced unit may cause belt misalignment
or other issues. Use of a level is recommended.
0.56 M
(22.2”)
1.76 M
(69.4”)
1.45 M
(57.2”)
2.65 M
(104.4”)
PROPER USAGE
1. Sit on the cycle facing the handlebars.
Both feet should be on the floor
one on each side of the frame.
2. To determine proper seat position, sit on
the seat and position both feet on the
pedals. Your knee should bend slightly at
the furthest pedal position. You should be
able to pedal without locking your knees or
shifting your weight from side to side.
3. Adjust pedal straps to desired tightness.
4. To get off of the cycle, follow the
proper usage steps in reverse.
11
Page 12

HOW TO ADJUST THE INDOOR CYCLE
ENGLISH
The indoor cycle can be adjusted for maximum comfort and exercise
effectiveness. The instructions below describe one approach to adjusting
C
the indoor cycle to ensure optimal user comfort and ideal body
positioning; you may choose to adjust the indoor cycle differently.
SADDLE ADJUSTMENT
A
Proper saddle height helps ensure maximum exercise efficiency
and comfort, while reducing the risk of injury. Adjust the saddle
height to make sure it’s in proper position, one that keeps a slight
bend in your knee while your legs are in the extended position
HANDLEBAR ADJUSTMENT
Proper position for the handlebar is based primarily on comfort.
B
D
E
Typically, the handlebar should be positioned slightly higher
than the saddle for beginning cyclists. Advanced cyclists could try
different heights to get the arrangement most suitable for them.
A) SADDLE HORIZONTAL POSITION
Pull the adjustment lever down to slide the saddle forward
or backward as desired. Push the lever up to lock saddle
position. Test the saddle slide for proper operation.
B) SADDLE HEIGHT
Lift the adjustment lever up while sliding the saddle up and down
with the other hand. Push the lever down to lock saddle position.
C) HANDLEBAR HORIZONTAL POSITION
Pull the adjustment lever towards the rear of the cycle
to slide the handlebars forward or backward as desired.
Push the lever forward to lock handlebar position.
12
D) HANDLEBAR HEIGHT
Pull the adjustment lever up while raising or lowering the handlebar
with the other hand. Push the lever down to lock handlebar position.
E) PEDAL STRAPS
Place the ball of the foot into the toe cage until the ball of
the foot is centered over the pedal, reach down and pull
the pedal strap up to tighten prior to use. To remove your
foot from the toe cage, loosen the strap and pull out.
Page 13

RESISTANCE CONTROL / EMERGENCY BRAKE
The preferred level of difficulty in pedaling (resistance) can be regulated in fine increments by use of the
tension control lever. To increase the resistance, push the tension control lever towards the ground. To
decrease the resistance, pull up the lever upwards.
IMPORTANT:
• To stop the flywheel while pedaling, push down hard on the lever.
• The flywheel should quickly come to a complete stop.
• Make sure your shoes are fixed into the toe clip.
• Apply full resistance load when the bike is not in use to prevent injuries due to moving drive gear
components.
WARNING
The indoor cycle does not have a free moving flywheel; the pedals will continue to move
together with the flywheel until the flywheel stops. Reducing speed in a controlled
manner is required. To stop the flywheel immediately, push down the red emergency
brake lever. Always pedal in a controlled manner and adjust your desired cadence
according to your own abilities. Push the red lever down = emergency stop.
The indoor cycle uses a fixed flywheel that builds momentum and will keep the pedals
turning even after the user stops pedaling or if the user’s feet slip off. DO NOT ATTEMPT
TO REMOVE YOUR FEET FROM THE PEDALS OR DISMOUNT THE MACHINE UNTIL BOTH
THE PEDALS AND THE FLYWHEEL HAVE COMPLETELY STOPPED. Failure to follow these
instructions may lead to loss of control and the potential for serious injury.
ENGLISH
13
Page 14

MAINTENANCE
MAINTENANCE SCHEDULE
ENGLISH
1. Any and all part removal or replacement must be
performed by a qualied service technician.
2. DO NOT use any equipment that is damaged and or has worn or broken parts.
Use only replacement parts supplied by your country’s local MATRIX dealer.
3. MAINTAIN LABELS AND NAMEPLATES: Do not remove labels for
any reason. They contain important information. If unreadable or
missing, contact your MATRIX dealer for a replacement.
4. MAINTAIN ALL EQUIPMENT: Preventative maintenance is the key to
smooth operating equipment as well as keeping your liability to a
minimum. Equipment needs to be inspected at regular intervals.
5. Ensure that any person(s) making adjustments or performing maintenance
or repair of any kind is qualied to do so. MATRIX dealers will provide service
and maintenance training at our corporate facility upon request.
D
B
A
C
ACTION FREQUENCY
Clean the indoor cycle using soft cloths or paper towels or other
Matrix approved solution (cleaning agents should be alcohol
and ammonia free). Disinfect the saddle and handlebars and
wipe off all bodily residues.
Make sure that the indoor cycle is level and does not rock. DAILY
Clean entire machine using water and a mild soap or other
Matrix approved solution (cleaning agents should be alcohol
and ammonia free).
Clean all exterior parts, the steel frame, front and rear
stabilizers, seat and handlebars.
Test the emergency brake to make sure it is functioning
properly. To do this, press down the red emergency brake
lever while pedaling. When functioning properly, it should
immediately slow down the ywheel until it comes to a complete
stop.
Lubricate the saddle post (A). To do this, raise the saddle post to
the MAX position, spray with maintenance spray and rub down
the entire exterior surfaces with a soft cloth. Clean the saddle
slide (B) with a soft cloth and if necessary apply a small amount
of lithium/silicone grease.
Lubricate the handlebar post (C). To do this, raise the handlebar
post to the MAX position, spray with maintenance spray and
rub down the entire exterior surfaces with a soft cloth. Clean
the handlebar slide (D) with a soft cloth and if necessary apply a
small amount of lithium/silicone grease.
Inspect all assembly bolts and pedals on the machine for proper
tightness.
AFTER EACH USE
WEEKLY
BI-WEEKLY
BI-WEEKLY
BI-WEEKLY
MONTHLY
14
Inspect handlebar and seat height adjustment levers for proper
tightness.
5 mm
MONTHLY
Page 15

PRODUCT SPECIFICATIONS
CXP Indoor Cycle
Max User Weight 159 kg / 350 lbs
User Height Range 147 – 200.7 cm / 4’11” – 6’7”
Max Saddle and Handlebar Height 130.3 cm / 51.3”
Max Length 145.2 cm / 57.2”
Product Weight 57.6 kg / 127 lbs
Shipping Weight 63.5 kg / 140 lbs
Required Footprint (L x W)* 122.4 x 56.3 cm / 48.2” x 22.2”
Dimensions
(max saddle & handlebar height)
Overall Dimensions
(L x W x H)*
* Ensure a minimum clearance width of 0.6 meters (24”) for access to and passage around MATRIX equipment.
Please note, 0.91 meters (36”) is the ADA recommended clearance width for individuals in wheelchairs.
For most current owner’s manual and information, check www.matrixtness.com
145.2 x 56.4 x 130.2 cm /
57.2” x 22.2 x 51.3”
122.4 x 56.4 x 102.8 cm /
48.2” x 22.2 x 40.5”
NOTE:
This equipment has been tested and found to comply with the limits
for a Class B digital device, pursuant to part 15 of the FCC rules. These
limits are designed to provide reasonable protection against harmful
interference in a residential installation. This equipment generates, uses
and can radiate radio frequency energy and, if not installed and used in
accordance with the instructions, may cause harmful interference to radio
communications. However, there is no guarantee that interference will
not occur in a particular installation. If this equipment does cause harmful
interference to radio or television reception, which can be determined
by turning the equipment off and on, the user is encouraged to try to
correct the interference by one or more of the following measures:
• Reorient or relocate the receiving antenna.
• Increase the separation between the equipment and receiver.
• Connect the equipment into an outlet on a circuit different
from that to which the receiver is connected.
• Consult the dealer or an experienced radio/TV technician for help.
Any changes or modifications not expressly approved by the party responsible
for compliance could void the user’s authority to operate this equipment.
FCC RF Radiation Exposure Statement:
ENGLISH
1. This Transmitter must not be co-located or operating in
conjunction with any other antenna or transmitter.
2. This equipment complies with FCC RF radiation exposure limits
set forth for an uncontrolled environment. This equipment
should be installed and operated with a minimum distance
of 20 centimeters between the radiator and your body
15
Page 16

CXP
© 2018 Johnson Health Tech
Part # 1000411498
Rev 1.0 A
 Loading...