

Page 1
AKKU-RASENMÄHER
ALM 40-1 Li X-ONE
Originalbetriebsanleitung
DE
AKKU-RASENMÄHER
Originální návod
CZ
Sekačka na trávu na baterie
Art. No: 511.010.592
Translation of the original instructions
UK
CORDLESS LAWN MOWER
Page 2
18
15
1
2
4a
16
3
5
4
6
7
8
19
9
11
1
2
Page 3
2
14
3
4
5-2
7
5-1
12
6
10
17
8
3
Page 4
13
20
21
9
11
10
4
Page 5

Einleitung
Herzlichen Glückwunsch zum Kauf Ihres
neuen Gerätes. Sie haben sich damit für ein
hochwertiges Gerät entschieden. Dieses Gerät
wurde während der Produktion auf Qualität
geprüft und einer Endkontrolle unterzogen.
Die Funktionsfähigkeit Ihres Gerätes ist somit
sichergestellt.
Die Betriebsanleitung ist Bestandteil dieses
Gerätes. Sie enthält wichtige Hinweise für
Sicherheit, Gebrauch und Entsorgung. Machen
Sie sich vor der Benutzung des Gerätes mit allen
Bedien- und Sicherheitshinweisen vertraut.
Benutzen Sie das Gerät nur wie beschrieben und
für die angegebenen Einsatzbereiche.
Bewahren Sie die Betriebsanleitung gut auf und
händigen Sie alle Unterlagen bei Weitergabe des
Gerätes an Dritte mit aus.
Bestimmungsgemäße Verwendung
Das Gerät ist nur für das Mähen von Rasen- und
Grasflächen im häuslichen Bereich bestimmt.
Das Gerät ist für den Einsatz im
Heimwerkerbereich bestimmt. Es wurde nicht
für den gewerblichen Dauereinsatz konzipiert.
Jede andere Verwendung, die in dieser
Betriebsanleitung nicht ausdrücklich zugelassen
wird, kann zu Schäden am Gerät führen und eine
ernsthafte Gefahr für den Benutzer darstellen.
Das Gerät ist zum Gebrauch durch Erwachsene
bestimmt.
Kinder sowie Personen, die mit dieser
Betriebsanleitung nicht vertraut sind, dürfen das
Gerät nicht benutzen. Die Benutzung des Gerätes
bei Regen oder feuchter Umgebung ist verboten.
Der Hersteller haftet nicht für Schäden, die durch
bestimmungswidrigen Gebrauch oder falsche
Bedienung verursacht wurden.
Sicherheitshinweise
Dieser Abschnitt behandelt die grundlegenden
Sicherheitsvorschriften bei der Arbeit mit dem
Gerät.
Allgemeine Sicherheitshinweise
Dieses Gerät kann bei unsachgemäßem
Gebrauch ernsthafte Verletzungen verursachen.
Um Personen- und Sachschäden zu vermeiden,
lesen und beachten Sie unbedingt die folgenden
Sicherheitshinweise und machen Sie sich miz
allen Bedienteilen gut vertraut.
Vorbereitung
• Erlauben Sie niemals Kindern oder anderen
Personen, die die Betriensanleitung nicht kennen,
das Gerät zu benutzen. Örtliche Bestimmungen
können das Mindestalter der Bedienungsperson
festlegen.
• Setzen Sie das Gerät niemals ein, während
Personen, besonders Kinder und Haustiere, in
der Nähe sind. Kinder dürfen nicht mit dem Gerät
spielen.
• Der Bediener oder Nutzer ist für Unfälle oder
Schäden an anderen Menschen oder deren
Eigentum vertantwortlich.
• Überprüfen Sie das Gelände, auf dem das Gerät
eingestzt wird und entfernen Sie Steine, Stöcke,
Drähte oder andere Fremdkörper, die erfasst und
weggeschleudert werden können.
• Tragen Sie geeignete Arbeitskleidung wie
festes Schuhwerk mit rutschfester Sohle und
eine robuste, lange Hose. Benutzen Sie das
Gerät nicht, wenn Sie barfuß gehen oder offene
Sandalen tragen. Vermeiden Sie das Tragen
loser Kleidung oder Kleidung mit hängenden
Schnüren oder Gürteln.
• Führen Sie vor jeder Benutzung eine
Sichtprüfung des Gerätes durch. Benutzen Sie
das Gerät nicht, wenn Schutzeinrichtungen
(z. B. Prallschutz oder Grasfangkorb) Teile
der Schneideinrichtung oder Bolzen fehlen,
abgenutzt oder beschädigt sind. Zur Vermeidung
einer Unwucht dürfen beschädigte Werkzeuge
und Bolzen nur satzweise ausgetauscht werden.
• Seien Sie vorsichtig bei Geräten mit mehreren
Schneidwerkzeugen, da die Bewegung eines
Messers zur Rotation der übrigen Messer führen
kann.
• Benutzen Sie nur Ersatz- und Zubehörteile, die
DE
5
Page 6

vom Hersteller geliefert und empfohlen werden.
Der Einsatz von Fremdteilen führt zum sofortigen
Verlust des Garantieanspruches.
• Abgenutzte oder beschädigte Hinweisschilder
müssen ersetzt werden.
Arbeiten mit dem Gerät
Führen Sie Füße und Hände beim Arbeiten
nicht in die Nähe oder unter rotierende Teile. Es
besteht Verletzungsgefahr!
• Schalten Sie den Motor nach Anweisung ein und
nur dann, wenn Ihre Füße in sicherem Abstand
von den Schneidwerkzeugen sind.
• Benutzen Sie das Gerät nicht bei Regen bei
schlechter Witterung, in feuchter Umgebung
oder an nassem Rasen. Arbeiten Sie nur bei
Tageslicht oder guter Beleuchtung.
• Arbeiten Sie mit dem Gerät nicht, wenn Sie
müde oder unkonzentriert sind oder nach der
Einnahme von Alkohol oder Tabletten. Legen Sie
immer rechtzeitig eine Arbeitspause ein. Gehen
Sie mit Vernuft an die Arbeit.
• Achten Sie beim Arbeiten auf einen sicheren
Stand, insbesondere an Hängen. Arbeiten
Sie immer quer zum Hang, niemals auf- oder
abwärts. Seien Sie besonders vorsichtig, wenn Sie
die Fahrtrichtung am Hang ändern. Arbeiten Sie
nicht an übermäßig steilen Hängen.
• Führen Sie das Gerät nur im Schritttempo. Seien
Sie besonders vorsichtig, wenn Sie das Gerät
umkehren, zu sich heranziehen oder rückwärts
gehen.
• Schalten Sie das Gerät mit vorsicht entsprechend
den Anweisungen in dieser Betriebsanleitung
ein. Achten Sie auf ausreichden Abstand der Füße
zu rotierenden Messsern.
• Kippen Sie das Gerät nicht beim Starten,außer
wenn dies beim Anlaufen in hohem Gras
erforderlich ist. In diesem Fall kippen Sie das
Gerät durch Drücken des Griffholms so, dass
die Vorderräder des Gerätes leicht angehoben
werden. Überprüfen Sie immer, dass sich beide
Hände in Arbeitsstellung befinden, bevor das
Gerät wieder auf den Boden zurückgestellt wird.
• Arbeiten Sie nie ohne Grasfangkorb oder
Prallschutz. Halten Sie sich immer entfernt von
der Auswurföffnung.
• Starten Sie den Motor nicht, wenn Sie vor dem
Auswurfschacht stehen.
Achtung Gefahr! Messer läuft nach. Es besteht
Verletzungsgefahr.
• Das Gerät darf nicht angehoben oder
transportiert werden, solange der Motor läuft.
Schalten Sie das Gerät ab, wenn es zum Transport
gekippt werden muss, wenn andere Flächen als
Rasen überquert werden und wenn das Gerät
zu und von den zu mähenden Flächen gebracht
wird.
• Halten Sie die Grasauswurföffnung stets
sauber und frei. Entfernen Sie Schnittgut nur im
Stillstand des Gerätes.
• Hinterlassen Sie das Gerät nie unbeaufsichtigt
am Arbeitsplatz.
• Arbeiten Sie nicht mit einem beschädigten,
unvollständigen oder ohne die Zustimmung
des Herstellers umgebauten Gerät.
Verwenden Sie das Gerät nie mit beschädigten
Schutzeinrichtungen oder Abschirmungen oder
fehlenden Sicherheitseinrichtungen wie Ablenkund/ oder Grasfangeinrichtungen.
• Überlasten Sie Ihr Gerät nicht. Arbeiten Sie nur
im angegebene Leistungsbereich und ändern
Sie nicht die Reglereinstellungen am Motor.
Verwenden Sie keine Leistungsschwachen
Maschinen für schwere Arbeiten. Benutzen Sie Ihr
Gerät nicht für Zwecke, für die es nicht bestimmt
ist.
• Benutzen Sie das Gerät nicht in der Nähe
von entzündbaren Flüssigkeiten oder Gasen.
Bei Nichtbeachtung besteht Brand- oder
Explosionsgefahr.
• Schalten Sie das Gerät aus, ziehen Sie den
Sicherheitsschlüssel ab und entnehmen Sie
den Akku. Vergewissern Sie sich, dass alle
beweglichen Teile still stehen:
6
Page 7

• Immer, wenn Sie das Gerät verlassen und wenn
es nicht verwendet wird,
• bevor Sie Blockierungen lösen oder
Verstopfungen im Auswurfkanal beseitigen,
• bevor Sie das Gerät überprüfen, reinigen oder
daran arbeiten,
• wenn ein Fremdkörper getroffen wurde. Suchen
Sie nach Beschädigungen am Gerät und führen
Sie die erforderlichen Reparaturen durch, bevor
Sie erneut starten und mit dem Gerät arbeiten,
• falls das Gerät anfängt, ungewöhnlich stark
zu vibrieren, ist eine sofortige Überprüfung
erfordlich.
• Sorgen Sie dafür, dass alle Muttern, Bolzen und
Schrauben fest angezogen sind.
• Suchen Sie das Gerät nach eventuellen
Beschädigungen ab.
• Führen Sie die erforderlichen Reparaturen
beschädigter Teile durch
- Bringen Sie Hände oder Füße niemals in die
Nähe oder unter rotierende Teile. Stellen Sie sich
nie vor die Grasauswurföffnung.
- Ziehen Sie den Stromkreisunterbrecher/
Kontaktschlüssel immer wenn:
• Sie sich vom Gartengerät entfernen, vor dem
Beseitigen von Blockierungen,
• wenn Sie das Gartengerät überprüfen, reinigen
oder an ihm arbeiten,
• nach der Kollision mit einem Fremdkörper.
Überprüfen Sie das Gerät sofort auf
Beschädigungen und lassen Sie es wenn
notwendig reparieren,
• wenn das Gartengerät ungewöhnlich zu
vibrieren beginnt (unverzüglich prüfen!).
- Lassen Sie den Motor abkühlen, bevor Sie das
Gerät in geschlossenen Räumen abstellen.
- Achten Sie beim Warten der Schneidmesser
darauf, dass selbst dann, wenn die
Spannungsquelle abgeschaltet ist, die
Schneidmesser bewegt werden können.
- Sorgen Sie dafür, dass alle Muttern, Bolzen und
Schrauben fest angezogen sind und das Gerät in
einem sicheren Arbeitszustand ist.
- Versuchen Sie nicht, das Gerät selbst zu
reparieren, es sei denn, Sie besitzen hierfür
eine Ausbildung. Sämtliche Arbeiten, die
nicht in dieser Betriebsanleitung angegeben
werden, dürfen nur von uns ermächtigten
Kundendienststellen ausgeführt werden.
- Bewahren Sie das Gerät an einem trockenen Ort
und außerhalb der Reichweite von Kindern auf.
- Behandeln Sie Ihr Gerät mit Sorgfalt. Halten Sie
die Werkzeuge scharf und sauber, um besser und
sicherer arbeiten zu können. Befolgen Sie die
Wartungsvorschriften.
- Tragen Sie Schutzhandschuhe, wenn Sie die
Schneideinrichtung wechseln.
- Überprüfen Sie die Grasfangeinrichtung
regelmäßig auf Verschleiß und Verformungen.
Ersetzen Sie aus Sicherheitsgründen
verschlissene oder beschädigte Teile. Seien Sie
beim Einstellen der Messer besonders vorsichtig,
damit Ihre Finger nicht zwischen den rotierenden
Messern und feststehenden Teilen der Maschine
eingeklemmt werden.
- Überprüfen Sie, dass nur
Ersatzschneidwerkzeuge verwendet werden, die
vom Hersteller zugelassen sind.
Elektrische Sicherheit:
- Der Anschlussstecker des Ladegerätes muss in
die Steckdose passen. Der Stecker darf in keiner
Weise verändert werden. Verwenden Sie keine
Adapterstecker gemeinsam mit schutzgeerdeten
Elektrowerkzeugen. Unveränderte Stecker und
passende Steckdosen verringern das Risiko eines
elektrischen Schlages.
- Vermeiden Sie Körperkontakt mit geerdeten
Oberflächen wie von Rohren, Heizungen, Herden
und Kühlschränken. Es besteht ein erhöhtes
Risiko durch elektrischen Schlag, wenn Ihr Körper
geerdet ist.
7
Page 8

- Halten Sie Elektrowerkzeuge von Regen
oder Nässe fern. Das Eindringen von Wasser in
ein Elektrowerkzeue erhöht das Risiko eines
elektrischen Schlages.
Sorgfältiger Umgang mit und Gebrauch von
Akkuwerkzeugen
- Laden Sie die Akkus nur in Ladegeräten auf,
die vom Hersteller empfohlen werden. Für ein
Ladegerät, das für eine bestimmte Art von Akkus
geeignet ist, besteht Brandgefahr, wenn es mit
anderen Akkus verwendet wird.
- Verwenden Sie nur die dafür vorgesehenen
Akkus in den Elektrowerkzeugen. Der Gebrauch
von anderen Akkus kann zu Verletzungen und
Brandgefahr führen.
- Halten Sie den nicht benutzten Akku fern
von Büroklammern, Münzen, Schlüsseln,
Nägeln, Schrauben oder anderen kleinen
Metallgegenständen, die eine Überbrückung
der Kontakte verursachen könnten. Ein
Kurzschluss zwischen den Akkukontakten kann
Verbrennungen oder Feuer zur Folge haben.
- Bei falschen Anwendung kann Flüssigkeit
aus dem Akku austreten. Vermeiden Sie den
Kontakt damit. Bei zufälligem Kontakt mit Wasser
abspülen. Wenn die Flüssigkeit in die Augen
kommt, nehmen Sie zusätzlich ärztliche Hilfe in
Anspruch. Austretende Akkuflüssigkeit kann zu
Hautreizungen oder Verbrennungen führen.
Spezielle Sicherheitshinweise für Akkugerät
- Stellen Sie sicher, dass das Gerät ausgeschaltet
ist, bevor Sie den Akku einsetzen. Das Einsetzen
eines Akkus in ein Elektrowerkzeug, das
eingeschaltet ist, kann zu Unfällen führen.
- Laden Sie Ihre Batterien nur im Innenbereich
auf, weil das Ladegerät nur dafür bestimmt ist.
Gefahr durch elektrischen Schlag.
- Um das Risko eines elektrischen Schlags zu
reduzieren, ziehen Sie den Stecker des Ladegeräts
aus der Steckdose heraus, bevor Sie es reinigen.
- Setzen Sie den Akku nicht über längere Zeit
starker Sonneneinstrahlung aus und legen Sie
ihn nicht auf Heizkörpern ab. Hitze schadet dem
Akku und es besteht Explosionsgefahr.
- Lassen Sie einen erwärmten Akku vor dem
Laden abkühlen.
- Öffnen Sie den Akku nicht und vermeiden Sie
eine mechanische Beschädigung des Akkus. Es
besteht die Gefahr eines Kurzschlusses und es
können Dämpfe austreten, die die Atemwege
reizen. Sorgen Sie für Frischluft und nehmen
Sie bei Beschwerden zusätzlich ärztliche Hilfe in
Anspruch.
- Verwenden Sie keine nicht wiederaufladbaren
Batterien. Das Gerät könnte beschädigt werden.
Richtiger Umgang mit dem Akkuladegerät
- Dieses Gerät kann von Kindern ab 8 Jahren und
darüber sowie von Personen mit verringerten
physischen, sensorischen oder mentalen
Fähigkeiten oder Mangel an Erfahrung und
Wissen benutzt werden, wenn sie beaufsichtigt
oder bezüglich des sicheren Gebrauchs des
Gerätes unterwiesen wurden und die daraus
resultierenden Gefahren verstehen. Kinder
dürfen nicht mit dem Gerät spielen. Reinigung
und Benutzer-Wartung dürfen nicht von Kindern
ohne Beaufsichtigung durchgeführt werden.
- Verwenden Sie zum Laden des Akkus
ausschließlich das mitgelieferte Ladegerät. Es
besteht Brand- und Explosionsgefahr.
- Überprüfen Sie vor jeder Benutzung Ladegerät,
Kabel und Stecker und lassen Sie es von
qualifiziertem Fachpersonal und nur mit OrigalErsatzteilen reparieren. Benutzen Sie ein defektes
Ladegerät nicht und öffnen Sie es nicht selbst.
Damit wird sichergestellt, dass die Sicherheit des
Gerätes erhalten bleibt.
- Achten Sie darauf, dass die Netzspannung
mit den Angaben des Typenschildes auf dem
Ladegerät übereinstimmt. Es besteht die Gefahr
eines elektrischen Schlags.
- Trennen Sie das Ladegerät vom Netz, bevor
Verbindungen zum Elektrowerkzeug geschlossen
oder geöffnet werden. So stellen Sie sicher, dass
Akku und Ladegerät nicht beschädigt werden.
8
Page 9
- Halten Sie das Ladegerät sauber und fern von
Nässe und Regen. Benutzen Sie das Ladegerät
niemals im Freien. Durch Verschmutzung und
das Eindringen von Wasser erhöht sich das Risiko
eines elektrischen Schlags
- Das Ladegerät darf nur mit den zugehörigen
Original-Akkus betrieben werden. Das Laden
von anderen Akkus kann zu Verletzungen und
Brandgefahr führen.
- Vermeiden Sie mechanische Beschädigungen
des Ladegerätes. Sie können zu inneren
Kurzschlüssen führen.
- Das Ladegerät darf nicht auf brennbarem
Untergrund (z. B. Papier, Textilien) betrieben
werden. Es besteht Brandgefahr wegen der beim
Laden auftretenden Erwärmung.
- Wenn die Anschlussleitung dieses Gerätes
beschädigt wird, muss sie durch den Hersteller
oder seinen Kundendienst oder eine ähnlich
qualifizierte Person ersetzt werden, um
Gefährdungen zu vermeiden.
- Laden Sie in dem Ladegerät keine
nichtaufladbaren Batterien auf. Das Gerät könnte
beschädigt werden.
Vorsicht- Scharfe Schneidmesser!
Füße und Hände fernhalten.
Verletzungsgefahr!
Motor ausschalten und Kontaktschlüssel
ziehen vor Einstellungs- oder
Reinigungsarbeiten.
Achtung! Nachlauf des Messers.
Setzen Sie das Gerät nicht der
Feuchtigkeit aus.
Schnittkreis
Schnitthöhe
Kontaktschlüssel
Symbole und Bildzeichen
Bildzeichen auf dem Gerät:
Vor der Benutzung des Gerätes die
Gebrauchsanweisung lesen!
Achtung!
Lesen Sie die Betriebsanleitung
aufmerksam durch.
Achtung! Verletzungsgefahr durch
weggeschleuderte Teile.
Umstehende Personen von dem Gerät
fernhalten
96
Angabe des Schallleistungspegels L
in dB.
dB
In Übereinstimmung mit geltenden
europäischen Richtlinien
Elektrogeräte gehören nicht in den
Hausmüll.
WA
9
Page 10
Bildzeichen auf dem Akku:
Allgemeine Beschreibung
Geben Sie Akkus an einer
Altbatteriesammelstelle ab,
wo sie einer umweltgerechten
Wiederverwertung zugeführt werden.
Akku-Li
Setzen Sie den Akku nicht über längere
Zeit starker Sonneneinstrahlung
aus und legen Sie ihn nicht auf
45
Heizkörpern ab (max. 45 °C).
Werfen Sie den Akku nicht ins Feuer .
Werfen Sie den Akku nicht ins Wasser.
Werfen Sie den Akku nicht in den
Hausmüll.
Bildzeichen auf dem Ladegerät:
Input
Output
Lieferumfang
Nehmen Sie das Gerät vorsichtig aus der Packung
und prüfen Sie, ob die nachfolgenden Teile
vollständig sind.
- Akku-Rasenmäher und unterer Holm
- Oberer Holm
- Grasfangkorb
- 2 Kabelhalter
- 2 Schrauben mit Beilagscheiben zur Befestigung
des unteren Holms
- 2 Schrauben mit Beilagscheiben und Schrauben
zur Befestigung des oberen Holms
- Akku (separat kaufen)
- Ladegerät (separat kaufen)
- Originalbetriebsanleitung
Entsorgen Sie das Verpackungsmaterial
ordnungsgemäß.
Funktionsbeschreibung
Der Akku-Rasenmäher besitzt ein parallel zur
Schnittebene sich drehendes Schneidwerkzueg.
Er ist mit einem leistungsstarken Elektromotor,
einem robusten Kunststoffgehäuse, einem
Sicherheitsschalter, einem Prallschutz und
einem Grasfangkorb ausgestattet. Zusätzlich
ist das Gerät 6-fach höhenverstellbar und hat
leichtgängige Räder. Die Funktion der Bedienteile
entnehmen Sie bitte den nachfolgenden
Beschreibungen.
10
Das Ladegerät ist nur zur Verwendung
in Räumen geeignet.
Vor dem Laden ist die
Betriebsanleitung zu lesen.
Schutzklasse II
Elektrogeräte gehören nicht in den
Hausmüll.
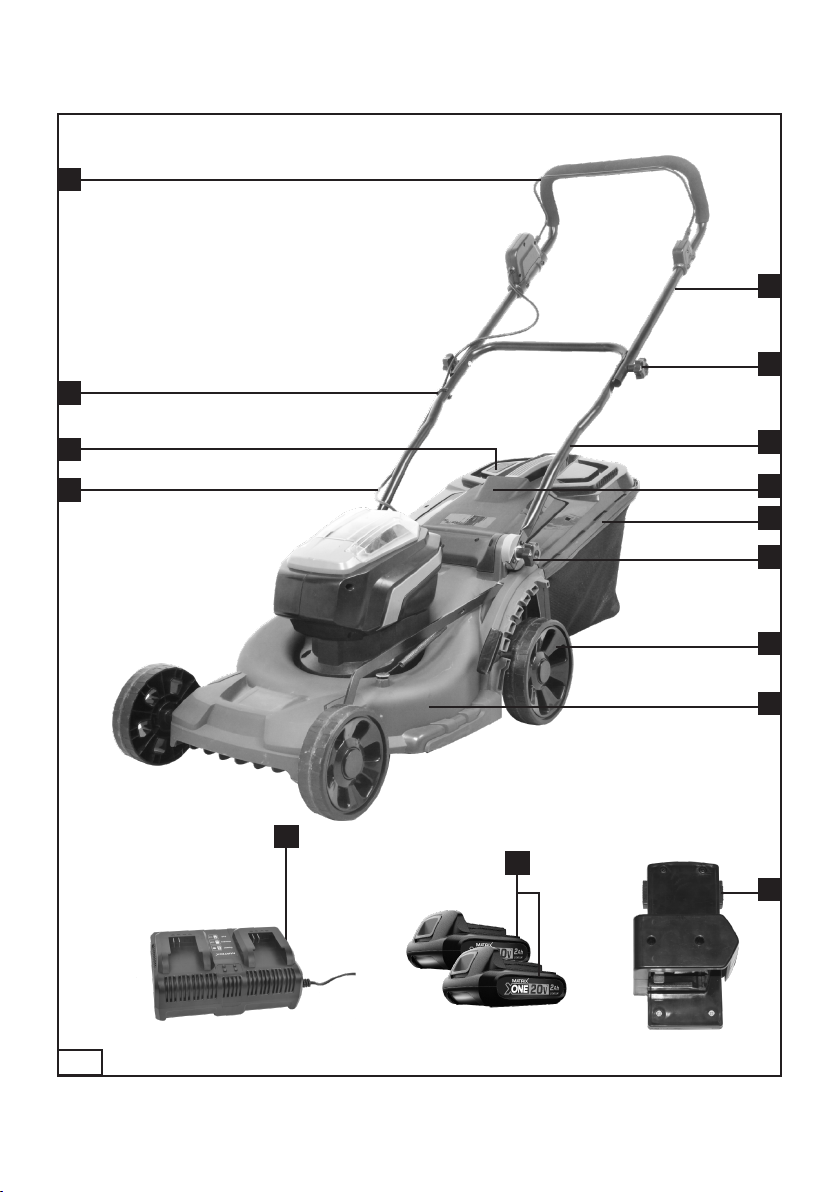
Übersicht
1. Oberer Holm
2. Schrauben zur Befestigung des oberen Holms
3. Unterer Holm
4. Grasfangkorb
4a. Füllstandsanzeige
5. Prallschutz
6. Schrauben zur Befestigung des unteren Holms
7. Räder
8. Gerätegehäuse
9. Akku (separat kaufen)
10. Kontaktschlüssel
11. Auswurftaste
12. Abdeckung
Page 11
13. Hebel zur Schnitthöhenverstellung
14. Tragegriff
15. Kabelhalter
16. Gerätekabel
17. Entriegelungsknopf
18. Starthebel
19. Ladegerät (separat kaufen)
20. Messer
21. Messerschraube
Montage
- Führen Sie nur Arbeiten aus, die Sie sich selbst
zutrauen.
- Bei Unsicherheiten wenden Sie sich an einen
Fachmann oder direkt an unseren Service.
Unteren Holm montieren
1. Befestigen Sie den unteren Holm (3) mit den
beiligenden Schrauben (6), den Unterlegscheiben
(a) und den unteren Schrauben (6) rechts und
links am Gerätgehäuse.
2. Drehen Sie die Schrauben (6) im Uhrzeigersinn.
Bedienung
Einstellung am Gerät dürfen nur bei
abgeschaltetem Motor und stillstehendem
Messer vorgenommen werden. Es besteht die
Gefahr von Personenschäden.
Schalten Sie das Gerät aus, ziehen Sie den
Kontaktschlüssel(10) und warten Sie den
Stillstand des Messers ab.
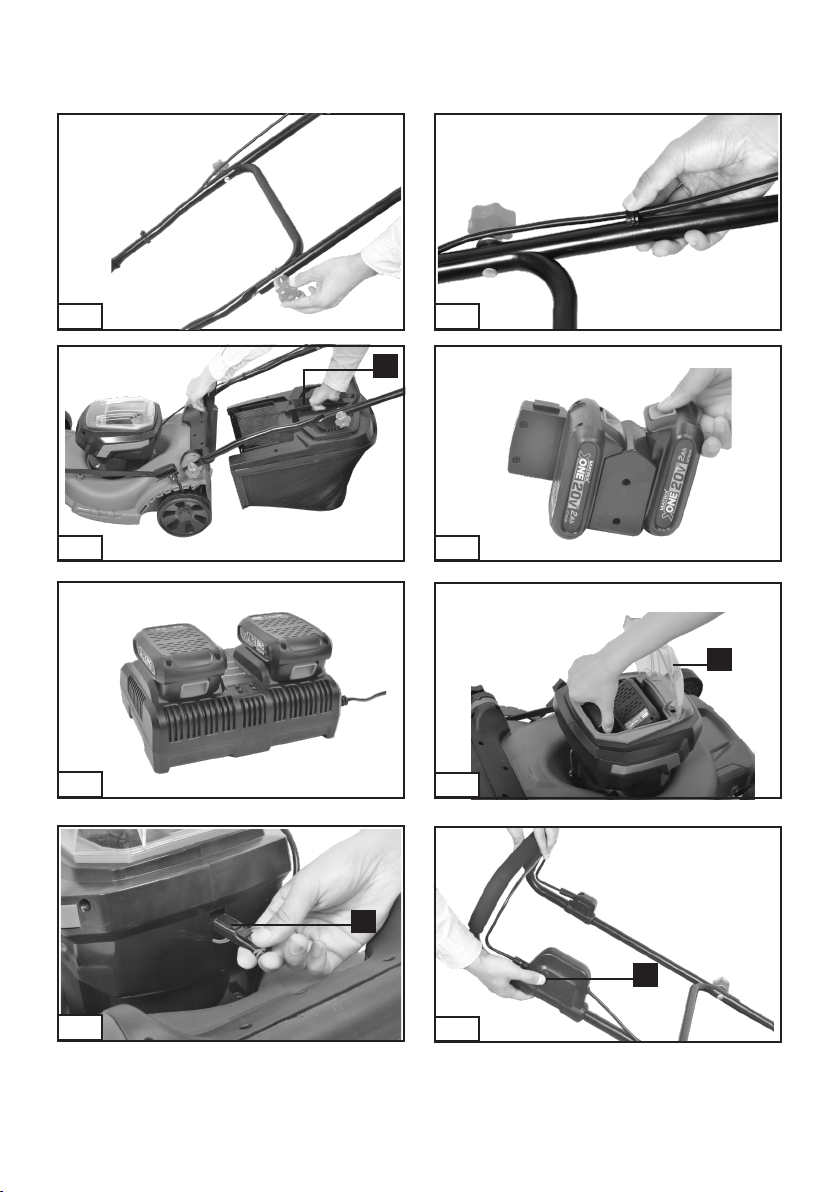
Grasfangkorb einhöngen / abnehmen
1. Zum Einhängen des Grasfangkorbes (4) heben
Sie den Prallschutz (5) an und hängen den
Grasfangkorb (4) in beide Aufnahmen ein.
2. Klappen Sie den Prallschutz (5) auf den
Grasfangkorb (4). Erhält den Grasfangkorb an
richtiger Position.
3. Zum Abnehmen des Grasfangkorbes (4)
heben Sie den Prallschutz (5) an und hängen den
Grasfangkorb aus. Klappen Sie den Prallschutz (5)
an das Gerätegehäuse (8) zurück.
ACHTUNG! Mit dem Gerät darf nicht ohne
Prallschutz oder Grasfangkorb gearbeitet werden.
Es besteht Verletzungsgefahr.
Oberen Holm montieren
1. Setzen Sie ein Ende des oberen Holmes (1) auf
das Schraubgewinde am Gerätegehäuse auf.
2. Ziehen Sie die Enden des oberen Holmes (1)
etwas auseinander und setzen Sie das andere
Ende auf das Schraubgewinde am Gerätegehäuse
auf.
Der Entriehelungsknopf (17) muss sich in
Mährichtung rechts befinden.
3. Positionieren Sie die beiliegenden
Unterlegscheiben(a). Die gewölbten Seiten
zeigen in Richtung Holm
4. Drehen Sie die oberen Schrauben (2) im
Urzeigersinn auf.
5. Verriegeln Sie die Schrauben (2) indem Sie
diese in Richtung des oberen Holms (1) drücken.
6. Kabelhalter einklipsen: Klipsen Sie die
Kabelhalter (15) am oberen (1) und unteren (3)
Holm ein und fixieren Sie damit das Gerätekabel
(16). Am Ende des unteren Holms (3) können
Sie das Gerätekabel (16) in einen bestehenden
Kabelhalter durchführen.
Füllstandsanzeige
Seitlich am Grasfangkorb (4) ist eine
Füllstandsanzeige (b) angebracht.
Füllstandsanzeige geöffnet:
Grasfangkorb leer.
Füllstandsanzeige geschlossen:
Grasfangkorb gefüllt.
Schnitthöhe einstellen
Das Gerät besitzt 6 Positionen zur Einstellung der
Schnitthöhe:
35 mm / 25 mm – geringe Schnitthöhe
55 mm / 45 mm – mittlere Schnitthöhe
75 mm / 65 mm – große Schnitthöhe
1. Fassen Sie den Tragegriff (14) und heben Sie
das Gerät an, bzw. Drücken Sie das Gerät nach
unten.
2. Greifen Sie den Hebel (13) zur
Schnitthöhenverstellung und führen Sie ihn
an der Rasterung vorbei auf die gewünschte
11
Page 12

Einstellung der Schnitthöhe.
Der richtige Schnitthöhe beträgt bei einem
Zierrasen etwa 25-45 mm, bei einem Nutzrasen
etwa 45-65 mm.
Für den ersten Schnitt in der Saison sollte eine
große Schnitthöhe gewählt werden.
Ein- und Ausschalten
1. Stellen Sie das Gerät auf eine ebene Fläche.
2. Heben Sie die Abdeckung (12) am
Gerätegehäuse an und schieben Sie den
geladenen Akku (9) entlang der Führungsschiene
in das Gerät. Er rastet hörbar ein.
3. Stecken Sie den Kontaktschlüssel (10) in die
dafür vorgesehene Öffnung neben dem Akku (9).
4. Achten Sie vor dem Einschalten darauf, dass
das Gerät keine Gegenstände berührt.
5. Zum Einschalten betätigen Sie den
Entriegelungskopf (17) und halten diesen,
während Sie den Starthebel (18) drücken. Lassen
Sie den Entriegelungsknopf los.
6. Zum Ausschalten lassen Sie den Starthebel (18)
los.
WARNUNG! Aufgrund des intelligenten
Energiemanagements läuft der Motor
verzögert an.
Nach dem Ausschalten des Gerätes dreht
sich das Messer noch für einige Sekunden.
Berühren Sie das laufende Messer nicht. Es
besteht die Gefahr von Personenschäden.
Ladevorgang
setzen Sie den Akku nicht extremen
Bedingungen wie Wärme und Stoß aus. Es
besteht Verletzungsgefahr durch auslaufende
Akkuüssigkeit! Spülen Sie bei Augen- oder
Hautkontakt die betroenen Stellen mit
Wasser oder Neutralisator und suchen Sie
einen Artz auf.
Laden Sie den Akku nur in trockenen Räumen
auf, die Außenäche des Akkus muss sauber
und trocken sein, bevor Sie das Ladegerät
anschließen. Es besteht die Gefahr von
Verletzungen durch Stromschlag.
Laden Sie den Akku nur mit beiliegendem
Ladegerät auf.
- Laden Sie den Akku vor dem ersten Gebrauch
auf. Den Akku nicht mehrmals hintereinander
kurz aufladen.
- Eine wesentlich verkürzte Betriebszeit trotz
Aufladung zeigt an, dass der Akku verbraucht
ist und ersetzt werden muss. Verwenden Sie
nur einen Original-Akku, den Sie über den
Kundendienst beziehen können.
- Beachten Sie in jedem Falle die jeweils gültigen
Sicherheitshinweise sowie Bestimmungen und
Hinweise zum Umweltschutz.
- Defekte, die aus unsachgemäßer Handhabung
resultieren, unterliegen nicht der Garantie.
Akku einsetzen / entnehmen
ACHTUNG! Schalten Sie das Gerät aus, ziehen
Sie den Kontaktschlüssel (10) und warten Sie den
Stillstand des Messers ab.
Der Akku besteht aus zwei Akku-packs. Bevor Sie
den Akku einsetzen, müssen Sie zuerst die AkkuPacks in die Aufnahme schieben (siehe Bild 5).
1. Zum Einsetzen des Akkus (9) in das
Gerät, schieben Sie den Akku entlang der
Führungsschiene in das Gerät. Er rastet hörbar
ein.
2. Zum Herausnehmen des Akkus (9) aus dem
Gerät drücken Sie die Auswurftaste (11). Der
Akku (9) rückt ein Stück aus der Führungsschiene.
Ziehen Sie den Akku heraus.
Akku auaden
WARNUNG! Schalten Sie das Gerät aus, ziehen
Sie den Kontaktschlüssel (10) und warten Sie den
Stillstand des Messer ab.
Lassen Sie einen frisch entladenen Akku (9) ca. 15
Minuten abkühlen, bevor Sie ihn in das Ladegerät
(19) einsetzen.
1. Nehmen Sie gegebenenfalls die Akkus (9) aus
dem Gerät.
2. Schieben Sie die Akkus (9) auf das Ladegerät
(19). Er rastet hörbar ein.
3. Schließen Sie das Ladegerät (19) an eine
Steckdose an.
4. Nach erfolgtem Ladevorgang trennen Sie das
Ladegerät (19) vom Netz.
5. Drücken Sie die Entriegelungstasten am
Akku (9) und ziehen Sie die Akkus (9) aus dem
Ladegerät (19).
12
Page 13

Ladestandsanzeige Akku
3 grüne LED´s leuchten
-> Akku voll geladen
Gerätes dreht sich das Messer noch für
einige Sekunden. Berühren Sie das laufende
Messer nicht. Es besteht die Gefahr von
Personenschäden.
2 grüne LED´s leuchten
-> Akku zur Hälfte geladen
1 grüne LED leuchtet
-> Akku ist fast leer
Verbrauchte Akkus
- Eine wesentlich verkürzte Betriebszeit trotz
Aufladung zeigt an, dass der Akku (9) verbraucht
ist und ersetzt werden muss. Verwenden
Sie nur einen Ersatz-Akku, den Sie über den
Kundendienst beziehen können.
- Beachten Sie in jedem Falle die jeweils gültigen
Sicherheitshinweise sowie Bestimmungen und
Hinweise zum Umweltschutz (siehe „ Entsorgung
/ Umweltschutz“).
Arbeiten mit dem Gerät
WARNUNG ! Beachten Sie den Lärmschutz und
örtliche Vorschriften.
Regelmäßiges Mähen regt die Graspflanze zu
einer verstärkten Blattbildung an, lässt aber
gleichzeitig Unkrautpflanzen absterben. Daher
wird der Rasen nach jedem Mähvorgang dichter
und es besteht ein gleichmäßig belastbarer
Rasen.
Der erste Schnitt erfolgt ab etwa April bei
einer Aufwuchshöhe von 70-80 mm. In der
Hauptvegetationszeit wird der Rasen mindestens
einmal pro Woche gemäht.
- Führen Sie das Gerät im Schritttempo in
möglichst geraden Bahnen. Für ein lückenloses
Mähen sollten sich die Bahnen immer um wenige
Zentimeter überlappen.
- Stellen Sie die Schnitthöhe so ein, dass das
Gerät nicht überlastet wird. Andernfalls kann der
Motor beschädigt werden.
- Arbeiten Sie an Hängen immer quer zum
Hang. Seien Sie besonders vorsichtig beim
Rückwärtsgehen und Ziehen des Gerätes.
- Reinigen Sie das Gerät nach jedem Einsatz wie
im Kapitel „ Reinigung / Wartung“ beschrieben.
ACHTUNG ! Nach dem Ausschalten des
Technische Daten
Maschine
Motorspannung: 40 V
Leerlaufdrehzahl n
Schnittbreite: 370 mm
Schnitthöhe: 25-75 mm
Schutzart: IPX1
Volumen Grasfangkorb: 40 L
Schalldruckpegel: L
Schallleistungspegel: L
Garantiert: L
Vibration: a
Akku Pack (separat kaufen)
Akku Pack: 2*20V 2000mAh Li-ion
Ladegerät (separat kaufen):
Eingangleistung: 220-240V~ 50-60 Hz, 120W
Ausgangleistung 1: 20.5V 2.2A
Ausgangleistung 2: 20.5V 2.2A
Ladezeit: 1h
Lärm- und Vibrationswerte wurden entsprechend
den in der Konformitätserklärung genannten
Normen und Bestimmungen ermittelt.
Technische und optische Veränderungen
können im Zuge der Weiterentwicklung ohne
Ankündigung vorgenommen werden. Alle Maße,
Hinweise und Angaben dieser sind deshalb ohne
Gewähr. Rechtsansprüche, die aufgrund der
Betriebsanleitung gestellt werden, können daher
nicht geltend gemacht werden.
Der angegebene Schwingungsemissionswert
ist nach einem genormten Prüfverfahren
gemessen worden und kann zum Vergleich eines
Elektrowerkzeugs mit einem anderen verwendet
werden.
Der angegebene Schwingungsemissionswert
kann auch zu einer einleitenden Einschätzung
der Aussetzungs mit einem anderen verwendet
: 3800 min
0
=79 dB(A); KpA=3 dB
PA
=91.64 dB(A); KwA=3 dB
wA
=1.2 m/s2; K=0.5 m/s
h
=96 dB(A)
wA
-1
2
13
Page 14

werden.
Der angegebene Schwingungsemissionswert
kann auch zu einer einleitenden Einschätzung
der Aussetzung verwendet werden.
WARNUNG: Der Schwingungsemissionswert
kann sich während der tatsächlichen Benutzung
des Elektrowerkzeugs von dem Angabewert
unterschieden, abhängig von der Art und Weise,
in der das Elektrowerkzeug verwendet wird.
Es besteht die Notwendigkeit,
Sicherheitsmaßnahmen zum Schutz des
Bedieners festzulegen, die auf einer Abschätzung
der Aussetzung während der tatsächlichen
Benutzungsbedingungen beruhen (hierbei
sind alle Anteile des Betriebszyklus zu
berücksichtigen, beispielsweise Zeiten, in denen
das Elektrowerkzeug abgeschaltet ist, und solche,
in denen es zwar eingeschaltet ist, aber ohne
Belastung läuft).
Reinigung / Wartung
Lassen Sie Arbeiten, die nicht in dieser
Betriebsanleitung beschrieben sind, von einer
von uns ermächtigten Kundendienststelle
durchführen. Verwenden Sie nur Originalteile.
Tragen Sie beim Umgang mit dem Messer
Hangschuhe.
Schalten Sie das Gerät aus, ziehen Sie den
Kontaktschlüssel (10) und warten Sie den
Stillstand des Messers ab.
Allgemeine Reinigungs- und
Wartungsarbeiten
Spritzen Sie das Gerät nicht mit Wasser ab.
Es besteht die Gefahr eines elektrischen
Schlages.
- Halten Sie das Gerät stets sauber. Verwenden
Sie zum Reinigen eine Bürste oder ein Tuch, aber
keine Reinigungs- bzw. Lösungsmittel.
- Entfernen Sie nach dem Mähen anhaftende
Pflanzenreste mit einem Holz- oder Plastikstück
von den Rädern, den Lüftungsöffnungen, der
Auswurföffnung und dem Messerbereich.
Verwenden Sie keine harten oder spitzen
Gegenstände, Sie können das Gerät beschädigen.
- Kontrollieren Sie das Gerät vor jedem Gebrauch
auf offensichtliche Mängel wie lose, abgenutzte
oder beschödigte Teile. Prüfen Sie den festen Sitz
aller Muttern, Bolzen und Schrauben.
- Überprüfen Sie Abdeckungen und
Schutzeinrichtungen auf Beschädigungen und
korrekten Sitz. Tauschen Sie diese gegebenenfalls
aus.
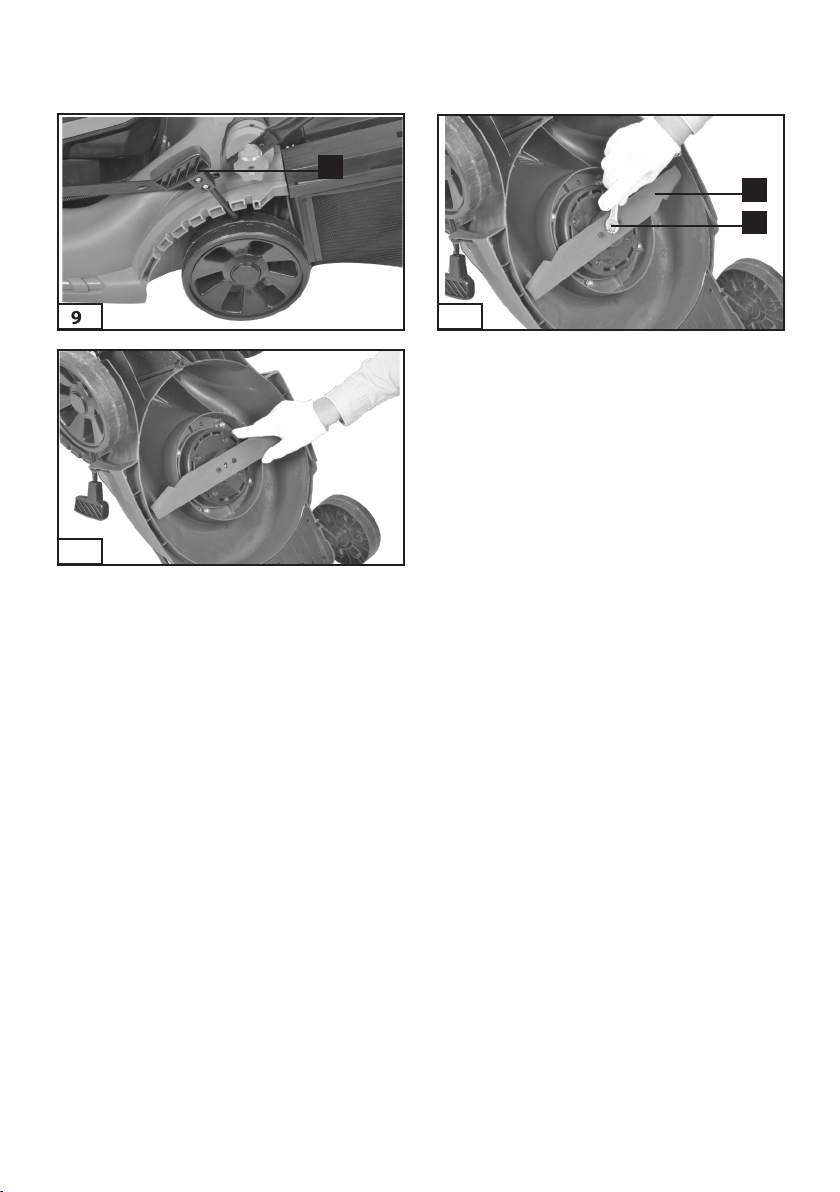
Messer austauschen
Ist das Messer stumpf, so kann es von einer
Fachwerkstätte nachgeschliffen werden. Ist das
Messer beschädigt oder zeigt eine Unwucht, so
muss es ausgewechselt werden.
1. Drehen Sie das Gerät um.
2. Benutzen Sie feste Handschuhe und halten
Sie das Messer (20) fest. Drehen Sie die
Messerschraube (21) gegen den Uhrzeigersinn
mit Hilfe eines Schraubenschlüssels.
3. Bauen Sie das neue Messer (20) in umgekehrter
Reihenfolge wieder ein. Achten Sie darauf, dass
das Messer (20) richtig positioniert und die
Messerschraube (21) fest angezogen ist.
Lagerung
Lösen Sie die Schrauben (2+6) und klappen Sie
den oberen Holm (1) und den unteren Holm
(3) zusammen, damit das Gerät weniger Platz
beansprucht. Die Gerätekabel dürfen dabei nicht
eingeklemmt werden.
- Bewahren Sie das Gerät trocken und außerhalb
der Reichweite von Kindern auf.
- Lassen Sie den Motor abkühlen, bevor Sie das
Gerät in geschlossenen Räumen abstellen.
- Nehmen Sie den Akku vor einer längeren
Lagerung (z. B. Überwinterung) aus dem Gerät.
- Lagern Sie den Akku nur im teilgeladenen
Zustand. Der Ladezustand sollte während einer
längeren Lagerzeit 40-60% betragen (zwei LEDLeuchten der Ladezustands-Anzeige leuchten).
- Prüfen Sie während einer längeren
Lagerungsphase etwa alle 3 Monate den
Ladezustand des Akkus und laden Sie bei Bedarf
nach.
- Lagern Sie den Akku zwischen 10°C bis 25°C.
Vermiden Sie während der Lagerung extreme
Kälte oder Hitze, damit der Akku nicht an
Leistung verliert.
14
Page 15

- Wir haften nicht für durch unsere Geräte
hervorgerufene Schäden, sofern diese durch
unsachgemäße Reparatur oder den Einsatz
von Nicht-Originalteilen bzw. Durch nicht
bestimmungsgemäßen Gebrauch verursacht
werden.
Entsorgung / Umweltschutz
Nehmen Sie den Akku aus dem Gerät und führen
Sie Gerät, Akku, Zubehör und Verpackung einer
umweltgerechten Wiederverwertung zu.
Elektrische Geräte gehören nicht in den
Hausmüll.
Werfen Sie den Akku nicht in den Hausmüll,
ins Feuer (Explosionsgefahr) oder ins Wasser.
Li-Ion
Beschädigte Akkus können der Umwelt und
ihrer Gesundheit schaden, wenn giftige Dämpfe
oder Flüssigkeiten austreten.
- Geben Sie das Gerät und das Ladegerät an einer
Verwertungsstelle ab.
- Entsorgen Sie Akkus im entladenen Zustand.
Wir empfehlen die Pole mit einem Klebestreifen
zum Schutz vor einem Kurzschluss abzudecken.
Öffnen Sie den Akku nicht.
- Entsorgen Sie Akkus nach den lokalen
Vorschriften. Geben Sie Akkus an einer
Altbatteriesammelstelle ab, wo sie einer
umweltgerechten Wiederverwertung zugeführt
werden. Fragen Sie hierzu Ihren lokalen
Müllentsorger oder unser Service-Center.
- Werfen Sie geschnittenes Gras nicht in
die Mülltonne, sondern führen Sie es der
Kompostierung zu oder verteilen Sie es als
Mulchschicht unter Sträuchern und Bäumen.
15
Page 16

Fehlersuche
Problem Mögliche ursache Fehlerbehebung
Gerät startet nicht Akku (9) entladen Akku Ladezustand prüfen Akku
Akku (9) nicht eingesetzt Akku einsetzen
Entriegelungsknopf (17) oder
Starthebel (18) defekt
Kohlebürsten abgenutzt
Motor defekt
Gras zu lang Größere Schnitthöhe einstellen.
Motor setzt aus Blockierung durch Fremdkörper Fremdkörper entfernen
Arbeitsergebnis nicht
zufriedenstellend oder
Motor arbeitet schwer
Messer rotiert nicht Messer (20) durch Gras blockiert Gras entfernen
Abnorme Geräusche,
Klappern oder
Vibrationen
Schnitthöhe zu niedrig Größere Schnitthöhe einstellen
Messer (20) stumpf Messer schleifen lassen oder
Messerbereich verstopft Gerät reinigen
Messer (20) falsch montiert Messer korrekt einbauen
Messerschraube (21) locker Messerschraube festziehen
Messerschraube (21) locker Messerschraube festziehen
Messer beschädigt Messer austauchen
aufladen
Reparatur durch Service-Center
Durch Drücken des unteren
Holm die Vorderräder leicht
anheben.
austauschen
16
Page 17

Introduction
Congratulations on the purchase of your new
device. With it, you have chosen a high quality
product.
During production, this equipment has been
checked for quality and subjected to a final
inspection. The functionality of your equipment
is therefore guaranteed.
The operating instructions constitute part of this
product. They contain important information on
safety, use and disposal.
Before using the product, familiarize yourself
with all of the operating and safety instructions.
Use the product only as described and for the
applications specified.
Keep this manual safely and in the event that the
product is passed on, hang over all documents to
the third party.
Intended purpose
The equipment is designed only for mowing
domestic lawns and grass areas.
Any other use that is not expressly permitted in
these instructions may result in damage to the
equipment and represent a serious risk to the
user.
The equipment is intended for use by adults.
It is not to be used by children or people who
are unfamiliar with these instructions. The use
of the equipment is prohibited in the rain or a
damp environment. The manufacturer will not
be liable for damages caused by use other for the
intended purpose or by incorrect operation.
This equipment is not suitable for commercial
use. Commercial use will invalidate the
guarantee.
Safety precautions
This section covers the basic safety regulations
when working with the lawnmower.
General Safety Information
This equipment may cause serious injury in
the case of improper use. In order to avoid injury
to people and damage to property, the following
safety information must be observed and users
must familiarize themselves with all operating
parts.
Preparation
- This appliance is not intended for use by
persons (including children) with reduced
physical, sensory or mental capabilities, or lack
of experience and knowledge, unless they have
been given supervision or instruction concerning
use of the appliance by a person responsible for
their safety.
- Do not allow the use of this equipment by
children or others who are unfamiliar with these
operating instructions. Local regulations may
specify the minimum age of the operator.
- Do not use the equipment when people and
particularly children or pets are nearby.
- Children must be supervised in order to ensure
that they do not play with the equipment.
- The operator or user is responsible for accidents,
injuries to other people or damage to the
property of others.
- Check the terrain on which the equipment is
to be used and remove stones, sticks, wires and
other foreign objects that could become caught
and thrown up.
- Wear suitable work clothing such as stable shoes
with non-slip soles and robust, long trousers. Do
not use the equipment when barefoot or when
wearing open sandals.
- Before each use, carry out a visual inspection
of the equipment. Do not use the equipment if
protective devices (e.g. collision guard or grass
bag), parts of the cutting device or bolts are
missing, worn or damaged. To avoid imbalance,
damaged tools and bolts are to be replaced only
in sets.
- Take care with equipment that has several
cutting tools, as the movement of one blade may
result in the rotation of the other blades.
- Use only spare parts and accessories supplied
and recommended by the manufacturer. The use
UK
17
Page 18

of non-original parts will immediately invalidate
the guarantee.
Working with the Equipment
Do not place feet or hands near or under
rotating parts when working.
Risk of injury!
- Switch on the motor according to the
instructions and only when your feet are at a safe
distance from the cutting tools.
- Do not use the equipment in the rain, in poor
weather, in a damp environment, or on wet grass.
Work only in daylight or with good lighting.
- Do not work with the equipment when tired,
lacking concentration or under the influence
of alcohol or drugs. Always take breaks in good
time. Take a sensible approach to the work.
- When working, ensure a firm stance, particularly
on slopes. Always work across the slope, never
upwards or downwards. Take particular care
when changing the direction of travel on the
slope. Do not work on excessively steep slopes.
- Run the equipment only at a walking pace. Take
particular care when turning the equipment
around, pulling it towards you or going
backwards.
- Switch on the equipment carefully and
in accordance with the directions in these
instructions. Ensure sufficient distance between
feet and the rotating blades.
- Do not tilt the equipment when starting other
than if it is necessary to do so when starting up
in long grass. In this case, tilt the equipment by
pressing down the handle bar such that the front
wheels of the equipment are raised. Always check
that both hands are in the working position
before returning the equipment to the ground.
- Do not work without the grass bag or collision
guard. Keep away from the ejection hole at all
times.
- Do not start the motor when standing in front
of the discharge chute.
Caution! Danger! The blade continues to run
after switching off.
There is a risk of injury.
- The equipment is not to be lifted or transported
while the motor is running.
- Switch off the equipment if it has to be tilted in
transit, when crossing surfaces other than grass,
and when the equipment is being transported to
and from the surfaces to be mowed.
- Always keep the grass ejection hole clean
and clear. Remove cut material only when the
equipment is stopped.
- Do not leave the equipment unattended in the
workplace.
- Do not work with equipment that is damaged,
incomplete, or has been modified without the
authorisation of the manufacturer. Do not use
the equipment with damaged safety devices or
screens or with missing safety equipment such as
deflection and/or grass collection devices.
- Do not overload the equipment. Work only
within the specified power range and do not
change the regulator settings on the motor. Do
not use lowpowered machines for heavy work.
Do not use your equipment for purposes other
than those for which it is designed.
- Do not use the equipment near inflammable
liquids or gases. Nonobservance will result in a
risk of fire or explosion.
- Do not lift or carry the equipment when the
motor is running.
- Switch the device off, remove the safety key and
take out the battery. Make sure that all moveable
parts are stationary:
• whenever you leave the apparatus unattended
and when it is not being used,
• before removing obstructions or loosening
blockages from the discharge chute,
• before checking or cleaning the apparatus or
performing any work on it,
18
Page 19

• when a foreign object has been hit by the
apparatus. Check for damage to the apparatus
and carry out the necessary repairs before
switching it on again and working with it,
• if the apparatus starts to vibrate excessively, an
immediate check is required
• make sure that all nuts, bolts and screws are
properly tightened.
• Inspect the apparatus for any damage.
• have any necessary repairs carried out to
damages parts.
- Do not place feet or hands near or under
rotating parts. Do not stand in front of the grass
ejection hole during sickle mowing.
- Always pull the circuit breaker / ignition key if:
• you leave the apparatus unattended, before
clearing blockages
• if you check or clean the apparatus or work on
it,
• after a collision with a foreign object.
Immediately examine the device for damage and,
if necessary, have it repaired,
• if the apparatus starts to vibrate in an unusual
way ( check immediately)
Maintenance and Storage
- Allow the motor to cool before storing the
equipment in a confined space.
- During maintenance of the cutting blades, be
aware of the fact that even if the power supply is
switched off, the cutting blades can be set into
motion.
- When servicing the cutting blades on it that
even if the voltage source is switched off, the
cutting blade can be moved.
- Ensure that all nuts, bolts and screws are
tightened firmly and the equipment is in safe
working condition.
- Do not attempt to repair the equipment
yourself unless you have been trained to do so.
Any work not specified in these instructions is to
be carried out only by customer service centres
that we have authorised.
- Keep the equipment in a dry location and out of
reach of children.
- Handle the equipment with care. Keep tools
sharp and clean, in order to facilitate better and
safer work. Follow the maintenance instructions.
- Wear protective gloves when changing the
cutting device.
- Regularly check the grass collection device
for wear and strains. For safety reasons, replace
worn or damaged parts. When adjusting the
blades, take particular care to avoid fingers being
trapped between the rotating blades and fixed
parts of the machine.
- Check that only replacement tools authorised
by the manufacturer are used.
Electrical safety
- The plug of the charger must fit into the socket.
The plug must not be modified in any way.
Do not use any adapter plugs together with
electric tools that have a protective earth.
Unmodified plugs and matching sockets reduce
the risk of electric shock.
- Avoid body contact with earthed surfaces such
as pipes, radiators, cookers and refrigerators.
There is an increased risk of electric shock if your
body is earthed.
- Do not expose electric tools to rain or wet
conditions. The penetration of water into an
electric tool increases the risk of electric shock.
Careful handling an use of battery devices
- Charge the batteries only in chargers that are
recommended by the manufacturer. Risk of fire
if a charger that is suitable for a specific type of
battery is used with other batteries.
- In the power tools, use only the batteries
19
Page 20

designed for the purpose. The use of other
batteries may result in injuries and risk of fire.
- Keep the unused battery away from paper
clips, coins, keys, nails, screws and other small
metal objects, which could cause bridging of
the contacts. A short circuit between the battery
contacts may cause burns or fire.
- If used incorrectly, liquid may leak from the
battery. Avoid contact with this. In the event of
accidental contact, rinse off with water. If the
liquid gets into eyes, seek medical assistance.
Leaking battery fluid may cause skin irritations or
burns.
Special safety directions for battery-operated
tools
- Ensure that the device is switched off before
inserting the battery. Inserting a battery into
a power tool that is switched on may result in
accidents.
- Recharge the batteries indoors only because the
battery charger is designed for indoor use only.
Risk of electric shock.
- To reduce the electric shock hazard, unplug the
battery charger from the mains before cleaning
the charger.
- Do not subject the battery to strong sunlight
over long periods and do not leave it on a heater.
Heat damages the battery and there is a risk of
explosion.
- Allow a hot battery to cool before charging.
- Do not open up the battery and avoid
mechanical damage to the battery. Risk of short
circuit and fumes may be emitted that irritate
the respiratory tract. Ensure fresh air and seek
medical assistance in the event of discomfort.
- Do not use non-rechargeable batteries. This
could damage the appliance.
Correct handling of the battery charger
- This appliance can be used by children aged
from 8 years and above and persons with
reduced physical, sensory or mental capabilities
or lack of experience and knowledge if they
have been given supervision or instruction
concerning use of the appliance in as safe way
and understand the hazards involved. Children
shall not play with the appliance. Cleaning and
user maintenance shall not be made by children
without supervision.
- To charge the battery, use only the charger
supplied. Risk of fire and explosion. This ensures
that the safety of the device is maintained.
- Before each use, check the charger, cable
and plug and have them repaired by qualified
professionals and only with original parts. Do not
use a defective charger and do not open it up
yourself. This ensures that the safety of the device
is maintained.
- Connect the charger only to a socket with an
earth. Ensure that the mains voltage matches the
specifications on the charger rating plate. Risk of
electric shock.
- Disconnect the charger from the mains before
closing or opening connection to the battery /
power tool / device. This ensures that the battery
and charger are not damaged.
- Keep the charger clean and away from wet and
rain. Do not use the charger outdoors. Dirt and
the entry of water increase the risk of electric
shock.
- Operate the charger only with the appropriate
original batteries. Charging other batteries may
result in injuries and risk of fire.
- Avoid mechanical damage to the charger. This
can result in internal short circuits.
- Do not operate the charger on a combustible
surface (e.g. paper, textiles). Risk of fire due to
heating during charging.
- If the power cable for this equipment
is damages, it must be replaced by the
manufacturer, a customer service agent of the
same or a similarly qualified person in order to
prevent hazards.
- Do not charge non-rechargeable batteries in
20
Page 21

the charger. This could damage the appliance.
Symbols on the equipment
Picture on the device:
96
contact key
The guaranteed value LwA in dB
dB
Read the instruction manual carefully
before operating the machine.
Attention!
Read the instruction manual carefully.
Be aware of thrown objects. Keep
other people at a safe distance whilst
working.
keep bystanders away
Be aware of cutting. Moving blades. Do
not put hands or feet near the blade.
Warning: Disconnect the spark plug
cap before carrying out any repairs or
maintenance.
Attention! Blade rotates backward.
Do not use the machine in the rain or
on wet places.
In accordance with applicable
European directives.
Machines are not to be place with
domestic waste.
Icon on the battery:
Battery pack is part of the recyclable
resources.
Battery Li-ion
Avoid continuous sunlight
45
Keep away from fire
Do not throw it into water
cutting width
cutting height
Batteries are not belong to litter bin.
There is a legal obligation to return
batteries for proper disposal.
21
Page 22

Icon on the charger:
Input
output
and grass box. Additionally, the equipment is
height adjustable to six levels and has smoothrunning wheels. For the function of the operating
parts, please refer to the descriptions below.
Overview
The charger only uses in room.
Read the instruction manual
completely and carefully before
charging.
class ll
Do not dispose of electrical
equipment in the household waste.
General description
Extent of the delivery
Carefully remove the equipment from the
packaging and check whether the following parts
are complete:
- Cordless lawnmower and lower handle
- Upper handle
- Grass box
- 2 cable holders
- 2 screws with washers for fastening the lower
handle
- 2 screws with washers and screws for fastening
the upper handle
- Rechargeable battery (purchase separately)
- Charger (purchase separately)
- Translation of the original instructions for use
Dispose of the packaging material
correctly
1. Upper bar
2. Screws for fastening the upper handle
3. Lower bar
4. Grass box
4a. level indicator
5. Collision guard
6. Screws for fastening the lower handle
7. Wheels
8. Housing
9. Rechargeable battery (purchase separately)
10. Ignition key
11. Eject button
12. Cover
13. Lever for cutting height adjustment
14. Carrying handle
15. Cable holders
16. Device cable
17. Release button
18. Start lever
19. Charger (purchase separately)
20. Blade
21. Blade screw
Assembly
- Only carry out work that you know you are
capable of
- If in doubt, consult an expert or our service
centre directly
Mounting the lower handle
1. Fasten the lower handle (3) with the enclosed
screws (6), the washers (a) and the lower screws
(6) on the right and left of the housing.
2. Turn the screws (6) clockwise.
Function description
The cordless lawnmower has a cutting tool, which
turns parallel to the cutting level. It is equipped
with a high performance electric motor, robust
plastic housing, safety switch, collision guard,
22
Mounting the upper handle
1. Attach one end of the upper handle (1) to the
screw thread on the apparatus housing
2. Pull the ends of the upper handle (1) slightly
apart and put the other end of the screw thread
Page 23

on the apparatus housing.
The release button (17) must be located on the
right in the mowing direction.
3. Place the enclosed washers (a) in position. The
curved sides face the handle.
4. Turn the upper screws (2) clockwise.
5. Lock the screws (2) by pressing them in the
direction of the upper handle (1).
6. Clipping in the cable holders: Clip in the cable
holders (15) on the upper (1) and lower handle
(3) and use them to fix the device cable (16) in
position. At the end of the bottom handle (3) you
can insert the device cable (16) into an existing
cable holder.
Operation
Adjusting the cut height
The apparatus has 6 positions for adjusting the
cutting height:
35 mm / 25 mm – short cutting height
55 mm / 45 mm – medium cutting height
75 mm / 65 mm – tall cutting height
1. Hold the carrying handle (14) and lift the
device or press the device down.
2. Grip the lever (13) for adjusting the cutting
height and move it past the ratchet mechanism
to the desired cutting height.
The correct height is around 25 – 45 mm for a
decorative lawn and around 45 – 65 mm for a
used lawn.
A higher cut height should be selected for the
first cut of the season.
The apparatus must only be adjusted when
the motor is switched o and the blades are
stationary. There is a risk of personal injury.
Switch o the apparatus, remove the ignition
key (10) and wait for the blades to come to a
standstill.
Hanging on / removing the grass box
1. To hang on the grass box (4), lift the collision
guard (5) and hang on the grass box using both
supports.
2. Fold the collision guard (5) onto the grass box
(4). It holds the grass box in the correct position.
3. To remove the grass box (4), lift the collision
guard (5) and detach the grass box. Fold the
collision guard (5) back onto the mower housing
(80.
WARNING! Do not operate the appliance without
the collision guard or the grass box. Risk of injury!
Lever gauge
The level gauge (b) is located on the side of the
grass box.
Lever gauge flap open: Grass box
empty.
Lever gauge flap closed: grass box full.
Switching On and O
1. Place the apparatus on a lever surface.
2. Lift the cover (12) of the apparatus housing
and insert the charged battery (9) along the
guide rail into the apparatus. You should be able
to hear the rechargeable battery lock into place.
3. Insert the ignition key (10) into the opening
provided for it next to the battery (9).
4. Before switching the apparatus on, make sure
that it is not touching any objects.
5. To switch the apparatus on, press the release
button (17) and hold it down while pressing the
starting lever (18). Let go of the release button.
6. To switch the apparatus off, let go of the
starting lever (18).
Warning! Due to the intelligent energy
management system, the motor starts after a
delay.
After switching o the equipment, the cable
continues to turn for several seconds. Do not
touch the moving blade. There is a risk of
injury.
Charging the battery
Do not expose the battery to extreme
conditions such as heat or impact. Risk of
injury from escaping electrolytic solution!
After eye / skin contact, rinse the aected
areas with water or a neutralizer and consult a
doctor.
23
Page 24

Charger the battery in a dry room only. Prior
to attaching the charger, check that the
battery’s outer surface is clean and dry. There
is a risk of injury due to electric shock.
Only use the charger from the package to
charge the battery.
- Charge the battery before the first time of use.
Do not briefly charge the battery several time in
a row.
- If a fully recharged battery lasts for considerably
shorter operating times, the battery is used up
and needs to be replaced.
- Always take heed of the applicable safety
instructions as well as the environmental
protection regulations and information.
- The warranty excludes all defects caused by
improper handling.
Insert / remove rechargeable battery
Switch off the apparatus, remove the ignition
key (10) and wait for the blades to come to a
standstill.
The battery is made up of two battery packs.
Before you insert the battery in the machine, you
must insert the battery packs in holder first. (see
Fig. 5).
1. To insert the battery (9) push the battery along
the guide rail into the appliance. It locks into
place audibly.
2. To remove the battery (9) from the appliance,
press the release button and pull the battery out.
Recharging the battery
Switch off the apparatus, remove the ignition
key (10) and wait for the blades to come to a
standstill.
Allow a freshly charged battery (9) to cool down
for approx.. 15 minutes before inserting it into
the battery charger (19).
1. Remove the battery (9) from the appliance.
2. Slide the rechargeable battery (9) onto the
charger (19). It locks into place audibly.
3. Plug the charger (19) into an electrical outlet.
4. After the charging process, disconnect the
charger (19) from the main supply.
5. Press the release buttons on the battery (9) and
pull the battery (9) out of the charger (19).
Battery capacity indicator
The 3 LEDs will indicate the status of battery
capacity as soon as you press the button.
All LEDs illuminate:
The battery is fully charged.
Two LEDs illuminate:
The battery has an adequate remaining
charge.
Only one LED:
The battery is fast empty, recharge the
battery.
Used batteries
- If a fully recharged battery lasts for considerably
shorter operating times, the battery (9) is used up
and needs to be replaced.
- Always take heed of the applicable safety
instructions as well as the environmental
protection regulations and information (see “
Waste Disposal and Environmental Protection”).
Working with the appliance
Regular mowing encourages increased foliation
of the grass and kills off weeds at the same time.
Therefore, not only does each mowing increase
the density of the lawn, it also produces an
evenly resilient lawn.
The first cut is to be made in around April, at
a growth height of 70-80 mm. in the main
vegetation period, the lawn is to be mowed at
least once a week.
- Run the equipment at a walking pace, in
tracks that are as even as possible. For gap-free
mowing, the tracks should always overlap by a
few centimetres.
- Adjust the cut height so the equipment is
not overloaded. Otherwise, the motor may be
damaged.
- On slopes, always work across the slope. Take
particular care when going backwards and pilling
the equipment.
- Clean the equipment after each use, as
described in the chapter on “ Cleaning,
Maintenance and Storage”.
Warning! After switching o the equipment,
the blade continues to turn for several
seconds. Do not touch the moving blade.
There is a risk of injury.
24
Page 25

Technical specications
Machine
motor voltage: 40 V
Idling speed n
: 3800 min
0
cutting circle: 370 mm
cutting height: 25-75mm
protection type: IPX1
grass box volume: 40 L
Sound pressure level: L
Sound power level: L
=79 dB(A), K=3 dB(A)
pA
=91.64 dB(A), K=3 dB(A)
wA
Guaranteed: 96 dB(A)
Vibration: a
=1.2 m/s2; K= 0.5 m/s
h
Battery pack (purchase separately)
Battery pack: 2*20V 2000mAh Li-ion
Charger (purchase separately):
input: 220-240V~ 50-60 Hz ,120W
output 1: 20.5V 2.2A
output 2: 20.5V 2.2A
charging time: 1h
Cleaning / Maintenance
Have work that is not described in these
instructions carried out by a customer service
centre that we have authorized. Use only
original parts.
Wear gloves when handling the blade.
Switch o the apparatus, remove the ignition
key (10) and wait for the blades to come to a
standstill.
General cleaning and maintenance work
Do not jet water onto the appliance. This
would result in the danger of an electric
shock.
- Always keep the equipment clean. To clean, use
a brush or cloth but no detergent or solvent.
- After mowing, use a piece of wood or plastic to
remove adherent plant remains from the wheels,
ventilation holes, ejection hole and blade area.
Do not use hard or pointed objects, as these may
damage the blade.
- Before each use, check the apparatus for
obvious defects such as loose, worn or damaged
parts. Check that all nuts, bolts and screws are
sitting firmly.
- Check the covers and protective devices for
damage and check that they are sitting correctly.
-1
Replace them if necessary.
Changing the blade
If the blade is blunt, it can be sharpened by a
specialist workshop. If the blade is damaged or
showing signs of imbalance, it must be replaced
(see chapter on “ Spare parts”).
1. Turn the equipment over.
2
2. Use sturdy gloves and hold the blade (20)
firmly. Turn the blade screw (21) anticlockwise off
using a screwdriver.
3. Install the new blade (20) in the reverse order.
Ensure that the blade (20) is positioned correctly
and the blade screw (21) tightened firmly.
Storage
Release the screws (2+6) and fold the bow-type
handle (1) and the lower handle (3) together so
that the device takes up less space. Make sure
not to pinch the machine cables while doing this.
- Keep the equipment dry and out of reach of
children.
- Allow the motor to cool before storing the
equipment in a confined space.
- Remove the battery before storing the unit for
longer periods of time (e.g. hibernation).
- Store the battery only in a partially charged
state. The state of charge should be 40-60 % over
a longer storage period (two LED lights of the
charge status indicator light up).
- During a longer storage period, check the state
of charge of the battery and recharge if necessary
roughly every 3 months.
- Store the equipment between 10 °C and 25 °C.
During storage, avoid extreme cold or heat so the
battery does not lose power.
We will not be liable for damages caused by our
equipment where these are caused by improper
repair or the use of non-original parts or by use
other than for the intended purpose.
25
Page 26

Waste Disposal / Environmental
Protection
Remove the battery from the device and take the
device, battery, accessories and packaging for
environmentally friendly recycling.
Electric units do not belong with domestic
waste.
Do not dispose of batteries in household
waste, fire (risk of explosion) or water.
Li-Ion
Damaged batteries may damage the
environment and your health if toxic fumes or
liquids leak out.
- Return the unit and the recharger to a recycling
centre. The plastic and metal parts employed can
be separated out and thus recycled use can be
implemented.
- Dispose of batteries in discharged condition.
We recommend covering the pole with adhesive
tape to prevent a short circuit. Do not open up
the battery.
- Dispose of batteries in accordance with the
local regulations. Take batteries to an old battery
collection point where they will be recycled in an
environmentally friendly manner. For information
about this, ask your local waste management
company or our service centre.
- Throw cut grass in the dustbin, but run it to
the composting or distribute it as a mulch layer
under shrubs and trees.
26
Page 27

Trouble shooting
Problem Possible cause Fault xing
Appliance doesn’t start Rechargeable battery (9) discharged Check the charge status,
Rechargeable battery (9) not
inserted
Defective release button (17) or
start lever (18)
Worn carbon brushes
Defective motor
Grass too long Set a greater cut height. Lift
Motor stops Blockage by foreign object Remove the foreign object
Result unsatisfactory or
motor labours
Blade fails to turn Blade blocked by grass Remove the grass
Strange noises, rattling or
vibrations
Cut height too low Set a higher cut height
Blade (20) blunt Have the blade sharpened or
Blade area blocked
Blade assembled incorrectly Install the blade correctly
Blade screw loose Tighten the blade screw
Blade screw loose Tighten the blade screw
Blade damage Replace the blade
charge rechargeable battery
Insert rechargeable battery
Repair by customer services
the front wheels slightly by
pressing down on the bowtype handle (1)
replace it
Clean the equipment
27
Page 28

Úvod
Gratulujeme k nákupu nového zařízení.
Vybrali jste vysoce kvalitní zařízení.
Toto zařízení bylo během výroby testováno na
kvalitu a podrobeno konečné kontrole.
Tím je zajištěna funkčnost vašeho zařízení.
Návod k obsluze je součástí tohoto zařízení.
Obsahuje důležité pokyny pro bezpečnost,
použití a likvidaci.
Před použitím přístroje se seznamte se všemi
provozními a bezpečnostními pokyny.
Přístroj používejte pouze tak, jak je popsáno a
pro určené oblasti použití.
Návod k obsluze uchovávejte na bezpečném
místě a předejte všechny dokumenty třetím
osobám.
Zamýšlené použití
Přístroj je určen pouze pro sekání trávniků a
travnatých ploch v domácnosti.
Zařízení je určeno pro použití v domácnosti.
Nebyl určen pro nepřetržité průmyslové použití.
Jakékoli jiné použití, které není výslovně
povoleno v této příručce, může mít za následek
poškození přístroje a vážné ohrožení uživatele.
Přístroj je určen pro dospělé.
Děti a osoby, které nejsou s tímto návodem
seznámeny, by neměly přístroj používat.
Použití přístroje v dešti nebo vlhkém prostředí je
zakázáno.
Výrobce neodpovídá za škody způsobené
nesprávným použitím nebo nesprávným
provozem.
Bezpečnost
Tato část popisuje základní bezpečnostní
pravidla při práci se zařízením.
Všeobecné bezpečnostní pokyny
Toto zařízení může při nevhodném
použití způsobit vážné zranění.
Abyste se vyhnuli zranění osob a škodám na
majetku, přečtěte si a dodržujte níže uvedené
bezpečnostní pokyny a seznamte se se všemi
ovládacími prvky.
Příprava
Nikdy nedovolte dětem ani jiným osobám,
•
které neznají návod, použít přístroj.
Místní ustanovění může stanovit minimální věk
provozovatele.
Nikdy přístroj nepoužívejte
•
v blízkosti lidí, zejména dětí a domácích zvířat.
Děti se nesmějí hrát s přístrojem.
•
Provozovatel nebo uživatel je zodpovědný
za nehody nebo
zranění jiných osob nebo poškození
jejich majetku.
•
Zkontrolujte terén, na kterém bude zařízení
nasazeno a odstraňte kameny, tyče, dráty nebo
jiné cizí předměty, které mohou být zachyceny a
vyhozeny.
•
Používejte vhodný pracovní oděv
pevnou obuv s protiskluzovou podešví a
robustní, dlouhé kalhoty.
Nepoužívejte přístroj při chůzi naboso nebo při
nošení otevřených sandálů.
Vyvarujte se nošení volného oděvu nebo
oděvů se zavěšenými tkaničkami nebo pásy.
•
Proveďte před každým použitím
vizuální kontrolu zařízení. Nepoužívejte přístroj,
pokud chybí nebo jsou opotřebované nebo
poškozené ochranné zařízení (např. ochrana
proti nárazu nebo koš na trávu), části řezacího
zařízení nebo čepy. Aby nedošlo k
nevyváženosti, mohou být poškozené nástroje
a čepy vyměněny pouze v sadách.
Dávejte pozor na zařízení s více než jedním
•
řezacím nástrojem, protože pohyb nože může
vést k rotaci ostatních nožů.
• Používejte pouze náhradní díly a příslušenství
CZ
28
Page 29

doporučené výrobcem.
Použití cizích částí vede k okamžité ztrátě záruky.
•
Opotřebované nebo poškozené značky
musí být vyměněny.
Práce se zařízením
Při práci nepokládejte nohy ani ruce do
blízkosti nebo pod rotující části. Hrozí
nebezpečí zranění!
•
Zapněte motor podle pokynů a
pouze pokud jsou vaše nohy v bezpečné
vzdálenosti od řezných nástrojů.
•
Nepoužívejte přístroj při dešti
špatném počasí, ve vlhkém prostředí nebo
na mokré trávě. Pracujte pouze za denního
světla nebo při dobrém osvětlení.
Pokud přístroj používáte, nepracujte s ním
•
unavený nebo nekoncentrovaný nebo po požití
alkoholu nebo tablet.
Vždy si udělejte ve správny čas pauzu.
Jděte do práce s klidem.
•
Při práci dbejte na bezpečný
postoj, zejména na svazích. Pracujte vždycky
křížem ke svahu, nikdy nahoru nebo dolů. Při
změně směru jízdy ve svahu buďte obzvláště
opatrní. Nepracujte na příliš strmých svazích.
• Přístroj pohybujte pouze tempem chůze.
Buďte opatrní při couvání, tažení směrem k
sobě nebo při chůzi dozadu.
•
Zařízení pečlivě vypněte
dle pokynů v tomto návodu.
Zajistěte dostatečnou vzdálenost mezi nohama a
rotujícími noži.
Při spouštění přístroj nenaklánějte, s výjimkou
•
pokud je to nutné při startování ve vysoké
trávě.
V tomto případě zařízení nakloňte tak, že
zatlačíte na rukojeť tak, aby se přední kola
zařízení mírně zvedla.
Vždy zkontrolujte, zda jsou obě ruce v
pracovní poloze předtím, než
se zařízení vrátí na zem.
•
Nikdy nepracujte bez lapače trávy nebo
ochrany proti nárazu.
Vždy se držte dál od vyprazdňovacího otvoru.
•
Nespouštějte motor, když stojíte před
odhazovací šachtou.
Pozor nebezpečí!
Nůž dobíhá. Hrozí nebezpečí zranění.
Zařízení nesmí být zvednuto nebo
•
přepravováno za chodu motoru.
Vypněte přístroj, pokud je třeba jej přepravovat,
pokud se přechází přes jiné oblasti než trávníky, a
pokud je jednotka přiváděna do a z oblastí, které
mají být sečeny.
Vždy držte otvor pro vyprazdňování trávy
•
čistý a volný. Posečenou trávu odstraňte pouze
v klidovém stavu.
Nikdy nenechávejte přístroj bez dozoru
•
na pracovišti.
Nepracujte s poškozeným,
•
neúplným nebo přestavěným přístrojem bez
souhlasu výrobce.
Nikdy nepoužívejte přístroj s poškozenými
ochrannými kryty nebo štíty nebo chybějícími
bezpečnostními zařízeními, jako jsou deflektory
a / nebo zařízení pro sběr trávy.
Nepřetěžujte zařízení. Pracujte pouze
•
ve specifikovaném rozsahu výkonu a neměnte
nastavení regulátoru na motoru.
Nepoužívejte stroje s nízkym výkonem pro
těžkou práci.
Přístroj nepoužívejte pro účely, pro které není
určen.
Přístroj nepoužívejte v blízkosti
•
hořlavých kapalin nebo plynů.
Pokud tak neučiníte, může dojít k požáru
nebo výbuchu.
•
Vypněte zařízení,
yyjměte bezpečnostní klíč a vyjměte
baterii. Ujistěte se, že všechny pohyblivé
části jsou v klidu:
29
Page 30

kdykoliv opustíte zařízení a kdy
•
se nepoužívá
než vyřešíte překážky nebo
•
odstraňujete ucpání ve výstupním kanálu,
• před kontrolou přístroje, čištěním nebo
při práci na něm,
•
když byla sekačka zasažena cizím předmětem.
Vyhledejte poškození přístroje a proveďte
nezbytné opravy před restartem a prací se
zařízením,
pokud přístroj začne neobvykle silně
•
vibrovat, je nutná okamžitá kontrola.
•
Ujistěte se, že všechny matice a šrouby
jsou utaženy.
•
Přehledejte zařízení na eventuélní
poškození.
•
Proveďte nezbytné opravy
poškozených částí
- Nikdy nedávejte ruce nebo nohy do blízkosti
nebo pod rotující části. Nikdy nestůjte před
otvorem pro vyprazdňování trávy.
- Vždy vypněte jistič / kontaktní klíč,
pokud:
•
se vzdalujete od zahradního nářadí, před
ostraněním blokování,
•
při kontrole zahradního nářadí, čistění
nebo při práci na něm,
•
po kolizi s cizím tělesem.
Přístroj okamžitě zkontrolujte, zda není
poškozený, a v případě potřeby jej
nechte opravit,
•
pokud začne zahradný nástroj neobvykle
vibrovat (okamžitě zkontrolujte!).
- Před umístěním sekačky do interiéru nechte
motor vychladnout.
- Při údržbě nožů se ujistěte, že i když je
zdroj napájení vypnutý
se řezací nůž může pohybovat .
- Ujistěte se, že jsou všechny matice, čepy a
šrouby pevně utaženy a sekačka je v
bezpečném stavu.
- Nepokoušejte se přístroj opravit sami,
pokud jste nedostali školení.
Veškeré práce, které nejsou uvedeny v této
příručce, smí provádět pouze autorizovaná
servisní střediska.
- Přístroj skladujte na suchém místě a mimo
dosah dětí.
- S přístrojem zacházejte opatrně.
Udržujte své nástroje ostré a čisté pro lepší a
bezpečnější práci.
Dodržujte pokyny pro údržbu.
- Při výměně nože používejte ochranné
rukavice.
- Pravidelně kontrolujte, zda není lapač trávy
opotřebovaný a deformovaný.
Z bezpečnostních důvodů vyměňte
opotřebované nebo poškozené díly.
Při nastavování nožů buďte velmi opatrní, aby se
prsty neuchytily mezi rotujícími noži a pevnými
částmi stroje.
- Zkontrolujte, zda jsou použity pouze náhradní
řezné nástroje schválené výrobcem.
Elektrická bezpečnost:
- Konektor nabíječky musí zapadnout do
zásuvky.
Zástrčka nesmí být žádným způsobem měněna.
Nepoužívejte zástrčky adaptéru společně s
elektricky uzemněným elektrickým nářadím.
Neupravené zástrčky a odpovídající zásuvky
snižují riziko úrazu elektrickým proudem.
- Vyvarujte se kontaktu s uzemněnými povrchy,
jako jsou trubky, ohřívače, kamna a chladničky.
Pokud je vaše tělo uzemněno, existuje zvýšené
riziko úrazu elektrickým proudem.
30
Page 31

- Elektrické nářadí chráňte před deštěm nebo
vlhkostí. Vniknutí vody do elektrického nářadí
zvyšuje riziko úrazu elektrickým proudem.
Pečlivé zacházení a použití
akumulátorového nářadí
- Baterie nabíjejte pouze v nabíječkách
doporučených výrobcem.
Nabíječka vhodná pro určitý typ baterie může
při použití s jinými bateriemi způsobit požár.
KJOBSBEJÈUPSZ5FQMPQPÝLP[VKFCBUFSJJBISP[Ó
OFCF[QFǏÓWâCVDIV
1DzFEOBCÓKFOÓNOFDIUFPIDzÈUâBLVNVMÈUPS
WZDIMBEOPVU
/FPUFWÓSFKUFCBUFSJJBWZWBSVKUFTF
NFDIBOJDLÏIPQPÝLP[FOÓCBUFSJF
)SP[ÓSJ[JLP[LSBUVBÞOJLVQBSLUFSÏESÈäEÓ
EâDIBDÓDFTUZ6KJTUǔUFTFäFNÈUFǏFSTUWâ
W[EVDIBWQDzÓQBEǔQPUÓäÓWZIMFEFKUFMÏLBDzTLPV
QPNPD
- V elektrickém nářadí používejte pouze
vhodné baterie. Použití jiných baterií může
způsobit zranění nebo požár.
- Nepoužitou baterii uchovávejte mimo
papírových sponek, mincí, klíčů, hřebíků,
šroubů nebo jiných drobných kovových
předmětů, které by mohly přemostit kontakty.
Zkrat mezi kontakty baterie může způsobit
popáleniny nebo požár.
- Při nesprávném použití může být kapalina
opustit baterii. Zabraňte kontaktu s ní. V případě
náhodného kontaktu opláchněte vodou. Pokud
se tekutina dostane do očí, vyhledejte lékařskou
pomoc. Unikající tekutina baterie může způsobit
podráždění kůže nebo popáleniny.
Speciální bezpečnostní pokyny
pro akumulátorové nářadí
- Před vložením baterie se ujistěte, že je přístroj
vypnutý.
Vložení baterie do zapnutého elektrického
nářadí může vést k nehodám.
- Nabíjejte baterie pouze uvnitř, protože
nabíječka je určena pouze pro vnitřní nabíjení.
Nebezpečí úrazu elektrickým proudem.
- Abyste předešli nebezpečí úrazu elektrickým
proudem, před čištěním odpojte nabíječku ze
zásuvky.
- Nevystavujte baterii dlouhodobě silnému
slunečnímu světluBOFQPLMÈEFKUF
/FQPVäÓWFKUFOFEPCÓKFDÓCBUFSJF.PIMPCZ
EPKÓULQPÝLP[FOÓ[BDzÓ[FOÓ
4QSÈWOÏ[BDIÈ[FOÓTOBCÓKFǏLPV
5PUP[BDzÓ[FOÓNPIPVQPVäÓWBUEǔUJWFWǔLVMFU
BTUBSÝÓBPTPCZTFTOÓäFOâNJGZ[JDLâNJ
TNZTMPWâNJOFCPEVÝFWOÓNJTDIPQOPTUNJOFCP
TOFEPTUBUFǏOâNJ[LVÝFOPTUNJB[OBMPTUNJ
QPLVEKTPVQPEEP[PSFNBCZMZQPVǏFOZP
CF[QFǏOÏNQPVäÓWÈOÓ[BDzÓ[FOÓBSP[VNǔKÓ
WâTMFEOâNSJ[JLǾN
%ǔUJTFOFTNǔKÓISÈUTQDzÓTUSPKFN
ƎJÝUǔOÓBÞESäCVOFTNÓQSPWÈEǔUEǔUJCF[
EP[PSV
- K nabíjení baterie používejte pouze
dodávanou nabíječku.
Hrozí nebezpečí požáru a výbuchu.
- Před každým použitím zkontrolujte nabíječku,
kabely a zástrčky a nechte je opravit pouze
kvalifikovanými pracovníky a pouze s
originálními náhradními díly.
Nepoužívejte vadnou nabíječku a neotevírejte ji
sami, což zajistí zachování bezpečnosti přístroje.
- Ujistěte se, že síťové napětí odpovídá údajům
na typovém štítku nabíječky.
Hrozí nebezpečí úrazu elektrickým proudem.
- Před připiojením nebo odpojením nabíječky k
elektrickému nářadí odpojte nabíječku od sítě,
aby nedošlo k poškození baterie a nabíječky.
31
Page 32

- Udržujte nabíječku v čistotě a mimo dosah
vlhkosti a deště.
Nikdy nepoužívejte nabíječku venku.
Znečištění a pronikání vody zvyšují riziko úrazu
elektrickým proudem
- Nabíječka smí být provozována pouze s
originálními akumulátory.
Nabíjení jiných baterií může způsobit zranění
nebo požár.
- Zabraňte mechanickému poškození
nabíječky.
Může to vést k vnitřním zkratům.
- Nabíječka nesmí být provozována na hořlavých
površích (např. Papír, textil).
Hrozí nebezpečí požáru v důsledku ohřevu
během nabíjení.
- Pokud je napájecí kabel tohoto zařízení
poškozen, musí být nahrazen výrobcem nebo
jeho servisním technikem nebo podobně
kvalifikovanou osobou, aby nedošlo k
ohrožení.
- Nenabíjejte nenabíjecí baterie v nabíječce.
Mohlo by dojít k poškození zařízení.
Pozor - ostré řezné nože!
Udržujte nohy a ruce pryč.
Nebezpečí úrazu!
Před seřizováním nebo čištěním
vypněte motor a vyjměte kontaktní klíč.
Pozor! Dojezd nože.
Nevystavujte přístroj vlhkosti.
Řezací kruh
Výška řezu
Kontaktní klíč
Symboly a obrázky
Obrázky na zařízení:
Před použitím přístroje si přečtěte
návod!
Pozor!
Pozorně si přečtěte návod k
obsluze.
Pozor! Nebezpečí poranění při
odhození dílů.
Udržujte osoby mimo zařízení
96
Indikace hladiny akustického výkonu
LWA v dB.
dB
V souladu s platnými evropskými
směrnicemi
Elektrické spotřebiče nepatří do
domovního odpadu.
32
Page 33

Obrázky na baterii:
Obecný popis
Baterie likvidujte v místě sběru
odpadních baterií,
jsou zasílány pro ekologickou
recyklaci.
Akku-Li
Nevystavujte baterii delší dobu silnému
slunečnímu světlu a neumísťujte je na
radiátory (max. 45 ° C).
45
Nevhazujte baterii do ohně.
Nevhazujte baterii do vody.
Nevhazujte baterii do koše.
Obrázky na nabíječce:
Vstup
Výstup
Obsah dodávky
Opatrně vyjměte zařízení z obalu a zkontrolujte,
zda jsou kopletní následující části.
- Akumulátorová sekačka a spodní řídítka
- Vrchní řídítka
- Lapač trávy
- 2 držáky kabelů
- 2 šrouby s podložkami pro upevnění spodních
řídítek
- 2 šrouby s podložkami a šrouby pro připevnění
horních řídítek
- Baterie (koupit samostatně)
- Nabíječka (koupit samostatně)
- Originální návod k obsluze
Obalový materiál řádně zlikvidujte.
Popis funkce
Akumulátorová sekačka má řezný nástroj rotující
rovnoběžně s rovinou řezu.
Je vybaven výkonným elektromotorem,
robustním plastovým pouzdrem, bezpečnostním
spínačem, ochranou proti nárazu a lapačem
trávy.
Dodatečně je přístroj 6krát výškově nastavitelný
a má kolečka s lehkým chodem.
Funkci obslužních částí naleznete v následujících
popisech.
33
Nabíječka je vhodná pouze pro
použití v místnostech.
Před nabíjením si přečtěte
návod k obsluze.
Třída ochrany II
Elektrické spotřebiče nepatří do
domovního odpadu.
Přehled
1.
Horní řídítka
2.
Šrouby pro upevnění horních řídítek
Dolní řídítka
3.
Koš na trávu
4.
4a. indikátor hladiny náplně
5.
Ochrana proti nárazům
6.
Šrouby pro upevnění spodních řídítek
Kolečka
7.
Skříň zařízení
8.
Baterie (koupit samostatně)
9.
10.
Kontaktní klíč
11.
Uvolňovací tlačítko
Víko
12.
Page 34

Páka pro nastavení výšky sečení
13.
Rukojeť
14.
Držák kabelu
15.
16.
Napájecí kabel
17.
Tlačítko pro uvolnění
18.
Páka startéru
Nabíječka (koupit samostatně)
19.
Nůž
20.
21.
Šroub nože
Montáž
- Provádějte pouze práci, na kterou si troufate.
- V případě nejasností se obraťte přímo na
odborníka nebo na náš servis.
Montáž spodních řídítek
Připevněte spodní říditka(3) pomocí
1.
přiložených šroubů (6), podložek (a) vpravo a
vlevo na kryt přístroje.
Otáčejte šrouby (6) ve směru hodinových ručiček.
2.
Obsluha
Seřízení přístroje se smí provádět pouze s
vypnutým motorem a stojacím nožem. Hrozí
nebezpečí zranění.
Vypněte přístroj, vytáhněte kontaktí klíč (10) a
počkejte, až se čepel zastaví.
Zavěšení/odebrání lapače trávy
1.
Při nasazení lapače trávy (4) zvedněte
ochranu proti nárazu (5) a zavěšte sběrný
koš (4) na oba závěsy.
2.
Zaklapněte ochranu proti nárazu (5) na
koš na sběr trávy (4).
Pro vyjmutí koše na sběr trávy (4)
3.
zvedněte ochranu proti nárazu (5) a odeberte
koš. Ochranu proti nárazu (5) sklopte zpět na
kostru přístroje (8). POZOR! Zařízení nesmí být
provozováno bez ochrany proti nárazu nebo
lapače trávy. Hrozí nebezpečí zranění.
Montáž horních řídítek
1.
Nasaďte jeden konec horního řídítka (1) na
šroubový závit na spodních řídítkach.
Roztáhněte konce horních řídítek (1)
2.
mírně od sebe a druhý konec umístěte na závit
šroubu na spodních řídítkach
.
Tlačítko pro odemknutí (17) musí být vpravo ve
směru sečení.
3. Umístěte přiložené podložky (a).
4.
Zatočte horní šrouby (2) ve směru
hodinových ručiček.
5.
Šrouby (2) zajistěte zatlačením
k horním řídítkám (1).
6.
Připevnění držáku kabelu: Zacvakněte
držák kabelu (15) na horní (1) a dolní (3) řídítka a
upevněte k nim kabel zařízení (16).
Na konci spodních řídítek (3) můžete vložit
kabel přístroje (16) do stávajícího držáku kabelu.
Indikátor hladiny náplně
Na straně lapače trávy (4) je
namontován indikátor hladiny (b).
Indikátor hladiny náplně
otevřen: lapač trávy
prázdný.
Indikátor hladiny náplně
zavřený: lapač trávy naplněn.
Nastavte výšku sečení
Zařízení má 6 poloh pro nastavení výšky sečení:
35 mm / 25 mm - nízká výška řezu
55 mm / 45 mm - průměrná výška řezu
75 mm / 65 mm - vysoká výška řezu
1.
Uchopte držadlo (14) a zvedněte
nebo stiskněte směrem dolů.
Páku (13) pro
2.
seřízení výšky sečení veďte kolem rastru na
požadované
34
Page 35

nastavení výšky sečení. Správná výška řezu pro
dekorativní trávník je asi 25-45 mm, pro
užitkový trávník asi 45-65 mm. Pro první řez v
sezóně by měla být zvolena vysoká výška
sekání.
Zapnutí a vypnutí
1.
Umístěte zařízení na rovný povrch.
2.
Zvednìte kryt (12)
na zařízení a zasuňte nabitou baterii (9) podél
vodicí kolejnice do přístroje.
Slyšitelně cvakne.
3.
Vložte kontaktní klíč (10) do
na to určeného otvoru vedle baterie (9).
4.
Ujistěte se, že před zapnutím
se přístroj nedotýká předmětů.
Pro zapnutí stiskněte tlačítko
5.
(17) a přidržte ji při stisknutí spouštěcí páky (18).
Uvolněte uvolňovací tlačítko.
6.
Chcete-li vypnout, uvolněte páku startu (18)
POZOR! Díky inteligentnímu řízení
energie se motor rozběhne.
Po vypnutí přístroje se nůž ještě několik
sekund otáčí.
Nedotýkejte se běžícího nože.
Hrozí nebezpečí zranění.
Nabíjení
Nevystavujte baterii extrémním
podmínkám, jako je teplo a otřes.
Hrozí nebezpečí zranění v důsledku úniku
kapaliny z akumulátoru!
V případě kontaktu s očima nebo kůží
opláchněte postižené místo vodou nebo
neutralizátorem a vyhledejte lékařskou
pomoc.
Baterii nabíjejte pouze v suchých prostorách,
vnější povrch baterie musí být před
připojením nabíječky čistý a suchý.
Hrozí nebezpečí úrazu elektrickým proudem.
Baterii nabíjejte pouze přiloženou
nabíječkou.
- Před prvním použitím nabijte baterii.
Nenabíjejte baterii několikrát
krátce po sebe.
- Výrazně zkrácená provozní doba navzdory
nabíjení znamená, že je baterie vybitá a je třeba
ji vyměnit. Používejte pouze originální baterii,
kterou můžete získat prostřednictvím
zákaznického servisu.
- Vždy dodržujte platné bezpečnostní pokyny a
předpisy a pokyny pro ochranu životního
prostředí.
- Vady vzniklé v důsledku neodborné
manipulace nejsou kryty zárukou.
Vložení/vyjmoutí baterie
POZOR! Vypněte přístroj, vytáhněte kontaktní
klíč (10) a počkejte, až se nůž zastaví.
aterie se skládá ze dvou akumulátorů.
Před vložením baterie musíte nejprve zasunout
akumulátory do držáku (viz obrázek 5).
1.
Pro vložení baterie (9) do
zařízení, posuňte baterii podél vodicí lišty do
zařízení. Slyšitelně cvakne.
2.
Pro vyjmutí baterie (9) ze
zařízení, stiskněte tlačítko vysunutí (11).
Baterie (9) se trochu vysune z vodicí kolejnice.
Vytáhněte baterii.
Nabijení baterie
POZOR! Vypněte přístroj, vytáhněte kontaktní
klíč (10) a vyčkejte, až se nůž zastaví.
Před vložením do nabíječky (19) nechte čerstvě
vybitou baterii (9) asi 15 minut vychladnout.
V případě potřeby vyjměte baterie (9)
1.
ze zařízení.
Zasuňte baterie (9) do nabíječky
2.
(19). Slyšitelně cvakne.
3.
Zapojte nabíječku (19) do
zásuvky.
Po úspěšném nabití odpojte
4.
nabíječku (19) ze sítě.
5.
Stiskněte uvolňovací tlačítko na
baterii (9) a vyjměte baterii (9) z nabíječky
(19).
35
Page 36

Indikátor stavu baterie
3 zelené LED diody svítí
-> Baterie je plně
nabitá
2 zelené LED diody svítí
-> Baterie je nabitá do
poloviny
1 zelená LED svítí
-> Baterie je téměř
vybitá
Použité baterie
- Výrazně snížená provozní doba navzdory
nabíjení znamená, že baterie (9) je vybitá a je
třeba ji vyměnit.
Použijte pouze náhradní baterii, kterou si
můžete objednat u zákaznického servisu.
- Vždy dodržujte platné bezpečnostní pokyny a
předpisy a pokyny pro ochranu životního
prostředí (viz "Likvidace / ochrana životního
prostředí").
Práce se zařízením
VAROVÁNÍ! Dodržujte předpisy pro ochranu
před hlukem a místní předpisy.
Pravidelné sečení stimuluje travnatou rostlinu ke
zvýšení tvorby listů, ale zároveň umožňuje
odumírání rostlin plevelů.
Trávník je tedy po každém sečení hustší a odolný
zátěži.
První sečení se provádí od dubna na výšku 70-80
mm.
Během hlavního vegetačního období se trávník
kosí nejméně jednou týdně.
- Přístroj držte co nejpřesněji v rovných pásech za
chůze. Pro bezproblémové sekání by se pruhy
měly vždy překrývat o několik centimetrů.
- Nastavte výšku sečení tak, aby zařízení nebylo
přetíženo. V opačném případě může dojít k
poškození motoru.
- Vždy pracujte na svazích křížem ke svahu. Buďte
obzvláště opatrní při pohybu dozadu a tažení
zařízení.
- Přístroj po každém použití vyčistěte, jak je
popsáno v kapitole "Čištění / údržba". POZOR! Po
vypnutí
přístroje se nůž ještě několik vteřin otáčí.
Nedotýkejte se běžícího nože.
Hrozí nebezpečí zranění.
Technické údaje
Stroj
Napětí motoru:
Volnoběžné otáčkyn0 :
Šířka řezu:
Výška řezu:
Třída ochrany:
Objem koše na trávu:
L
Hladina akustického tlaku:
dina ak. výkonu: LwA=91.64 dB(A); KwA=3 dB
Hla
=79 dB(A); KpA=3 dB
PA
Zaručená: LwA=96 dB(A)
Vibrace: ah=1.2 m/s2; K=0.5 m/s
Baterie (koupit samostatně)
Akumulátor:
2*20V 2000mAh Li-ion
Nabíječka (koupit samostatně):
Vstupní výkon:
220-240V~ 50-60 Hz, 120W
Výstupní výkon 1:
Výstupní výkon 2:
Doba nabíjení:
Úrovně hluku a vibrací byly stanoveny podle
norem a předpisů uvedených v prohlášení o
shodě.
Technické a vizuální změny mohou být
provedeny v průběhu dalšího vývoje bez
předchozího upozornění.
Veškeré rozměry, poznámky a informace jsou
proto bez záruky.
Nelze tedy uplatnit právní nároky učiněné na
základě návodu k obsluze.
Deklarovaná hodnota emisí vibrací byla měřena
podle standardizovaného zkušebního postupu a
může být použita pro porovnání jednoho
elektrického nářadí s jiným.
Uvedená hodnota emisí vibrací může být také
použita pro porovnání posouzení jednoho
elektrického nářadí s jiným.
40 V
3800 min
370 mm
25-75 mm
IPX1
40 L
20.5V 2.2A
20.5V 2.2A
1h
-1
2
36
Page 37

Uvedená hodnota emisí vibrací může být také
použita pro počáteční posouzení použití.
VAROVÁNÍ: Hodnota emise vibrací se může
lišit od hodnoty indikace při skutečném použití
elektrického nářadí v závislosti na způsobu
použití elektrického nářadí.
Je třeba zavést bezpečnostní opatření na
ochranu provozovatele na základě odhadu
během skutečných podmínek použití (s
přihlédnutím ke všem částem provozního cyklu,
jako jsou doba, kdy je nářadí vypnuto a kdy je
používáno. kdy je zapnuto, ale běží bez zatížení).
Čištění / údržba
Práce, které nejsou popsány v tomto
návodu, nechte provést autorizovaným
servisním střediskem.
Používejte pouze originální díly.
Při manipulaci s nožem noste rukavice.
Vypněte přístroj, vytáhněte kontaktní klíč (10)
a počkejte, až se nůž zastaví.
Všeobecné úklidové a
údržbářské práce
Přístroj nestříkejte vodou.
Hrozí nebezpečí úrazu elektrickým proudem.
- Přístroj vždy udržujte čistý.
K čištění používejte kartáč nebo hadřík, ale
nepoužívejte čisticí prostředky ani rozpouštědla.
- Po sečení odstraňte zbývající zbytky rostlin
kusem dřeva nebo plastu z kol, průduchů,
výpustného otvoru a oblasti lopatky.
Nepoužívejte tvrdé nebo špičaté předměty,
ohlo by dojít k poškození zařízení.
m
- Před každým použitím zkontrolujte, zda přístroj
neobsahuje zjevné závady, jako jsou volné,
opotřebované nebo poškozené části.
Zkontrolujte dotažení všech matic, čepů a
šroubů.
- Zkontrolujte kryty a ochranné zařízení, zda
nejsou poškozené a zda jsou správně osazeny.
Vyměna nožů
Je-li nůž tupý, může být znovu naostřen
odbornou dílnou. Pokud je nůž poškozen nebo
vykazuje nevyváženost, musí být vyměněn.
1.
Otočte zařízení.
2.
Používejte silné rukavice a držte
nůž (20) pevně. Šroub (21) otočte klíčem proti
směru hodinových ručiček.
3.
Nový nůž (20) nasaďte v opačném
postupu. Zkontrolujte, zda je nůž (20) správně
umístěn a zda je šroub nože (21) pevně
dotažen.
Skladování
Povolte šrouby (2 + 6) a sklopte horní řídítka (1) a
spodní řídítka (3) společně tak, aby zaberali méně
místa. Kabely zařízení se nesmí svírat.
- Udržujte přístroj v suchu a mimo dosah dětí.
- Před umístěním jednotky do interiéru nechte
motor vychladnout.
- Před delším skladováním vyjměte baterii ze
zařízení (např. přezimování).
- Baterii skladujte částečně nabitou. Úroveň
nabití by měla být 40-60% během delšího
skladování (svítí dvě kontrolky LED indikátoru
úrovně nabití).
- Při delším skladování kontrolujte stav nabití
akumulátoru přibližně každé tři měsíce a v
případě potřeby jej dobijte.
- Baterii skladujte v rozmezí 10 ° C až 25 ° C.
Během skladování se vyhněte extrémnímu
chladu nebo teplu, abyste zabránili ztrátě výkonu
baterie.
37
Page 38

- Neneseme odpovědnost za škody
způsobené našimi zařízeními, pokud jsou
způsobeny nesprávnou opravou nebo
použitím neoriginálních dílů nebo
nesprávným použitím.
Likvidace / ochrana životního prostředí
Vyjměte baterii ze zařízení a přístroj, baterii,
příslušenství a obal recyklujte šetrně k životnímu
prostředí.
Elektrické spotřebiče nejsou
domovním odpadem.
Nevhazujte baterii do koše,
do ohně (nebezpečí výbuchu) nebo do vody.
Li-Ion
Poškozené baterie mohou poškodit životní
prostředí a vaše zdraví, pokud unikají toxické
výpary nebo kapaliny.
- Předejte přístroj a nabíječku recyklačnímu
středisku.
- Baterie likvidujte ve vybitém stavu.
Doporučujeme zakrýt póly lepící páskou, aby se
zabránilo zkratu. Neotevírejte baterii.
- Baterie zlikvidujte v souladu s místními
předpisy. Baterie zlikvidujte v místě sběru
odpadních baterií, kde jsou recyklovány
způsobem šetrným k životnímu prostředí.
Zeptejte se místní likvidace odpadu nebo
našeho servisního střediska.
- Nevhazujte trávu do popelnice, ale dejte ji do
kompostu nebo ji rozdělte jako mulčovací vrstvu
pod keře a stromy.
38
Page 39

Poradce při potížích
Problem
Zařízení se nespustí Baterie (9) je vybita
Motor se zastaví Blokování cizími předměty Odstraňte cizí předměty
Výsledek práce
neuspokojivý nebo
motor pracuje těžko
Nůž se neotáčí Nůž (20) je zablokovaný trávou Vyjměte trávu
Abnormální zvuky,
chrastění nebo
vibrace
Možná příčina Poradce při potížích
Baterie (9) není zasunutá Vložte baterii
Uvolňovací tlačítko (17) nebo
páka spouštění (18) je vadná
Opotřebované uhlíkové kartáče
Vadný motor
Tráva je příliš vysoká
Příliš nízká výška řezu Nastavte větší výšku sečení
Nůž (20) je tupý Naostřete nebo vyměňte
Ucpaná oblast nože Vyčistěte zařízení
Nůž (20) je nesprávně namontován Nasaďte nůž správně
Šroub nože (21) je uvolněný Utáhněte šroub nože
Šroub nože (21) je uvolněný Utáhněte šroub nože
Nůž je poškozený Vyměňte nůž
Zkontrolujte stav baterie
Nabijte baterii
Oprava servisním střediskem
Nastavte větší výšku sečení.
Stisknutím dolní rukojeti lehce
nadzvedněte přední kola.
nůž
39
Page 40

Original Konformitätserklärung
Matrix GmbH
Postauer Str. 26
D-84109 Wörth/Isar
Germany
Fax: +49 (0) 8702/45338 98
E-Mail: info@matrix-direct.net
erklärt folgende Konformität gemäss
DE
EU-Richtline und Normen für den Artikel
pro tento výrobek prohlašuje následující
CZ
shodu podle směrnice EU a norem
hereby declares the following
UK
conformity under the EU Directive and
standards for the following article
Akku-Rasenmäher / ALM 40-1 Li X-ONE
2006/42/EC 87/404/EEC
2000/14/EC_2005/88/EC
98/37/EG
2014/30/EU
Akku-Rasenmäher: EN 60335-1:2012+A11:2014; EN 60335-2-77:2010; EN 62233:2008;
EN 55014:2006/+A1:2009/+A2:2011; EN55014-2:2015;
Ladegerät: EN 60335-1:2012+AC:14+A11:14; EN 60335-2-77:2010; EN 62233:2008
Geräuschemission 2000/14/EC, Anhang III & 2005/88/EC, garantierter Schallleistungspegel LwA=99 dB (A)
Autorisierte Person zur Aufbewahrung der technischen Dokumente:
Matrix GmbH
Postauer Str. 26
D-84109 Wörth/Isar
Germany
R&TTED 1999/5/EC
2002/96/EC
2011/65/EU_(EU)2015/863
Wörth/Isar, den 09.05.2019
Art.-Nr.: 511.010.592
40
Tino Switon (Geschäftsführer)
Page 41

GARANTIE
DE
GARANTIE
Dieses Gerät ist ein Qualitätserzeugnis. Es wurde unter Beachtung der
derzeitigen technischen Erkenntnisse konstruiert und unter Verwendung eines
üblichen guten Materials sorgfältig gebaut.
Die Garantiezeit beträgt 24 Monate und beginnt mit dem Zeitpunkt der
Übergabe, der durch Kassenbon, Rechnung oder Lieferschein nachzuweisen
ist. Innerhalb der Garantiezeit werden alle Funktionsfehler durch unseren
Kundendienst beseitigt, die nachweisbar, trotz vorsichtsmäßiger Behandlung
entsprechend unserer Bedienungsanleitung auf Materialfehler zurückzuführen
sind.
Die Garantie erfolgt in der Weise, dass mangelhafte Teile nach unserer Wahl
unentgeltlich instandgesetzt oder durch einwandfreie Teile ersetzt werden.
Ersetzte Teile gehen in unser Eigentum über. Durch die Instandsetzung oder
Ersatz einzelner Teile wird die Garantiezeit weder verlängert noch wird neue
Garantiezeit für das Gerät in Gang gesetzt. Für eingebaute Ersatzteile läuft keine
eigene Garantiefrist. Wir übernehmen keine Garantie für Schäden und Mängel an
Geräten oder deren Teile, die durch übermäßige Beanspruchung, unsachgemäße
Behandlung und Wartung auftreten. Das gilt auch bei Nichtbeachtung der
Bedienungsanleitung sowie Einbau von Ersatz- und Zubehörteile, die nicht in
unserem Programm aufgeführt sind. Beim Eingreifen oder Veränderungen an
dem Gerät durch Personen, die hierzu nicht von uns ermächtigt sind, erlischt der
Garantieanspruch.
Schäden, die auf unsachgemäße Handhabung, Überlastung oder auf
natürliche Abnutzung zurückzuführen sind, bleiben von der Garantie
ausgeschlossen.
Der Hersteller haftet nicht für Folgeschäden. Schäden, die durch
Herstelleroder Materialfehler entstanden sind, werden durch Reparatur- oder
Ersatzlieferung unentgeltlich behoben.
Vorrausetzung ist, dass das Gerät unzerlegt und vollständig mit Kauf- und
Garantienachweis übergeben wird.
Verwenden Sie im Garantiefall ausschließlich die Originalverpackung.
So garantieren wir Ihnen eine reibungslose und schnelle
Garantieabwicklung.
Bitte senden Sie die Geräte “frei Haus” ein oder fordern Sie einen FreewayAufkleber an. Unfreie Einsendungen können wir leider nicht annehmen!
Die Garantie bezieht sich nicht auf die Teile, die durch eine natürliche
Abnutzung verschlissen werden.
Bei Garantieanspruch, Störungen, Ersatzteil- oder Zubehörbedarf wenden
Sie sich bitte an die hier aufgeführte Kundendienstzentrale:
Änderungen vorbehalten.
.
.
Tel.: +49 (0) 1806/841090 . Fax: +49 (0) 8702/45338 98
WARRANTY
UK
This appliance is a quality product. It was designed in compliance with
current technical standards and made carefully using normal, good quality
materials.
The warranty period is 12 months and commences on the date of purchase,
which can be verified by the receipt, invoice or delivery note. During this
warranty period all functional errors, which, despite the careful treatment
described in our operating manual, are verifiably due to material flaws, will
be rectified by our after-sales service staff.
The warranty takes the form that defective parts will be repaired or replaced
with perfect parts free of charge at our discretion. Replaced parts will
become our property. Repair work or the replacement of individual parts
will not extend the warranty period nor will it result in a new warranty period
being commenced for the appliance. No separate warranty period will
commence for spare parts that may be fitted. We cannot offer a warranty for
damage and defects on appliances or their parts caused by the use of excessive
force, improper treatment and servicing.
This also applies for failures to comply with the operating manual and the
installation of spare and accessory parts that are not included in our range
Matrix GmbH Service
Postauer Str. 26 . D – 84109 Wörth/Isar
.
e-mail: service@matrix-direct.net
CZ ZÁRUKA
Tento přístroj je výrobek vysoké kvality. Byl sestrojen s ohledem na současné
technické poznatky a pečlivě sestaven s použitím běžného kvalitního materiálu.
Záruční lhůta je 24 měsíců a začíná okamžikem předání, které je doloženo
pokladním lístkem, účtenkou nebo dodacím listem. Po dobu záruční lhůty budou
naším zákaznickým servisem odstraněny veškeré funkční chyby, které
prokazatelně vznikly vadou materiálu i přes šetrné zacházení v souladu s naším
návodem na obsluhu.
Záruka proběhne tím způsobem, že budou vadné části dle naší volby buď
bezplatně opraveny nebo nahrazeny nezávadnými částmi. Nahrazené části
přechází do našeho vlastnictví. Opravou nebo výměnou jednotlivých částí se
záruční lhůta neprodlužuje, ani se nestanovuje nová záruční lhůta na přístroj. Pro
vestavěné náhradní části neběží žádná vlastní záruční lhůta. Nepřebíráme záruku
za škody a závady na přístrojích nebo jejich částech, které vznikly nadměrným
namáháním, nadměrným zacházením či údržbou. Totéž platí i pro
nerespektování návodu k obsluze, jakož i instalaci náhradních dílů a příslušenství,
které nejsou v našem programu uvedeny. V případě zásahů nebo změn na našem
přístroji osobami, které k tomu nejsou námi zplnomocněné, zaniká nárok na
záruku.
Na škody, vzniklé nesprávným zacházením, přetěžováním nebo přirozeným
opotřebováním, se záruka nevztahuje. Výrobce nenese odpovědnost za následné
škody. Škody, vzniklé výrobními vadami nebo vadou materiálu, budou bezplatně
opraveny nebo nahrazeny
of products. In the event of interference with or modifications to the
appliance by unauthorised persons, the warranty will be rendered void.
Damages that are attributable to improper handling, over loading, or
natural wear and tear are excluded from the guarantee.
Damages caused by the manufacturer or by a material defect will be
corrected at no charge by repair or by providing spare parts.
The prerequisite is that the equipment is handed over assembled, and
complete with the proof of sale and guarantee.
For a guarantee claim, only use the original packaging.
That way, we can guarantee quick and smooth guarantee processing.
Please send us the appliances post-paid or request a Freeway sticker.
Unfortunately we will be unable to accept appliances that are not postpaid.
The warranty does not cover parts that are subject to natural wear and tear.
If you wish to make a warranty claim, report faults or order spare parts or
accessories, please contact the after-sales centre below:
Subject to change without prior notice.
Podmínkou je, aby byl přístroj nerozebrán a předán spolu s kompletní
účtenkou a záručním listem. V případě uplatnění záruky použijte
výhradně originální obal. Zaručíme Vám tak bezproblémový a rychlý
průběh záruky.
Přístroje prosím zasílejte dodávkou zboží do obchodu nebo si
vyžádejte
Freeway-známku. Neofrankované zásilky nemůžeme bohužel přijmout!
Záruka se nevztahuje na ty části, které se opotřebovaly přirozeným
opotřebováním.
V případě nároků na záruku, poruchy, potřeby náhradních dílů nebo
příslušenství se prosím obraťte na zde uvedenou centrálu
zákaznického
servisu.
Změny vyhrazeny.
MATRIX
Postauerstrasse 26
84109 Wörth/Isar
DE
www.matrix-direct.net
service@matrix-direct.net
Tel.: +49(0) 1806/841090
41
Page 42

Akku-Rasenmäher / ALM 40-1 Li X-ONE
GARANTIE
DE
gekauft bei:
in (Ort, Straße):
Name d. Käufers:
Straße, Haus-Nr.:
PLZ, Ort :
Telefon:
Datum, Unterschrift:
Fehlerbeschreibung:
CZ ZÁRUKA
Zakoupeno u:
V (místo, ulice):
Jméno zákazníka:
Ulice, číslo domu:
PSČ, místo:
Telefon:
Datum, podpis:
Popis závady
WARRANTY
UK
Purchased at:
in (city, street):
Name of customer:
Street address:
Postal code, city:
Telephone:
Date, signature:
Fault description:
42
 Loading...