


Home Management System
USER MANUAL

Table of Content
1. Arc’s Remote
1.1 Getting Started
1.2 Buttons Explained
2. Arc’s Home Section
2.1 Arc Home Section Overview
2.2 Adding Apps In The Home Section
2.3 Deleting Apps In The Home Section
3. Home Entertainment
3.1 Home Entertainment Overview
3.2 How To Access The Home Entertainment
Section And Play Any Movie/TV Show
3.3 How To Add/Delete And Play A Movie/TV
Show To Your Watch List
3.4 How To Play A Movie/TV Show Trailer
3.5 How To Search For Any Movie/TV Show
4. Smart Home
4.1 Smart Home Overview
4.2 How To Create A Room
4.3 How To Delete A Room
4.4 How To Edit A Room
4.5 How To Include A Device
4.6 How To Exclude A Camera
4.7 How To Include A Wi-Fi Camera
4.8 How To Assign A Device In A Room
4.9 How To Re-assign A Device To Another
Room
4.10 How To Create A Scene
4.11 How To Create a Macro (Routine)
4.12 How To View Device History
4.13 How To View A Device Or Room
4.14 How To Change Temperature Units
4.15 How To Reset Your Smart Home To
Factory Settings
4.16 How To Remove A Lost Device
4.17 How To Find The Gateway UID
6. Router
6.1 Router Section Overview
6.2 How To View Connected Devices On
Arc’s Network
6.3 How To Blacklist A Device
6.4 How To Whitelist A Device
6.5 How To Change Your Wi-Fi Name And
Password
6.6 How To Change Your Name And
Password For Router Admin Login
6.7 How To Disable Wi-Fi
6.8 How To Extend Wi-Fi Range
6.9 How To Prioritize Bandwidth
6.10 How To Reboot Arc’s Router
6.11 How To See Router Firmware
Version
6.12 How To Enable Guest Wi-Fi
6.13 How To Factory Reset Arc’s Router
6.14 How To Connect Arc To Wi-Fi Instead Of
Ethernet
7. Cyber Security
7.1 Cyber Security Overview
7.2 How To See Logged Threats
7.3 How To Get A Security Report To Your
Email
7.4 How To Improve Your Security Score
8. Parental Control
8.1 Web Supervision Overview
8.2 How To Block A Website And URL
8.3 How To Block A Category
8.4 How To Rename A Device
8.5 How to Block Schedule Online Activity
5. Energy Management
5.1 Energy Management Overview
5.2 How To Enter Form Of Currency And
Value Per Kwh
5.3 How To Exclude Devices From
Calculations.
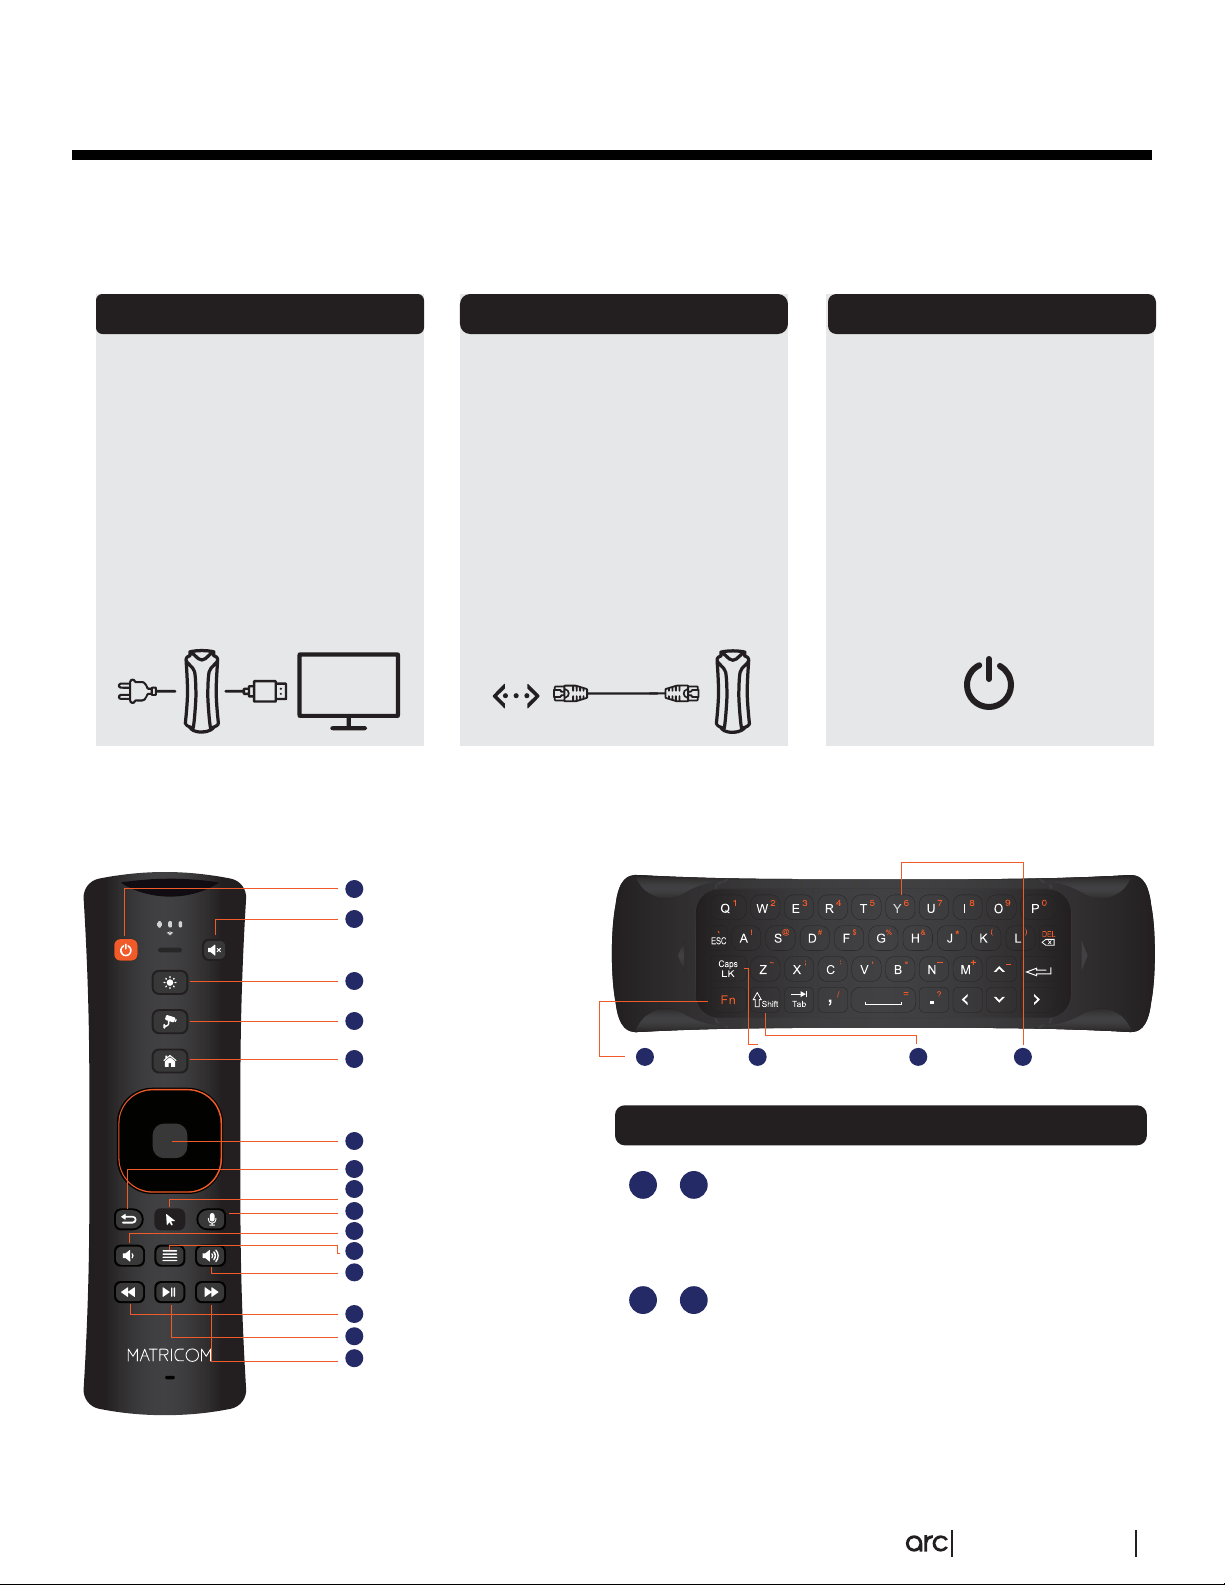
Getting Started
Let’s get started on setting up you Arc!
1.1 Arc - Getting Started
Step 1 Step 2 Step 3
Unbox your Arc and connect
the provided HDMI cable
cord to your TV or monitor
and Arc. Plug the power
adapter to your Arc and into
the wall socket. Switch the
input/source on your TV
accordingly to match the
HDMI input that’s connected
to Arc
1.2 Buttons Explained
1
2
Sleep
Mute
Get connected, and plug
your provided ethernet cable
into the blue colored LAN
port of the Arc. Connect the
other end of the ethernet
cable into your wall-based
Ethernet port or existing
router.
Next, press the power
button located next to the
power adapter’s port to turn
the device “ON”. Once your
device is powered on; pair
your remote and follow the
Arc’s Setup Wizard.
3
Device Shortcut
4
Camera Access
5
Home
6
Ok Button
7
Back
8
Cursor
9
Voice Command
10
Volume Down
11
Menu
12
Volume Up
13
Fast Forward
14
Play / Pause
Fast Backward
15
Function
16
Caps Lock Shift Calibration
17 18 18
Button Combinations
+
16 18
16 17
Character Shift
If button has more than one secondary
character, switch between them by using this
combination.
+
Calibration
Press and hold these buttons for 3 seconds.
The remote will light up. Then place it
horizontally on the table until the light turns off.
[
]
\
|
}
{
GETTING STARTED 2

Home
This section of the Arc explains how to access the toolbar features and system settings. This is the
starting point to accessing your Router and Smart Hub features of the Arc. It also displays the
status of Arc’s Z-Wave, Wi-Fi, and Bluetooth communications. The toolbar is helpful for viewing
notifications, clearing your cache for better performance and getting access to the backend settings
of your Arc.
2.1 Home Section Overview
Where to Find Your Toolbar Shortcuts
Shortcuts are located on Top of the screen,
in Top Left, and the Top Right corner.
Z Wave Clear RAM Notifications
Z-Wave Activated
Z-Wave hub is ON and active
when the Z-Wave logo is
orange.
Z-Wave Not Activated
Z-Wave hub is OFF and
inactive when the Z-Wave
logo is not orange. Press the
Z-Wave logo to turn it back
ON again.
Press this button to clear the
cache and RAM.
Selecting to open the “Android
Notifications”.
Bluetooth
Bluetooth is ON when the icon is illuminated Orange. Clicking the
Bluetooth icon will open the Bluetooth settings.
If the Arc remote is not connected, try connecting a USB Mouse via
Bluetooth. Reconnect your remote by pressing the HOME and
BACK buttons together for 2 seconds.
Bluetooth is OFF when this icon is not illuminated Orange. Connect
a USB mouse to select this icon and turn it ON again.
HOME 3

Internet Access
Settings
Voice Command
Internet Access
When the Globe is Orange,
that indicates that you have
internet access.
No Internet Access
When the Globe is not
orange, that indicates that
there is no internet access.
Try reconnecting to the
internet in the router settings
and if needed, power the Arc
ON and OFF again.
Clicking on this “Gear” icon
will open up the Arc’s
settings.
Clicking on this Calendar icon
in the top left corner of the Arc
will open up the “Time Zone
settings”.
2.2 Adding Your Apps to the Home Screen
Time Settings
Log in to your Google
account to unlock the power
of the Google Assistant.
Press the Voice Command
button on your Arc remote to
prompt Google Assistant.
Hold the button down to
speak commands and
perform various functions
with the sound of your voice.
Step 1
Go to the “Home Section” and then click on the
“Add Favorite” button.
2.3 Deleting Apps In The Home Section
Step 1
Select the app you want to delete from the home
screen.
Step 2
Select the app you want to mark as your favorite,
and confirm the action by pressing the “OK” button.
Step 2
Press the (MENU) button on remote and then
select “YES” on the popup.
HOME 4

Home Entertainment
This is where you can access all your home entertainment needs. The “Movies” and “TV Shows”
tabs lets you browse the latest content with your existing subscriptions. Arc’s search engine
categorizes movies and TV shows and lets you search specific criteria such as actors or genre. You
can put content on your “Watchlist” and even watch trailers for upcoming movies or shows.
3.1 Home Entertainment Overview
1. In the main screen of the Arc you can
see highlighted the “Movies” and “TV
Shows” tabs. Click on it and you’ll see
how they expand.
2. Both sections have a vertical search
menu that is categorized to help refine
your search query.
3. In here you can see the sources of
streaming providers available, and you
can even put content on your “Watchlist”
or view “Trailer” highlighted here.
3.2 How To Access Home Entertainment And Play Any Movie / TV Show
1. Select the “Movie” or “TV Shows” tab in
the Arc to load the full section. Use the
Arc remote to navigate within the section
and search for the content you desire by
the criteria of your choice (“Genre”, “Year”,
etc.)
2. Select to expand the movie or TV show
you’d like to watch.
3. Select a source you are subscribed to
and stream the movie or TV show. If the
app you wish to use is not installed,
select an app you wish to use, and you’ll
be redirected to the Google Play Store to
download that app.
HOME ENTERTAINMENT
5

3.3 How To Add/Delete And Play A Movie/TV Show To Your Watch List
1. Select the “Movie” or “TV Shows” tab in
the Arc to load the full section.
2. Find the movie or TV show you wish to
add and click to expand it. Add it to your
Watch List by clicking the “+” button
labeled “Watch List”. To delete, repeat the
same steps and click the Watch List
button again.
3. You can view content in your Watch
List when you open the “Movies” or “TV Shows” tab. You will see your Watch List at the top of the search
query within Movies or TV shows. From there, you can select and expand your viewing options to select and
play your desired content.
3.4 How to Play A Movie/TV Show Trailer
3.5 How To Search For Any Movie/TV Show
Step 1
Select the “Movie” or “TV shows” tab in the Arc to
load the full section.
1. Select the “Movie” or “TV shows” tab in
the Arc to load the full section.
2. Find a movie or TV show and click to
expand it. Next to the “Watch List” button
is the “Preview” button. Click to watch the
trailer.
Step 2
Scroll all the way to the bottom and select the
“Search” tab. Enter your keywords and to search
for the movie or TV show you are looking for.
HOME ENTERTAINMENT
6

Smart Home
Arc’s Smart Home section is where automating your everyday devices come to life. This is where
you can setup your devices to create scenes and routines. You will learn how to create scenes and
macros (routines) to design when or how you use your devices. You will also learn how to place
scenes and macros in “Rooms” and how to label your rooms with devices and their function as they
would exist in your home. By downloading the XHome app, you will have access to Arc’s Smart
Home and the devices you’ve setup.
4.1 Smart Home Overview
Smart Devices
On the left side: This is the smart
device section where all connected
devices are shown. They are grouped
into categories by device such as
“Switch, Lights, Sensors, etc.” Clicking
the device in each device category will
open a page where you can manage
your devices.
Smart Rooms
In the center: Smart rooms live in the center
console of the “Smart Home” section. Clicking
on any room will open a page where all the
connected smart devices are by category.
You can download the X-Home app in the Google Play Store or the Apple App Store.
You can also download the X-Home app by scanning the first QR code underneath “Scenes”. When you set
up your X-Home app, scan the second QR code underneath the first code you’ve just scanned.
Note: These codes will disappear once you create your first scene. The codes can be found in the “Arc Settings”.
Go to “Smart Home” in the Arc Setting‘s menu and scroll to you left where it says, “Connect Mobile App”. There
you can scan the QR code to connect to your smartphone.
Smart Scenes
On the right: You can create as many Scenes as
you wish using the X-Home application. If there
are no scenes created, you will be able to start
creating scenes when you use the two QR
Codes to begin.
SMART HOME 7

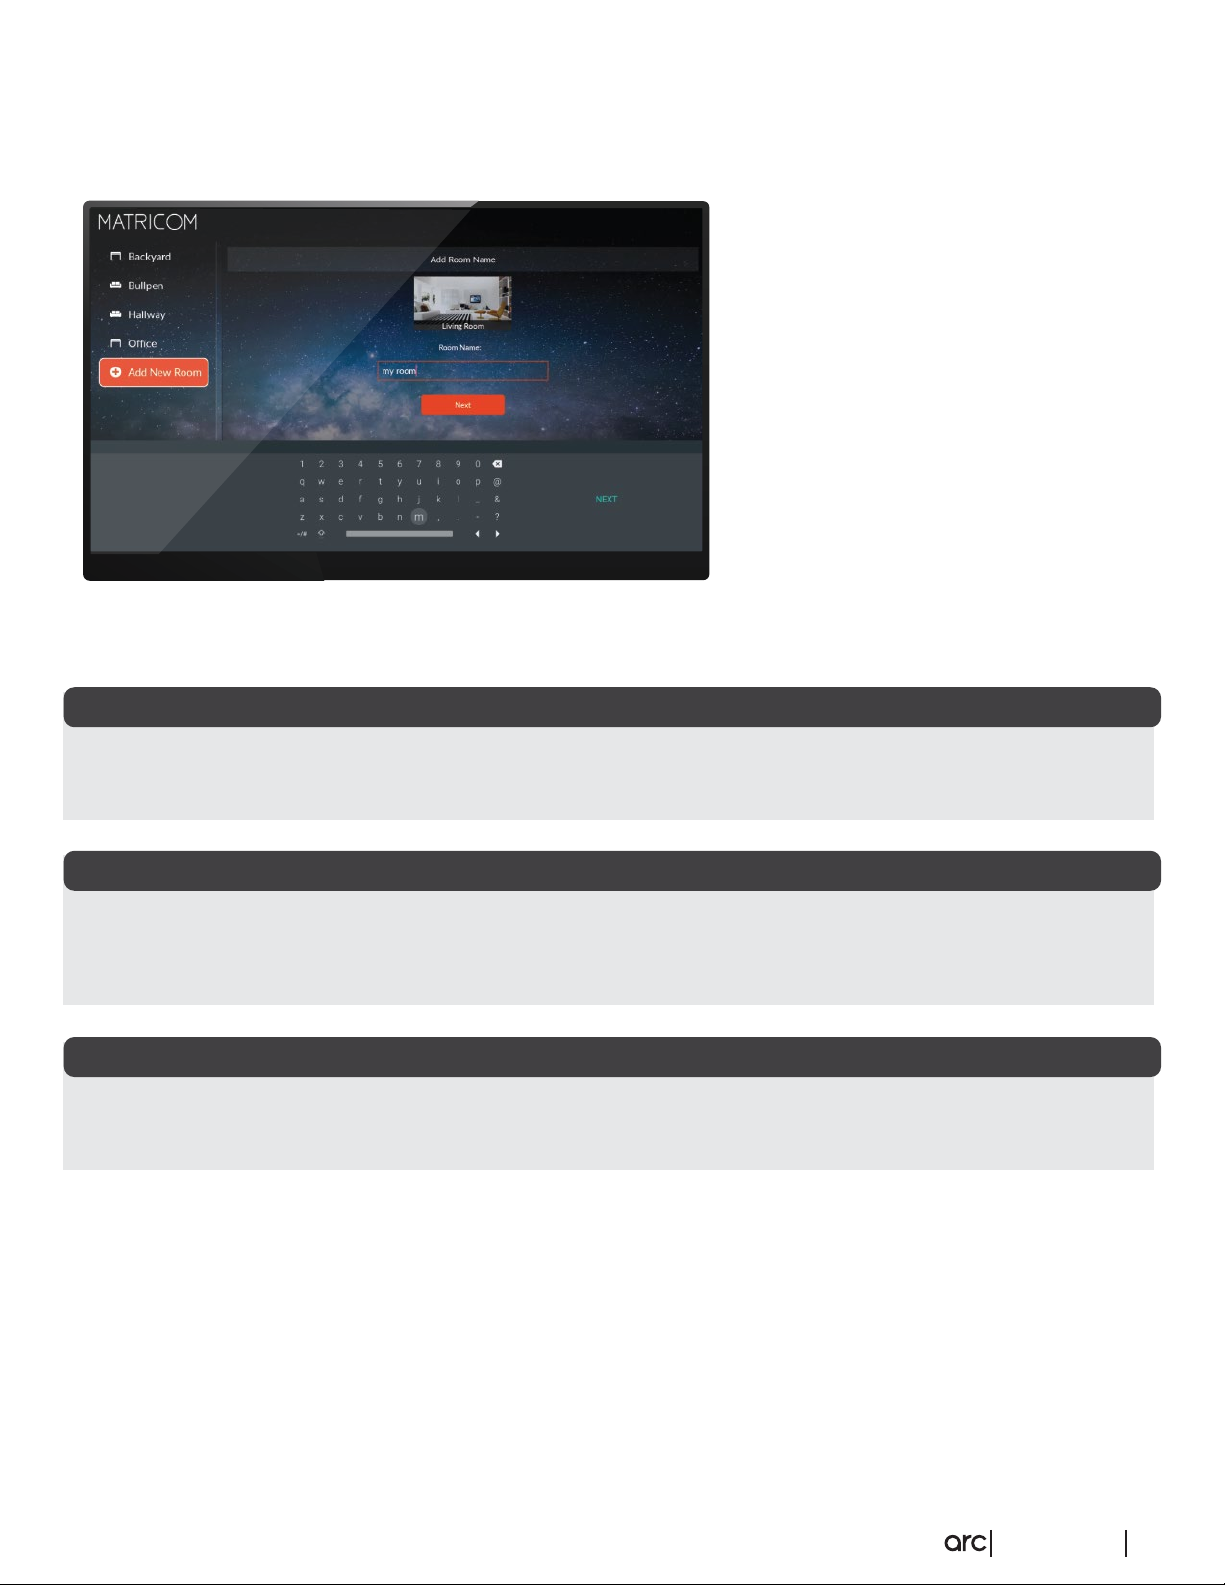
4.2 How To Create A Room
4.3 How To Delete A Room
1. In the “Smart Home” main screen
underneath Rooms (located in the center)
select the “Add New Room” button.
2. Select your room type and click the
“Next” button.
3. Customize your room name and then
click the "Next” button. Now that you have
successfully created a room, you can now
start adding smart devices
1. In the “Smart Home” main screen,
select the room you wish to delete under
“Rooms”.
4.4 How To Edit A Room
x2
2. Press the “Menu” button twice to open
the options menu for that room.
3. Click on the “Delete” button to remove
that room.
1. In the “Smart Home” main screen,
navigate to “Rooms” and select the room
you wish to edit.
2. Select the room you wish to edit by
highlighting it orange.
3. Press the “Menu” button twice to open
the options menu for that room. Make
your changes and click “Save” when you
are finished.
SMART HOME 8
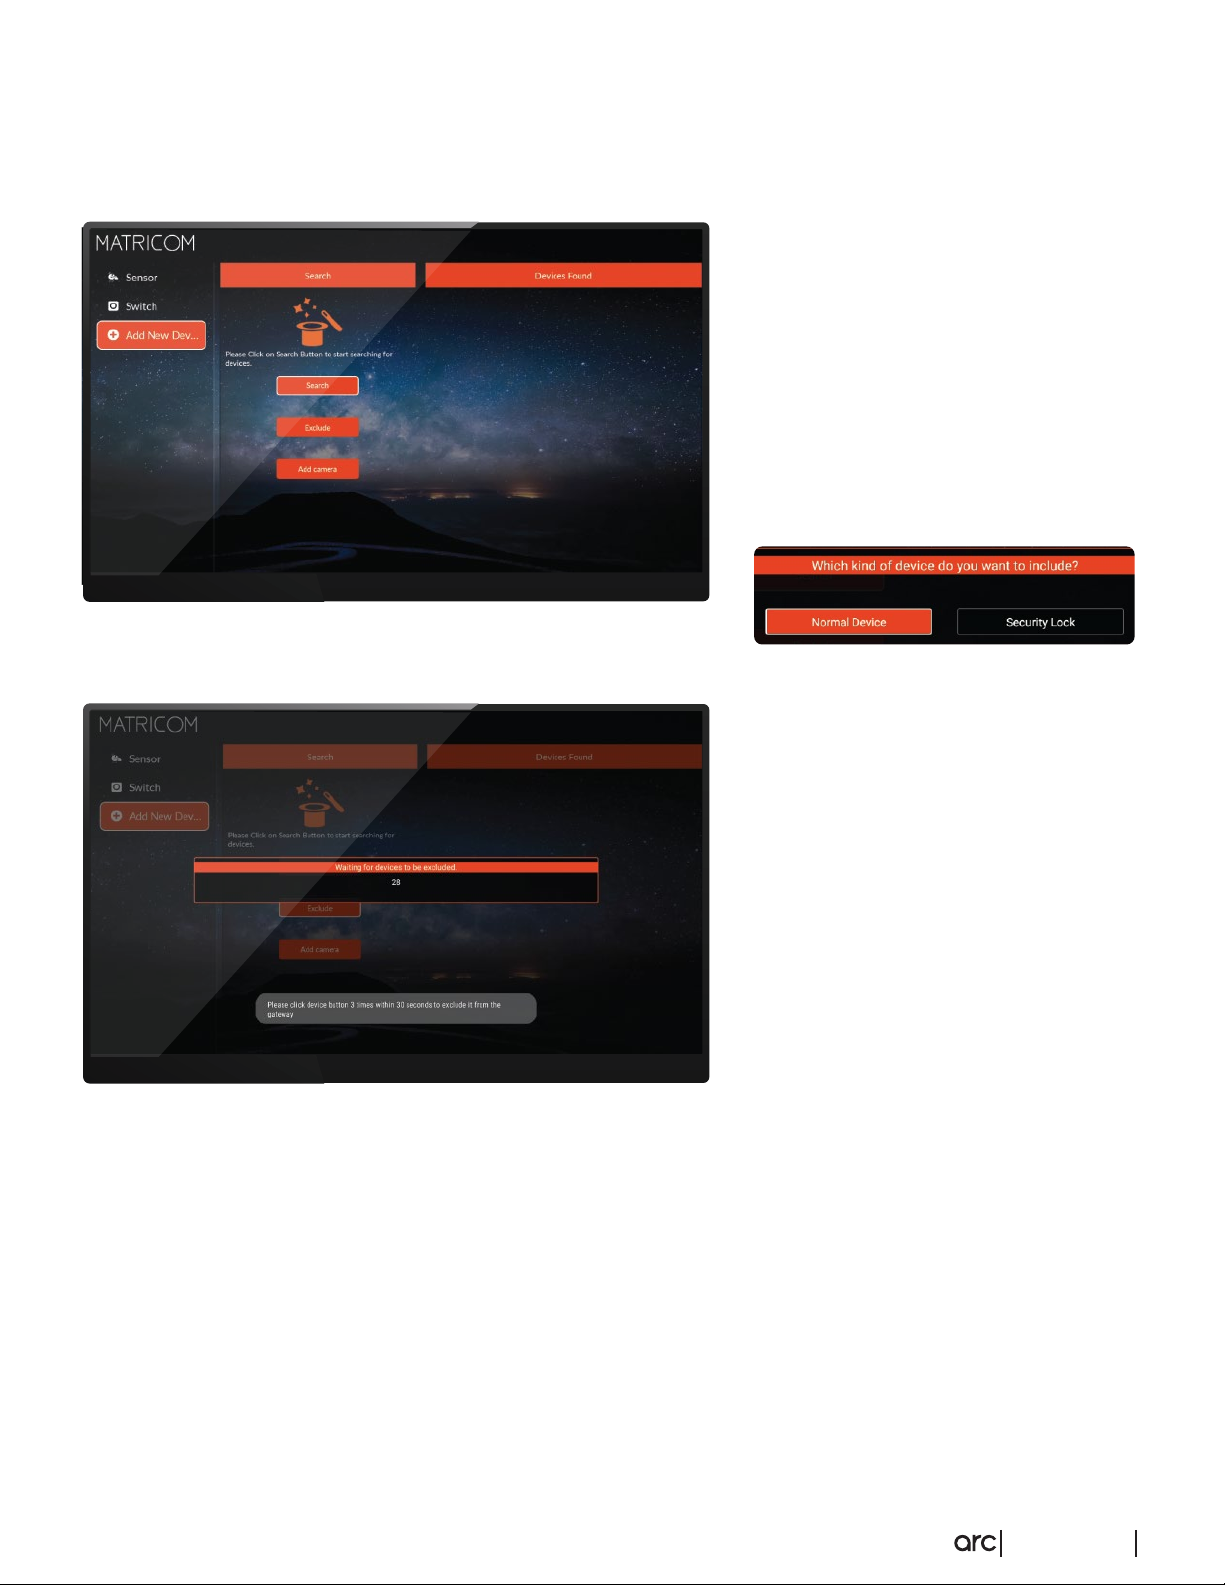
4.5 How To Include A Device
4.6 How To Exclude A Device
1. Click “ Add New Device” under “Devices”
in the “Smart Home” main screen.
2.Click on the “Search” button.
Note: If the device was connected earlier,
then you will need to exclude the device
first. (See “4.5 How to Exclude a Device”)
3. Choose between “Normal” devices or
“Security Lock”. Normal devices are
switches, dimmers, sensors, and etc.
Security locks are smart locks for your
door.
1. Click “Add New Device” under
“Devices” in the “Smart Home” main
screen.
2. Click on the “Exclude” button. When
the timer starts counting down, press
the pairing button of your smart device
three times to exclude it.
Note: Devices that may be too far or hard
to reach can be excluded through the
X-Home app with the same instructions.
4.7 How To Include A Wi-Fi Camera
1. Download the corresponding IP Camera application from the Google Play Store or App Store and
plug in the camera with the directions included in its packaging.
2. Go to the Arc’s “Wi-Fi settings” and connect to your camera’s network.
3. Open the IPCamera app and then scan the QR code of your camera. Enter the camera’s default
password and click “save”.
4. Go to “Advanced Settings/ Wi-Fi Settings”, and connect your camera to your network.
5. Now go back into the Arc and click “ Add New Device” under “Devices” in the “Smart Home” main screen.
6. Click on “Add Camera”.
7. Enter the camera’s UID number and Password, or simply click on the “LAN Search” button.
8. After you’ve entered the camera’s credentials, click on the “Save” button to connect your camera.
SMART HOME 9

4.8 How To Assign A Device In A Room
4.9 How To Re-assign A Device To Another Room
1. Select the room you wish to assign a
device to and press the “OK” button.
2. Go to “Add New Device” category. On
the right of the screen will be all your
non-included devices. Simply click the
device you want to assign and press
“OK”.
1. Select the device you want to reassign.
2. Press the menu button twice on your
Arc remote to edit the device.
3.
Where it says “Assigned to”, click the
room your device is currently assigned
to and select the room you wish to
reassign it to.
4. After selecting the new room, click the
“Save” button.
SMART HOME 10

4.8 How To Assign A Device In A Room
4.11 How to Create a Macro (Routine)
1. Open the X-Home app and log in.
2. Select “Scenes” located at the bottom of
the app and click the “+” button to create
a new Scene.
3. Enter a “Scene Name” and then click on
the “+” button to select what devices you
want in your Scene.
4. Turn your devices ON or OFF and click on
the “Save” button when you are finished.
1. Open the X-Home app and log in.(skip the
login if necessary).
2. Select “Macros” located at the bottom of
the app and click the “+” button to create
a new scene.
3. Enter a custom name for the macro and
click the “+” icon under the “IF” option.
Select your device to add it to your macro.
4. Click on the device you just added in the
list and enter your desired values.
5. Click on the “Then” button and select the
outcome desired.
6. Click on the “Option” button if you want
extra options for the macro created. For
example, you can select and create a schedule for your smart lights.
7. Click on “Save” to save your macro.
Note: You will need to enable your macro.
SMART HOME 11

4.12 How To See A Device’s History
4.13 How To See A Device Or Room
1. Press the menu button twice on your Arc
remote to edit the device. Click “Edit
Device”.
2. Select the room on the left side and then
press the menu button twice.
1. Locate the device you wish to see the
history of by pressing the menu button
twice.
2. Select the “History Chart Option”.
3. Here you can see the device's history and
usage for up to 90 days.
4.14 How To Change Units of Temperature
4.15 How To Reset Your Smart Home To Factory Settings
1. Go to “Arc Settings” and click on “Reset
Smart Home”. All rooms, scenes, macros
and devices will be deleted and the Arc
will be restored to its factory settings.
1. Go to “Settings” in the top-right corner.
2. Go to “Unit Settings”.
3. Select your desired temperature unit of
measurement.
SMART HOME 12
4.16 How To Remove A Lost Device
4.17 How To Find The Gateway UID
Method 1
1. Locate the smart device you wish to
delete in the room it’s located in.
2. Press the menu button twice on your
Arc remote, then click “Remove Lost
Device”.
Scan the bottom QR Code in the X-Home app underneath “Scenes” in the “Smart Home” section of the app.
Method 2
1. Go to the “Arc’s Settings” by clicking the “Gear” shaped icon in the top right screen.
2. Go into the Arc’s settings and select “Connect Mobile App”.
Method 3
You can find the QR code on the bottom sticker located on the packaging.
SMART HOME 13

Energy Management
Energy management is an extended feature of Arc’s Smart Hub. Users get full access to Arc’s energy
management tools when they connect smart-metered Z-Wave devices. Get a cost breakdown of how
much energy you use per Kwh hour and total usage up to 30 days. Manage your devices within the
interface and power off to save on your next month’s energy bill.
5.1 Energy Management Overview
Note: Please research your energy provider’s
price of 1 kWh and set the value of one kWh
beforehand.
5.2 How To Enter Your Form Of Currency And Value Per Kwh
1. Go into your “Arc Settings” by clicking the
“Gear” shaped icon.
2. Scroll down to “Energy Management”
settings.
1. In this screen, you will be able to see all your
smart metered devices that are connected to the
Arc. You can select devices to turn OFF in this
screen.
2. In this section, you can see graphical data of how
much energy is consumed per kWh.
3. This area depicts the cost of kWh over time.
4. This graph shows you the power consumed over
eight hours.
3. First, select your currency and then finally
set the price per kWh.
5.3 How To Exclude Devices From Being Calculated
1. Go into your “Arc Settings” by clicking the
“Gear” shaped icon.
2. Scroll down to “Energy Management” set
3. Select “Customize Device”
4. Select the device you would like to exclude
from being calculated and press “OK”.
Finally, click the “Exclude from Calculations”
button.
ENERGY MANAGEMENT 14

Router
Arc’s router gives you control with its network management tools. Create your network and even
create a guest network separate from you own. Allow and block user’s devices and see who’s
connected on your network. Prioritize how you use your bandwidth based on the applications you
use the most.
6.1 Router Overview
6.2 How To View Connected Devices On Arc’s Network
Select the “Router” icon twice to open
1.
more router settings.
2. “Router Info” contains a list of Online
and Offline devices. To make a user
offline select the device and click
OFFLINE.
1. On the left, you can see the download speed
when downloading data per Kilobyte.
2. In the center, you can see the upload speed
when uploading data per Kilobyte.
3. On the right, you can see the router's
available memory, which can fluctuate
depending on how much data is being
processed on the router.
4. To expand more settings for Arc’s router,
select the “Router” icon twice.
John’s Phone
6.3 How To Blacklist A Device
Select the “Router” icon twice to open
1.
more router settings.
2. Go to “Router Info” and select a device
you’d like to blacklist.
3. Press “OK” to confirm your action.
ROUTER 15

6.4 How To Whitelist A Device
John’s Phone
6.5 How To Change Your Wi-Fi Name And Password
1.
Select the “Router” icon twice to open
more router settings.
2. Select “Wi-Fi setting” and under “Wi-Fi
Info Setting” you can customize the name
of Arc’s router.
1. Select the “Router” icon twice to
open more router settings.
2. Go to “Router Info” and select a
device you’d like to whitelist.
Note: Blacklisted devices have a
“Stop” icon.
3. Select the device click “OK” to
unlock the device.
3. Enter your old password and then enter a
new password in the required fields.
4. Click “Save” to confirm your changes.
Note: Both instructions are the same for the
2.4 and 5.8 networks.
6.6 How To Change Your Name And Password For Router Admin Login
Select the “Router” icon twice to
1.
open more router settings.
2. Navigate to “Router Admin”.
3. Enter your old password and then
enter a new password in the
required fields.
Note: Always make sure to log your
old password.
ROUTER 16

6.7 How To Disable Wi-Fi
6.8 How To Extend Wi-Fi Range
1. Select the “Router” icon twice to open more
router settings.
2. Go to “Wi-Fi Mode” and under “Please Select
Wi-Fi Mode” click “Long Range”.
1. Select the “Router” icon twice to open
more router settings.
2. Go to “Wi-Fi Mode” and under “Please
Select Wi-Fi Mode” click “Wi-Fi Off”.
6.9 How To Prioritize Bandwidth
6.10 How To Reboot Arc’s Router
1. Select the “Router” icon twice to open more
router settings.
2. Go to “Router State” and select the “Reboot
Router” button to reset your Router.
1. Select the “Router” icon twice to open
more router settings.
2. Go to “Intelligent Bandwidth” and under
“Please Select APP to Prioritize” and
select how you’d like to prioritize your
bandwidth such as “No Priority”,
“Prioritize Games”, “Prioritize Videos”,
and “ Prioritize Web Pages”.
COM
ROUTER 17

6.11 How To See Your Router’s Firmware Version
1. Select the “Router” icon twice to open
more router settings.
COM
what version you’re on where it says,
“Device Version Number”.
3. Confirm this by checking the device’s
firmware version in the “Settings”.
4. Press the “Gear” shaped-icon in the home screen and select the “Settings”.
5. Click “About” and see the firmware version under ”Build”.
6.12 How To Enable Guest Wi-Fi
1. Select the “Router” icon twice to open more
router settings.
2. Go to “Web Guide” and click “Guest Wi-Fi”
and enable it.
2. Go to “Router State” and check to see
3. Enter a Wi-Fi name and password and click
“Save”.
6.13 How To Factory Reset Arc’s Router
1. Connect a device to open a web browser
and go to 192.168.11.1
2. Enter your router’s credentials that you
set up on the Arc. By default, input
“Admin” in both fields if you have not
set up your router with custom
credentials.
3. Go to “Management” and select “Load
Factory Default”. Click “Restore to
Factory”.
ROUTER 18

6.14 How To Connect To Wi-Fi Instead Of Ethernet
1. Select the “Router” icon twice to open
more router settings.
2. Navigate to “Web Guide” and then click
on “Wireless”.
3. Select the network you’d like to connect
to and enter the Wi-Fi password.
Note: Switch back to an ethernet
connection by enabling the “DHCP”
connection under “Select Internet Access
Mode”
ROUTER 19

Cyber Security
Arc provides cybersecurity to prevent unwanted access to your network. See how many threats were blocked,
what devices are healthy or affected, and get a cyber security report to take action.
7.1 Cyber Security Overview
1. At the top of the screen, you can view
connected devices that are active or
inactive under “Security Overview”.
Green devices indicate that the device
is not infected. Yellow indicates that a
user has visited a malicious site. Red
indicates that your device is infected.
2. “Security System” shows if your device
is up-to-date and will be Green if
updated or Red if it isn’t.
3. “Total Traffic Scanned” shows the total
web traffic scanned.
4. “Security Score” shows the score of your device from one to five. By clicking on it, you will see a list of
directions to set your score to a five.
5. “Total Threats Blocked” shows the total number of threats blocked.
6. Double click the “Security” tab will open more options for cybersecurity.
7.2 How To View Threats
1. Double click the “Security” tab to
expand more cybersecurity options.
2. Select the device you want to view. You
can see what infected the device on the
right side screen under “Attack Details”. If
you feel that this is a mistake you can
click to report it and we’ll clear the threat.
3. Take action based off the type of threat
you received.
Note: Make sure to register your Arc so you
can receive email notifications from us.
CYBERSECURITY 20

7.3 How To Send A Cyber Security Report
7.4 How To Improve Your Security Score
1. Double click the “Security” tab to
expand more cyber security options.
2. Select the device you want to view. You
can see what infected the device on the
right under “Attack Details”.
3. Press the menu button twice on your
Arc remote in this screen and press
“Yes” to send a report. We will send you
a report to your Arc registered email
account.
1. Click the “Security” tab to expand more
cybersecurity options.
2. Click on the “Security Score” button
and view the pop-up.
3. Strengthen your security PIN code and
follow the rest of the instructions shown.
Contact us to clear your device of any
logged threats.
CYBERSECURITY 21

Parental Controls
Parental Controls are an added benefit of the Arc. Schedule your child’s online time by the hour. Protect your
child from unwanted content and block websites, social media, and even specific URLs from being accessed.
8.1 Parental Controls Overview
1. “Parental control Weekly Overview”
shows who’s on your network with their
cybersecurity status.
2. “Web Supervision” allows you to see a
user’s web history up to a day, week,
two weeks, and up to month.
Underneath this tab is the type of
content browsed on the internet. You
can click these icons to see just a list of
that searched content.
8.2 How To Block A Website And URL
1. Open the “Parental Controls” tab and
enter your PIN.
2. Select the device and the website the
you wish to block.
3. Click the “Block Website” button to
restrict that site.
Similarly you can block a URL before your
child visits a website.
1. Open the “Parental Controls” tab and
enter your PIN.
2. Go to “Blocked Websites” and then click “Block New Website”.
3. Enter the URL in the first field and then select the device in the second field. Then click the “Block” button.
PARENTAL CONTROL 22

8.3 How To Block A Category
8.4 How To Rename A Device
1. Open the “Parental Controls” tab and enter
your PIN.
1. Open the “Parental Controls” tab and
enter your PIN.
2. Select the social media website you wish
to block.
3. Click “Block Socials”. This will block the
user from visiting that social media site in
all together.
2. Go to “Device Info”, click the field titled
“Device Name”, and rename your device.
8.5 How to Block Schedule Online Activity
1.Open the “Parental Controls” tab and enter
your PIN.
2.Go to “Timed Supervision" and select the
device you’d like to place a time
restriction on.
3.When you’ve selected your device, click on
any of the online activity to prompt the
parental controls access bar.
4.Select “Limit internet”.
5.Schedule the desired times you wish to block by double clicking the boxes by the hour and save.
PARENTAL CONTROL 23

If you have any questions, or need further assistance - we are here for you!
Contact us at Matricom Technical Support Monday-Friday 9:00 AM - 5:00 PM
at 786-686-5515 or chat with us directly at matricom.net.
CONTACT US 24
 Loading...