

Page 1

PolySpace
®
User’s Guide
UML Lin
kRH 5
Page 2
How to Contact The MathWorks
www.mathworks.
comp.soft-sys.matlab Newsgroup
www.mathworks.com/contact_TS.html Technical Support
suggest@mathworks.com Product enhancement suggestions
bugs@mathwo
doc@mathworks.com Documentation error reports
service@mathworks.com Order status, license renewals, passcodes
info@mathwo
com
rks.com
rks.com
Web
Bug reports
Sales, prici
ng, and general information
508-647-7000 (Phone)
508-647-7001 (Fax)
The MathWorks, Inc.
3 Apple Hill Drive
Natick, MA 01760-2098
For contact information about worldwide offices, see the MathWorks Web site.
®
PolySpace
© COPYRIGHT 1999–20 10 by The MathWorks, Inc.
The software described in this document is furnished under a license agreement. The software may be used
or copied only under the terms of the license agreement. No part of this manual may be photocopied or
reproduced in any form without prior written consent from The MathW orks, Inc.
FEDERAL ACQUISITION: This provision applies to all acquisitions of the Program and Documentation
by, for, or through the federal government of the United States. By accepting delivery of the Program
or Documentation, the government hereby agrees that this software or documentation qualifies as
commercial computer software or commercial computer software documentation as such terms are used
or defined in FAR 12.212, DFARS Part 227.72, and DFARS 252.227-7014. Accordingly, the terms and
conditions of this Agreement and only those rights specified in this Agreement, shall pertain to and govern
theuse,modification,reproduction,release,performance,display,anddisclosureoftheProgramand
Documentation by the federal government (or other entity acquiring for or through the federal government)
and shall supersede any conflicting contractual terms or conditions. If this License fails to meet the
government’s needs or is inconsistent in any respect with federal procurement law, the government agrees
to return the Program and Docu mentation, unused, to The MathWorks, Inc.
Trademarks
MATLAB and Simulink are registered trademarks of The MathWorks, Inc. See
www.mathworks.com/trademarks for a list of additional trademarks. Other product or brand
names may be trademarks or registered trademarks of their respective holders.
Patents
The MathWorks products are protected by one or more U.S. patents. Please see
www.mathworks.com/patents for more information.
Revision History
March 2009 Online Only Revised for Version 5.3 (Release 2009a)
September 2009 Online Only Revised for Version 5.4 (Release 2009b)
March 2010 Online Only Revised for Version 5.5 (Release 2010a)
UML Link™ RH User’s Guide
Page 3

PolySpace UML Link RH User’s Guide
1
About PolySpace UML Link RH Software ............ 1-2
Overview
Accessing the PolySpace Panel
........................................ 1-2
....................... 1-3
Contents
Integrating and Upgrading the PolySpace Add-In
Overview
Integrating the PolySpace Add-In with a Rhapsody
Project
Upgrading PolySpace Software
Configuring Analysis Options
Running a Verification
Monitoring a Verification
Viewing PolySpace Results
Locating Faulty Code in Rhapsody Model
Limitations
Configuration File, Default Template, and Declarations
Information
Configuration File
Default Template CFG Options
Declarations for C Functions Without Arguments
........................................ 1-5
........................................ 1-5
...................... 1-6
....................... 1-8
............................. 1-9
.......................... 1-13
......................... 1-14
............ 1-15
...................................... 1-16
..................................... 1-17
................................. 1-17
...................... 1-17
.... 1-5
....... 1-18
iii
Page 4

iv Contents
Page 5

PolySpace UML Link RH
User’s Guide
• “About PolySpace UML Link RH Software” on page 1-2
• “Integrating and Upgrading thePolySpaceAdd-In”onpage1-5
• “Configuring Analysis Options” on page 1-8
• “Running a Verification” on page 1-9
• “Monitoring a Verification” on page 1-13
1
• “Viewing PolySpace Results” on page 1-14
• “Locating Faulty Code in Rhapsody Model” on page 1-15
• “Configuration File, Default Template, and Declarations Information” on
page 1-17
Page 6

1 PolySpace
®
UML Link™ RH User’s Guide
About PolySpace UML Link RH Software
In this section...
“Overview” on page 1-2
“Accessing the PolySpace Panel” on page 1-3
Overview
In a collaborative Model-Driven Development (MDD) environment, software
run-time errors can be produced by either design issues in the model or faulty
handwritten code. You may be able to detect the flaws using code reviews
and intensive testing. Howe ver, these techniques are time-consuming and
expensive.
Through PolySpace
verification to C, C++ and Ada code that you generate from your IBM
Rational®Rhapsody®model. As a result, you can detect run-time errors
and automatically identify model flaws quickly and early during the design
process.
For information about installing and using IBM Rational Rhapsody, go to
www-01.ibm.com/software/awdtools/rhapsody/.
The workflow for using the PolySpace UML Link RH add-in within the IBM
Rational Rhapsody MDD environment is:
• Install the add-in. See the Installing PolySpace UML Link RH Product
sectioninthePolySpace Installation Guide.
• Integrate the PolySpace add-in with your project. See “Integrating and
Upgrading the PolySpace Add-In” on page 1-5.
• Specify the
files and run verification. See “Running a Verification” on page 1-9.
• If necessary, specify additional PolySpace configuration options in the
PolySpace Launcher. See “Configuring Analysis Options” on page 1-8.
• Monitor verification. See “Monitoring a Verification” on page 1-13.
• View results. See “Viewing PolySpace Results” on page 1-14.
®
UML Link™ RH software, you can apply PolySpace
include path to your operating system (environment) header
®
1-2
Page 7

About PolySpace®UML Link™ RH Software
• Analyze errors and locate code within model. See“Locating Faulty Code
in Rhapsody Model” on page 1-15.
After you install the PolySpace UML Link RH add-in, you have access
to PolySpace functionality from the Rhapsody editor. See “Accessing the
PolySpace Panel” on page 1-3.
Note In the following sections, PolySpaceInstallCommon refers to the
installation location of the PolySpace common folder.
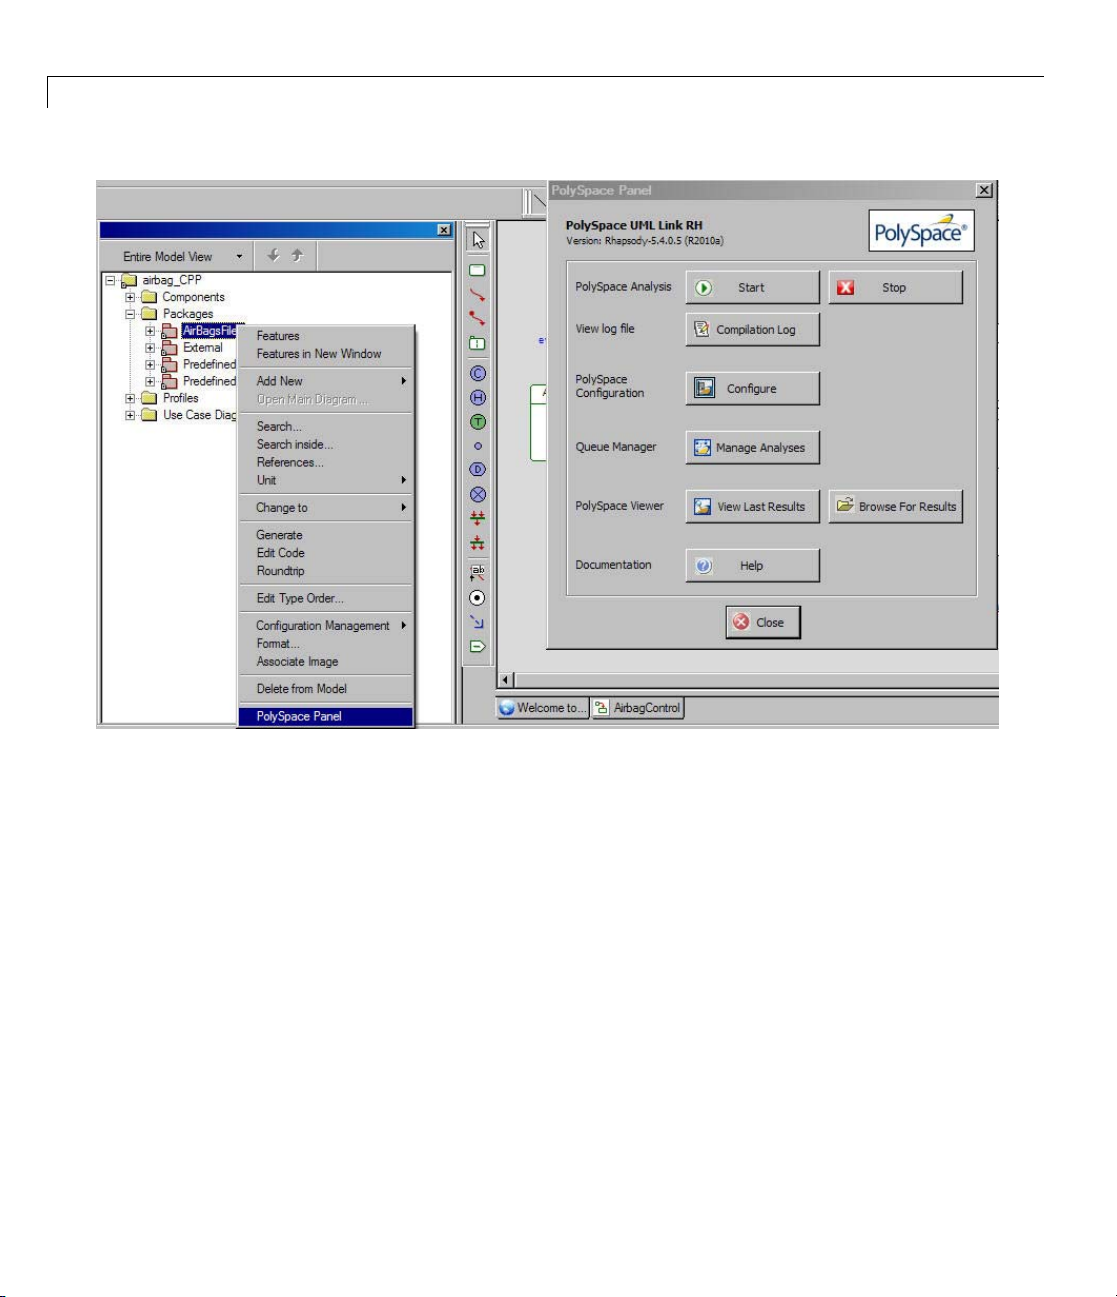
Accessing the PolySpace Panel
To open the PolySpace Pane lintheRhapsodyeditor:
1 In the Entire Model View, open the model that you want to verify.
For example,
PolySpaceInstallCommon/PolySpaceUMLLink/example.
2 Select files or packages, for example, AirBagFiles under Packages.
3 Right-click AirBagFiles. From the context menu, select PolySpace
airbag_CPP.rpy in
Panel.
1-3
Page 8
1 PolySpace
®
UML Link™ RH User’s Guide
1-4
The Poly
perfor
Clicki
Space Panel has various button options that allow you to set up and
mPolySpacefunctions.
ng Help opens the PDF help document.
Page 9
Integrating and Upgrading the PolySpace Add-In
Integrating and Upgrading the PolySpace Add-In
In this section...
“Overview” on page 1-5
“Integrating the PolySpace Add-In with a Rhapsody Project” on page 1-5
“Upgrading PolySpace Software” on page 1-6
Overview
This section describes how you integrate the PolySpace UML Link RH add-in
with a Rhapsody project.
The PolySpace add- in is written usi ng the Visual B a s i c
by Rhapsody. This add-in installs itself in new Rhapsody projects by using
thecopyVBAfeatureinthe
Note For Rhapsody versions until 7.3, the environment variable %WINDIR%
specifies the location of rhapsody.ini. With later versions, this file is located
in the parent Rhapsody installation folde r.
For Rhapsody projects that already exist, you
must copy the PolySpace Visual Basic add-in from
<PolySpaceCommonInstall>\PolySpaceUMLLink\bin\polyspace.vba to the
project folder. Then, rename the add-in
the existing VBA file.
rhapsody.ini file.
project_name.vba, which replaces
®
extension provided
Integrating the PolySpace Add-In with a Rhapsody
Project
If you use Rhapsody Visual Basic, you carry out the integration as f ollows:
1 Using the Rhapsody Visual Basic e ditor, export each form and module
for the existing code.
2 Close your model.
1-5
Page 10
1 PolySpace
®
UML Link™ RH User’s Guide
3 Copy the PolySpace.vba file into the model folder and rename it
project_name.vba.
4 Reopen the model, and use the Visual Basic editor to import each form and
module that was exported in step 1.
If you w ant, you can also update the master
contents of
project_name.vba for use in new projects.
polyspace.vba file with the
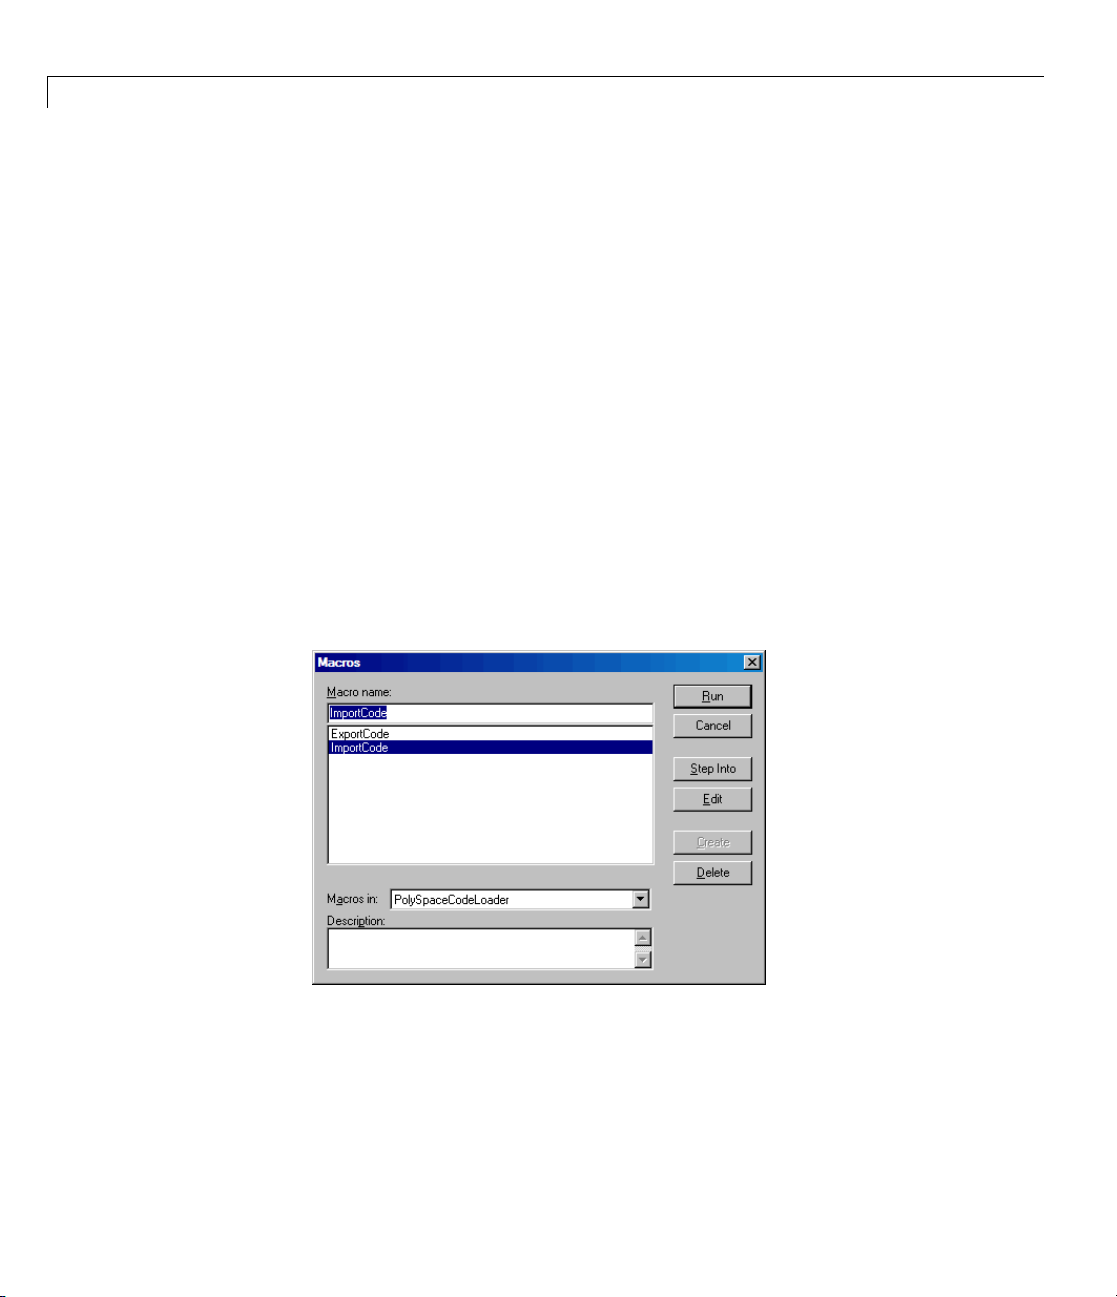
Upgrading PolySpace Software
When you upgrade your PolySpace software, the VBA code in existing
Rhapsody projects is not automatically updated.
To update your PolySpace integration:
1 Open your Rhapsody model.
2 Select Tools > VBA > Macros.
1-6
3 In the Macros dialog box, select ImportCode.
4 Click Run.
Page 11

Integrating and Upgrading the PolySpace Add-In
5 In the Select folder dialog box, select the folder containing the
PolySpace UML Link RH code. By default, this code is located in
PolySpace_Common/PolySpaceUMLLink/bin/code.
6 Click OK.
The software imports the appropriate code modules from the selected folder.
Note You can also use this VBA macro to export PolySpace code from your
model. You may want to do this when merging VBA code from two separate
projects. When exporting code from a model, be careful not to overwrite the
code in the
PolySpaceUMLLink folder.
1-7
Page 12

1 PolySpace
®
UML Link™ RH User’s Guide
Configuring Analysis Options
To specify analysis options for your verification:
1 Select your files and open the PolySpace Panel. See“Accessing the
PolySpace Panel” on page 1-3.
2 Click Configure to open a scaled-down version of the PolySpace Launcher.
1-8
3 Select your analysis options.
4 To save your options, in the top left corner, click the disk button.
For information on how to choose your options, see the Option Description
sectionintheappropriatePolySpace Products Reference Guide.
Page 13
Running a Verification
To start a verification:
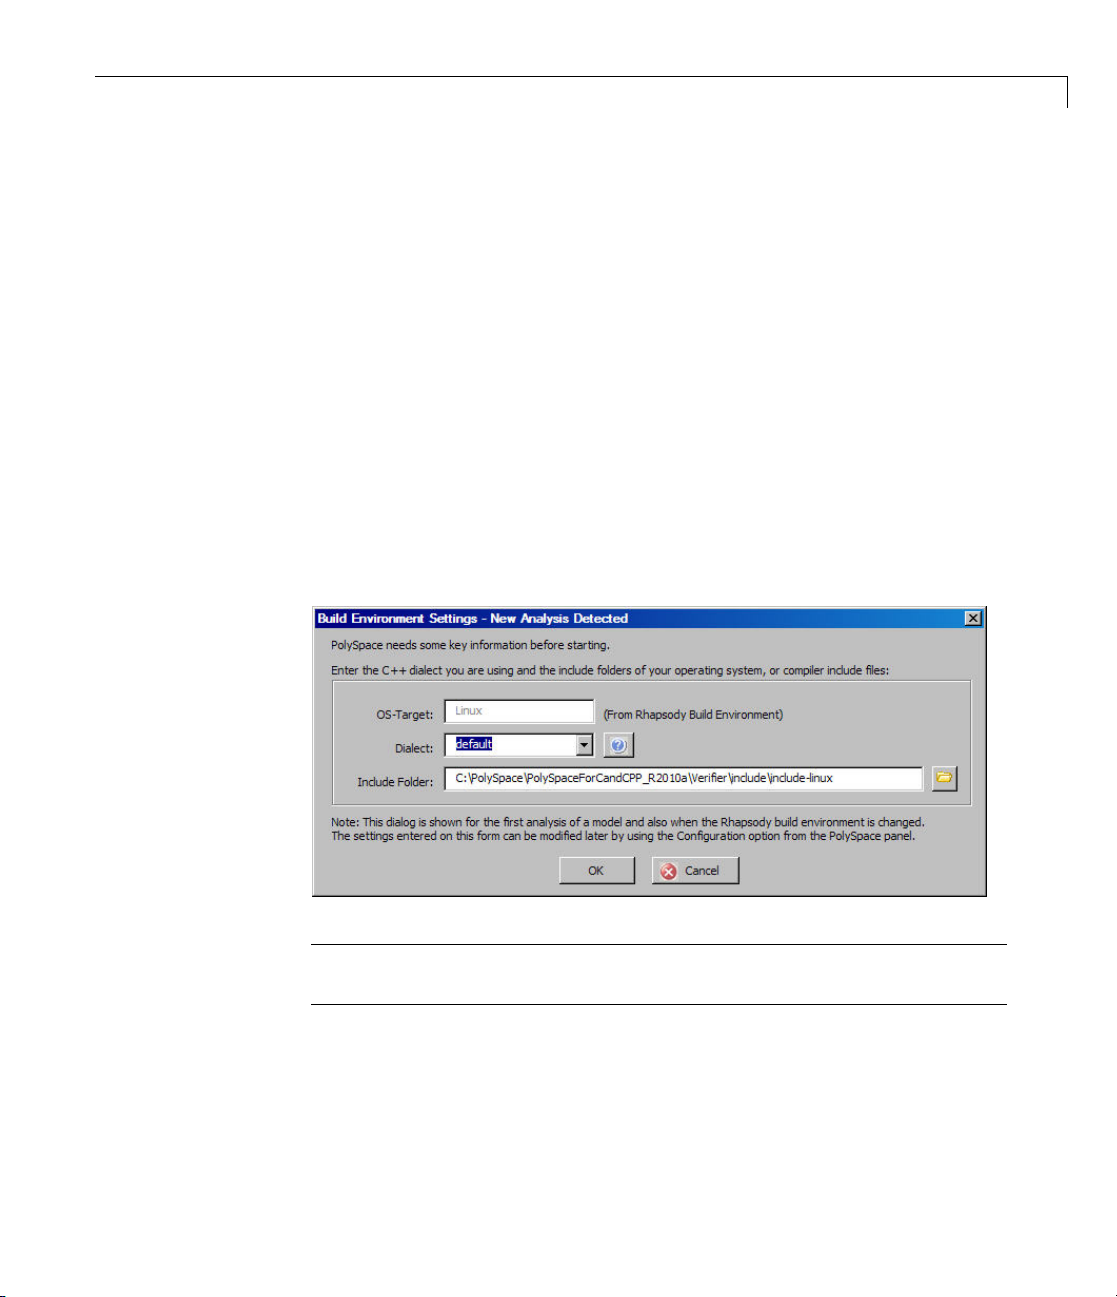
1 On the PolySpace Panel, click Start.
If you are starting the first verification of a model, or if the Rhapsody
configuration environment has changed since the last verification, the
software opens the Build Environment Settings dialog box.
The software detects the operating syste m target from the model
environment and sets the OS-Target field automatically. If the software
detects Linux
®
,thenthesoftware:
Running a Verification
• Sets the Dialect field to
default
• Specifies the path to the Linux header files supplied with PolySpace
software in the Include F older field.
Note Before starting a verification, make sure that the generated code
for the model is up to date.
2 Click OK.
1-9
Page 14

1 PolySpace
®
UML Link™ RH User’s Guide
1-10
3 In the Start Analysis dialog box, under Settings,specifyvaluesforthe
following fields:
• Precision Level — Precision of your verification.
• To Pass — Number of passes that you want the so ftw are to ca rry out.
• Results Folder — Location of the results folder.
Page 15

Running a Verification
Note ThesoftwaresetstheResults Folder field automatically when
you specify or change:
– The type of analysis that you want to perform.
– The package that you want to analyze.
After you select your analysis type and package, you can alter the
contents of the Results Folder field.
4 Under Analysis Mode, select the type of analysis that you want to
perform. For more information, see the Option Description sectioninthe
appropriate PolySpace Products Reference Guide.
5 Under Scope, select the file, class, or package that you want to analyze.
6 If you want to send your verification to the PolySpace Server, select the
Remote Mode check box. If you want to perform the verification locally,
clear this check box.
7 Click Execute. A command window opens, showing the phases of the
verification that are performed locally.
1-11
Page 16

1 PolySpace
®
UML Link™ RH User’s Guide
1-12
Note You can change the settings (size of window, number of lines of
history, font, and so on) for the command window. Right-click the window
title and select Properties to open the Properties dialog box. The options
available are similar to those available with the Windows
®
operating
system Command Window.
If your verification is client-based, you can stop your verification. On the
PolySpace Panel, click Stop. To stop a verification on the PolySpace Server,
use the PolySpace Queue Manager. See “Monitoring a Verification” on page
1-13.
Page 17

Monitoring a Verification
To view the latest compilation log, on the PolySpace Panel, click Compilation
Log.
If your verification is client-based, you can observe progress in the Command
Window that opens when you run the verification.
If your verification is running on a PolySpace Server, on the PolySpace
panel, click Manage Analyses to display the PolySpace Queue Manager
(or Spooler). Use the PolySpace Queue Manager to manage jobs running on
any PolySpace Server.
For more information, see the Managing Verification Jobs Using the PolySpace
Queue Manager section in the appropriate PolySpace Products User Guide.
Monitoring a Verification
1-13
Page 18

1 PolySpace
®
UML Link™ RH User’s Guide
Viewing PolySpace Results
To view the results from the last completed verification, on the PolySpace
Panel, click View Results.
If no results are available (that is, the results are still on the server), the
software prompts you to open the PolySpace Queue Manager. You can
download the results using the PolySpace Queue Manager.
To browse through or open all verification results for a given model, on the
PolySpace Panel, click Browse for Results .
For more information on PolySpace verificatio n results, see the Reviewing
Verification Results section in the appropriate PolyS pace Products User Guide.
1-14
Page 19

Locating Faulty Code in Rhapsody Model
To identify the faulty code within your Rhapsody model using PolySpace
verification results:
1 InthePolySpaceViewer,navigatetoanerror, for example, a non-initialized
variable at line 104 of
2 Right click the error. From the context menu, select Back to Model.
Airbag Control_C.
Locating Faulty Code in Rhapsody®Model
Note For the Back To Model command to work, you must have your
Rhapsody model open.
The Back To Model command is available only if the PolySpace check is
enclosed by the tags
ThesoftwarelocatesthefaultycodewithinyourRhapsodymodel.
Depending on the Rhapsody configuration, the faulty code appears either
in a dialog box or in the code view.
//#[ and ]#//.
1-15
Page 20

1 PolySpace
®
UML Link™ RH User’s Guide
1-16
Limitations
You can use the Back to Model comm and only if the source code lines that
contain a PolySpace check do not also contain a macro. Otherwise, the
software produces the following warning:
Unable to go back to the UML model from this location
For locations where Rhapsody does not support the Back to Model command,
or for code that does not belong to the model, the software produces the
following warning when you try to use the Back to Model command:
No element found in model
Page 21

Configuration File, Default Template, and Declarations Information
Configuration File, Default Template, and Declarations
Information
In this section...
“Configuration File” on page 1-17
“Default Template CFG Options” on page 1-17
“Declarations for C Functions Without Arguments” on page 1-18
Configuration File
The first time you perform a verification, the software
copies a t emplate, P oly Spac e configuration file, from
PolySpaceInstallCommon/PolySpaceForUML/etc/template_language.cfg
to the project folder and renames this file:
model_language.cfg
where
•
model is the name of your model
language is the name of the language that the model targets, that is, C,
•
C++, or Ada
You can update the template
• Editing it through the PolySpace Launcher
• Double-clicking the file in a Windows Explorer window
• Replacing the template file with a copy of the
model folder
You can then share a configuration among project members and use the
configuration with other projects.
.cfg file by one of the following means:
.cfg file from a Rhapsody
Default Template CFG Options
In the template_C++.cfg file, the following are the default options:
1-17
Page 22

1 PolySpace
®
UML Link™ RH User’s Guide
-lang=CPP
-prog=template_cfg
-results-dir=r->results
-allow-undef-variables=true
-respect-types-in-globals=true
-respect-types-in-fields=true
-dos=true
-target=i386
-D=[OM_NO_FRAMEWORK_MEMORY_MANAGER]
-to=7
-OS-target=no-predefined-OS
In the template_Ada.cfg file, the following are the default options:
-lang=ADA
-prog=template_cfg
-results-dir=r->results
-allow-undef-variables=true
-respect-types-in-globals=true
-respect-types-in-fields=true
-dos=true
-target=i386
-D=[OM_NO_FRAMEWORK_MEMORY_MANAGER]
-to=7
-OS-target=no-predefined-OS
1-18
Declarations for C Functions Without Arguments
By default, Rhapsody generates declarations for functions without any
parameters, using the form:
void my_function()
rather than:
void my_function(void)
This can result in the following PolySpace compilation error:
Fatal error: function 'my_function' has unknown prototype.
Page 23

Configuration File, Default Template, and Declarations Information
To avoid this problem, in Rhapsody, at the project level, set the property
C_CG::Configuration::EmptyArgumentListName to void.
1-19
 Loading...