

Page 1

Polyspace
®
Products for Ada 6
Getting Started Guide
Page 2

How to Contact MathWorks
www.mathworks.
comp.soft-sys.matlab Newsgroup
www.mathworks.com/contact_TS.html Technical Support
suggest@mathworks.com Product enhancement suggestions
bugs@mathwo
doc@mathworks.com Documentation error reports
service@mathworks.com Order status, license renewals, passcodes
info@mathwo
com
rks.com
rks.com
Web
Bug reports
Sales, prici
ng, and general information
508-647-7000 (Phone)
508-647-7001 (Fax)
The MathWorks, Inc.
3 Apple Hill Drive
Natick, MA 01760-2098
For contact information about worldwide offices, see the MathWorks Web site.
®
Polyspace
© COPYRIGHT 1997–2010 by The MathWorks, Inc.
The software desc ribed in this document is furnished under a license agreement. The software may be used
or copied only under the terms of the license agreement. No part of this manual may be photocopied or
reproduced in any form without prior written consent from The MathWorks, Inc.
FEDERAL ACQUISITION: This provision applies to all acquisitions of the Program and Documentation
by, for, or through the federal government of the United States. By accepting delivery of the Program
or Docum entation, the government hereby agrees that this software or documentation qualifies as
commercial computer software or commercial computer software documentation as such terms are used
or defined in FAR 12.212, DFARS Part 227.72, and DFARS 252.227-7014. Accordingly, the terms and
conditions of this Agreement and only those rights specified in this Agreement, shall pertain to and govern
theuse,modification,reproduction,release,performance,display,anddisclosureoftheProgramand
Documentation by the federal government (or other entity acquiring for or through the federal government)
and shall supersede any conflicti ng contractual terms or conditions. If this License fails to meet the
government’s needs or is inconsistent in any respect with federal procurement law, the government agrees
to return the Program and Documentation, unused, to The MathWorks, Inc.
Trademarks
MATLAB and Simulink are registered trademarks of The M athWorks, Inc. See
www.mathworks.com/trademarks for a list of additional trademarks. Other product or brand
names may be trademarks or registered trademarks of their respective holders.
Patents
MathWorks products are protected by one or more U.S. patents. Please see
www.mathworks.com/patents for more information.
Products for Ada Getting Started Guide
Page 3

Revision History
March 2008 First printing Revised for Version 5.1 (Release 2008a)
October 2008 Second printing Revised for Version 5.2 (Release 2008b)
March 2009 Third printing Revised for Version 5.3 (Release 2009a)
September 2009 Online only Revised for Version 5.4 (Release 2009b)
March 2010 Online only Revised for Version 5.5 (Release 2010a)
September 2010 Online only Revised for Version 6.0 (Release 2010b)
Page 4

Page 5

Introduction to Polyspace Products for
Verifying Ada Code
1
Product Overview ................................. 1-2
Overview of Polyspace Verificat ion
The Value of Polyspace Verification
................... 1-2
................... 1-2
Contents
Product Components
Polyspace Products for Ada
Polyspace Verification En vi r onment
Other Polyspace Components
Installing Polyspace Products
Finding the Installation Instructions
Obtaining Licenses for Polyspace
Polyspace
Working with Polyspace Software
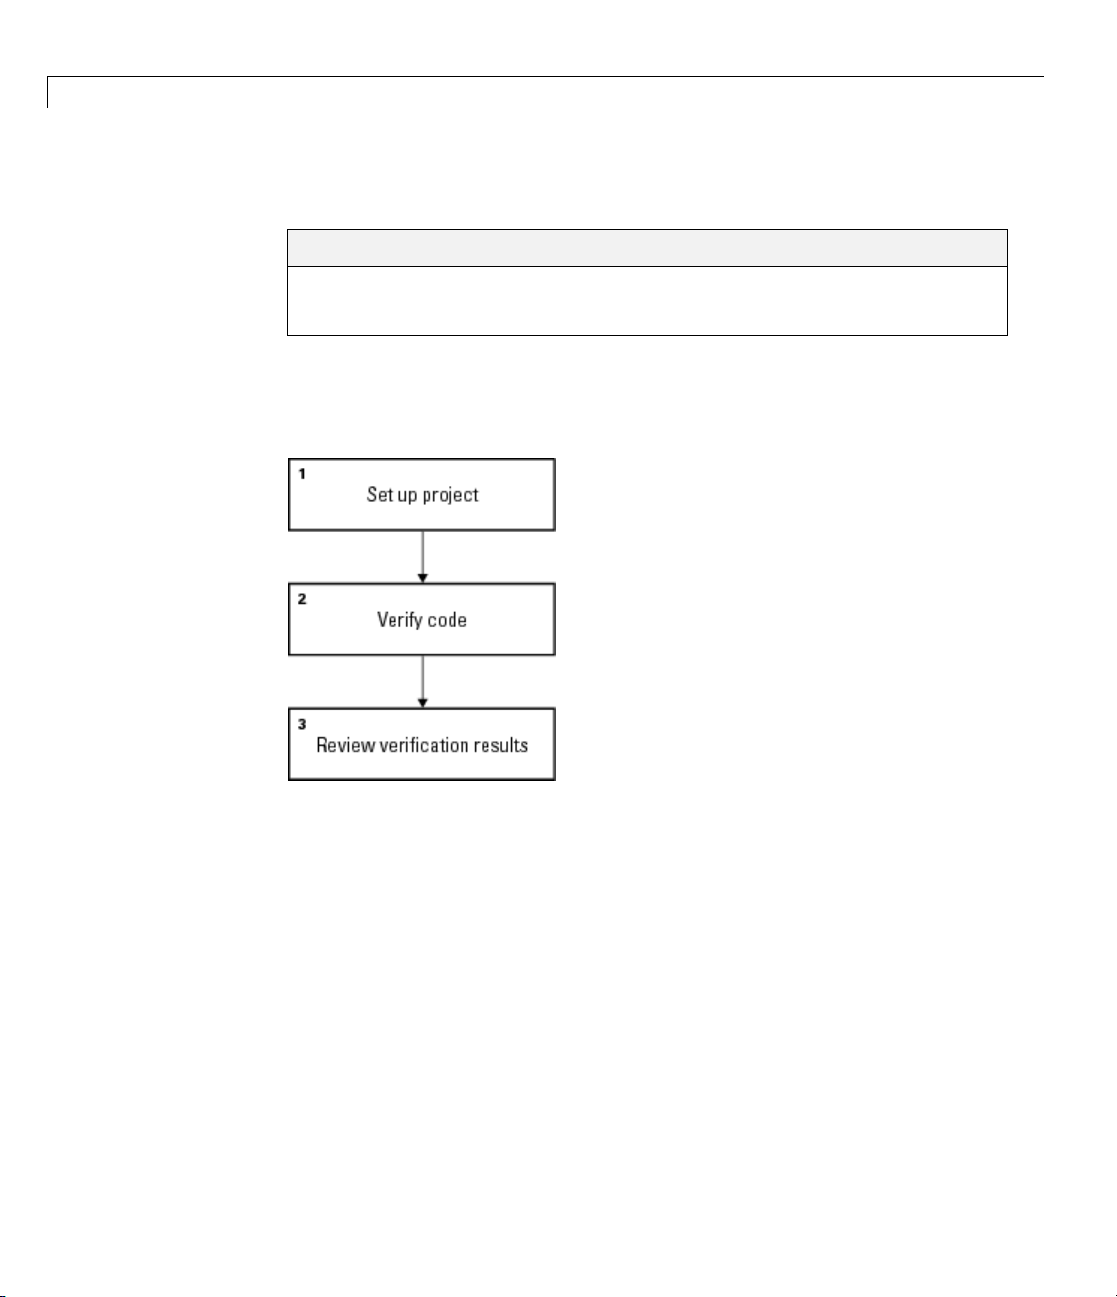
Basic Workflow
The Workflow in This Guide
Learning More
Product Help
MathWorks Online
Related Products
Polyspace Products for Verifying C/C++ Code
Polyspace Products for Linking to Models
®
Server for Ada Products ................ 1-9
.................................... 1-13
..................................... 1-13
.............................. 1-5
......................... 1-5
.................. 1-5
........................ 1-7
...................... 1-9
®
Client for Ada and
................... 1-10
................................... 1-10
......................... 1-11
................................ 1-13
.................................. 1-14
................. 1-9
........... 1-14
.............. 1-14
v
Page 6

Setting Up a Polyspace Project
2
About the Setting Up a Project Tutorial ............. 2-2
Overview
Example Files
........................................ 2-2
.................................... 2-2
Creating a New Project
What Is a Project?
Preparing Project Folders
Opening the Polyspace Ver ification Environment
Creating a New Project to Verify an Ada Package
............................ 2-3
................................. 2-3
........................... 2-3
....... 2-4
....... 2-7
Running a Verification
3
About This Tutorial ................................ 3-2
Overview
Before You Start
Preparing for Verification
Opening the Project
Specifying Source Files to Verify
Launching Server Verification from Project
Manager
Starting the Verification
Monitoring the Progress of the Verification
Removing Verification Results from the Server
Troubleshooting a Failed Verification
........................................ 3-2
.................................. 3-3
.......................... 3-4
................................ 3-4
..................... 3-4
........................................ 3-6
............................ 3-6
............ 3-7
......... 3-11
................. 3-12
vi Contents
Using Polysp a ce In One Clic k to Launch V erification
Overview of Polyspace In One Click
Setting the Active Project
Sending the Files to Polyspace Software
........................... 3-15
................... 3-15
............... 3-17
.. 3-15
Page 7

Launching Client Verification from Project
Manager
Starting the Verification
Monitoring the Progress of the Verification
Completing Verification
Stopping the Verification
........................................ 3-21
............................ 3-21
............ 3-22
............................ 3-23
........................... 3-24
Reviewing Verification Results
4
About the Reviewing Verification Results Tutorial ... 4-2
Overview
Before You Start
........................................ 4-2
.................................. 4-2
Opening Verification Results
Opening Run-Time Checks Perspective
Opening Verification Res ults
Exploring Run-Time Checks Perspective
Overview
Reviewing Procedural Entities
Reviewing Results
Using Review Assistant
Reviewing All Checks
Reviewing Example Checks
Filtering Checks
Reviewing Results in Assistant Mode
What Is Assistant Mode?
Switching to Assistant Mode
Selecting the Methodology and Criterion Level
Exploring Methodology for Ada
Reviewing Checks
Defining a Custom Methodology
Generating Reports of Verification Results
PolySpace Report Generator Overview
........................................ 4-4
................................. 4-9
.............................. 4-9
.................................. 4-16
................................. 4-23
....................... 4-3
................ 4-3
........................ 4-3
....................... 4-6
............................ 4-9
......................... 4-13
................ 4-20
........................... 4-20
........................ 4-20
...................... 4-21
..................... 4-24
................ 4-26
............ 4-4
......... 4-21
.......... 4-26
vii
Page 8

Generating Report for example.adb ................... 4-27
Index
viii Contents
Page 9

Introduction to Polyspace
Products for Verifying Ada
Code
• “Product Overview” on page 1-2
• “Product Components” on page 1-5
• “Installing Polyspace Products” on page 1-9
1
• “Working with Polyspace Software” on page 1-10
• “Learning More” on page 1-13
• “Related Products” on page 1-14
Page 10

1 Introduction to Polyspace
®
Product Overview
Overview of Polyspace Verification
Polyspace®products verify C, C++, and Ada code by detecting run-time errors
before code is compiled and executed. Po lyspace verification uses formal
methods not only to detect errors, but to prove mathem atically that certain
classes of run-time errors do not exist.
To verify the source code, you set up verification parameters in a project, run
the verification, and review the results. A graphical user interface helps you
to efficiently review verification results. Results are color-coded:
Products for Verifying Ada Code
In this section...
“Overview of Polyspace Verification” on page 1-2
“The Value of Polyspace Verification” on page 1-2
• Green – Indicates code that never has an error.
• Red – Indicates code that always has an error.
• Gray – Indicates unreachable code.
• Orange – Indicates unproven code (code that might have an error).
The color-coding helps you to quickly identify errors and find the exact
location of an error in the source code. After you fix errors, you can easily run
the verification again.
The Value of Polyspace Verification
Polyspace verification can help you to:
• “Ensure Software Reliability” on page 1-3
• “Decrease Development Time” on page 1-3
• “Improve Development Process” on page 1-4
1-2
Page 11

Product Overview
Ensure Software Reliability
Polyspacesoftwareensuresthereliability of your Ada applications by proving
code correctness and identifying run-time errors. Using advanced verification
techniques, Polyspace software performs an exhaustive verification of your
source code.
Because Polyspace software verifies all possible executions of your code, it
can identify code that:
• Never has an error
• Always has an error
• Is unreachable
• Might have an error
With this information, you can be confident that you know how much of your
code is run-time error free, and you can improve the reliability of your code
by fixing the errors.
Decrease Development Time
Polyspace software reduces developmenttimebyautomatingtheverification
process and helping you to efficiently review verification results. You can use
it at any point in the development process. However, using it early in coding
phases allows you to find errors w h en they are less costly to fix.
YouusePolyspacesoftwaretoverifyAda source code before compile time.
To verify the source code, you set up verification parameters in a project,
run the verification, and review the results. This process takes significantly
less time than using manual methods or tools that require you to mo dify
code or run test cases.
Color-coding of results helps you to quickly identify errors. You will spend
less time debugging because you can see the exact location of an error in the
source code. After you fix errors, you can easily run the verification again.
Using Polyspace verification software helps you to use your time effectively.
Because you know which parts of your code are error-free, you can focus on
thecodethathasdefiniteerrors or might have errors.
1-3
Page 12

1 Introduction to Polyspace
®
Products for Verifying Ada Code
Reviewing the code that might have errors (orange code) can be
time-consuming, but Polyspace software helps you with the review process.
You can use filters to focus on certain types of errors or you can allow the
software to identify the code that you should review.
Improve Development Process
Polyspace softwa r e makes it easy to share verification parameters and
results, allowing the development team to work together to improve product
reliability. Once verification parameters have been set up, developers can
reuse them for other packages in the same application.
Polyspace verific ati on software supports code verification t h r oughout the
development process:
• An individual develo per can find and fix run-time errors during the initial
coding phase.
• Quality assurance can check overall reliability of an application.
1-4
• Managers can monitor application reliability by generating reports from
the verification results.
Page 13

Product Components
In this section...
“Polyspace Products for Ada” on page 1-5
“Polyspace Verification Environment” on page 1-5
“Other Polyspace Components” on page 1-7
Polyspace Products for Ada
The Polyspace products for verifying Ada code are:
Polyspace
Polyspace
Polyspace Client for Ada software is the management and visualization tool of
Polyspace products. You use it to submit jobs for execution by the Polyspace
Server, and to review verification results.
®
Client™ for Ada
®
Server™ for Ada
Product Components
Polyspace Server for Ada software is the computational engine of Polyspace
products. You use it to run jobs posted by Polyspace clients, and to manage
multiple servers and queues.
Polyspace Verification Environment
The Polyspace verification environment (PVE) is the graphical user interface
of the Polyspace Client for Ada software. You use the Polyspace verification
environment to create Polyspace projects, launch verifications, and review
verification results.
For Ada verification, you use two perspectives of the Polyspace verification
environment:
• “Project Manager P erspective” on page 1-6
• “Run-Time Checks Perspective” on page 1-6
1-5
Page 14
1 Introduction to Polyspace
®
Products for Verifying Ada Code
Project Manager Perspective
The Project Manager perspective allows you to create projects, set verification
parameters, and launch verifications.
1-6
You use the P roject Manager perspective in the tutorial i n Chapter 2, “Setting
Up a Polyspace Project”.
Run-Time Checks Perspective
The Run-Time Checks perspective allows you to review verification results,
comment individual checks, and track review progress.
Page 15

Product Components
YouusetheRun-TimeChecksperspectiveinthetutorialinChapter4,
“Reviewing Verification Results”.
Other Polyspace Components
In addition to the Polyspace verification environment, Polyspace products
provide several other components to manage verifications, improve
productivity, and track software quality. These components include:
• Polyspace Q ueue Manager Interface (Spooler)
1-7
Page 16
1 Introduction to Polyspace
®
Products for Verifying Ada Code
• Polyspace in One Click
• Polyspace Metrics Web Interface
Polyspace Queue Manager Interface (Polyspace Spooler)
The Polyspace Queue Manager (also called the Polyspace Spooler) is the
graphical user interface of the Polyspace Server for Ada software. You use the
Polyspace Queue Manager Interface to move jobs within the queue, remove
jobs, monitor the progress of individual verifications, and download results.
1-8
You use the Polyspace Queue Manager in the tutorial “Launching Server
Verification from Project Manager” on page 3-6.
Polyspa
Polyspace in One Click is a convenie n t way to verify multip le files using the
same set of options.
After creating a project with the options you want, you can use Polys pace in
One Click to designate that project as the active project, and then send source
files to Polyspace software for verification with a single mouse click.
YouusePolyspaceinOneClickinthetutorial“UsingPolyspaceInOneClick
to Launch Verification” on page 3-15.
ce in One Click
Page 17

Installing Polyspace Products
In this section...
“Finding the Installation Instructions” on page 1-9
“Obtaining Licenses for Polyspace®Client for Ada and Polyspace®Server
for Ada Products” on page 1-9
Finding the Installation Instructions
The tutorials in this guide require both Polyspace Client for Ada and
Polyspace Server for Ada. Instru ctions for installing Polysp ace products are
in the Polyspace Installati o n Guide. Before running Polyspace products, you
must also obtain and install the necessary licenses.
Obtaining Licenses for Polyspace Client for Ada and
Polyspace Ser ver for Ada Products
See “Polyspace License Installation” in the Polyspace Installation Guide for
information about obtaining and installing licenses for Polyspace products.
Installing Polyspace®Products
1-9
Page 18
1 Introduction to Polyspace
®
Products for Verifying Ada Code
WorkingwithPolyspaceSoftware
In this section...
“Basic Workflow” on page 1-10
“The Workflow in This Guide” on page 1-11
Basic Workflow
The basic workflow for using Polyspace software to verify Ada source code is:
1-10
In this workflow, you:
1 Use the Project Manager perspective to set up a project file.
2 Verify code on a server or client.
YoucanusetheProjectManagerperspectivetostarttheverificationor
you can select files from a Microsoft
Polyspacesoftwareforverification. For verifications that run on a s erve r,
you can use the Polyspace Queue M anager Interface (Polyspace Spooler) to
manage the verificat ions and download the results to a client.
3 Use the Run-Time Checks p erspective to review verification results.
®
Windows®folder and send them to
Page 19

Workin g wi t h Polys p ace®Software
TheWorkflowinThisGuide
The tutorials in this guide take you through the basic workflow, including the
different options for ru nning verifications. The workflow that you will follow
in this guide is:
In this workflow, you will:
1 Create a new project that you can use for the other steps in the workflow.
This ste
2 Verify a single package using demo Ada source code.
p is in the tutorial Chapter 2, “Setting Up a Polyspace Project”.
This step is in the tutorial Chapter 3, “Running a Verification”. In this
tutorial, you will verify the same package using three different methods
for running a verification. You will:
• Use the P roject Manager perspective to start a verification that runs
on a server.
• UsePolyspaceInOneClicktostartaverification that runs on a server.
• Use the P roject Manager perspective to start a verification that runs
on a client.
iew the verification results.
3 Rev
1-11
Page 20

1 Introduction to Polyspace
®
Products for Verifying Ada Code
This step is in the tutorial Chapter 4, “Reviewing Verification Results”.
1-12
Page 21

Learning More
In this section...
“Product Help” on page 1-13
“MathWorks Online” on page 1-13
Product Help
To access the help that came with your installation, select Help > Help or
click the H elp icon in the Polyspace window.
To access the online documentation for Polyspace products, go to:
/www.mathworks.com/access/helpdesk/help/toolbox/polyspace/polyspace.html
MathWorks Online
For additional information and support, s ee:
Learning More
www.mathworks.com/products/polyspace
1-13
Page 22

1 Introduction to Polyspace
Related Products
®
Products for Verifying Ada Code
In this section...
“Polyspace Products for Verifying C/C++ Code” on page 1-14
“Polyspace Products for Linking to Models” on page 1-14
Polyspace Products for Verifying C/C++ Code
For information about Polyspace products that verify C/C++ code, see the
following:
http://www.mathworks.com/products/polyspaceclientc/
http://www.mathworks.com/products/polyspaceserverc/
Polyspace Products for Linking to Models
For information about Polyspace products that link to models, see the
following:
1-14
http://www.mathworks.com/products/polyspacemodelsl/
http://www.mathworks.com/products/polyspaceumlrh/
Page 23

Setting Up a Polyspace
Project
• “About the Setting Up a Project Tutorial” on page 2-2
• “Creating a New Project” on page 2-3
2
Page 24

2 Setting Up a Polyspace
®
Project
About the Setting Up a Project Tutorial
In this section...
“Overview” on page 2-2
“Example Files” on page 2-2
Overview
You must have a project file before you can run a Polyspace verification of
your source code. In this tutorial, you will create a project that you can use to
run verifications in later tutorials.
Example Files
In this tutorial, you will verify the package example.adb that comes with the
Polyspace installation CD. You can learn more about the files and folders
required for this tutorial in “Preparing Project Folders” on page 2-3.
2-2
Page 25

Creating a New Project
In this section...
“What Is a Project?” on page 2-3
“Preparing Project Folders” on page 2-3
“Opening the Polyspace Verification Environment” on page 2-4
“Creating a New Project to Verify an Ada Package” on page 2-7
What Is a Project?
In Polyspace software, a project is a named set of parameters for verification
of your software project’s source files. A project includes:
• Source files
• Include f olders
• Analysis options
Creating a New Project
• One or more Verifications, each of w hich include:
- Source (specific versions of source files used in the verification)
- Configuration (specific set of analysis options used for the verification)
- Verification results
You can create your own project or use an existing one. You can create and
modify a project using the Project Manager perspective.
In this tutorial, you create a new project and save it as a configuration file
(
.cfg).
Preparing Project Folders
Before you start verifying Ada code with Polyspace software, you must know
the locations of the Ada source package and any other specifications upon
which it may depend either directly or indirectly. You must also know where
you want to store the verification results.
2-3
Page 26

2 Setting Up a Polyspace
®
Project
For each project, you decide where to store source files and results. For
example, you can create a project folder and then create separate folders for
the source files, include files, and results within the project folder.
For this tutorial, prepare a project folder as follows:
1 Create a project folder named polyspace_project.
2 Open polyspace_project, and create the follow ing folders:
sources
•
• includes
• results
3 Copy the file example.adb and exampl e.ads from
Install_folder\Examples\Demo_Ada_Single-File\sources
to
2-4
polyspace_project\sources
where Install_folder is the installation folder.
4 Copy all files from
Install_folder\Examples\Demo_Ada_Single-File\sources
to
polyspace_project\includes.
Opening the Po lyspace Verification Environment
Use the Polyspace verification environment to create projects, start
verifications, and review verificatio n results.
To open the Polys pace verification environment:
1 Double-click the Polyspace icon.
Page 27

Creating a New Project
2 IfyouhavebothPolyspaceClientforC/C++andPolyspaceClientforAda
products on your system, the PolySpace Language Selection dialog box
opens.
• Select PolySpace for Ada,andclickOK.
The Polyspace verification environment opens.
2-5
Page 28

2 Setting Up a Polyspace
®
Project
Specify source files and include folders
Specify analysis options
Monitor progress and view log
By default, the Polyspace Verification Environment displays the Project
Manager perspective. The Project Manager perspective has three main
sections.
2-6
Use this
section...
Project
Browser
(upper-left)
Configuration
(upper-right)
Output
(lower-right)
For...
Specifying:
• Source files
• Include folders
• Results folder
Specifying analysis options
Monitoring the progress of a verification, and view ing
status, log messages, and general verification statistics.
Page 29

Creating a New Project
You can resize or hide any of these sections. You learn more about the Project
Manager perspective later in this tutorial.
Creating a New Project to Verify an Ada Package
Youmusthaveaproject,savedwithfiletype.cfg, to run a verification. In
this part of the tutorial, you create a new project to verify
You create a new p roject by:
• “Opening a N ew project” on page 2-7
• “Specifying the Source Files and Include Folders” on page 2-9
• “Specifying the Analysis Options” on page 2-11
• “Specifying Source Files to Verify” on page 2-12
• “Saving the Project” on page 2-13
Opening a New project
To open a new project for verifying example.adb:
example.adb.
1 Select File > New Project.
The PolySpace Project: Define Properties dialog box appears:
2-7
Page 30

2 Setting Up a Polyspace
®
Project
2 In the Project name field, enter example_project.
2-8
3 Clear the
Note Cle
the loc
locati
on page
files a
4 In the
crea
In this example, the project folder is
5 Under Project language,clickAda95.
ck Finish.The
6 Cli
env
Default location check box.
aring the Default location check box allows you to specify
ation of your project files. In this tutorial, you change the default
on to the project folder that you created in “Preparing Project Folders”
2-3. Changing the default location makes it easier to specify source
nd include folders.
Location field, enter or navigate to the project folder that you
ted earlier.
C:\PolySpace\polyspace_project.
example_project opens in the PolySpace verification
ironment.
Page 31
Creating a New Project
Specifying the Source Files and Include Folders
To specify the source files and include folders for the verification of
example.adb:
1 In Project Browser, select the Source folder.
2 Click
the Add source icon
.The PolySpace Project: Add Source Files and Include Folders dialog box
appears.
in the upper left the Project Browser.
2-9
Page 32

2 Setting Up a Polyspace
®
Project
3 The project folder polyspace_proj ect should appear in the Look in
drop-down box. If it does not, navigate to that folder.
2-10
4 Select the folder sources.ThenclickAdd source.
,
The files
example
5 Select the includes folder. Then click Add Include.
The
6 Click F
The Pr
example.adb and example.ads, appear in the Source tree for
_project
includes folder appears in the Include tree for example _pro ject.
.
inish to apply the changes and close the dialog box.
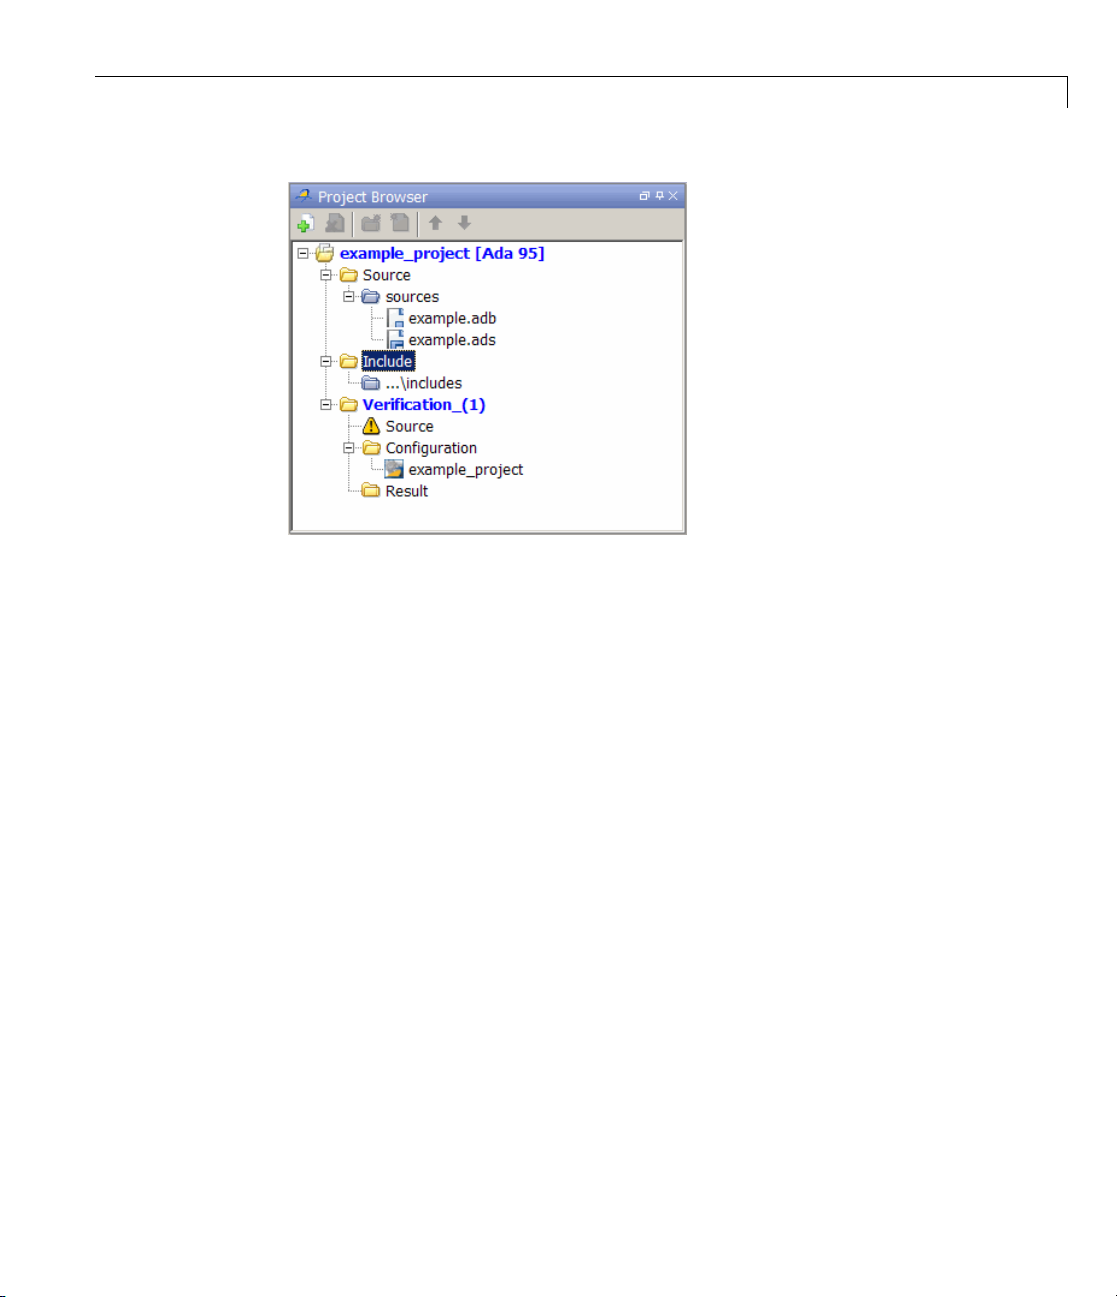
oject Browser now looks like the following:
Page 33
Creating a New Project
Specifying the Analysis Options
The analysis options in the upper-right section of the Project Manager
perspective include parameters that Polyspacesoftwareusesduringthe
verification process. For more information about analysis options, see
“Options Description” in the Polyspace Products for Ada Reference.
To specify the analysis options for this tutorial:
1 Expand the Target/Compilation section.
2 In the Operating system target for PolySpace stubs drop-down menu, select
no-predefined-OS.
3 Keep the default values for all other options.
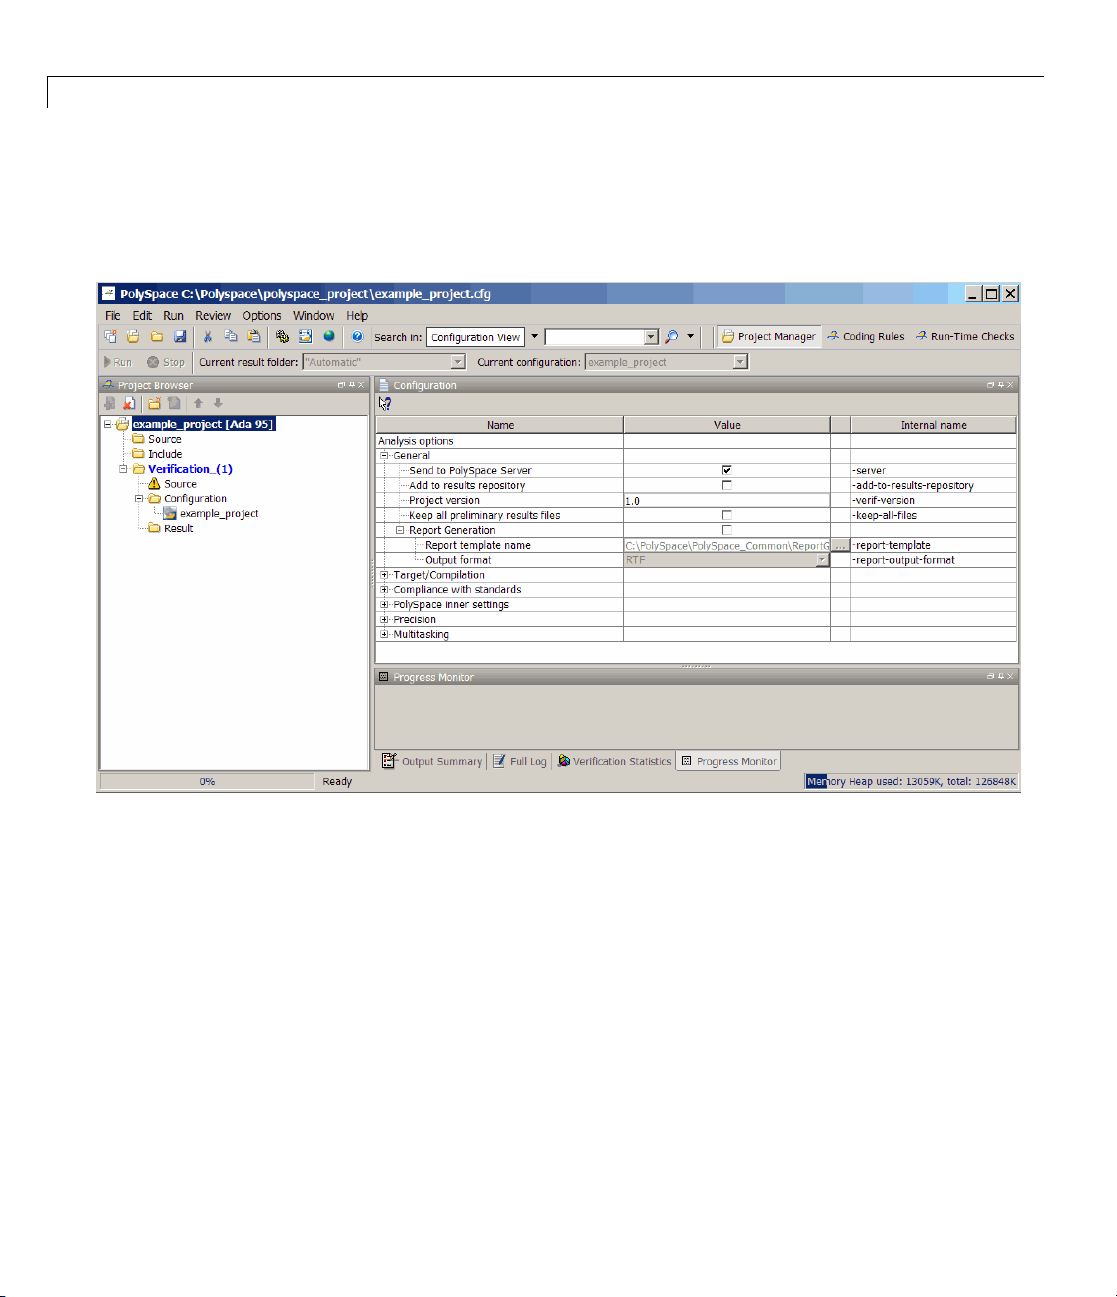
The analysis options now look like this.
2-11
Page 34

2 Setting Up a Polyspace
®
Project
2-12
Specifyi
ng Source Files to Verify
Before you can launch a verification, you must specify the files in the project
that you want to verify. In
example_project,therearetwofilestoverify.
To specify source files for a verification:
1 In the Project Brow ser Source tree, right-click the folder
example_project[Ada 95] > Source > sources, w hich contains the
source files
2 From th
The source files
of
Verification_(1).
example.adb and example.ads.
e context menu, select Copy Source File to > Verification_(1).
example.adb and example.ads appear in the Source tree
Page 35

Saving the Project
To save the project, select File > Save project.
Creating a New Project
2-13
Page 36

2 Setting Up a Polyspace
®
Project
2-14
Page 37

Running a Verification
• “About This Tutorial” on page 3-2
• “Preparing for Verification” on page 3 -4
• “Launching Server Verification from Project Manag er” on page 3-6
• “Using Polyspace In One Click to Launch Verification” on page 3-15
• “Launching Client Verification from Project Manager” on page 3-21
3
Page 38

3 Running a Verification
About This Tutorial
In this section...
“Overview” on page 3-2
“Before You Start” on pag e 3-3
Overview
Once you have created the project example.cfg as described in “Creating a
New Project” on page 2-3, you can run the verification.
You can run a verification on a server or a client.
Use... For...
Server • Best perfo
• Large fil
• Multitas
Client • An alter
• Small fi
Note Ve
not be a
ng on it.
runni
You can start a verification using either the Project Manager or Polyspace In
One Click. With either method, the v erif ica t ion ca n run on a server or a client.
rmance
es (more than 800 lines of code including comments)
king
native to the server when the server is busy
les with no multitasking
rification on a client takes more time. You might
ble to use your client computer when a verification is
3-2
Page 39

Use... For...
About This Tutorial
Project Manager
A basic way to start a verif ica t ion.
You specify the source files in the project file.
With the project file open, you click a button to
start the verification.
Polyspace In One Click A conven ient way to start the verification of
several files which use the same verification
options.
Once you specify the project file containing the
verification options, you s pecify the source files
by selecting them from a Microsoft Windows
folder. You start the verification by sending the
selected files to Polyspace software.
In this tutorial, you learn how to run a verification on a server and on a
client, and you learn how to start a verification using the Project Mana g e r
and Polyspace In One Click. You verify the package
example.adb three times
using a different method each time. You use:
1 Project Manager to start a verification that runs on a server.
2 Polyspace In One Click to start a verification that runs on a server.
3 Project Manager to start a verification that runs on a client.
Each verification stores the same results in your project. You review these
results in the tutorial Chap ter 4, “Reviewing Verification R esu lts”.
Before You Start
Before you start this tutorial, you must complete Chapter 2, “Setting Up a
Polyspace Project”. You use the folders and project file,
that tutorial to run the verifications.
example.cfg,from
3-3
Page 40

3 Running a Verification
Preparing for Verification
In this section...
“Opening the Project” on page 3-4
“Specifying Source Files to Verify” on page 3-4
Opening the Project
To run a verification, you must have an open project file. For this tutorial, you
use the project file
Polyspace Project”. Open
example.cfg that you created in Chapter 2, “Setting Up a
example.cfg if it is not already open.
To open
1 If the Polyspace verification environment is not already open, do uble-click
2 Select File > Open project.
3 In Look in, navigate to polyspace_project.
4 Select example_project.cfg.
5 Click Open to open the file and close the dialo g box.
example.cfg:
the Polyspace icon.
The Open a PolySpace project file dialog box opens.
Specifying Source Files to Verify
Each Polyspace project can contain multiple verifications. Each of these
verifications analyze a specific set of source files using a specific set of
analysis options.
Therefore, before you can launch a verification, you must specify which files in
your project you want to verify. In the
there is only one file to verify.
To copy source files to a verification:
example_project used in this tutorial,
3-4
Page 41
Preparing for Verification
1 In the Project Brow ser Source tree, right-click the folder
example_project[Ada 95] > Source > sources, w hich contains the
source files
2 From the context menu, select Copy Source File to > Verification_(1).
example.adb and example.ads.
The source files
of
Verification_(1).
example.adb and example.ads appear in the Source tree
3-5
Page 42
3 Running a Verification
Launching Server Verification from Project Manager
In this section...
“Starting the Verification” on page 3-6
“Monitoring the Progress of the Verification” on page 3-7
“Removing Verification Results from the Server” on page 3-11
“Troubleshooting a Failed Verification” on page 3-12
Starting the Verification
In this part of the tutorial, you run the verification on a server.
To start a verification that runs on a server:
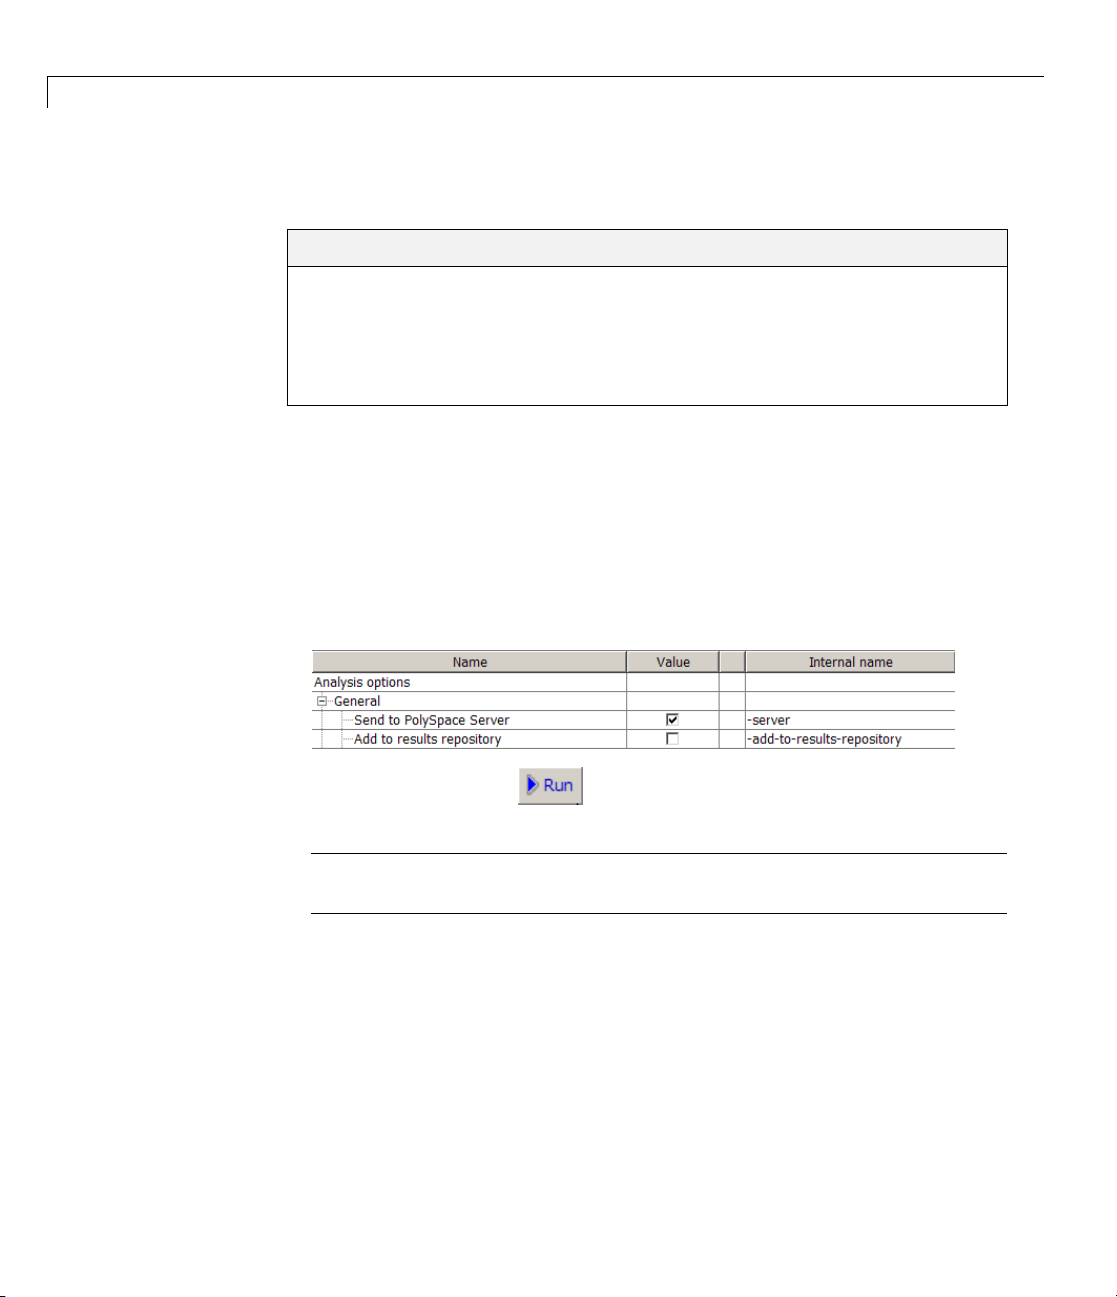
1 In the Configuration view, under Analysis options > General, select
the Send to PolySpace Server check box.
3-6
2 Click the Run button on the Project Manager toolbar.
Note If you see the message Verification process failed,clickOK
and go to “Troubleshooting a Failed Verification” on page 3-12.
The verification has three main phases:
a Checking syntax and semantics (the compile phase). Because Polyspace
software is independent of any particular Ada compiler, it ensures that
your code is portable, maintainable, and complies with Ada standards.
b Generating a main if it does not find a main and the Generate a Main
option is selected. For more information about generating a main, see
Page 43

Launching Server Verification from Pro ject Manager
the section “Generate a main”in the “Options Description” chapter of the
PolySpace Products for Ada Reference.
c Analyzing the code for run-time errors and generating color-coded
diagnostics.
Thecompilephaseoftheverificationruns on the client. When the compile
phase finishes:
• You see the message
Manager persp ective . This messa ge indicates that the part of the
verification that takes place on the client is complete. The rest of the
verification runs on the server.
• AmessageinOutput Summary gives you the identification number
(Analysis ID) for the verification.
3 For information on any message in the log, click the me ssa ge.
queued on server at the bottom of the Project
Monitoring the Progress of the Verification
Therearetwowaystomonitortheprogressofaverification:
• Using the Project Manager – allows you to follow the progress of the
verifications you submitted to the server, as well as client verifications.
• Using the Queue Manager (Spooler) – allows you to follow the progress
of any verification job in the server queue.
Monitoring Progress Using Project Manager
You can monitor the progress of your verification by viewing the progress
monitor and logs at the bottom of the Project Manager perspective.
Theprogressmonitorhighlightsthecurrentphaseinblueanddisplaysthe
amount of time and completion percentage for that phase.
3-7
Page 44

3 Running a Verification
The logs report additional information about the progre ss of the verification.
To view a log, click the button for that log. The information appears in the
log display area at the bottom of the Project Manager window. Follow the
next steps to view the logs:
1 Click the Output Summary tab to display compile phase messages and
errors. You can search the log by entering search terms in the Search
box and clicking the left arrow to search backward or the right arrow to
search forward.
2 Click the Verification Statistics tab to display statistics, such a s analysis
options, stubbed functions, and the verification checks performed.
3 Click the Refresh button to update the display as the verification
progresses.
4 Click the Full Log tab to display messages, e rrors, and statistics for all
phases of the verification. You can search the log by entering search terms
in the Search box and clicking the left arrow to search backward o r the
right arrow to search forward.
3-8
Monitoring Progress Using Queue Manager
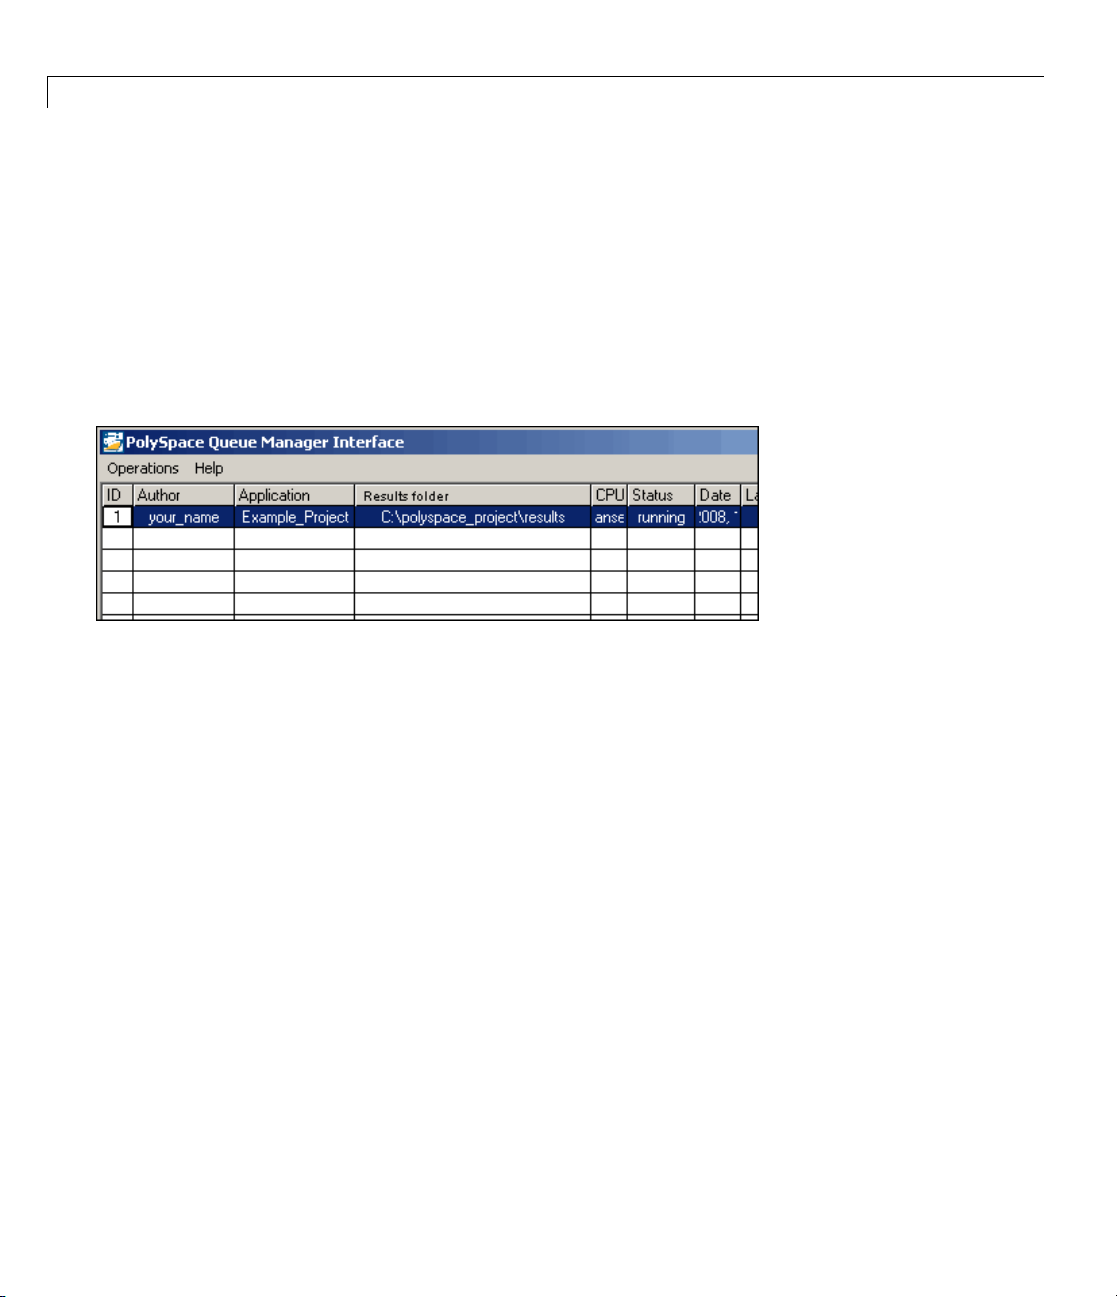
You monitor the progress of the verification using the Polyspace Queue
Manager (also called the Spooler).
To monitor the verification of
1 In the Run-Time Checks perspective toolbar, click the Polyspace Queue
Manager icon
. The Polyspace Queue Manager Interface opens.
Example_Project:
Page 45

Launching Server Verification from Pro ject Manager
2 Point anywhe re in the row for ID 1.
3 Right-click to open the context menu for this verification.
4 Select View log file.
A window opens displaying the last one-hundred lines of the verification.
3-9
Page 46

3 Running a Verification
5 Click Close to close the window.
6 Select Follow Progress from the context menu. The Progress Monitor
opens.
You can monitor the progress of the verif ica tion by watching the progress
bar and viewing the logs at the bottom of the window. The progress monitor
highlights the current phase in blue and displays the amount of time and
completion percentage for that phase.
The logs report additional information about the progress of the verification.
To view a log, click the button for that log. The information appears in the
log display area at the bottom of the Project Manager window. Follow the
next steps to view the logs:
• Click the Output Summary tab to display com pile phase m essage s and
errors. You can search the log by entering search terms in the Search
box and clicking the left arrow to search backward or the right arrow to
search forward.
• Click the Verification Statistics tab to display statistics, such
as analysis options, stubbed functions, and the verification checks
performed.
3-10
• Click the Refresh button
to update the display as the verification
progresses.
• Click the Full Log tab to display messages, errors, and statistics for all
phases of the verification. You can search the log by entering search
terms in the Search box and clicking the left arrow to search backward
or the right arrow to search forward.
7 Select File > Quit to close the progress window.
8 Wait for the verification to finish.
When the verification is complete, the status in the PolySpace Queue
Manager Interface changes from
running to completed.
Page 47

Launching Server Verification from Pro ject Manager
Removing Verification Results from the Server
At the end of a server verification, the server autom ati c ally downloads
verification results to the res ults folder specified in the project. You do not
need to manually download your results.
Note You can manually download verification results to another location on
your client system, or to other client systems.
Verification results remain on the se rver until you remove them. Once your
results have been downloaded to the client, you can remove them from the
server queue.
To remove your results from the server:
1 InthePolySpaceQueueManagerInterface, right-click the verification, and
select Remove From Queue. A dialog box opens requiring confirmation
that you want to remove the verification from the queue.
2 Click Yes.
Note To download the results and remove the verification from the queue,
right-click the verification and select Download Results And Remove
From Queue. If you download results before the verification is complete,
you get partial results and the verification continues.
3 Select Operations > E xit to close the PolyS p a ce Queue Manager Interface.
3-11
Page 48

3 Running a Verification
Once the results are on your client, you can review them using the Run-Time
Checks perspective. You review the results from the verification in Chapter
4, “Reviewing Verification Results”.
Troubleshooting a Failed Verification
When you see a message that the verification failed, it indicates that
Polyspace software could not perform the verification. The following sections
present some possible reasons for a failed verification.
Hardware Does Not Meet Requirements
The verification fails if your computer does not have the minimal hardware
requirements. For inform a tion about the hardware requirements, see
www.mathworks.com/products/polyspaceclientada/requirements.html.
To determine if this is the cause of the failed verification, search the log for
the message:
3-12
Errors f ound when verifying host configuration.
You can:
• Upgrade your computer to meet the minimal requirements.
• Select the Continue with current configuration option in the General
section of the Analysis options and run the verification again.
You Did Not Specify the Location of Included Files
If you se e a message in the log, such as the following, either the files are
missing or you did not specify the location of included files.
Verifier found an error in example.adb:23:14: "runtime_error
(spec)" depends on "types (spec)"
For information on how to specify the location of include files, see “Creating a
New Project to Verify an Ada Packa ge” on page 2-7.
Page 49

Launching Server Verification from Pro ject Manager
Polyspace Software Cannot Find the Server
Ifyouseethefollowingmessageinthelog,Polyspacesoftwarecannotfind
the server.
Error: Unknown host :
Polyspace software uses information in the preferences to locate the server.
To find the server information in the preferences:
1 Select Options > Preferences.
2 Select the Server Config uration tab.
3-13
Page 50

3 Running a Verification
By default, Polyspace software automatically finds the server. You can
specify the server by selecting Use the following server and port and
providing the server name and port. For information about setting up a
server, see the Polyspace Installation Guide.
3-14
Page 51

Using Polyspace®In One Click to Launch Verification
Using Polyspace In One Click to Launch Verification
In this section...
“Overview of Polyspace In One Click” on page 3-15
“Setting the Active Project” on page 3-15
“Sending the Files to Polyspace Software” on page 3-17
Overview of Polyspace In One Click
In a Microsoft Windows environment, Polyspace software provides a
convenient way to streamline your work when you want to verify several
packages using the same set o f options. Once you have set up a project file
that has the options you want, you designate that project as the active project,
and then send the source files to Polyspace software for verification. You do
nothavetoupdatetheprojectwithsource file information. This process is
called Polyspace In One Click.
In this part of the tutorial, using Polyspace In One Click, you learn how to:
1 Set the active project.
2 Send source files to Polyspace software for verification.
Setting the Active Project
The active project is the project that Polyspace In One Click uses to verify the
packages that yo u select. Once you have set an active project, it remains
active until you change the active project. Polyspace software uses the
analysis options from the project; it does not use the source files or results
folder from the project.
To set the active project:
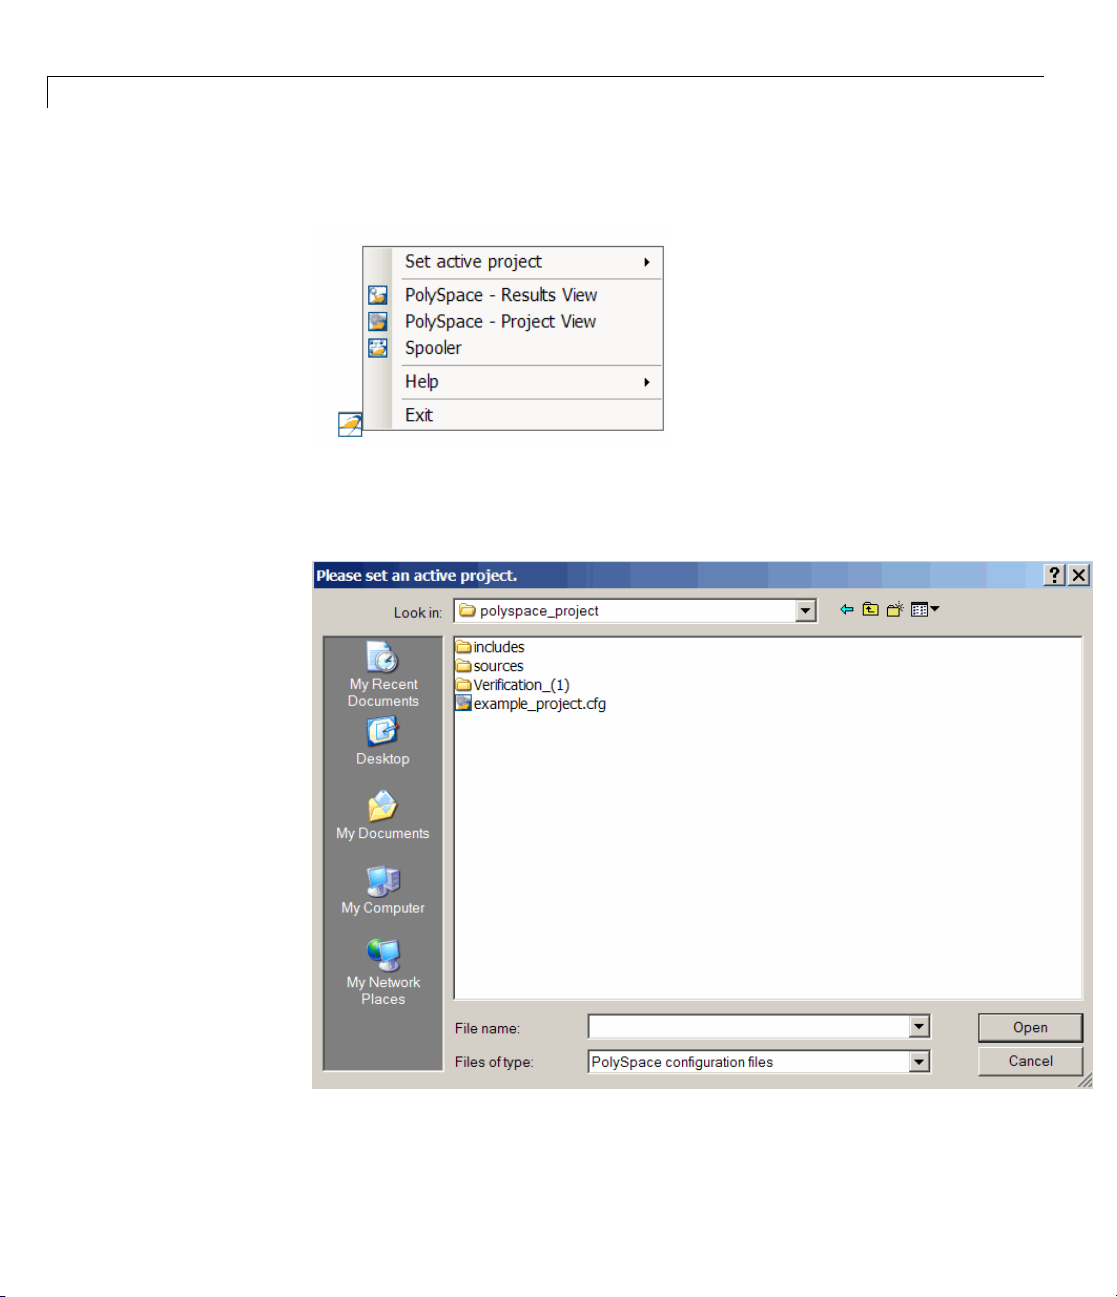
1 Right-click the Polyspace In One Click icon in the taskbar area of your
Windows desktop:
3-15
Page 52
3 Running a Verification
The context menu appears.
2 Select Set active project > Browse from the menu.
The Please set an active project dialog box appears:
3-16
3 Navigate to polyspace_project.
Page 53

Using Polyspace®In One Click to Launch Verification
4 Select example_project.cfg.
5 Click Open to apply the changes and close the dialog box.
Sending the Files to Polyspace Software
You can send several packages to Polyspace software for verification. For this
tutorial, you send one package,
example.adb.
To send
1 Navigate to the folder polyspace_project\sources.
2 Select the files example.adb and example.ads.
3 Right-click the file example.adb.
example.adb to Polyspace software for verification:
The context menu appears.
4 Select Send To > PolySpace.
The PolySpace basic settings dialog box appears.
3-17
Page 54

3 Running a Verification
3-18
5 Make sure that Results folder is polyspace_ proj ect.
6 Select the Send to PolySpace Server option if it is not already selected.
7 Leave the default values for the other parameters.
Click Start.
The verification log appears.
Page 55

Using Polyspace®In One Click to Launch Verification
The com
phase c
• You se
• Ames
• Moni
pile phase of the verification runs on the client. When the compile
ompletes:
ethemessage:
End of
PolySpace Verifier analysis
sage in the log area tells you that the verification was transferred to
erver and gives you the identification number (Analysis ID) for the
the s
fication. For this verification, the identification number is
veri
tor the verification using the Spooler. For information on using the
oler to monitor a verification on a server, see “Monitoring the Progress
Spo
he Verification” o n page 3-7.
of t
1.
3-19
Page 56

3 Running a Verification
• When the verification completes, download the results to
polyspace_project\results. Forinformationondownloadingresults
from a server to a client, see “Removing Verification Results from the
Server” on page 3-11
You review the results in Chapter 4, “Reviewing Verification Results”.
3-20
Page 57
Launching Client Verification from Project Manager
Launching Clien t Verification from Project Manager
In this section...
“Starting the Verification” on page 3-21
“Monitoring the Progress of the Verification” on page 3-22
“Completing Verification” on page 3-23
“Stopping the Verification” on page 3-24
Starting the Verification
For the best performance, run verifications on a server. If the server is busy
or you want to verify a small package, you can run a verification o n a client.
Note Because a verification on a client can process only a limited number
of variable assignments and function calls, the source code should have no
more than 800 lines of code.
To start a verification that runs on a client:
1 Open the project file example_project.cfg if it is not already open.
For information about opening a project file, see “Preparing for Verification”
on page 3-4.
2 In the Configuration pane, under Analysis options > General,clear
the Send to PolySpace Server check box.
3 If you see a warning that multitasking is not available when you run
a verification on the client, click OK to continue and close the message
box. This warning only appears when you clear the Send to PolySpace
Server check box.
4 Click the Run button on the Project Manager toolbar.
3-21
Page 58
3 Running a Verification
5 If you see a caution that Polyspace software will remove existing results
from the results folder, click Yes to continue and close the message dialog
box.
The Output Summary and Progress Monitor windows become active,
allowing you to monitor the progress of the verification
Note If you see the message Verification process failed,clickOK and
go to “Troubleshooting a Failed Verification” on page 3-12.
Monitoring the Progress of the Verification
You can monitor th e progress of the verification b y viewing the progress
monitor and logs at the bottom of the Project Manager perspective.
3-22
The progress bar highlights the current phase in blue and displays the
amount of time and completion percentage for that phase.
The logs report additional information about the progre ss of the verification.
To view a log, click the corresponding tab. The information appears in the
log display area at the bottom of the Project Manager perspective. Follow the
next steps to view the logs:
1 Click the Output Summary tab to display compile phase messages and
errors. You can search the log by entering search terms in the Search
field and clicking the left arrow to search backward or the right arrow to
search forward.
Page 59

Launching Client Verification from Project Manager
2 Click the Verification Statistics tab to display statistics, such a s analysis
options, stubbed functions, and the verification checks performed.
Click the refresh button
to update the display as the verification progresses.
3 Click the Full Log tab to display messages, e rrors, and statistics for all
phases of the verification.
You can search the full log by entering a search term in the Search in the
log box and clicking the left arrow to search backward or the right arrow to
search forward.
Completing Verification
When the verification finishes, the message Verification Completed
appears at the bottom of the Project Manager window, and the results appear
in the Project Browser.
3-23
Page 60

3 Running a Verification
In the tutorial Chapter 4, “Reviewing Verification Results”, you open the
Run-Time Checks perspective and review the verification results.
Stopping the Verification
You can stop the verification befo r e it is complete. If you stop the verification,
results are incomplete. If y ou start another verification, the verification starts
from the beginning.
To stop a verification:
1 Click the Stop button on the Project Manager toolbar.
A warning dialog box opens.
3-24
2 Click Yes.
The verification stop s and the message
appears.
3 Click OK to close the Message dialog box.
Note Closing the Polyspace verification environme nt window does not stop
the verification. T o resume display of the verification progress, start the
Polyspacesoftwareandopentheproject.
Verification process stopped
Page 61

Reviewing Verification
Results
• “About the Reviewing Verification Results Tutorial” on page 4-2
• “Opening Verification Results” on page 4-3
• “Exploring Run-Time Checks Perspective” on page 4-4
• “Reviewing Results” on page 4-9
• “Reviewing Results in Assistant Mode” on page 4-20
4
• “Generating Reports of Verification Results” on page 4-26
Page 62

4 Reviewing Verification Results
About the Reviewing Verification Results Tutorial
In this section...
“Overview” on page 4-2
“Before You Start” on pag e 4-2
Overview
In the previous tutorial, Chapter 3, “Running a Verification”, you completed
a verification of the package
verification results.
The Polyspace verification environment contains a Run-Time Checks
perspectivethatyouusetoreviewresults. In this tutorial, you learn:
1 How to use the Run-Time Checks perspective, including how to:
• Open the Run-Time Checks perspective and view verification results.
example.adb. In this tutorial, you explore the
4-2
• Explore results in expert mode.
• Explore results in assistant mode.
• Generate reports.
2 How to interpret the co lor-coding that Polyspace software uses to ide n tify
the severity of an error.
3 How to find the location of an error in the source code.
Before You Start
Before starting this tutorial, complete the tutorial Chapter 3, “Running a
Verification”. In this tutorial, you use the verification results stored in this
file:
polyspace_project\Verification_(1)\Result_(1)\RTE_px_example_project_
LAST_RESULTS.rte
Page 63

Opening Verification Results
In this section...
“Opening Run-Time Checks Perspective” on page 4-3
“Opening Verification Results” on page 4-3
Opening Run-Time Checks Perspective
Use the Run-Time Ch ecks perspective to review v erification results. T o open
the Run-Time Checks perspective, on the PolySpace Verification Environment
Opening Verification Results
toolbar, click the Run Time Checks button
.
Opening Verification Results
To open the verification results:
1 Select File > Open Result.
2 In the Please select a file dialog box, navigate to
polyspace_project\Verification_(1)\Result_(1) and select the file
RTE_px_example_project_LAST_RESULTS.rte.
3 Click Open.
The results appear in the Run-Time Checks perspective.
4-3
Page 64

4 Reviewing Verification Results
Exploring Run-Time Checks Perspective
In this section...
“Overview” on page 4-4
“Reviewing Procedural Entities” on page 4-6
Overview
The Run-Time Checks perspective looks like this.
4-4
Page 65

Exploring Run-Time Checks Perspective
The Run-Time Checks perspective has six sections below the toolbar. Each
section provides a different view of the results. The following table describes
these views.
This view... Displays...
Procedural entities
Diagnostics (checks) for each file and
function in the project
Source code Source code for a selected check in
the procedural entities view
4-5
Page 66

4 Reviewing Verification Results
This view... Displays...
Coding review Statistics about the review progress
for checks with the same type and
category as the selected check
Selected check
Variables
Call tree Tree structure of function calls
You can resize or hide any o f these sections. You learn more about the
Run-Time Checks perspective later in this tutorial.
Details about the selected check
Information about the global
variables declared in the source code
Note Thefilethatyouusein
this tutorial does not have global
variables.
ReviewingProceduralEntities
The procedural entities view, on the left side of the Run-Time Checks
perspective, displays a table with information about the diagnostics for each
file in the project. The procedural entitie s view is also called the Run-Time
Checks view. When you first open the results file from the verification of
example.adb, you see the following p rocedural entities view.
4-6
Page 67

Exploring Run-Time Checks Perspective
If you place the cursor over Procedural entities and right-click, you can
select other columns to display, for example,
Classification.
The package RUNTIME_ERROR is red because its contains at least one definite
run-time error. Polyspace software assigns each package the color of the
most severe error found in that package. Note that the other entities
displayed for the example project are simply black. This indicates that they
contain specifications that were used for the analysis. The first column of
the Procedural entities view names the procedural entity (the package or
function). The following table describes some of the other columns in the
procedural entities view.
Column
Indicates
Heading
Number of red checks (operations where an error always
occurs)
Number of gray checks (unreachable code)
Number of orange checks (warnings for operations where
an error might occur)
4-7
Page 68

4 Reviewing Verification Results
Column
Heading
Tip If you see three dots in place of a heading, , resize the column until you
see the heading. Resize the procedural entities view to see additional columns.
What you select in the procedural entities view determines what is displayed
in the other views. In the following example s, you learn how to use the views
and how they interact.
Indicates
Number of green checks (operations where an error never
occurs)
Selectivity of the verification (percentage of checks that are
not orange)
This is an indication of the level of proof.
4-8
Page 69

Reviewing Results
In this section...
“Using Review Assistant” on page 4-9
“Reviewing All Checks” on page 4-9
“Reviewing Example Checks” on page 4-13
“Filtering Checks” on page 4-16
Using Review Assistant
You can use the review Assistant on the Run-Time Checks toolbar to facilitate
your review of run-time checks.
Use the Assistant slider to select a mode (1, 2,or3). Each mode corresponds
to a set of criteria specified by a configuration set. By default, when you open
a results file, the software opens the Run-Time Checks perspective with the
slide at
1 and the Methodology for Ada configuration selected.
Reviewing Results
Polyspace software uses the configuration set to choose checks for review . You
can create new configuration sets by using the Assistant configuration
tab in the Polyspace Preferences dialog box. For more infor mation, see
“Reviewing Results in Assistant Mode” on page 4-20.
To review all run-time checks, move the Assistant slider to Off .See
“Reviewing All Checks” on page 4-9.
For
Reviewing All Checks
In this part of the tutorial, you learn how to use the Run-Time Checks
perspective views to examine checks from a verification. This part of the
tutorial covers:
4-9
Page 70
4 Reviewing Verification Results
• “Selecting a C heck to Review” on page 4-10
• “Displaying the Calling Sequence” on p age 4-12
• “Tracking Review Progress” on page 4-12
Note To see all checks in the procedural entities view, move the Assistant
slider to Off. See “Using Review Assistant” on page 4-9.
Selecting a Check to Rev iew
In the procedural entities view , RUNTIME_ERROR is red, indicating that this
package has at least one red check. To review a red check in
1 In the procedural entities view, expand RUNTIME_ERROR.
2 Expand the red function SQUARE_ROOT.
RUNTIME_ERROR:
A color-coded list of the checks performed on
SQUARE_ROOT appears:
Each item in the list of checks has an acronym that identifies the type of
check and a number. For example, in
EXCP.5, EXCP stands for Arithmetic
Exception. For more information about different types of checks, see
“Check Descriptions” in the Polyspace Client/Server for Ada User’s Guide.
3 Click on the red check EXCP.5.
4-10
Page 71
Reviewing Results
You see the section of source code where this error occurs, and details
about the check.
4 In Review Details,youcan:
• Classify the run-time check as a defect. Select a category from the
Classification drop-down list, for example,
• Assign a status, for example,
Fix. This action indicates to Polyspace
High.
that you have reviewed the check
• Justify the check. For example, if you classified the check as
defect
, you could select the Justified check box to indicate that the
Not a
check is justified.
• Enter remarks in the Comment field, for example, defect or justification
information.
4-11
Page 72

4 Reviewing Verification Results
Displaying the Calling Sequence
You can display the calling sequence that leads to the code associated with a
check. Toseethecallingsequenceforthered
1 In the procedural entities view, expand SQUARE_ROOT.
2 Click on the red check EXCP.5.
3 In the Review Details toolbar, click the call graph button.
EXCP.5 check in SQUARE_ROOT:
A window displays the call graph.
4-12
ThecodeassociatedwithEXCP.5 is in SQUARE_ROOT. The function MAINRTE
calls SQUARE_ROOT.
Tracking Review Progress
Review Statistics allows you to keep track of the checks that you have
reviewed.
Page 73

Reviewing Results
The Count column displays a ratio and the Progress column displays the
equivalent percentage. The first row displays the ratio of reviewed checks
to the total number of checks that have the same color and category as the
current check. In this example, it displays the ratio of reviewed red EXCP
checks to total red EXCP errors in the project.
The second, third, and fourth rows displays the ratio of reviewed checks to
total checks for red, gray, and orange checks respectively. The fifth row
displays the ratio of the number of green checks to the total number of checks,
providing an indicator of the reliability of the softw are.
Reviewing Example Checks
In this part of the tutorial, you learn about other types and categories of
errors by reviewing the following checks in
• “Example: Unreachable Code” on page 4-13
• “Example: A Function with No Errors” on page 4-14
example.adb:
• “Example: Division by Zero” on page 4-15
Example: Unreachable Code
Unreachable code is code that never executes. Polyspace software displays
unreachable code in gray. In the following steps, you will look at an example
of unreachable code.
1 Under Procedural Entities,expandUNREACHABLE_CODE and click on the
gray
ZDV.6.
The source code for this function displays in the source code view.
4-13
Page 74
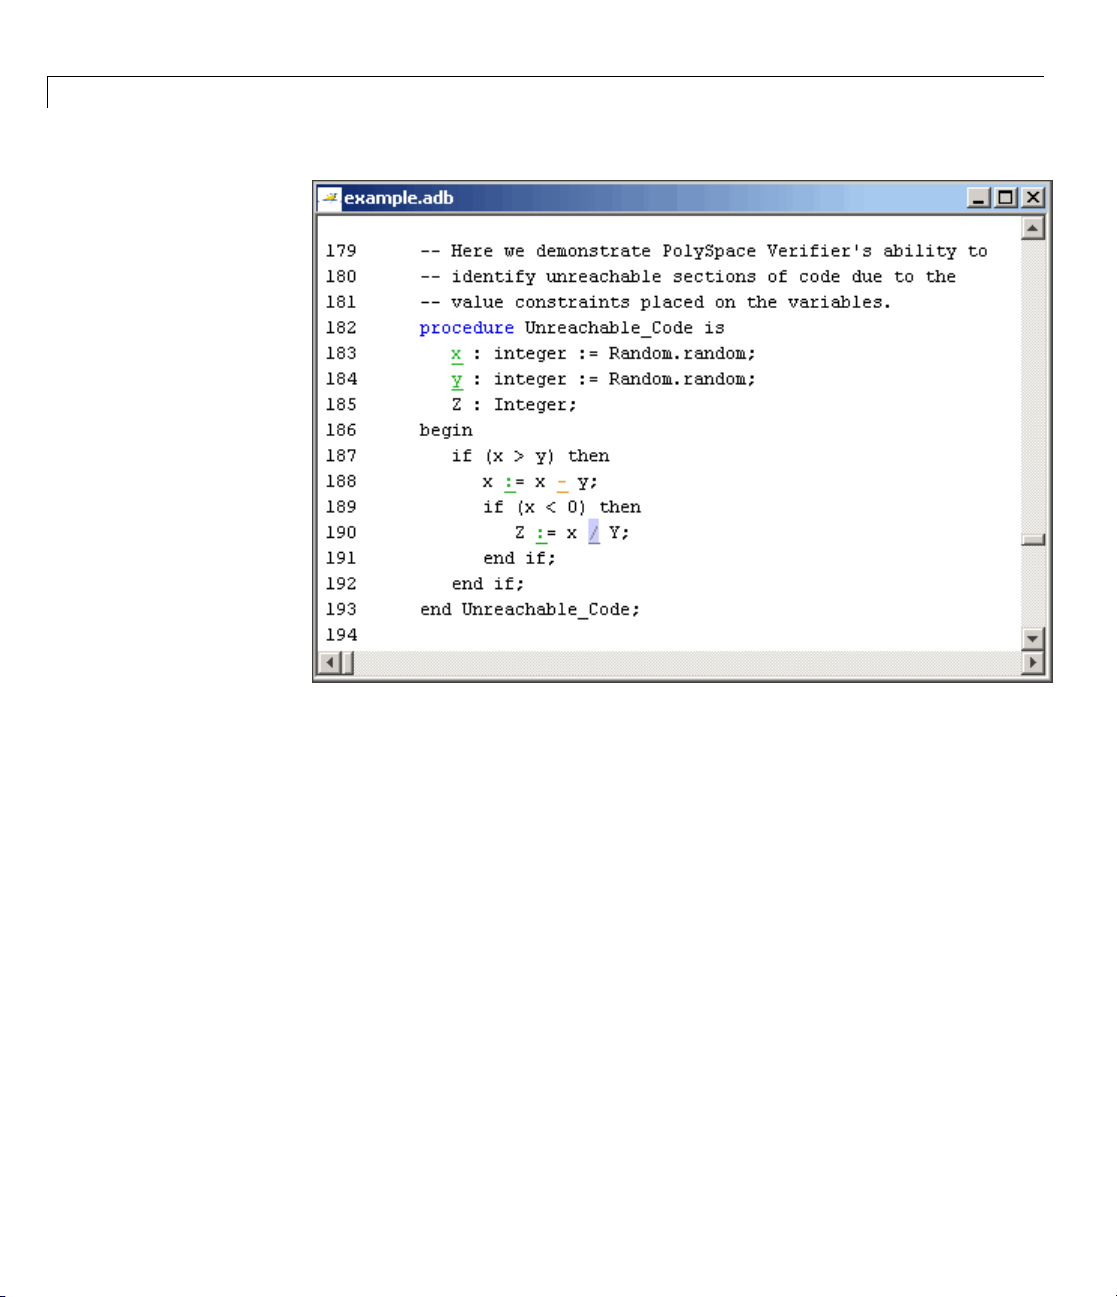
4 Reviewing Verification Results
4-14
2 Examine the source code.
At line 190, the code
is always false.
<0
Z:=x/Y;is never reached because the condition x
Example: A Function with No Errors
In the following example, Polyspace software determines, in code with a large
number of iterations, that a loop terminates and a variable does not overflow:
1 In Procedural entities, click on the green NON_INFINITE_LOOP function.
The source code for this function is displayed in the source code view.
Page 75

Reviewing Results
2 Examine the source code. The variable cur never overflows because the
loop at line
117 terminates before cur can overflow.
Example: Division by Zero
In the follow ing example, Polyspace software detects a potential division
by zero:
1 In Procedural entities,expandRECURSION.
The source code for this function is displayed in the source code view.
4-15
Page 76

4 Reviewing Verification Results
4-16
2 Examine the RECURSION function.
When
will result in division by zero. The orange color indicates that this is a
potential error (depe n ding on the value of
RECURSION is called with depth less than zero, the code at line 70
depth).
Filtering Checks
You can filter the checks that you see in the Run-Time Checks perspective so
that you can focus on certain checks. Polyspace software allows you to filter
your results in several ways. You can filter by:
• Check category (ZDV, IDP, NIP, etc.)
• Color of check (gray, orange, green)
Page 77
Reviewing Results
• Justified or unju s tif ied
• Classification
• Status
To filter checks, select one of the filter buttons in the Run-Time checks toolbar.
Tip The tooltip for a filter button tells you what filter the button is for.
Example: Filtering NIVL Checks
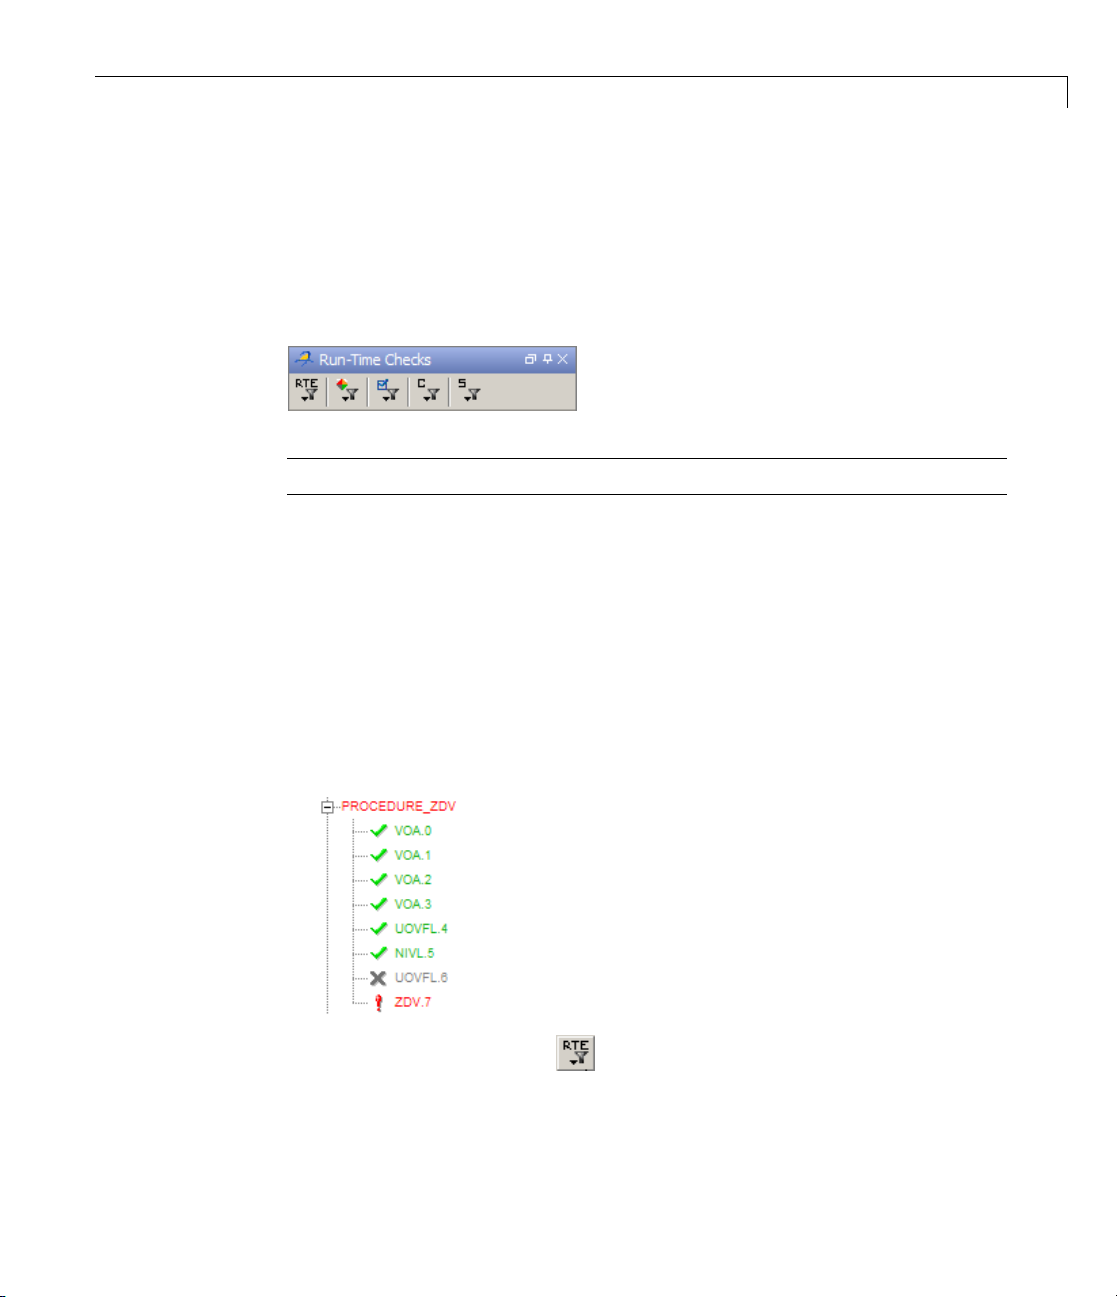
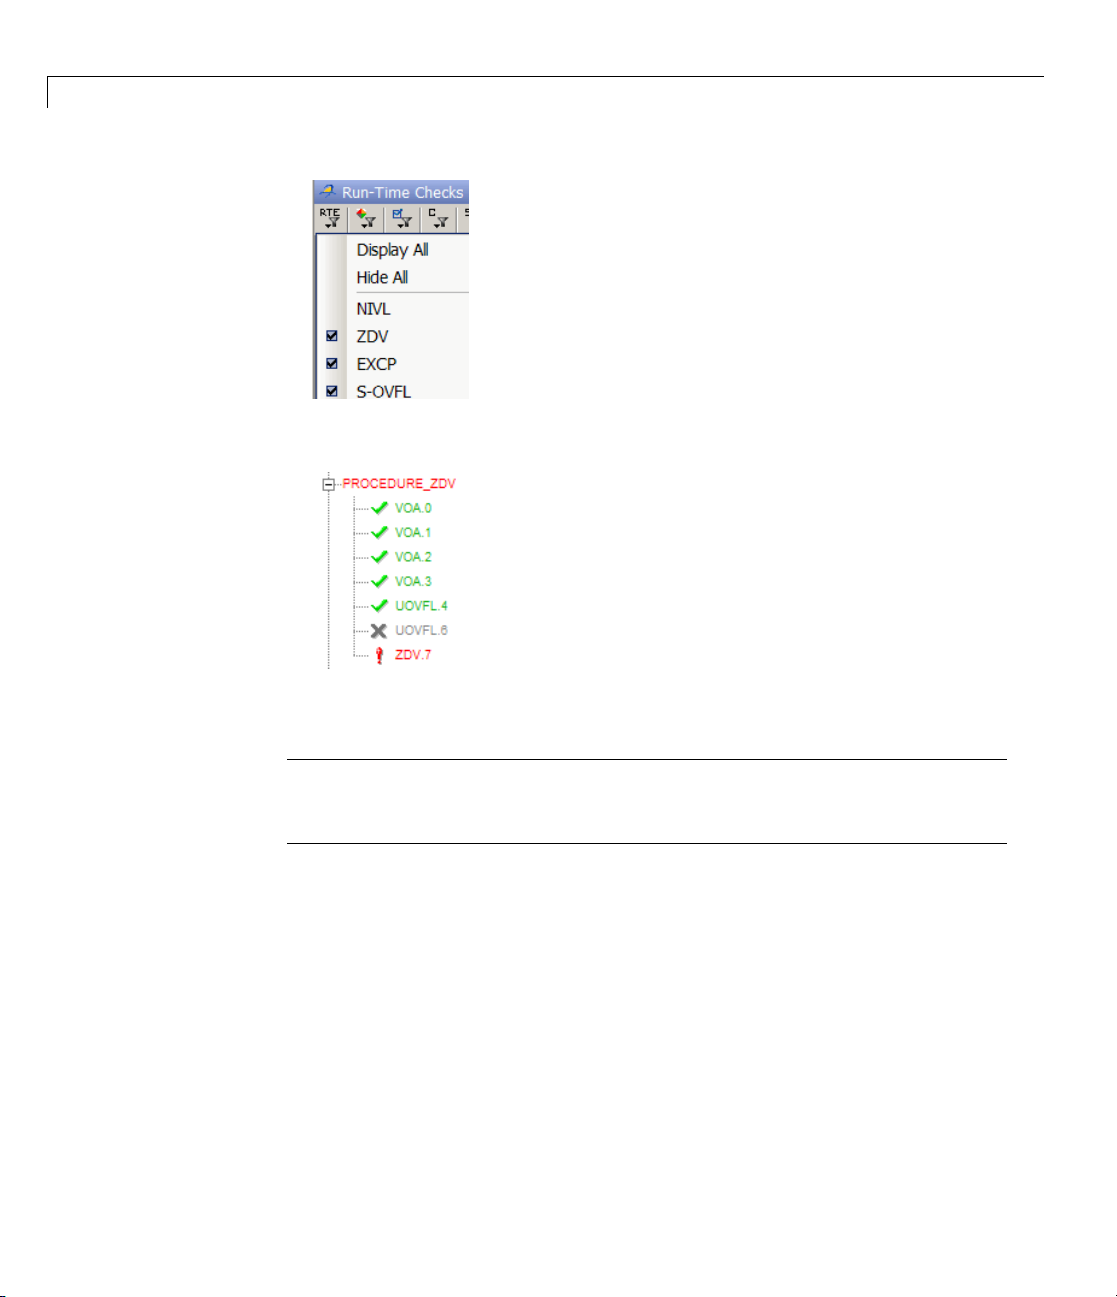
You can us e an RTE filter to hide a given check category, such as N IVL . When
a filter is enabled, you do not see that check category.
To filter NIVL checks:
1 Expand PROCEDURE_ZDV.
PROCEDURE_ZDV has eight checks: six are green, one is gray, and one is red.
2 Click the RTE filter icon .
3 Clear the NIVL check box.
4-17
Page 78
4 Reviewing Verification Results
The software hides the NIVL check for PROCEDURE_ZDV.
4-18
4 Select the NIVL option to redisplay th e NIVL check.
Note When you filter a check category, red checks of that category are not
hidden. For example, if you filter ZDV checks, you still see
PROCEDURE_ZDV.
ZDV.7 under
Example: Filtering Green Checks
You can use a color filter to hide checks of a certain color.
To filter green checks:
1 Expand PROCEDURE_ZDV.
PROCEDURE_ZDV has eight checks: six are green, one is gray, and one is red.
Page 79
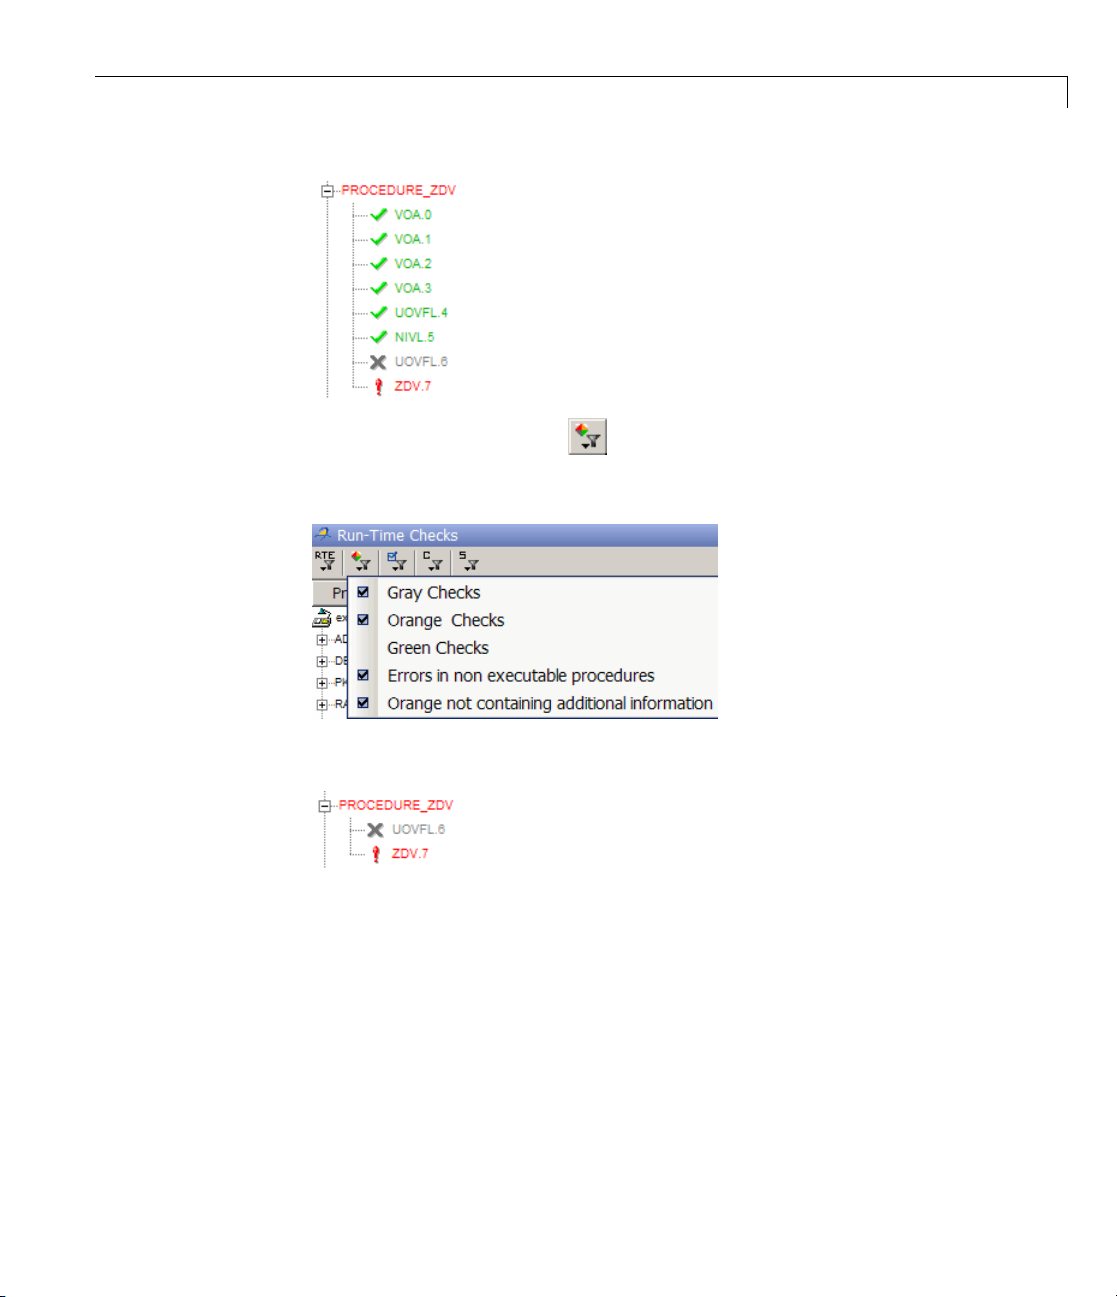
Reviewing Results
2 Click the Col
3 Clear Green Checks.
or filter icon
The software hides the green checks.
.
4-19
Page 80

4 Reviewing Verification Results
Reviewing Results in As sistant Mod e
In this section...
“WhatIsAssistantMode?”onpage4-20
“Switching to Assistant Mode” on page 4-20
“Selecting the Methodology and Criterion Level” on page 4-21
“Exploring Methodology for Ada” on page 4-21
“Reviewing Checks” on page 4-23
“Defining a Custom Methodology” on page 4-24
What Is Assistant Mode?
In assistant mode, Polyspace software chooses the checks for you to review
and the order in which you review them. Polyspace software presents checks
toyouinthisorder:
4-20
1 All red checks
2 All blocks of gray checks (the first check in each unreachable function)
3 Orang
You wi
Metho
Swit
To s
• Mov
e checks according to the selected methodology and criterion level
ll learn about methodologies a nd criterion levels in “Selecting the
dology and Criterion Level” on page 4-21.
ching to Assistant Mode
witch to assistant mode:
etheAssistantsliderto1 in the Run-Time Checks toolbar.
The toolbar displays controls specific to assistant mode.
Page 81

Reviewing Results in Assistant M ode
The controls for this mode include:
• A menu for selecting the review methodology for orange checks.
• A slider for selecting the criterion level within that methodology.
• Arrows for navigating through the reviews.
Selecting the Methodology and Criterion Level
A methodology is a named configuration that defines the number of orange
checks, by category, that you review in assistant mode. Each methodology
has three criterion levels. Each level specifies the number of orange checks
for a given category. The levels correspond to different development phases
that have different review requirements. To select the methodology and level
for this tutorial:
1 Select Methodology for Ada from the methodology menu.
2 If the level slider is not already at 1, move the slider to level 1.
Exploring Methodology for Ada
In this part of the tutorial, you exam ine the configuration for Methodology
for Ada.Tobegin:
1 Select Options > Preferences.
The PolySpace Preferences dialog box appears.
2 Select the Assistant configuration tab.
The configuration for Methodology for Ada appears.
4-21
Page 82

4 Reviewing Verification Results
On the right side of the dialog box, a table shows the number of orange
checks that you review for a given criterion and check category.
For example, the table specifies that you review ten orange ZDV checks
when you select criterion 1. The num ber of checks increases as you move
from criterion 1 to criterion 3, reflecting the changing review requirements
as you move through the development process.
4-22
In the lower-left part of the dialog box, the section Review threshold
criterion contains text that appears in the tooltip for the Assistant slider
on the Run-Time Checks toolbar.
For the configuration Methodology for Ada, the criterion names are:
Page 83

Reviewing Results in Assistant M ode
Criterion
1
2
3
Name in the Tooltip
Fresh code
Unit tested
Code review
These names correspond to phases of the development process.
3 Click OK to close the dialog box.
Reviewing Checks
In assistant mode, you review checks in the order in which Polyspace software
presents them:
1 All red checks
2 All blocks of gray checks (the first check in each unreachable function)
3 Orange checks according to the selected methodology and criterion level
Earlier in this tutorial, you selected Methodology for Ada, criterion l. In this
part of the tutorial, you continue to review the checks for
this methodology and criterion level. To navigate through these checks:
example.adb using
1 Click the forward arrow .
oftware displays
The s
ZDV.7 as the current check.
4-23
Page 84

4 Reviewing Verification Results
2 Continue to click the forward arrow until you have reviewed all the checks.
The source code view displays the source for this check. In Review Details,
you see information about this check and you can review this check.
Note You can display the calling sequence and track review progress as
you did in “Reviewing Results” on page 4-9.
After the last check, a dialog box appears asking if you want to start ag ai n
from the first check.
4-24
3 Click No.
Defining a Custom Methodology
You cannot change the predefined methodologies, s uch as Methodology for
Ada, but you can define your own methodology. In this part of the tutorial,
you learn how to create and use your ow n methodology.
The methodology that you create is the Methodology for Ada with one change:
1 Select Option > Preferences.
The PolySpace Preferences dialog box opens.
2 Select the Assistant configuration tab.
3 Select Add a set from the Configuration set drop-down list.
Page 85

Reviewing Results in Assistant M ode
4 In the Create a new set dialog box, enter My methodology and click
Enter to close the dialog box.
5 Under the Criterion 1 column, enter the number 1 next to ZDV .Thistells
Polyspace software to select up to one orange ZDV for review.
6 Click OK to save the methodology and close the dialog box.
To use
1 Select My meth odo logy from the methodology menu.
2 If the level slider is not already at 1, move the slider to level 1.
3 Click the forward arrow to review the checks.
My methodo logy :
With this m
is the oran
ge ZDV.5 in
ethodology at criterion 1, the only orange check you review
RECURSION.
4-25
Page 86
4 Reviewing Verification Results
Generating Reports of Verification Results
In this section...
“PolySpace Report Generator Overview ” on page 4-26
“Generating Report for example.adb” on page 4-27
PolySpace Report Generator Overview
The PolySpace Report Generator allows you to generate reports about your
verification results, using p redefined report templates.
The PolySpace Report Generator provides the following report templates:
• Coding Rules Report – Provides information about compliance with
MISRA-C Coding Rules, as well as PolySpace configuration settings for
the verification.
• Developer Report – Provides information useful to developers, including
summary results, detailed lists of red, orange, and gray checks, and
PolySpace configuration settings for the verification.
4-26
• Developer with Green Checks Report – Provides the same content as
the Developer Report, but also includes a detailed list of green checks.
• Quality Report – Provides information useful to quality engineers,
including summary results, statistics about the code, graphs showing
distributions of checks per file, and PolySpace configuration settings for
the verification.
The PolySpace Report Generator allows you to generate verification reports in
the following formats:
• HTML
• PDF
• RTF
• Microsoft W ord
• XML
Page 87

Generating Repo rts of Verification Results
Note Microsoft Word format is not available on UNIX platforms. RTF format
is used instead.
Generating Repor t for example.adb
You can generate rep orts for any verification results using the Polyspace
Report Generator.
To generate a verification report:
1 Open your verification results.
2 Select Run > Run Report > Run Report.
The Run Report dialog box opens.
3 In the Select Report Template section, select Developer.rpt.
4 In O
5 Select, for example, RTF from the Output format drop-down list.
utput folder, specify a folder, for example,
yspace_project\Verification_(1)\Result_(1)\PolySpace-Doc
pol
.
4-27
Page 88

4 Reviewing Verification Results
6 Click Run Report.
The software creates the specified report. When report generation is
complete, the report opens.
4-28
Page 89

Index
IndexA
active project
definition 3-15
setting 3-15
analysis options 2-11
ANSI compliance 3-6
assistant mode
criterion 4-21
custom methodology 4-24
methodology 4-21
methodology for Ada 4-21
overview 4-20
reviewing checks 4-23
selection 4-20
use 4-20 4-23
C
call graph 4-12
call tree view 4-4
calling sequence 4-12
cfg.Seeconfiguration file
client 1-5 3-2
installation 1-9
verification on 3-21
coding review progress view 4-4 4-12
Coding Rules perspective 1-5
color-coding of verific a tion results 1-2 to 1-3 4-6
compile log
Project Manager 3-7 3-22
Spooler 3-8
compile phase 3-6
compliance
ANSI 3-6
configuration file
definition 2-3
custom methodology
definition 4-24
D
desktop file
definition 2-3
division by zero
example 4-15
downloading
results 3-11
dsk.Seedesktop file
E
expert mode
filters 4-16
overview 4-9
use 4-9
F
files
includes 2-9
source 2-9
filters 4-16
folders
includes 2-9
sources 2-9
H
hardware requirements 3-12
help
accessing 1-13
I
installation
PolySpace Client for Ada 1-9
PolySpace products 1-9
PolySpace Server for Ada 1-9
Index-1
Page 90

Index
L
licenses
obtaining 1-9
logs
compile
Project Manager 3-7 3-22
Spooler 3-8
full
Project Manager 3-7 3-22
Spooler 3-8
stats
Project Manager 3-7 3-22
Spooler 3-8
viewing
Project Manager 3-7 3-22
Spooler 3-8
M
methodology for Ada 4-21
P
PolySpace Client for Ada
installation 1-9
license 1-9
PolySpace In One Click
active project 3-15
overview 3-15
sending files to PolyS pace software 3-17
starting verification 3-17
use 3-15
Polyspace products for Ada
components 1-5
overview 1-2
user interface 1-5
PolySpace products for Ada
installation 1-9
licenses 1-9
overview 1-2
related products 1-14
workflow 1-10
Polyspace Queue Manager Interface.SeeSpooler
PolySpace Server for Ada
installation 1-9
license 1-9
Polyspace verification environment
opening 2-4
preferences
assistant configuration 4-21
Project M anager perspective
default server mode 3-6
server detection 3-13
procedural entities view 4-4
product overview 1-2
progress bar
Project Manager window 3-7 3-22
project
creation 2-3 2-7
definition 2-3
file types
configuration file 2-3
desktop file 2-3
folders
includes 2-3
results 2-3
sources 2-3
opening 3-4
saving 2-13
Project Manager
monitoring verification progress 3-7 3-22
starting verification on client 3-21
starting verification on server 3-6
viewing logs 3-7 3-22
window 2-4
overview 2-4
progress bar 3-7 3-22
Project M anager perspective 1-5
stopping 3-23
Index-2
Page 91

Index
R
related products 1-14
PolySpace products for linking to
Models 1-14
PolySpace products for verifying C code 1-14
PolySpace products for verifying C++
code 1-14
reports
generation 4-26
results
downloading from server 3-11
opening 4-3
report generation 4-26
reviewing 4-1
rte view.Seeprocedural entities view
Run-time checks perspective
call tree view 4-4
coding review progress view 4-4
procedural entities view 4-4
selected check view 4-4
source code view 4-4
variables view 4-4
Run-Time Checks perspective 1-5
opening 4-3
window
overview 4-4
S
selected check view 4-4
server 1-5 3-2
detection 3-13
information in preferences 3-13
installation 1-9 3-13
verification on 3-6
source code view 4-4
Spooler 1-5
monitoring verification progress 3-8
removing verification from queue 3-11
use 3-8
viewing log 3-8
T
troubleshooting failed verification 3-12
U
unreachable code
example 4-13
V
variables view 4-4
verification
Ada code 1-2
Ccode 1-14
C++ code 1-14
client 3-2
compile phase 3-6
failed 3-12
monitoring progress
Project Manager 3-7 3-22
Spooler 3-8
phases 3-6
results
color-coding 1-2 to 1-3
opening 4-3
report generation 4-26
reviewing 4-1
running 3-2
running on client 3-21
running on server 3-6
starting
from Polyspace In One Click 3-2
from PolySpace In O ne Click 3-17
from Project Manager 3-2 3-21
from Project Manager perspective 3-6
stopping 3-24
troubleshooting 3-12
Index-3
Page 92

Index
W
workflow
basic 1-10
in this guide 1-11
Index-4
 Loading...