

Page 1

Polyspace
®
8
Installation Guide
Page 2

How to Contact MathWorks
www.mathworks.
comp.soft-sys.matlab Newsgroup
www.mathworks.com/contact_TS.html T echnical Support
suggest@mathworks.com Product enhancement suggestions
bugs@mathwo
doc@mathworks.com Documentation error reports
service@mathworks.com Order status, license renewals, passcodes
info@mathwo
com
rks.com
rks.com
Web
Bug reports
Sales, prici
ng, and general information
508-647-7000 (Phone)
508-647-7001 (Fax)
The MathWorks, Inc.
3 Apple Hill Drive
Natick, MA 01760-2098
For contact information about worldwide offices, see the MathWorks Web site.
®
Polyspace
© COPYRIGHT 2007–2010 by The MathWorks, Inc.
The software desc ribed in this document is furnished under a license agreeme nt. The software may be used
or copied only under the terms of the license agreement. No part of this manual may be photocopied or
reproduced in any form without prior written consent from The MathWorks, Inc.
FEDERAL ACQUISITION: This provision applies to all acquisitions of the Program and Documentation
by, for, or through the federal government of the United States. By accepting delivery of the Program
or Docum entation, the government hereby agrees that this software or documentation qualifies as
commercial computer software or commercial computer software documentation as such terms are used
or defined in FAR 12.212, DFARS Part 227.72, and DFARS 252.227-7014. Accordingly, the terms and
conditions of this Agreement and only those rights specified in this Agreement, shall pertain to and govern
theuse,modification,reproduction,release,performance,display,anddisclosureoftheProgramand
Documentation by the federal government (or other entity acquiring for or through the federal governme nt)
and shall supersede any conflicti ng contractual terms or conditions. If this License fails to meet the
government’s needs or is inconsistent in any respect with federal procurement law, the government agrees
to return the Program and Documentation, unused , to The MathWorks, Inc.
Trademarks
MATLAB and Simulink are registered trademarks of The M athWorks, Inc. See
www.mathworks.com/trademarks for a list of additional trademarks. Other product or brand
names may be trademarks or registered trademarks of their respective holders.
Patents
MathWorks products are protected by one or more U.S. patents. Please see
www.mathworks.com/patents for more information.
Installation Guide
Page 3

Revision History
March 2008 First printing New for Version 5.1 (Release 2008a)
October 2008 Second printing Revised for Version 6.0 (Release 2008b)
March 2009 Third printing Revised for Version 7.0 (Release 2009a)
September 2009 Fourth printing Revised for Version 7.1 (Release 2009b)
March 2010 Online only Revised for Version 7.2 (Release 2010a)
September 2010 Online only Revised for Version 8.0 (Release 2010b)
Page 4

Page 5

Before You Begin
1
Hardware and Software Requirements .............. 1-2
Polyspace Product Requirements
Polyspace Plug-In Requiremen ts
Polyspace Software License Requiremen ts
UNIX and Linux Installation Requirements
Polyspace Documentation Requirements
..................... 1-2
..................... 1-3
............. 1-5
............ 1-6
.............. 1-6
Contents
DVD Contents
Polyspace Installation Options
Polyspace Software Installation Folders
..................................... 1-7
...................... 1-10
............. 1-12
Installing Polyspace Software
2
Overview ......................................... 2-2
Polyspace Products You Can Install
Polyspace Client Software
Polyspace Server Software
Installing the Polyspace Software
Before Starting the Installation
Installing the Software
Configuring the Polyspace Server Software
Activating Polyspace Software
PolyspaceSoftwareIcons
.......................... 2-2
.......................... 2-3
............................. 2-4
........................... 2-25
.................. 2-2
................... 2-4
...................... 2-4
............ 2-10
....................... 2-14
Launching Installation from Command Line
Installing Software on a Linux or UNIX Platform
......... 2-26
....... 2-26
v
Page 6

Installing Software in Silent Mode ................... 2-26
Configuring Polyspace Software
Configuring Polyspace Client Software
Configuring Polyspace Server Software
Configuring Polyspace Metrics Web Interface
Troubleshooting Common Errors
.................... 2-28
................ 2-28
................ 2-29
.......... 2-37
..................... 2-39
Installing Polyspace Model Link Products
3
Installing Polyspace Model Link Products ........... 3-2
Upgrading MATLAB Software
Troubleshooting Polyspace Model Link SL
Installation
MATLAB Software Is Not Installed Locally
No Write Access to MATLAB Product Root
..................................... 3-5
...................... 3-4
............ 3-5
............. 3-6
vi Contents
Installing Polyspace UML Link RH
4
Installing Polyspace UML Link RH Product .......... 4-2
Upgrading Polyspace Software
5
Upgrading Polyspace Client Products ............... 5-2
Upgrading Polyspace Server Products
............... 5-4
Page 7

Overview ........................................ 5-4
Upgrading an Active Server
Upgrading an Inactive Server
......................... 5-4
....................... 5-4
Installing Polyspace C++ Add-In for Visual
6
Installing the Polyspace C++ Add-In for Visual
Studio
.......................................... 6-2
Installing Polyspace Plug-In for Eclipse IDE
7
Installing the Polyspace Plug-In for Eclipse IDE ...... 7-2
Studio
Uninstalling Polyspace Products
8
Uninstalling on Windows Platforms ................. 8-2
Should I Uninstall Previous Releases Before Installing?
Uninstalling the Polyspace Software
Uninstalling Shared Components
Uninstalling on Linux or UNIX Platforms
Should I Uninstall Previous Releases Before Installing?
Uninstalling the Polyspace Software
Uninstalling Shared Components
.................. 8-2
.................... 8-3
............ 8-4
.................. 8-4
.................... 8-4
.. 8-2
.. 8-4
vii
Page 8

Polyspace License Installation
9
Polyspace License Overview ........................ 9-2
Overview
Polyspace Licensing Options
Obtaining a License File
........................................ 9-2
........................ 9-2
............................ 9-5
Common Licensing Questions
Do I need a FLEXnet Server to Use an Indiv idual
License?
How Do I Identify Designated Computer and Concurrent
Licenses?
What If I Have Other MathWorks Products Installed?
What If I Have an Old Polyspace FLEXnet License Server?
....................................... 9-8
...................................... 9-8
...................... 9-8
............................................... 9-9
Configuring Designated Computer Licenses
Overview
Installing License Files
DCLicenseFileFormat
Configuring Concurrent Licenses
Introduction to FLEXnet Licensing
Installing FLEXnet M anager
Configuring a Concurrent License
Installing Licenses on an Existing FLEXnet Server
Checking Installed Licenses
License Error Messages
Overview
Error -15, the FLEXnet server is unreachable
Error -5, the Polyspace feature is not available
Error -21, license file does not support this version
Error -10, the license date has expired
........................................ 9-10
............................. 9-10
............................ 9-11
................... 9-12
................... 9-12
........................ 9-17
.................... 9-24
........................ 9-29
............................ 9-30
........................................ 9-30
................ 9-31
......... 9-10
...... 9-28
.......... 9-30
......... 9-31
...... 9-31
... 9-8
viii Contents
Page 9

Index
ix
Page 10

x Contents
Page 11

Before You Begin
• “Hardware and Software Requirements” on page 1-2
• “DVD Contents” on page 1-7
• “Polyspace Installation Options” on page 1-10
• “Polyspace Software Installation Folders” on page 1-12
1
Page 12
1 Before You Begin
Hardware and Software Requirements
In this section...
“Polyspace Product Requirements” on page 1-2
“Polyspace Plug-In Requirements” on page 1-3
“Polyspace Software License Requirements” on page 1-5
“UNIX and Linux Installation Requirements” on p age 1-6
“Polyspace Documentation Requirements” on page 1-6
Polyspace Product Requirements
Before you install Polyspace®software on a client or server workstation, your
hardware and software must meet the following requirements.
Requirement
RAM
Processor
Operating
system
32-Bit and 64-Bit Client 32-Bit and 64-Bit Server
1024 MB minimum
2 GB ECC RAM recommended
Any Intel or AMD x86 processor supporting SSE2 instruction set
®
SPARC
Linux:
• Red Hat Enterprise Linux®5.x
• OpenSuSE 11.1
• Debian 5.x
• Ubuntu 8.04, 8.10, 9.04, and 9.10
Windows:
• Windows
Windows XP (SP3)
• Windows Server
and ultraSPARC
1
®
7
®
2003 (R2 SP2)
2GBminimum
4 GB ECC RAM recommended
1-2
Page 13
Hardware and Software R equirements
Requirement
32-Bit and 64-Bit Client 32-Bit and 64-Bit Server
• Windows Vista™ (SP1 or SP2)
• Windows Server 2008 (SP2 or R2) and 2008)
For Windows systems, you must also install Microsoft
Disk space
2GB
Swap space At least twice the RAM size.
Multi-core
support
Polyspace verification benefits from using multi-core processors. Th e
recommended hardware is 4 core processors with 2 GB of RAM per core.
Note To ins
the 32-bi
which req
Polyspa
Before y
softwa
tall Polyspace software on a 64-bit Linux machine, you must have
t libraries installed. The Polyspace installer uses 32-bit binaries,
uire these libraries.
ce Plug-In Requirements
ou install Polyspace link products or plug-ins, your hardware and
re must meet the following requirements.
®
.NET Framework 3.5
Produc
Polys
t
pace Model Link™
SL
yspace Model Link TL
Pol
1. The listed distributions are those Linux distributions that MathWorks®products have
been validated against. It is likely that other distributions with kernel version 2.6 or later
nd glibc version 2.5 or later can successfully run MathWorks
a
will be in a limited position to provide technical support for those distributions.
Plug-In Software
MATLAB
®
Real-Time Workshop
Embedded Coder™
MATLAB
TargetLink
®
(dSPACE®)
Releas
e
Operating
System
R2008a
Windo
ws
or later
®
8a
R200
ter
or la
R2008a
Windows
dows
Win
or later
0
3.
Windows
®
products, but MathWorks
1-3
Page 14

1 Before You Begin
Polyspace UML Link™
RH
Polyspace C++ add-in for
Visual Studio
®
(C++ only)
Polyspace plug-in for
Eclipse IDE
Excel Macros
Rhapsody
®
(Telelogic®)
Microsoft Visual Studio
7.2, 7.3, and 7.4 Windows
7.1 (SP1)
.NET 2003
Microsoft Visual Studio
8.0
2005
Eclipse IDE 3.4 and 3.5
Java
Microsoft
®
Excel
®
1.6
2003 and 2007 Windows
Windows
Windows
Linux, Solaris™,
Windows
1-4
Page 15

Hardware and Software R equirements
Polyspace Software License Requirements
Polyspace software provides two licensing options that, when combined with
the supported installation types, provide flexibility in redeploying product
licenses to different users.
Polyspace software provides the follo wing license options.
License
Protection Description
Option
Designated
Computer
(Individual)
MAC address or serial
disk number of the
designated computer
DC licenses are only for
Polyspace client software. DC
licenses are appropriate for
users who want to install and
administer the client software
themselves.
A DC license is provided in a
text file.
Concurrent MAC address or serial
disk number of the
FLEXnet
®
server
Concurrent licenses are for
both Polyspace client and
server software. Concurrent
licenses are appropriate for
organizations that use license
keys to control software access.
Concurrent licenses require a
FLEXnet license manager.
Note For more information, see Chapter 9, “Polyspace License Installation”.
This chapter describes the licensing options in detail, and how to install the
FLEXnet license manager.
1-5
Page 16

1 Before You Begin
UNIX and Linux In
stallation Requirements
Configuration
Ensure that the
/tmp folder contains at least 10 MB of free space.
Environment Settings
• User path must include PolySpace_Install/bin (to launch the product
without using the absolute path).
• Place the Polyspace license file in
Polyspace_Common/licenses/license.dat.
• Polyspace Graphical User Interfaces require CDE window manager on
Solaris Open Software environment and Gnome on Linux. Behavior on
other Window managers is unpredictable.
For more information about installation folders, see “Polyspace Software
Installation Folders” on page 1-12.
Access Rights
You must have Read and Execution access rights for all Polyspace software
installation.
1-6
Polyspace Documentation Requirements
The Polyspace documentation requires Adobe®Acrobat®Reader. If you
do not have Acro bat Reader on your system, you can download it from
www.acrobat.com.
Note The Polyspace documentation requires Acrobat Reader release 5.0
or later.
Page 17

DVD Contents
Depending on the products you purchase, the Polyspace DVD (or downloaded
installer file) allows you to install one or more of the following Polyspace
products:
DVD Contents
• Polyspace
®
Client™ for C/C++ — Verify and review C and C++ source
code.
• Polyspace
®
Server™ for C/C++ — Verify C and C++ source code on a
dedicated server.
• Polyspace Client for Ada — Verify and review Ada83 and Ada95 source
code.
• Polyspace Server for Ada — Verify Ada83 and Ada95 source code on a
dedicated server.
• Polyspace Model Link SL — Verify and review C source code generated
using Real-Time Workshop Embedded Codersoftware from a Simulink
®
model.
• Polyspace Model Link TL — Verify and review C source code generated
using TargetLink code generator from a Simulink model.
• Polyspace UML Link RH — Verify and review C, C++, and Ada source
code generated from Rhapsody software.
Note The difference between Polyspace S erver and Polyspace Client products
is described in “Polyspace Installation Options” on page 1-10.
The DVD (or downloaded installer file) contains six subfolders and program
files.
1-7
Page 18

1 Before You Begin
1-8
The important subfolders and programs are:
•
Setup.exe – Runs the Graphical Installation Wizard on a Windows
platform.
•
install.sh – Runs the shell script Installation Wizard on a UNIX
platform.
The
-console option enables you to execute the command in a console
mode.
The
-h option gives you command options.
version.txt – Contains the complete version number of the Polyspace
•
product that has been burned on the DVD.
•
Addons folder – Contains useful configuration tools, available for Windows
and UNIX platforms.
®
Page 19

DVD Contents
• Docs folder – Contains all documentation for Polyspace products, in PDF
format.
•
Data folder – Contains Polyspace data.
Examples folder – Contains sample verification results from Polyspace tools
•
(using Polyspace Client, Server, and Model Link for each language). These
results can be displayed with The Polyspace Verification Environment,
available with any of the Polyspace products.
Note Refer to the appropriate getting started guide for a quick d escription of
the Polyspace products for your language:
• Polyspace Products for Ada Getting Started Guide
• Polyspace Products for C Getting Started Guide
• Polyspace Products for C++ Getting Started Guide
1-9
Page 20

1 Before You Begin
Polyspace Installation Options
You can install the following prod ucts from the Polyspace installation DVD :
• Polyspace Client for C/C++
• Polyspace Server for C/C++
or
• Polyspace Client for Ada
• Polyspace Server for Ada
A Client installation allows you to perform local verifica t ion, rev iew previously
completed code verifications, and send new verification requests to a dedicated
server.Thisoptionisappropriatefordeveloper workstations. The installation
requires approximately 300 to 50 0 MB of disk space. You must have local
administrator rights and access to the registry to complete the installation.
A Server installation allows a machine to receive verifications coming from
clients. This option is appropriate for machines dedicated to Polyspace
software. The installation requires approximately 300 to 500 MB of disk
space. You m ust use a local user login with local administrator rights to
complete the installation.
1-10
A Polyspace Server can receive Polyspace verifica tion requests from any
number of Polyspace Clients.
Page 21

Clients
QM
Polyspace®Client/Server Architecture
Polyspace terminology is described in the following tabl e.
Polyspace®Installation Options
CPUs
Term
Polyspace Client
Polyspace Server Computer that manages code verifications from a
Queue Manager
(QM)
CPU A Polyspace Server that is dedicated to running code
Description
Developer workstation that requests Polyspace code
verifications to be performed on servers. You can install
any number of client systems.
number of clients. You can configure a Server as either a
Queue Manager or a CPU.
A Polyspace Server that manages code verifications
coming from a number of clients. The Queue Manager
can run verifications itself, or simply dispatch
verification jobs to other CPUs. Typically, there is only
one QM system.
verifications. A CPU receives verification jobs from the
QMandrunsthem. Ittypicallydoesnothingbutperform
verifications. You can install any number of CPU s.
1-11
Page 22

1 Before You Begin
Polyspace Software Installation Folders
Polyspacesoftwareisinstalledinthreefolders.
• The principal folder contains the kernel of the installed Polyspace release.
The default f o lder is
language can be either CandCPP or Ada.
• A common components folder contains the shared components available for
any language, such as the Java run time library, the Polyspace Verification
Environment, the Remote Launcher (RL), and any add-ins (such as the
Polyspace C++ add-in for Visual Studio and the P ol yspace In O ne Click
Toolbar (POC)). The default folder is
C:\PolySpace\PolySpaceForlanguage,where
C:\PolySpace\PolySpace_Common.
• A folder contains the Remote Launcher configuration file
The folder is
In this document, these foldersare referred to as follows:
•
PolySpace_Install refers to C:\PolySpace\PolySpaceForLanguage
(/usr/local/PolySpace/PolySpaceForLanguage for UNIX systems),
PolySpace_Common refers to C:\PolySpace\PolySpace_Common
•
(/usr/local/PolySpace/PolySpace_Common for UNIX systems).
PolySpaceRLDatas refers to C:\PolySpace\PolySpace_RLDatas
•
(/var/PolySpace for UNIX systems).
C:\PolySpace\PolySpace_RLDatas.
polyspace.conf.
1-12
Page 23

Installing Polyspace
Software
• “Overview” on page 2-2
• “Installing the Polyspace Software” on page 2-4
• “Launching Installation from Command Line” on page 2-26
• “Configuring Polyspace Software” on page 2-28
2
Page 24
2 Installing Polyspace
Overview
®
Software
In this section...
“Polyspace Products You Can Install” on page 2-2
“Polyspace Client Software” on page 2-2
“Polyspace Server Software” on page 2-3
Polyspace Products You Can Install
This chapter describes how to ins tall and configure the following Polyspace
products:
• Polyspace Client for Ada
• Polyspace Server for Ada
• Polyspace Client for C/C++
• Polyspace Server for C/C++
2-2
Polyspace Client Software
Polyspace Client software is the management and visualization tool of
Polyspace products. You use it to submit jobs for execution by Polyspace
Server, and to review verification results. The Polyspace Client software
includes the following features:
• Polyspace Verification Environment (including the Project Manager
perspective, Coding Rules perspective, and Run-Time Checks perspective)
• Data Range Specifications (DRS)
• Coding Rules Checker (MISRA C
• Report Generator
• Automatic Orange Tester
Install the Polys pace Client software on developer workstations that will send
verification jobs to the Polyspace Server.
The installation requires approximately 300 to 500 MB of disk space.
®
, MISRA C++, or JSF C++)
Page 25

Polyspace Ser ver Software
Polyspace Server software is the computational engine of Polyspace products.
You use it to run jobs posted by Polyspace Clients, and to manage multiple
servers and queues. The Polys pace Server software includes the following
features:
• Remote Launcher
• Polyspace Queue Manager (Spooler)
• Report Generator
• HTML Generator.
Install the Polyspace Server software on machines that are dedicated to
receiving verifications from clients (the Queue Manager and CPUs).
The installation requires approximately 300 to 500 MB of disk space.
Overview
2-3
Page 26

2 Installing Polyspace
®
Software
Installing the Polyspace Software
In this section...
“Before Starting the Installation” on page 2-4
“Installing the Software” on page 2-4
“Configuring the Polyspace Server Software” on page 2-10
“Activating Polyspace Software” on page 2 -14
“Polyspace Software Icons” on page 2-25
Before Starting the Installation
Before starting the installation process, ensure that you have the fo llow ing:
• The Polyspace DVD (or downloaded installer file).
• Your e-mail address and password for your MathWorks account.
2-4
• Alocaluserloginwithadministrator rights.
• At least 2 GB of free disk space.
Installing the Software
Polyspace software provides a graphical installa t ion wizard that guides you
through the installation process. This wizard is available on Solaris, Linux,
or Windows platforms. The following sections describe a complete Windows
installation.
To install the Polyspace software:
1 Insert the Polyspace DVD into your DVD drive, or double-click the installer
file you downloaded from the MathWorks Web site.
The Polyspace autorun starts.
Page 27

Installing the Polyspace®Software
Note If
the
2 Click
you do not see the autorun window after a few minutes, launch
set
up.exe
program on the DVD.
Install PolySpace for Windows.
The installation wizard runs, preparing Polyspace installer. This process
can take a few minutes.
2-5
Page 28
2 Installing Polyspace
®
Software
2-6
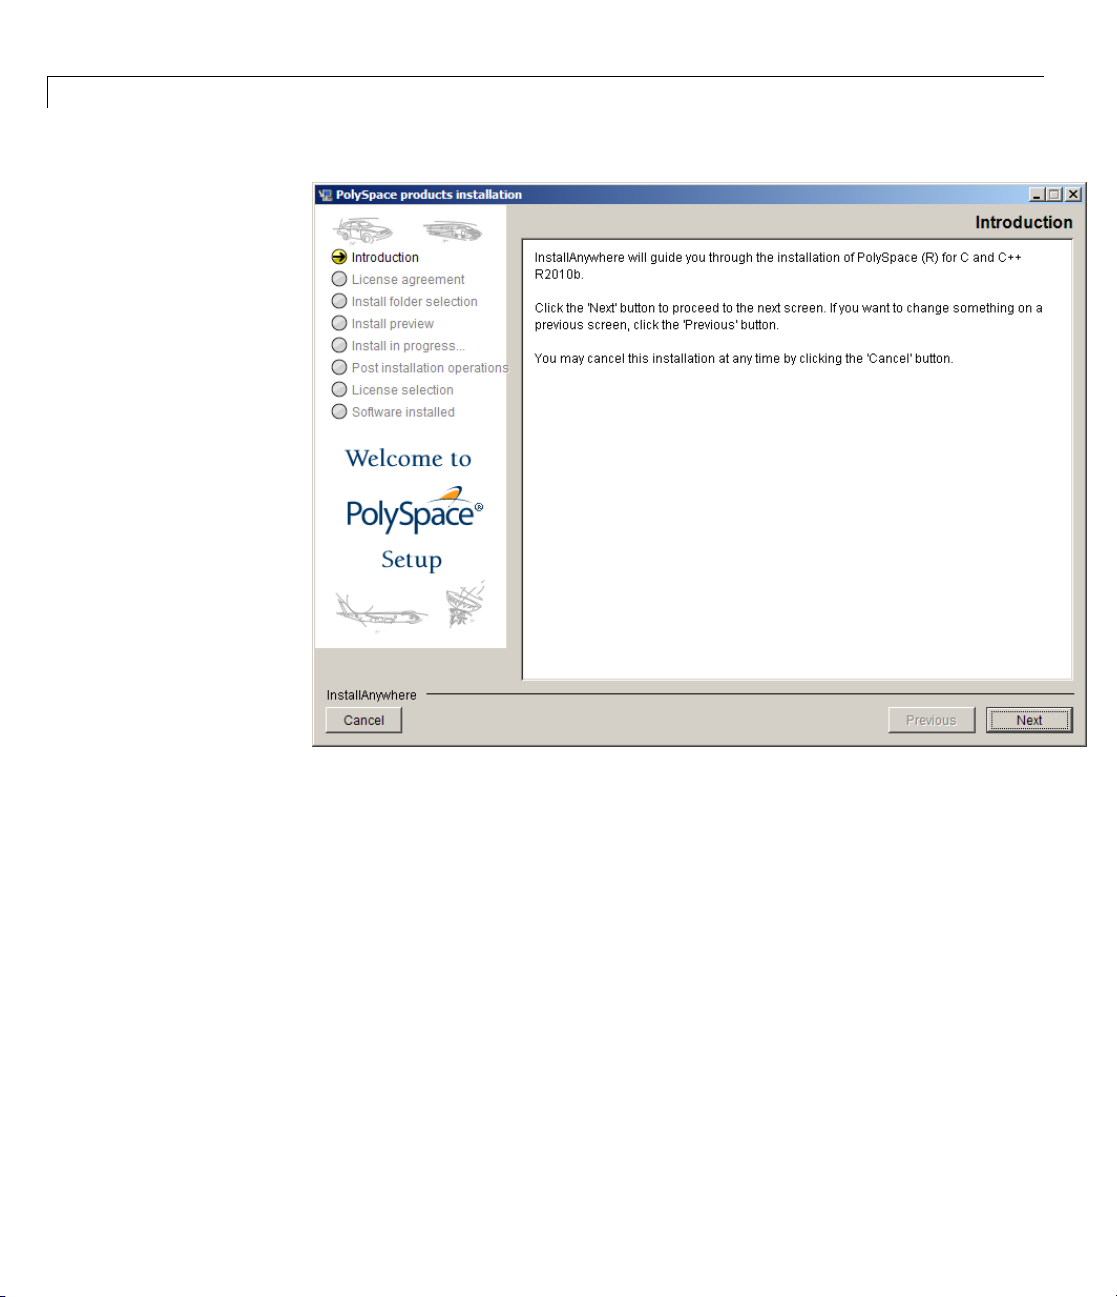
3 When the Polyspace products installation window opens, click Next.
4 In the Software License agreement window, select Iacceptthetermsof
the license agreement,thenclickNext.
Page 29

Installing the Polyspace®Software
5 In the Install folder selection screen, select the folders in which to install
the Polyspace software and shared components.
The default folder for the product software is
C:\PolySpace\PolySpaceForlanguage where language can be either
CandCPP or Ada.
The default folder for shared components is
C:\PolySpace\PolySpace_Common.
6 Click Next.
7 (Optional) If you are installing Model Link products, select the MATLAB
installation you w an t to use, t h en click Next.
(Optional) If you are installing the Polyspace plugin for Eclipse, specify the
Eclipse installation folder, then click Next.
2-7
Page 30

2 Installing Polyspace
®
Software
2-8
8 In the Install preview window, click Install.
• Polyspace shared components are installed and configured (this may
take a few minutes).
• When shared component installation is complete, the Polyspace product
software is installed (this may take a few minutes).
Page 31

Installing the Polyspace®Software
9 In the Post Installation op erations window, do o ne of the following:
• If you are installing a Polyspace Server,selectSetup this machine as
a PolySpace Server,thenclickNext.
The Software installed window and the Polyspace Remote Launcher
Manager dialog box open. For informationonconfiguringtheRemote
Launcher, refer to “Configuring the Polyspace Server Software” on page
2-10.
• If you are installing a P olyspace Client,clickNext.
The Software installed window opens.
2-9
Page 32

2 Installing Polyspace
®
Software
2-10
10 Click Done.
The Polyspace Software Activation dialog box opens.
Product installation is complete, but you must activate the software. For
more information, see “Activating Polyspace Software” on page 2-14.
Configuring the Polyspace Server Software
When you finish installing the Polyspace Server software, the Polyspace
Remote Launcher Manager dialog box opens . You must configure the port
number for the Polyspace Server to complete the software installation.
Configuring the port number establishes communication between the
PolyspaceServerandPolyspaceClients.
Page 33
Installing the Polyspace®Software
To complete the server installation:
1 Specify the port number on which the server com municate s with Clients.
The default port number is
12427.
2-11
Page 34

2 Installing Polyspace
®
Software
Note The port number must be the same as the port number for all
Polyspace Clients.
2 To install the s erver as a service on a Windows machine (or a daemon on a
Linux or Solaris machine), select Install server as service (daemon),
then enter the user name and password to start the server as a service
or daemon.
Note Password i s not required on a Linux or Solaris machine.
If you do not select Install server as service (daemon),you
must configure the server manually after installation. See “Manual
Configuration of the Polyspace Server” on page 2-32.
3 Click Start Daemon.
2-12
You see a message that the configuration has been saved.
4 Click Yes to start the Daemon.
5 Click Yes to save your settings.
The Start Daemon log window appears.
Page 35
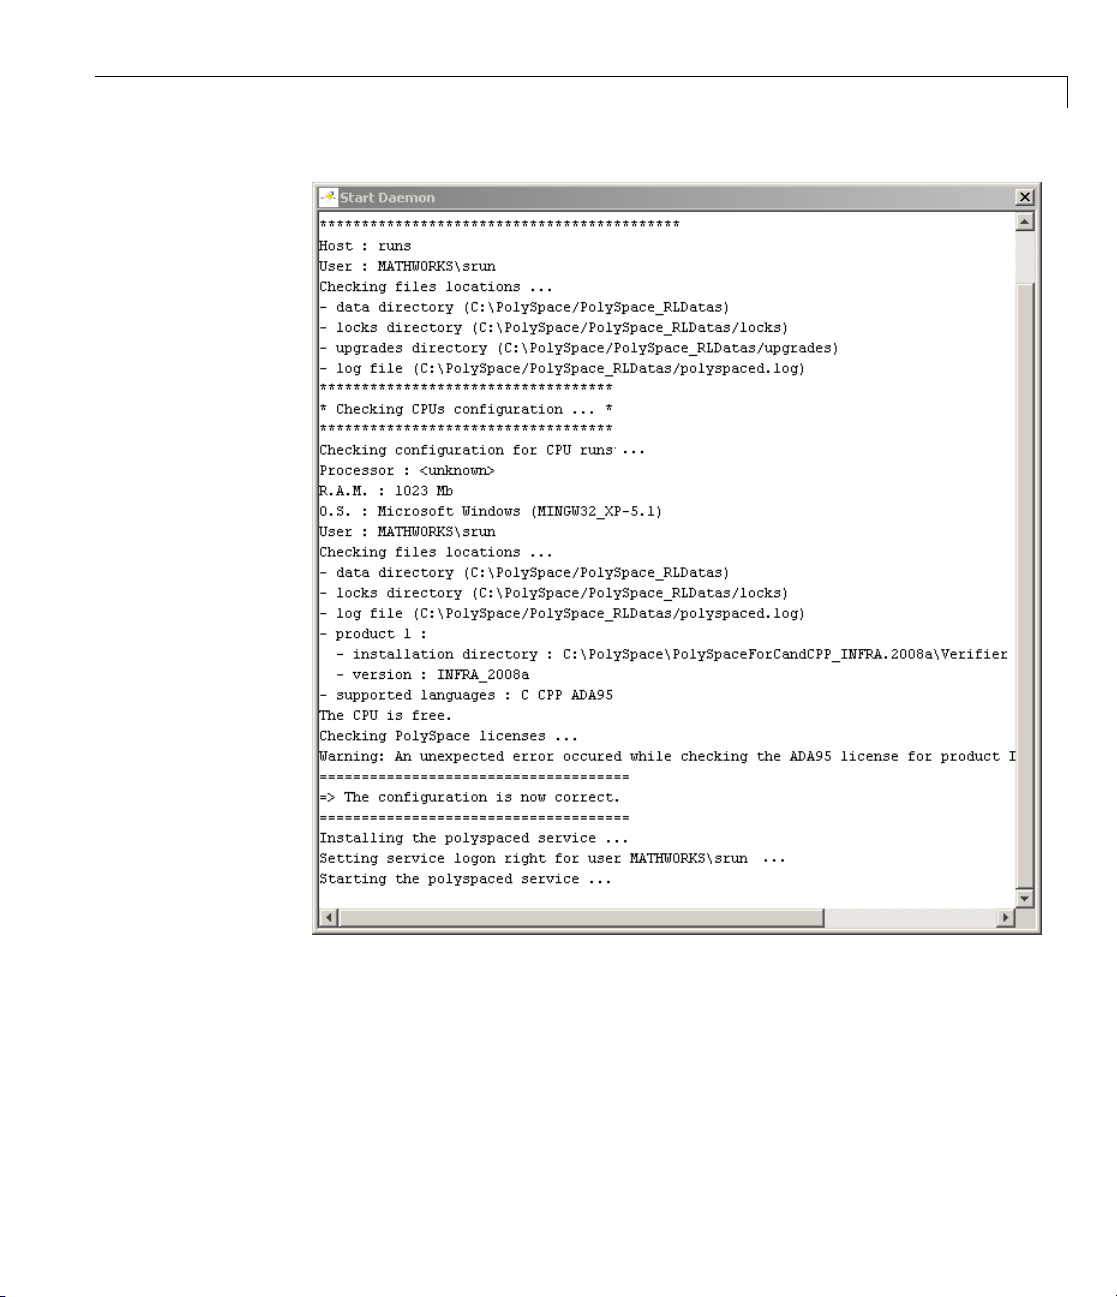
Installing the Polyspace®Software
The Remote Launcher Manager checks product paths, licenses, and the
creation and start up of the service (daemon). When the configuration che ck
is complete, the message “Start of the daemon has succeeded.” appears.
2-13
Page 36

2 Installing Polyspace
®
Software
Note If a problem occurs, an error message appears at the bottom of the
screen. If you get an error, see “Troubleshooting Common Errors” on page
2-39.
6 When you see the message “Start of the daemon has succeeded,” click OK.
7 Click Close to close the Remote Launcher Manager
The Polyspace Server installation is complete.
Note By default, the server becomes the first CPU of the architecture.
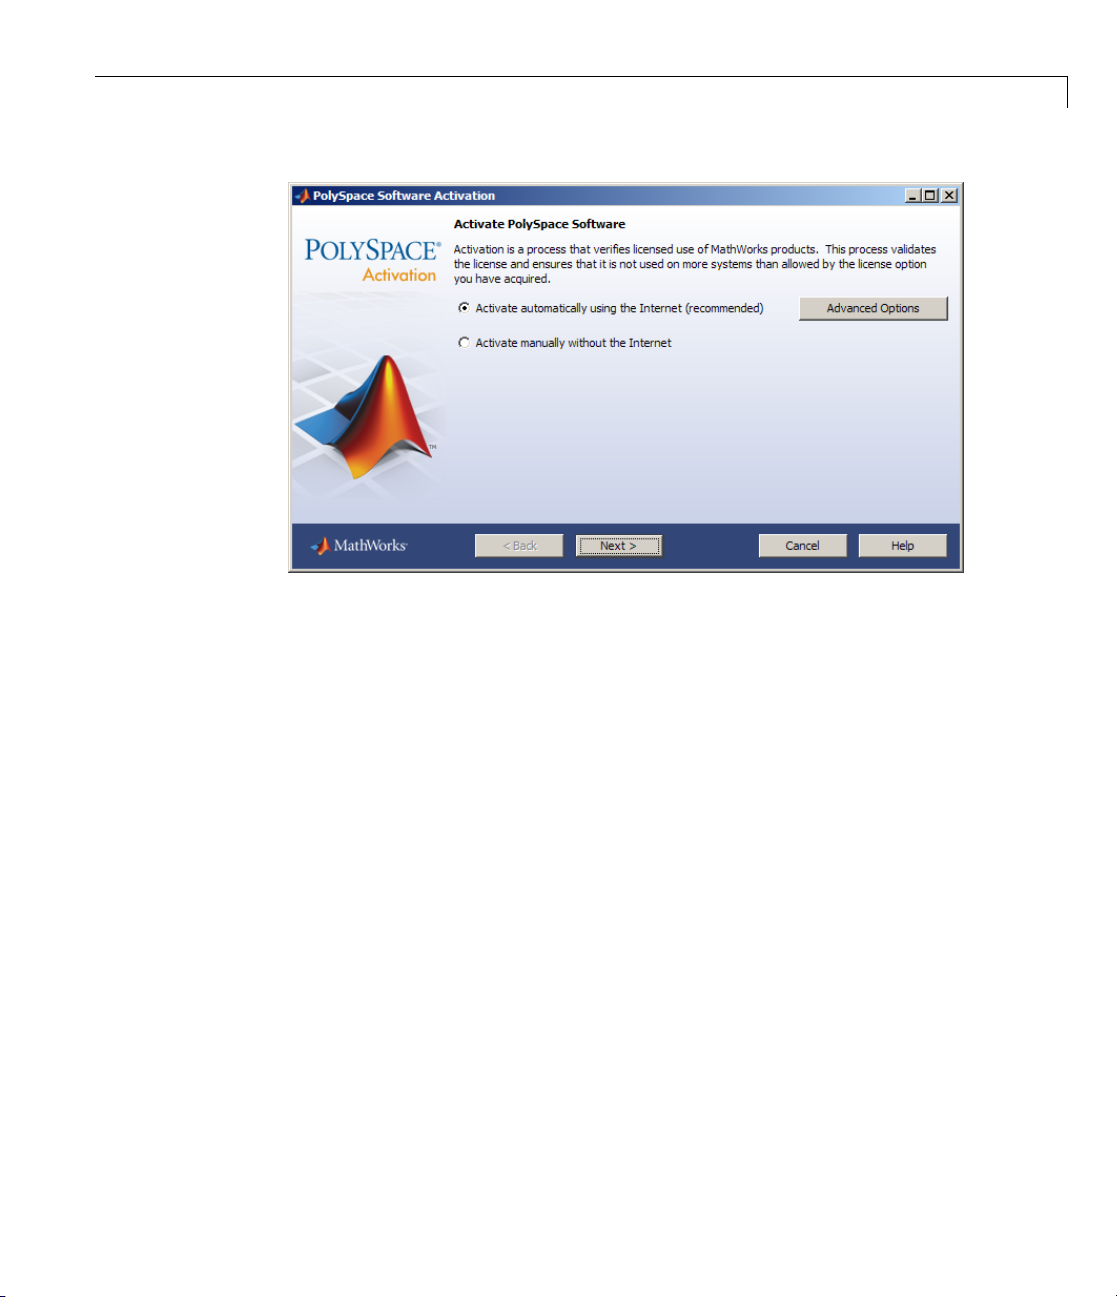
Activating Polyspace Software
Activation is a process that verifies licensed use of MathWorks products.
The process validates your product licenses and ensures that they are used
correctly. You must complete the activation process before you can use
Polyspace software.
2-14
When you finish installing t h e Polyspace softw a r e, the Polyspace Software
Activation dialog box opens.
Page 37
Installing the Polyspace®Software
If you are using Designated Computer (Individual) licenses, you must activate
the license for each Polyspace system individually. However, if you are
using Concurrent licenses for multiple Polyspace systems, you do not ne ed
to activate each Polyspace system. You activate the license once (for the
FLEXnet license server), then provide license files for each Polyspace system.
To complete the activation process, refer to the following sections:
• “Activating With Existing License File” on page 2-16
• “Activating Automatically (With Internet Connection)” on page 2-17
• “Activating M anually (Without Internet Connection)” on page 2 -21
If you cancel the activation process, you can activate the software at any time
after installation by selecting Start > Programs > PolySpace > Activate
Polyspace R2010b.
2-15
Page 38

2 Installing Polyspace
®
Software
Note The Activation Client is not supported on Solaris systems. If you are
installing Po ly space software on a Solaris system, go to the M athWorks
License Center to retrieve a license file, then provide the path to your
license.dat file during installation.
For more information on software activation, including frequently asked
questions, refer to the MathWorks Web site:
www.mathworks.com/support/activation/polyspace.html
Activating With Existing License File
If you have an existing license file for the so ftware that you are installing, you
canprovideapathtothelicensefiletocompletetheactivationprocess. You
do not need to access the MathWorks License Center.
For example, if you use concurrent licenses for Polyspace software, your
license manager provides a license file for each Polyspace system. You do not
activate the software on each system, you just provide a path to this license
file.
2-16
Note With concurrent licenses, a FLE Xnet license server m anages licensing
of individual systems. You manually activate the concurrent license
once (using the License Center at the MathWorks We b site), and then
provide license files for each Polyspace system. For more information, see
“Configuring Concurrent Licenses” on page 9-12.
To activate with an existing license file:
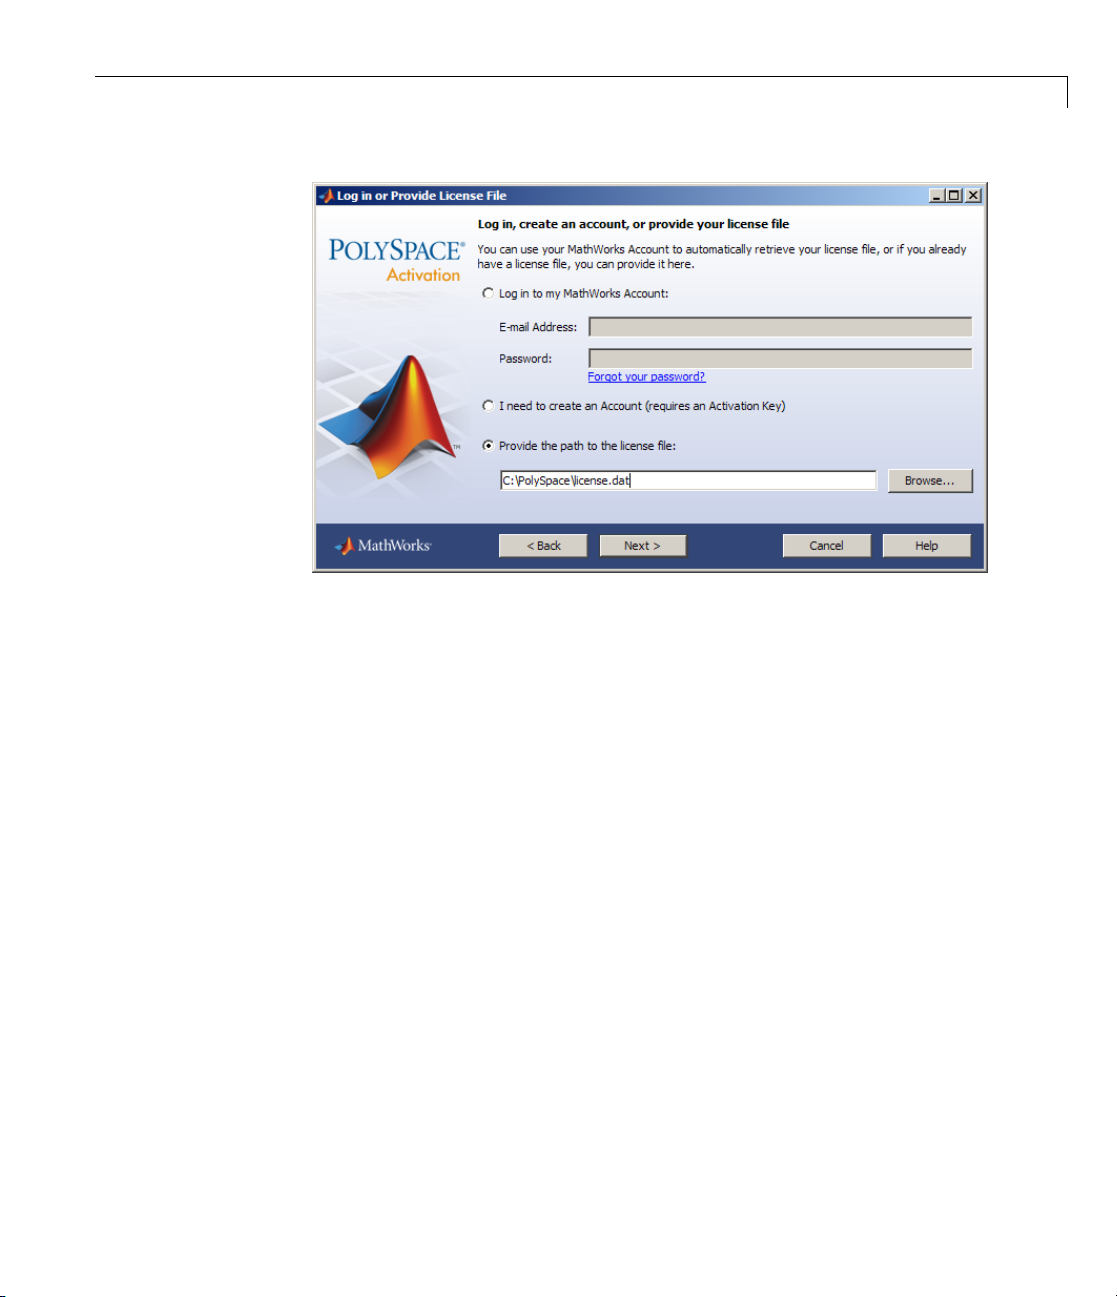
1 In the Software Activation dialog box, select Activate automatically
using the Internet,thenclickNext.
The Log In or Provide License File dialog box appears.
Page 39
Installing the Polyspace®Software
2 Select Pr
3 Enter the path to your license file, then click Next.
ovide the path to the license file.
The Activatio n Complete dialog box appears.
4 Select F
inish to close the Activation Client.
Activating Automatically (With Internet Connection)
If your
softwa
your M
Polyspace system is connected to the Internet, you can activate your
re automatically after installation. This process involves logging in to
athWorks account, and selecting the license that you want to activate.
2-17
Page 40

2 Installing Polyspace
®
Software
To activate your software automatically:
2-18
1 In the PolySpace Software Activation dialog box, select Activate
automatically using the Internet,thenclickNext.
The Log i
n or Provide License File dialo g box appears.
Page 41

Installing the Polyspace®Software
2 Enter the
Note If yo
and Acco
The Lic
ense Selection dialog box appears.
login information for your MathWorks account, then click Next.
u do not have a MathWorks account, select Ineedtocreate
unt, and follow the instructions to create one.
2-19
Page 42

2 Installing Polyspace
®
Software
3 Select the license you want to activate, then click Next.
The Confirmation dialog box appears.
4 Select Activate.
2-20
Page 43

Installing the Polyspace®Software
Your license file is automatically copied to the Polyspace system.
5 In the Activation Complete dialog box, select Finish to close the Activation
Client.
Activating Manually (Without Internet Connection)
If your Polyspace system does not have an Internet connection, you must
activate your software manually. This process involves accessing the
MathWorks License Center from another computer, then manually copying
your license file to the Polyspace system.
To activate your software manually:
1 In the Polyspace Software Activation dialog box, select Activate Manually
without the Internet,thenclickNext.
ffline Activation dialog box appears.
The O
2-21
Page 44
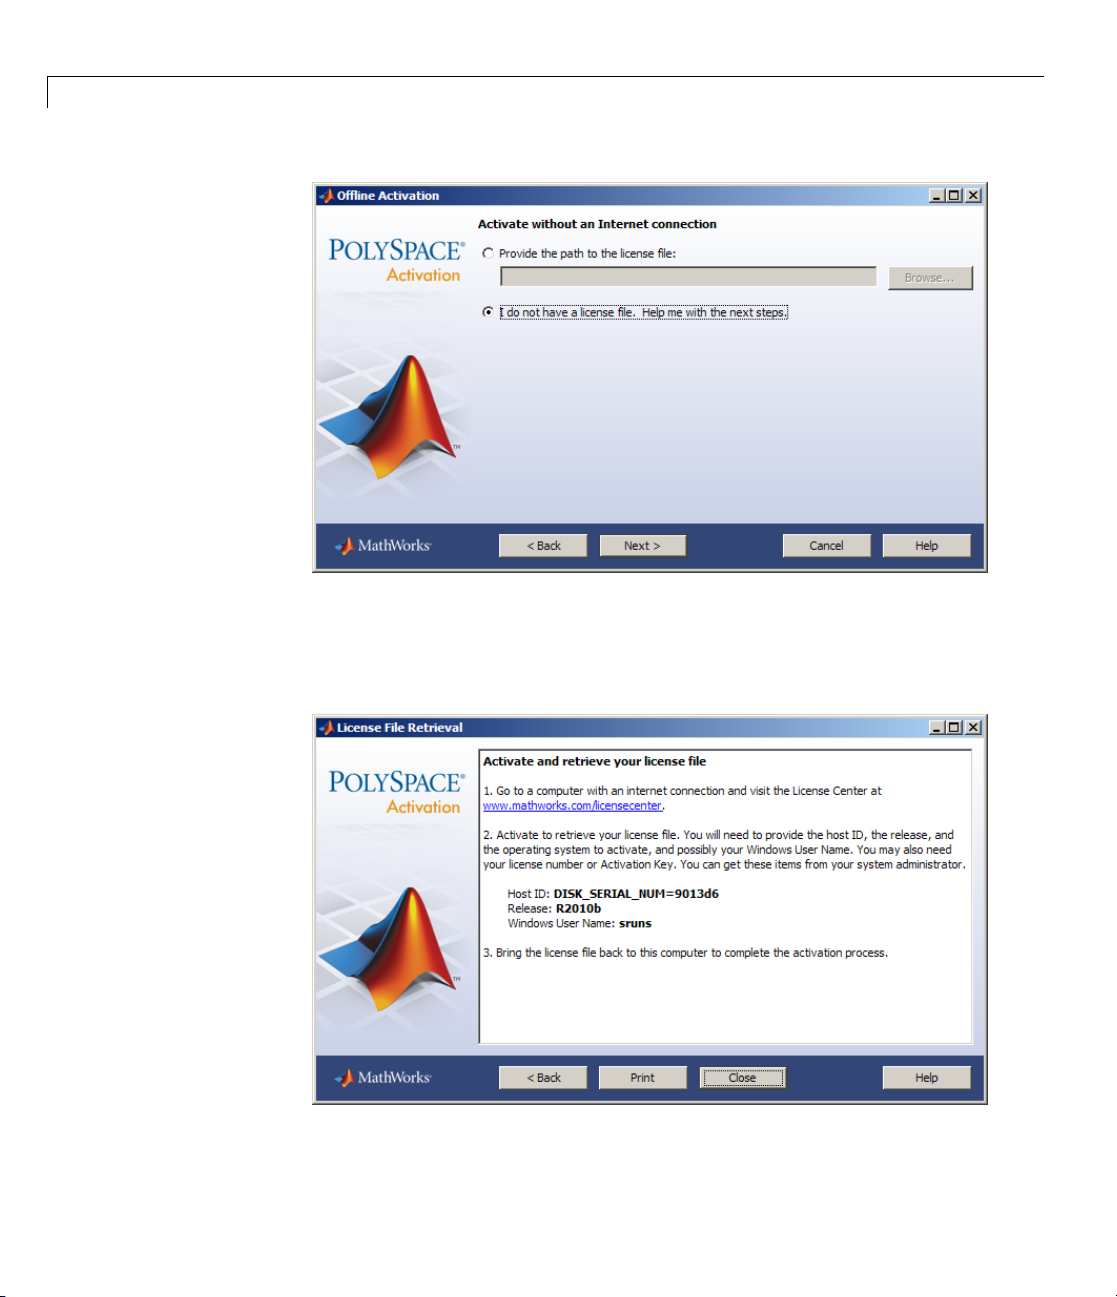
2 Installing Polyspace
®
Software
2 Select Id
o not have a license file,thenclickNext.
The License File Retrieval dialog box displays the information that you
need to activate your software.
2-22
Page 45
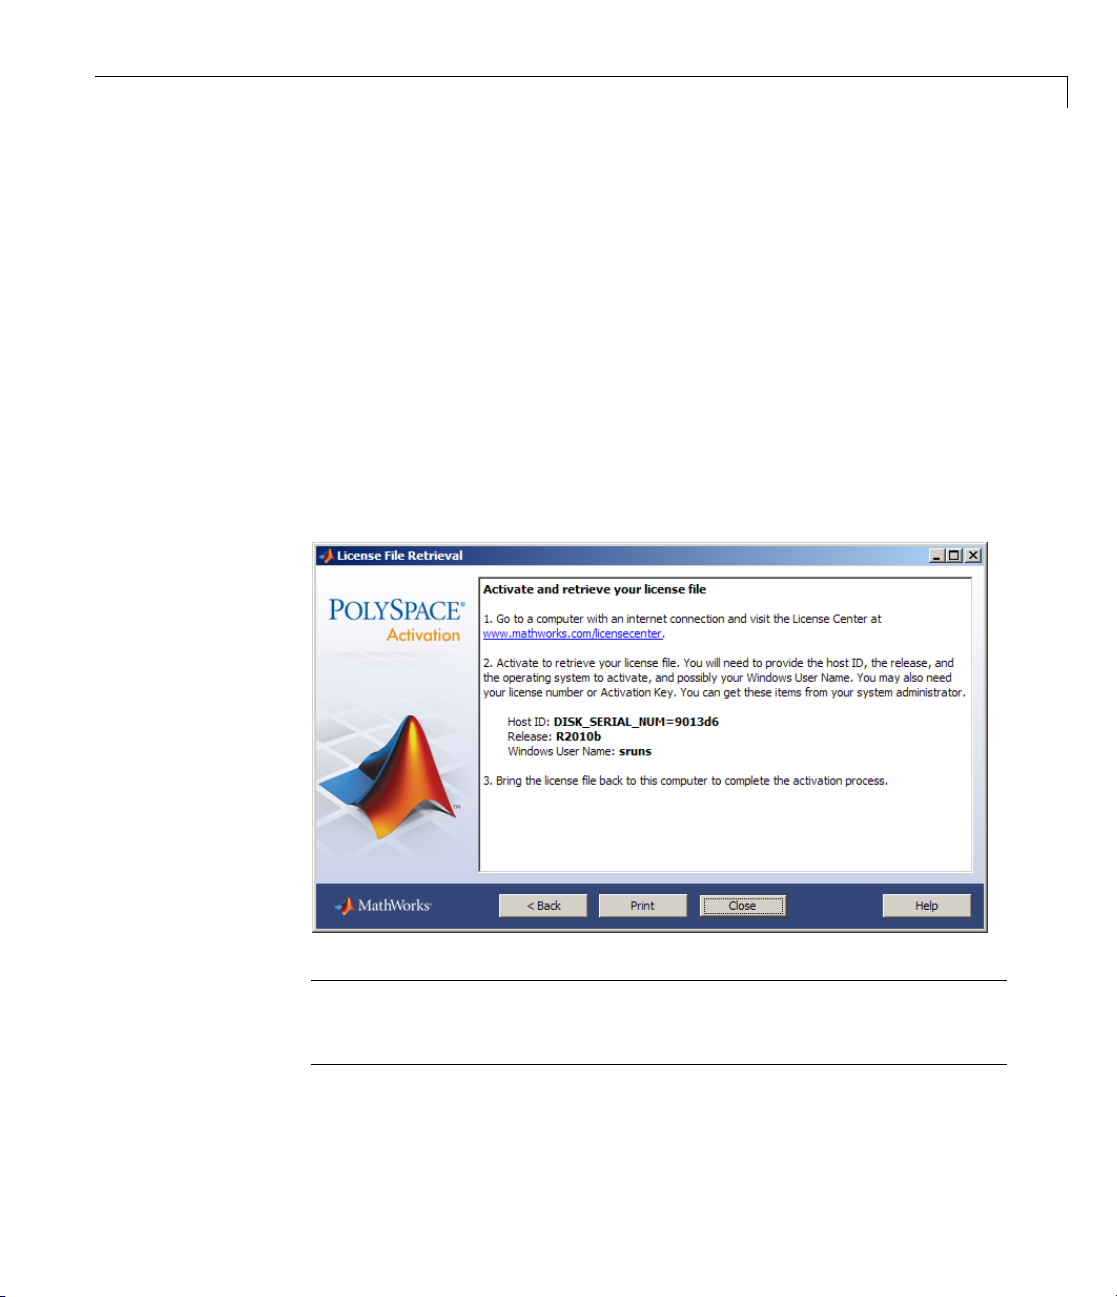
Installing the Polyspace®Software
3 Save the information displayed in the License File Retrieval dialog box. For
example, you can print a copy by clicking Print.
4 Go to a computer with an Internet connection, and then go to the License
Center at the MathWorks Web site:
http://www.mathworks.com/licensecenter
5 Activate your license, then download your license file.
For more information, see the License Center Help.
6 Copy your license file to the Polyspace system.
7 Return to the Offline Activation dialog box, then select Provide the path
to the license file.
Note
Sta
res
8 En
If you closed the Activation window, select
rt > Programs > PolySpace > Activate Polyspace R2010b to
tart it.
ter the path to your license file, then click Next.
2-23
Page 46

2 Installing Polyspace
®
Software
The Activatio n Complete dialog box appears.
9 Select Finish to close the Activation Client.
2-24
Page 47
Installing the Polyspace®Software
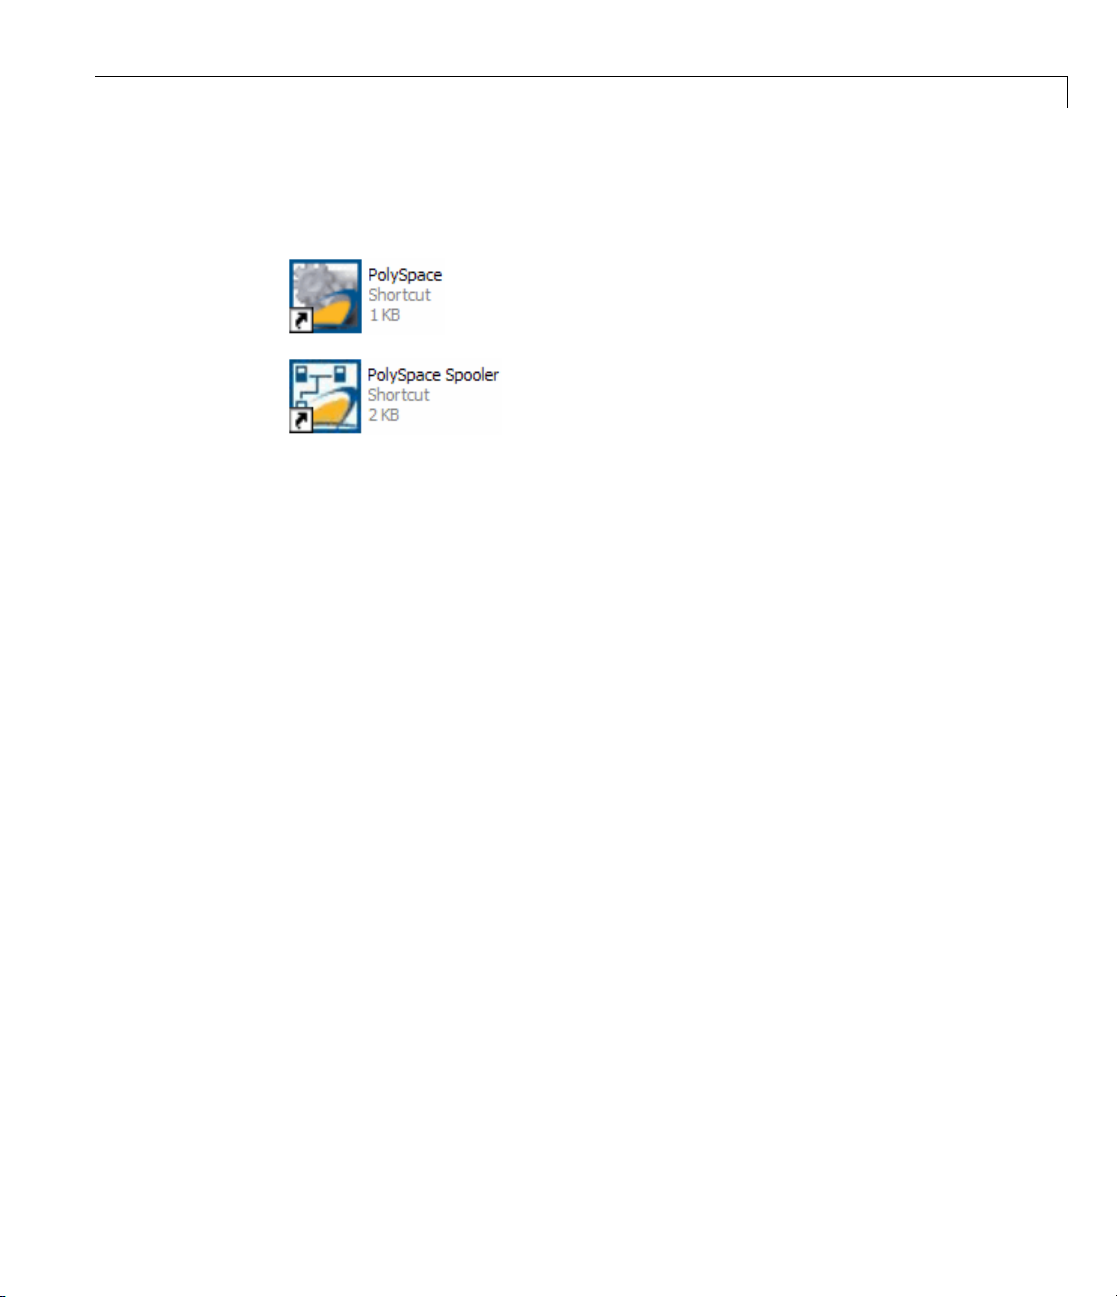
Polyspace Software Icons
After you complete the installation, two icons appear on your desktop:
• PolySpace – The Polyspace Verification Environment (PVE) graphical
user interface. You use the PVE to se t up a verification project, launch
verification of your source code, and explore v erificatio n results.
• PolySpace Spooler — The graphical user interface you use to manage
verifications sent to Polyspace Servers.
2-25
Page 48

2 Installing Polyspace
®
Software
Launching Installation from Command Line
In this section...
“Installing Software on a Linux or UNIX Platform” on page 2-26
“Installing Software in Silent Mode” on page 2-26
Installing Software on a Linux or UNIX Platform
To install Polyspace products on a Linux or UNIX system, execute the
following command in a terminal window:
DVD/install.sh
This script launches the installation wizard. To complete the installation,
refer to “Installing the Polyspace Software” on page 2-4.
Note If you are using the Gnome window manager in Linux or the CDE
window manager in S olaris, click
DVDpathtousethegraphicalinstallationwizard.
Linux.bin or Solaris.bin in the root of the
Installing Software in Silent Mode
By default, -silent mode performs a Polyspace software installation using
default parameters (auto server mode and 12427 for the port).
Note If you are installing a Polyspace Server using silent mode, the
Polyspace Remote Launcher Manager do es not open automatically. After
installing the software, you must configure the Polyspace server settings. For
more information, see “Configuring Polyspace Server Software” on page 2-29.
UNIX Platforms
To install the software on a UNIX system using silent mode, execute the
following command in a terminal window:
2-26
Page 49

Launching Installation from Command Line
DVD/install.sh -silent -install-dir PolySpace_Install
where PolySpace_Install represents the installation folder.
The common components are automatically installed at the same level
as the installation folder that you choose, or if it exists, in the existing
PolySpace_Common folder.
Windows Platforms
To install the software on a Windows system using silent mode, execute the
following
DVD\DATA\Windows\setup_silent.bat PolySpace_Install
The common components are automatically installed at the same level
as the installation folder that you choose, or if it exists, in the existing
PolySpace_Common folder.
.bat file in a command prompt shell:
2-27
Page 50

2 Installing Polyspace
®
Software
Configuring Polyspace Software
In this section...
“Configuring Polyspace Client Software” on page 2-28
“Configuring Polyspace Server Software” on page 2-29
“Configuring Polyspace Metrics Web Interface” on page 2-37
“Troubleshooting Common Errors” on page 2-39
Configuring Polyspace Client Software
Initial Configuration
By default, the Polyspace Client is configured to automatically d etect a
Polyspace Server on the network using port 12427.
Manually Configuring the Polyspace Client
By default, the Polyspace Client automatically detects any available P olyspace
Server configured as a Queue Manager on the network. However:
• If the Client finds more than one Polyspace Server, the Client displays an
error message listing the names of all detected servers. Carefully note all
names and close the error dialog box.
• If no Polyspace Server is available, you see the “
” error message when you launch a verification or execute any
found
Polyspace command.
In these cases, you can specify a specific Queue Manager server associated to
a specific port number to correct the error.
To manually configure the remote server:
1 In the Polyspace verification environment, select Options > Preferences.
The Polyspace Pre ferences dialog box opens.
2 Select the Server configuration tab.
No QueueManager server
2-28
Page 51

Configuring P olyspace®Software
3 In the Remo
and port bu
4 Enter an IP address (or server name) and associated port number (default
12427) for the Polyspace Server. You must use the same port number for
te configuration section, select the Use the following server
tton.
all Polyspace clients, Queu e Manager and servers.
5 If you want to configure access to Polyspace Metrics, see “Configuring
Polyspace Metrics Web Interface” on page 2-37.
6 Click O
The preferences are stored in the P
in
name\.rte
K.
olySpace-Launcher.prf preferences file
user home folder/.rte folder (C:\Documents and Settings\user
on a W indow s system).
Note Although you can modify this file with an ASCII editor, you should
not do so. You should always use the graphical user interface to modify the
remote launcher settings.
Configuring Polyspace Server Software
• “Initial Configuration” on page 2-30
2-29
Page 52

2 Installing Polyspace
®
Software
• “Graphical Configuration of the Polyspace Server” on page 2-30
• “Manual Configuration of the Polyspace Server” on page 2-32
• “Configuration File and Folder” on page 2-35
• “Installing a New CPU” on page 2-36
• “Files and Folders Created When Installing the Queue Manager for
Polyspace Server” on page 2-36
• “Specifying Port Number of Polyspace Me trics Web Server in Queue
Manager” on page 2-37
Initial Configuration
You perform initial configuration of the Polyspace Server softw are during
installation (see “Configuring the Polyspace Server Software” on page 2-10).
After installation, the Polyspace Server becom es the first C PU of the
architecture by default.
2-30
Note All the information displayed in the Remote Launcher configuration
window during installation is automatically saved as ASCII text in the file
Polyspace_Common/
../PolySpace_RLDatas/polyspaced.log
in UNIX).
file
(/var/PolySpace/polyspaced.log
Graphical Configuration of the Polyspace Server
The default Server configuration assumes that the Server is both the Queue
Manager and a CPU.
The Queue Manager can be configured or updated graphically (on Windows
systems) or using a shell command using a graphical user interface:
The “Remote Launcher Manager” command is accessible using
the menu Start > Programs > PolySpace or the exe command
PolySpace_Common/RemoteLauncher/PSTRLManager.exe allows to configure
and update the Queue Manager and associated polyspace.conf file.
Page 53

Configuring P olyspace®Software
The “Common Settings” dialog allows setting port and locations of the Queue
Manager as a Windows service. Note that it is mandatory to stop the current
Queue Manager before any change or update of the parameters. Please use
first the “Stop Daemon” button.
2-31
Page 54

2 Installing Polyspace
®
Software
The “Queue M anager Settings” allows setting the address of the Queue
Manager and all attached CPU of the Remote Launcher. The syntax
“<describing name/IP address>[:<port number>]” attaches a CPU.
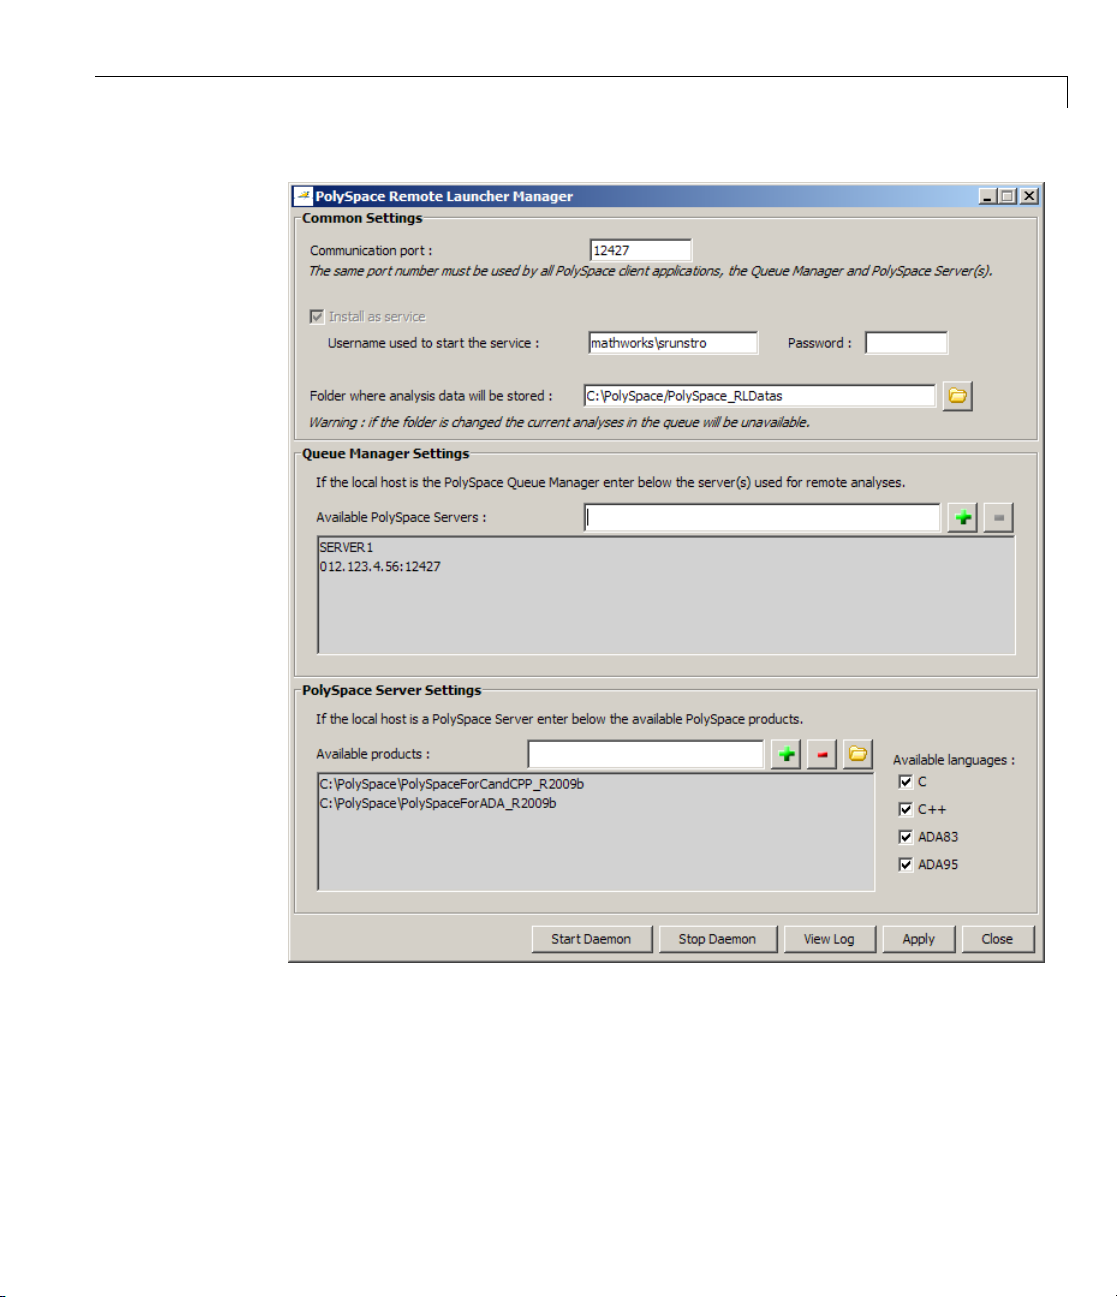
In the previous figure, “SERVER1” is the Queue Manager and
“012.123.4.56:12427” represents a CPU with a specific port number.
The last sub-window “Polyspace Server Settings” allows setting Polyspace
products locations and language.
Note All information displayed during the execution of commands like
“
Start Daemon”, “Stop Daemon”arealsowritteninthepolyspaced.logfile
in
<PolySpace_Common>/../PolySpace_RLDatas (/var/PolySpace under
UNIX).
Manual Configuration of the Polyspace Server
A configuration of the Server/Verifier, Queue Manager of the Client/Server
architecture has been stored in a standard file. A default configuration is
generated during the installation: the current machine is at the same time
the Queue Manager, and the distant machine.
2-32
The batch command
PolySpace_Common/RemoteLauncher/bin/setup-remote-launcher
can be used to create or destroy the configuration file. It is called
polyspace.conf. It may be found:
• For administrator or user on a Windows OS system
at:
PolySpace_Common/../PolySpace_RLDatas
(c:\PolySpace\PolySpace_RLDatas)
• For administrator or user on a UNIX OS system: /etc/PolySpace
The configuration file contains fields which set a Queue Manager and CPU
architecture:
•
product= — It determines the installation folders of Polyspace Verifier. It
ispossibletohaveoneperlanguage.
Page 55

Configuring P olyspace®Software
• lang= — It determines the supported verificat ion languages. The lan gu age
variable specifies the supported language declaration (CPU only). The
values may be: C, C++, CPP, Ada, Ada83, ADA, Ada95 and ADA95.
•
username= —. Theusernamevariablespecifiestheusernameusedto
run the daemon process. If the daemon is started as root on UNIX, it will
automatically change its user ID to run as the given user.
•
datadir= — The data directory name identifies the place w here the data
sent remotely are stored.
•
locksdir= — The locks directory identifies the place where the locks are
stored.
port= — The port number on which the daemon is listening (default value
•
<datadir>/locks will be used by default without specified field.
is 12427). The available port can be specified between 10000 to 15000.This
range depends on the available OS requirements.
•
cpu= — The CPU name and port specifies available Queue Manager and
CPUs. Syntax can be
If more than one
<address IP or name of CPU>[:port number].
cpu= is specified, others are CPUs where the Queue
Manager can dispatch verifications.
•
results_repository_dir= — The Polyspace Metrics results repository
folder. Default is
process_automation= — The flag that specifies whether automatic
•
verification is activated (
<datadir>/results-repository.
yes). Default is no. If automatic verification is
activated, then Polyspace verifies your code according to the configuration
you provide in the file
Any change in the configuration file except for the
<results_repository_dir>/Projects.psproj.
cpu= field (for example, to
add a new CPU, see next paragraph), the associated daemon/service manager
need to be stopped and re started:
•
PolySpace_Common/RemoteLauncher/bin/setup-remote-launcher
-stop-service
is us ed to stop the service. Note that any s tandard program
on OS can stop the service or daemon.
•
PolySpace_Common/RemoteLauncher/bin/setup-remote-launcher
-start-service
is used to start or restart the service. Note that any
standard program associated to the OS can restart the service or daemon.
2-33
Page 56

2 Installing Polyspace
®
Software
Note PolySpace _Common/RemoteLauncher/bin/setup-remote-launcher
gives available options
-h
If you did not select the Queue Manager as a service (daemon) during
installation, use the following commands to install it:
• Windows platform:
PolySpace_Common/RemoteLauncher/bin/InstallPolySpaceService.bat
Note The Windows service can also be managed like other services using
the My Computer > Manage > Services and Applications menu.
• UNIX platform:
PolySpace_Common/RemoteLauncher/bin/setup-remote-launcher
-install-service
2-34
Note ThePolyspacedaemoncanalsobemanagedlikeotherdaemonin
the
/etc/init.d install services folder.
You can then launch the polyspaced service (daemo n) using the following
commands:
•
PolySpace_Common/RemoteLauncher/bin/polyspaced -stop —Stops
the Queue Manager.
•
PolySpace_Common/RemoteLauncher/bin/polyspaced —Startsor
restarts the Queue Manager.
Note <Polyspace_Common>/RemoteLauncher/bin/polyspaced -h gives
available options.
Page 57

Configuring P olyspace®Software
Configuration File and Folder
We can find in the <Polyspace_Common>/../PolySpace_RLDatas folder the
following files and folders:
• The poly
all comm
Queue Ma
• The
spoole
• The
•
polys
polys
product=c:\PolySpace\PolySpaceForCandCPP
product=c:\PolySpace\PolySpaceForAda
lang=Ada95
lang=C
lang=CPP
datadir=c:\PolySpace\PolySpace_RLDatas
username=bard
cpu=BERGERON
spaced.log
unication between clients and the Queue Manager during the
nager life.
ue_infos.txt
que
r.
cks
lo
folder contains the l ocks file for each verification.
pace.conf
pace.conf
file contains installation log information as well as
file contains information o f the Queue Manager
is the configuration file. An example of a Server/Verifier
configuration file looks like th is:
2-35
Page 58

2 Installing Polyspace
®
Software
cpu=192.168.2.79:12428
In this example, the BERGERON cpu has been configured to be a Queue
Manager and a CPU of
12427. The product installed in c:\PolySpace\PolySPaceForCandCPP will be
used. Moreover, another CPU of address I P
on port
12428.
C, CPP and Ada95 code verifications on default port
192.168.2.79 has been declared
On a UNIX system, the directory location containing
default is
/var/PolySpace.
locks and datadir by
Installing a New CPU
Installing a new CPU is very simple: just follow the standard Polyspace
Server installation. Then, edit the
been chosen as Queue Manager, and add the new CPU using the field
cpu=<describing name/IP address>[:<port number>]
See the following example where there are two declared CPUs.
product=c:\PolySpace\PolySpaceForCandCPP
product=c:\PolySpace\PolySpaceForAda
lang=Ada95
lang=C
lang=CPP
datadir=c:\PolySpace\PolySpace_RLDatas
username=bard
cpu=BERGERON
cpu=192.168.2.79:12428
Note On the new CPU, it is important to remove the field cpu= in the
polyspace.conf file to avoid being also a “Queue Manager”.
polyspace.conf of the CPU which has
2-36
Files and Folders Created When Installing the Queue Manager
for Polyspace Server
When you install the Polyspace daemon/service, the softw are creates the
following items (UNIX):
Page 59

Configuring P olyspace®Software
• polyspace.conf file in /etc/PolySpace, containing the Polyspace
configuration information.
•
/var/PolySpace folder containing many files, such as <locks>
polyspaced.log <analysisX> queue_infos.txt
/etc/init.d/polyspaced file,usedtostart,stop,andrestartthe
•
.
deamon/service.
•
/tmp/polyspace folder w hich stores all temporary files.
You must have write access to all of these locations to successfully install
the Queue Manager service.
Specifying Port Number of Polyspace Metrics Web Server in
Queue Manager
If you change or specify a non-default value for the Web server port number of
your Polyspace client (see Configuring Access to Polyspace Metrics), you must
manually configure the same value for your Queue Manager.
In
<PolySpace_Common>/../PolySpace_RLDatas/tomcat/conf/server.xml,
edit the port attribute of the Connector e lement:
<?xml version="1.0" encoding="UTF-8"?>
<Server port="8005" shutdown="SHUTDOWN">
<Service name="Catalina">
<Connector port="8080"/>
<Engine name="Catalina" defaultHost="localhost">
<Host name="localhost"
appBase="C:\PolySpace\PolySpace_Common\RemoteLauncher\lib\
apache-tomcat-5.5.28\webapps"/>
</Engine>
</Service>
</Server>
Configuring Polyspace Metrics Web Interface
Polyspace Metrics is a Web-based tool that allows you to evaluate and monitor
software quality through the lifecycle of a project.
To configure access to Polyspace Metrics :
2-37
Page 60
2 Installing Polyspace
®
Software
1 Specify the Queue Manager server on which Polyspace carries out the
verification and creates the results repository. See “Configuring Polyspace
Client Software” on page 2-28 and “Configuring Polyspace Server Software”
on page 2-29.
2 Select Options > Preferences to open the Po lyspace Preferences dialog
box.
3 Select the Server configuration tab.
2-38
4 In th
5 Select the Download results autom atically check box. When you
e Metrics configuration section, specify a locally accessible folder
ownloading result files from the Polyspace Metrics Web interface.
for d
clickonaniteminPolyspaceMetricstoviewtheiteminthePolyspace
verification environment, the software downloads results to the verification
launch folder. H owever, if this folder does not exist, the software downloads
Page 61

Configuring P olyspace®Software
results to the folder that you specify in the Folder field, which by default,
is
C:\Temp.
6 Ifyoudonotselectthischeckbox,thenwhenyouclickonanitemin
Polyspace Metrics, a dialog box opens. Using this dialog box, you can
specify your locally accessible folder.
7 The folder and its contents are not deleted when you exit t he Polyspace
verification environment.
8 In the Port number field, specify the number of the port for communication
between the Polyspace verification environment and the Polyspace Metrics
Web interface. The default is
9 In the Web server port number field, specify the number of the web
server port. The default is
12428.
8080. You must configure the same number for
the Queue Manager server. See Specifying Port Number of Web Server in
Queue Manager “Specifying Port Number of Polyspace Metrics Web Server
in Queue Manager” on page 2-37.
Note The Polyspace Metrics Web interface URL is:
http://ServerName:WSPN
where ServerName isthenameorIPaddressoftheQueueManagerserver
and
WSPN is the Web server port number.
Troubleshooting Common Errors
This section contains information on troubleshooting the following com mon
errors:
• “Errors Concerning the
• “Errors Concerning Problems with Write Access” on page 2 -41
• “Java Not Found Errors” on page 2-41
• “Other Errors” o n page 2-42
polyspace.conf File” on page 2-40
2-39
Page 62

2 Installing Polyspace
®
Software
Errors Concerning the polyspace.conf File
If you receive any of t he following errors:
1 Stop the polyspacedservice (daemon).
2 Update the polyspace.conf file.
3 Restart the service (daemon).
The following errors concern the polyspace.conf file.
• "
Error: The data folder path should not contain white space.";
• "Error: At least one language should be supported by the
CPU.";
• "<polyspace.conf>:<line_number>: Duplicate entry for product
<version value>.";
• "<polyspace.conf>:<line_number>: Unknown language :
<value>.";
2-40
• "<polyspace.conf>:<line_number>: Duplicate entry for language
<value>.";
• "<polyspace.conf>:<line_number>: Duplicate entry for
<queuemanager name>. ";
• "<polyspace.conf>:<line_number>: Duplicate entry for
<value>.";
• "<polyspace.conf>:<line_number>: Duplicate entry for
username'.";
• "<polyspace.conf>:<line_number>: Duplicate entry for
'port'.";
• "<polyspace.conf>:<line_number>: Invalid port number :
<value>";
• "<polyspace.conf>:<line_number>: Invalid CPU name.";
• "<polyspace.conf>:<line_number>: Duplicate entry for CPU
<hostname> ";
• "<polyspace.conf>:<line_number>: Unknown key : <value> ";
Page 63

Configuring P olyspace®Software
• "<polyspace.conf>:<line_number>: Parse error.";
• "No PolySpace product found for language <value>.";
• "Warning: Invalid <lang> license for product <version> on
host <hostname> ";
• "The PolySpace product <version> was not found.";
Errors Concerning Problems with Write Access
If you receive any of the following errors, check right accesses with username
declared in the polyspace.conf file in the folder <d ir>,<file name> or
<
path> (given in the error message).
Check also that you have not changed anything linked to “polyspaced” service
(daemon) without stopping it.
•
"Fatal error: Directory <dir> is not accessible.";
• "Fatal error: Could not change the owner of <path> to
<username> ";
• "Fatal error: Could not open file <file name> for reading.";
• "Fatal error: Could not set <permission> permissions on
<path> "
• "Fatal error: Could not open file <file name>
Java Not Found Errors
When installing a Polyspace_Common product on a 64 bit Linux machine, the
installation program ma y end with the following error message:
exec: 2433: /tmp/install.dir.880/Linux/resource/jre/bin/java: not found
This error occurs because the Polyspace installer is itself a 32-bit binary using
32-bit binaries, which may cause problems on a 64-bit machine. It needs
32-bit libraries installed.
To solve this problem, install the 32-bit libraries. For example, on an Ubuntu
64-bit Linux machine, install the package "
ia32-libs" from your Linux
distribution.
2-41
Page 64

2 Installing Polyspace
®
Software
Refer to the documentation for your Linux distribution for more information
on installing these libraries.
Other Errors
Other errors may concern OS system , network and standard command
available (for example “tar”, “gzip”, etc.).
Double check that these standard commands exist in your system. Error
messages are detailed enough to know which command has failed.
2-42
Page 65

3
Installing Polyspace Model
Link Products
• “Installing Polyspace Model Link Products” on page 3-2
• “Upgrading MATLAB Software” on page 3-4
• “Troubleshooting Polyspace Model Link SL Installation” on page 3 -5
Page 66

3 Installing Polyspace
®
Model Link Products
Installing Polyspace Model Link Products
The Polyspace Model Link SL a nd Polyspace Model Link TL provide automatic
error detection for code generated from MathWorks Simulink models.
Polyspace Model Link SL installation consists of two components:
• Simulink Polyspace library with associated blocks
• “Back to model” (HTML links in the code source) extension in the
Polyspace Run-Time Checks perspective that allows direct navigation from
a run-time error in the auto-generated code to the co rresponding block in
the Simulink model.
To install Polyspace Model Link SL:
1 Install the Polyspace software as described earlier in this guide.
The Polyspace Installer automatically detects that MATLAB and Simulink
components are installed and displays the following window:
3-2
Page 67

Installing Polyspace®Model Link Products
2 Select the MATLAB releases to link with Polyspace.
3-3
Page 68

3 Installing Polyspace
®
Model Link Products
UpgradingMATLABSoftware
If you upgrade your MATLAB release, you must re-install Polyspace Model
Link SL or Polyspace Model Link TL for that release.
You can re-install Polyspace M odel Link SL without using the installation
DVD.
To reinstall:
1 Copy the file
Polyspace_Common\PolySpaceModelLink\startup\polyspacerc.m into
your new MATLAB release
2 Enter edit matlabrc in the MATLAB command window.
3 Go to the end of the file, and add the following lines:
%% POLYSPACE CONFIGURATION
polyspacerc;
%% END OF POLYSPACE CONFIGURATION
matlabroot(new)\toolbox\local.
3-4
4 Run MATLAB in “regserver” mode, to post-install your MATLAB release
on the local machine. To do this, enter the following command:
matlabroot(new)\bin\matlab.exe /regserver /r quit
Where matlabroot(new) is the MATLAB installation folder, for example
C:\MATLAB\R2009a.
Page 69
Troubleshooting Polyspace®Model Link™ SL Installation
Troubleshooting Polyspace Model Link SL Installation
In this section...
“MATLAB Software Is Not Installed Locally” on page 3-5
“No Write Access to MATLAB Product Root” on page 3-6
MATLAB Software Is Not Installed Locally
If MATLAB is not installed locally, the registry entries do not contai n
reference to MATLAB, which Polyspace uses to detect installation folders.
In this case, the Polyspace installer will not detect MATLAB, and will skip
installation of the Polyspace Model Link tools. Therefore, you must perform a
manual installation.
To perform a manual installation:
1 Insert the Polyspace DVD in your DVD drive.
2 Locate the corresponding windows drive (hereafter D:\), and copy the
entire folder
PolySpace_Common\PolySpaceModelLink.
3 Copy th
into ma
4 Edit matlabroot\toolbox\local\matlabrc, and add the foll owing lines
D:\Data\Windows\Addin\Mathworks\polyspace into
efile
D:\Data\Windows\Addin\Mathworks\startup\polyspacerc
tlabroot\toolbox\local
.
attheendofthefile:
%% POLYSPACE CONFIGURATION
polyspacerc;
%% END OF POLYSPACE CONFIGURATION
5 Run MATLAB in “regserver” mode, to post-install your MATLAB release
on the local machine. To do this, enter the following command:
matlabroot(new)\bin\matlab.exe /regserver /r quit
ere
Wh
C:
matlabroot(new) is the MATL AB installation folder, for example
\MATLAB\R2009a
.
3-5
Page 70

3 Installing Polyspace
®
Model Link Products
No Write Access t
If the installer
you if you want to
the Polyspace M
• If you select Y
shortcut to ex
This command s
Model Link so
• If you select
Polyspace M
detects that there is no write access to
add a desktop shortcut to start MATLAB and configure
odel Link software.
es, a shortcut is added to your desktop. Double-click the
ecute
matlabroot\bin\win32\matlab.exe /r polyspacerc.
tarts MATLAB and automaticallyconfiguresthePolyspace
ftware.
No, the installer wil l describe how to manually configure
odel Link software
o MATLAB Product Root
matlabroot,itasks
3-6
Page 71

Installing Polyspace UML
Link RH
4
Page 72

4 Installing Polyspace
®
UML Link™ RH
Installing Polyspace UML Link RH Product
The Polyspace UML Link RH product provides an add-in inside the
Rhapsody Model-Driven development tool. It concerns the installation of
two components:
• Polyspace library
• “Back to model” extension (HTML link inside the code) in the Polyspac e
Run-Time Checks perspective that allows direct navigation from a run-time
error in the auto-generated code to the corresponding block in the UML
model.
The Polyspace Installer automatically detects that Rhapsody components
are installed and installs Polyspace UML Link RH during the “Shared
components” installation.
If you install the Rhapsody software after installing Polyspace software, you
can either re-install the Polyspace software or manually copy the plug-in files
from the DVD to
/PolySpace_Common/PolySpaceModelLink/.
4-2
By default, a
Polyspace_Common/PolySpaceUMLLink is created where we can
find all the components of Polyspace UML Link RH. Moreover, the Polyspace
installer modifies two files associated with the R ha p sody usage:
• Alineinthe
CopyVBA=Polyspace_Common\PolySpaceUMLLink\bin\PolySpace.vba
rhapsody.ini file located at the root of C:, or in C:\WINNT:
where Polyspace_Common represents the path to the PolySpace_Common
folder.
• Some lines are added to the
RhapsodyInstallDir\Share\Properties\site.prp:
Subject General
Metaclass Model
Property HelpersFile String "
PolySpaceUMLLink\\etc\\PolySpace.hep"
End
Polyspace_Common\\
Page 73

Upgrading Polyspace
Software
• “Upgrading Polyspace Client Products” on page 5-2
• “Upgrading Polyspace Server Products” on page 5-4
5
Page 74

5 Upgrading Polyspace
®
Software
Upgrading Polyspace Client Products
When the remote launcher has been installed, The Queue Manager interface
(or Polyspace Spooler) is available to manage verifications sent by a Polyspace
Client.
The Menu Operations > Upgrade PolySpace Product allows the upgrade
of a Polyspace Client.
5-2
On the Server side, in the
Polyspace_Common/../PolySpace_RLDatas/upgrades folder
(
/var/PolySpace/upgrades on UNIX) a new rele as e of a product has been
installed with the following format: <version>.tar or <version>.tar.gz. If such
file in the upgrades folder exists, it is possible to upgrade the Polyspace client:
Note The tar file needs to contain the setup.exe at his root.
Page 75

Upgrading Polyspace®Client Products
After having chosen options (installation folder and silent modes), the
“Polyspace Queue Manager Interface” downloads the complete setup package
(approximately 60 0 Mb) and un pac ks it. It could take several minutes
to download and unpack (5 to 10), depending of network and Desktop
PC performances. Then, a standard installation begins. Note that it is
recommended to close all Polyspace Products, if they are open.
5-3
Page 76
5 Upgrading Polyspace
®
Software
Upgrading Polyspace Server Products
In this section...
“Overview” on page 5-4
“Upgrading an Active Server” on page 5-4
“Upgrading an Inactive Server” on page 5-4
Overview
When you are upgrading the Polyspace software on a Server, you need to
determineifthePolyspaceServerdaemonisactiveornot(whetheradaemon
is running and one or more verifications are queued and running on CPUs).
Upgrading an Active Server
Toupgradeanactiveserver:
5-4
• Perform the Client upgrade procedure in “Upgrading Polyspace Client
Products” on page 5-2.
• After the installation completes, open the Polyspace Remote Launcher
Manager to configure the serve r. For more information, see “Configuring
Polyspace Server Software” on page 2-29
Upgrading an Inactive Server
On an inactive server (a machine w ithout an installed daemon or without any
verifications queued and running), you can choose the Polyspace Server
installation. The field “product=” will be filled in an automatic way. You m ust
only add the lang= if it does not already exist.
Do not forget to update the polyspace.conf of the Polyspace Server wh ich
serves as a Queue Manager, i.e. by adding a new entry cpu=.
Note You can install different releases of a same product language. The
Polyspace Server w ill automatically lead verifications coming from different
client releases to adequate CPU and associated Polyspace release product.
Page 77

Installing Polyspace C++
Add-In for Visual Studio
6
Page 78

6 Installing Polyspace
®
C++ Add-In for Visual Stud io
®
Installing the Polyspace C++ Add-In for Visual Studio
The Polyspace installer automatically detects that Visual Studio is installed
and installs the add-in during the “Shared Components” installation.
When a Polyspace Client for C/C++ is already installed before you install
Visual Studio, you must reinstall the Polyspace software from the DVD.
6-2
Page 79

7
Installing Polyspace Plug-In
for Eclipse IDE
Page 80

7 Installing Polyspace
®
Plug-In for Eclipse IDE
Installing the Polyspace Plug-In for Eclipse IDE
During the installation process, you will see t he follow ing screen:
7-2
To install the Polyspace Plug-In for Eclipse™ IDE:
1 Select Choose, then specify the location of your Eclipse fo lder, for example,
C:\eclipse.
2 Click Next to proceed with the installation process.
The Polyspace plug-in is installed only if you have already set up the Eclipse
Integrated Development Environment (IDE). For information on installing
this IDE, see the Eclipse documentation at
Note If yo u installed Polyspace software before the Eclipse IDE, you must
re-install the Polyspace software.
www.eclipse.org.
Page 81

Installing the Polyspace®Plug-In for Eclipse™ IDE
When the installation process is complete, the menu bar of the Eclipse editor
has the Polyspace menu:
7-3
Page 82

7 Installing Polyspace
®
Plug-In for Eclipse IDE
7-4
Page 83

Uninstalling Polyspace
Products
• “Uninstalling on Windows Platforms” on page 8-2
• “Uninstalling on Linux or UNIX Platforms” on page 8-4
8
Page 84
8 Uninstalling Polyspace
®
Products
Uninstalling on Windows Platforms
In this section...
“Should I Uninstall Previous Releases Before Installing?” on page 8-2
“Uninstalling the Polyspace Software” on page 8-2
“Uninstalling Shared Components” on page 8-3
Should I Uninstall Previous Releases Before
Installing?
If you are upgrading your existing Polyspace software to the latest release, you
may need to uninsta ll the existing software before installing the new release.
• If you are currently running release R2008a or later, do not
uninstall the previous release before installing the current release.
The new server software can run verifications launched from
both releases. Before installing the new release, however, you
need to stop the Polyspace service. You can run the command:
%POLYSPACE_COMMON%\RemoteLauncher\PSTRLManager.exe to check if the
service is running and stop it if necessary. After installing, you can restart
the service using the same command.
8-2
• If you are currently running release R2007a+ or earlier, you must
uninstall the prev ious release before installing the current release.
R2007a+ and earlier releases used the Cygwin API, which is incompatible
with the current release.
Uninstalling the Polyspace Software
You can uninstall the Polyspace software through the standard interface
available on a Windows PC.
To uninstall the Polyspace software:
1 From the Windows desktop, select Start > Settings > Control
Panel > Add or Remo ve Programs.
2 Select the Polyspace product you want to uninstall.
Page 85

Uninstalling on Windows®Platforms
3 Select Change/Remove.
The uninstallation procedure goes through steps. Please follow the
instructions and refer to paragraphs below for specifics components, if
necessary.
Note Som e files and folders added after installation can remain after the
uninstall process is complete. After reboot, check the
PolySpace_Install
and Polyspace_Common folders for remaining files and subfolders. You can
remove these files by hand.
Uninstalling Shared Components
You can also uninstall specific shared components.
To uninstall Polyspace shared components:
1 From the Windows desktop, select Start > Settings > Control
Panel > Add or Remo ve Programs.
2 Select PolySpace Shared Components.
3 Select Change/Remove.
The shared components are removed.
8-3
Page 86

8 Uninstalling Polyspace
®
Products
Uninstalling on Linux or UNIX Platforms
In this section...
“Should I Uninstall Previous Releases Before Installing?” on page 8-4
“Uninstalling the Polyspace Software” on page 8-4
“Uninstalling Shared Components” on page 8-4
Should I Uninstall Previous Releases Before
Installing?
If you are upgrading your existing Polyspace software to the latest release,
you do not need to uninstall the existing software before installing the new
release. The new server software can run verifications launched from both
releases.
Before installing the new release, you must stop the polyspaced daemon. Using
an administrator login, you can run the command
to stop the daemon. After installing, you can restart the service using
stop
the command
/etc/init.d/polyspaced start.
/etc/init.d/polyspaced
8-4
Uninstalling the Polyspace Software
To uninstall components under Linux or UNIX system:
• Enter
PolySpace_Install/Uninstall/Uninstall .
This script launches the graphical uninstall wizard.
Uninstalling Shared Components
You can also uninstall specific shared components.
To uninstall Polyspace shared components:
1 Enter Polyspace_Common/Uninstall/Uninstall
The shared components a re uninstalled.
Page 87

Polyspace License
Installation
• “Polyspace License Overview” on page 9-2
• “Common Licensing Questions” on page 9-8
• “Configuring Designated Computer Licenses” on page 9-10
• “Configuring Concurrent Licenses” on page 9-12
• “Checking Installed Licenses ” on page 9-29
9
• “License Error Messages” on page 9-30
Page 88

9 Polyspace
®
License Installation
Polyspace License Overview
In this section...
“Overview” on page 9-2
“Polyspace Licensing Options” on page 9-2
“Obtaining a License File” on page 9-5
Overview
This chapter describes Polyspace licensing for administrators and users of
Polyspace products. It describes:
• Types of licensing available
• How to configure your lice ns e
• FLEXnet server installation
• How to use Polyspace products with FLEXnet licenses
9-2
Polyspace Licensing Options
There are two licensing options:
• “Designated Computer (Individual) Licenses” on page 9-2
• “Concurrent (Floating) Licenses” on page 9-4
Designated Computer (Individual) Licenses
Designated Computer (DC) licenses are used only for Polyspace client
software. DC licenses are appropriateforenduserswhowanttoinstall,
operate, and administer the client software themselves. A DC license
authorizes you to use your Polyspace client software on any one computer
system to which you have access. If you are running Polyspace software on
your work computer, a DC license does not authorize you to run the software
on your home system as well. The system you choose can be a Microsoft
Windows or UNIX computer.
With a DC license, you are the system administrator. In this role, you are
responsible for:
Page 89

Polyspace®License Overview
• Installing and activating the Polyspace client software on your computer.
• Ensuring that you are the only person who runs the software on your
computer.
To generate a DC license, you need to activate your software using either
the Polyspace Software Activation Client, or the License Center at the
MathWorks Web site. To obtain a DC license, refer to “Checking Installed
Licenses ” on page 9-29.
Note DC licenses do not use the FLEXnet server. For DC licences, you need
only to activate your software.
9-3
Page 90

9 Polyspace
®
License Installation
Concurrent (Floating) Licenses
Concurrent licenses are used for both Polyspace client and Polyspace server
software. Concurrent licenses are appropriate for organizations that have
standardized on the FLEXnet license manager, or who wa nt to impose limits
on software use for accounting or license management purposes.
Concurrent licenses use license keys to control access. Users check out a
license key when they launch a Polyspace product. When all the keys for
a particular product are checked out, the license manager denies fur the r
requests.
A Network Named User (NNU) configuration is an option for concurrent
licensing that may be set up as a protective measure to restrict the usage of
shared licenses.
The system administrator for Concurrent licenses must set up an installation
that optimizes accessibility to the products. Concurrent licenses allow you to
install the software only in a Network Concurrent User installation type.
9-4
Polyspace®FLEXnet®Server Architecture
Page 91

Polyspace®License Overview
ThepreviousfigureshowshowtousePolyspaceproductswithaFLEXnet
license manager:
• Polyspace products are used by any number of users. The Polyspace
products can include both Client and Server products.
• Each Polyspace product requests licenses from the FLEXnet server.
• The FLEXnet server can be installed on the same machine as a Polyspace
product, as long as it is running a mutually supported operating system
(see “Supported Machines and Versions” on page 9-16).
Note With concurrent licenses, you do not need to activate the software on
each Polyspace system. You manually activate the concurrent license once
(using the License Center at the MathWorks Web site), and then provide
license files for each Polyspace system.
Obtaining a License File
When you activate your software through the MathWorks Activation Client,
you automatically receive a license file. You do not need to take any addit ion al
steps.
If you are using a concurrent license, or do not have access to the Activation
Client, you must obtain a license file from MathWorks. You can obtain license
files from the License Center at the MathWorks Web site:
http://www.mathworks.com/licensecenter
To obtain a concurrent license file, you need either the MAC address or Serial
disk number of your computer. You will provide this number to MathWorks to
obtain the license file.
Getting the License hostid on UNIX Platforms
On a UNIX machine, the hostid corresponds to the MAC address of the
machine where the FLEXnet server is running (using a concurrent license) or
where the DC license is used.
You can display the hostid of a UNIX machine using the lmutil FLEXnet
utility available on the Polyspace DVD at
DVD/Data/Unix/FLEXLM/x86-linux
9-5
Page 92

9 Polyspace
®
License Installation
for a Linux system or at DVD/Data/Unix/FLEXLM/sparc-solaris for a Solaris
system.
Use the following command:
./lmutil lmhostid
The result on a shell window looks like the following:
lmutil - Copyright (c) 1989-2007 by Macrovision Corporation.
All rights reserved.
The FLEXlm host ID of this machine is "831da5d6"
Transmit the number between double quotes to MathWorks in order to obtain
the license file.
Getting the License hostid on Windows Platforms
On a Windows machine, hostid or machine_hostid corresponds to the Serial
disk number of the machine where the FLEXnet server is running (using a
concurrent license) or where the DC license is used.
9-6
You can display the hostid of a Windows machine using the
lmtools.exe FLEXnet utility available on the Polyspace DVD at
DVD\Data\Windows\FLEXLM\x86-win32.
The Disk volume serial number needs to be checked in the System Settings
tab of lmtools.exe on W indow s.
Page 93

Polyspace®License Overview
Disk Volume Serial Number Accessible from LMTOOLS
Itcanalsobeobtainedusingthefollowingcommandprompt:
lmutil.exe lmhostid -vsn
The res
Tran
the l
ult on a Command Prompt window looks like the following:
lmutil - Copyright (c) 1989-2007 by Macrovision Corporation.
All rights reserved
The FLEXlm host ID of this machine is "DISK_SERIAL_NUM=e855c07a"
smit the number between double quotes to MathWorks in order to obtain
icense file.
9-7
Page 94

9 Polyspace
®
License Installation
Common Licensing Questions
In this section...
“Do I need a FLEXnet Server to Use an Individual License?” on page 9-8
“How Do I Identify Designated Computer and Concurrent Licenses?” on
page 9 -8
“What If I Have Other MathWorks Products Installed?” on page 9-8
“What If I Have an Old Polyspace FLEXnet License Serve r? ” on page 9-9
Do I need a FLEXnet Server to Use an Individual
License?
Designated Computer (individual) licenses do not use the FLEXnet server.
For DC licences, you nee d only activate your software license .
For more information, see “Configuring Designated Computer Licenses” on
page 9-10.
9-8
How Do I Identify Designated Computer and
Concurrent Licenses?
DC license files have the word uncounted in the license line. This line is
used directly in the license file. See the example in “DC License File Format”
on page 9-11.
What If I Have Other MathWorks Products Installed?
Polyspace products use the same license mechanism as other MathWorks
products.
If you receive a Designated Computer license for Polyspace pro ducts, re fer to
“Configuring Designated Computer Licenses” on page 9-10.
If you receive a Concurrent License and you alre ady use a FLEXnet Server for
other MathWorks products, you must add all concurrent
thePolyspacelicensetotheFLEXnetServer,andrereadit.
INCREMENT lines in
Page 95

Common Licensing Questions
Then, refer to “Configuring Licenses on a Polyspace Client or Polyspace
Server System” on page 9-25.
What If I Have an Old Polyspace FLEXnet License
Server?
To use Polyspace products release R2007a+ or later, you must upgrade the
FLEXnet Server to the version available on the Polyspace product DVD. The
upgrade process involves uninstalling your old FLEXnet server and installing
the new one.
For installation information, see “Installing FLEXnet Manager” on page 9-17.
Then, refer to “Configuring Concurrent Licenses” on page 9-12 for licensing
information.
9-9
Page 96
9 Polyspace
®
License Installation
Configuring Designated Computer Licenses
In this section...
“Overview” on page 9-10
“Installing License Files” on page 9-1 0
“DC License File Format” on page 9-11
Overview
This section describes how to install a Designated Computer (individual)
license for Polyspace products, using a
how to check license usage.
Designated Computer licenses are available only for Polyspace client software
Note When you activate your software through the MathWorks Activation
Client, your license is configured automatically. You do not need to take
any additional steps.
license.dat file. It also describes
9-10
Installing License Files
To install a DC licence, you copy the license.dat file to the a ppropriate path.
The same
be set up with the standard Polyspace subfolder localization (see format in
“DC License File Format” on page 9-11).
Placethelicensefileinthe
installed the Polyspace software in the default f older, place the file in the
following location:
•
/PolySpace/PolySpace_Common/licenses/license.dat on a UNIX
platform.
•
\PolySpace\PolySpace_Common\licenses\license.dat on a Windows
platform.
license.dat file must be used for all Polyspace products and must
Polyspace_Common/licenses folder. If you
Page 97

Configuring Designated Computer Licenses
Caution Remove any previous license.dat file from the /licenses folder.
DC License File Format
This kind of license is used for an individual user and computer. It does not
require a FLEXnet license manager to be running. It has the following format:
INCREMENT PolySpace_Feature MLM passcode_version_number
date_of_license_end
SN=serial_number
machine_hostid – This is the hostid of the machine, usually the Mac address
on UNIX system and the disk serial number on W indows (see Getting the
License hostid). The
Example
# MATLAB license passcode file.
# License No: 517786
INCREMENT PolySpace_Client_C_CPP MLM 19 3-jan-2008 uncounted \
ABCDEF12345678A HOSTID=DISK_SERIAL_NUM=388ab914 SN=517786 TS_OK
uncounted key HOSTID=machine_hostid
machine_hostid must be given to obtain a license file.
9-11
Page 98

9 Polyspace
®
License Installation
Configuring Concurrent Licenses
In this section...
“Introduction to FLEXnet Licensing” on page 9-12
“Installing FLEXnet Manager” on page 9-17
“Configuring a Concurrent License” on page 9-24
“Installing Licenses on an Existing FLEXnet Server” on page 9-28
Introduction to FLEXnet Licensing
• “What is FLEXnet Manager?” on page 9-12
• “FLEXnet Software Components” on page 9-13
• “Supported Machines and Versions” on page 9-16
9-12
What is FLEXnet Manager?
A Concurrent license requires FLEXnet Manager. Macrovision®FLEXnet
Manager is a network license manager used to control the use of the Polyspace
software products.
FLEXnet Manager is the most popular license manager in the software
industry. FLEXnet Manager allows software licenses to be available
anywhere on a network, instead of being tied to specific machines. Floating
licensing benefits both users and license administrators. Users make more
efficient use of fewer licenses by sharing them on the network. License
managers control the users and machines that have access to the software
managed by FLEXnet Manager.
Note FLEXnet Manager is not automatically installed as part of the
Polyspace software installation. Refer to “Installing FLEXnet Manager” on
page 9-17 for information about installing the FLEXnet software.
Page 99

FLEXnet Software Com ponents
• “Windows Platforms” on page 9-14
• “Linux or Solaris Platforms” on page 9-16
Configuring Conc urrent Licenses
9-13
Page 100

9 Polyspace
®
License Installation
Windows Platforms. On a Windows system, the following software
components relate to the standard FLEXnet package (see FLEXnet
®
Components on page 9-15).
FLEXnet Component
license.dat
Description
License file. If you do not have a license,
contact MathWorks.
lmtools.exe
MLM.exe
Allowsyoutomanagethelicense.
Vendor service that keeps track of the
number of licenses checked out, and where
they are.
lmgrd.exe
License service that handles the initial
contact with Polyspace products, passing the
lmutil.exe
connection on to
starts and restarts
Allows you to perform license server
MLM.exe.Thisservicealso
MLM.exe.
management and administration, for
example, displaying the MAC address, IP
address, disk serial number, and user name.
Can be used from the comm and line.
The following figure shows the FLEXnet components available on the DVD in
DVD\Data\Windows\FLEXLM\x86-win32.
9-14
 Loading...